

Page 1

Table Blender
with Grinder
ZX886X
Safety rst
Never touch the blades while the appliance is plugged in.
Always read your instructions before using for the rst time.
Page 2
Please read all instructions carefully to familiarise yourself with the Wahl James Martin Table Blender before using.
THIS TABLE BLENDER IS INTENDED FOR HOUSEHOLD USE ONLY.
Save these instructions for further reference.
For any further assistance or information call customer services on
T: 01227 740066
or visit
W: www.wahl.co.uk
E: customer.services@wahl.co.uk
CONTENTS
DESCRIPTION OF PARTS
IMPORTANT SAFEGUARDS
BEFORE USE
OPERATING INSTRUCTIONS
CLEANING AND MAINTENANCE
WIRING
PRODUCT REGISTRATION
GUARANTEE
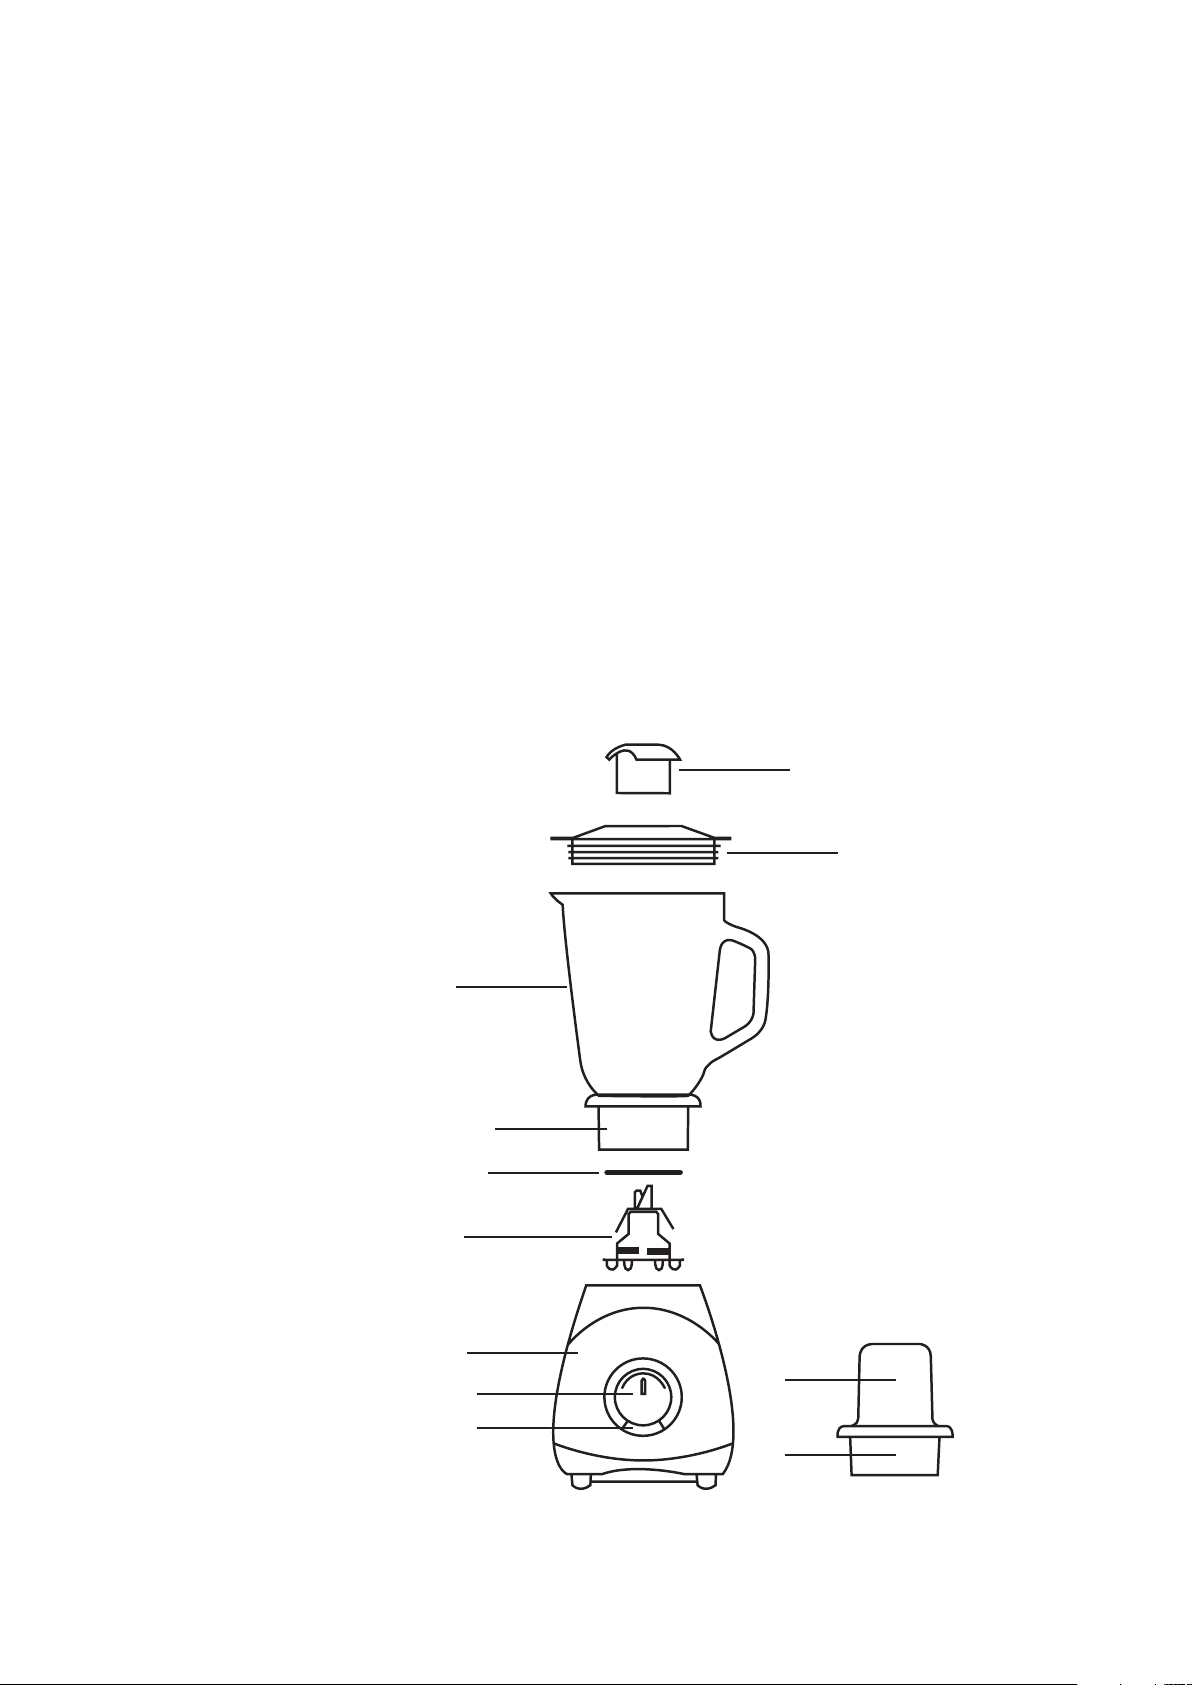
DESCRIPTION OF PARTS
A: Measuring Cup
B: Jar cover
C: Glass jar
D: Base
E: Rubber ring
F: Blade
G: Body
H: Dial
I: Ice crush
J: Grinder glass
K: Base
Page 2
Page 3
Page 3
Page 3
Page 5
Page 6
Page 6
Page 6
A
B
C
D
E
F
G
H
J
I
K
Page 3

IMPORTANT SAFEGUARDS
When using this electrical appliance, especially when children are present, basic safety precautions should always be
observed including the following.
TO REDUCE THE RISK OF FIRE AND INJURY
1. This appliance shall not be used by children. Keep the appliance and its cord out of reach
of children. Appliances can be used by persons with reduced physical, sensory or mental
capabilities or lack of experience and knowledge if they have been given supervision or
instruction concerning use of the appliance in a safe way and if they understand the hazards
involved. Children shall not play with the appliance.
2. Never touch or allow contact with moving parts while in motion. Keep hands, hair clothing
and other utensils away from the moving parts during operation to prevent accident,
injury or damage to the appliance.
3. Switch off the appliance and unplug from outlet when not in use, before putting on or taking
off attachments and also before cleaning the appliance.
4. Never use your appliance without paying attention! Always unplug the unit when not in use,
even for a moment.
5. Do not operate the appliance with a broken cord or plug, or if the appliance malfunctions, or
is dropped or damaged in anyway.
6. Any servicing or repair must be performed by an authorized service representative.
7. Do not use outdoors or in damp areas.
8. Do not let the cord hang over the edge of the work surface or let it touch any hot surfaces.
9. The use of attachments that are not supplied by the manufacturer may cause fire, electric
shock or injury and damage to the appliance.
10.To protect against risk of electrical shock, never immerse the unit or let it come into contact
with water or any other liquids. Do not use the unit with wet hands. If the appliance should
become wet, damp or fall in water, remove plug from mains socket immediately. Do not put
your hands in the water.
11.Hot liquids and steam can cause injury. Always allow hot liquids to cool to a lukewarm
temperature before blending.
For cleaning of surfaces in contact with food please refer to page.
12.
13.Never carry the unit by its power cord.
14.Use this appliance only for its intended purpose.
WARNING: THE BLADE IS VERY SHARP. WASH WITH CARE AND NEVER TOUCH THE BLADE WITH YOUR
FINGERS.
BEFORE USE
1. Remove all packaging and clean the jug, measuring cup and lid thoroughly before using for the first time.
Only clean the main unit with a damp cloth. Never immerse the unit in water or place under running water.
See cleaning and storage section page 8 for full cleaning instructions. The blender should be placed on flat
surface before operation.
2. Do not plug in the appliance before assembling.
3. Place the appliance on a flat surface.
4. Place the glass jug on to the motor unit.
5. Put the lid on top of the jug and push it down. Insert the measuring cup into the cover and turn until it locks
into place.
6. Make sure the appliance is turned off before plugging in.
OPERATING INSTRUCTIONS
1. Before plugging in ensure that the mains voltage matches that shown on the rating label.
2. This unit has a safety design, it will not work if the jug is not installed onto the main body properly.
3. Turn the control dial to position 0 in order to make sure the unit is turned off.
4. Place ingredients into the jug, do not exceed the maximum 1.5L capacity.
IMPORTANT: Do not operate without any ingredients.
5. Put the lid on top of the jug ensuring it is fitted correctly.
6. Turn the control dial clockwise to your desired speed as you need, or use the pulse function by turning the
dial anti-clockwise.
Page 4

IMPORTANT: Do not open the lid while the blender is working.
CONTROL SETTINGS
1 - Low Speed. Will blend continuously on Low speed until you return the switch to the off position.
2 - High Speed. Will blend continuously on High speed until you return the switch to the off position.
0 - Off. Will turn off the unit.
ICE CRUSH - To use this setting hold the button in for a few seconds, then release, repeat this process until
your ice is at the desired consistency.
PULSE - The pulse setting will operate at the highest speed, and will only operate when you are holding
the switch, as soon as you release the switch the appliance will stop. This is suitable for when you
only want to roughly blend ingredients and you require control so that you don’t end up with a
really fine mixture.
7. Turn the dial to the “OFF” position when you have finished. Wait for the blender to completely stop. Unplug
the appliance before removing the lid or the jug.
8. Always ensure the appliance is unplugged after use.
NOTE: It is recommended to cut the meat, vegetables or other food into smaller pieces before putting them in the
jug. Large quantities of food should be processed in small batches, do not overload. Do not operate the blender continuously for more than 1 minute. Always allow the appliance to cool down to room temperature before
continuing.
WARNING: ALWAYS COOL HOT LIQUIDS BEFORE BLENDING.
NOTE: If blending warm liquids remove the measuring cap and start at low speed increasing to high speed if
required. The pulse setting is not recommended for warm liquids. Do not blend warm liquids over the 1L level,
and always take care to avoid contact with any steam or liquids.
USING THE GRINDING ATTACHMENT
1. Make sure the unit is unplugged and turned off before installation of the grinder attachment.
2. The grinder can be used for coffee beans, dried
3. Turn grinder upside down and carefully unscrew the blade housing. Carefully remove the blade housing.
4. Fill the grinder with desired ingredients. Do not fill more than half full.
5. Screw the blade housing tightly on to the bowl.
6. Turn the grinder the right way up and place on the motor unit.
7. Plug the appliance in and select desired speed setting. Apply a small amount of pressure to the top of the
grinding bowl, to ensure the safety switch is activated.
8. When the ingredients have been ground/chopped to the desired consistency, unplug the appliance, and re-
move the grinding unit from the appliance.
herbs, bread crumbs etc.
NOTE: Always unplug and remove the complete grinding unit. Do not unscrew the glass bowl on the unit. As this
will cause the ingredients to spill out and expose the blade unit.
9. Turn the grinder upside down and carefully unscrew the blade housing. Carefully remove the blade housing
Page 5

and ring, and carefully empty out the ingredients into a bowl etc.
Do not operate the grinder continuously for more than 30 seconds. Always allow the appliance to cool down to
room temperature before continuing.
WARNING: AFTER USE ALWAYS ENSURE THE DIAL IS RETURNED TO “0” (OFF POSITION) AND THE
APPLIANCE IS UNPLUGGED
CLEANING AND MAINTENANCE
GRINDER ATTACHMENT
1. In addition to the following you must refer to the safety precautions.
2. Turn grinder upside down and carefully unscrew the blade housing. Carefully remove the blade housing.
Clean with hot water and a little mild cleaning agent taking great care as the blades are very sharp.
3. Ensure the bowl and blades are clean, rinse and dry well before re-using.
4. Never use aggressive cleaning agents.
WARNING: DO NOT TOUCH THE SHARP BLADES, WHEN CLEANING PLEASE WIPE WITH A CLOTH TO AVOID
ACCIDENTAL INJURY.
CLEANING AND STORAGE
BLENDER AND JUG
1. In addition to the following you must refer to the safety precautions.
2. Do not clean motor main body, power cord and plug with water.
3. Clean the main body with a soft, damp cloth and some mild cleaning agent.
4. Fill the jug half-full with warm water and a little cleaning agent. Let the unit run on speed 2 until the jug is
clean.
5. Ensure the jug and blades are clean, rinse and dry well before re-using.
WARNING: THE BLADES INSIDE OF THE JUG ARE VERY SHARP.
6. Never use aggressive cleaning agents.
REMOVABLE BLADES
The blades of your Wahl James Martin Table blender are removable and can be removed for cleaning. Please
ensure that you read the following instructions carefully.
1. Ensure the appliance is turned off and unplugged.
2. Remove the jug assembly from the base, turn the jug upside down and following the instructions on the
blade housing turn clockwise to remove the blades and to replace turn anti-clockwise.
3. Carefully remove the blade housing and wash with mild cleaning agent taking great care as the blades are
sharp.
4. Dry all parts carefully.
TO REASSEMBLE
1. Carefully screw the blade housing onto the glass jug ensuring that it is securely tightened.
IMPORTANT: Always unplug the main housing and remove the complete jug assembly before attempting to
unscrew the blade housing.
IMPORTANT: Never place or store the blade housing on the main unit whilst removed from the jug.
Page 6

WIRING
WARNING: IF THE SUPPLY CORD IS DAMAGED IT MUST BE REPLACED BY THE MANUFACTURERS SERVICE
AGENT OR A SIMILARLY QUALIFIED PERSON IN ORDER TO AVOID A HAZARD.
The wires in the mains lead of this Table Blender are coloured in accordance to the following code:
Blue Neutral (N) Brown live (L)
This appliance is fitted with a 3 pin plug which has a 13amp fuse fitted.
If the plug supplied is not suitable for your socket or becomes damaged, it should be cut off and disposed of, and a
suitable plug fitted as detailed below.
As the colours of the wires in the mains lead of this Table Blender may not correspond with the colour markings identifying the terminals in your plug, proceed as follows.
The wire which is coloured BLUE must be connected to the terminal in the plug which is marked with the letter ‘N’ or
coloured BLACK or BLUE.
The wire which is coloured BROWN must be connected to the terminal in the plug which is marked with the letter ‘L’ or
coloured RED or BROWN.
DO NOT connect either wire to the terminal in the plug which is marked with the letter ‘E’ or has the Earth symbol, or
coloured GREEN or GREEN/YELLOW
PRODUCT REGISTRATION
Wahl are constantly developing and launching new products in the UK. We would like to understand your
product needs and expectations and we value any comments you may have. As part of Wahl Customer Care, we
are offering you the chance to be kept up to date with the latest product launches, innovations and special offers.
Please take a minute to register your product online at www.wahl.co.uk.
WASTE ELECTRICAL & ELECTRONIC EQUIPMENT DIRECTIVE 2002/96/EC (WEEE)
At the end of this products life it should not be disposed of with general household waste.
Care should be taken to dispose of in a suitable manner in accordance with your Local Authority
regulation.
GUARANTEE
This product is guaranteed against defects in material and workmanship for a period of 2 years from the date of
original purchase or receipt as a gift.
Should this product become defective during the guarantee period, return it to the store of purchase together
with your proof of purchase for repair or replacement
Alternatively within the guarantee period you can return the product to Wahl (UK) Ltd who will repair any such
defect or elect to replace the product or any part of it, without charge, provided that there is proof of purchase.
Should a replacement be offered this will not extend the original guarantee period.
The guarantee becomes invalid in the case of misuse, alteration or repair by unauthorised persons.
This product is designed for domestic use only and use within a professional environment will invalidate the
guarantee.
This guarantee in no way affects your rights under statutory law in the United Kingdom.
Wahl (UK) Ltd
Herne Bay Trade Park
Herne Bay
Kent
CT6 8JZ
www.wahl.co.uk
Customer Service T: 01227 740066
Form No. ZB519
Rev0 04-15
 Loading...