

Wahl 91592 User Manual
1
2
3
4
7
8
5
6
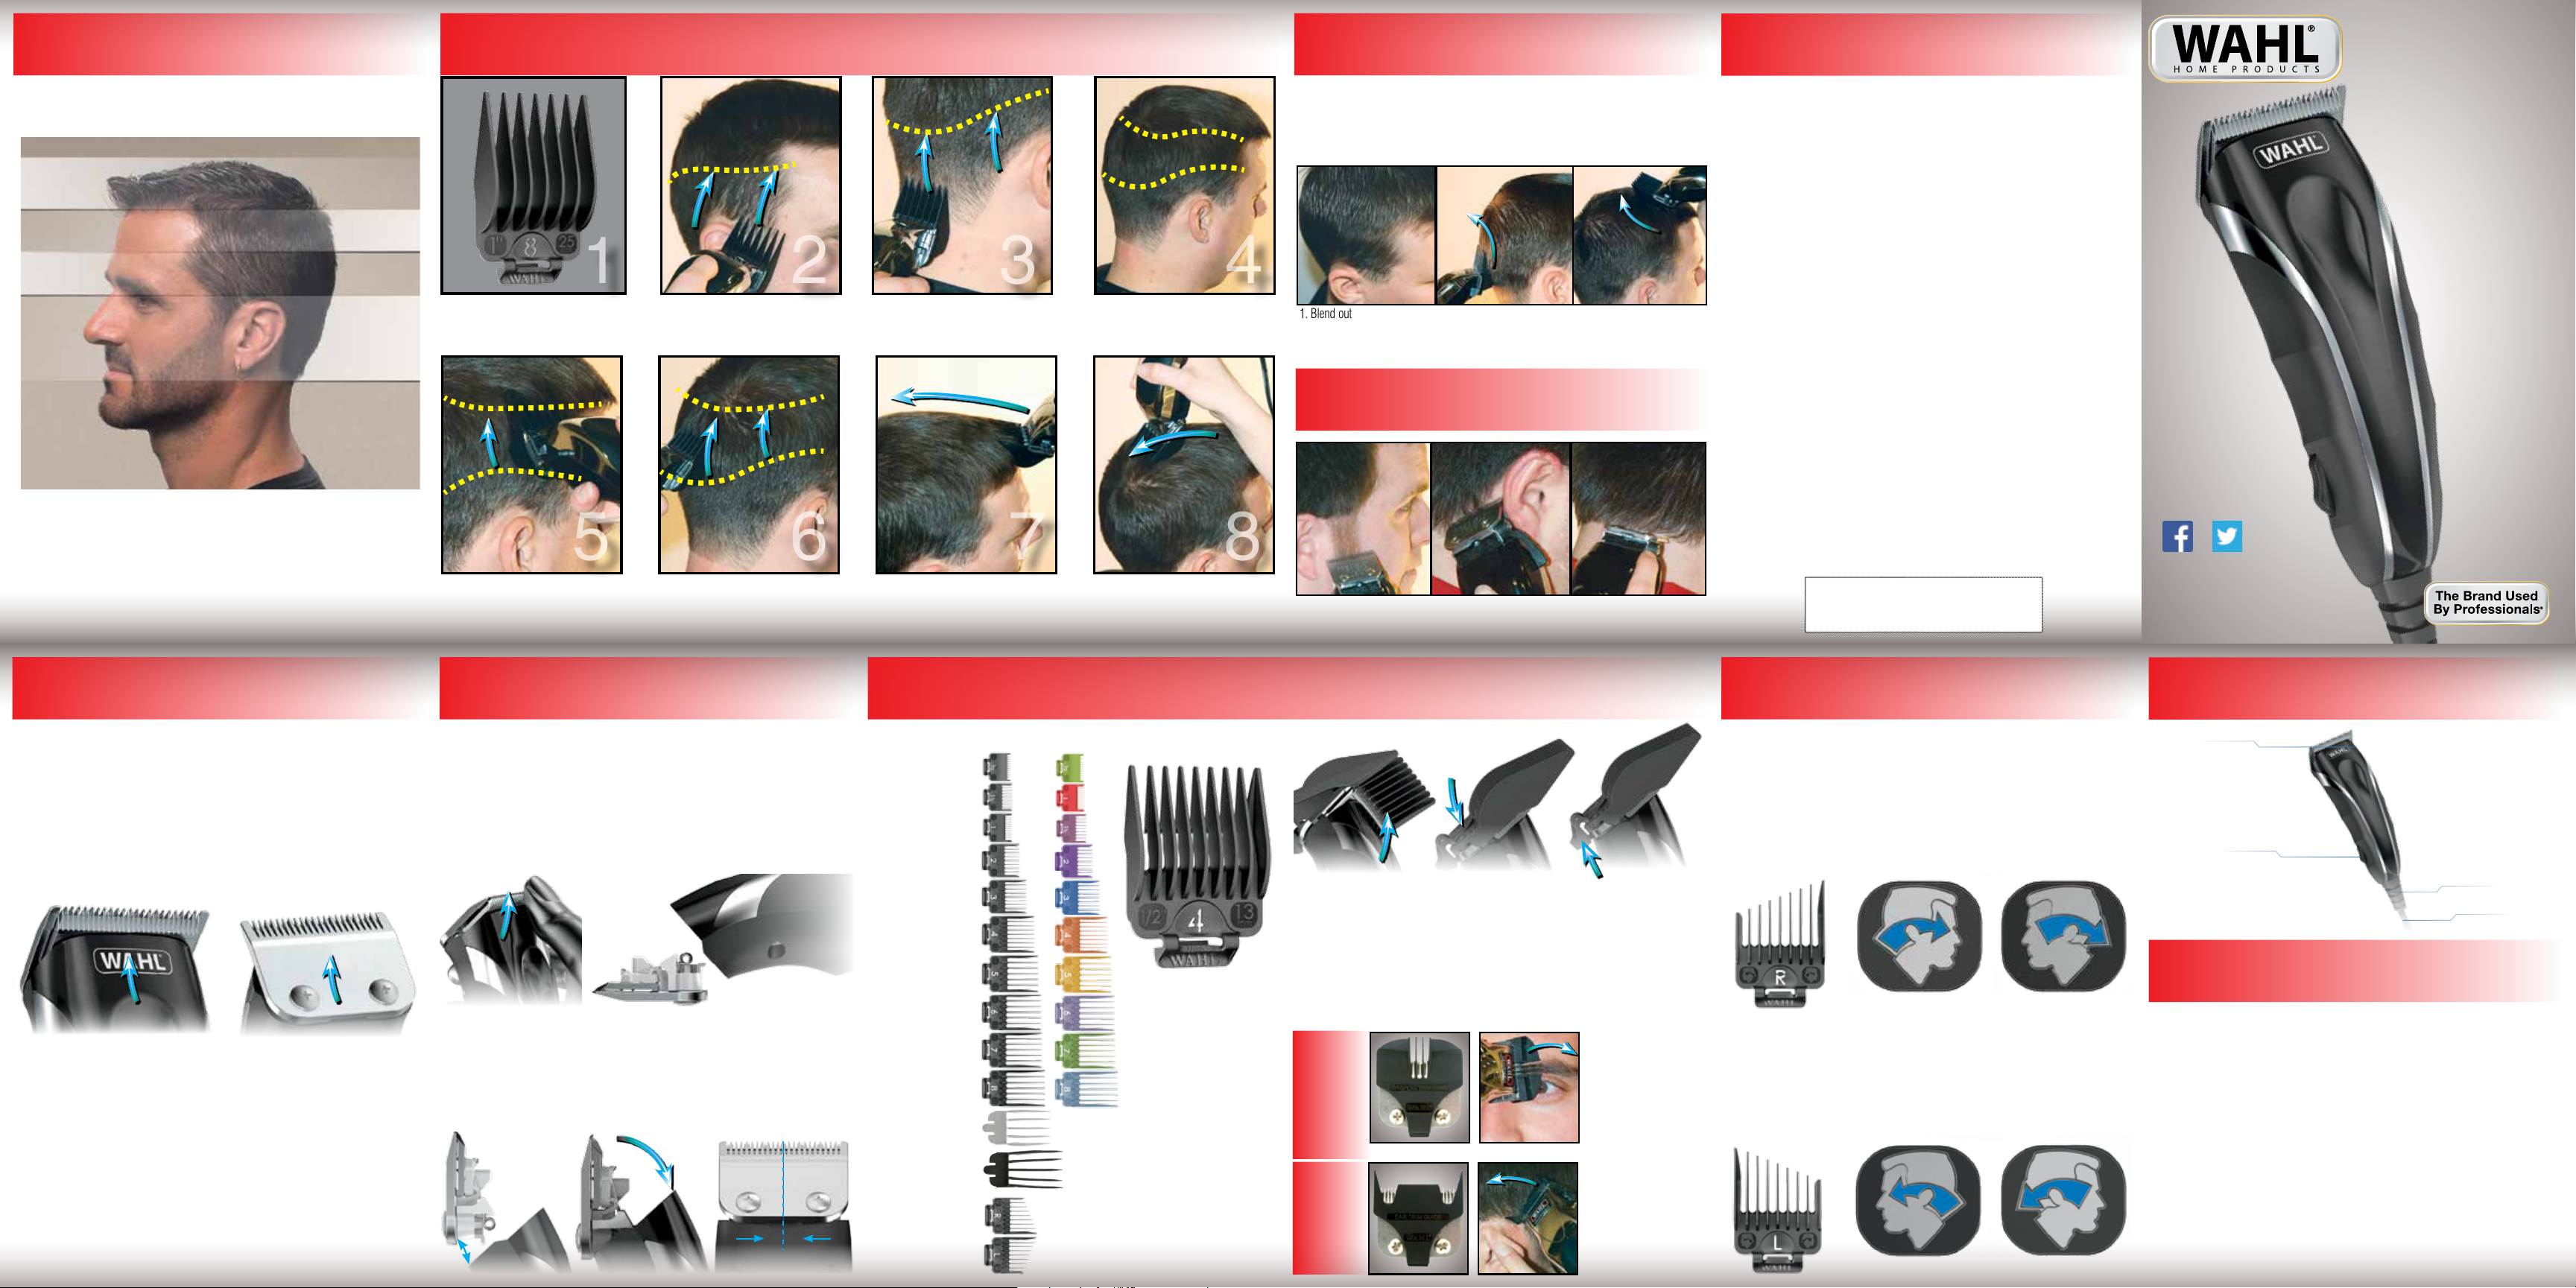
When you cut your hair, you should visualize the head as if it were divided
into four sections. Image below shows the different sections. Using proper
techniques when moving from one section to the next will help you blend the
sections together for professional looking results.
Section 4:
Top of
the head
Section 3:
The rim
or side
Section 2:
Under the rim
of the head
Section 1:
The neckline
• The first time you cut hair, cut only a small amount of hair until you become
accustomed to the length of hair each attachment guard provides.
• For best results, hair should be dry before using clipper.
• For best results, when cutting hair, go through hair at a slow, even speed.
Don’t force the clipper through the hair.
• For best results, go through the hair against the direction of your hair’s growth,
so you can catch more hair with the guard.
• The blades on your new clipper should be oiled every few haircuts.
1. Comb hair and remove tangles.
Attach the largest attachment guard to
the clipper.
5. Use the attachment guards with the
next highest number than in step 3.
Example:If you used a #6 guards in
step 3, select guard #7.
STEP-BY-STEP GUIDE FOR CUTTING HAIRTIPS & TECHNIQUES
BLENDING
WARRANTY
Home
Haircutting
2. Start at hairline on side of head
and cut up to middle of head. Note:
If cut hair is too long repeat
with next smaller guard.
6. Continue cutting around middle
portion of head as in steps 2 and 3.
Middle
3. Continue around head repeating step 2. 4. You are now ready to cut
7. For cutting top of head, use the
attachment guard with the next highest
number than in step 6. Start at front
bang area.
the middle portion of the hair.
8. Cut across top of head. Comb hair
on entire head to assess if further
cutting is necessary.
When you want to blend from one section to the next, you will need to practice moving the
clipper in an upward rocking motion. This motion will leave the hair slightly longer where the
clipper pulls away from the scalp, enabling you to blend between the sections and achieve
a smooth transition from one length of hair to the next. This technique will enhance the
appearance of your haircuts.
1. Blend out any cut lines.
Lines may form where you
change guard sizes. Use the
same comb used in step 3
2. Using a rocking motion,
blend out the middle cut
line.
3. Using the guard used in
step 8 repeat blending the
top outline as needed.
OUTLINING
1. No attachments needed.
Start with the sideburns.
2. Continue around ear as
shown.
4. Trim neckline as shown.
If your Wahl product fails to operate satisfactorily within five (5) years from the date of original purchase
or receipt as a gift, Wahl will, at our option, repair or replace it and return it to you FREE OF CHARGE.
If your Wahl product fails to operate satisfactorily within two (2) years from the date of original purchase
or receipt as a gift, Wahl will, at our option, repair or replace it and return it to you FREE OF CHARGE.
Do not return this product to store where purchased. Products needing repair under this warranty
should be returned with postage prepaid to:
Wahl Clipper Corp.
Attn: Repair Department
3001 Locust Street
Sterling, Illinois 61081
Include a note describing the defect and the date of original purchase or receipt as a gift (if in warranty).
Products out of warranty will be repaired at our standard repair charges.
This warranty is void and no repair or replacement will be made under this warranty or otherwise if:
(1) The product is modified in any manner or repaired by anyone other than Wahl Clipper Corporation
or Wahl authorized service center. (2) The product has been used commercially or subjected to
unreasonable use.
This warranty gives you specific legal rights and you may also have other rights which may vary from
state to state. No other written express warranty is given. Any implied warranty, including any warranty
of merchantability which may arise from purchase or use, is limited to the year period provided in this
express warranty. Some states may not allow such limitation, so it may not apply to you. No responsibility
is assumed for incidental or consequential damages of any type, or for the use of unauthorized
attachments. Some states may not allow the exclusion or limitation of incidental or consequential
damages, so the limitation or exclusion may not apply to you. Outside U.S.A., check with store for Wahl
authorized distributor’s warranty.
5-YEAR LIMITED WARRANTY - CLIPPER
Valid in U.S.A. Only
2-YEAR LIMITED WARRANTY - BATTERY TRIMMER
Valid in U.S.A. Only
Not all kits include a trimmer
For personal attention from one of our customer service
www.grooming.wahl.com or 1-800-767-9245
Question?
representatives please contact us at:
grooming.wahl.com
Part #91592 v.2017.02
© 2016 WAHL CLIPPER CORPORATION
P.O. Box 578, Sterling, Illinois 61081 USA
CLIPPER MAINTENANCE
CLEANING:
To remove hair from between the blades, use the cleaning brush provided. DO NOT USE
WATER TO CLEAN THE BLADES. For best results, after brush cleaning the
blades, add Wahl clipper oil to the blades.
OIL
The blades on your new clipper should be oiled every few haircuts. Place a few drops of
Wahl Clipper Oil on the teeth (front) as well as at the back side of the blade. Use only Wahl
Clipper oil (a small bottle is included in this kit, additional oil can be purchased separately,
see www.grooming. Wahl.com for details). DO NOT USE HAIR OIL, GREASE,
OR ANY OIL MIXED WITH KEROSENE OR ANY SOLVENT.
CORD
The cord should not be used to pull the clipper. Since freedom of movement needs to be
maintained, care should be used to keep the cord untwisted and unobstructed.
YOUR CLIPPER HAS A POLARIZED PLUG: To reduce the risk of electric
shock, this appliance has a polarized plug (one plug blade is wider than the other). This
plug fits in a polarized outlet only one way. In the event the plug doesn’t fit fully in the outlet,
reverse the plug. DO NOT CHANGE THE PLUG IN ANY WAY.
Please register your Wahl Clipper online at: grooming.wahl.com
Purchase Confirmation-
With the information you provide, we confirm the date of purchase of your product. This
confirmation is of benefit to you, especially if your original proof of purchase is lost.
Proof of Ownership-
Your UPC number, item number and other information will be kept in our files for up to ten
years.
DETACHABLE BLADES
The blades on your new Wahl clipper are detachable for easy cleaning. The clipper blades were
oiled and aligned before leaving our factory. Don’t attempt to adjust blade alignment. Please
contact our Customer Service Department if any questions.
REMOVING BLADES:
Before removing blades, make sure the on/off switch is turned to the “0” or “OFF” position.
1. Hold the clipper in both hands. Using both thumbs, push the blades away from the front
of the clipper.
2. The blade set with the top and bottom blades will come off in one piece.
ATTACHING BLADES:
Before reattaching blades, make sure the on/off switch is turned to the “0” or “OFF” position.
1. Place the blade at an angle (with the bottom portion of blade fitting into the clipper) so the
outer white clips of the blade set sit just below the metal clips inside the clipper. Make
sure blade is center aligned with clipper.
2. While holding the bottom of the blade, push-on the blade to the clipper with your thumb
until blade “snaps” into place. Don’t use excessive force to push blade into place.
Center Align Blade
Some kits do not include all size Wahl guards. Some kits include colored guards.
1
#
-
/2
#
1
#
11/2
#
2
#
-
3
#
-
4
#
-
5
#
-
6
#
-
7
#
8
#
-
10
-
#
12
Right Ear Taper
Left Ear Taper
(1.5mm)
-
(3mm)
-
(4.5mm)
-
(6mm)
(10mm)
(13mm)
(16mm)
(19mm)
(22mm)
-
(25mm) 1”
(32mm) 1
(38mm) 1
1
1
1
/16”
/8”
/4”
3
/8”
1
/2”
5
/8”
3
/4”
7
/8”
3
/16”
1
1
/4”
/2”
• Attachment guards help you cut
hair to a desired length by keeping
the blades at set distance from the
skin helping ensure an even hair
length when cutting hair with a
clipper. For reference, each guard
is numbered and also lists what the
length of the hair will be after being
cut.
• Attachment guard sizes vary.
Always start with a longer length
guard (you can always use a
shorter length guard if the length is
not short enough).
• The first time you cut hair, cut
only a small amount of hair until
you become accustomed to the
length of hair each attachment
guard provides.
Push Down
Push Up
(fig A) (fig B)
ADDING GUARDS: Pictured in g A & g B
Before adding guards, make sure the on/off switch is turned to the “0” or “OFF” position.
1. While holding at a slight angle, place the attachment guard onto the clipper so the tips of the blade
rests into the slots of the guard fingers. (fig A)
2. Using your thumb, push down on the guard, where the guard size number is located, until you hear a
“SNAP”. (fig B)
REMOVING GUARDS: Pictured in g C
Before removing guards, make sure the on/off switch is turned to the “0” or “OFF” position.
1. While holding the top of attachment guard, place your thumb on the underside of the attachment guard
tab. Push up on tab to remove guard from clipper. (fig C)
GUARDS
BROW TRIM
GUARDS
EAR TRIM
NOTE: NOT ALL WAHL KITS INCLUDE BROW / EAR TRIM GUARDS
1. Attach the brow trim guard
to clipper
2. Starting from just above
your nose, slowly guide
the clipper to the outside of
your face.
For shorter brow trim
repeat steps 1 and 2
working from outside
face to your nose.
1. Attach ear trim
clipper.
2. Hold the clipper at a
45-degree angle.
3. Use your finger to tilt ear
forward away from hairline.
4. Slowly trim along the hair
line from back to front.
Avoid poking eyes.
guard
(fig C)
to
EARSEASY-TO-USE ATTACHMENT GUARDS
To achieve a “tapered” cut around the ears, use the left and right tapered
attachment guards
1) Attach the “R” RIGHT attachment guard to the clipper.
fig. A) First, starting behind the RIGHT ear (so shorter portion of guard fingers are closest
to the ear), move the clipper upward and around towards the front side of the ear. Repeat as
needed.
fig B) Second, starting on the front of the LEFT ear, (so shorter portion of guard fingers are
closest to the ear), move the clipper upward and around towards the back side of the ear.
Repeat as needed.
2) Repeat, except now using the “L” LEFT guard. Attach the “L” LEFT attachment guard to
the clipper.
fig. A) First, starting behind the LEFT ear (so shorter portion of guard fingers
are closest to the ear), move the clipper upward and around towards the front side
of the ear. Repeat as needed.
fig. B) Second, starting on the front of the RIGHT ear, (so shorter portion of guard fingers
are closest to the ear), move the clipper upward and around towards the back side of the
ear. Repeat as needed.
fig. A
fig. A
fig. B
fig. B
YOUR NEW CLIPPER
Clipper Blades
(Removable)
On/Off Switch
Cord Strain Relief
Power Cord
YOUR NEW BATTERY TRIMMER
BATTERY INSTRUCTIONS
Select clipper kits include a battery trimmer, your kit may or may not include a trimmer
1. Remove battery cover from clipper by pushing in and back on the plastic door in the direction of the
arrow.
2. IMPORTANT: Be sure to insert the negative (-) end of each battery first, so that it depresses the spring at
the top of the battery compartment. Then slide the positive (+) end into position. Do not allow the
negative terminal clips to bend and cut the casing of the batteries.
Use alkaline batteries with your Wahl Clipper. Alkaline batteries will provide the longest operating time
before battery replacement is needed. Clipper should run approximately three hours on alkaline batteries.
3. Replace battery cover to its original position.
4. Move switch to “ON” position to use.
5. To maximize battery life, trimmer should be shut “OFF” immediately after using.
1
2
3
4
7
8
5
6
CONSEJOS Y TÉCNICAS
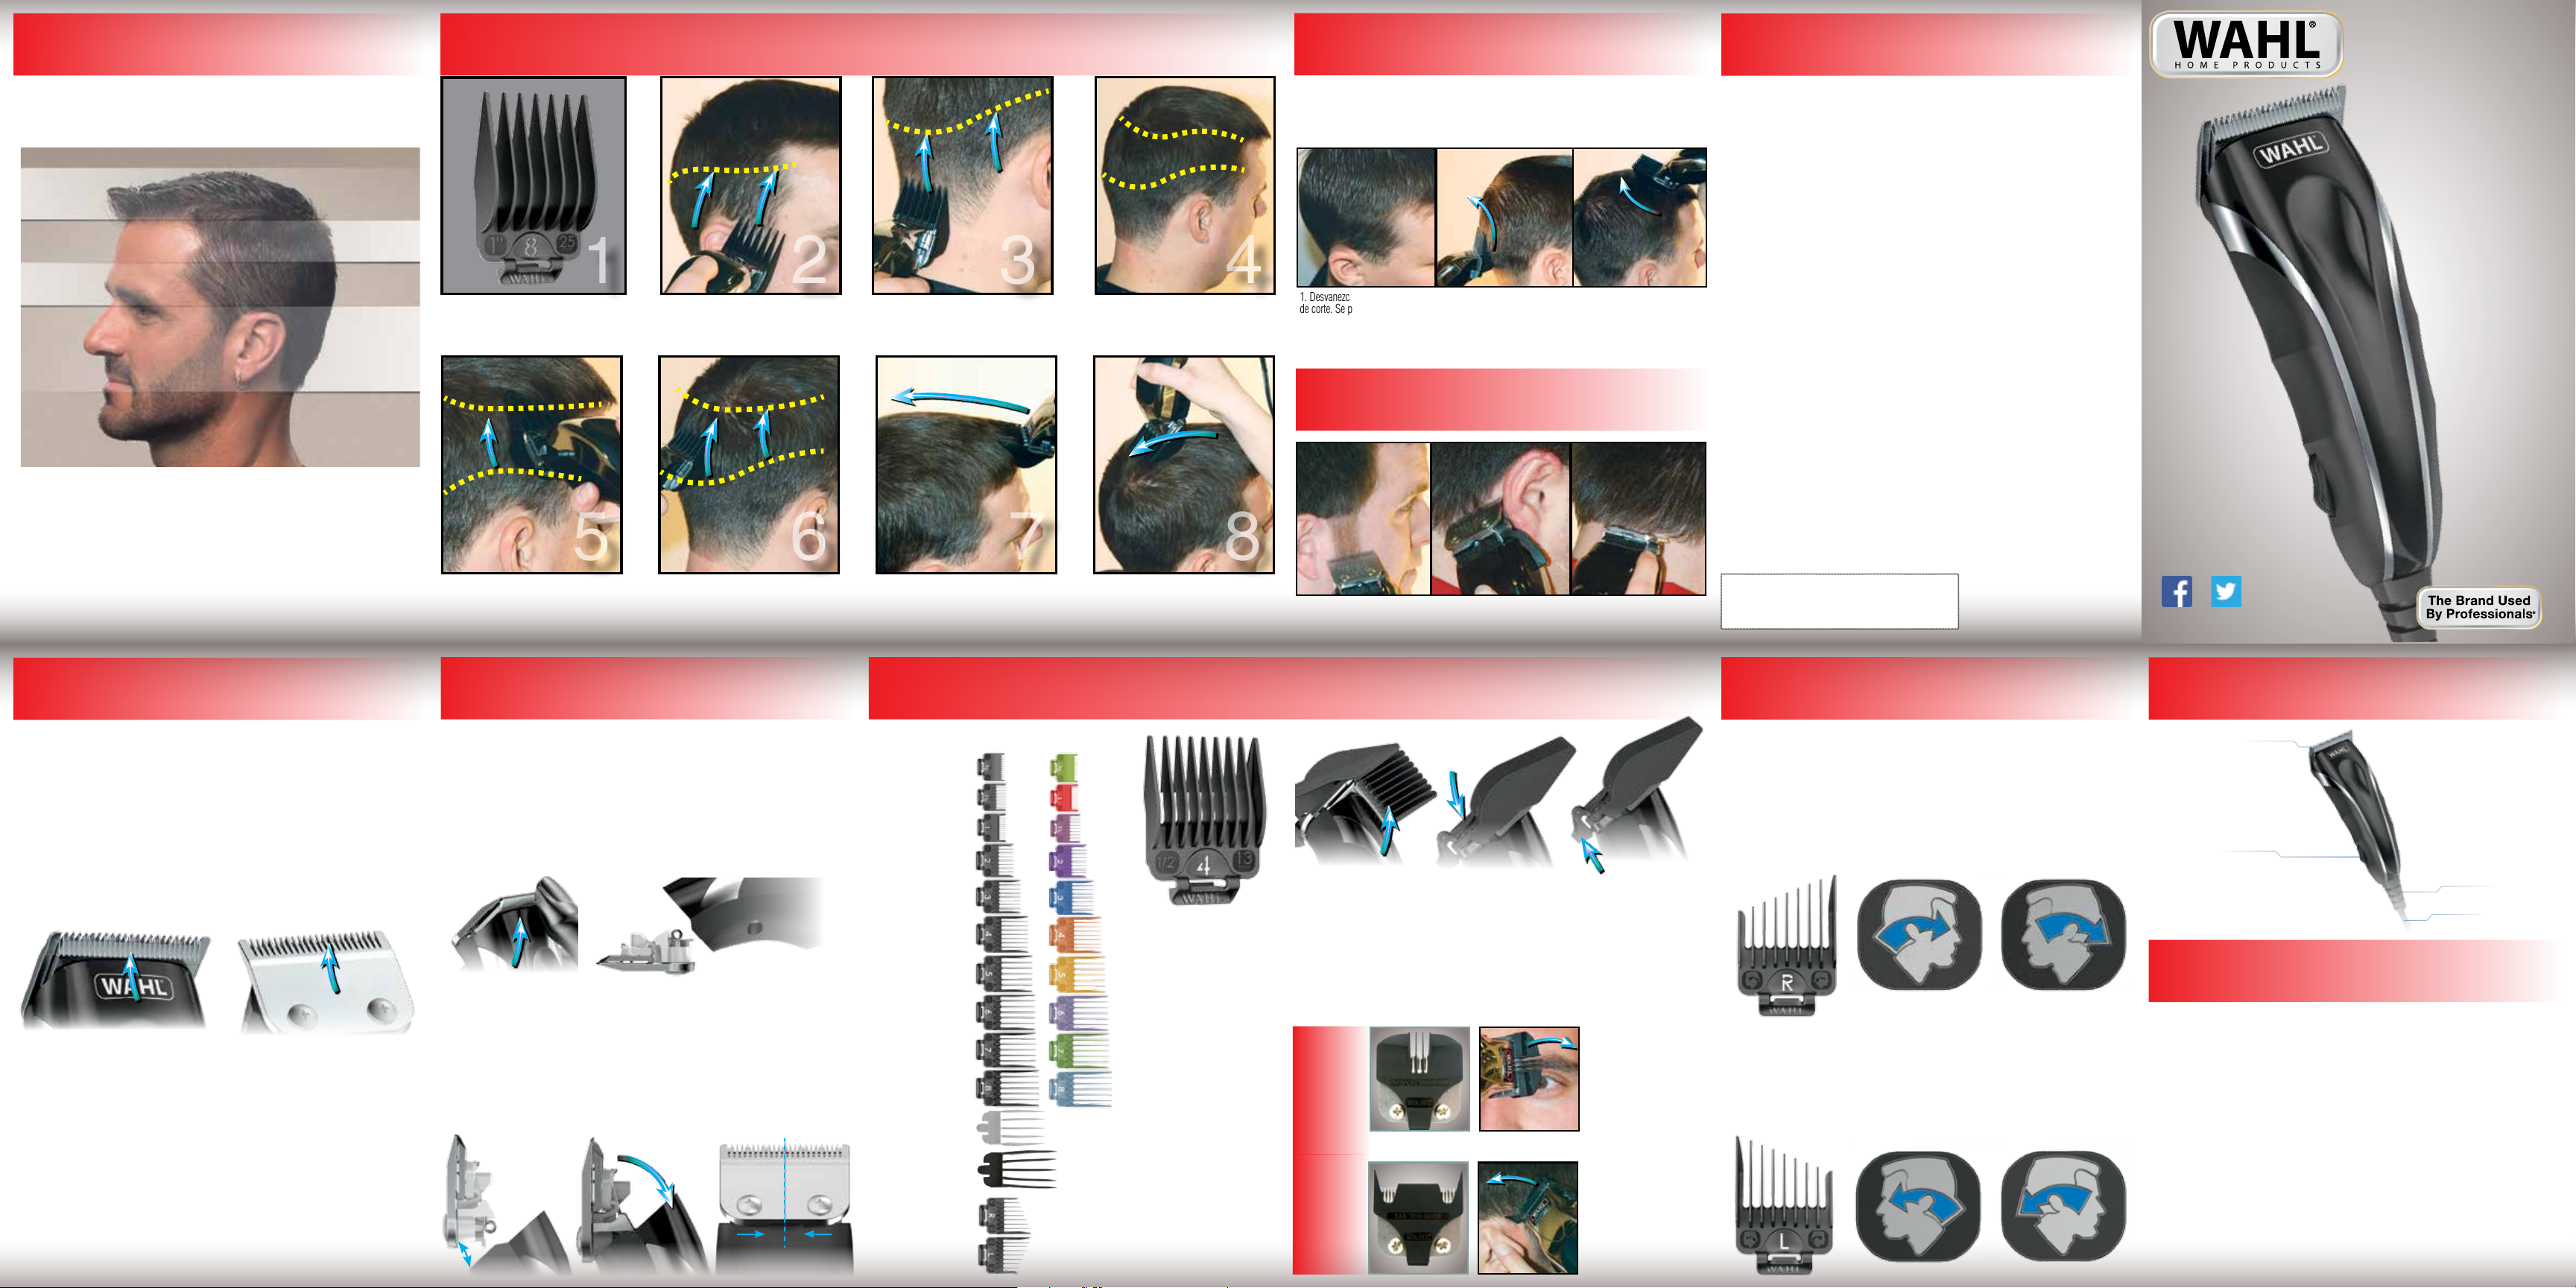
Cuando corte su cabello, debe visualizar la cabeza como si estuviera dividida
en cuatro secciones. La siguiente imagen muestra las diferentes secciones. El
uso de técnicas adecuadas cuando se desplaza de una sección a la siguiente
lo ayudará a combinar las secciones para obtener resultados de aspecto
profesional.
Sección 4:
Parte superior
de la cabeza
Sección 3:
El borde o
Sección 2: Debajo
del borde de la
cabeza
• La primera vez que corte el cabello, corte solo una pequeña cantidad hasta que
se acostumbre al largo del cabello que logra con cada protector.
• Para obtener los mejores resultados, el cabello debe estar seco antes de
utilizar la cortadora.
• Para obtener los mejores resultados, al cortar el cabello recórralo a una
velocidad lenta y uniforme. No haga fuerza sobre la cortadora al pasarla por
el cabello.
• Para obtener los mejores resultados, corte el cabello en contra de la dirección
del crecimiento, para que pueda tomar más cabello con la protección.
• Las cuchillas de su nueva cortadora se deben aceitar cada varios cortes.
costado
Sección 1:
El cuello
1. Peine el cabello y elimine los nudos. Coloque
el peine guía más largo en la cortadora.
5. Use el peine con el siguiente número más alto
que el que utilizó en el paso 3. Ejemplo: Si usó
el peine Nº 6 en el paso 3, seleccione el Nº 7.
GUÍA PARA CORTAR EL CABELLO PASO A PASO
2. Comience en la línea de crecimiento del
cabello y corte hasta la mitad de la cabeza.
Nota: Si el cabello cortado está demasiado
largo, repita el procedimiento con el siguiente
peine guía más pequeño.
6. Continúe cortando alrededor de la porción
media de la cabeza como en los pasos 2 y 3.
3. Continúe alrededor de la cabeza, repitiendo el
.
paso 2
7. Para cortar la parte superior de la cabeza, use el peine
con el siguiente número más alto que el del paso 6.
Comience en el área del cabello de la frente.
4. Ahora está listo para cortar la parte
media del cabello.
8. Corte en toda la parte superior de la cabeza.
Peine el cabello de toda la cabeza para determinar
si necesita cortar más.
Parte media
COMBINACIÓN
Cuando desee combinar una sección con la siguiente, necesitará practicar cómo mover
la cortadora en un movimiento oscilante hacia arriba. Este movimiento dejará el cabello
levemente más largo en la zona en que la cortadora se aleja del cuero cabelludo, permitiéndole
combinar las secciones y obtener una transición uniforme desde una longitud de cabello a la
siguiente. Esta técnica mejorará el aspecto de sus cortes de cabello.
1. Desvanezca todas las líneas
de corte. Se pueden formar
líneas en las partes en las que
cambia el tamaño del peine.
Use el mismo peine que usó en
el paso 3.
2. Con un movimiento
oscilante, desvanezca la
línea media de corte.
3. Con el peine que usó
en el paso 8, repita el
desvanecido en el contorno
superior, conforme se
requiera.
CONTORNO
1. No necesita accesorios.
Comience con las patillas.
2. Continúe alrededor de la oreja,
como se muestra.
4. Recorte la líznea del cuello,
como se muestra.
GARANTÍA
GARANTÍA LIMITADA POR 5 AÑOS - CORTADORA
Válida en EE. UU. solamente
Si su producto Wahl no funciona de forma satisfactoria durante un período de cinco (5) años contados
a partir de la fecha original de compra o de recibirlo como regalo, Wahl lo reparará o reemplazará a su
criterio, y se lo devolverá, SIN CARGO.
GARANTÍA LIMITADA POR 2 AÑOS - RECORTADORA DE BATERÍAS
Su juego podría o podría no incluir una recortadora.
Si su producto Wahl no funciona de forma satisfactoria durante un período de dos (2) años contados
a partir de la fecha original de compra o de recibirlo como regalo, Wahl lo reparará o reemplazará a su
criterio, y se lo devolverá, SIN CARGO.
No devuelva este producto a la tienda donde fue adquirido. Los productos que necesiten ser
reparados conforme a esta garantía deben enviarse con franqueo pagado a:
Wahl Clipper Corp.
Attn: Repair Department
3001 Locust Street
Sterling, Illinois 61081
Incluya una nota que describa el defecto y la fecha original en que se compró o se recibió como regalo (si
está en garantía). Los productos fuera de garantía se repararán aplicando nuestros cargos de reparación
estándar.
Esta garantía carecerá de validez y no se realizará ninguna reparación o reemplazo bajo la misma si: (1)
El producto es modificado de algún modo o reparado por un tercero ajeno a Wahl Clipper Corporation
o a un centro de servicio autorizado de Wahl. (2) El producto ha sido utilizado para fines comerciales o
sometido a un uso no razonable.
Esta garantía le otorga derechos legales específicos y también puede tener otros derechos que varían en
cada estado. No se otorga ninguna otra garantía explícita por escrito. Toda garantía implícita, incluida
cualquier garantía de comerciabilidad que pueda surgir del uso o de la compra, se limita al período de
años especificado en la presente garantía explícita. Dicha limitación puede estar prohibida en algunos
estados, así que podría no aplicarse a usted. No se asume responsabilidad alguna por daños indirectos
o consecuentes de cualquier tipo, ni por el uso de accesorios no autorizados. Algunos estados pueden
prohibir la exclusión o limitación de daños indirectos o consecuentes, de modo que esta limitación o
exclusión puede no aplicarse a su caso. Fuera de EE. UU., consulte en la tienda sobre la garantía del
distribuidor autorizado de Wahl.
Para recibir atención personalizada de uno de nuestros
representantes de servicio al cliente, comuníquese con
¿Preguntas?
www.grooming.wahl.com o al 1-800-767-9245
nosotros en:
Válida en EE. UU. solamente
© 2016 WAHL CLIPPER CORPORATION
P.O. Box 578, Sterling, Illinois 61081 USA
Part #91592 v.2017.02
CÓMO CORTAR EL
CABELLO EN CASA
grooming.wahl.com
MANTENIMIENTO DE LA CORTADORA
LIMPIEZA:
Para quitar el pelo entre las cuchillas, use el cepillo de limpieza incluido. NO UTILICE
AGUA PARA LIMPIAR LAS CUCHILLAS. Para obtener mejores resultados, después de
limpiar las cuchillas con el cepillo añada aceite para cortadora Wahl a las cuchillas.
ACEITE
Las cuchillas de su nueva cortadora se deben aceitar cada varios cortes. Coloque unas
cuantas gotas de aceite para cortadora Wahl en los dientes (la parte frontal) de las cuchillas,
así como en la parte posterior de estas. Utilice solamente aceite para cortadora Wahl (en
este kit se incluye una botella pequeña; puede comprar aceite adicional por separado; vea los
detalles en www.grooming.wahl.com). NO USE ACEITE PARA CABELLO, GRASA NI
OTRO ACEITE MEZCLADO CON QUEROSENO U OTRO SOLVENTE.
CABLE
No se debe usar el cable para tirar de la cortadora. Debido a que es necesario mantener
la libertad de movimiento, se debe tener cuidado de mantener el cable sin retorcer y sin
obstrucciones.
SU CORTADORA TIENE UN ENCHUFE POLARIZADO: Para reducir el
riesgo de descarga eléctrica, este aparato tiene un enchufe polarizado (un enchufe es más
ancha que la otra). Esta clavija encaja en la toma polarizada sólo en una posición. En caso de
que el enchufe no encaje completamente en el tomacorriente, gírelo en la otra dirección. NO
HAGA NINGUNA ALTERACIÓN AL ENCHUFE.
Registre su cortadora Wahl en línea en: grooming.wahl.com
Confirmación de compra-
Con la información que nos proporcione, confirmamos la fecha de compra de su producto.
Esta confirmación le será útil, especialmente si extravía su comprobante de compra original.
Comprobante de compra-
Su número UPC, el número de artículo y otros datos se conservarán en nuestros archivos
hasta por diez años.
CUCHILLAS DESMONTABLES
Las cuchillas de su nueva cortadora Wahl son desmontables para limpiarlas con más facilidad.
Las cuchillas de la cortadora se aceitaron y alinearon antes de salir de la fábrica. No intente
ajustar la alineación de las cuchillas. Comuníquese con nuestro departamento de servicio al
cliente si tiene alguna pregunta.
CÓMO QUITAR LAS CUCHILLAS:
Antes de quitar las cuchillas, asegúrese de que el interruptor de encendido/apagado se
encuentre en la posición “0” o “APAGADO”.
1. Sostenga la cortadora con ambas manos. Utilizando los dos pulgares empuje las
cuchillas, separándolas del frente de la cortadora.
2. El conjunto de cuchillas, con la cuchilla superior e inferior, saldrá en una sola pieza.
CÓMO COLOCAR LAS CUCHILLAS:
Antes de volver a colocar las cuchillas, asegúrese de que el interruptor de encendido/apagado
se encuentre en la posición “0” o “APAGADO”.
1. Coloque la cuchilla inclinada (con la parte inferior de la cuchilla encajada en la cortadora)
de modo que los clips blancos en la parte exterior del conjunto de cuchillas estén justo
debajo de los clips de metal en el interior de la cortadora. Asegúrese de que la parte
central de la cuchilla está alineada con la cortadora.
2. Mientras sujeta la parte inferior de la cuchilla, empuje la cuchilla hacia la cortadora con el
pulgar hasta que la cuchilla encaje en su sitio con un chasquido. No empuje la cuchilla
con demasiada fuerza.
Alinee la parte
central de la cuchilla
PROTECTORES DE USO FÁCIL
Algunos juegos no incluyen todos los tamaños de protectores de Wahl. Algunos juegos incluyen protectores de colores.
1
#
-
/2
#
1
-
#
11/2
#
2
#
-
3
#
-
4
#
-
5
#
-
6
#
-
7
#
8
#
-
10
-
#
12
Peine-guia parala
recortar las orejas
Peine-guia parala
oreja izquierda
(1.5mm)
-
(3mm)
(4.5mm)
-
(6mm)
(10mm)
(13mm)
(16mm)
(19mm)
(22mm)
-
(25mm) 1”
(32mm) 1
(38mm) 1
1
1
1
/8”
/4”
3
1
5
3
7
/8”
/2”
/8”
/4”
/8”
/16”
3
/16”
1
/4”
1
/2”
• Los protectores lo ayudan
a cortar el cabello a un largo
deseado al mantener las cuchillas
a una distancia específica de la
piel, lo que ayuda a garantizar
que la longitud del cabello sea
uniforme al cortarlo con una
cortadora. Como referencia,
cada protector esté numerado,
y también especifica qué largo
tendrá el cabello después de
cortarlo.
• Los tamaños de los
protectores varían. Siempre
utilice un protector de más
longitud (siempre puede utilizar
un protector más corto si
descubre que el cabello no está lo
suficientemente corto).
• La primera vez que corte el
cabello, corte solo una pequeña
cantidad hasta que se acostumbre
al largo del cabello que logra con
cada protector.
Push Down
Push Up
(fig A) (fig B)
CÓMO COLOCAR PROTECTORES: Consulte las guras A y B
Antes de colocar protectores, asegúrese de que el interruptor de encendido/apagado se encuentre en la
posición “0” o “APAGADO”.
1. Mientras lo sostiene ligeramente inclinado, coloque el protector sobre la cortadora de manera que las
puntas de la cuchilla queden sobre las ranuras en los dientes del protector. (Fig. A)
2. Utilice su pulgar para empujar el protector hacia abajo, en donde se encuentra el número de tamaño,
hasta que escuche un chasquido. (Fig. B)
CÓMO QUITAR PROTECTORES: Consulte la gura C
Antes de quitar protectores, asegúrese de que el interruptor de encendido/apagado se encuentre en la
posición “0” o “APAGADO”.
1. Mientras sostiene la parte superior del protector, coloque su pulgar en la parte inferior de la lengüeta
del protector. Levante la lengüeta para sacar el protector de la cortadora. (Fig. C)
CEJAS
PROTECTORES
NOTA: NO TODOS LOS JUEGOS DE WAHL INCLUYEN PROTECTORES PARA
PARA RECORTAR
RECORTAR CEJAS/OREJA
OREJAS
PROTECTORES
PARA RECORTAR
1. Coloque el protector para
recortar cejas en la cortadora.
2. Comenzando justo
arriba de su nariz, dirija la
cortadora lentamente hacia
los costados de su rostro.
Para recortar las cejas más
cortas, repita los pasos 1
y 2 moviendo la cortadora
desde los costados de su
rostro hacia la nariz.
1. Coloque el protector para
recortar orejas en la cortadora.
2. Sostenga la cortadora a un
ángulo de 45 grados.
3. Utilice su dedo para inclinar
la oreja hacia adelante, lejos
de la línea del cabello.
4. Recorte lentamente a lo
largo de la línea del cabello,
de atrás hacia adelante. Cuide
de no picar los ojos.
(fig C)
OREJAS
Para lograr un corte “desvanecido” alrededor de las orejas, utilice las
protecciones con reducción izquierda y derecha.
1) Coloque la protección DERECHA (“R”) en la cortadora.
fig. A) Primero, comenzando detrás de la oreja DERECHA (de modo que la parte del
protector con los dientes más cortos esté más cerca de la oreja), mueva la cortadora hacia
arriba y alrededor, hacia la parte frontal de la oreja. Repita las veces que sea necesario.
fig. B) Segundo, comenzando adelante de la oreja IZQUIERDA (de modo que la parte del
protector con los dientes más cortos esté más cerca de la oreja), mueva la cortadora hacia
arriba y alrededor, hacia la parte trasera de la oreja. Repita las veces que sea necesario.
fig. A
2) Repita, pero ahora utilice la protección IZQUIERDA (“L”). Coloque la protección
IZQUIERDA (“L”) en la cortadora.
fig. A) Primero, comenzando detrás de la oreja IZQUIERDA (de modo que la parte del
protector con los dientes más cortos esté más cerca de la oreja), mueva la cortadora hacia
arriba y alrededor, hacia la parte frontal de la oreja. Repita las veces que sea necesario.
fig. B) Segundo, comenzando adelante de la oreja DERECHA (de modo que la parte del
protector con los dientes más cortos esté más cerca de la oreja), mueva la cortadora hacia
arriba y alrededor, hacia la parte trasera de la oreja. Repita las veces que sea necesario.
fig. A
fig. B
fig. B
SU NUEVA CORTADORA
Cuchillas para cortadora
Interruptor de
encendido/apagado
Sujetacables
Cable de alimentación
SU NUEVA RECORTADORA
INSTRUCCIONES DE LAS BATERÍAS
Algunos juegos cortadora incluyen una recortadora de baterías, su juego podría o podría
no incluir una recortadora
1. Retire la cubierta de la batería de la cortadora presionando la puerta de plástico hacia adentro y atrás, en
el sentido que indica la flecha.
2. IMPORTANTE: Asegúrese de colocar primero el extremo de carga negativa (-) de cada batería para que
comprima el resorte ubicado en la parte inferior del compartimento de la batería. Luego, deslice el
extremo positivo (+) para colocarlo en su posición. No permita que los sujetadores del extremo
negativo se doblen y corten la carcasa de las baterías.
Use baterías alcalinas en su cortadora Wahl. Las baterías alcalinas le brindarán el tiempo de
funcionamiento más prolongado antes de necesitar un reemplazo. La cortadora debe funcionar
aproximadamente tres horas con baterías alcalinas.
3. Vuelva a colocar la cubierta de las baterías en su posición original.
4. Mueva el interruptor a la posición “ON” (Encendido) para usar el aparato.
5. Para maximizar la vida útil de la batería, la recortadora se debe apagar (colocar en posición “OFF”)
inmediatamente después de usarla.
 Loading...