

Wahl 8550, 9590 Operating Instructions Manual

Operating Instructions for Animal
Grooming Kit
Rechargeable Cord/Cordless
Model 8550-types and
Model 9590-types
BEFORE USE: CLIPPER MUST
CHARGED FOR 24 HOURS
BE
FULLY
WARNING!
Certain sanitizing solutions and spray lubricants
may cause stress crack damage to clippers.
W
e recommend blade lubrication and cleaning
with WAHL CLIPPER OIL ONLY.
IMPORTANT SAFEGUARDS
When using an electrical appliance, basic precautions should always
be followed, including the following.
READ ALL INSTRUCTIONS BEFORE USING THIS CLIPPER.
DANGER
To reduce the risk of electrical shock:
1) Do not reach for a charger that has fallen into water. Unplug immediately.
2) Do not place or store clipper where it can fall or be pulled into tub or sink. Do not place or drop into water or other liquid.
3) Except when charging, always unplug clipper from the electrical outlet immediately after using.
4) Unplug clipper before cleaning.
5) Do not use while bathing or in a shower.
WARNING
To reduce the risk of burns, fire, electrical shock, or injury to persons:
1) An appliance should never be left unattended when plugged in.
2) Close supervision is necessary when this appliance is used by or near children or invalids.
3) Use this appliance only for its intended use, as described in this manual. Do not use attachments not recommended by the manufacturer.
4) Never operate this appliance if it has a damaged cord or plug, if it is not working properly, if it has been dropped and damaged, or dropped into water.
Return appliance to an authorized service center.
5) Keep the cord away from heated surfaces.
6) Never operate this appliance with the air openings blocked or while on a soft surface, such as a bed or a couch, where the air openings may be
blocked. Keep the air openings free of lint, hair and the like.
7) Never drop or insert any object into an opening.
8) Do not operate where aerosol (spray) products are being used, where oxygen is being administered or near flammable liquids, such as certain flammable blade lubricants or cleaning agents.
9) Do not use this appliance with a damaged or broken guide comb,or with teeth missing from the blades, as injury may occur.
10) During use, do not place or leave appliance where it may be damaged by an animal or exposed to weather.
11) To disconnect clipper, turn all controls to “O - OFF,” then remove plug from outlet 12) When discarding old batteries from clipper, do not throw into fire
where heat could cause them to rupture. Also, do not attempt to recharge alkaline, heavy-duty or regular batteries in a nickel-cadmium battery recharger.
13) The blades on your clipper have fine teeth for precise cutting. Handle carefully when against the skin in order to avoid irritation.
SAVE THESE INSTRUCTIONS
This clipper has been designed for household use.
FACTS ABOUT BLADES AND CUTTING
• Blades not only become dull from cutting hair, they are dulled by the abrasive particles on the hair, such as dirt, sand, etc.
• Blades will not cut if abrasive particles are picked up and carried by the oil film between the blades. These particles tend to hold the blades apart and
cause chewing and pulling instead of clean cutting.
• The cutting blades furnished with Wahl Animal Clippers are made of a special High Carbon Steel scientifically heat-treated for correct hardness. Years
of experience have created a special process for grinding these blades to a superior sharpness.
• Oiling the blades performs two distinct functions:
1) Provides a low friction, very thin film lubricant between the cutting blades so that they can take a full cutting stroke without becoming hot from friction.
2) Flushes abrasive particles and hair out from between the blades.
NOTE: If you cut into dirt, immediately wash the blades with oil to flush it out. Periodically dip the teeth in a swallow pan of Wahl Clipper Oil (with clipper
running) to flush out dirt and hair.
FOR RECHARGEABLE CORD/CORDLESS CLIPPERS
1) Before use, the clipper must be fully charged for 24 hours.
2) Once fully charged, the unit may be used without cord.
3) After use, move the switch to the “O - OFF” (CHARGE) position. Reconnect the clipper to the transformer cord and recharge batteries by connecting
the wall plug transformer into any convenient electrical outlet.
FOR DIRECT PLUG-IN OPERATION
1) Should you need to use clipper in corded mode when battery is fully discharged, it is best to charge clipper in “O - OFF” position for several minutes
before use. During use, you may notice a decrease in blade speed. This is perfectly normal. The clipper will still perform adequately in corded mode with
a fully discharged battery.
2) Connect the clipper to the transformer cord, and plug the wall transformer into an electrical outlet.
3) Move the switch to the “1 - ON” position.
4) After use, turn to “O - OFF” position thendisconnect wall transformer from outlet.
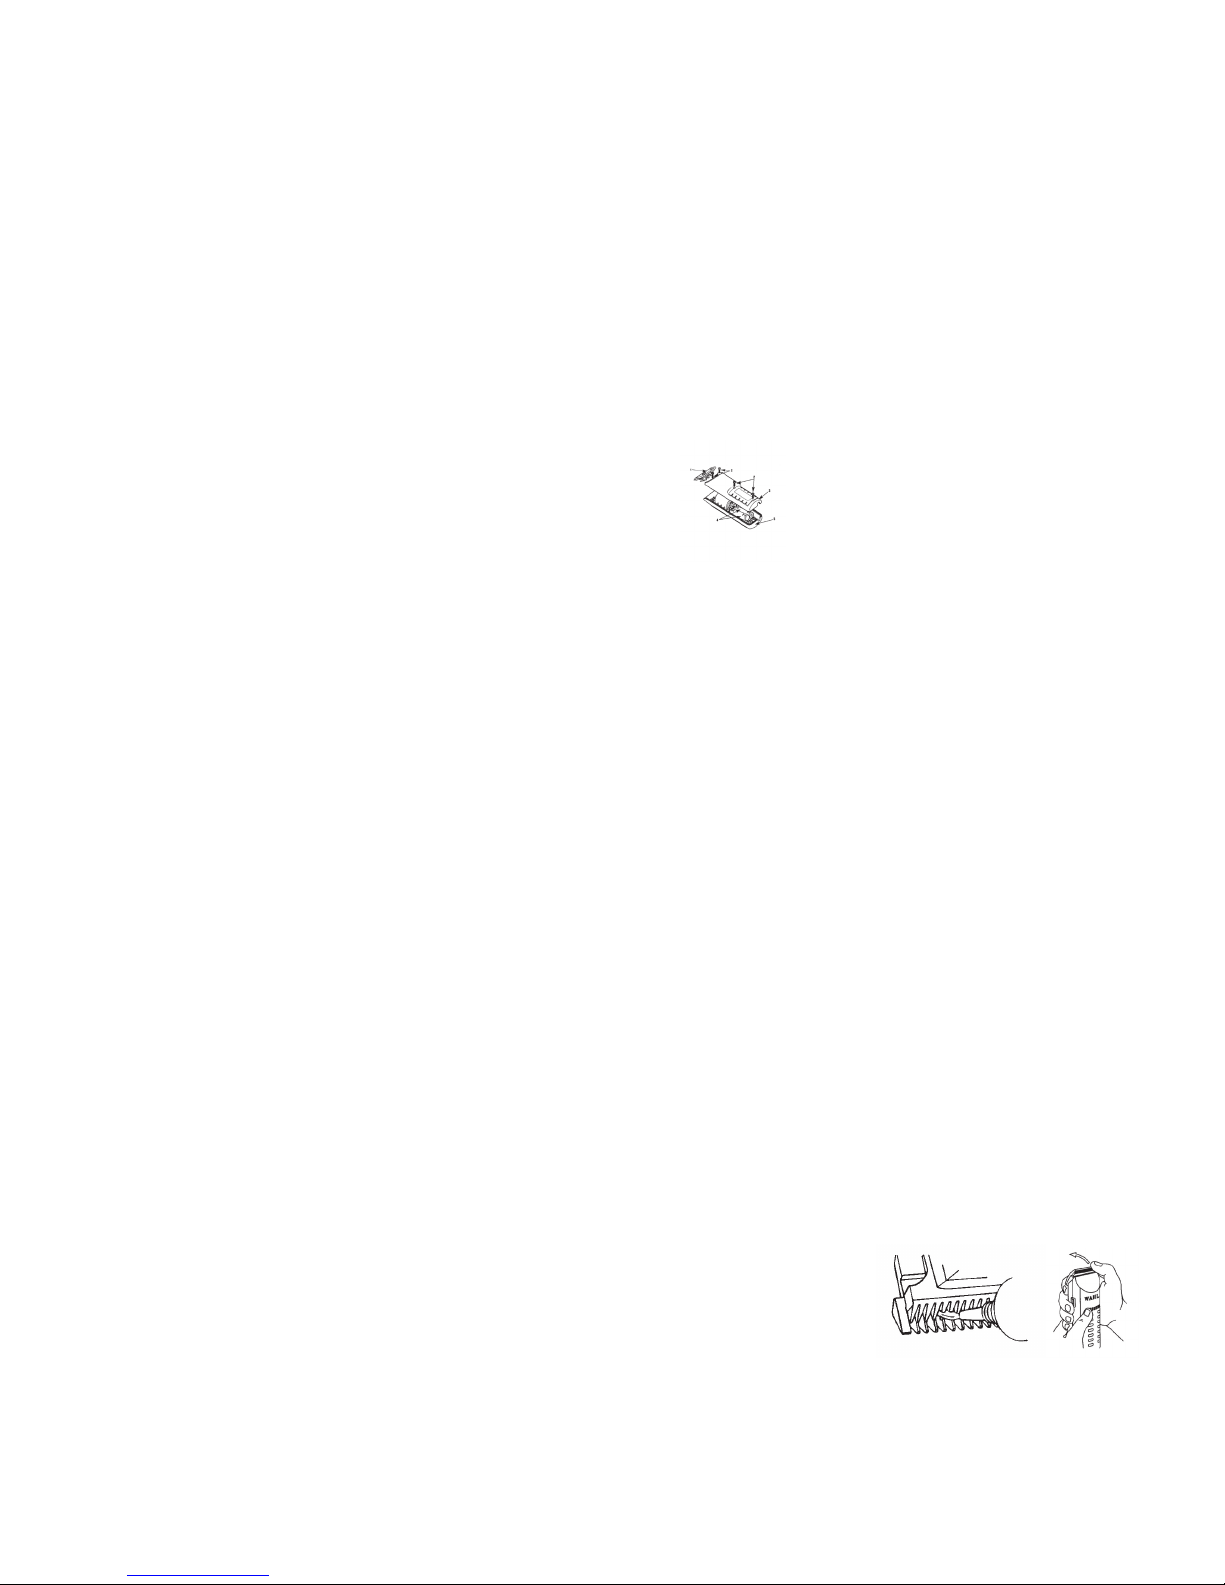
REPLACEMENT OF RECHARGEABLE BATTERIES
CONTAINS NICKEL-METAL HYDRIDE BATTERIES
Depending on use, your batteries should last three to five years before
replacement is necessary. When replacement is necessary, follow these steps:
1) Remove blade assembly (1) from clipper.
2) Turn clipper upside down (screws should be facing up).
3) Remove all four screws (2) from clipper.
4) Carefully remove bottom housing (3) from clipper.
5) For disposal of batteries, check your local laws and regulations. For recycling co tact a government recycling agency, waste disposal service, retailer,
or visit online recycling sources such as www.batteryrecycling.com or www.rbrc.org.
6) If replacing batteries, replace with new NICKEL-METAL HYDRIDE batteries only. To obtain replacement batteries refer to your products authorized
service center.
IMPORTANT: Place the new rechargeable batteries with positive and negative ends in proper position. Consult drawing of upper housing of clipper (5)
for proper placement.
7) Make sure all parts are seated properly in upper housing of clipper (5).
8) Place bottom housing of clipper (3) back into proper placement.
9) Hold case together tightly and replace screws into clipper. Tighten until snug.
10) Attach blade assembly (1) to clipper.
CLIPPER USE AND MAINTENANCE
1) Once the unit is initially charged, for 24 hours, it will take 12 to 15 hours to charge your clipper with completely discharged batteries.
2) A fully charged clipper will deliver a minimum of 30 minutes of continuous trimming.
3) When clipper is not in use, it should be connected to the transformer to assure maximum power whenever it is used. The transformer is designed to
continuously charge the battery, without overcharging.
4) It is normal for the unit to become somewhat warm during normal use.
5) Avoid pressing the blades strongly against the skin, being especially careful around the ears. (The blades should be directed toward the skin at a right
angle, but without significant pressure.)
6) After cutting hair, clean the blades and oil clipper before storing the unit. Place a small drop of WAHL CLIPPER OIL ONLY on the ends of the blades
while clipper is running.
7) To clean the unit, use either a clean, dry, or dampened cloth.
DO NOT USE benzine or thinner to clean the unit.
8) Do not store the clipper in a wet or moist environment.
9) To prolong blade life, do not use clipper on hair that is coated with hair spray.
10) Do not touch any of the internal mechanisms. If the unit should need repair, do not repair it yourself. Return the product to an authorized service
center.
11) Keep the cord untwisted and unobstructed. When stored, the cord should be coiled and the unit placed in a dry place, away from children.
12) Use only the power source specified on the rating plate.
13) Be careful not to drop the clipper or to “nick” the blades.
14) Always replace the blade guard when the clipper is not in use.
15) Periodically dip the blade in a shallow pan of Wahl Clipper Oil (with clipper running) to flush out dirt and hair particles.
16) Feed clipper through the hair only as fast as it will cut. Feeding too fast wedges the hair clippings between the blades, keeping them from cutting
properly.
DO NOT CUT WET HAIR.
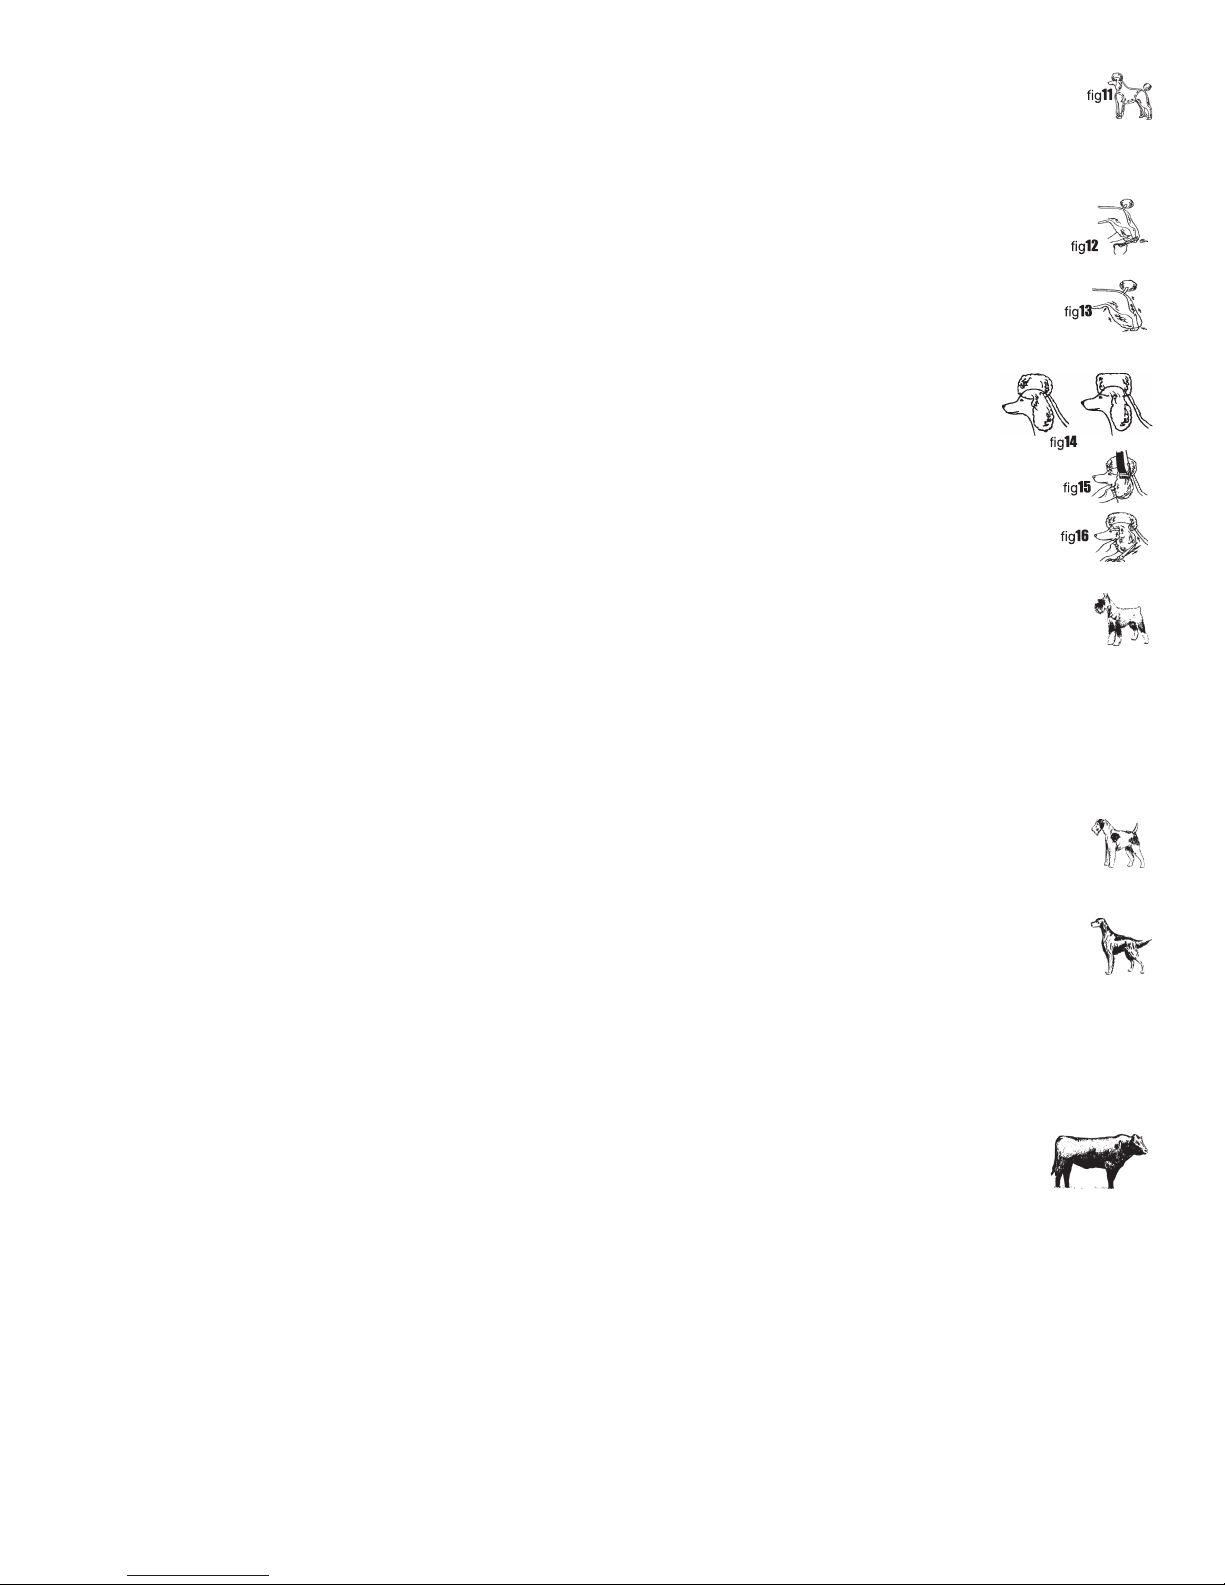
REMOVING AND CLEANING DETACHABLE BLADES
To remove the blades, hold the clipper firmly in one hand. Using the thumb of your other hand, simply push the blades away
from the front of the clipper. The blades and the mounting plate behind them will all come off in one piece. To remove hair
from between the blades, use the cleaning brush
provided. Be sure to use Wahl Clipper Oil between the blades before each use. Before replacing the blades, be sure the top
blade moves freely.
To replace the blades, place the hook at the bottom of the blade set into the space provided on the clipper housing. Then pivot the blade settoward the
housing until it snaps into place. Once it is seated, snap blade set to case so that you hear a click.
WAHL’S GUIDE TO FOOLPROOF ANIMAL CLIPPING
Assemble your supplies: Clipper, oil, blades, slicker brush, attachment combs and comb, scissors, tear-free shampoo, dryer, rubber bath mat, nail cutters.
Be sure all your equipment is in good working condition and easy to reach. Grooming should be done on a solid table (about 30” high) with a non-slip
surface to give your dog a steady and secure footing. A grooming post to secure the dog would be of considerable aid. Good lighting is essential. The

light should be adequately bright and evenly distributed; there should be no shadows.
BEFORE YOU CUT
Brush out coat thoroughly
a) Remove all snarls, knots, tangles and mats.
b) Part the hair and brush on 1” sections-brush from the skin out.
Bath Time
a) Soak the dog thoroughly.
b) Apply shampoo and work into a good lather.
c) Pay particular attention to the rectum and pads (bottom of the paws).
d) Be careful also not to get soap in the dog’s eyes (for safety use a “tear-free” shampoo).
e) Rinse very thoroughly.
f) Squeeze legs, ears and tail.
g) Towel dry
h) Fluff dry or brush and dry.
• Start with the legs using a wire brush and moving up to the body.
• Direct dryer to the area you are brushing. Do one spot at a time.
• Use light, fluffing strokes.
• There should be no snags or tangles when you are done.
CUTTING HAIR
The first time you cut hair, cut only a small amount until you become
accustomed to how long each guide leaves the hair. Depending on
your model, the following guide combs may be included in your kit.
Always start by placing the largest guide
comb on the clipper, then use shorter combs if desired length is shorter.
Guide Comb #3—leaves hair approx. 3/8”
Guide Comb #4—leaves hair approx. 1/2”
Guide Comb #7—leaves hair approx. 3/4”
Guide Comb #8—leaves hair approx. 1”
To attach combs, hold comb with teeth up and snap it firmly to the bottom of the clipper blade.
For uniform cutting, allow the clipper to cut its way through the hair.
Do not force it through at a faster rate.
Tips For All Breeds of Dogs
1) Before clipping your puppy for the first time, run the clipper near the puppy’s ear for a short time so he gets used to the noise.
2) If clipping for the first time, the clipping process will be slow. Try to move with the dog when clipping. After a few grooming sessions, you will develop
your own comfortable style and grooming will go faster.
3) Take your time when grooming, and use a lot of affection. Dogs know when you’re in a hurry and will react by getting nervous, making grooming more
difficult.
4) It is very important to trim out excess hair on the pads. Otherwise the pads will become dirty and matted, causing painful walking for the dog.
Grooming Your Poodle
Because their hair grows so rapidly, poodles need to be groomed much more often than other breeds.
Feet:
1) Have dog sit facing you. Bring rear leg forward (Fig. 1) and clip sides of foot from nail to end of toes. Clip on top of toes, stopping at ankle
joint. Don’t trim up ankle. Spread toes apart with thumb and forefinger (Fig. 2). Cut hair between toes, being careful not to nick foot webbing.
2) Spread bottom pads with thumb and clip between toes and pads, being careful not to nick foot webbing (Fig. 3).
3) Repeat for other three feet. Touch up stray hair with scissors.
Tail:
1) Stand dog with tail toward you. Hold tail with one hand and clip top and sides AGAINST the grain from the middle toward the body. Clip bottom
WITH the grain from the bottom toward the middle (Fig. 4).
2) Comb out pompon at end of tail and use scissors to trim the largest ball possible.
3) With scissors, carefully clip around anal opening.
Face and Throat:
1) Be very careful around this area-too close of a cut may cause razor burns. Cut AGAINST grain. The area to be clipped is shown in Figs. 5-8.
Bend ears back and use a cloth band to keep topknot (bangs) out of clipping area. The clipper is not to be used above eyes. Note: You may
want to “rough trim” this area first, cutting WITH the grain.
2) Hold muzzle with your free hand. Cut from ear to the outside corner of eye in a straight line. Stretch the skin at the outside corner of left eye
upward and backward. Clip CAREFULLY under the eye. (Use Fig. 5 and 6 as your guide.) Repeat on other side.
3) With free hand, stretch the corner of the mouth with your thumb, using the rest of your hand to hold mouth shut. Clip around mouth and side
of face. Repeat on other side.
4) Holding muzzle, clip the area between the eyes and down the nose.
5) To clip the muzzle, clip away from the eyes toward the nose. Hold dog’s head, throat taut, and clip bottom of muzzle (Fig. 8). The Adam’s
apple is usually the stopping point of the cut, but you may clip lower.
6) Clip the rest of the throat area toward the muzzle.
7) If you desire your poodle to have a mustache, clip to angle the top of the mustache even with the crack of the mouth. Then trim a straight cut
around the chin.
Stomach:
1) Stand dog facing you. Lift front legs and clip from a point above the testicles or vulva in a straight line to the end of the rib cage, using Fig. 9 as
a guide. DO NOT clip up leg. Use light pressure, being careful to not nick vulva, penis, testicles or nipples. Cover them with your hand.
2) Clip the hair on penis with the grain.
Body:
Tip: Stop frequently while clipping to fluff the hair. It will help keep the hair even.
1) Clip along the back, starting at the base of the skull, and cut down the middle of the back to the tail (Fig. 10). Shorten all hair as shown in
the illustration, starting at the neck.
2) See Fig. 11. Clip hair between the shoulders and hips. Clip under the chest from behind the front legs to the end of the rib cage.
3) Scissor trim to touch up.
Rear Legs:
IMPORTANT:Be very careful when clipping around the “armpit” and the flank. These are areas of skin that are easy to cut; especially on older dogs
whose skin has loosened.
1) Brush the hair on the back legs in an upward and outward motion to fluff. You can now shape the legs as full or as tapered as you wish.
2) Start by trimming any hair that falls over the foot (Fig.12).
3) Starting at ankle, cut up to hip a little hair at a time (Fig. 13). Once you are at the hip, blend hair so it tapers into shorter body hair. (When using
guide combs on the legs, complete your stroke; don’t stop midway.)
4) Repeat with other back leg, making it the same size as the first leg.
5) Touch up with scissors.
Front Legs:
1) With dog facing you, comb hair up and out.
2) Trim front legs to match back legs.
3) Comb up hair at shoulders and blend it with shorter body hair.
4) Comb hair on chest and between front legs; trim it to the length of the shoulder and body hair.
Head:
1) With dog facing you, comb hair on top of the head (topknot) upward and forward (Fig. 14).
2) Scissor cut a square or round topknot.
3) Blend lower topknot hair with the shorter neck hair.
Ears:
1) With dog facing you, clip from top of the ear downward. NEVER turn clipper in other direction.
2) Lay the ear in the palm of your hand. Clip the outside of the ear first, and then the inside (Fig. 15).
3) Hold ear with your free hand and scissor cut the sides. Be careful not to cut the ear itself (Fig. 16).
4) Repeat with other ear, and touch up any stray hairs.
Schnauzer
IMPORTANT: Trim your Schnauzer at least once before
cropping ears. Otherwise your dog will probably associate
clipping with cropping and make grooming difficult.
1) With dog standing, clip top of back from the base of the skull to the base of the tail. Clip throat, front and sides of body and tail. Clip these areas with
the grain. Clip sides and back of rear legs toward hock; curve the sides into the hock. Do not clip the front of the rear legs.
2) Clip stomach from rear to front. Clip penis hair carefully with the grain. Clip skull from point above eyebrows to the base of the skull and to the ears.
Clip from the outside corner of the eyes to the base of the ears and to the corner of the mouth.
3) Clip both sides of ears from the base to the tip.
4) Scissor cut and trim front legs to gain a rounded and straight appearance. Scissor trim rear legs. Scissor trim eyebrows, muzzle and mustache to
achieve a straight and square look.
Airedale, Irish, Lakeland, Welsh and Wire Fox Terriers.
If you plan to show your terrier and he has a wire coat, stripping, not clipping, is required. However, clipping is a far easier method of grooming
for both pet and groomer.
Clip the same way as the Schnauzer, except the rear legs which do not need clipping. Clip to blend sides of the dog into the hips. Scissor cut and trim
the eyebrows, muzzle and mustache to there cognized standard of the particular breed of dog.
Cockers, Setters and Spaniels
Sporting dogs generally require little clipping. However, long-haire breeds can be more effective in the field when properly groomed. Dogs
should be clipped several weeks in advance of the hunting season to facilitate better hunting, offer greater comfort to the dog, and make coat
care easier.
Clipping also allows growth of the shorter, denser coat that provides warmth and more resistance to burrs and stickers.
1) Clipping with the grain, clip the neck, shoulders and chest. Blend the hair into the body and lower chest. Clip legs and tail.
2) Clip body, if needed. It is suggested that dog’s hair be cut to 1/2” to 3/4” long. This may detract from the dog’s “looks,” but is sensible for a dog used in
hunting.
3) After a day in the field, comb your dog’s coat. A “tangle-remover” spray will help get rid of burrs.
FITTING BEEF CATTLE
When clipping large animals, care should be taken as some animals may be nervous around the noise and vibration of the clipper. A
suggestion before fitting your cattle would be to wash your animal with mild animal shampoo and then blow dry. Air blow and brush the
hair forward up toward the ears. Be sure the hair is dry before you begin to clip.Before clipping, gain the animal’s confidence. Do this by
approaching the slowly, making sure the animal is aware of your presence. A gentle rubbing to the side of the animal should be sufficient.
With the WAHL #10 STANDARD BLADE, start clipping the animal’s neck or throat. Clip against the grain (or lay) of the hair, which will give a slightly
shorter cut. Clip up to the bottom of the animal’s head and down to the brisket. Clip the hair on the belly up to the brisket. To increase the depth in the animal’s body, leave the hair unclipped from the naval area back. Clip up the sides until you achieve cleanness and levelness in the underline. Clip the hair
around the head, eyes and poll. When clipping the poll, leave about half the poll width unclipped in the center. Completely clip around the tail, approximately half way down to where the top of the tail ball is tied. Clip up to about where the tail starts to get thicker.
IMPORTANT: MAKE SURE CLIPPER IS SHUT OFF BEFORE ASSEMBLING ATTACHMENT COMBS.
BLENDING
Depending upon the length of cut, use the clipper with or without the attachment comb. To blend the hair from the shoulders to the neck and from the
sides to the belly, hold your clipper upside down with the blades pointed in toward the hair. Then lightly, starting at the top of the hair and stroking downward in a combing type manner, remove just a little hair at a time. To clip the back of the animal use the desired length attachment comb and clip from
the tail head to behind the poll, establishing a straight line across the top of the animal. Try to achieve a wide blocked look by eaving hair longer in areas
that need to be filled in.
FINAL CLIPPING
Apply any desired cosmetics,(i.e. adhesive, show foam, final mist, etc.) to dress up the animal. Tease the end tail hair, tie the hair up and apply adhesive
to form the ball shape. Comb hair into its final position, following by any final freehand trimming. When you are finished, clean your clipper and oil the

blades before packing it away (refer to instructions on CARE AND SERVICES).
GROOMING HORSES
When clipping large animals, care should be taken as some animals may be nervous around the noise and vibration of the clipper.
BEFORE YOU CUT
1) Make sure clipper is clean and in perfect working condition. towel dry. Then comb and brush the longer mane and tail.
CUTTING HAIR
1) Start with the front legs. Clipping with the grain (or lay) of the hair will give a slightly longer cut. The leg can be clipped while the hoof is on the ground
or with the leg in your hand. Clip the fetlocks, being careful around joints and projections. Proceed with all four legs.
2) Clip the hair around the muzzle, chin and ears. All the hair on the outside of the ears can be clipped, but avoid clipping the hair on the inside. Be careful, also, when clipping the hair on the edges of the ears; do not hold the clipper with the blades pointing toward the edges, but parallel to the edges.
3) If you wish to shorten the hair on the mane and tail, hold the hair between your index and middle fingers with the amount of hair you wish to cut protruding above your fingers. Then cut that hair off with a parallel stroke across fingers.
4) To thin the hair on the tail and mane, hold your clipper upside down with the blades pointed in toward the hair. Then, starting at the top of the hair and
lightly stroking downward in a combing-like manner, remove just a little hair at a time.
5) Hair on the body of the horse can either be cut or left longer for weather protection and additional padding. Remember when clipping, that less hair is
removed when cutting with the grain; more hair is removed when cutting against the grain of the hair.
6) When you are finished, clean the clipper and oil the blades before packing it away.
SERVICES AND REPAIR (for USA purchased products only)
This appliance contains no user-serviceable parts. Wahl Service Department. Do not return this product to the store where purchased.
If you have problems with your clipper, send it prepaid with a noteexplaining the problem to:
Wahl Clipper Corporation
Attn: Service Department
3001 Locust Street / PO BOX 578
Sterling, Illinois 61081
Telephone: 1-800-PRO-WAHL or visit www.wahl.com
Sharp clipper blades cut faster. FOR GENUINE FACTORY BLADE SHARPENING, remove as a set (do not send one blade only). Blades will be resharpened for a nominal charge. Please wrap blades securely when mailing them to Wahl. Return to:
Wahl Clipper Corporation
Attn: Service Department
3001 Locust Street/PO Box 578
Sterling, Illinois 61081
For products purchased in Europe, return to:
Wahl Europe
Herne Bay Trade Park
Herne Bay, Kent CT6 8JZ England
For products purchased outside the United States or Europe, contact
your distributor. New replacement blades are available from your
retail tack or pet shop or from Wahl Clipper Corporation.
LIMITED WARRANTY: This warranty valid only for sales in the Continental United States. For sales outside of the Continental United States contact
local distributor for warranty and terms. If your Wahl product fails to operate satisfactorily within one (1) year from the date of original purchase or receipt
as a gift, Wahl will at our option repair or replace it and return it to you FREE OF CHARGE. Our warranty does not cover blades, which are wear out
parts. Please mail your product prepaid to Wahl Clipper Corporation, Sterling, Illinois 61081, Attention: Repair Department, with a Note describing the
defect and the date of original purchase or receipt as a gift (if in warranty). Products out of warranty will be repaired at our standard repair charges.The
warranty is void and no repair or replacement will be made under this warranty or otherwise if:
1) The product is modified in any manner.
2) The product is repaired by anyone other than Wahl Clipper Corporation.
3) The product has been subjected to unreasonable use.
This warranty gives specific legal rights and you may also have other rights, which may vary from state to state. No other written express warranty is
given. Any implied warranty including any warranty of merchantability, which may arise from purchase or use, is limited to the one-year period provided in
this express warranty. Some states may not allow such limitation, so it may not apply to you. No responsibility is assumed for accidental or consequential
damages of any type, or for the use of unauthorized attachments. Some states may not allow the exclusion or limitation of incidental or consequential
damages, so the limitation or exclusion may not apply to you.
Models listed in this booklet may not be available in certain voltages
and cycleages, contact your Wahl distributor for further information.
WAHL CLIPPER CORPORATION
2900 LOCUST STREET
PO BOX 578
STERLING, ILLINOIS 61081
PHONE 1-800-PRO-WAHL/ 815-625-6525
www.wahl.com
Wahl UK, Ltd
Herne Bay Trade Park
Sea Street, Herne Bay
Kent CT6 8JZ, England
Phone (44) 1227 740066
FAX (44) 1227 375636

CANADA
SERVICE, REPAIR & GUARANTEE
We guarantee this Wahl product against mechanical defects for the time period indicated on the trimmer package (if used on the voltage and cycle
indicated on the appliance). Damage due to rough handling or dropping is not covered by this guarantee. Batteries and broken blades are not covered
by this guarantee. If your Wahl product requires service, do not return it to the store where purchased. Call Wahl (toll free) at 1-866-787-WAHL (9245)
for the name and address of the Wahl Service Centre closest to you or send it prepaid with a note explaining the problem to the address below. Products
under guarantee will be returned postage prepaid
Wahl Canada Inc.
165 Riviera Drive
Markham, Ontario
L3R 5J6
 Loading...