


1
Part 1: INSTALLATION INSTRUCTIONS
FOR THE BUTLER MULTI
(Please keep these Instructions for future Reference)
Important Message to the Owner
Please read fully the Operation & Maintenance Instructions with your Butler Multi BEFORE lighting your
first fire. Your insurance company may require notification of the installation. Please check.
When a Wet Back is fitted it must be connected to the water supply or damage will result.
Such damage is not covered by Warranty. Tempering Valves should be installed to the system for safety.
Tempering Valves may be a Permit Requirement. Check with your Building Inspector or Local Council.
BIA: As from 22 April 2003 Automatic Smoke Detectors/Alarms will be mandatory in all new homes and
when solid fuel heating appliances are installed. Permits will not be signed off if alarms are not fitted.
Important Message to the Installer
The Butler Multi has been tested to and complies with AS/NZS 2918:2001- Domestic Solid Fuel
Burning Appliances
The Butler Multi must be installed in accordance with these installation instructions to comply with AS/NZ
2918-2001-Domestic Solid Fuel burning appliances.
Installer’s Responsibilities
Installation of the Butler Multi must be in accordance with these instructions.
Any variation from these installation instructions or any doubts about them must be checked against
requirements of the AS/NZS 2918-2001.The installation must be carried out by a suitably qualified installer.
We recommend using an NZHHA Accredited Technician.
WARNING: THE APPLIANCE AND FLUE SYSTEM SHALL BE INSTALLED IN
ACCORDANCE WITH AS/NZS 2918: 2001 AND THE APPROPRIATE REQUIREMENTS OF
THE RELEVENT BUILDING CODE OR CODES.
THE APPLIANCE AND FLUE SYSTEM SHOULD NOT BE MODIFIED IN ANY WAY
WITHOUT THE WRITTEN APPROVAL OF THE MANUFACTURER.
WARNING: DO NOT CONNECT WET BACKS TO AN UNVENTED HOT WATER SYSTEM
INSTALL IN ACCORDANCE WITH AS 3500.4.1 OR NZS 4603 AND THE APPROPRIATE
REQUIREMENTS OF THE RELEVENT BUILDING CODE OR CODES
CAUTION: MIXING OF APPLIANCE OR FLUE SYSTEM COMPONENTS FROM DIFFERENT SOURCES OR
MODIFYING THE DIMENSIONAL SPECIFICATION OF COMPONENTS MAY RESULT IN HAZARDOUS
CONDITIONS. WHERE SUCH ACTION IS CONSIDERED, THE MANUFACTURER SHOULD BE
CONSULTED IN THE FIRST INSTANCE.
CAUTION: CRACKED AND BROKEN COMPONENTS, e.g. GLASS PANELS OR FIRE BRICKS MAY
RENDER THE INSTALLATION UNSAFE.
Flue System
Must be manufactured in accordance with AS/NZ 2918-2001 and tested to Appendix F. See installation
instruction section on page 5.
PLEASE LEAVE THESE INSTRUCTIONS WITH THE OWNER WHEN THE INSTALLATION IS COMPLETED

2
PRELIMINARY INSTALLATION PROCEDURES
FOR THE BUTLER MULTI
To get full benefit from the Butler Multi it is important that it is installed correctly, both for efficiency and
safety sake. The following points should be noted:
1. The characteristics of the Butler Multi will determine its position within the home. As a general rule
an interior wall installation suits flue requirements better than against an exterior wall.
2. Check for flue obstructions above the ceiling. (e.g. header tanks, electrical mains or load bearing roof
supports).
3. The minimum vertical flue height for satisfactory operation is 4.2metres above the top of the
Butler Multi Flue Flange. The performance of the Butler Multi depends more on the flue than on any
other single component. It is the draw on the flue that drives the stove.
4. Remember a permit is required from your Local Authority.
Floor Protector/Hearth Requirements
The MINIMUM requirement for the Butler Multi with a wet back fitted or as a DRY model is an
ASH HEARTH only.
The Floor Protector shall extend under the appliance and NOT Less than the width of the Appliance and shall
extend 300mm forward and 200mm each side of the Fuel Loading/Ash-Removal opening.
The Ash Hearth shall have an upper surface, including grouting, of durable, non-combustible material. All joints
in the surface must be sealed to protect and prevent ash or spilled embers reaching the floor. For concrete
floors trim any floor coverings to the same minimum hearth requirement.
NOTE: THE BUTLER MULTI MUST BE AFFIXED TO THE HEARTH AND FLOOR FOR SEISMIC RESTRAINT.
For Seismic Restraint use two holes in the base at the rear and screw through the hearth and into the floor.
NOTE: FOR DRY MODEL AND SPECIAL 2KW WET BACK MODEL PLEASE SEE SEPARATE DRY
INSTALLATION INSTRUCTION SHEET AS CLEARANCES ARE DIFFERENT.
Wet Back Fitting
The Butler Multi is fitted with a wet back unless a Dry Model is requested.( see separate specification sheet )
We recommend that you use the “Lion” Wet Back which has been designed and tested specifically for the
Butler Multi. In general, wet backs are factory fitted at the time of ordering.
However, a suitably qualified person can fit or change the wet back out in the field if this is required.
Water must always be present in the wet back.
The wet back MUST be connected by a Registered Plumber to an open vented system.
Tempering valves are required.
Please check the PH level of the water supply as wet backs can become fouled with lime which will void
the warranty.
NB Some coals are very corrosive and may shorten the life of the wet back – please check with the
supplier as this is NOT covered by warranty.
Please advise the householders NOT to boil the wet back as this will cause vibrations and will fatigue the wet
back, the pipes and the cylinder. This will NOT be covered by the warranty.
Baffle & Brick Assembly for Wet Back Model
Position the baffle on the ledge in the top, central chamber of the wet back, in the ceiling of the firebox.
The round rods on the baffle should face downwards. The baffle should then be pushed back so that there is
no gap at the rear. Position the bricks so that they tuck up under the edge of the wet back.
3
BUTLER MULTI WET 6KW
Fitted with a standard 6kw “Lion” Wet Back only
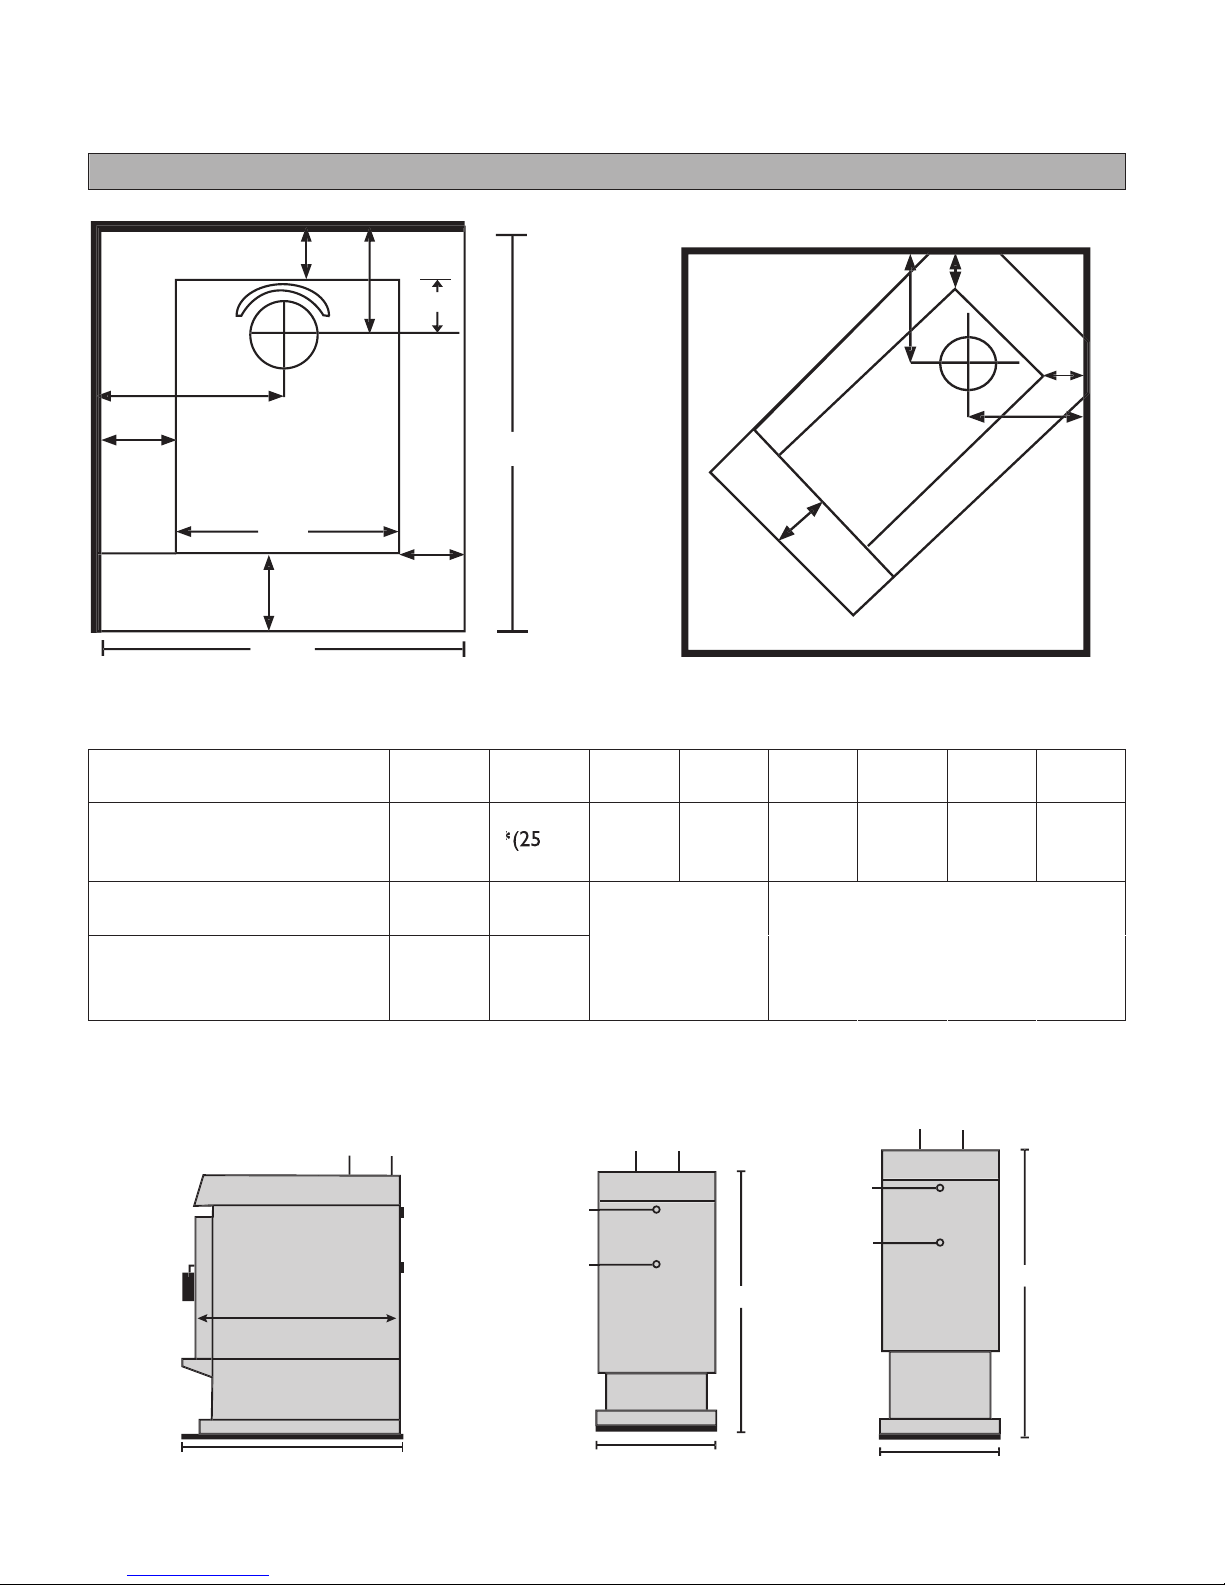
Wet Installation Clearances AS/NZ Standard 2918:2001
Estimated Heat Output 8kw (depending on fuel used) Estimated Hot Water Output 6kw
Minimum clearance to
Combustible Surfaces
A B C D E F G H
With double stainless steel
Flue shield to unprotected
mm)
wall
50mm 50mm 300mm 175mm 25mm 190mm 210mm 240mm
As above 12mm Eterpan LD
board spaced 25mm off wall
37mm 37mm
As above with sheet metal any
type 0.5mm or thicker spaced
25mm off the wall.
25mm 25mm
Ash Hearth Floor
Protection must
extend under the
stove and forward
300mm extending
200mm either side of
the door opening
Other screening materials are available and clearance factors can be calculated to the AS/NZS 2918:2001.
Please ask your retailer or contact Wagener Stoves if you need further advice.
150
150
320
660mm
585m
770mm770mm
25mm
25mm25mm
wetbackwetback
pipespipes
wetback
pipes
150
320
800mm
725 mm
910mm910mm
E
H
E
H
C
670
D
B
G
A
C
Floor Protector
Ash
Hearth only
320
TOP
TOP
F
140
*
* 1.
One side wall clearance can be reduced
to 25mm by rotating the fl ue shield 45 deg
2.
Bench height side wall only (not above top
of heater) clearance 25mm.
*(185mm)
870
50
50
300
600
520
2017

4
FLUE INSTALLATION 3/05
The Butler Multi uses a 150mm diameter flue.
It is imperative that the connection between the flue
and the flue spigot is sealed using a recommended
flue sealant. If an offset bend is required it should be as
steep as possible to enable ease of cleaning.
Extra flue height may be required to compensate for
lack
of draw. The performance of the Butler Multi
depends more on the flue than on any other single
component as it is the draw on the flue that drives the
Butler Multi. We recommend 4.
2metres of flue.
The top of the flue system should be at
least 1000mm above the roof or at least
600mm higher than any obstacle or ridge
within 3 metres of the flue.
A total minimum vertical flue height
ABOVE the Butler Multi of 4.
2 metres
is normally required for adequate draft.
Joints between sections of the flue pipes
are push fitted so that the upper section
enters the bottom section and
must be SEALED using a flue sealant.
Each section should be secured to prevent
Separation using 3 stainless steel self tapping
screws or pop rivets.
Only flue systems which comply with the
AS/NZS 2918-2001 should be used.
Please follow flue manufacturers instructions
on page 5
150mm Free Standing Woodfire Flue Kit Installation
Instructions
.
2017

5
150 MM FREE STANDING WOODFIRE FLUE KIT
INSTALLATION INSTRUCTIONS
(See illustration Page 4)
This flue kit has been manufactured in accordance with AS/NZS 2918:2001 and tested to appendix F.
To ensure safety this flue kit must be installed as outlined in these instructions. Heater and flue clearances
from combustible walls must be in accordance with heater manufacturer’s specifications and AS/NZS
2918:2001. Theses installation instructions are for tested appliances only.
1. Locate heater in its proposed position and mark a point on the ceiling that is directly above the centre
of the heater’s flue outlet. Check that the heater’s location allows the OUTER HEAT SHIELD to clear
all structural roof timbers.
2. Cut a 260mm square hole in the ceiling. Directly above cut a hole in the roof to accommodate OUTER
HEAT SHIELD.
3. Fit timber nogs around ceiling and roof holes. i.e. Nogs form a 260mm square aperture which allows
air to circulate freely over the OUTER HEAT SHIELD surface.
4. Position the OUTER HEAT SHIELD so that it is flush with the underneath of the ceiling and protrudes
through the roof the required height. (Refer to AS/NZS 2918/2001 if more details are required).
When calculating roof penetration height allow for an extra 500mm that can be achieved by using the
OUTER HEAT SHIELD SLIP EXTENSION.
a) If the flue is within 3 metres of the ridge, the OUTER HEAT SHIELD must protrude at least
600mm above the ridge of the roof.
b) If the distance from the ridge is more than 3 metres, the OUTER HEAT SHIELD must protrude
at least 1000mm above roof penetration.
Additional OUTER HEAT SHIELD and INNER SHIELD (BAFFLE) may have to be added to ensure the correct
roof penetration heights are obtained.
5. Fix an appropriate flashing around the OUTER HEAT SHIELD to seal onto the roofing material.
6. From the roof slide the INNER SHIELD into the OUTER HEAT SHIELD until it rests 12mm above
ceiling level.
7. Assemble FLUE PIPES together ensuring seams are in line. Secure each joint with 3 rivets or self-
tapping screws. FLUE PIPES must be assembled with crimped ends down. (towards heater)
8. Place CEILING PLATE over heater flue spigot, ensuring the folded edge upstands are facing the ceiling.
9. From the roof lower FLUE PIPE through OUTER HEAT SHIELD into position.
10. Before securing the OUTER HEAT SHIELD SLIP EXTENSION to the OUTER HEAT SHIELD with 3
rivets or self tapping screws, ensure the FLUE PIPE extends above the top of the OUTER HEAT
SHIELD SLIP EXTENSION 145mm. Adjust SLIP EXTENSION to obtain this measurement. If minimum
roof penetration heights described earlier can not be achieved add sufficient stainless steel FLUE PIPE.
11. Fit TOP FLUE SPACER BRACKET to the FLUE making sure the lugs fit snugly inside OUTER HEAT
SHIELD SLIP EXTENSION. Make sure TOP FLUE SPACER BRACKET fits hard down onto OUTER
HEAT SHIELD SLIP EXTENSION.
12. Fit CASING COVER over the FLUE PIPE and push down firmly onto TOP FLUE SPACER BRACKET.
Secure with a rivet or self-tapping screw.
13. Fit COWL but do not secure, as removal for flue cleaning will be necessary.
14. Fasten CEILING PLATE to ceiling using screws and spacers provided. Ensure an even air gap around
FLUE PIPE when fixing. Remove protective plastic from CEILING PLATE.
N.B. It is the responsibility of the installer to ensure that the installation of this flue kit complies
with AS/NZS 2918:2001, the appliance manufacturers specifications for flues and that relevant
Local Body requirements are adhered to.

6
Part 2: OPERATION & MAINTENANCE
INSTRUCTIONS FOR THE BUTLER MULTI 3/05
Message to the Owner
Thank you for purchasing the Butler Multi.
With care and common sense the Butler Multi will give you many years of trouble free service.
We recommend an annual safety check of flues, bricks, door seals, door catches, air controls and the like.
WARNINGS AND CAUTIONS
1. WARNING: ANY MODIFICATION OF THE APPLIANCE THAT HAS NOT BEEN APPROVED IN
WRITING BY THE TESTING AUTHORITY IS CONSIDERED AS BREACHING AS/NZS 4013.
2. WARNING: DO NOT USE FLAMMABLE LIQUIDS OR AEROSOLS TO START OR REKINDLE THE FIRE.
3. WARNING: DO NOT USE FLAMMABLE LIQUIDS OR AEROSOLS IN THE VICINITY OF THIS
APPLIANCE WHEN IT IS OPERATING.
4. WARNING: DO NOT STORE FUEL WITHIN HEATER INSTALLATION CLEARANCES.
5. WARNING: DO NOT OPERATE THIS APPLIANCE AS AN OPEN FIRE. IT IS NOT TESTED TO BE
USED IN THIS WAY AND WILL BE CONSIDERED AS BREACHING AS/NZS2918:2001.
6. WARNING: OPEN AIR CONTROLTO FULL AIR SUPPLY BEFORE OPENING FIRE DOOR.
7. CAUTION: THIS APPLIANCE SHOULD NOT BE OPERATED WITH A CRACKED GLASS.
8. CAUTION: THIS APPLIANCE SHOULD BE MAINTAINED AND OPERATED AT ALL TIMES IN
ACCORDANCE WITH THESE INSTRUCTIONS.
9. CAUTION: THE USE OF SOME TYPES OF PRESERVATIVE-TREATED WOOD AS A FUEL CAN BE
HAZARDOUS.
Further Cautions & Over Firing
Never use the Butler Multi with the door ajar or open. This will cause over firing and damage to
your stove & flue which will NOT be covered by warranty as well as being potentially dangerous.
SIGNS OF OVER FIRING: Flue turns red hot and stove “roars”.
POSSIBLE CAUSE OF OVER FIRING REMEDY
1. Excess flue length/ windy conditions Move Air Control to reduce or close air supply
2. Door Ajar Close door
3. Faulty door seal Replace faulty door seals
4. Full load of very dry, small wood Don’t load excess fuel
5. Dirty flue catches fire Close Air Supply. Call fire brigade if necessary.
Inspect & Clean Flue when cold.
The Butler Multi is HOT while in operation and contact may cause burns.
CREOSOTE OR SOOT FIRE: In the unlikely event of a soot or creosote fire occurring see Remedy 5 above.

7
OPERATING YOUR BUTLER MULTI 3/05
Fuels – Wood & Coal
1. Wood - Dry, seasoned wood should be used at all times and, as a general rule, the harder the wood the
longer it will burn.
Try to buy wood well in advance and store so that the air can circulate through the pile to assist drying.
Wet, unseasoned wood (under 12 months old) can cause creosote problems, especially if it is burned slowly.
If unseasoned fuel is used, special care should be taken to ensure that the fire is actually burning and not just
smouldering which will precipitate a creosote problem.
DO NOT burn driftwood or treated timber as they will damage your Butler Multi and flue and void your
warranty.
2. Coal – To burn coal you will need to start the fire with wood to establish a good base fire bed of hot
embers. Then add coal a little at a time allowing the coal to burn before adding more. Once the desired fuel
load has been added and is burning well adjust the air controls to achieve desired burn rate.
WARNING: Some coal types are very corrosive to the fire box, flue and wet back. Corrosion is not covered
by the warranty – please check with your coal supplier.
NOTE: The Heat output of the Butler Multi is controlled not only by the air controls but also by the type and
quality of fuel in the firebox.
First Burn for a New Appliance or Repainted Appliance
On INITIAL LIGHTING, the high temperature paint used on the Butler Multi will give off smoke and odour
for a short period. This is a temporary condition.
Open doors and windows to give adequate ventilation.
To condition the firebricks (ie remove moisture to prevent cracking) your first 2-3 fires must be small.)
Start Up
1. Slide the air control (black knob above the door) to select the HIGH position for full air supply.
Rotate the lower air control on the door to fully open.
2. Open the firebox door. Place crumpled newspaper on top of the firebox grate (if using firelighters
place firelighters under the newspaper). Stack kindling around it like an Indian Tepee and light the
newspaper (or firelighters), then close the firebox door. Once the kindling is well alight add slightly
larger pieces of wood until you have a good healthy fire. If burning coal see instructions above.
3. Refuel once the fire is established.
4. Adjust the air controls to the desired setting when fire is burning well.
5. It should not be necessary to fill the firebox to capacity. Smaller loads of wood or coal burned on half
air supply will produce more heat per kg of wood/coal. Flue length and outside wind may affect the
performance of the fire.
6. Over Firing will damage your stove & flue system and will void your warranty.
Please refer to page 6 - Signs of Over Firing, Causes and Remedies.
Stove Top Cooking
Establish a good fire and allow the Butler Multi to heat up. Never cook food directly on the top of the stove.
The Butler Multi is not a BBQ. Always use kettles, pots and appropriate cooking implements.

8
Slow Burning
Ensure that your Air Control is fully open and that you have a good base of hot embers. Add a full load of
larger pieces of hardwood or coal. Allow to burn for 10-20 minutes before adjusting the Air Controls to low
(almost closed position).
The Butler Multi will now burn away for long periods on low.
Reloading after a Slow Burn
At the end of a slow burn adjust the air controls to the high position for maximum air supply.
Rake the embers and re-establish the fire by adding a few small split logs and allow the firebox temperature to
build up before adding the balance of the fuel.
The addition of large quantities of cold fuel to a low fire will reduce the firebox temperature dramatically and
this may result in ‘losing’ the fire. Proceed with fire as before.
MAINTENANCE AND CLEANING 3/05
Ensure that your Butler Multi is cold and that there are no hot embers in the fire box.
The outside enamel panels of your Butler Multi may be cleaned with a soft rag and non abrasive “spray &
wipe” type products.
Ash Removal
Over a period of time ash will build up in your Butler Multi requiring removal.
Ash build-up will depend upon the quality and quantity of your fuel.
To empty ashes from the fire box, rake ashes on the grate with poker, to loosen and allow to fall through to
ash pan below. Dispose of contents of ash pan in a non-combustible container with a tightly fitting lid.
Place outdoors immediately to a location clear of combustible materials.
Door Glass
Under normal operating conditions, using seasoned fuel, the glass in your Butler Multi should remain relatively
clear. If the glass becomes dirty it can be cleaned by dipping a damp paper towel into the dry cold ashes, and
rubbing gently on the dirty glass to clean. If in the unlikely event your door glass breaks it must be replaced
with a 5mm ceramic glass. This can be purchased through your Wagener Stoves Dealer.
NOTE: Do not operate your Butler Multi with broken glass and under no circumstance should a non-ceramic
type glass be used as it may explode due to the intense heat inside the fire box.
The Door Seals
The door seal should be checked and adjusted to provide a perfect seal at all times. Excess air entering the
fire box past a faulty seal will make it impossible to achieve a slow burn, and may result in over firing the
Butler Multi and causing damage.
Fire Box Bricks
Fire Bricks serve two purposes. Firstly, to protect the steel chassis and secondly to maintain high
temperatures in the fire box to effect complete combustion of the fuel. Cracked and broken bricks should be
replaced. Remember to place your fuel in the firebox rather than throwing it in. This will extend the life of
your bricks.
Flue Cleaning
Flue cleaning and maintenance is probably best done by a professional who can also advise you on the
condition of your flue and other parts like bricks and seals. This should be done annually. However, if you are
cleaning the flue yourself first allow the fire to go out and the Butler Multi to cool down. Remove the cowl
and rod the flue downwards from the roof. Remove the baffle to clean out the soot from the firebox.
Alternatively remove the baffle and rod the flue upwards, from inside, through the open firebox door.
 Loading...