

Wagan Power Dome NX User Manual
Item no. 2485
Artículo Nº 2485
User’s Manual
Manual de Usuario
www.wagan.com
Power Dome™ NX by Wagan Tech
1
© 2012 Wagan Corp oration
All Rights Reserved
Wagan Tech and wagan.com are trademarks used by Wagan Corp oration
User’s Manual—Read before using this equipment.
2
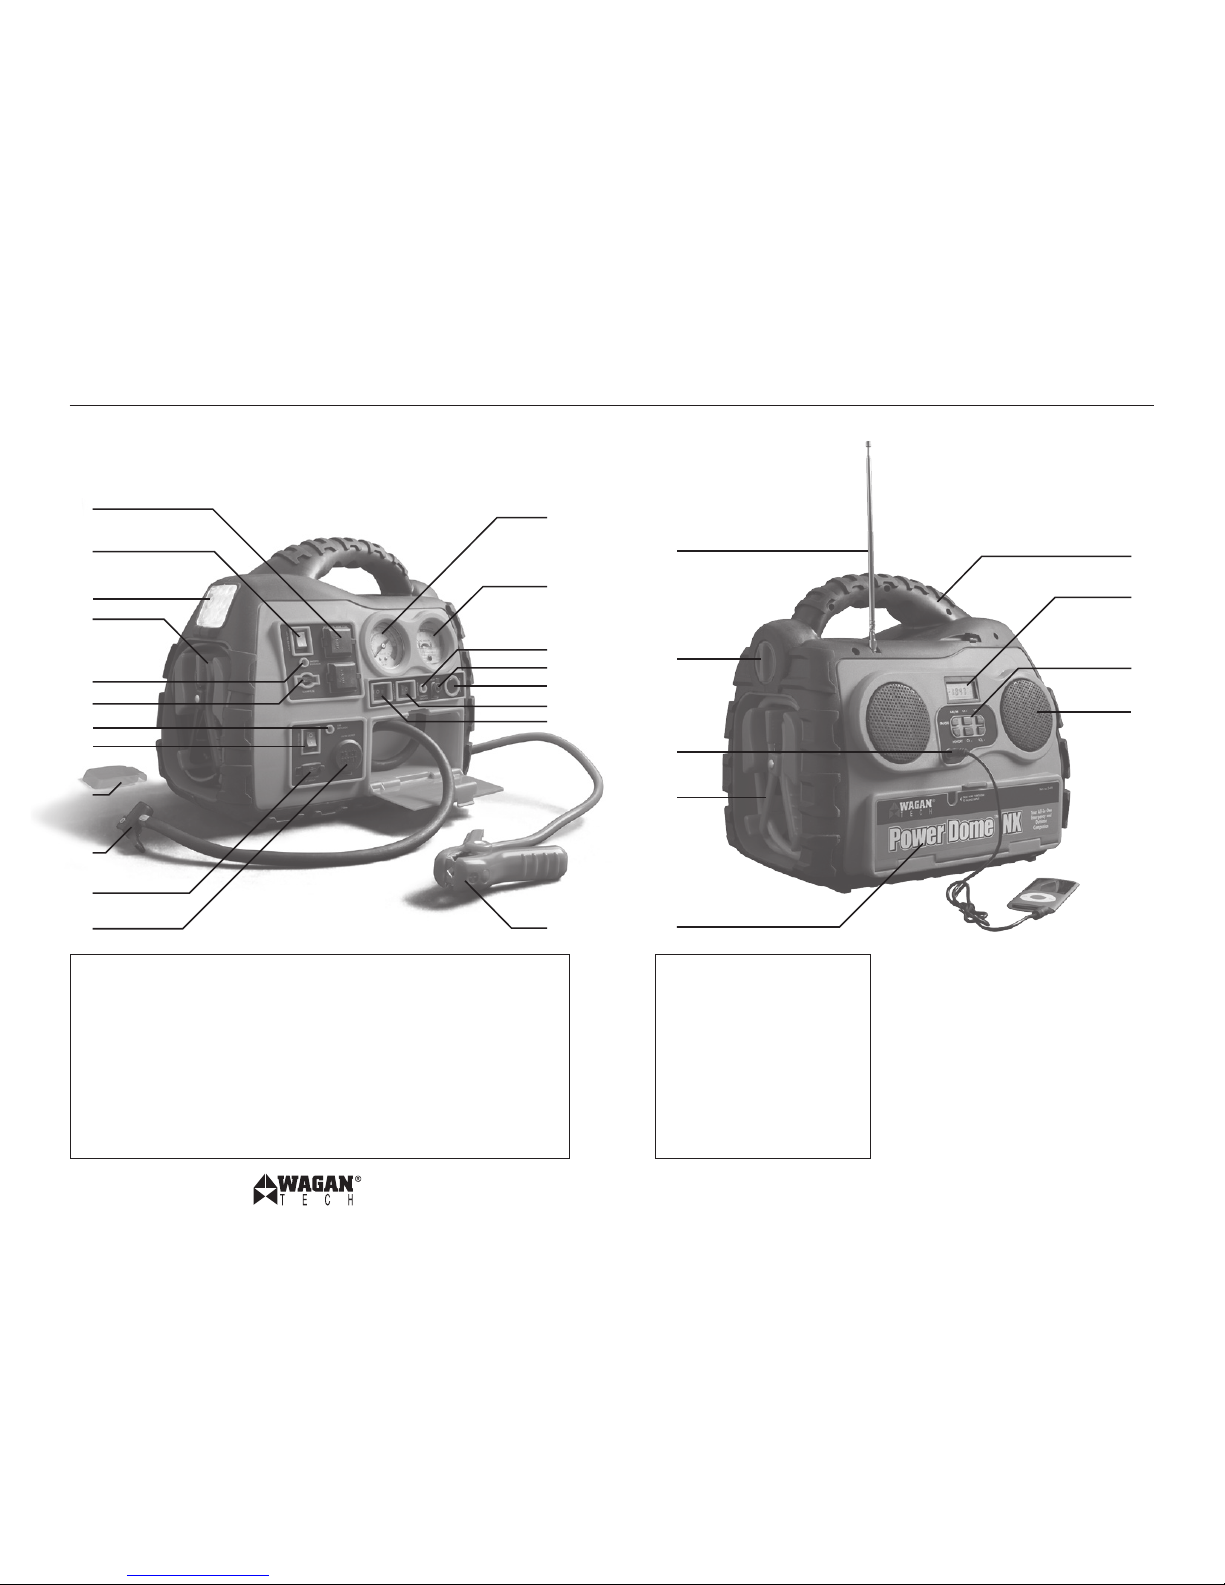
POWER DOME NX COMPONENTS
LEFT SIDE:
1. Inverter AC Outlets
2. Inverter ON/OFF Switch
3. Work Light
4. Black Negative (−) Jumper Cable
5. Inverter Power Indicator
6. 25 Amp Fuse
7. USB/DC Power Indicator
8. USB/DC Power Switch
9. Hazard Flasher Lens
10. Compressor Hose
11. USB Power Port
12. DC Power Port
13. Compressor Pressure Gauge
14. Battery Status Voltmeter
15. Charging Indicator
16. Charging Jack
17. Battery Check Button
18. Compressor ON/OFF Switch
19. Work-Light/Blinker/OFF Switch
20. Red Positive (+) Jumper Cable
13.
14.
15.
17.
16.
19.
18.
20.
1.
2.
3.
4.
5.
6.
7.
8.
9.
10.
11.
12.
RIGHT SIDE:
*MP3 player and Audio
Cable not included
21. Extendable Antenna
22. Jump Starter Safet y Switch
23. 3.5mm Audio Input Jack
24. Red Positive (+) Jumper Cable
25. Storage Compartment
26. Rubber Handle
27. Clock Radio LED Display
28. Clock Radio Controls
29. Speakers
26.
27.
28.
29.
21.
23.
22.
24.
25.

www.wagan.com
Power Dome™ NX by Wagan Tech
3
© 2012 Wagan Corporation
All Rights Reserved
Wagan Tech and wagan.com are trademarks used by Wagan Corp oration
User’s Manual—Read before using this equipment.
4
Thank you for purchasing the Power Dome™ NX by Wagan Tech. This product has been
carefully engineered and manufactured to operate dependably. Keep this manual on file for
future reference.
PLEASE READ AND UNDERSTAND ALL WARNINGS, CAUTIONS, AND NOTES INCLUDED IN
THIS MANUAL. FOLLOW INSTRUCTIONS PROVIDED BY YOUR VEHICLE MANUFACTURER AND
OTHER MANUALS FOR ANY DEVICE INTENDED TO BE USED WITH THIS UNIT.
FEATURES
• 500 Cranking Amp jump starter with heavy duty cable and clamps
• 260 PSI high flow air compressor for inflating tires and accessories
• Easy to read analog pressure gauge
• 200 watt power inverter (500 watt peak surge)
• Two 110 volt AC outlets
• One 12 volt accessory outlet for powering DC appliance loads to 11 Amps
• One USB power port for charging/operating cell phones, PDAs and MP3 players
• AM/FM radio with built-in speakers
• 3.5mm Audio input jack for external music players
• Bright 9 LED area light
• Hazard Flasher Lens and blinking mode for light
• AC recharging adapter
• DC recharging adapter
• Easy to read analog voltmeter for checking battery status
WARNINGS
• Do not attempt to remove or replace the battery used in this device. When
the battery has reached the end of its lifetime, please take the entire unit to a
battery recycling facilit y.
• Use only the provided chargers, cables and clamps. Unauthorized parts may
damage the unit.
• This product has no consumer serviceable parts, other than the 25A fuse.
• For proper and safe operation of the 12 Volt DC power accessory outlet, do
not place anything in it except the plug of the accessory to be used.
BATTERY CHECK
The Battery Check button provides the user with the current state of charge on the internal
battery. It is the user’s responsibility to periodically monitor the battery charge and to
recharge the batter y after each use. Recharge every three months even if the Power Dome is
not used.
1. Make sure charging adapters are unplugged.
2. Press and hold the BATTERY CHECK button.
3. The Battery Check meter (DC Voltmeter) will display the battery voltage.
4. Battery status (voltage) is read with charging adapters disconnected.
• 12.6V DC and above: battery is ready for use
• 12.0V DC and below: battery needs charging
• Below 10.5V DC: battery is discharged, charge immediately
CHARGING THE POWER DOME NX AT HOME WITH AC POWER
Only use the AC charging adapter supplied with this unit.
• Make sure all Power Dome switches are set to OFF.
• Open the dust cover on the Charging Jack.
• Connect the AC Charging Adapter to the AC outlet.
• Plug the Charging Adapter’s cord into the Power Dome’s Charging Jack.
• The Charging Indicator will light up during the charging process.
• Initial AC charge can take up to 48 hours.
• DO NOT charge for more than 48 hours.
• After charging the battery, disconnect the adapter from the AC outlet first, then from
the charging jack.
• Replace the dust cover on the charging jack.
CHARGING THE POWER DOME NX IN YOUR VEHICLE WITH DC POWER
Only use the DC charging adapter supplied with this unit.
• Note that the engine must be running while charging the Power Dome.
• Make sure all Power Dome switches are switched OFF.
• Open the dust cover on the Charging Jack.
• Plug the Charging Adapter’s cord into the Power Dome’s Charging Jack.
• Plug the DC Charging Adapter into an accessory outlet (cigarette lighter).
• The Charging Indicator will light up during the charging process.
• DO NOT charge more than 16 hours through the DC outlet.

www.wagan.com
Power Dome™ NX by Wagan Tech
5
© 2012 Wagan Corporation
All Rights Reserved
Wagan Tech and wagan.com are trademarks used by Wagan Corp oration
User’s Manual—Read before using this equipment.
6
• After charging the battery, disconnect the adapter from the accessory socket first,
then from the charging jack.
• Replace the dust cover on the charging jack.
DC TO AC POWER INVERTER
The Power Dome’s inverter can operate most AC appliances or a combination of appliances
up to 200 watts. Operating time is dependant on the AC load (watts) and the charge
and condition of Power Dome’s internal battery. Reduced AC loads and a full charge on
the battery will result in longer operating time. Be sure to turn off or disconnect any AC
appliance not in use. There is a user replaceable 25 amp automotive type fuse below the
inverter ON/OFF switch. This fuse protects the inverter from an unlikely excessive input
current. Ordinary overloads will cause the inverter to automatically shut down. Reduce the
load and restart the inverter.
USING THE POWER INVERTER
CAUTION: Some rechargeable devices are equipped with a separate AC charger. These
devices are likely to operate properly with this inverter. Rechargeable devices that have builtin chargers, on the other hand, may not be compatible with this type of inverter (see device
owner’s manual).
Some motorized devices may operate at excessively elevated temperature when used
with this inverter. During first use with this inverter, check for excessive motor temperature.
Abnormally elevated temperature of the device is an indication that they should not be
used with this inverter.
1. Open the AC outlet dust cover.
2. Connect the AC appliance or appliances to either AC outlet.
3. Turn on the inverter by switching the Inverter’s ON/OFF switch to the ON “|”
position.
4. If the Inverter Power Indicator LED light is green, the inverter is operating.
5. Turn on one AC appliance and observe the Power Indicator.
• If the LED remains green, then turn on the second appliance.
• If the Power Indicator remains green, then both
appliances are operating properly.
• If the Power indicator LED is not lit, then reduce the AC load. If the
inverter is still not operating, refer to the troubleshooting table at the
end of this User’s Manual.
6. After use, remove the appliances from the plugs.
7. Replace the Inverter dust covers and switch the Inverter Power Switch to the OFF
“O” position.
8. Recharge the Power Dome as soon as convenient.
DC POWER PORT
The DC Power Port (accessory socket) is located to the left of the Air Compressor Hose
Compartment. The port can power a DC load up to 11 Amps. Overloading the port results
in “tripping” and self-resetting circuit breaker. Removing the overload automatically restores
power to the DC power port.
1. Uncover the dust cover from the Power Port.
2. Turn the DC/USB Power Switch (next to the DC power port) to the ON “|” position.
Maker sure the LED next to the switch is lit.
3. Insert the 12V DC accessor y plug into the Power Port.
4. Operate the appliance as usual.
5. After use, disconnect the accessory plug from the Power Port
and store the accessory.
6. Replace the Power Port’s dust cover and switch the DC/USB Power Switch to the
OFF “O” position.
7. Recharge the Power Dome as soon as convenient.
USB POWER PORT
1. Uncover the dust cover from the Power Port.
2. Turn the DC/USB Power Switch (next to the DC power port) to the ON “|” position.
Maker sure the LED next to the switch is lit.
3. Insert the USB plug into the Power Port.
4. Operate the appliance as usual.
5. After use, disconnect the USB plug.
6. Replace the Power Port’s dust cover and switch the DC/USB Power Switch to the
OFF “O” position.
7. Recharge the Power Dome as soon as convenient.
AM/FM RADIO
The Radio can receive frequencies in the standard AM and FM broadcast bands (AM
520–1710 kHz, FM 88–108 MHz). An extendable rod antenna provides adequate signal
to receive all local radio stations. When not in use, the antenna should be stored in the
retracted position. This will prevent damage to the antenna while Power Dome is being
moved. All Radio controls are conveniently located in one area.
NOTE: All AM band radios are subject to receiving noise interference from electronic
devices, static lightning strikes and some motorized equipment. If you are operating the
Power Dome inverter and noise is being received on the AM band, either turn OFF the
inverter or change the radio to receive the FM band.
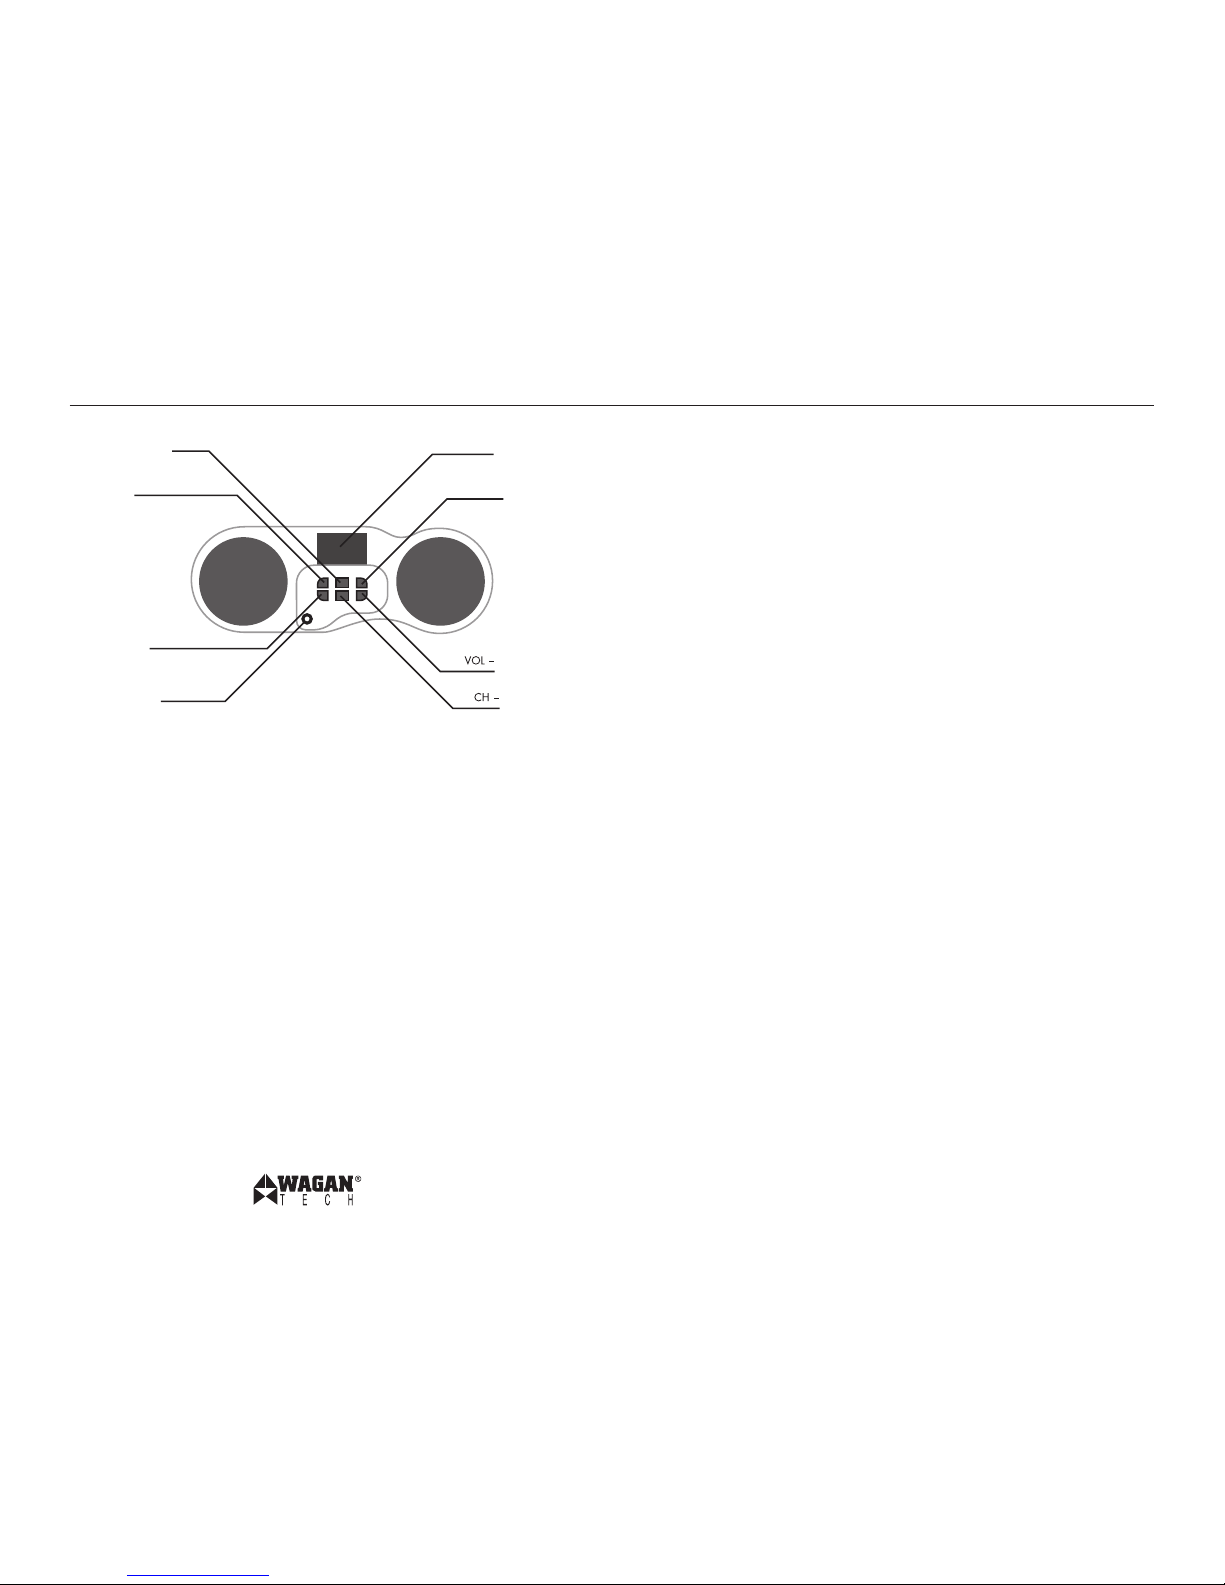
PWR/BAND
CH +
Audio Input
Memory
VOL +
LED screen
www.wagan.com
Power Dome™ NX by Wagan Tech
7
© 2012 Wagan Corporation
All Rights Reserved
Wagan Tech and wagan.com are trademarks used by Wagan Corp oration
User’s Manual—Read before using this equipment.
8
TURNING ON AND TUNING THE RADIO
1. Carefully raise and extend the antenna.
2. Press and hold the PWR/BAND button for at least 1 second to turn the radio on.
The current frequency is displayed, with the AM/FM band shown in the corner.
3. Tap the PWR/BAND button quickly to switch between AM and FM bands.
4. Tap the CH + and CH − buttons to adjust the station. Press and hold the buttons to
automatically scan stations.
5. Tap the MEMORY button to switch to your station preset. Continue pressing the
button to cycle through each preset. See the section on setting radio station presets
on the next page.
6. When finished, press and hold the PWR/BAND button for at least 1 second to turn
off the radio and return to Clock Mode. Carefully retract the antenna and return it
to the lowered position.
ADJUSTING THE VOLUME
1. With the radio turned on, Tap the VOL + and VOL − buttons to adjust the volume.
Press and hold the buttons to adjust the volume quickly. The radio can be adjusted
by 32 levels.
2. When using an external audio device in the Audio Input Jack, the volume will be
controlled by the external device.
SETTING THE CLOCK
1. With the radio off and the Display showing in Clock Mode, press and hold the
MEMORY button for at least 1 second.
2. The clock display will flash and enter Clock Set Mode.
3. Tap the CH + button to increase the hour. Hold the button continuously to increase
the adjustment speed. The display will switch from AM to PM and PM to AM
appropriately.
4. Tap the CH − button to increase the minutes. Hold the button continuously to
increase the adjustment speed.
5. Tap the MEMORY button again to confirm the new clock time, returning to regular
Clock Mode.
SETTING RADIO STATION PRESETS
1. While the radio is playing, press and hold the MEMORY button for at least 1
second to record the current station as a preset.
2. When the “M” on screen flashes, tap the MEMORY button repeatedly to select the
desired memory position between 1–10.
3. Press and hold the MEMORY button once more to confirm the station preset at that
position. The radio will switch back to regular Radio Mode.
4. Repeat steps 1 to 3 for each desired preset.
5. When using the radio, tap the MEMORY button to select a preset. The current
preset is displayed on screen with the “M” and the preset number 1–10.
6. The radio can hold up to 10 AM or 10 FM station presets in memory. If presets are
stored for AM, then the FM presets will be lost. The same applies for FM presets
replacing AM ones.
3.5MM AUDIO INPUT
1. Turn the radio on.
2. Insert a 3.5mm audio cable into the audio input jack.
3. The opposite end of the cable should be plugged into a compatible audio device.
4. Turn on the audio device and set it to output sound. The sound should be audible
from the Power Dome speakers.
5. The Power Dome’s USB Power Port can conveniently power your audio device.

www.wagan.com
Power Dome™ NX by Wagan Tech
9
© 2012 Wagan Corporation
All Rights Reserved
Wagan Tech and wagan.com are trademarks used by Wagan Corp oration
User’s Manual—Read before using this equipment.
10
USING THE AIR COMPRESSOR
The Air Compressor can inflate a variety of tires and inflatable equipment. It can provide
inflation pressure up to 260 PSI (pounds per square inch). Be careful not to over-inflate by
monitoring the compressor gauge while inflating. The Compressor’s ON/OFF switch is
located above the compressor hose and nozzle compartment.
CAUTION: Never connect or disconnect the nozzle with the compressor operating.
1. Before inflating any tire, look for the recommended inflation pressure information
on the inside of the car door.
2. Open the compartment door on the side of the Power Dome and extend the hose.
3. Position the Power Dome so that you can see the Pressure Gauge.
4. Make sure the chuck lever is positioned UP (away from the chuck opening).
5. Remove the valve cap from the valve stem.
6. Attach the chuck to the tire’s valve stem and move the chuck lever DOWN to secure
the chuck to the valve stem.
7. Turn compressor switch to the ON position.
8. Monitor the pressure gauge while inflating the tire.
9. When the recommended tire pressure has been reached, turn the compressor OFF.
10. Disconnect the hose and replace the valve cap.
11. Store the hose in the Air Hose compartment.
12. Recharge the Power Dome as soon as convenient.
JUMP STARTER WARNINGS
• CAUTIONS: Lead-acid batteries can release explosive gasses. Failure to follow
instructions may cause property damage, explosion hazard and/or personal injury.
• This product is not a toy. Keep out of the reach of children.
• Do not smoke while using the jump starter.
• Make sure that someone is available to give assistance if needed.
• Do not operate this device while wearing vinyl clothing. Friction can cause static
electricity sparks. Remove any metallic jewelr y, such as rings, bracelets, necklaces
and watches while working with a lead acid battery. It can produce a short-circuit
that may cause severe burns.
• Wear complete eye and clothing protection. Do not touch your eyes while working
near or with the battery.
• Keep battery terminals clean. Be careful to keep corrosion from coming in contact
with your eyes.
• Jump start vehicles or boats in well ventilated areas.
• Do not operate this unit submerged in or around water. Water can damage the unit.
• Do not let the cords of the jump starter or attached appliances get wet.
• This product is not intended for use in the rain or temperatures above 130° F.
• Never attempt to charge or jump start a frozen battery.
• To prevent short-circuits, power arcing, and/or explosions, never allow the metal
ends/tips of the black and red clamps (positive and negative terminals) to touch
each other or connect to the same piece of metal.
• After use, turn OFF the Power Safety switch.
• Excessive engine cranking can damage the vehicle’s starter motor. If the engine
fails to start after the recommended number of attempts, discontinue the jump start
procedure and look for other problems that may need to be corrected.
JUMP STARTING:
1. Review the Jump starter warnings.
2. Make sure all vehicle appliances, lights, radio, etc. are turned OFF.
3. Make sure the vehicle’s brake is set and the transmission is in park.
4. Make sure all Power Dome switches are OFF.
5. Securely connect the Red (+) cable clamp to the vehicle’s Positive (+) battery
terminal.
6. Connect the Black (-) cable clamp to a non-moving part on the vehicle.
* If the vehicle to be started has a Positive Grounded System (positive battery terminal
is connected to chassis):
i. Connect the negative (−) black clamp to the vehicle battery’s negative terminal.
ii. Connect the positive (+) red clamp to the vehicle chassis or a solid, non-moving,
metal vehicle component or body part. DO NOT clamp directly to the positive
battery terminal or moving parts.
7. Switch ON the Jumper Safet y Switch located at the back of the Power Dome.
8. Inside the vehicle, turn on the ignition switch and attempt to start the engine.
9. Crank for a maximum of three seconds. If the engine does not start, wait three
minutes before the next attempt.
10. After the engine starts, turn OFF the Jumper Safety Switch.
11. Disconnect the Black Clamp first, and then disconnect the Red Clamp.
12. Be sure that the cables and clamps are securely stored.
13. Recharge the Power Dome as soon as convenient.
NOTE: If the engine does not start, there may be a problem other than a discharged battery.
Call for service.
 Loading...