

Page 1

User Manual
All-in-One Solar
Courtyard / Street LED Light
Item No. 8581
Page 2

Assembling bolt
Washer
Bracket
ON/OFF switch
PIR
Light panel
Nut
Solar panel
Features:
1. Smart Remote Control Function to satisfy different customer use.
3 main lighting mode as below
a). Constant brightness all the time (100%/60%/30%/10%)
b.) Dim lighting + motion sensor (30 seconds 100% High
brightness)
c.) Timer lighting mode (8 Option)
2. ALS (Adaptive Lighting System) to achieve all night lighting when Weather
change. Constant current output!
3. VFT (Variable Frequency Technology) to control and adjust the LED driver
frequency to reach the max output of LED and battery.
4. TCS (Temperature Control System) to protect the battery charging and
discharging in high temperature.
5. 10 hour full charge the battery by Standard sunlight. Once the battery are
fully charged, it can support 3 night lighting.
Page 3

Specifications
Solar Panel
LED
Charging Time
Lighting Mode
Lighting Time
PIR Sensor
IP Rating
Install Height
Material
Size
Warranty
Charging Temp
Discharging Temp
Storage Temp
14V, 22.7W
80 LED's, 4,500 lumens
9-10 hours
1. Constant brightness all the time
(100%/60%/30%/10%)
2. Dim lighting + Motion Sensor
(30 sec 100% High brightness)
3. Timer lighting mode
(1H/2H/3H/4H/5H/6H/7H/8H, 8 options)
More than 3 nights
5~8m, 120˚
Waterproof IP65
4-6 m
Aluminum alloy + steel glass
1098*227*164mm
1 year
0~45˚
-20˚~60˚
0~45˚
Page 4
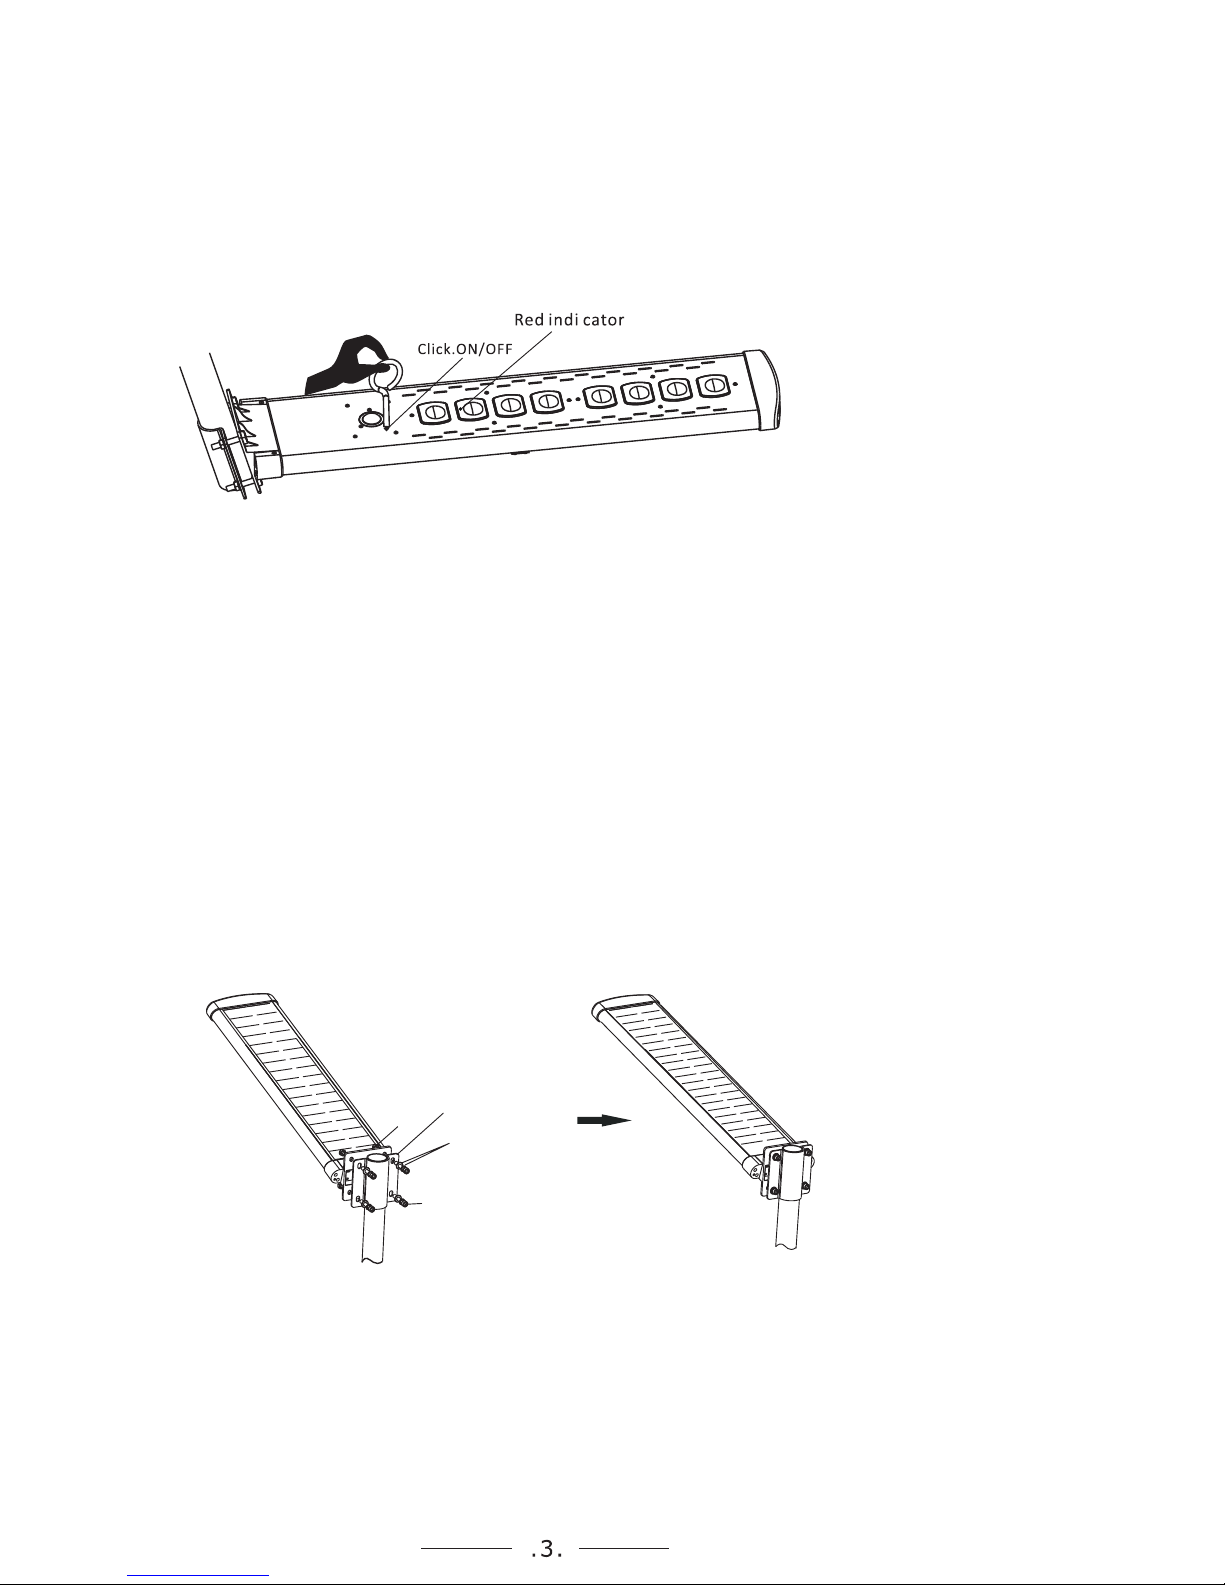
Nut
Bracket
Washer
Assembling bolt
Operating Instructions:
1 How to unlock the working system?
The internal battery is locked from factory for safety shipment, so users
have to use supplied key pin to click the "on/off" socket and unlock the
battery and lighting system.
Remark: Then use the supplied pin key to click
the "ON/OFF" hole, the red indicator turns on
means the lamp is unlocked and you can use the
remote controller; if no red indicator, means the
lamp is locked or no power.
If need to lock (turn off) the light, please use the pin to click the
on/off socket again.
2. How to install the device?
Please notice to install the light to the place without any shade and
better face to sun light directly for better charging.
For street/roadway lighting, we suggest to install 12-18m distance
between each light.
Page 5
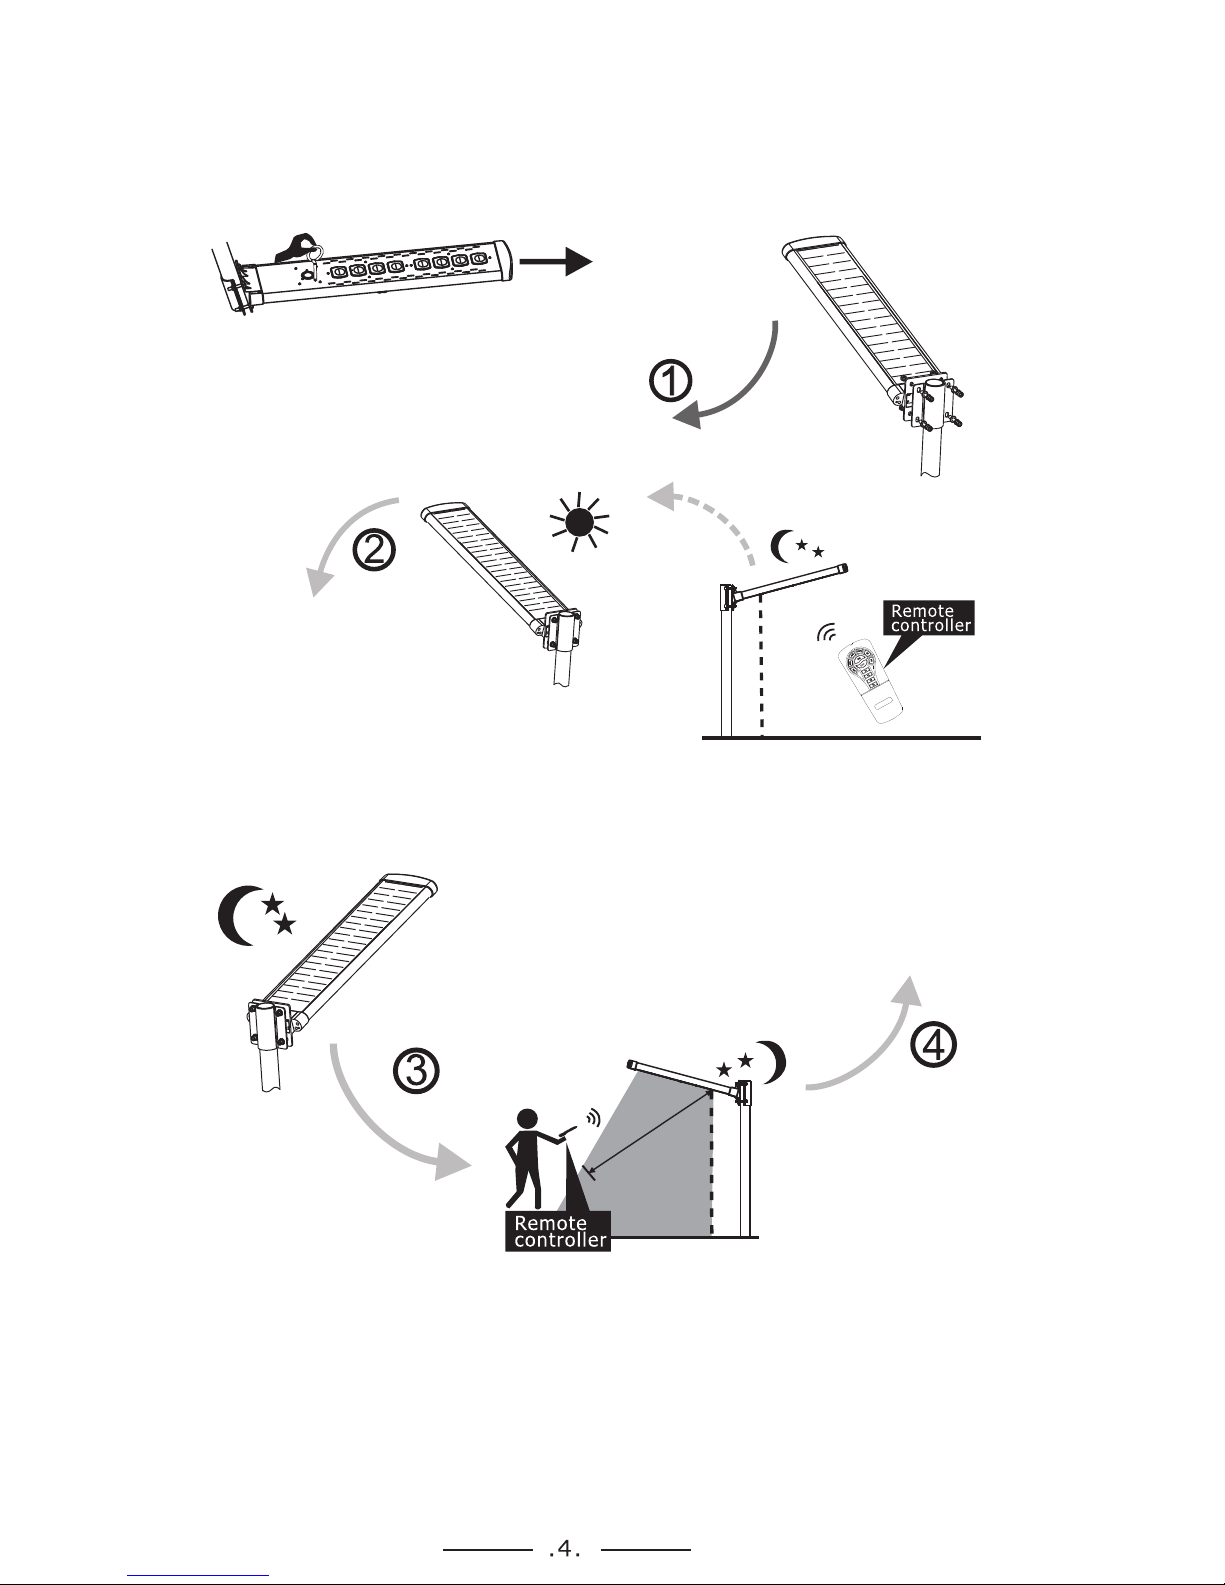
Working process instructions
Use the supplied key pin to click the
"ON/OFF" socket to unlock the battery
Please fasten the light to the
pole by the bolt
Step 1: Light switch off for
sun charging in daytime
Step 2: When the first time use, at
night, press the button "on" by
remote controller to turn on the
lamp, it will be the default lighting
mode (M1)---10% dim light when
no people around + PIR sensor
100% brightness for 30 seconds,
then turn to dim light again.
Step 4: After set M1 or M2 neutral lighting
mode, if you need to set other lighting
mode (brightness and timer mode), the
lamp will have memory function. In the next
day it will work with the same lighting mode
as we set up, and after the time is over,
then it will turn to default lighting mode M1.
Step 3: Use remote controller to choose M1 or M2 two neutral lighting mode
M1 (10% + PIR): 10% dim light when no people around + PIR sensor 100% brightness
for 30s, then turn to dim light again.
M2 (30% + PIR): 30% dim light when no people around + PIR sensor 100% brightness
for 30s, then turn to dim light again.
Notice: After choose M1 or M2, if do not press other button, it will keep the same mode
the second day.
Page 6
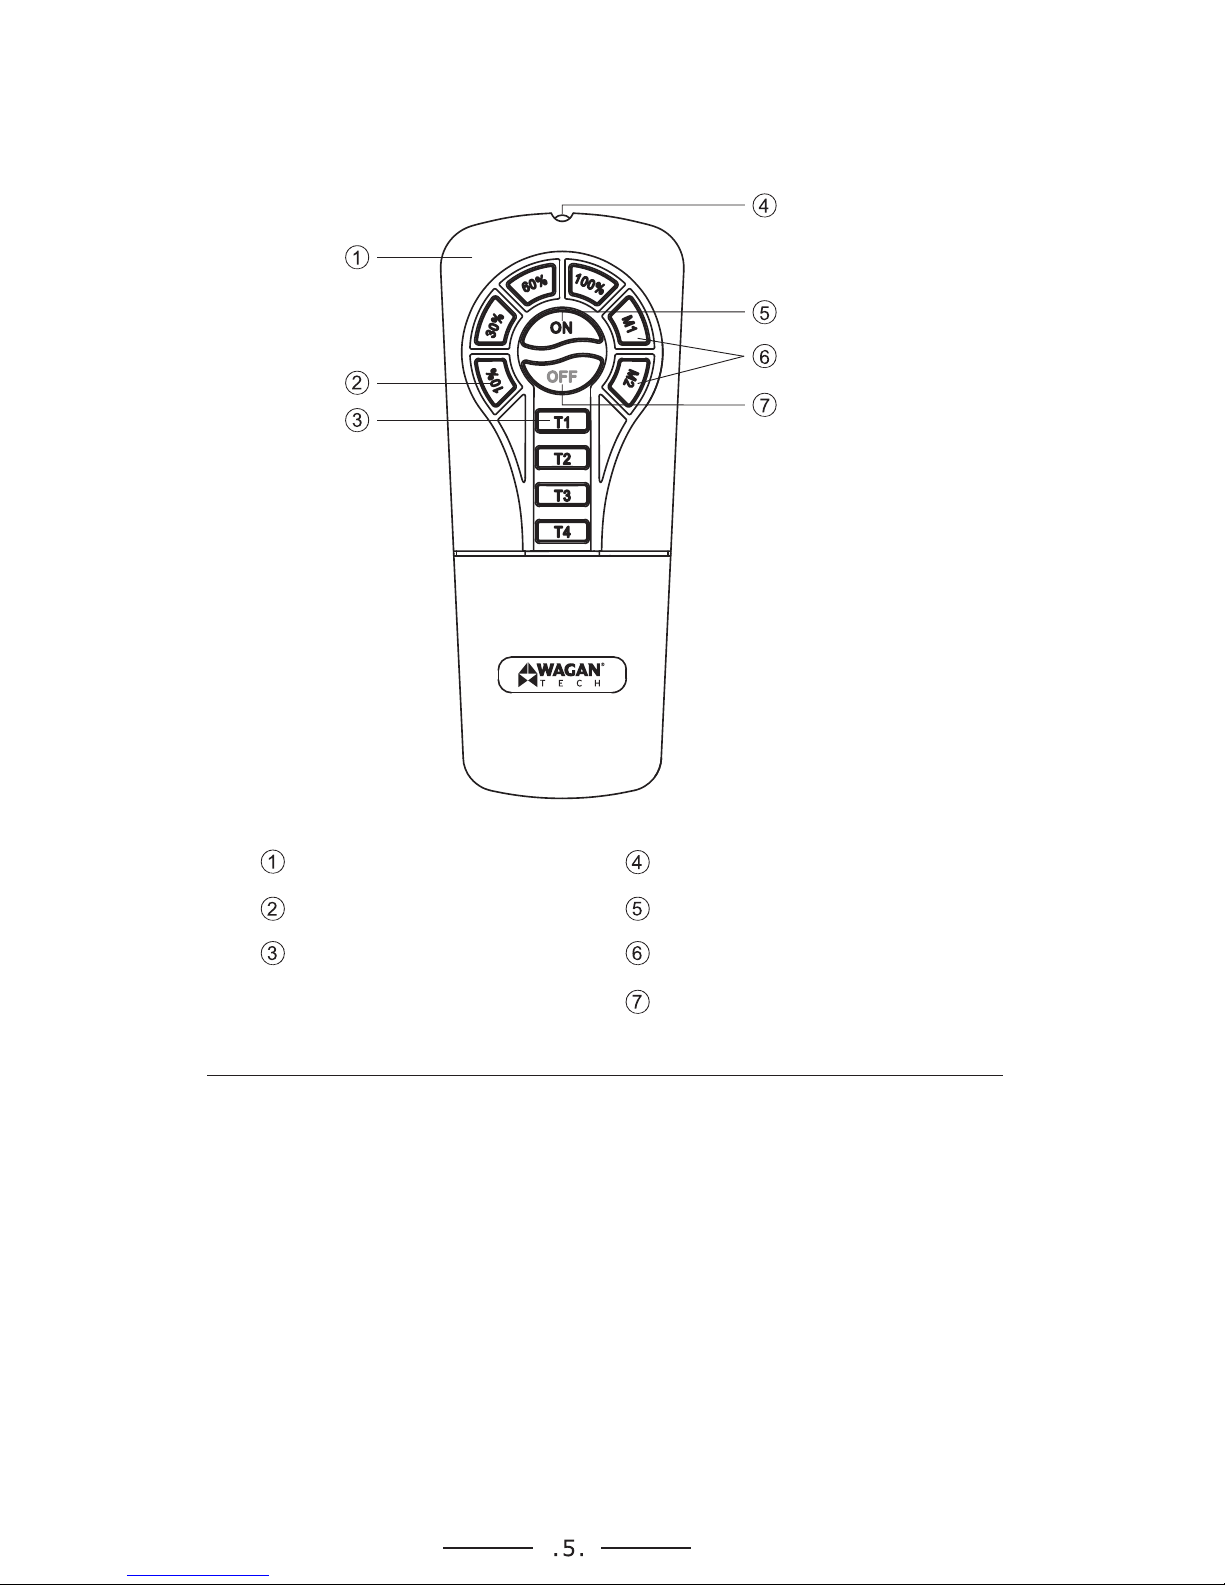
Remote controller
Indicator light
Brightness key
Timer key
Infrared transmitter
On key
M1/M2 PIR mode key
Off key
ON: Turn on the lamp, when you first time turn on the lamp, the initial
default lighting mode is M1.
OFF: Turn off the lamp and save the last lighting mode.
Page 7

Button 10%: To set brightness 10% for all the time till dawn, if you press
any buttons of T1~T4, the lamp will turn on M1 lighting mode after timer
end.
Button 30%: To set brightness 30% for all the time till dawn, if you press
any buttons of T1~T4, the lamp will turn on M1 lighting mode after timer
end.
Button 60%: To set brightness 60% for all the time till dawn, if you press
any buttons of T1~T4, the lamp will turn on M1 lighting mode after timer
end.
Button 100%: To set brightness 100% for all the time till dawn, if you
press any buttons of T1~T4, the lamp will turn on M1 lighting mode after
timer end.
T1: Set up 1 hour / 5 hours lighting time for the current brightness, after 1
hour it will auto turn back to M1 lighting mode.
(Long press any buttons of T2~T4 for 2S to cancel timer and the indicator
will quick flash 3 times.)
T2: Set up 2/6 hours lighting time for the current brightness, after 1 hour it
will auto turn back to M1 lighting mode.
(Long press any buttons of T2~T4 for 2S to cancel timer and the indicator
will quick flash 3 times.)
T3: Set up 3/7 hours lighting time for the current brightness, after 1 hour it
will auto turn back to M1 lighting mode.
(Long press any buttons of T2~T4 for 2S to cancel timer and the indicator
will quick flash 3 times.)
T4: Set up 4/8 hours lighting time for the current brightness, after 1 hour it
will auto turn back to M1 lighting mode.
(Long press any buttons of T2~T4 for 2S to cancel timer and the indicator
will quick flash 3 times.)
Page 8
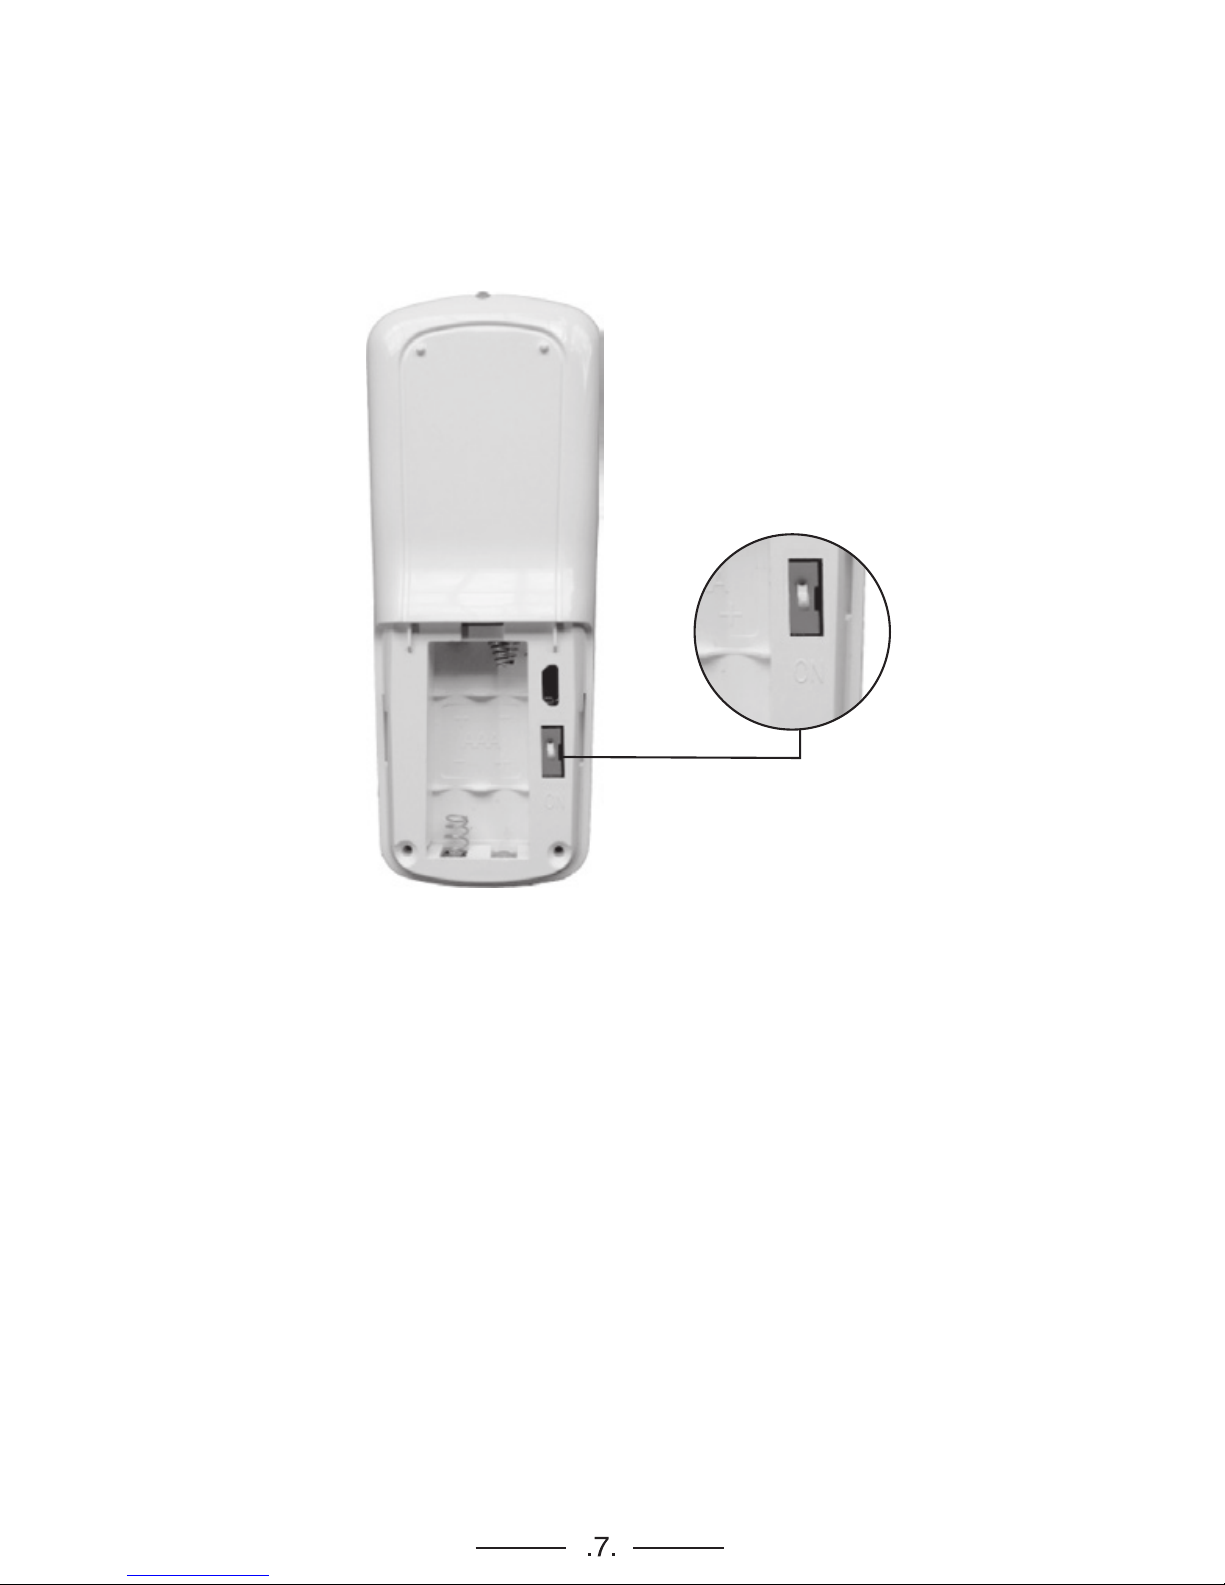
If you want to set up time to 5-6-7-8 hours, please pull the backside
button to "ON" position.
Button M1: 10% brightness + PIR (100% brightness for 30S delay and
10% dim light if no new motion happen)
Button M2: 30% brightness + PIR (100% brightness for 30S delay and
30% dim light if no new motion happen)
Indicator: Turn red when you press buttons
All the buttons have memory function: Means when you set up the
lighting mode and next days will follow the same lighting mode till you do
others setup.
ON
ON
Page 9
Special note:
1.) Please notice to unlock the battery and working system by supplied
Key Pin before install.
2.) Please give bright sunlight charging over 5 hours before first time use,
as the battery is very low from factory.
3.) If there is no good sunlight in 3 months, the battery may be out of
power so you have to charge it by bright sunlight, when it's fully
charged, please use supplied Key Pin to unlock the device and
lighting system, otherwise, it can't work anymore.
4.) If there is no good sunlight or in winter, especially in North countries,
it may take longer time to fully charge the device and this is very
normal for solar products.
5.) The matched pole diameter is 60mm.
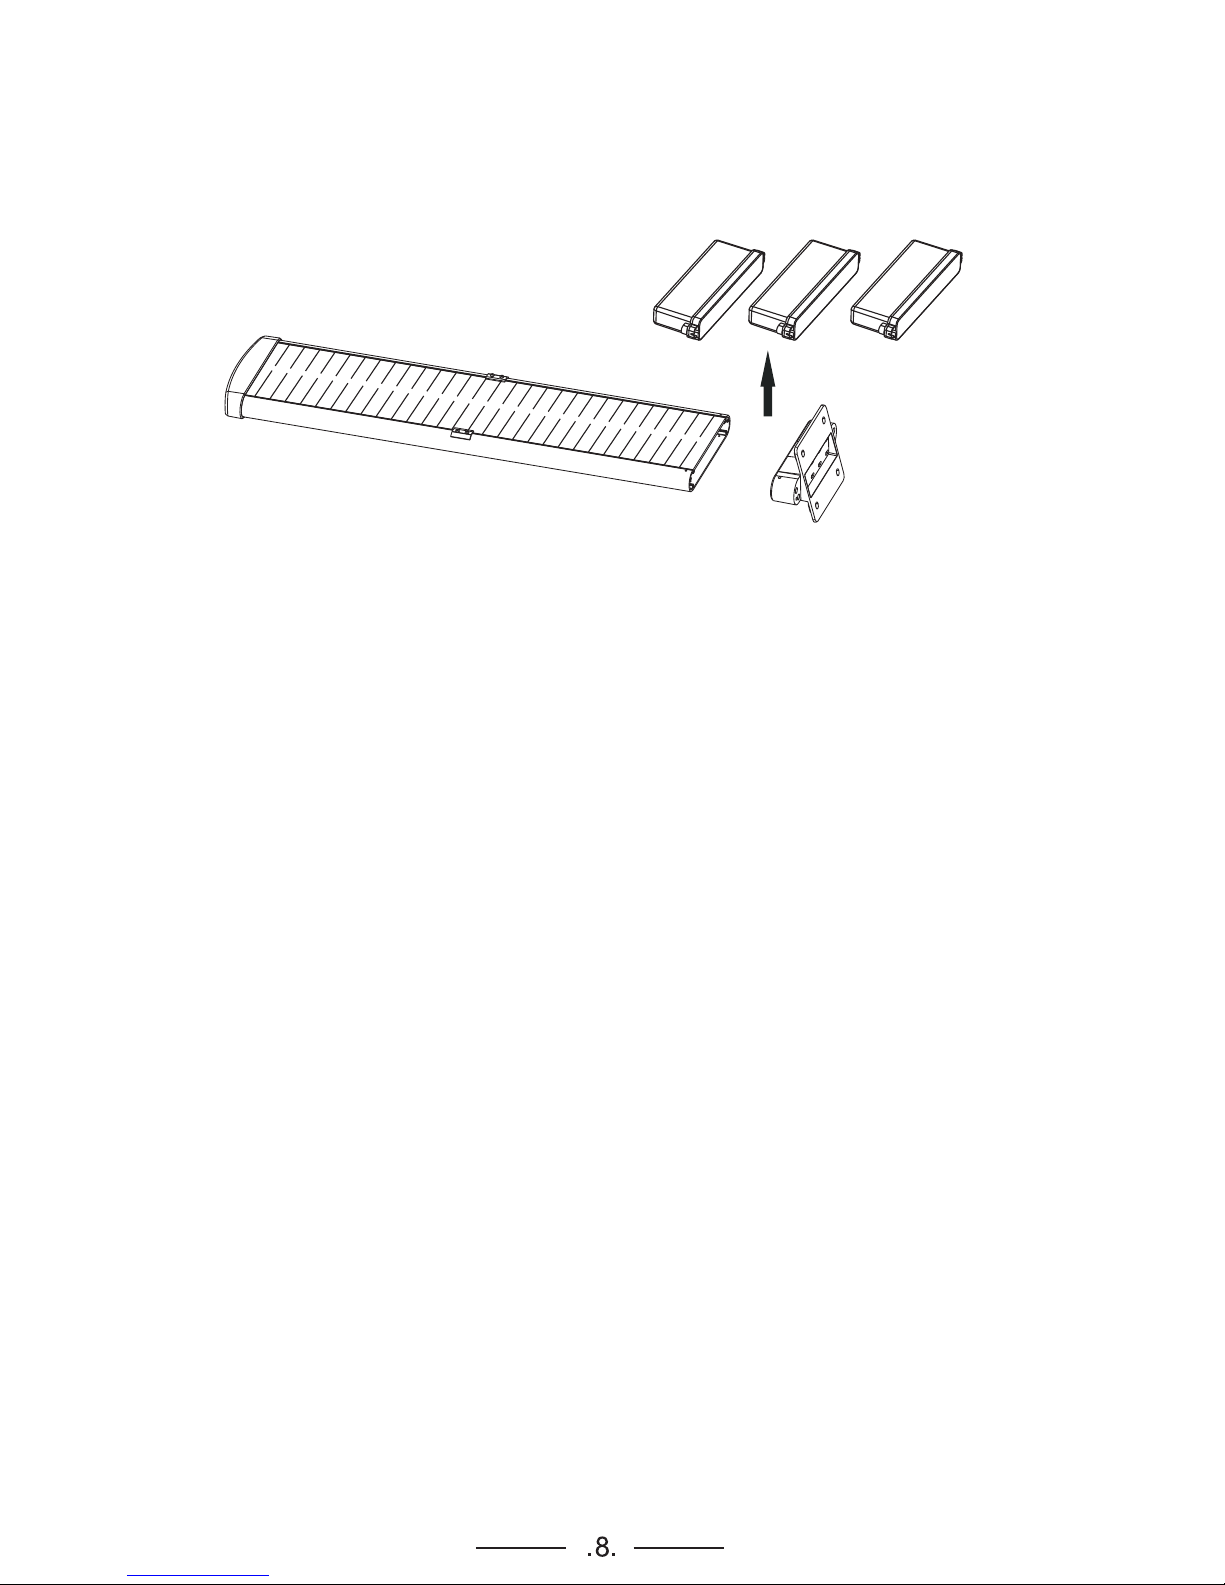
Replace the inside battery work as the picture when the
battery span life is in the end.
Page 10

Warning:
1. Keep the device away from fire and oil in order to avoid any fire or
explosion.
2. Any severe shock or smash to the light is not recommended.
3. No one except professional technicians should attempt to disassemble the
light in order to avoid damaging the light.
Package includes:
1. Key pin: 1pc
2. Assembling bolt: 4pcs
3. Nut: 4pcs
4. Remote controller: 1pc
Application:
Courtyard / Garden park / Street / Roadway / Pathway / Parking Lot /
Private Road / Sidewalk / Public square / Plaza / Campus / Airfield /
Farm & ranch / Perimeter security / Wildlife area / Remote area / Military base
 Loading...