

Page 1

Item #2467
Artículo #2467
with Air Compressor
300 Amp Battery Jumper
User’s Manual
Manual de Usuario
Arrancador de batería de 300 Amp
con Compresor de Aire
Page 2

www.wagan.com
300 Amp Battery Jumper™ with Air Compressor by Wagan Tech
1
© 2010 Wagan Corporation
All Rights Reser ved
Wagan and wagan.com are trademarks used by Wagan Corporatio n
User’s Manual—Read before using this equipment
2
Thank you for purchasing the 300 Amp Battery Jumper™ with Air Compressor by Wagan
Tech. With normal care and proper treatment it will provide years of reliable service.
IMPORTANT!
Please read all of the operating instructions carefully prior to use. It is import ant to
understand all warnings, cautions, and instructions included in this instruction manual, your
vehicle battery manufacturer manual, and other manuals for any device intended to be used
with this unit. Retain these instructions for future reference.
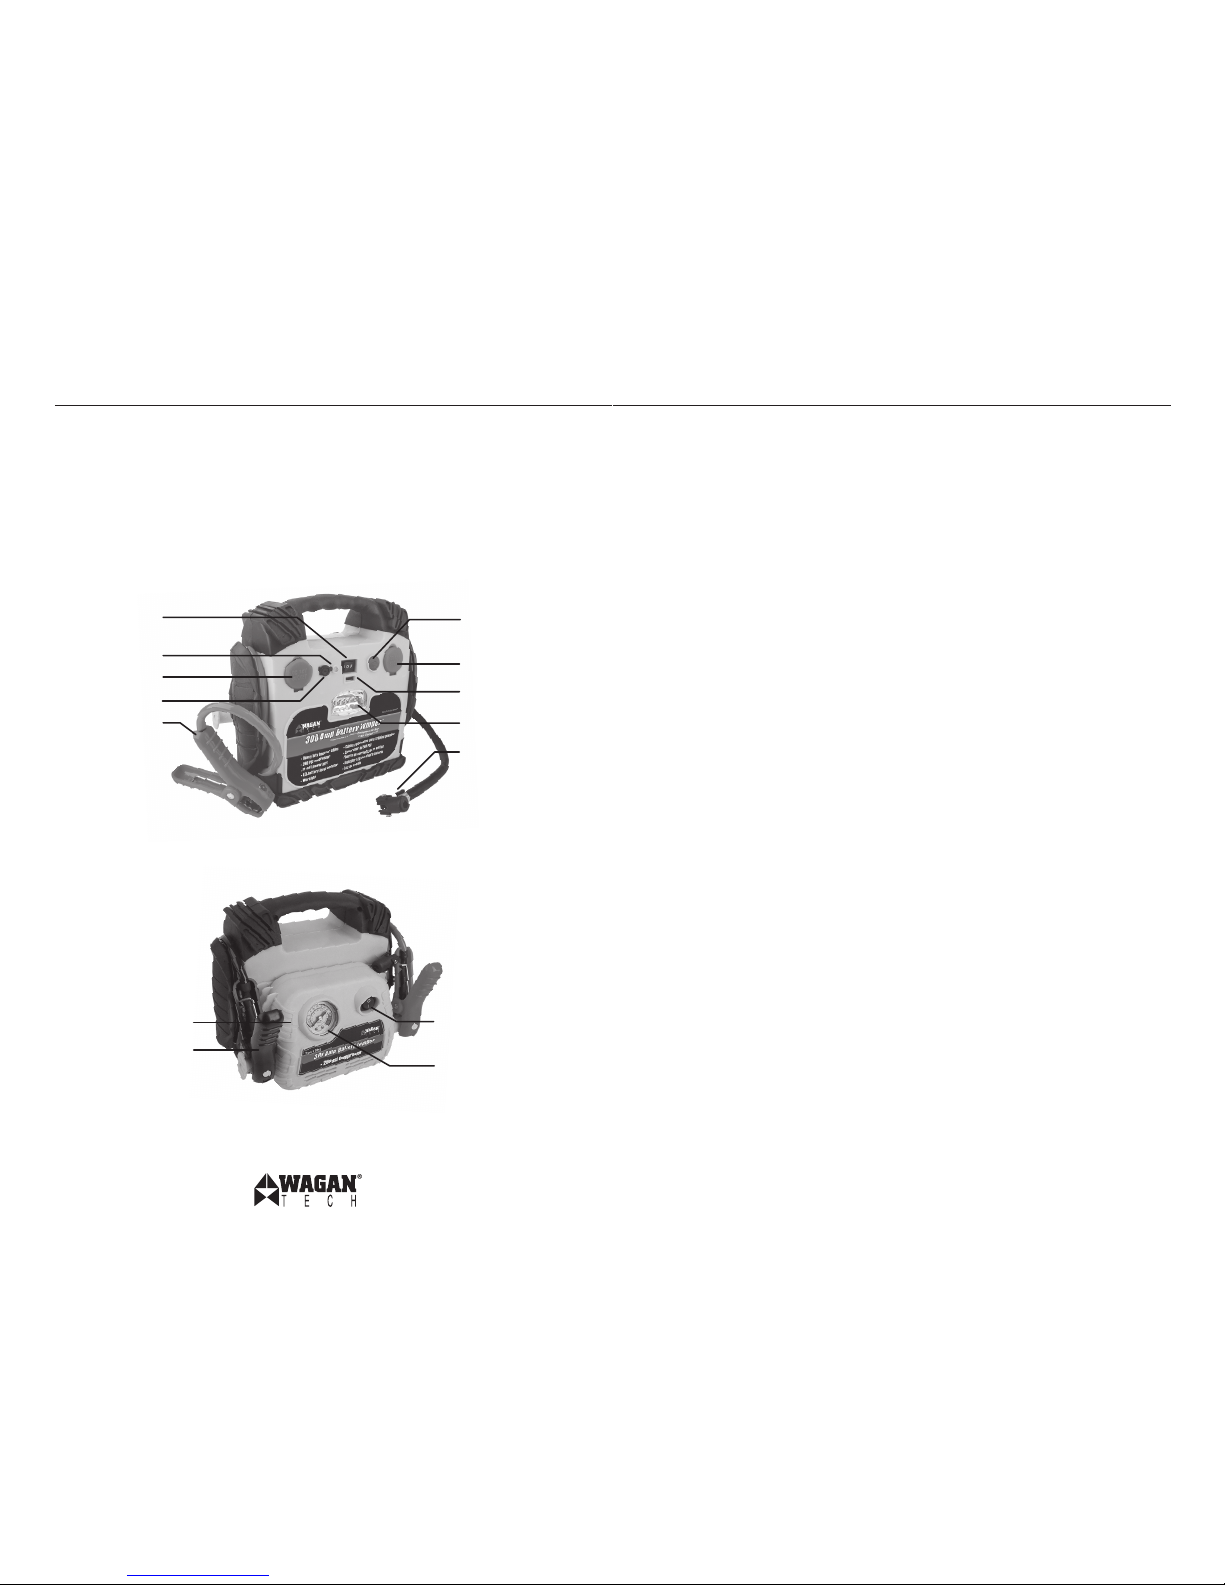
USB & work light
power switch
Charging indicator
12V DC socket
Charging Jack
Heavy duty
booster clamp
Battery check button
12V DC socket
USB Power Port
LED work light
Air hose
260 PSI air compressor
Heavy duty booster clamp
Air compressor power switch
Air compressor gauge
Cautions
• This product is NOT a toy. Keep out of the reach of children.
• Never work alone with this product. Make sure that someone is available to give
assistance if needed.
• Do not operate this device while wearing vinyl clothing. Static electricity may be
generated when vinyl clothing is rubbed.
• Remove any metallic jewelr y, such as rings, bracelets, necklaces, and watches
while working with a lead acid batter y. It can produce a short-circuit that may
cause severe burns.
• Wear complete eye and clothing protection. Do not touch eyes while working near
or with battery.
• Keep batter y terminals clean. Be careful to keep corrosion from coming in contact
with eyes.
• Do not operate this unit in or around water. Water can damage the unit.
• Do not let the cords of the jumpstarter or attached appliances get wet.
• This product is not intended for use in the rain or temperatures above 130°F.
• Never charge or jump- start a frozen battery.
• To prevent short-circuits and arcing, never allow the metal ends/tips of clamps
(positive & negative terminals) to touch each other or connect to the same piece
of metal.
• Do not attempt to remove or replace the battery used in this device. When
the batter y has reached the end of its lif etime, take the entire unit to a bat tery
recycling facility.
• Use only the provided chargers, cables, and clamps. Unauthorized part s may
damage the unit.
• This product has no consumer ser viceable parts.
• For proper and safe operation of the 12 Volt DC power accessory outlets, do
not place anything into it except the plug of the accessory to be used.
Charging and Recharging
WARNING: Do not overcharge this unit. Overcharging may result in damage to the unit.
Prior to charging unit, read and understand all instructions for this unit.
• This product may arrive p artially charged from the manufacturer. It is recommended
to fully charge the unit immediately af ter purchase and before first use.
Page 3

www.wagan.com
300 Amp Battery Jumper™ with Air Compressor by Wagan Tech
3
© 2010 Wagan Corporation
All Rights Reser ved
Wagan and wagan.com are trademarks used by Wagan Corporatio n
User’s Manual—Read before using this equipment
4
• The charging LED indicator will illuminate while charging. The light will stay
lit while charging plug is plugged in. When charging is complete, press the
“Battery Check” button and the “Battery Status” light will show the state of the
battery charge. When charging is complete, remove the AC/DC adapter from the
unit. Press the batter y status button and the green LED light will be illuminated to
indicate charging is complete.
• Do not charge the unit for more than 48 hours continuously.
• Do not charge the unit on a boat, boat ramp, or dock since the electrical cords
and outlets used for charging could cause severe electrical shock if they get wet.
• It is recommended that the unit is in an upright position while charging.
Charging with AC Charger:
1. Insert AC charger plug into charging jack of the unit.
2. Insert AC charger receptacle plug into AC receptacle.
3. Fully charge the unit.
• First time charge: 38 hours continuously
• Recharge or bet ween use: 34- 36 hours continuously
4. When charging is complete, unplug the AC charger receptacle plug then the AC
charger from the charging jack on the unit.
Charging with 12-Volt Charger:
1. Insert DC charger plug into charging jack of the unit.
2. Insert DC charger accessor y plug into vehicle cigarette lighter socket.
3. Fully charge the unit for 12-14 hours continuously while the engine is running.
4. When charging is completed, unplug the DC charger accessory plug first and
then the DC charger from the charging jack on the unit.
Jump-starting a Vehicle
WARNING: Vehicles equipped with on-board computers may be affected if the engine battery
is jump-started. Read your vehicle owner’s manual before attempting to start the vehicle to
determine if external starting assistance can be used. Failure to follow these instructions may
cause damage or explosion. Use safety glasses to protect eyes while jump-starting a battery.
1. Turn off the vehicle ignition and all accessories (e.g. radios, lights, air conditioners,
and cellular phones).
2. Set the emergency brake and put vehicles with automatic transmission in park
position.
3. Determine the polarit y of the vehicle’s battery terminals. The positive (POS, P,
+) battery terminal usually is larger in diameter than the negative (NEG, N, −)
terminal. If you are unsure, you should refer to the vehicle owner’s manual.
4. Determine whether your vehicle uses a negative or positive grounded system:
Negative ground system (negative battery terminal is grounded to chassis). Most
vehicles use this system. Positive grounded battery terminal is grounded to chassis
or any other part of the vehicle. IF YOU ARE UNSURE, YOU SHOULD REFER TO
VEHICLE OWNER’S M ANUAL.
5. Remove clamps from the holders. Never allow clamps (positive & negative
terminals) to touch together or contact the same piece of metal to prevent shortcircuits and arcing.
6. Follow instructions for a negative grounded system or positive grounded system as
indicated below:
Negative Grounded System
a. Securely connect the positive (+) red clamp to the positive (POS, P, +) terminal
of the vehicle battery or the remote positive (+) terminal if equipped.
b. Securely connect the negative (−) black clamp to the vehicle chassis, engine
block, or a non -moving metal part of the vehicle which is verified to be
grounded. Do not clamp directly to negative batter y terminal, carburetor,
fuel lines, or sheet metal body parts.
c. See jump-starting step 7 to continue.
Positive Grounded System:
a. Securely connect the negative (−) black clamp to the negative (Neg, N, −)
ungrounded terminal of the vehicle bat tery.
b. Securely connect the positive (+) red clamp to the vehicle chassis, engine
block, or a non -moving metal part of the vehicle which is verified to be
grounded. Do not clamp directly to positive bat tery terminal, carburetor, fuel
lines, or sheet metal body parts.
c. See jump-starting step 7 to continue.
7. Allow 2 to 3 minutes of charging time. It is recommended to have a second person
to assist holding the unit securely in place during the next steps.
8. Turn on the vehicle to attempt to start the engine. Stop if the vehicle does not start
after 4 to 5 seconds of engine cranking. Wait 3 to 4 minutes then try again. Repeat
several times until the vehicle starts.
CAUTION: Excessive engine cranking can damage vehicle starter motor. If the
engine turns, but fails to start after several attempts, other technical problems might
be involved. Discontinue cranking the engine until the other problems have been
determined and corrected.
Page 4
www.wagan.com
300 Amp Battery Jumper™ with Air Compressor by Wagan Tech
5
© 2010 Wagan Corporation
All Rights Reser ved
Wagan and wagan.com are trademarks used by Wagan Corporatio n
User’s Manual—Read before using this equipment
6
9. When finished, stand as far away from the vehicle batter y as possible and
disconnect the clamps in reverse sequence to connecting procedure:
• For negative grounded systems, first disconnect ne gative (black) then
positive (red) clamps.
• For positive grounded systems, first disconnect positive (red) then ne gative
(black) clamps.
Using the Air Compressor
WARNING: Check item to be inflated for manufacturer’s recommended maximum inflation
pressure. Avoid over inflation. Most tires are properly inflated between 24-35 PSI. Some truck
and bicycle tires require 40 PSI or more.
To Inflate Tires
1. Remove valve cap from air valve stem. Note: Make sure locking thumb lever is
in up position. If necessary, use valve stem adapter.
2. Insert stem connector to valve stem. Make sure connector is pushed into valve
stem as far as possible.
3. Press down the locking thumb lever to engage.
4. Set the compressor on/off switch (located next to the pressure gauge) to “on”
position by pressing down the section of switch marked “I”. Note: In the event
that the tire is completely flat, raise the vehicle using a recommended jack before
inflating the tire.
5. Monitor tire pressure on air pressure gauge. Note: It is recommended to use a
separate air gauge to check the actual inflation pressure. When desired pressure
is reached, turn off compressor, turn the locking thumb lever to up position, and
remove stem connector from valve stem. Also remove valve stem adapter
if applicable.
6. Replace valve cap on valve stem.
To Inflate Plastic Inflatable (balls, air mattresses, rubber rafts, etc.)
1. Check manufacturer’s specifications on the item to be inflated for correct
inflation pressure.
2. Remove valve cap cover from valve stem.
3. Insert proper valve stem adapter into stem connector as far as possible and
turn the locking thumb lever to down position.
4. Insert the other end of the valve stem adapter into inflatable air valve stem
as far as possible.
5. Set the compressor on/off switch (located next to the pressure gauge) to “I”
position.
6. Monitor air pressure on pressure gauge meter. When desired pressure is reached,
turn of f compressor, turn the lo cking thumb lever to up position, and remove stem
connector from valve stem. Also remove valve stem adapter if applicable. Replace
valve cap on valve stem.
DC Power Port
DC Power Por t (accessor y socket) can power a DC load of up to 11 Amps. Overloading the
port results in “tripping” a self-resetting circuit breaker. Removing the overload automatically
restores power to the DC Power Port.
1. Uncover the dust cover from the Power Port.
2. Insert the 12V DC accessor y plug into the Power Port.
3. Operat e the appliance as usual.
4. After use, disconnect the accessor y plug from the Power Port and store the
accessory.
5. Replace the Power Port’s dust cover.
6. Recharge the jump starter as soon as convenient.
USB Power Port
The USB Power Port is located above the LED light. Devices that require up to 5 volts at
500mA can be powered or recharged through a user-supllied cord.
Storage
This unit may be stored in any position. Make sure the clamps and air hose are securely
tucked away in their original positions. Store in a cool, dry area. If the unit is not used for
a prolonged period of time, recharge every 2 months in the winter and every month in the
summer.
Specifications
Power Supply Bat tery 12AH sealed lead acid
Power Supply DC Output 12-volts nominal
Air Compressor 260 PSI
Power Supply Charging Time 38 hours for first-time charging with AC charger
34-36 hours to recharge with AC charger
12-14 hours to recharge with 12-volt DC charger
Jumper Cable Length 29.5 inches/75 cm
Page 5
www.wagan.com
Arrancador de batería de 300 Amp de Wagan Tech
7
Manual de Usuario—Leer antes de utilizar este equipo
© Corpo ración Wag an 2010
Todos los derechos reservado s
WAGAN y Wagan.com son marcas registradas de la Corporación Wagan
8
Muchas gracias p or adquirir el Arrancador de Batería de 300 Amp con Compresor de Air
de Wagan Tech. Este le brindará años de servicio confiable si es tratado con el cuidado
apropiado.
¡IMPORTANTE!
Antes de utilizar su nuevo Arrancador de Batería de 300 Amp con Compresor de Aire, lea
y entienda todas las advertencias, precauciones y notas incluidas en este manual. Siga las
instrucciones proporcionadas por el fabricante de su vehículo y fabricante de los aparatos que
se proponga utilizar con esta unidad. Mant enga estas instrucciones para referencias futuras.
Precauciones
• Mantenga esta unidad f uera del alcance de los niños.
• Nunca trabaje sólo con este producto. Asegúrese de que alguien esté disponible para
darle asistencia si fuera necesario.
• No use ropa de vinil cuando este cargando la batería – la fricción puede causar
chispas estáticas de electricidad.
• Despójese de toda la joyería de metal, tales como anillos, brazaletes, collares y
relojes mientras trabaje con una batería de ácido de plomo. Puede producir un cortocircuito causando quemaduras severas.
• Utilice siempre gafas y ropa protectora. No se toque los ojos mientras este trabajando
cerca o con una b atería.
• Mantenga los terminales de las baterías limpias. Tenga cuidado de evitar que la
corrosión entre en contacto con los ojos.
• No opere la unidad en o cerca del agua. El agua puede dañar la unidad.
• No permita que los cables del arrancador o los aparatos adjuntos se mojen.
• Este producto no está destinado para su uso bajo la lluvia o temperaturas superiores
a 130 ° F.
• No intente cargar o arrancar una batería congelada.
• Para evitar corto-circuitos y chispas, nunca permita que las puntas de metal/las puntas
de las pinzas (terminales positivos y negativos) se toquen entre si o se conecten a la
misma pieza de metal.
• No intente quitar o reemplazar la batería utilizada en este disp ositivo. Cuando la
batería ha llegado al final de su vida, llevar toda la unidad a un centro de reciclaje
de baterías.
• Utilice solamente los cargadores, los cables y las pinzas suministrados con esta
unidad. Par tes no autorizadas podrían dañar la unidad.
• Este producto no tiene piezas recambiables.
• Para un funcionamiento correcto y seguro de los zócalos de corriente CC de 12V, no
coloque nada en él, excepto el enchufe del accesorio que se utilizara.
Interruptor para USB
& luz de trabajo
Zócalo para Carga CA
Zócalo de Corriente CC
Zócalo para Carga CA
Abrazaderas resistentes
para trabajos pesados
Botón de control
de la batería
Zócalo de Corriente CC
Puerto USB
Luz de trabajo
Manguera de aire
Compresor de aire 260 PSI
Abrazaderas resistentes
para trabajos pesados
Botón de Encendido
Apagado del Compresor
Calibrador del Compresor
Page 6

www.wagan.com
Arrancador de batería de 300 Amp de Wagan Tech
9
Manual de Usuario—Leer antes de utilizar este equipo
© Corpo ración Wag an 2010
Todos los derechos reservado s
WAGAN y Wagan.com son marcas registradas de la Corporación Wagan
10
Arrancando (Jumpstarting) un vehículo
PRECAUCION: los vehículos equipados con ordenadores a bordo pueden verse afectados si la
batería del motor es encendido utilizando el arrancador. Lea el manual de propietario del vehículo
antes de intentar arrancar el vehículo para determinar si se necesita ayuda externa para arrancar
el vehículo. El incumplimiento de estas instrucciones puede causar daños o explosiones. Utilice
gafas de seguridad para proteger los ojos, mientras arranca una batería.
1. Apague la ignición del vehículo y todos los accesorios (por ejemplo, radios, luces,
aire acondicionado y teléfonos celulares).
2. Ponga el freno de emergencia y poner los vehículos con transmisión automática en
posición de estacionamiento.
3. Determine la polaridad de los terminales de la batería del vehículo. El terminal
positivo (POS, P, +) de la batería por lo general es mas grande en diámetro que el
terminal negativo (NEG, N, −).
4. Determine si el vehículo utiliza un sistema ground positivo o ground ne gativo: sistema
ground negativo (el terminal negativo de la batería está conectado al chasis). La
mayoría de vehículos usan este sistema. El terminal positivo está conectado al chasis
o a cualquier otra parte del vehículo. SI NO ESTA SEGURO, CONSULTE SU MANUAL
DE PROPIETARIO DEL VEHICU LO,
5. Remueva las pinzas de los sostenedores. Nunca permita que las pinzas (terminales
positivos y negativos) se toquen entre si o se conecten a la misma pieza de metal para
evitar cortocircuitos y chispas.
6. Siga las instrucciones para un sistema grounded negativo o un sistema grounded
positivo a continuación:
Sistema grounded negativo
a. Conecte de forma segura la pinza roja positiva (+) al terminal positivo (POS, P, +)
de la batería del vehículo o al terminal remoto positivo si esta equipado.
b. Conecte de forma segura la pinza negra negativa (−) al chasis del vehículo,
motor bloqueado, o a alguna pieza de metal sin movimiento del vehículo
conectado a tierra. No conecte directamente a la terminal negativa de su batería,
carburador, líneas de combustible o láminas de metal.
c. Vea el paso 7 para continuar.
Sistema ground positivo
a. Conecte de forma segura la pinza negra negativa (−) al terminal negativo (Neg,
N, −) sin conexión a tierra de la batería del vehículo.
b. Conecte de forma segura la pinza roja positiva (+) al chasis del vehículo, motor
bloqueado, o alguna pieza de metal sin movimiento del vehículo que este
conectado a tierra. No conecte directamente al terminal positivo de la batería,
carburador, líneas de combustible o láminas de metal.
c. Vea paso 7 para continuar.
Carga y Recarga
ADVERTENCIA: no sobrecargue esta unidad. La sobrecarga puede provocar daños a la unidad.
Antes de cargar la unidad, lea y comprenda todas las instrucciones para esta unidad.
• Esta unidad puede llegar parcialmente cargada por el fabricante. Se recomienda
cargar la unidad por completo inmediatamente después de la compra y antes del
primer uso.
• El indicador de carga LED se iluminará durante el proceso de la carga. La luz
permanecerá encendida mientras el cargador esté enchufado. Cuando el proceso
de carga haya sido completado, pulse el botón “Battery Check” y la luz del botón
“Battery Status” mostrará el estado de la carga de la batería. Cuando el proceso
de carga este completo, remueva el adaptador CA/CC de la unidad. Pulse el botón
“Battery Status” y la luz verde LED se iluminará para indicar que la carga está
completa.
• No cargue la unidad por más de 48 horas continuas.
• No cargue la unidad en un bote, rampa para botes o muelles; ya que los cables
eléctricos y enchufes podrían causar fuer tes descargas eléctricas si se mojan.
• Se recomienda que la unidad este en posición ver tical durante el proceso de carga.
Cargando su unidad con un cargador de corriente CA:
1. Introduzca el cargador en el enchufe de corriente CA.
2. Introduzca el enchufe de corriente CA a un toma corrientes CA
3. Cargue completamente la unidad
• Carga por primera vez: 38 horas continuas
• Recarga o carga entre uso: 34 -36 horas continuas
4. Cuando cargue completamente, desenchufe el cargador del toma corrientes CA y
luego del enchufe de corriente CA.
Cargando con un cargador de 12-Volt
1. Introduzca el cargador en el puerto de corriente CC.
2. Inserte el enchufe del accesorio CC en el zócalo de accesorios de su auto
(encendedor de cigarrillos).
3. Cargue completamente la unidad por 12-14 horas continuas mientras el motor esté en
marcha.
4. Cuando haya completado la carga, primero desenchufe el cargador de accesorios
CC y luego desenchufe del puerto de corriente CC.
Page 7

www.wagan.com
Arrancador de batería de 300 Amp de Wagan Tech
11
Manual de Usuario—Leer antes de utilizar este equipo
© Corpo ración Wag an 2010
Todos los derechos reservado s
WAGAN y Wagan.com son marcas registradas de la Corporación Wagan
12
Para inflar plásticos inflables (pelotas, colchones de aire, balsas de goma, etc.)
1. Revise las especificaciones del fabricante del artículo para obtener la correcta presión
de inflado.
2. Remueva la tapa de la válvula de aire.
3. Inserte el adaptador de la válvula al conector de la válvula y luego presione la
palanca de bloqueo hacia abajo.
4. Inserte el otro extremo del adaptador a la válvula de aire del inflable lo más que
pueda.
5. Establezca el interruptor del compresor de aire a encendido/apagado (situado al
lado del medidor de presión) en la posición “I”
6. Controle la presión de aire en el medidor de presión de aire. Cuando se llega a la
presión deseada, apague el compresor, suba la palanca de bloqueo y retire el tubo
de conexión de la válvula. También quite el adaptador de la válvula si ha sido usado.
Reemplace la tapa de la válvula.
Puerto de Corriente CC
El puer to de corriente CC (zócalo de accesorios) se encuentra al lado izquierdo de la unidad.
Este puerto de corriente CC tiene una capacidad de carga de 11 Amps. Una sobrecarga en el
puerto puede resultar en un “disparo” un interruptor de circuito de restablecimiento automático.
La eliminación de la sobrecarga restaura automáticamente la energía para el puerto de
corriente CC.
1. Destap e el protector contra el polvo del puerto de corriente CC
2. Inserte el enchufe de 12V para accesorios en el puerto de corriente
3. Utilice el aparato como de costumbre.
4. Después de su uso, desconecte el enchufe del accesorio del puerto de corriente y
guarde el accesorio.
5. Vuelva a colocar el protector contra el polvo.
6. Recargue el jump starter tan pronto sea conveniente.
Puerto USB
El puerto USB esta localizado encima de la luz LED. LOs dispositivos que requieren un máximo de
5 voltios a 500mA se pueden alimentar o recargar a traves de un cable de usuario suministrado.
Almacenamiento
Esta unidad se puede almacenar en cualquier posición. Asegúrese de que las pinzas estén
protegidas dentro de las cubier tas del cable de refuerzo para almacenamiento. Conserve a
temperatura ambiente. Almacenar en un lugar fresco y seco. Si no se utiliza durante un período
prolongado de tiempo, recargue cada 2 meses en el invierno y todos los meses en el verano.
7. Permita de 2 a 3 minutos de tiempo de carga. Se recomienda tener a una segunda
persona para ayudar a sostener la unidad en su lugar de forma segura durante los
próximos pasos.
8. Encienda el vehículo para tratar de arrancar el motor. Deténgase si el motor del
vehículo no arranca después de 4 o 5 segundos. Espere de 3 a 4 minutos y luego
vuelva a intentarlo. Repita varias veces hasta que el vehículo arranque.
PRECAUCION: Los excesivos arranques pueden dañar el motor de arranque de su
vehículo. Si el motor gira, pero no arranca luego de varios intentos, otros problemas
técnicos pudieran estar implicados. Deje de arrancar el mot or hasta que los otros
problemas hayan sido determinados y corregidos.
9. Cuando haya terminado, manténgase lo más alejado de la batería del vehículo
como sea posible y desconecte las pinzas en el orden inverso a la conexión de
procedimiento:
• Para sistemas ground negativo, primero desconecte la pinza negativa (negra) y
luego la pinza positiva (roja)
• Para sistemas ground positivo, primero desconecte la pinza positiva (roja) y luego
la pinza negativa (negra)
Usando el Compresor de Aire
ADVERTENCIA: Para inflar el objeto, verifique cual es la presión máxima recomendada
por el fabricante. Evite el exceso de inflación. La mayoría de los neumáticos están inflados
apropiadamente entre 24 y 35 PSI. Algunos neumáticos para camiones y bicicletas requieren de
40 PSI o más.
Para inflar neumáticos
1. Quite la tapa de la válvula de aire. Nota: Asegúrese que el seguro de la p alanca de
bloqueo esté hacia arriba. Si es necesario, use el adaptador de la válvula.
2. Inserte el tubo de conexión a la válvula. Ase gúrese de que el conector se inserte en la
válvula.
3. Presione hacia abajo la palanca de bloqueo.
4. Establezca el interruptor de encendido/apagado (situado al lado del medidor
de presión) a posición encendido (“on”) presionando hacia abajo la sección del
interruptor marcado “I”. Nota: en caso de que el neumático este completamente
desinflado, se recomienda levantar el vehículo con una gata antes de inflar el
neumático.
5. Controle la presión del neumático en el medidor de presión de aire. Nota: Se
recomienda utilizar diferentes medidores de aire para comprobar la presión real de
la inflación. Cuando alcance la presión deseada, apague el compresor de aire, suba
la palanca de bloqueo y retire el tubo de conexión de la válvula. También quite el
adaptador de la válvula si ha sido usado.
6. Reemplace la tapa de la válvula.
Page 8
www.wagan.com
Arrancador de batería de 300 Amp de Wagan Tech
13
All WAGAN Cor porati on products are warrant ed to the origin al purchaser of this pro duct.
Warrant y Durat ion: This p roduct is warra nted t o the original p urchaser for a perio d of one (1) Year from th e origin al
purchase da te, to be free of d efects in material and workmanship. WAGAN Corporation disclaims any liability for
conseq uential damages. In n o even t will WAGAN Corporation be responsib le fo r any amount of damag es beyond
the amount paid fo r th e product at retail. In the event of a d efect ive item, pleas e co ntact WAGA N Corporation at
(800) 231-5806 to obtain a Retu rned M erchandise Authorizat ion numb er (RMA#), and return instructions. Each ite m
return ed will require a separate RMA#. Aft er you h ave rec eived t he RM A# and the ret urn ins tructions fro m WAGAN
Corporation, p lease follow the instructions and send t he item with PREPAID SHIPPING, a long with all of the required
documentation, a comple te ex planation o f the prob lem, yo ur na me, ad dress and daytim e pho ne nu mber. WAGAN
Corporation will, at its option, replac e or repair the d efect ive par t.
A Returned M erchandise Authoriz ation number (RM A#) is REQUIR ED when sending in any defective item. WAGAN
Corporation is not responsible for any item(s) retur ned withou t an official Return ed Merchandise Autho rization number.
The item(s) must be returned with prepaid shipping. WAGAN Corp oration is not responsible for any shipping ch arges
incurre d in returning th e ite m(s) ba ck to the compa ny for repair or replacement. This warrant y is void i f the produ ct
has been da maged by accident, in shipment, un reasonable use, misus e, negl ect, im proper ser vice, c ommerci al use,
repairs by unauthorized personnel or other causes not arising out of defe cts in mate rials or workmanship. This
warrant y is effec tive only if the produ ct is purcha sed and op erated in the USA and does not exte nd to any units which
have be en used in violation of written instr uction s furnis hed.
Warrant y Disclaimers: This warrant y is in lieu of all warranties expre ssed or implied and no representative o r perso n
is au thorize d to assu me any oth er li abilit y in conne ction with the sale of our product s. There shall be no claims fo r
defec ts or failure of performance or product failu re under any the ory of tor t, contract or commerc ial law inclu ding, but
not limit ed to negligen ce, gross neglig ence, st rict lia bility, bre ach of warrant y and breach of contra ct.
Warrant y Pe rform ance: During the above one (1) Year warranty period, a product wi th a d efect will be replac ed
with a comparable mod el wh en the pro duct is ret urned to WAGAN Corp oratio n with an original store rec eipt. T he
replac ement p roduct will be in warran ty for the ba lance o f the on e (1) Year warrant y period.
Todos los produc tos de l a corporación WAGAN son garantizad os al com prador original de este producto.
Duración de la gara ntía: Este producto es garantizado al comprado r original po r un p eríodo de un (1) año a partir
de l a f echa origin al d e la com pra. El product o es ta g arantizado de e star libre de defectos en los materi ales o e n
la fabricación d el mismo. La cor poración Wagan no se h ace respons able por ningún tipo de daños consecuente s.
La corpora ción WAGAN no se hace respo nsable en ningún momento d e cu alquier daño más allá de la ca ntidad
pagad a po r el p roducto a un precio al d etal. En el caso de rec ibir un artíc ulo defect uoso, p or favor con tacte a la
corpo ración WAGAN al 1-800 -231-5806 y obte nga un nú mero de a utoriza ción de d evolución de me rcancía (RMA)
al igual que instru ccione s de d evolución. Cada ar tículo devuelto necesit ara un número RMA diferen te. De spués de
recibir el número RM A y las instru ccione s de devolución de la Corporació n WAGAN, por favor siga las instr uccion es
y envíe el artículo (pagando por el envío) junto con la documentac ión requerida, una explicación completa del
proble ma, nombr e, dirección, y número de teléfono. La corporación Wagan decidirá a su discreción reparar o
reempl azar el produc to defectuoso.
Números de autoriz ación de devolución de m ercancí a (RMA) son REQUERIDOS en c aso de enviar un artícul o
defec tuoso. La corpora ción WAGAN no es responsable por nin gún articulo dev uelto sin el debid o numero RMA. La
corpo ración WAGAN no es responsab le de gastos incur ridos en la devolución de product os que necesit en reparación
o reemp lazo. Esta garantía será cancelada en cas o de que e l produ cto haya sido dañado por accide nte en el
envío, por uso irrazo nable, mal uso, negligencia, servicio inapropiado, uso come rcial, reparaciones po r p ersona l
no aut orizado, u otra s causas que se no se presenten debido defe ctos e n materiales o la fabric ación. Esta ga rantía
excluye unidad es que h ayan sid o utiliza das en v iolación de las instru ccione s escritas en este manu al de usuarios.
Excep ción de la garant ía: Esta garantía toma efecto en lugar de cualquie r o tra garant ía expresada o implica da,
que no re presen te a ninguna p ersona aut orizad a de asumir ning una otra responsabilidad co necta da c on l a venta
de productos de l a Corporación Wa gan. Deman das debido a defe ctos o fallas de de productos no d eberán
ocurri r bajo ninguna teoría de disputas, c ontrat os, o leyes com erciale s, inc luyendo pero no limit ando negligencia,
respon sabilidad estricta, inf racción de la garantía, o infracc ión de contrato.
Condiciones de l a garantía: Durante el antedicho per iodo de u n (1) año, productos defectuoso s serán re emplaz ados
por u n mod elo c ompara ble, c uando el product o sea devu elto a la corpo ración WAGAN con un recibo de c ompra
original. El prod ucto d e reemplazo est ará bajo garantí a por el resto d el peri odo de u n (1) año.
Wagan Corp. Limited Warranty
Garantía Limitada de la Corporación Wagan
REV2008
Specifications
Batería 12AH de plomo de ácido sellada
Potencia de energía de salida
(CC)
12-voltios nominal
Compresor de aire 260 PSI
Tiempo de carga 38 horas la primera vez con adaptador CA
34-36 horas para recargar con adaptador CA
12-14 horas para recargar con un adaptador
CC de 12 voltios
Longitud del cable del Jumper 29.5 pulgadas/75 centímetros
Page 9

www.wagan.com
Toll Free: 1.800.231.5806
31088 San Clemente Street
Hayward, CA 94544
U.S.A.
©2010 Wagan Corporation
All Rights Reserved
Wagan Tech and wagan.com are trademarks used by Wagan Corporation
© Corporación Wagan 2010
Todos los derechos reservados
WAGAN Tech y Wagan.com son marcas registradas de la Corporación Wagan
REV20101214
 Loading...