

Item#2741
User’s Manual
18M Brite-Nite
™
MEGA SPOTLIGHT
www.wagan.com
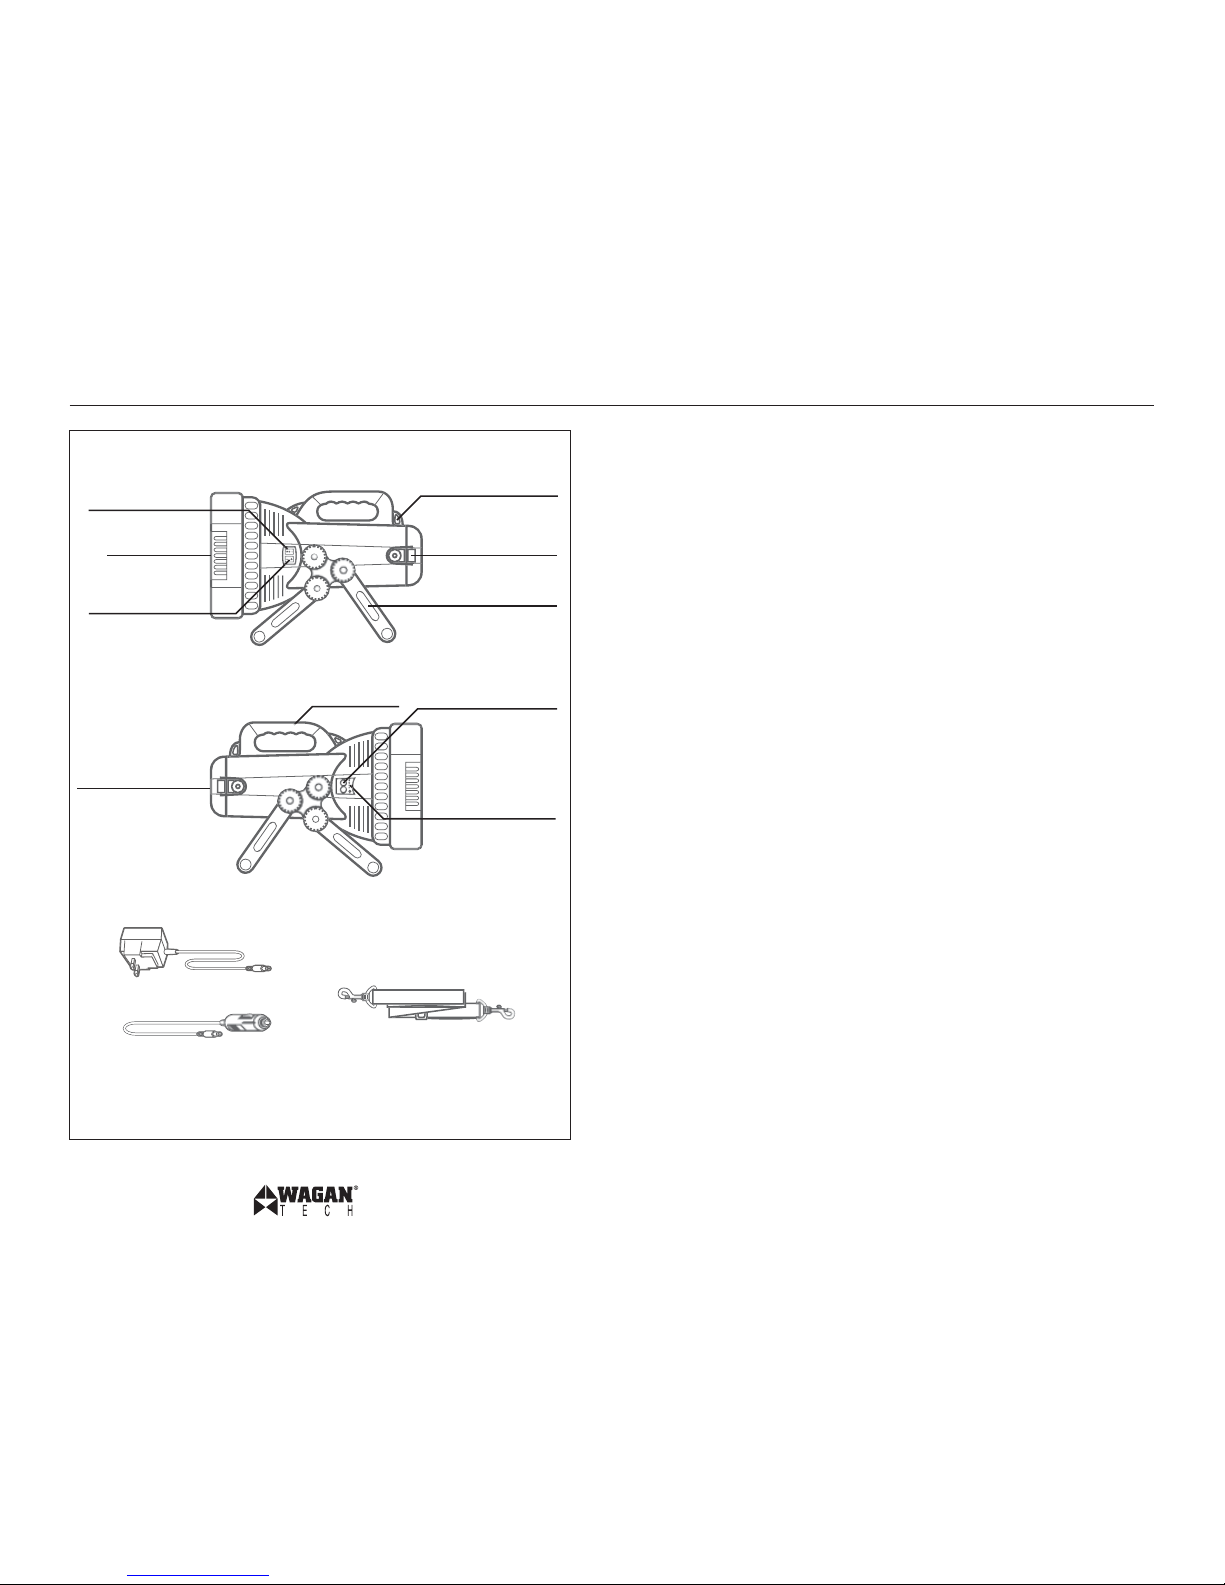
Carrying Handl e
Emergency Beacon LED
AC Charger
DC Charger
* product may var y in appearance slight ly from shown
Shoulder Strap
AC/DC Charger Input
Batter y Status Indicator
Shoulder Strap Attachment
Swivel Folding Stand
Latch Buckle
(for back cover)
Emergency Beacon
Power Switch
Halogen Bulb
Power Switch
H4 Halogen Bulb
18M Brite-NiteTM Mega Spotlight by Wagan Tech
1
©2010 Wagan Corporation
All Rights Reser ved
Wagan and wagan.com are trademarks used by Wagan Corporatio n
User’s Manual—Read before using this equipment
2
Thank you for purchasing the 18M Brite -Nite
™
Mega Spotlight by Wagan Tech. With
minimal care and proper treatment it will provide years of reliable service. Please read
all operating instructions carefully before using the unit. Keep this user’s manual for future
reference.
INTRODUCTION
This spotlight is useful for accomplishing a variety of activities. In the field, it serves as a
powerful spotlight. During tire changes at night, the lantern can light the area while the red
flashing emergency beacon warns motorists to avoid the area. Two chargers are included
allowing either DC charge from a cigarette lighter socket or from any AC socket. The
spotlight has a folding stand that can be used to aim the spotlight beam onto a targeted
area.
FEATURES
• Sealed rechargeable 12V lead- acid batter y
• Charge in vehicle from cigarette lighter socket with 12V DC adapter
• Charge at home with AC adapter
• Large handle for easy carrying and use
• Red flashing emergency beacon LED light
• Yellow LED indicator lights let the user know that charging power is connected
• A retractable stand allows the spotlight beam to be positioned at a variety
of angles
• Nylon shoulder strap for easy carrying
SPECIFICATIONS
• Operating Voltage: 12V DC
• Sealed Lead -acid Battery: 12V DC, 7 AH
• Quartz Halogen Bulb: 12V, 50/120 Watt, H4
• Dimensions: 40 × 25.5 × 26.3 cm
• Weight: 4.4 kg
GENERAL SAFETY PRECAUTIONS
FAILURE TO HEED THESE PRECAUTIONS MAY RESULT IN PERSONAL INJURY AND/OR
PROPERTY DAMAGE.
• As with all lead-acid cell batteries, be sure to fully recharge the batter y before
storing.
• Turn off all lamp f unctions and allow unit to cool before storing.

www.wagan.com
18M Brite-NiteTM Mega Spotlight by Wagan Tech
3
©2010 Wagan Corporation
All Rights Reser ved
Wagan and wagan.com are trademarks used by Wagan Corporatio n
User’s Manual—Read before using this equipment
4
• Do not drop unit as this may cause damage.
• The lens will become hot during operation even after immediate shutdown of unit.
• Do not cover lens or refle ctor during operation.
• Do not shine lights directly into eyes.
• When maintaining the spotlight, always wear safet y glasses.
• Only use supplied chargers.
• Recharge fully every 3–6 months even if the unit is not in use. This will prolong the
life of the bat tery.
• This power unit is intended to be correctly orientated in a vertical or floor mount
position. Do not lay the spotlight lens downward when on.
• Do not use in wet conditions for the spotlight may short circuit.
• Do not expose to high temperature or fire, as the batter y may explode.
• Charging produces hydrogen gas that may explode when exposed to fire.
• Do not use near flammable liquids, combustible materials or gasses.
• Do not use for any other purpose than momentary lighting.
• Do not modify or alter this unit.
• Do not charge the spotlight for more than 30 hours. Overcharging will shor ten battery life.
• Avoid charging the battery at temperatures below 40 ° F (4° C).
• The DC charger cigarette lighter plug becomes warm when used. Unplug from
cigaret te light er receptacle with caution.
• Keep out of reach of children.
CHARGING YOUR SPOTLIGHT
Your Spotlight is supplied with two charging adapters. One adapter is powered by standard
110 volts AC. This is the AC charger. The other charging adapter is the DC charger. Be sure
to charge the unit completely before the first use. This step will prolong the life of the internal
battery. Use the AC charger for the first charge. Charge the battery for 24 hour before
first use. DO NOT use any charging means other than those provided. DO NOT operate
the spotlight while charging, as you may damage the charging adapter and discharge the
spotlight’s batteries.
AC Charging
The AC charger provides a slow steady charge to the unit. Charge for a maximum of 16
hours (except for the initial 24 hour charge) and do not overcharge.
1. Make sure that all switches are set to “O”, the of f position
2. With the AC charger, insert the DC plug into the AC charger jack on the spotlight
3. Plug the wall module of the AC charger into the AC outlet on wall
4. The red indicator LED will light up to indicate the spotlight is charging
5. Indicator LEDs will illuminate increasingly, from RED, YELLOW to GREEN depending
on bat tery status at time of charging.
• RED LED: Batter y is low
• RED/YELLOW LEDs: Battery is slightly full
• RED/YELLOW/GREEN LEDs: Battery is medium full
• RED/YELLOW/2 GREEN LEDs: Batter y is completely full
DC Charging
Any 12V DC power outlets, such as ones found in automobiles, boats and jump starters can
charge t his spot light using the DC charger. For full charge, the power source must be from a
vehicle or boat DC outlet and the engine should be running. Charge for 10 hours maximum.
Do not overcharge.
1. Make sure that all switches are set to “O”, the of f position
2. With the DC charger, insert the smaller DC plug into the DC charger jack on the
spotlight
3. Plug the larger DC plug into the cigarette lighter outlet
4. The Indicator RED LED will light up to indicate the spotlight is charging
5. Indicator RED/YELLOW LEDs will illuminate during charging.
USING THE HALOGEN SPOTLIGHT/FLASHING EMERGENCY LIGHT
There are two Rocker type switches. One switch has 2 p ositions, the other has three positions
and are marked I, 0, and II. Always store the lamp with both switches in the “O” position.
The halogen sp otlight rocker switch and functions are shown in the table below:
Switch Location/Function Halogen Spotlight (Rocker Switch 1)
“O” Position OFF
“I” Position Spotlight ON — High intensity
“II” Position Spotlight ON — Low intensity
The flashing emergency light rocker switch and functions are shown in the table below:
Switch Location/Function Flashing Emergency Light (Rocker Switch 2)
“O” Position OFF
“I” Position Flashing Red Emergency LED ON
 Loading...