


Wafian HR-F1
Setup and User Guide
1.3.0
Wafian Corporation
3525 Del Mar Heights Rd. #417
San Diego, CA 92130
www.wafian.com
February 2008

CAUTION: Safety Instructions: Wafian HR-F1
Use the following safety guidelines to help ensure your own personal safety and to help protect your HR-F1 and
working environment from potential damage.
SAFETY: General
To help prevent electric shock, plug the HR-F1 and device power cables into properly grounded electrical outlets.
These cables are equipped with 3-prong plugs to help ensure proper grounding. Do not use adapter plugs or
remove the grounding prong from a cable. If you must use an extension cable, use a 3-wire cable with properly
grounded plugs.
To help avoid the potential hazard of electric shock, do not use your HR-F1 during an electrical storm.
To help avoid the potential hazard of electric shock, do not connect or disconnect any cables or perform
maintenance or reconfiguration of this product during an electrical storm.
Before you clean your HR-F1, disconnect the HR-F1 from the electrical outlet. Clean your HR-F1 with a soft cloth
dampened with water. Do not use liquid or aerosol cleaners, which may contain flammable substances.
To help avoid possible damage to the system board, wait 5 seconds after turning off the HR-F1 before
disconnecting a device from it.
To avoid shorting out your HR-F1 when disconnecting a network cable, first unplug the cable from the network
adapter on the back of your HR-F1, and then from the network jack. When reconnecting a network cable to your
HR-F1, first plug the cable into the network jack, and then into the network adapter.
To help protect your HR-F1 from sudden, transient increases and decreases in electrical power, use a surge
suppressor, line conditioner, or uninterruptible power supply (UPS).
Ensure that nothing rests on your HR-F1's cables and that the cables are not located where they can be stepped
on or tripped over.
Do not push any objects into the openings of your HR-F1. Doing so can cause fire or electric shock by shorting
out interior components.
Keep your HR-F1 away from radiators and heat sources. Also, do not block cooling vents. Avoid placing loose
papers underneath your HR-F1; do not place your HR-F1 in a closed-in wall unit or on a bed, sofa, or rug.
SAFETY: When Using Your HR-F1
As you use your HR-F1, observe the following safe-handling guidelines.
CAUTION: Do not operate your HR-F1 with any cover(s) removed.
CAUTION: Do not attempt to service the HR-F1 yourself, unless you are a trained service
technician or as explicitly approved and instructed by Wafian.
Refer all servicing to qualified servicing personnel. Servicing is required when the HR-F1 has been damaged in
any way, such as power-supply cord or plug is damaged, liquid has been spilled or objects have fallen into the
HR-F1, the HR-F1 has been exposed to rain, moisture, extreme temperatures, does not operate normally, or has
been dropped.
2

NOTICE: To help avoid possible damage to the system board, wait 5 seconds after turning off the HR-F1
before disconnecting a device from the HR-F1.
In addition, take note of these safety guidelines when appropriate:
When you disconnect a cable, pull on its connector or on its strain-relief loop, not on the cable itself. Some
cables have a connector with locking tabs; if you are disconnecting this type of cable, press in on the locking tabs
before disconnecting the cable. As you pull connectors apart, keep them evenly aligned to avoid bending any
connector pins. Also, before you connect a cable, ensure that both connectors are correctly oriented and aligned.
Handle components with care. Do not touch the components or contacts on a card.
SAFETY: Protecting Against Electrostatic Discharge
Static electricity can harm delicate components inside your HR-F1. To prevent static damage, discharge static
electricity from your body before you touch any of your HR-F1's electronic components. You can do so by
touching an unpainted metal surface on the HR-F1 chassis.
CAUTION: Any changes or modifications not expressly approved in this manual could void your
warranty.
3

WAFIAN HR-F1
Thank You for choosing Wafian®. This document will help you setup and use the Wafian HR-F1. For additional
information please visit us at www.wafian.com/Support.htm.
Table of Contents
1. Introduction.................................................................................................................... 6
2. In the Box ...................................................................................................................... 6
3. Connections................................................................................................................... 7
4. Power and Front Panel Features................................................................................... 7
AC Power ................................................................................................................. 7
DC Power ................................................................................................................. 7
Front Panel Features ................................................................................................ 7
5. Settings ......................................................................................................................... 8
Presets dialog ................................................................................................................ 8
Settings for 720p60 Recording Via HD Component.................................................. 8
Settings for 720p24 Recording Via HD Component.................................................. 8
Settings for 720p60 SlowMo @24p Recording (2.5x Slow-Mo Effect) Via HD
Component............................................................................................................... 9
Settings for 1920x1080 23.976psf Recording Via HD-SDI........................................ 9
Settings for 1920x1080 30i Recording Via HD-SDI .................................................. 9
Settings for 1920x1080 w/Pulldown Removal (24p) Recording Via HD-SDI........... 10
Recorder tab ................................................................................................................ 10
Video tab ..................................................................................................................... 11
Input Source .......................................................................................................... 11
HDSDI Video Format.............................................................................................. 12
Component Video Input ......................................................................................... 12
Component Video Output....................................................................................... 12
Down Conversion Mode ......................................................................................... 12
Input Color Bit Depth ............................................................................................. 12
Reference Source................................................................................................... 12
Up convert 8-bit source to 10-bit (Cineform Intermediate Only) ........................... 13
Encoder Quality...................................................................................................... 13
Encoder PreEmphasis............................................................................................. 13
Final Frame Rate (Slow-Mo)................................................................................... 13
Pulldown Removal.................................................................................................. 13
De-Interlace Input Video (SD Only) ....................................................................... 14
Crop Input NTSC to 640X480................................................................................. 14
Drop Every Other Frame ........................................................................................ 14
Flip Video Frame .................................................................................................... 14
Audio tab ..................................................................................................................... 14
Record Type........................................................................................................... 14
4

Audio Source.......................................................................................................... 14
Embedded Audio Channels..................................................................................... 14
Analog Audio Level................................................................................................. 14
Time Code tab ............................................................................................................. 14
Optional LTC Time Code ........................................................................................ 15
Player tab..................................................................................................................... 15
Reference Source................................................................................................... 15
Play all clips consecutively ..................................................................................... 15
Loopback Playback................................................................................................. 15
Device Control tab ....................................................................................................... 15
System Settings tab ..................................................................................................... 16
6. Recording .................................................................................................................... 17
Other Recording Features ...................................................................................... 17
7. Playback...................................................................................................................... 19
8. System Configuration .................................................................................................. 20
9. System Specifications ................................................................................................. 22
10. Notes and Troubleshooting ......................................................................................... 23
Recording Length and Storage Capacity ................................................................ 23
IMPORTANT DISCLAIMERS.................................................................................... 23
11. Software License Agreement....................................................................................... 24
12. Wafian HR-F1 One (1) Year Limited Warranty............................................................. 27
13. Contact Wafian ............................................................................................................ 28
5

1. Introduction
In the Box
Congratulations, you now have one of the industry’s most powerful High Definition tools available. The Wafian
HR-F1 is a direct-to-disk high definition video disk recorder with HD-SDI and component inputs and outputs for
field use. The HR-F1 can record Standard Definition or High Definition 4:2:2 10-bit video for 10+ hours. It can
record 8 channels of embedded audio and 2 channels of analog or EBU/AES audio. It records at resolutions up to
1920x1080 at different frame rates. The HR-F1 offers Ethernet, IEEE 1394 and USB2 ports for data sharing and
DVI/VGA connectivity for monitoring.
With the HR-F1 recorder, your video is recorded in one of the highest quality formats available. The HR-F1’s easy
operation allows you view the footage as it is recorded and to immediate review the footage via its touch-screen
interface.
If you have any questions regarding the HR-F1 that are not answered in this manual, please visit
www.wafian.com/Support.htm or contact Wafian Customer Support at support@wafian.com.
2.
Please verify that you have received the following components along with your HR-F1 recorder.
The Wafian HR-F1 HD-SDI & ComponentHD Video Field Recorder.
An Accessory Pack with:
AC/DC adaptor
Power cable
Stylus pen
External hard drive tray
Users Guide
6
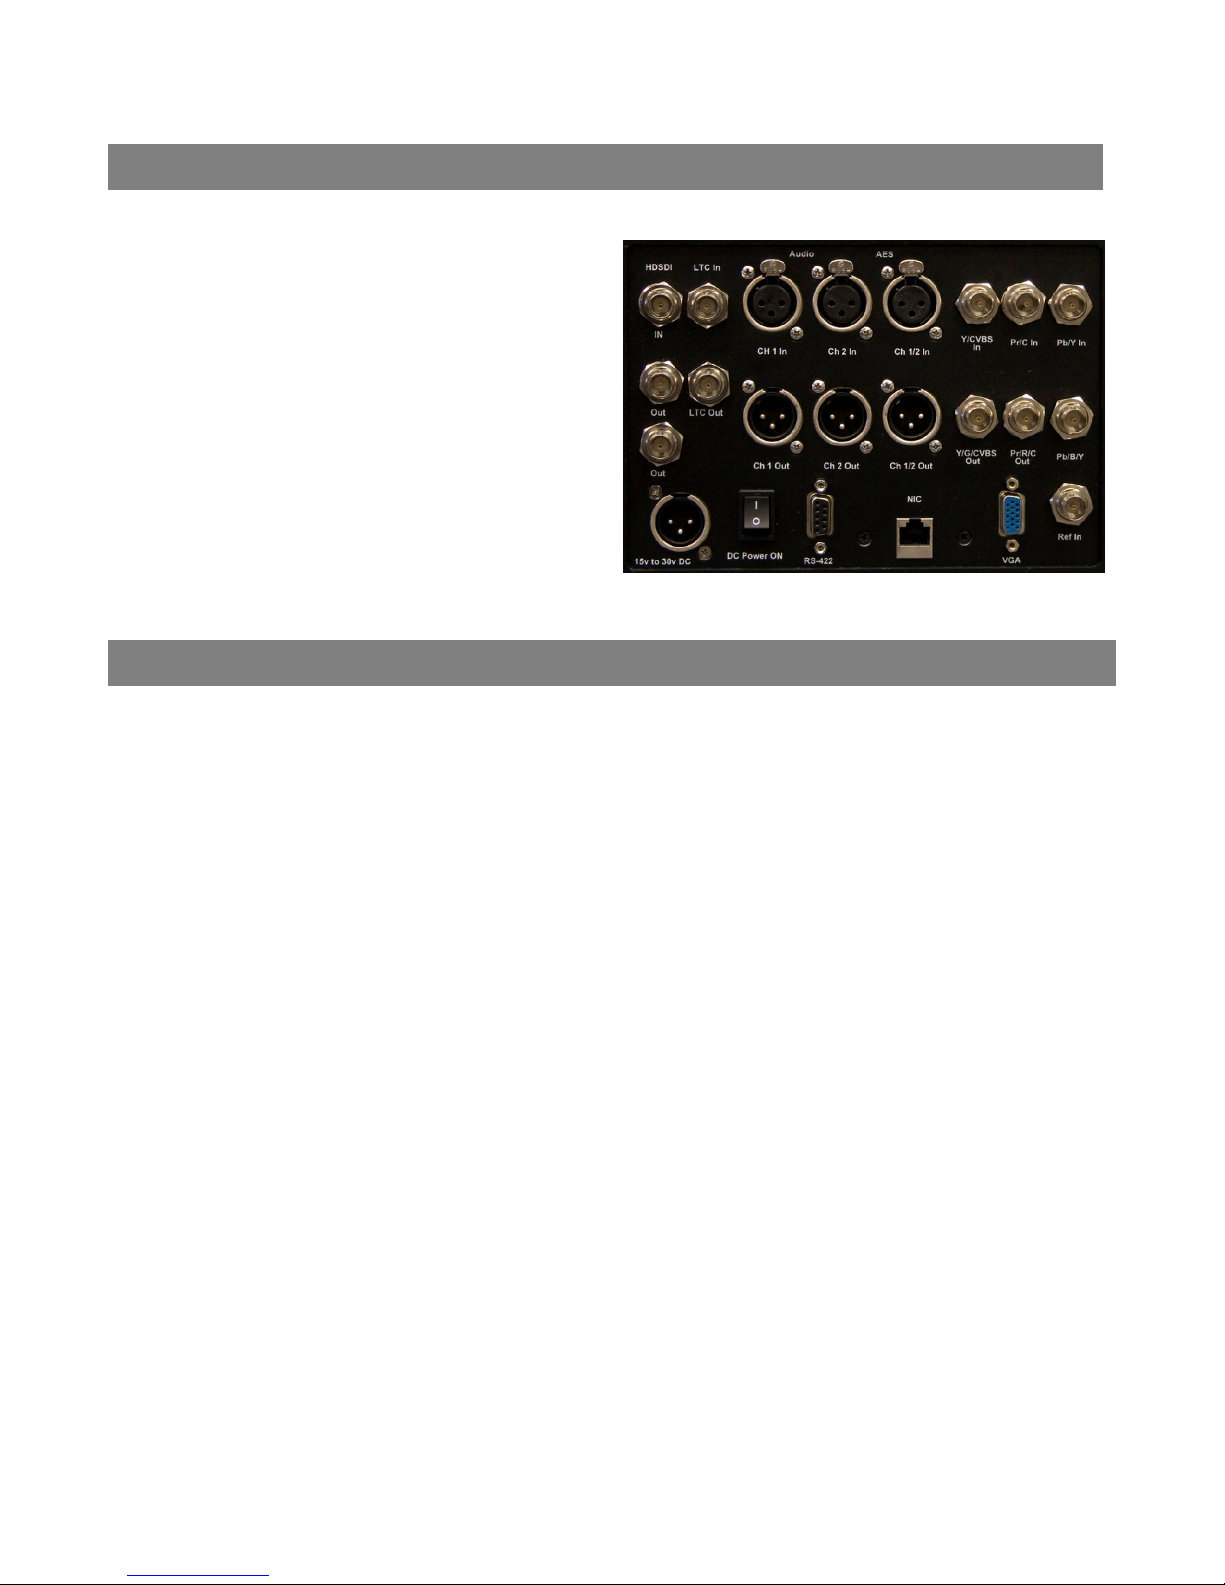
3. Connections
With the power disconnected:
To record from component or
composite sources, securely connect to
the Y/Pr/Pb inputs in the back panel of
your HR-F1.
To record from an HDSDI source,
connect the HDSDI input cable to
the top BNC connector on the rear
panel. The bottom two BNC
connectors are HDSDI output
ports.
4. Power and Front Panel Features
AC Power
Make sure the power cable is plugged in and the power switch on the back of the unit is in the on position. Press
the Power button below the LCD to turn on the unit. To turn off the system, press and hold the same Power
button below the LCD for five seconds.
DC Power
The HR-F1 can be operated using DC power through external 24 volt XLR battery packs. A single Anton Bauer
Cine VCLX battery pack will allow operation of the HR-F1 for approximately 6 hours while idle, or 4 hours while
recording continuously. Note that if the power supply is overloaded, it will stop all output voltages. Once the
problem has been resolved, it will automatically reset itself and the power off switch will be cycled, allowing
normal operation. If this does not occur, please contact Wafian Support at support@wafian.com.
Front Panel Features
The removable media drive can be disconnected from the HR-F1 while power is on. The drive’s enclosure offers
USB II, eSata, and Firewire outputs.
NOTE: Do not remove the HR-F1 media drive while recording or playing back clips.
For easy access to your media, the HR-F1 front panel also offers standard USB II, Firewire (IEEE 1394), and
audio in/out ports.
7
5. Settings
Before you record, your system must be setup to match your desired video settings. Access the Presets window
to select preset settings, or to specify your own settings. To do so click on the media path and record settings
link on the record mode window, which will open the Presets dialog. Note that users may select the Keyboard
button to type in text within any of the available fields within the Presets.
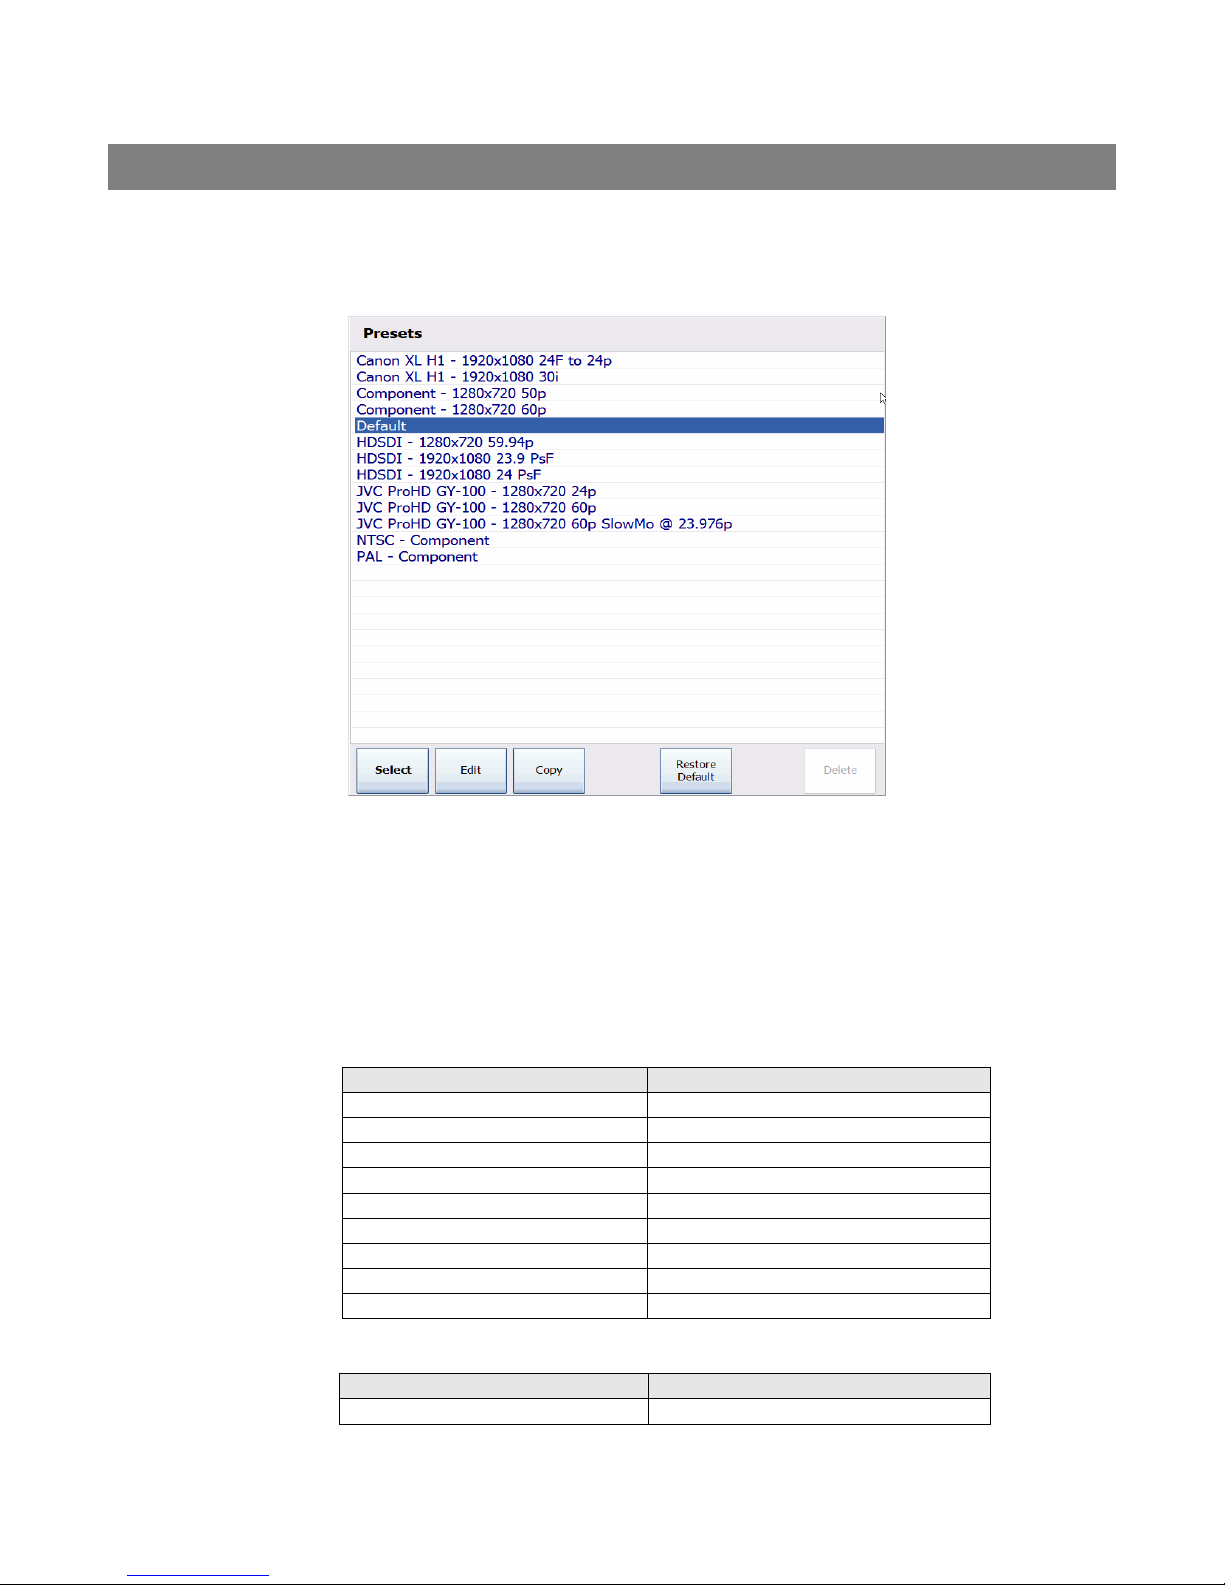
Presets dialog
Within the Presets window chose any of the available presets by selecting it and pressing Select. Users may also
choose to copy a preset and then customize their configuration further by selecting their preset and pressing Edit.
To restore the Default preset back to its original (out of the box) state, simply press Restore Default.
Preset configurations “out of the box”
Settings for 720p60 Recording Via HD Component
Setting Value
Input Source ComponentAnalog
HDSDI Video Format HDSDI_720p_5994
Component Video Input AnalogIn_720p_5994
Component Video Output AnalogOut_720pSMPTE
Input Color Bit Depth 10-Bit YCbCr
Encoder Quality High
Record Type AudioAndVideo
Final Framerate None
Pull Down Removal None
Settings for 720p24 Recording Via HD Component
Setting
Input Source ComponentAnalog
8

HDSDI Video Format HDSDI_720p_5994
Component Video Input AnalogIn_720p_5994
Component Video Output AnalogOut_720pSMPTE
Input Color Bit Depth 10-Bit YCbCr
Encoder Quality High
Record Type AudioAndVideo
Final Framerate None
Pull Down Removal Extract24pFrom60p
Settings for 720p60 SlowMo @24p Recording (2.5x Slow-Mo
Effect) Via HD Component
Setting Value
Input Source ComponentAnalog
HDSDI Video Format HDSDI_720p_5994
Component Video Input AnalogIn_720p_5994
Component Video Output AnalogOut_720pSMPTE
Input Color Bit Depth 10-Bit YCbCr
Encoder Quality High
Record Type AudioAndVideo
Final Framerate FPS_23_976
Pull Down Removal None
Settings for 1920x1080 23.976psf Recording Via HD-SDI
Setting Value
Input Source HDSDI
HDSDI Video Format HDSDI_1080psf_2398
Component Video Input AnalogIn_1080i_30
Component Video Output AnalogOut_1080psfSMPTE
Input Color Bit Depth 10-Bit YCbCr
Encoder Quality High
Record Type AudioAndVideo
Final Framerate None
Pull Down Removal None
Settings for 1920x1080 30i Recording Via HD-SDI
Setting Value
Input Source HDSDI
HDSDI Video Format HDSDI_1080i_2997
Component Video Input AnalogIn_1080i_30
Component Video Output AnalogOut_1080iSMPTE
Input Color Bit Depth 10-Bit YCbCr
Encoder Quality High
Record Type AudioAndVideo
Final Framerate None
Pull Down Removal None
9

Settings for 1920x1080 w/Pulldown Removal (24p) Recording
Via HD-SDI
Setting Value
Input Source HDSDI
HDSDI Video Format HDSDI_1080i_2997
Component Video Input AnalogIn_1080i_30
Component Video Output AnalogOut_1080iSMPTE
Input Color Bit Depth 10-Bit YCbCr
Encoder Quality High
Record Type AudioAndVideo
Final Framerate None
Pull Down Removal Extract24FramesFrom30i
Once you have selected to edit an existing preset, or to create a new one, the Edit Preset window will display.
Recorder tab
Within the recorder tab you may select to record .AVI or .MOV files. The wrapper format should be determined
by your workflow. However, most video editing tools understand both wrapper formats. When you take the files
onto a computer you will need to have a CineForm Intermediate decoder installed on that system. The decoders
are available for free from www.wafian.com/Support.htm.
You can also specify name rules for the clips that you will record as well as their location. Clip filenames are
automatically built from a name rule. The default name rule will create clips named Scene-1-Take-###.mov in
the Scene-1 folder under the Media Path. Users may specify their own recording path, and create their own
name rules using the following guidelines.
Name Rules
Name rules are a flexible and powerful way for the HR-F1 to create unique clip names without constant user
interaction.
When starting to record, the HR-F1 creates the clip name from the text in the Name Rule field and replaces
variables (text enclosed in curly brackets, {variable}) with their current value. Variables allow you to provide
meaningful clip names, specify sub-directories, and uniquely identify clips. If a clip name is not unique, the HR-F1
will increment the right most numeric field or append "-001" to the end of the name.
Sub-directories
Name rules can specify sub-directories within the media directory for clips by naming the directory followed by
the backslash (\) character. The sub-directory will automatically be created if it does not exist.
Variables
You can use the following variable names with the HR-F1:
{date} - The current system date (YYYY-MM-DD)
{datetime} - The current system date and time (YYYY-MM-DD_HH-MM-SS)
{extension} - AVI
{scene} - The value of the Scene field
{serialnumber} - This unit's serial number
{take} - The value of the Take field
{time} - The current system time (HH-MM-SS)
{recordertakenumber} – The number of times this particular recorder has started recording
10

Examples:
WF-{serialnumber}-{datetime}.{extension}
{Scene}\{Scene}-{Take}-001.{extension}
Legal characters
Name Rules should not include characters that are invalid in filenames (<>\/:?*|”).
Freeze Frame
Within the Recorder tab of the presets you can also specify the path and name rules to apply in recording freeze
frames. The same guidelines that apply for creating clip name rules, apply for creating freeze frame name rules.
Please see the Recording section of this document for details regarding freeze frame capturing.
Video tab
You need to set the HR-F1’s record settings to match your input source.
Input Source
Depending on the hardware connected to the HR-F1, users may choose to record using HDSDI (digital video) or
Component Analog.
11

HDSDI Video Format
The selection of this field determines the mode of input for the video format coming into the HR-F1 (the board’s
frame buffer geometry or RAM on the input board). Users may select Standard Definition or High Definition
settings within this field.
Component Video Input
Within this field users specify the format of the component or composite video coming into the recorder via its
BNC connectors. For composite or component analog recording, both this field and HDSDI Video Format need to
be set to the correct resolution and frame rate.
Component Video Output
This setting controls the resolution and frame rate on the component/composite video outputs of the recorder.
Down Conversion Mode
When recording HD Video, you can set the Component Video Output field to the appropriate SD resolution to
monitor the video with a SD component monitor.
The down conversion settings control how the HD image is scaled to SD as follows:
Setting Description
LetterBox Scale frame to fit screen, maintains aspect ratio (black borders).
Crop Crop into frame, do not scale.
Anamorphic Stretch frame to fill screen, does not maintain aspect ratio.
The following HD SD conversions are supported:
HDSDI Video Input Down-converted SD Output
720p 5994 NTSC (480i)
1080i 5994 NTSC (480i)
720p 50 PAL (576)
1080i 50 PAL (576)
1080p 25 PAL (576)
1080 25psf PAL (576)
Input Color Bit Depth
Within the Input Color Bit Depth field users select 8 bit or 10 bit color depth for HDSDI input.
Reference Source
Option Description
External Use Ref-In connection on the rear panel for reference
Input1 Use HDSDI signal reference
FreeRun Do not use a reference source
In general the operator should use Input1 for this field. When linking one HR-F1 to another, be sure to set the
reference source of the second HR-F1 to Input1.
12

Up convert 8-bit source to 10-bit (Cineform Intermediate Only)
Users select this check box only when using a camera that outputs an 8 bit image. When selected, the HR-F1
compresses 8 bit video with the 10 bit video codec in order to increase precision and preserve quality. This mode
increases the bit rate and disk consumption.
Encoder Quality
Settings within this field determine the bit rate of each recorded clip. The default and the recommended setting
is High. Custom_ChromaKey is used to preserve chroma information around the edges of what is being recorded,
and is the best setting when recording footage that will be used for green screening. Note that lowering the
encoding quality will allow you to record continuously for longer durations. Please visit www.cineform.com for
more detailed information regarding these settings.
Encoder PreEmphasis
This field controls encoder noise roll-off. The different selectable values can help reduce your bit rate by telling
the HR-F1’s encoder to roll off more or less noise.
Option Result
Half Default – Normal setting for a good balance between noise and
bit rate
Third More noise but still high quality
Quarter More noise but less quality than Third
Fifth More noise but less quality than Quarter
Sixth More noise but less quality than Fifth
Off Turns this feature off – no pre-emphasis
Final Frame Rate (Slow-Mo)
Within this field users select the frame rate in which recorded clips are played out. Depending on this setting, the
HR-F1 performs real-time undercranking that provides the user with 2.5, 2.x, 1.5x slow motion effects among
others, a powerful special effect for recording at one frame rate and playing out at another.
Example: Results from 720p 60:
Option Motion Effect
FPS_23_976 Used to play out clips at 2.5x (slow motion)
FPS_29_97 Used to play out clips at 2.0x (slow motion)
FPS_48 Used to play out clips at 1.25x (slow motion)
Pulldown Removal
This field tells the HR-F1 to remove duplicate fields (pulldown) from the incoming video signal. In addition the
standard 2:3 pulldown, this field allows recording true 24p clips from cameras such as the Canon XL H1 and JVC
Pro HD 250. For example:
Camera & Mode Pulldown Removal Setting Result
Canon XL H1 / F2 (24F) Extract24FramesFrom30i 1080 23.976p
JVC ProHD GY-250 24/48p Extract48pFrom60p 720 48p
JVC ProHD GY-250 24/48p Extract24pFrom60p 720 23.976p
JVC ProHD GY-250 60p Extract30pFrom60p 720 30p
13

De-Interlace Input Video (SD Only)
Selecting this feature will de-interlace the interlaced fields in SD input such that they become progressive.
Crop Input NTSC to 640X480
Selecting this feature will scale 720X486 input into 640X480. This is only active with NTSC input.
Drop Every Other Frame
When this checkbox is selected, every other frame coming into the HR-F1 is dropped and the rest are recorded.
Flip Video Frame
Select this checkbox to flip the video being recorded. For example, this option is useful when using a Redrock
Micro 35mm lens adapter with your camera.
Audio tab
Record Type
Select video only, audio-only, or both. Note that audio-only still required video input to record.
Audio Source
Users select whether they are recording audio from an AES-EBU (digital audio), HDSDI embedded, or XLR
balanced analog source. The HR-F1 rear panel includes inputs for two-channels for both AES-EBU and balanced
XLR audio.
Embedded Audio Channels
Within this field users select the number of channels being used for audio recording. The HR-F1 supports two
channels at 48k when using AES or Analog audio, and eight channels at 48k when using embedded HDSDI audio.
It is important to mention that the eight channel audio requires Prospect HD build 2.2.86 or newer for editing,
and that Adobe Premiere Pro 2.0 only currently supports six channels of audio.
Note that the option ChannelsAllMixedDownToTwo only mixes down channels one through six, it does not include
channels seven and eight. Also note that the mixdown is equal for all channels. In other words, back channels
are not lowered more than front channels.
Analog Audio Level
Users may select to record audio at 18dBU or 24dBU. This field deals with headroom and affects the audio
precision when converting to/from analog, the higher the number, the higher the precision.
Time Code tab
Users may select to record the time code embedded in the HDSDI input signal. Alternatively, time of the day may
be used to generate a time code, or the HR-F1’s recording time code may be selected. Note that Record Run is a
global setting stored by the system for any presets. In other words, this time code will be consistent across
presets and when reset or modified, the changes will apply to all presets.
When selecting Time Of Day or Record Run time code, users may select to use drop-frame time code for 29.97 or
59.95 frame rates. Time code for video is displayed in drop frame coding as HH;MM;SS;FF format. The semi-
14

colon denotes drop frame coding. Note that frames are not dropped when selecting drop-frame time code, only
the count of frames 01 and 02 is dropped after the first minute of recording, with the exception of every tenth
minute. In other words, the time code for the first minute goes from 00;00;59;29 to 00;01;00;02. The next 9
minutes are similar. The 10th minute time code goes from 00;09;59;29 to 00;10;00;00. The cycle repeats as if it
was at time code 00;00;00;00.
By default, the HR-F1 stores the time code of the first frame it records on every capture. This information is
appended to the end of the files it generates. The HR-F1 recognizes this information and regenerates a time
code based on the clock for the given file during playback. User bits are not saved. Also note that AVI clip’s time
code is only readable in Adobe Premiere using Prospect HD. Please visit www.cineform.com for more
information.
Optional LTC Time Code
Optionally, the Wafian HR-F1 can be ordered with its LTC time code in/outputs enabled. This ad-on allows you to
jam in time code into the recorder in order to sync to an external time code source. Please ask about upgrading
your HR-F1 to include LTC time code capability.
Player tab
Within this field Playback Format, Reference Source during playback, and different loopback playback options
may be selected.
Reference Source
Reference sources can be selected for playback of your clips, which is independent from the reference source
specified within the Video tab of your preset. In general the operator should use FreeRun for this field.
Option Description
External Use Ref-In port in the rear panel for reference
Input1 Use HDSDI signal reference
FreeRun Do not use a reference source
Play all clips consecutively
When selecting this checkbox, all clips displayed in the media bin will play back consecutively. When the last clip
has been played back, playback will stop. If Loopback Playback is also selected, all clips will be played
consecutively and after the last clip has been played back, the first clip will begin to play back in again. This
playback pattern will continue until playback is stopped manually.
Loopback Playback
When selecting this checkbox, selected clips will be played back in a loop. If Play all clips consecutively is also
selected, all clips will be played consecutively and after the last clip has been played back, the first clip will begin
to play back in again. This playback pattern will continue until playback is stopped manually.
Device Control tab
To enable device control, connect your RS422 controller to the back panel of the HR-F1. Within the Device
Control tab select the Allow Remote Control checkbox and select the Communication Port that your controller will
be communicating with, in most cases COM1. Note that currently only the Record, Stop, Playback, and Pause
commands are enabled. Other device control features will be available in the future as a software upgrade.
15

System Settings tab
Within the System Settings tab users may specify a port to use on the recorder for network device control over
an Ethernet connection. Basic authentication can also be established by specifying a User Name and Password
for remote users to enter before connecting to the recorder remotely. Please contact Wafian Customer Support
at support@wafian.com for the API to use this function.
Within the Operations section of the System Settings tab, users may choose to empty the contents of their media
folder, restart the HR-F1 system, or restart the Interface. Within the Media Library section, users can select to
sort the clips in the media bin based on their creation date, or their file name. Access to the HR-F1’s Event Log is
also present in this tab.
HR-F1 Event Log
Selecting to view the Event log displays the Event Viewer window. Within this window, selecting Wafian from the
tree on the left displays all logged events on the right panel. Double clicking on each of these event logs displays
their details. Note that the exact time codes of dropped frames are logged as individual events, which can be
viewed by selecting the Warning log for such event.
16

6. Recording
Press the Record button on the top left of the screen to start recording. The system will show the record
duration on the bottom of the screen. Pressing this button again will stop recording and add the clip to the
media bin on the bottom of the screen.
Other Recording Features
Buffer Indicators
The two progress meters next to the Record button indicate the amount of memory buffer space used by the
recorder. The meter on the top indicates the amount of memory coming in from the HDSDI input into the
system. The one on the bottom indicates the amount of memory being used to write to disk. In other words,
frames come in from the HDSDI input, get buffered, go through the compressor, and then get written to disk,
which is the slowest of the above processes. Hence, the meter on the bottom (disk buffer) will get full before the
one on the left is triggered. These meters are helpful for tuning and diagnosing settings that may cause frame
dropping. Because the HR-F1 is a tool for professionals pushing the hardware’s performance, there are setting
options that the hardware may not be able to sustain.
Error Indicators
DF - Drop Frames – Turns red if the system falls behind and drops a frame. If you are dropping frames, try
adjusting the encoder quality settings of your preset. Extreme temperatures is another possible reason for the
CPU to slow down and cause the system to drop frames.
System Error – A System Error dialog will display if the system detects an internal error. If you have
adjusted your settings to minimize the stress on the system and the errors persist, please report the problem
to support@wafian.com. When reporting a system error, please include:
17

Wafian HR-F1 serial number
Steps to reproduce the problem, including the error message displayed and the resulting problem
Manufacturer and model number of the camera/system that you were using to connect to the
HR-F1
Media format, resolution, and frame rate
Clip Properties
To view the properties of any of your clips, click and hold (or right click if you have a mouse) on the desired clip’s
thumbnail in the Thumbnail Bin and select Properties… Currently the clip’s path, resolution, time code, bit rate,
date of creation and size are displayed in this window. Click and hold again to delete or rename clips.
AUTO Recording
To start and stop recording at specific time codes embedded in the incoming HDSDI video, click the AUTO button
and specify in point and out point time codes.
As soon as you click OK, the recording time code settings will go into effect. The AUTO button will turn orange
when auto recording is enabled. To disable it, simply click on the AUTO button once again and
deselect Auto Record.
Keyboard Controls
If you have a keyboard connected to your HR-F1, pressing Ctrl+r will cause recording to start, while pressing
Ctrl+s will cause recording to stop.
Freeze Frames
To record freeze frames while previewing or recording, press the freeze frame button in the upper
right corner of the screen. You may press this button as many times and as frequently as you
wish. Freeze frames are recorded into the JPG format and using the name rules and location
specified in the Recorder tab of your preset.
18

7. Playback
n. You may press this button as many times and as frequently as you wish.
Press the clip’s thumbnail on the media bin to go into playback mode
Press the Play button on the top left corner to start playing the clip
While playing back a clip, you can press the Pause button on the top left of the screen. Pressing it again
resumes playback
Select anywhere within the progress bar (above the video display area) to skip to any part of the clip.
While paused, you may also click the Next Frame and Previous Frame buttons above the progress bar to
skip back or forward one frame at a time. Also see Keyboard Controls below
Click the time code just right of the progress bar to toggle between the clip’s duration, and the clip’s end
time code
To delete a clip, click and hold (or right click if you have a mouse) on the clip’s thumbnail in the Thumbnail
Bin and select Delete Clip
To rename a clip, click and hold (or right click if you have a mouse) on the clip’s thumbnail in the
Thumbnail Bin and select Rename
To return to record mode, press the Switch to Record Mode button -
The media path for the clips being displayed within the media bin is above the media bin
To browse other folders, click the icons on the bottom right side of the media bin
Freeze Frames
To record freeze frames while playing back, press the freeze frame button in the upper right
corner of the scree
Freeze frames are recorded into the JPG format and using the name rules and location specified in
the Recorder tab of your preset.
Keyboard Controls
If you have a keyboard connected to your HR-F1, pressing certain shortcut keys will allow you to skip to different
parts of your clips. The right or left arrow keys on your keyboard will display the next or previous frame. You can
19

also press the Home or End keys to go to the beginning or the end of a clip. Lastly, press Ctrl + left/right keys to
skip one full second back/forward.
8. System Configuration
Accessing Your Media Remotely
The Wafian HR-F1 can show up as a node on your local network. Each Wafian HR-F1 is given a unique name
based on its serial number. For example, if your serial number is HRF1-0003, the system name will be WafianHRF1-0003. Computers on your network can access your recorder with that name. To use the HR-F1 on a
network, a DHCP server must be available to assign an IP Address. Alternatively, you may configure the unit to
use a fixed IP address, please consult the Windows documentation for instructions.
By default, the recorded media is stored in M:\Media. This folder is also shared for read access on the network,
so that computers can access the recorded media with the following path:
\\wafian-hrf1-0003\media
Replace hrf1-0003 in the name above with your HR-F1’s serial number.
Copying Your Media onto an External Drive
Once you have recorded footage, you can copy your media onto an external drive. To do so simply connect your
IEEE 1394A (Firewire) or USB 2 drive to a corresponding port on the front panel of the HR-F1. Open an Explorer
window and notice that your external drive will now appear as an available drive on the system. Simply drag and
drop your AVI or MOV media files from their location within M:\Media onto your drive. Once the copying process
is complete, disconnect your external drive and continue normal operation of the HR-F1.
Swapping Removable Drives
The HR-F1 removable hard drive can be hot swapped while the system is in operation, or while the system is
turned off. To remove the hard drive from its bay simply pull its gray lever and extract the drive. If the hard
drive is removed while the recorder is in preview or playback mode, a Media Offline label will display at the
bottom of the screen, and normal operation will be limited until a hard drive is connected to the recorder once
again. After securely inserting a hard drive into the removable drive bay, select Disk Scan, the system will
automatically detect the hard drive, map its volume letter to match the recording path of your current preset, and
it will allow you to continue recording. If hard drives are swapped while the system is off, when it is powered up
again the Media Offline label will display until you select Disk Scan to map the new drive to the recording path of
the currently selected preset.
Note that recording to an external hard drive via USB or Firewire is always possible. While the removable hard
drive bay is empty, you may connect an external drive to the system. The recorder will automatically detect it
and after selecting Disk Scan, the recorder will map the external drive to the recording path of the currently
selected preset.
NOTE: This functionality applies to both standard removable hard drives as well as removable solid state drives.
IMPORTANT: Do not extract the removable hard drive while recording, as you may lose the clip being recorded at
that time. If you accidentally remove the drive while recorded and you wish to recover your clip, please contact
Wafian at support@wafian.com
.
20

Monitoring Video with External Monitors
To connect your Wafian HR-F1 to a VGA or DVI monitor for external monitoring, use the VGA port in the rear
panel. For DVI monitoring, simply connect your monitor using a DVI to VGA adaptor. This will mirror the control
video interface displayed on the HR-F1 front panel at 1024x768 resolution. For connecting to a monitor via HDSDI, connect your monitor to the HD-SDI Out ports in the rear panel of the HR-F1. Note that video going into
your recorder is simply looped out onto the HD-SDI Out ports, so it is possible to monitor video via HD-SDI while
in preview, record, or playback mode.
NOTE: The VGA signal coming out of the HR-F1 can be transmitted up to 10 feet. For monitoring at longer
distances, please use a VGA amplifier to strengthen the video signal.
21

9. System Specifications
HDSDI:
Component and Composite:
Video Formats:
HDSDI: 1 Input, 2 Output BNC
HD Component In & Out
SD Component/Composite in & Out
SDI, HDSDI
1920x1080: 23.98p, 24p, 25i, 25p, 29.97i,
29.97p, 30i, 30p
1920X1080: 23.98psf, 24psf, 25psf
1280X720: 50p, 59.94p, 60p
NTSC
PAL
4:2:2 - 8 or 10 bit color
Time code RP188, generated, time-of-day,
LTC (optional)
Component Analog
1920X1080: 25i, 30i
1280x720 50p*, 60p
NTSC
PAL
4:2:2 - 8 or 10 bit color
Time code RP188, generated, time-of-day,
LTC (optional)
Audio Formats:
Recording Formats:
Storage Configurations & Capacity:
Interfaces:
Dimensions:
Case: Ruggedized Steel Chassis
Power: AC: 100 - 240 volt
2 channel 48 kHz AES/EBU or Analog
8 channel 48 kHz HDSDI Embedded
CineForm Digital Intermediate™
AVI & MOV
YUV 4:2:2 (8 or 10 bit)
VBR 12-25 MB/s
~10 Hours – Hot swappable 750 GB SATA II
(15MB/s)
External bay with Firewire (IEEE 1394), eSata,
USB II outputs (optional)
IEEE 1394A
USB 2
Gigabit Ethernet
RS 422
368 mm (W) x 267 mm (D) x 254 mm (H)
8.4in touch-screen color display (1024x768)
22

DC: 24 volt 3-pin XLR (optional)
Notes and Troubleshooting
Operating Temperature: 32-104° F or 0-40° C
NOTE: Specifications are subject to change.
* currently 6 missing horizontal lines at the bottom of each frame.
10.
Thank you for using the Wafian HR-F1, please know that we always appreciate your feedback regarding the
current features and functionality of the HR-F1, as well as suggestion for future improvements. Be sure to visit
our knowledgebase at www.wafian.com/Support.htm or contact us at support@wafian.com.
Recording Length and Storage Capacity
The length of uninterrupted recording that the HR-F1 is capable of performing varies depending on the format
that you select, as well as other variables such as remaining disk capacity and environmental conditions. For
example, under normal conditions and using a 1920 X 1080 23.97psf preset, the HR-F1 can record up to 8 hour
clips. For other formats such as 720p60 the HR-F1 can record up to 6.5 hour clips. However, recording length
may vary if the HR-F1 is exposed to extreme heat, or if its disks are close to being full. For longer continuous
recording duration, lower the encoding quality. Please contact our Customer Support group at
support@wafian.com or visit our website at www.wafian.com for more information regarding recording duration
capabilities for different configurations.
The HR-F1 can store and play back 10+ hours of footage at full resolution 1920 X 1080 24P 10 bit clips. Please
contact our Customer Support group at support@wafian.com or visit our website at www.wafian.com for more
information regarding storage capacity for different configurations. Note that the system will stop recording and
display a warning message when it has only 500 MB of storage capacity left on disk.
IMPORTANT DISCLAIMERS
GOOD ADVICE FOR DIGITAL ACQUISITION: As with any form of digital acquisition, it is recommended that
you back up your media frequently. There are various ways of extracting your media from the recorder, the HRF1 can be connected to an external storage device via Firewire, USB 2, or Ethernet. Your footage is your most
valuable asset, keep multiple copies of it at all times.
Third party software and system configuration changes: We don't recommend and cannot support
installing and running 3
Because of the broad range of configuration changes that can be made to the Operating System and its
components, we do not recommend that you make any configuration changes to your HR-F1 system. We cannot
support HR-F1 systems where the original configuration has been modified. Do so at your own risk.
Playback of media generated by other tools: While in most cases the HR-F1 will play back media generated
by a variety of professional video/audio tools, we currently only support the correct playback of media generated
by the HR-F1.
Internet use and vulnerability: Because it is possible to connect the Wafian HR-F1 to a network and/or the
Internet, it can become vulnerable to viruses, spyware, and other harmful programs. Please be aware that
protecting the HR-F1 from such risks is the responsibility of its user. Addressing problems that may derive from
this risk is not covered by the product’s warranty or any Support agreement.
rd
party software on the HR-F1 as that may affect the performance of the Wafian HR-F1.
23

Rough handling: Even though the HR-F1 has been designed to work out in the field, as with any electronic
reement
equipment we recommend the use of caution when moving the HR-F1 while in use and transporting the system.
As an additional safety measure please inquire about the HR-F1’s custom Pelican case.
Temperature range: Operate the HR-F1 in proper temperature environments (32-104° F or 0-40° C). As a
result of extreme temperatures and overheating the system may perform poorly, including dropping frames.
Bit rate modifications: Because of the variable bit rate, the codec will expand to preserve quality, which may
cause to overload the system and consequently it may drop frames. To reduce this risk lower the gain on your
camera to reduce noise, or change the encoder quality settings within the Recording Format tab of the
Application Preferences window. Selecting the default setting of High is recommended, Custom_FilmScan1 and
Custom_FilmScan2 should only be used for special circumstances. Please contact our Support team if you would
like additional information at support@wafian.com. You can also select to stripe your disks rather than mirror
them. For optimal performance, the highest bit rate at which your media files should be recorded is 30 MB/sec
average or less. To view the bit rate of each recorded media file, right click (or click and hold) on its thumbnail
within the media bin and select “Properties…” Some of the factors that will affect the bit rate of your footage are
level of detail in your images, light, gain on your camera, and encoder quality settings among others. Please visit
www.wafian.com for further information.
Power source and cabling: Before operating the HR-F1, be sure that it is connected to a proper (clean)
source of power, and that each of your cables, barrels (tubes), and converters are in proper working condition.
Please know that the quality of the image that the HR-F1 receives can be affected if you are connected to an
irregular source of power or if your peripherals have been damaged.
11. Software License Ag
1. This is an agreement between Wafian Corporation (“Wafian”) and Licensee, who is being licensed to use the
Wafian HR-F1 software and accompanying user documentation (“Software”). Use of the Software constitutes
acceptance of this agreement.
2. Subject to payment of applicable license fees for the Software and the terms of this agreement, Wafian hereby
grants Licensee a non-exclusive, non-transferable royalty-free license to use the Software, in binary executable
form. Licensee may use the Software only for Licensee’s internal business purposes and only on the system on
which the Software was installed. Subject to earlier termination as provided below, the term of the license is
perpetual unless otherwise agreed by the parties. Licensee hereby covenants that it will not and will not allow
others to:
a. modify, adapt, reproduce or transfer the Software;
b. permit other companies or individuals to use the Software;
c. modify, translate, reverse engineer, decompile, disassemble (except to the extent applicable laws
specifically prohibit such restriction), or create derivative works based on the Software;
d. lease, assign, or otherwise transfer rights to the Software; or
e. remove any proprietary notices or labels from the Software.
Wafian is and remains the owner of all title, rights, and interests in the Software. The Software is protected by
copyright and other intellectual property laws and by international treaties. Wafian reserves any rights not
expressly granted under this agreement.
3. The Software contains confidential and proprietary information of Wafian, and Licensee agrees to take all
reasonable precautions to ensure that no unauthorized persons have access to the Software. Licensee will not
make copies of the Software or allow copies of the Software to be made by others, unless authorized by this
agreement. Licensee may make copies of the Software for backup purposes only. Any actual or threatened
breach of any of the terms of this agreement will constitute immediate and irreparable harm to Wafian for which
24

monetary damages would be an inadequate remedy. Licensee agrees that Wafian may, in addition to any other
remedy available under this agreement or at law, obtain injunctive or other appropriate equitable relief for any
such actual or threatened breach, and Wafian may take any other measures necessary to prevent unauthorized
use.
4. NO WARRANTIES. Wafian expressly disclaims any warranty for the Software. Software and any related
documentation are provided “as is” without warranty of any kind, either express or implied, including, without
limitation, the implied warranties of merchantability, fitness for a particular purpose, or non-infringement. The
entire risk arising out of use or performance of the Software remains with Licensee.
5. NO LIABILITY FOR DAMAGES. In no event shall Wafian be liable for any damages whatsoever (including,
without limitation, damages for loss of business profits, business interruption, loss of business information, or any
other pecuniary loss) arising out of use of or inability to use the Software, even if Wafian has been advised of the
possibility of such damages. UNDER NO CIRCUMSTANCES SHALL WAFIAN OR ITS RESELLERS BE LIABLE TO
LICENSEE OR ANY OTHER PERSON FOR ANY INDIRECT, SPECIAL, INCIDENTAL, OR CONSEQUENTIAL DAMAGES
OF ANY KIND, INCLUDING WITHOUT LIMITATION, DAMAGES FOR LOST PROFITS OR REVENUE, BUSINESS
INTERRUPTION, LOSS OF DATA, COMPUTER FAILURE OR MALFUNCTION, OR ANY AND ALL OTHER DAMAGES
OR LOSSES, WHETHER FORESEEABLE OR NOT. IN NO EVENT WILL WAFIAN BE LIABLE FOR ANY DAMAGES IN
EXCESS OF THE AMOUNT WAFIAN RECEIVED FROM LICENSEE FOR A LICENSE TO USE THE SOFTWARE, EVEN
IF WAFIAN SHALL HAVE BEEN INFORMED OF THE POSSIBILITY OF SUCH DAMAGES.
6. Licensee agrees to defend and indemnify Wafian and hold Wafian harmless from all claims, losses, damages,
complaints, or expenses connected with or resulting from Licensee's business operations. Wafian shall defend
Licensee against (or, at Wafian’s option, settle) any and all third party claims made or brought against Licensee
as a result of the Software’s infringement of a third party’s patent, copyright or trade secret and shall indemnify
and hold Licensee harmless from any and all final judgments, damages, costs, liabilities or expenses, including
reasonable attorney’s fees, suffered or incurred by Licensee in connection with any such claim. Licensee agrees
that Wafian shall be relieved of its obligations under this Section unless Licensee notifies Wafian of such claim
within ten (10) days after Licensee’s receipt thereof and gives Wafian the sole authority to defend and settle such
claim, the relevant information then in Licensee’s possession and, at Wafian’s expense, reasonable assistance for
Wafian to settle and/or defend any such claim. If the Software becomes the subject of such an infringement
claim, then Wafian may, at its option and expense (a) procure for Licensee the right to continue to use the
Software; (b) replace or modify the Software with other suitable and reasonably equivalent Software or parts
thereof so that the Software becomes non-infringing; or (c) if it is not commercially reasonable to take the
actions specified in items (a) or (b), terminate this agreement and refund the license fees previously paid to
Wafian for the applicable Software, less a pro rata amount attributable to Licensee’s prior use of the Software.
Notwithstanding the foregoing provisions, Wafian assumes no liability for any infringement claims with respect to
the modification of the Software by Licensee or other parties when the infringement would not have occurred but
for such modification, or the combination of the Software with any other product that is not a Wafian product,
when the infringement would not have occurred but for such combination. THE FOREGOING PROVISIONS OF
THIS SECTION STATE THE SOLE AND ENTIRE LIABILITY AND OBLIGATIONS OF WAFIAN AND THE EXCLUSIVE
REMEDY OF LICENSEE WITH RESPECT TO ANY INFRINGEMENT OF ANY INTELLECTUAL PROPERTY RIGHT BY
THE SOFTWARE OR WAFIAN.
7. Wafian has the right to terminate this agreement and Licensee's right to use this Software upon any material
breach by Licensee. Upon any such termination, Licensee must return or destroy all copies of the Software. No
refunds or credits will be due.
8. This agreement is the entire and exclusive agreement between Wafian and Licensee regarding this Software.
This agreement replaces and supersedes all prior negotiations, dealings, and agreements between Wafian and
Licensee regarding this Software, and supersedes any terms on Licensee purchase orders or similar ordering
documents.
9. License acknowledges that Licensee purchased a license to use the Software as part of an overall hardware
and software solution that includes system components from third parties. Use of the Wafian HR-F1 system
25

requires accepting license agreements and hardware terms from multiple vendors. Licensee agrees to adhere to
all other relevant vendor license agreements that are applicable to third party components of the system.
10. This agreement shall be governed by and shall be interpreted in accordance with the laws of the state of
California (excluding its conflict of laws provisions) except that Wafian may enforce its intellectual property rights
before the competent courts of any jurisdiction where an act of infringement has occurred. Licensee agrees that
the courts located in the county of San Diego, California, USA, will constitute the sole and exclusive forum for the
resolution of any and all disputes arising out of or in connection with this agreement and Licensee hereby
irrevocably consents to the personal jurisdiction and venue of such courts and irrevocably waives any objections
thereto. The United Nations Convention on Contracts for the International Sale of Goods is expressly excluded
from this agreement. In the event of any dispute between the parties to this agreement, the prevailing party shall
be entitled to recover attorneys’ fees and costs of suit from the other party in addition to such other relief as may
be granted.
11. This agreement is valid without Wafian’s signature. It becomes effective upon clicking “Agree” or Licensee's
use of the Software.
12. Failure by either party to enforce any of its rights under this agreement shall not be taken as or deemed to
be a waiver of such. No waiver or amendment of any provisions of this agreement shall be valid or binding
against either party unless the waiver or amendment is made in writing and signed by the duly appointed
representatives of both parties. If any provision of this agreement is held to be unenforceable, such provision
shall be reformed only to the extent necessary to make it enforceable, and the remainder of this agreement shall
nonetheless remain in full force and effect.
13. Licensee agrees not to export the Software or any part or direct product thereof in violation of U.S. export
laws and regulations. Licensee may not assign this agreement to any third party without first obtaining the
express written consent of Wafian, and any assignment by Licensee without such consent shall be null and void.
26

12. Wafian HR-F1
One (1) Year Limited Warranty
Wafian’s warranty obligations are limited to the terms set forth below:
Wafian Corporation (“Wafian”) warrants the hardware product against defects in materials and workmanship for a
period of ONE (1) YEAR from the date of original purchase. If a defect exists, Wafian will, at its option, (1) repair
the product at no charge, using new or refurbished replacement parts, (2) exchange the product with a product
that is at least functionally equivalent to the original product. A replacement product/part assumes the remaining
warranty of the original product or ninety (90) days from the date of the replacement or repair, whichever
provides longer coverage for you. When a product or part is exchanged, any replacement item becomes your
property and the replaced item becomes Wafian’s property.
Prior to returning a product to Wafian, you must request a RMA number. Please contact Wafian at 858-863-4166
option 2 or support@wafian.com to explain the problem and request an RMA number. The RMA number must be
included with the package and be labeled on the box. Upon receiving the RMA number, deliver the product at
your expense to Wafian.
When you contact Wafian for warranty service, please be prepared to provide your name, address, telephone
number, and a copy of the bill of sale bearing the appropriate Wafian serial numbers as proof of date of the
original purchase. In addition, you will need to include the RMA number for processing and tracking as
mentioned above.
This Limited Warranty applies only to hardware products manufactured by or for Wafian that can be identified by
the “HR-F1” trademark, trade name, or logo affixed on them.
separate Software License Agreement included with the software.
apply to any non-Wafian products even if packaged or sold with Wafian hardware. Non-Wafian products may
provide their own warranty. This warranty does not apply and maybe void if the product has been damaged by
accident, abuse, misuse, or misapplication; if the product has been modified without the written permission of
Wafian; or if any Wafian serial number has been removed or defaced. Wafian reserves the right to use both new
and refurbished components during the repair process for any unit under warranty that has been approved for
repair.
Wafian software is warranted pursuant to a
This Limited Warranty does not
The Warranty and remedies set forth above are exclusive and in lieu of all others, whether oral or written,
expressed or implied. Wafian specifically disclaims any and all implied warranties, including, without limitation,
warranties of merchantability and fitness for a particular purpose. No Wafian distributor, agent, or employee is
authorized to make any modification, extension, or addition to this warranty.
WAFIAN IS NOT RESPONSIBLE FOR DIRECT, SPECIAL, INCIDENTAL, OR CONSEQUENTIAL DAMAGES
RESULTING FROM ANY BREACH OF WARRANTY, OR UNDER ANY OTHER LEGAL THEORY, INCLUDING BUT NOT
LIMITED TO LOST PROFITS, DOWNTIME, GOODWILL, DAMAGE TO OR REPLACEMENT OF EQUIPMENT AND
PROPERTY, AND ANY COSTS OF RECOVERING, REPROGRAMMING, OR REPRODUCING ANY PROGRAM OR DATA
STORED IN OR USED WITH WAFIAN PRODUCTS. Some states do not allow the exclusion or limitation of
incidental or consequential damages or exclusions or limitations on the duration of implied warranties or
conditions, so the above limitations or exclusions may not apply to you. This warranty gives you specific legal
rights, and you may also have other rights that vary by state.
WAFIAN IS NOT RESPONSIBLE FOR WARRANTY REPAIRS OR REPLACEMENT IF THE PRODUCT OR PRODUCTS
HAVE NOT BEEN PAID FOR IN FULL. IF THERE ARE OTHER INVOICES THAT HAVE NOT BEEN PAID IN FULL, NO
WARRANTY WILL BE AVAILABLE FOR THE PRODUCT OR PRODUCTS UNTIL THE ACCOUNT IS PAID IN FULL.
27

NOTE: Before delivering your product for warranty service, it is your responsibility to keep a
separate backup copy of the software and data, and disable any security passwords. Data recovery
is not included in the warranty service and Wafian in not responsible for data that may be lost or
damaged during transit or repair.
13. Contact Wafian
Wafian Corporation Technical Support
3525 Del Mar Heights Rd. #417
San Diego, CA 92130
858-863-4166 option 2
support@wafian.com
www.wafian.com/Support.htm
The contents of this document are copyright © Wafian Corporation 2005-2008. All rights are reserved.
WAFIAN™ and the Wafian logo are trade marks of Wafian Corporation. The technologies and processes
described on this document are subject to other intellectual property rights, owned or controlled by Wafian
Corporation.
28
 Loading...