

ORFEUSZ206
Advanced Speaker Management System
for Surround Sound and Effects
User Manual
Software version 1.2
July 2007

____________________________________________________________________________________
Wrocław Audio Force
ORFEUSZ206
user manual
1
Important Safety Instructions
When you install Orfeusz in your equipment rack, make sure maximum operating temperature is
observed. In particular, avoid placing it directly above heat producing equipment such as power
amplifiers.
To prevent shock or fire hazard, do not expose the unit to rain or moisture.
For safety reasons, this unit is earthed-grounded. When connecting it to a power outlet, make sure a
ground terminal is available.
Always replace blown fuse with same type fuse and rating.
Unpacking and Inspection
Thoroughly inspect the packing materials and report any damage to the carrier at once. Report
equipment malfunction to your dealer.
In the box you should find the following items: Orfeusz206 hardware unit, power chord, USB cable,
the user manual as well as a CD-ROM with the software and manuals in various languages. Inspect
the contents and report any missing item.
After unpacking the unit, save all packing materials in case you ever need to ship the unit.
Cleaning Instructions
To clean the hardware unit, simply wipe it with a soft cloth. You might use a mild soap and water
solution to help loosen stains and dirt. Do not use any other detergents!
Technical Support
We at Wrocław Audio Force really want you to make the best of your Orfeusz.
We welcome your questions on the phone or by email (support@waf.com.pl). An engineer will do his
best to provide accurate answers and solutions to your possible problem.
If your unit needs to be serviced, contact your dealer or our support service before shipping it back (see
warranty below).
We also welcome your suggestions. Is there a feature that could be improved? Is there a feature that
should be introduced? Please let us know; we will consider the change and get back in touch with you.
Warranty
This product is covered by a warranty of 1 year from the date of original purchase, or accordingly to
your local regulations. Warranty is granted to the original purchaser as well as subsequent owners during
the warranty period.
If you suspect your unit to malfunction although you followed the instructions contained in the user
manual, contact the dealer where you purchased your product or our support service
(support@waf.com.pl).
Please be aware that this warranty does not cover damage occurring during shipment of this product.
Claims for shipping damages must be made with the carrier.
Wrocław Audio Force
ul. Kotlarska 40
50-120 Wrocław (Poland)
Tel +48 (0)71 343 99 44
www.waf.com.pl

____________________________________________________________________________________
Wrocław Audio Force
ORFEUSZ206
user manual
2
Table of Contents
Important Safety Instructions, Unpacking and Inspection, Cleaning Instructions,
Technical Support, Warranty …………………………………………………………….… 1
Section 1: Getting Started ………………………………………………………………. 3
General Overview 3
Hardware Presentation 3
Software Conventions 6
Section 2: Device Installation and Software Removal ………………………………. 7
Software Installation 7
Hardware Installation 9
Software Removal 10
Section 3: Spatial Mode ………………………………………………………………. 12
General Remarks about Loudspeaker Positioning 13
Orfeusz206 Loudspeaker Positioning Tool 13
Orfeusz206 Loudspeaker Calibration Tool 16
Sound Field Models 17
Software Environment 19
Master 19
Virtual Sound Field 19
Equalizer 20
Effects 21
Spatial Effects 21
Automove 24
Trajectory Editor 27
Trajectory Playlist Manager 28
Monitor 29
Joystick Configuration 30
MIDI Control and MTC synchronization 32
Section 4: Stereo Mode ………………………………………………………………. 34
Input Mixer 34
Output Mixer 36
System Configuration 36
Example 1: Three-way stereo Linkwitz-Riley 12dB/oct 39
Example 2: Two-way stereo with subwoofers 41
Example 3: Double stereo with subwoofers 44
Section 5: Preferences, System Update and Stand-Alone Modes ………………. 46
Preferences 46
System update 47
Stand-Alone Modes 47
Specifications ……………………………………………………………………..………… 48
Appendix: List of MIDI controllable parameters …………..……………..…………….. 49
____________________________________________________________________________________
Wrocław Audio Force
ORFEUSZ206
user manual
3
Section 1: Getting Started
Thank you for choosing the WAF Orfeusz206 Advanced Speaker Management System. Orfeusz206 was
carefully designed, manufactured and tested, and we hope that you will be using it for long years with
total satisfaction.
Orfeusz206 is a spatial sound processing unit, delivered with its companion software running on a
standard PC equipped with a Windows™ operating system. Orfeusz206 will introduce spatial sound
attributes in your show, and allow you to perform real-time surround mixing. Additionally, Orfeusz206
will be helpful in conventional stereo setups. As this kind of device is not common on the market, we
recommend that you read thoroughly the user manual to make the best of your new equipment.
This first section deals with general aspects of the device, including hardware features and some
software conventions.
General Overview
Orfeusz206 can work either in Spatial Mode, or in Stereo Mode, online (host-connected) or stand-alone.
In Spatial Mode, Orfeusz emulates a user-defined acoustic model based on room properties and sound
objects1 positions. In Stereo Mode, Orfeusz206 can route, shape and distribute in various ways the stereo
input to outputs for a stereo sound setup.
Spatial and Stereo modes are mutually exclusive: you run either a spatial sound
setup, or a stereo one, and it is your responsibility to operate Orfeusz206 in the
appropriate mode.
To access the audio processing parameters, you need to launch a remote session (i.e. you need to connect
the hardware unit to a free USB port of your PC and run Orfeusz206 control application). In remote
session, all parameters can be altered, and changes take effect immediately. You need also to be in
remote session in order to store or delete stand-alone modes.
When running stand-alone, the external unit does not try to initiate a connection with the computer, and
instead, processes audio according to parameters stored in memory. Stand-alone modes are appropriate
for static spatial scenery or stereo configuration, and Orfeusz206 provides memory space for 3
independent sets of parameters. Selection of the operating mode is made with the front panel pushbutton.
Hardware Presentation
1
An object in this context is either one of the sources or the 'listener' – see section 3.
1
234
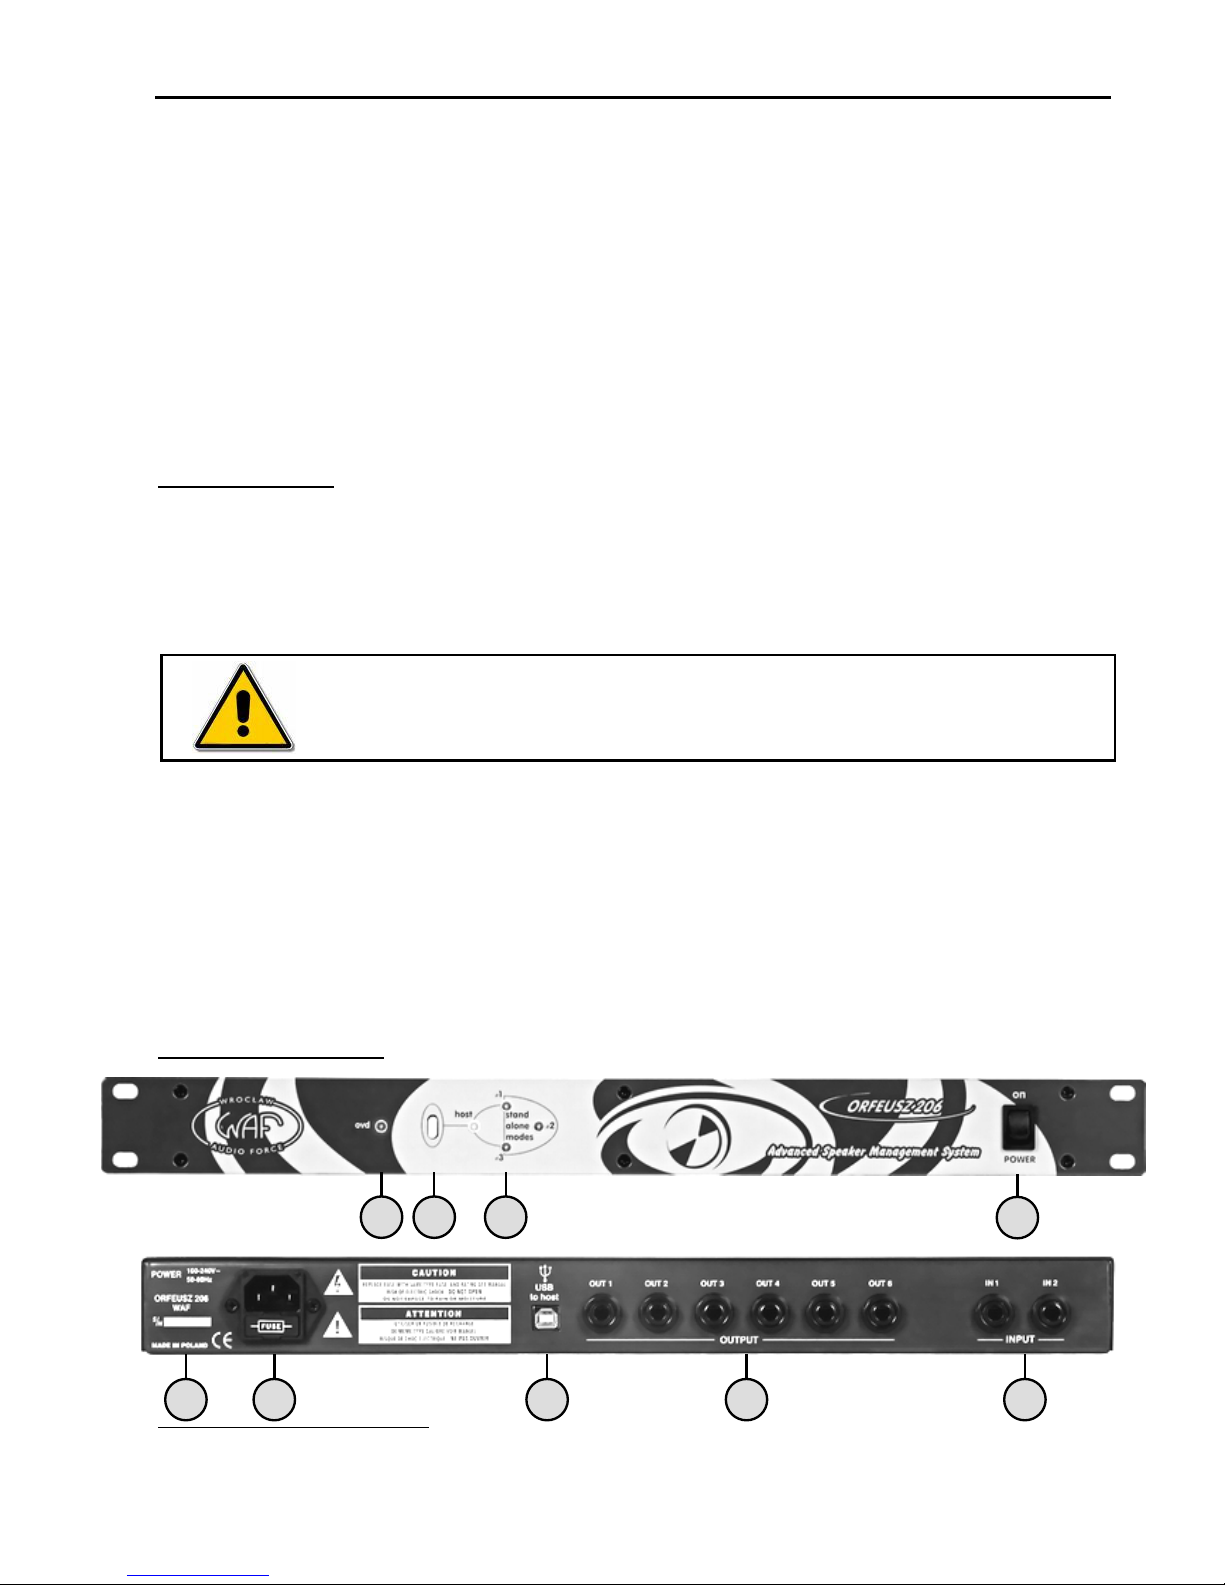
Front Panel
56789
Rear Panel
____________________________________________________________________________________
Wrocław Audio Force
ORFEUSZ206
user manual
4
1
OVD led: lights on when signals are clipping during processing
2
Mode pushbutton: press to select operating mode
3
Mode leds: indicate in which mode device is running
4
Power rocker
5
Serial number label
6
Power connector with fuse drawer
7
USB type B connector to host PC
8
Balanced output jacks ¼"
9
Balanced input jacks ¼"
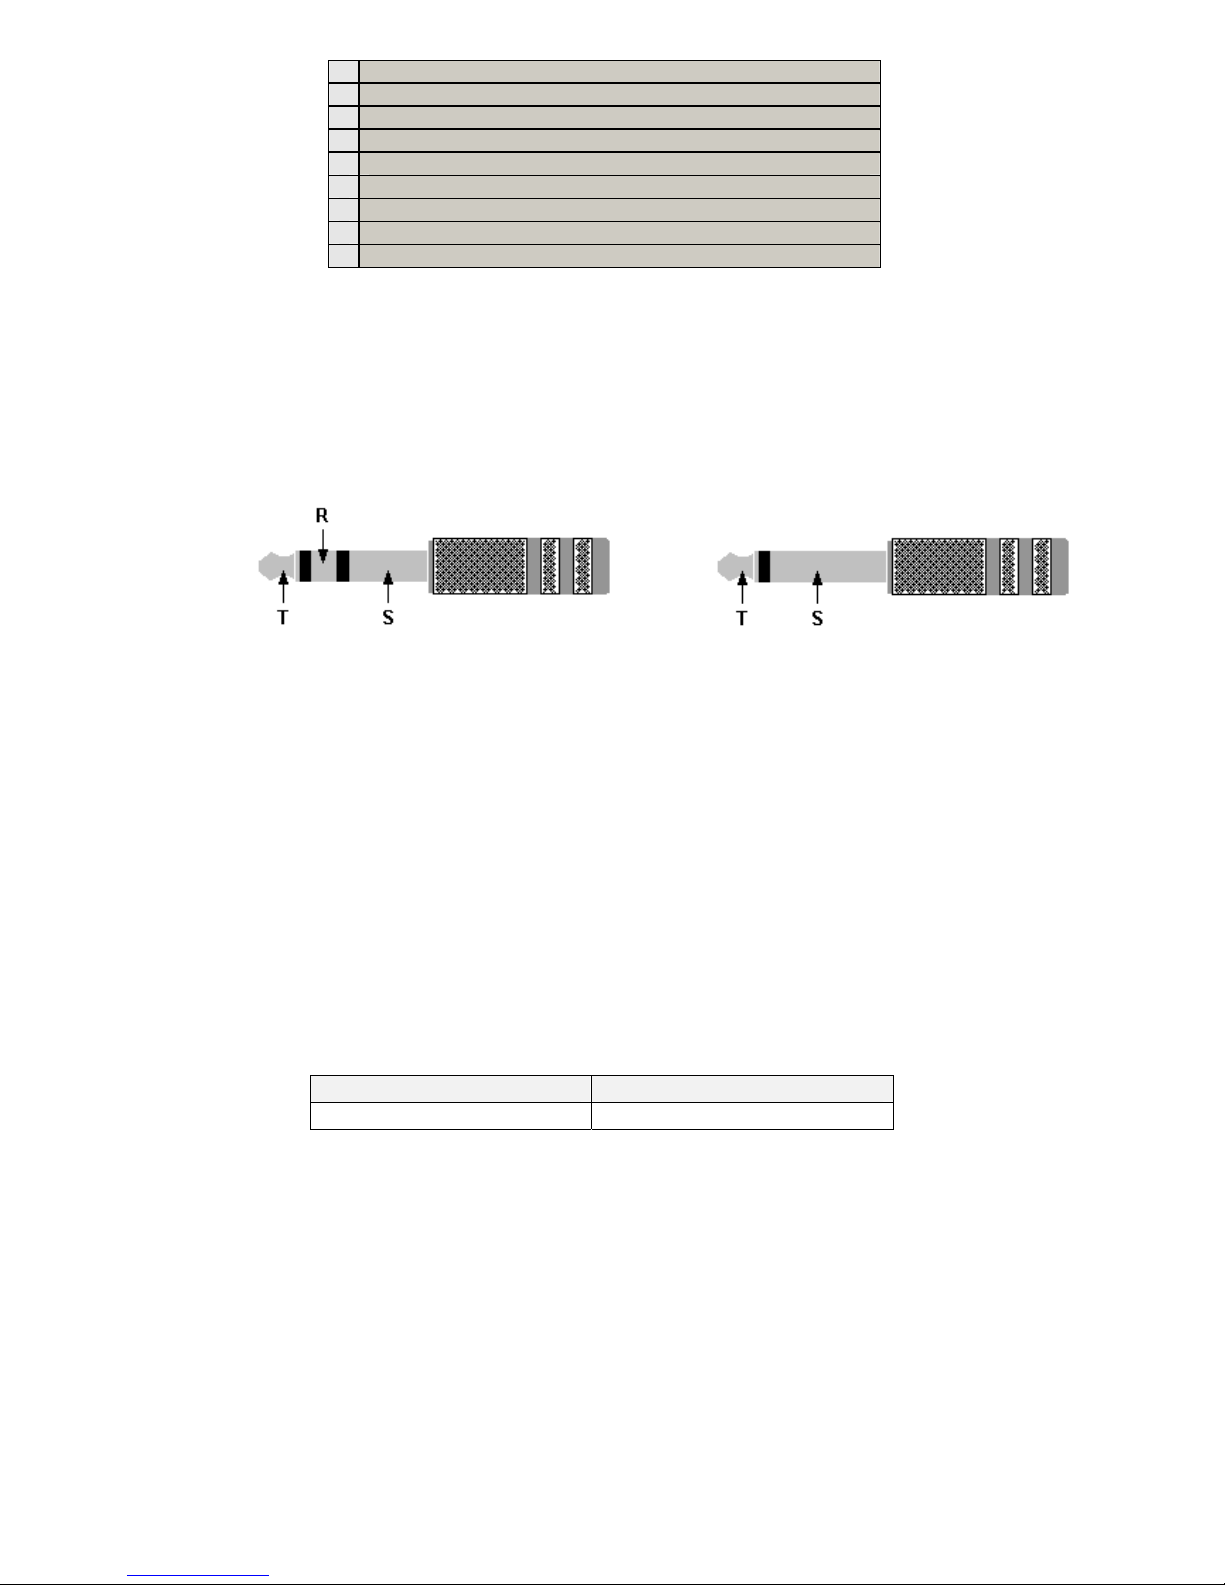
Audio inputs (9) and outputs (8) are symmetrical balanced, which means that you can feed here either
symmetrical or asymmetrical signals. Just make sure that your cables conform to the most widely spread
standard illustrated below. In particular, in no case should the ring terminal on a stereo jack be left
unconnected. A safe rule is to always use stereo jacks for symmetrical signals, and mono jacks for
asymmetrical signals.
Symmetrical jack Asymmetrical jack
T (tip): Positive phase (hot)
R (ring): Negative phase (cold)
S (sleeve): Ground
T (tip): Signal
S (sleeve): Ground
Signals to inputs and from outputs are at line level. Never attach audio power amplifier outputs directly
to any of the unit's connectors. If you wish to plug a microphone or an instrument to Orfeusz, you will
need to intercalate a preamplifier.
Orfeusz206 is equipped with a universal power supply and will work with any AC mains voltage
between 100V and 240V. If you travel abroad, you don't need to care about anything except having an
appropriate power chord at destination. Keep in mind that, for safety reasons, Orfeusz must be earthgrounded.
If the fuse blows, replace it with a same type and rating fuse. See below the table for fuse specifications.
Remove the power chord from the unit, and lift out the drawer (6) to access the fuse. If the fuse blows
frequently, this might be a sign of malfunction. Contact your dealer or our support service.
Fuse Type Location
T 630 mA (slow type) Power receptacle on rear panel
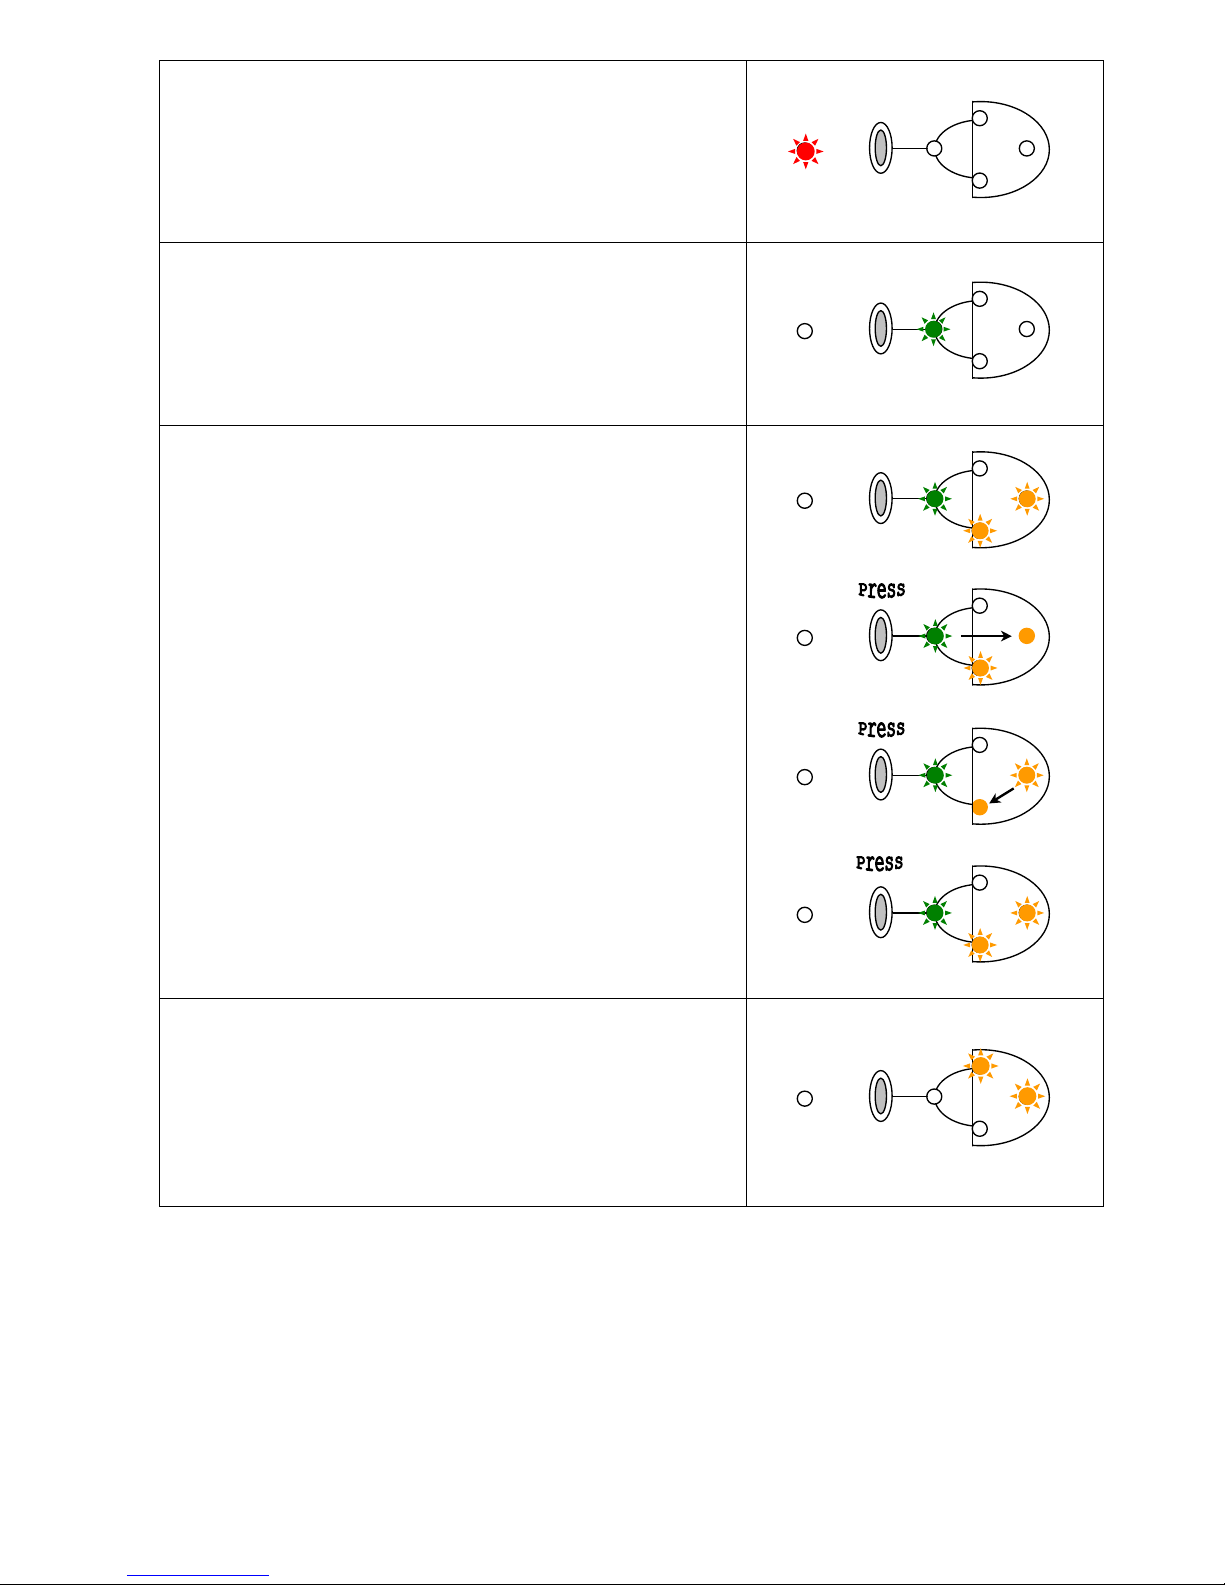
When you switch the hardware on, some leds are blinking in order to let you know that the device is
waiting for your input. Indeed, you can choose either to start a host-remote session or a stand-alone
mode if previously stored. The table on next page provides details of the leds' and pushbutton's (2)
behaviour at start-up.
While the unit is running, you can anytime switch to another mode (either to a stored stand-alone mode,
or begin a remote session) pressing accordingly the pushbutton. Be aware that outputs will be muted
when you press the pushbutton, until the device starts again in the selected mode.
____________________________________________________________________________________
Wrocław Audio Force
ORFEUSZ206
user manual
5
ovd
host
#1
#2
#3
ovd
host
#1
#2
#3
ovd
host
#1
#2
#3
ovd
host
#1
#2
#3
ovd
host
#1
#2
#3
ovd
host
#1
#2
#3
ovd
host
#1
#2
#3
If no stand-alone mode is stored, and the device is not
connected, the red OVD led (1) is blinking.
When this occurs, the only thing you can do is connect
Orfesuz206 to a host computer and start a remote session (see
next case below). Stand-alone modes can be stored or deleted
within the control application while the unit is running a
remote session.
If no stand-alone mode is stored, and Orfeusz is connected to
a powered computer, the green led HOST (3) is blinking to
inform you that the device is ready for a remote session.
To start a remote session, you need to launch Orfeusz
companion application and select the Connect item from the
File submenu. As soon as you start the remote session, HOST
led will light on and stop blinking.
If modes #2 and #3 for example were stored, and the device is
physically connected to a powered computer, green led
HOST, and orange leds MODE #2 and MODE #3 (3) are
blinking. At this point you can either start a remote session, or
select one of the two available stand-alone modes by pressing
the pushbutton (2).
If you press the pushbutton once, led MODE #2 will light on
and stop blinking, meanwhile leds HOST and MODE #3 will
keep on blinking 3 times. When these leds stop blinking,
settings corresponding to stand-alone mode #2 are recalled
from memory, and the device starts operating in this mode.
While the latter leds are still blinking, you can press the
pushbutton again to select stand-alone mode #3.
If you press the pushbutton once again, you will get back to
the original situation, where Orfeusz awaits that you either
connect for a remote session, or select a stand-alone mode
among the ones available.
If the device is not physically connected, or if it is connected
but the PC is not powered, and (for example) stand-alone
modes #1 and #2 are available, orange leds MODE #1 and
MODE #2 are blinking.
Press once to select mode #1, or twice to select mode #2.
After a short while, the led of the selected mode will light on
without blinking, and the other led will turn off. At this
moment, the device starts operating in the selected mode.
____________________________________________________________________________________
Wrocław Audio Force
ORFEUSZ206
user manual
6
Software Conventions
As already mentioned, Orfeusz will either run a Spatial Mode or a Stereo Mode.
When you start Orfeusz control application for a remote session, the first thing you should do – and
before connecting – is select between these two modes.
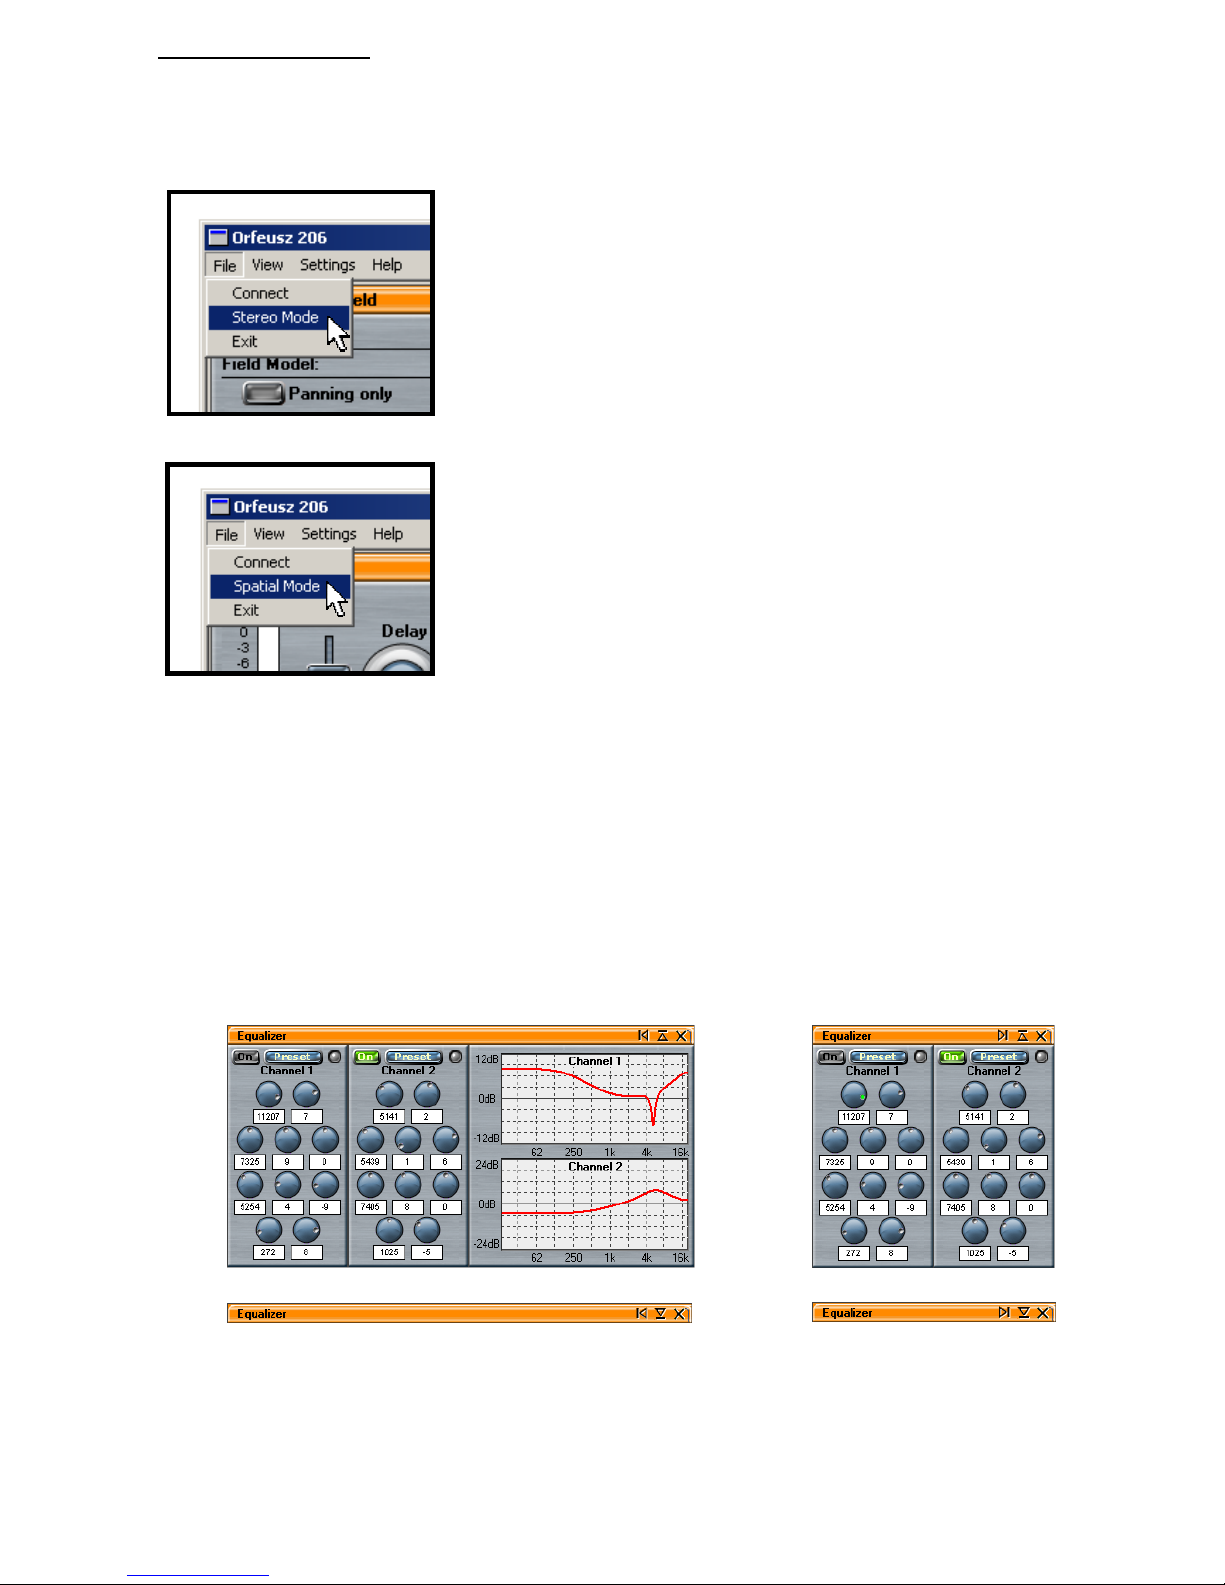
If the software is set in Spatial Mode, access the Stereo Mode in the File
submenu.
Conversely, if Orfeusz control application is set in Stereo Mode, click
the Spatial Mode item in the File submenu for the device to operate in
Spatial Mode.
Orfeusz control application will start in the same mode that was run in the preceding remote session.
In order to let you organize your screen space in the way you find it most practical, we provided a
custom type of window, which can be arranged in various ways.
As an example, we describe here the Equalizer window, as available in Spatial Mode.
The pictures below show how the Equalizer window can be displayed. Available controls in the title bar
allow you to show or hide window's features in order to save space on screen. The window can also be
fully closed if not needed, clicking the (X) control. Window appearance has no effect on sound
processing.
For your convenience, screen general layouts may be further saved and recalled, like any preset (Window
→ Custom → Presets in the main menu). Thus you can organize, store and recall custom application
layouts anytime.
____________________________________________________________________________________
Wrocław Audio Force
ORFEUSZ206
user manual
7
Section 2: Device Installation and Software Removal
This section describes how to install/uninstall the software onto/from your computer, and what to do
when you connect the hardware for the first time.
Depending on your Windows™ operating system version and configuration, the procedure described
below, as well as the dialogue boxes shown, might slightly differ. If you are used to install applications
on your computer, the following instructions will appear quite like a routine. If you are not, it might be a
good idea to get some help from a reliable computer 'freak', or from your dealer.
Software Installation
1. Before you begin, make sure the unit is not powered or not connected to the computer.
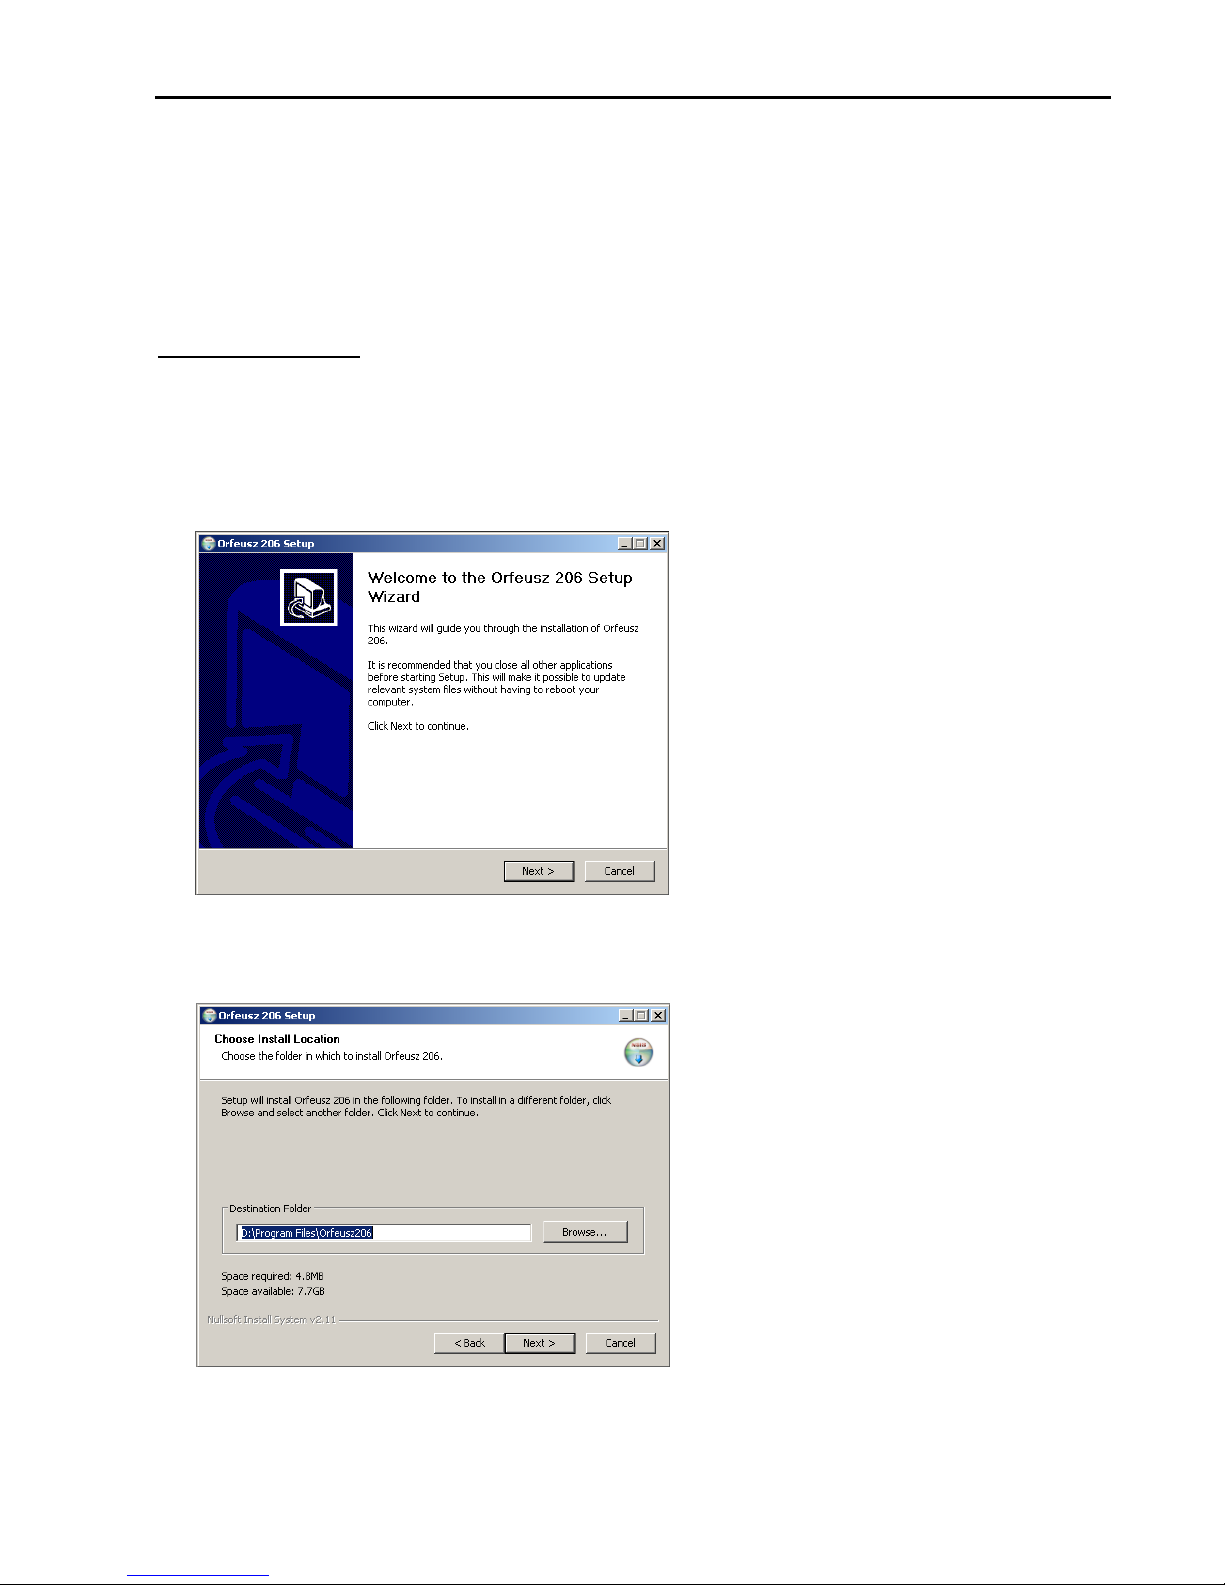
2. Start installing the software, either from the CD-ROM supplied with the unit, or after you
downloaded the newest release from our website (http://www.waf.com.pl). A window similar to the
one below will appear. Click 'Next'.
3. The next window will prompt you where files should be copied. By default, a new directory named
Orfeusz206 will be created in Program Files directory. Click 'Next' to validate.
4. The following window will prompt you what name to give to the item that will appear in the Start
Menu after installation. Default name is Orfeusz 206. Click 'Install'.

____________________________________________________________________________________
Wrocław Audio Force
ORFEUSZ206
user manual
8
5. Depending on your operating system version and configuration, the following warning dialogue box
might popup.
Click 'Continue Anyway'.
6. Files are now being extracted and copied. When this step completes, click 'Next'.
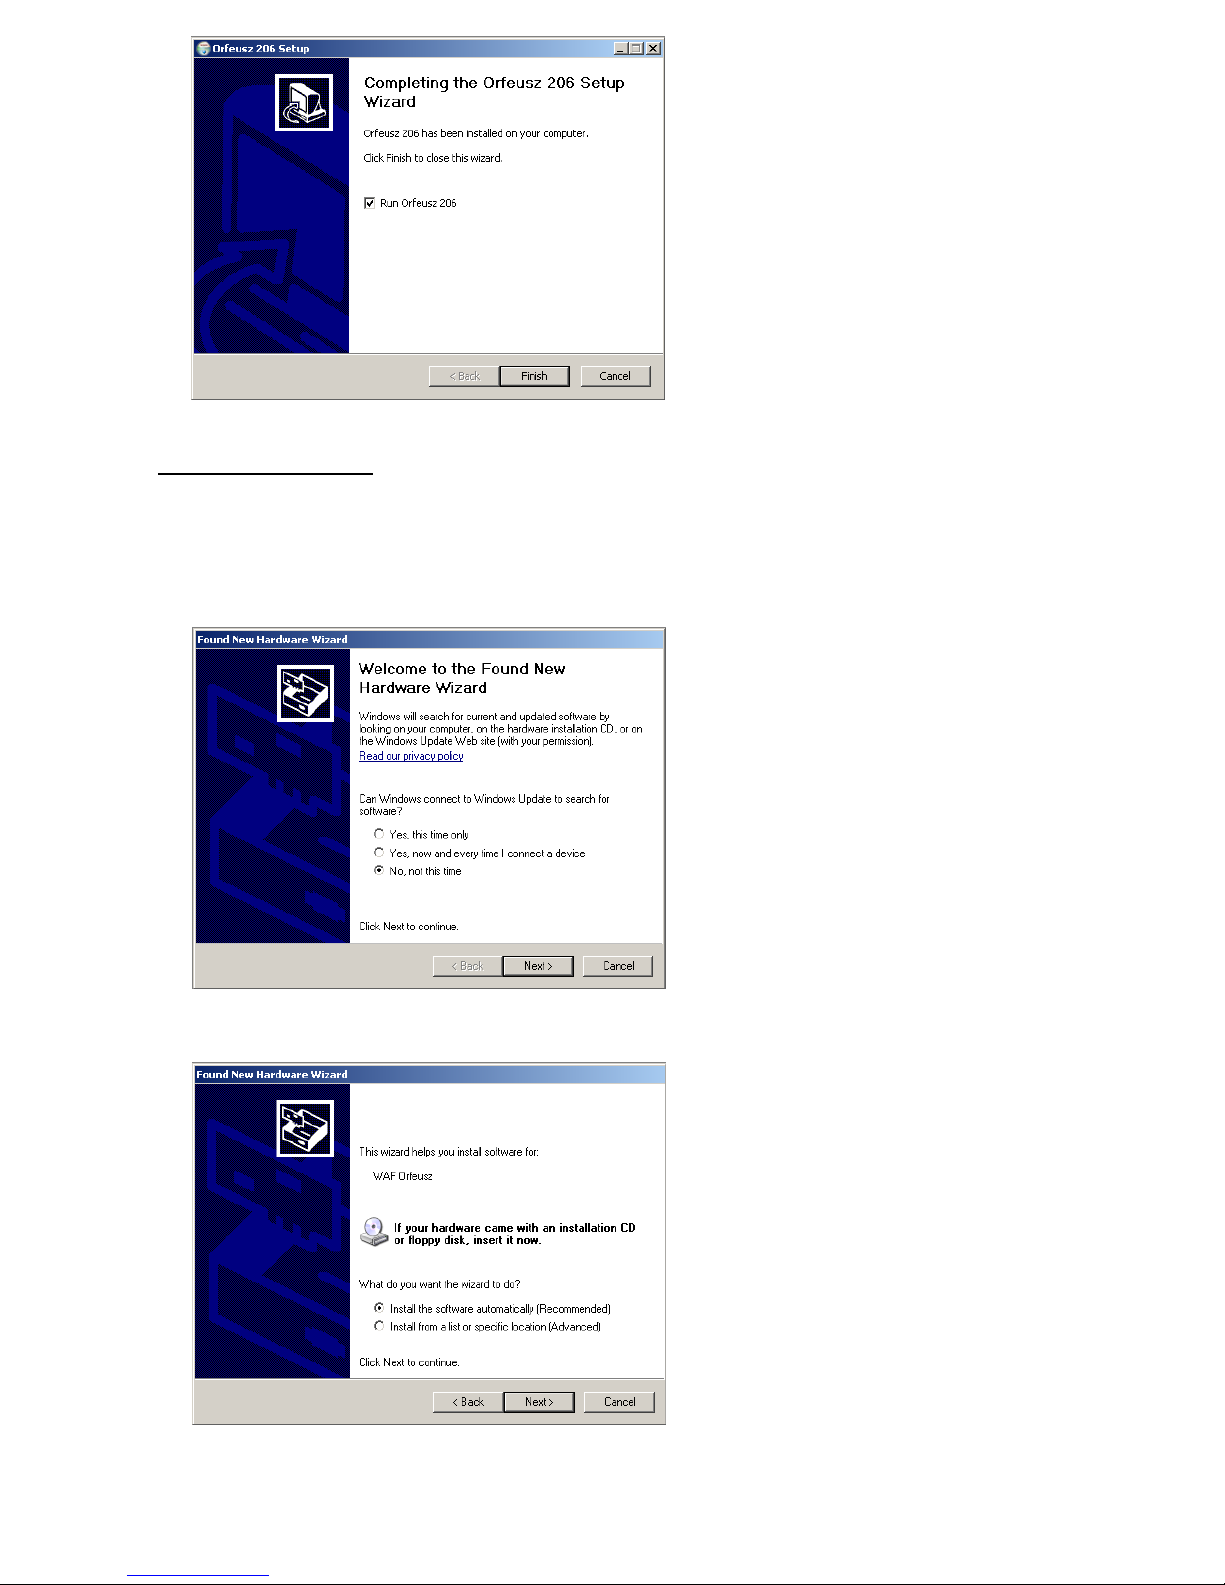
7. Click 'Finish' in the next window. That's it, you're ready now to let your system recognize your new
hardware. See the following paragraph.
____________________________________________________________________________________
Wrocław Audio Force
ORFEUSZ206
user manual
9
Hardware Installation
When software installation completes, you can let Windows™ detect the hardware unit. This step is to
be performed once only, when you connect Orfeusz206 to your computer for the first time.
1. Connect the hardware unit to a free USB port of your computer, and switch the unit on.
Depending on your operating system version,
a window might ask you to look for drivers
online.
Make sure you checked 'No, not this time'
and click 'Next'.
2. Check 'Install the software automatically (Recommended)' on the following window, and click 'Next'.
____________________________________________________________________________________
Wrocław Audio Force
ORFEUSZ206
user manual
10
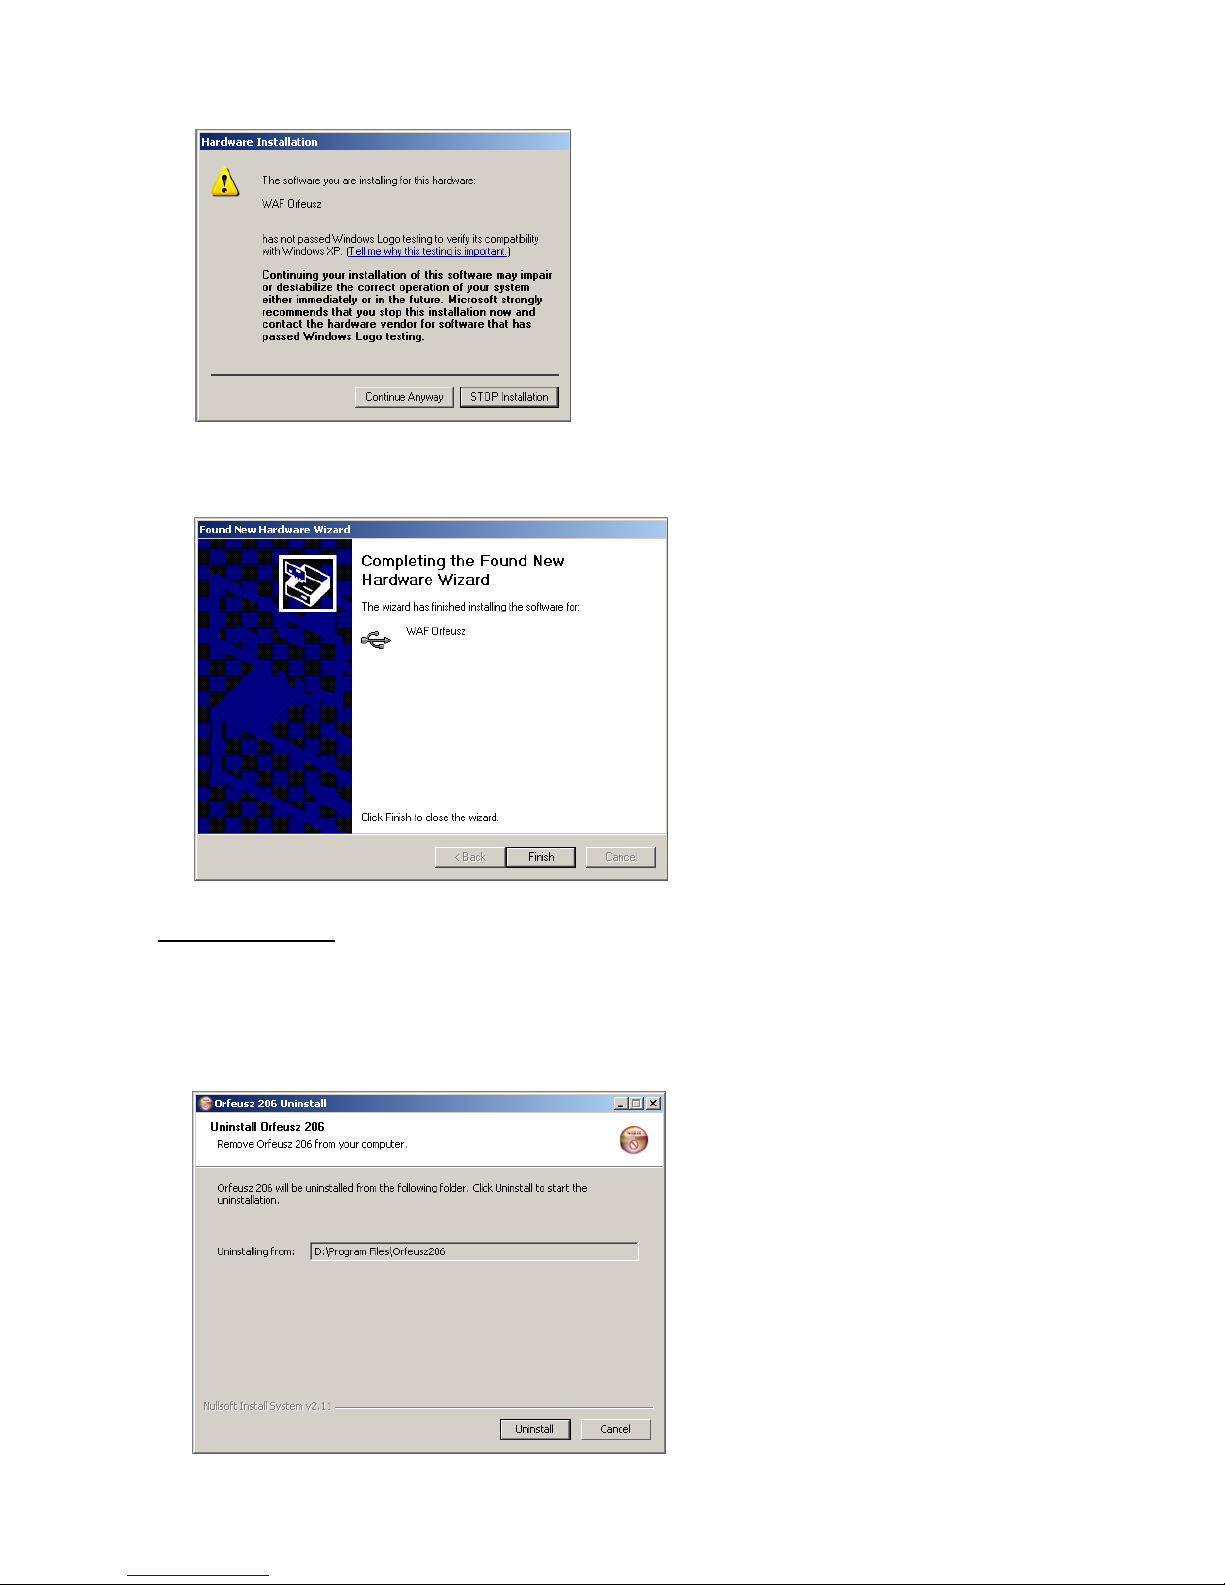
3. Again, depending on your operating system version and configuration, the following warning
window might come on screen. Click 'Continue Anyway'.
4. After a short delay, you should see the last window informing you that the hardware is installed and
ready to use. Click 'Finish'. Congratulations! You're ready now to use your new audio system.
Software Removal
If for any reason you wish to remove Orfeusz206 control application from your computer, a shortcut to
the uninstaller is available in the Start Menu.
1. Make sure Orfeusz206 application is not running, turn the external unit off, and click 'Uninstall'.
____________________________________________________________________________________
Wrocław Audio Force
ORFEUSZ206
user manual
11
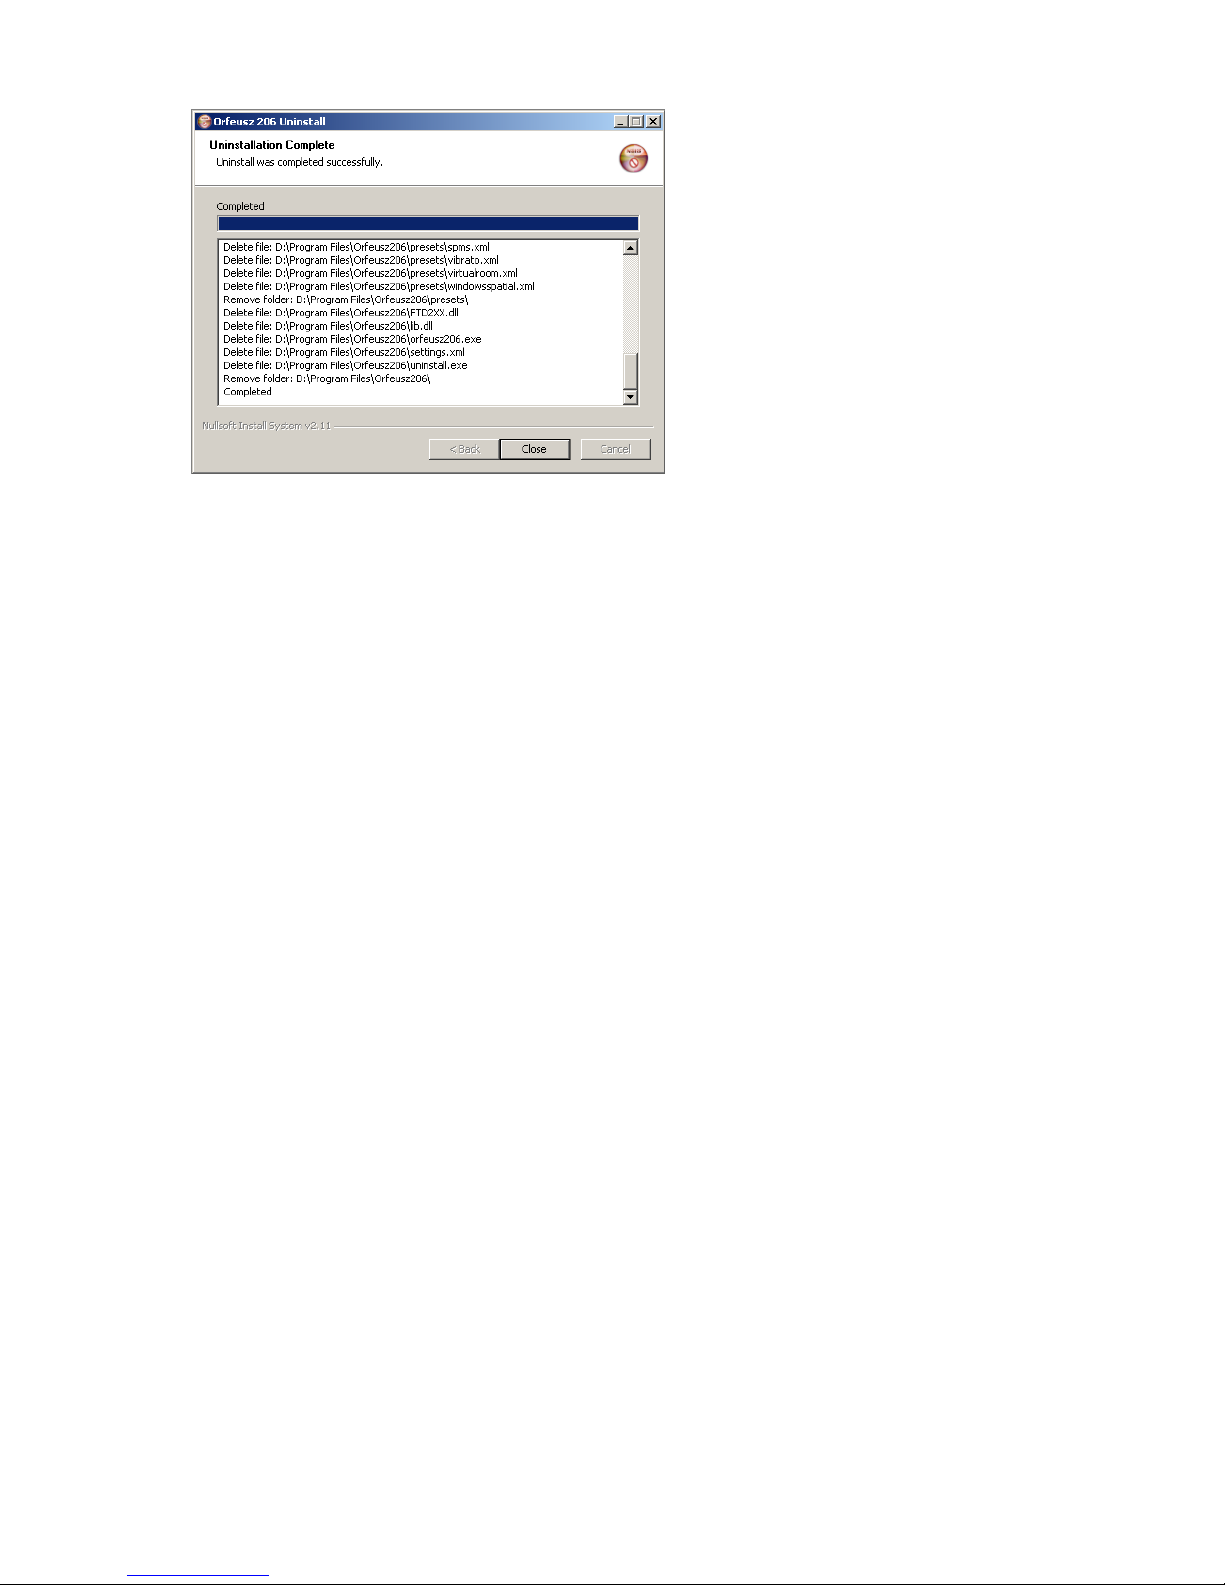
2. The next window will list items removed from your computer. When this step completes, click
'Close'. You can reinstall Orfeusz application anytime.

____________________________________________________________________________________
Wrocław Audio Force
ORFEUSZ206
user manual
12
Section 3: Spatial Mode
Orfeusz206 is the perfect system to add space dimension to your live show. It not only enables you to
position the sources around the audience, but also lets you at will have sources come near and move
away. Beside smooth movement capability, Orfeusz206 features additional tools to support you in
making of your spatial session a delightful and successful practice.
Because real-time spatial sound is quite uncommon in live setups, we recommend again that you
carefully read this chapter, which encompasses instructions for positioning and calibrating
loudspeakers, description of the various sound field models available, the software environment, as well
as automation, effect coupling, joystick configuration and MIDI setup.
The figure below shows a possible setting for a spatial session over 6 loudspeakers, where source are
fed from a mixer and joystick and/or MIDI controlled. Audience is sitting or standing inside the
perimeter defined by loudspeakers.
ORFEUSZ206
Mixer
USB chord
Joysticks
Audience is here!
PC running Orfeusz206
control application
MIDI Controller

____________________________________________________________________________________
Wrocław Audio Force
ORFEUSZ206
user manual
13
General Remarks about Loudspeaker positioning
Prior to positioning loudspeakers, there are several issues you should consider:
How many loudspeakers do you plan to use?
In what kind of site are you going to set your equipment for the show? Is it open-air? Or is it in a
hall with strong natural reverberation?
Can you freely position the loudspeakers?
How large is the audience? Where is the audience going to sit or stand?
Is audience supposed to look in a determined direction? (Is there a screen? a stage?)
Proper assessment of the constraints bearing upon your show is a determining factor for a successful
setup.
Number of loudspeakers
For the smoothest source travel in space, we recommend that you use 6 loudspeakers, preferably all
identical. Indeed, with 6 loudspeakers properly positioned, you will be able to place and displace
smoothly your sources wherever in the plan and around the audience. If moreover all loudspeakers are
identical (and properly calibrated – see next paragraph), Orfeusz206 will generate a sound field
homogeneous in all directions.
However, there might be reasons why you don't want to use 6 loudspeakers. An obvious reason might be
that you don't have so many of them available for your setup. Another could be that, for your personal
aesthetics or some other technical imperative, you decided a priori that you would use only 4 of 5 of
them.
What you need to keep in mind:
A number of 4 loudspeakers at least are required for a spatial mixing session with Orfeusz206.
The more loudspeakers, the better your control on sound localization and source movement.
Preferably all loudspeakers are identical.
Performance site
It is worth that you study in detail the performance site before you position your loudspeakers. Have a
walk through it and localize exits, possible bars and obstacles, all these places were you definitely would
not be allowed to put a loudspeaker. Have a tape measure ready and make a dimensioned sketch of the
site. On the same sketch, mark obstacles, stage, audience area and the mixing spot.
If the performance is to be open-air, then you're likely to manage a perfect setup. Otherwise, Orfeusz206
will assist you to achieve the best speaker configuration meeting room constraints.
What you have to remember:
The ideal configuration is attained with loudspeakers placed on a circular perimeter, with same
angle between successive loudspeakers. If this configuration is not feasible, Orfeusz206 will
correct loudspeaker emissions in order to achieve a homogeneous sound field – but keep as close
as possible to the ideal circular setup.
Spatial field is inside the perimeter delimited by loudspeakers. The larger this area, the more
people you can fit in for the show – but don't make this area unnecessarily large.
Whenever possible, place loudspeakers at appropriate listening height i.e. head level.
In most cases, there is no obvious setup. Take your time to consider various speaker
configurations to appreciate and build a satisfactory system setup.
Orfeusz206 Loudspeaker Positioning Tool
This step should be completed each time you take on a new installation. To access the loudspeaker
positioning tool, select Settings → Loudspeaker Setup… in the main menu.

____________________________________________________________________________________
Wrocław Audio Force
ORFEUSZ206
user manual
14
The Setup Type panel shows three possible options:
Custom. This is our preferred method for positioning loudspeakers, based on an ideal circular
setup that you gradually alter to meet your requirements.
ITU 5.1. This one is for a conventional 5.1 setup, which is suitable if you intend to mix on top of
prerecorded 5.1 materials.
Fixed. This method has to be selected if speaker configuration is fixed and imposed. Do not use
this option in any other context, as Custom option will generally produce better results.
The first time you display Loudspeaker Setup window, it shows one Custom example – which is actually
Wrocław Audio Force developers' room (preset waf office 6spk).
The red region is the room area, and obstacles are represented in black: these are the places where we
don't want to put any loudspeaker.
The yellow circle is the ideal loudspeaker perimeter, and the arrow in the middle shows the 'North': that's
the reference direction (we'll talk about it further again). This setup is based on 6 loudspeakers
symbolized by green circles where numbers are referring to outputs.
Performing the Loudspeaker Setup procedure consists in completing a similar layout, of course adapted
to your situation.
Position at cursor
Zoom
____________________________________________________________________________________
Wrocław Audio Force
ORFEUSZ206
user manual
15
To build your own Custom setup:
Press New and select Custom in Setup Type panel.
In the black area, draw lines representing the walls of your place. We recommend that you
measure all relevant distances from a common point in the room. Furthermore, assigning to this
point the couple of coordinates (0, 0) should ease the procedure. To draw the room area, click to
mark each vertical edge, and finally double-click to complete (the first and last point will be
automatically connected together). Loudspeakers will pop up on screen, but ignore them at this
stage.
Draw obstacles the same way you drew the room. Obstacles are
all these areas where you cannot or don't want to put a
loudspeaker. By right-clicking access undo and delete
commands.
Now, drag the yellow arrow to the center of the audience.
Speakers are bound to sweet spot and will move accordingly.
Rotate sweet spot in the desired direction (figure). This is the
'North', i.e. the reference direction of sound sources.
If you right-click on a loudspeaker, you access a contextual
menu with special commands. By selecting Withdraw, you
remove a loudspeaker from the spatial setup – this means that
Orfeusz206 output with same number will not participate to the
spatial field. Right-clicking on the same loudspeaker and
selecting Bind allows you to use this output again. Swap
commands allow swapping two loudspeakers. It's at this stage
that you define how many loudspeakers you intend to use.
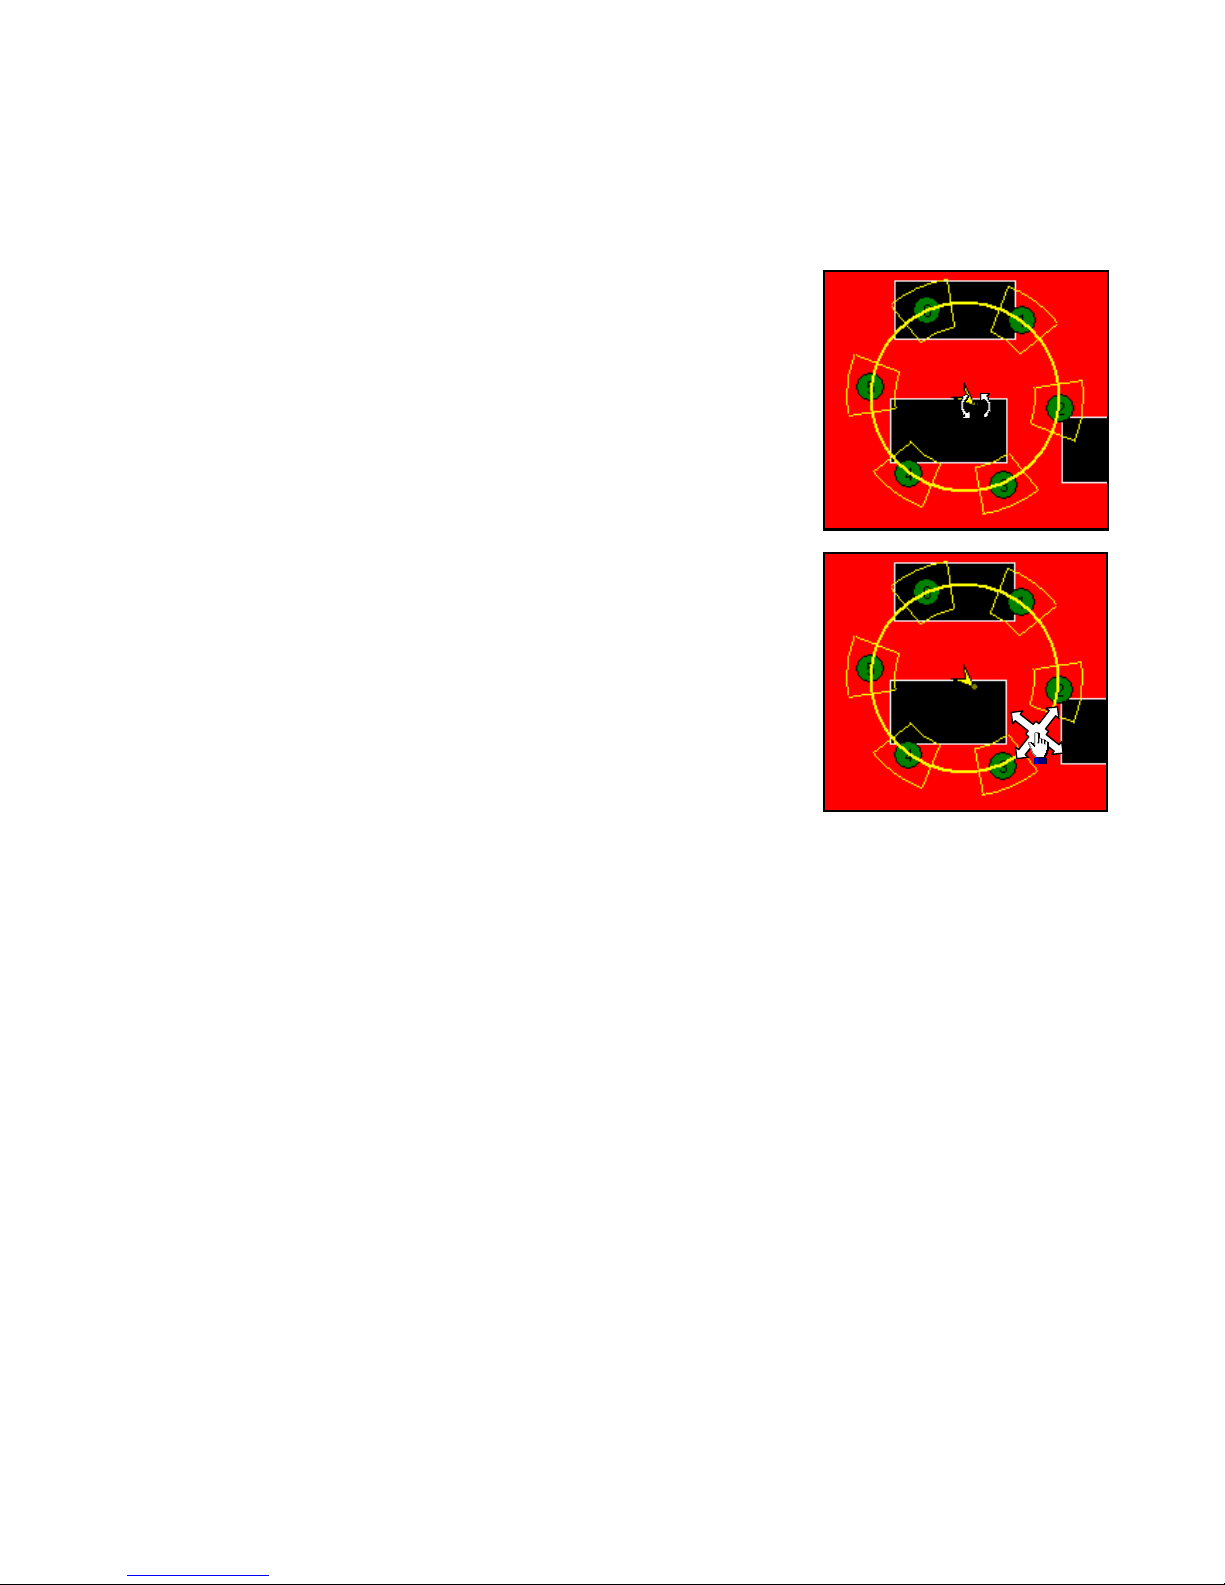
Position the mouse cursor on the yellow circle, click and drag
to dimension the loudspeaker perimeter, and to orient globally
loudspeakers (figure).
Finally, drag each loudspeaker individually to the most
convenient location. Each loudspeaker may be displaced in a
perimeter defined by the thin yellow lines. Size of this
perimeter depends on the number of loudspeaker used for the setup: the more of them, the larger
the area. When you are finished, consider saving your layout.
To build a ITU 5.1 or Fixed setup:
Drawing the performance hall is not required for these setup types, because by definition they don't offer
any placement freedom. Indeed, ITU 5.1 setup has standardized loudspeaker placement, meanwhile
Fixed setup type should be used only in a hall where loudspeakers are fixed and can't be moved at all.
In the Setup Type panel, select the desired setup type. Loudspeakers pop on screen immediately.
For your convenience, you may draw the room shape, as well as landmarks for reference.
For ITU 5.1 setups, drag sweet spot to the desired location, then rotate and resize loudspeaker
perimeter. Central speaker always designates the 'North'.
For Fixed setups, drag loudspeakers to the appropriate position, or edit their locations in the
Loudspeakers panel. Loudspeaker placement should always enclose audience. Drag the sweet
spot to the appropriate position (or let Orfeusz control application find the best one for you, by
checking the Auto box), and rotate as desired.
Subwoofers
If your spatial setup is based on less than 6 loudspeakers, you may use the remaining outputs to feed
subwoofers. Unused outputs carry the monophonic sum of all spatial signals, low pass filtered according
to your settings in the Subwoofers panel. When subwoofer functionality is switched on, lower
frequencies fed to subwoofers are filtered out from spatial signals.

____________________________________________________________________________________
Wrocław Audio Force
ORFEUSZ206
user manual
16
Orfeusz206 Loudspeaker Calibration Tool
Orfeusz206 comes with a calibration tool reachable from the main menu: Settings → Loudspeaker
Calibration. The aim of calibration procedure is to align output levels of every loudspeaker in the setup
to make sure that the sound field is homogeneous, and that there's no preferred direction.
Orfeusz206 calibration tool will command the external unit to output pink noise. We like pink noise for
calibration purpose, because most musical programs have similar average power spectrum density.
Loudspeaker Calibration window displays your speaker setup in a simplified fashion. The yellow arrow
in the middle shows the same 'North' direction.
To start calibration process, click Start button. Orfeusz206 mutes now all outputs.
Click Next. Orfeusz206 emits pink noise
on the first output used for spatial speaker
setup (outputs dedicated to subwoofer feed
are not taken into account in the calibration
process). If you wish to start a calibration
from scratch, click Reset to set all
loudspeakers level to minimum.
Adjust level with the slider so that you get
a similar level to what you expect during
performance. Place a sound level meter at
sweet spot position (or ask someone with
reliable ears to stand at sweet spot) and
register the sound level.
Click Next. Orfeusz206 emits now pink
noise through the next output in clockwise
order. Adjust level on slider so that you get
the same sound level as registered
previously. Loudspeaker Calibration
window highlights in red the speaker that
is emitting, so this is a good opportunity to
check also your loudspeaker wiring.
Repeat until you adjusted the level for all
loudspeakers. When you're finished, click
Close: you're ready to mix now!
Note: Pink noise is generated at –12 dBFS
level. Hence, maximum output level at
calibration stage (when sliders are in
utmost position) is –6 dBu.

____________________________________________________________________________________
Wrocław Audio Force
ORFEUSZ206
user manual
17
Sound Field Models
In order to cover all your possible needs, 4 different sound field models were made available (see Virtual
Sound Field window for how to switch between these models).
In Panning Only mode, the only spatial cue to be rendered is the source azimuth, through
appropriate panning. Sources are displayed on circles centered on the listener. In this mode, you can
freely rotate the listener, or both sources individually, or eventually both sources together thanks to
the cross (X) control linking both sources. Be aware that in this simplest mode Automove and Spatial
Effects are not available. Panning Only mode doesn't entail any sound coloration.
To move sources, drag them individually with the mouse to the desired location, or displace them
together dragging the cross (X) symbol. To rotate the listener, place mouse cursor on the green spot
to have the following symbol displayed, and rotate in the appropriate direction. Note that listener
is facing 'North' when positioned upwards, as depicted in the screenshot below.
Trick: to lock the angle between the two sources while moving them collectively, double-click on
the cross (X) symbol.
Free Field model emulates sound propagation of sources in a free field. This mode renders all
spatial attributes – azimuth, distance and speed – in a virtual anechoic environment. A circle of
adjustable size surrounds the listener and shows the reference distance. At
reference distance, source loudness is maximal, and will not increase if source is
moved closer to listener. This is to avoid clipping signals, but should also be used
to tailor the depth of the acoustic environment. To increase or decrease reference
listener
sources
source linking
control

____________________________________________________________________________________
Wrocław Audio Force
ORFEUSZ206
user manual
18
distance, place mouse cursor to have the following symbol displayed, then click and drag to
adjust. In Free Field mode, objects may be displaced with mouse, or preferably with joysticks (see
joystick section).
Except when sources or listener are moving (because of Doppler effect), Free Field mode doesn't
entail sound coloration neither.
Motion Optimized and Space Optimized modes are the most complete simulations, including all
spatial sound attributes in a user-defined acoustic. In these modes, you set the kind of acoustic
atmosphere that suits your show, by defining the room dimensions as well as wall materials. Along
with direct sound, wall reflections are computed, updated and rendered in real-time. Although these
are the most powerful modes in the set, you should remember that sound coloration and artifacts
might occur as for natural sound propagation. Typically, when you position a sound source against a
reflecting wall, the sound heard by the listener is mainly the combination of direct sound and one
reflection slightly delayed – which is a comb filter. Sound coloration occurs in our model because it
occurs in real world too.
Motion Optimized mode is especially suitable if sources are moving a lot and quickly. Space
Optimized, although quite similar, is more focused on acoustic rendering (room acoustic is more
detailed), and might produce slight sound distortion when sources are moving in very reverberant
virtual environments. Experiment and pick the mode that suits better your artistic goal. Use the
reference distance circle to proportion sound objects and balance early reflections and late
reverberation.
sources
listener – and reference
distance circle
virtual room walls

____________________________________________________________________________________
Wrocław Audio Force
ORFEUSZ206
user manual
19
Software Environment
Master
Master allows you to monitor input signal level and adjust output level.
General and individual soft mute switches are available for inputs as well as for outputs.
Output level sliders should remain linked after speaker calibration completion.
Input level is displayed in dBFS (dB Full Scale). Always keep sufficient headroom in order not to
clip. The required headroom for EQ and effects depends of course on your settings.
Virtual Sound Field
Virtual Sound Field window allows selecting between the 4 sound field models described earlier.
If Panning Only or Free Field models are selected, the remaining of the window is disabled.
With Motion Optimized and Space Optimized models, which are the true spatial modes, you can further
define the virtual listening environment by specifying virtual room dimensions and wall materials. The
figure in the middle shows the resulting room impulse response (with predefined listener and source
positions). After you made a change to virtual room definition, click Apply button for taking changes
into account.
The latter impulse response is complemented with late reverberation, whose parameters are
automatically set for a realistic global acoustic atmosphere. You can modify these parameters if you
deselect Autoset option, and selecting Autoset again will reset parameters to their software-computed
values.
Modulation option should be normally off, unless some particular noise-like sound such as
cymbals produces objectionable late reverberation. Switching on this option corrects in most
cases any possible metallic sounding, at the expense however of a small amount of vibrato which
might be objectionable on acoustic instruments (piano).
mute all inputs
mute all outputs
input level meters
individual Mute switch
output level sliders Link switch

____________________________________________________________________________________
Wrocław Audio Force
ORFEUSZ206
user manual
20
Predelay is a classic parameter for reverberation systems, and refers to the amount of time delay
(in ms) between direct sound and the beginning of late reverb.
Colour refers to low pass filtering, simulating air and wall absorption of high frequencies.
Volume is the general level of reverberation.
At last, in Free Field, Motion Optimized and
Space Optimized modes, there's an option
called Boom, which modifies direct sound
panning law when sources come close to the
listener (i.e. when sources come inside the
reference circle around the listener).
This option is especially recommended when
sources are 'going across' the audience, and
limits the 'hole' caused by signals tipping from
one side to the other of audience, by
progressively feeding all loudspeakers.
Boom option is without effect when sources
are out of the reference cercle.
Equalizer
Orfeusz206 includes a parametric equalizer on both input channels.
The selected EQ filters implementation is not likely to clip strongly.
Bypass switches are clickless. Equalizer can be turned on and off anytime during performance.
Corresponding equalizing curves are displayed on the right hand side. Double-click on a graph to
toggle between –12/+12 dB and –24/+24 dB scales.
Lower peaking filter parameters might be mapped to trajectories (see Spatial Effects).
High frequencies
shelving filter
Low frequencies
shelving filter
Mid-frequencies
p
eaking filters
On/Off switch
(bypass)
Clipping led

____________________________________________________________________________________
Wrocław Audio Force
ORFEUSZ206
user manual
21
Effects
Additionally to an EQ section, each input channel includes an effect section comprising flanger, vibrato
and chorus. Only one effect per channel can be turned on at a time.
When effects are stereo linked, settings from channel 1 are transferred to channel 2, and oscillators run
in phase or in quadrature, depending on which effect is running.
Bypass switches are clickless: you can turn effects on and off anytime. Use the Level knob to
align output levels when effects are on and off.
Each effect is equipped with a clipping led.
For negative Feedback, an option called Strong Flange is available for flanger. When this option
is selected, the flanger will produce an intense effect sound.
Effects can be mapped to trajectories (see Spatial Effects).
Spatial Effects
Spatial Effects are not effects by themselves, but rather a new way of coupling effect parameters to
source trajectories. Indeed, when Spatial Effects are turned on, traditional effect parameters are
continually updated while sources are moving, according to laws that you accurately tuned.
Spatial Effects may be applied to both channels, one effect at a time, and to following parameters as
summarized in the table below.
EQ Flanger Vibrato Chorus
Central frequency
Gain
Quality factor
Rate
Delay
Mix
Rate
Delay
Mix
Rate
Depth
Mix
These latter parameters can be coupled to source azimuth, distance or speed, always relative to listener.
Click here to link effects on both channels

____________________________________________________________________________________
Wrocław Audio Force
ORFEUSZ206
user manual
22
As this kind of effect coupling rather unusual, we are going to have a close look now at two examples,
the first one being a 'Spatial EQ', and the second a 'Spatial Vibrato'.
Example 1: Spatial EQ
A Spatial EQ is actually the lower second-order peaking filter in Equalizer window, whose gain, quality
factor and frequency parameters are adjusted according to source movement. In the present example, we
wish to couple 1. filter central frequency to source azimuth, 2. gain to distance, and 3. quality factor Q to
speed. Note that this is just an example, and we could couple parameters in a completely different
fashion, or couple only one or two of them and leave the remaining constant (a spatial effect with all
coupling knobs set to Off is identical to a traditional effect – all parameters are constant).
There are 2 Spatial Effects windows, one for each channel. In order to set a spatial EQ on channel 1, you
first need to select EQ in Spatial Effects – Channel 1 window, as illustrated below.
In this current example, we couple EQ peaking frequency to source 1 azimuth relative to listener. This
means that EQ peaking frequency will be automatically adjusted when source 1 turns about the listener.
To achieve this, position Coupling knob on Azimuth, as illustrated.
With the Range control, set the bounds for frequency sweeping. When the source moves
about the listener, the filter central frequency will sweep the Range interval, between these
two limits.
Use the second control to adjust for what azimuth should the maximum frequency value
occur. The minimum frequency will occur at the diametrically opposite direction.
Eventually, there's yet another switch allowing you to select between linear (Lin) or
logarithmic (Log) sweeps. The figure on next page compares how the parameter will change
for both laws. Logarithmic law is especially suitable for frequency sweeps – it generates a
constant speed sweep on the logarithmic frequency scale of EQ graph.
____________________________________________________________________________________
Wrocław Audio Force
ORFEUSZ206
user manual
23
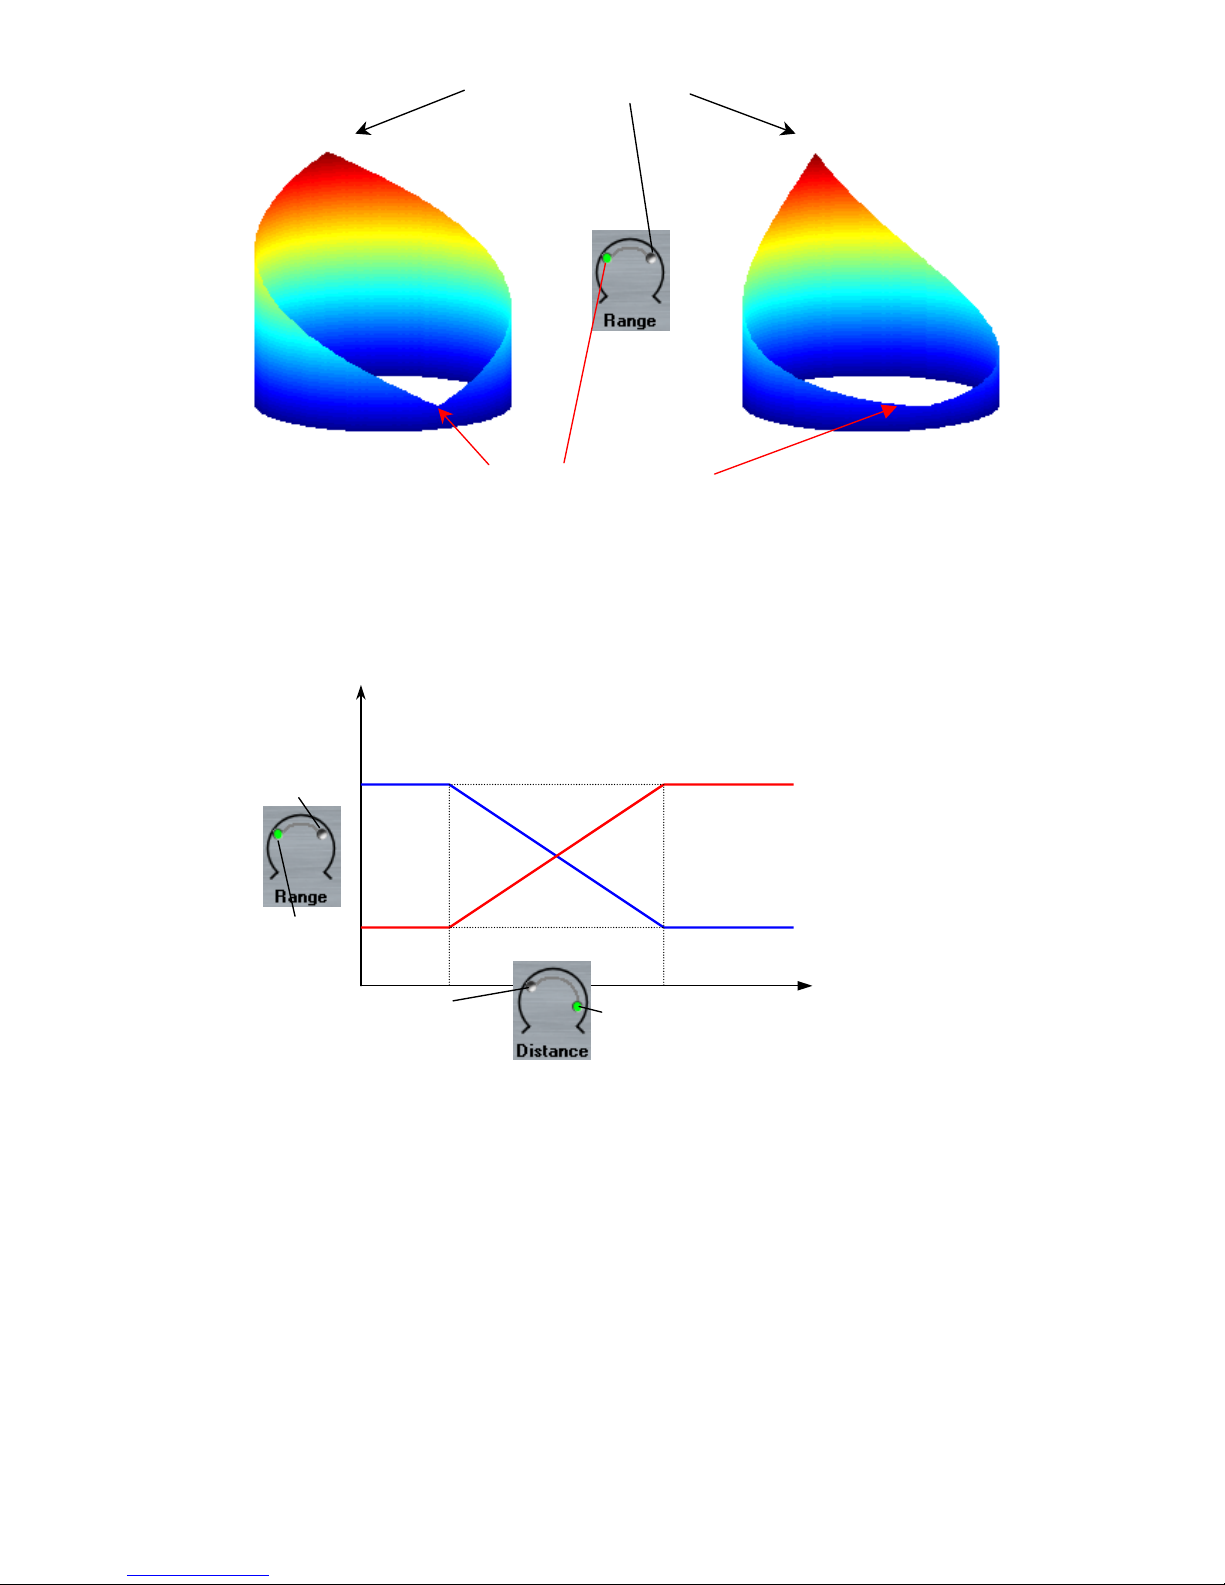
In order to couple gain to distance, set the knob of gain section in the appropriate position. With the
Range control, select the lower and upper limits of the gain interval. Select with the Distance control
values of distance for which minimum and maximum gains should occur. Finally, with the Direction
switch, select whether gain should increase (Asc ascending law) or decrease (Desc descending) as
distance grows. Note that the maximal distance in the Distance control is the virtual room diagonal.
The resulting gain variation is depicted in the graph below.
Eventually, we are now going to couple quality factor Q to source speed. This last step is quite similar to
distance coupling: position Q Coupling knob to Speed, and select your appropriate ranges. A still source
has speed 0.
Example 2: Spatial Vibrato
In this current example, we are going to show that various effect parameters may be coupled to the same
trajectory attribute. Indeed, we wish here to couple both Rate and Mix vibrato parameters to source to
listener distance. In order to achieve that, you need to switch on Vibrato in Spatial Effects, and turn
rotating Coupling knobs accordingly – see the screenshot on next page. Parameter Delay is left constant
(i.e. is not coupled). To complete the settings, adjust Ranges and Distance upper and lower limits as
desired.
Range minimum value
Range maximum value
LINEAR LOGARITHMIC
lower distance
u
pp
er distance
min
g
ain
max
g
ain
gain
distance to listener
ascending
descending

____________________________________________________________________________________
Wrocław Audio Force
ORFEUSZ206
user manual
24
Automove
Orfeusz can also generate automated trajectories of various types. You can store up to 5 trajectories per
object2 and trigger any of these anytime (additionally to an unlimited number of presets).
To trigger automated trajectory n°3 for source 1, click the corresponding button n°3, and trajectory is
immediately launched. For editing trajectory parameters, just access the corresponding controls: with the
Speed knob, you can accelerate or slow down motion, and with Direction switch, you can reverse motion
direction. Listener can additionally spin at the rate and in the direction desired. If you wish to reshape
source trajectory, we recommend that you first stop movement ( ). Four kinds of trajectories are
2
An object in this context is either one of the sources or the listener.
Automated trajectory n° 3 currently used for source 1
Start/stop motion
Motion speed adjustment knob
Listener spinning speed and direction control
Motion direction switch
Trajectory type selector
Lobes number (cardioids only)
____________________________________________________________________________________
Wrocław Audio Force
ORFEUSZ206
user manual
25
available, and detailed on next page. Note that the right-most knob, enabled only when you select a
cardioid trajectory, allows you to select the number of lobes. When you're finished editing, consider
saving as a preset or storing in the memory slot designated by the trajectory switch. Press to launch
motion again.
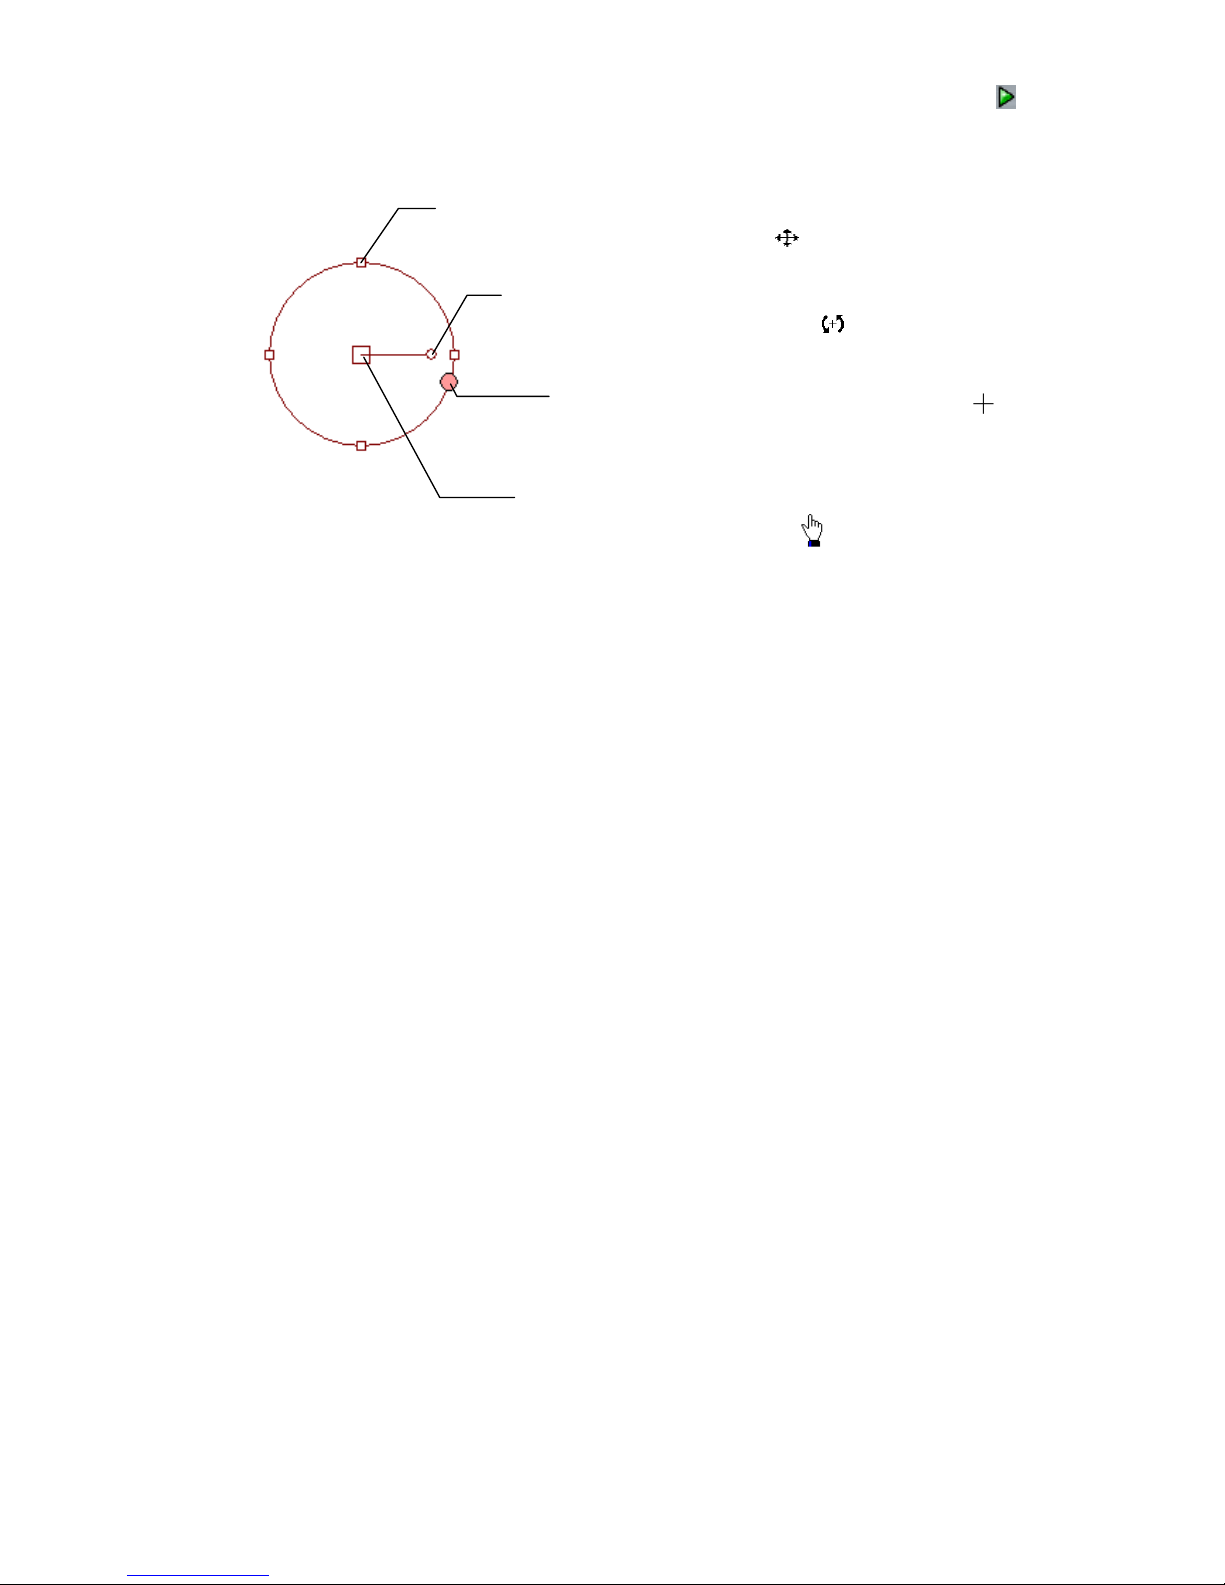
Drag this square (or any other) to resize or reshape
the trajectory (cursor: ).
Drag this round to rotate the whole trajectory
about listener (cursor: ).
Drag this square to displace the whole trajectory
(cursor: )
Position mouse cursor on object (cursor: ).
Click and drag to redraw trajectory from scratch.

____________________________________________________________________________________
Wrocław Audio Force
ORFEUSZ206
user manual
26
Elliptic or circular
trajectories. Constant
angular speed motion.
When ellipse is very flat,
source seems to travel back
and forth on a line segment.
Planetary motion. Same as
above, except that angular speed is
not constant, but obeys a law similar
to celestial body motion. The point
inside the curve is the ellipse's focus.
Spiral. Constant
angular velocity. Drag the
small round to adjust the
number of turnings from
center to periphery.
Cardioids. Constant
angular velocity. Various
shapes are achievable
according to settings. Adjust
the number of lobes with the
right-most rotating knob.
Adjust lobes shape by dragging
the small round.

____________________________________________________________________________________
Wrocław Audio Force
ORFEUSZ206
user manual
27
Trajectory Editor
Trajectory Editor is a flexible tool allowing recording and editing of trajectories as well as associated
spatial effects.
In the context of this editor, a trajectory is more than just movements and comprises:
Both sources' and listener's movements,
The Virtual Sound Field mode and settings,
Listener's reference distance adjustments,
And eventually effects and spatial effects.
Prerecorded trajectories are saved as compact binary files with OTF extension (Orfeusz Trajectory File
format), and may be played back in a given order (see Trajectory Playlist Manager).
1
Playback synchronization with an incoming MIDI timecode (MTC)
2
Play
3
Record
4
Stop
5
Locate cursor at beginning of file
6
Fast rewind (5x)
7
Fast forward (5x)
8
Locate cursor at end of file
9
Start new trajectory
10
Load trajectory
11
Save trajectory
12
Queue trajectory in Playlist Manager
Time at cursor
p
osition
Recording
source select
Total length
1 2 3 4 5 6 7 8 1211109
Total file length
Portion of file currently on display
Position of cursor within file
Slider
Time cursor
____________________________________________________________________________________
Wrocław Audio Force
ORFEUSZ206
user manual
28
In order to record a new trajectory from scratch:
1. Press New.
2. Select the Virtual Sound Field mode and adjust settings.
3. Select the source of your recording. This can be any combination of Source 1, Source 2, Listener
and Effects.
4. Press REC key.
Trajectory Editor's window shows events occurring for each object. Effects changes are displayed as
vertical markers, meanwhile object displacements are displayed as hatched areas. To perform a zoom in
or out, resize the slider. Simply click on the graph to place the cursor at the desired location.
While recording movements, objects may be animated by all available means: mouse dragging,
joystick activation, MIDI commands or even Automove.
Movements can be recorded in a sequenced fashion. Indeed, you might want to record first
Source 1 movement (select Source 1 and deselect all others in the recording source selection
panel), then record Source 2 movement (deselect now Source 1 and select Source 2), and finally
record Listener's movement. Once you are satisfied with the global trajectory, you can add
effects (select Effects and deselect all others).
Objects, which were not selected as recording source, are moving according to file's contents.
A contextual menu (right-click) offers editing commands – among other things, you may
suppress unwanted parts at the beginning (Clear before cursor command) or at the end of the file
(Clear after cursor command).
Be aware that, when playing back a prerecorded trajectory, objects will move
according to what's recorded. Joysticks, mouse dragging and Automove are
disabled, and settings in the Virtual Sound Field window are locked until the
trajectory completes.
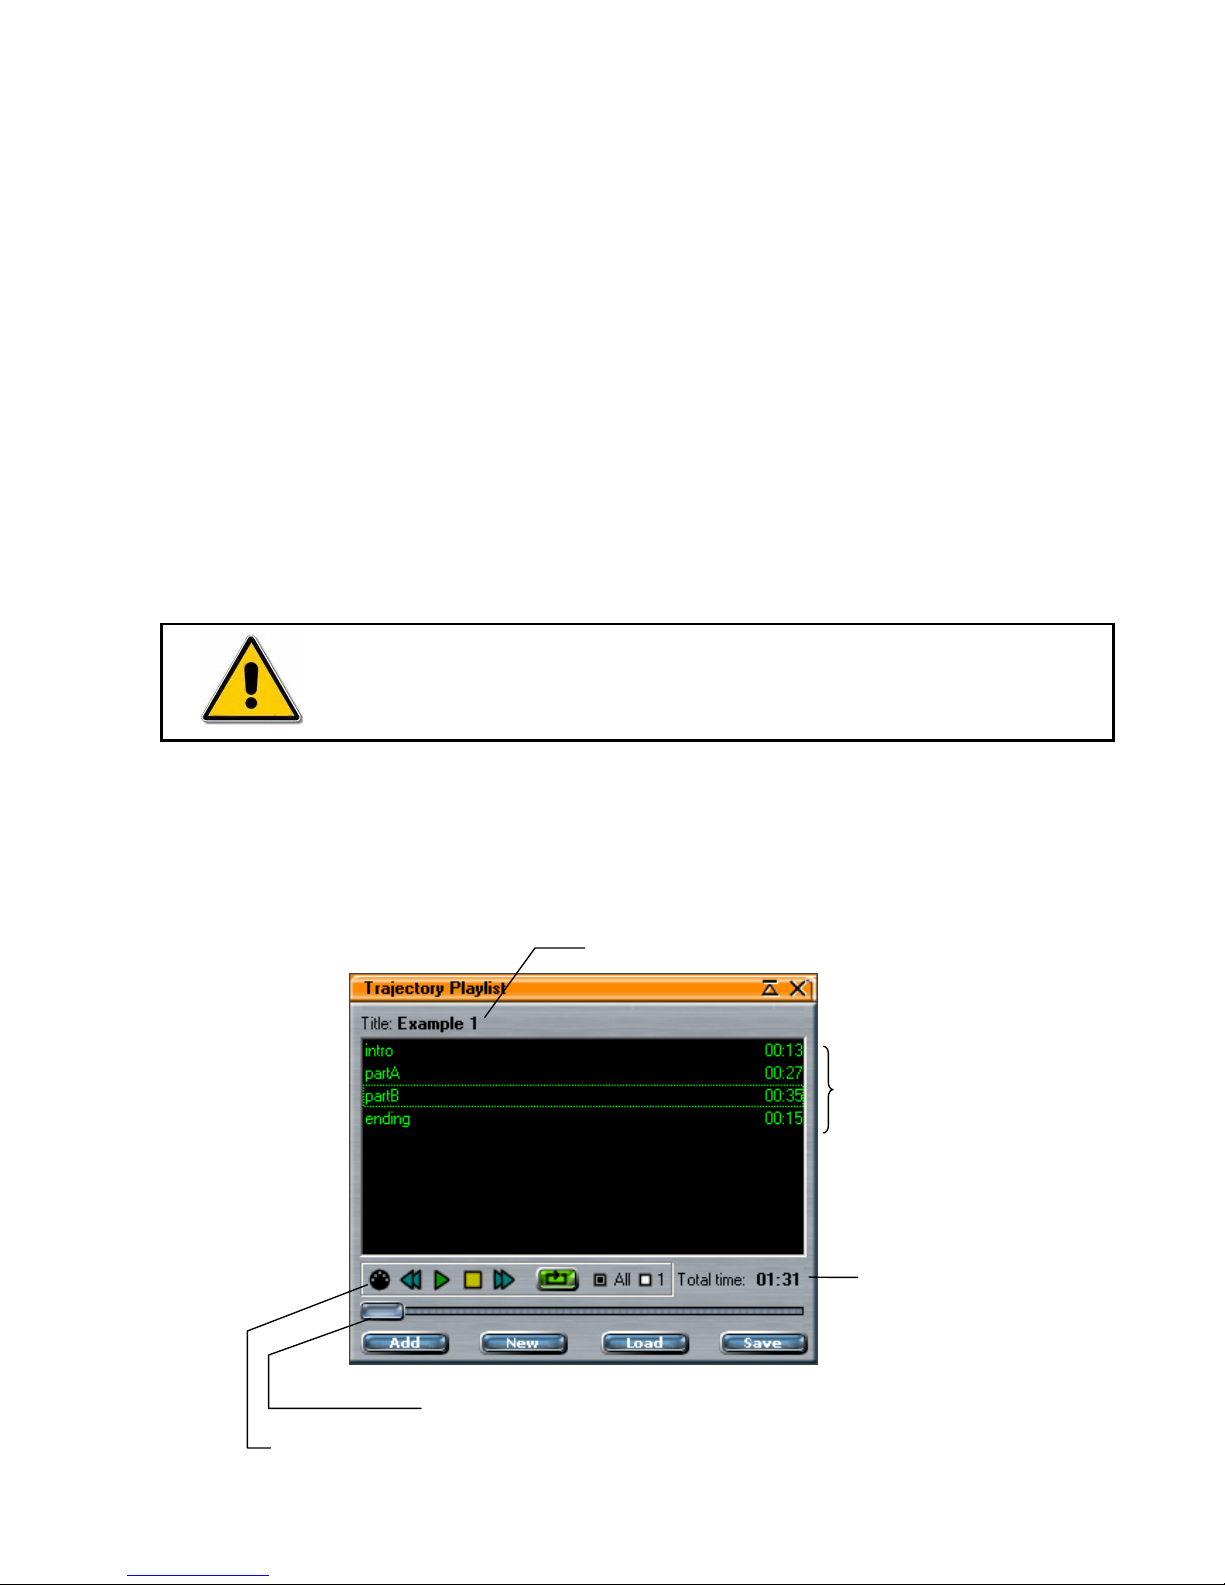
Trajectory Playlist Manager
Trajectory Playlist Manager, along with Trajectory Editor, enables to build any automated sequence of
trajectories.
A playlist is an ordered sequence of trajectories. Playlists are saved as files with OPF extension (Orfeusz
Playlist File format).
Playlist title (file name)
List of trajectories
Playlist total
length
Transport section (Sync/Previous/Play/Stop/Next and Repeat)
Slider

____________________________________________________________________________________
Wrocław Audio Force
ORFEUSZ206
user manual
29
We are going to show here a basic example using most of the controls. Our example is a sequence built
on 4 different parts: an intro, a part A, a part B, and an ending. We wish to achieve the following
structure:
1. Press New to start a new playlist.
2. Press Add in order to add to the empty
playlist the 4 required parts. Multiple
selection in the Open dialog is obtained by
pressing the Shift or the Ctrl keyboard
key. Then, by dragging files in the playlist
manager, you can easily alter the sequence
order and get the result illustrated in the
screenshot on previous page.
3. Select file partA, right-click and select
Duplicate from the contextual menu.
Repeat this step once again, and order files
to obtain the sequence exemplified on the
screenshot opposite.
4. Select the 4 files forming the AABA
pattern (press Ctrl or Shift key to
select several files), and duplicate the
whole pattern as above. If necessary,
organize again the sequence playing
order.
5. You might consider saving your
playlist. Press Save and enter a
suitable filename (here Example 1).
6. Hit the Play key in transport section
to start playing the sequence. Keep in
mind that direct control of objects is
disabled when playing a prerecorded
trajectory.
The transport section includes 2 handy controls determining how the list should be played back, as
described in the table below.
1
Playback stops after each file. Press Play again to launch next file.
All
All files are played back, then player stops.
1
Selected file is repeated endlessly.
All
Whole playlist is repeated endlessly.
intro PartA PartA PartB PartA PartA PartA PartB PartA ending

____________________________________________________________________________________
Wrocław Audio Force
ORFEUSZ206
user manual
30
Monitor
Monitor window displays the amount of processing power currently in
use. CPU designates the PC processor, and the graph bar shows the
total amount of processing power, including Orfeusz206 control
application and all other services in use.
DSP designates the external unit digital signal processor load.
Joystick configuration
Joystick Options window is accessible from the main menu (Settings → Joystick Options…). Up to three
joysticks can be connected to Orfeusz206 to control individually all three objects movement – but you
can also use one single joystick and configure buttons to toggle control between objects. Joysticks may
be of ancient D-connector type, or equipped with a USB connector.
Although you may use mouse and even keyboard to control objects movement, we recommend the use
of joystick for a smooth and realistic trajectory. Indeed, with mouse you may achieve accelerations not
feasible in the real world, and hence produce unrealistic sound output (a public speaker traveling 20
meters in a fraction of second, with abrupt acceleration and stop, would not sound natural even in the
real world…), meanwhile object control with joystick is based on a motion and friction forces model
ensuring smooth trajectory.
Select the Joystick tab corresponding to the
peripheral you want to configure (this may be
Joystick 1, Joystick 2 or Joystick 3).
In the Device combo box, associate one of your
peripherals to the joystick being configured.
Assign an object to your peripheral in the Object
combo box. By default, the joystick will control
the designated object.
Adjust joystick control over object's dynamics
by setting Acceleration and Friction sliders.
You can further assign functions to joystick
buttons. In the Actions section, select which
button you wish to configure in the left-hand
combo box, and assign an action in the righthand one. The table on next page summarizes all
the actions available for joystick buttons.
When you are finished configuring all your
joysticks, click OK to return to the main
interface.
Hint 1: When adjusting joystick settings, click
Apply and test. Click OK to return to the main
window, or change settings again until you are
satisfied.
Hint 2: You can assign multiple actions to a
single button. For example, you might want that
one button triggers a trajectory AND turns effect
on. To achieve this, select twice the same button
in the left-hand combo boxes, and assign actions
in the right-hand ones.

____________________________________________________________________________________
Wrocław Audio Force
ORFEUSZ206
user manual
31
Actions assignable to joystick buttons
Change Object to Listener
Change Object to Source 1
Change Object to Source 2
Toggle Source Control
If you use less than 3 joysticks, you can configure
buttons to switch control to another object.
On/Off Automove 1
On/Off Automove 2
On/Off Automove 3
On/Off Automove 4
On/Off Automove 5
Trigger an automated trajectory.
Start/Stop EQ
Start/Stop Flanger
Start/Stop Vibrato
Start/Stop Chorus
Switch effect (and corresponding Spatial Effect) on.
The illustration below shows an example of joystick configuration. This is a regular joystick for gamers,
equipped with 11 buttons (trigger is usually button 1). Actions were assigned to 'only' 8 buttons. This
configuration allows toggling motion control between the 2 sources.
Note that while controlling Source 1, buttons trigger automated trajectories for Source 1 and turn on
effects on channel 1, and while controlling Source 2, buttons trigger actions on Source 2 and channel 2.
Button 11: On/Off Vibrato
Button 10: On/Off Chorus
Button 7: On/Off Flanger
Button 6: On/Off EQ
Button 5: Change Object
to Source 2
Button 4: Change Object
to Source 1
Button 9: On/Off Automove 2Button 8: On/Off Automove 1

____________________________________________________________________________________
Wrocław Audio Force
ORFEUSZ206
user manual
32
MIDI Control and MTC synchronization
Orfeusz206 may be controlled and synchronized by MIDI messages. A MIDI configuration window is
available in the main menu.
The first tab allows selecting the MIDI port
receiving messages. This can be either a
physical port to which a device such as a MIDI
controller is connected, or of course a virtual
port as shown on the screenshot.
Virtual ports are handy solutions to
synchronize, by using MTC (Midi TimeCode),
two applications running on the same computer.
In the context of spatial audio, you will
generally sync Orfeusz and an audio or video
player.
At the present time, Orfeusz does not emit any
MIDI message. As a consequence, Orfeusz is
always the 'slave' of a 'master' application or
external hardware device.
The second tab, named Sync, is dedicated to
synchronization.
The edit box on top allows inputting an offset.
Underneath, the application shows the current
incoming MTC time, as well as the timecode
framerate.
Pressing one of the MIDI buttons available on
the Trajectory Editor window, or on the Playlist
Manager Window, activates synchronization.
Finally, the last tab enables to associate a MIDI controller to virtually any parameter of the application
(see the full list of controllable parameters at the end of the manual).
In order to control a given parameter:
- Press Add, and select from the structured pop-up menu the desired parameter.
- Select the corresponding MIDI channel (CH1 to CH16) and controller number (CC0 to
CC127) thanks to the two combo boxes available on the right-hand side.
Orfeusz is moreover able to learn by itself the data identifying the controller - this feature eases the
MIDI configuration stage.

____________________________________________________________________________________
Wrocław Audio Force
ORFEUSZ206
user manual
33
To enable that feature, press Learn button and activate the MIDI controller (knob, button, fader, MIDI
sensor etc…) you wish to associate to the selected parameter. Orfeusz sets automatically the channel
number (CH) and the controller number (CC).
Sound objects may also be MIDI
controlled. Fx parameter is related
to left to right displacement,
meanwhile Fy parameter is related
to forward and backward motion. As
with joysticks settings, one can
adjust dynamic motion properties of
the sounding objects, by setting the
Acceleration slider.
However, friction parameter is
univocally set by the Friction slider
in Joystick configuration window
(see previous paragraph).

____________________________________________________________________________________
Wrocław Audio Force
ORFEUSZ206
user manual
34
Section 4: Stereo Mode
Although Orfeusz206 is a spatial sound unit, it also provides an alternate Stereo Mode useful for
managing speakers in a conventional stereo set-up.
Stereo Mode comprises 3 main modules: Input Mixer, Output Mixer and System Configurators. We call
here system any combination of filters/eq/gains/delays required to perform a full crossover unit.
This section describes successively the various modules, and then illustrates with general examples how
Orfeusz206 crossover systems allow for extra-fast set-up.
Input Mixer
The block diagram of the Input Mixer is shown below, and consists of identical gains, delays and
graphic equalizers available on each section. Inputs 1 and 2 are summed to provide signal 'mix',
appropriate for feeding subwoofers.
Here are operation details about the Input Mixer. Please refer to the screenshot on next page to locate
corresponding controls.
Level-meters show signal level in dBFS at A/D conversion stage.
Inputs 1 and 2 are equipped with a soft-mute button.
When adjusting gain, make sure not to clip signals. A clipping led is available in gain each
section.
Delay values can be either typed in the edit boxes, or set with the jog-dial, which has gross and
fine adjustment knobs.
To switch on graphic EQs, click the corresponding 'On' switch. Click again to switch off
(bypass).
Graphic EQs may be linked ('Link' button): the changes made to one section are duplicated in the
two other sections.
EQs' filters bandwidth is adjustable (narrow, medium or large).
You can load and save EQ presets ('Preset' button). For a flat correcting curve, load the flat
factory preset.
EQ output level is adjustable from –12 dB to +12 dB.
If the EQ section is clipping (red led), lower the input gain in that same section.
To set an EQ slider back to 0, double-click on it.
delay
graphic EQ
delay
graphic EQ
delay
graphic EQ
in 1
in 2
1
2
mix

____________________________________________________________________________________
Wrocław Audio Force
ORFEUSZ206
user manual
35
The table below summarizes Input Mixer specifications:
Input Mixer Specifications
Max input level +9 dBu (= 0 dBFS)
Gain
adjustable -∞ to +12dB
Delay adjustable 0 to 300 ms
Graphic EQ 31 third-octave bands, –12dB/+12dB
input gain slider
level meter
delay jog-dial with gross/fine adjustments
input clipping led
On/Off switch (bypass)
Preset switch
Link switch
show/hide EQs
EQ clipping led
Mute switch
31-band graphic EQ
EQ output level
EQ bandwidth selector

____________________________________________________________________________________
Wrocław Audio Force
ORFEUSZ206
user manual
36
Output Mixer
Output Mixer comprises as many identical sections as there are systems. Systems are combinations of
crossover filters and EQs driving broadband speakers, and may be one-way, two-way or three-way. They
are discussed more in details in the next paragraph. The figure below shows how the Output Mixer
window looks like in a stereo set-up with one subwoofer: there are 3 identical sections (left, right, and
sub).
Each section consists of a level control, a delay with jog-dial and a soft mute switch. Output level
controls may be linked so that general level may be changed in one step, without altering the relative
settings.
Output Mixer Specifications
Max output level +6 dBu (= 0 dBFS)
Gain
adjustable -∞ to 0 dB
Delay adjustable 0 to 150 ms
System Configuration
Systems are available in 3 variations: one-way, two-way and three-way systems. The block diagrams
below outline the components of each system type.
delay jog-dial
output level control
output level link switch
Mute switch
in out
±
p
aram. EQ
delay
p
aram. EQ
out lo
±
delay
p
aram. EQ
out hi
±
in
delay
p
aram. EQ
out lo
±
delay
p
aram. EQ
out mid
±
delay
p
aram. EQ
out hi
±
in
One-way
Two-wa
y
Three-way
____________________________________________________________________________________
Wrocław Audio Force
ORFEUSZ206
user manual
37
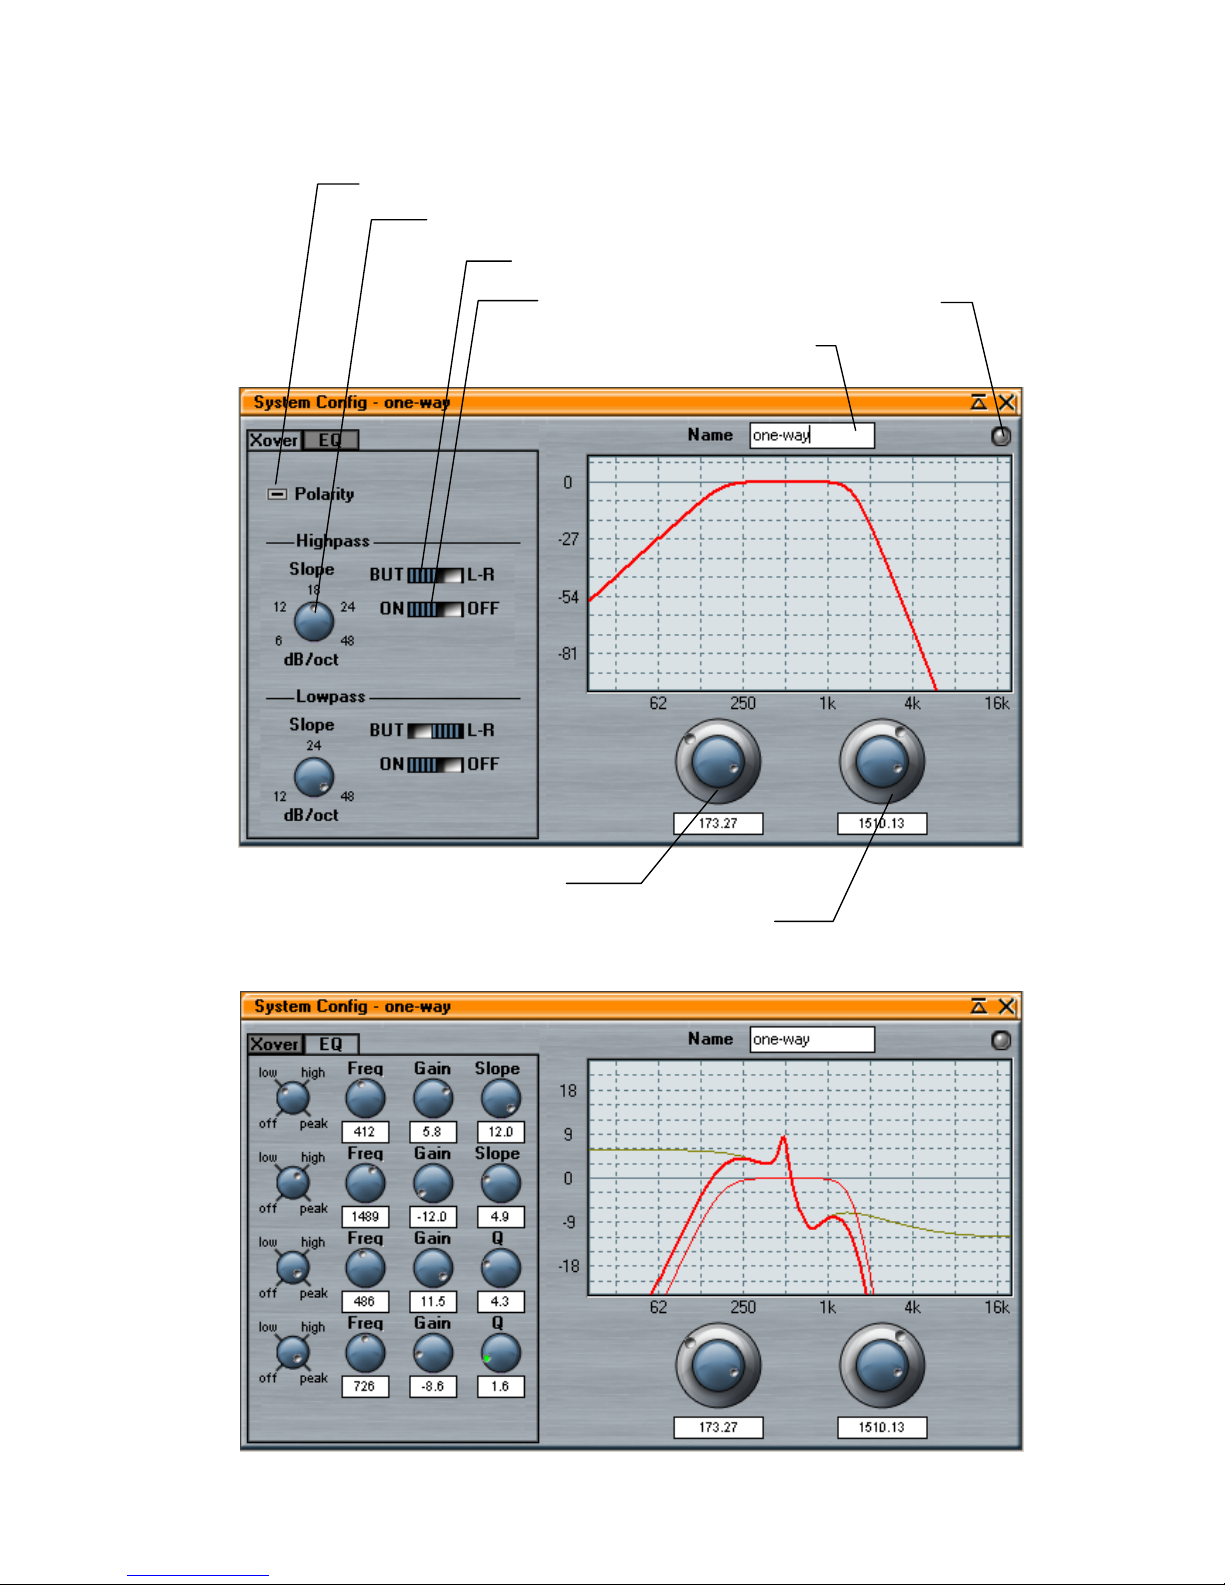
One-way systems have one input and one output. They provide independent low-pass and high-pass
filters and, as a consequence, total control over crossover filtering. The EQ tab gives furthermore access
to 4 fully parametric filters, which can be low-shelf, high-shelf or peaking, with adjustable frequency,
gain (-12 dB/+12 dB) and slope/quality factor.
p
olarity switch
slope selector knob
filter type switch (Buttorworth or Linkwitz-Riley)
bypass switch
clipping led
system name edit box
low corner frequency
high corner frequency

____________________________________________________________________________________
Wrocław Audio Force
ORFEUSZ206
user manual
38
Two-way and three-way systems have one input, and 2 or 3 outputs. They were made available in order
to save time at set-up stage (see examples below). Setting up a crossover network with a multi-way
system config window imposes the following constraints:
Crossover filtering type (Butterworth, Linkwitz-Riley or FIR) is common to all filters within the
system.
Successive filters are overlapping at corner frequencies (-3 dB for Butterworth filters, -6 dB for
Linkwitz-Riley and FIR filters).
Polarities of the various outputs are automatically set when obvious, but can be modified further.
Moreover, you can compensate for time misalignment in your system thanks to dedicated short delay
lines (max 10 ms), as well as for drivers' efficiency discrepancies thanks to independent gain controls
(from -6 dB to +6 dB).
Finally, activating the LF Cut option allows associating a subwoofer to any multi-way system (except
FIR).
Additional hints:
You can zoom in part of the frequency response graph. Just click and select with the mouse the
region to be zoomed. To zoom out back to the original view, simply click on the graph.
Each output has four dedicated parametric filters.
There's a number of clipping leds equal to the number of ways. These leds warn of clipping both
in the crossover filters and in the EQ section.
System Config Specifications
Crossovers
Butterworth (6, 12, 18, 24, 48 dB/oct), Linkwitz-Riley (12, 24, 48
dB/oct), FIR3 (max. 511 coefficients)
Parametric EQ
4 filters per output, configurable as low-shelf, high-shelf or peaking
filter.
Gains –12dB / +12dB
3
Not available for 1-way systems
low frequencies
cut switch
low frequencies filter cutoff
frequency jog-dial
time alignment controls
level alignment controls

____________________________________________________________________________________
Wrocław Audio Force
ORFEUSZ206
user manual
39
Example 1: Three-way stereo Linkwitz-Riley 12dB/oct
The following examples illustrate the ideal way to use systems in order to complete your set-up
configuration in a very short time. Some of the commands given here were not studied before, so we
recommend you to view these examples as exercises helpful to learn how to make the best of your
Orfeusz206.
This first example deals with a pair of 3-way cabinets with 100 Hz and 1000 Hz cutoff frequencies.
Additionally, we wish to set a Linkwitz-Riley 12dB/oct crossover network on all 3 elements.
1. Click on the 'New' set-up icon to start from scratch.
2. Click on the 3-way system icon (or right-click on the layout window and select insert 3-way
system from the contextual menu). A 3-way system is inserted in the layout window.
3-way system icon
3-way crossover symbol
New setup icon

____________________________________________________________________________________
Wrocław Audio Force
ORFEUSZ206
user manual
40
3. Double-click on the 3-way crossover symbol (or View → Systems → three-way in the menu) in
order to open the crossover settings window.
4. Switch off LF Cut if it was on.
5. Set the filtering switch to IIR.
6. Set the crossover network type switch to Linkwitz-Riley (L-R).
7. Turn the slope knob to the 12 dB/oct position.
8. Type into the edit boxes the desired cut-off frequencies (or use the dial wheel).
9. In the Name edit box, type in the name of your system. In this example we chose 'left'.
You're finished with the basic settings for the first system. Note that polarity of the second driver was
automatically reversed in order to align drivers' phases at cutoff frequencies (characteristic of 12dB/oct
Linkwitz-Riley crossover networks). If necessary, you can adjust the Level of each element in order to
compensate for loudspeakers efficiency. You can also adjust Time sliders to compensate for distance
misalignment. The basic expected result is shown below.
10. Now we assume that your left and right systems are identical. Simply right-click on the left
speaker symbol, (or on the left crossover system symbol), and select Create Copy from the popup
menu.
11. Enter the new system's name in the appropriate edit box – here we called the second system
'right'.
12. The last thing you need to do is perform the appropriate routing. Simply drag with the mouse the
routing paths from the input squares to the crossovers', and from the crossovers' outputs to the
____________________________________________________________________________________
Wrocław Audio Force
ORFEUSZ206
user manual
41
device outputs. In order to modify an existing routing, you need to drag new lines that are going
to overwrite your previous settings.
Example 2: Two-way stereo with subwoofers
1. Click the 2-way system icon (or select insert 2-way system
from the context menu).
2. Double-click on the 2-way crossover symbol (or View →
Systems → two-way in the menu) in order to open the
crossover settings window.
3. Let's assume that we wish a Butterworth crossover with
48dB/oct slope and 1200 Hz cutoff frequency. To achieve
this, just position Filtering switch on IIR, crossover type

____________________________________________________________________________________
Wrocław Audio Force
ORFEUSZ206
user manual
42
switch on BUT, select the appropriate slope with the knob and type in the cutoff frequency. The
expected result is shown below.
4. Our exemplified sound system consists of broadband speakers and subwoofers. The range of
frequencies fed to subwoofers has to be removed from the signal fed to broadband speakers. To
achieve this, simply switch LF Cut option on and type in the subwoofer cutoff frequency (here
120 Hz).
5. Now we'll see some of the features that allow
completing the configuration in a few clicks.
From the speaker's contextual menu, select Create
Copy to set automatically the right side broadband
speaker.

____________________________________________________________________________________
Wrocław Audio Force
ORFEUSZ206
user manual
43
Still from the contextual menu, select Create
Complementary to set automatically one subwoofer.
Repeat this step for the second subwoofer.
6. You are finished with the crossover settings. In order
to complete this set-up, you still need to perform the
routing. We show below a possible routing – but any
is acceptable.
____________________________________________________________________________________
Wrocław Audio Force
ORFEUSZ206
user manual
44
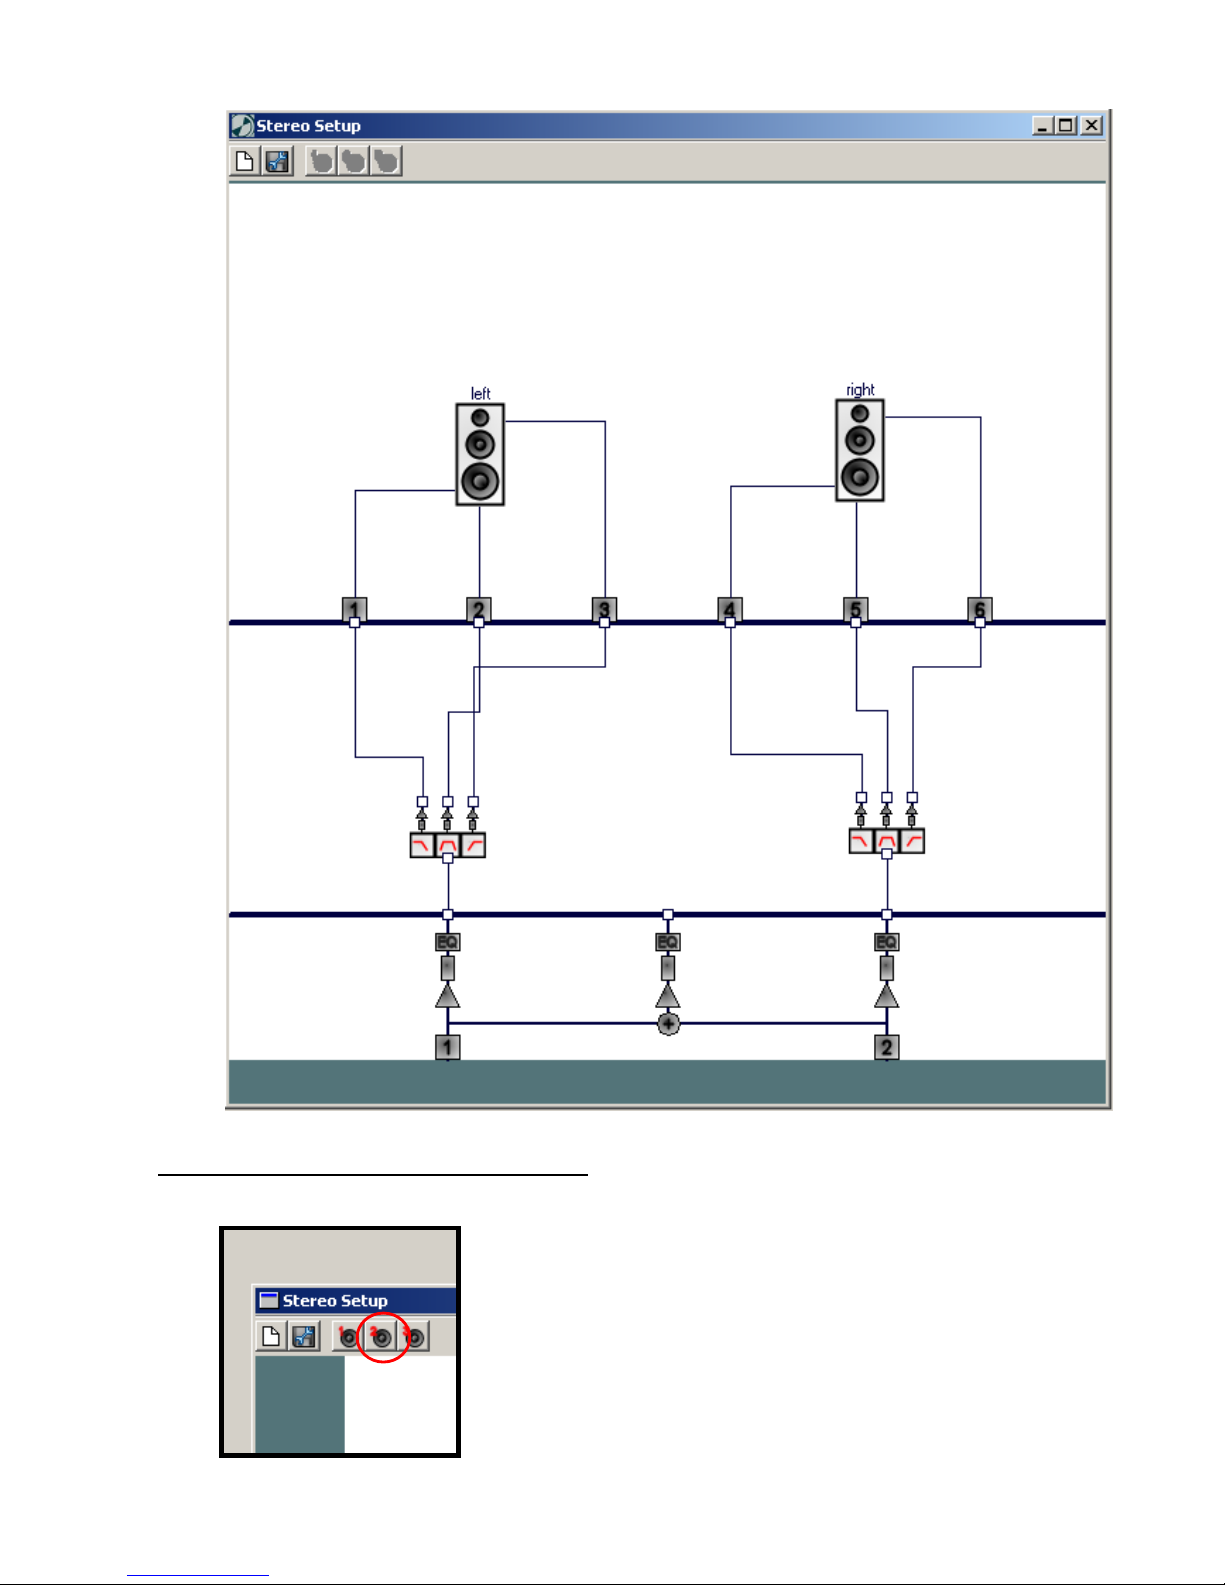
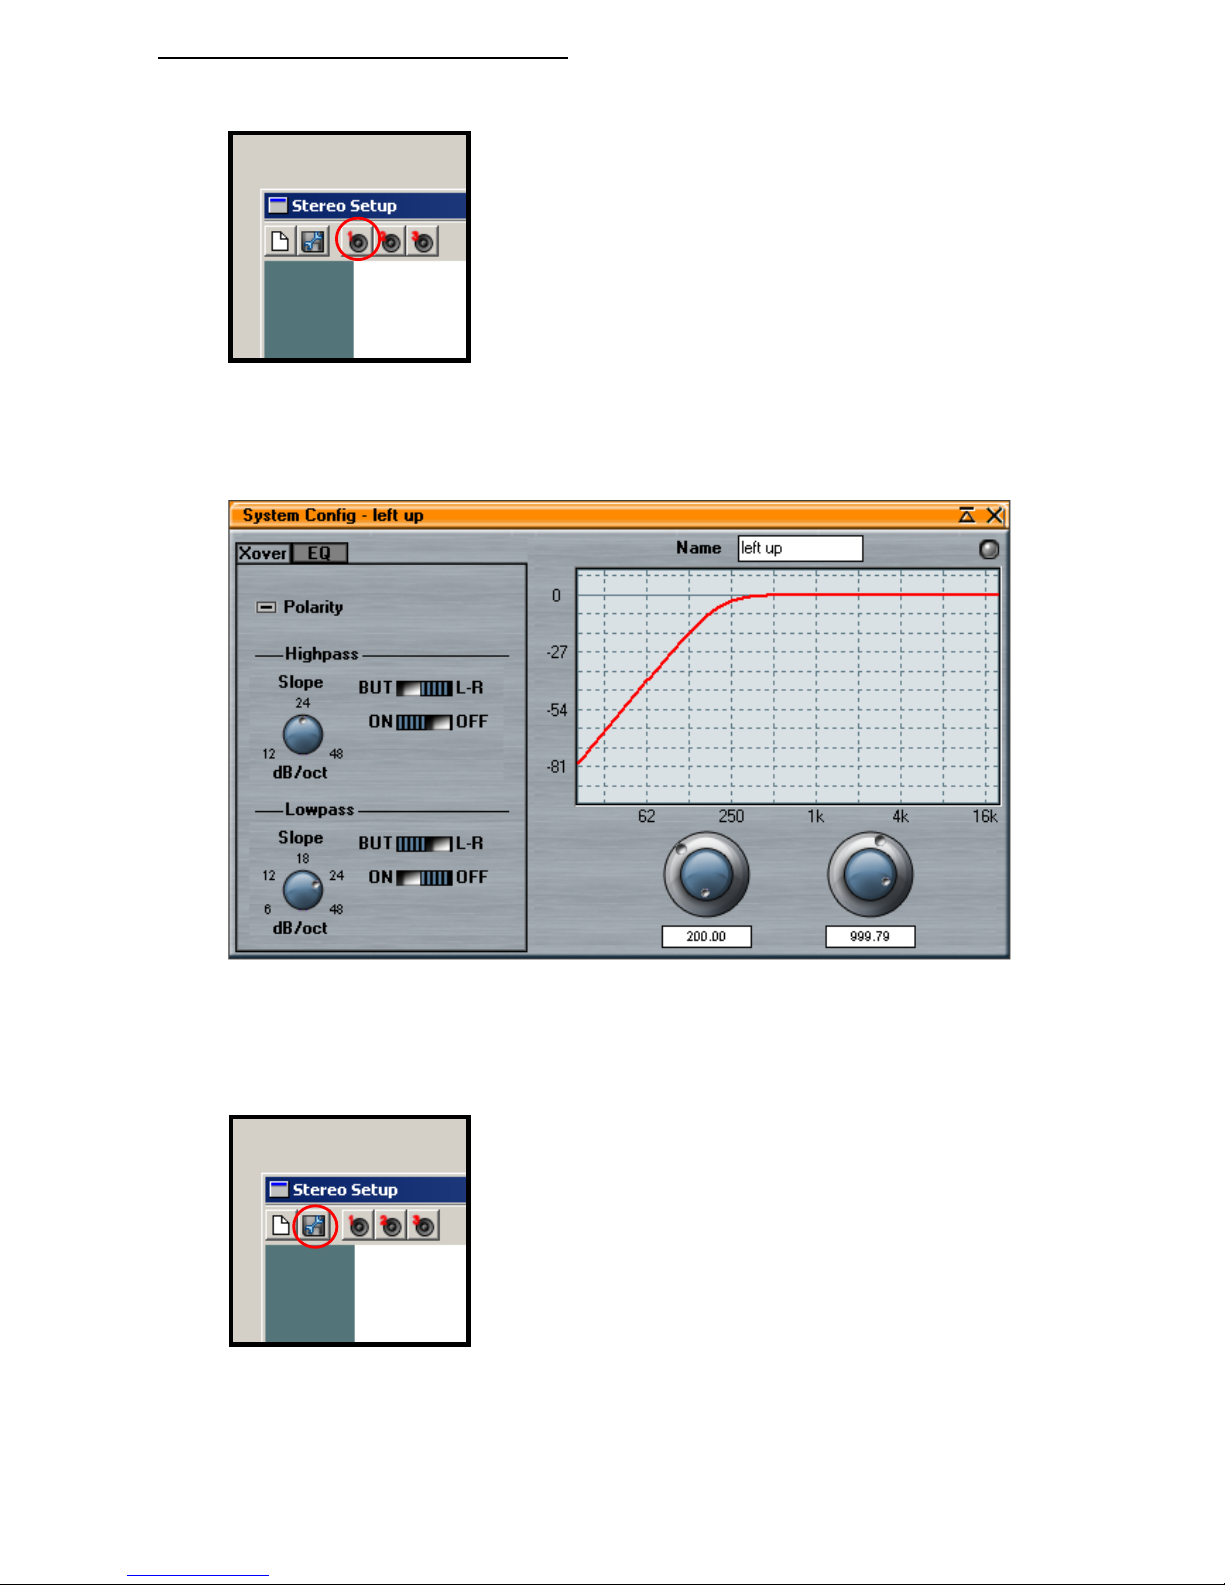
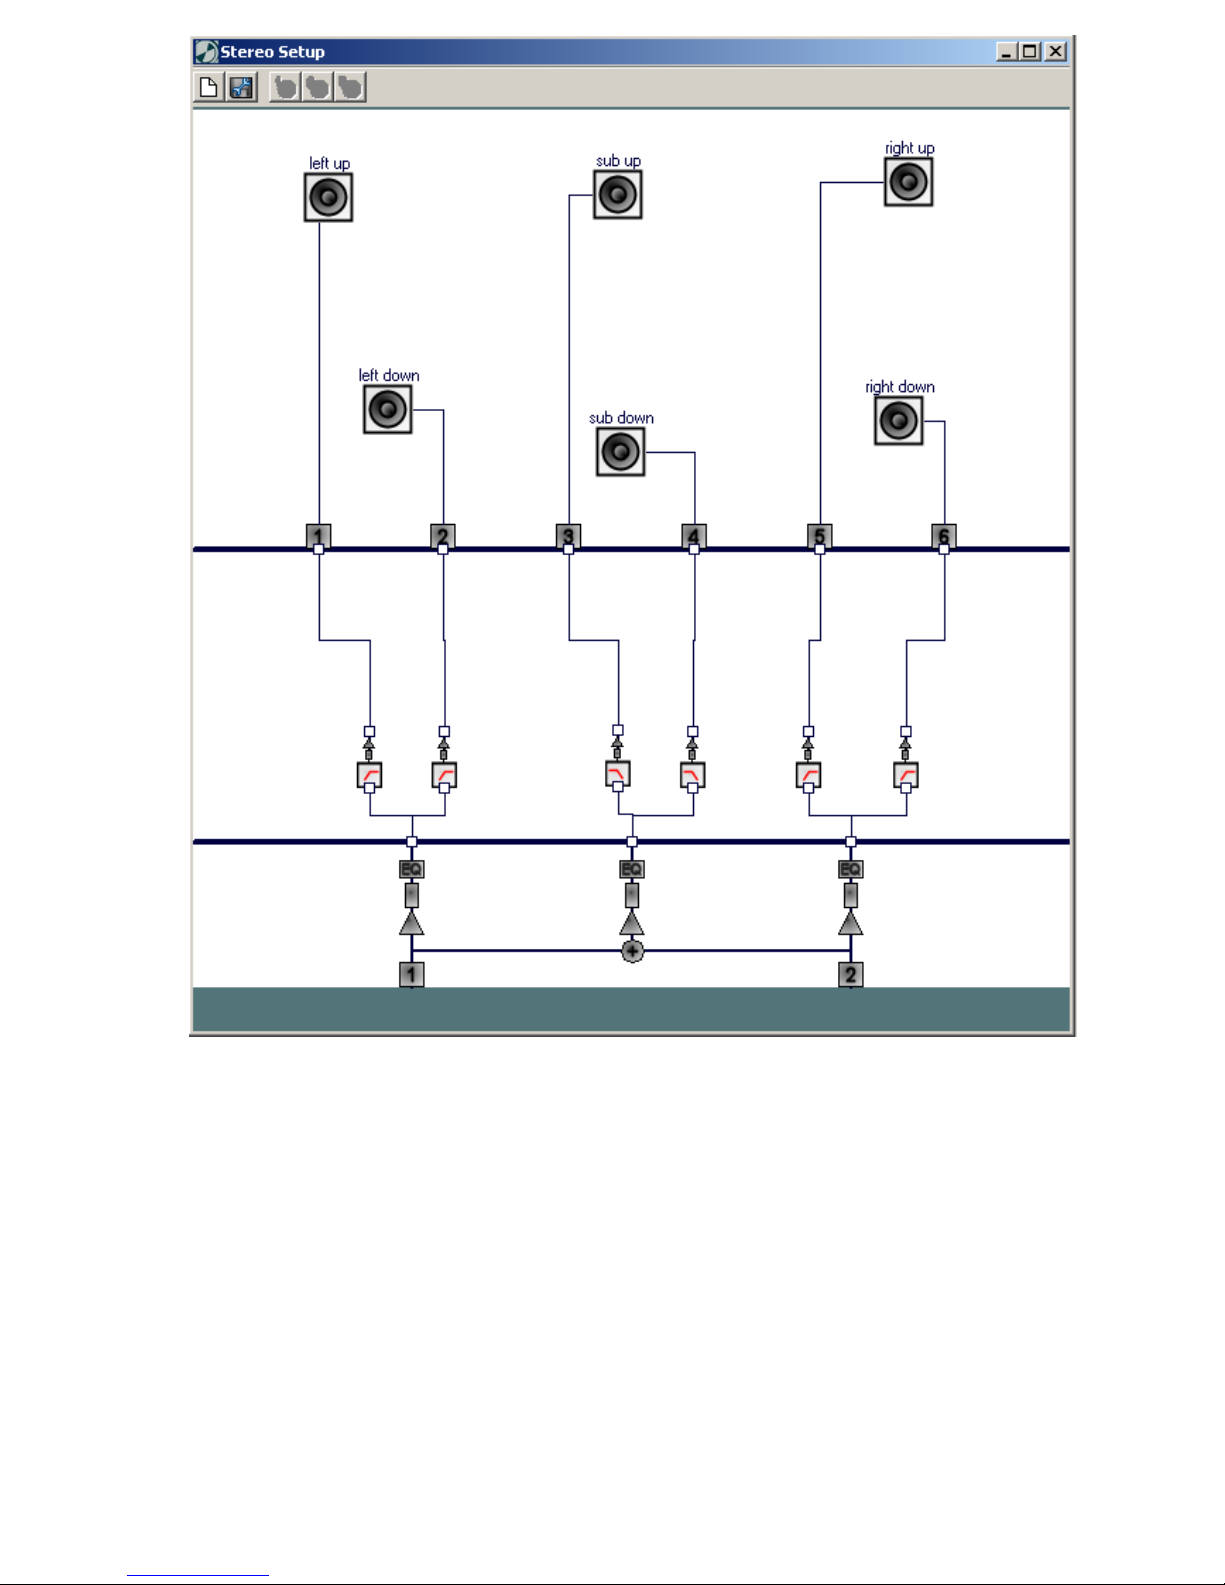
Example 3: Double stereo with subwoofers
1. Click the 1-way system icon (or select insert 1-way system from the context menu).
2. Double-click on the 1-way crossover symbol (or View → Systems → one-way in the menu) in
order to open the crossover settings window. We'll set here a Linkwitz-Riley high-pass filter with
200 Hz cutoff frequency and 24 dB/oct slope.
3. From the speaker's contextual menu, select 3 times Create Copy to set automatically 3 more
identical speakers, and click twice Create Complementary to set automatically the 2 subwoofers.
To complete your set-up, rename the speakers and perform the routing.
4. When you're finished, save your configuration among the presets for future use.
____________________________________________________________________________________
Wrocław Audio Force
ORFEUSZ206
user manual
45
____________________________________________________________________________________
Wrocław Audio Force
ORFEUSZ206
user manual
46
Section 5: Preferences, System Update and Stand-Alone Modes
Preferences
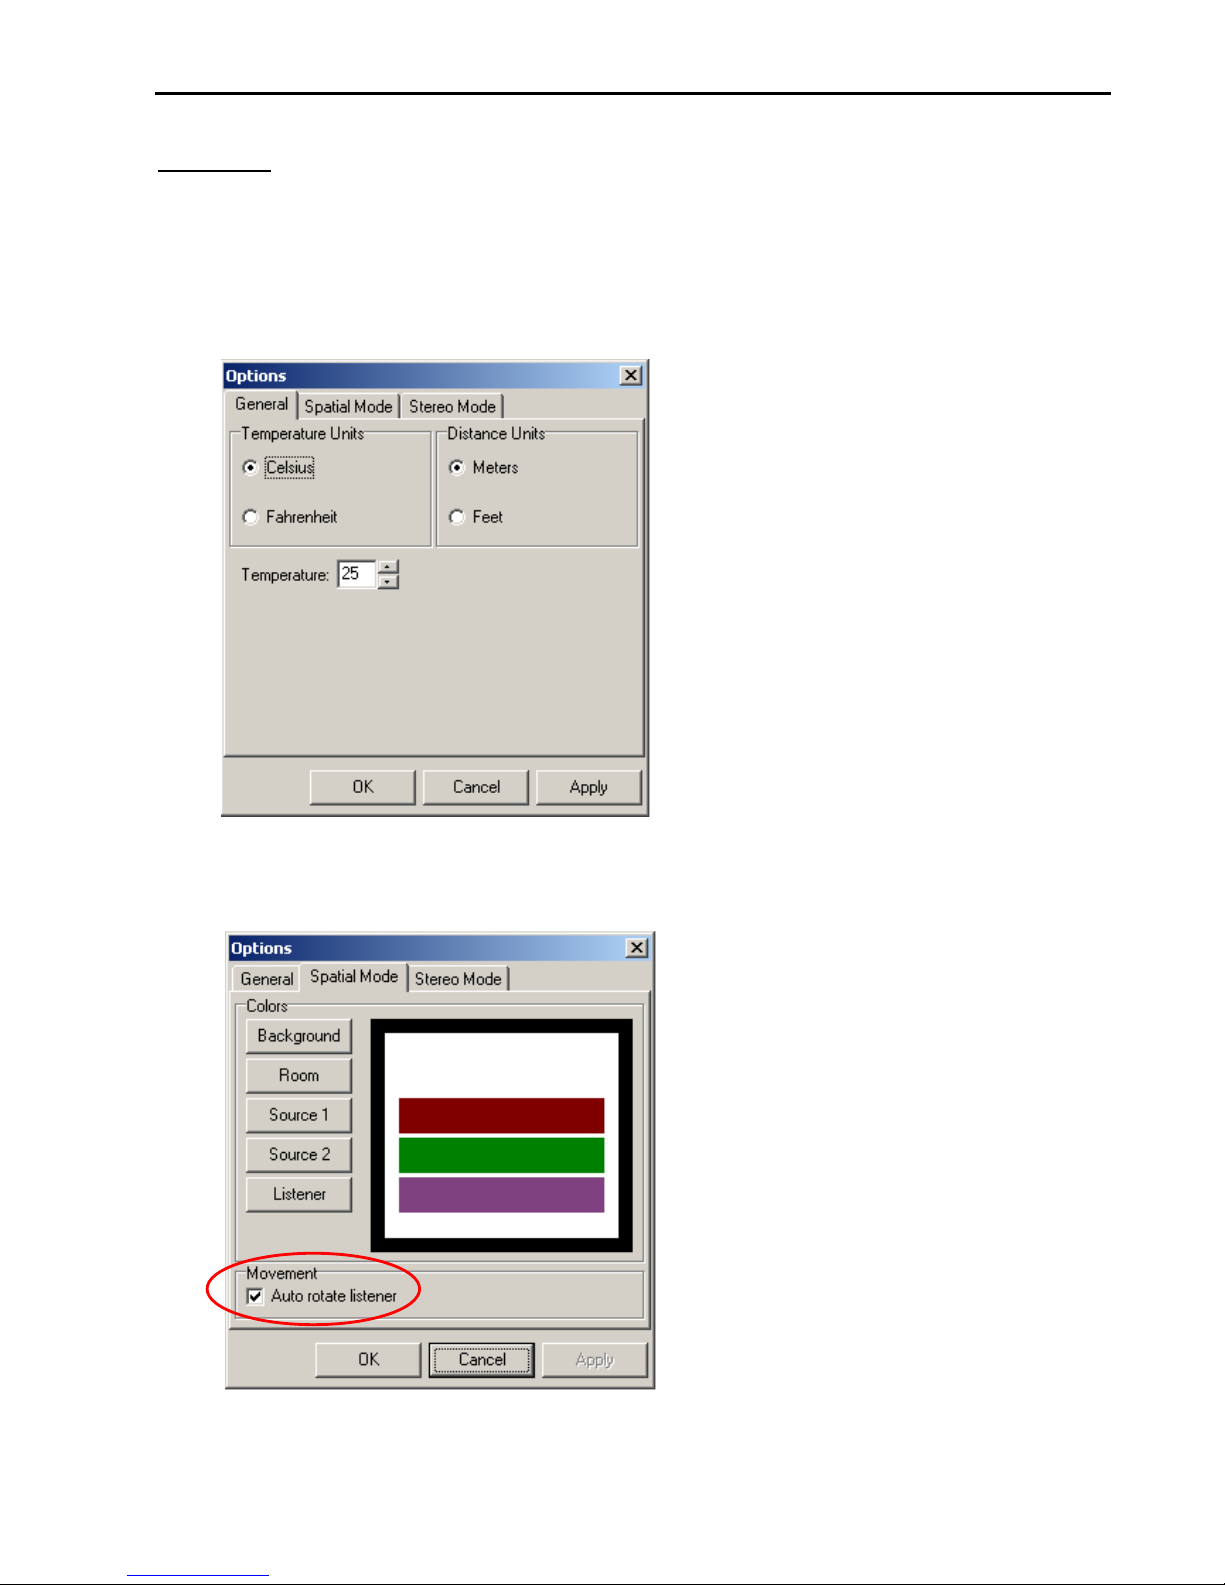
An Options window is available in Settings submenu.
In the General tab, you can set distance units to meters or feet, and temperature units to Celsius or
Fahrenheit.
You can also type in the ambient temperature. This latter information is used to transform time delays
into distances (speed of sound depends on air temperature).
In the two remaining tabs, you can set environment colours, as well as Listener's behaviour when
travelling (Spatial Mode).

____________________________________________________________________________________
Wrocław Audio Force
ORFEUSZ206
user manual
47
When Auto rotate listener option is checked, Listener is automatically oriented in the direction of
movement. When this option is unchecked, Listener's orientation remains fixed. See figure below.
System Update
An update command is available in the Help submenu. When you select this item, Orfeusz206 control
application will check online if a new version is available for download. Make sure your Internet
connection is working.
If there's a new version, we recommend that you update
your system. Indeed, newest version will provide
additional features as well as possible bug corrections.
When the update procedure completes, turn on
Orfeusz206 hardware and connect with the control
application. If necessary, a new code will be uploaded into
the external unit; follow then instructions displayed on
screen.
Software version number currently installed is available in
the About box (Help → About…).
Stand-Alone Modes
Orfeusz206 external unit provides memory space for 3 of them, which might be stereo configurations or
static spatial source placements. In Stand-Alone Mode, Orfeusz206 operates without connecting to the
PC – see section 1 for how to have Orfeusz206 operating a Stand Alone Mode.
Access sub-menu Settings → Stand Alone Modes… in order to clear or store data for Stand-Alone
Modes. Select the memory slot you wish to modify, and press Store to overwrite the previous settings, or
Clear to just delete them. Settings stored reflect
your online configuration at the time you issue
the store command. In other words, what you
store is what you have on screen. In particular,
if you are running Orfeusz in Spatial Mode, you
will store a spatial stand-alone mode, and
likewise in Stereo Mode, you will store a stereo
stand-alone mode. When storing or clearing
action has completed, close the dialog to return
to normal online operation.
Please note that while storing Stand-Alone data, Orfeusz will mute outputs during
5 seconds.
Auto-rotate set Auto-rotate cleared

____________________________________________________________________________________
Wrocław Audio Force
ORFEUSZ206
user manual
48
Specifications
Control Application Requirements
MINIMAL CONFIGURATION
Processor 1 GHz, 256 MB RAM, Windows™ 98/2000/XP
RECOMMENDED DISPLAY
1280 x 1024 or higher resolution
CONNECTIVITY
Min. 1 free USB port
OPTIONAL PERIPHERALS
Up to 3 joysticks
Hardware Specifications
AUDIO (at 48kHz sampling frequency)
Inputs:
2 (balanced/unbalanced)
Outputs:
6 (balanced/unbalanced)
Connectors:
Jacks 6.3 mm (in/out)
Max Level:
in 9 dBu / out 6dBu
Impedance:
in 9 kΩ / out 50 Ω
Frequency Response:
+/- 0.05 dB (20Hz - 20kHz)
S/N:
101 dB unweighted @ 997 Hz
Crosstalk:
< -95 dB (20Hz - 20kHz)
INTERFACE
Connector:
USB type B
Protocol:
USB 2.0 compliant
GENERAL
Dimensions:
Standard rack 1U (depth 216 mm)
Weight:
2.8 kg (6.2 lbs)
Mains:
100-240V (50-60Hz)
Power Consumption:
<15W
Operating Temperature:
0°C to 50°C (32°F to 122°F)

____________________________________________________________________________________
Wrocław Audio Force
ORFEUSZ206
user manual
49
Appendix: List of MIDI Controllable parameters
List of MIDI Controllable Parameters
(MIDI Setup Add Menu Structure)
Automove Speed
Automove Direction
Automove 1 Start/Stop
Automove 2 Start/Stop
Automove 3 Start/Stop
Automove 4 Start/Stop
Source 1
Automove 5 Start/Stop
Automove Speed
Automove Direction
Automove 1 Start/Stop
Automove 2 Start/Stop
Automove 3 Start/Stop
Automove 4 Start/Stop
Source 2
Automove 5 Start/Stop
Automove Speed
Automove Direction
Automove 1 Start/Stop
Automove 2 Start/Stop
Automove 3 Start/Stop
Automove 4 Start/Stop
Automove
Listener
Automove 5 Start/Stop
On/Off
Strong
Level
Rate
Delay
Depth
Feedback
Flanger
Mix
On/Off
Level
Rate
Delay
Vibrato
Mix
On/Off
Level
Rate
Delay
Depth
Effects
Channel 1
Chorus
Mix

____________________________________________________________________________________
Wrocław Audio Force
ORFEUSZ206
user manual
50
On/Off
Low Freq
Low Gain
Mid 1 Freq
Mid 1 Q
Mid 2 Gain
Mid 2 Freq
Mid 2 Q
Mid 2 Gain
High Freq
Channel 1
(cont.)
EQ
High Gain
On/Off
Strong
Level
Rate
Delay
Depth
Feedback
Flanger
Mix
On/Off
Level
Rate
Delay
Vibrato
Mix
On/Off
Level
Rate
Delay
Depth
Chorus
Mix
On/Off
Low Freq
Low Gain
Mid 1 Freq
Mid 1 Q
Mid 2 Gain
Mid 2 Freq
Mid 2 Q
Mid 2 Gain
High Freq
Effects (cont.)
Channel 2
EQ
High Gain

____________________________________________________________________________________
Wrocław Audio Force
ORFEUSZ206
user manual
51
Mute 1
Inputs
Mute 2
Mute 1
Mute 2
Mute 3
Mute 4
Mute 5
Mute 6
Volume 1
Volume 2
Volume 3
Volume 4
Volume 5
Master
Outputs
Volume 6
Fx
Source1
Fy
Fx
Source2
Fy
Fx
Fy
Azimuth
Movement
Listener
Reference
Play
Stop
Next
Previous
Playlist
Manager
Sync
Spatial EQ On/Off
Spatial Flanger On/Off
Spatial Vibrato On/Off
Channel 1
Spatial Chorus On/Off
Spatial EQ On/Off
Spatial Flanger On/Off
Spatial Vibrato On/Off
Spatial Effects
Channel 2
Spatial Chorus On/Off
Boom On/Off
Modulation On/Off
Late Reverb Predelay
Reverb Colour
Virtual Model
Late Reverb Volume
 Loading...