

Page 1

1556 Woodlan d Drive . Salin e . MI 48176 USA .7 34.786. 961 1. ww w.wadia.com
Specifications
Digital Inputs:
2 Coaxial S/PDIF (RCA), 1 TOSLINK Optical, 1 USB B
Power:
<
50 watts RMS per channel into 8 and 4 Ohms
Dynamic Power Rating @ 1kHz:
100 watts per channel into 4 Ohms
Distortion (THS + N):
1kHz@1 Watt: 0.03-0.09%, 1kHz @ 45 W: 0.11%
Signal-to-Noise Ratio:
-103dB (signal on), -105dB (signal off)
Frequency Response:
20Hz to 20kHz ±0.7dB
Power Requirements:
AC 100 – 240VAC, 50/60Hz
Dimensions (HWD):
2.7 x 8 x 8 in., 6.86 x 20.32 x 20.32 cm
Weight:
6 lbs, 2.72kg
Accessories Included:
Aluminum Remote
Heavy Duty Power Cord
151PowerDAC
manual
mini
151PowerDAC_Manual_Print_10-27-10:Layout 1 10/28/10 11:17 AM Page 2
Page 2

19
5 Wadia shall not, under any circumstances, be liable for any incidental
or consequential damages arising from the loss of property or other
damage or losses due to the failure of a Wadia 151PowerDAC mini.
Wadia will not pay for loss of use or inconvenience caused by the failure
of a Wadia 151PowerDAC mini. Wadia will not pay for damage caused
to other audio components caused by the failure of the Wadia
151PowerDAC mini within the limits allowed by State Law.
6 The customer is responsible for the shipping charges for all repairs,
warranty or non-warranty, shipped to Wadia. Wadia will pay return
shipping to the customer or dealer (within the United States) for all
warranty replacements. Special shipping methods or services will not be
covered by Wadia.
7 This product is only warranted in the country of original sale by Wadia.
Thank You.
All of us at Wadia Digital would like to say thank
you, and congratulations for purchasing the Wadia
151PowerDAC mini Digital Integrated Amplifier. We
sincerely believe that your Wadia 151PowerDAC mini
is an intelligent investment that will bring you many
years of musical enjoyment and satisfaction.
We understand how eager you are to begin listening
and we want you to become familiar with the full
capabilities of the Wadia 151PowerDAC mini.
However, before powering on the device, we
encourage you to look through the manual and
pay special attention to the sections highlighted
with an ◆.
151PowerDAC_Manual_Print_10-27-10:Layout 1 10/28/10 11:17 AM Page 4
Page 3

18
Warranty
This Warranty covers the Wadia 151PowerDAC mini.
Wadia Digital warrants that this product shall be free from defects in materials
and workmanship for:
1 year for all parts of the product (excluding batteries).
The warranty period begins at the date of sale and is subject to the following
requirements and understandings:
1 This is a non transferable warranty.
2 The product must not have been modified in any manner whatsoever, or
the warranty is immediately voided.
3 The product must not have been stored in a humid, damp environment;
nor subjected to weather, water, or salt spray.
4 During the warranty period Wadia will repair or exchange a defective
Wadia 151PowerDAC mini with a similar available product, at no cost to
the owner for labor, materials, and shipping charges from Wadia.
Tabl e of Contents
Installation
Connections
Operation
Appendices
Wadia Digital – a Brief History 4
Important Safety Instructions 6
Getting Started 8
Features 8
Unpacking 9
Accessories 9
Installing Battery in Remote Control 10
◆Connecting to AC Power 10
◆Using Line Conditioners 11
◆Using Surge Protectors 11
Back Panel 12
◆Speaker Outputs 13
◆Connecting the Digital Inputs 13
Front Panel 14
Using the 151PowerDAC mini 15
Using the Remote Control 16
Warranty 18
Specifications 20
151PowerDAC_Manual_Print_10-27-10:Layout 1 10/28/10 11:17 AM Page 6
Page 4
+
mode
input
enter
displayon/off
phase
mute
trackback
volumedown
volumeup
pause
play
stop
eject
blanceleft
balancebight
trackforward
-
17
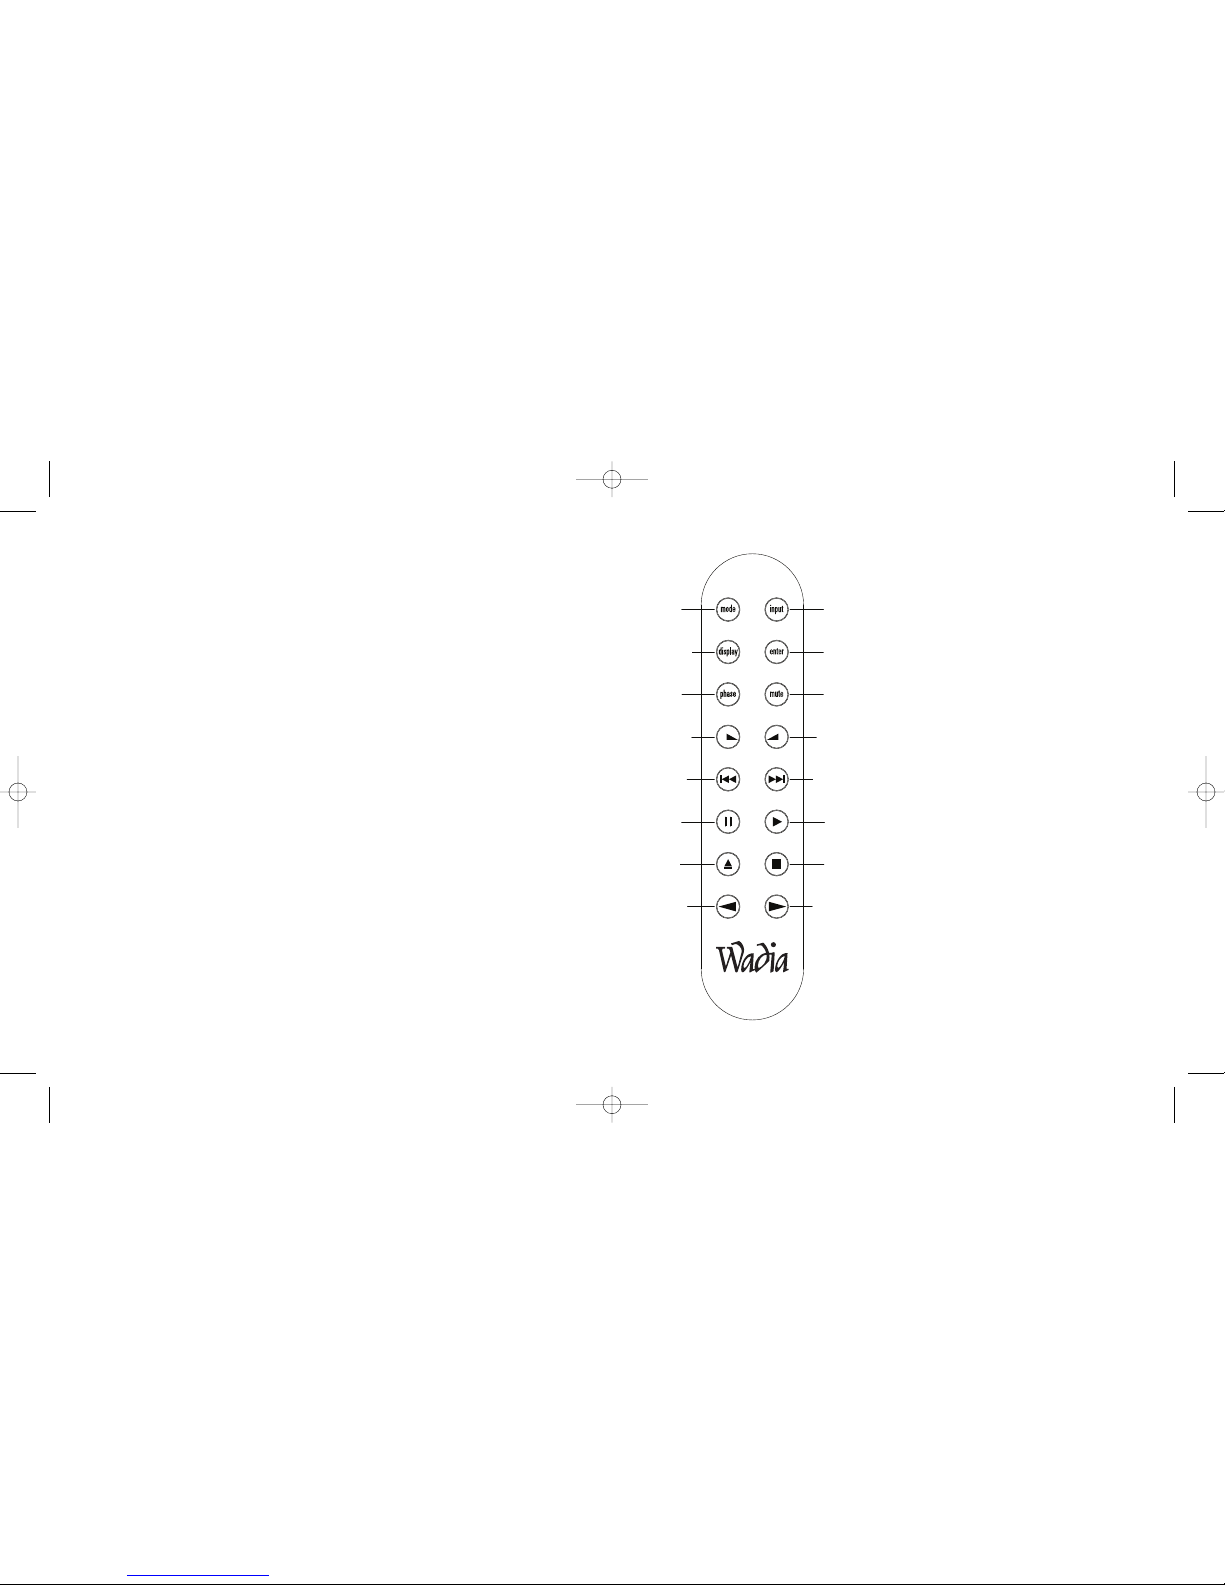
Pause
The Pause button pause the playback on
a Wadia transport
Play
The Play button starts the playback on
Wadia transport
Eject
The Eject button cause a Wadia transport
to eject the disc inside the drive
Stop
The Stop button stops the play back of a
Wadia transport
Balance Left
The Balance Left button causes the sound
to the left speaker to be more dominant
Balance Right
The Balance Right button causes the
sound to the right speaker to be more
dominant
Wadia Digital – a Brief History
Wadia Digital, founded in 1988, is one of the original companies dedicated to
high performance digital audio reproduction. Wadia was formed by a team of
engineers from the Minneapolis based 3M Corporation (Minnesota Mining and
Manufacturing) who shared many years of experience in advanced digital
telecommunications research and development. In the early 1980’s, these engineers
became intrigued by the emerging compact disc technology. Disappointed with
the sound quality of early CD players, they examined the workings and designs of
these early components and found them to be unsophisticated when compared
with the technology available in other areas of digital design. In response, they
founded Wadia Digital – a company based on the philosophy of applying advanced
technology to improve the performance of digital audio components. Wadia’s
first product, the Wadia 2000 Decoding Computer, was an absolute breakthrough
in digital audio. For many discerning listeners, it proved that Digital Audio was a
musically responsive, evolving, and engaging format.
Building on a tradition of excellence, Wadia continues to develop innovative
technology; refining, listening, engineering, and improving along the way. Since the
Wadia 2000, new generations of industry-leading designs have been introduced
and embraced by listeners around the world. Each step of the way, Wadia has
consistently raised the standard for performance of Digital Audio playback.
4
151PowerDAC_Manual_Print_10-27-10:Layout 1 10/28/10 11:17 AM Page 8
Page 5

Using the Remote Control
Mode
Not active
Input
The Input button will cycle to the next with each push of the button
(Coax 1, Coax 2, TOSLINK, and USB)
Display on/off
The display button will turn the LCD display on or off
Enter
The Enter button displays current sample rate of digital signal
Phase
The phase button inverts the polarity of the signal
Volume Down
The Volume Down decreases the volume
Volume Up
The Volume Up increases the volume
Track Back
The Track Back button skips to the previous track on a Wadia transport
Track Forward
The Track Forward button skips to the next track on a Wadia transport
16
Here is a brief list of the technological innovations the Wadia engineers
have pioneered over the past 20 years:
• DigiMaster™ patented algorithm (filter optimized for reproducing music)
• ClockLink™ proprietary jitter reduction technology
• SwiftCurrent™ current to voltage conversion technology
• First outboard Digital-to-Analog converter
• First to apply glass fiber-optics to home audio
• First to recognize jitter as a source of audible distortion
• First to perfect digital volume control
• First high-end CD player competitive with expensive separates
• First companyto providebit perfect digital audio outputfromthe iPod
While Wadia’s expertise and track record exceed those of most digital audio
companies, technology alone does not guarantee an immersive and captivating
musical performance. Wadia’s intuitive designs are born of a delicate balance
of technology shaped by a passion for music.
Wadia continues to re-define the limits of digital music playback. We are proud to
introduce the Wadia 151PowerDAC mini – a breakthrough in sonic performance
and a strong statement of our dedication to music.
5
151PowerDAC_Manual_Print_10-27-10:Layout 1 10/28/10 11:17 AM Page 10
Page 6

Using the 151PowerDAC mini
Power
The power switch is located on the back panel of the Wadia 151PowerDAC mini.
Depress the power switch (circle) to turn the power “off”. Please make sure
the Wadia 151PowerDAC mini is turned off when making all digital and
speaker connections.
Input
The Input button will cycle to the next input with each push of the button.
(Coax 1, Coax 2, TOSLINK, and USB)
Phase
The Phase button inverts the polarity of the signal.
Mute
The Mute button will mute the volume to zero, hit the button again and the volume
will revert to its previous setting.
Volume
Volume on the Wadia 151PowerDAC mini is controlled with the volume ‘+’ and
‘-‘ buttons on the front panel. The buttons maybe continuously held for quicker
volume setting. To increase the volume press ‘+’, ‘-‘ to decrease the volume.
15
Important Safety Instructions
To get the best performance from your 151PowerDAC mini, and for your
own safety, please read and follow these important safety instructions.
• Read these instructions.
• Keep these instructions.
• Heed all warnings.
• Follow all instructions.
• Do not use this apparatus near water.
• Clean only with dry cloth.
• Do not block any ventilation openings. Install in accordance with the
manufacturer's instructions.
• Do not install near any heat sources such as radiators, heat registers,
stoves, or other apparatus (including amplifiers) that produce heat.
• Do not defeat the safety purpose of the polarized or grounding-type plug.
A polarized plug has two blades with one wider than the other. A
grounding type plug has two blades and a third grounding prong. The
wide blade or the third prong are provided for your safety. If the provided
plug does not fit into your outlet, consult an electrician for replacement
of the obsolete outlet.
6
151PowerDAC_Manual_Print_10-27-10:Layout 1 10/28/10 11:17 AM Page 12
Page 7
Operation
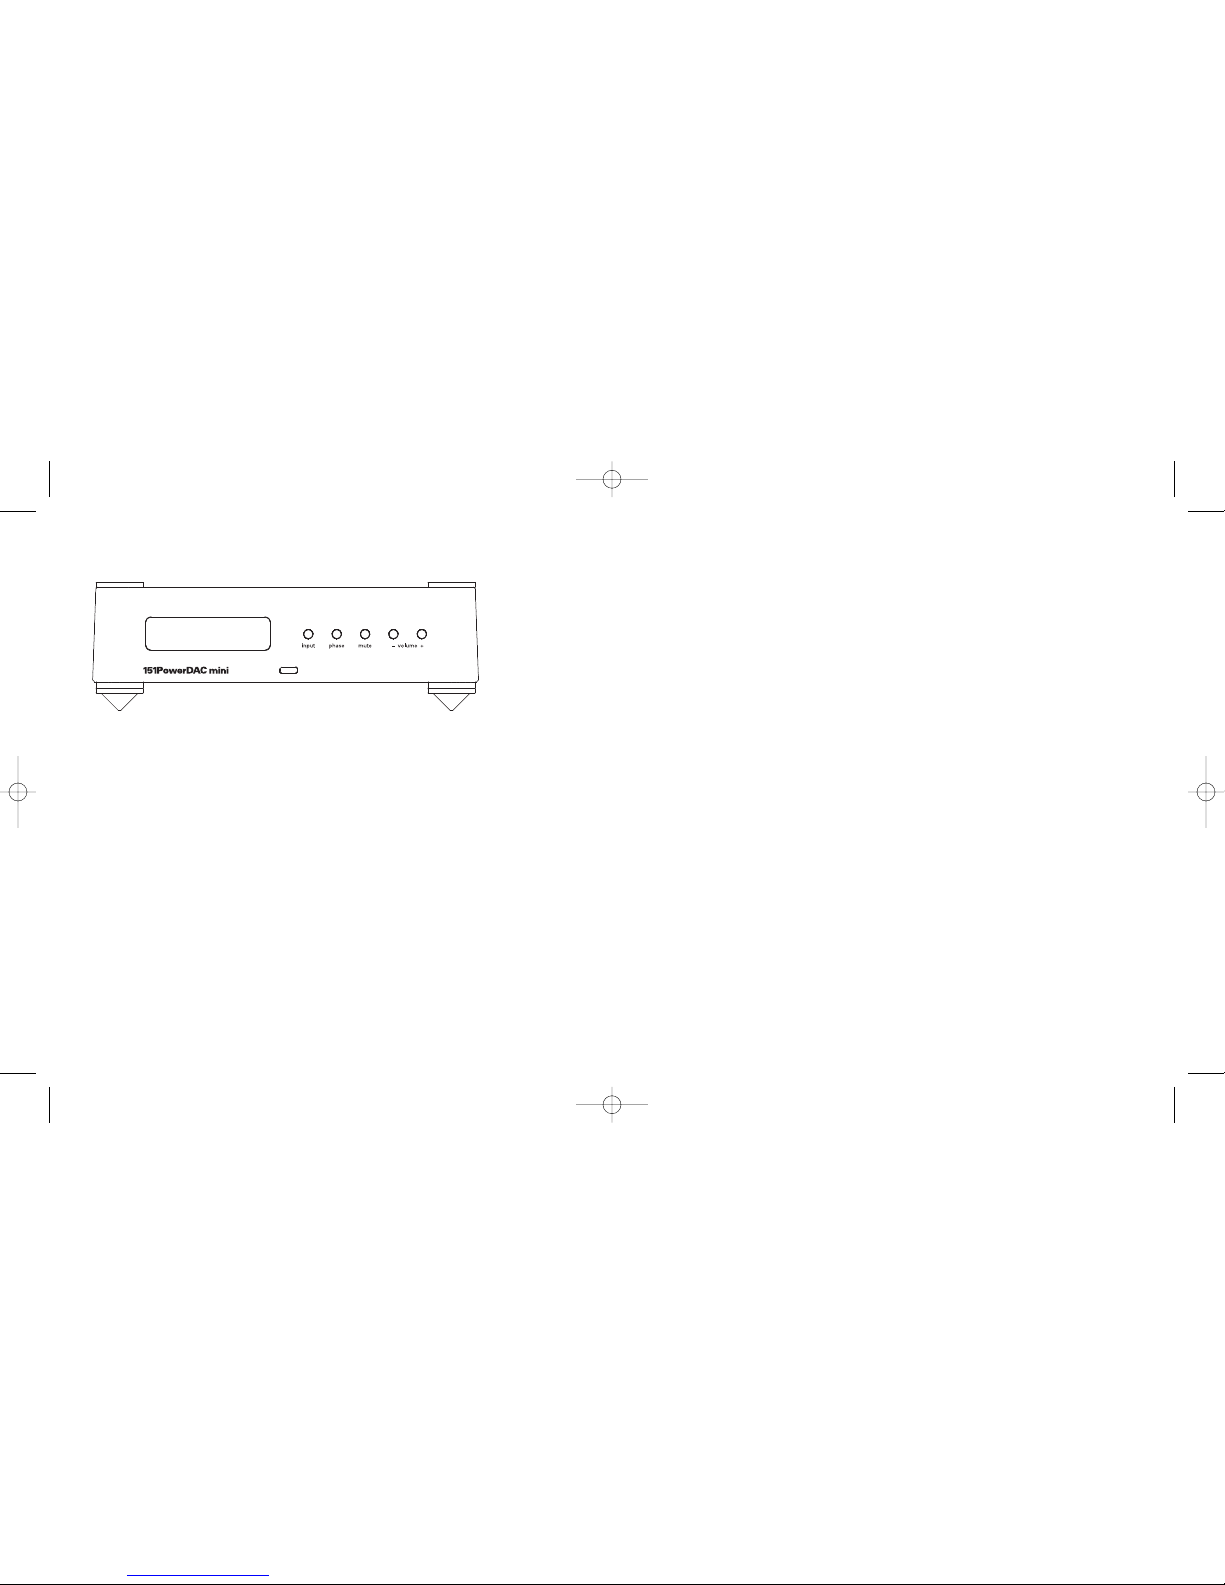
Front Panel
1 LCD display
2 Input Selector
3 Phase Button
4 Mute Button
5 Volume Up
6 Volume Down
1 2 3 456
14
• Protect the power cord from being walked on or pinched particularly
at plugs, convenience receptacles, and the point where they exit from
the apparatus.
• Only use attachments/accessories specified by the manufacturer.
• Use only with the cart, stand, tripod, bracket, or table specified by
the manufacturer, or sold with the apparatus. When a cart is used, use
caution when moving the cart/apparatus combination to avoid injury
from tip-over.
• Unplug this apparatus during lightning storms or when unused for long
periods of time.
• Refer all servicing to qualified service personnel. Servicing is
required when the apparatus has been damaged in any way, such as
power-supply cord or plug is damaged, liquid has been spilled or objects
have fallen into the apparatus, the apparatus has been exposed to rain
or moisture, does not operate normally, or has been dropped.
7
151PowerDAC_Manual_Print_10-27-10:Layout 1 10/28/10 11:17 AM Page 14
Page 8

◆Speaker Outputs
The speaker outputs are on the back of the Wadia 151PowerDAC mini. Connect
the left speaker to the left speaker terminals and the right speaker to the right
speaker terminals. Make sure you keep the Wadia 151PowerDAC mini positive
terminal (red) with the positive terminal on the speaker and the negative (black)
on the Wadia 151PowerDAC mini with the negative (black) on the speaker.
◆Connecting the Digital Inputs
The Wadia 151PowerDAC mini has 4 digital inputs on the back.
• 2 Digital Coax Inputs:
Use a digital cable coax with RCA connectors. A digital source would be
the Wadia 170iTransport.
• 1 TOSLINK Optical Input:
Use a TOSLINK optical cable from a digital source. DVD player or laptop
computer with optical output.
• 1 USB Input:
Use a USB cable from a desktop or laptop computer. The USB input accepts a
sample rate up to 24-bit/96kHz.
13
Installation
Getting Started
The Wadia 151PowerDAC mini is an integrated amplifier with 4 digital inputs
with upsampling to 24-bit/384kHz. Despite its small size, the 151PowerDAC mini
is bursting with technology to bring you the best sound possible.
Features
• 24-bit/384kHz upsampling
• Accepts up to a 24-bit /192kHz input data rate
• Wadia’s DirectConnect with Digital Volume Control technology
•<50 watts RMS per channel into 8 and 4 Ohms
• 4 Digital Inputs: 2 Coaxial S/PDIF (RCA), 1 TOSLINK Optical, 1 USB B
• 5-way insulated Gold Binding Posts
• High quality Gold Plated Input Jacks
• Aluminum full function Remote Control
• Heavy Duty Power Cord
8
151PowerDAC_Manual_Print_10-27-10:Layout 1 10/28/10 11:17 AM Page 16
Page 9
Unpacking
Use care in unpacking your Wadia 151PowerDAC mini. Inspect it for any shipping
damage and call your dealer immediately if any is found.
Do not plug your Wadia 151PowerDAC mini into an AC outlet if you find
shipping damage.
We advise saving all packing materials so that the unit can be easily and safely
shipped if the need arises.
Accessories
The following accessories are included with the Wadia 151PowerDAC mini:
• AC power cord
• Remote Control
9
Connections
Avoid static discharge to the inputs or outputs. To prevent static shocks,
touch any grounded surface, such as the chassis of any component that
uses a grounded 3-prong plug, before connecting or removing a cable.
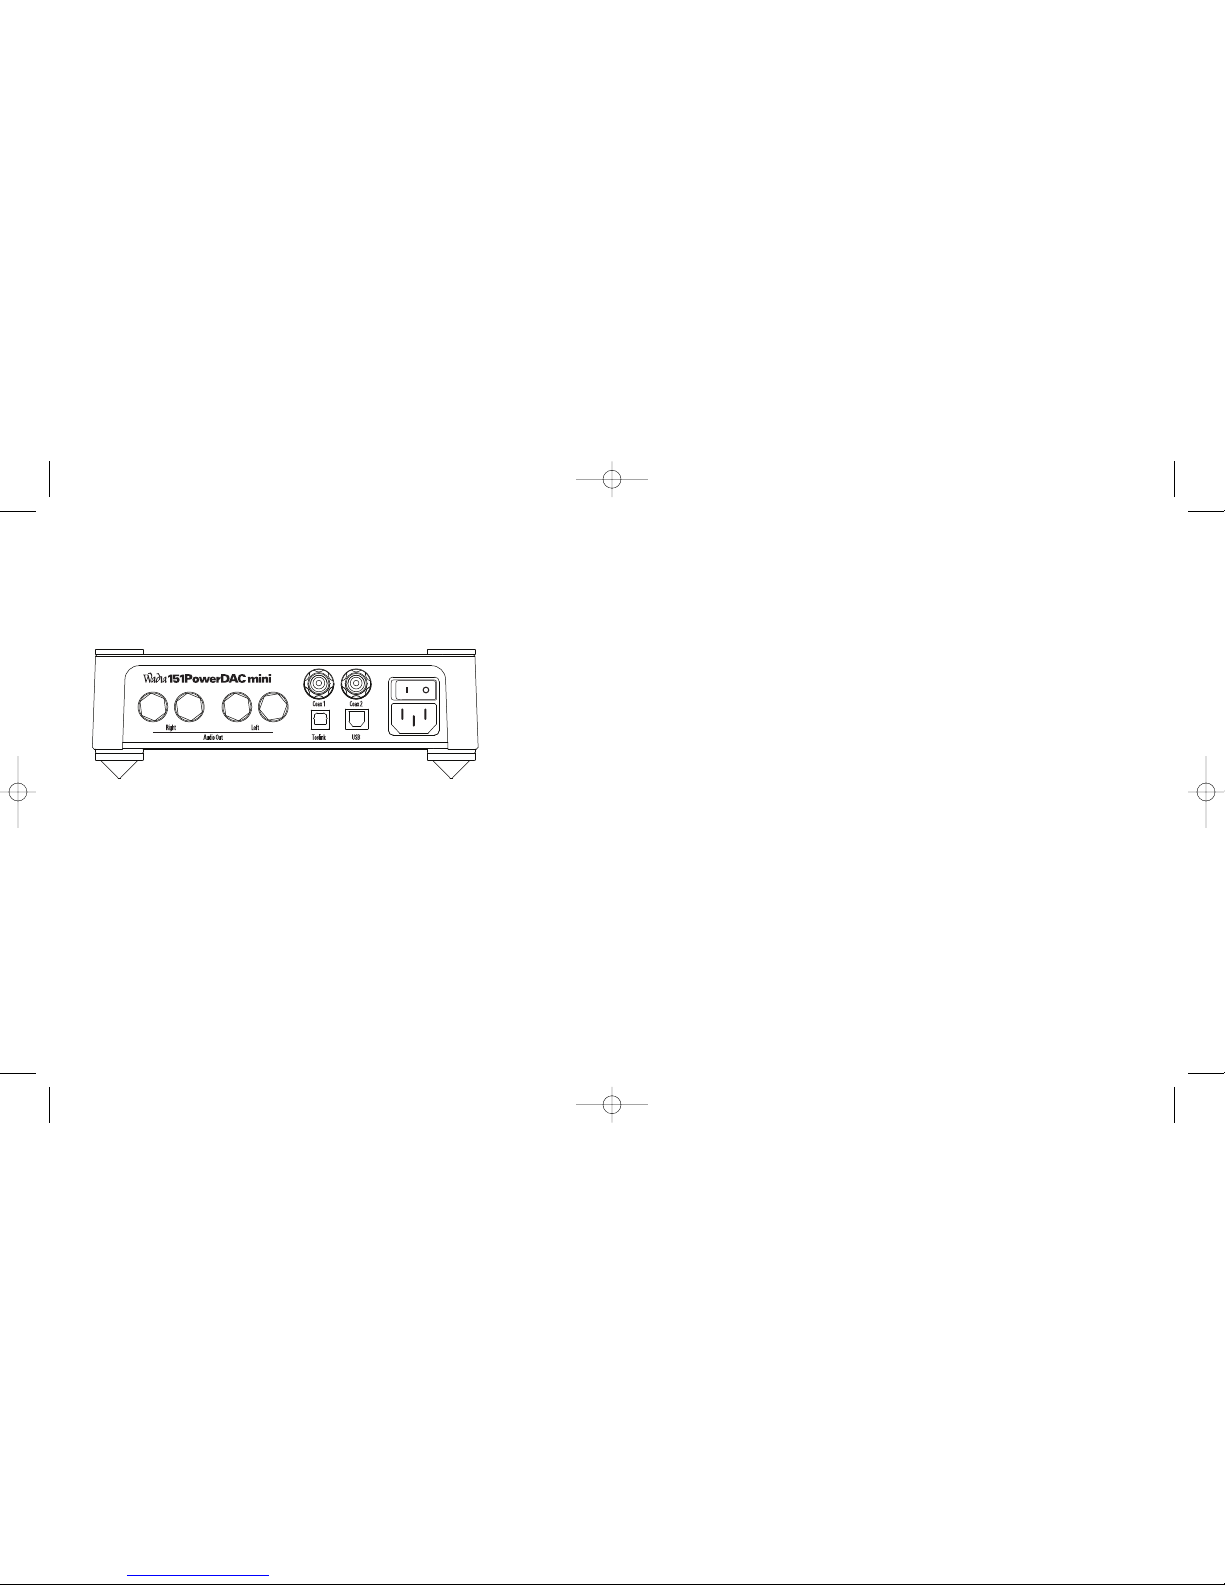
Back Panel
1 Right speaker terminals
2 Left speaker terminals
3 Coax 1 S/PDIF (RCA)
4 Coax 2 S/PDIF (RCA)
5 TOSLINK Optical
6 USB B
7 Power Switch
8 Power cord terminal
12
1 2
34
56
7
8
151PowerDAC_Manual_Print_10-27-10:Layout 1 10/28/10 11:17 AM Page 18
Page 10

◆Using AC Line Conditioners
The Wadia 151PowerDAC mini employs extensive power-line filtering and
noise suppression technology so fine performance is available with the Wadia
151PowerDAC mini plugged directly into a wall outlet using the AC power cord
provided. However many users report gains in sound quality when using power
conditioners or after-market power cords. If you wish to experiment with any of
these devices we recommend working with your dealer and trusting your own
ears for what sounds best.
◆Using a “Surge Protector”
Although the Wadia 151PowerDAC mini resists most significant voltage spikes
it can still be damaged by extreme voltage overload such as a lightning strike.
This type of damage is not covered under warranty. In certain circumstances, a
“surge protector” can prevent this type of damage. If needed, we recommend
a high quality conditioner/surge protection device to avoid the degradation in
sound typical with inexpensive “strip” devices.
11
Installing Battery in Remote Control
The Wadia 151PowerDAC mini remote control requires two AAA batteries. To
install the batteries, remove the battery cover on the back of the remote. Insert
the batteries as indicated on the battery holders, and replace the cover.
◆Connecting to AC Power
Check to make sure that the power cord shipped with your Wadia
151PowerDAC mini has been manufactured for operation at your AC line
voltage. Damage caused by improper operation is not covered by Wadia
warranty. If the included cable and wall termination is different from your
AC outlet, contact your Wadia dealer.
10
151PowerDAC_Manual_Print_10-27-10:Layout 1 10/28/10 11:17 AM Page 20
 Loading...