

Page 1
G
&
N
I
F
T
H
G
I
L
A
N
S
EASY CONNECT®
INSTALLATION INSTRUCTIONS
E
C
L
A
I
R
A
G
E
S
N
&
E
V
!
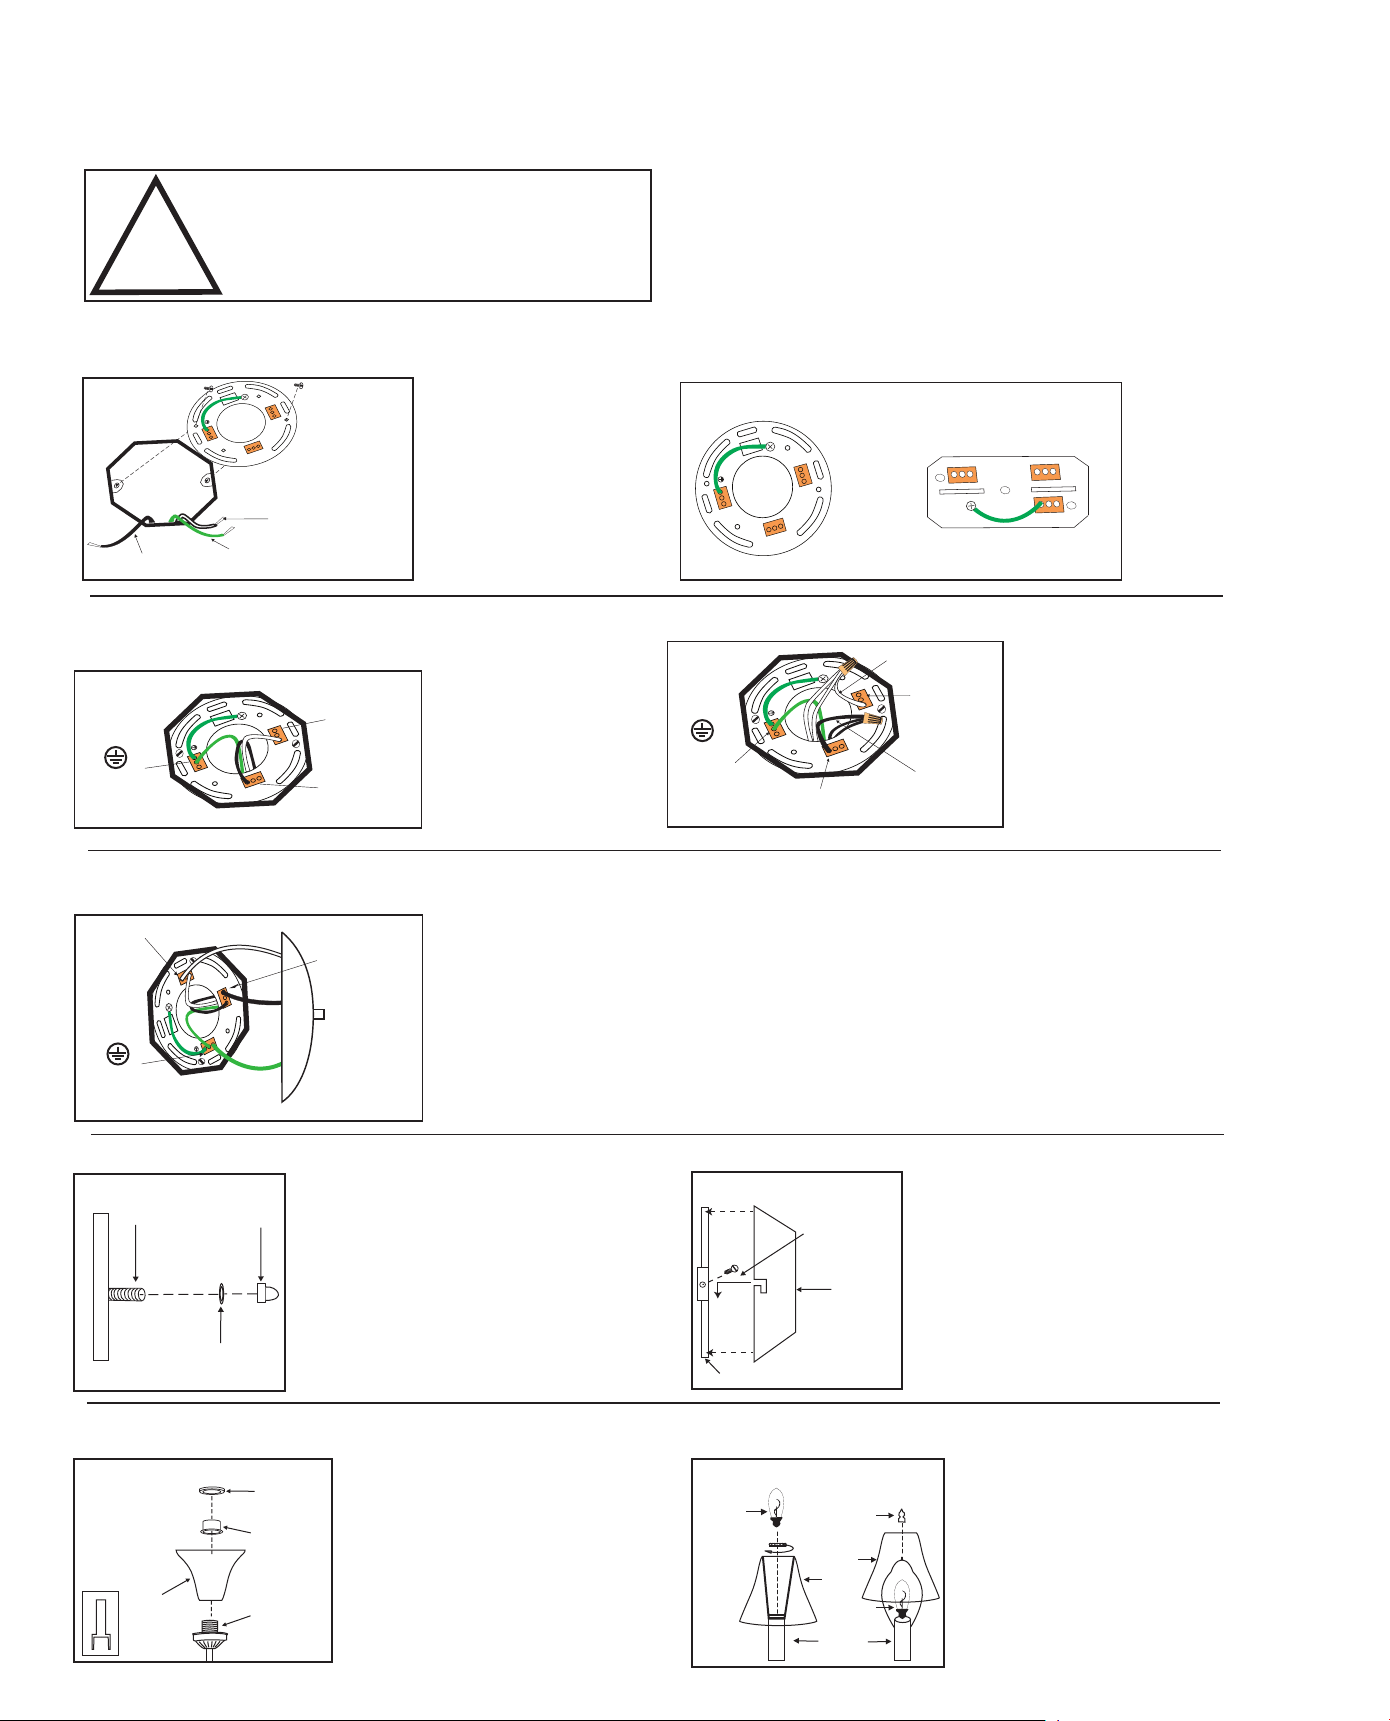
INSTALL EASY CONNECT MOUNTING BRACKET:
STEP 1
Electrical
Box
Black (Live)
Green (Ground)
S
R
U
E
T
A
L
I
T
QUESTIONS OR CONCERNS CONTACT CANARM AT:
1-800-265-1833 (English) • 1-800-567-2513 (French)
Monday through Friday 8:00 AM to 5:00 PM E.S.T.
“INSTRUCTIONS PERTAINING TO RISK OF FIRE OR INJURY TO PERSONS”
“READ ALL INSTRUCTIONS”
“IMPORTANT SAFETY
INSTRUCTIONS”
“SAVE THESE INSTRUCTIONS”
Attach easy connect
mounting bracket
to electrical box with
electrical box screws
(not included).
L
Easy Connect
N
mounting
bracket
White
(Neutral)
EW-1
12/12
SAFETY PRECAUTIONS:
1. TURN OFF ELECTRICAL POWER BEFORE STARTING INSTALLATION OF
LIGHT FIXTURE.
2. THIS PRODUCT MUST BE INSTALLED IN ACCORDANCE WITH THE APPLICABLE
INSTALLATION CODE BY A PERSON FAMILIAR WITH THE CONSTRUCTION AND
OPERATION OF THE PRODUCT AND THE HAZARDS INVOLVED.
NOTE: Product May Not Look Exactly As Shown In Figures.
STYLE #1
N
L
STYLE #2
CONNECT HOUSE WIRES
STEP 2 - Option 1
(N)
White
(Neutral)
(L)
Black
(Live)
Green
(Ground)
N
L
CONNECT LIGHT FIXTURE
STEP 3
(N)
White
(Neutral)
Green
(Ground)
N
L
(L)
Black
(Live)
Light
Fixture
STEP 4
STYLE#1
Stud
Or
Nipple
Fixture
Star
Washer
STYLE#1- Tuck electrical wires into
Cap
outlet box and position fixture over
Nut
studs or nipple on mounting bracket
assembly. Secure fixture in place with
star washer(s) and cap nut(s).
Note: If required, assemble body and
spread the arms of the fixture out
evenly.
Option 2 - MULTIPLE ELECTRICAL BOX WIRES
Jumper Wire
Connect (push) electrical
wires from electric box
(house wiring) into correct
inserts. Black (Live),
White (Neutral),
Green (Ground)
Green
(Ground)
Black (Live)
Connect (push) electrical wires from fixture into correct inserts.
Black (live), White (neutral), Green (ground)
STYLE#2
Bracket
(L)
L
Screw
Fixture
N
(N)
White
(Neutral)
Jumper
Wire
STYLE #2 - Insert one screw into the
mounting bracket - do not tighten
yet. Tuck electrical wires into outlet
box and position fixture over the
mounting bracket. Line up the screw
in the bracket to the "7" hole on the
fixture. Slide fixture to secure in place.
Insert remaining screw. Tighten both
screws to secure.
For multiple black (live) &
white (neutral) wires joined
in the electrical box
(house wiring), attach a single
“black” and “white” Jumper Wire
before connecting. Strip 7mm
from a 6” Jumper Wires (AWG 12-24)
supplied. Then connect (push) wires
into correct inserts.
STEP 5 - Optional for some models (
STYLE#1
Glass
Spinner
Nut
Optional
STYLE#1 - Remove spinner nut from
socket. Position glass on the fixture
and secure with spinner nut. Install
proper bulb type and wattage.
Note:
Fixture
Glass may face up or down.
Socket
Imported By: CANARM LTD., 2157 Parkedale Ave., Brockville, Ontario, K6V 5V6, Tel: (613) 342-5424, Fax: (800) 263-4598
Note: Refer to the style of assembly that matches the style of your fixture.)
STYLE #2A
Bulb
STYLE #2B
Finial
If your fixture has shades,
STYLE#2A - Remove spinner nut from
socket. Position shade on lamp and
Shade
Bulb
Tube
secure with spinner nut. Place shade
on tube, then install bulb.
STYLE#2B - Install bulb, shade
then finial.
 Loading...