

Page 1
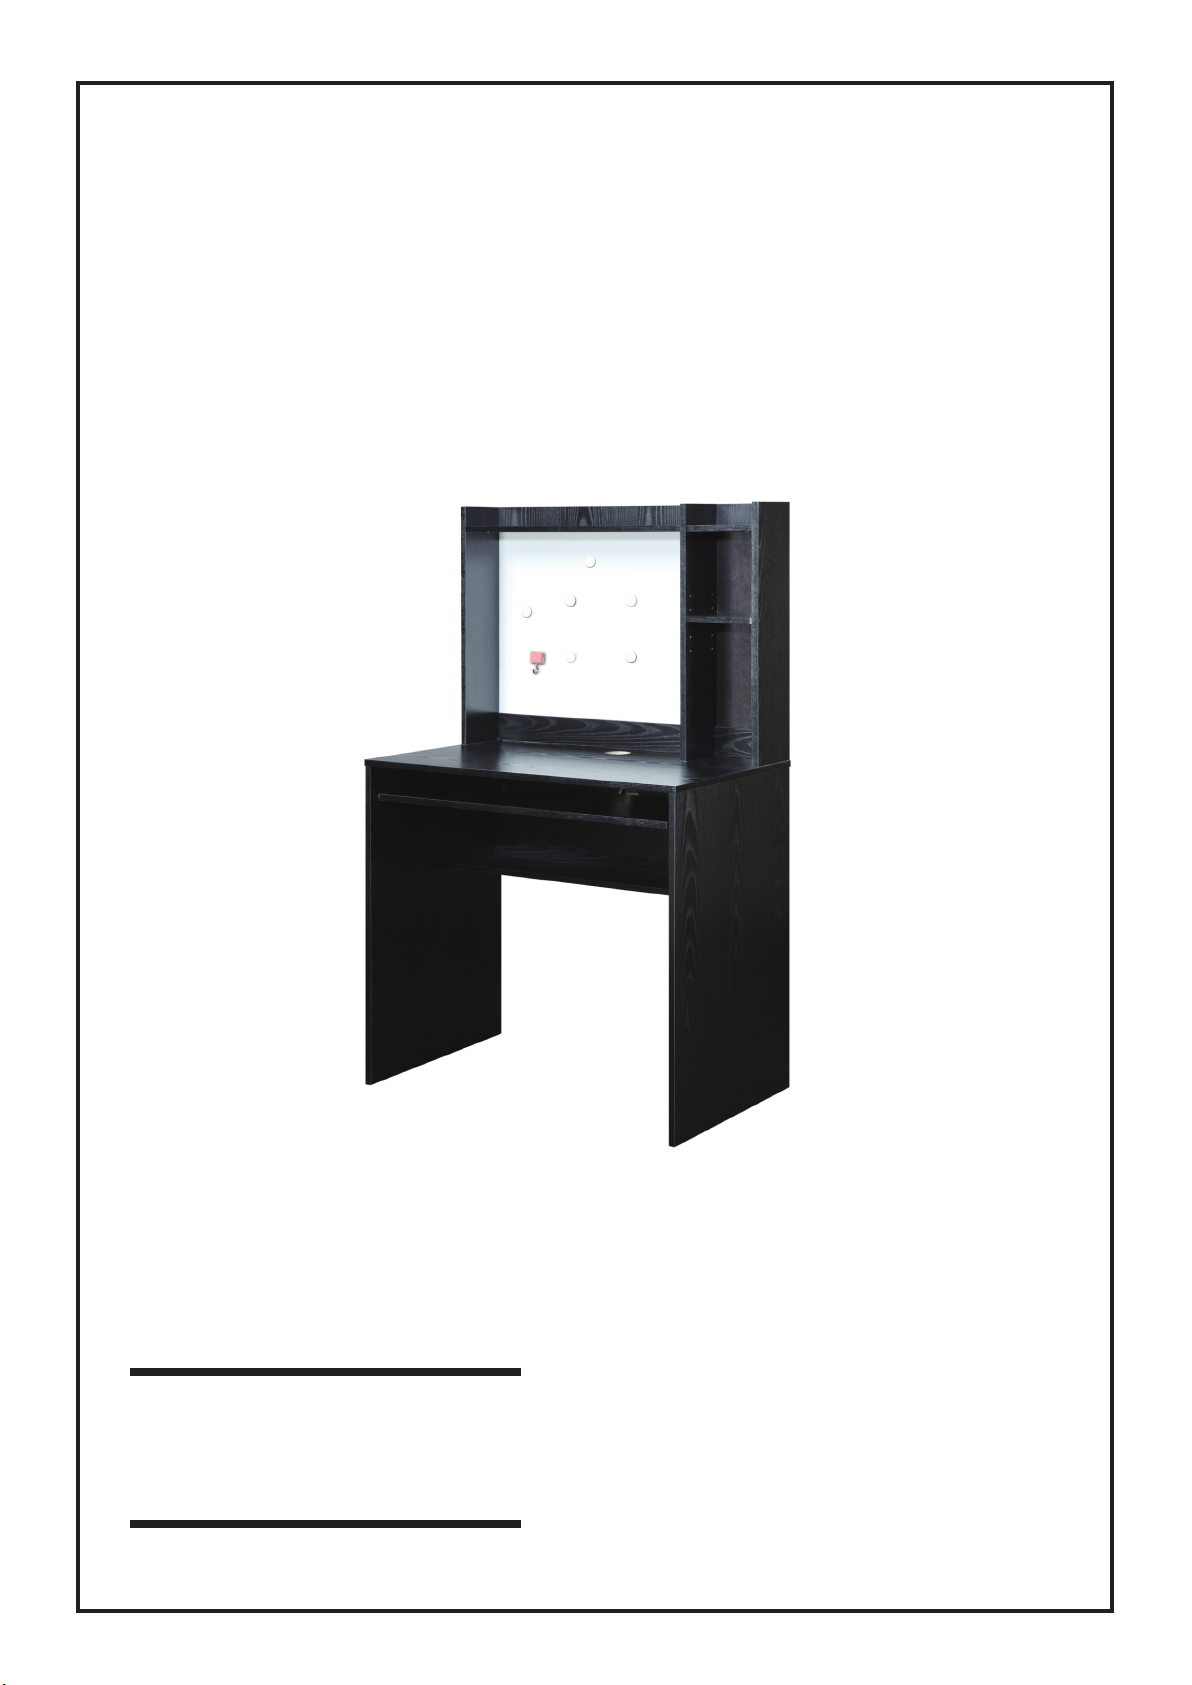
DESK W/ MAG BULL BOARD & SHELVES
ASSEMBLY INSTRUCTIONS
We have designed our furniture with you,the customer in mind. our clear, easy to follow,
step by step instructions will guide you through the project from start to finish.
fell confident that this will be a fun and rewarding project . The final product will be a quality
piece of furniture that will go together smoothly and give years of enjoyment.
Page 2
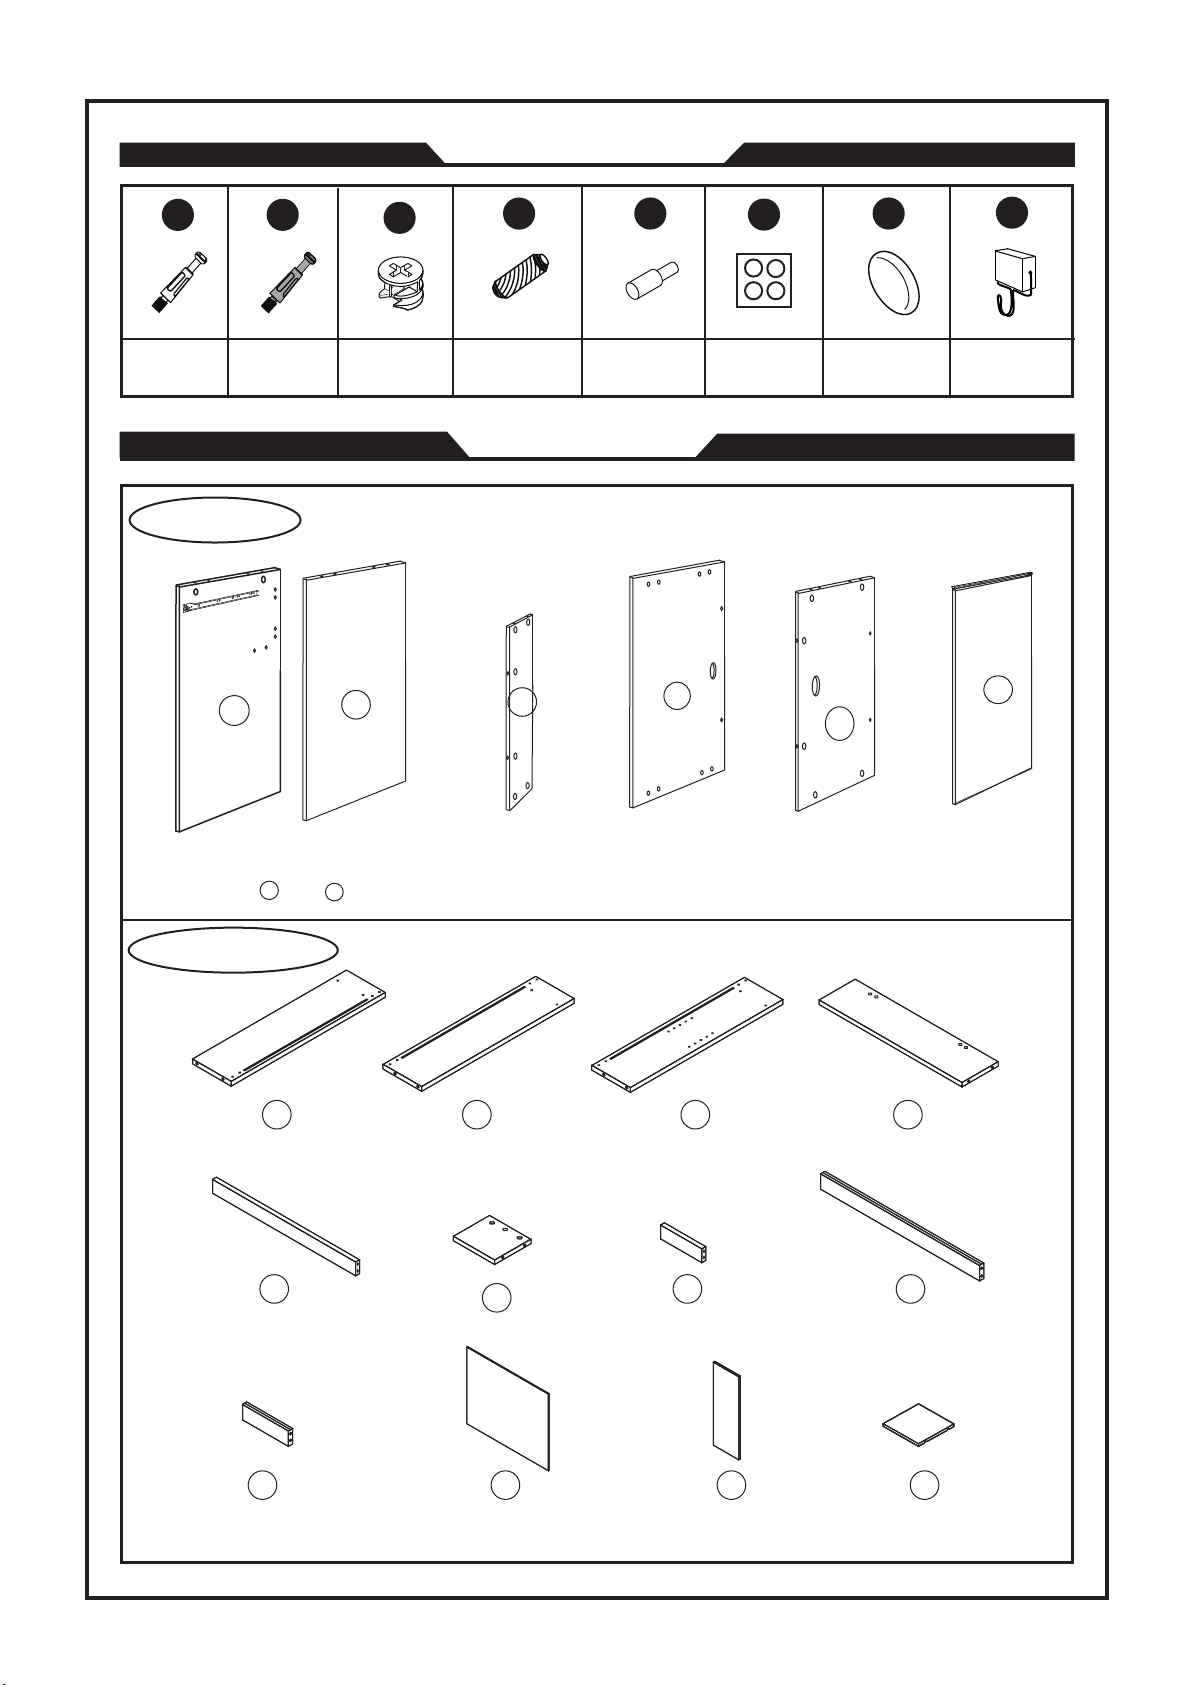
Hardware List
A
Cambolt
(20pcs)
The first part
Self Tapping
(15pcs)
1
Cambolt
B
2
C
Camlock
(35pcs)
D
dowel
(24pcs)
Panel List
3
E
Metal Pin
(4pcs) (35pcs)
4
Sticker
F
G H
Magnetic Ball Magnetic Key Holder
(6pcs) (1pc)
6
5
Side Panel(2pcs)
1
Left Right
2
Support panel (1pcs)
Desktop panel (1pcs)
The second part
7 8 9
Top left panel (1pcs) Top middle panel (1pcs) Top right panel (1pcs)
11
Top connection long board (1pcs)
Top short shelf (1pcs)
12
Top connection short board (1pcs)
13
Back panel (1pcs)
Top long shelf (1pcs)
Support long board (1pcs)
Drawer panel (1pcs)
10
14
15 16 17
Support short board (1pcs)
Magnetic back panel (1pcs)
Back panel (1pcs)
18
Movable panel (1pcs)
Page 2 of 6
Page 3
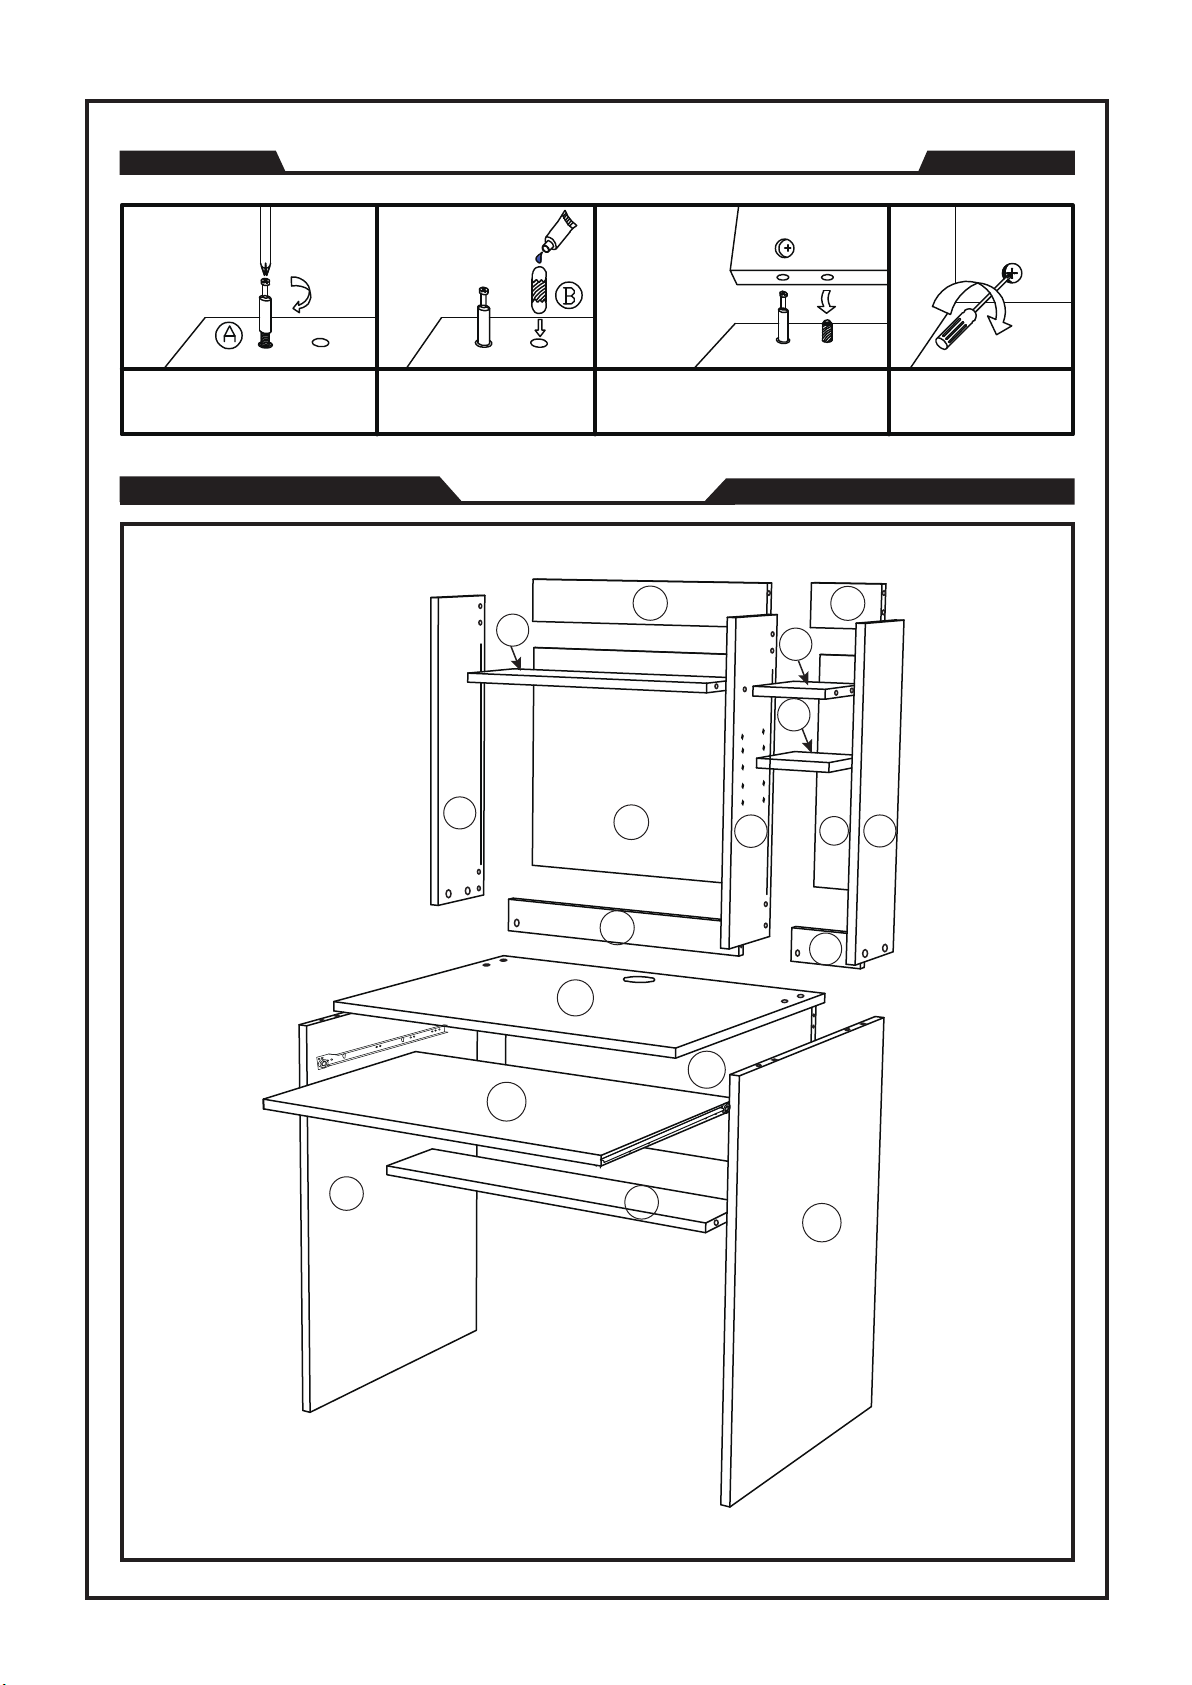
Assembling the unit with camlocks and wood dowels.
Gently screw cam
dowel into the
threaded anchor.
Lightly glue one end of
the wood dowel and tap
halfway into hole.
Hardware List
10
7
Lightly glue wood dowel and
connect to second panel by
inserting dowels into holes.
11
16
14
8
12
18
17
15
Screw the camlock
firmly into locked
position.
13
9
4
5
6
1
3
2
Page 3 of 6
Page 4
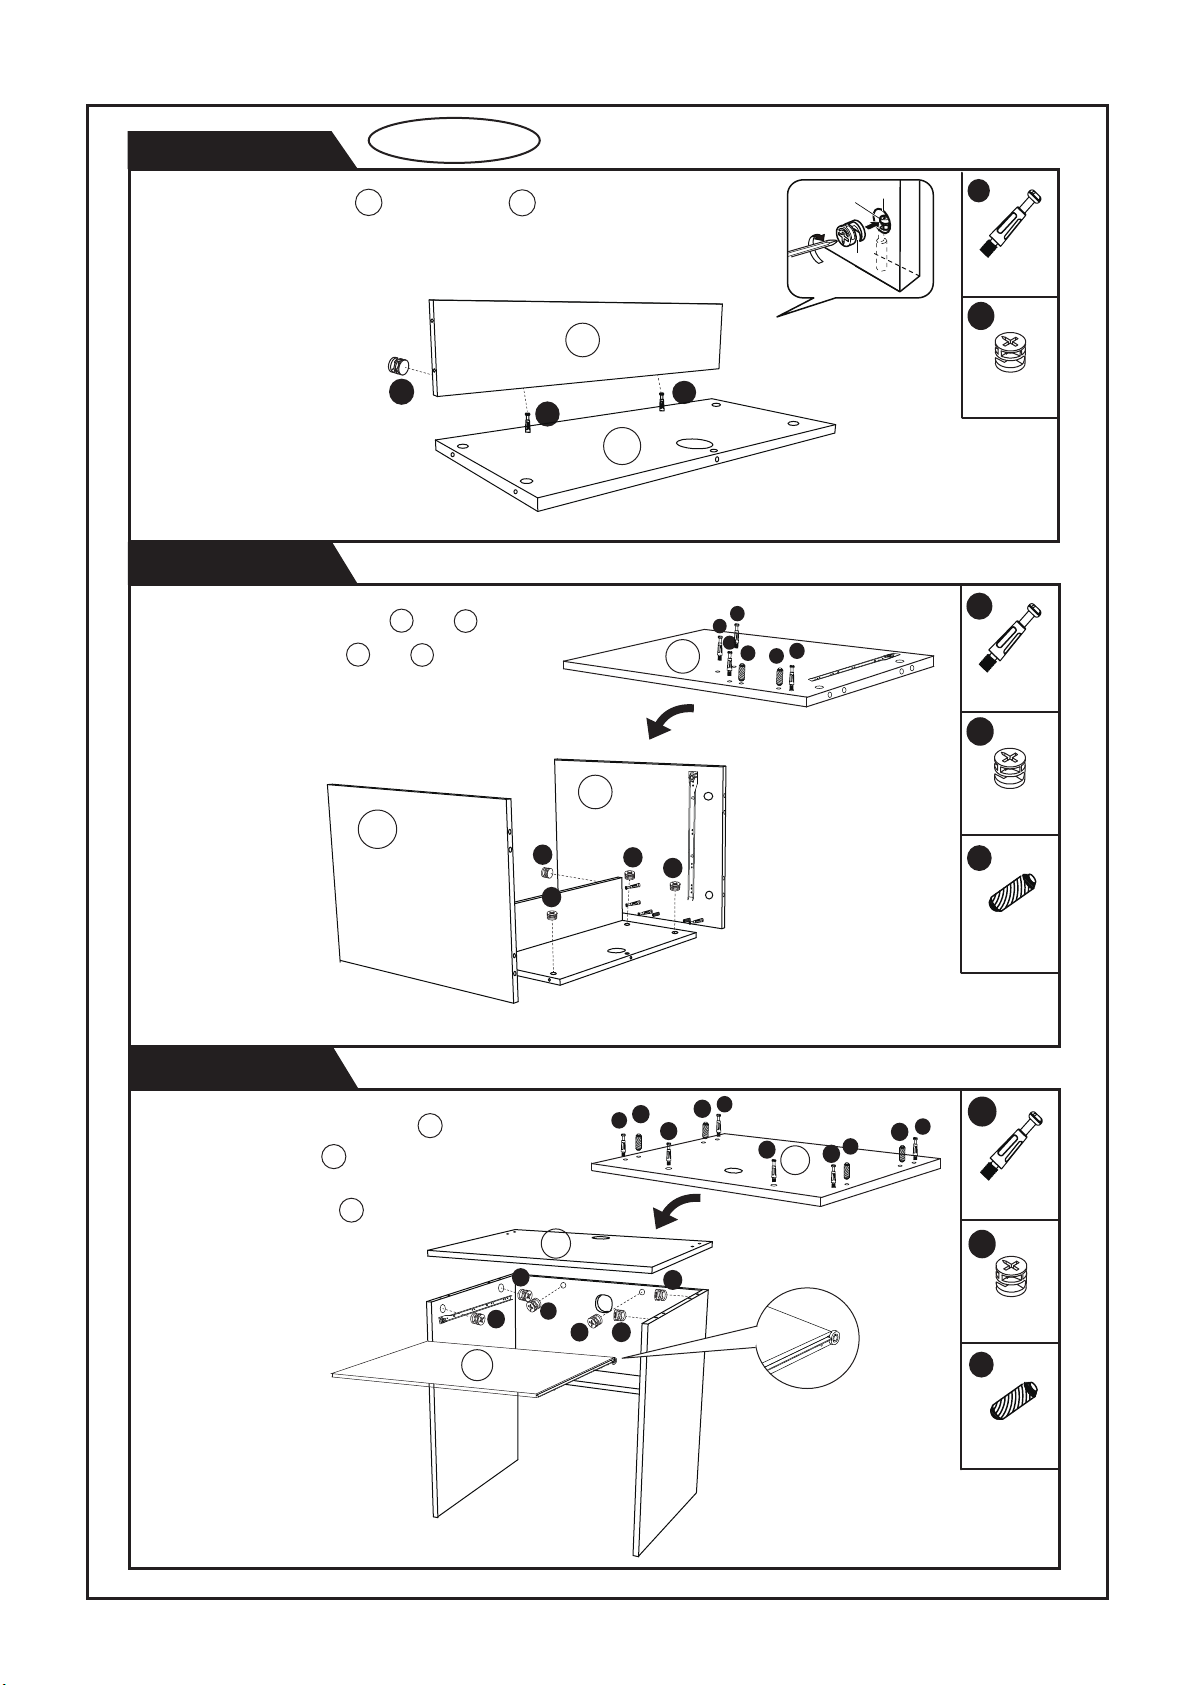
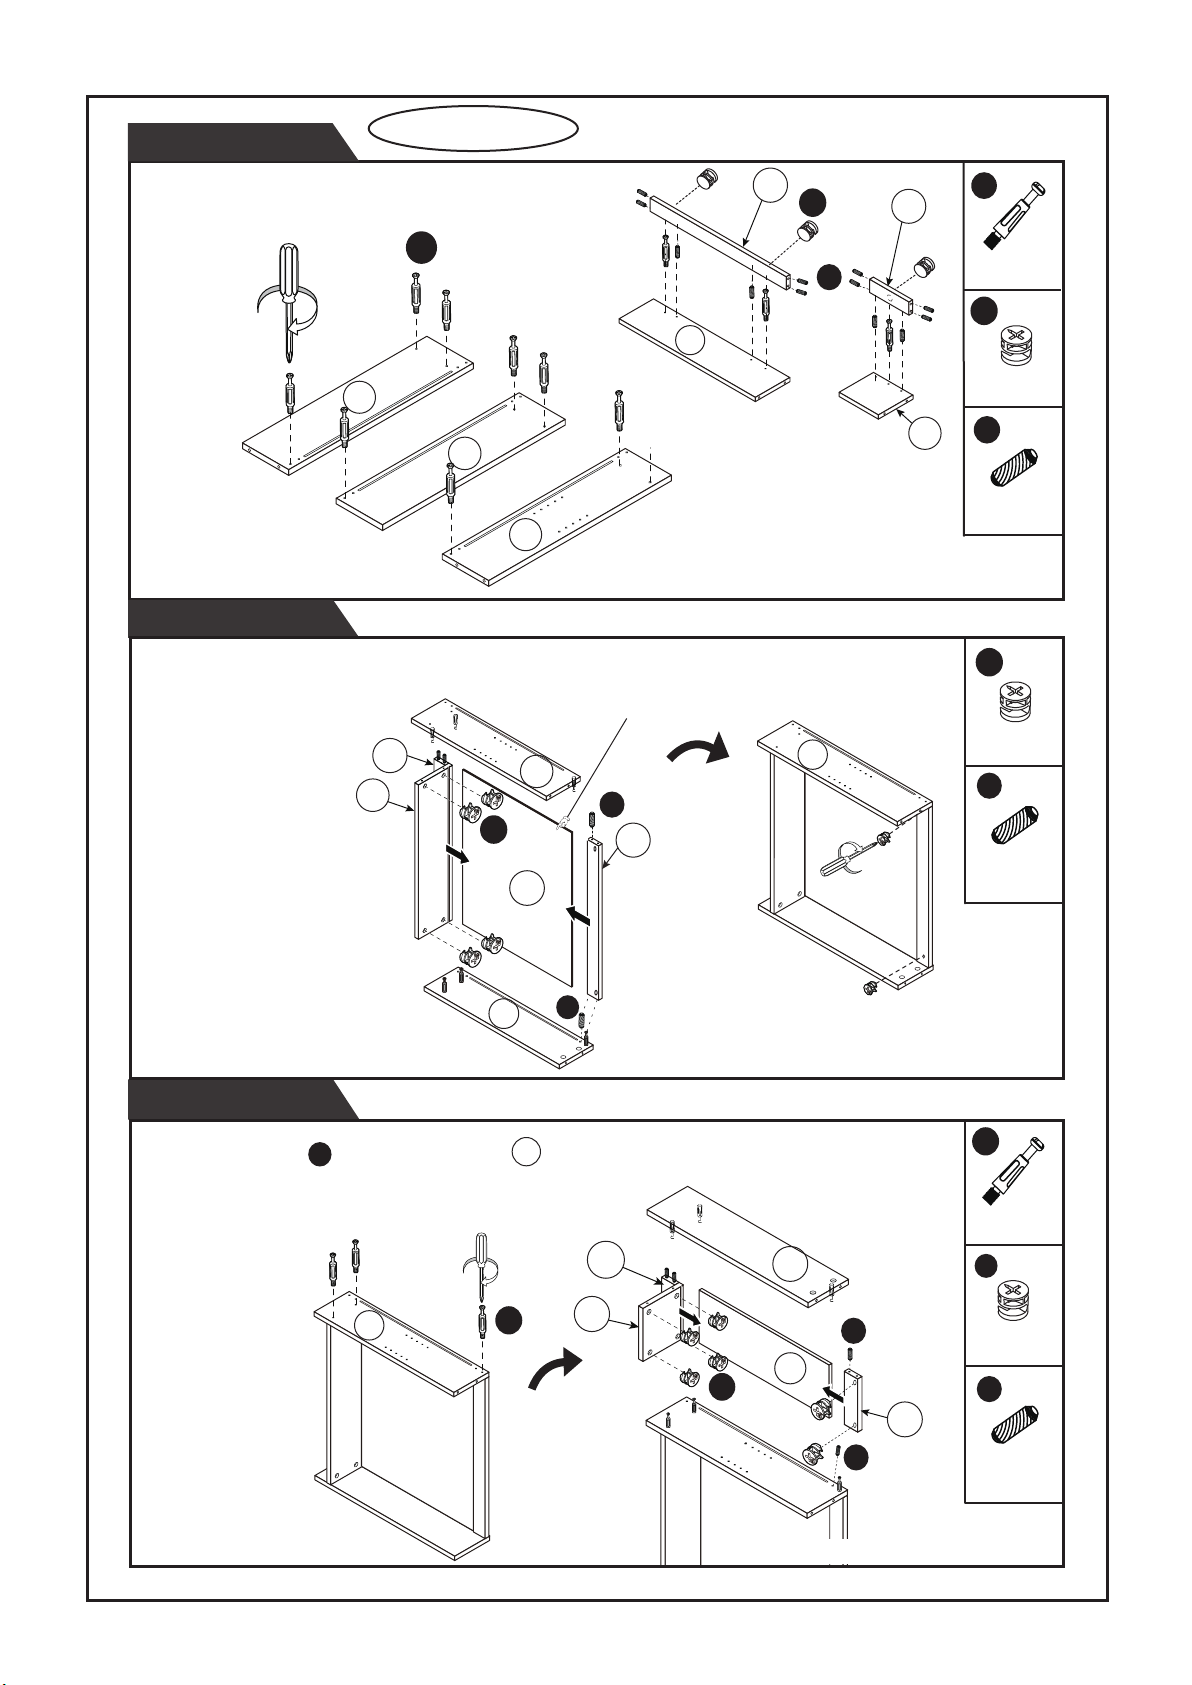
Step 1
The first part
Connect the Support panel and back panel as shown.
3
5
3
C
A
Step 2
1.Attach hardware to side panel and as shown.
2.Connect the side panel and to unit , and
Gently tighten camlocks.
1
1
2
2
5
A
X
2
C
A
A
A
A
1
A
D
D
A
X
2
X
8
C
2
Step 3
1.Attach hardware to desktop panel .
2.Place desktop panel on unit,and
gently tighten camlocks.
3.Slide the drawer panel into assembly.
The first part is completed
4
6
4
1
X
8
C
C
4
C
C
C
6
C
C
A
D
A
D
A
FRONT
A
4
D
D
D
A
D
X
4
A
A
X
6
C
C
X
C
C
6
D
X
4
Page 4 of 6
Page 5
Step 4
The second part
1.Attach hardware to panels as shown.
2.Assembly the panels as shown,and Gently tighten camlocks.
B
7
8
9
Step 5
Assembly the panels as shown,and Gently tighten camlocks.
Magnetic back panel outwards
11
10
B
C
8
D
11
C
13
D
10
FRONT
FRONT
12
This step needs to be carefully distinguished from the
*
panel number, put the hardware into the correct holes.
8
14
B
C
D
C
D
X
12
X
3
X
12
X
6
16
7
Step 6
1.Insert Cambolt into Top middle panel .
2.Assembly the panels as shown,and
The second part is completed.
B
Gently tighten camlocks.
8
8
B
D
13
12
Note the number and location of the panel
*
9
D
17
C
15
D
B
C
D
X
2
X
3
X
6
X
2
Note the number and location of the panel
*
Page 5 of 6
Page 6
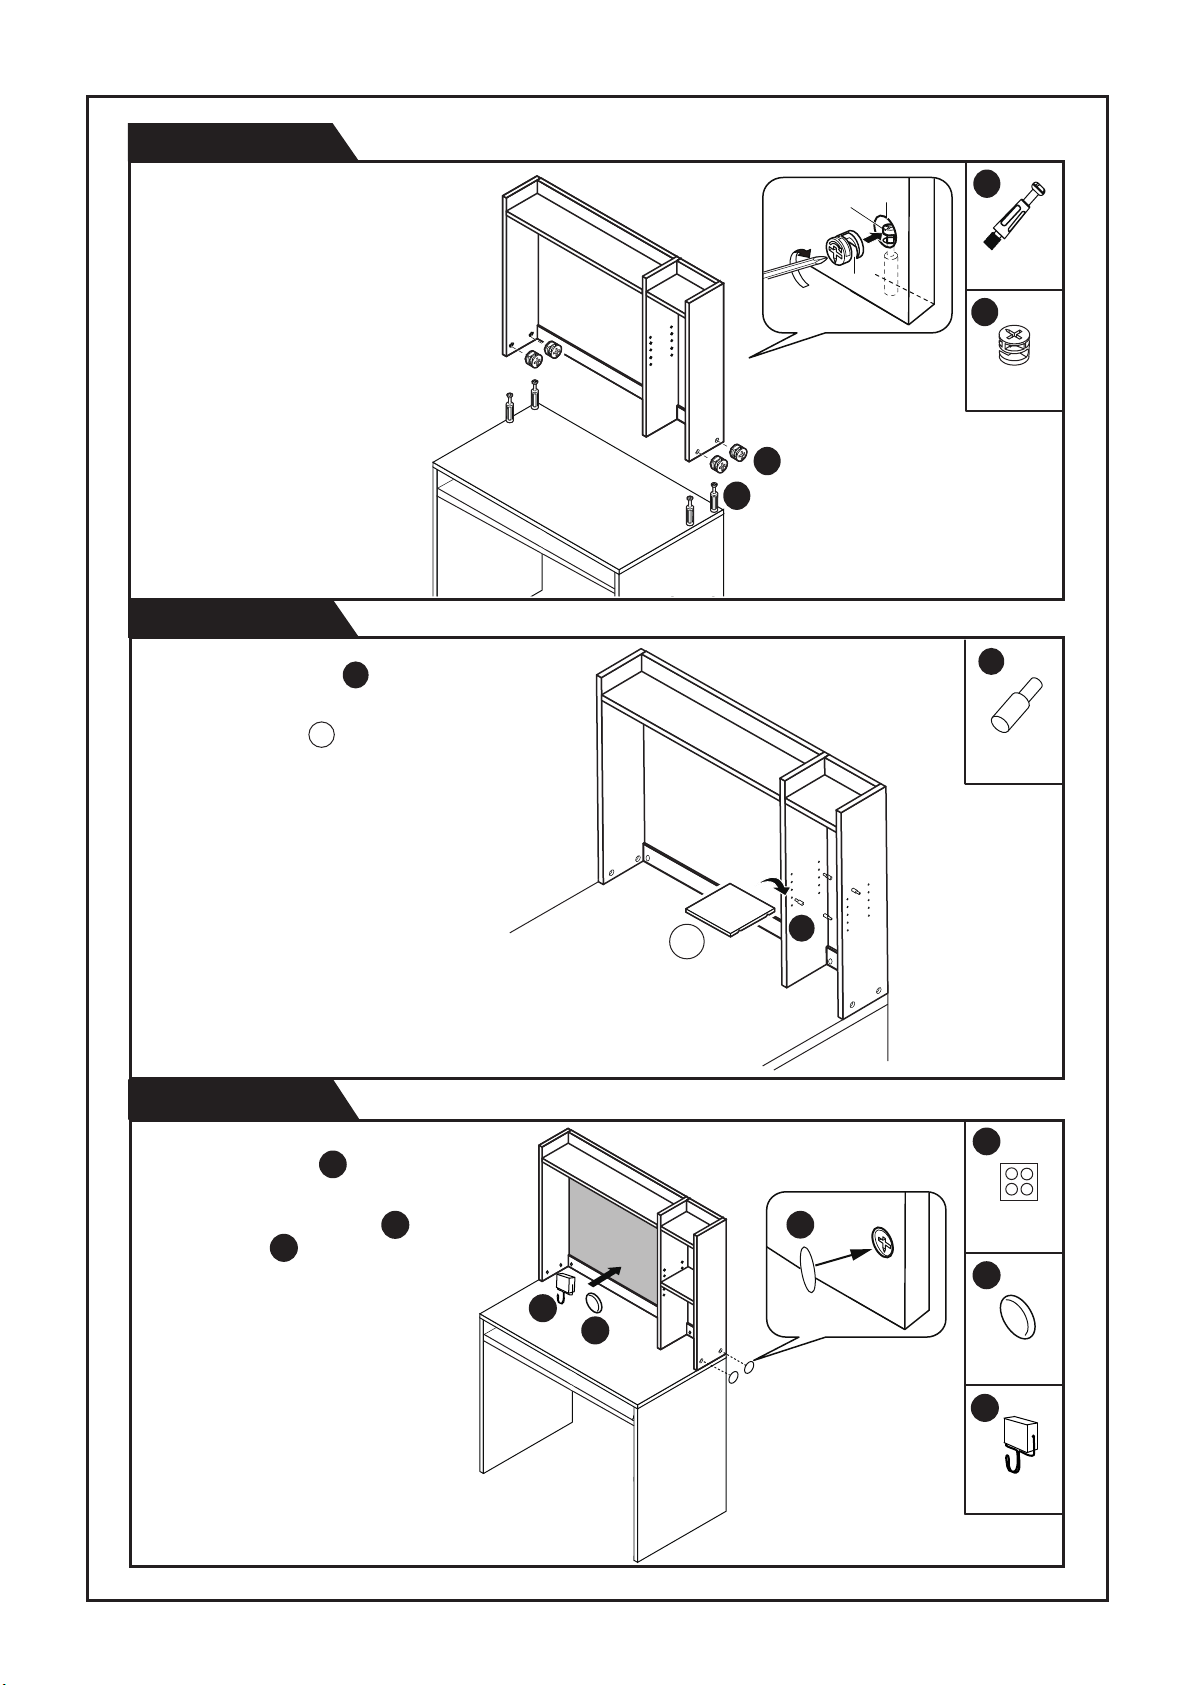
Step 7
Attach hardware to unit , and connect the
two parts,
Gently tighten camlocks.
Step 8
1、Push metal pins into holes on
unit as shown.
2. Place panel on metal pins.
E
18
A
C
A
C
E
X
4
X
4
X
4
Step 9
H
F
F
G
1. Attach stickers to exposed
camlock holes.
Attach the Magnetic Ball and Magnetic
2.
Key Holder to Magnetic board as shown.
Finish and enjoy!
H
G
18
F
E
F
x35
G
x6
H
x1
Page 6 of 6
 Loading...