

Page 1
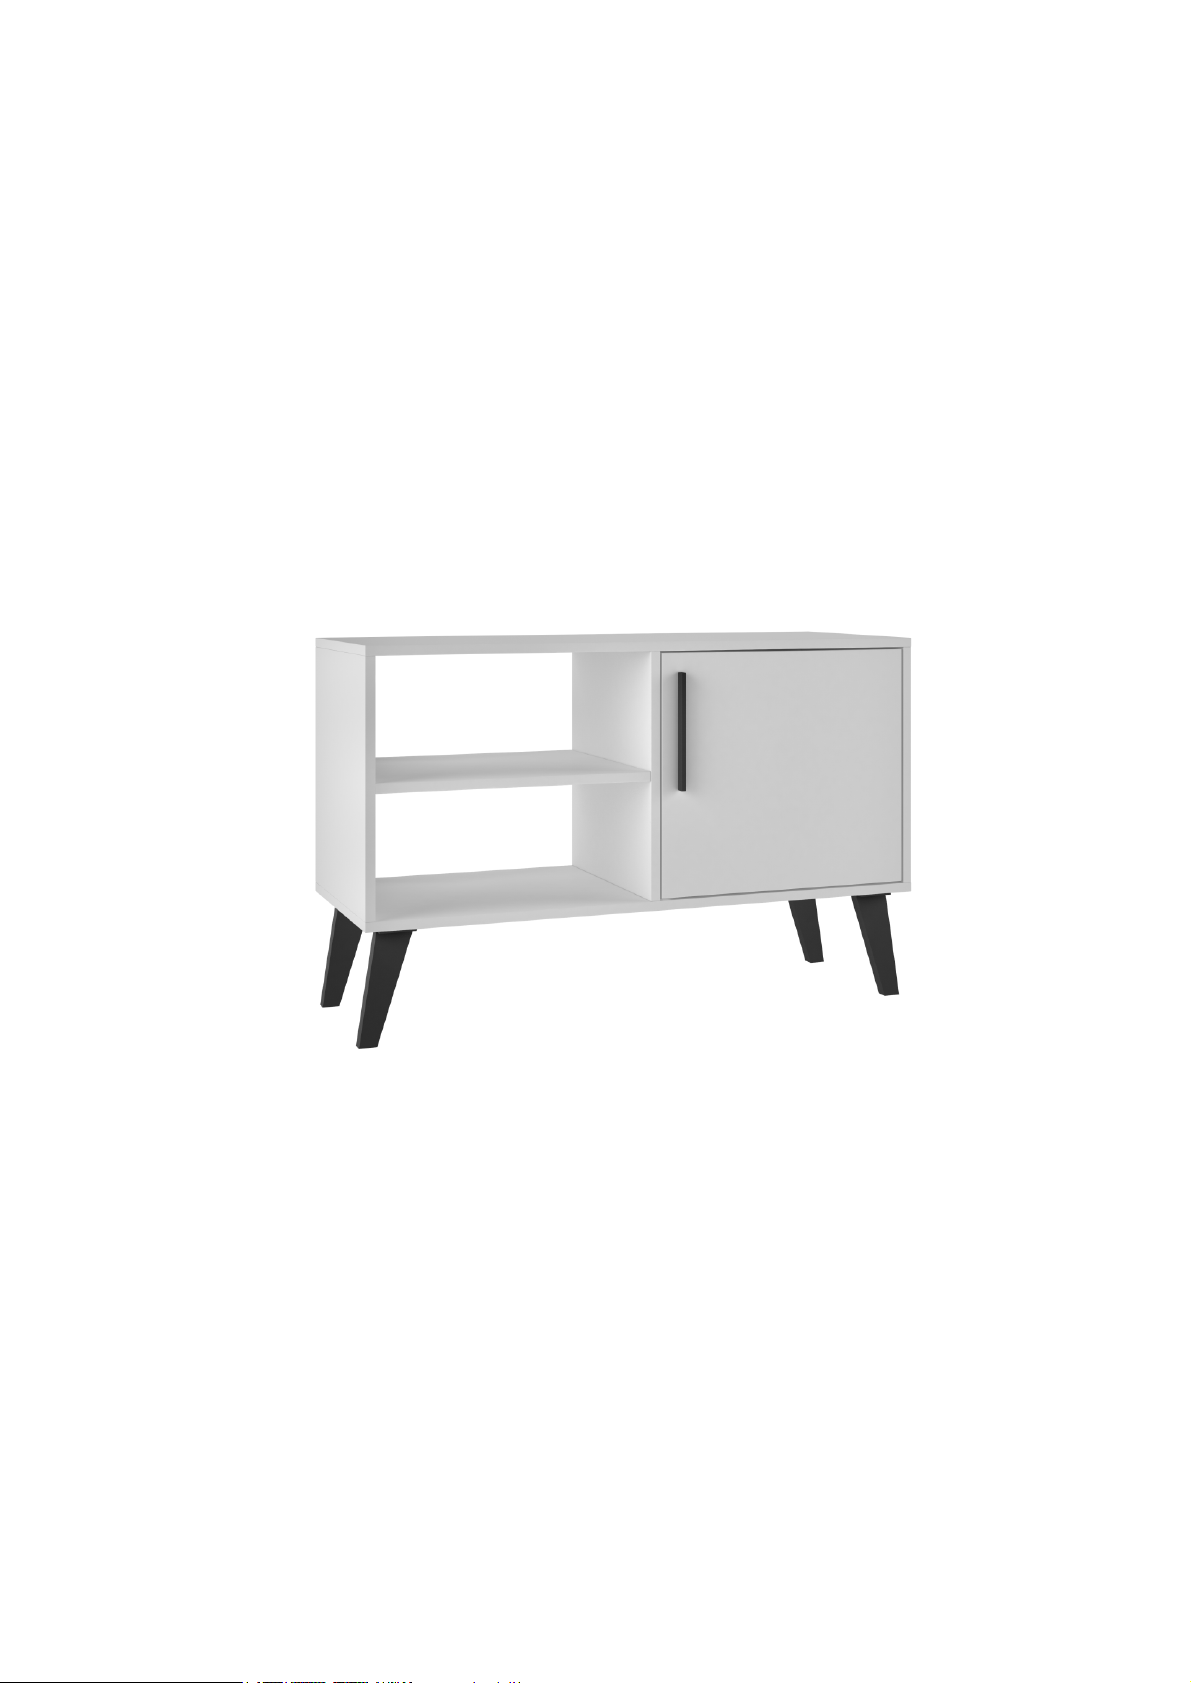
MANUAL DE MONTAGEM
ASSEMBLY INSTRUCTIONS
INSTRUCCIONES DE MONTAJE
1
Page 2
Sumário
Summary
Resumen
Acessórios incluídos na caixa
Hardware included in box
Accesorios incluidos en la caja
Leia atentamente este manual e siga os passos indicados para que o produto não perca
a garantia e também para uma perfeita montagem.
Read this manual and follow the steps in order to keep the guarantee and also for the
perfect fit.
Lea este manual y siga los pasos para que el producto no pierda la garantía y también
para el ajuste perfecto.
6
7
8
V : 01/19
3
Page 3
Antes de começar
Before starting
Antes de comenzar
Antes de começar a montagem prepare o ambiente, deixando-o completamente limpo e
com bom espaço para iniciar o trabalho.
Prepare the room before starting the assembly, leaving it completely clean and the area in
good condition to start the work.
Antes de comenzar el montaje preparar el ambiente, dejándolo completamente limpio y
con bueno espacio para comenzar el trabajo.
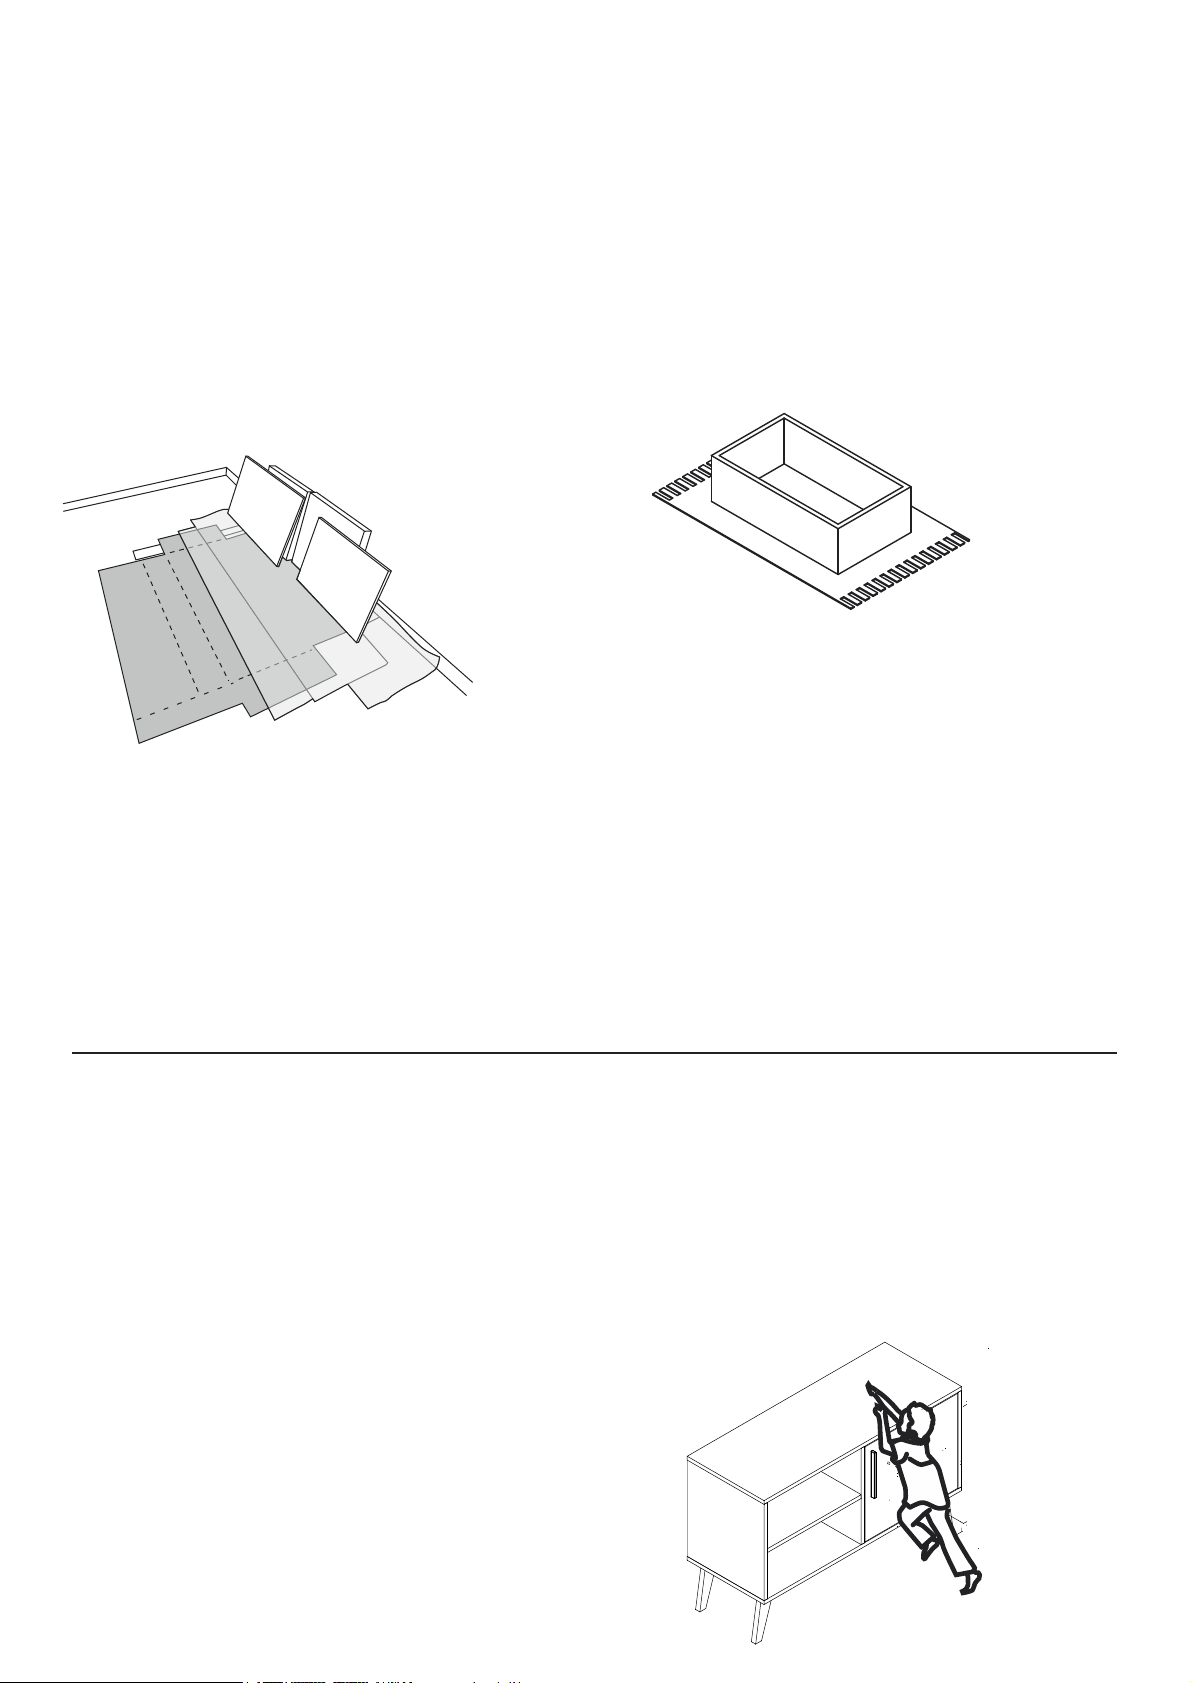
Forre a área de montagem com um
cobertor ou tapete. Assim, você evita
avarias nas peças durante o processo de
montagem.
Utilize o papelão da própria embalagem
para separar e apoiar as peças retiradas
das caixas.
Use the cardboard of the packaging to
separate and support the parts removed
from the boxes.
Utilice el cartón de la embalaje para
separary apoyan las piezaz desmontadas
de las cajas.
Cover the assembly area with a blanket or carpet
to avoid damaging the parts during the
assembly process.
Cubrir la zona de ensamble con una manta o
alfombra. De este modo, se evitan daños
en las piezas durante el proceso de montaje.
Evite acidentes
Avoid accidents
Prevenir accidentes
Solicitamos observar atentamente as orientações de montagem como: fixação do produto na parede,
colocação de cola em locais específicos necessários, o peso suportado pelo produto, etc...
We request you to carefully observe the assembly instructions as: fixing the product on the wall, adding
glue in needed and specifics places, product weight limit, etc.
Pedimos que lea atentamente las instrucciones, principalmente las informaciones de fijación del
producto en la pared, colocación de pegamento en local específico y necesario, el peso soportado por
el producto etc...
Não escale ou se apoie no móvel.
Do not climb or lean on the furniture.
No se suba ni se apoye en el mueble.
X
4
Page 4
Dimensões e ferramentas
Dimensions and tools
Dimensiones y herramientas
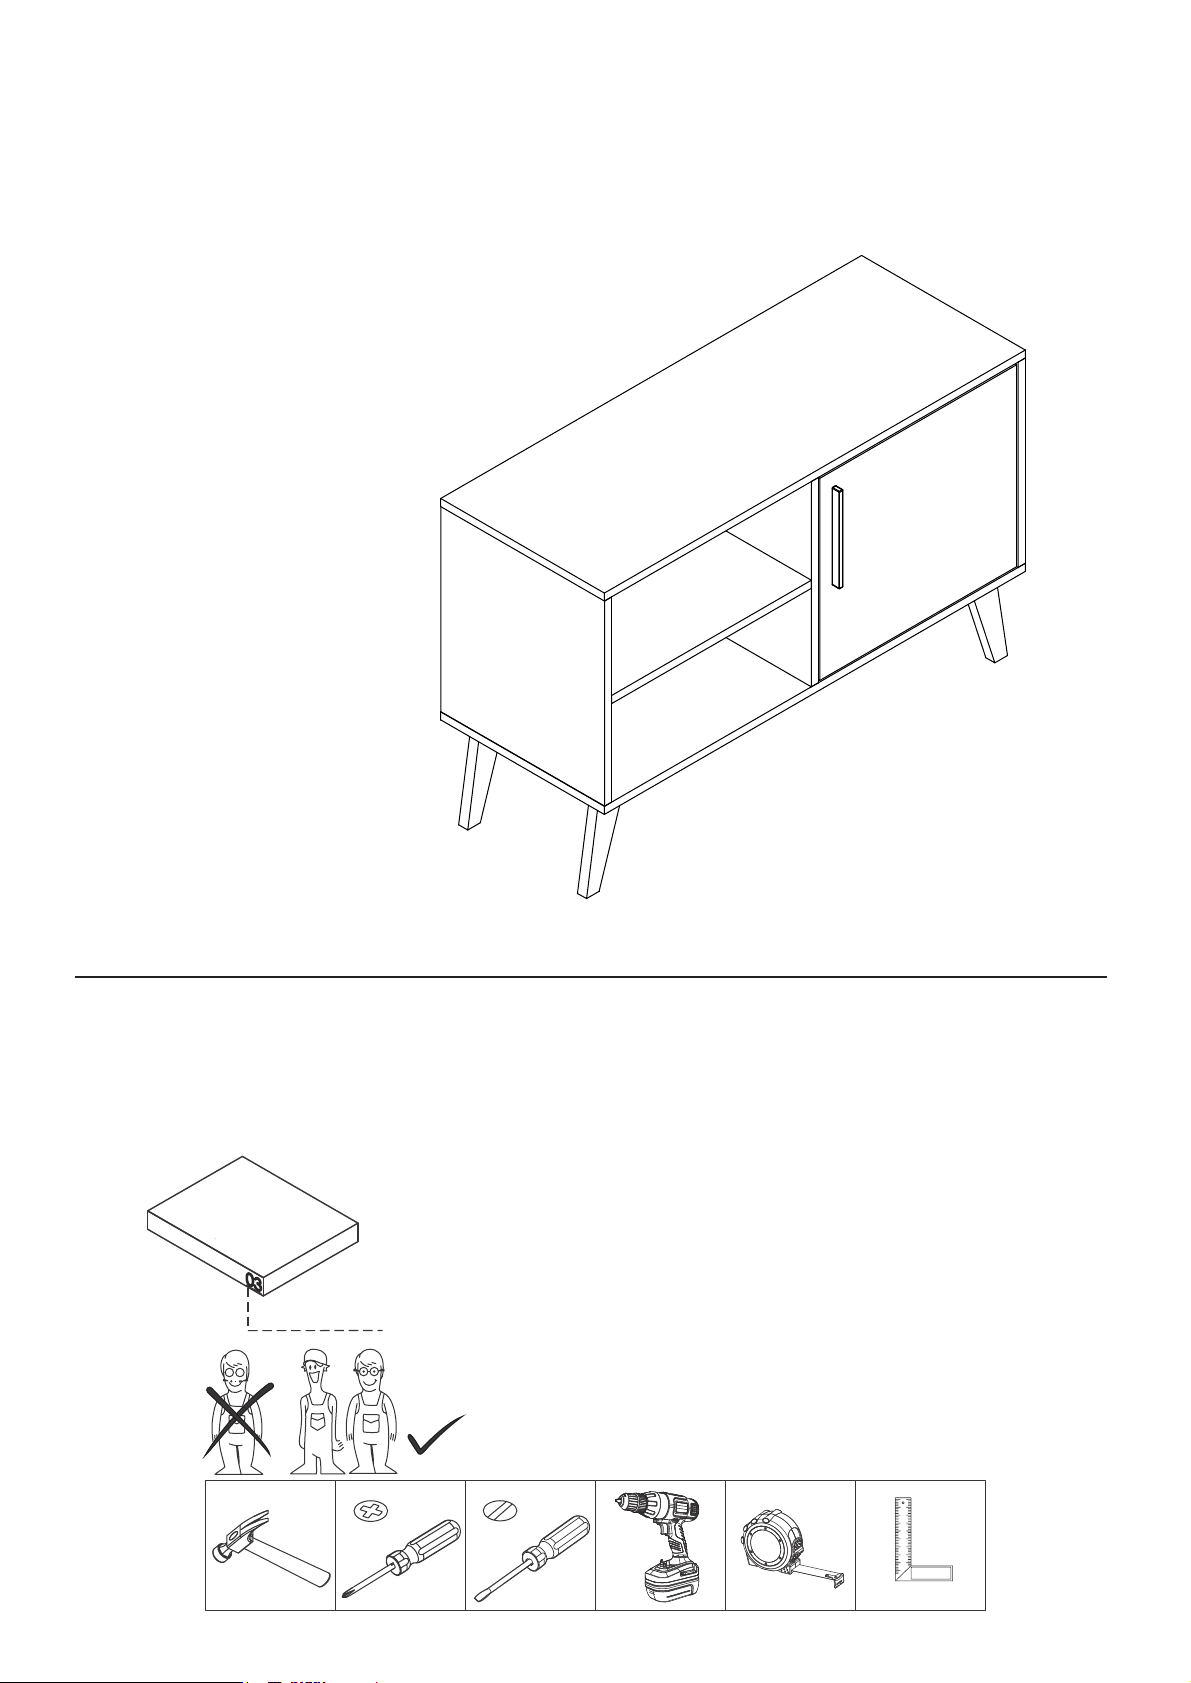
Dimensões:
L: 900 A: 585 P: 350 mm
Dimensions:
W: 35.43 H: 23.03 D: 13.78 inches
Dimensiones:
L: 900 A: 585 P: 350 mm
Limpeza
Cleanig
Limpieza
Pano levemente umedecido com água, seguido de pano seco, não utilizar produtos químico ou abrasivos.
Slightly dampened cloth and after a dry cloth, do not use chemicals or abrasives.
Solamente utilizar un paño húmedo y después un paño seco, no utilice productos químicos o abrasivos.
UTILIZE ALCOOL APENAS PARA REMOVER O NUMERO DAS PEÇAS
USE ALCOHOL ONLY TO REMOVE PART NUMBERS
UTILICE ALCOHOL SOLAMENTE PARA ELIMINAR EL NUMERO DE LAS PIEZAS
Para facilitar a montagem, utilize uma parafusadeira elétrica.
To improve assembly, use an eletronic screwdriver.
Para facilitar el armado, utilice un destornillador eléctrico.
5
Page 5
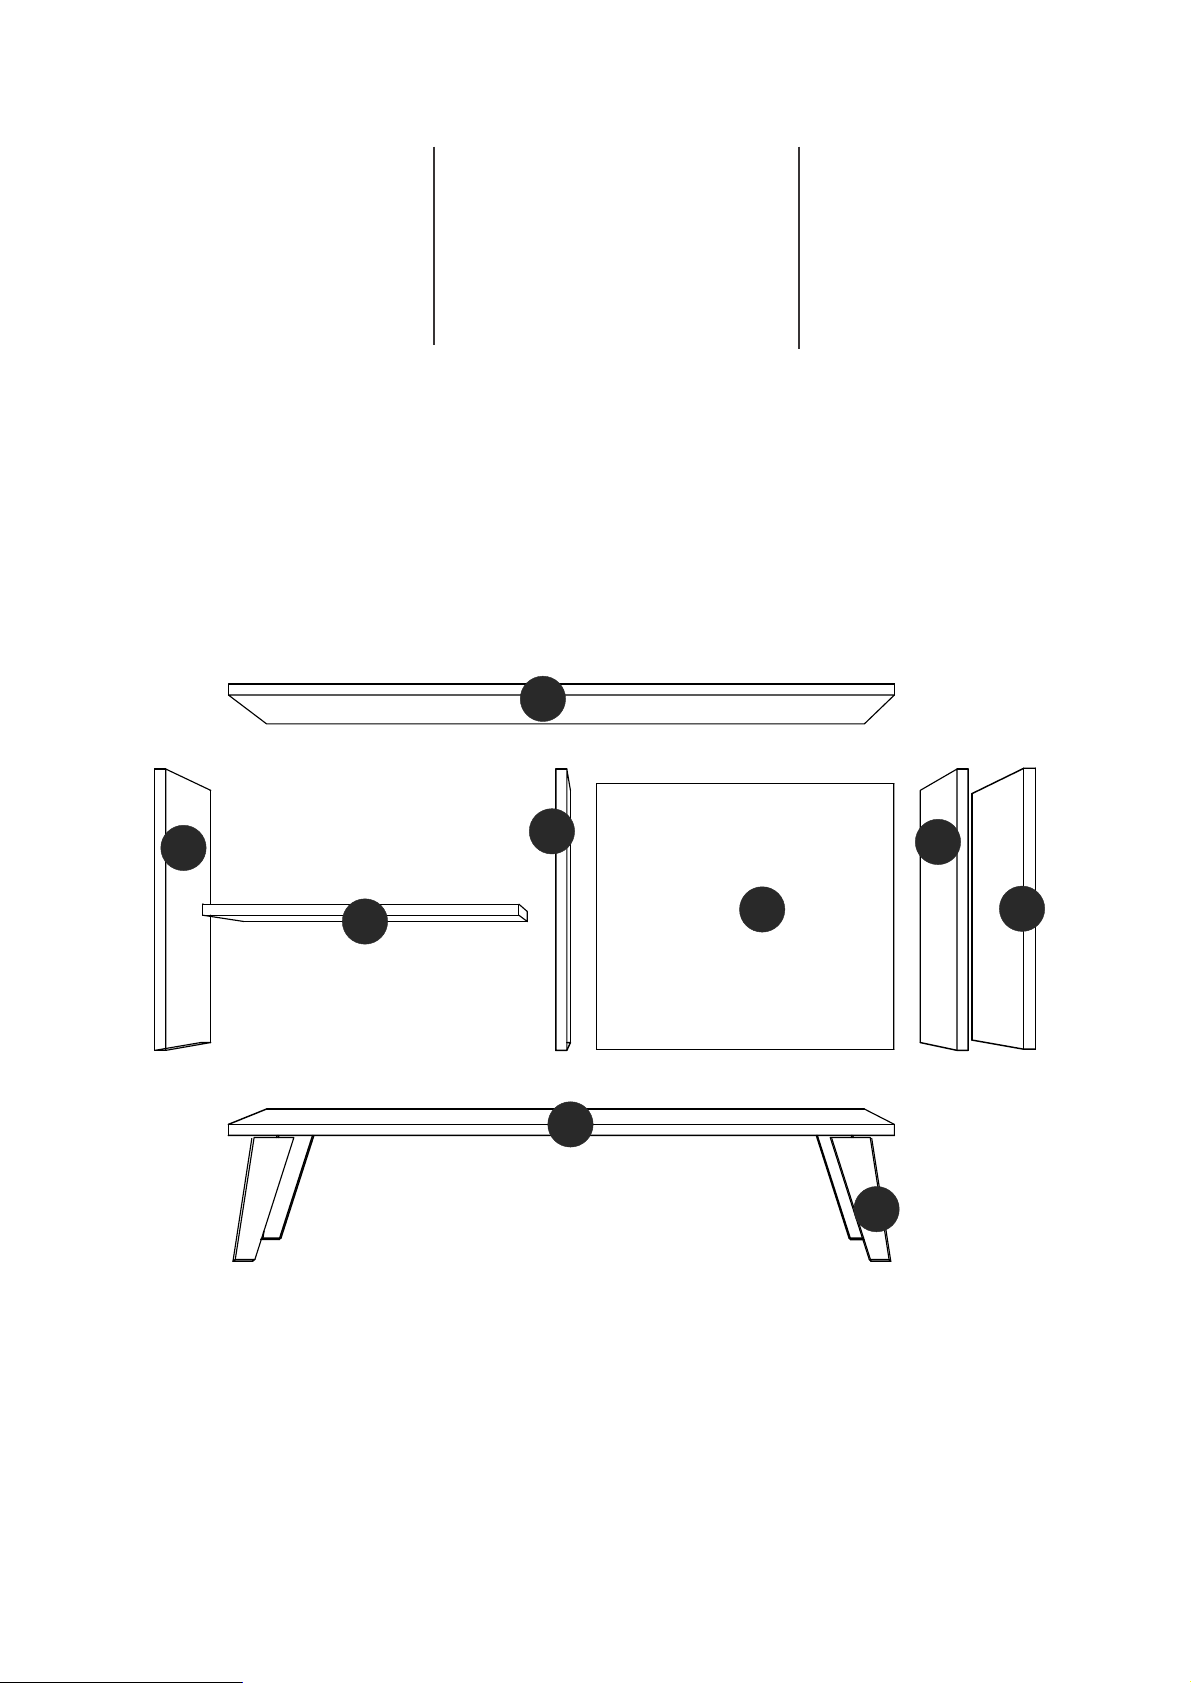
PEÇA DESCRIÇÃO QUANT. PIEZA DESCRIPCIóN CANTIDAD
BASE
001
002
TAMPO
003
LATERAL ESQUERDA
LATERAL DIREITA
004
DIVISÓRIA
005
006
PRATELEIRA
007
PORTA
008
COSTA
009 009 009
PÉS
1
1
1
1
1
1
1
1
4
PART DESCRIPTION QTY
001
002
003
004
005
006
007
008
BASE
TOP
LEFT SIDE
RIGHT SIDE
PARTITION
SHELF
DOOR
BACK
FEET
1
1
1
1
1 1
1
1
1
4
BASE
001
002
TAPA
003
LATERAL IZQUIERDA
LATERAL DERECHA
004
PARTICIÓN
005
006
REPISA
PUERTA
007
008
REVÉS
PIES
1
1
1
1
1
1
1
4
02
03
06
05
01
08
04
07
09
6
Page 6
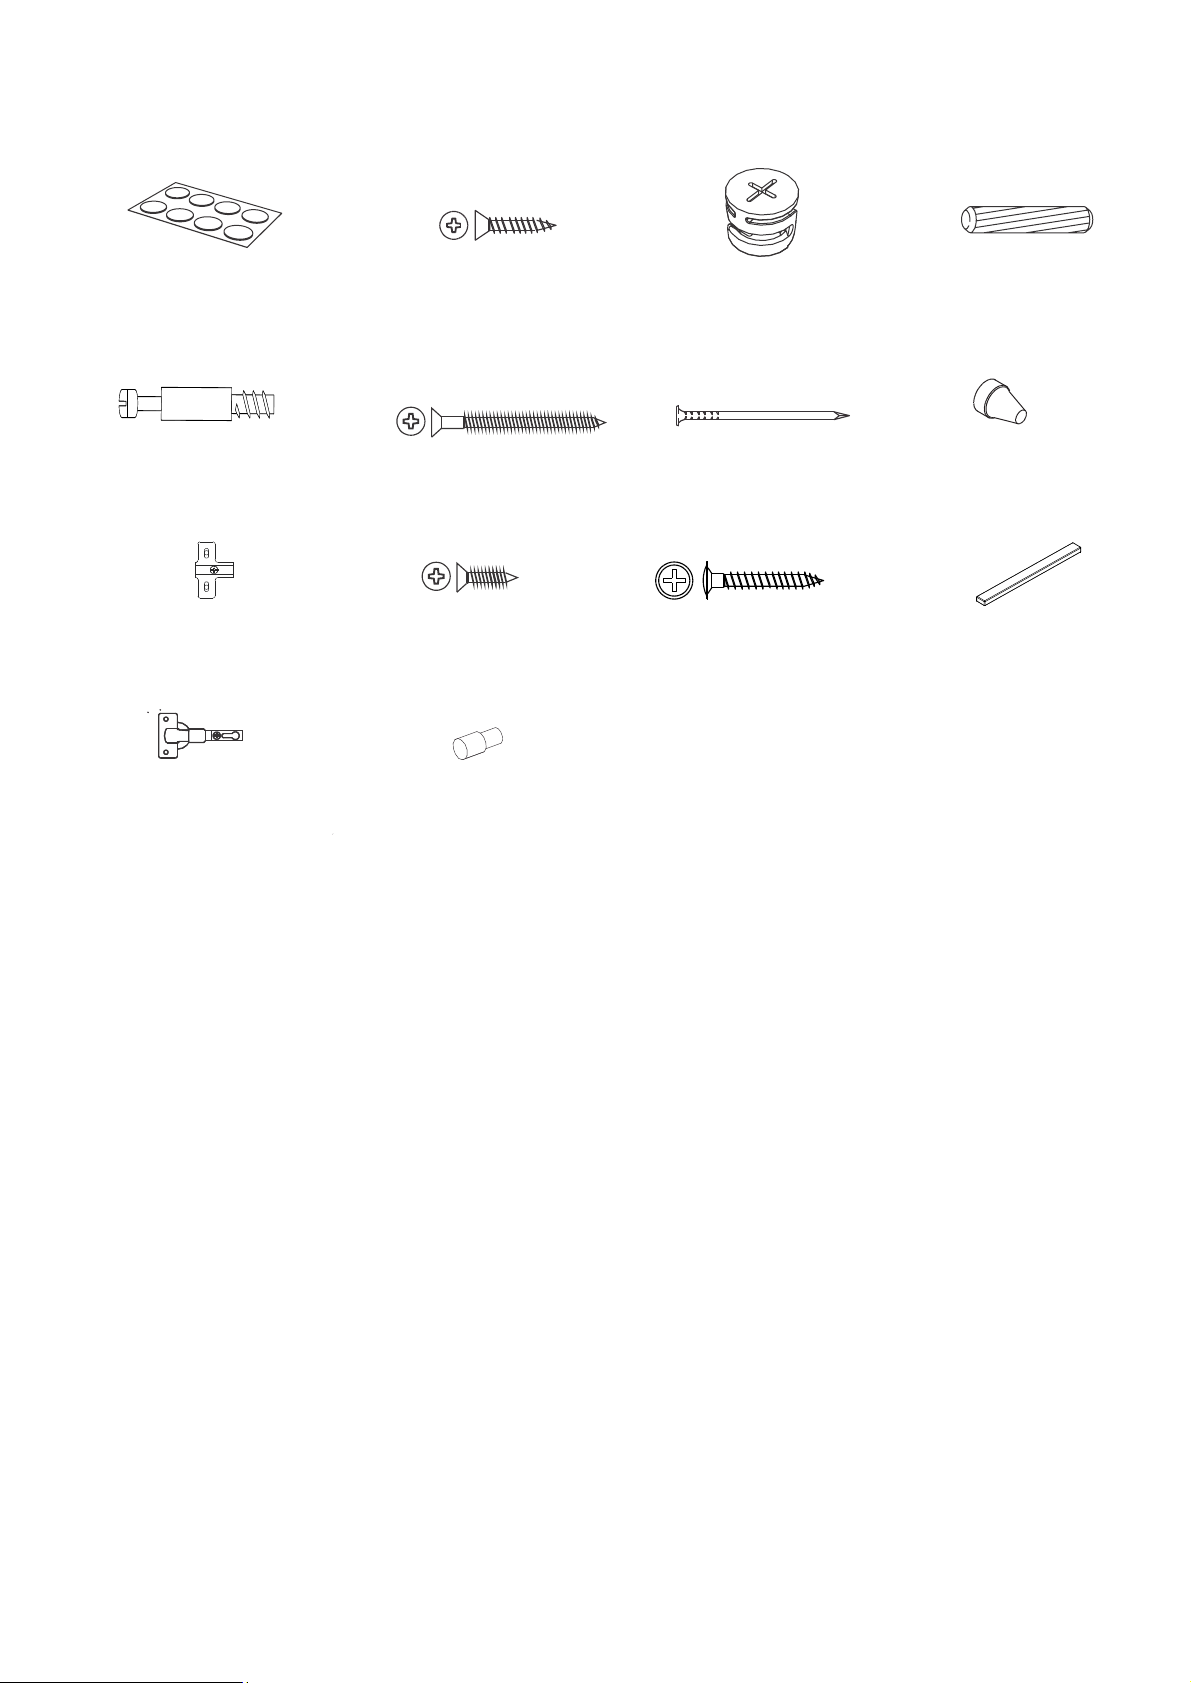
ACESSóRIOS INCLUÍDOS NA CAIXA 01 - HARDWARE INCLUDED IN BOX 01 - ACCESORIOS INCLUÍDOS EN LA CAJA 01
x 16
TAPA FUROS x 10
STICKER x 10
x 16
X 10
8x30
TAPAS PLÁSTICAS x 10
X 10
X 2
X 2
x 6
x 8
SUPORTE PLÁSTICO x 1
PLASTIC SUPPORT x 1
SOPORTE PLASTICO x 1
X 20
x 2
GIZ x 01
CHALK x 01
TIZA x 01
PUXADOR x 2
HANDLE x 2
MANIJA x 2
7
Page 7
A
= 11 KG - 24.25LB
A
B
= 5 KG - 11LB
B
B
B
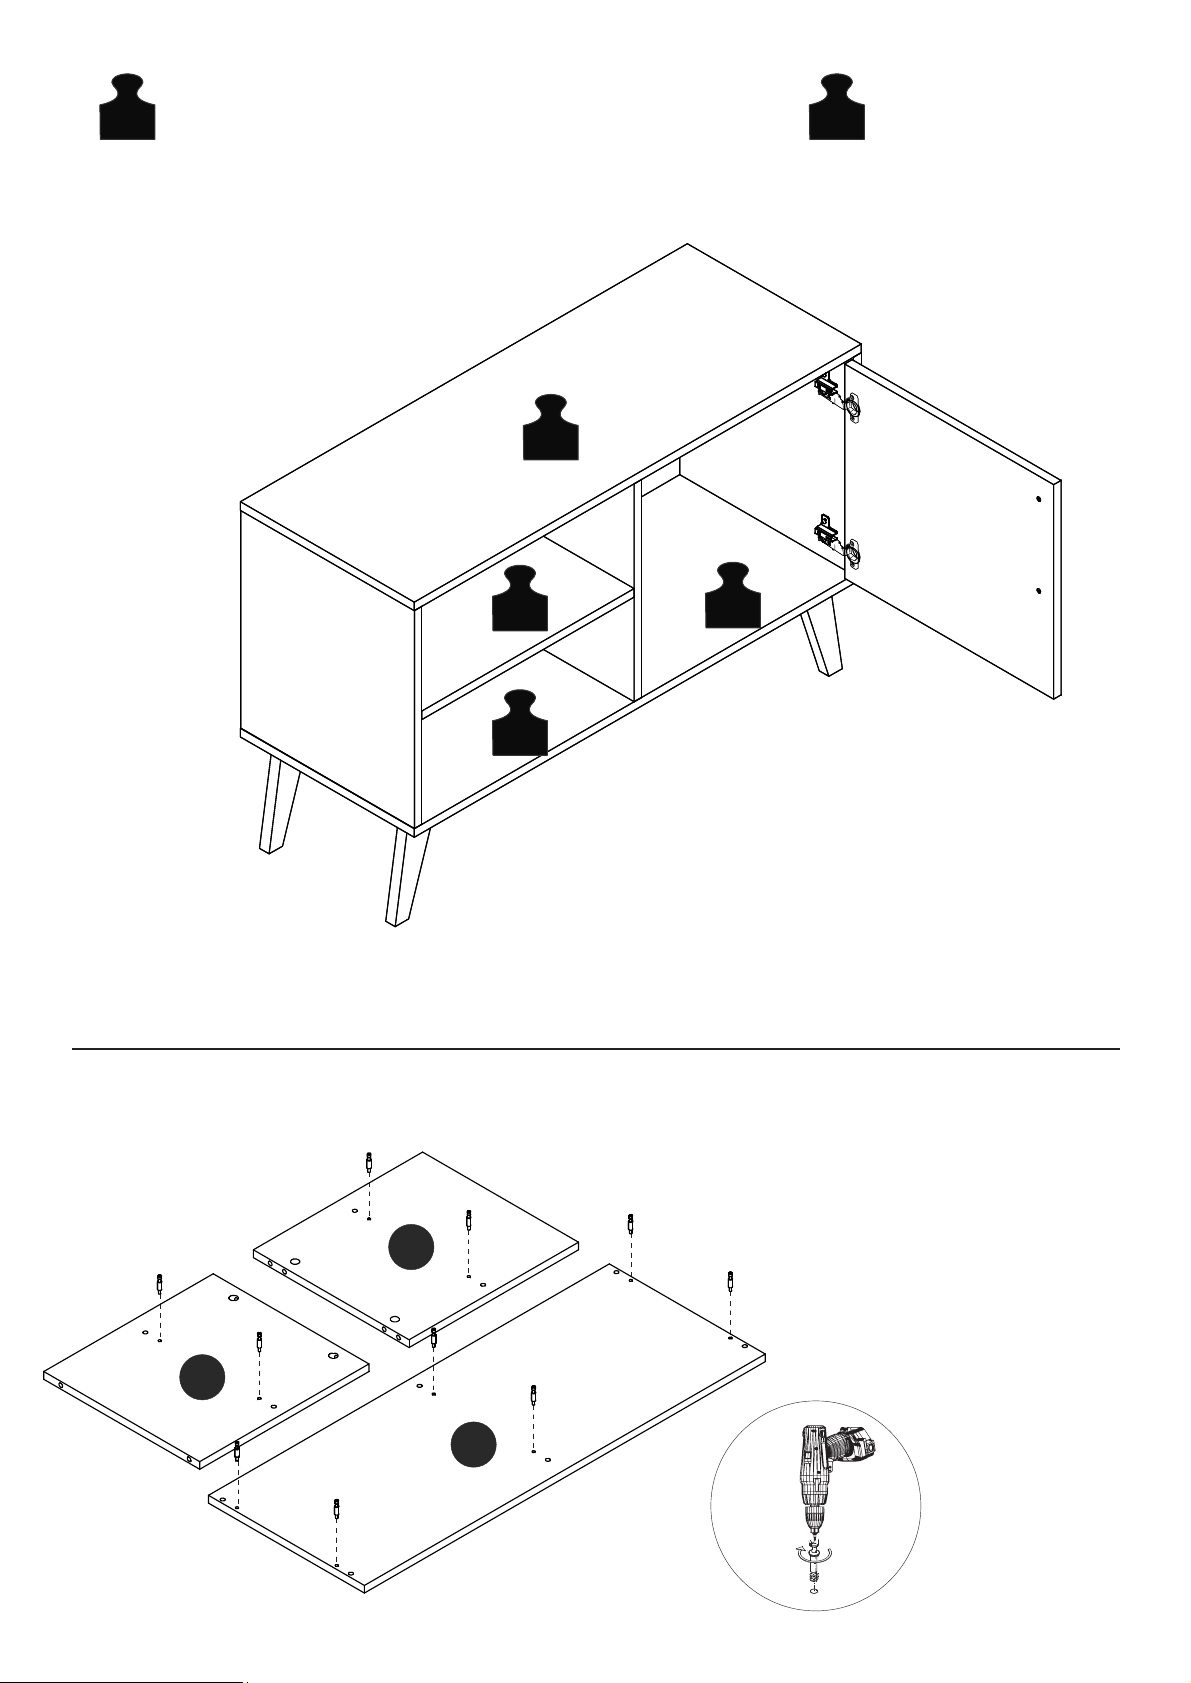
PASSO 1 / STEP 1 / PASO 1
Insira a ferragem nas peças 02, 03 e 05. Insert
hardware into pieces 02, 03 and 05. Añade el herraje
en las piezas 02, 03 y 05.
03
05
02
8
Page 8
05
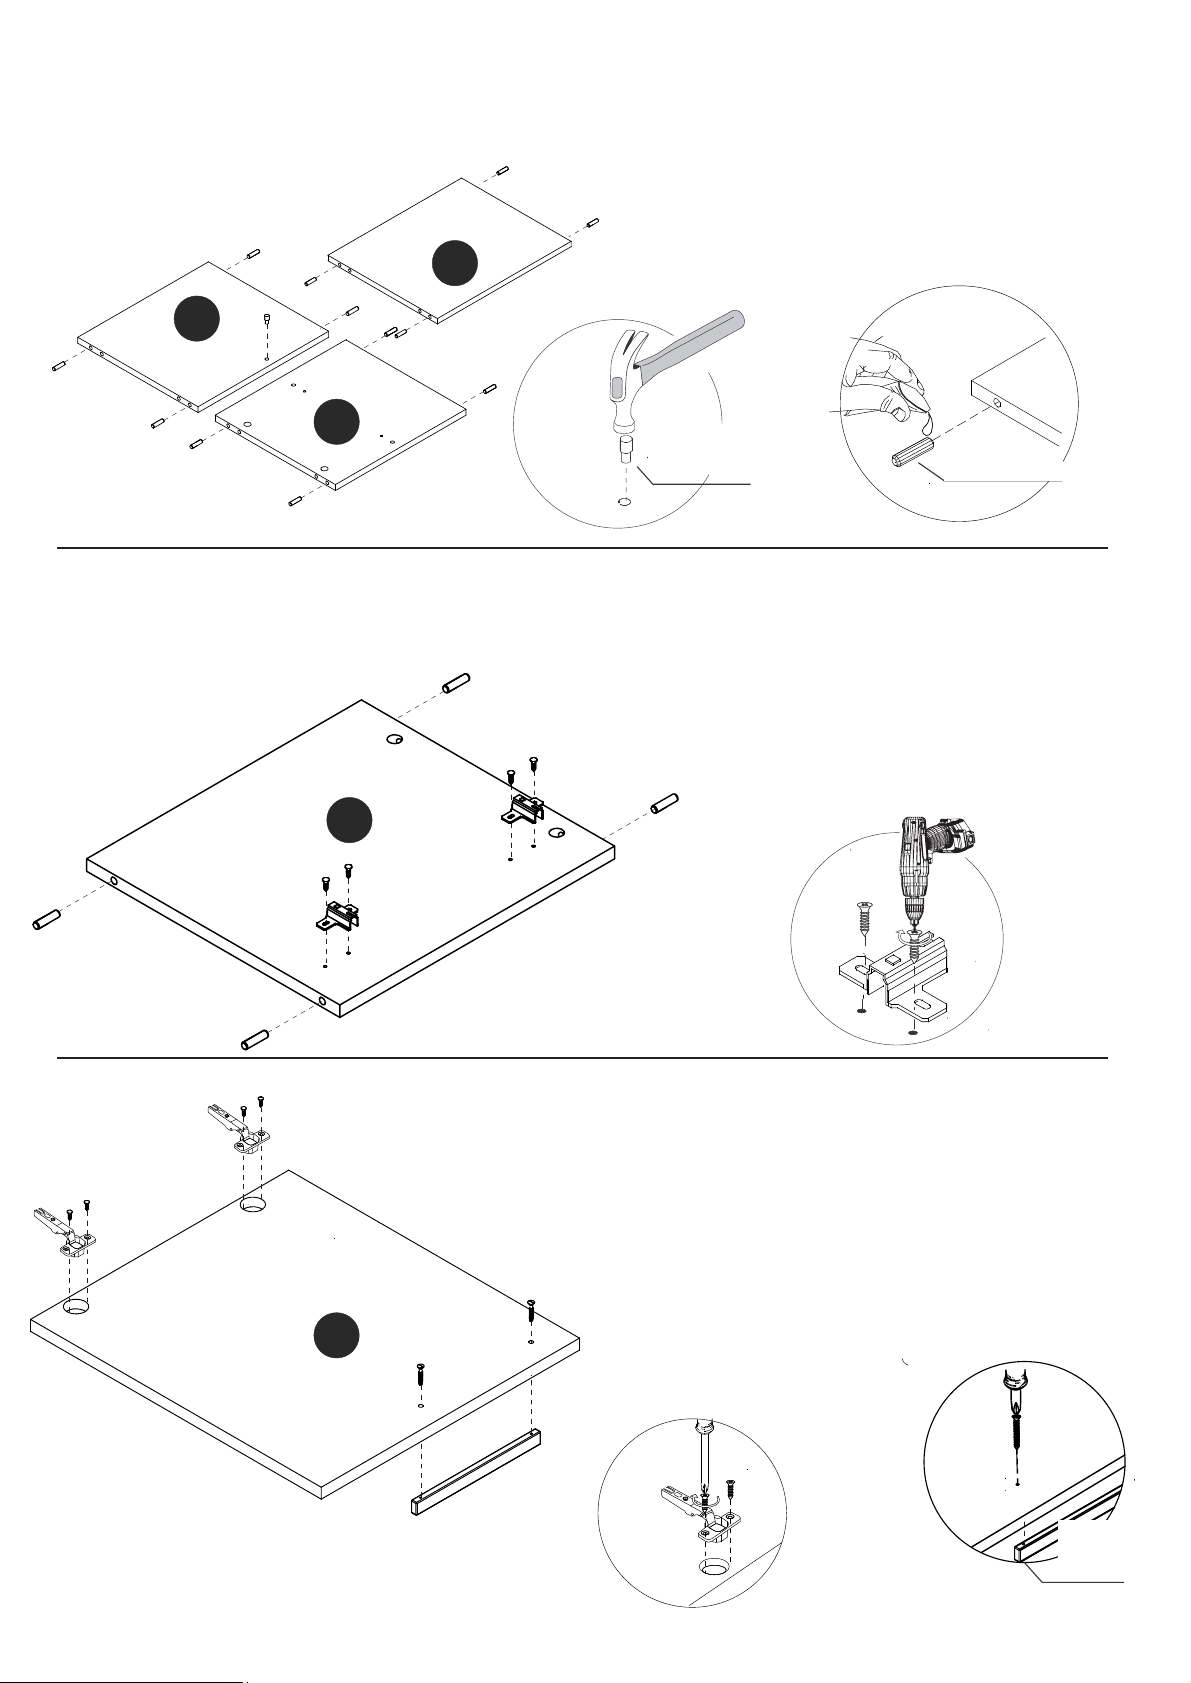
PASSO 2 / STEP 2 / PASO 2
Insira o suporte plástico a ferragemnas peças 03, 05 e 06. Insert the plastic
support and hardware into pieces 03, 05 and 06. Añade el soporte plastico y
el herraje en las piezas 03, 05 y 06.
06
03
04
SUPORTE PLÁSTICO
PLASTIC SUPPORT
SOPORTE PLASTICO
PASSO 3 / STEP 3 / PASO 3
Fixe a ferragemna peça 04 utilizando a ferragem . Attach hardware at
piece 04 using hardware . Fije el herrajeen la pieza 04 utilizando el
herraje
08
PASSO 4 / STEP 4/ PASO 4
Fixe o puxador usando a ferragem . Fixe a ferragem
usando a ferragem .
hardware using hardware .
Fije la manija utilizando el herraje . Fije el herraje
utilizando el herraje .
Fix the handle using hardware . Fix
PUXADOR
HANDLE
MANIJA
9
Page 9
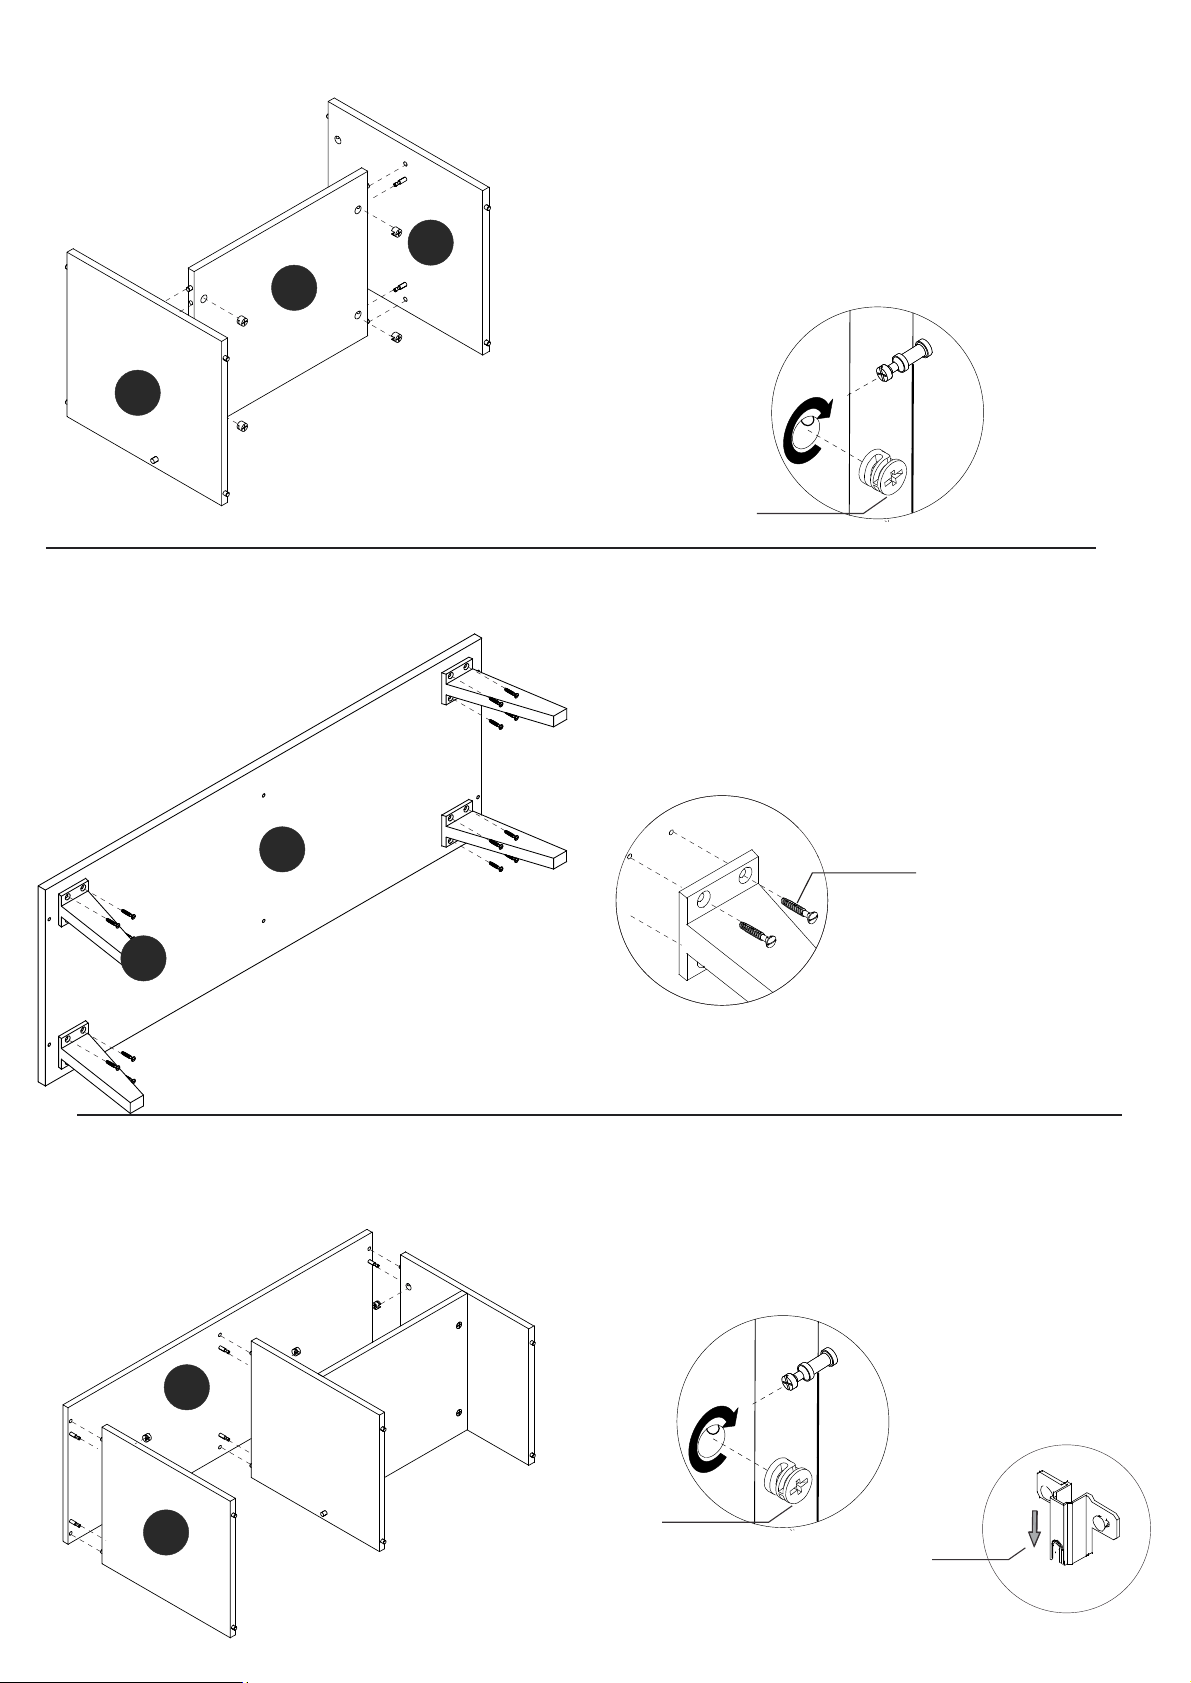
05
PASSO 5 / STEP 5 / PASO 5
Conecte as peças 03, 05 e 06, insira a ferragem e gire para apertar. Connect
pieces 03, 05 and 06, insert hardware and turn to tighten. Junte las piezas 03,
05 y 06, añade el herraje y gire para apretar.
03
06
PASSO 6 / STEP 6 / PASO 6
Fixe os pés (peças 09) na peça 01 usando a ferragem . Fix the feet
(pieces 09) at piece 01 using hardware .
Fije los pies ( piezas 09) en la pieza 01 utilizando el herraje
09
01
PASSO 7 / STEP 7 / PASO 7
Conecte as peças 02 e 04, insira a ferragem e gire para apertar. Connect
pieces 02 and 04, insert hardware and turn to tighten. Junte las piezas 02 y
04, añade el herraje y gire para apretar.
02
04
Por favor, observe a posição da ferragem Please,
note hardware position.
Por favor, observe la posición del herraje .
10
Page 10
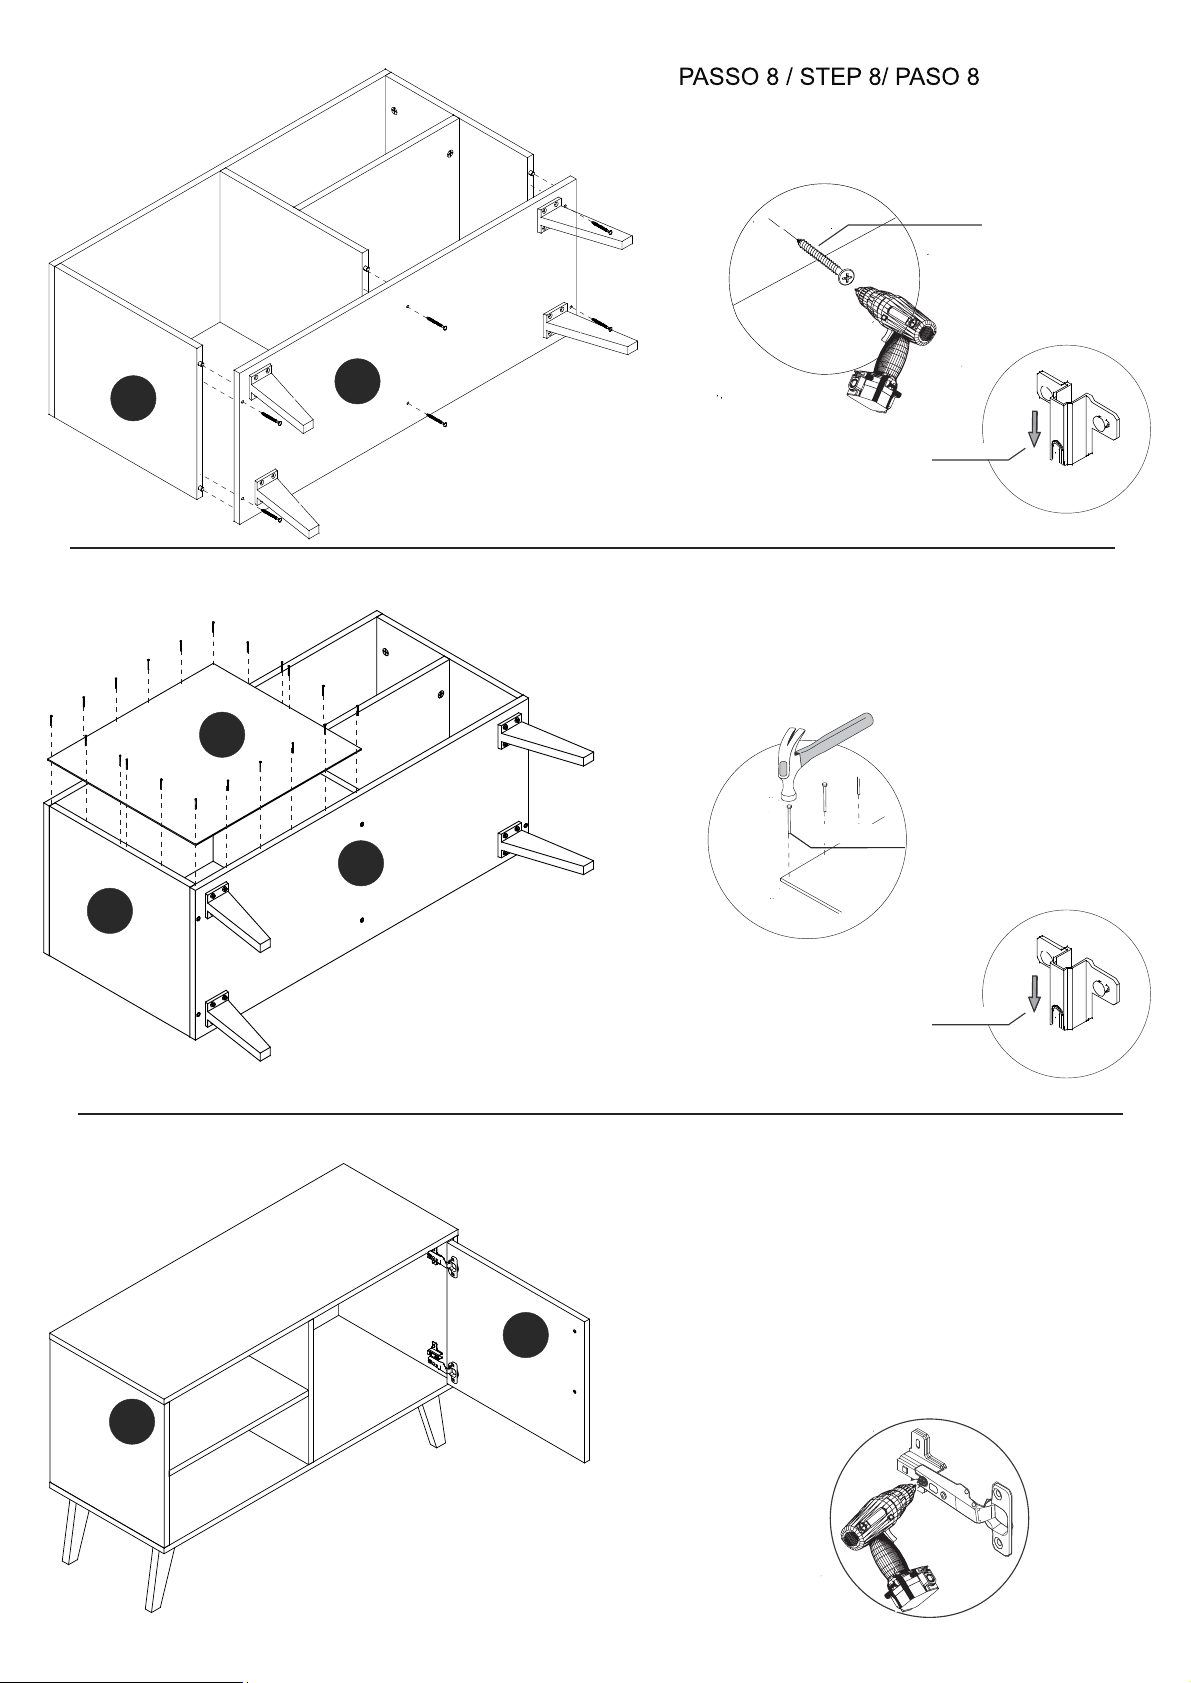
Conecte a peça 01 utilizando ferragem . Connect
piece 01 using hardware . Junte la pieza 01
utilizando el herraje .
04
04
01
Por favor, observe a posição da ferragem Please,
note hardware position.
Por favor, observe la posición del herraje .
PASSO 9 / STEP 9 / PASO 9
Fixe a peça 08 ao móvel utilizando a ferragem . Fix piece
08 at the furniture using hardware . Fije la pieza 08 al
mueble utilizando el herraje .
08
01
03
Por favor, observe a posição da ferragem Please,
note hardware position.
Por favor, observe la posición del herraje.
PASSO 10 / STEP 10 / PASO 10
Fixe a peça 07 ao móvel montado.
Fix piece 07 at the assembled furniture.
Fije la pieza 07 al mueble armado.
07
11
Page 11
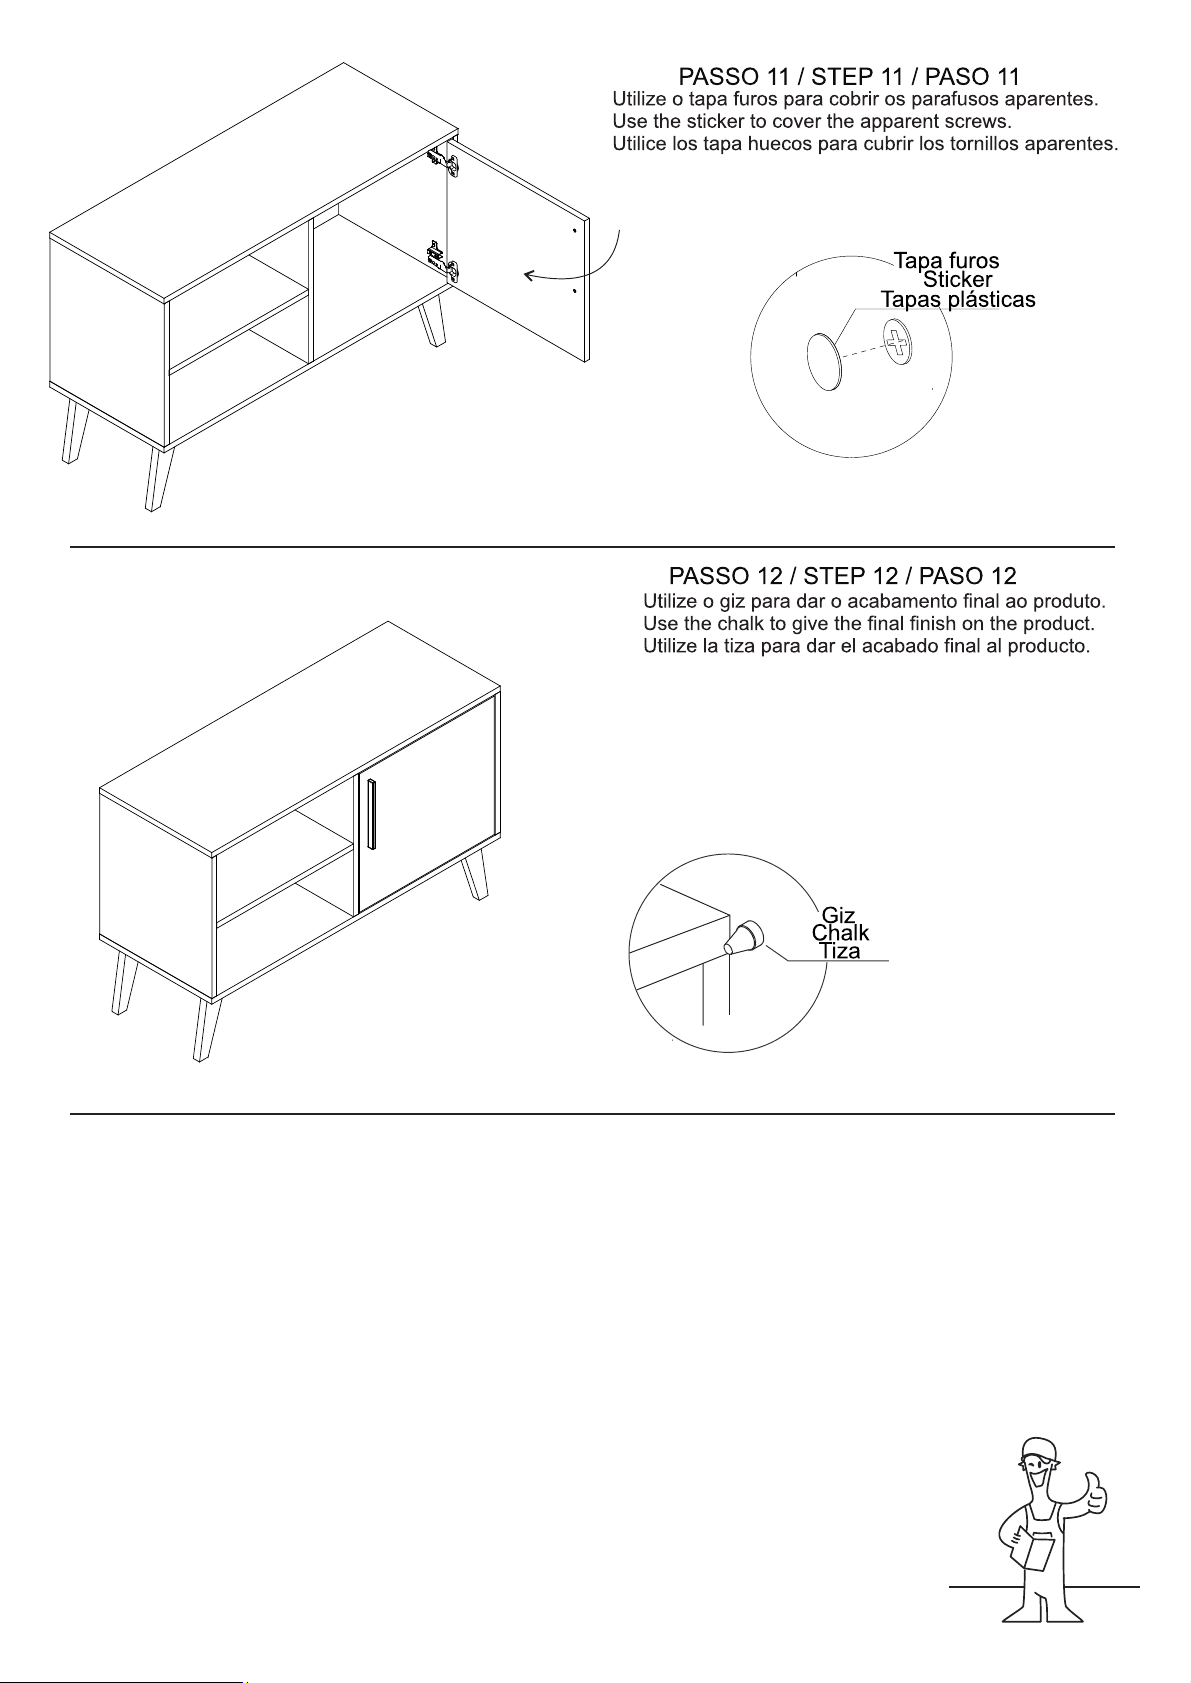
12
 Loading...