

Page 1
INSTALLATION INSTRUCTION
Aether 3.5” Color Tunable LED Downlight
HR-3LED-H18A-CC
SAFETY INSTRUCTION
IMPORTANT: NEVER attempt any work without shutting o the electricity.
• Read all instructions before installing.
• System is intended for installation by a qualied electrician in accordance with the National Electrical Code and local regulations.
• Place the wall switch in the “OFF” position.
• Go to the main fuse box, or circuit breaker. Unscrew the fuse(s) or switch ”OFF” the circuit breaker switch(es) that control the power
to the space that you are working on.
CAUTION:
All parts must be used as indicated in these instructions. Do not substitute any parts, leave parts out, or use any parts that are worn out or
broken. Failure to follow this instruction could invalidate the ETL/cETL listing of this xture.
AVERTISSEMENT
IMPORTANT : COUPEZ L’ÉLECTRICITÉ AVANT TOUTE MANIPULATION.
• Lisez toutes les instructions avant d’installer.
• Système est destiné à être installé par un électricien qualié en conformité avec le code national de l’électricité et les règlements locaux.
• Placez l’interrupteur mural en position d’arrêt (« OFF »).
• Accédez au panneau central de disjoncteurs ou de fusibles de votre demeure et placez l’interrupteur principal en position d’arrêt (« OFF »).
MISE EN GARDE
Toutes les pièces doivent être utilisées tel qu’il est indiqué dans ces instructions. Ne remplacez pas les pièces, n’en laissez pas de côté et
ne les utilisez pas si elles sont usées ou brisées. Le non-respect de ces instructions peut annuler l’homologation ETL/cETL du luminaire.
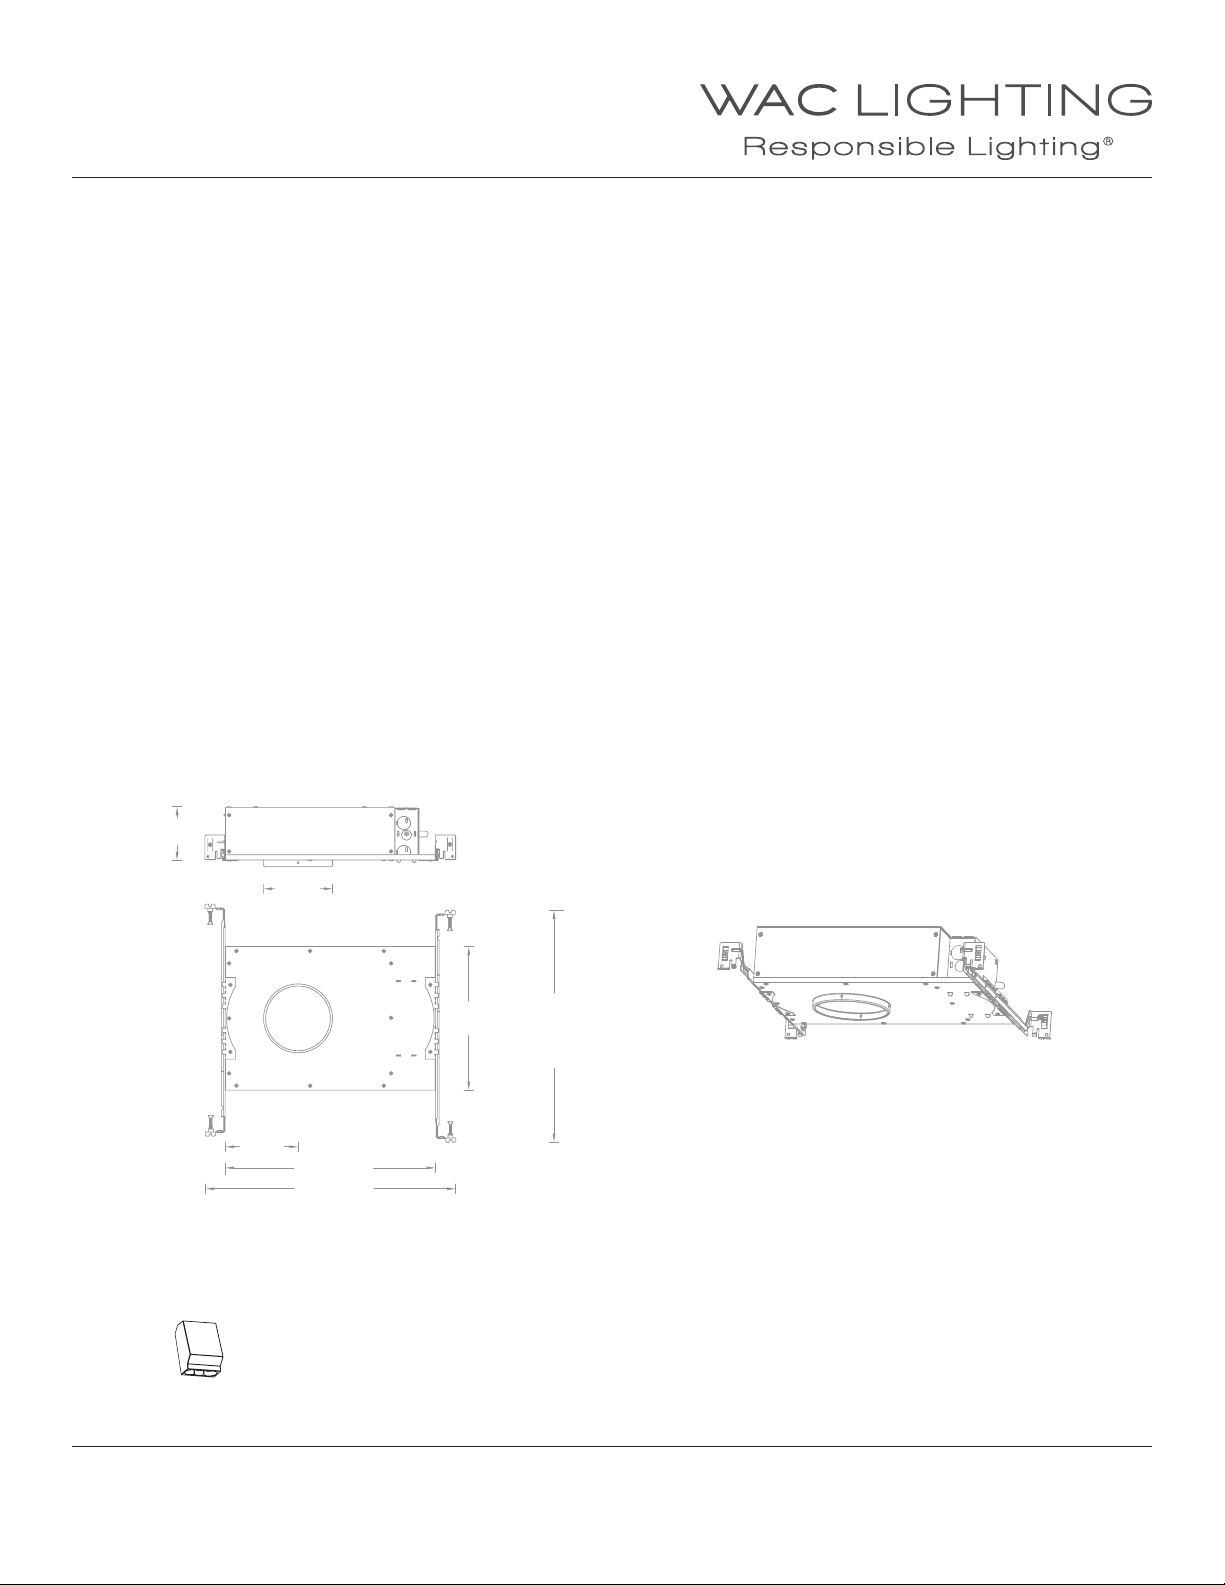
OVERVIEW:
Housing is new construction IC, AIRTIGHT. Housing requires a trim for nished look. Check catalog for compatible trims choices
32"
4s"
92" Min 142"
Max 212"
4w"
13d"
162"
ELECTRICAL ACCESSORY
Wire Connector
Qty: 4pcs
7EAC000253
WAC Lighting
www.waclighting.com
Phone (800) 526.2588 • Fax (800) 526.2585
WAC Lighting retains the right to modify the design of our products at any time as part of the company's continuous improvement program. SEPTEMBER, 2017 1
Headquarters/Eastern Distribution Center
44 Harbor Park Drive • Port Washington, NY 11050
Phone (516) 515.5000 • Fax (516) 515.5050
Western Distribution Center
1750 Archibald Ave • Ontario, CA 91761
Phone (800) 526.2588 • Fax (800) 526.2585
Page 2
INSTALLATION INSTRUCTION
Aether 3.5” Color Tunable LED Downlight
HR-3LED-H18A-CC
HOUSING INSTALLATION:
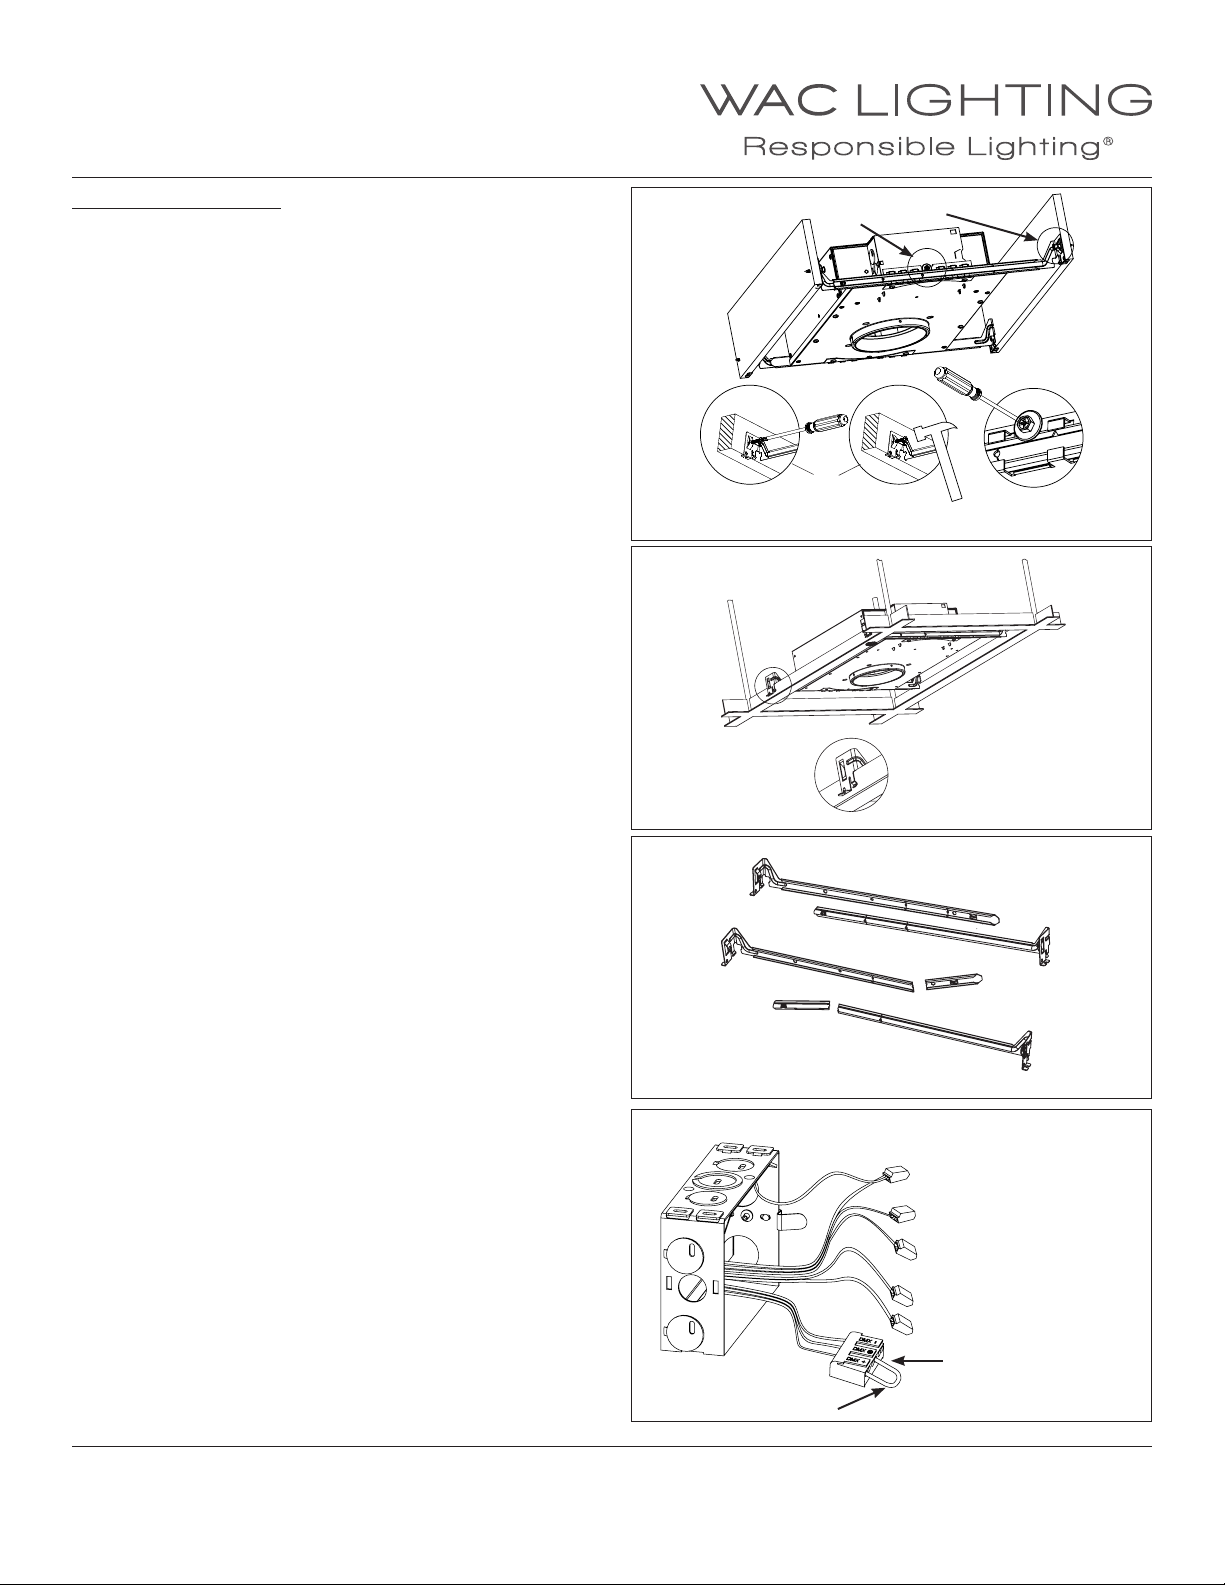
1. Install housing using two hanger bars provided, align the bottom
of the hanger bar with the bottom of the joist, secure the
“screw-nail” on each end by screw-driver or by hammer
(See FIG.1 detail A).
Slide xture along hanger bar into desired location, use locking
screws to secure (See FIG.1 detail B).
For grid installation, hanger bars are supported on grids.
(See FIG.2)
FIG.1
FIG.2
B
A
A
B
2. To shorten hanger bars to t in a 12” joist, snap o one section of
the hanger bars (See FIG.3).
3. Remove spring latched junction box cover and connect xture
wires to building wires: insert each supply wire into appropriate
junction box connector. Connect black xture wire to hot, white
xture wire to neutral, green xture wire to ground, grey xture
wire to Dim (-), purple xture wire to Dim (+), DMX xture wires to
DMX controller (See FIG.4).
FIG.3
Snap o one section t in a 12” joist
FIG.4
Jump wire
Green: ground
Black: hot
White: neutral
Grey : 0 - 10V Dim (-)
Purple : 0-10V Dim (+)
DMX Connector
Green: DMX (+)
Orange: DMX (-)
Brown: DMX Ground
WAC Lighting
www.waclighting.com
Phone (800) 526.2588 • Fax (800) 526.2585
WAC Lighting retains the right to modify the design of our products at any time as part of the company's continuous improvement program. SEPTEMBER, 2017 2
Headquarters/Eastern Distribution Center
44 Harbor Park Drive • Port Washington, NY 11050
Phone (516) 515.5000 • Fax (516) 515.5050
Western Distribution Center
1750 Archibald Ave • Ontario, CA 91761
Phone (800) 526.2588 • Fax (800) 526.2585
Page 3
INSTALLATION INSTRUCTION
Aether 3.5” Color Tunable LED Downlight
HR-3LED-H18A-CC
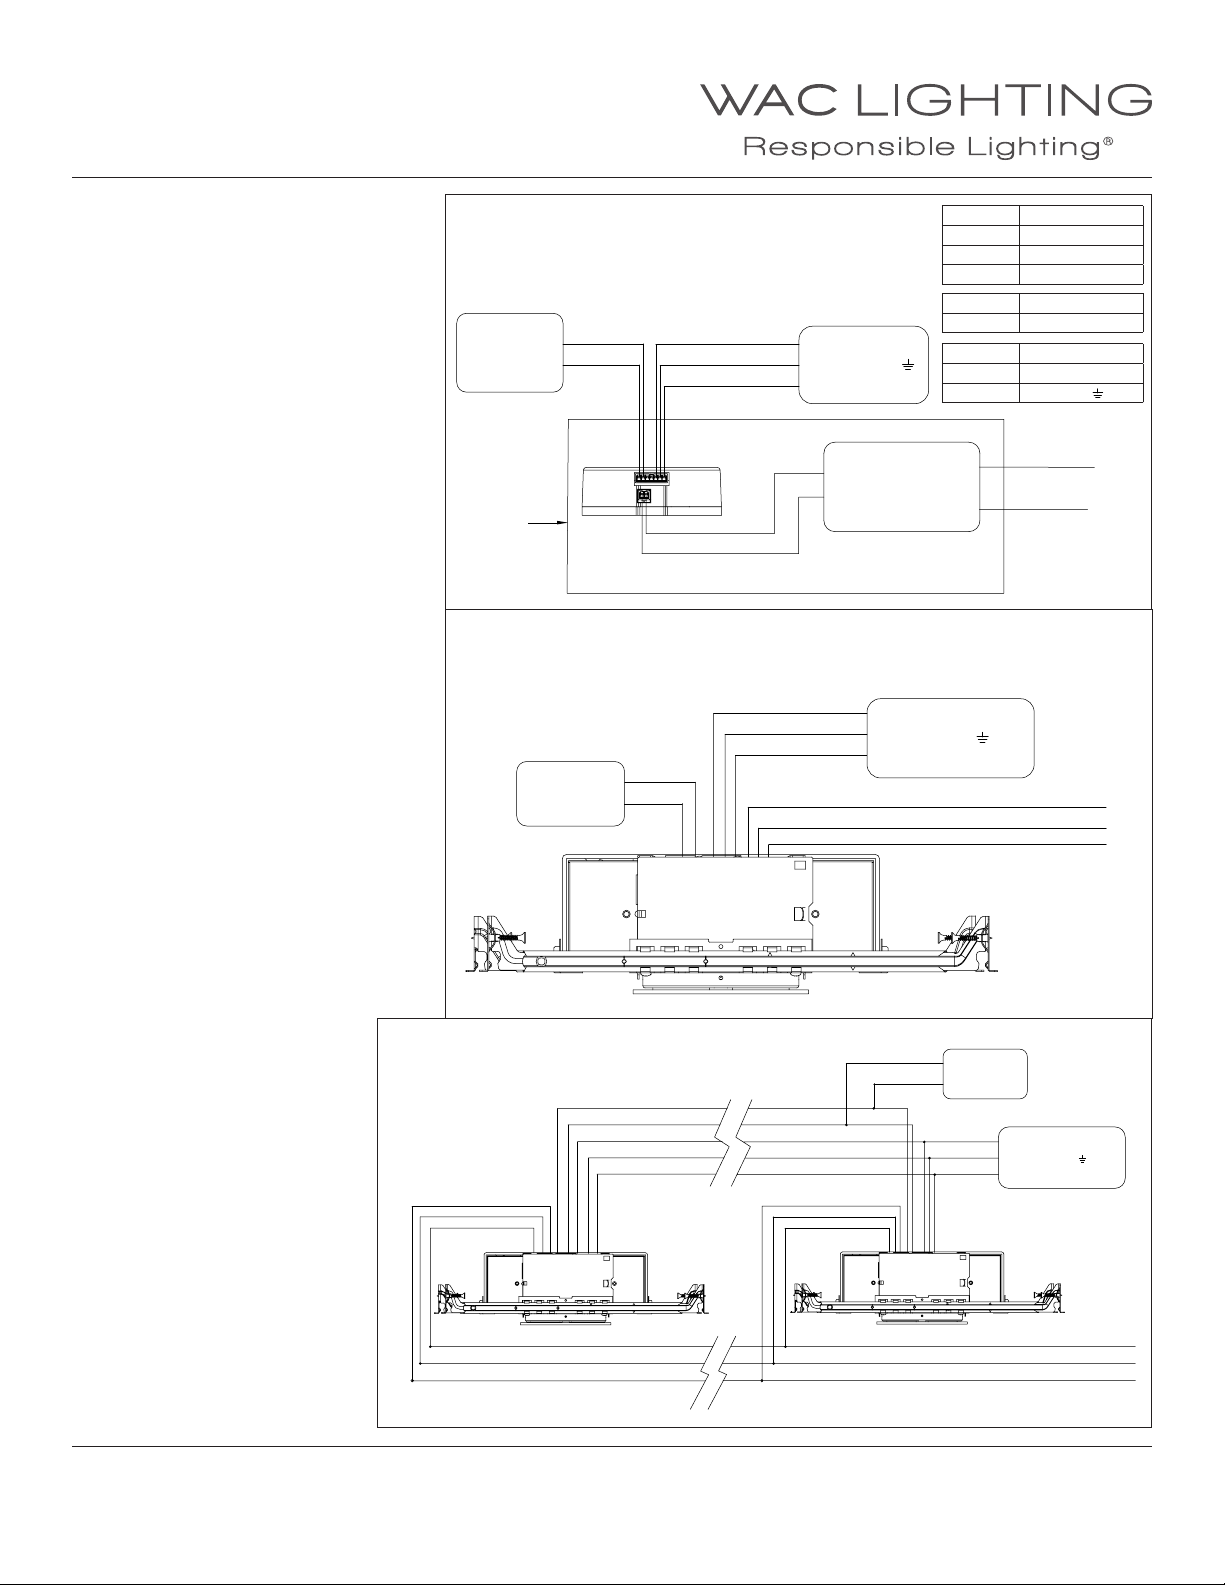
To utilize DMX, remove the jump wire then
connect DMX wire. For the single xture, do
the wiring according to the related wiring
diagrams (See FIG.5 & 6).
For multiple xtures, do the wiring according
to the related wiring diagrams (See FIG.5 & 7).
When not using a dimmer and DMX, connect
black xture wire to hot, white xture wire
to neutral and green xture wire to ground.
Leave all other wires capped individually.
Place all wiring and connectors back in
junction box and replace the junction box’s
cover.
FIG.5
010V DIMMER
GREY (DIM-)
VIOLET (DIM+)
FIXTURE
FIG.6
010V DIMMER
GREY (DIM-)
VIOLET (DIM+)
Single Fixture (Interior Wiring)
DMX CONTROLLER
Grey
Violet
CMT One
Green
Brown
Orange
Red
Black
GREEN (DMX+)
BROWN (DMX )
ORANGE (DMX-)
+
DC POWER SUPPLY
_
Single Fixture (Exterior Wiring)
Green
Brown
Orange
Grey
Violet
Lead Color Input
Black Hot (120V/277V AC)
White Neutral
Green Ground
Violet 0-10 Dim+
Grey 0-10 Dim-
Green DMX+
Orange DMX-
Brown DMX...
Hot
Neutral
DMX CONTROLLER
GREEN (DMX+)
BROWN (DMX )
ORANGE (DMX-)
LINE VOLTAGE (120V/277V AC)
BLACK (Hot)
WHITE (Neutral)
GREEN (Ground)
Black
LINE IN VOLTAGE
(120V/277V AC)
White
WAC Lighting
www.waclighting.com
Phone (800) 526.2588 • Fax (800) 526.2585
FIG.7
Headquarters/Eastern Distribution Center
44 Harbor Park Drive • Port Washington, NY 11050
Phone (516) 515.5000 • Fax (516) 515.5050
Multi Fixtures (Exterior Wiring)
Grey
Violet
Green
Brown
Orange
Fixture One
(J-Box)
Fixture One
(J-Box)
010V DIMMER
Grey
Violet
LINE VOLTAGE (120V/277V AC)
Western Distribution Center
1750 Archibald Ave • Ontario, CA 91761
Phone (800) 526.2588 • Fax (800) 526.2585
GREY (DIM-)
VIOLET (DIM+)
Green
Brown
Orange
Fixture Two
(J-Box)
BLACK (Hot)
WHITE (Neutral)
GREEN (Ground)
DMX CONTROLLER
GREEN (DMX+)
BROWN (DMX )
ORANGE (DMX-)
WAC Lighting retains the right to modify the design of our products at any time as part of the company's continuous improvement program. SEPTEMBER, 2017 3
Page 4
INSTALLATION INSTRUCTION
Aether 3.5” Color Tunable LED Downlight
HR-3LED-H18A-CC
DOWNLIGHT TRIM INSTALLATION
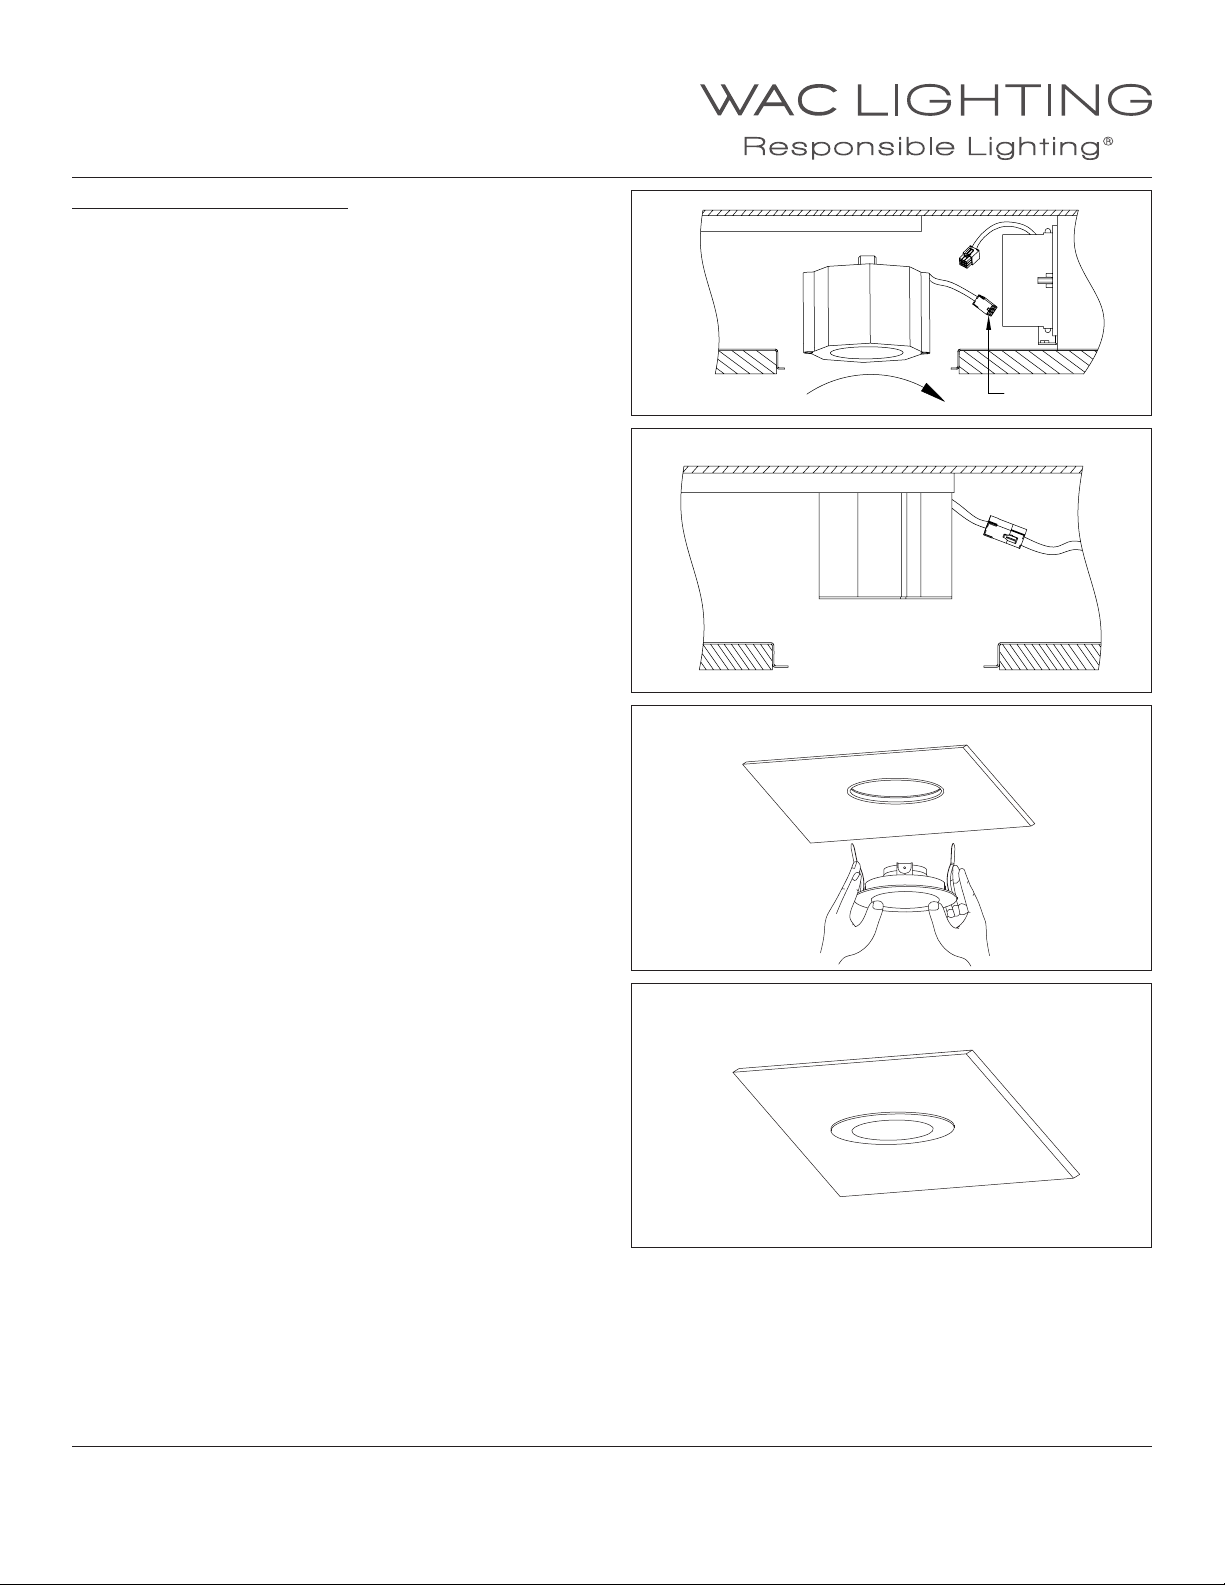
1. When installing in drywall, cut a hole 4 5/8” in the drywall.
Note: 1 1/2” inch maximum ceiling thickness.
2. Install light engine into the housing by rotating it clockwise
onto stud (See FIG.8)
Connect light engine and housing 9-pin power connectors
(See FIG.9).
3. Raise the trim to housing, depress trim spring clips and push
the trim assembly up until the trim ring is ush to the ceiling
(See FIG.10 & 11).
FIG.8
Clockwise to Install
FIG.9
FIG.10
9-Pin Connector
4. Refer to the included ilumenight 2.0 Quick Start Guide for
initial Bluetooth xture setup and control. The Bluetooth
discovery distance is up to 30 meters (approx.. 100 feet). Discovery distance may vary due to environmental factors. When
commissioning multiple modules, reducing the discovery
distance enables a connection to be established with the
closest lamp.
FIG.11
WAC Lighting
www.waclighting.com
Phone (800) 526.2588 • Fax (800) 526.2585
WAC Lighting retains the right to modify the design of our products at any time as part of the company's continuous improvement program. SEPTEMBER, 2017 4
Headquarters/Eastern Distribution Center
44 Harbor Park Drive • Port Washington, NY 11050
Phone (516) 515.5000 • Fax (516) 515.5050
Western Distribution Center
1750 Archibald Ave • Ontario, CA 91761
Phone (800) 526.2588 • Fax (800) 526.2585
Page 5
INSTALLATION INSTRUCTION
Aether 3.5” Color Tunable LED Downlight
HR-3LED-H18A-CC
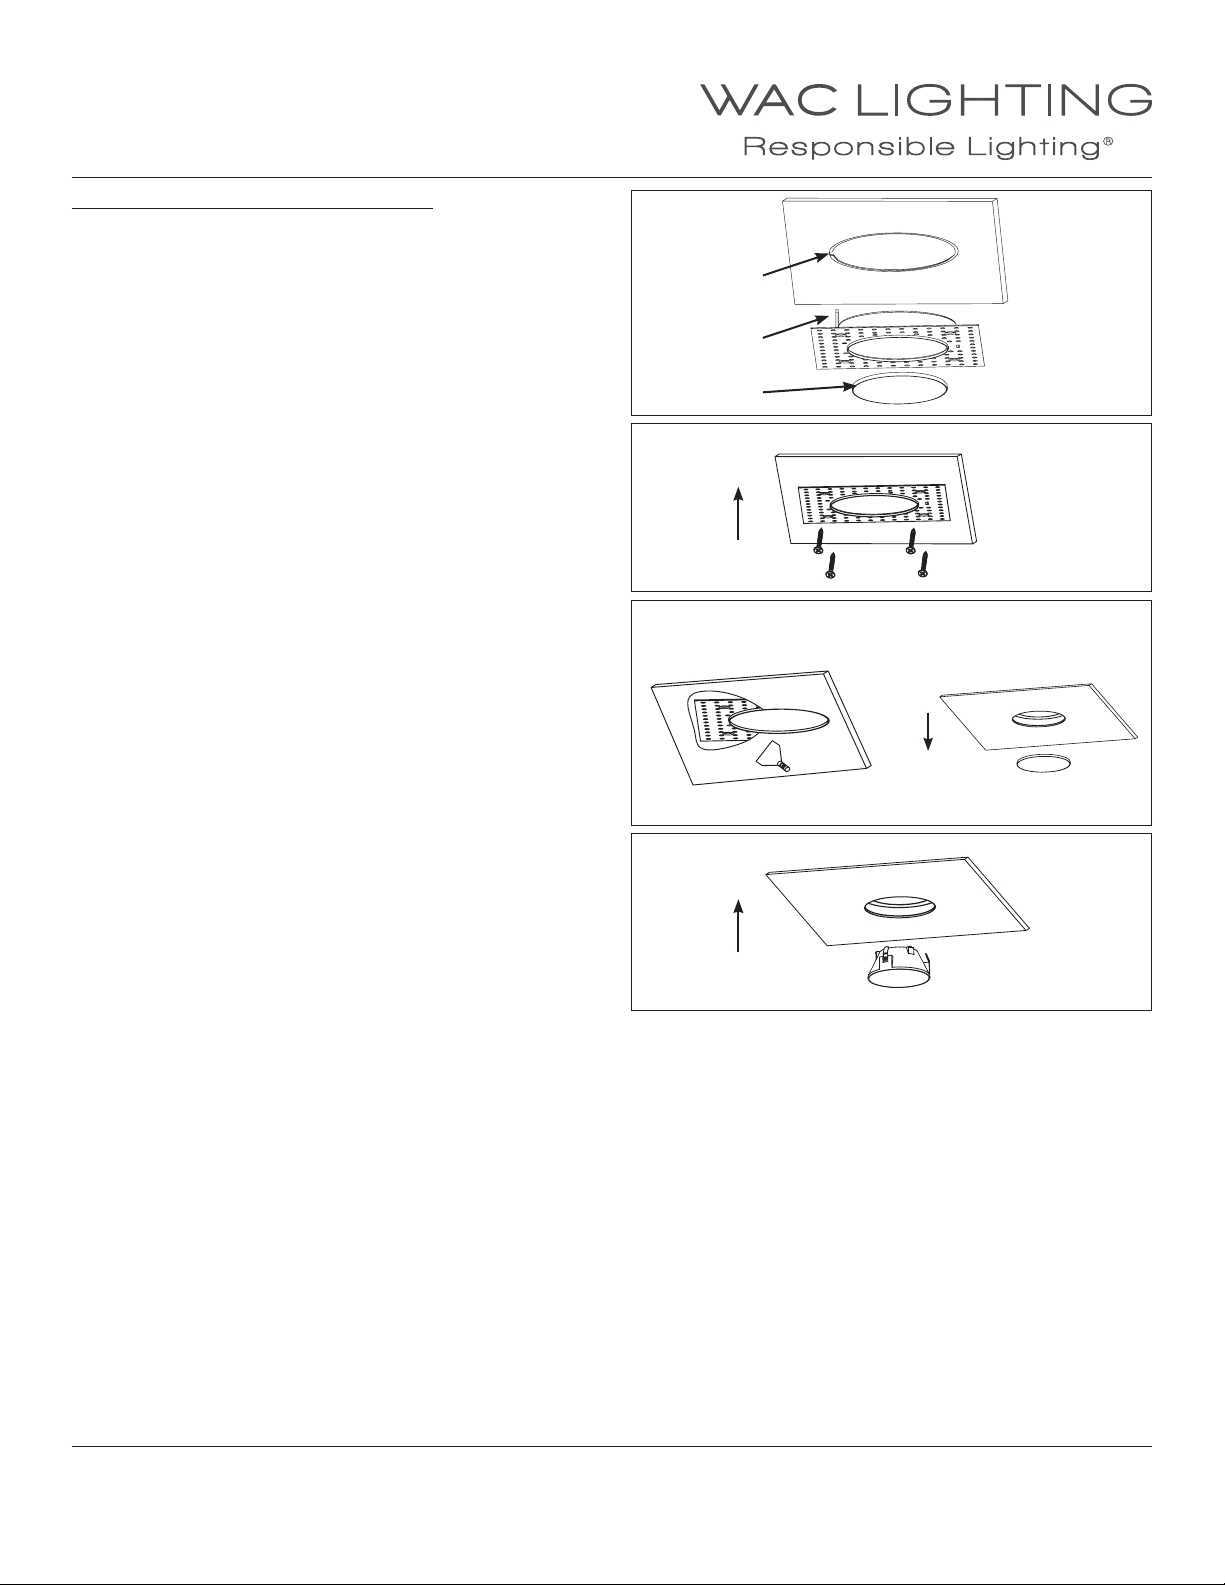
DOWNLIGHT INVISIBLE TRIM INSTALLATION
1. When installing in drywall, cut a hole 4 5/8” in the drywall.
Note: 1 1/2” inch maximum ceiling thickness.
2. Raise the invisible trim frame aligning tab to slot in housing,
and put plaster shield inside (See FIG.12).
3. Secure the invisible trim frame to the housing, ush up
against the ceiling by using the screws supplied (See FIG.13).
4. Apply plaster or spackle over Invisible frame and sand surface
when dry for a nished look (See FIG.14).
5. Remove the plaster cover when nishing is completed
(See FIG.15).
6. Install light engine into the housing by rotating it clockwise
onto stud (See FIG.8)
Connect light engine and housing 9-pin power connectors
(See FIG.9).
FIG.12
Slot in housing
Tab
Plaster Shield
FIG.13
FIG.14 FIG.15
Remove plaster shield
FIG.16
7. Raise the invisible trim assembly up to trim frame until the
trim ring is ush to the trim frame (See FIG.16).
8. Refer to the included ilumenight 2.0 Quick Start Guide for
initial Bluetooth xture setup and control. The Bluetooth
discovery distance is up to 30 meters (approx.. 100 feet). Discovery distance may vary due to environmental factors. When
commissioning multiple modules, reducing the discovery
distance enables a connection to be established with the
closest lamp.
WAC Lighting
www.waclighting.com
Phone (800) 526.2588 • Fax (800) 526.2585
WAC Lighting retains the right to modify the design of our products at any time as part of the company's continuous improvement program. SEPTEMBER, 2017 5
Headquarters/Eastern Distribution Center
44 Harbor Park Drive • Port Washington, NY 11050
Phone (516) 515.5000 • Fax (516) 515.5050
Western Distribution Center
1750 Archibald Ave • Ontario, CA 91761
Phone (800) 526.2588 • Fax (800) 526.2585
Page 6
INSTALLATION INSTRUCTION
Aether 3.5” Color Tunable LED Downlight
HR-3LED-H18A-CC
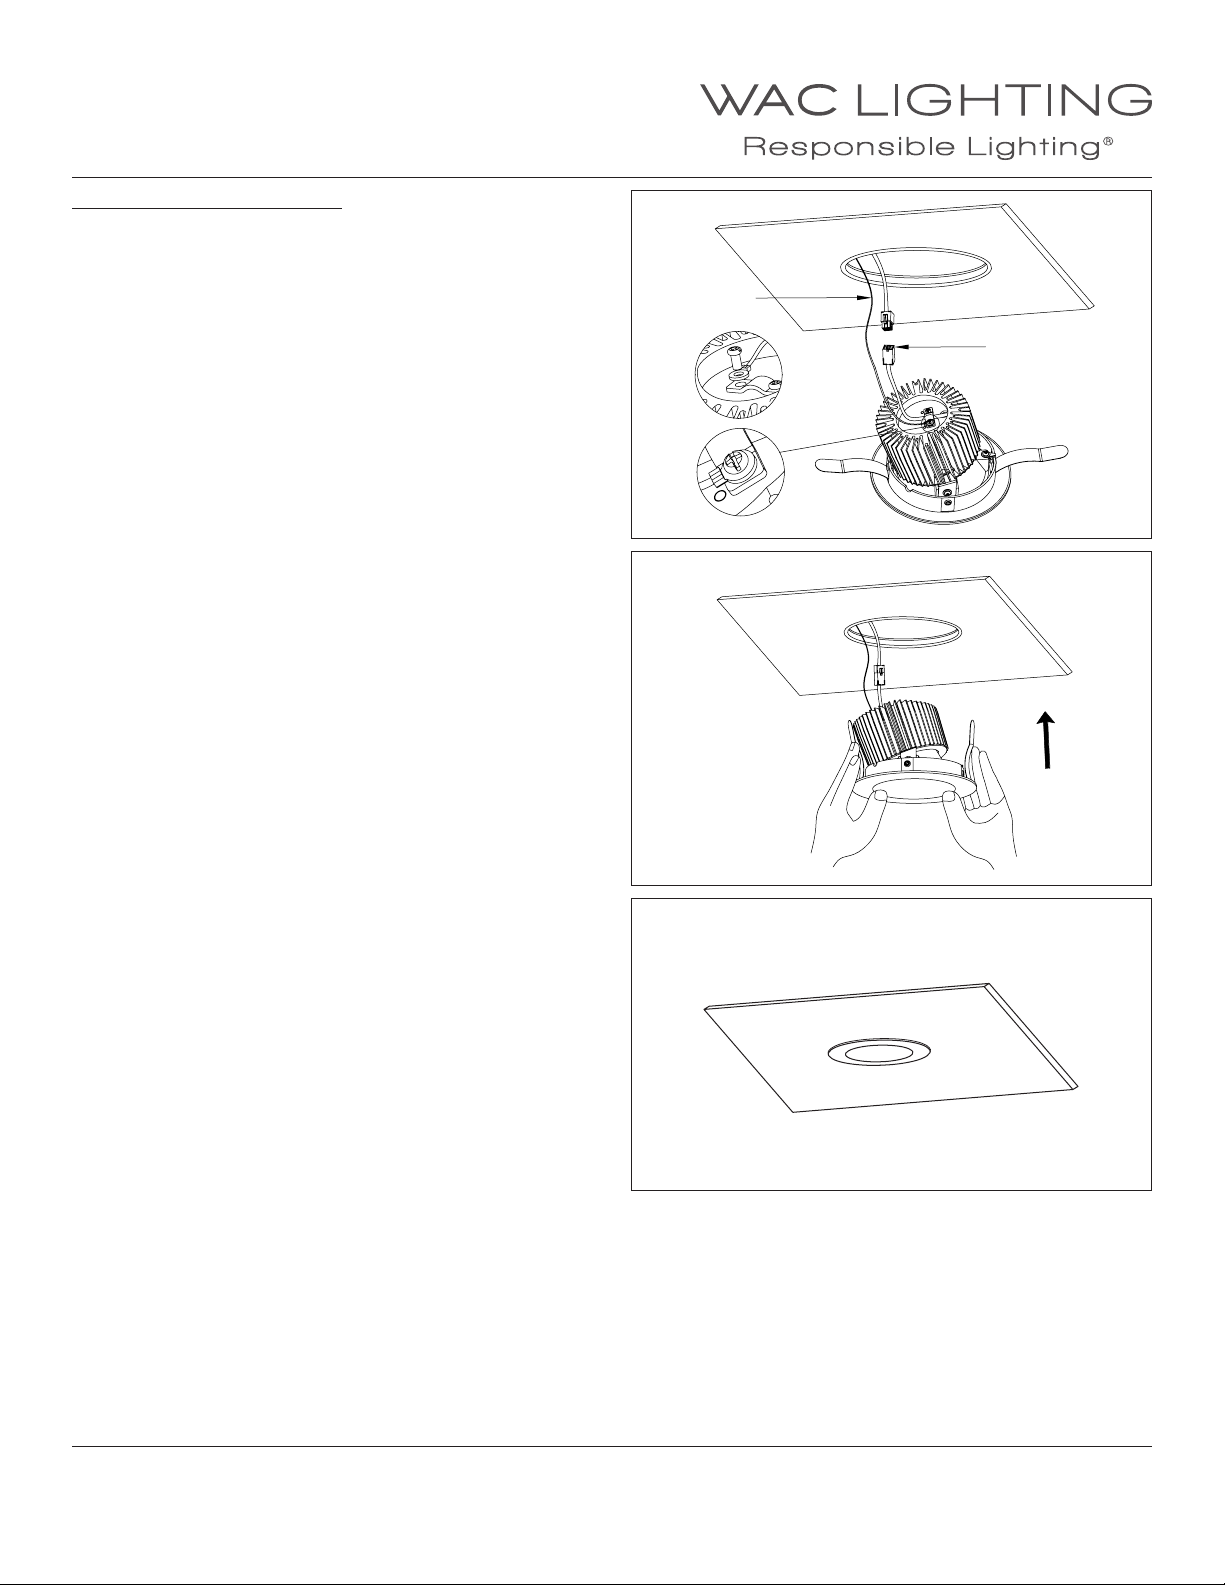
WALL WASH TRIM INSTALLATION
1. When installing in drywall, cut a hole 4 5/8” in the drywall.
Note: 1 1/2” inch maximum ceiling thickness.
2. Raise trim to ceiling, connect the 9-pin quick connector and
secure safety cable to top of trim by using screw provided
(as Fig.17).
3. Push the trim assembly up inside the housing until the trim
ring is ush to the ceiling (as Fig.18 & 19).
4. Refer to the included ilumenight 2.0 Quick Start Guide for
initial Bluetooth xture setup and control. The Bluetooth
discovery distance is up to 30 meters (approx.. 100 feet). Discovery distance may vary due to environmental factors. When
commissioning multiple modules, reducing the discovery
distance enables a connection to be established with the
closest lamp.
FIG.17
Safety cable
9-Pin
Connector
FIG.18
WAC Lighting
www.waclighting.com
Phone (800) 526.2588 • Fax (800) 526.2585
FIG.19
Headquarters/Eastern Distribution Center
44 Harbor Park Drive • Port Washington, NY 11050
Phone (516) 515.5000 • Fax (516) 515.5050
Western Distribution Center
1750 Archibald Ave • Ontario, CA 91761
Phone (800) 526.2588 • Fax (800) 526.2585
WAC Lighting retains the right to modify the design of our products at any time as part of the company's continuous improvement program. SEPTEMBER, 2017 6
Page 7
INSTALLATION INSTRUCTION
Aether 3.5” Color Tunable LED Downlight
HR-3LED-H18A-CC
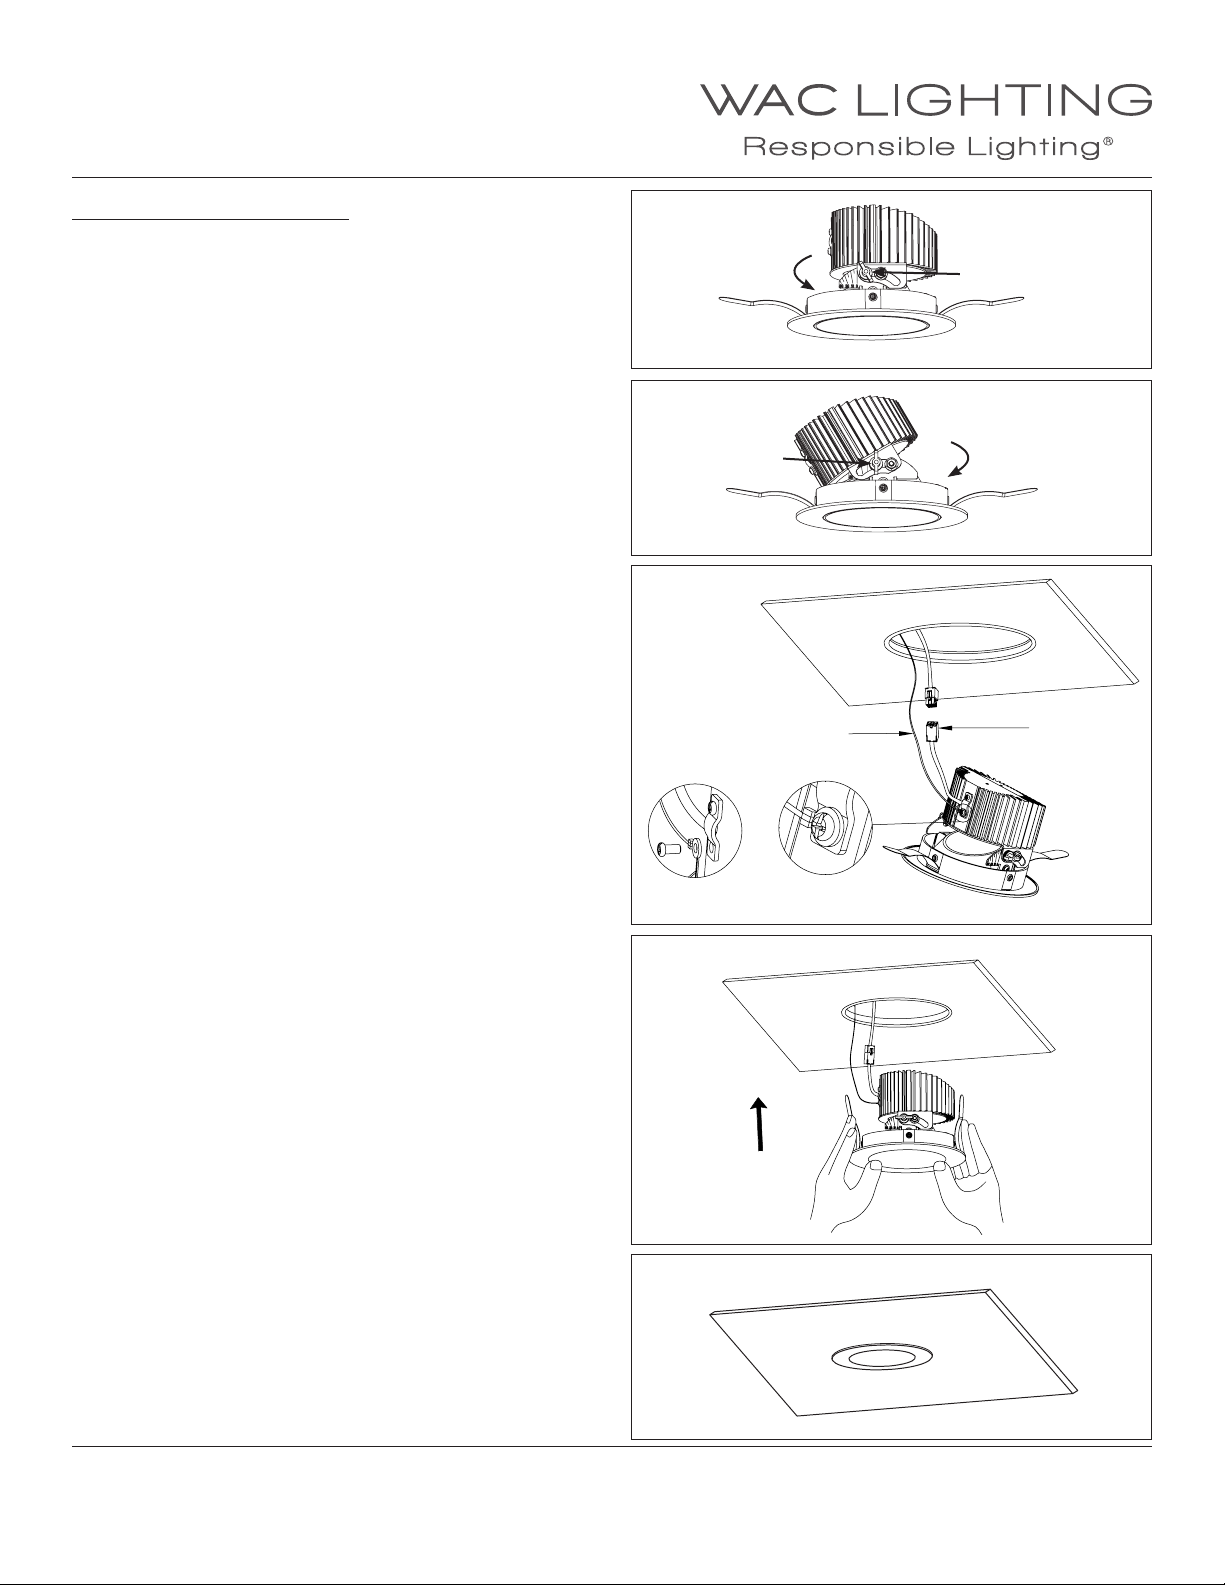
ADJUSTABLE TRIM INSTALLATION
1. When installing in drywall, cut a hole 4 5/8” in the drywall.
Note: 1 1/2” inch maximum ceiling thickness.
2. Loosen the locking tab by rotating counter clockwise
(See FIG.20).
Adjust to the desire angle (From 0°to 30°), Retighten the locking tab (See FIG.21).
3. Raise trim to ceiling, connect the 9-pin power quick
connector. Secure safety cable to top of trim by using screw
provided (See FIG.22).
4. Push the trim assembly up inside the housing until the trim
ring is ush to the ceiling (See FIG.23 & 24).
FIG.20
FIG.21
FIG.22
FIG.23
Counter
Clockwise
to Loosen
Locking Tab
Safety cable
Locking Tab
Clockwise
to Tighten
9-Pin
Connector
5. Refer to the included ilumenight 2.0 Quick Start Guide for
initial Bluetooth xture setup and control. The Bluetooth
discovery distance is up to 30 meters (approx.. 100 feet). Discovery distance may vary due to environmental factors. When
commissioning multiple modules, reducing the discovery
distance enables a connection to be established with the
closest lamp.
FIG.24
WAC Lighting
www.waclighting.com
Phone (800) 526.2588 • Fax (800) 526.2585
WAC Lighting retains the right to modify the design of our products at any time as part of the company's continuous improvement program. SEPTEMBER, 2017 7
Headquarters/Eastern Distribution Center
44 Harbor Park Drive • Port Washington, NY 11050
Phone (516) 515.5000 • Fax (516) 515.5050
Western Distribution Center
1750 Archibald Ave • Ontario, CA 91761
Phone (800) 526.2588 • Fax (800) 526.2585
 Loading...