

Page 1
INSTALLATION INSTRUCTION
OCULUX 3” LED - Remodel
R3BBRT-10
SAFETY INSTRUCTION
IMPORTANT: NEVER attempt any work without shutting o the electricity.
• Read all instructions before installing.
• System is intended for installation by a qualied electrician in accordance with the National Electrical Code and local regulations.
• Go to the main fuse box, or circuit breaker. Place the main power switch in the “OFF” position and unscrew the fuse(s) or switch “OFF” the
circuit breaker switch(es) that control the power to the xture or room that you are working on.
• Place the wall switch in the “OFF” position.
AVERTISSEMENT
IMPORTANT : Coupez l’électricité avant TOUTE manipulation.
• Lisez toutes les instructions avant d’installer.
• Système est destiné à être installé par un électricien qualié en conformité avec le code national de l’électricité et les règlements locaux.
• Accédez au panneau central de disjoncteurs ou de fusibles de votre demeure et placez l’interrupteur principal en position d’arrêt (« OFF »).
• Placez l’interrupteur mural en position d’arrêt (« OFF »).
CAUTION
All parts must be used as indicated in these instructions. Do not substitute any parts, leave parts out, or use any parts that are worn out or
broken. Failure to follow could invalidate the ETL/cETL listing of this xture.
OVERVIEW
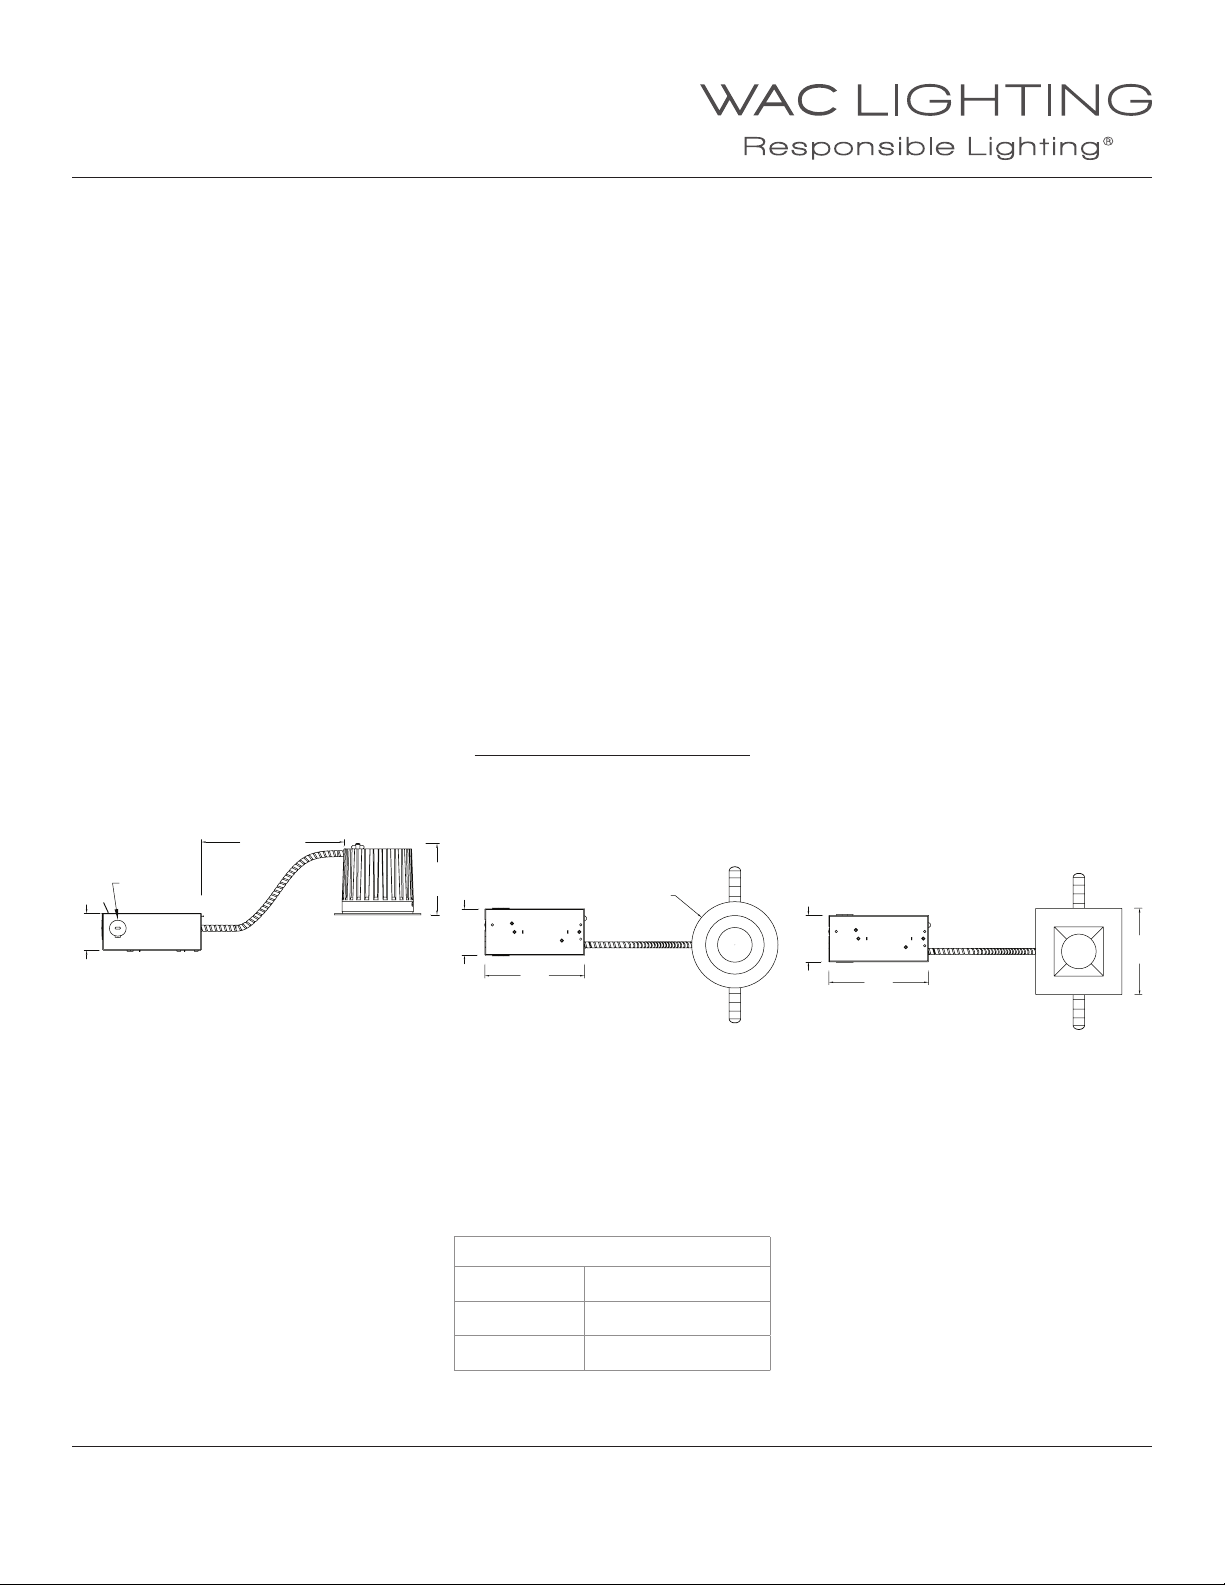
Housing is remodel Airtight IC (Refer to table below). Housing requires a trim for nished look. Refer to specication sheets for compatible
trim options.
⁄" Knockout
2⁄"
(3 Typical)
MAX 12"
REMODEL OVERALL DIMENSIONS
3⁄"
Ø4¾"
2⁄"
5½"
SPECIFICATIONS
Input: 120V
Installation: IC for all models (11W)
2⁄"
4¾"
5½"
waclighting.com
Phone (800) 526.2588
Fax (800) 526.2585
Dimming: ELV / TRIAC / 0-10V
Headquarters/Eastern Distribution Center
44 Harbor Park Drive
Port Washington, NY 11050
Central Distribution Center
1600 Distribution Ct
Lithia Springs, GA 30122
Western Distribution Center
1750 Archibald Avenue
Ontario, CA 91760
1WAC Lighting retains the right to modify the design of our products at any time as part of the company's continuous improvement program. FEBRUARY, 2017
Page 2
INSTALLATION INSTRUCTION
OCULUX 3” LED - Remodel
R3BBRT-10
REMODEL INSTALLATION
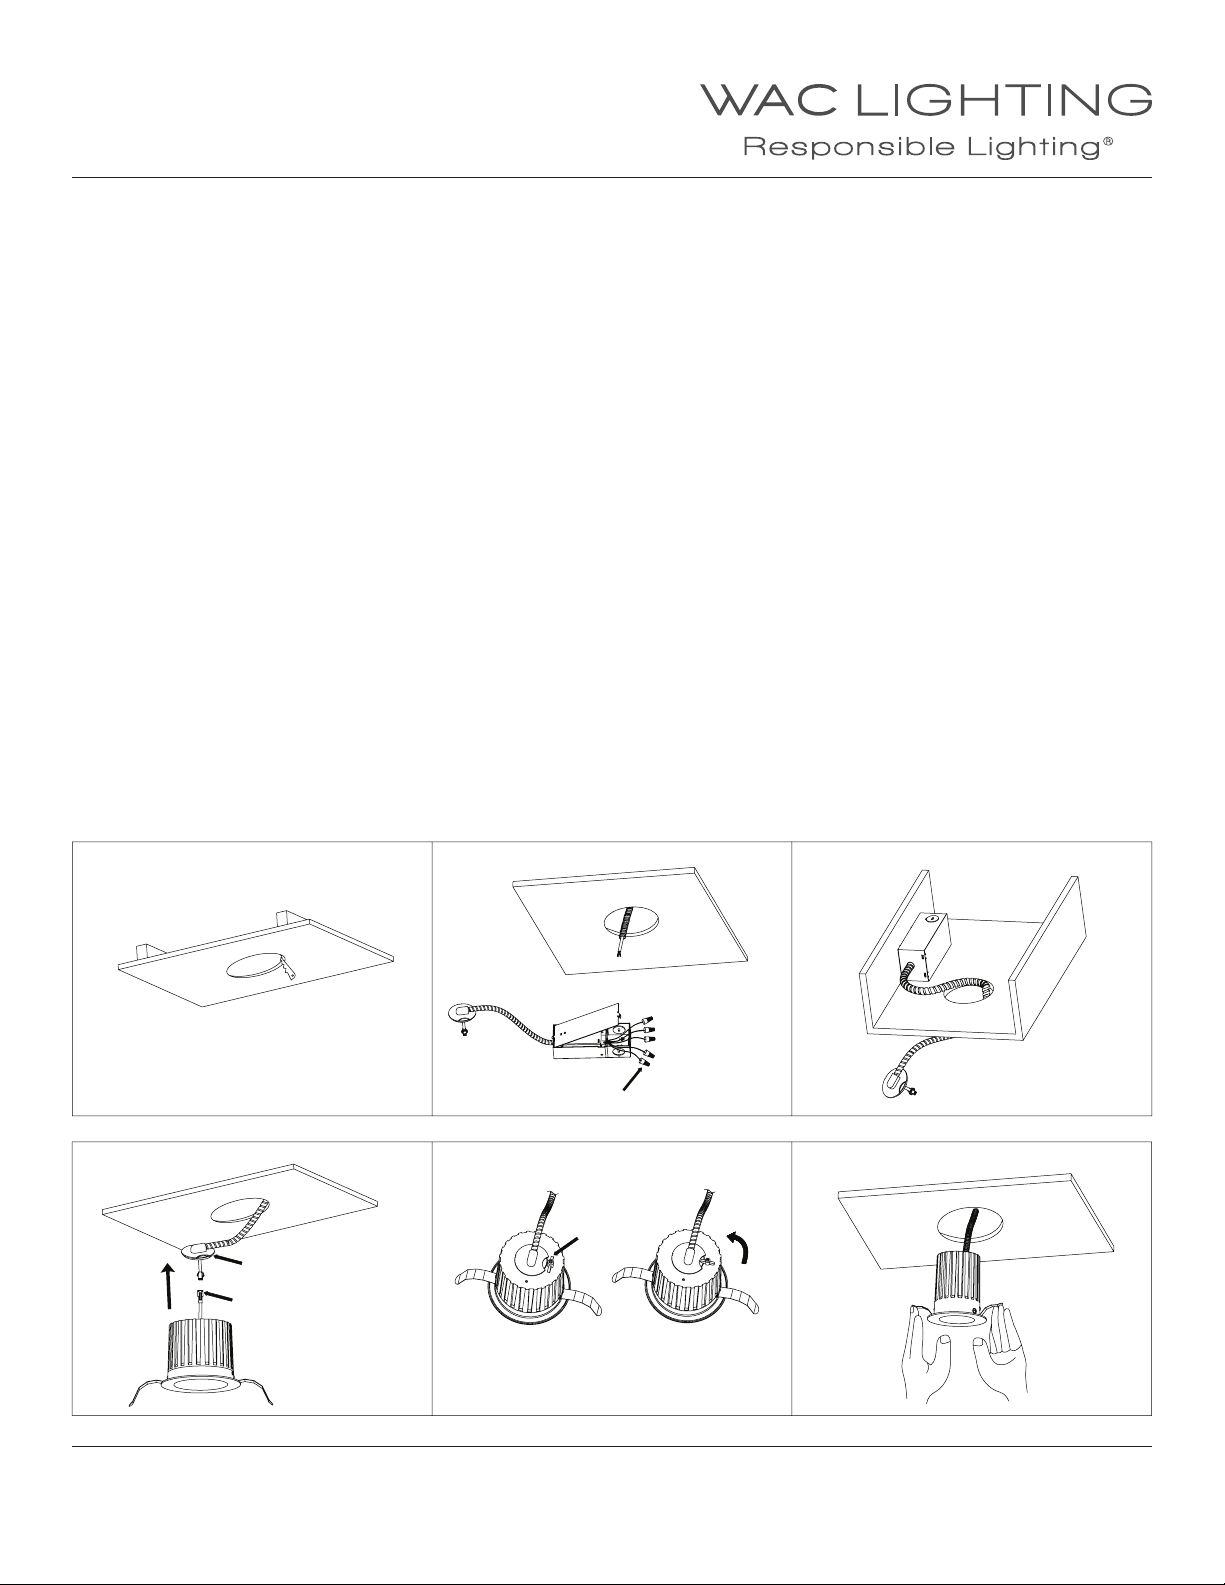
1. At the point of installation, cut a 4 ¼” round hole for a round trim or a square trim (See FIG. 1).
2. Ceiling thickness range is ½” to 1”.
3. Pull building supply wires through ceiling cutout and open xture junction box door.
Remove desired housing knockout and feed building wires into housing using appropriate connector.
4. Connect xture wires to building wires (See FIG. 2):
Connect each supply wire with appropriate junction box wire connector. This xture features electronic low voltage (ELV) or TRIAC or 0-10V
dimming capabilities.
To utilize ELV or TRIAC, wire black (line hot), white (line neutral) and green (ground) in accordance to dimmer specications.
To utilize 0-10V dimming, wire purple (dim+), gray (dim-), black (line hot), white (line neutral) and green (ground) in accordance to dimmer
specications.
When not using a dimmer, connect black xture wire to hot, white xture wire to neutral and green xture wire to ground. Leave all other
wires capped individually.
5. Place all wiring and connectors back in junction box and replace the junction box’s cover.
6. Guide junction box through the cut hole and secure appropriately (See FIG. 3).
7. Raise the trim to ceiling and connect power connector. Secure cap on top of heat sink by locking wing nut (See FIG. 4 & 5).
8. Fold trim assembly mounting springs inward and insert trim assembly into ceiling cutout. Be sure once installed, trim assembly is ush
and secure (See FIG. 6).
FIG. 1
ROUND: CUT OUT Ø4¼"
FIG. 4
Cap
FIG. 2
FIG. 5
Wire Connector
Wing Nut
FIG. 3
Black − Hot
Green − Ground
White − Neutral
Purple − Dim+
Gray − Dim-
FIG. 6
waclighting.com
Phone (800) 526.2588
Fax (800) 526.2585
Power Connector
Headquarters/Eastern Distribution Center
44 Harbor Park Drive
Port Washington, NY 11050
UNLOCK LOCK
Central Distribution Center
1600 Distribution Ct
Lithia Springs, GA 30122
Western Distribution Center
1750 Archibald Avenue
Ontario, CA 91760
2WAC Lighting retains the right to modify the design of our products at any time as part of the company's continuous improvement program. FEBRUARY, 2017
Page 3
INSTALLATION INSTRUCTION
OCULUX 3” LED - Remodel
R3BBRT-10
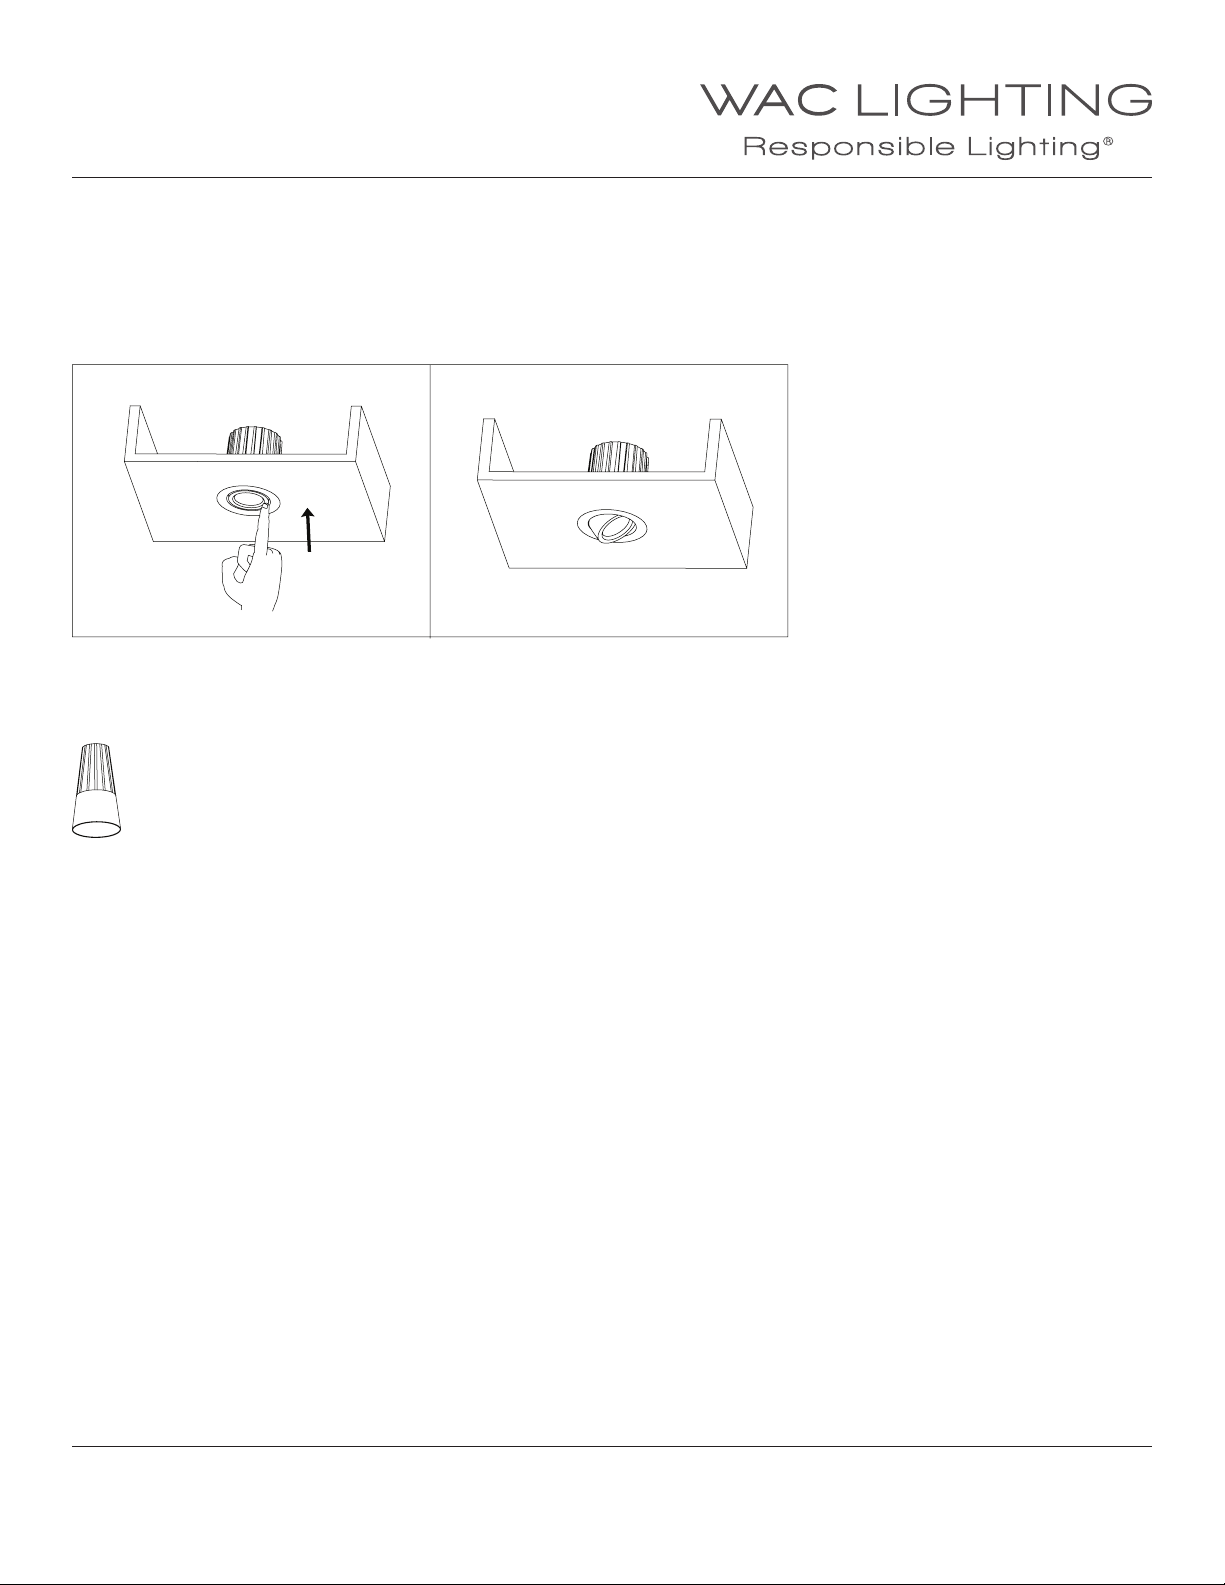
ADJUSTMENT FEATURES
The adjustable trims can be vertically adjusted between 0-35 degrees, and can self-stop in place once the adjustment is done.
Use one nger to push up one side of trim edge to get the desired degree (See FIG. 8 & 9).
FIG. 8 FIG. 9
ELECTRICAL ACCESSORY
Wire Connector
Qty: 3 pcs
7EAC112201
waclighting.com
Phone (800) 526.2588
Fax (800) 526.2585
Headquarters/Eastern Distribution Center
44 Harbor Park Drive
Port Washington, NY 11050
Central Distribution Center
1600 Distribution Ct
Lithia Springs, GA 30122
Western Distribution Center
1750 Archibald Avenue
Ontario, CA 91760
3WAC Lighting retains the right to modify the design of our products at any time as part of the company's continuous improvement program. FEBRUARY, 2017
 Loading...