

Page 1
INSTALLATION INSTRUCTION
Silo X20 - LED Monopoint
MO-2020
SAFETY INSTRUCTION
IMPORTANT: NEVER attempt any work without shutting o the electricity.
- Read all instructions before installing.
- System is intended for installation by a qualied electrician in accordance with the National Electrical Code and local regulations.
- Go to the main fuse box, or circuit breaker. Place the main power switch in the “OFF” position and unscrew the fuse(s) or switch “OFF” the
circuit breaker switch(es) that control the power to the xture or room that you are working on.
- Place the wall switch in the “OFF” position.
CAUTION
- All parts must be used as indicated in these instructions. Do not substitute any parts, leave parts out, or use any parts that are worn out or
broken. Failure to follow this instruction could invalidate the UL/CUL listing of this xture.
AVERTISSEMENT
IMPORTANT : Coupez l’électricité avant TOUTE manipulation.
- Lisez toutes les instructions avant d’installer.
- Système est destiné à être installé par un électricien qualié en conformité avec le code national de l’électricité et les règlements locaux.
- Accédez au panneau central de disjoncteurs ou de fusibles de votre demeure et placez l’interrupteur principal en position d’arrêt («OFF »).
- Placez l’interrupteur mural en position d’arrêt (« OFF »).
MISE EN GARDE
- Toutes les pièces doivent être utilisées tel qu’il est indiqué dans ces instructions. Ne remplacez pas les pièces, n’en laissez pas de côté et ne
les utilisez pas si elles sont usées ou brisées. Le non-respect de ces instructions peut annuler l’homologation ETL/CETL du luminaire.
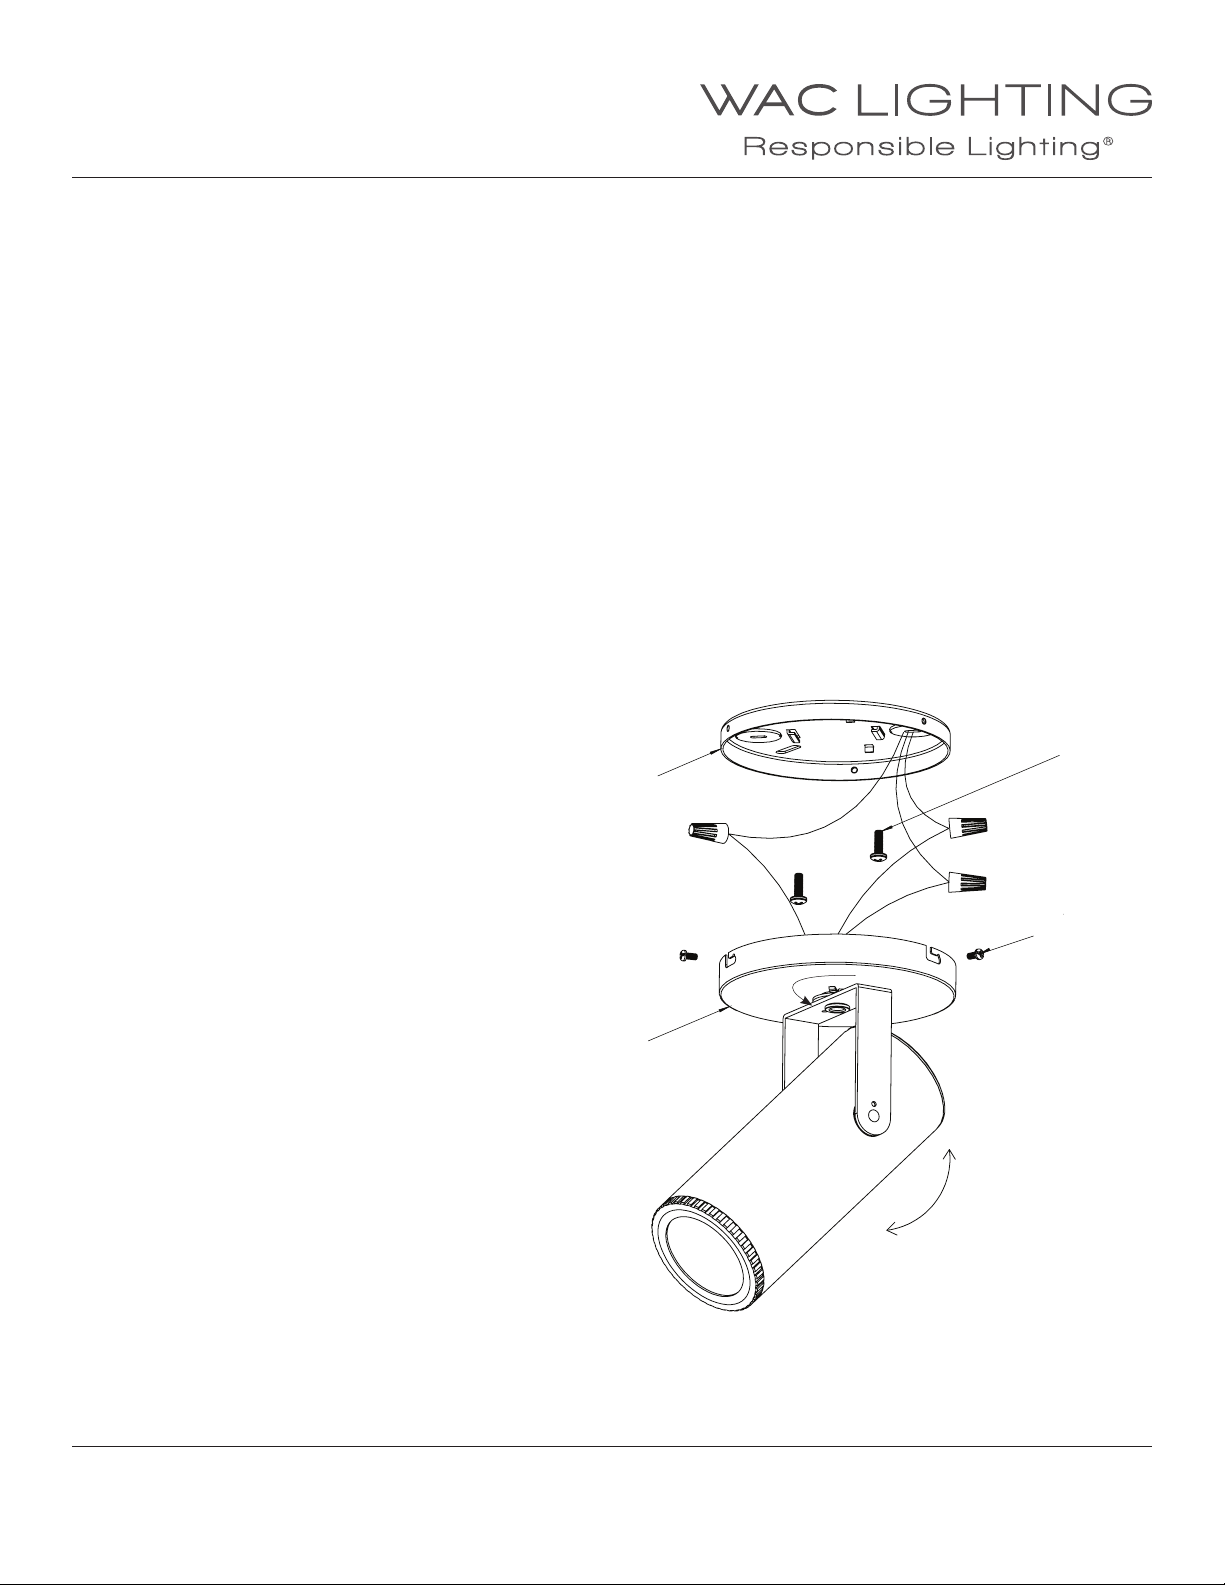
INSTALLING FIXTURE: Fig.1)
1. Loosen the three canopy screws, twist and separate
the canopy cover from the base plate.
(keep screws on base plate)
2. Remove a knock out from the base plate.
Install appropriate wire connector
3. Attach the base plate to the surface using slotted holes
for mounting screws (supplied).
4. Connect xture wires to 120-277V AC power wire,
with wire nuts (supplied). Dimmable with compatiable
electronic low voltage (ELV) dimmer.
5. Connect ground wire to the green wire from xture.
6. Mount the canopy to the base plate by twisting
key holes over three screws in base plate.
7. Tighten screws to secure canopy.
8. After the light is on, rotate the luminaire body
horizontally or vertically to aim properly.
FIG.1
Base plate
Canopy
Base plate
mounting screw
Canopy mounting
screw
355°
±90° from vertical
position
Note: All parts must be used as indicated in these instructions. Do not substitute any parts, leave parts out, or use any parts that are worn out
or broken. Failure to follow this instruction could invalidate the UL/CUL listing of this xture.
WAC Lighting
www.waclighting.com
Phone (800) 526.2588 • Fax (800) 526.2585
WAC Lighting retains the right to modify the design of our products at any time as part of the company's continuous improvement program. JUNE, 2016
Headquarters/Eastern Distribution Center
44 Harbor Park Drive • Port Washington, NY 11050
Phone (516) 515.5000 • Fax (516) 515.5050
Western Distribution Center
1750 Archibald Ave • Ontario, CA 91761
Phone (800) 526.2588 • Fax (800) 526.2585
Page 2
INSTALLATION INSTRUCTION
Silo X20 - LED Monopoint
MO-2020
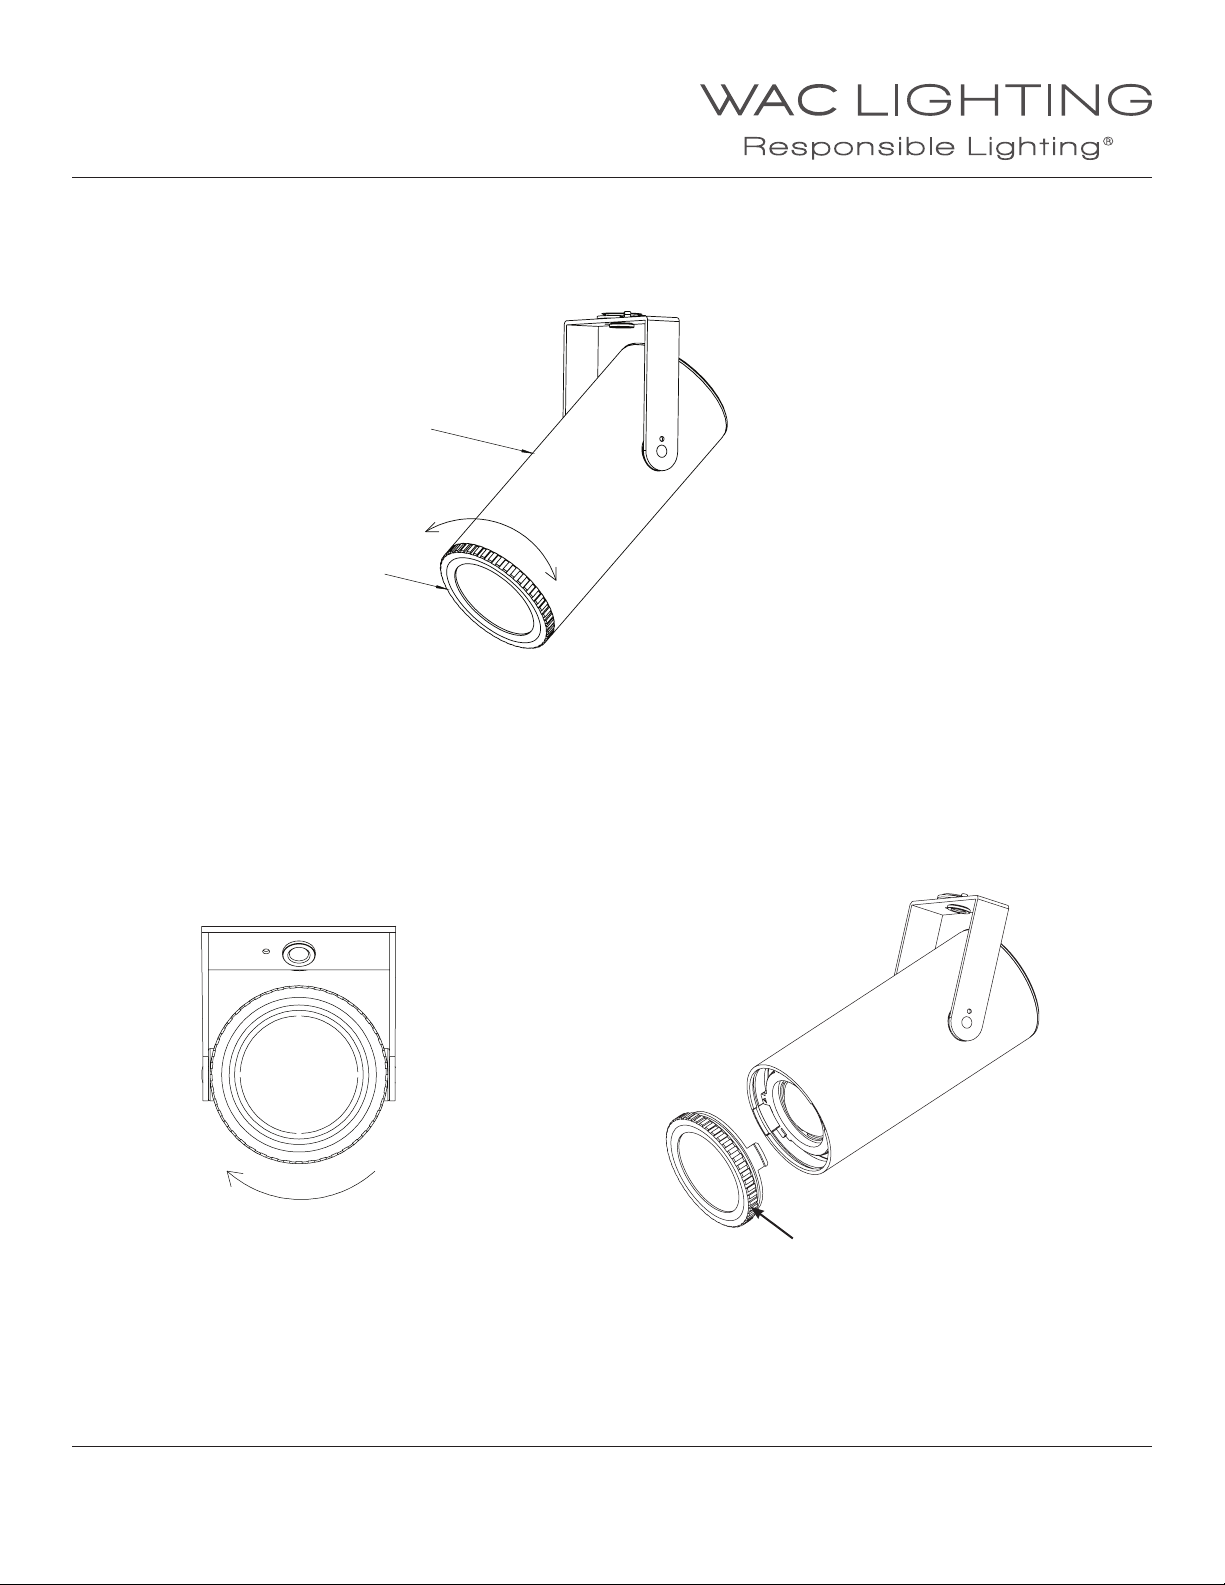
BEAM ANGLE ADJUSTMENT : Fig.3
1. Hold xture body with one hand and front cap with another.
2. Grip the front cap with two ngers and rotate it gently clockwise or counter clockwise until desired beam angle is achieved.
3. Cease rotation when you feel resistance as beam angle is reaching its minimum or maximum
Fig.3
Fixture Body
Counter Clockwise
Increase beam angle
Front Cap
ACCESSORIES:
1. With xture powered o and front cap facing toward you, rotate the front cap clockwise just passed the position you feel a “click” (Fig. 4)
2. Gently, while holding xture body secure, rock front cap assembly back and forth while pulling it away from xture body to remove
front cap assembly (Fig. 5)
Fig.4
Beam angle
adjustment
Clockwise
Decrease beam angle
Fig.5
Rotate clockwise
WAC Lighting
www.waclighting.com
Phone (800) 526.2588 • Fax (800) 526.2585
WAC Lighting retains the right to modify the design of our products at any time as part of the company's continuous improvement program. JUNE, 2016
Headquarters/Eastern Distribution Center
44 Harbor Park Drive • Port Washington, NY 11050
Phone (516) 515.5000 • Fax (516) 515.5050
Front cap assembly
Western Distribution Center
1750 Archibald Ave • Ontario, CA 91761
Phone (800) 526.2588 • Fax (800) 526.2585
Page 3
INSTALLATION INSTRUCTION
Silo X20 - LED Monopoint
MO-2020
ACCESSORIES:
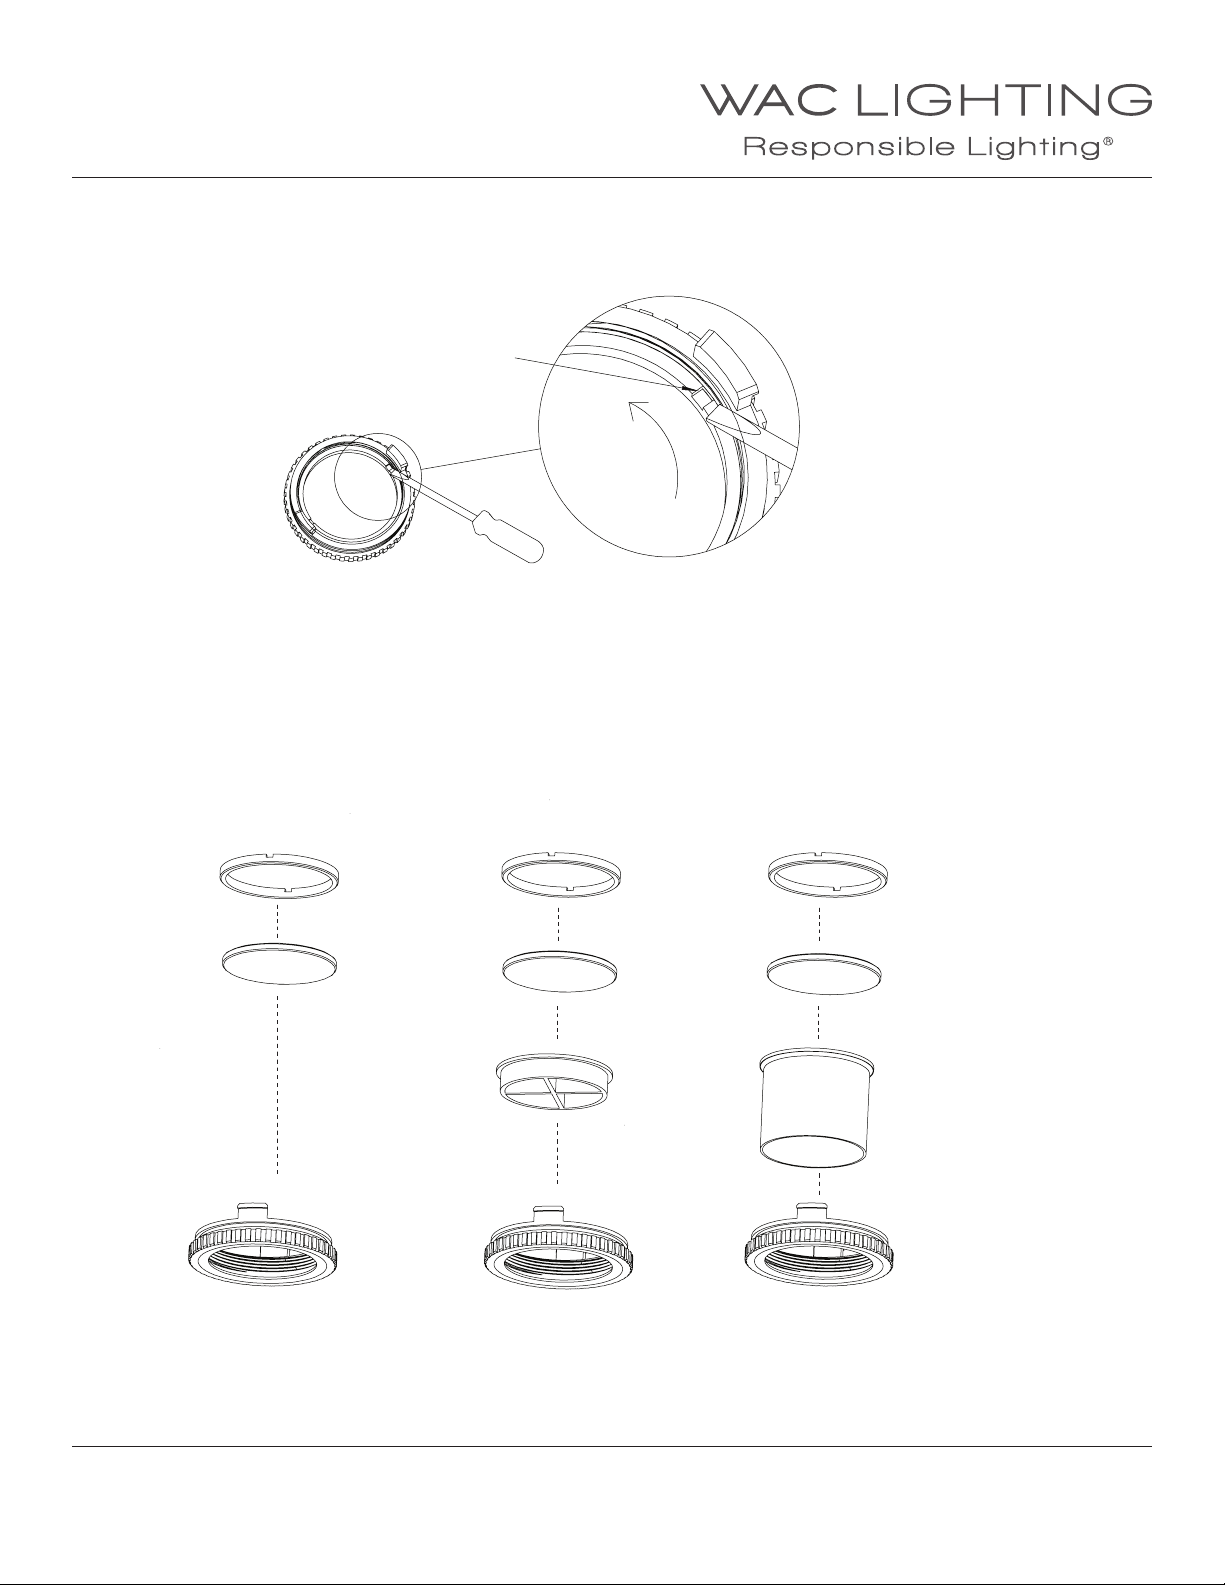
3. Use a at-tip-screwdriver to remove the accessory holder by rotating it counter clockwise. (Fig. 6)
Fig.6
Accessories Holder Slot
4. Fixture accommodates one lens and one glare control accessory. Refer to spec sheet for list of compatible accessories.
Install accessories between the front cap and accessory holder. Tighten accessory holder after accessories are installed. (Fig.7)
Fig.7
Accessory Holder
LENS-16
LENS-16-CRL LENS-16-SNOOT
Front Cap
WAC Lighting
www.waclighting.com
Phone (800) 526.2588 • Fax (800) 526.2585
WAC Lighting retains the right to modify the design of our products at any time as part of the company's continuous improvement program. JUNE, 2016
Headquarters/Eastern Distribution Center
44 Harbor Park Drive • Port Washington, NY 11050
Phone (516) 515.5000 • Fax (516) 515.5050
Western Distribution Center
1750 Archibald Ave • Ontario, CA 91761
Phone (800) 526.2588 • Fax (800) 526.2585
Page 4
INSTALLATION INSTRUCTION
Silo X20 - LED Monopoint
MO-2020
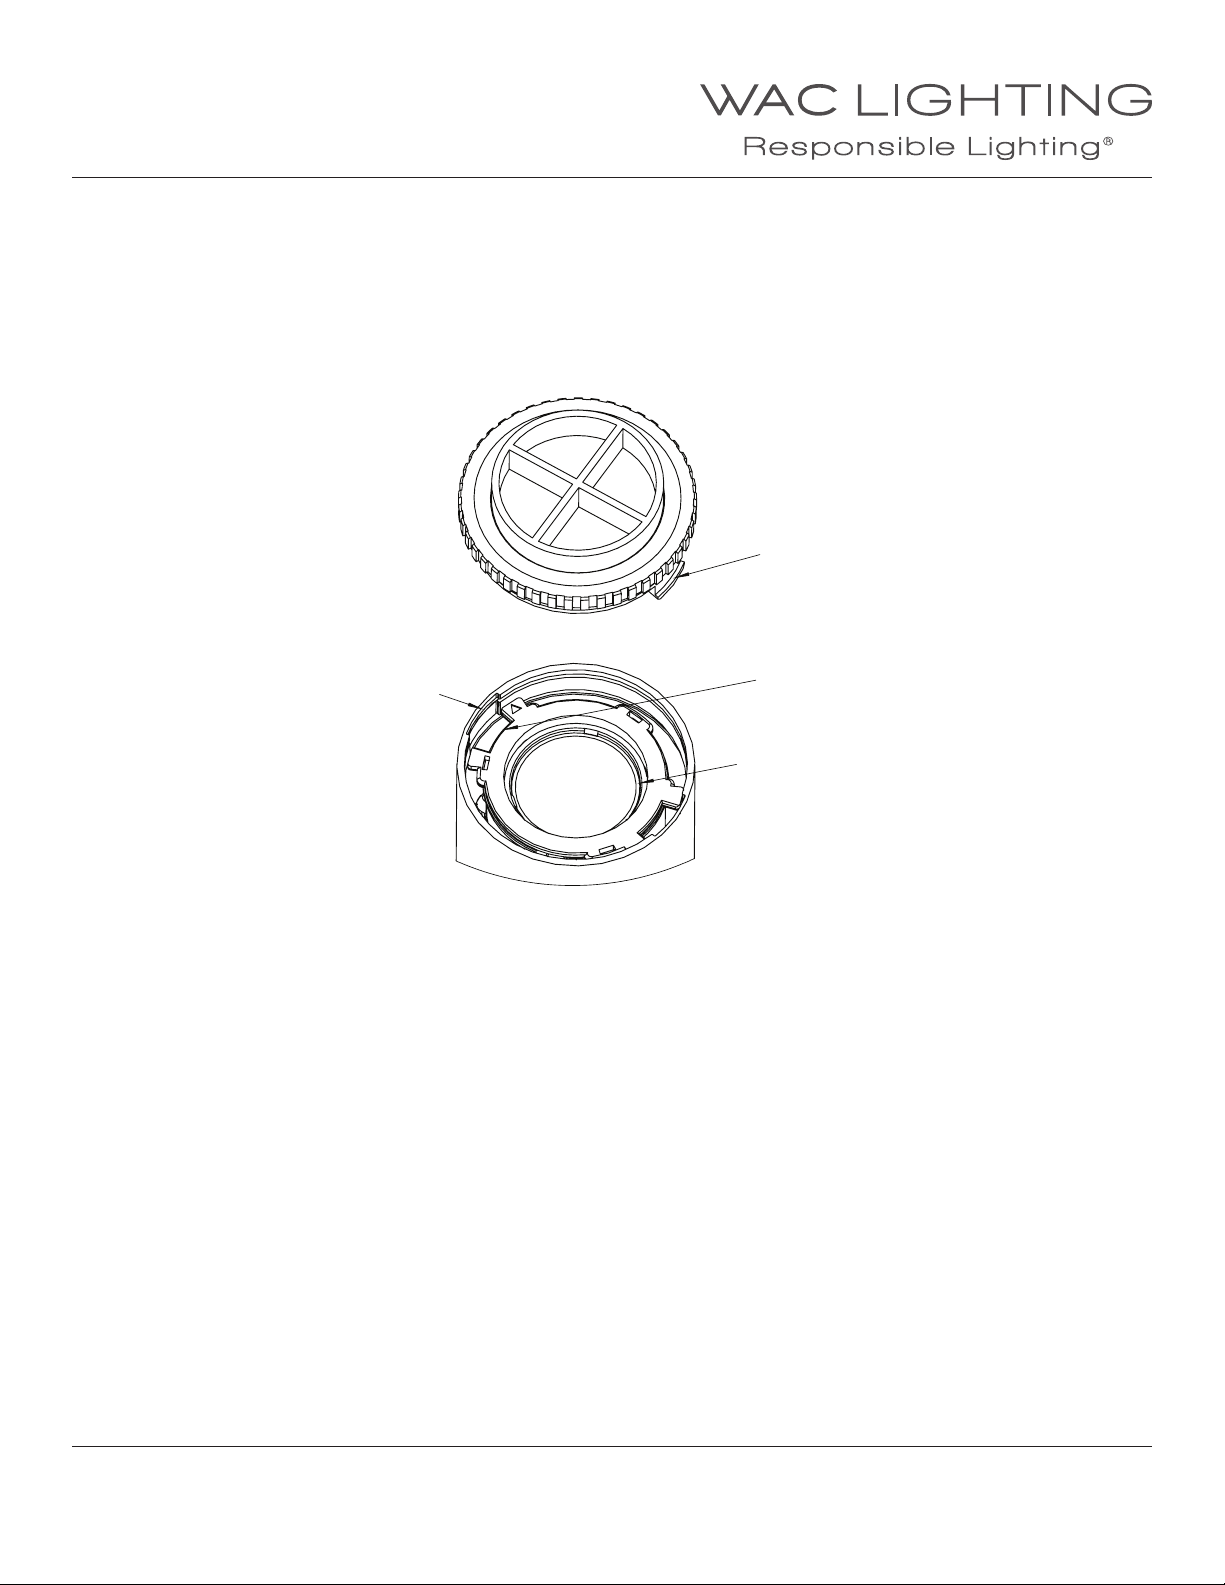
5. Ensure internal xture lens is still at the top position, and lens holder slots align with xture body slots.
Align the front cap tabs with the xture body slots and insert the front cap assembly back into the xture.
Once fully inserted, rotate the front cap assembly counter clockwise passed the “click” and to the desired beam angle. (Fig. 8)
Fig.8
Front Cap Tabs
Fixture body slot
Lens Holder Slot
Internal fixture lens positioned at top
WAC Lighting
www.waclighting.com
Phone (800) 526.2588 • Fax (800) 526.2585
WAC Lighting retains the right to modify the design of our products at any time as part of the company's continuous improvement program. JUNE, 2016
Headquarters/Eastern Distribution Center
44 Harbor Park Drive • Port Washington, NY 11050
Phone (516) 515.5000 • Fax (516) 515.5050
Western Distribution Center
1750 Archibald Ave • Ontario, CA 91761
Phone (800) 526.2588 • Fax (800) 526.2585
 Loading...