

Page 1
INSTALLATION INSTRUCTION
Wall Washer LED Track Luminaires
H-LED42W, L-LED42W, J-LED42W, WTK-LED42W, WHK-LED42W
IMPORTANT SAFETY INSTRUCTIONS
• Read all instructions before installing.
• System is intended for installation by a qualied electrician in accordance with the National Electrical Code
and local regulations.
• Go to the main fuse box, or circuit breaker. Place the main power switch in the “OFF” position and unscrew the fuse(s) or
switch ”OFF” the circuit breaker switch(es) that control the power to the xture or room that you are working on.
• Place the wall switch in the “OFF” position.
CAUTION
All parts must be used as indicated in these instructions. Do not substitute any parts, leave parts out, or use any parts that are
worn out or broken. Failure to follow this instruction could invalidate the ETL/CETL listing of this xture.
OVERVIEW:
Fixtures are designed for use on WAC Lighting’s track systems. They may also be used on other manufacturer’s brand of track
(consult factory for compatibility).
LED TRACK FIXTURE TRACK SYSTEMS
J-LED42W Series J and J2 Track
H-LED42W Series H Track
L-LED42W Series L Track
WTK-LED42W Series W Track (input: 120V)
WHK-LED42W Series W Track (input: 120V)
FIXTURE INSTALLATION FOR J/H/L TRACK:
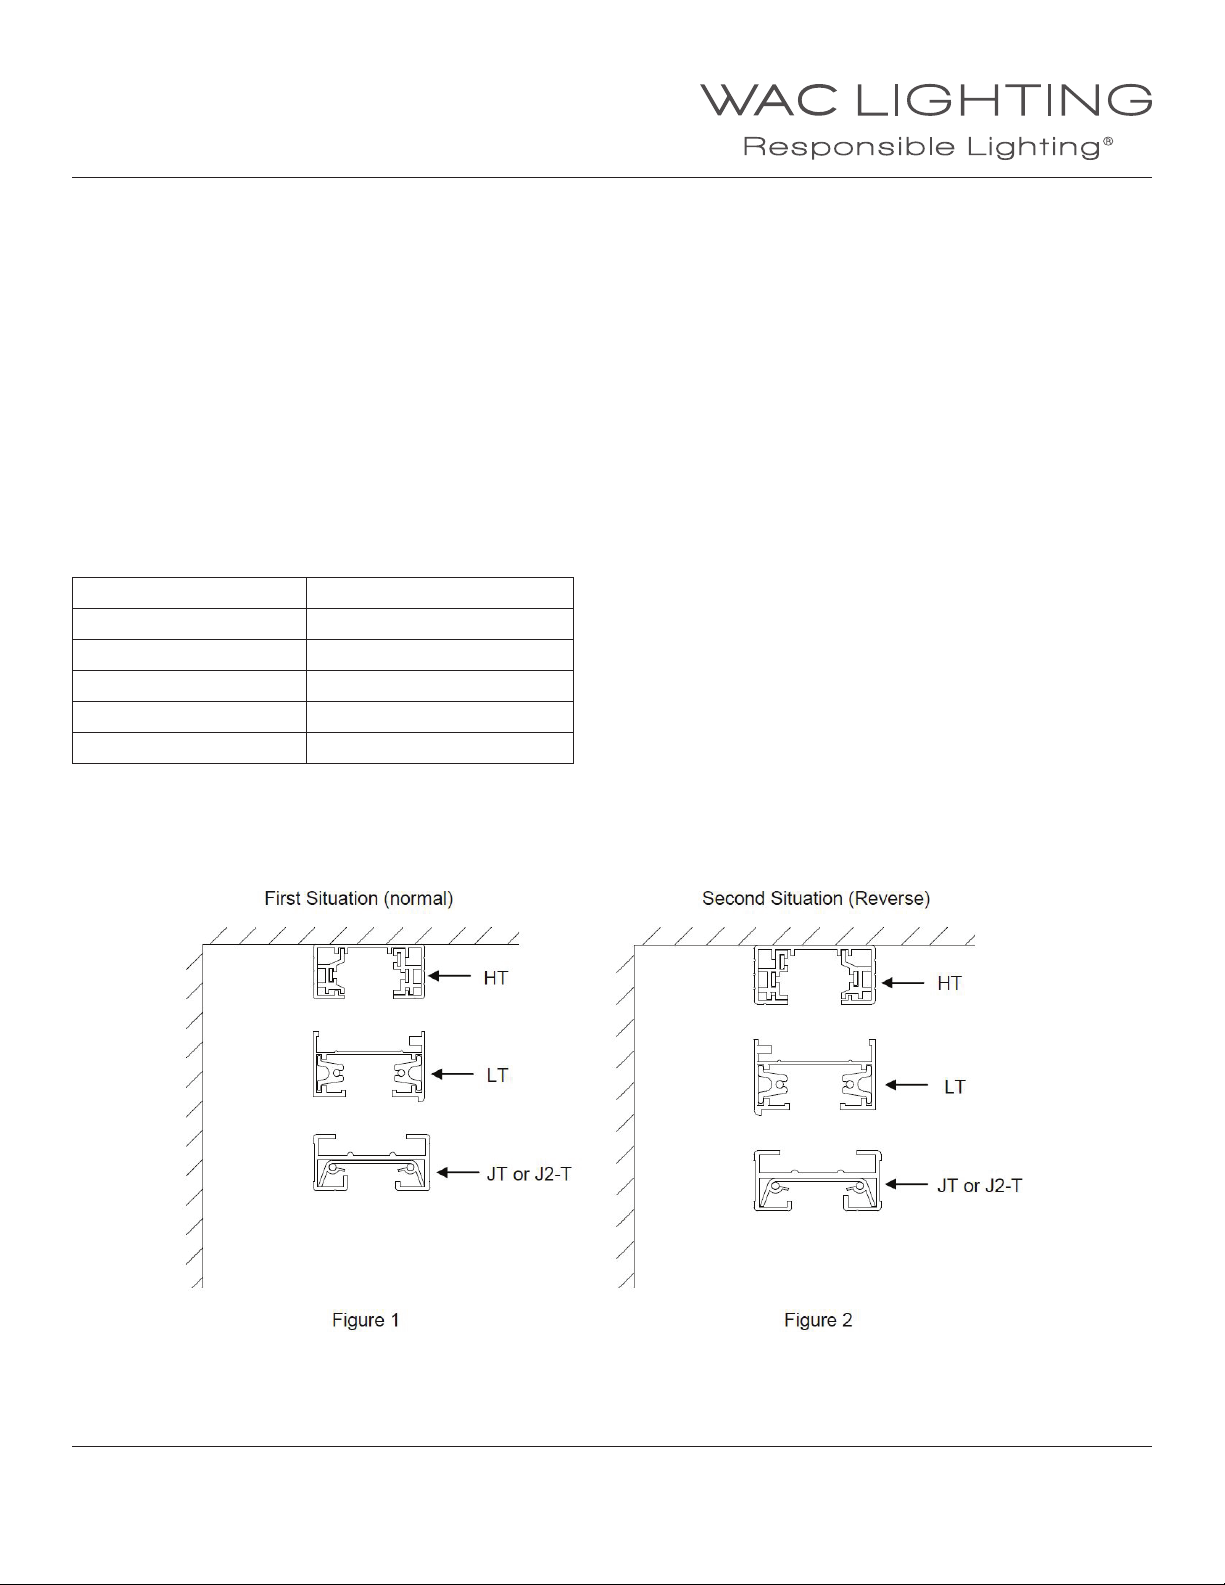
1. First nd out how the track is installed, there are two situation.
WAC Lighting
www.waclighting.com
Phone (800) 526.2588 • Fax (800) 526.2585
WAC Lighting retains the right to modify the design of our products at any time as part of the company's continuous improvement program. JULY, 2014
Headquarters/Eastern Distribution Center
44 Harbor Park Drive • Port Washington, NY 11050
Phone (516) 515.5000 • Fax (516) 515.5050
Western Distribution Center
1750 Archibald Ave • Ontario, CA 91761
Phone (800) 526.2588 • Fax (800) 526.2585
Page 2
INSTALLATION INSTRUCTION
Wall Washer LED Track Luminaires
H-LED42W, L-LED42W, J-LED42W, WTK-LED42W, WHK-LED42W
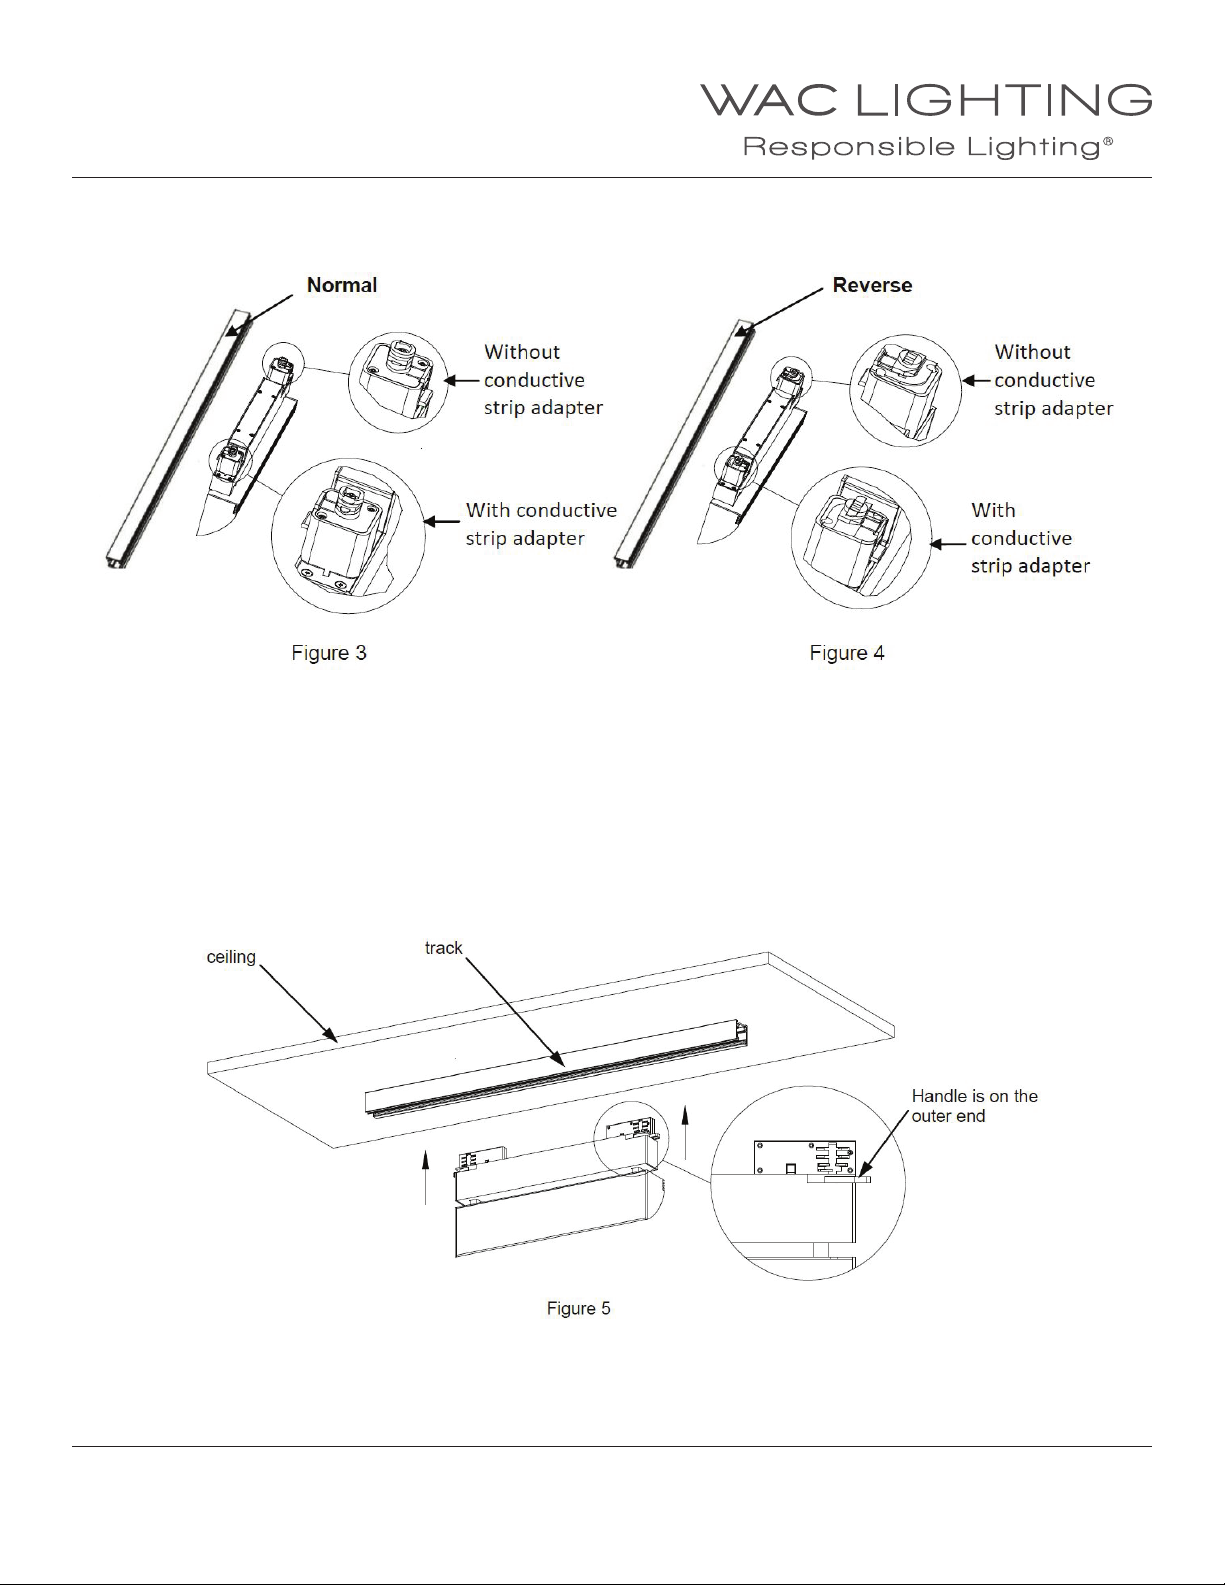
2. According to the type of the installed track, adjust the adapter on both ends of the light. For HT/JT or J2-T tracks, adjust the
adapter as is shown in Figure 3. To install LTtrack (normal), adjust the adapter as is shown in Figure 3. To install LT track (reverse),
adjust the adapter as is shown in Figure 4.
3. Press the bass of the adapter, inset the adapter into the groove of the track. The product includes 2 adapters
(one with conductive strip for input supply and installation, one without conductive strip for track installation).
4. If the track (HT/LT/JT or J2-T) is installed forward like in Figure 1, rotate the adapter with conductive strip 90°counterclockwise to
lock it. If the track is installed reverse, rotate the adapter with conductive strip 90°clockwise to lock it, and rotate the adapter
without conductive strip 90° to any direction and lock it.
INSTRUCTIONS FOR INSTALLING WT/WHT SERIES:
1.Embed the track connector into the groove of the track, push clip of the track connector should be closed up
before the connector is embedded, the handles should be on the outer ends of the light to lock.
2. Rotate the handles and x the connector to the track. The product includes 2 track connectors (one for input
supply and installation, one for track installation).
WAC Lighting
www.waclighting.com
Phone (800) 526.2588 • Fax (800) 526.2585
WAC Lighting retains the right to modify the design of our products at any time as part of the company's continuous improvement program. JULY, 2014
Headquarters/Eastern Distribution Center
44 Harbor Park Drive • Port Washington, NY 11050
Phone (516) 515.5000 • Fax (516) 515.5050
Western Distribution Center
1750 Archibald Ave • Ontario, CA 91761
Phone (800) 526.2588 • Fax (800) 526.2585
Page 3
INSTALLATION INSTRUCTION
Wall Washer LED Track Luminaires
H-LED42W, L-LED42W, J-LED42W, WTK-LED42W, WHK-LED42W
NOTE:
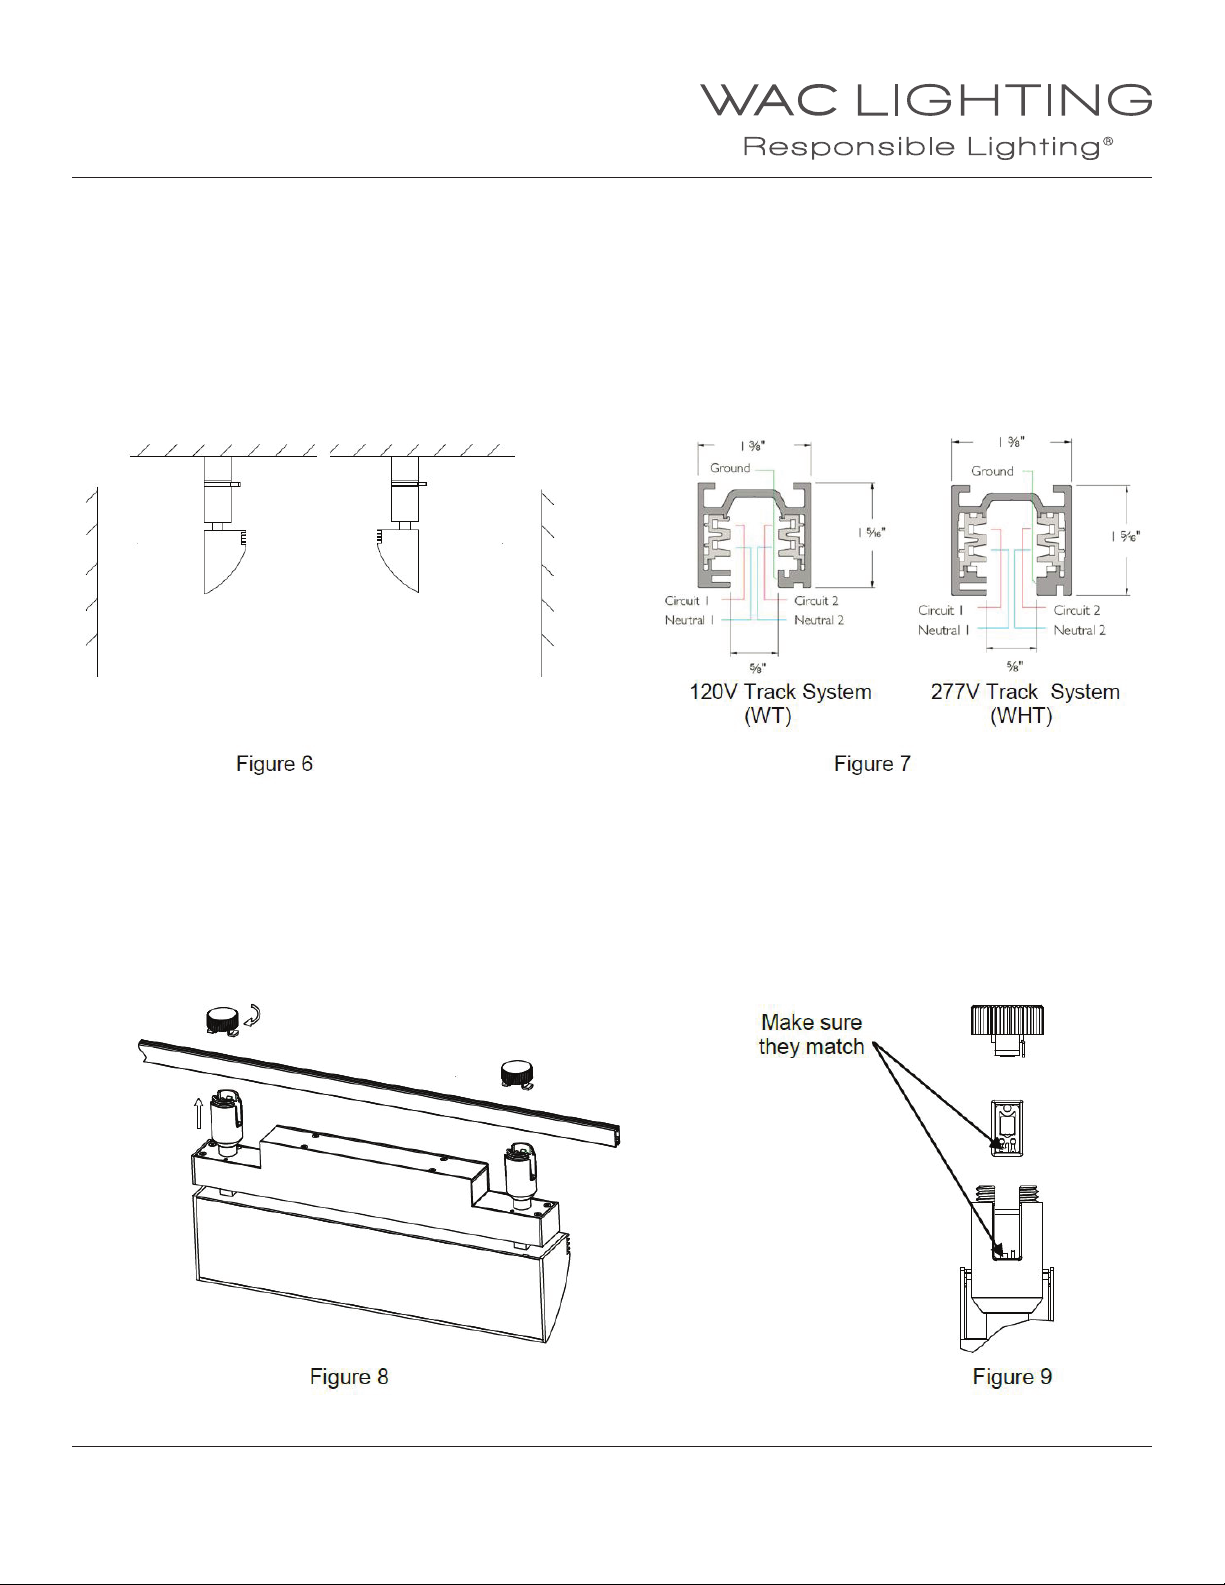
1. The handle of track connector can be rotated 90° in either direction.
Attention:The handle of the track connector is designed to be rotated 90° in either direction, but can only rotate
90° to one direction after the connector is xed with the track. When the working direction of the light is changed,
the handle can still be rotated to the same side of the track. But the light emitting surface would be on the other
side of the connector (Figure 6).
2. WTK-LED42W Fixture use on WAC WT 120V track system only, WHK-LED42W Fixture use on
WAC WHT 277V track system only (Figure 7).
INSTRUCTIONS FOR INSTALLING HM1-T SERIES PRODUCTS:
1. Unscrew the lock nut from the track adapter.
2. Insert the track into the track adapter upward.
3. Check the direction of the track (Figure 9), both the neutral line sign of the track and the adapter should be on
the same side to make sure the contact between conductive strip and track is solid.
4. Tighten the lock nut.
WAC Lighting
www.waclighting.com
Phone (800) 526.2588 • Fax (800) 526.2585
WAC Lighting retains the right to modify the design of our products at any time as part of the company's continuous improvement program. JULY, 2014
Headquarters/Eastern Distribution Center
44 Harbor Park Drive • Port Washington, NY 11050
Phone (516) 515.5000 • Fax (516) 515.5050
Western Distribution Center
1750 Archibald Ave • Ontario, CA 91761
Phone (800) 526.2588 • Fax (800) 526.2585
Page 4
INSTALLATION INSTRUCTION
Wall Washer LED Track Luminaires
H-LED42W, L-LED42W, J-LED42W, WTK-LED42W, WHK-LED42W
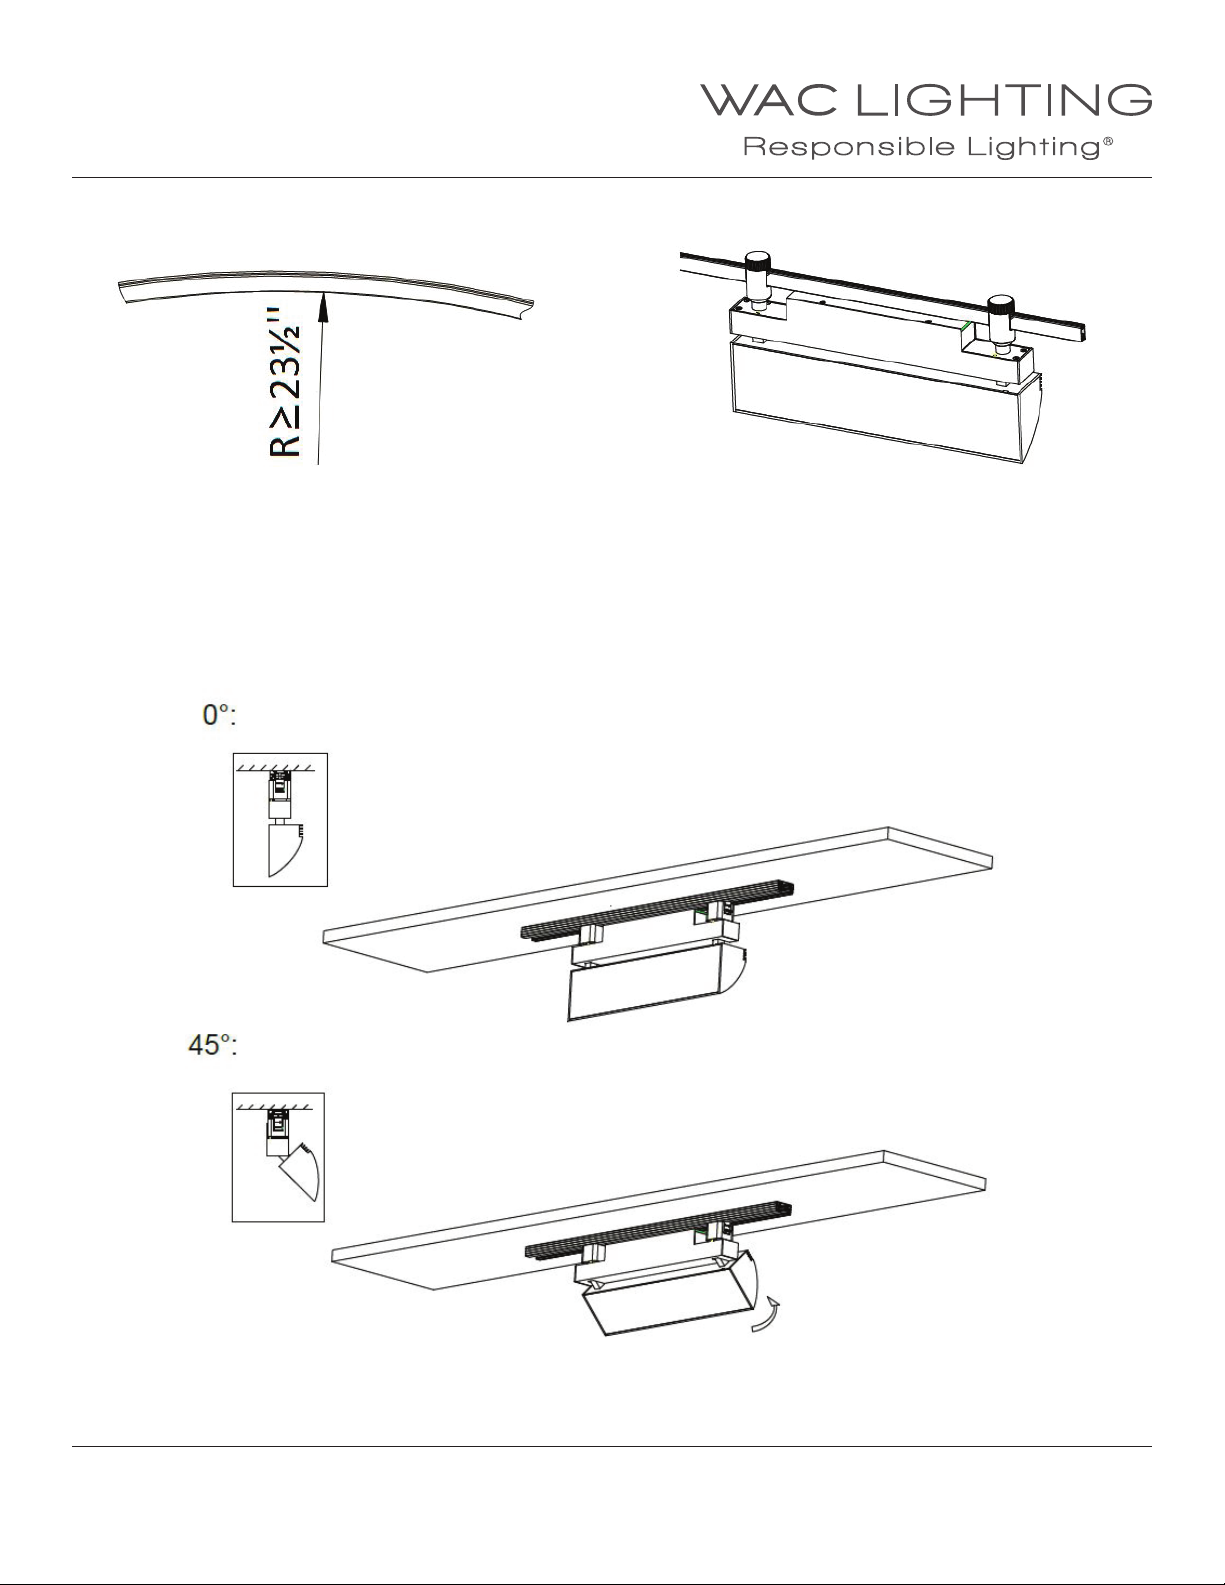
5. The xture can be used with HM1-T Flexrail, minimum bending radius R≥23½’’ .
REMOVE THE LIGHT:
To remove the light from the track,follow the instruction in reverse order.
Attention! When removing, hold the light to prevent from falling!
USE THE LIGHT:
To adjust the wall wash area of the light, you can rotate the light body from 0° to 45°.
Attention! Light can get very hot, be careful not to burn your hands.
WAC Lighting
www.waclighting.com
Phone (800) 526.2588 • Fax (800) 526.2585
WAC Lighting retains the right to modify the design of our products at any time as part of the company's continuous improvement program. JULY, 2014
Headquarters/Eastern Distribution Center
44 Harbor Park Drive • Port Washington, NY 11050
Phone (516) 515.5000 • Fax (516) 515.5050
Western Distribution Center
1750 Archibald Ave • Ontario, CA 91761
Phone (800) 526.2588 • Fax (800) 526.2585
 Loading...