

Page 1
INSTRUCTIONS : LED STEP AND WALL LIGHTS
MODEL : WL-LED310
IMPORTANT:
- Read all instructions before installing.
- System is intended for installation by a qualified electrician in accordance with the National Electric Code,
and local regulations. Consult with local inspector to ensure compliance.
- To reduce the risk of fire, electrical shock and injuries to persons, turn off power at main switch before
installing or modifying the system.
- Retain instructions for future maintenance reference.
- Not complying with instructions could result in failure of the fixtures, and void the warranty
FRAME-MOUNTED INSTALLATION INTO NEW STRUCTURES:
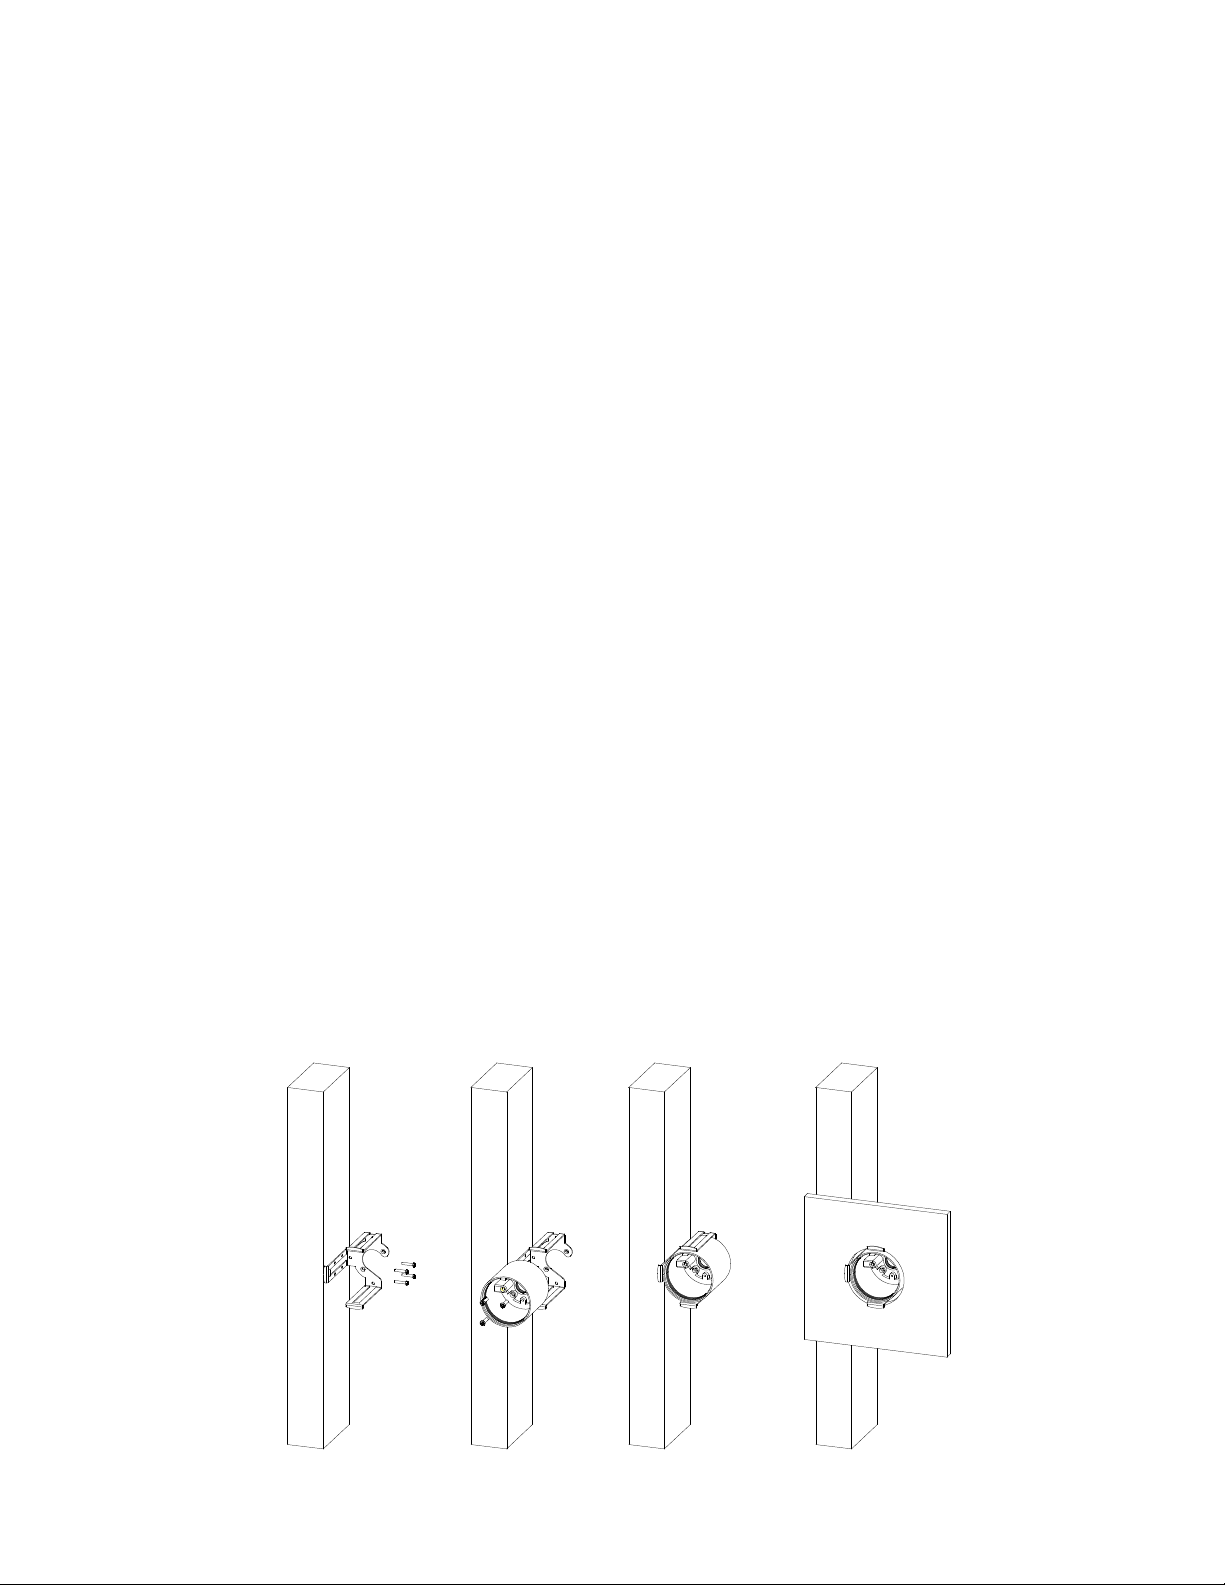
1. Remove all (3) adjusting brackets from mounting bracket as shown in Fig. A.
2. Use wood or sheet metal screws (by others) to attach mounting bracket to stud.
Important: Offset bracket forward to account for drywall or wood thickness. (Fig. 1a)
3. Attach the metal conduit to the canopy, then attach the canopy to the mounting bracket using the (3) screws
and (3) rubber washers (pre-installed at the factory) provided. (Figs 1b & 1c). Note: For indoor installation,
rubber washers are not required, and can be discarded. Connect building wires to the canopy in
accordance with the National Electrical Code and local ordinances.
4. Install drywall (or other material) after cutting a 3 1/8” diameter hole to allow for the recessed mounting
bracket. (Fig. 1d)
5. Slip gasket onto the back of the fixture. (Fig. 2)
Note: For indoor installation, gasket is not required, and can be discarded.
6. Connect the fixture wires to the housing wires as follows: Black fixture wire to black (Hot) housing wire,
White fixture wire to white (Neutral) housing wire, and Green fixture wire to Ground. (Fig. 3)
Note: Multiple fixtures (up to 200) can be wired together in parallel: Hot to hot, and neutral to neutral.
7. Place all wiring and connectors back in housing and install the fixture.
Note: For outdoor installation, it is recommended that the installer run a bead of clear, outdoor-rated
silicone (GE RTV-162 or equivalent) caulk between gasket or back of fixture and mounting surface to
prevent seepage of water into fixture.
8. Secure the fixture to the housing by turning it clockwise into the canopy. (Fig. 4)
Important: Do not rotate fixture more than 3 full revolutions since doing so might cause the wires to
disconnect.
1 / 3
FIG. 1.a
FIG. 1.b
FIG. 1.c
FIG. 1.d
Page 2
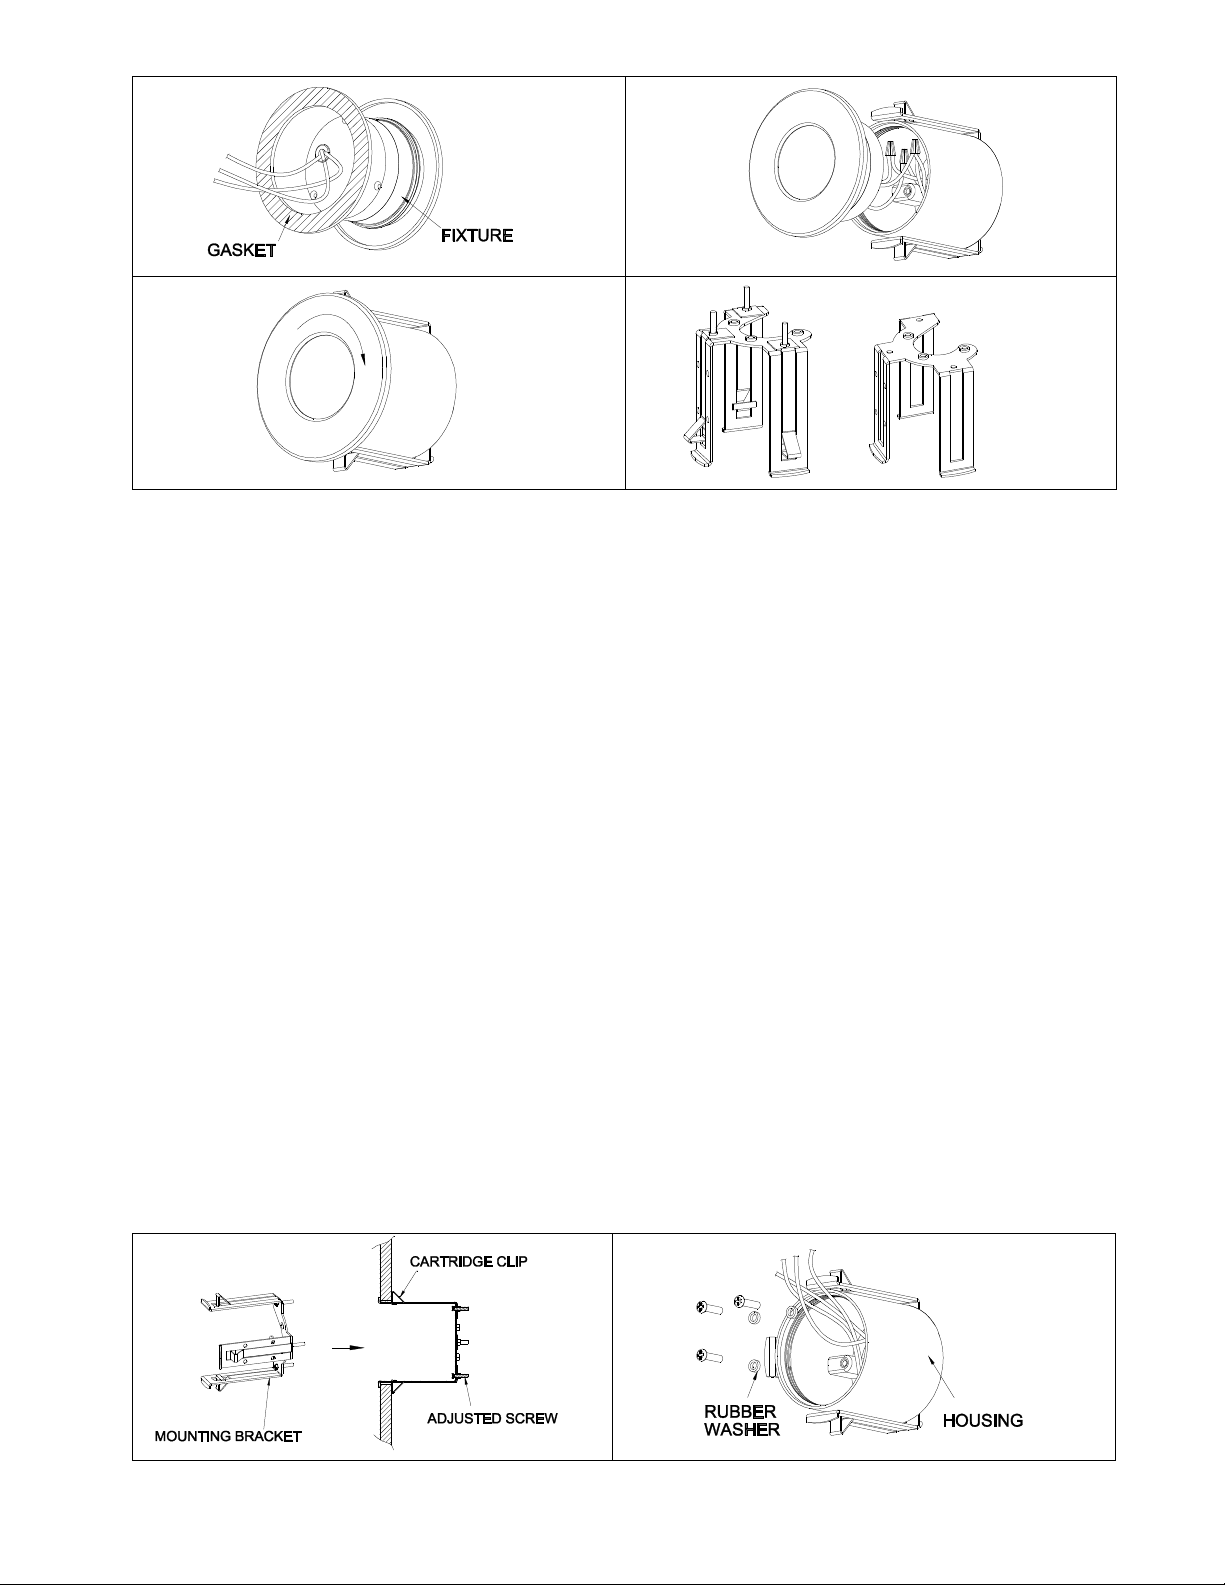
FIG. 2
FIG. 4
INSTALLATION INTO EXISTING (DRYWALL / PLYWOOD / OSB) STRUCTURES:
1. Cut a hole 3 1/8” in diameter on the surface of the drywall (or other sheeting material). Hole needs to have a
depth of at least 4” in order to accommodate the housing and wiring. Pull building wire through the hole.
2. Loosen (but do not remove) the three screws securing the three adjusting brackets to the mounting bracket
(Fig. A). Pull building wiring through hole in the back of the mounting bracket, then insert bracket with
adjusters into wall (Fig. 5).
3. Using a Phillips bit, tighten each of the three adjusters until the mounting bracket fits snugly in the hole.
4. Attach the metal conduit to the canopy, then attach the canopy to the mounting bracket using the (3) screws
and (3) rubber washers (pre-installed at the factory) provided. (Fig. 6). Note: For indoor installation,
rubber washers are not required, and can be discarded. Connect building wires to the canopy in
accordance with the National Electrical Code and local ordinances.
5. Slip gasket onto the back of the fixture. (Fig. 2)
Note: For indoor installation, gasket is not required, and can be discarded.
6. Connect the fixture wires to the housing wires as follows: Black fixture wire to black (Hot) housing wire,
White fixture wire to white (Neutral) housing wire, and Green fixture wire to Ground. (Fig. 3)
Note: Multiple fixtures (up to 200) can be wired together in parallel: Hot to hot, and neutral to neutral.
7. Place all wiring and connectors back in housing and install the fixture.
Note: For outdoor installation, it is recommended that the installer run a bead of clear, outdoor-rated
silicone (GE RTV-162 or equivalent) caulk between gasket or back of fixture and mounting surface to
prevent seepage of water into fixture.
8. Secure the fixture to the housing by turning it clockwise into the canopy. (Fig. 4).
Important: Do not rotate fixture more than 3 full revolutions since doing so might cause the wires to
disconnect.
FIG. 3
FIG. A
2 / 3
FIG. 5
FIG. 6
Page 3
Retain these instructions for future service and adjustments
INSTALLATION INTO (WOOD BLOCK / MORTAR) STRUCTURES:
1. Cut a hole 3” in diameter on the surface of the drywall (or other sheeting material). Hole needs to have a
depth of at least 4” in order to accommodate the housing and wiring. Pull building wiring through the hole.
2. Remove mounting bracket (and adjusters) from canopy (Fig. A).
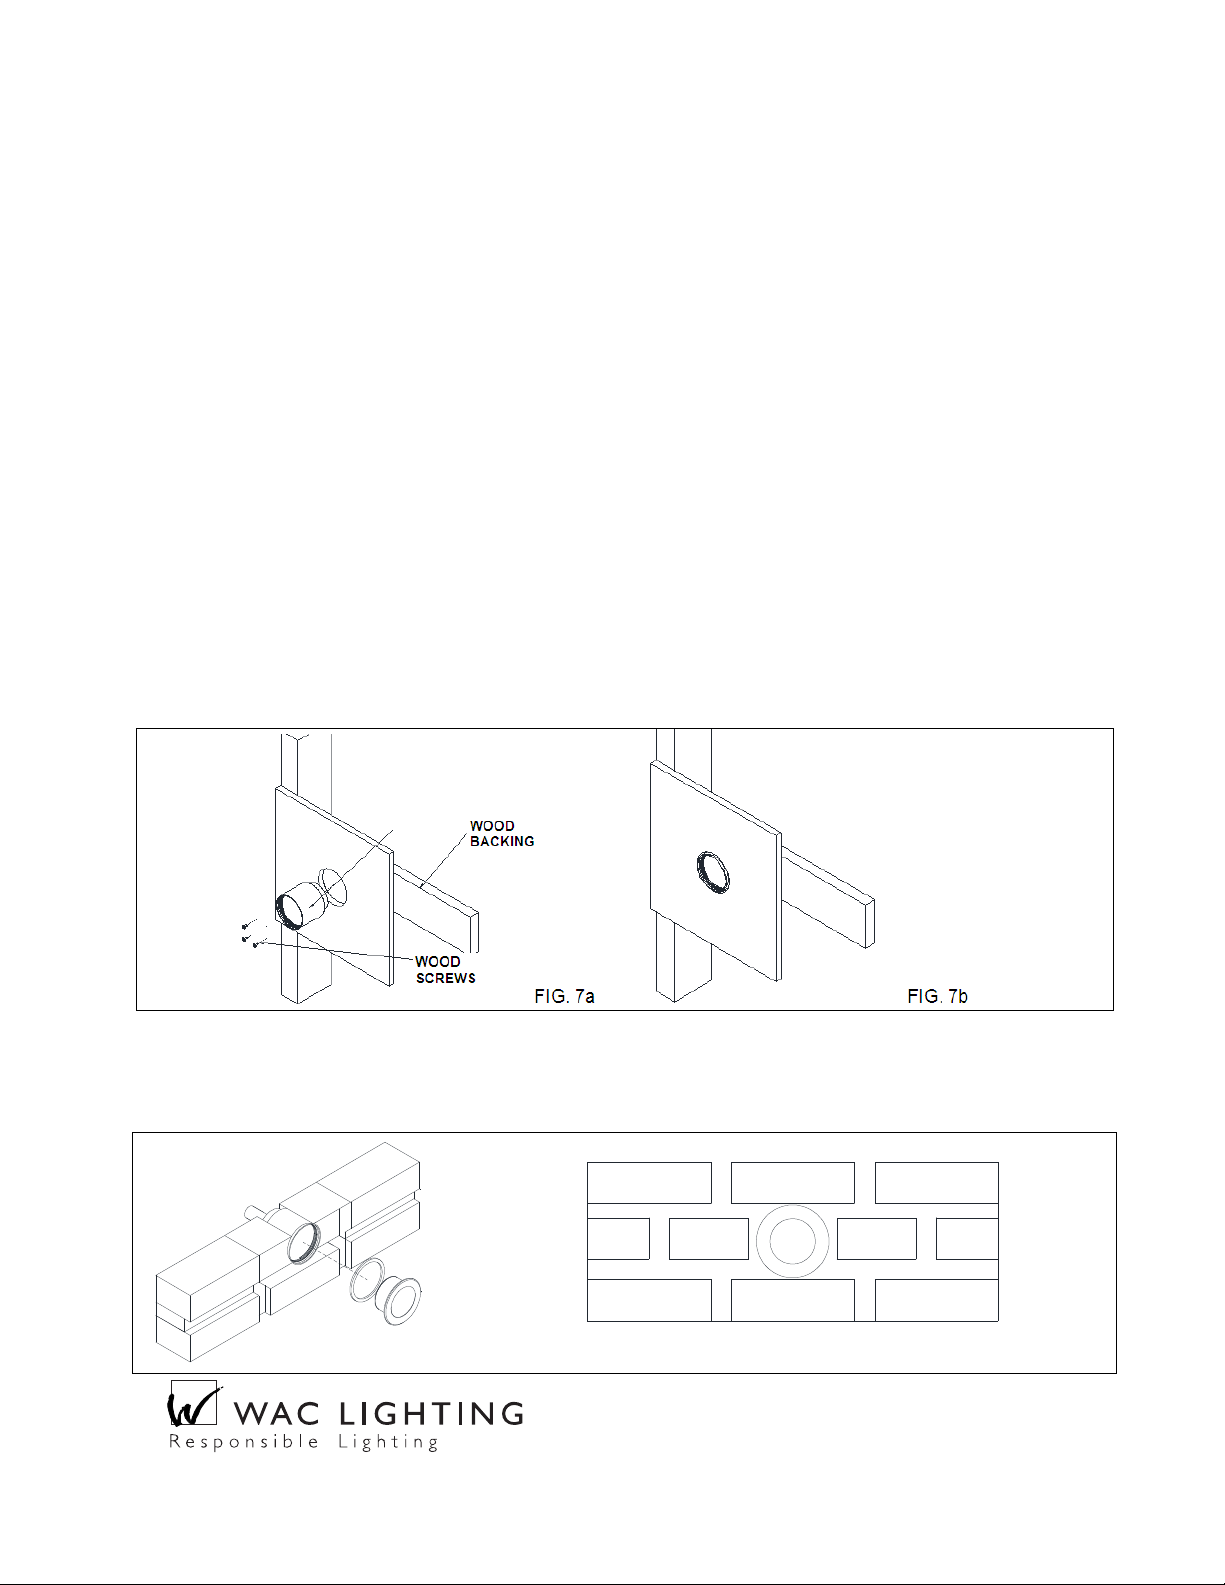
3. Attach the metal conduit to the canopy, then attach the canopy directly to the wooden structure at the back of
the hole using (3) wood screws (by others) with (3) rubber washers pre-installed at the factory. (Figs 7a & 7b).
Note: For indoor installation, rubber washers are not required, and can be discarded. Connect building
wires to the canopy in accordance with the National Electrical Code and local ordinances.
4. Slip gasket onto the back of the fixture. (Fig. 2)
Note: For indoor installation, gasket is not required, and can be discarded.
5. Connect the fixture wires to the housing wires as follows: Black fixture wire to black (Hot) housing wire,
White fixture wire to white (Neutral) housing wire, and Green fixture wire to Ground. (Fig. 3)
Note: Multiple fixtures (up to 200) can be wired together in parallel: Hot to hot, and neutral to neutral.
6. Place all wiring and connectors back in housing and install the fixture.
Note: For outdoor installation, it is recommended that the installer run a bead of clear, outdoor-rated
silicone (GE RTV-162 or equivalent) caulk between gasket or back of fixture and mounting surface to
prevent seepage of water into fixture.
7. Secure the fixture to the housing by turning it clockwise into the canopy. (Fig. 4)
Important: Do not rotate fixture more than 3 full revolutions since doing so might cause the wires to
disconnect.
1. For installation into masonry, it is important that the fixture be completely sealed. Install in accordance with
the NEC and local codes. Attach metal conduit to the canopy, then use mortar to secure canopy in place
(Figs. 8a 8b). Follow steps 4 thru 7 above.
3 / 3
FIG. 8a
FIG. 8b
615 South Street, Garden City, NY 11530
Tel: (516) 515-5000 Fax (516) 515-5050
www.waclighting.com
 Loading...