

Page 1
INSTALLATION INSTRUCTION
1” LEDme Mini Recessed - New Construction
HR-LED211, HR-LED251
SAFETY INSTRUCTION
IMPORTANT: NEVER attempt any work without shutting o the electricity.
• Read all instructions before installing.
• For installation by a qualied electrician.
• System is intended for installation in accordance with National Electric Code, and local regulations.
Consult with local inspector to assure compliance.
• To reduce the risk of re, electrical shock and injuries to persons, turn o power at main switch before installing
or modifying the system.
• Retain instructions for future maintenance reference.
OVERVIEW
Housing sold as new construction may be re-congured in eld for remodel. Type IC xtures are designed for direct
contact with insulating materials. Fixtures may also be used in non-insulated ceilings.
MOUNTING FOR NEW CONSTRUCTION HOUSING:
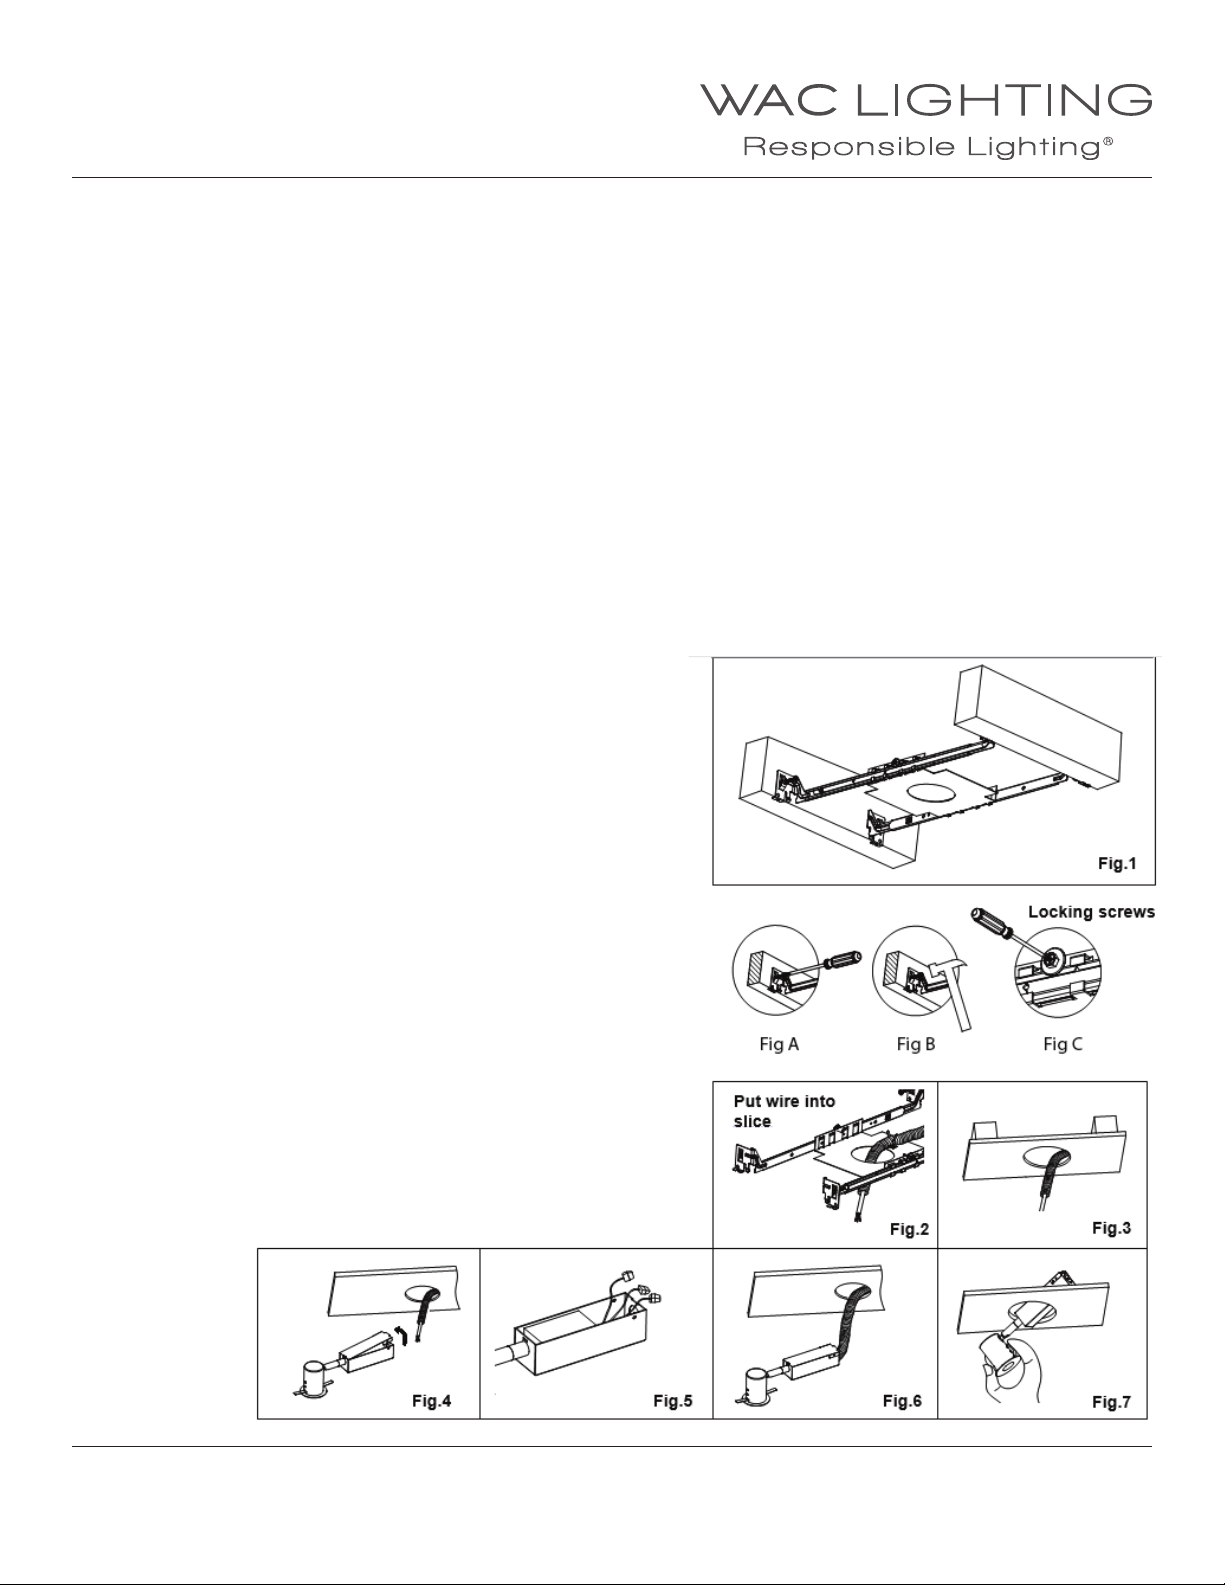
1. Install mounting frame using two hanger bars, (24 1/2” max).
Bars are notched on the ends to t over “T” bars in suspended ceilings.
Hanger bars include a captive mounting “screw-nail” for ease of
installation, as shown in the Fig.1. Align the bottom of the
hanger bar with the bottom of the wood joist. Secure the “screw-nail”
on each end by screwdriver (as Fig.A), or by hammer (as Fig.B).
2. Slide xture along bar hangers into desired location.
Use locking screws to secure (as Fig.C).
3. Pull out the conduit in enough length then put into the slice (as Fig.2).
4. When installing in drywall, cut appropriate a hole 2 1/2”
in the drywall (as Fig.3).
5. Pull out the junction box cover and connect xture wires to
building wires, insert each supply wire into appropriate junction
box connector. Connect black xture wire to hot, white xture wire
to neutral and green xture wire to ground. When connect in series
xture, use a spread conduit connector (as Fig.4,5).
6. Place all wiring and connectors back in wiring box and replace
junction box door (as Fig.6).
7. Pivot the J box up through the hole, followed by the can,
until the trim ring is ush to the ceiling (as Fig.7).
WAC Lighting
www.waclighting.com
Phone (800) 526.2588 • Fax (800) 526.2585
WAC Lighting retains the right to modify the design of our products at any time as part of the company's continuous improvement program. JUNE, 2014
Headquarters/Eastern Distribution Center
44 Harbor Park Drive • Port Washington, NY 11050
Phone (516) 515.5000 • Fax (516) 515.5050
Western Distribution Center
1750 Archibald Ave • Ontario, CA 91761
Phone (800) 526.2588 • Fax (800) 526.2585
Page 2
INSTALLATION INSTRUCTION
1” LEDme Mini Recessed - New Construction
HR-LED211, HR-LED251
MOUNTING FOR REMODEL HOUSING:
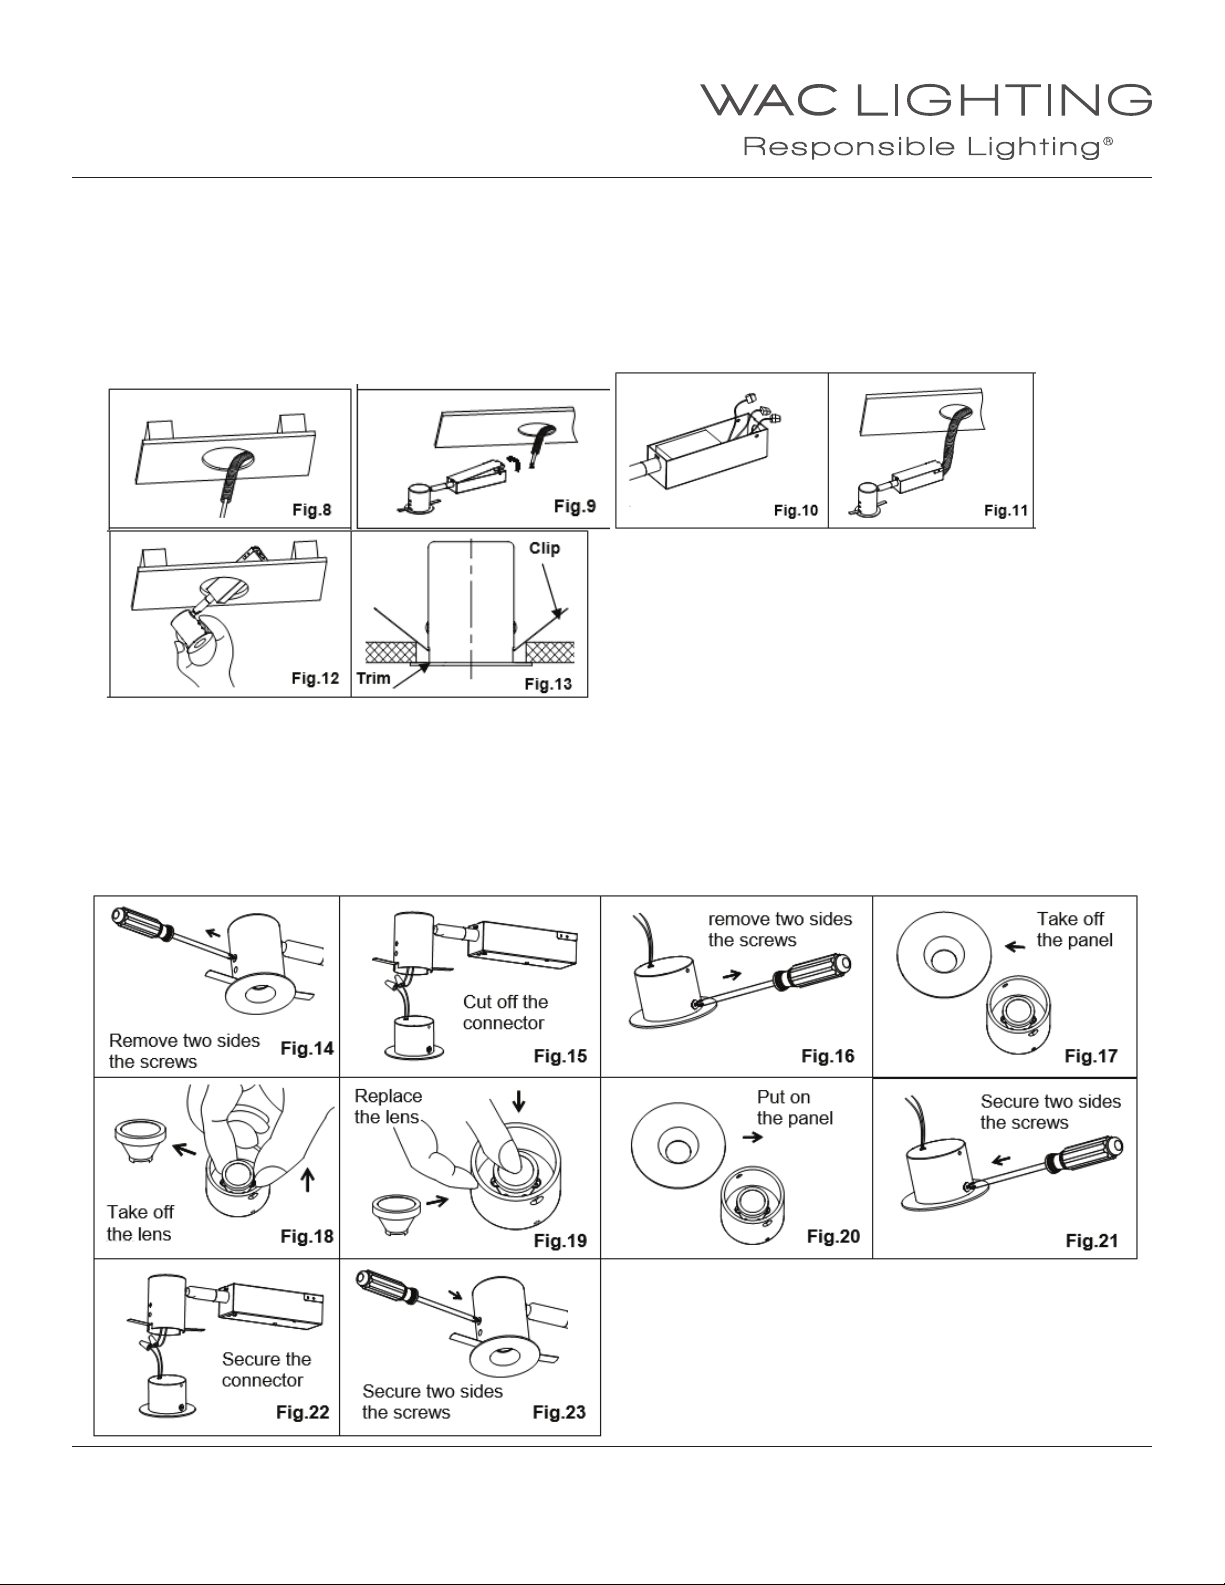
1. When installing in drywall, cut appropriate a hole 2 1/2” in the drywall, pull ceiling wire through the hole(as Fig.8).
2. Pull out the junction box cover and connect xture wires to building wires, insert each supply wire into appropriate junction
box connector. Connect black xture wire to hot, white xture wire to neutral and green xture wire to ground.
When connect in series xture, use a spread conduit connector (as Fig.9, 10).
3. Place all wiring and connectors back in wiring box and replace junction box door (as Fig.11).
4. Pivot the J box up through the hole, followed by the can, until the trim ring is ush to the ceiling (as Fig.12,13)
(Framing kit is for new construction mounting only)
TO REPLACE LED LENS:
1. Remove two sides the screws of the can (as Fig.14).
2. Cut o the connector (as Fig.15).
3. Remove two sides the screws and take o the panel (as Fig.16, 17).
4. Replace the lens you choose (as Fig.18, 19).
5. Put on the panel and secure two sides the screws (as Fig.20, 21).
6. Secure the connection and secure two sides the screws of the can (as Fig.22, 23).
WAC Lighting
www.waclighting.com
Phone (800) 526.2588 • Fax (800) 526.2585
WAC Lighting retains the right to modify the design of our products at any time as part of the company's continuous improvement program. JUNE, 2014
Headquarters/Eastern Distribution Center
44 Harbor Park Drive • Port Washington, NY 11050
Phone (516) 515.5000 • Fax (516) 515.5050
Western Distribution Center
1750 Archibald Ave • Ontario, CA 91761
Phone (800) 526.2588 • Fax (800) 526.2585
 Loading...