

Page 1
INSTRUCTIONS: Line Voltage Track Fixture
Model: LTK-103
Caution:
Read all instructions before installing.
Switch off power before installing or re-lamping.
Do not attempt to energize anything other than a track light fixture.
All installation shall be in accordance with NEC and all local codes.
Overview:
Fixtures are designed for use on “L” series W.A.C. Lighting track. They may also be used on other
manufacturer’s brand of track (consult factory for compatibility).
Installing Lamp & Shade:
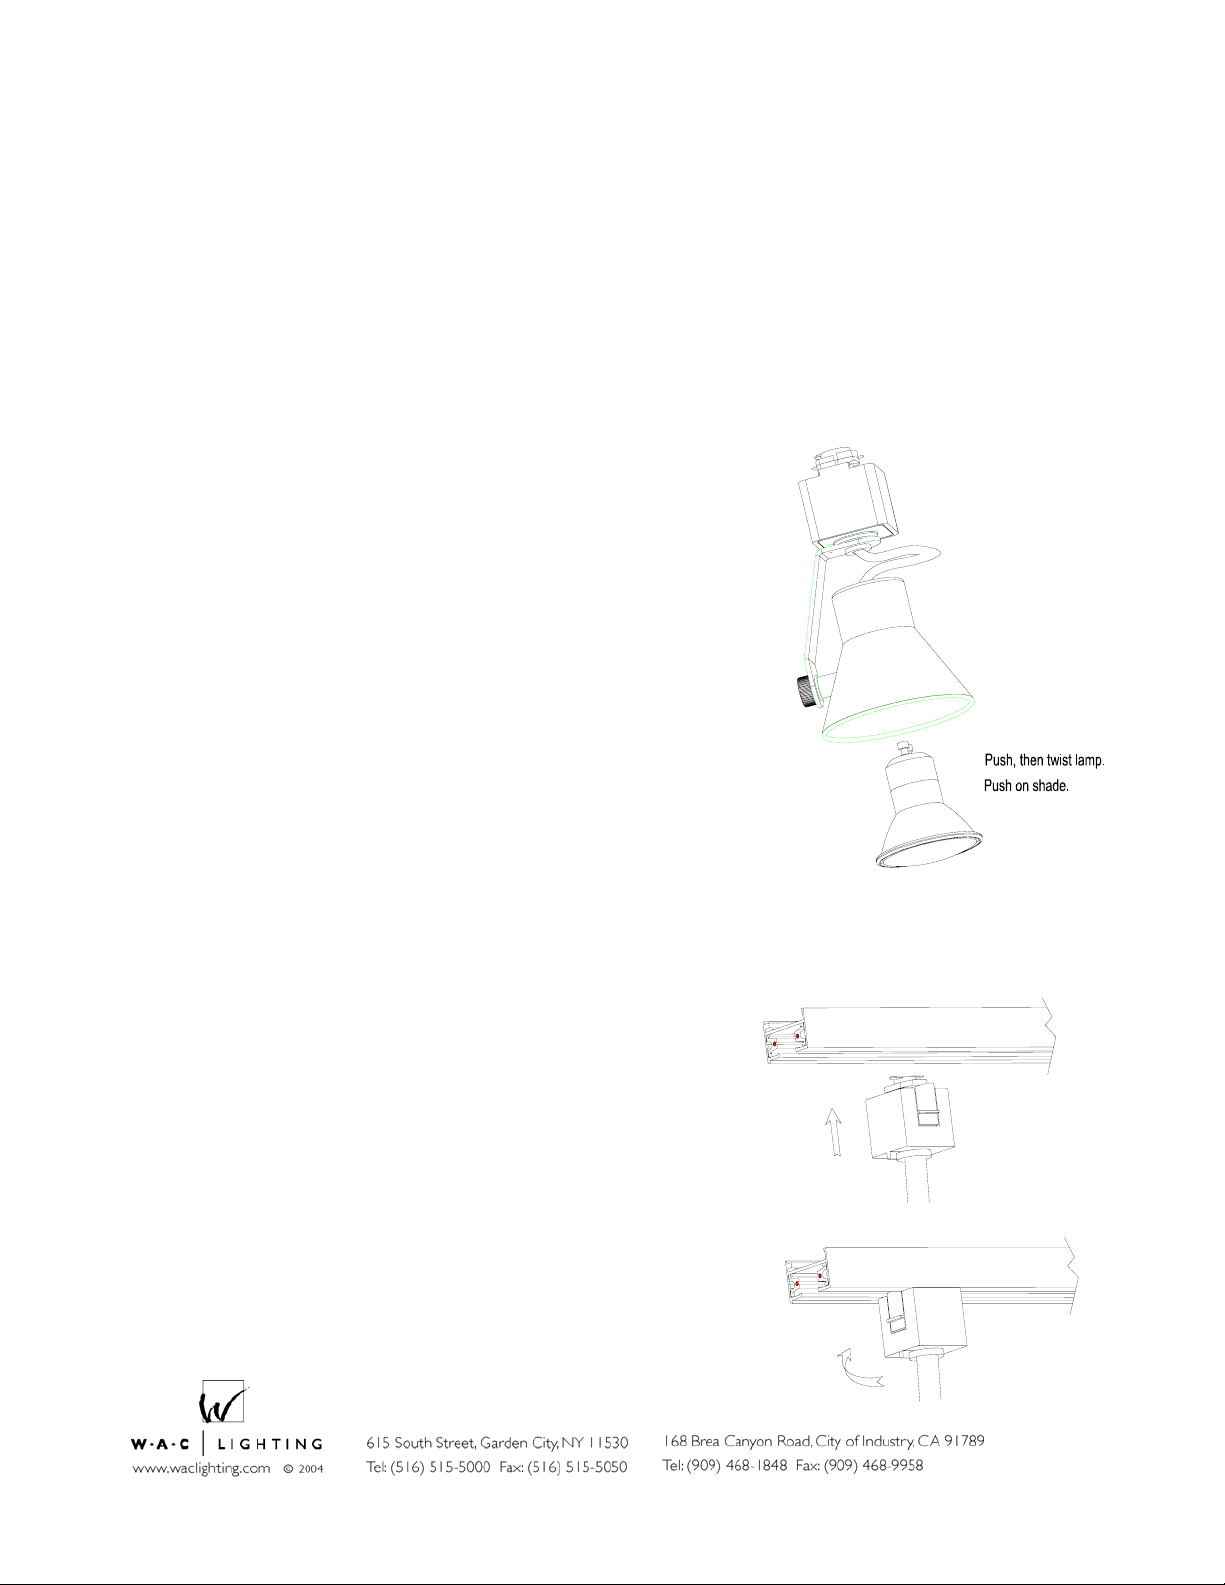
1. Fixture is supplied with a 120 volt MR16
lamp with GU10 base, 50Watt maximum.
(Not suitable for other types of lamps.)
2. Insert lamp into the shade so the lamp pins
protrude through the back.
3. Place pins in the socket holes and twist
1/4" to the right. The lamp should feel firmly
seated.
Installing Fixtures:
1. Note the track has a ridge running it’s length to
indicate polarity.
2. Note the slant of the locking tab.
3. Insert adapter into track slot and rotate it 90 º so
that the low side of the locking tab faces the ridged
side of the track.
4. Make sure the locking tab seats in the track slot.
5. Removal is the reverse procedure. Tracks
heads may be positioned anywhere along the
track length.
Note: “L” series track accepts only W.A.C. track
heads.
Retain instructions for future reference.
06/05/06
Page 2
INSTRUCTIONS: Line Voltage Track Fixture
Model: JTK-103
Caution:
Read all instructions before installing.
Switch off power before installing or re-lamping.
Do not attempt to energize anything other than a track light fixture.
All installation shall be in accordance with NEC and all local codes.
Overview:
Fixtures are designed for use on “J” series W.A.C. Lighting track. They may also be used on other
manufacturer’s brand of track (consult factory for compatibility).
Installing Lamp & Shade:
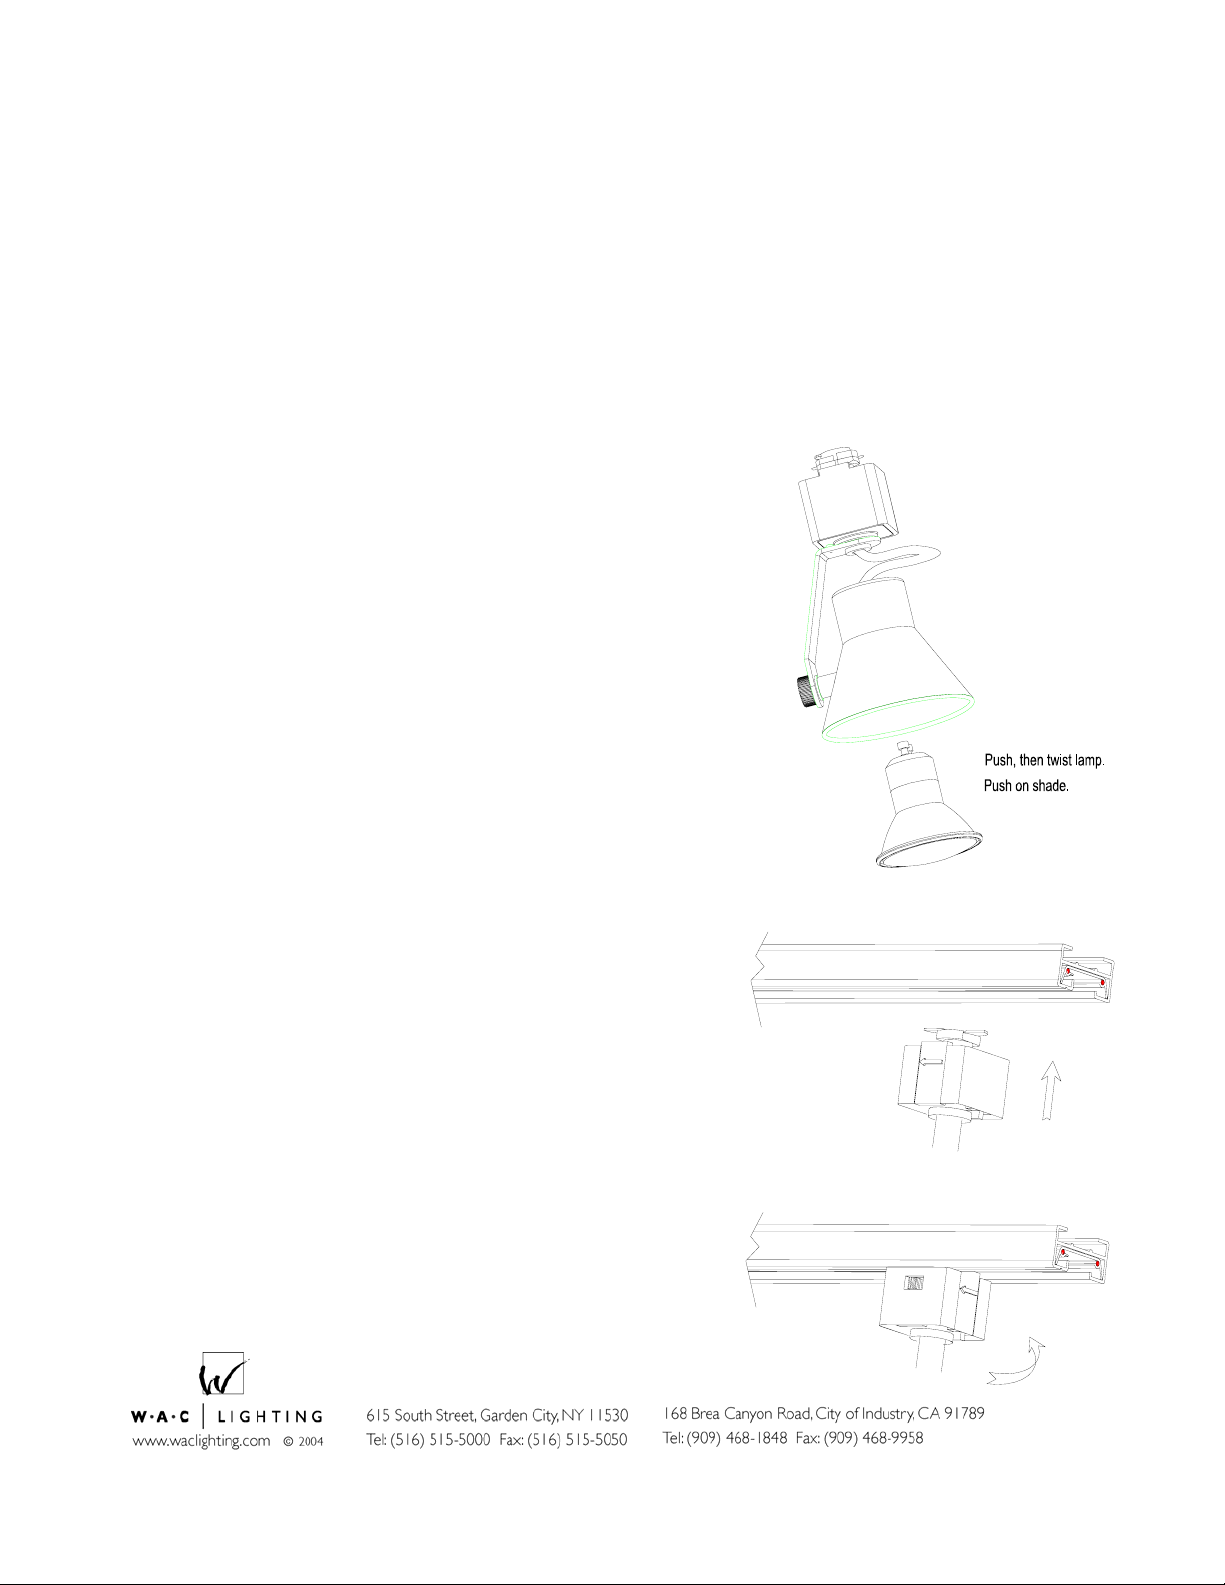
1. Fixture is supplied with a 120 volt MR16
lamp with GU10 base, 50Watt maximum.
(Not suitable for other types of lamps.)
2. Insert lamp into the shade so the lamp pins
protrude through the back.
3. Place pins in the socket holes and twist
1/4" to the right. The lamp should feel firmly
seated.
Fixture Installation
1. Note the track has a groove running it’s
length to indicate polarity.
2. Note the arrow on the locking tab.
3. Insert adapter into track slot and rotate it
90° The arrow should point to the
grooved side of the track.
4. Make sure the locking tab seats in the
track slot.
5. Removal is the reverse procedure. Track
heads may be positioned anywhere along
the track length.
Retain instructions for future reference.
06/05/06
Page 3
INSTRUCTIONS: Line Voltage Track Fixture
Model: HTK-103
Caution:
Read all instructions before installing.
Switch off power before installing or re-lamping.
Do not attempt to energize anything other than a track light fixture.
All installation shall be in accordance with NEC and all local codes.
Overview:
Fixtures are designed for use on “H” series W.A.C. Lighting track. They may also be used on other
manufacturer’s brand of track (consult factory for compatibility).
Installing Lamp & Shade:
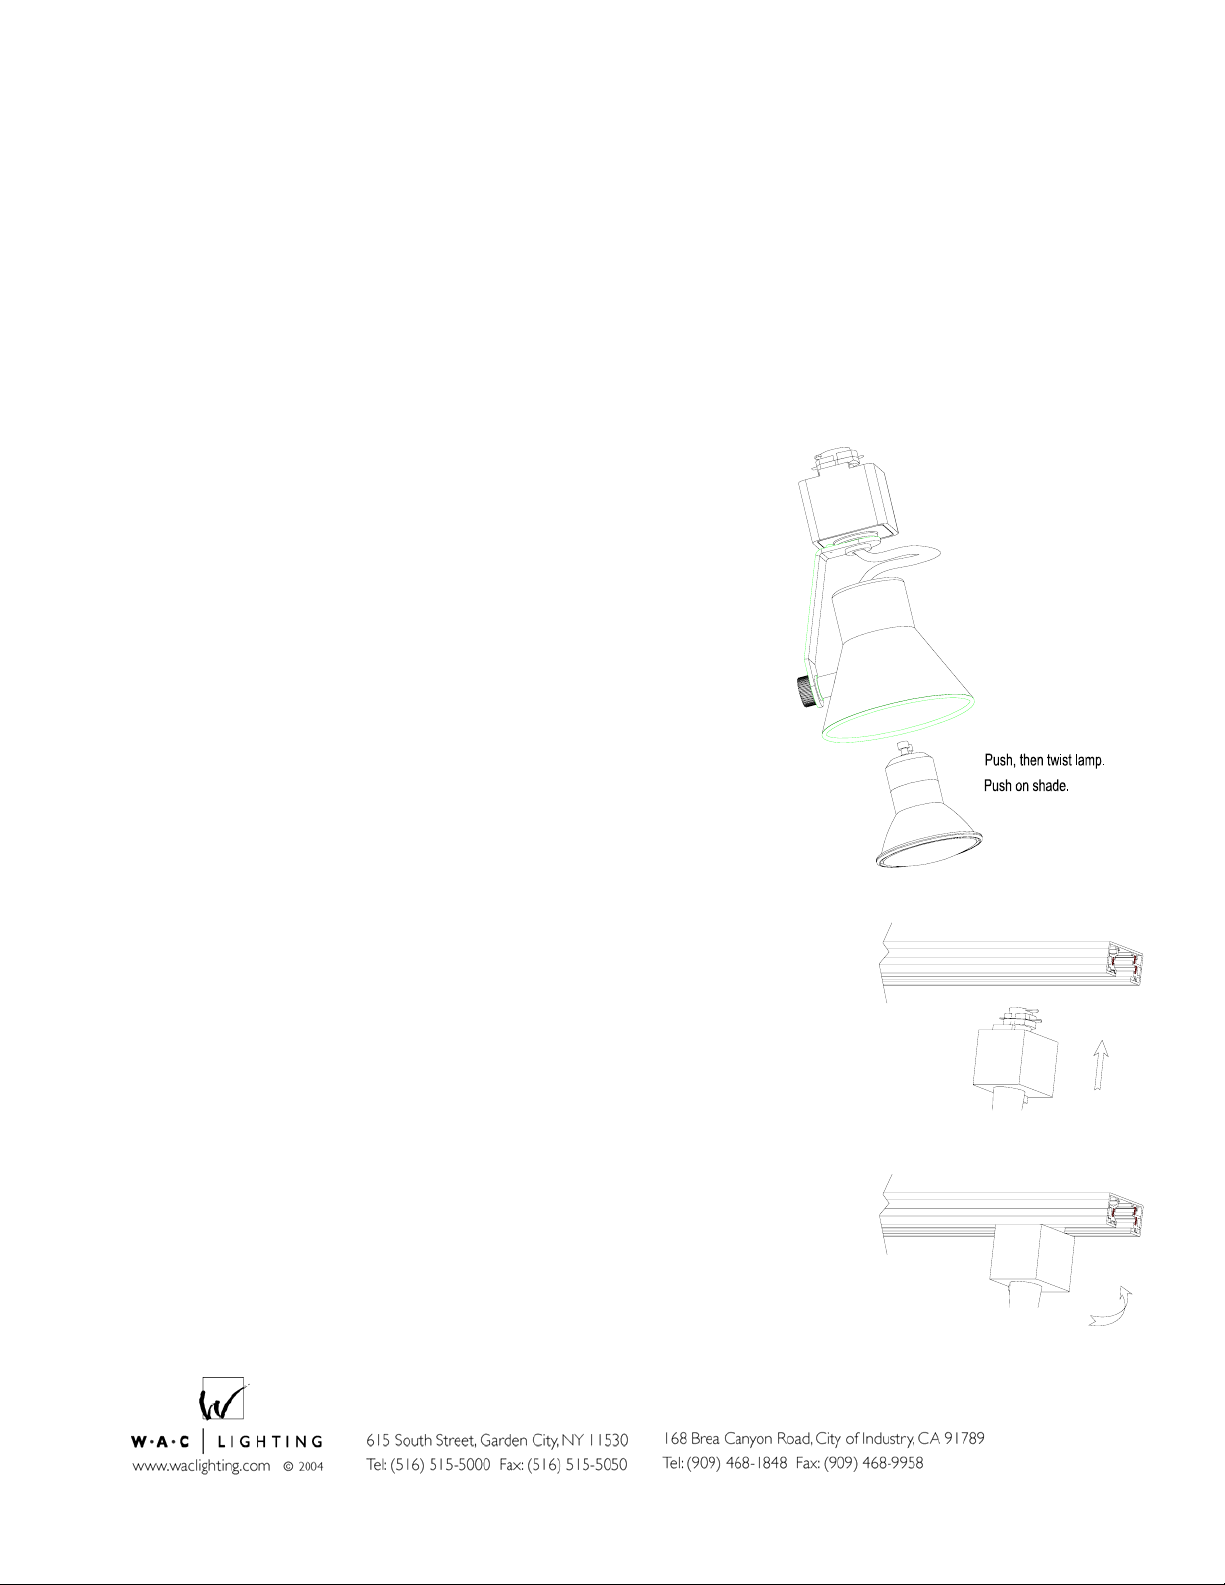
1. Fixture is supplied with a 120 volt MR16
lamp with GU10 base, 50Watt maximum.
(Not suitable for other types of lamps.)
2. Insert lamp into the shade so the lamp pins
protrude through the back.
3. Place pins in the socket holes and twist
1/4" to the right. The lamp should feel firmly
seated.
Installing on Track:
1. Note the track head contacts, and the polarity groove running the
length of the track.
2. The two contacts should be positioned so that when rotated, they
will face the grooved side of the track (this is the side with two
flat copper wires running its length).
3. Insert adapter into track slot. Pull downward on the adapter while
rotating the adapter 90º.
4. Release the adapter so the locking tab seats in the track slot.
5. Removal is the reverse procedure. Tracks heads may be
positioned anywhere along the track length.
6. Not suitable for use on wall mounted track.
Retain instructions for future reference.
Step 2
Step 3
06/05/06
 Loading...