

Page 1
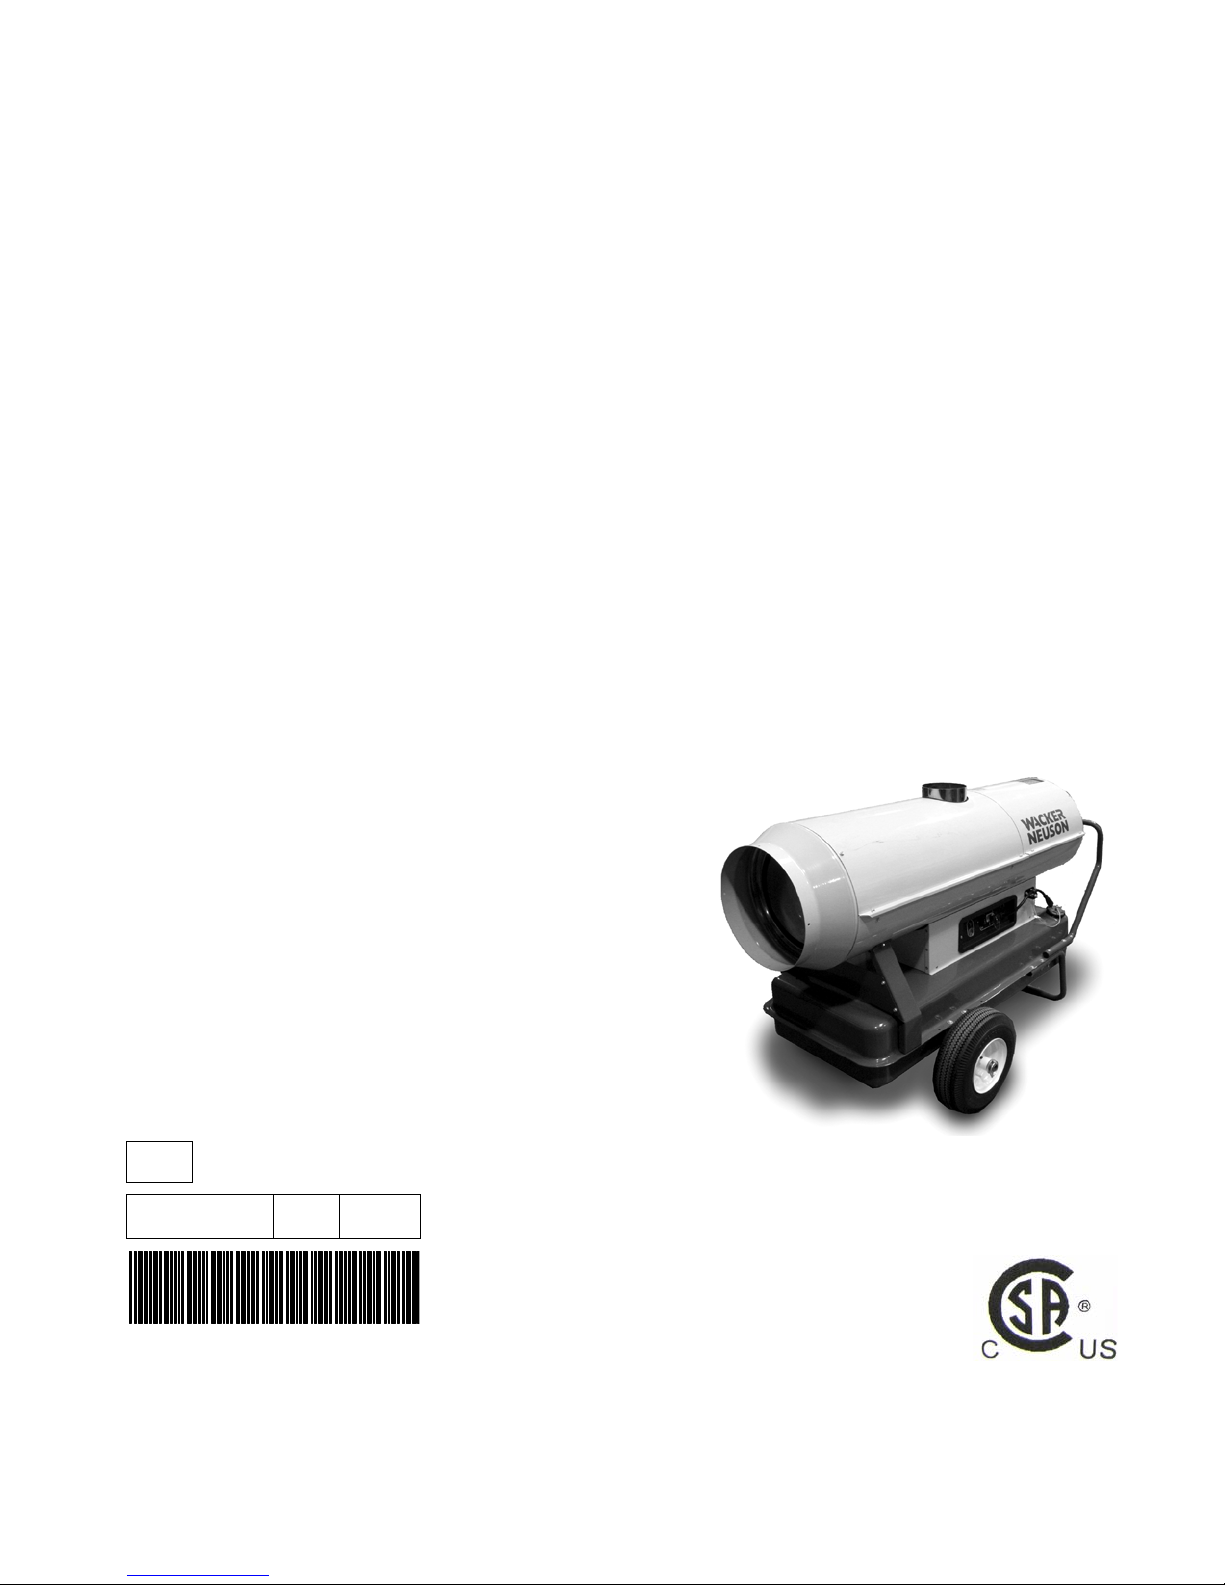
Operator’s Manual
Indirect-Fired Air Heaters
HI 110D / HI 110HD D
HI 200D / HI 200HD D
HI 300D / HI 300HD D
EN
5000192822 06 0614
5000192822
Page 2

Copyright
notice
© Copyright 2014 by Wacker Neuson Production Americas LLC
All rights, including copying and distribution rights, are reserved.
This publication may be photocopied by the original purchaser of the machine. Any
other type of reproduction is prohibited without express written permission from
Wacker Neuson Production Americas LLC.
Any type of reproduction or distribution not authorized by Wacker Neuson Production
Americas LLC represents an infringement of valid copyrights. Violators will be
prosecuted.
Trademarks
Manufacturer
All trademarks referenced in this manual are the property of their respective owners.
Wacker Neuson Production Americas LLC
N92W15000 Anthony Avenue
Menomonee Falls, WI 53051 U.S.A.
Tel: (262) 255-0500 · Fax: (262) 255-0550 · Tel: (800) 770-0957
www.wackerneuson.com
Original
instructions
This Operator’s Manual presents the original instructions. The original language of this
Operator’s Manual is American English.
Page 3

Foreword
Foreword
This heater is designed and approved for use as a construction heater in
accordance with the applicable standards of CSA. CHECK WITH YOUR LOCAL
FIRE SAFETY AUTHORITY IF YOU HAVE QUESTIONS ABOUT APPLICATIONS.
Other standards govern the use of fuel gases and heat producing products in
specific applications. Your local authority can advise you about these.
THE INSTALLATION OF THE UNIT SHALL BE IN ACCORDANCE WITH THE
REGULATIONS OF THE AUTHORITIES HAVING JURISDICTION.
SAVE THESE INSTRUCTIONS—This manual contains important instructions for
the machine models below. These instructions have been written expressly by
Wacker Neuson Production Americas LLC and must be followed during installation,
operation, and maintenance of the machines.
Machines
covered by
this manual
This manual covers machines with the following item numbers:
Machine Item Number Machine Item Number
HI 110 D 0620915 HI 300 D 0620866
HI 110 HD 0620864 HI 300 HD D 0620867
HI 200 D 0620865, 5200011877
HI 200 HD 0620916, 5200011878
wc_gr012020
Machine
identification
Serial number
(S/N)
ghi_tx001445gb.fm 3
A nameplate listing the model number, item number, revision number, and serial
number is attached to this machine. The location of the nameplate is shown above.
For future reference, record the serial number in the space provided below. You will
need the serial number when requesting parts or service for this machine.
Page 4

Foreword
Serial Number:
Machine
documentation
Expectations
for
information in
this manual
From this point forward in this documentation, Wacker Neuson Production
Americas LLC will be referred to as Wacker Neuson.
Keep a copy of the Operator’s Manual with the machine at all times.
Use the separate Parts Book supplied with the machine to order replacement
parts.
Refer to the separate Repair Manual for detailed instructions on servicing and
repairing the machine.
If you are missing any of these documents, please contact Wacker Neuson to
order a replacement or visit www.wackerneuson.com.
When ordering parts or requesting service information, be prepared to provide
the machine model number, item number, revision number, and serial number.
This manual provides information and procedures to safely operate and
maintain the above Wacker Neuson model(s). For your own safety and to
reduce the risk of injury, carefully read, understand, and observe all instructions
described in this manual.
Wacker Neuson expressly reserves the right to make technical modifications,
even without notice, which improve the performance or safety standards of its
machines.
The information contained in this manual is based on machines manufactured
up until the time of publication. Wacker Neuson reserves the right to change
any portion of this information without notice.
The illustrations, parts, and procedures in this manual refer to Wacker Neuson
factory-installed components. Your machine may vary depending on the
requirements of your specific region.
Manufacturer’s
approval
This manual contains references to approved parts, attachments, and
modifications. The following definitions apply:
Approved parts or attachments are those either manufactured or provided by
Wacker Neuson.
Approved modifications are those performed by an authorized Wacker
Neuson service center according to written instructions published by Wacker
Neuson.
Unapproved parts, attachments, and modifications are those that do not
meet the approved criteria.
Unapproved parts, attachments, or modifications may have the following
consequences:
Serious injury hazards to the operator and persons in the work area
Permanent damage to the machine which will not be covered under warranty
Contact your Wacker Neuson dealer immediately if you have questions about
approved or unapproved parts, attachments, or modifications.
4 ghi_tx001445gb.fm
Page 5

HI 110 / 200 / 300
Table of Contents
Foreword 3
1 Safety Information 7
1.1 Signal Words Found in this Manual ...................................................... 7
1.2 Machine Description and Intended Use ............................................... 8
1.3 Operating Safety .................................................................................. 9
1.4 Safety Guidelines for Operating Combustion Burners ....................... 10
1.5 Service Safety .................................................................................... 11
2 Labels 13
2.1 Label Locations .................................................................................. 13
2.2 Label Meanings .................................................................................. 15
3 Lifting and Transporting 19
3.1 Lifting and Transporting the Machine ................................................. 19
4 Operation 20
4.1 Installing the Lift Brackets (if equipped) ............................................. 20
4.2 Installing the Wheels and Handle ....................................................... 21
4.3 Controls and Service Locations .......................................................... 22
4.4 Control Panel ...................................................................................... 24
4.5 Recommended Fuels and Fuel Blending Guide ................................. 25
4.6 Inspecting the Fuel Hose .................................................................... 26
4.7 Positioning the Machine ..................................................................... 27
4.8 Suggested Venting ............................................................................. 28
4.9 Installing the Heater Duct ................................................................... 30
4.10 Flex Ducting Options .......................................................................... 31
4.11 Connecting Power to the Machine ..................................................... 32
4.12 Pre-Starting Checks ........................................................................... 33
4.13 Starting the Machine .......................................................................... 34
4.14 Starting the Machine in Extremely Cold Weather ............................... 35
4.15 Stopping the Machine ......................................................................... 36
4.16 Burner Faults ...................................................................................... 37
4.17 Installing and Using the Remote Thermostat ..................................... 38
5 Accessories 39
5.1 Available Accessories ........................................................................ 39
wc_bo5000192822_06TOC.fm
5
Page 6

Table of Contents
HI 110 / 200 / 300
6 Burner Setup 40
6.1 Removing the Access Panel ...............................................................40
6.2 Removing and Installing the Burner Assembly ....................................41
6.3 Setting Up the Burner ..........................................................................42
6.4 Checking the Oil Burner Electrodes ....................................................44
6.5 Checking/Changing the Burner Nozzle ...............................................45
6.6 Adjusting the Fuel Pressure ................................................................46
6.7 Setting the Air Band ............................................................................47
7 Maintenance 48
7.1 Periodic Maintenance Schedule ..........................................................48
7.2 Inspecting the Heat Exchanger ...........................................................49
7.3 Changing the Fuel Heater Filter ..........................................................52
7.4 Inspecting and Cleaning the Cadmium (CAD) Cell .............................53
7.5 Cleaning the Fan Blades and Motor ....................................................54
7.6 Cleaning the Interior Shell ...................................................................55
7.7 Inspecting the Flame Head .................................................................56
7.8 Inspecting the Electrical Connections .................................................57
7.9 Cleaning the Machine ..........................................................................58
8 Basic Troubleshooting 59
9 Technical Data 60
9.1 Machine ...............................................................................................60
9.2 Dimensions - HI110D, HI110HD D ......................................................61
9.3 Dimensions - HI200D, HI200HD D ......................................................62
9.4 Dimensions - HI300D, HI300HD D ......................................................62
10 Schematics 64
10.1 Electrical Schematic - HI 110 D, HI 110 HDD .....................................64
10.2 Electrical Schematic - HI 200 D ...........................................................65
10.3 Electrical Schematic - HI 200 HDD .....................................................66
10.4 Electrical Schematic - HI 300 D ...........................................................67
10.5 Electrical Schematic - HI 300 HDD .....................................................68
6
wc_bo5000192822_06TOC.fm
Page 7
HI 110 / 200 / 300 Safety Information
1 Safety Information
1.1 Signal Words Found in this Manual
This manual contains DANGER, WARNING, CAUTION, NOTICE, and NOTE
signal words which must be followed to reduce the possibility of personal injury,
damage to the equipment, or improper service.
This is the safety alert symbol. It is used to alert you to potential personal hazards.
f Obey all safety messages that follow this symbol.
DANGER
DANGER indicates a hazardous situation which, if not avoided, will result in death
or serious injury.
To avoid death or serious injury from this type of hazard, obey all safety messages that
f
follow this signal word.
WARNING
WARNING indicates a hazardous situation which, if not avoided, could result in
death or serious injury.
f
To avoid possible death or serious injury from this type of hazard, obey all safety messages that follow this signal word.
CAUTION!
CAUTION indicates a hazardous situation which, if not avoided, could result in
minor or moderate injury.
To avoid possible minor or moderate injury from this type of hazard, obey all safety mes-
f
sages that follow this signal word.
NOTICE: Used without the safety alert symbol, NOTICE indicates a situation
which, if not avoided, could result in property damage.
Note: A Note contains additional information important to a procedure.
ghi_si000463gb.fm 7
Page 8

Safety Information HI 110 / 200 / 300
1.2 Machine Description and Intended Use
Machine
description
Intended use
The HI Heater is an indirect-fired air heater that operates on diesel fuel. The
machine consists of the following components:
Stainless steel combustion chamber and heat exchanger
Blower
Single-stage burner
High-temperature shut-down device
Fuel tank
Fuel is consumed in a closed combustion chamber. Room air or outside air
(depending on the application) is pulled into the machine where it is heated. This
clean, dry, hot air is then blown into the space to be heated by the blower. Access
to the blower assembly is protected by a guard fitted on the air inlet.
The HI Heater is intended to provide heat on outdoor or indoor construction sites (if
properly vented) and in other rugged applications.
This machine has been designed and built strictly for the intended use described
above. Using the machine for any other purpose could permanently damage the
machine or seriously injure the operator or other persons on the work site. Machine
damage caused by misuse is not covered under warranty.
Do not use this machine indoors without proper exhaust venting designed for
indoor use which meets all applicable regulations.
Optional
accessories
This machine has been designed and built in accordance with the latest global
safety standards. It has been carefully engineered to eliminate hazards as far as
practicable and to increase operator safety through protective guards and labeling.
However, some risks may remain even after protective measures have been taken.
They are called residual risks. On this machine, they may include exposure to:
exhaust emissions
hot surfaces such as exhaust vents and fuel heater
fuel and fuel fumes when refueling
high voltages and arc flash
To protect yourself and others, make sure you thoroughly read and understand the
safety information presented in this manual before operating the machine.
Wacker Neuson Corporation offers many optional accessories for the machine.
These accessories include the following:
Remote thermostat
Duct adapters (various sizes, available as kits, or individual ducts at lengths of
25 ft. or more).
Exhaust vents and elbows
Contact your Wacker Neuson dealer for more information.
8 ghi_si000463gb.fm
Page 9

HI 110 / 200 / 300 Safety Information
1.3 Operating Safety
Operator
training
Machine
condition
Before operating the machine:
Read and understand the operating instructions contained in all manuals
delivered with the machine.
Familiarize yourself with the location and proper use of all controls and safety
devices.
Contact Wacker Neuson for additional training if necessary.
When operating this machine:
Do not allow improperly trained people to operate the machine. People
operating the machine must be familiar with the potential risks and hazards
associated with it.
Only operate the machine when:
The heat exchanger is in proper working order.
All safety devices and guards are in place and in working order.
All controls operate correctly.
The machine is set up correctly according to the instructions in the Operator’s
Manual.
The machine is clean.
The machine’s labels are legible.
When operating the machine:
Do not modify or defeat the safety devices.
Do not use worn electrical cords.
Do not use faulty fuel supplies.
Guidelines for
operator
When operating the machine:
Remain aware of the machine’s moving parts. Keep hands, feet, and loose
clothing away from the machine’s moving parts.
Wear protective clothing appropriate to the job site when operating the machine.
Wear safety glasses.
When operating the machine:
Do not operate a machine in need of repair.
Do not smoke near the machine.
Do not block the air inlet or outlet during machine operation.
Personal
Protective
Equipment
(PPE)
ghi_si000463gb.fm 9
Wear the following Personal Protective Equipment (PPE) while operating this
machine:
Close-fitting work clothes that do not hinder movement
Safety glasses with side shields
Hearing protection
Safety-toed footwear
Page 10
Safety Information HI 110 / 200 / 300
Machine
installation
guidelines
Work space
As a recommended installation practice, refer to the current issue of CSA B139,
Installation Code for Oil Burning Equipment in Canada and NFPA 31 Standard for
the Installation of Oil-Burning Equipment in the USA;
Never operate the machine in immediate proximity to flammable materials.
Minimum distances are specified in the Operation chapter under Positioning the
Machine.
A rough estimate of opening required for each gallon (US) of capacity is one
square foot for indirect-fired heater
When operating the machine:
Position the machine on a firm, noncombustible, level surface.
Keep the area immediately surrounding and underneath the machine clean,
neat, and free of debris and combustible materials.
Keep the area above the machine clear of debris that could fall on the machine.
Store the machine properly when it is not being used.
Keep unauthorized personnel, children, and pets away from the machine.
When operating the machine:
Do not connect ductwork between the exhaust outlet port and the supply air inlet
port.
Never operate the machine in areas that contain flammable objects, fuels, or
products that produce flammable vapors.
Do not position the electrical cords under the machine or over the top of the
machine.
1.4 Safety Guidelines for Operating Combustion Burners
When using the machine:
Clean up any spilled fuel immediately.
Replace the fuel tank cap after refueling the machine.
Refill the fuel tank in a well-ventilated area.
Make sure you have proper certification or licensing required by the locality,
state, or province in which the machine is being installed to work with Liquid
Petroleum (LP).
When using the machine:
DANGER
Exhaust gas from the burner contains carbon monoxide, a deadly poison. Exposure
to carbon monoxide can kill you in minutes.
f Never run the machine indoors or in an enclosed area unless the machine is
vented properly according to local and national codes.
Do not fill or drain the fuel tank near an open flame, while smoking, or while the
machine is running.
Do not smoke when refueling the machine.
10 ghi_si000463gb.fm
Page 11

HI 110 / 200 / 300 Safety Information
1.5 Service Safety
Licensing/
training/
Cleaning
Maintenance
guidelines
Only trained personnel should troubleshoot or repair electrical problems
occurring with the machine.
When cleaning and servicing the machine:
Keep the area around the burner free of debris such as leaves, paper, cartons,
etc.
Keep the machine clean and labels legible.
When cleaning the machine:
Do not clean the machine while it is running.
Never use gasoline or other types of fuels or flammable solvents to clean parts.
Fumes from fuels and solvents can become explosive.
When maintaining the machine:
Keep the fuel lines in good condition and properly connected.
Allow the burner to cool before maintaining the machine.
Re-install the safety devices and guards after repairs and maintenance.
Keep all electrical cords away from heat, oil, vibrating surfaces, and sharp
edges.
Inspect all electrical cords before each use and replace damaged cords.
Replacing
parts and
labels
Accessories,
safety devices
and
modifications
Personal
Protective
Equipment
(PPE)
When maintaining the machine:
When replacement parts are required for this machine, use only Wacker
Neuson replacement parts or those parts equivalent to the original in all types of
specifications, such as physical dimensions, type, strength, and material.
Replace worn or damaged components.
Replace all missing and hard-to-read labels.
Replace or repair electrical components with components that are identical in
rating and performance as the original component.
When using the machine:
Use only accessories/attachments that are recommended by
Wacker Neuson Corporation.
When using the machine:
Never operate the machine if any safety devices or guards are missing or
inoperative.
Do not defeat safety devices.
Do not modify the machine without the express written approval of the
manufacturer.
Wear the following Personal Protective Equipment (PPE) while servicing or
maintaining this machine:
Close-fitting work clothes that do not hinder movement
Safety glasses with side shields
ghi_si000463gb.fm 11
Page 12

Safety Information HI 110 / 200 / 300
Hearing protection
Safety-toed footwear
In addition, before servicing or maintaining the machine:
Tie back long hair.
Remove all jewelry (including rings).
12 ghi_si000463gb.fm
Page 13
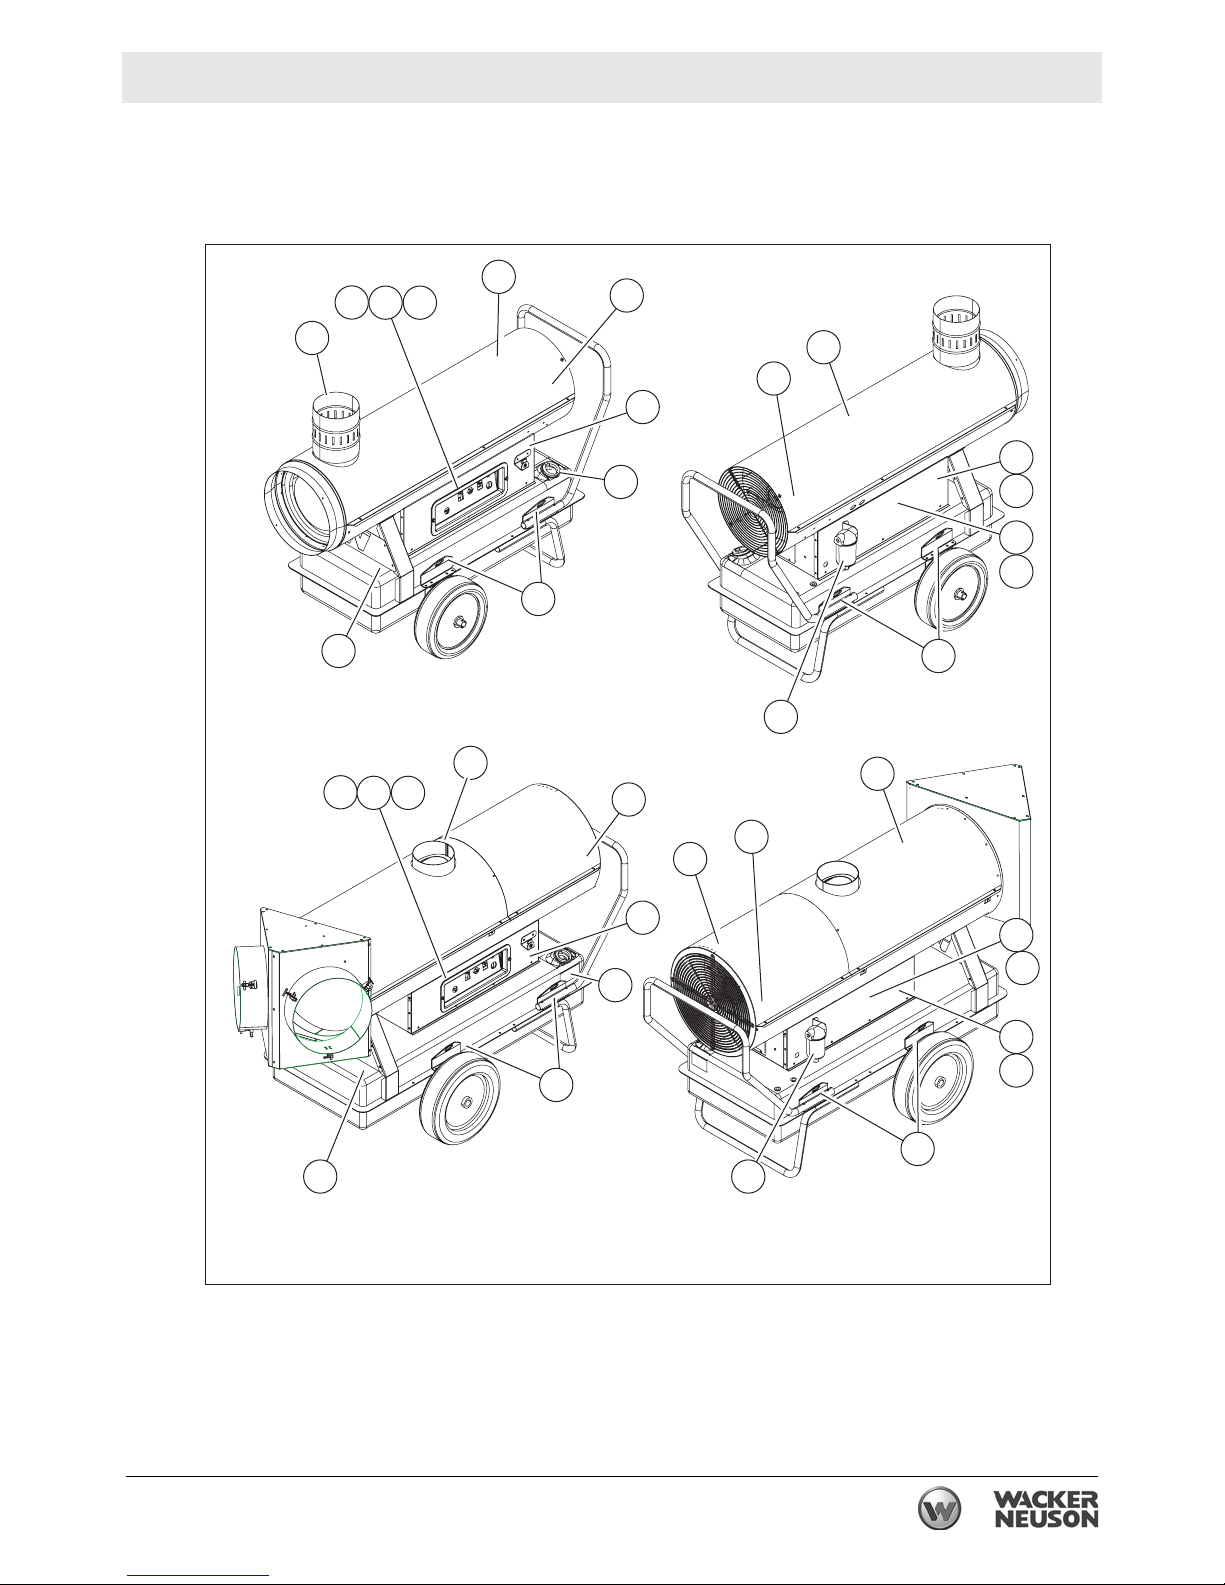
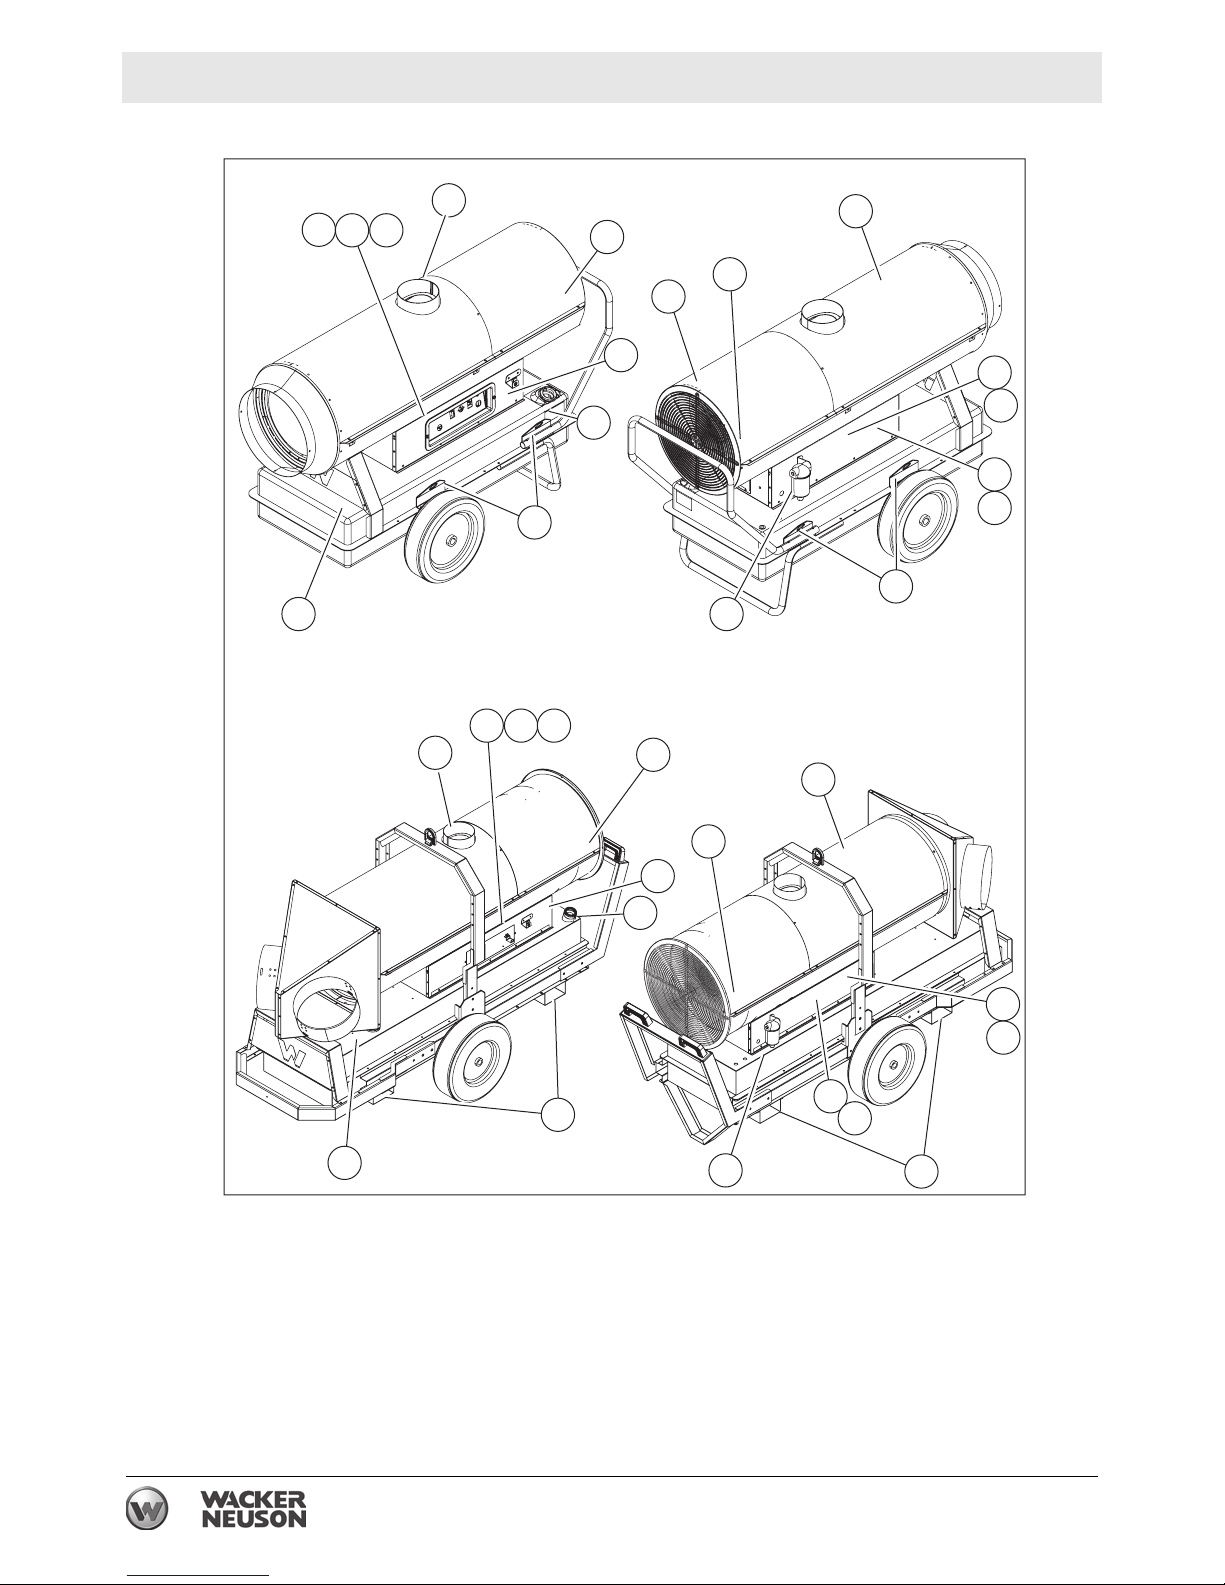
HI 110 / 200 / 300 Labels
2 Labels
2.1 Label Locations
(4)
J
H
D G
A
B
G
B
P
K
E
H
L
N
C
F
HI 110
C
A
A
H
D
G
B
G
B
J
(4)
C
P
E
HI 200
L
N
K
H
C
AF
wc_gr009251
ghi_si000464gb.fm 13
Page 14
Labels HI 110 / 200 / 300
(4)
A
H
G
D
B
G
B
J
P
L
E
N
K
C
H
C
AF
HI 300
D
G H
A
B
J
(4)
B
P
E
H
K
L
C
F
HI 300 HD
A
N
C
wc_gr009252
14 ghi_si000464gb.fm
Page 15
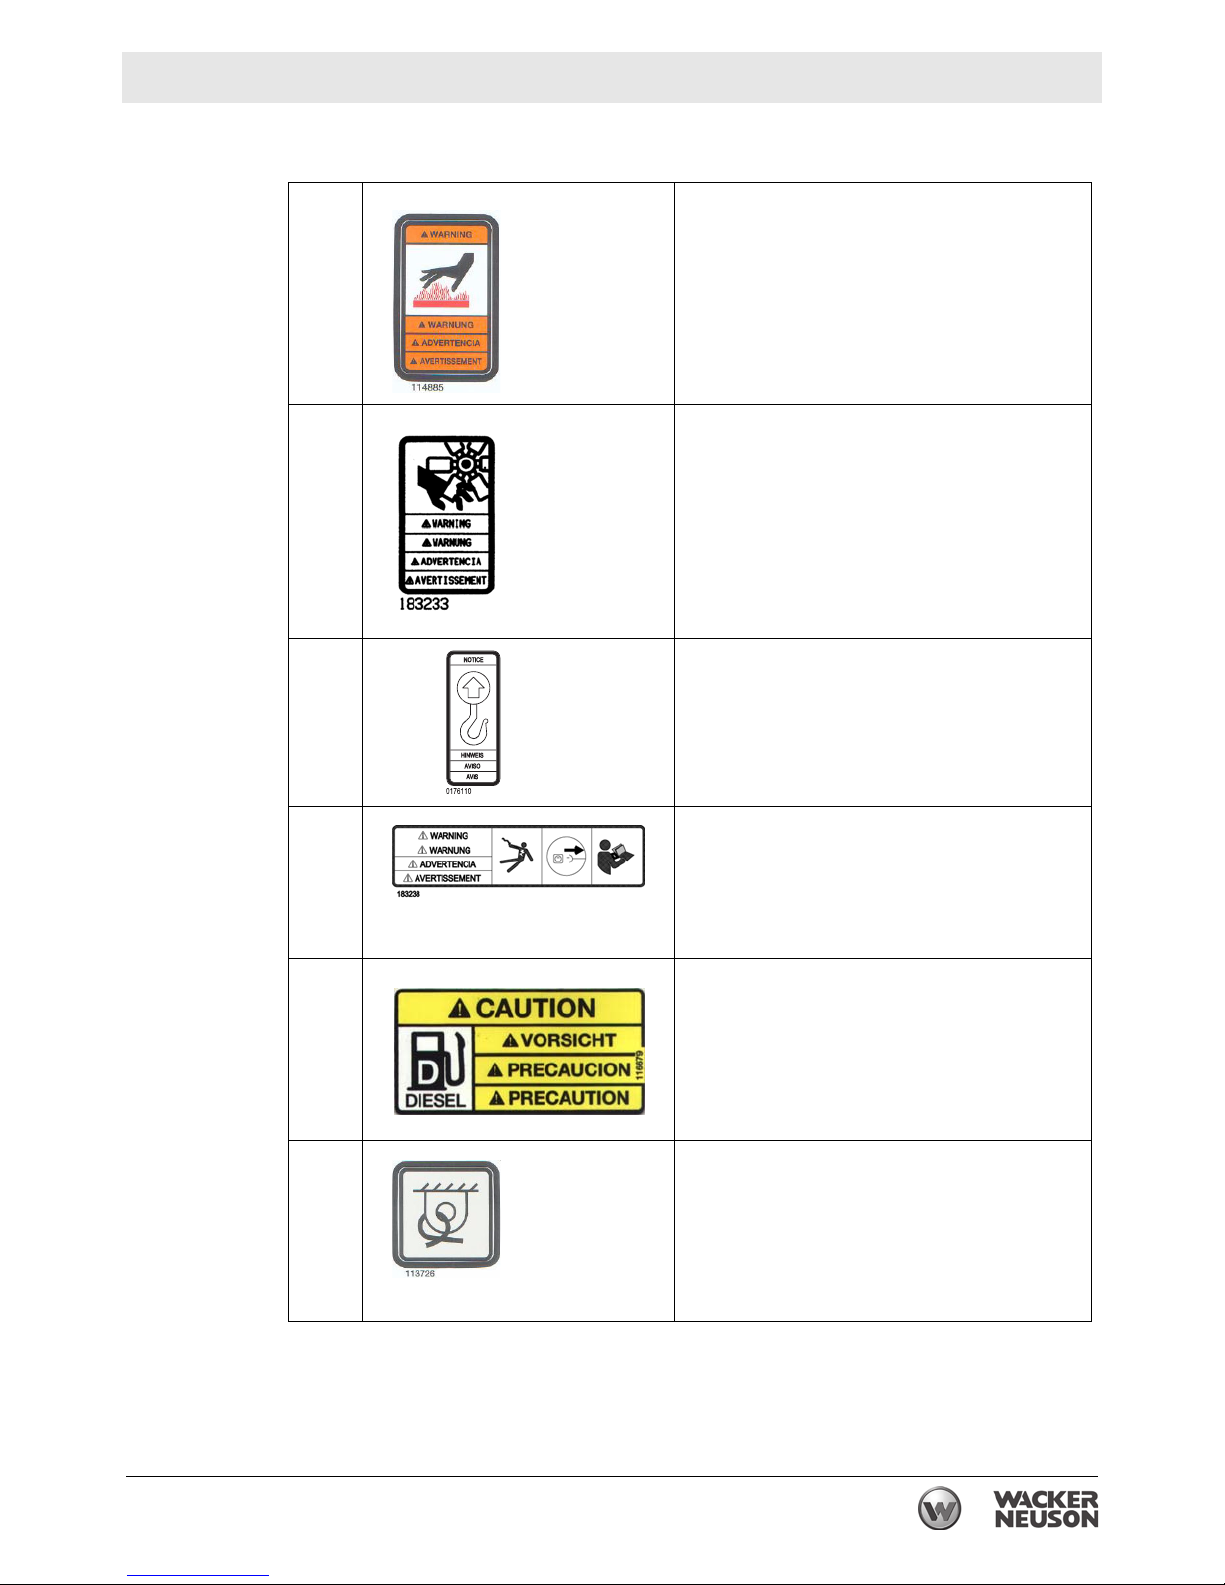
HI 110 / 200 / 300 Labels
2.2 Label Meanings
1
A WARNING
Hot surface hazard!
B WARNING
Entanglement hazard. Rotating machinery.
Do not reach inside machine when engine is
running.
C NOTICE
Lifting point
D
WARNING!
Electric shock hazard.
Disconnect power before servicing.
Read Operator’s Manual.
ECAUTION
This machine uses diesel fuel.
F Tie-down point
ghi_si000464gb.fm 15
Page 16

Labels HI 110 / 200 / 300
G
DANGER
Using a heater indoors can kill you in
minutes. Heater exhaust contains
carbon monoxide. This is a poison
you cannot see or smell. During
indoor operation, vent exhaust gas
outdoors. Refer to Operator's
Manual.
HCAUTION
Hot while in operation. Do not touch. Keep
children, clothing, and combustibles away.
J Safety instruction label for diesel fuelled
heaters
K A nameplate listing the model number, item
number, revision number, and serial number
is attached to each unit. Please record the
information found on this plate so it will be
available should the nameplate become lost
or damaged. When ordering parts or
requesting service information, you will
always be asked to specify the model
number, item number, revision number, and
serial number of the unit.
L Heater rating plate
16 ghi_si000464gb.fm
Page 17
HI 110 / 200 / 300 Labels
M WARNING
Licensed gas technician required.
Natural gas / liquid propane burner setup and
installation, fuel supply connection, test
firing, and burner adjustment MUST be
performed by a LICENSED professional gas
technician and must conform to the
requirements of all relevant local, state,
provincial, and Federal authorities.
Failure to heed this warning may result in an
explosion and/or fire causing property
damage, personal injury, or death.
N Creating Green Environments
This product may help you earn credits
toward LEED® EQ 3.1 and 3.2 certification.
P DIRECTIONS FOR OPERATION:
1. Connect the machine to 120V power supply using a 12/3 x 50 foot max. 10/13 x
100 foot max. extension cord.
2. Wait 20-30 minutes to allow the oil filter to
pre-heat the fuel.
3. Turn the machine on:
a. Continuous heat mode (I) or
thermostat mode (II)
b. If available, select high or low fire
mode.
4. To turn off, switch to (0) position.
— WARNING
If three consecutive attempts to reset the
machine are unsuccessful, then troubleshoot
the heating system for the root cause(s) of
the lockout.
Make necessary repairs or adjustments to
ensure a safe start condition.
Ensure that the heat exchanger is free of
oil and oil vapors before starting or resetting the burner.
ghi_si000464gb.fm 17
Page 18
Labels HI 110 / 200 / 300
— Fork lift pocket
18 ghi_si000464gb.fm
Page 19
HI 110 / 200 / 300 Lifting and Transporting
3 Lifting and Transporting
3.1 Lifting and Transporting the Machine
Requirements
Background
Guidelines
Transport vehicle capable of carrying 1000 lbs (454 kg)
Crane or lift capable of carrying 1000 lbs (454 kg)
NOTICE: These machines are NOT designed to be towed with any vehicle.
WARNING
Crushing hazard.
f Only qualified riggers should attempt aerial lifting of this machine.
Follow the guidelines below when lifting and transporting this machine.
Remove all venting from the machine prior to lifting/transporting.
Cover all openings on the machine to avoid infiltration from road debris and dust.
Except for the HI 300HD, use all four lifting points on the sides of the machine
when using an aerial lifting rig.
When using an aerial lifting rig on the HI 300HD, use the designated lifting point
on top of the machine.
HI 300HD only: Use the designated fork pockets when transporting the machine
with a fork lift.
Use the manual transport handle when relocating the machine within the job site.
When tying down the machine, route tie-down straps or chains through the
lower frame only.
NOTICE: Do not route tie-down straps or chains over the top of the machine.
Doing so will damage the machine. Use only the designated tie-down locations.
ghi_tx001446gb.fm 19
Page 20
Operation HI 110 / 200 / 300
4 Operation
4.1 Installing the Lift Brackets (if equipped)
Before attempting to lift the machine, the lift brackets must be installed.
1. Remove the machine from the crate.
2. Intstall the four lift brackets
(a) as shown using the supplied bolts and washers.
20 ghi_tx001447gb.fm
Page 21
HI 110 / 200 / 300 Operation
4.2 Installing the Wheels and Handle
Overview
Installing the
axle and
wheels
The axle, wheels, handle, and stand are shipped loose with the machine and must
be assembled before operation.
There are pre-drilled holes for all of the components to be assembled. Bolts,
washers, and nuts are provided.
Follow the procedure below to install the axle and wheels.
1. Lift the machine using appropriate lifting gear.
WARNING
Crushing hazard.
f Refer to chapter Lifting the Machine for instructions on proper lifting techniques.
2. Attach the two axle mounting brackets (a) to the sides of the fuel tank.
f
c
d
Atttaching the
handle and
stand
Result
e
g
b
a
wc_gr007779
3. Insert the ends of the axle (b) through the axle mounting brackets.
4. Place a wheel (c) and flat washer (d) on each end of the axle as shown.
5. Insert hitch pins (e) into the holes at each end of the axle to secure the wheels.
A
6. Align the holes in the handle (f) and stand (g) with the holes on the fuel tank
flange as shown.
7. Attach the handle and base support with bolts, washers, and nuts.
The machine has now been assembled. Lower the machine and proceed.
ghi_tx001447gb.fm 21
Page 22

Operation HI 110 / 200 / 300
3
4.3 Controls and Service Locations
HI 110D
j
HI 200
wc_gr00925
22 ghi_tx001447gb.fm
Page 23

HI 110 / 200 / 300 Operation
j
HI 300
j
HI 300 HD
Machine
components
ghi_tx001447gb.fm 23
Ref Description Ref Description
a Exhaust flue f Air inlet and fan guard
b Control panel g Access panel
c Manual transport handle h Fuel filter
d Fuel fill location j Manual holder
e Lift brackets (if equipped) — —
(Only on HI 200 HD and HI 300 HD models)
Page 24

Operation HI 110 / 200 / 300
4.4 Control Panel
Control panel
components
Ref Description Ref Description
a
Burner fault lamp and reset
d Power indicator
button (dual function)
b Mode switch (on-off-on)
See topic Starting the Machine.
c Thermostat receptacle — —
e Power cord
Symbols and
meanings
Symbol Meaning/function Symbol Meaning/function
RESET
Press and hold the button to
reset the machine when a
burner fault has occurred.
On
(Remote thermostat mode)
See topic Starting the
Machine
Power indicator
Illuminates when power is connected to the machine and the fuse is intact.
Thermostat connection point
On
(Continuous heat mode)
See topic Starting the Machine
24 ghi_tx001447gb.fm
Page 25

HI 110 / 200 / 300 Operation
4.5 Recommended Fuels and Fuel Blending Guide
Low ambient temperatures cause diesel fuels to gel. Gelled fuels will cause burner
ignition failure and/or burner fuel pump damage. Always use the proper fuel for the
conditions.
Fuel Blend Guide
Lowest expected ambient
temperature °F (°C)
Below 5 (-15)
Generator powered Shore powered
50-50 blend of #2 diesel
and #1 diesel, plus
additives
OR
50-50 blend #2 diesel and
K1 kerosene, plus
additives
100% #1 diesel plus
additives
OR
100% K1 kerosene,
plus additives
70-30 blend of #2 diesel and #1 diesel, plus additives
5 to 25 (-15 to -4)
Above 25 (-4) Winter-blend diesel
70-30 blend of #2 diesel and K1 kerosene,
OR
plus additives
NOTICE: Do not use B20 or any other type of biodiesel fuel in this machine.
CAUTION
Fire hazard.
f Do not use gasoline, crankcase oil, or any oil containing gasoline.
ghi_tx001447gb.fm 25
Page 26

Operation HI 110 / 200 / 300
4.6 Inspecting the Fuel Hose
When
Replacement
hose
Visually inspect the fuel hose assembly each time before operating the heater.
WARNING
Fire and explosion hazards. A damaged hose may leak flammable fuel.
f Do not operate the heater if the hose has excessive abrasions, wear, or cuts.
Replace a damaged hose assembly with an equivalent as specified on the
machine label.
26 ghi_tx001447gb.fm
Page 27

HI 110 / 200 / 300 Operation
4.7 Positioning the Machine
DANGER
Exhaust gas from the burner contains carbon monoxide, a deadly poison. Exposure
to carbon monoxide can kill you in minutes.
f Never run the machine indoors or in an enclosed area unless the machine is
vented properly according to local and national codes.
WARNING
Fire hazard. Restricting air flow through the machine during operation can cause a
fire due to overheating components.
f Do not block the air inlet or outlet during machine operation.
NOTICE: Restricting the air flow through the machine during operation can cause
the machine and its components to overheat. To avoid damage, provide adequate
air flow through the machine while it is operating.
Guidelines
Proximity
restrictions
Observe the following guidelines when positioning the machine for operation.
Installer must be familiar with all applicable laws, codes, regulations, or other
restrictions regarding installation of Indirect-fired (IDF) heaters.
Machine must be on flat, firm surface.
Installation must adhere to proximity restrictions.
Install wedge blocks under the wheels to prevent movement.
The machine must be located a safe distance from any other structures, vehicles,
materials or other combustible surfaces. The following proximity restrictions apply
for all machine installations.
20 ft. (6 m) to air outlet
3 ft. (1 m) to air inlet and sides
5 ft. (1.5 m) to top
20 ft (6 m) from outlet to external fuel container
Note: Graphic is representative only. Your machine may vary.
ghi_tx001447gb.fm 27
Page 28

Operation HI 110 / 200 / 300
4.8 Suggested Venting
DANGER
Asphyxiation hazard.
Exhaust gas from the burner contains carbon monoxide, a deadly poison. Exposure
to carbon monoxide can kill you in minutes.
f Never run the machine indoors or in an enclosed area unless the machine is
vented properly according to local and national codes.
Overview
Before
installing the
machine
Duct
requirements
Machine
setup
The exhaust from indirect-fired heaters must be vented to a chimney or an exhaust
duct. Exhaust gases must rise in order to maintain a proper draft in the chimney or
exhaust duct.
Note: The information presented below is intended as a general reference guide.
Local and national code requirements supersede these suggestions.
Adhere to all local and national codes.
Adhere to all fire prevention regulations.
Consult all appropriate governing bodies or local contractor for venting and
fresh air requirements.
Make sure that the room or building to be heated has sufficient ventilation to
ensure that the machine has enough air to function properly.
Do not use B-vent exhaust pipes to vent an oil burning machine. Contact
Wacker Neuson Product Support for recommended alternatives.
Check local codes for appropriate vent piping materials.
Position the machine in a manner that avoids excessive vent bends (elbows),
and long horizontal runs.
Keep air inlets and outlets free from obstruction. Ensure that there are no bulky
objects or sheets/covers near or on the machine.
Routing the
vent piping
Route the venting pipes in a manner that avoids flammable materials.
Route the venting pipes in a manner that avoids contact with people.
Sufficient draft shall be created to assure safe and proper operation of the
machine (minimum 0.05 wc).
Avoid any 90° elbows or bends in at least the first 10 feet (3m) of exhaust ducts.
Terminat i ng
the vent
piping
When the machine is connected to a flue pipe, the flue pipe shall terminate in a
vertical section at least two feet (0.6m) long.
If exhaust is to be vented out the side of a building, as shown in the lower left
diagram, the end of the exhaust pipe should be vertical and at least 2 feet
(0.6m) long. A rain cap should be installed to avoid any potential downdraft or
back pressure on the exhaust system.
28 ghi_tx001447gb.fm
Page 29
HI 110 / 200 / 300 Operation
Note: The above venting diagram shows suggested venting layouts only. Consult
all appropriate governing bodies or local contractor for venting and fresh air
requirements.
ghi_tx001447gb.fm 29
Page 30
Operation HI 110 / 200 / 300
4.9 Installing the Heater Duct
Overview
Requirements
Procedure
Optional ducts can be connected to the air outlet. This allows warm air to be evenly
distributed throughout the heating area.
NOTICE: When using ducts, observe the static air pressure limits specified in
Technical Data.
Machine shut down and cooled
Machine properly positioned
CAUTION
Hot surface hazard. The machine surfaces may be hot.
f Allow the machine to cool for a minimum of ten minutes before touching it.
To install the ducts, carry out the following procedure.
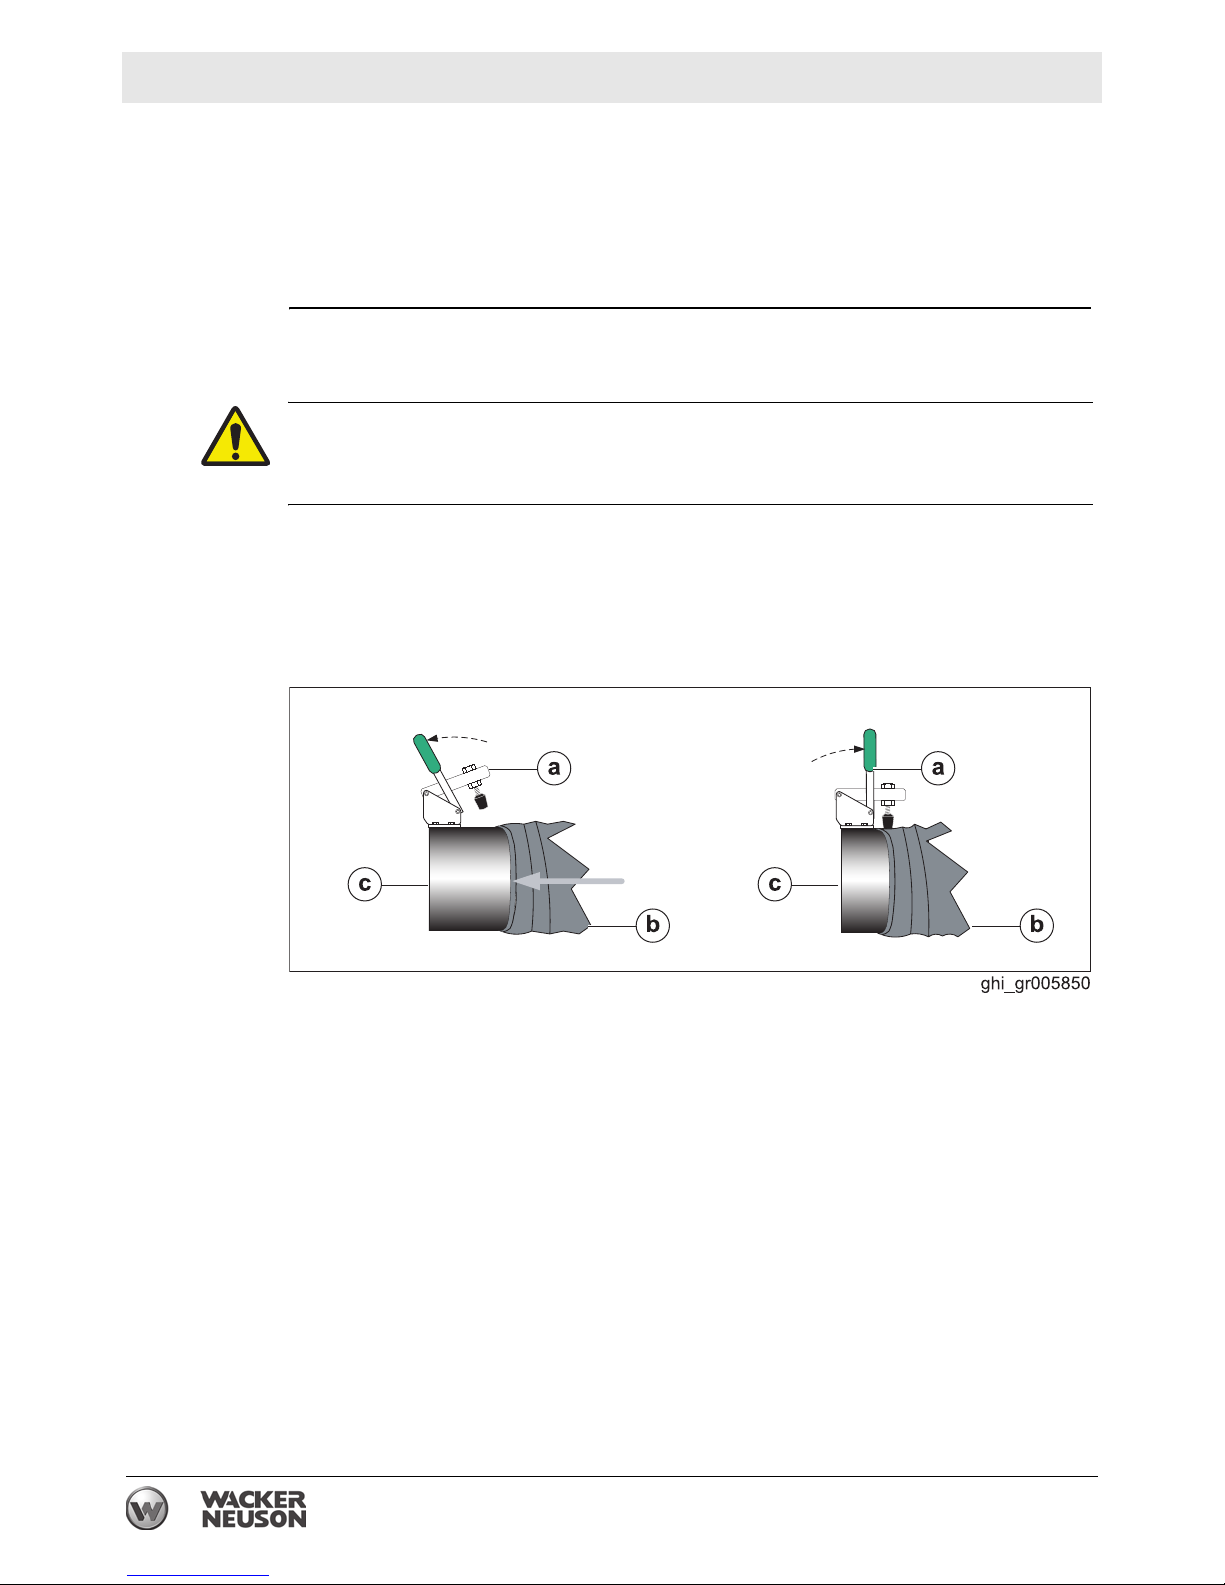
1. Open the clamps (a).
2. Slide the duct (b) onto the duct adapter (c).
3. Close the clamp to secure the duct in place.
30 ghi_tx001447gb.fm
Page 31
HI 110 / 200 / 300 Operation
4.10 Flex Ducting Options
Refer to the chart below for the maximum allowable return and supply duct lengths
for your machine.
NOTICE: Do not exceed the maximum total lengths specified in the chart.
Exceeding these lengths, or blocking any of the duct openings, constricts the air
flow through the machine and may cause a high-temperature shut-down fault.
MODEL RETURN DUCTING SUPPLY DUCTING
—Return
adapter
HI 110
HI 200 14 in. 25 1 25 ft 25 ft
HI 200 2 X 12 in. 25 1 25 ft 50 ft
HI 300 16 in. 25 1 25 ft 25 ft
HI 300HD 2 X 12 in. 25 1 25 ft 50 ft
Return ductwork not available.
duct
Maximum
number of
25 ft. duct
sections
To ta l
combined
length
Supply
duct
adapter
12 in. 25 1 25 ft 25 ft
Length of
each duct
section
(ft)
Maximum duct sec-
tions per opening
Qty Length
Tot a l c o m -
bined
length
ghi_tx001447gb.fm 31
Page 32

Operation HI 110 / 200 / 300
4.11 Connecting Power to the Machine
Requirements
Extension
cords
Power source (115VAC)
Machine properly positioned
Operation mode switch in the OFF (0) position
]
WARNING
Fire hazard and electric shock hazard. The use of under-sized extension cords can
lead to fire and electric shock. Fire and electric shock can cause severe injury.
f Do not use under-sized extension cords.
Restrictions for extension cords:
Use only 3-wire type extension cords with heavy-duty plugs.
The maximum length of extension cord usage per circuit is 30 m (100 ft).
Use 12-gauge extension cords for lengths up to 15 m (50 ft).
Use 10-gauge extension cords for lengths up to 30 m (100 ft).
CAUTION
Burn hazard. The self-regulating fuel heater, located inside the fuel filter canister,
will initiate when power is connected to the machine. The surface of the fuel filter
canister may become very hot.
f Use caution when working with the fuel filter canister.
Procedure
Perform the procedure below to connect power to the machine.
1. Verify that the operation mode switch is in the OFF (0) position.
2. Connect the main power cord cord to a properly-rated power source.
Note: If the ambient temperature is below freezing, wait 10–30 minutes before
proceeding.
32 ghi_tx001447gb.fm
Page 33

HI 110 / 200 / 300 Operation
4.12 Pre-Starting Checks
Requirements
Checks
Machine properly positioned
Power connected to the machine
Before starting the machine, check the following items:
Item Task
Fuel sight gauge (if equipped) Check that the fuel tank is full (if applicable).
Fuel tank cap Check that the fuel tank cap (if applicable) is
secure.
Operation mode switch Check that the operation mode switch is in the
OFF position.
Main control panel Check that proper power supplies have been con-
nected at the main control panel. See topic
Connecting Power to the Machine.
Remote thermostat (if installed) Check that the remote thermostat has been cor-
rectly installed. See topic Installing the Remote
Thermostat or Thermostat Receptacle Plug.
Ducts and duct adapters Check that all ducts and duct adapters have been
properly installed. See topic Installing the Heater
Duct.
Result
The machine is ready to turn on.
ghi_tx001447gb.fm 33
Page 34

Operation HI 110 / 200 / 300
4.13 Starting the Machine
Requirements
Procedure
Machine properly positioned
Power connected
Pre-Starting Checks completed
To start the machine, follow the procedure below.
1. Select an operation mode.
a. Continuous heat mode (I)
b. Thermostat mode (II)
0
wc_gr007558
Operational
sequence
Nozzle heater
The following sequence of events will occur.
1. The blower will start.
Note: HI 200 HD and HI 300 HD machines are equipped with an additional heater
that warms the nozzle to the required operating temperature.
2. The burner will start firing.
If a remote thermostat is not being used, the burner will fire continuously.
In applications in which the remote thermostat is being used, the burner will fire
until the air temperature of the application area reaches the target temperature
set by the remote thermostat. At that time, the burner will shut off, but the blower
will continue to operate. When the air temperature of the application area falls
below the target temperature set by the remote thermostat, the burner will refire.
The process continues as long as there is fuel for the burner.
34 ghi_tx001447gb.fm
Page 35

HI 110 / 200 / 300 Operation
4.14 Starting the Machine in Extremely Cold Weather
Background
Preheating
the fuel
In temperatures below 32°F (0°C), it may be necessary to preheat the fuel inside
the fuel filter canister. The fuel filter canister is equipped with a low-wattage heating
element specially designed for this purpose.
HI 200 HD and HI 300 HD machines are also equipped with a thermostatically
controlled nozzle heater as described below.
.
WARNING
Burn hazard. The external surface of the fuel filter may be hot.
f Wear safety gloves when handling the fuel filter.
Note: Excess heating may increase the need for maintenance. See topics
“Replacing the Fuel Filter” and “Replacing the Burner Nozzle”.
To preheat the fuel, carry out the following procedure.
1. Connect power to the machine. See topic Connecting Power to the Machine.
2. Wait up to 30 minutes—longer for colder temperatures.
3. Start the machine. See topic Starting the Machine.
Note: In extreme wind, the machine may need to be temporarily blocked from the
wind in order to start.
Troubleshooting
Nozzle heater
4. If the burner does not start on the first attempt, allow the power-on sequence to
cycle again.
5. If, after the second power-on sequence completes, the machine will not fire,
move the power switch to the OFF position.
6. Wait another 20-30 minutes and attempt to start the machine again.
The burner may not fire immediately on startup if the nozzle is cold. HI 200 HD and
HI 300 HD machines are equipped with an additional heater that warms the nozzle
to the required operating temperature.
ghi_tx001447gb.fm 35
Page 36

Operation HI 110 / 200 / 300
4.15 Stopping the Machine
Procedure
Shutdown
sequence
Follow the procedure below to stop the machine.
WARNING
Electric shock hazard. Electric power is still active at the blower even when the
machine is turned OFF.
f Remove all electric power to the machine before servicing the machine.
1. Turn the operation mode switch to the OFF (0) position (c).
0
The following sequence of events will occur after turning the machine off.
1. The burner will shut down.
2. The blower will stop when the machine is sufficiently cool.
36 ghi_tx001447gb.fm
Page 37

HI 110 / 200 / 300 Operation
4.16 Burner Faults
The burner fault lamp / reset button (a) is illuminated while the machine is
operating. The lamp is green during normal operation.
Burner fault
A burner fault occurs if the burner does not start after two failed attempts to start or
restart upon shutdown. The lamp will turn red.
f To clear a burner fault, press and hold the burner fault lamp / reset button for
2–3 seconds until the lamp goes out.
f Re-start the machine.
f If the burner fault re-occurs, see Basic Troubleshooting.
WARNING
If three consecutive attempts to reset the machine are unsuccessful, then troubleshoot the
heating system for the root cause(s) of the lockout.
f Make necessary repairs or adjustments to ensure a safe start condition.
f Ensure that the heat exchanger is free of oil and oil vapors before starting or resetting
the burner.
ghi_tx001447gb.fm 37
Page 38

Operation HI 110 / 200 / 300
4.17 Installing and Using the Remote Thermostat
Requirements
Procedure
Remote thermostat
Pre-starting checks complete
Follow the procedure below to install and use the remote thermostat.
1. Remove the protective cap (a) from the control panel receptacle.
2. Connect the remote thermostat (b) to the control panel receptacle (c).
3. Set the sensor end (d) within the area to be heated.
4. Adjust the target temperature with the dial (e).
b
a
d
Result
Thermostat
adapter
e
c
b
wcghi_gr007405
The machine will now be controlled by the remote thermostat.
An adapter is available to convert the proprietary thermostat connection to an
Edison plug style connection for use with commonly available thermostats. This
adapter can be purchased using Wacker Neuson part #5200007098.
NOTICE: The thermostat adapter is designed for use ONLY with a thermostat. To
avoid damaging the machine, do not plug any other equipment into the thermostat
adapter.
38 ghi_tx001447gb.fm
Page 39

HI 110 / 200 / 300 Accessories
5 Accessories
5.1 Available Accessories
Introduction
Wacker Neuson Corporation offers many optional accessories for this machine.
These accessories are described below. Contact your local Wacker Neuson dealer
or visit www.wackerneuson.com for ordering information.
Item Description/Purpose
Remote thermostat Allows the user to remotely control the target
temperature
Exhaust pipe An insulated exhaust pipe that offers a method of
directing exhaust away from the application area
Inlet and outlet covers Vinyl covers that protect the interior of the machine
from the elements during transport or storage
Duct adapters—various sizes Various sizes of detachable inlet and outlet adapters
Flexible ducts—various sizes Vinyl ducts that offer a method of directing inlet and
outlet air
Exhaust support bracket Bracket to support exhaust vents
Exhaust vent rain cap Metal cap to protect exhaust pipes from the elements
ghi_tx001448gb.fm 39
Page 40

Burner Setup HI 110 / 200 / 300
5
6 Burner Setup
6.1 Removing the Access Panel
Requirements
Overview
Procedure
Machine shut down and cooled
Machine properly positioned
CAUTION
Hot surface hazard. The machine surfaces may be hot.
f Allow the machine to cool for a minimum of ten minutes before touching it.
Your machine is equipped with a removable access panel. The access panel must
be removed in order to maintain and repair certain machine components such as
the burner, electric motor, and fuel pump.
Follow the procedure below to remove the access panel.
1. Shut down the machine and allow it to cool.
2. Disconnect the power cord from the power source.
3. Remove the screws that fasten the access panel (g).
Note: There are six screws to remove on the HI 110; four screws to remove on the
HI 200 and HI 300.
g
g
4. Remove the access panel and set it aside.
5. Perform the required maintenance.
6. When maintenance is complete, reinstall the access panel and fasten it with the
screws.
wc_gr00738
40 ghi_tx001449gb.fm
Page 41

HI 110 / 200 / 300 Burner Setup
6.2 Removing and Installing the Burner Assembly
Requirements
Procedure
Removal
Machine shut down and cooled
Machine properly positioned
CAUTION
Hot surface hazard. The machine surfaces may be hot.
f Allow the machine to cool for a minimum of ten minutes before touching it.
Before performing any maintenance on the burner assembly, it must be removed
from the machine. To remove or install the burner assembly perform the following
procedure.
1. Shut down the machine and allow it to cool.
2. Disconnect the power cord from the power source.
3. Remove the access panel. See topic Removing the Access Panel.
e
d
Installation
c
b
wc_gr007378
4. Remove the screw (d) to disconnect the ground wire (c) from the burner
assembly (b).
5. Rotate the burner assembly counter-clockwise and remove it from the flame
head and air tube assembly (e).
6. Perform the required maintenance.
Note: Refer to the maintenance procedures in this manual.
7. Reinstall the burner assembly. Refer to the steps below to install the burner
assembly.
1. Place the burner assembly into the flame head and air tube assembly.
2. Rotate the burner assembly clockwise to lock it into place.
3. Install the ground wire using the screw (d).
4. Reinstall the access panel.
ghi_tx001449gb.fm 41
Page 42
Burner Setup HI 110 / 200 / 300
6.3 Setting Up the Burner
Factory
settings
Machine Nozzle size Fuel pressure Air band setting
gph psi bar Diesel Winter blend
HI 110 D 0.55 x 80W 217 15 3.0 2.0
HI 110 HD D 0.55 x 80W 217 15 3.0 2.0
HI 200 D 1.10 x 80W 181 12.5 3.8 3.0
HI 200 HD D 1.10 x 80W 181 12.5 3.3 2.6
HI 300D 1.50 x 80W 200 13.8 6.8 3.4
HI 300HD D 1.50 x 80W 200 13.8 3.5 3.2
Background
Tools required
Mandates
When
The burner consists of several different components and subsystems. Each of these
components or subsystems must be operating correctly for the burner to function properly.
The following tools are required to adjust the burner:
High-quality combustion analyzer
Smoke spot tester
Fuel pressure test gauge
General hand tools
Adjustments made shall be done so that the machine conforms to the require-
ments of local, state, and federal codes and authorities.
Adjustments shall be made at the job site.
Adjust the burner:
Before operating the machine at elevations 305 m (1,000 ft) above or below the
location of where the last adjustments were made
Before starting at a new job site
After any burner maintenance or repair has been performed
If burner performance is in question
Procedure
Follow the procedure below to set up the burner.
1. Shut down the machine.
2. Set the burner electrodes.
(See topic Checking and Adjusting the Oil Burner Electrodes.)
3. Check the burner nozzle.
(See topic Checking/Changing the Burner Nozzle.)
4. Set the air band.
(See topic Setting the Air Band.)
5. Start the machine and the burner.
6. Check/set the fuel pressure.
(See topic Adjusting the Fuel Pressure.)
42 ghi_tx001449gb.fm
Page 43
HI 110 / 200 / 300 Burner Setup
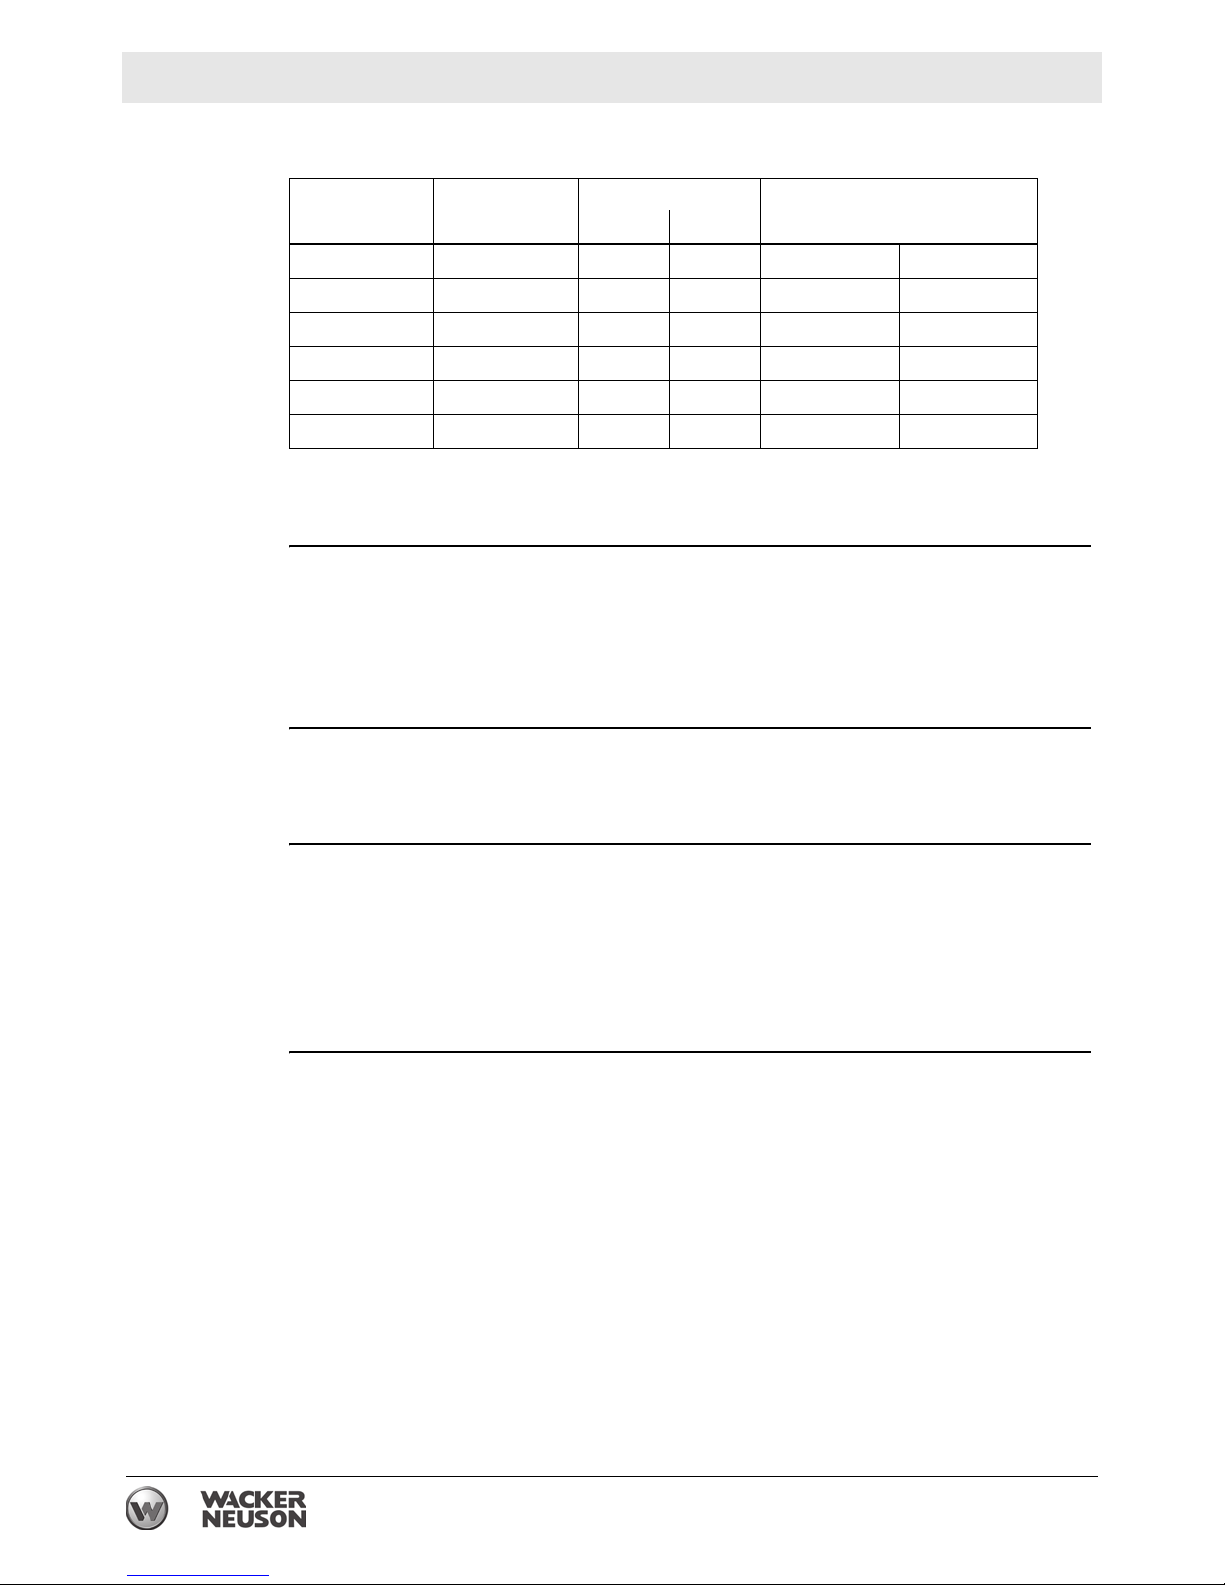
7. Conduct a smoke spot test. Follow the smoke spot tester manufacturer’s
instructions and the general guidelines below.
HI Heater
ghi_gr007395
Use the access hole in the exhaust stack.
Several samples should be taken as the heater warms.
The final sample should be taken just before the heater reaches 71°C (160°F).
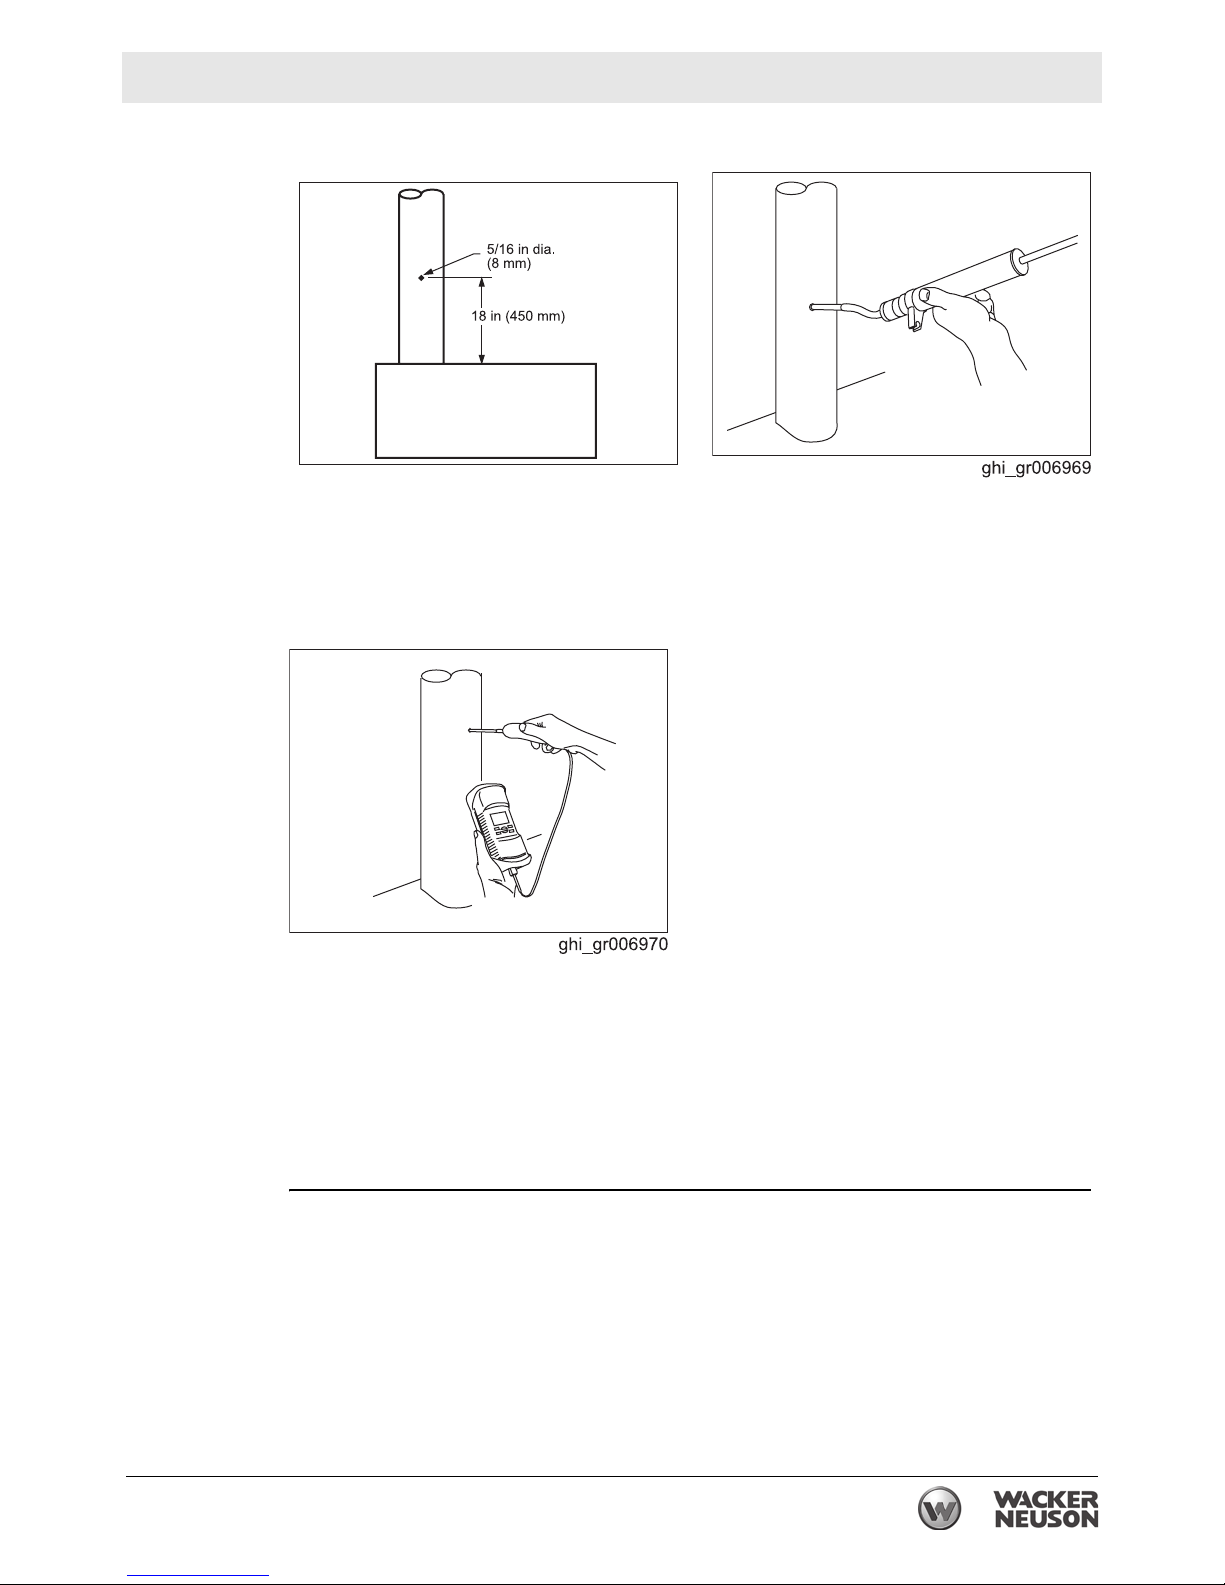
8. Analyze the combustion. Follow the combustion analyzer manufacturer’s
instructions and the general guidelines below.
Use the access hole in the exhaust stack.
Take several samples as the heater warms.
Take the final sample just before the heater reaches 71°C (160°F).
9. Re-adjust the air band, if necessary, until the smoke spot test and combustion
analysis are within the following parameters:
O
content: 3–5%
2
Smoke spot: less than 1
Result
ghi_tx001449gb.fm 43
The burner has now been set.
Page 44

Burner Setup HI 110 / 200 / 300
6.4 Checking the Oil Burner Electrodes
Requirements
When to
inspect
Procedure
Machine shut down
Power disconnected
Burner cool
Inspect the electrodes on your machine every two weeks or after every 50 hours of
operation. The condition of the electrodes will drastically affect your machine’s
ability to fire efficiently.
Remove the burner assembly and inspect the condition of the electrode tips (a).
Refer to the table below to determine the condition of the electrode tips.
a
b
a
c
wc_gr007619
Condition Task
None; ok as-is
None; ok as-is
Replace
The electrodes should be replaced if they are worn or damaged. Contact your
Wacker Neuson dealer for replacement electrodes.
44 ghi_tx001449gb.fm
Page 45

HI 110 / 200 / 300 Burner Setup
ghi_g
6.5 Checking/Changing the Burner Nozzle
Prerequisites
When
Removing the
nozzle
Installing the
nozzle
Machine shut down and cool to the touch
Machine properly positioned
CAUTION
Hot surface hazard. The machine surfaces may be hot.
f Allow the machine to cool for a minimum of ten minutes before touching it.
Replace the burner nozzle annually, or if it is damaged.
To replace the burner nozzle, carry out the following procedure.
1. Remove the burner. See topic Removing and Installing the Burner Assembly.
2. Place an adjustable wrench on the large fitting (a) on the nozzle base (c).
3. Place another adjustable wrench on the nozzle (b).
4. Rotate the nozzle counter-clockwise and remove it from the assembly.
5. Install the new nozzle (b) onto the nozzle base (c).
6. Tighten the nozzle (b) using an adjustable wrench. Rotate the wrench
clockwise.
7. Reinstall the burner assembly. See topic Removing and Installing the Burner
Assembly.
b
a
c
ghi_tx001449gb.fm 45
r007408
Page 46
Burner Setup HI 110 / 200 / 300
9
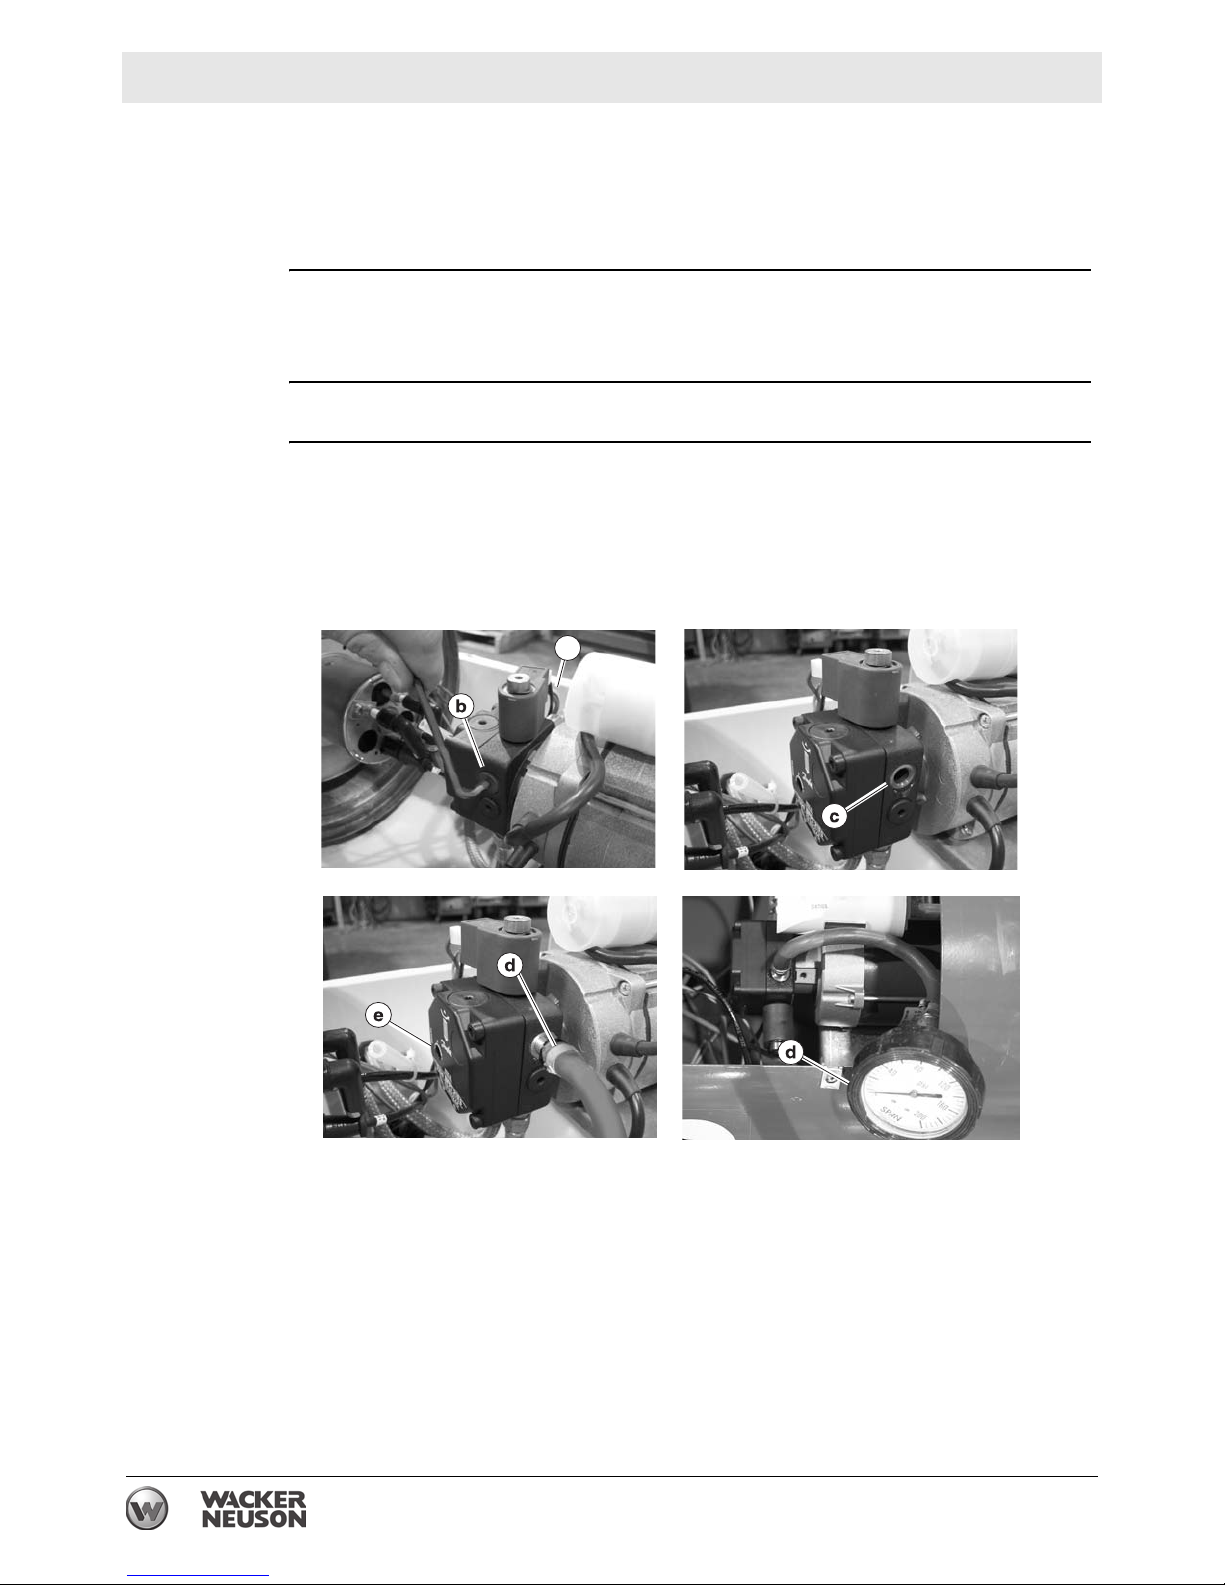
6.6 Adjusting the Fuel Pressure
Requirements
Background
When to
check
Procedure
Machine shut down and cool to the touch
Power disconnected
Fuel pressure gauge
The information below will show you how to check the fuel pressure on your
machine. Incorrect fuel pressure will result in too much fuel, or too little fuel, to be
supplied to the burner. This will cause the machine to smoke during operation.
Check the fuel pressure if the machine emits smoke during operation.
To check and/or adjust the fuel pressure, carry out the following procedure.
1. Remove the access panel. See topic Removing the Access Panel.
2. Disconnnect one of the wires from the solenoid valve (a).
3. Remove the threaded plug (b) from the pressure test port (c) using a hex key
wrench. Set the plug in a safe location to be re-installed later.
a
4. Install a pressure gauge with adapter (d) in the pressure test port.
5. Start the machine. See topic Starting the Machine.
6. With the machine running, verify the fuel pressure setting during the preventilation period (approximately 15 seconds). Refer to the Technical Data
charts in this manual for the correct settings.
7. After the pre-ventilation period, the absence of a flame will cause the machine to
stop in safety mode. Press the reset button to enable re-start if the fuel pressure
needs adjustment.
ghi_gr00737
46 ghi_tx001449gb.fm
Page 47
HI 110 / 200 / 300 Burner Setup
9
Adjusting fuel
pressure
8. Adjust the fuel pressure if necessary using the adjusting screw (e) and re-check
the settings. Repeat steps 4–6 to re-check the settings.
NOTICE: Do not adjust the fuel pressure to a setting outside the safe operational
parameters.
9. Remove the pressure gauge (d) from the pressure test port (c).
10.Re-install the threaded plug (b) into the pressure test port (c).
11.Re-connect the solenoid wire.
12.Close the access panel and re-install the two bolts (a) that secure the panel.
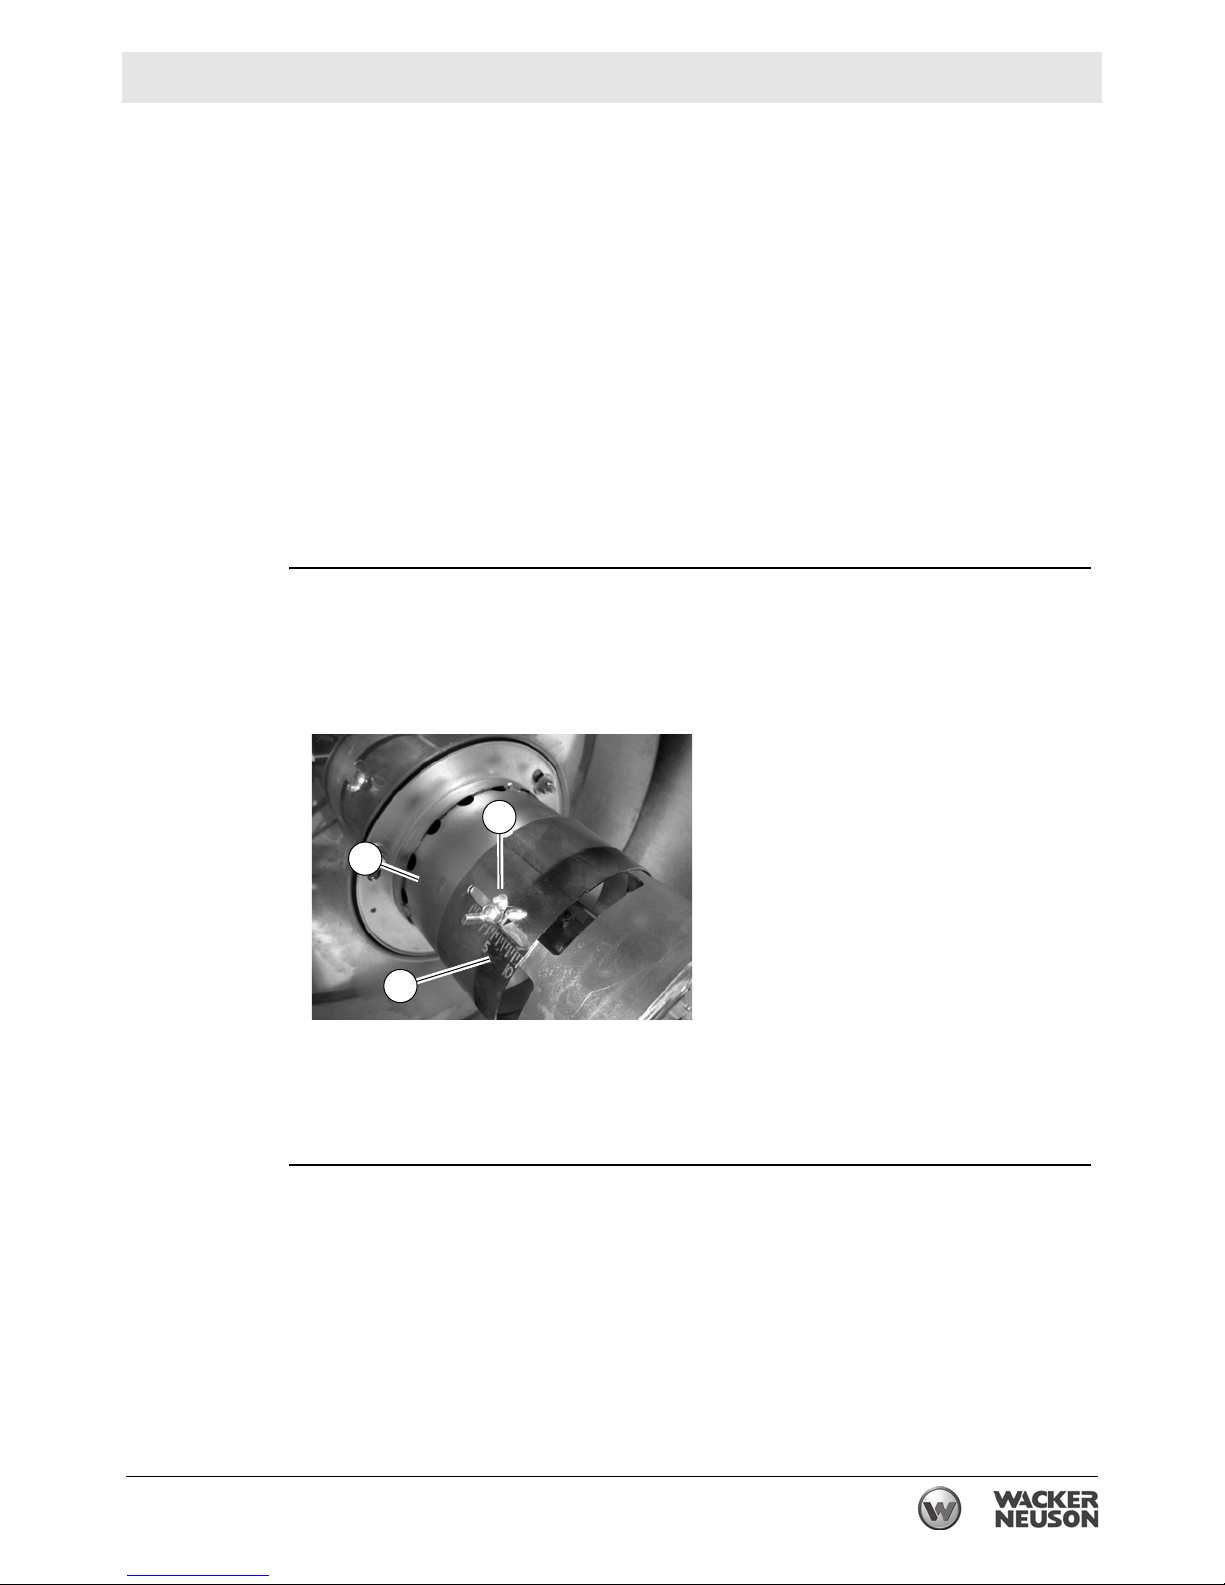
6.7 Setting the Air Band
Requirements
Procedure
Machine shut down
Power disconnected
Perform the procedure below to set the air band.
1. Shut down the machine and allow it to cool.
2. Disconnect the power cord from the power source.
3. Remove the access panel. See topic Removing the Access Panel.
Result
a
b
c
ghi_gr00740
4. Loosen the wing nut (a) and slide the air band (b) as needed. The front edge
should line up with the graduations (markings) on the flame head (c).
5. Tighten the wing nut.
The air band has now been set.
ghi_tx001449gb.fm 47
Page 48

Maintenance HI 110 / 200 / 300
7 Maintenance
7.1 Periodic Maintenance Schedule
Interval*
(hours of service)
Daily 2 Weeks 6 Months Yearly
Task
Inspect the heater.
Inspect the hose assembly.
Check fuel level and
pressure.
Clean the machine.
Clean the fuel filter.
Clean the fan and the
interior shell.
Clean and check/adjust
burner electrode settings.
Inspect the heat exchanger.
Inspect electrical
components.
Inspect the blower motor
and belts. Replace the belt
if necessary.
--- (50) (1000) (1200)
Replace the burner nozzle.
Replace the fuel heater
filter.
Maintain the heater
weldment.
Inspect and test the burner. As needed or upon changing job sites;
see chapter Burner Setup.
Inspect burner electrodes;
replace if necessary.
*
Use whichever comes first, calendar time or service hours.
As needed or upon changing job sites;
see chapter Burner Setup.
48 ghi_tx001450gb.fm
Page 49

HI 110 / 200 / 300 Maintenance
7.2 Inspecting the Heat Exchanger
Introduction
Reasons for
inspection
When
The heat exchanger consists of the combustion chamber and an outer shell. As
intake air flows over the hot combustion chamber, it collects heat. The heated
intake air is then blown out of the supply ducts.
A cracked or damaged heat exchanger is hazardous! Poisonous carbon monoxide
gas can escape from the heat exchanger and enter the clean air stream.
Combustible gases may also ignite the surrounding insulation material, causing a
fire.
To ensure a safe operating condition, the heat exchanger must be inspected
regularly for damage.
DANGER
Asphyxiation hazard. Gases escaping from a cracked or damaged heat exchanger
contain carbon monoxide (CO). This is a poison you cannot see or smell. CO can
kill you in minutes!
f Do not operate the machine if it has a cracked or damaged heat exchanger.
Inspect the heat exchanger at least twice a year as part of the regularly scheduled
maintenance program.
Inspect the heat exchanger more often if any of the following conditions exist:
The machine has been transported over extremely rough roads or terrain.
The machine / transport vehicle has been involved in an accident.
The machine has been dropped.
There is visible damage to the heater shell.
The burner has been improperly adjusted and is over-firing.
There is doubt about whether regularly scheduled maintenance has been
performed.
The safety systems have been bypassed by improper or modified wiring.
NOTICE: If the machine wiring has been altered, correct the wiring before
operating the machine.
Requirements
Power disconnected from the machine.
Machine cool. Do not inspect a hot heat exchanger.
Assistant to aid in the inspection
Lifting equipment
Shop light or flash light
Inspection mirror
This procedure continues on the next page.
ghi_tx001450gb.fm 49
Page 50

Maintenance HI 110 / 200 / 300
Continued from the previous page.
Access
procedure
Follow the procedure below to access the heat exchanger.
1. Remove the access panel (a). (See Removing the Access Panel.)
d
a
a
c
c
b
c
e
wc_gr008456
2. Loosen the three nuts (b) securing the burner tube assembly (c). Rotate and
remove the burner tube assembly.
3. Remove the cover (d) from HI 200 and HI 300 machines.
4. Remove the bolts that secure the heat exchanger (e) to the lower shell.
5. Lift the heat exchanger out for visual inspection by either of the following
methods:
Use a hoist with non-marring straps and approved rigging devices
Use a team of four people to lift the heat exchanger by hand, using safe lifting
practices and techniques.
The heat exchanger can now be inspected.
This procedure continues on the next page.
50 ghi_tx001450gb.fm
Page 51

HI 110 / 200 / 300 Maintenance
Continued from the previous page.
Inspection
procedure
Follow the procedure below to inspect the heat exchanger.
1. Using a strong light and inspection mirror, inspect the outer shell of the
combustion chamber for cracks or separations.
2. Inspect welded areas.
3. Use the light and mirror to examine the interior of the combustion chamber for
cracks or separations. Also, inspect the burner tube assembly mounting surface
(f) for damage.
g
f
wc_gr008458
4. Have an assistant shine the light over the exterior shell of the combustion
chamber while you peer through the burner mounting hole (g). Look for signs of
light inside the combustion chamber.
Results
Reassembly
Do not use the machine if any of the following conditions exist. Contact Wacker
Neuson Product Support for assistance.
Cracks or separations are discovered in the heat exchanger
Soot is vislble on the exterior (air side) of the heat exchanger
There are cracks or damage to the burner tube assembly mounting surface.
Note: Light surface rust is normal.
Follow the procedure below to reassemble the machine after inspecting the heat
exchanger.
1. Reinstall the heat exchanger.
2. Reinstall the cover (HI 200 / HI 300 only).
3. Reinstall the burner tube assembly.
4. Reinstall the access panel.
The machine has now been reassembled.
ghi_tx001450gb.fm 51
Page 52

Maintenance HI 110 / 200 / 300
7.3 Changing the Fuel Heater Filter
Prerequisites
Procedure
Machine shut down
Power disconnected
Burner cool
CAUTION Hot surface hazard.
The external surface of the fuel filter canister may be hot.
f Allow the machine to cool before servicing.
WARNING Hot fluids.
The fuel inside the fuel filter canister may be hot.
f Wear safety glasses.
Follow the procedure below to change the fuel heater filter.
1. Disconnect the power, shut down the machine, and allow it to cool.
2. Remove the screw that secures the cover to the housing (a).
3. Remove the filter (b).
4. Inspect the O-ring (c). Replace it if it is cracked, damaged, or deformed.
5. Install the new filter.
6. Reinstall the cover.
Result
The procedure to replace the fuel heater filter is now complete.
52 ghi_tx001450gb.fm
Page 53
HI 110 / 200 / 300 Maintenance
0
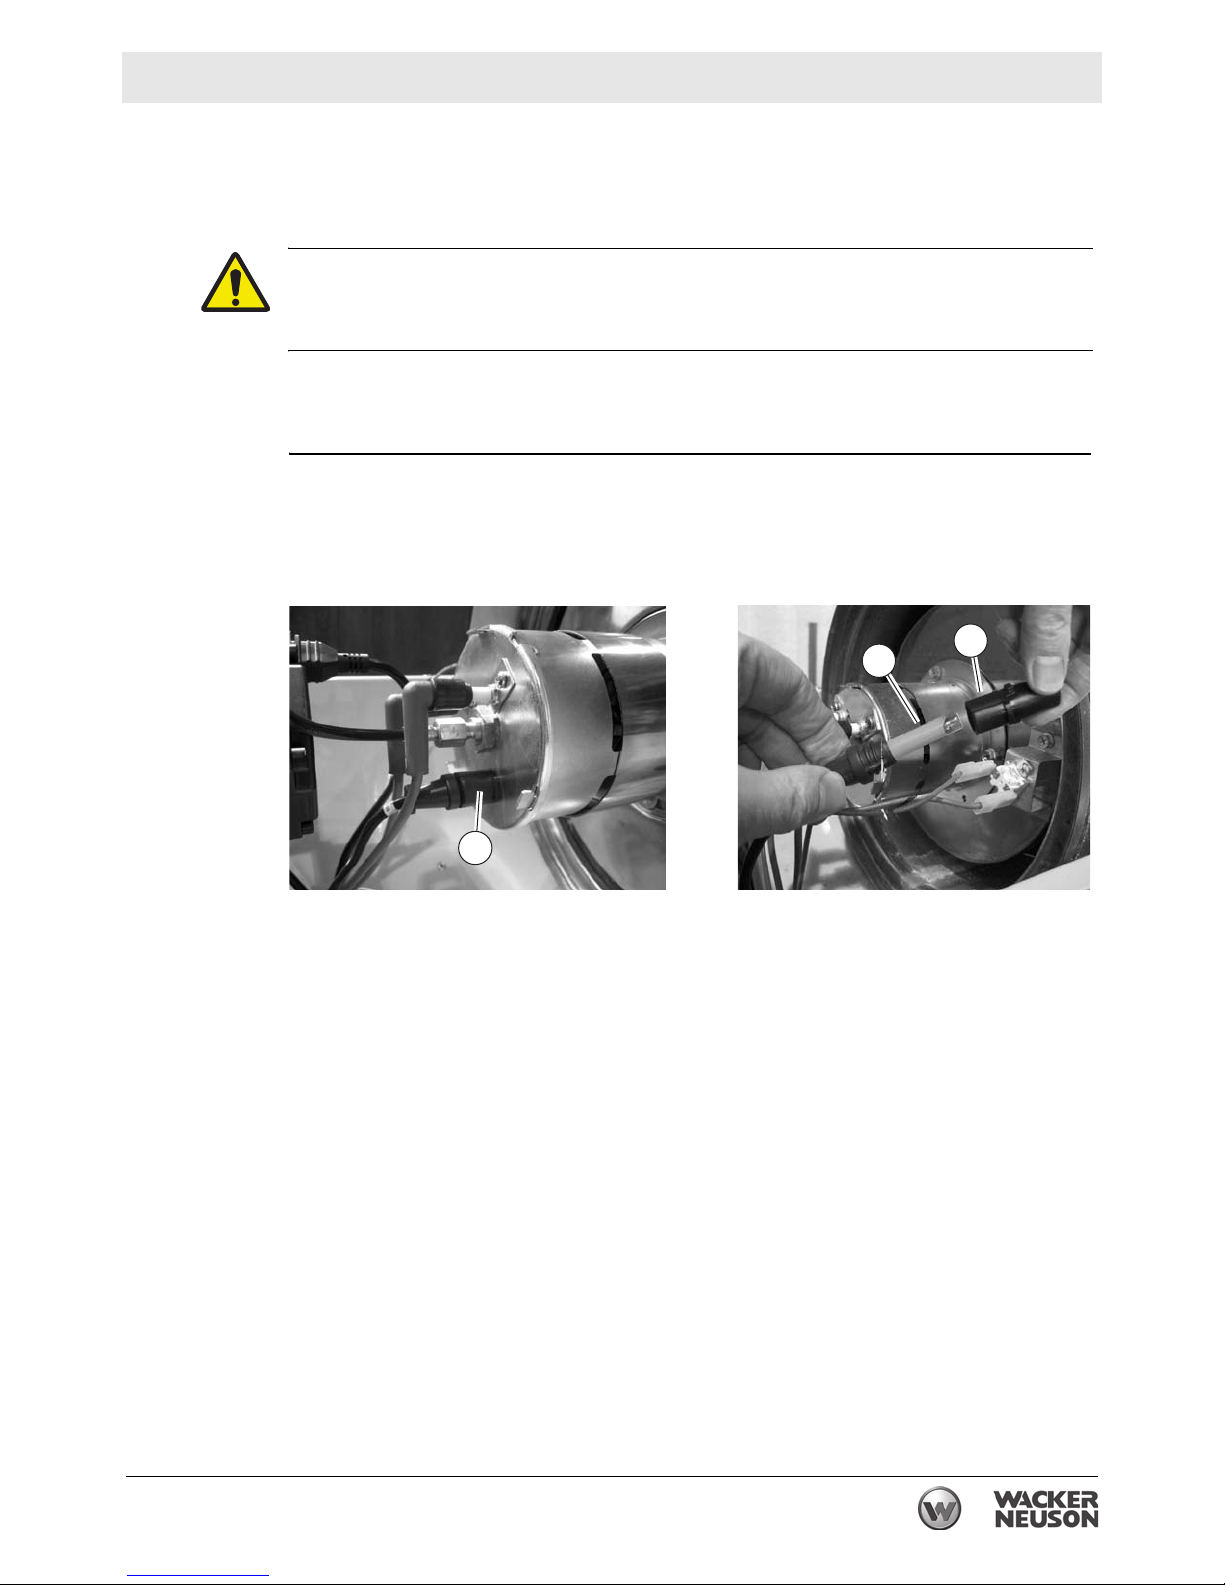
7.4 Inspecting and Cleaning the Cadmium (CAD) Cell
Prerequisites
When
Machine shut down and cool to the touch
Machine properly positioned
CAUTION
Hot surface hazard. The machine surfaces may be hot.
f Allow the machine to cool for a minimum of ten minutes before touching it.
Inspect and clean the CAD cell as needed, or while performing other scheduled
maintenance procedures.
To inspect and clean the CAD cell, carry out the following procedure.
1. Remove the access panel. See topic Removing the Access Panel.
2. Twist and pull out the plastic protective holder
(1) off the base of the burner
assembly. The CAD cell (2) is inside this plastic holder.
1
2
1
ghi_gr00737
3. Inspect the CAD cell for cleanliness. Be sure the cell is free of debris or soot.
4. Clean the CAD cell if necessary.
NOTICE: Do NOT use solvents or liquids to clean the CAD cell. Use a soft dry
cloth to clean the CAD cell.
5. Reinstall the plastic protective holder onto the base of the burner assembly.
ghi_tx001450gb.fm 53
Page 54

Maintenance HI 110 / 200 / 300
7.5 Cleaning the Fan Blades and Motor
Prerequisites
When
Machine shut down and cool to the touch
Power source disconnected
WARNING
Electric shock hazard. Electric power is still active at the blower even when the
machine is turned OFF.
f Remove all electric power to the machine before performing this procedure.
CAUTION
Hot surface hazard. The machine surfaces may be hot.
f Allow the machine to cool for a minimum of ten minutes before touching it.
Clean the fan blades and motor prior to the first seasonal use, every 1200 hours or
annually, or as needed.
To clean the fan blades and motor, carry out the following procedure.
1. Remove the fan guard (f). There are four screws that secure the fan guard.
f1
f
HI 110D
HI 110D
HI 200 / HI 300
HI 200 / HI 300
g
m
ghi_gr007380
2. Remove the the access panel (g). See topic Removing the Access Panel.
This procedure continues on the next page.
54 ghi_tx001450gb.fm
Page 55

HI 110 / 200 / 300 Maintenance
3. Inspect and, if necessary, clean the motor (m) using compressed air.
4. Clean the fan blades using a stiff brush.
5. Reinstall the internal access panel.
6. Reinstall the fan guard.
7.6 Cleaning the Interior Shell
Prerequisites
When
Machine shut down and cool to the touch
Power source disconnected
CAUTION
Hot surface hazard. The machine surfaces may be hot.
f Allow the machine to cool for a minimum of ten minutes before touching it.
Clean the interior shell prior to the first seasonal use, every 1200 hours or annually,
or as needed.
To clean the interior shell, carry out the following procedure.
1. Remove the fan guard. See topic Cleaning the Fan Blades and Motor.
2. Remove the internal access panel. See topic Removing the Internal Access Panel
.
3. Inspect and clean the interior shell using compressed air.
4. Re-install the internal access panel.
5. Re-install the fan guard.
ghi_tx001450gb.fm 55
ghi_gr007381
Page 56

Maintenance HI 110 / 200 / 300
2
7.7 Inspecting the Flame Head
Requirements
When
Procedure
Machine shut down and cool to the touch
Machine properly positioned
CAUTION
Hot surface hazard. The machine surfaces may be hot.
f Allow the machine to cool for a minimum of ten minutes before touching it.
Inspect the flame head prior to the first seasonal use, during regular maintenance,
and as needed.
To inspect the flame head (a), carry out the following procedure.
1. Remove the access panel. See topic Removing the Access Panel.
2. Remove the burner assembly. See topic Removing and Installing the Burner
Assembly. The flame head is attached.
a
a
ghi_gr00738
3. Inspect the flame head for the following:
Wear. Replace if necessary.
Cleanliness. Clean the flame head if necessary.
Thermal stress. Replace if necessary.
4. Re-install the burner assembly. See topic Removing and Installing the Burner
Assembly.
56 ghi_tx001450gb.fm
Page 57

HI 110 / 200 / 300 Maintenance
7.8 Inspecting the Electrical Connections
After disconnecting the power cord, check all electrical connections for the
following:
Proper connections. Be sure that all connections are complete and tight.
Corrosion. Clean or replace if necessary.
Damaged wires/connectors. Replace if necessary.
Proper ground.
ghi_tx001450gb.fm 57
Page 58
Maintenance HI 110 / 200 / 300
7.9 Cleaning the Machine
Requirements
General
cleaning
Machine shut down
Machine cool
Clean the following areas to ensure proper operation.
Item Method/task
Burner Remove all dirt and debris. Ensure that the air intake area is
unobstructed.
Hoses, connectors,
and couplings
Trailer (if equipped) Clean with compressed air: 50 psi maximum.
Covers/machine
exterior
Air inlets/ouputs Remove all dirt and debris. Ensure that the air intake area is
Wipe clean with cloth.
Wipe clean with cloth.
unobstructed.
58 ghi_tx001450gb.fm
Page 59
HI 110 / 200 / 300 Basic Troubleshooting
8 Basic Troubleshooting
Note: The following symptoms and remedies are some of the more common
issues that have arisen during the history of these machines. These do not represent all the possibilities. If you need advanced troubleshooting assistance, please
contact Wacker Neuson Product Support.
Symptom Possible Causes Remedy
The burner does not start • The remote thermostat or
thermostat plug is not
inserted correctly.
• Faulty cable or power
supply
• The over temperature limit
has tripped
• The burner is in lock-out
mode.
The burner starts, the flame
does not ignite, the unit locks
out
•No fuel
• Worn burner nozzle
• Faulty electrodes
• Cad cell detecting external
light.
• Cad cell defective
• Burner control defective
The burner starts, flame
ignites, but the unit locks out
• Incorrect fuel pressure
• Worn burner nozzle
• Incorrect air lock setting
• Cad cell defective
• Burner control defective
• Insert the remote
thermostat or thermostat
plug.
• Check cable and power
supply
• Press the reset button.
• Fill fuel tank
• Replace burner nozzle
• Replace electrodes
• Check the Cad cell
enclosure
• Increase fuel pressure
• Replace burner nozzle
• Re-adjust air lock setting
The burner ignites but the
performance is poor
Black smoke from vent pipe • Insufficient combustion air
The machine stops due to
pressure switch fault
ghi_tx001468gb.fm 59
• Worn burner nozzle
• Clogged fuel filter
• Air leaks in the fuel lines
• Insufficient oil pressure
• Insufficient ventilation air
• Overheat condition
• Faulty pressure switch
• Incorrect nozzle
• Wrong fuel pressure
• Replace burner nozzle
• Replace the fuel filter
• Inspect the lines for leaks;
replace if necessary
• Remove any obstructions
from the air inlet and outlet
areas.
• Contact Wacker Neuson
Product Support
Page 60
Technical Data HI 110 / 200 / 300
9 Technical Data
9.1 Machine
Model
Units
Heat input BTU/hr 112,141 204,873
Heat output BTU/hr 92,516 173,117
Fuel consumption L (gal)/hr 3.1 (0.81) 5.6 (1.48)
Efficiency % 82.5 84.5
Noise level at 1 m dB (A) 74 77
Power requirement VAC/Hz 120/60 120/60
Electrical current Ampere 15 15
Weight (no fuel) kg (lb) 80 (176) 109 (240)
Height mm (in.) 978 (38.5) 983 (38.6)
Length mm (in.) 1219 (48) 1661 (65.4)
Width mm (in.) 610 (24) 762 (30)
Flue diameter mm (in.) 152.4 (6) 152.4 (6)
HI 110D
HI 110HD D
HI 200D
HI 200HD D
Fuel tank capacity L (gal) 67.4 (17.8) 105 (27.74)
60
wc_td000400gb.fm
Page 61
HI 110 / 200 / 300 Technical Data
Model
Units
Heat input BTU/hr 293,982 293,982
Heat output BTU/hr 245,475 245,475
Fuel consumption L (gal)/hr 8 (2.12) 8 (2.12)
Efficiency % 83.5 83.5
Noise level at 1 m dB (A) 75 75
Power requirement VAC/Hz 120/60 120/60
Electrical current Ampere 15 15
Weight (no fuel) kg (lb) 160 (352) 202.8 (447)
Height mm (in.) 1270 (50) 1321 (52)
Length mm (in.) 1740 (69) 2134 (84)
Width mm (in.) 762 (30) 864 (34)
Flue diameter mm (in.) 152.4 (6) 152.4 (6)
Fuel tank capacity L (gal) 134.8 (35.6) 216.1 (57.1)
HI 300D
HI 300HD D
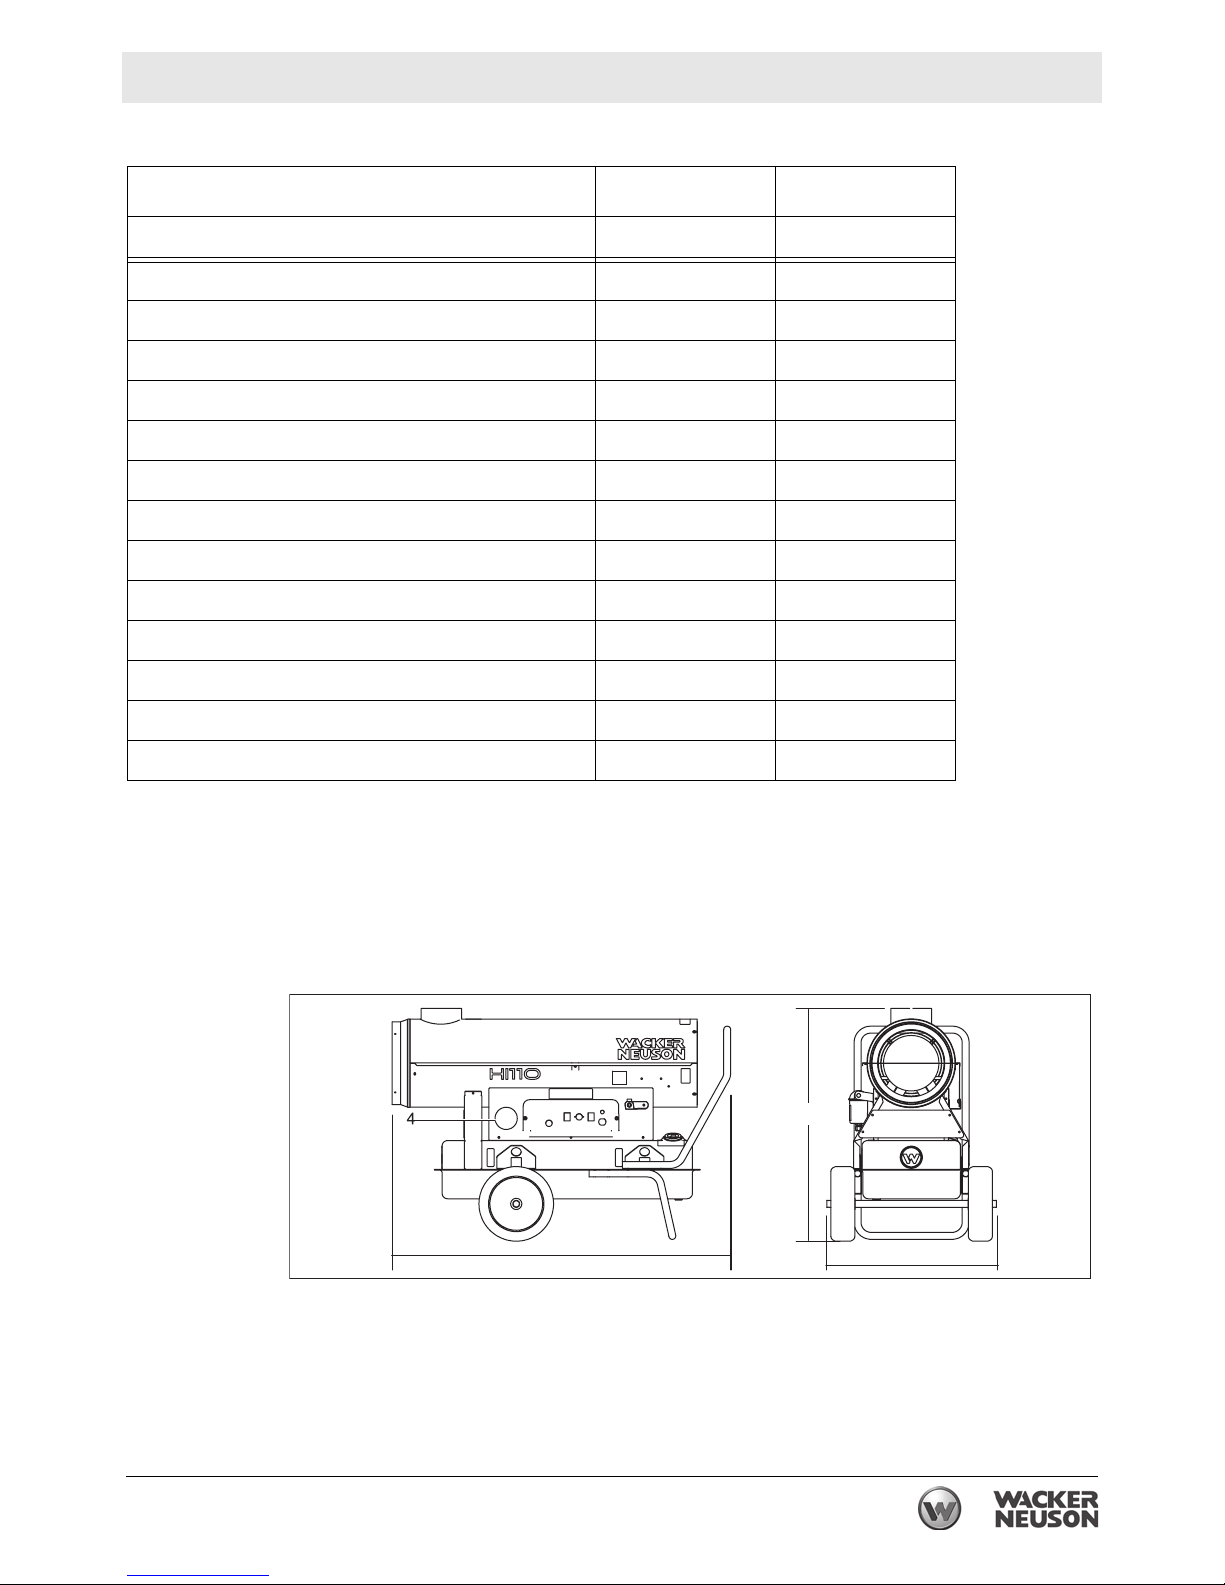
9.2 Dimensions - HI110D, HI110HD D
in. (mm)
48 (1219)
wc_td000400gb.fm
61
38.5 (978)
24 (610)
wc_gr012068
Page 62
Technical Data HI 110 / 200 / 300
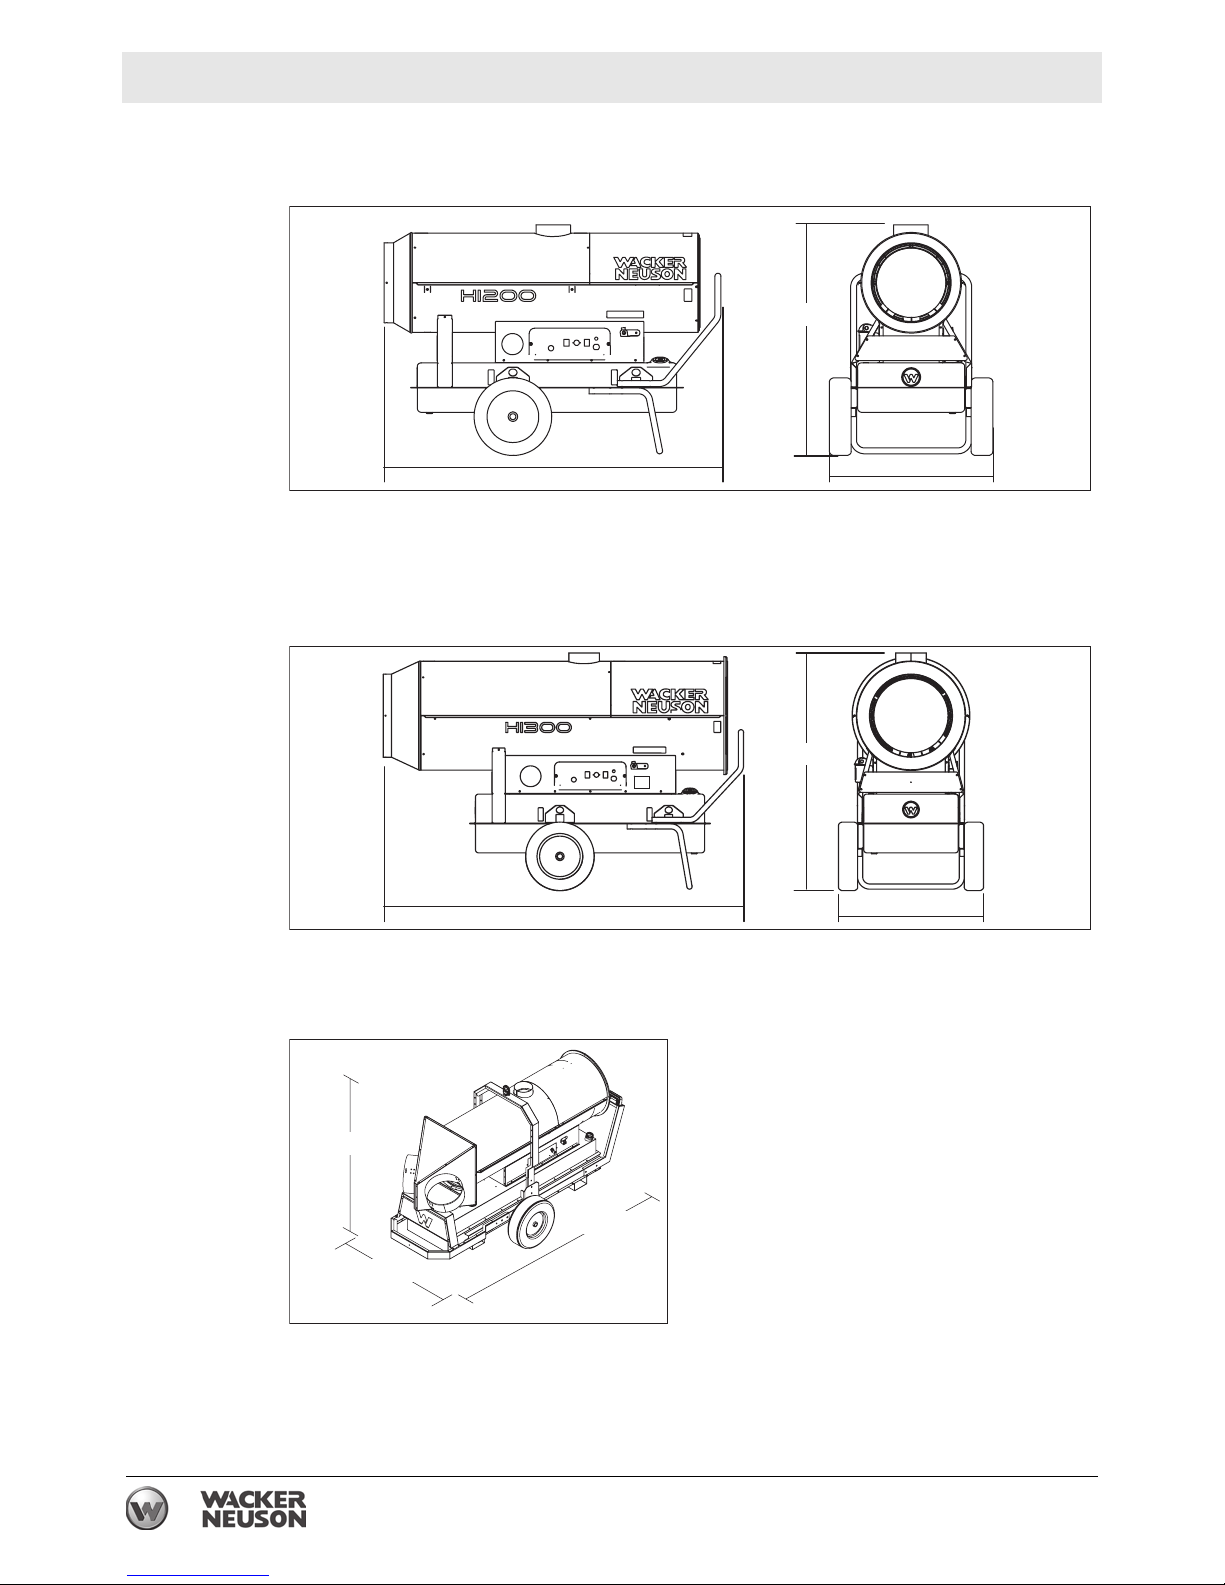
9.3 Dimensions - HI200D, HI200HD D
in. (mm)
38.6 (983)
65.4 (1661)
9.4 Dimensions - HI300D, HI300HD D
in. (mm)
69 (1740)
in. (mm)
30 (762)
wc_gr012069
50 (1270)
30 (762)
wc_gr012070
52 (1321)
34 (864)
84 (2134)
wc_gr012071
wc_td000400gb.fm
62
Page 63

HI 110 / 200 / 300 Technical Data
wc_td000400gb.fm
63
Page 64

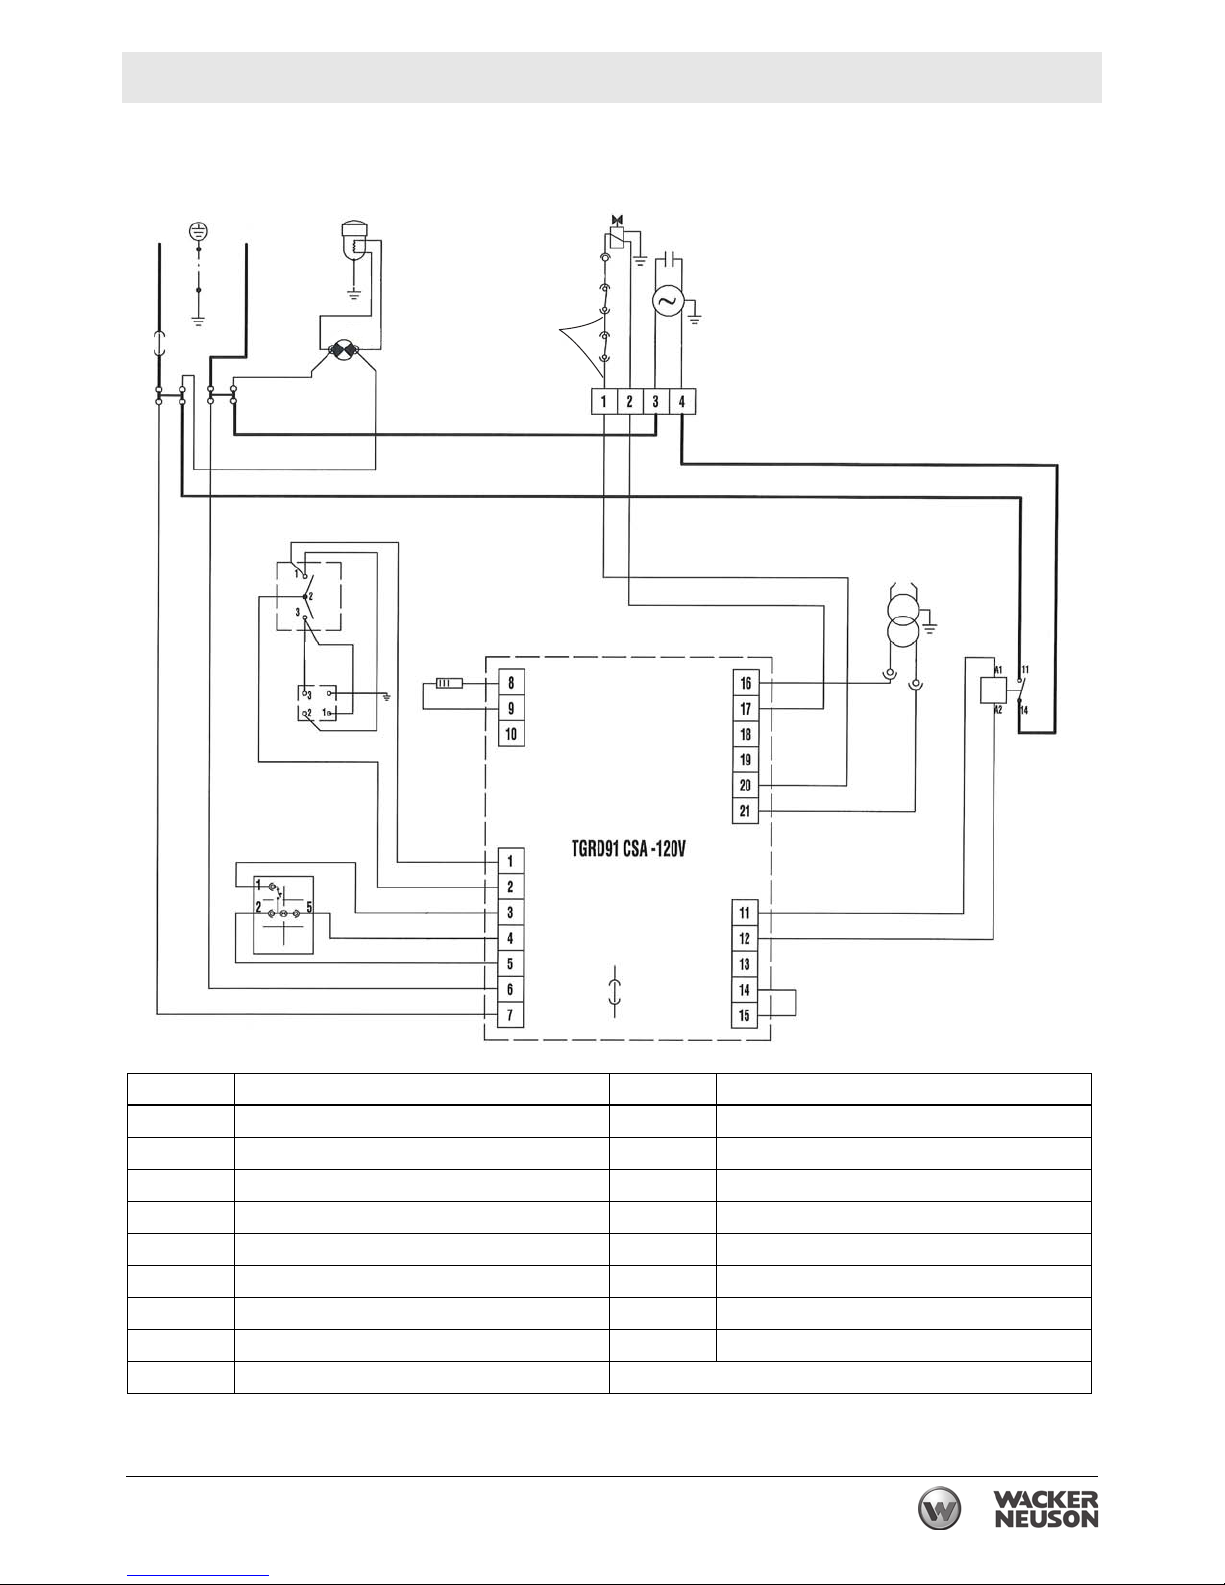
Schematics HI 110 / 200 / 300
10 Schematics
10.1 Electrical Schematic - HI 110 D, HI 110 HDD
12
7
LN
3
5
13
WH
BK
RD
BK
WH
BK
BK
6
14
WH
WH
BK
RD
7
RD
2
WH
11
8
RD
9
4
J4
J3
10
BK
RD
RD
YL
GY
BU
WH
TGRD91 CSA 120V
J1
1
WH
BK
J2
wc_gr012018
No. Description No. Description
1 Fuse 8 Control switch
2 Overheat thermostat 9 Room thermostat plug
3 Solenoid valve 10 Control box
4 CAD cell 11 Air pressure switch
5 Capacitor 12 Heated fuel filter (optional)
6 Fan motor 13 Reset switch/lockout indicator
7 Electric pilot lamp 14 High voltage transformer
64
wc_tx003764gb.fm
Page 65
HI 110 / 200 / 300 Schematics
10.2 Electrical Schematic - HI 200 D
1
BK
BR
WH
14
3
4
12
BU
6
WH
7
BK
BK
BK
2
WH
WH
11
J3
BK
BK
13
PE
N
RD
WH
8
WH
BK
L
9
RD
5
10
J4
RD
RD
15
WH
BK
No. Description No. Description
1 Fuse 10 Room thermostat plug
2 High voltage transformer 11 Relay
3 Overheat thermostat 12 Control box
4 Solenoid valve 13 Heated fuel filter
5 CAD cell 14 Air pressure switch
6 Capacitor 15 Reset switch / lockout indicator
7 Fan motor 16 Resistance heater coil*
8 Electric pilot lamp 17 Nozzle line heater*
9 Control switch *Used on HD models only
YL
GY
BU
J1
J2
1
WH
BK
BK
wc_gr012019
wc_tx003764gb.fm
65
Page 66

Schematics HI 110 / 200 / 300
10.3 Electrical Schematic - HI 200 HDD
BR
BK
1
BK
GY
L
PE
N
13
WH
BU
WH
BR
RD
8
BR
WH
14
3
4
8
6
7
BK
WH
BU
BK
17
16
15
9
10
BK
BK
WH
RD
RD
5
RD
YL
GY
BU
WH
WH
J4
J1
BR
BK
11
WH
BK
2
WH
WH
11
J3
BK
12
J2
1
BK
WH
BK
BK
wc_gr012025
No. Description No. Description
1 Fuse 10 Room thermostat plug
2 High voltage transformer 11 Relay
3 Overheat thermostat 12 Control box
4 Solenoid valve 13 Heated fuel filter
5 CAD cell 14 Air pressure switch
6 Capacitor 15 Reset switch / lockout indicator
7 Fan motor 16 Resistance heater coil*
8 Electric pilot lamp 17 Nozzle line heater*
9 Control switch *Used on HD models only
66
wc_tx003764gb.fm
Page 67

HI 110 / 200 / 300 Schematics
10.4 Electrical Schematic - HI 300 D
4
6
14
BR
WH
7
N
L
PE
13
RD
BK
1
WH
BK
8
WH
9
RD
RD
RD
YL
GY
BU
5
J4
J1
RD
10
15
WH
BK
BU
3
WH
BK
BK
BK
2
WH
WH
11
J3
12
J2
1
BK
BK
WH
BK
BK
wc_gr012020
No. Description No. Description
1 Fuse 10 Room thermostat plug
2 High voltage transformer 11 Relay
3 Overheat thermostat 12 Control box
4 Solenoid valve 13 Heated fuel filter
5 CAD cell 14 Air pressure switch
6 Capacitor 15 Reset switch / lockout indicator
7 Fan motor 16 Resistance heater coil*
8 Electric pilot lamp 17 Nozzle line heater*
9 Control switch *Used on HD models only
wc_tx003764gb.fm
67
Page 68

Schematics HI 110 / 200 / 300
10.5 Electrical Schematic - HI 300 HDD
GY
No. Description No. Description
1 Fuse 10 Room thermostat plug
2 High voltage transformer 11 Relay
3 Overheat thermostat 12 Control box
4 Solenoid valve 13 Heated fuel filter
5 CAD cell 14 Air pressure switch
6 Capacitor 15 Reset switch / lockout indicator
7 Fan motor 16 Resistance heater coil*
8 Electric pilot lamp 17 Nozzle line heater*
9 Control switch *Used on HD models only
68
wc_tx003764gb.fm
Page 69

Page 70

Wacker Neuson Produktion GmbH & Co. KG, Preußenstraße 41, D-80809 München, Tel.: +49-(0)89-3 54 02-0 Fax: +49 - (0)89-3 54 02-390
Wacker Neuson Limited - Room 1701–03 & 1717–20, 17/F. Tower 1, Grand Century Place, 193 Prince Edward Road West, Mongkok, Kowloon, Hongkong.
Wacker Neuson Production Americas LLC, N92W15000 Anthony Ave., Menomonee Falls, WI 53051
Tel. : (262) 255-0500 Fax: (262) 255-0550 Tel.: (800) 770-0957
Tel: (852) 3605 5360, Fax: (852) 2758 0032
 Loading...