

Page 1

Generator
G 7Ai
OPERATOR’S MANUAL
0152817en 003
0309
0152817EN
Page 2

DANGER
CARBON MONOXIDE
Using a generator indoors CAN KILL YOU IN MINUTES.
Generator exhaust contains carbon monoxide (CO). This is a poison you cannot see or
smell. If you can smell the generator exhaust, you are breathing CO. But even if you cannot
smell the exhaust, you could be breathing CO.
• NEVER use a generator inside homes, garages, crawlspaces, or other partly enclosed
areas. Deadly levels of carbon monoxide can build up in these areas. Using a fan or
opening windows and doors does NOT supply enough fresh air.
• ONLY use a generator outside and far away from windows, doors, and vents. These
openings can pull in generator exhaust.
Even when you use a generator correctly, CO may leak into the home. ALWAYS use a
battery-powered or battery-backup CO alarm in the home.
If you start to feel sick, dizzy, or weak after the generator has been running, move to fresh
air RIGHT AWAY. See a doctor. You could have carbon monoxide poison.
Page 3

G 7Ai Table of Contents
wc_bo0152817en_003TOC.fm 1
1. Foreword 3
2. Safety Information 4
2.1 Operating Safety .................................................................................. 5
2.2 Operator Safety while using Internal Combustion Engines .................. 6
2.3 Service Safety ...................................................................................... 7
2.4 Label Locations .................................................................................... 8
2.5 Safety and Operating Labels ................................................................ 9
3. Technical Data 12
3.1 Generator ........................................................................................... 12
3.2 Engine ................................................................................................ 13
3.3 Sound Specifications .......................................................................... 14
3.4 Dimensions ......................................................................................... 14
4. Operation 15
4.1 Application and Power Requirements ................................................ 15
4.2 Indoor Installation ............................................................................... 16
4.3 Outdoor Installation ............................................................................ 17
4.4 Grounding the Generator ................................................................... 17
4.5 Generator Derating ............................................................................. 18
4.6 Use of Extension Cords ...................................................................... 19
4.7 Isolation Monitor ................................................................................. 22
4.8 Control Panel ...................................................................................... 23
4.9 Before Starting ................................................................................... 24
4.10 To Run ................................................................................................ 24
4.11 To Stop ............................................................................................... 25
Page 4

Table of Contents G 7Ai
wc_bo0152817en_003TOC.fm 2
5. Maintenance 26
5.1 Engine Maintenance ............................................................................26
5.2 Periodic Maintenance Schedule ..........................................................26
5.3 Engine Oil ............................................................................................27
5.4 Air Cleaner ..........................................................................................28
5.5 Spark Plug ...........................................................................................29
5.6 Cleaning the Sediment Cup ................................................................30
5.7 Carburetor Adjustment ........................................................................31
5.8 Engine Speed ......................................................................................32
5.9 Storage ................................................................................................33
5.10 Transport .............................................................................................33
5.11 Troubleshooting ...................................................................................34
5.12 Wire Colors ..........................................................................................34
5.13 Engine Wiring Schematic ....................................................................35
5.14 Generator Wiring Schematic - Schuko, French ...................................36
5.15 Generator Wiring Schematic - CEE .....................................................37
5.16 Generator Wiring Schematic - Swiss ...................................................38
Page 5

wc_tx000001gb.fm 3
CALIFORNIA
Proposition 65 Warning:
Engine exhaust, some of its constituents, and certain vehicle
components, contain or emit chemicals known to the State of
California to cause cancer and birth defects or other reproductive
harm.
1. Foreword
This manual provides information and procedures to safely operate
and maintain this Wacker model. For your own safety and protection
from injury, carefully read, understand and observe the safety
instructions described in this manual.
Keep this manual or a copy of it with the machine. If you lose this
manual or need an additional copy, please contact Wacker
Corporation. This machine is built with user safety in mind; however,
it can present hazards if improperly operated and serviced. Follow
operating instructions carefully! If you have questions about operating
or servicing this equipment, please contact Wacker Corporation.
The information contained in this manual was based on machines in
production at the time of publication. Wacker Corporation reserves the
right to change any portion of this information without notice.
All rights, especially copying and distribution rights, are reserved.
Copyright 2006 by Wacker Corporation.
No part of this publication may be reproduced in any form or by any
means, electronic or mechanical, including photocopying, without
express written permission from Wacker Corporation.
Any type of reproduction or distribution not authorized by Wacker
Corporation represents an infringement of valid copyrights and will be
prosecuted. We expressly reserve the right to make technical
modifications, even without due notice, which aim at improving our
machines or their safety standards.
WARNING
Page 6

Safety Information G 7Ai
wc_si000088gb.fm 4
2. Safety Information
This manual contains DANGER, WARNING, CAUTION, and NOTE
callouts which must be followed to reduce the possibility of personal
injury, damage to the equipment, or improper service.
This is the safety alert symbol. It is used to alert you to potential
personal injury hazards. Obey all safety messages that follow this
symbol to avoid possible injury or death.
DANGER indicates a hazardous situation which, if not avoided, will
result in death or serious injury.
WARNING indicates a hazardous situation which, if not avoided, could
result in death or serious injury.
CAUTION indicates a hazardous situation which, if not avoided, could
result in minor or moderate injury.
CAUTION: Used without the safety alert symbol, CAUTION indicates
a potentially hazardous situation which, if not avoided, may result in
property damage.
Note: Contains additional information important to a procedure.
DANGER
WARNING
CAUTION
Page 7

G 7Ai Safety Information
wc_si000088gb.fm 5
2.1 Operating Safety
BACKFEED FROM THE GENERATOR INTO THE PUBLIC POWER
DISTRIBUTION SYSTEM CAN CAUSE SERIOUS INJURY OR
DEATH TO UTILITY WORKERS!
Improper connection of generator to a building's electrical system can
allow electrical current from the generator to backfeed into utility lines.
This may result in electrocution of utility workers, fire, or explosion.
Connections to a building's electrical system must be made by a
qualified electrician and comply with all applicable laws and electrical
codes.
If connected to a building's electrical system the generator must meet
the power, voltage, and frequency requirements of the equipment in
the building. Differences in power, voltage, and frequency
requirements may exist and improper connection may lead to
equipment damage, fire, and personal injury or death.
Familiarity and proper training are required for the safe operation of
equipment. Equipment operated improperly or by untrained personnel
can be dangerous. Read the operating instructions contained in both
this manual and the engine manual and familiarize yourself with the
location and proper use of all controls. Inexperienced operators should
receive instruction from someone familiar with the equipment before
being allowed to operate the machine.
2.1.1 NEVER operate the generator when open containers of fuel, paint, or
other flammable liquids are near.
2.1.2 NEVER operate the generator, or tools attached to the generator, with
wet hands.
2.1.3 NEVER use worn electrical cords. Severe electrical shock and
equipment damage may result.
2.1.4 NEVER run the electrical cords under the generator, or over vibrating
or hot parts.
2.1.5 NEVER enclose or cover the generator when it is in use or when it is
hot.
2.1.6 NEVER overload the generator. The total amperage of the tools and
equipment attached to the generator must not exceed the load rating
of the generator.
2.1.7 NEVER operate the machine in snow, rain, or standing water.
2.1.8 NEVER allow untrained personnel to operate or service the generator.
The generator set should be set up by a trained electrician.
2.1.9 NEVER connect generators with isolation monitors in parallel. This
would affect the operation of the isolation monitor.
DANGER
WARNING
Page 8

Safety Information G 7Ai
wc_si000088gb.fm 6
2.1.10 ALWAYS store the equipment properly when it is not being used.
Equipment should be stored in a clean, dry location out of the reach of
children.
2.1.11 ALWAYS position and operate the generator on a firm,
noncombustible, level surface.
2.1.12 ALWAYS transport the generator in an upright position.
2.1.13 ALWAYS keep the machine at least one meter (three feet) away from
structures, buildings, and other equipment during use.
2.1.14 ALWAYS keep the area immediately surrounding and underneath the
machine clean, neat, and free of debris and combustible materials.
Make sure that the area overhead is clear of debris that could fall onto
or into the machine or exhaust compartment.
2.1.15 ALWAYS remove all tools, cords, and other loose items from the
generator before starting it.
2.2 Operator Safety while using Internal Combustion Engines
Internal combustion engines present special hazards during operation
and fueling. Read and follow the warning instructions in the engine
owner’s manual and the safety guidelines below. Failure to follow the
warnings and safety guidelines could result in severe injury or death.
2.2.1 DO NOT run the machine indoors or in an enclosed area such as a
deep trench unless adequate ventilation, through such items as
exhaust fans or hoses, is provided. Exhaust gas from the engine
contains poisonous carbon monoxide gas; exposure to carbon
monoxide can cause loss of consciousness and may lead to death.
2.2.2 DO NOT smoke while operating the machine.
2.2.3 DO NOT smoke when refueling the engine.
2.2.4 DO NOT refuel a hot or running engine.
2.2.5 DO NOT refuel the engine near an open flame.
2.2.6 DO NOT spill fuel when refueling the engine.
2.2.7 DO NOT run the engine near open flames.
2.2.8 DO NOT start the engine if fuel has spilled or a fuel odor is present.
Move the generator away from the spill and wipe the generator dry
before starting.
2.2.9 ALWAYS refill the fuel tank in a well-ventilated area.
2.2.10 ALWAYS replace the fuel tank cap after refueling.
2.2.11 ALWAYS check the fuel lines and the fuel tank for leaks and cracks
before starting the engine. Do not run the machine if fuel leaks are
present or the fuel lines are loose.
DANGER
Page 9

G 7Ai Safety Information
wc_si000088gb.fm 7
2.3 Service Safety
Poorly maintained equipment can become a safety hazard! In order
for the equipment to operate safely and properly over a long period of
time, periodic maintenance and occasional repairs are necessary. If
the generator is experiencing problems or is being serviced, attach a
“DO NOT START” sign to the control panel to notify other people of its
condition.
2.3.1 DO NOT use gasoline or other types of fuels or flammable solvents to
clean parts, especially in enclosed areas. Fumes from fuels and
solvents can become explosive.
2.3.2 DO NOT attempt to clean or service the machine while it is running.
2.3.3 DO NOT modify the equipment without the express written approval of
the manufacturer.
2.3.4 DO NOT allow water to accumulate around the base of the machine.
If water is present, move the machine and allow the machine to dry
before servicing.
2.3.5 DO NOT service the machine if your clothing or skin is wet.
2.3.6 DO NOT allow untrained personnel to service this equipment. Only
trained electrical technicians should be allowed to service the electrical
components of this equipment.
2.3.7 ALWAYS keep the machine clean and labels legible. Replace all
missing and hard-to-read labels. Labels provide important operating
instructions and warn of dangers and hazards.
2.3.8 ALWAYS replace the safety devices and guards after repairs and
maintenance.
2.3.9 ALWAYS let the engine cool before transporting or servicing it.
2.3.10 ALWAYS keep hands, feet, and loose clothing away from the moving
parts on the generator and engine.
2.3.11 ALWAYS turn the engine off before servicing the machine. If the
engine has electric start, disconnect the negative terminal on the
battery before servicing the machine.
2.3.12 ALWAYS keep the fuel lines in good condition and properly connected.
Leaking fuel and fumes are extremely explosive.
WARNING
Page 10

Safety Information G 7Ai
wc_si000088gb.fm 8
2.4 Label Locations
2 -
1
5
1 1
5 6
DANGER
GEFAHR
DANGER
PELIGRO
STOP
Page 11

G 7Ai Safety Information
wc_si000088gb.fm 9
2.5 Safety and Operating Labels
Wacker machines use international pictorial labels where needed.
These labels are described below:
Label Meaning
DANGER!
Engines emit carbon monoxide; operate only in well-ventilated area. Read the Operator’s
Manual.
No sparks, flames, or burning objects near the machine. Shut off the engine before refueling.
WARNING!
Hot surface!
CAUTION!
Read and understand the supplied Operator’s
Manuals before operating this machine. Failure to do so increases the risk of injury to yourself or others.
Potential Earth - Hook up cable from grounding rod to this point.
Guaranteed sound power level in dB(A)
DANGER
GEFAHR
DANGER
PELIGRO
STOP
2 -
1 5 1 1 5 6
Page 12

Safety Information G 7Ai
wc_si000088gb.fm 10
CAUTION!
Lifting point
When TEST button is lit, the Isolation Monitor
has tripped. Stop the engine. Read the operator’s manual for further information.
Open main circuit breaker.
Open the fuel flow valve.
Open the choke.
Close the choke.
Label Meaning
Page 13

G 7Ai Safety Information
wc_si000088gb.fm 11
Push or turn engine switch to ON position.
Pull the rewind starter.
Close main circuit breaker.
Close the fuel flow valve.
Push or turn engine switch to OFF position.
WARNING!
Electric shock hazard. Read operator’s manual
for instructions.
A nameplate listing the model number, item
number, revision number, and serial number is
attached to each unit. Please record the information found on this plate so it will be available
should the nameplate become lost or damaged. When ordering parts or requesting service information, you will always be asked to
specify the model number, item number, revision number, and serial number of the unit.
Label Meaning
Page 14

Technical Data G 7Ai
wc_td000088gb.fm 12
3. Technical Data
3.1 Generator
Item No. G 7AI
0009104 Rev 105 and
higher
G 7AI
0009104 Rev 104 and
lower
0009105, 0009106,
0009107
Generator
Continuous Output
3ø kVA (kW)
1ø kVA/kW
5,4 (4,3)
5,0
7,0 (5,6)
4,9
Type Dual voltage, brush-type system
AC Voltages Available
volts / phase
400 / 3ø
230 / 1ø
Frequency
Hz
50
Power Factor
400VAC 3ø
230VAC 1ø
0.8
1.0
400VAC receptacles
230VAC receptacles
qty / amp
qty / amp
1 / 16
3 / 16
Main Circuit Breaker
amp
16 (4-pole)
Weight (dry)
Kg
93
Page 15

G 7Ai Technical Data
wc_td000088gb.fm 13
3.2 Engine
Item No. G 7AI
0009104 Rev 105 and
higher
G 7AI
0009104 Rev 104 and
lower
0009105, 0009106,
0009107
Engine
Engine Make Honda
Engine Model GX 390 UI GX 390 K1
Rated Power
kW
8.2
Spark Plug NGK BPR 6ES
Electrode Gap
mm
0.7 - 0.8
Engine Speed - full load
rpm
3000 ± 100
Engine Speed - no load
rpm
3100 ± 100
Air Cleaner
type
Dual element
Battery
Type/Volt/
Amp-hours
50-N18L-A/12/20
Engine Lubrication
oil grade
SAE 10W30 service class SG or SF
Engine Oil Capacity
ml
1100
Fuel
type
Regular unleaded gasoline
Fuel Tank Capacity
liters
15
Fuel Consumption
liters/hr.
3.2
Running Time
hrs.
4.7
Valve clearance (cold)
mm
Inlet: 0.15
Outlet: 0.20
Page 16

Technical Data G 7Ai
wc_td000088gb.fm 14
3.3 Sound Specifications
The required sound specification, Paragraph 1.7.4.f of 89/392/EEC
Machinery Directive, is:
• 0009104 Revision 105 and higher - guaranteed sound power level
(LWA) = 97 dB(A).
• 0009104 Revision 104 and lower, 0009105, 009106, 0009108 - guaranteed sound power level (LWA) = 99 dB(A).
This sound value was determined according to ISO 3744 for the sound
power level (LWA).
3.4 Dimensions
mm (in.)
Page 17

G 7Ai Operation
wc_tx000235gb.fm 15
4. Operation
4.1 Application and Power Requirements
This generator is designed to operate single-phase 50 Hz appliances
running at 230 VAC and three-phase 50 Hz appliances at 400 VAC.
Both single and three phase sides of the generator can be used at the
same time.
CAUTION: Do not exceed the power output of the generator. Damage
to tools or generator will occur. See Technical Data.
Check the nameplate or label provided on tools and appliances to
make sure their power requirements are met by the power output of the
generator. If the wattage is not given for a particular tool or appliance,
contact the tool manufacturer for wattage requirements.
Some appliances and tools require a surge of current when starting.
This means that the amount of power needed to initially start the
equipment is larger than the power required to keep it running. The
generator must be capable of supplying this "surge" current. Other
types of appliances require more power than is actually stated on their
nameplate.
The information in “Approximate Starting Power Requirements” is
offered only as a general guideline to help you determine power
requirements for different types of equipment. Check with your nearest
Wacker dealer, or contact the manufacturer or dealer of the tool or
appliance, if you have questions regarding power requirements.
CAUTION: DO NOT exceed the rated current limit of any receptacle.
CAUTION: If a tool or appliance does not reach full speed within a few
seconds after it is switched on, turn it off immediately to avoid damage.
Page 18

Operation G 7Ai
wc_tx000235gb.fm 16
Approximate Starting Power Requirements
• Incandescent lights and appliances such as irons and hot plates,
which use a resistive-type heating element, require the same wattage
to start and run as is stated on their nameplates.
• Fluorescent and mercury lamps require 1.2–2 times their stated wattage to start.
• Electrical motors and many types of electrical tools often require a
large starting current. The amount of starting current depends on the
type of motor and its use.
• Most electrical tools require 1.2–3 times their stated wattage for starting.
• Loads such as submersible pumps and air compressors require a
very large force to start. They need as much as 3–5 times the wattage
stated on the nameplate in order to start.
If the wattage is not given for a particular tool or appliance, it can be
calculated by multiplying its voltage and amperage requirements:
Single Phase: VOLTS x AMPS = WATTS
Three Phase: VOLTS x AMPS x 1.732 x 0.8 = WATTS
4.2 Indoor Installation
If the generator must be installed indoors, adequate ventilation or
exhaust hoses must be provided. When venting exhaust fumes, make
sure the exhaust piping is large enough to prevent excessive back
pressure to the engine. Back pressure reduces engine efficiency and
may cause the engine to overheat.
Exhaust gas from the engine contains poisonous carbon monoxide
gas; exposure to carbon monoxide can cause loss of consciousness
and may lead to death. Never run the generator indoors or in an
enclosed area unless adequate ventilation, through such items as
exhaust hoses or fans, is provided.
When installed indoors, steps to prevent fire and explosion such as
providing a good, earthen ground, removing all flammable materials
near the generator, and using only electrical cables in good condition,
must be observed. See Operating Safety.
DANGER
Page 19

G 7Ai Operation
wc_tx000235gb.fm 17
4.3 Outdoor Installation
Place the generator in an area where it will not be exposed to rain,
snow, or direct sunlight. Make sure it is positioned on firm, level
ground, so it will not slide or shift. Position the engine exhaust away
from areas where people may be present.
If operating the generator inside a tunnel or deep trench, make sure
there is adequate ventilation. Precautions similar to those required
when operating indoors may be necessary.
The surrounding area must be free from water and moisture. All
components must be protected from excessive moisture.
4.4 Grounding the Generator
This machine is equipped with an isolation monitor for personal
protection. Under standard operating conditions do not connect frame
PE stud to earth ground. Refer to local codes if machine is used to
power a building or similar distribution system.
Page 20

Operation G 7Ai
wc_tx000235gb.fm 18
4.5 Generator Derating
All generators are subject to derating for altitude and temperature.
Internal combustion engines, unless modified, run less efficiently at
higher altitudes due to the reduction of air pressure. This translates
into a lack of power and thus reduction in generator output.
Temperature affects both engine and generator performance. As
temperature increases, an engine will run less efficiently and more
resistance will be found in electrical components. Therefore, as the
temperature increases, the output of the generator decreases. Altitude
also affects the cooling capacity of air—the higher the altitude the less
dense the air is and thus the lower its ability to transfer heat.
For every increase in altitude of 500 m (1650 ft.) above 1000 m (3300
ft.), the output of the generator will be reduced by 3%. For every
increase of 5° C (9° F) in ambient temperature above 40° C (104° F),
the output of the generator will be reduced by 3%. Use the tables
shown for altitude and temperature deration factors. It may be
necessary to consider both altitude and ambient temperature deration
factors to determine true generator output.
Ambient Temp.
°C (°F)
Derate Factor
45 (113) 3 % 0.97
50 (122) 6 % 0.94
55 (131) 9 % 0.91
60 (140) 12 % 0.88
Altitude
m (ft.)
Derate Factor
1500 (4900) 3 % 0.97
2000 (6600) 6 % 0.94
2500 (8200) 9 % 0.91
3000 (9900) 12 % 0.88
3500 (11500) 15 % 0.85
4000 (13100) 18 % 0.82
Page 21

G 7Ai Operation
wc_tx000235gb.fm 19
4.6 Use of Extension Cords
When a long extension cord is used to connect an appliance or tool to
the generator, a voltage loss occurs—the longer the cord, the greater
the voltage loss. This results in less voltage being supplied to the
appliance or tool and increases the amount of current draw or reduces
performance. A cord with a larger cross section will reduce the voltage
loss.
CAUTION: Operating equipment at low voltage can cause it to
overheat.
Use only tough rubber-sheathed cable in accordance with IEC 245-4.
Damaged cords can cause electric shock. Electric shock can cause
serious injury or death. DO NOT use worn, bare, or frayed cords.
Replace damaged cords immediately.
Do not exceed the rating of the cord.
Contact the cord manufacturer if in doubt about cord use.
Choose the cord size from the Minimum Extension Cord Size Table or
calculate minimum cord size using the Minimum Extension Cord Size
Graph. The X axis of the graph represents A x m (Ampere x meter)
values. The Y axis represents wire size in mm2. Multiply the operating
current for the load in amps (A) by the desired extension cord length in
meters (m). Find the result along the X axis. Move up the graph until
you reach the appropriate sloped line for your application. Move to the
Y axis; this is the recommended minimum cord size.
Example:
For a 3-phase, 400V application, if the operating current for the load is
15 A, and the desired extension cord length is 100 m, then:
15 A x 100 m = 1500 A x m.
1500 A x m = 2.5 mm
2
.
WARNING
Page 22

Operation G 7Ai
wc_tx000235gb.fm 20
Minimum Extension Cord Size 230V
Minimum Extension Cord Size 400V
Volts Total length of cord in meters
230 V 0 - 30 30 - 60
Amp Rating
Cross sectional area of wire in mm
2
2 0.75 1.5
41.5 2.5
61.5 4
82.5 4
10 2.5 6
15 4 10
20 6 10
25 6 16
30 10 16
400 V
Amp Rating
Diameter of cord, mm2
Maximum Fuse
15 1 10
18 1.5 10
26 2.5 20
34 4 25
44 6 35
61 10 50
82 16 63
108 25 80
Page 23

G 7Ai Operation
wc_tx000235gb.fm 21
10
6
4
2.5
1.5
0
1000
2000
3000 4000 5000
6000
wc_gr001081
A x m
mm
2
16
25
1
~
2
3
0
V
5
0
H
z
3
~
4
0
0
V
5
0
H
z
Page 24
Operation G 7Ai
wc_tx000235gb.fm 22
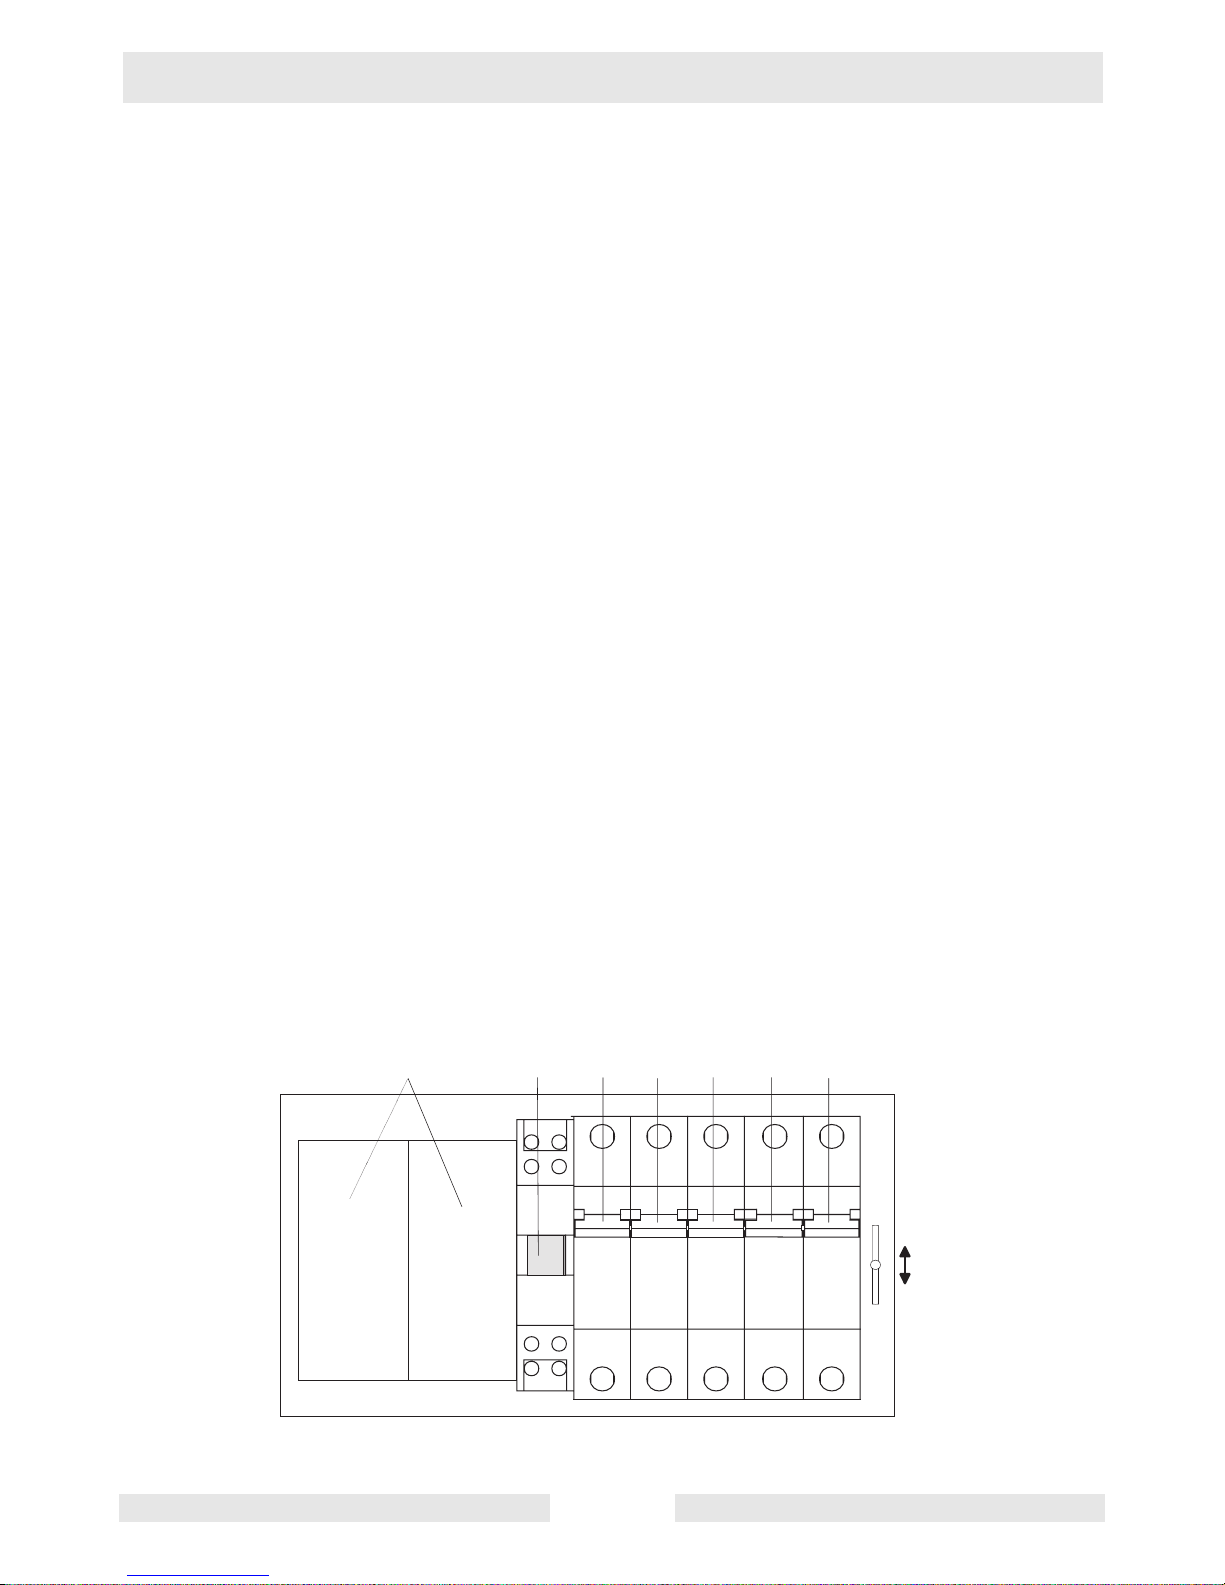
4.7 Isolation Monitor
See Graphic: wc_gr000274
Generator is equipped with an Isolation Monitor. The Isolation Monitor
consists of a sensing module (a), a TEST button with light (b), a relay
(c), and a breaker for each phase and neutral (d1-d4). The relay and
the breakers are mechanically ganged together and operate as the
main circuit breaker. The Isolation Monitor protects the operator from
a ground fault by sensing a resistance change, as in a short to ground,
on the output of the generator. When the Isolation Monitor senses a
resistance change, it lights the TEST button and it causes the relay to
open, which mechanically trips the main circuit breaker. The Isolation
Monitor cannot be reset with the generator running. Before the
main circuit breaker can be closed, the generator must first be shut
down, the fault cleared, and the generator restarted.
To test the Isolation Monitor:
Start the generator. Place the main circuit breaker in the closed
position (e1). Push the TEST button (b). The TEST button will light up,
and the main circuit breaker will move to the open position (e2). Power
is now off at the receptacles. If the breaker does not open, the Isolation
Monitor is not working. Do not use the generator until the problem can
be corrected. To restore power to the receptacles, shut down the
generator, restart it, and place the circuit breaker in the closed position
(e1).
The main circuit breaker is current-operated and shuts off the power to
the receptacles when an overcurrent occurs that is greater than what
the breaker is rated for.
If the circuit breaker lever opens during operation, stop the generator
and check the generator and any equipment it was powering for
defects. Repair all defects before operating the generator.
a
b
c
d1 d2 d3
d4
e1
e2
wc_gr000274
Page 25

G 7Ai Operation
wc_tx000235gb.fm 23
4.8 Control Panel
See Graphic: wc_gr000273, wc_gr001082
The generator is protected by a 16 amp circuit breaker (a) located on
the control panel.
The circuit breaker protects the generator from severe overloads or
short circuits. If the circuit breaker opens, turn the engine off
immediately and determine the cause before restarting. Check the
appliances and tools attached to the generator for defects and make
sure their power requirements do not exceed the power rating of the
generator or the current limit of the receptacles.
When the circuit breaker opens, the breaker lever will snap down. To
reset circuit breaker, lift lever up.
Depending on model, the generator will have following type of
receptacles:
Schuko (c1): Two 230 volt, IP44 (c), one 230 volt, IP44 CEE (d), and
one 400 volt, 3-phase 5 pin receptacle CEE (b).
CEE (c2): Three 230 volt CEE (c, d), and one 400 volt 5 pin receptacle
CEE (b).
Swiss (c3): Two 230 volt, IPx4 (c), one 230 volt CEE (d), and one 500
volt 5 pin receptacle CEE (b).
French (c4): Two 250 volt, IP44 (c), one 230 volt CEE (d), and one 400
volt 5 pin receptacle CEE (b).
Note: Enlargements of receptacles show protective covers removed
for identification purposes only. Never remove protective covers.
?
? "
? !
?
w c _ g r 0 0 1 0 8 2
Page 26

Operation G 7Ai
wc_tx000235gb.fm 24
4.9 Before Starting
4.9.1 Read and understand safety and operating instructions at beginning of
this manual.
4.9.2 Read and understand the meanings of all warning and operating
labels.
4.9.3 Check:
• oil level in engine.
• fuel level.
• condition of air cleaner.
• tightness of external fasteners.
• condition of fuel lines.
4.10 To Run
See Graphic: wc_gr000665, wc_gr000274
4.10.1 Disconnect all loads from the generator and place main circuit breaker
lever in open position (e2).
4.10.2 Open fuel valve by moving lever to the right (a1).
4.10.3 If engine is cold, move choke lever to closed position (b1). If engine is
hot, set choke to open position (b2).
4.10.4 Turn engine switch to "ON" (c1) and pull starter rope (d).
Note: If the oil level in the engine is low, the engine will not start. If this
happens, check oil level and add oil as needed.
4.10.5 Open choke as engine warms (b2).
4.10.6 Place main circuit breaker in closed position (e1). Allow the engine to
warm up for a few minutes before attaching loads. On models G 7Ai
check function of the Isolation Monitor. See Section Isolation Monitor.
wc_gr000665
a1
a2
b1
b2
c1
c2
d
Page 27

G 7Ai Operation
wc_tx000235gb.fm 25
4.11 To Stop
See Graphic: wc_gr000665, wc_gr000274
4.11.1 Turn off and disconnect all tools and appliances attached to the
generator.
4.11.2 Place main circuit breaker in open position (e2).
4.11.3 Turn engine switch to “OFF” (c2).
4.11.4 Close fuel valve by moving lever to the left (a2).
Note: To stop engine quickly in an emergency, turn engine switch to
"OFF".
Page 28

Maintenance G 7Ai
wc_tx000236gb.fm 26
5. Maintenance
5.1 Engine Maintenance
The chart below lists basic machine and engine maintenance. Refer to
the engine manufacturer’s Operator’s Manual for additional
information on engine maintenance.
5.2 Periodic Maintenance Schedule
Daily
before
starting
After
first
20 hrs.
Every
50
hrs.
Every
100
hrs.
Every
300
hrs.
Check the fuel level.
Check the engine oil level.
Inspect the air filter. Replace as
needed.
Check external hardware.
Clean the air cleaner element.*
Inspect the shockmounts for damage.
Change the engine oil.*
Clean the sediment cup or fuel
strainer.
Check and clean the spark plug.
Check and adjust the valve clearance.
Clean the fuel tank.*
Check condition of the fuel line.
Replace when necessary.
*Service more frequently in dusty conditions.
Page 29

G 7Ai Maintenance
wc_tx000236gb.fm 27
5.3 Engine Oil
See Graphic: wc_gr000022
5.3.1 Drain the oil while the engine is still warm.
5.3.2 Remove the oil filler plug (a) and the drain plug (b) to drain the oil.
Note: In the interests of environmental protection, place a plastic sheet
and a container under the machine to collect any liquid that drains off.
Dispose of this liquid in accordance with environmental protection
legislation.
5.3.3 Install the drain plug.
5.3.4 Fill the engine crankcase with the recommended oil up to the level of
the plug opening (c). See Technical Data for oil quantity and type.
5.3.5 Install the oil filler plug.
Page 30
Maintenance G 7Ai
wc_tx000236gb.fm 28
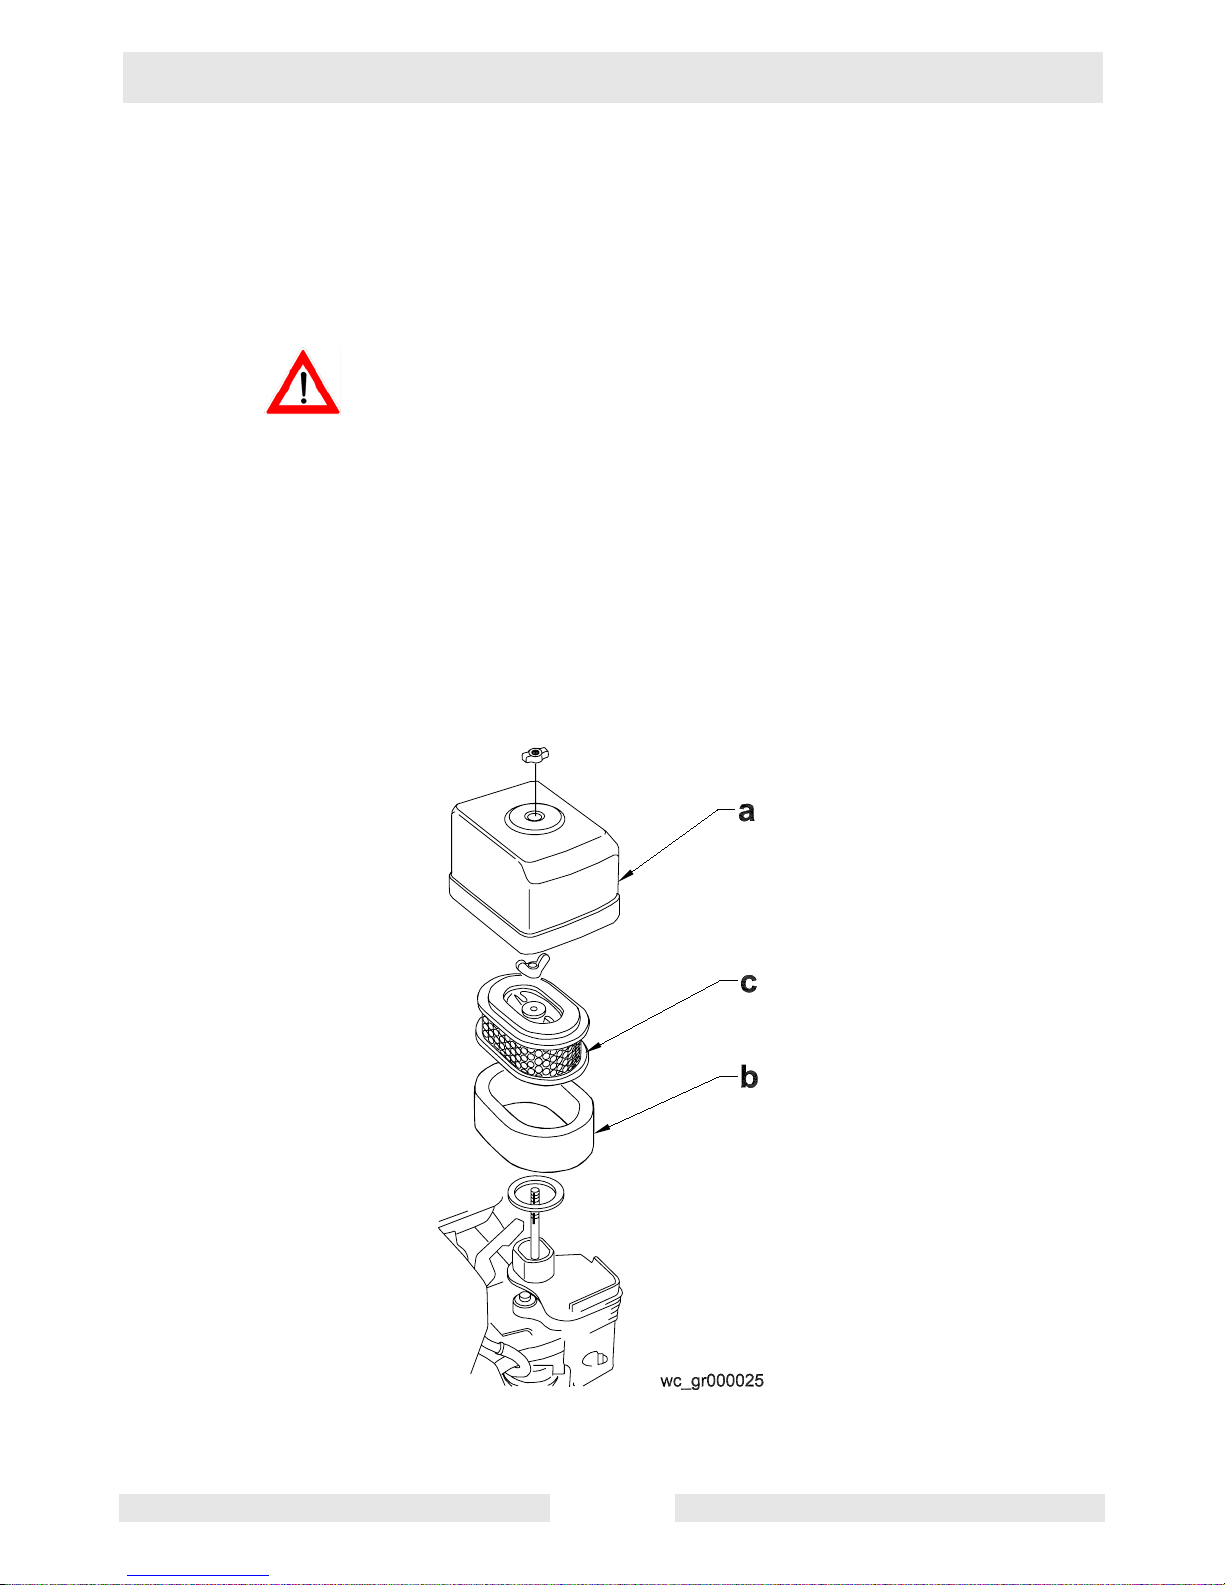
5.4 Air Cleaner
See Graphic: wc_gr000025
The engine is equipped with a dual element air cleaner. Service air
cleaner frequently to prevent carburetor malfunction.
CAUTION: NEVER run engine without air cleaner. Severe engine
damage will occur.
NEVER use gasoline or other types of low flash point solvents for
cleaning the air cleaner. A fire or explosion could result.
To service:
5.4.1 Remove air cleaner cover (a). Remove both elements and inspect
them for holes or tears. Replace damaged elements.
5.4.2 Wash foam element (b) in solution of mild detergent and warm water.
Rinse thoroughly in clean water. Allow element to dry thoroughly. Soak
element in clean engine oil and squeeze out excess oil.
5.4.3 Tap paper element (c) lightly to remove excess dirt. Replace paper
element if it appears heavily soiled.
WARNING
Page 31
G 7Ai Maintenance
wc_tx000236gb.fm 29
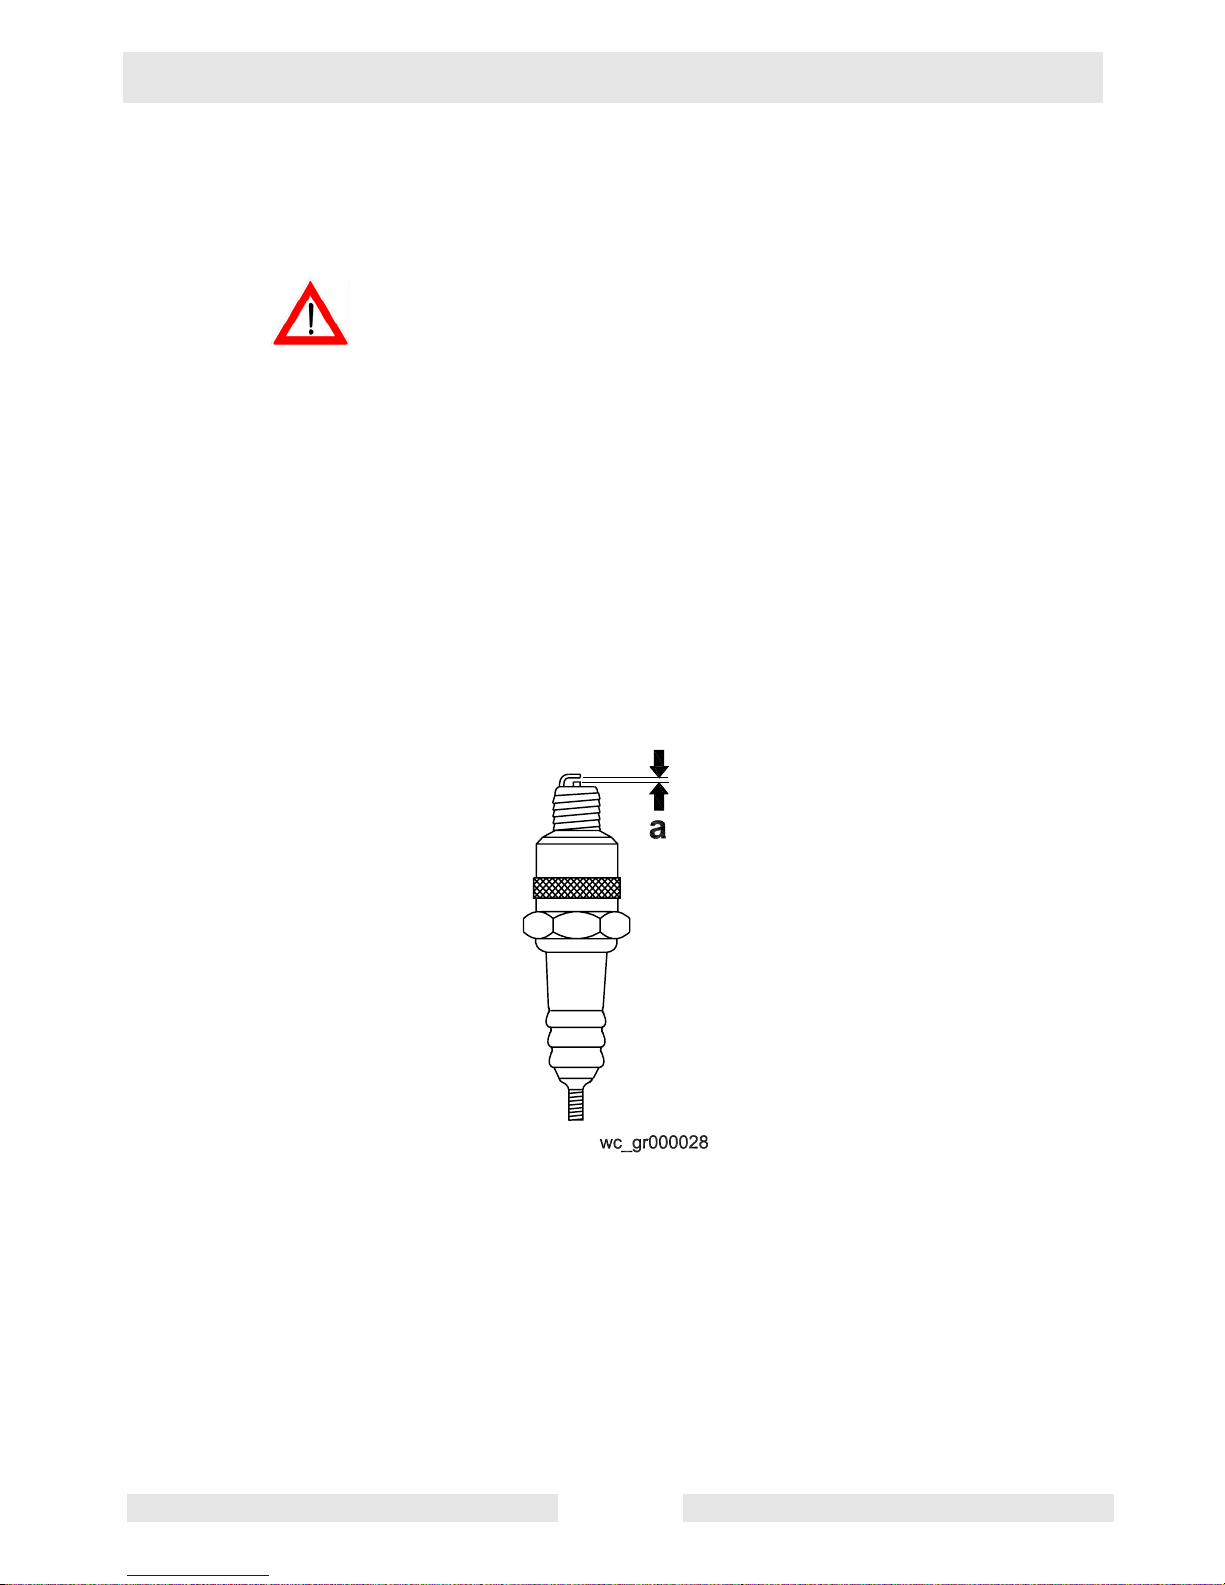
5.5 Spark Plug
See Graphic: wc_gr000028
Clean or replace the spark plug as needed to ensure proper operation.
Refer to the engine owner’s manual.
The muffler becomes very hot during operation and remains hot for a
while after stopping the engine. Do not touch the muffler while it is hot.
Note: Refer to the Technical Data for the recommended spark plug
type and the electrode gap setting.
5.5.1 Remove the spark plug and inspect it.
5.5.2 Replace the spark plug if the insulator is cracked or chipped.
5.5.3 Clean the spark plug electrodes with a wire brush.
5.5.4 Set the electrode gap (a).
5.5.5 Tighten the spark plug securely.
CAUTION: A loose spark plug can become very hot and may cause
engine damage.
WARNING
Page 32

Maintenance G 7Ai
wc_tx000236gb.fm 30
5.6 Cleaning the Sediment Cup
See Graphic: wc_gr000029
5.6.1 Turn the fuel valve off.
5.6.2 Remove the sediment cup (a) and the O-ring (b).
5.6.3 Wash both thoroughly in a nonflammable solvent. Dry and reinstall
them.
5.6.4 Turn the fuel valve on and check for leaks.
Page 33

G 7Ai Maintenance
wc_tx000236gb.fm 31
5.7 Carburetor Adjustment
See Graphic: wc_gr001061
The pilot screw (a) is fitted with a limiter cap to prevent excessive
enrichment of the air-fuel mixture in order to comply with emission
regulations. The mixture is set at the factory and no adjustment should
be necessary. Do not attempt to remove the limiter cap. The limiter cap
cannot be removed without breaking the pilot screw.
wc_gr001061
a
Page 34

Maintenance G 7Ai
wc_tx000236gb.fm 32
5.8 Engine Speed
See Graphic: wc_gr000114
Adjust engine to the no load or idle speed per the Technical Data.
5.8.1 Start the engine and allow it to warm up to normal operating
temperature.
5.8.2 Turn the throttle stop screw (a) in to increase speed, out to decrease
speed. Make sure the throttle lever is touching the stop screw before
measuring rpm.
wc_gr000114
a
Page 35

G 7Ai Maintenance
wc_tx000236gb.fm 33
5.9 Storage
Before storing the generator for a long period of time:
5.9.1 Close the fuel valve and remove and empty the sediment cup or fuel
strainer.
5.9.2 Disconnect the fuel line from the carburetor. Place open end of fuel line
into a suitable container and open fuel valve to drain fuel from tank.
Gasoline is extremely flammable. Drain the fuel tank in a wellventilated area. DO NOT drain the fuel tank in an area with flames or
sparks.
5.9.3 Loosen the drain screw on the carburetor and drain any remaining fuel
from the carburetor.
5.9.4 Change the engine oil.
5.9.5 Remove the spark plug and pour approximately 30 ml (1 ounce) of
clean engine oil into the cylinder. Crank the engine a few turns to
distribute the oil to the inside of the cylinder walls.
5.9.6 Pull the starter rope slowly until resistance is felt and leave the handle
in this position. This ensures that the intake and exhaust valves are
closed.
5.9.7 Store the generator in a clean, dry area.
5.10 Transport
Let the engine cool before transporting the generator or storing
indoors, to avoid burns or fire hazards.
When transporting the generator:
5.10.1 Turn the engine fuel valve to the OFF position.
5.10.2 Position the generator level to prevent fuel from spilling.
5.10.3 Secure the generator by tying it down with a suitable rope.
When transporting the machine by hand, be sure to employ manpower
commensurate with the weight of the machine. To avoid back injury
when lifting the machine, bend the knees to pick it up rather than
bending your back only.
WARNING
WARNING
WARNING
Page 36

Maintenance G 7Ai
wc_tx000236gb.fm 34
5.11 Troubleshooting
5.12 Wire Colors
Problem / Symptom Reason / Remedy
If engine doesn't start, check
that:
• Engine switch is on "Start".
• Fuel valve on engine is open.
• Fuel tank has fuel.
• Choke lever is in correct position. Choke should be
closed when starting a cold engine.
• All loads are disconnected from generator.
• Spark plug is in good condition.
• Spark plug cap is tight.
• Engine oil level is adequate.
If engine starts but there is no
power at receptacles, check
that:
• Circuit breaker is closed.
• Connector from generator to control panel is tight.
Wire Colors
B Black R Red Y Yellow Or Orange
G Green T Tan Br Brown Pr Purple
L Blue V Violet Cl Clear Sh Shield
P Pink W White Gr Gray LL Light blue
Page 37

G 7Ai Maintenance
wc_tx000236gb.fm 35
5.13 Engine Wiring Schematic
Ref. Description Ref. Description
1. Oil level switch 3. Ignition switch
2. Coil
w c _ g r 0 0 0 4 0 7
O F F
O N
B
B
Y
B / R
G
!
Page 38

Maintenance G 7Ai
wc_tx000236gb.fm 36
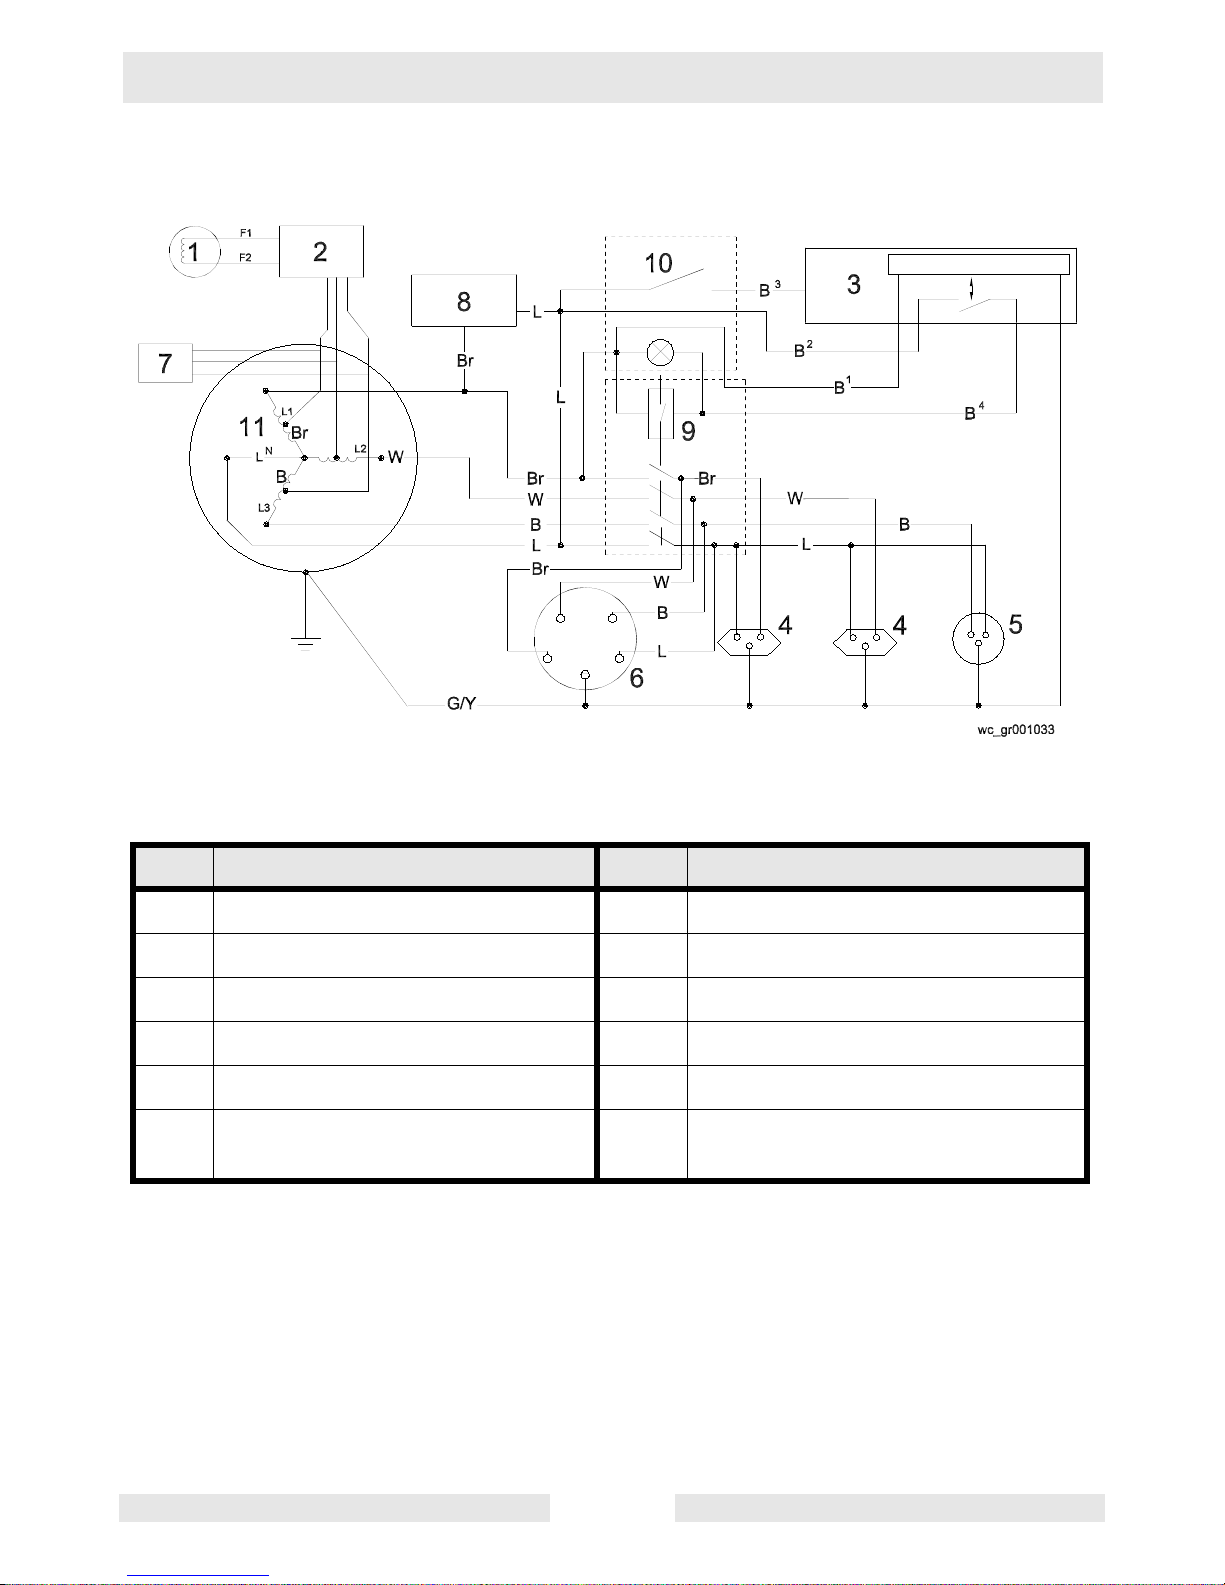
5.14 Generator Wiring Schematic - Schuko, French
Ref. Description Ref. Description
1. Rotor winding 7. Filter (RIS)
2. Automatic voltage regulator 8. Hour Meter
3. Isolation Monitor 9. Circuit Breaker/Trip Relay
4. 250 volt/16 Amp receptacleFrench/Schuko
10. Test Switch and Light
5. 230 volt/16 Amp receptacle CEE 11. Main stator winding
6. 400 volt/16 Amp receptacle-3
phase
Page 39

G 7Ai Maintenance
wc_tx000236gb.fm 37
5.15 Generator Wiring Schematic - CEE
Ref. Description Ref. Description
1. Rotor winding 6. Filter (RIS)
2. Automatic voltage regulator 7. Circuit Breaker/Trip Relay
3. Isolation Monitor 8. Hour Meter
4. 230 volt/16 Amp receptacle CEE 9. Test switch and light
5. 400 volt/16 Amp receptacle-3
phase
10. Stator winding
Page 40
Maintenance G 7Ai
wc_tx000236gb.fm 38
5.16 Generator Wiring Schematic - Swiss
Ref. Description Ref. Description
1. Rotor winding 7. Filter (RIS)
2. Automatic voltage regulator 8. Hour Meter
3. Isolation Monitor 9. Circuit Breaker/Trip Relay
4. 230 volt/16 Amp receptacle-Swiss 10. Test switch and light
5. 230 volt/16 Amp receptacle CEE 11. Stator winding
6. 400 volt/16 Amp receptacle-3
phase
Page 41

EC DECLARATION OF CONFORMITY
CE-KONFORMITÄTSERKLÄRUNG
DECLARACIÓN DE CONFORMIDAD DE LA CE
DÉCLARATION DE CONFORMITÉ C.E.
WACKER NEUSON CORPORATION, N92 W15000 ANTHONY AVENUE, MENOMONEE FALLS, WISCONSIN USA
AUTHORIZED REPRESENTATIVE IN THE EUROPEAN UNION
BEVOLLMÄCHTIGTER VERTRETER FÜR DIE EUROPÄISCHE GEMEINSCHAFT
REPRESENTANTE AUTORIZADO EN LA UNIÓN EUROPEA
REPRÉSENTANT AGRÉÉ AUPRÈS DE L’UNION EUROPÉENNE
hereby certifies that the construction equipment specified hereunder / bescheinigt, daß das Baugerät / certifica que la máquina de
construcción / atteste que le matériel :
WACKER CONSTRUCTION EQUIPMENT AG
Preußenstraße 41
80809 München
1. Category / Art / Categoría / Catégorie
Power Generators
Kraftstromerzeuger
Grupos Electrógenos
Groupe Électrogènes de Puissance
2. Type - Typ - Tipo - Type G 7Ai
3. Item number of equipment / Artikelnummer / Número de referencia de la máquina / Numéro de référence du matériel :
0009104
4. Electric power / Elektrische Leistung / Potencia eléctrica / Force motrice :
4,3 kW
Has been sound tested per Directive 2000/14/EC / In Übereinstimmung mit Richtlinie 2000/14/EG bewertet worden ist / Ha sido
ensayado en conformidad con la norma 2000/14/CE / A été mis à l’épreuve conforme aux dispositions de la directive 2000/14/CEE :
Conformity Assessment Procedure /
Konformitätsbewertungsverfahren /
Procedimiento para ensayar
conformidad / Procédé pour l’épreuve
de conformité
Annex VIII / Anhang VIII
Anexo VIII / Annexe VIII
Name and address of notified
body / Bei folgender
einbezogener Prüfstelle /
Oficina matriculadora /
Organisme agrée
BSI Product Services,
Maylands Ave,
Hemel Hempstead,
Herts, HP2 4SQ, UK.
Measured sound power level /
Gemessener Schallleistungspegel /
Nivel de potencia acústica
determinado / Niveau de puissance
acoustique fixé
97 dB(A) 97 dB(A)
Guaranteed sound power level /
Garantierter Schallleistungspegel /
Nivel de potencia acústica
garantizado / Niveau de puissance
acoustique garanti
and has been produced in accordance with the following standards:
und in Übereinstimmung mit folgenden Richtlinien hergestellt worden ist:
y ha sido fabricado en conformidad con las siguientes normas:
et a été produit conforme aux dispositions des directives européennes ci-après :
2000/14/EC
2002/88/EC
89/336/EEC
98/37/EEC
28.07.08
Date / Datum / Fecha / Date
2008-CE-Generators7Ai_Q.fm
William Lahner Dan Domanski
Vice President of Engineering Manager, Product Engineering
WACKER NEUSON CORPORATION
Page 42

Wacker Construction Equipment AG · Preußenstraße 41 · D-80809 München · Tel.: +49-(0)89-3 54 02 - 0 · Fax: +49 - (0)89-3 54 02-3 90
Wacker Corporation · P.O. Box 9007 · Menomonee Falls, WI 53052-9007 · Tel. : (262) 255-0500 · Fax: (262) 255-0550 · Tel. : (800) 770-0957
Wacker Asia Pacific Operations · Skyline Tower, Suite 2303, 23/F · 39 Wang Kwong Road, Kowloon Bay, Hong Kong · Tel. +852 2406 60 32 · Fax: +852 2406 60 21
 Loading...