

Page 1

Operator’s Manual
Mobile Generator
G 50
EN
5000189846 05 0911
5000189846
Page 2

Copyright
notice
© Copyright 2011 by Wacker Neuson Production Americas LLC
All rights, including copying and distribution rights, are reserved.
This publication may be photocopied by the original purchaser of the machine. Any
other type of reproduction is prohibited without express written permission from
Wacker Neuson Production Americas LLC.
Any type of reproduction or distribution not authorized by Wacker Neuson Production
Americas LLC represents an infringement of valid copyrights. Violators will be
prosecuted.
Trademarks
Manufacturer
All trademarks referenced in this manual are the property of their respective owners.
Wacker Neuson Production Americas LLC
N92W15000 Anthony Avenue
Menomonee Falls, WI 53051 U.S.A.
Tel: (262) 255-0500 · Fax: (262) 255-0550 · Tel: (800) 770-0957
www.wackerneuson.com
Original
instructions
This Operator’s Manual presents the original instructions. The original language of this
Operator’s Manual is American English.
Page 3
G 50 Foreword
Foreword
SAVE THESE INSTRUCTIONS—This manual contains important instructions for
the machine models below. These instructions have been written expressly by
Wacker Neuson Production Americas LLC and must be followed during
installation, operation, and maintenance of the machines.
Machines covered in this manual
Machine Item Number
G 50 0620710, 0620964, 0620965, 0620966, 5200001317
Machine
documentation
Expectations
for
information in
this manual
From this point forward in this documentation, Wacker Neuson Production
Americas LLC will be referred to as Wacker Neuson.
Keep a copy of the Operator’s Manual with the machine at all times.
Use the separate Parts Book supplied with the machine to order replacement
parts.
Refer to the separate Repair Manual for detailed instructions on servicing and
repairing the machine.
If you are missing any of these documents, please contact Wacker Neuson to
order a replacement or visit www.wackerneuson.com.
When ordering parts or requesting service information, be prepared to provide
the machine model number, item number, revision number, and serial number.
This manual provides information and procedures to safely operate and
maintain the above Wacker Neuson model(s). For your own safety and to
reduce the risk of injury, carefully read, understand, and observe all instructions
described in this manual.
Wacker Neuson expressly reserves the right to make technical modifications,
even without notice, which improve the performance or safety standards of its
machines.
The information contained in this manual is based on machines manufactured
up until the time of publication. Wacker Neuson reserves the right to change
any portion of this information without notice.
CALIFORNIA
Proposition
65 Warning
Laws
pertaining to
spark
arresters
Engine exhaust, some of its constituents, and certain vehicle components, contain
or emit chemicals known to the State of California to cause cancer and birth
defects or other reproductive harm.
NOTICE: State Health Safety Codes and Public Resources Codes specify that in
certain locations spark arresters be used on internal combustion engines that use
hydrocarbon fuels. A spark arrester is a device designed to prevent accidental
discharge of sparks or flames from the engine exhaust. Spark arresters are
qualified and rated by the United States Forest Service for this purpose. In order to
comply with local laws regarding spark arresters, consult the engine distributor or
the local Health and Safety Administrator.
wc_tx001048gb.fm 3
Page 4

Foreword G 50
Manufacturer’s
approval
This manual contains references to approved parts, attachments, and
modifications. The following definitions apply:
Approved parts or attachments are those either manufactured or provided by
Wacker Neuson.
Approved modifications are those performed by an authorized Wacker
Neuson service center according to written instructions published by Wacker
Neuson.
Unapproved parts, attachments, and modifications are those that do not
meet the approved criteria.
Unapproved parts, attachments, or modifications may have the following
consequences:
Serious injury hazards to the operator and persons in the work area
Permanent damage to the machine which will not be covered under warranty
Contact your Wacker Neuson dealer immediately if you have questions about
approved or unapproved parts, attachments, or modifications.
4 wc_tx001048gb.fm
Page 5

Table of ContentsG 50
Foreword 3
1 Safety Information 9
1.1 Signal Words Used in this Manual ....................................................... 9
1.2 Machine Description and Intended Use ............................................. 10
1.3 Operating Safety ................................................................................ 12
1.4 Service Safety .................................................................................... 14
1.5 Operator Safety while using Internal Combustion Engines ................ 16
1.6 Towing Safety ..................................................................................... 17
1.7 Reporting Trailer Safety Defects ........................................................ 17
2 Labels 18
2.1 Label Locations .................................................................................. 18
2.2 Label Meanings .................................................................................. 20
3 Lifting and Transporting 29
3.1 Lifting the Machine ............................................................................. 29
3.2 Towing the Machine ........................................................................... 29
4 Operation 32
4.1 Safety Notices .................................................................................... 32
4.2 CO Alarms .......................................................................................... 32
4.3 Refueling the Machine ........................................................................ 33
4.4 Control Panel ...................................................................................... 34
4.5 Voltage Selector Switch ..................................................................... 36
4.6 Emergency Stop Switch ..................................................................... 37
4.7 Generator Monitoring ......................................................................... 38
4.8 Engine Monitoring .............................................................................. 39
4.9 Engine shutdown faults ...................................................................... 40
4.10 Current Overload Fault ....................................................................... 41
4.11 Event Log ........................................................................................... 41
4.12 Main Line Circuit Breaker ................................................................... 42
wc_bo5000189846_05TOC.fm 5
Page 6

Table of Contents G 50
4.13 Engine Start Switch .............................................................................43
4.14 Voltage Adjustment Rheostat ..............................................................43
4.15 Warning Light ......................................................................................43
4.16 Connection Lugs .................................................................................44
4.17 Grounding the Generator ....................................................................45
4.18 Convenience Receptacles ...................................................................46
4.19 Remote Run Terminal Block ...............................................................46
4.20 Panel Door Interlock Switch ................................................................46
4.21 Terminal Connections .........................................................................47
4.22 Before Starting ....................................................................................48
4.23 Manual Start-Up ..................................................................................48
4.24 Running the Generator ........................................................................51
4.25 Engine Power Correction Factors .......................................................52
4.26 Shutting down the generator ...............................................................52
4.27 Cold Weather Start-Up ........................................................................52
4.28 Automatic/Remote Start-Up ................................................................53
4.29 Remote/Transfer Switch ......................................................................54
5 Using the LCD Panel and Keypad 55
5.1 Navigating the Menus ..........................................................................56
5.2 Entering Passwords ............................................................................58
5.3 Adjusting Screen Contrast ...................................................................59
5.4 Setting the Time or Date .....................................................................60
5.5 Changing User Preferences ................................................................61
5.6 Changing / Disabling Low Fuel Fault ...................................................62
5.7 Changing Cooldown Time ...................................................................63
6 Factory-Installed Options 64
6.1 Engine Block Heater Option ................................................................64
6.2 Electronic Governor .............................................................................65
6.3 Automatic LCD Heat ............................................................................66
6.4 Low Coolant Shutdown .......................................................................67
6.5 Lube Level Maintainer .........................................................................68
6.6 Temperature-Activated Shutters .........................................................69
6.7 Lockable Battery Disconnect ...............................................................69
6.8 Extended Run Tank .............................................................................70
6.9 Battery Charger ...................................................................................70
6 wc_bo5000189846_05TOC.fm
Page 7

Table of ContentsG 50
6.10 Camlocks ............................................................................................ 71
6.11 Containment System .......................................................................... 72
6.12 Wiring Diagram (Factory-Installed Options) ....................................... 73
6.13 Wiring Diagram Components (Factory-Installed Options) .................. 74
7 Maintenance 75
7.1 Periodic Maintenance Schedule ......................................................... 75
7.2 New Machines .................................................................................... 76
7.3 Resetting the Periodic Maintenance Timer ........................................ 76
7.4 Electronic Control Unit (ECU) ............................................................. 77
7.5 Servicing the Air Cleaner .................................................................... 78
7.6 Engine Oil ........................................................................................... 79
7.7 Checking Engine Coolant ................................................................... 80
7.8 Troubleshooting Automatic Shutdown ................................................ 81
7.9 Maintaining the Trailer ........................................................................ 83
8 Technical Data 84
8.1 Engine ................................................................................................ 84
8.2 Generator ........................................................................................... 85
8.3 Machine ............................................................................................. 85
8.4 Trailer and Skid .................................................................................. 86
8.5 Dimensions ......................................................................................... 88
9 Schematics 89
9.1 Generator and Receptacle Wiring ...................................................... 90
9.2 Generator and Receptacle Wiring Components ................................. 91
9.3 Engine Wiring ..................................................................................... 92
9.4 Engine Wiring Components ................................................................ 93
9.5 Trailer Wiring ...................................................................................... 94
9.6 Trailer Wiring Components ................................................................. 95
wc_bo5000189846_05TOC.fm 7
Page 8

Table of Contents G 50
8 wc_bo5000189846_05TOC.fm
Page 9
G 50 Safety Information
1 Safety Information
1.1 Signal Words Used in this Manual
This manual contains DANGER, WARNING, CAUTION, NOTICE,
and NOTE signal words which must be followed to reduce the
possibility of personal injury, damage to the equipment, or improper
service.
This is the safety alert symbol. It is used to alert you to potential personal hazards.
f Obey all safety messages that follow this symbol.
DANGER
DANGER indicates a hazardous situation which, if not avoided, will result in death
or serious injury.
To avoid death or serious injury from this type of hazard, obey all safety messages that
f
follow this signal word.
WARNING
WARNING indicates a hazardous situation which, if not avoided, could result in
death or serious injury.
f
To avoid possible death or serious injury from this type of hazard, obey all safety messages that follow this signal word.
CAUTION!
CAUTION indicates a hazardous situation which, if not avoided, could result in
minor or moderate injury.
To avoid possible minor or moderate injury from this type of hazard, obey all safety
f
messages that follow this signal word.
NOTICE: Used without the safety alert symbol, NOTICE indicates a situation which, if not avoided, could result in property damage.
Note: A Note contains additional information important to a procedure.
wc_si000533gb.fm 9
Page 10

Safety Information G 50
1.2 Machine Description and Intended Use
This machine is a mobile electric power source. The Wacker Neuson
Mobile Generator consists of a trailer-mounted cabinet containing an
electric alternator, a fuel tank, and a diesel engine. A control panel,
receptacles, and connection lugs are provided on the side of the
cabinet. As the engine runs, the generator converts mechanical
energy into electric power. The operator connects loads to the electric
power receptacles and connection lugs.
This machine is intended for the purpose of supplying electrical power
to connected loads. Refer to the product specifications for the output
voltage and frequency of this generator, and for the maximum output
power limit of this generator.
This machine has been designed and built strictly for the intended use
described above. Using the machine for any other purpose could
permanently damage the machine or seriously injure the operator or
other persons in the area. Machine damage caused by misuse is not
covered under warranty.
The following are some examples of misuse:
• Connecting a load that has voltage and frequency requirements
that are incompatible with the generator output
• Overloading the generator with a load that draws excessive
power during either continuous running or start-up
• Operating the generator in a manner that is inconsistent with all
federal, state and local codes and regulations
• Using the machine as a ladder, support, or work surface
• Using the machine to carry or transport passengers or equipment
• Using the machine to tow other machines
• Operating the machine outside of factory specifications
• Operating machine in a manner inconsistent with all warnings
found on the machine and in the Operator’s Manual
This machine has been designed and built in accordance with the
latest global safety standards. It has been carefully engineered to
eliminate hazards as far as practicable and to increase operator
safety through protective guards and labeling. However, some risks
may remain even after protective measures have been taken. They
are called residual risks. On this machine, they may include exposure
to:
• Heat, noise, exhaust, and carbon monoxide from the engine
• Fire hazards from improper refueling techniques
• Fuel and its fumes
10 wc_si000533gb.fm
Page 11

G 50 Safety Information
G
• Electric shock and arc flash
• Personal injury from improper lifting the trailer tongue
• Typical hazards related to towing a trailer on roads and highways
To protect yourself and others, make sure you thoroughly read and
understand the safety information presented in this manual before
operating the machine.
Electrocution hazard!
Electrocution or severe electrical shock hazards are present
WARNIN
throughout the generator any time the engine is running! Read all
safety notes contained in this section before operating or servicing this
equipment.
No one except a trained electrician, familiar with this equipment,
should attempt repairs to the generator! Test procedures which require
that the generator be running must be performed using extreme
caution.
This machine is built with user safety in mind; however, like any
electrical device it can present serious hazards if improperly operated
and serviced. Follow instructions carefully! Should questions arise
during operation or service of this equipment, contact Wacker Neuson
Corporation.
wc_si000533gb.fm 11
Page 12

Safety Information G 50
1.3 Operating Safety
Familiarity and proper training are required for the safe operation of
the machine. Machines operated improperly or by untrained
personnel can be dangerous. Read the operating instructions
WARNING
Operator qualifications
contained in both this manual and the engine manual and familiarize
yourself with the location and proper use of all controls. Inexperienced
operators should receive instruction from someone familiar with the
machine before being allowed to operate it.
Only trained personnel are permitted to start, operate, and shut down
the machine. They also must meet the following qualifications:
• have received instruction on how to properly use the machine
• are familiar with required safety devices
The machine must not be accessed or operated by:
• children
• people impaired by alcohol or drugs
Personal Protective Equipment (PPE)
Wear the following Personal Protective Equipment (PPE) while
operating this machine:
• Close-fitting work clothes that do not hinder movement
• Safety glasses with side shields
• Hearing protection
• Safety-toed footwear
1.3.1 Do not operate the generator when open containers of fuel, paint, or
other flammable liquids are near.
1.3.2 Do not place flammable material or liquids near the generator.
1.3.3 Do not operate the generator, or tools attached to the generator, with
wet hands.
1.3.4 Do not use worn electrical cords. Severe electrical shock and
equipment damage may result.
1.3.5 Do not operate the machine indoors unless exhaust fumes can be
adequately ventilated.
1.3.6 Do not overload the generator. The total amperage of the tools and
equipment attached to the generator must not exceed the load rating
of the generator.
1.3.7 Do not allow untrained personnel to operate or service the generator.
The generator set should be set up by a certified electrician.
1.3.8 Do not operate generator in standing water.
1.3.9 Do not touch the hot engine, exhaust, or generator components.
Burns will result.
12 wc_si000533gb.fm
Page 13

G 50 Safety Information
1.3.10 Do not start a machine in need of repair.
1.3.11 Use the emergency stop button only in an actual emergency. Do not
restart the engine until the cause of the trouble has been determined
and fixed.
1.3.12 Wear hearing protection when operating equipment.
1.3.13 Follow starting and stopping instructions described in this manual.
Know how to operate and stop generator before starting it.
1.3.14 Make a walk-around inspection of the generator set before starting it.
Open side doors and visually inspect engine compartment for obvious
damage or the presence of foreign objects which might affect
operation.
1.3.15 Keep the machine at least one meter (three feet) away from
structures, buildings, and other equipment during use.
1.3.16 Store the machine properly when it is not being used. The machine
should be stored in a clean, dry location out of the reach of children.
1.3.17 Keep the area immediately surrounding and underneath the machine
clean, neat, and free of debris and combustible materials. Make sure
that the area overhead is clear of debris that could fall onto or into the
machine or exhaust compartment.
1.3.18 Make sure the machine is on a firm, level surface and will not tip, roll,
slide, or fall while operating.
1.3.19 Remove all tools, cords, and other loose items from the generator
before starting it.
1.3.20 Make sure the machine is well-grounded and securely fastened to a
good earthen ground per national and local regulations.
BACKFEED FROM THE GENERATOR INTO THE PUBLIC POWER
DISTRIBUTION SYSTEM CAN CAUSE SERIOUS INJURY OR
DEATH TO UTILITY WORKERS!
WARNING
Improper connection of generator to a building’s electrical system can
allow electrical current from the generator to backfeed into utility lines.
This may result in electrocution of utility workers, fire, or explosion.
Connections to a building’s electrical system must be made by a
qualified electrician and comply with all applicable laws and electrical
codes.
If connected to a building’s electrical system, the generator must meet
the power, voltage, and frequency requirements of the equipment in
the building. Differences in power, voltage, and frequency
requirements may exist and improper connection may lead to
equipment damage, fire, and personal injury or death.
wc_si000533gb.fm 13
Page 14

Safety Information G 50
1.4 Service Safety
A poorly maintained machine can become a safety hazard! In order
for the machine to operate safely and properly over a long period of
time, periodic maintenance and occasional repairs are necessary.
WARNING
Personal Protective Equipment (PPE)
Wear the following Personal Protective Equipment (PPE) while
servicing or maintaining this machine:
• Close-fitting work clothes that do not hinder movement
• Safety glasses with side shields
• Hearing protection
• Safety-toed footwear
In addition, before servicing or maintaining the machine:
• Tie back long hair.
• Remove all jewelry (including rings).
1.4.1 Do not perform even routine service (oil/filter changes, cleaning,
etc.) unless all electrical components are shut down. Before
servicing this machine, make sure the engine start switch is turned to
off “O”, the circuit breakers are open (off), the emergency stop switch
is closed (pushed in), and the negative terminal on battery is
disconnected. Attach a “DO NOT START” sign to the control panel.
This will notify everyone that the unit is being serviced and will reduce
the chance of someone inadvertently trying to start the unit. If the unit
is connected to a remote start or transfer switch, make sure the
remote switch is also off and tagged.
1.4.2 Ground Connection
The generator must be connected to a good earthen ground for
proper operating safety!
A central “equipment ground” is provided at the customer connection
lugs. This point is connected directly to the generator set base. All
other system grounds are connected to this central point. Ground the
generator in accordance with the standards defined in national, state,
and local regulations.
1.4.3 Do not attempt to open the radiator cap while the unit is running or
before the engine has cooled down. Severe burns may result!
1.4.4 Do not allow water to accumulate around the base of the machine. If
water is present, move the machine and allow the machine to dry
before servicing.
1.4.5 Do not service the machine if your clothing or skin is wet.
14 wc_si000533gb.fm
Page 15

G 50 Safety Information
1.4.6 Do not allow untrained personnel to service this equipment. Only
trained electrical technicians should be allowed to service the
electrical components of this equipment.
1.4.7 Do not modify the machine without the express written approval of the
manufacturer.
1.4.8 Do not pressure wash the control panel, generator end, or any other
electrical components when cleaning the unit. Never allow water to
accumulate around the base of the generator set. If water is present,
DO NOT service!
1.4.9 Allow the engine to cool before performing any service work on the
machine.
1.4.10 Remain aware of moving parts and keep hands, feet, and loose
clothing away from the moving parts of the generator and engine.
1.4.11 Replace all guards, fasten doors, and make sure all safety devices
operate properly after making repairs or servicing the equipment.
1.4.12 Keep the machine clean and labels legible. Replace all missing and
hard-to-read labels. Labels provide important operating instructions
and warn of dangers and hazards.
1.4.13 Check all external fasteners at regular intervals.
1.4.14 Make sure slings, chains, hooks, ramps, jacks, and other types of
lifting devices are attached securely and have enough weight-bearing
capacity to lift or hold the machine safely. Always remain aware of the
location of other people in the area when lifting the machine.
wc_si000533gb.fm 15
Page 16
Safety Information G 50
1.5 Operator Safety while using Internal Combustion Engines
WARNING
Internal combustion engines present special hazards during operation and fueling. Failure to
follow the warnings and safety standards could result in severe injury or death.
f Read and follow the warning instructions in the engine owner’s manual and the
safety guidelines below.
DANGER
Exhaust gas from the engine contains carbon monoxide, a deadly poison. Exposure to carbon monoxide can kill you in minutes.
f NEVER operate the machine inside an enclosed area, such as a tunnel, unless
adequate ventilation is provided through such items as exhaust fans or hoses.
Operating safety
When running the engine:
• Keep the area around exhaust pipe free of flammable materials.
• Check the fuel lines and the fuel tank for leaks and cracks before
starting the engine. Do not run the machine if fuel leaks are present
or the fuel lines are loose.
When running the engine:
• Do not smoke while operating the machine.
• Do not run the engine near sparks or open flames.
• Do not touch the engine or muffler while the engine is running or
immediately after it has been turned off.
• Do not operate a machine when its fuel cap is loose or missing.
• Do not start the engine if fuel has spilled or a fuel odor is present.
Move the machine away from the spill and wipe the machine dry
before starting.
Refueling safety
When refueling the engine:
• Clean up any spilled fuel immediately.
• Refill the fuel tank in a well-ventilated area.
• Replace the fuel tank cap after refueling.
• Do not smoke.
• Do not refuel a hot or running engine.
• Do not refuel the engine near sparks or open flames.
16 wc_si000533gb.fm
Page 17

G 50 Safety Information
1.6 Towing Safety
Towing a large trailer requires special care. Both the trailer and vehicle
must be in good condition and securely fastened to each other to
reduce the possibility of an accident.
WARNING
1.6.1 Verify that the hitch and coupling on the vehicle are rated equal to, or
greater than, the trailer's “gross vehicle weight rating” (GVWR).
1.6.2 Inspect the hitch and coupling for wear or damage. DO NOT tow the
trailer using defective parts.
1.6.3 Make sure the coupling is securely fastened to the vehicle.
1.6.4 Check the tires on the trailer for tread wear, inflation, and condition.
Replace worn tires.
1.6.5 Connect the safety chains.
1.6.6 Connect the breakaway cable safety hook to the bumper or rear of the
vehicle. DO NOT attach it to the hitch.
1.6.7 Test the surge brakes on the trailer and the brakes on the vehicle that
will be used for towing.
1.6.8 Make sure directional and trailer lights are connected and working
properly.
1.6.9 Check that the lug nuts holding the wheels are tight and that none are
missing.
1.7 Reporting Trailer Safety Defects
If you believe your trailer has a defect which could cause a crash or
could cause injury or death, you should immediately inform the
National Highway Traffic Safety Administration (NHTSA) in addition to
notifying Wacker Neuson Corporation.
If NHTSA receives similar complaints, it may open an investigation;
and if it finds that a safety defect exists in a group of vehicles, it may
order a recall and remedy campaign. However, NHTSA cannot
become involved in individual problems between you, your dealer, or
Wacker Neuson Corporation.
To contact NHTSA, you may either contact the Auto Safety Hotline tollfree at 1-800-424-9393 (or 366-0129 in Washington DC area),
www.nhtsa.com, or write to NHTSA, U.S. Department of
Transportation, 400 7th Street SW, (NSA-11), Washington, DC 20590.
You can also obtain other information about motor vehicle safety from
the Auto Safety Hotline.
wc_si000533gb.fm 17
Page 18
Labels G 50
AVERTISSEMENT
ADVERTENCIA
WARNING
WARNUNG
114885
AVERTISSEMENT
WARNING
WARNUNG
ADVERTENCIA
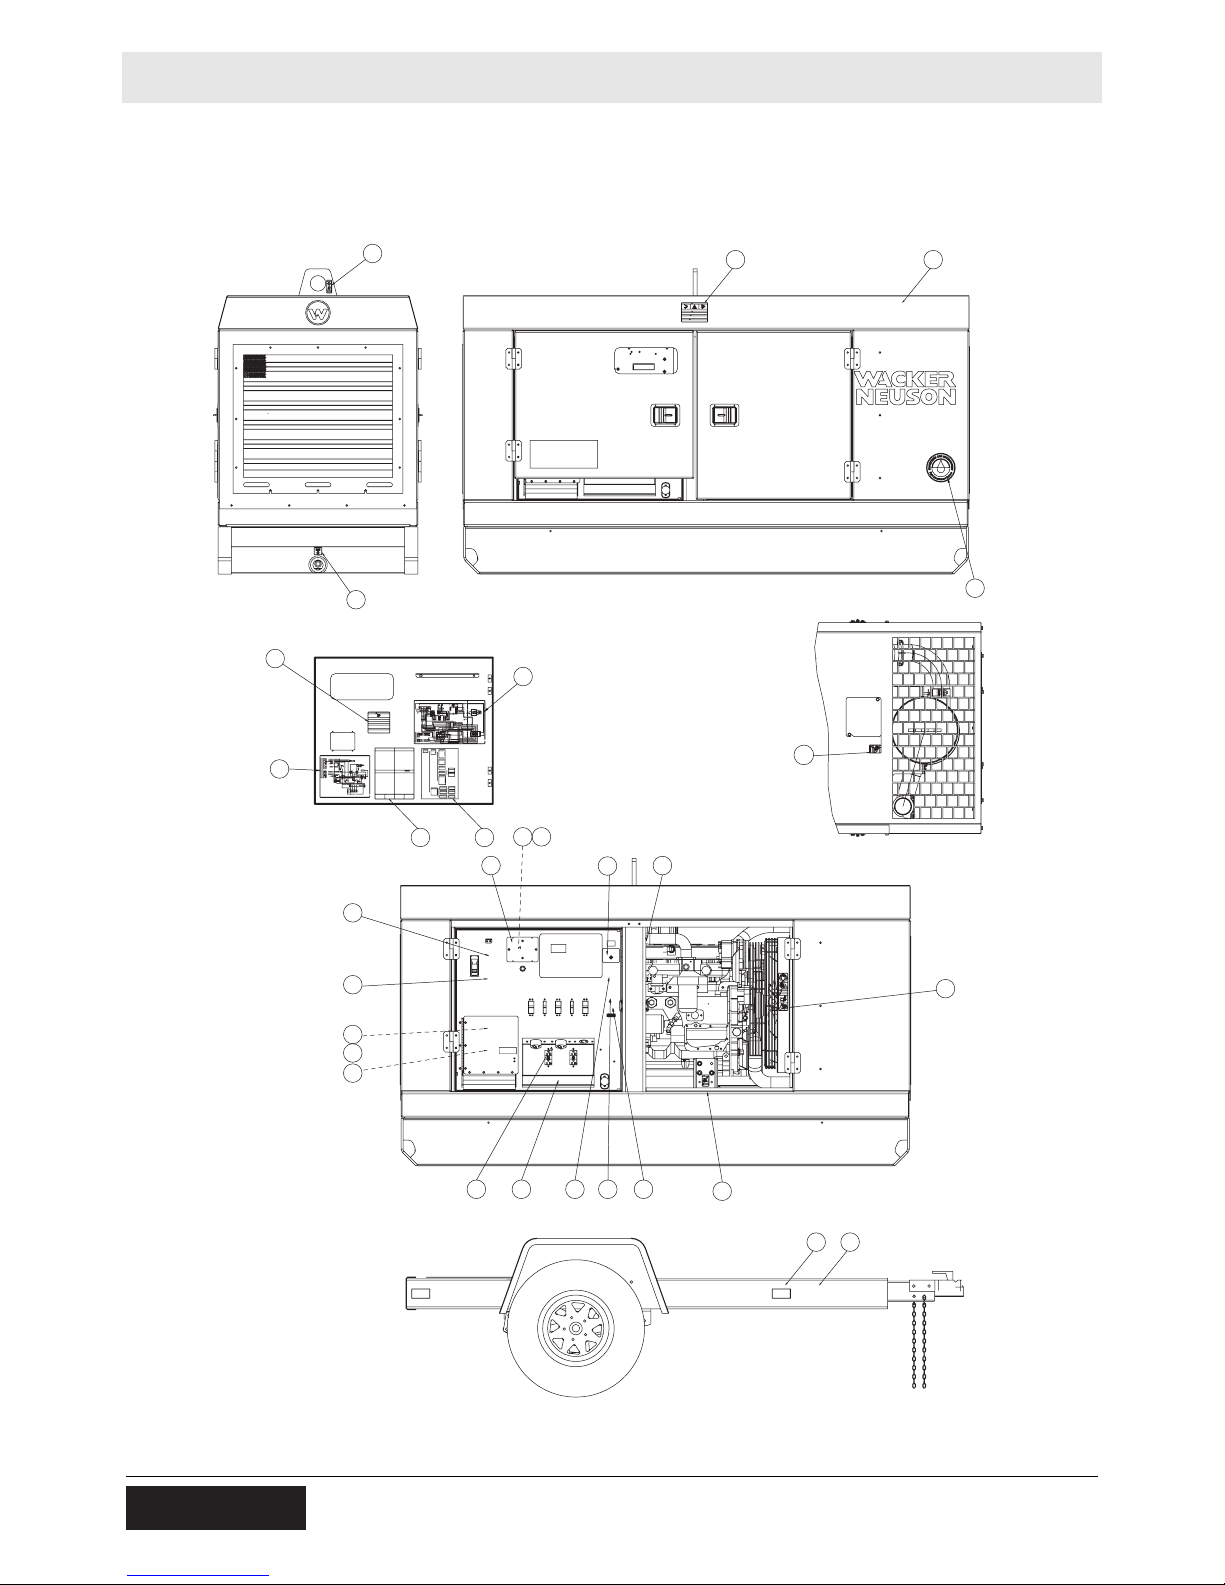
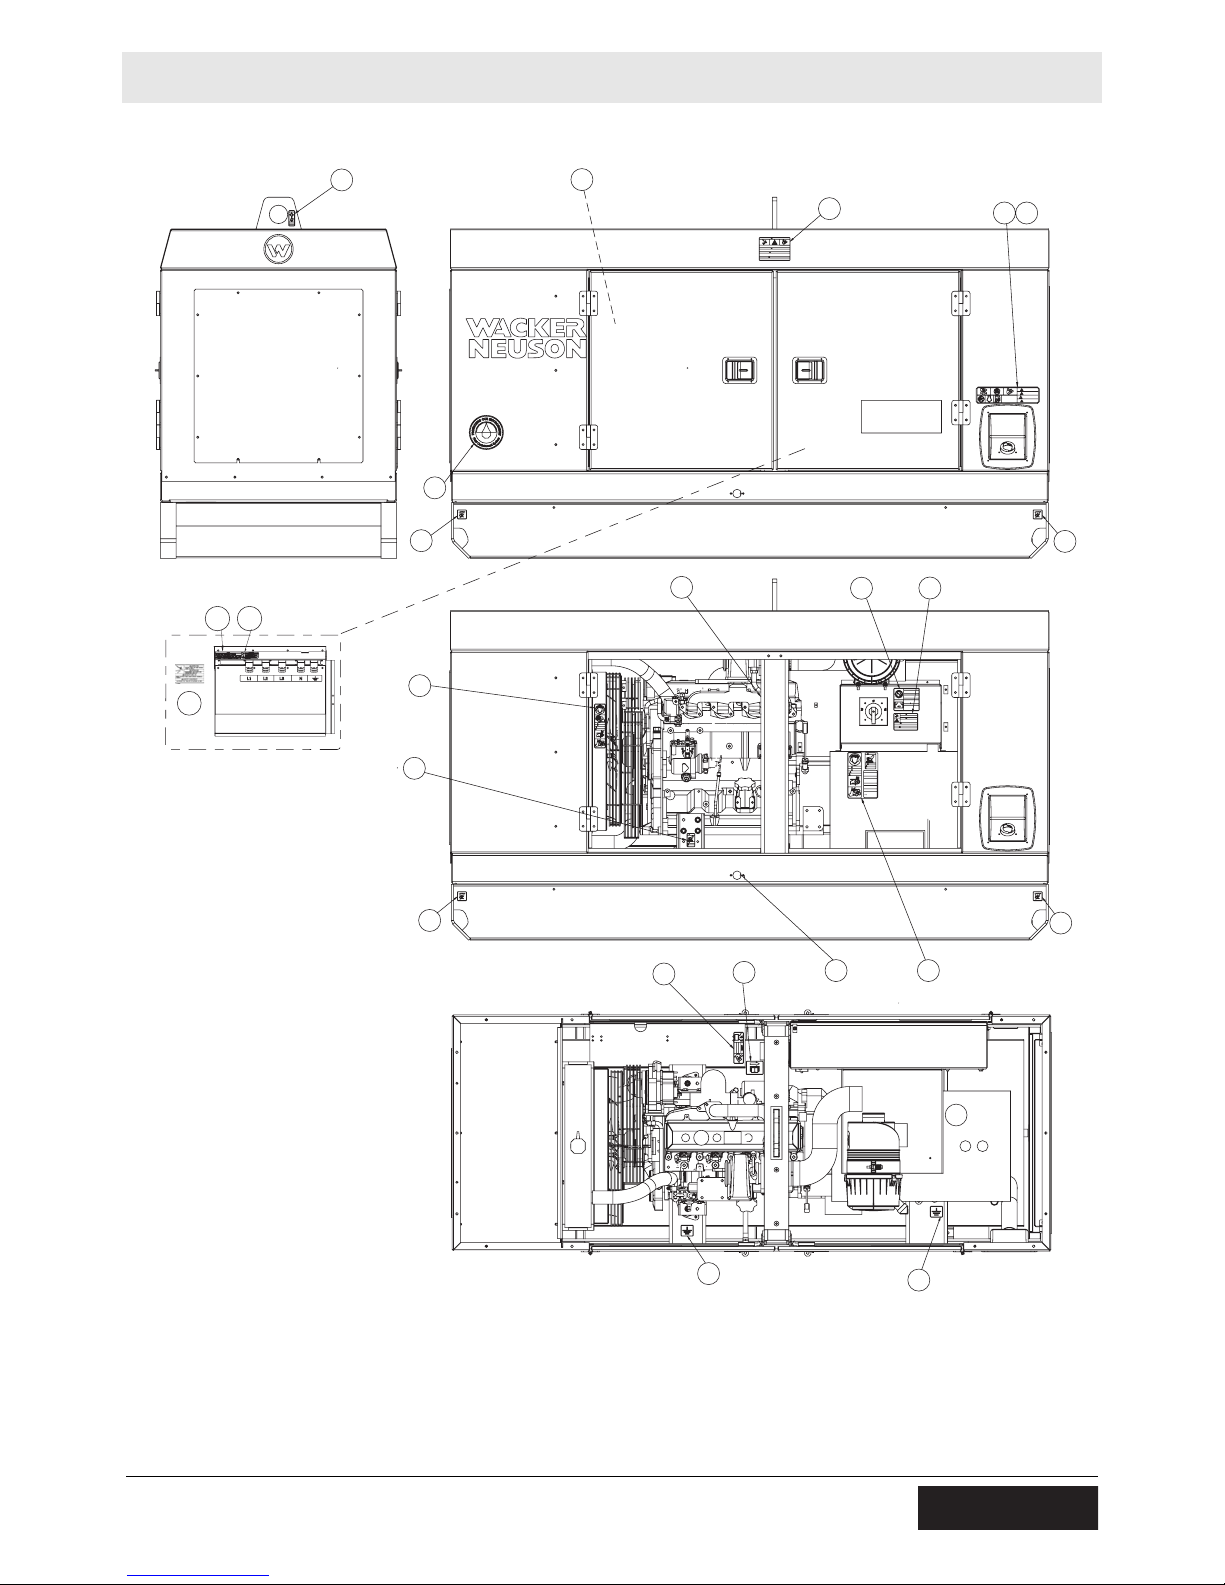
2Labels
2.1 Label Locations
L
HH
CC
U
BG
JJ
GG
A
K
DD
M1
M2
QQ
H
EE
KK
Q
J
Z
NN
OO
LL
MM
FF
WARNING
WARNUNG
ADVERTENCIA
AVERTISSEMENT
WARNING
WARNUNG
ADVERTENCIA
AVERTISSEMENT
114885
P
G
AA
T
X
wc_gr007670
18 wc_si000520gb.fm
Page 19
G 50 Labels
RR
SS
TT
U
JJ
V
P
PP
B
R
C
D
E
UU
V
G
V
O
Y
W
FS
W
wc_gr007671
V
wc_si000520gb.fm 19
Page 20
Labels G 50
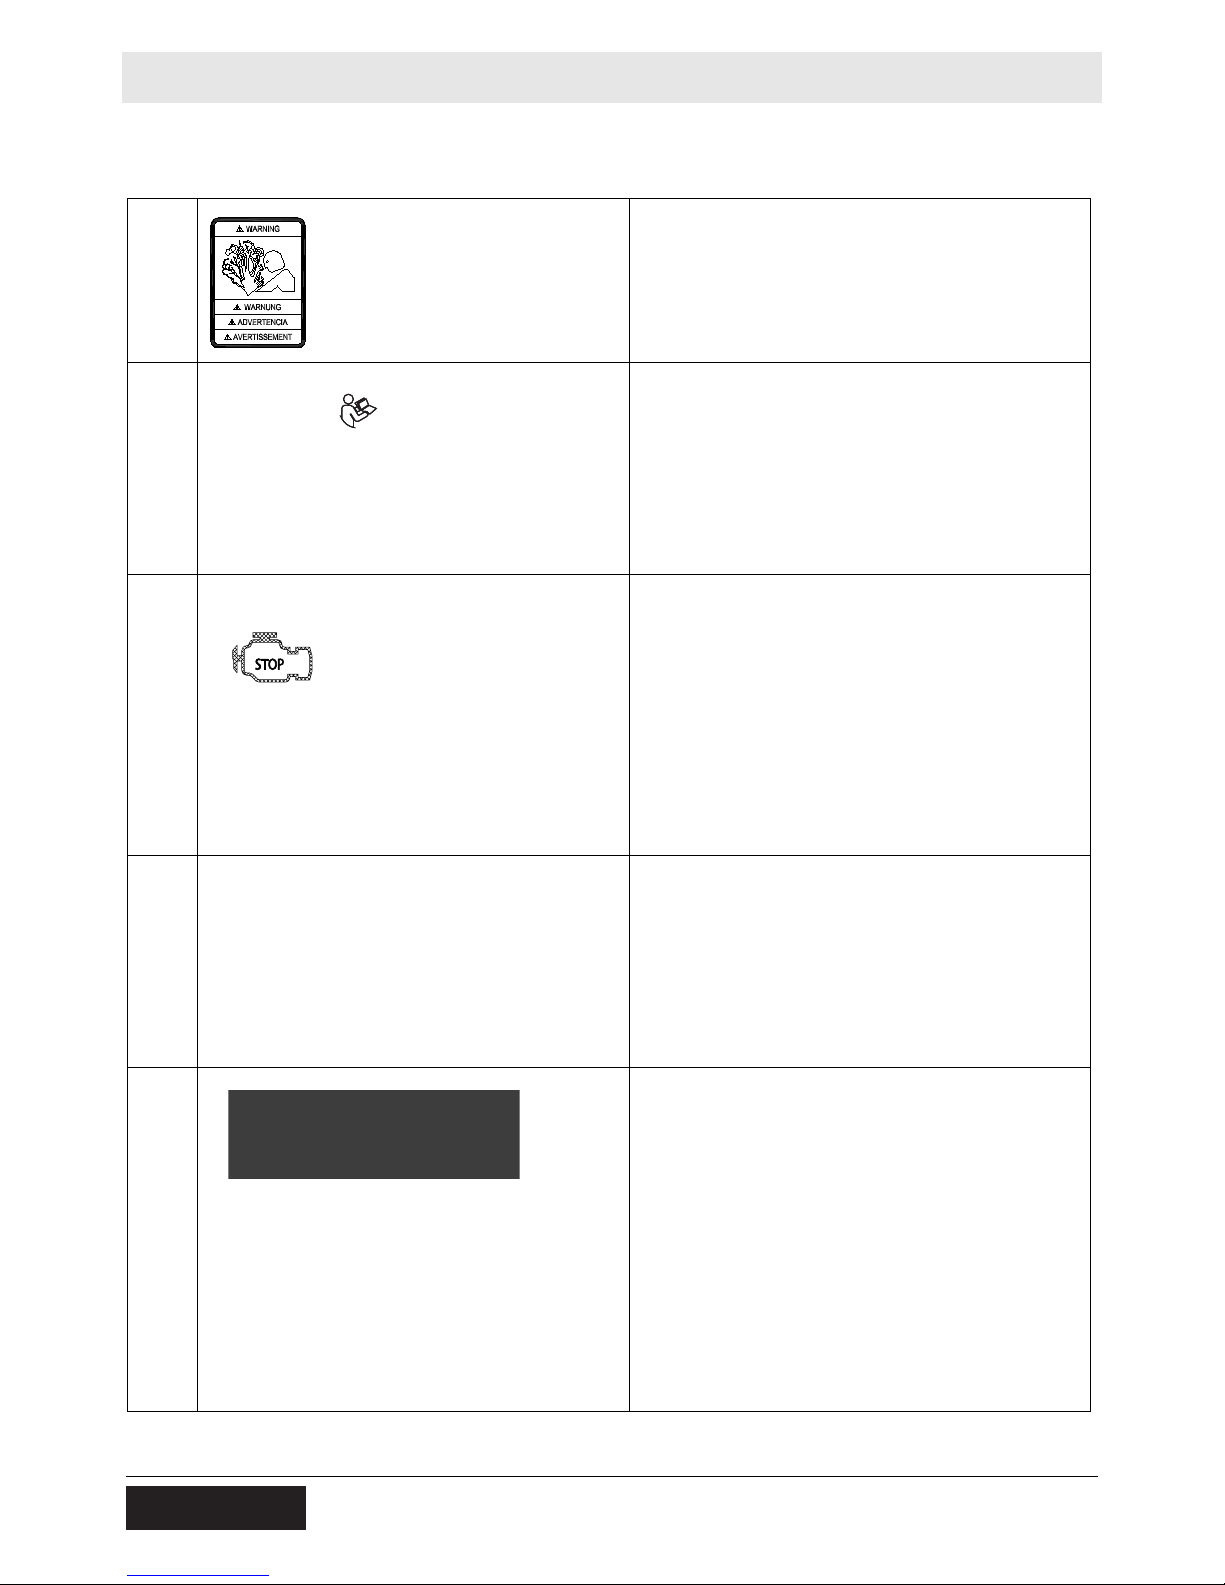
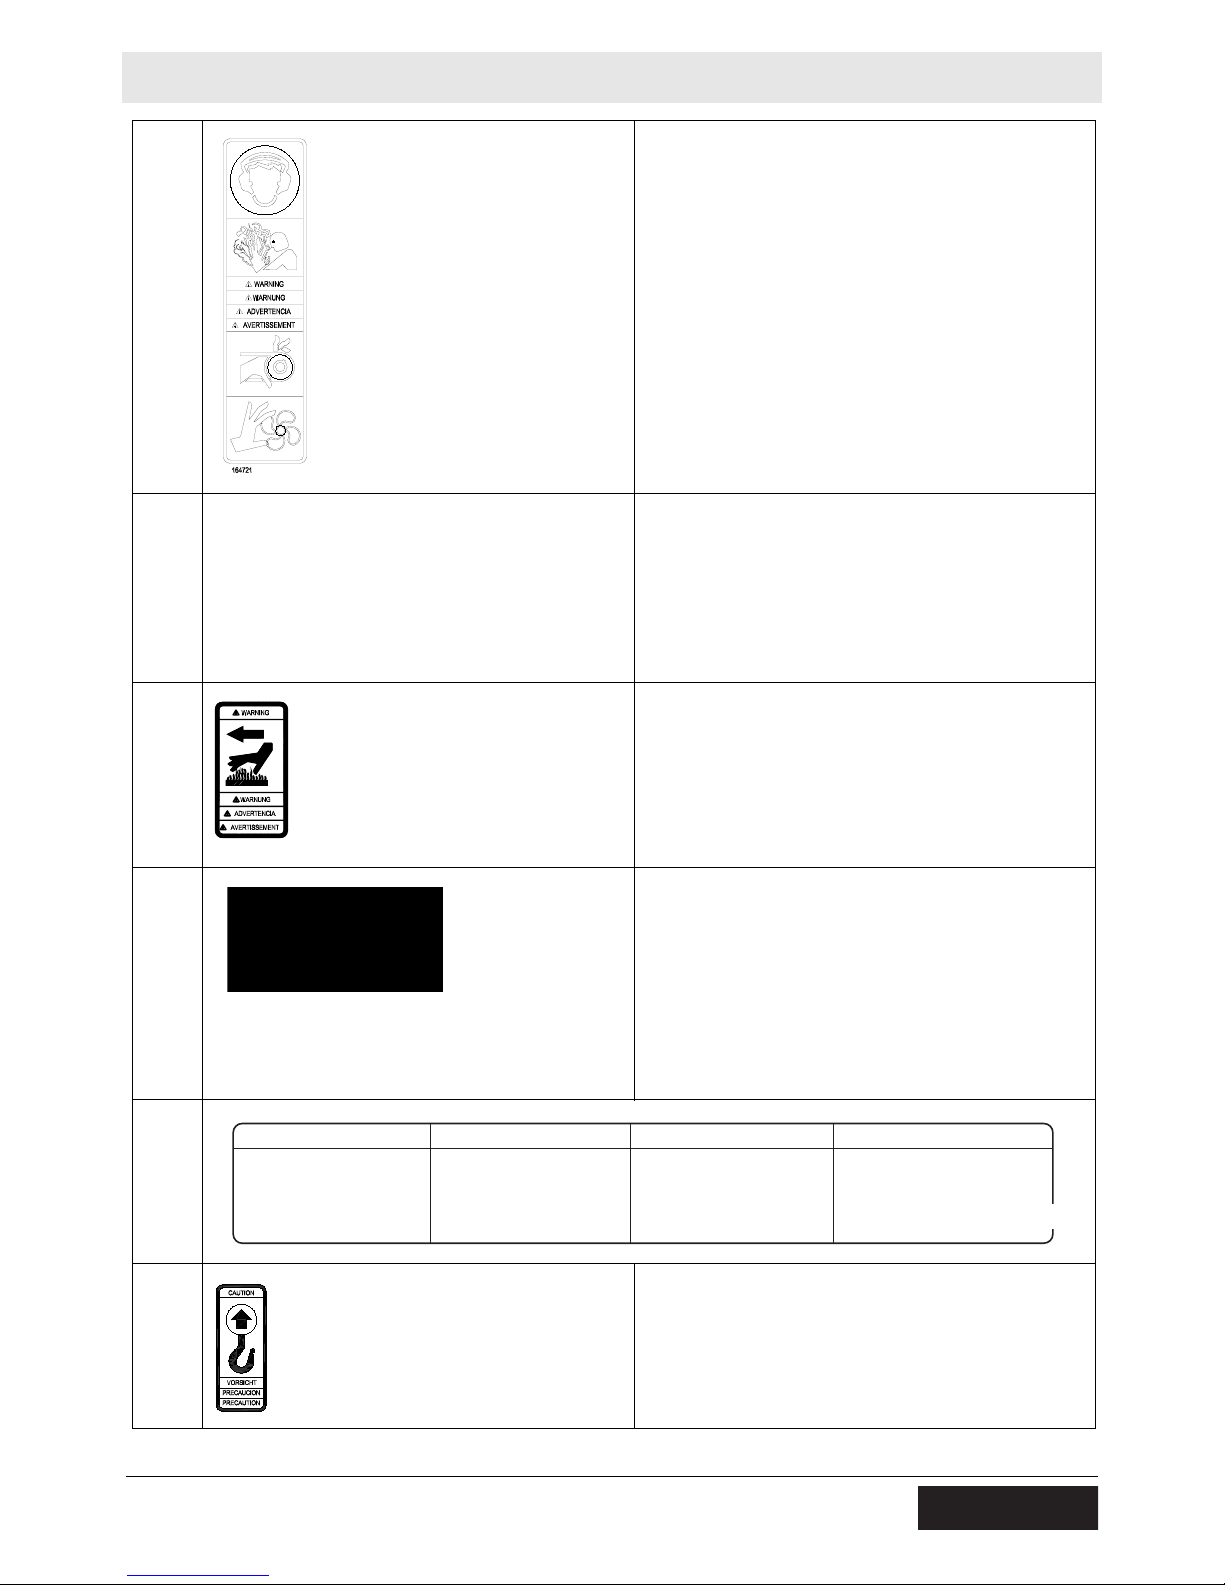
2.2 Label Meanings
A
B
C
WARNING!
Pressurized contents. Do not open when hot!
WARNING!
Lock doors. Access can cause electric shock or
injury.
NOTICE
Never change switch position with engine running. Results in damage to machine.
D
E
WARNING!
Electric shock can cause serious injury or death.
DANGER!
Asphyxiation hazard.
Engines emit carbon monoxide.
Do not run the machine indoors or in an
enclosed area.
Only use OUTSIDE and far away from win-
dows, doors, and vents.
Read the Operator’s Manual.
No sparks, flames, or burning objects near the
machine.
Stop the engine before refueling.
Use only clean, filtered diesel fuel.
20 wc_si000520gb.fm
Page 21
G 50 Labels
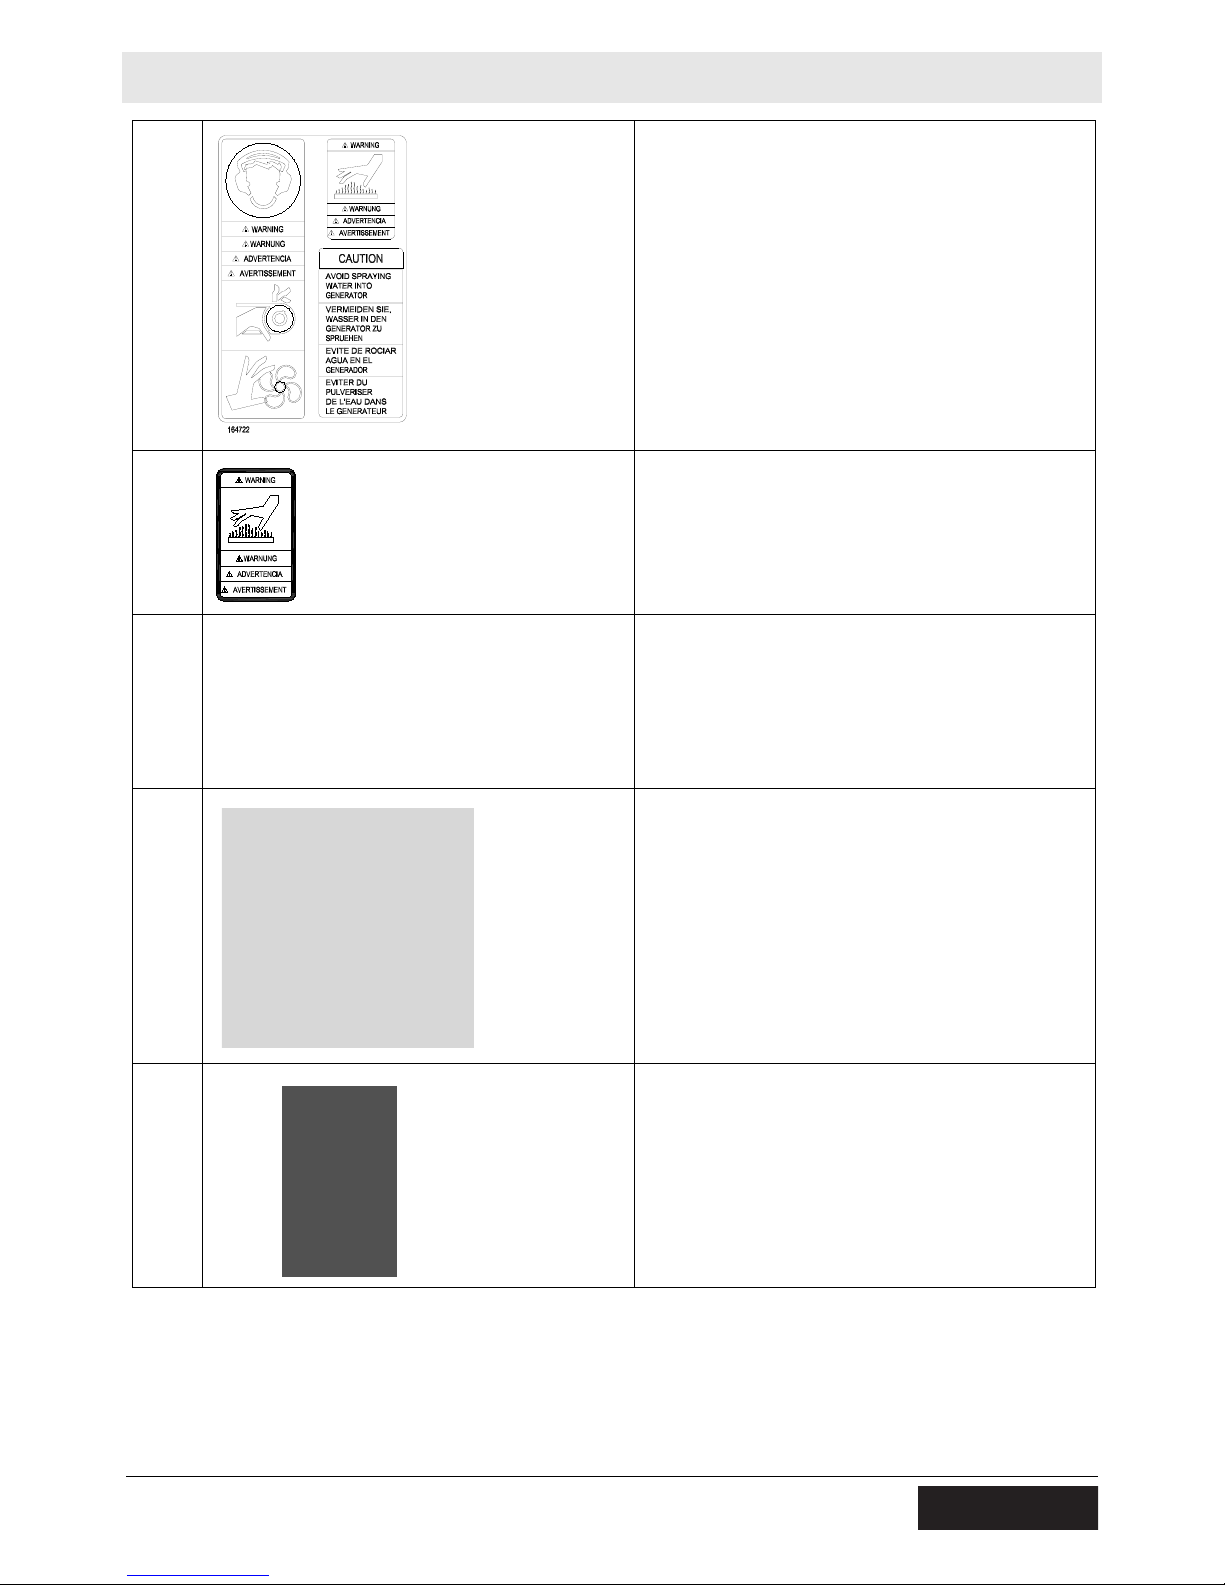
F
G
H
WARNING!
To prevent hearing loss, wear hearing protection.
Hand injury if entangled in moving belt.
Rotating machinery! Do not reach inside with
engine running.
WARNING!
Hot surface
CAUTION!
Avoid spraying water into generator.
WARNING!
Hot surface
WARNING
Electric shock at cooling fins.
J
K
DANGER!
Asphyxiation hazard.
Engines emit carbon monoxide.
Do not run the machine indoors or in an
enclosed area.
Electric shock and arc flash can cause serious
injury or death.
WARNING!
Generator can automatically start which can
cause serious injury. Disconnect battery before
servicing.
wc_si000520gb.fm 21
Page 22
Labels G 50
L
M1
M2
WARNING!
Read and understand the supplied Operator’s
Manual before operating the machine. Failure to
do so increases the risk of injury to yourself and
others.
WARNING!
To reduce the risk of electrical shock and arc
flash, read the Operator’s Manual. Improper connection of the generator to a building’s electrical
system can allow electrical current from the generator to backfeed into utility lines. This may
result in electrocution of utility workers, fire, or
explosion. Connections to a building’s electrical
system must be made by a qualified electrician
and comply with all applicable laws and electrical
codes.
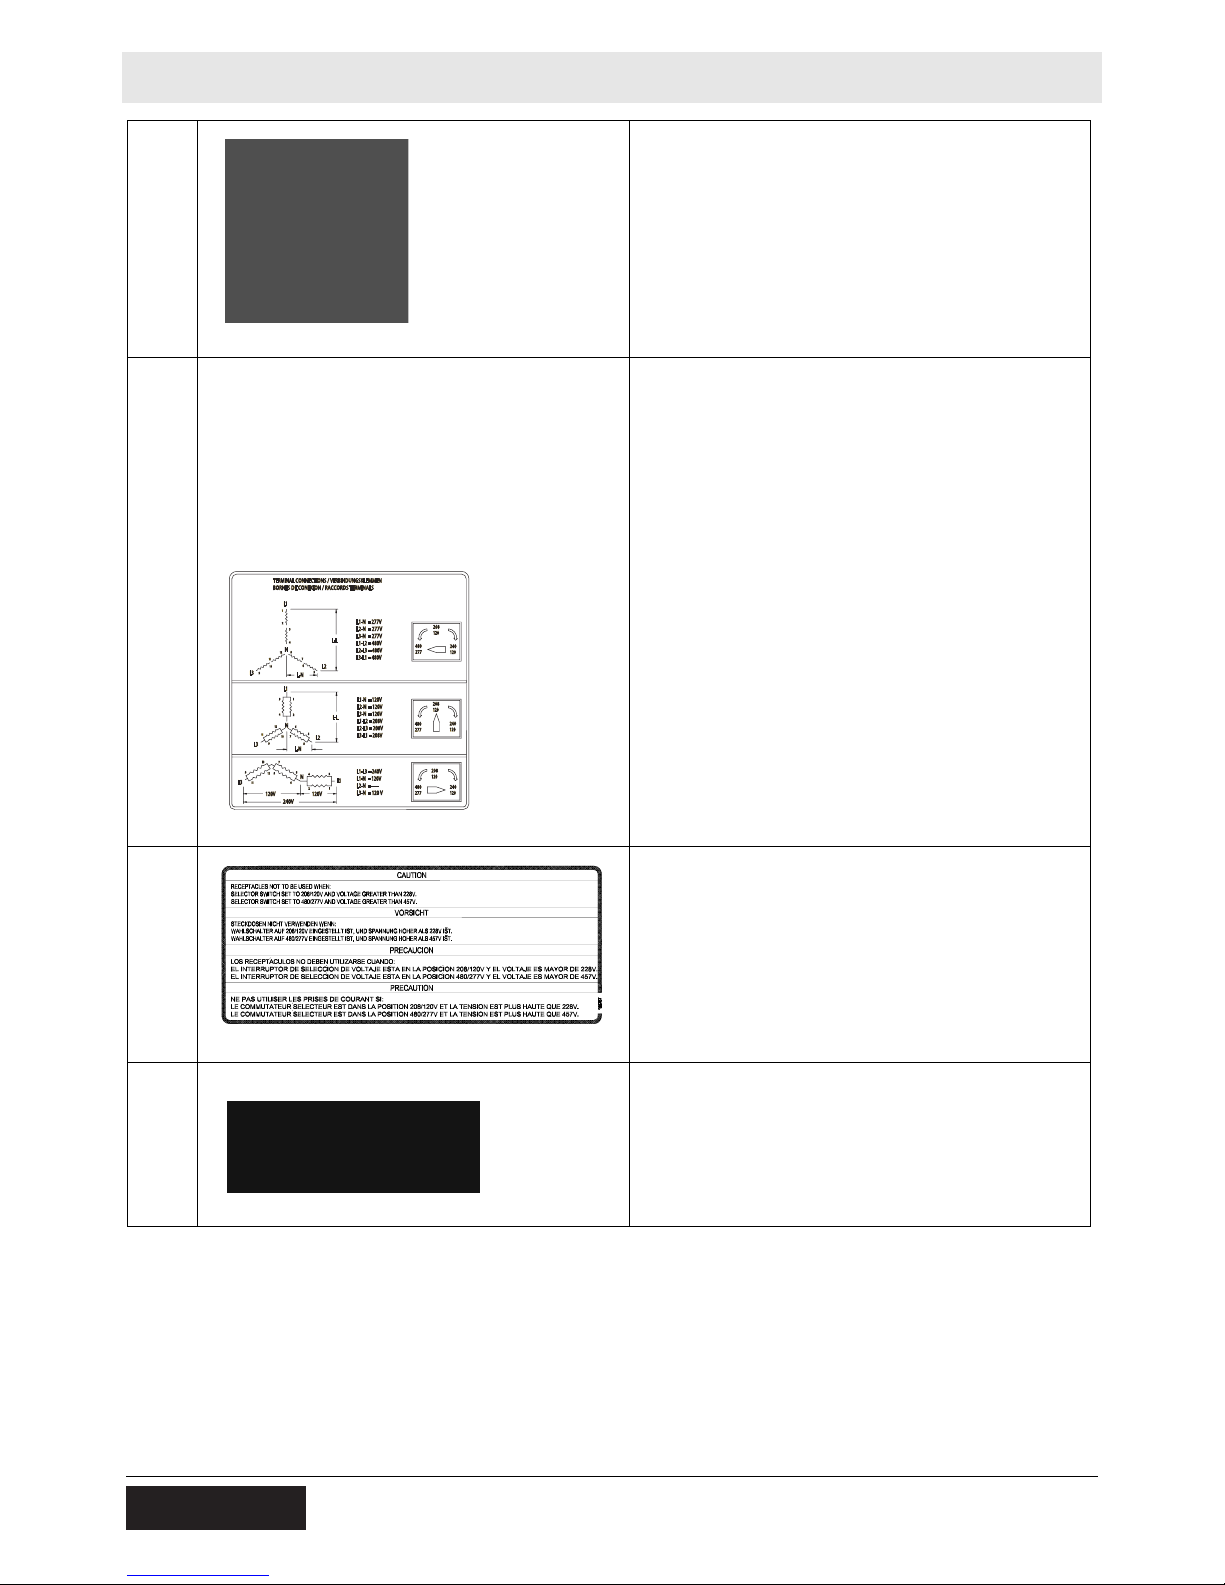
N
O
CAUTION!
Receptacles not to be used when:
Selector switch set to 208/120V and voltage
greater than 228V.
Selector switch set to 480/277V and voltage
greater than 457V.
WARNING!
Disconnect battery before servicing.
Read the Operator’s Manual.
22 wc_si000520gb.fm
Page 23
G 50 Labels
P
Q
R
WARNING!
To prevent hearing loss, wear hearing protection
when operating the machine.
WARNING!
Pressurized contents. Do not open when hot!
WARNING!
Hand injury if entangled in moving belt.
WARNING!
Rotating machinery! Do not reach inside
machine with engine running.
WARNING!
Electric shock at cooling fins.
WARNING!
Hot surface
S
T
U
(if equipped)
Battery disconnect must be in “ON” position to
start engine.
NOTICE: Do not use the battery disconnect
switch while engine is running. Damage to the
electrical components may occur.
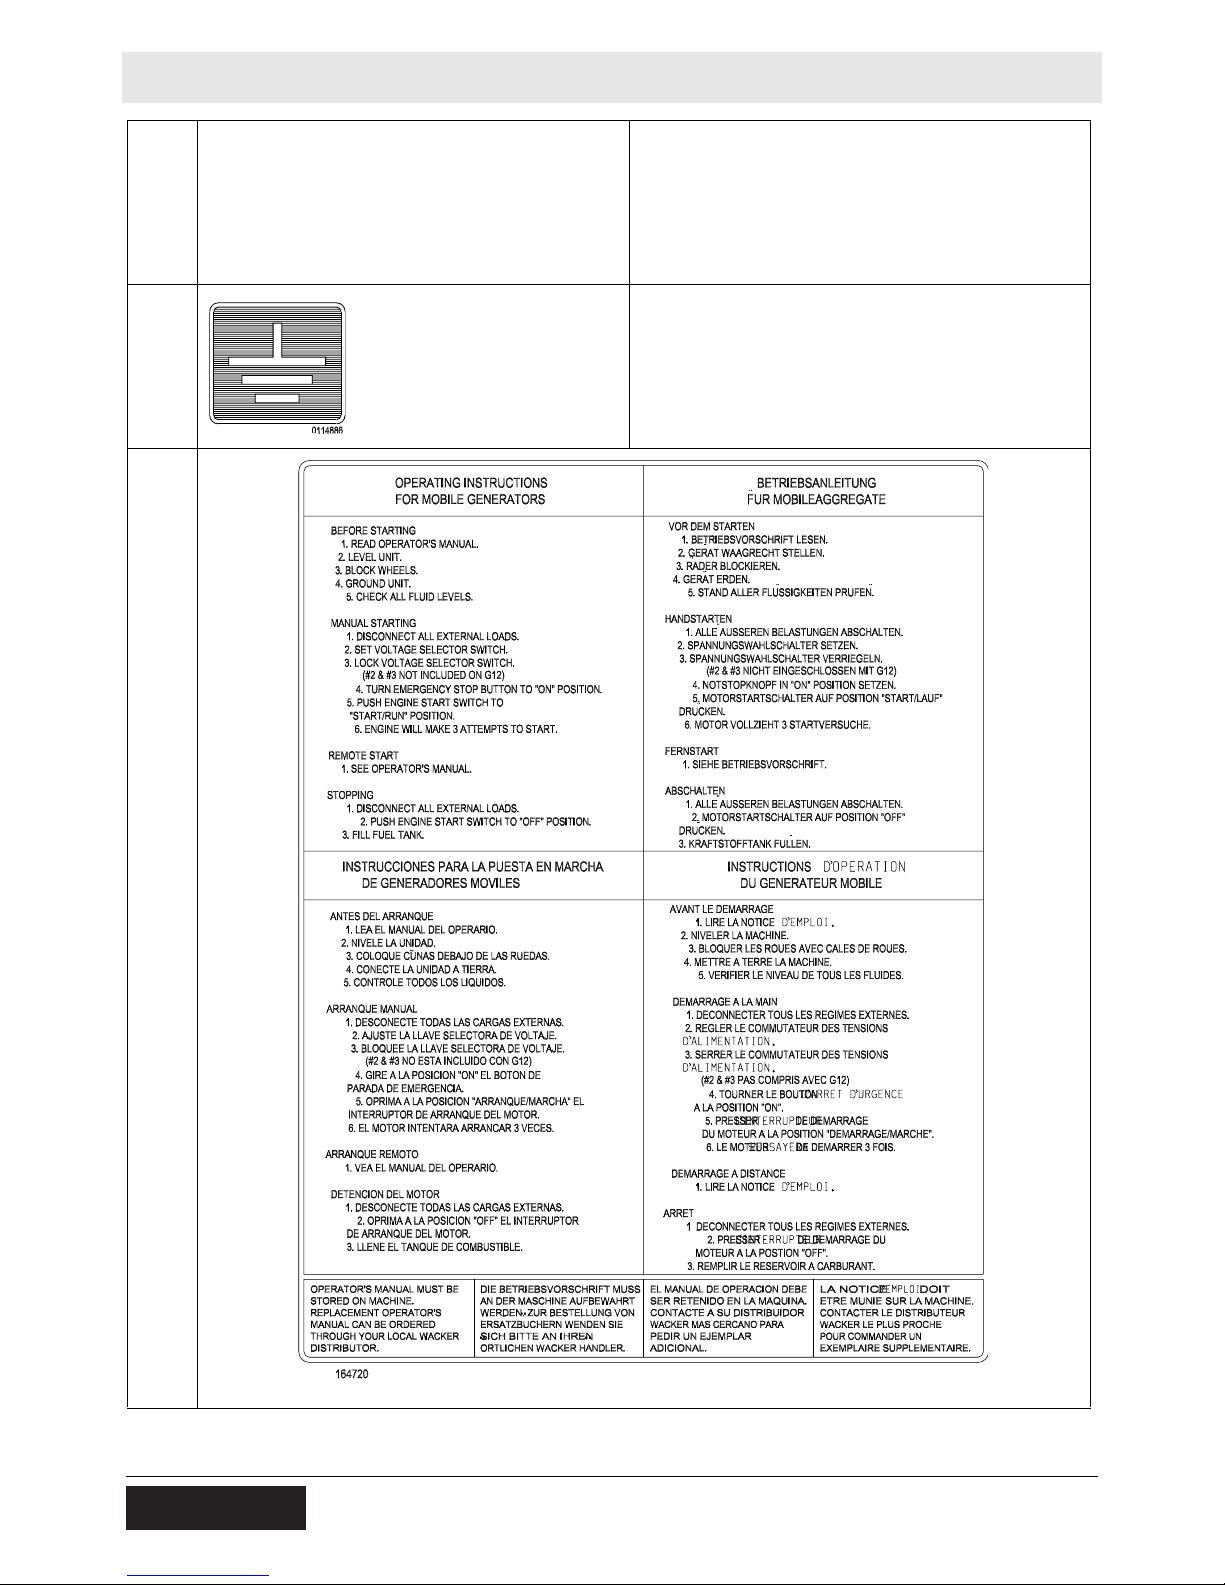
TOWING INSTRUCTIONS ABSCHLEPPINSTRUKTIONEN INSTRUCCIONES DE REMOLQUE
1. READ OPERATOR'S MANUAL.
2. USE HITCH RATED FRO TRAILER'S
"GROSS VEHICLE WEIGHT RATING".
3. SECURELY ATTACH TRAILER TO TOW
VEHICLE.
4. ATTACH SAFETY CHAINS USING CROSS
PATTERN.
5. ATTACH BREAKDOWN CHAIN TO VEHICLE.
6. CHECK TRAILER LIGHTS.
1. BETRIEBSVORSCHRIFT LESEN.
2. ANHANGEVORRICHTUNG VERWENDEN,
DIE DER GESAMTBETRIEBSGEWICHTSKLASSE
ENTSPRICHT.
3. ANHANGER SICHER AM ZUGFAHRZEUG
BEFESTIGEN.
4. SICHERHEITSKETTEN KREUZWEISE ANBRINGEN.
5. ABREISSKETTE AM FAHRZEUG ANBRINGEN.
6. ANHANGERLEUCHTEN PRUFEN.
1. LEA EL MANUAL DEL OPERARIO.
2. UTILICE UN ACOPLE CORRECTAMENTE
CLASIFICADO PARA LA "CLASE DE PESO BUTO"
DEL VEHICULO DEL REMOLQUE.
3. ASEGURESE DE AMARRAR CORRECTAMENTE
EL REMOLQUE AL VEHICULO DE REMOLQUE.
4. FIJE EN CRUZ LAS CADENAS DE SEGURIDA D.
5. FIJE EN EL VEHICULO DE REMOLQUE LA CADENA
DE DESPRENDIMIENTO.
6. CONTROLE LAS LUCES DEL REMOLQUE.
NOTICE
Lifting point.
INSTRUCTIONS DE REMORQUAGE
1. LIRE LA NOTICE D'EMPLOI.
2. UTILISER UN GROCHET D'ATTELAGE CONFORME AU
DEBIT NOMINAL DU POIDS BRUT DE VEHICULE DU
TRACTEUR.
3. ATTACHER LA REMORQUE FERMEMENT AU VEHICULE
TRACTEUR.
4. ATTACHER LES CHAINES DE SURETTE EN UTILISANT
UNE METHODE CROISEE.
5. ATTACHER LA CHAINE DE REMORQUAGE AU VEHICULE.
6. VERIFIER LES LAMPES DE LA REMORQUE.
114894
wc_si000520gb.fm 23
Page 24
Labels G 50
V
W
X
Tie-down point
Electrical ground
24 wc_si000520gb.fm
Page 25

G 50 Labels
Y
Z
AA
CC
Operator’s Manual must be stored on machine.
Replacement Operator’s Manual can be ordered
through your local Wacker Neuson distributor.
Remote start operation. Read Operator’s Manual
for instructions.
Drain containment system.
DD
EE
FF
Operating the main circuit breaker supplies or
interrupts power to the customer connection lugs.
Neutral bonded to frame
Fuses
Read the Operator’s Manual for machine information.
1 - Start / Run Circuit
2 - Not used
3 - Not used
4 - Controller
wc_si000520gb.fm 25
Page 26

Labels G 50
GG
HH
Generator and receptacle wiring
Engine wiring
JJ
KK
Protecting Our Environment
Fluid containment system
Diagnostic menu navigation
26 wc_si000520gb.fm
Page 27
G 50 Labels
LL
MM
NN
A nameplate listing the model number, item number, revision number, and serial number is
attached to each unit. Please record the information found on this nameplate so it will be available
should the nameplate become lost or damaged.
When ordering parts or requesting service information, you will always be asked to specify the
model number, item number, revision number,
and serial number of the unit.
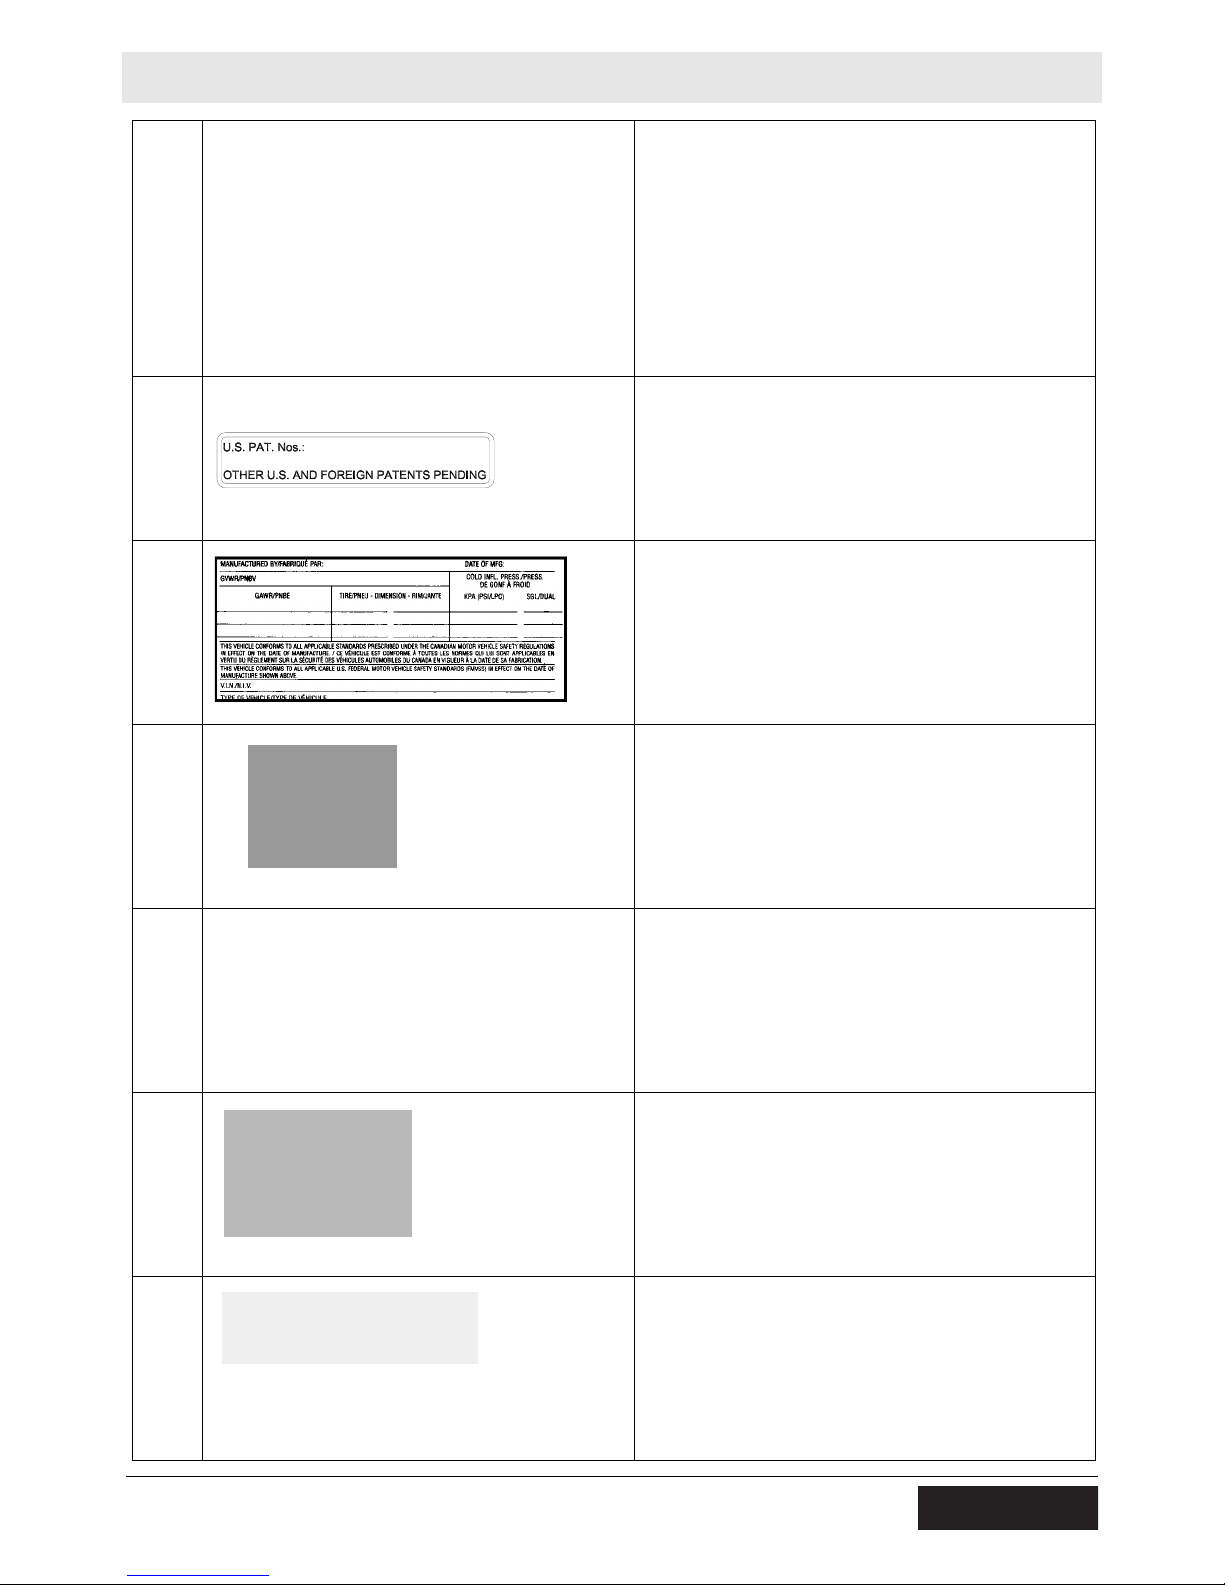
This machine may be covered by one or more
patents.
Certification Label (VIN Number)
Also attached to each unit is a Certification Label.
This label specifies that the trailer conforms with
all Federal Motor Vehicle Standards in effect at
the time of manufacture. The label includes the
Vehicle Identification Number (VIN) for the trailer.
OO
QQ
RR
SS
Remote start switch
Lug door must be closed for lugs and receptacles
to energize.
(Camlock models only)
WARNING!
Electric shock can cause serious injury or death.
(Camlock models only)
wc_si000520gb.fm 27
NOTICE
Separate overcurrent protection must be
provided. Do not exceed 400 amps per
receptacle.
Page 28

Labels G 50
TT
(Camlock models only)
WARNING!
Electric shock and arc flash can cause serious
injury or death.
28 wc_si000520gb.fm
Page 29

G 50 Lifting and Transporting
3 Lifting and Transporting
3.1 Lifting the Machine
A central lifting eye is located at the top of the generator and is
attached to a lifting frame inside the housing.
Crushing / machine damage hazard. Make sure the lifting devices
have sufficient capacity to lift the unit safely. Refer to Technical Data
WARNING
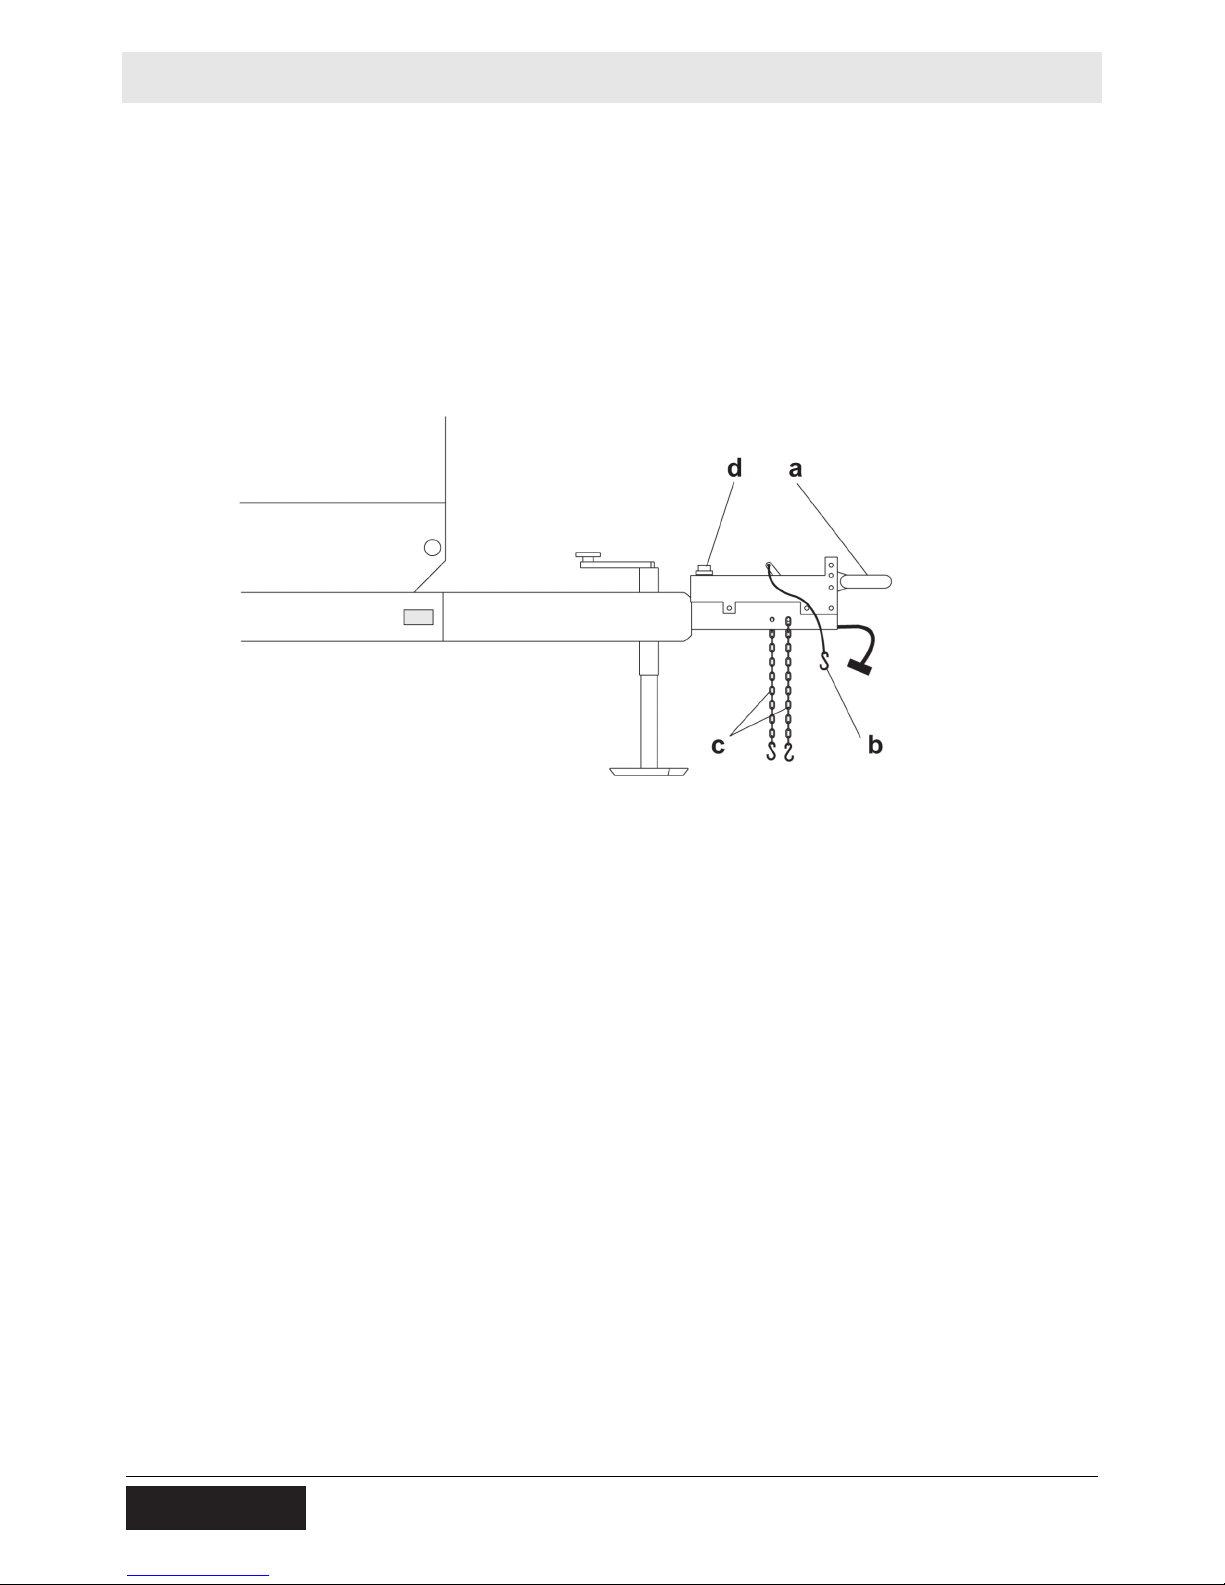
3.2 Towing the Machine
See Graphic: wc_gr000510
3.2.1 Check that the towing vehicle and hitch have a rating equal to or
for the proper operating weight of the generator.
When lifting the generator, attach a hook or sling securely to the lifting
eye.
The generator trailer is equipped with brakes, lights, and coupler
connection. Before towing the generator, perform the following:
greater than the GVWR. Refer to the Technical Data.
3.2.2 Check the condition of both the coupler and hitch. DO NOT tow the
trailer if the coupler or hitch is damaged.
3.2.3 Make sure that the hitch and coupler are compatible. The generator
trailer is equipped with either a pintle type coupler (a) or 50 mm (2 in.)
ball coupler.
3.2.4 Check that the directional and running lights on the trailer are working.
3.2.5 Connect the safety chains (c) using a crossed pattern under the trailer
tongue.
3.2.6 On trailers with surge or electric brakes, connect the breakaway cable
(b) on the trailer coupler to the rear bumper or frame of the vehicle.
This cable will actuate the brake system on the trailer if both the
coupling and safety chains have failed. The breakaway cable is not a
parking brake and should not be used as one.
3.2.7 Check that all fasteners on the coupling are secure.
3.2.8 Check the tread wear and inflation of tires. Make sure that all lug nuts
are in place and are tight.
3.2.9 Check the operation of the optional surge brakes by braking the
vehicle at a slow speed before entering traffic. Both the vehicle and the
trailer should brake smoothly. If the trailer seems to be pushing, check
the fluid level (d) in the surge brakes or the operation of the electric
brakes.
A film of grease on the coupler will extend coupler and ball life and
eliminate squeaking. Wipe the coupler and ball clean and apply fresh
grease each time the trailer is towed.
wc_tx001580gb.fm 29
Page 30
Lifting and Transporting G 50
NOTICE: When towing, maintain extra space between vehicles and
avoid soft shoulders, curbs and sudden lane changes. If you have not
pulled a trailer before, practice turning, stopping, and backing up in an
area away from heavy traffic.
DO NOT exceed 55 mph when towing a trailer.
In most states, large trailers must be registered and licensed by the
State Department of Transportation. Before towing, be sure to check
licensing requirements.
30 wc_tx001580gb.fm
Page 31

G 50 Lifting and Transporting
Notes:
wc_tx001580gb.fm 31
Page 32

Operation G 50
4 Operation
Preparing for first use
To prepare your machine for first use:
4.0.1 Make sure all loose packaging materials have been removed from the
machine.
4.0.2 Check the machine and its components for damage. If there is visible
damage, do not operate the machine! Contact your Wacker Neuson
dealer immediately for assistance.
4.0.3 Take inventory of all items included with the machine and verify that
all loose components and fasteners are accounted for.
4.0.4 Attach component parts not already attached.
4.0.5 Add fluids as needed and applicable, including fuel, engine oil, and
battery acid.
4.0.6 Move the machine to its operating location.
4.1 Safety notices
4.2 CO Alarms
• Do not exceed the power output of the generator. Damage to
tools or generator will occur. Refer to Technical Data.
• When using the generator as a standby or substitute power
supply, make sure the voltage and phase rotation of the line
connections match those of the utility lines. Failure to match
phase rotation and voltage may cause equipment connected to
the generator to operate incorrectly! This could create unsafe
operating conditions.
• Do not exceed the rated current limit of any receptacle.
• The bonding bar between the ground connections must remain in
place at all times unless a qualified electrician determines
otherwise.
Because this machine produces carbon monoxide (CO), Wacker
Neuson recommends that CO alarms be installed in all structures in
close proximity to the machine. CO alarms provide an extra measure
of protection against this poison that you cannot see or smell.
Install battery-operated CO alarms or plug-in CO alarms with battery
backup, according to the manufacturer’s instructions. CO alarms
should be certified to the requirements of the latest safety standards
(UL 2034, IAS 6-96, or CSA 6.19.01). Test the CO alarm batteries
monthly.
32 wc_tx001049gb.fm
Page 33

G 50 Operation
4.3 Refueling the Machine
Requirements
• Machine shut down
• Engine cool
• Machine/fuel tank level with the ground
• Fresh, clean fuel supply
Procedure
Perform the procedure below to refuel the machine.
WARNING
Fire hazard. Fuel and its vapors are extremely flammable. Burning fuel can cause
severe burns.
f Keep all sources of ignition away from the machine while refueling.
f Refuel only when the machine is outdoors.
f Clean up spilled fuel immediately.
4.3.1 Remove the fuel cap.
4.3.2 Fill the fuel tank until the fuel level gauge indicates that the tank is full.
CAUTION
Fire and health hazard. Fuel expands when heated. Expanding fuel in an over-filled
tank can lead to spills and leaks.
f Do not overfill the fuel tank.
4.3.3 Reinstall the fuel cap.
Result
The procedure to refuel the machine is now complete.
wc_tx001049gb.fm 33
Page 34

Operation G 50
E
M
E
R
G
E
N
C
Y
S
T
O
P
A
Ø
HZ
V
R
Basler
DIAGNOSTICS
DIAGNOSEN
DIAGNOSTICOS
DIAGNOSTICS
AUS
APAGADO
ARRET
OFF
REMOTE START
FERNSTART
ARRANQUE REMOTO
DEMARRAGE A
DISTANCE
START / LAUFEN
ARRANQUE / MARCHA
DEMARRER / MARCHE
START / RUN
DIAGNOSTICS
DIAGNOSEN
DIAGNOSTICOS
DIAGNOSTICS
4.4 Control Panel
DIAGNOSTICS
2
g
4
DIAGNOSEN
DIAGNOSTICOS
DIAGNOSTICS
1
5
3
a b f
6
de
OFF
AUS
APAGADO
ARRET
START / RUN
REMOTE START
START / LAUFEN
FERNSTART
ARRANQUE / MARCHA
ARRANQUE REMOTO
DEMARRER / MARCHE
DEMARRAGE A
DISTANCE
h
k
t
j
o
k
p
nl mqsr
wc_gr006314
34 wc_tx001049gb.fm
Page 35

G 50 Operation
Ref. Description Ref. Description
a Main circuit breaker o Remote run terminal block
b Voltage adjustment rheostat p Emergency stop switch
d Pre-alarm/shutdown LED q Interlock switch
e LCD panel r Customer connection terminal lugs
f Engine start switch s Ground connection
g Keypad t Bond bar
h Circuit breaker
(240V, 50 Amp)
j Circuit breaker
(240V, 30 Amp)
k Circuit breaker
(120V, 20 Amp)–two
l Twist-lock receptacle
(120/240 VAC, 50 Amp)
m Twist-lock receptacle
(120/240 VAC, 30 Amp)
n GFI receptacle
(120 VAC, 20 Amp)–two
1 Right arrow button
(right / forward)
2 Up arrow button
3 Down arrow button
4 Left arrow key
(left / backward)
5 Check mark button
(enter / accept)
6 Reset button
(cancel / reset)
wc_tx001049gb.fm 35
Page 36

Operation G 50
4.5 Voltage Selector Switch
See Graphic: wc_gr001682
The voltage selector switch is located in a separate enclosure on the
generator on the opposite side of the machine.
The selector switch is a three-position switch which mechanically
changes the connections between the generator output leads and the
terminal lugs on the generator. This allows three different volt ranges
to be selected.
120/240 VAC 1Ø
120/208 VAC 3Ø
139/240 VAC 3Ø (Refer to Section Voltage Adjustment Rheostat.)
277/480 VAC 3Ø
Voltage ranges are selected by rotating the handle on the switch to the
desired voltage. The switch is equipped with a locking mechanism.
This allows the voltage setting to be locked in place to prevent
unauthorized personnel from changing the voltage selection. To lock
switch in position, push lock up and attach a padlock through the
openings in the locking strip.
WARNING
NOTICE: NEVER CHANGE THE VOLTAGE SELECTOR SWITCH
WITH THE ENGINE RUNNING. This can cause arcing and can
severely damage the switch and the generator windings.
ELECTROCUTION HAZARD! High voltage is present inside this
panel when the generator is operating!
36 wc_tx001049gb.fm
Page 37

G 50 Operation
E
M
E
R
G
E
N
C
Y
S
T
O
P
E
M
E
R
G
E
N
C
Y
S
T
O
P
A
Ø
HZ
V
R
Basler
DIAGNOSTICS
DIAGNOSEN
DIAGNOSTICOS
DIAGNOSTICS
AUS
APAGADO
ARRET
OFF
REMOTE START
FERNSTART
ARRANQUE REMOTO
DEMARRAGE A
DISTANCE
START / LAUFEN
ARRANQUE / MARCHA
DEMARRER / MARCHE
START / RUN
4.6 Emergency Stop Switch
See Graphic: wc_gr006062
The emergency stop switch (p) is the red button located below the
receptacle panel and can be accessed with the panel doors closed.
Activate the emergency stop switch by pushing the red button in.
Pushing the emergency stop switch opens the main circuit breaker and
the fuel solenoid, and results in the engine shutting down. The switch
will remain activated until the button is pulled out.
NOTICE: PRESS THE EMERGENCY STOP BUTTON ONLY IN THE
CASE OF AN ACTUAL EMERGENCY WHERE THE GENERATOR
MUST BE STOPPED IMMEDIATELY! In all other instances, open the
main line circuit breaker and then turn the engine start switch to off “O”.
OFF
AUS
APAGADO
ARRET
START / RUN
REMOTE START
START / LAUFEN
FERNSTART
ARRANQUE / MARCHA
ARRANQUE REMOTO
DEMARRER / MARCHE
DEMARRAGE A
DISTANCE
p
wc_gr006315
wc_tx001049gb.fm 37
Page 38

Operation G 50
A
Ø
HZ
V
A
Ø
HZ
V
4.7 Generator Monitoring
Generator information is displayed on the top line of the LCD panel and
is scrolled continuously while the generator is operating, to show the
voltage, amperage and frequency of each phase.
Volts “V”- Displays the AC output voltage being produced by the
generator.
Phase “Ø” - Indicates which leg/phase is currently being displayed. In
three-phase mode, the display will read P1, P2, or P3. In single-phase
mode, the display will read L1, L3, or LL.
Amps “A” - Displays the AC output amperage produced by the
generator. If the generator is operating at no-load, output amperage
will display a 0.
Hertz “Hz” - Displays output frequency. If the frequency is too high or
too low, check the engine rpm.
Sample display with engine running.
208 P1 24 61.5
85% 175 78 14.3
READY
100% 175 0 13.2
Sample display in “Auto” mode.
38 wc_tx001049gb.fm
Page 39

G 50 Operation
4.8 Engine Monitoring
With the engine start switch set to “RUN/START” or “REMOTE
START”, engine information will be continuously displayed on the
bottom line of the LCD panel.
OIL —Displays engine oil pressure. The gauge registers oil
pressure between 0–100 psi. Normal operating pressure is between
60–80 psi. If oil pressure drops below 15 psi, the engine will
automatically shut down.
FUEL —Indicates the relative fuel level in the fuel tank. If fuel
level drops to 5% the engine will automatically shut down.
TEMPERATURE —Displays the temperature of the engine's
coolant. If the coolant temperature gets too high, the engine will
automatically shut down.
BATTERY —This gauge measures the engine starting battery
voltage. A normal reading is 13.5–14.5V. If the gauge falls much
below or above these values, the engine charging system should be
checked. With the engine switch set to “REMOTE START” and the
generator in stand-by mode, actual battery voltage is displayed.
ENGINE HOURS—The engine running hours are displayed on the
hour meter. Engine hours are accumulated only while the engine is
actually running.
SENDER FAILURE - Indicates that the coolant temperature sensor,
fuel lever sender, speed signal source, or the oil pressure sensor has
failed. This fault will not be displayed unless the fault has occurred;
also, this fault will not shut down the machine. If all speed signal
sources fail, the machine will shut down.
Engine Fault Set Points
Fuel Level = 5%
Low Oil Pressure = 1 bar (15 psi)
High Temperature = 115°C (239°F)
Underspeed = 55Hz (1650 rpm)
Overspeed = 66Hz (1980 rpm)
Overcrank = Three 12-second crank/rest cycles
wc_tx001049gb.fm 39
Page 40

Operation G 50
4.9 Engine shutdown faults
The Engine Control Module (ECM) continuously monitors vital engine
functions for seven fault conditions. When a fault condition occurs, the
engine will shut down and the LCD panel will display the fault causing
the shutdown. To reset the ECM and resume operation, return the
engine start switch manually to off “O”. Also refer to Section Warning
Light.
4.9.1 EMERGENCY STOP
Indicates that the emergency stop button has been depressed. This
display will remain on until the emergency stop button is pulled back
out.
4.9.2 LOW OIL PRESSURE
Indicates that the engine oil pressure dropped below 1 bar (15 psi) and
the ECM has shut the engine down.
4.9.3 HIGH ENGINE TEMPERATURE
Indicates that the engine coolant temperature has exceeded 115°C
(239°F) and the ECM has automatically shut down the engine. Normal
engine running temperature is 85°C±8°C (185°F±15°F ).
4.9.4 OVERSPEED
Indicates that the engine speed exceeded approximately 1980 rpm
(110% of its rated speed of 1800 rpm) and the ECM has automatically
shut the engine down.
4.9.5 OVERCRANK
An overcrank fault is displayed when the engine fails to start after three
cycles of the normal cranking cycle, and the ECM has automatically
shut down the generator due to the overcrank condition.
4.9.6 LOW FUEL
A low fuel fault condition will be displayed when the fuel tank drops to
5% and the ECM has shut down the engine. This fault condition
prevents the fuel lines from running completely dry and avoids the
need to bleed the lines when the tank is refilled.
The low fuel fault can be disabled if desired. See Changing/Disabling
Low Fuel Fault.
4.9.7 UNDERSPEED
Indicates that the engine speed dropped below 55Hz (1650 rpm) for
more than 15 seconds and the ECM has automatically shut down the
engine.
40 wc_tx001049gb.fm
Page 41

G 50 Operation
A
Ø
HZ
V
R
Basler
DIAGNOSTICS
DIAGNOSEN
DIAGNOSTICOS
DIAGNOSTICS
4.10 Current Overload Fault
Along with engine functions, the ECM continuously monitors the
current load in each phase. The values for current overload are
programmed into the ECM at the factory and are different for each
generator size.
a
d
wc_gr006061
4.10.1 When an overcurrent condition is sensed in any leg, the warning/fault
4.10.2 If the overcurrent condition persists, the main circuit breaker (a) will
4.10.3 To clear the overload fault, reset the main circuit breaker. Failing to
4.11 Event Log
LED (d) will flash and the display will indicate OVERCURRENT.
open and the display will change to OVRLOAD - SET BRKR. This
indicates an overload fault.
reset the main circuit breaker will cause the machine to shut down
after 5 minutes. The display will then change to OVERLOAD.
The control module contains an event log that records the first and
last occurrences of pre-alarms and alarms. See Using the LCD and
Keypad for instructions on how to access the event log.
wc_tx001049gb.fm 41
Page 42

Operation G 50
G
A
Ø
HZ
V
R
Basler
DIAGNOSTICS
DIAGNOSEN
DIAGNOSTICOS
DIAGNOSTICS
AUS
APAGADO
ARRET
OFF
REMOTE START
FERNSTART
ARRANQUE REMOTO
DEMARRAGE A
DISTANCE
START / LAUFEN
ARRANQUE / MARCHA
DEMARRER / MARCHE
START / RUN
wc_gr005866
g
4.12 Main Line Circuit Breaker
See Graphic: wc_gr005866
The main line circuit breaker (a) is located on the control panel.
In the off “O” position, this breaker interrupts power from the selector
switch to the terminal lugs at the bottom of the generator panel.
NOTICE: Before shutting down the generator or performing any
service to the generator unit, make sure the main circuit breaker is in
the off “O” position.
The convenience receptacles are not connected through the main line
circuit breaker but are connected directly to the generator windings. As
a result, the receptacles are powered even with the main breaker in the
off “O” position. To turn off power to receptacles, open the individual
circuit breakers provided for each.
NOTE: The warning light (d) will flash and the message MAIN
BREAKER OPEN will display on the LCD panel when the main line
circuit breaker is in the off “O” position and the controller has power.
WARNIN
ELECTROCUTION HAZARD! High voltage is present inside this
panel when the generator is operating!
OFF
AUS
APAGADO
ARRET
FERNSTART
DEMARRAGE A
DISTANCE
START / RUN
START / LAUFEN
ARRANQUE / MARCHA
DEMARRER / MARCHE
REMOTE START
ARRANQUE REMOTO
wc_gr005866
42 wc_tx001049gb.fm
Page 43

G 50 Operation
4.13 Engine Start Switch
See Graphic: wc_gr005866
The engine start switch (f) is a three-position switch: “REMOTE
START”, off “O”, and “START/RUN”. The “REMOTE START” position
is the normal setting used when using the generator as a back-up
power supply connected to a remote switch. In the REMOTE START
position, the generator is in stand-by mode and will not start until the
remote switch closes. In the “START/RUN” position, the switch
immediately starts the engine start cycle and activates the starter
motor to crank the engine. When set in the “REMOTE START” or
“START/RUN” position, the switch applies battery power to the control
module to turn on the LCD panel, and also energizes the engine’s
electrical system. In the off “O” position, power to the engine’s
electrical system, including the fuel solenoid, is disconnected.
4.14 Voltage Adjustment Rheostat
See Graphic: wc_gr005866
The voltage adjustment rheostat (b) is located above the customer
connection lugs. Use the rheostat to adjust the AC voltage output. Turn
clockwise to increase voltage, counter-clockwise to decrease voltage.
The voltage can be monitored at the LCD panel.
4.15 Warning Light
See Graphic: wc_gr005866
The warning light (d) on the metering panel will flash before a machine
fault condition occurs. This acts as a pre-alarm to call attention to a
potential fault condition. At the same time the warning light begins
flashing, the LCD panel will indicate which engine function is
approaching its fault value. Pressing the right arrow on the keypad (g)
will show a list of all active pre-alarms.
Engine Pre-alarm Set Points:
• Fuel Level = 15%
• High Temperature = 112°C (234°F)
• Low Oil Pressure = 1.4 bar (20 psi)
• Time to Maintenance = 0 hours
• Sender Failure = engine coolant and oil pressure senders
Note: “Time to Maintenance” and “Sender Failure” faults will not shut
down the generator.
wc_tx001049gb.fm 43
Page 44

Operation G 50
G
E
M
E
R
G
E
N
C
Y
S
T
O
P
A
Ø
HZ
V
R
Basler
DIAGNOSTICS
DIAGNOSEN
DIAGNOSTICOS
DIAGNOSTICS
4.16 Connection Lugs
See Graphic: wc_gr005864
The customer connection lugs (r) are located on left at the bottom of
the panel behind a hinged door. The lugs provide connection points for
attachment of outside loads.
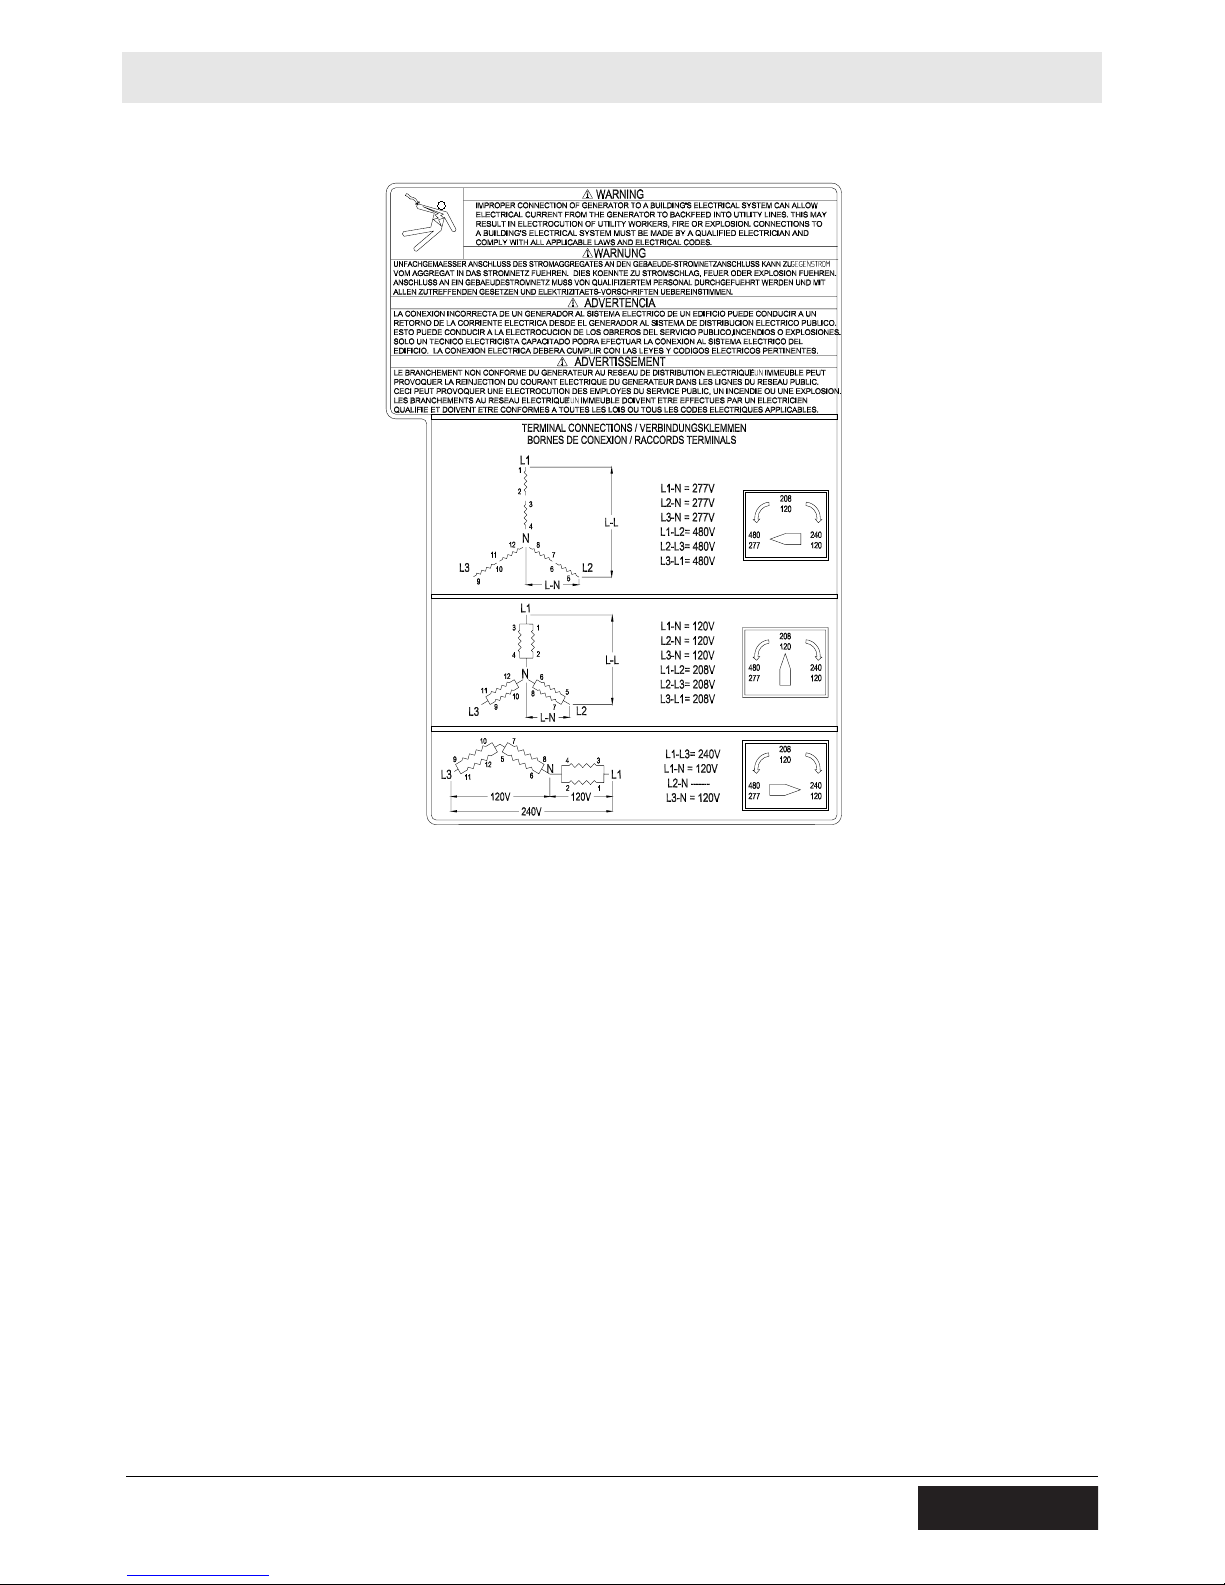
A large label like the one shown in section Terminal Connections is
attached to the inside of the terminal door. It shows the correct terminal
connections for selected voltages.
Connections to the lugs should be made by running the power cables
up under the lug door in the bottom of the panel and into the lug. Use
a 3/8 in. Allen wrench to tighten cable connections in place.
ELECTROCUTION HAZARD! High voltage is present inside this
panel when the generator is operating!
WARNIN
h
k
j
k
nl mqsr
wc_gr006316
44 wc_tx001049gb.fm
Page 45

G 50 Operation
4.17 Grounding the Generator
Location
A ground connection is located at the customer connection terminal
lugs.
wc_gr008288
Function
This ground connection is used for electrically grounding the
generator when necessary to comply with the National Electrical
Code and other federal, state, and local regulations. For grounding
requirements in your area, consult with a qualified electrician,
electrical inspector, or local agency having jurisdiction over electrical
compliance.
• If the generator is used at a construction site, there may be
additional regulations which must be observed.
• In some areas, generators are required to be registered with local
utility companies.
wc_tx001049gb.fm 45
Page 46

Operation G 50
4.18 Convenience Receptacles
See Graphic: wc_gr005864
The generator is equipped with two 120V/240V twist lock receptacles
(l) rated at 50A, and one 120V/240V twist lock receptacle (m) rated at
30A. The two 120V duplex receptacles (n) are equipped with ground
fault interrupts (GFI). Receptacles do not connect through the main
line circuit breaker. Each receptacle is protected by its own circuit
breaker (h, j, k) which is located directly above it. Power to the
receptacles is available any time the generator engine is running, even
with the main line circuit breaker open.
Note: When the voltage selector switch is in the 480 V / 3Ø position,
voltage at the duplex receptacles is 139 V, and voltage at the 30/50 A
receptacles is 139/240 V. When the voltage selector switch is in the
208 V / 3Ø position, voltage at the 30/50 A receptacles is 120/208 V.
When the voltage selector switch is in the 208 V / 3Ø position, the
voltage can be adjusted with the voltage adjustment rheostat (f) to 240
V / 3Ø. The voltage at the duplex receptacles is 139 V, and voltage at
the 30/50 A receptacles is 139/240 V.
4.19 Remote Run Terminal Block
See Graphic: wc_gr005864
The remote run terminal block (o) is located just to the right of the twist
lock receptacles. This block provides connection points for installation
of a remote start switch. When connected to a transfer switch, it allows
the generator to be used as a standby power supply.
4.20 Panel Door Interlock Switch
See Graphic: wc_gr005864
The customer connection lugs panel access door is equipped with an
interlock switch (q). When the door is opened this switch
automatically trips the main circuit breaker. Voltage to the receptacles
will not be cut.
46 wc_tx001049gb.fm
Page 47
G 50 Operation
4.21 Terminal Connections
WARNING
WARNING
ALL CONNECTIONS TO THE TERMINALS MUST BE MADE BY A
TRAINED ELECTRICIAN.
BACKFEED FROM THE GENERATOR INTO THE UTILITY’S
DISTRIBUTION SYSTEM CAN CAUSE A SERIOUS INJURY OR
DEATH TO UTILITY WORKERS!
Improper connection of generator to a building’s electrical system can
allow electrical current from the generator to backfeed into utility lines.
This may result in electrocution of utility workers, fire or explosion.
Connections to a building’s electrical system must be made by a
qualified electrician and comply with all applicable laws and electrical
codes.
ELECTROCUTION HAZARD! ALWAYS OPEN MAIN CIRCUIT
BREAKER AND SET ENGINE STOP SWITCH TO OFF “O”
BEFORE INSPECTING OR ATTEMPTING ANY CONNECTIONS TO
THE TERMINAL BLOCK! LETHAL VOLTAGE COULD BE
PRESENT ON THE TERMINAL LUGS!
wc_tx001049gb.fm 47
Page 48

Operation G 50
4.22 Before Starting
Before putting the generator into service, review each item on the
following checklist. Because generators are often run for long periods
of time unattended, it is important to make sure that the unit is set up
properly to reduce possible problems.
Failure to follow the procedures listed may cause injury to personnel or
damage to the generator. Be certain that all persons setting up the
WARNING
generator are certified or fully trained on the installation of the
generator.
• Check for any damage that might have been caused while towing to
the job site.
• Check to make sure no debris has lodged in vents, near radiator, or
around fan. Check to make sure that the exhaust compartment is
clean and nothing is touching the muffler or exhaust pipes.
• Check that generator is level.
• Chock trailer wheels.
• Check that generator is grounded to a good earthen ground per local
regulations and NEC standards.
• Check engine oil, coolant and fuel levels, and fill as required.
• Determine voltage needs. Set voltage selector switch and make
correct terminal connections.
• Check that all electrical connections were made in compliance with
local regulations and NEC standards.
• Check fan belt and hoses on engine for loose connections or fraying.
Tighten or replace as required.
• Close and secure side panel access doors.
• Review and follow safety instructions found in the front of this manual.
4.23 Manual Start-Up
See Graphic: wc_gr001682, wc_gr001677, wc_gr005866
Before starting the generator set, thoroughly review the pre-start-up
checklist in the previous section. Proceed with generator start-up only
after checking each item in that section.
Thoroughly read and make sure you understand the engine operator’s
manual supplied with the generator. Follow the steps below and the
illustration on the opposite page in the order listed.
48 wc_tx001049gb.fm
Page 49

G 50 Operation
When using the generator as a stand-by or substitute power supply,
make sure the voltage and phase rotation of the line connections
WARNING
4.23.1 Check position of voltage selector switch and make sure it is set for the
4.23.2 Make sure the engine start switch (f) is in the off “O” position.
4.23.3 Turn main line circuit breaker (a) and convenience receptacle circuit
4.23.4 Move engine start switch (f) to “REMOTE START” to check operation
match those of the utility lines or of any other power source normally
used. Failure to match phase rotation and voltage may cause
equipment connected to the generator to operate incorrectly!
This could create unsafe operating conditions.
desired voltage output. Lock the switch in place.
breakers to off “O”. This will disconnect all loads from the generator.
of engine control module. The LCD panel should momentarily display
INITIALIZING followed by READY and engine information. Check fuel
level and battery values.
Note: The warning light (d) will flash if the fuel level is below 15%. This
will not prevent the engine from starting.
4.23.5 Press the emergency stop button (p). The LCD panel should read
EMERGENCY STOP. Pull out the emergency stop button after
verifying the display and return the engine start switch to off “O”.
4.23.6 Start engine by moving the engine start switch to the “START/RUN”
position.
After displaying INITIALIZING and NOT IN AUTO sequence, the LCD
display will read START DELAY followed by CRANKING as the
engine begins its crank cycle. The normal cycle is for the engine to
crank for 12 seconds, then rest for 12 seconds. This cycle will repeat
three (3) times. If the engine does not start within this time, the engine
control module (ECM) will shut down the engine and OVERCRANK
will be displayed on the LCD panel. To repeat crank cycle, return start
switch to off “O” to reset the ECM. Allow starter motor to cool between
start-up attempts.
4.23.7 After engine starts, allow it to warm up for a few minutes and check
readouts on LCD panel. Make sure battery charging system, oil
pressure and engine temperature readings are within normal ranges.
4.23.8 Check that AC voltage is correct. Voltage can be fine-adjusted by
turning the voltage adjustment rheostat (b) on the metering panel.
4.23.9 Check frequency. The frequency should read 60 Hz.
wc_tx001049gb.fm 49
Page 50

Operation G 50
A
Ø
HZ
V
R
Basler
DIAGNOSTICS
DIAGNOSEN
DIAGNOSTICOS
DIAGNOSTICS
AUS
APAGADO
ARRET
OFF
REMOTE START
FERNSTART
ARRANQUE REMOTO
DEMARRAGE A
DISTANCE
START / LAUFEN
ARRANQUE / MARCHA
DEMARRER / MARCHE
START / RUN
G
E
R
N
a b fdeg
E
M
E
S
T
O
C
Y
P
wc_gr001677
OFF
AUS
APAGADO
ARRET
START / RUN
REMOTE START
START / LAUFEN
FERNSTART
ARRANQUE / MARCHA
ARRANQUE REMOTO
DEMARRER / MARCHE
DEMARRAGE A
DISTANCE
wc_gr006322
50 wc_tx001049gb.fm
Page 51

G 50 Operation
4.24 Running the Generator
See Graphic: wc_gr005866
Leave the engine start switch (f) in the “START/RUN” position while
the generator is operating. If the generator was started using a remote
switch, leave engine start switch in the “REMOTE START” position.
Let the generator run for a few minutes to warm engine before closing
main circuit breaker.
Before closing breakers, make sure that any electrical devices
attached downstream from the generator will not start up
WARNING
WARNING
unexpectedly.
While the generator is running, check for excessive vibration, oil leaks,
or coolant leaks.
Before placing the engine start switch (f) in the “REMOTE
START” position, verify that the contacts on any remote switch linked
to the generator set are OPEN. This will prevent the generator from
immediately starting when the engine start switch is moved to the
“REMOTE START” position.
wc_tx001049gb.fm 51
Page 52

Operation G 50
4.25 Engine Power Correction Factors
Performance data conditions
Performance data on John Deere engines are measured at the
following standard conditions:
• 744 mm (29.31 in.) of mercury dry air pressure
• 0% relative humidity
• 25°C (77°F) air intake temperature
• 40°C (104°F) fuel inlet temperature
Refer to the table below to estimate the engine power decrease in
percent as environmental factors vary from the standard conditions.
Engine power correction factors
Altitude
rise of 305 m
(1000 ft)
above 3050 m
(10,000 ft)
Model
G 50
Fuel temp
rise of 1°C
(1.8°F)
None
(ECU
compensated)
Air temp
rise of -12°C
(10°F)
0.50 4.00 0.07 0.5
4.26 Shutting down the generator
Check with other personnel on the jobsite and let them know that
power is being turned off. Make sure that the power shutdown will not
create any hazards by turning off devices such as pumps, heaters, or
lights that may need to be kept on.
4.26.1 Remove all loads from generator.
4.26.2 Open (turn to off “O”) main line circuit breaker.
4.26.3 Let engine run for approximately 5 minutes to allow it to cool down.
4.26.4 Move engine start switch to the off “O” position.
Relative
humidity rise
of 10%
Altitude
rise of 305 m
(1000 ft)
below 3050 m
(10,000 ft)
4.27 Cold Weather Start-Up
Successful cold weather starting requires that the battery be at peak
power, the correct weight motor oil is used, and the starter motor is in
good condition. The ECM will automatically activate the cold starting
aid and will display START DELAY as the heater heats.
52 wc_tx001049gb.fm
Page 53

G 50 Operation
4.28 Automatic/Remote Start-Up
See graphic: wc_gr005938
In the “REMOTE START” position the generator can be started
remotely, either through a transfer switch or some other type of remote
start switch. “REMOTE START” is the normal setting when using the
generator as a stand-by power supply. Before placing the generator in
the automatic starting mode, review the Before Starting and Manual
Starting sections in this Manual and follow procedure below.
Before placing the engine start switch (f) in the “REMOTE
START” position, verify that the contacts on any remote switch linked
WARNING
4.28.1 Perform a manual start at least once to verify that the metering panel
to the generator set are OPEN. This will prevent the generator from
immediately starting when the engine start switch is moved to the
“REMOTE START” position.
is operating correctly. Refer to the Before Starting and Manual Starting
sections in this Manual.
4.28.2 If a check of auto starting circuit is desired, attach a short jumper wire
(minimum 16 gauge insulated) between the two terminals on the
remote run terminal block. This applies a ground to the engine control
module to complete the start circuit. The engine should crank, start and
run.
Move the engine start switch to off “O” to stop engine. Remove jumper
from remote run terminals after testing is complete.
4.28.3 Secure generator by closing and locking all doors.
4.28.4 Set engine start switch to “REMOTE START” and close main line
circuit breaker.
The generator is now ready for automatic starting.
If the generator is to be used as a stand-by power supply for more than
a month, provisions must be made to maintain battery charge. This can
be done either by attaching a battery charger to the battery or by
starting generator manually and running engine periodically to
maintain charge. See Section Manual Starting.
Note: A cooldown timer is activated once the remote run signal is
removed. The cooldown time can be changed if desired. See
“Changing Cooldown Time.”
wc_tx001049gb.fm 53
Page 54

Operation G 50
4.29 Remote/Transfer Switch
When the generator is used as a stand-by power supply, it must be
equipped with a device which isolates it from the utility’s distribution
system.
WARNING
Failure to isolate the generator from the utility’s electrical
distribution system could cause output from the generator to
backfeed into the utility lines and cause injury or death to utility
workers!
The same is true if using the generator as a backup to some other type
of power supply system.
A transfer switch is designed to transfer electrical loads from the
normal power source (utility) to the emergency power source
(generator) when normal voltage falls below a prescribed level.
The transfer switch automatically returns the load back to the normal
source when power is restored back to operating levels.
Installation of a transfer switch or other type of remote starting device
is the responsibility of the generator user. Installation of such devices
must be performed by a qualified electrician following all directions
supplied by the manufacturer of the switch. If attaching generator to a
power supply normally serviced by a utility company, notify the utility
company and check local and state regulations. Familiarize yourself
with all instructions and warning labels supplied with the switch.
WARNING
DANGER
The bond bar connecting the neutral and ground lugs may need to be
removed for stand-by power applications. Check with NEC and local
regulations for compliance requirements.
When using the generator as a stand-by or substitute power supply,
make sure the voltage and phase rotation of the line connections
match those of the utility lines, or of any other power source normally
used. Failure to match phase rotation and voltage may cause
equipment connected to the generator to operate incorrectly!
This could create unsafe operating conditions.
Lethal voltage is always present in the transfer switch once it has been
properly installed!
54 wc_tx001049gb.fm
Page 55

Using the LCD Panel and Keypad Mobile Generator
5 Using the LCD Panel and Keypad
See graphic: wc_gr005938, wc_gr006064
During normal operation, the LCD panel (e) displays current
information on machine performance and operating status. The
keypad (g) provides access to additional monitoring functions through
a series of menus displayed on the LCD panel. You can also use the
keypad to change certain machine settings if desired.
.
5.0.1 The various monitoring and configuration menus can be accessed by
pressing the right arrow button (1). This action brings up the Main
Menu screen.
5.0.2 To select items on a menu, use the up/down arrow buttons (2,3) to
scroll through the available options. When the desired option is
highlighted (as shown above), press the right arrow button to access
the menu for that particular option.
5.0.3 To return to a previous menu screen, press the left arrow button (4).
5.0.4 To exit menu navigation and return to LCD panel monitoring status,
press and hold the left arrow button (4).
54 wc_tx001182gb.fm
Page 56

Mobile Generator Using the LCD Panel and Keypad
Metering
Settings
Metering
Engine
Oil Pressure
Coolant Temp
Fuel Level
Engine Load
Coolant Level*
Total Run Time
Settings
General Settings
Communications
Generator Protection
Breaker Management
Bias Control
Enter Password
General Settings
Crank Settings
Alarm-Status
Alarms
Pre-Alarms
Status
Inputs
Event Log
J1939 Engine Config*
J1939 Active DTC*
J1939 Previous DTC*
Session
Generator
Bus V
Bus Frequency
Synchronizer
Session
Session Info
Total Run Time
Loaded Run Time
Unloaded Run Time
Cumulative
Unloaded Run Time
Front Panel HMI
Detailed Data
Detailed Data
* NOT AVAILABLE ON SOME MODELS
5.1 Navigating the Menus
The label pictured below is a navigational aid to access the various
diagnostic menus programmed into the LCD. See the accompanying
table for information about the menu items.
.
wc_tx001182gb.fm 55
wc_gr007618
Page 57

Using the LCD Panel and Keypad Mobile Generator
Menu Item Description Menu Item Description
Alarm Config Alarm configuration J1939 Active DTC Diagnostic Trouble
Alarm Configuration J1939 Data
Alarms J1939 Engine Config Engine configuration
Alarm–Status J1939 Previous DTC Diagnostic Trouble
Amps kVA Kilovolt-amps
Back kVAR Kilovolt-amps Reactive
Battery Volt kW Kilowatts
Bias Control Language
Breaker Management LCD Contrast Liquid Crystal Display
Bus Frequency Loaded Run Time
Bus V Bus voltage Low Fuel Level
Communications Main Menu
Conf Elements Configurable elements Maintenance Reset
Conf Prot Status Configurable protection
status
Configure Date/Time Oil Pressure
Coolant Level Outputs
Coolant Temp PF Power factor
Cooldown Time Power
Crank Settings Pre-Alarms
Cumulative Programmable Inputs
Cumulative Info RPM Rotations per minute
Detailed Data Run Statistics
Diagnostic Menu
Navigation
Down Session Info
Engine Settings
Engine Load Speed Source
Enter Password Status
Event Log Synchronizer
Forward Sys Parameters System parameters
Frequency System Settings
Front Panel HMI Human-Machine
Interface
Fuel Level Total Run Time
General Settings Total Run Time
Generator Unloaded Run Time
Generator Protection Up
Hrs to Maintenance Hours to maintenance Voltages
Inputs — —
Metering
Session
System Units
Codes
Codes
56 wc_tx001182gb.fm
Page 58

Mobile Generator Using the LCD Panel and Keypad
5.2 Entering Passwords
See graphic: wc_gr006068
Some configuration procedures require a password to be entered
before changes can be made. Once a password has been entered, it
remains in the memory until the machine is shut off.
Note: The default password is OP and is set by the factory. Contact
your Wacker Neuson dealer if you need to have the password reset.
Follow the steps below to enter a password.
5.2.1 The password entry screen appears with a blinking letter “A” as the
default character. Use the up/down buttons (2,3) to change the “A” to
the correct letter or number.
5.2.2 When the correct letter or number appears, press the right arrow
button (1) to enter the character and move to the next position.
5.2.3 Use the up/down buttons to select the next character in the password,
and press the right arrow button. Continue selecting and entering
characters until the password is complete.
5.2.4 To return to a previous character, press the left arrow button (4).
5.2.5 When the password is complete, press the check mark button (5) to
enter the password and log into the configuration menu.
5.2.6 To clear a password and re-enter it, press the “X” button (6).
wc_tx001182gb.fm 57
Page 59

Using the LCD Panel and Keypad Mobile Generator
5.3 Adjusting Screen Contrast
The display contrast of the LCD panel can be adjusted to suit the
operator’s preference, or for increased visibility in jobsites with low or
bright ambient light.
5.3.1 To access the main menu, press the right arrow button (1) on the
keypad (g).
Note: If there are active alarms or pre-alarms, press the left arrow
button (4) three times to access the main menu.
5.3.2 Using the up/down arrow buttons (2,3), select SETTINGS, and press
the right arrow button.
5.3.3 Select GENERAL SETTINGS. Press the right arrow button.
5.3.4 Select FRONT PANEL HMI. Press the right arrow button.
5.3.5 Select LCD CONTRAST. Press the right arrow button.
5.3.6 If necessary, enter your password. (See Entering Passwords for more
information.)
5.3.7 Use the up/down arrow buttons to change the contrast as desired.
Press the check mark buttonwhen finished.
5.3.8 Exit by repeatedly pressing the left arrow button until the LCD panel
display returns to monitoring status.
58 wc_tx001182gb.fm
Page 60

Mobile Generator Using the LCD Panel and Keypad
5.4 Setting the Time or Date
See graphic: wc_gr005938
The control module features a clock powered by a separate battery.
Follow the steps below to change the time or date.
5.4.1 To access the main menu, press the right arrow button (1) on the
keypad (g).
Note: If there are active alarms or pre-alarms, press the left arrow (4)
three times to access the main menu.
5.4.2 Using the up/down arrow buttons (2,3), select SETTINGS, and press
the right arrow button.
5.4.3 Select GENERAL SETTINGS. Press the right arrow button.
5.4.4 Select CONFIGURE DATE/TIME. Press the right arrow button.
5.4.5 Select the item to change. Press the check mark button (5).
5.4.6 If necessary, enter your password. (See Entering Passwords for more
information.)
5.4.7 Use the up/down arrow buttons to change the value as desired. Press
the check mark button when finished.
5.4.8 Exit by repeatedly pressing the left arrow until the LCD panel display
returns to monitoring status.
wc_tx001182gb.fm 59
Page 61

Using the LCD Panel and Keypad Mobile Generator
5.5 Changing User Preferences
Changing Display Units
The LCD panel can be configured by the operator to display system
information in either metric units or English units.
5.5.1 To access the main menu, press the right arrow button (1) on the
keypad (g).
Note: If there are active alarms or pre-alarms, press the left arrow button (4)
three times to access the main menu.
5.5.2 Using the up/down arrow buttons (2,3), select SETTINGS and press
the right arrow button.
5.5.3 Select SYSTEM PARAMETERS. Press the right arrow button.
5.5.4 Select SYSTEM SETTINGS. Press the right arrow button
5.5.5 Select SYSTEM UNITS. Press the check mark button (5).
5.5.6 If necessary, enter your password. (See Entering Passwords for more
information.)
5.5.7 Select either METRIC or ENGLISH (default). Press the check mark
button.
5.5.8 Exit by repeatedly pressing the left arrow until the LCD panel display
returns to monitoring status.
Changing System Language
Many of the default English monitoring display and menu selections
can be changed to other languages. However, this reconfiguration
cannot be performed by the operator. Please contact your Wacker
Neuson representative if you wish to have the LCD panel display and
menu selections appear in a language other than English.
Note: Not all display and menu selections can be changed from the default
English. Refer to “Navigating the Menus” for translations if necessary.
60 wc_tx001182gb.fm
Page 62

Mobile Generator Using the LCD Panel and Keypad
5.6 Changing / Disabling Low Fuel Fault
See graphic: wc_gr005938
The low fuel fault value can be changed or disabled through the
diagnostics menu. (For example, you may wish to reduce the value so
that the machine operates for a longer period before running out of
fuel.)
Note: The engine will shut down if the machine runs out of fuel.
Follow the steps below to change or disable the low fuel fault.
5.6.1 To access the main menu, press the right arrow button (1) on the
keypad (g).
Note: If there are active alarms or pre-alarms, press the left arrow button (4)
three times to access the main menu.
5.6.2 Using the up/down arrow buttons (2,3), select SETTINGS and press
the right arrow button.
5.6.3 Select ALARM CONFIGURATION. Press the right arrow button.
5.6.4 Select ALARMS. Press the right arrow button.
5.6.5 Select LOW FUEL LEVEL. Press the right arrow button.
5.6.6 Select THRESHOLD. Press the check mark (5).
5.6.7 Enter your password. (See Entering Passwords for more information.)
5.6.8 Change the default Low Fuel Level value to zero (0) or the desired
figure. Press the check mark button to accept the change, or the reset
button (6) to cancel. Anything less than 5 will disable the automatic
shutdown feature.
5.6.9 Exit by repeatedly pressing the left arrow button until the LCD panel
display returns to monitoring status.
Note: The fuel level reading on the display will not drop below 5%.
wc_tx001182gb.fm 61
Page 63

Using the LCD Panel and Keypad Mobile Generator
5.7 Changing Cooldown Time
See graphic: wc_gr005938
A cooldown timer activates when the machine is no longer receiving a
remote run signal. This timer is factory set to zero (0) minutes. The
cooldown time can be changed if desired.
5.7.1 To access the main menu, press the right arrow button (1) on the
keypad (g).
Note: If there are active alarms or pre-alarms, press the left arrow (4)
three times to access the main menu.
5.7.2 Using the up/down arrow buttons (2,3), select SETTINGS and press
the right arrow button.
5.7.3 Select SYSTEM PARAMETERS. Press the right arrow button.
5.7.4 Select CRANK SETTINGS. Press the right arrow button
5.7.5 Select COOLDOWN TIME. Press the check mark button (5).
5.7.6 If necessary, enter your password. (See Entering Passwords for more
information.)
5.7.7 Use the up/down arrow buttons to change the default value. Press the
check mark to accept the change, or the reset button (6) to cancel.
5.7.8 Exit by repeatedly pressing the left arrow button until the LCD panel
display returns to monitoring status.
62 wc_tx001182gb.fm
Page 64

Factory-Installed Options G 50
6 Factory-Installed Options
This machine may be equipped with one or more of the following
factory-installed options. To verify if any of these options are installed
on your machine, contact Wacker Neuson Corporation at 1-800-770-
0957. A nameplate listing the Model Number, Item Number, Revision,
and Serial Number is attached to each unit. Please have this
information available when contacting Wacker Neuson Corporation.
The illustrations shown in this chapter represent typical installations.
The factory-installed options on your machine may look different.
6.1 Engine Block Heater Option
The engine block heater option includes a block heater (a) with a cord
(b). The function of the block heater is to heat the engine coolant/
engine block to improve cold-weather engine starting. Plug the cord
into a 120V power supply.
64 wc_tx001016gb.fm
Page 65

G 50 Factory-Installed Options
6.2 Electronic Governor
See Graphic: wc_gr001714, wc_gr001716
The electronic governor option consists of an electronic module (b)
and an electronic actuator (d). The module senses rotation of the
flywheel, then sends a signal to the electronic actuator that governs the
fuel injection system. The system is designed to precisely regulate
engine rpm, and thus frequency, to within approximately 0.25%. See
electronic governor manufacturer's literature for detailed information.
wc_tx001016gb.fm 65
Page 66

Factory-Installed Options G 50
6.3 Automatic LCD Heat
To improve the performance of the LCD panel in cold weather, the
LCD panel control module is equipped with an LCD heater. The heater
draws power from the panel control module and is active only when the
panel control module is powered.
An optional thermostat (a) can be installed if the machine is to be used
in extremely cold weather. The thermostat automatically powers the
panel control module when the temperature drops to approximately
-30°C (-22° F). This activates the heater to prevent damage to the LCD
panel.
It is important to note that the panel control module draws a small
amount of power from the battery when turned on—even when the
machine is not running. If the battery should fail, the heater will also fail.
Be sure to keep the battery charged when the generator is not in use.
wc_gr007626
66 wc_tx001016gb.fm
Page 67

G 50 Factory-Installed Options
6.4 Low Coolant Shutdown
See Graphic: wc_gr001708
The low-coolant shutdown system consists of an electronic sensor that
monitors coolant level. The sensor (a) is mounted to the radiator and
wired into the ECM. The sensor probe (b) is submerged in radiator
coolant. If the probe senses no coolant, it sends a signal to the ECM.
The ECM program includes a 10-second timer to protect from
nuisance shutdowns. If after the ten seconds coolant levels are still
sensed as being low, the ECM shuts down the engine. The ECM will
then display the “FAULT LOW WATER LEVEL”. Allow the engine to
cool before adding additional coolant.
NEVER remove the radiator cap while the engine is hot! Pressurized
WARNING
coolant can cause serious burns.
If it is necessary to open the radiator, only do so with the engine off,
and only when coolant is cool enough to touch with bare hands. Slowly
loosen the radiator cap to relieve pressure first, before removing it
completely.
Note: The sensor may be disabled by unplugging the wire harness.
This action will not shut down the machine.
wc_tx001016gb.fm 67
Page 68

Factory-Installed Options G 50
6.5 Lube Level Maintainer
See Graphic: wc_gr005771, wc_gr005772, wc_gr005778
The lube level maintainer system protects the engine from low oil
levels by providing an additional 6-quart oil reservoir. Oil from the
reservoir is gravity-fed from the oil reservoir (a) through the control
valve (b) and into the engine oil pan as needed. The valve includes a
sightglass (c) through which the oil level can be seen. This oil level is
the same as that measured by the engine dipstick. A float inside the
valve detects low oil levels and opens the valve to supply the needed
oil. The system is wired to the ECM and includes a low oil shutdown in
case the oil in the reservoir is depleted. If the engine shuts down due
to low oil, the ECM will display “FAULT LOW OIL LEVEL”. Fill the
engine and the additional oil reservoir with oil before placing the
generator back into service.
NOTICE: To prevent overfilling the engine with oil, place the shutoff
valve (d) in the closed position when moving or towing the generator.
Once the generator is in position, open the valve.
a
wc_gr005771
b
c
wc_gr005778
68 wc_tx001016gb.fm
Page 69

G 50 Factory-Installed Options
6.6 Temperature-Activated Shutters
See Graphic: wc_gr005770, wc_gr001707
The shutters (a) are mounted to the top of the generator enclosure.
The shutters are designed to keep the engine compartment warm, thus
increasing engine temperature during cold weather operation. The
shutters are activated through a wax-pellet actuator (b) that is
connected to the generator's cooling system. As radiator coolant
warms, the wax-pellet actuator engages a linkage (c) that opens the
shutters. As the coolant cools, the shutters close.
6.7 Lockable Battery Disconnect
See Graphic: wc_gr004338
A lockable ON/OFF switch is available which disconnects the battery.
A padlock (not included) securely locks the switch in the OFF position.
If equipped, the battery disconnect switch is mounted to the upper skid
beneath the access door on either the right or left side of the machine.
NOTICE: Do not use the battery disconnect switch while the engine is
running. Damage to electrical components may occur.
wc_tx001016gb.fm 69
Page 70

Factory-Installed Options G 50
6.8 Extended Run Tank
An extended run, 331-gallon fuel tank provides a 63-hour run time
under a continuous full load. The long run time eliminates the need for
daily refueling, saving money on fuel deliveries. The tank is fully fluidcontained and is ideal for remote or weekend running of equipment
such as dewatering submersible pumps.
6.9 Battery Charger
An optional battery charger maintains the battery at peak power while
the machine is turned off. Use of a battery charger is recommended
when the generator is not operated on a regular basis. The battery
charger prevents voltage drain and reduces the possibility of having to
jump-start the engine after long periods of inactivity. Plug the cord into
a 120V power supply.
wc_gr006179
wc_gr005779
70 wc_tx001016gb.fm
Page 71

G 50 Factory-Installed Options
6.10 Camlocks
A second optional outlet panel features camlock connectors for easy
tool changes. Each connector is protected by a spring-loaded cover.
NOTICE: Separate overcurrent protection must be provided. Do not
exceed 400 amps per receptacle.
WARNING
Electric shock hazard.
f Do not operate this machine with defective or missing guards, doors, or
protective interlocks.
wc_tx001016gb.fm 71
Page 72

Factory-Installed Options G 50
6.11 Containment System
See Graphic: wc_gr002647
Overspills and leaks are captured in the containment system. The
containment system holds over 110% of the fluid contained in the
machine.
The containment system should be checked every 50 hours or 2
weeks and drained when necessary. If fluid is found in the containment
tank, trace the cause of the leak and correct.
Note: In the interests of environmental protection, place impermeable
sheeting and a container under the machine to collect the liquid which
drains off. Dispose of this liquid in accordance with environmental
protection legislation.
72 wc_tx001016gb.fm
Page 73

G 50 Factory-Installed Options
6.12 Wiring Diagram (Factory-Installed Options)
B Black R Red Y Yellow Or Orange
G Green T Tan Br Brown Pr Purple
L Blue V Violet Cl Clear Sh Shield
P Pink W White Gr Gray LL Light blue
wc_tx001016gb.fm 73
Wire Colors
Page 74

Factory-Installed Options G 50
6.13 Wiring Diagram Components (Factory-Installed Options)
See Graphic: wc_gr001868
Ref Description Ref Description
1 Thermostat module 7 Positive air shutoff solenoid actua-
tor
2 Terminal block 8 Auxiliary relay terminals
3 1 Amp fuse 9 Plug 1, engine sensor inputs
4 Water level sensor 10 Electronic control board
5 Lube level maintainer low level
11 LCD heater
switch
6 30 Amp circuit breaker 12 Positive air shutoff relay module
74 wc_tx001016gb.fm
Page 75

G 50 Maintenance
7 Maintenance
7.1 Periodic Maintenance Schedule
The table below lists basic machine and engine maintenance. Tasks
designated with check marks may be performed by the operator.
Tasks designated with square bullet points require special training
and equipment.
Refer to the engine owner’s manual for additional information.
Daily
Check engine oil and coolant level 3
Check engine air filter gauge & air cleaner
dust cap *
Visual walkaround inspection 3
Check tire inflation, tread wear and lug nuts
before towing
Check fuel filter 3
Drain containment system As needed
Check brake fluid level in trailer at least
monthly
Service the battery
Change engine oil and replace oil filter**
Clean unit inside and out
Check air intake hoses, connections, and
system
Replace fuel filter element
Check automatic belt tensioner and belt
wear
Check cooling system 3
Monthly
3
3
250 Hrs 600 Hrs
or
12 Mo
3
3
1200
Hrs or
24 Mo
2000
Hrs
Other
Perform coolant solution analysis & add
SCA's
Grease axle
Pressure test cooling system
Flush cooling system***
Check and adjust engine valve clearance
Replace crankcase ventilation filter every
750 hours
*Replace the air filter cartridge when yellow indicator of the engine air filter gauge reaches the red line.
**Change the oil after the first 100 hours, then every 250 hours.
***If John Deere antifreeze is used, the flushing interval may be extended. See engine Operator’s Manual.
wc_tx001050gb.fm 75
Page 76

Maintenance G 50
7.2 New Machines
7.2.1 Run generator at least 60–100% of continuous load for the first 100
hours.
7.2.2 Change engine oil and replace oil filter after the first 50 hours.
7.3 Resetting the Periodic Maintenance Timer
After maintenance has been performed on the generator, it is
necessary to reset the periodic maintenance timer.
Resetting from Maintenance Timer Menus
The periodic maintenance timer can be reset while viewing the
maintenance timer pre-alarm or hours remaining. To reset the
periodic maintenance timer while viewing these menus, press and
hold the reset button (6) for 10 seconds.
If pre-alarm is active:
• Main screen
• METERING > ALARM STATUS > PRE-ALARMS
If pre-alarm is not active:
• METERING > ENGINE
• METERING > RUN STATISTICS > CUMULATIVE >
CUMULATIVE
Resetting from Main Menu
The periodic maintenance timer can also be reset from the main
menu.
76 wc_tx001050gb.fm
Page 77

G 50 Maintenance
7.3.1 To access the main menu, press the right arrow button (1) on the
keypad (g).
Note: If there are active alarms or pre-alarms, press the left arrow button (4)
three times to access the main menu.
7.3.2 Using the up/down arrow buttons (2,3), select SETTINGS and press
the right arrow button.
7.3.3 Select SYSTEM PARAMETERS. Press the right arrow button (1).
7.3.4 Select SYSTEM SETTINGS. Press the right arrow button (1).
7.3.5 Select MAINT RESET. Press the check mark button (5).
7.3.6 If necessary, enter your password. (See Entering Passwords for more
information.)
7.3.7 When prompted, select YES and press the check mark button.
7.3.8 Exit by repeatedly pressing the left arrow button (4) until the LCD
panel display returns to monitoring status.
7.4 Electronic Control Unit (ECU)
NOTICE: This unit may have an electronic control unit (ECU). Failure
to correctly isolate it during welding on this equipment will result in
damage not covered under warranty. Please take the following steps
to avoid ECU damage:
1. Remove GND connection from the engine control system-to-vehicle
frame.
2. Disconnect the connectors from the ECU.
3. Connect welder ground close to weld point so ECU and other
electronic components are not in ground path.
wc_tx001050gb.fm 77
Page 78

Maintenance G 50
7.5 Servicing the Air Cleaner
See Graphic: wc_gr000511
Replace the air filter cartridge (c) when yellow indicator of the engine
air filter gauge reaches the red line.
To replace the air filter cartridge:
• Remove the end cover (d), then discard the entire air filter cartridge.
• Insert a new air filter cartridge, then
• Re-install the end cover, making sure that the dust cap (e) is clean
and is pointing downward.
Periodically, make sure the inlet pipe (f) is free from obstructions.
Check all connections and make sure they are snug. An air leak at the
neck clamp, gauge connection, or intake pipe can quickly lead to
expensive engine repairs.
• Make sure that the intake piping (a) is fully engaged over the neck
of the filter to ensure a good seal.
• If the filter housing, gauge connection (b), neck, or inlet pipe are
crushed or damaged, replace them immediately.
=
>
B
?
@
A
w c _ g r 0 0 0 5 1 1
78 wc_tx001050gb.fm
Page 79

G 50 Maintenance
7.6 Engine Oil
Checking oil
Check engine oil daily before starting engine.
WARNING
Burn hazard. Engine, engine oil, muffler, and exhaust pipes become extremely hot
during operation.
f Stop the engine and allow the machine to cool before checking the oil or replac-
ing the engine oil or oil filter cartridge.
• Do not operate engine if oil level is below ADD mark on dipstick.
Always keep oil level within the crosshatch pattern or “full” mark on
dipstick.
• Change oil after first 100 hours of operation and every 250 hours
thereafter. Refer to the engine manufacturer’s Operator’s Manual for
lubrication specifications.
Break-in Service
• This engine is factory-filled with John Deere Engine Break-in Oil.
• Operate the engine at heavy loads with minimal idling during the
break-in period.
• Do not exceed 100 hours of operation with break-in oil.
• If the engine has significant operating time at light load, or more oil is
required in the first 100 hour period, a longer break-in period may be
required. In these situations, an additional 100 hour break-in period
is recommended using a new change of John Deere Engine Break-In
Oil and a new John Deere oil filter.
NOTICE:
on the dipstick. John Deere Engine Break-In Oil (TY22041) should be
used to make up any oil consumed during the break-in period.
• During the first 20 hours, avoid prolonged periods of no load or
sustained maximum load operation. If engine is to run for longer than
5 minutes without a load, shut unit down.
• After the first 100 hours, change engine oil and replace engine oil
filter. Fill crankcase with seasonal viscosity grade oil.
Do not add more oil until the oil level is BELOW the ADD mark
WARNING
Most used oil contains small amounts of materials that can cause cancer and other
health problems if inhaled, ingested, or left in contact with skin for prolonged
periods of time.
f Take steps to avoid inhaling or ingesting used engine oil.
f Wash skin thoroughly after exposure to used engine oil.
wc_tx001050gb.fm 79
Page 80

Maintenance G 50
7.7 Checking Engine Coolant
Check the coolant level of the radiator with the engine cold. After initial
filling of radiator to 3/4" below bottom of filler neck, maintain proper
level in overflow bottle daily.
NEVER remove radiator cap or drain plug while engine is hot!
Pressurized coolant can cause serious burns.
WARNING
Shut off engine. Only remove radiator cap when it is cool enough to
touch with bare hands. Slowly loosen cap to relieve pressure first,
before removing it completely.
Solutions of antifreeze and supplemental coolant additives MUST be
used year-round. Automotive-type coolants do not contain the correct
coolant additives to protect heavy-duty diesel engines. They often
contain a high concentration of silicates which can damage the engine
and cooling system. Refer to engine Operator’s Manual for coolant
recommendations.
80 wc_tx001050gb.fm
Page 81

G 50 Maintenance
7.8 Troubleshooting Automatic Shutdown
There are six automatic shutdown conditions:
• low oil pressure
• high coolant temperature
• engine overspeed
• engine underspeed
• engine overcrank
• low fuel level
When these occur, the operator can perform certain diagnostic tests to
help identify the problem. Most of these diagnostics deal with the
engine.
The generator, however, can also cause problems. Consult a qualified
electrician or your nearest Wacker Neuson dealer for possible causes
of generator problems.
Anytime the generator is down for service, secure it by closing and
locking all doors, and hang a "DO NOT RUN" sign on the metering
panel.
WARNING
Low Oil Pressure Shutdown
7.8.1 Check engine oil level using dipstick. Add oil if required.
7.8.2 Carefully inspect engine for oil leaks.
7.8.3 If oil level is good, start engine and verify loss of oil pressure. Shut
down engine immediately if oil pressure value does not read at least
15 psi within 5 seconds.
Check the oil pressure shutdown sender and connecting wiring on the
engine block. Check for continuity between sender and engine control
module. See wiring diagrams.
7.8.4 If oil level, oil pressure sender, and connecting wiring are good, the
fault could be caused by an engine failure.
Note: An engine failure caused by something other than one of the six
shutdown conditions discussed will cause a low oil fault condition to be
displayed.
High Coolant Temperature Shutdown
7.8.5 Restart engine and read water temperature. Stop engine if
temperature is above 115°C (239°F). Normal engine operating
temperature is between 77°–88°C (170°–190°F).
7.8.6 Allow engine to cool to a safe temperature and inspect coolant level in
radiator. Add coolant as needed.
7.8.7 Carefully inspect coolant hoses and engine block for leaks.
7.8.8 Check that fan belt for water pump is tight.
wc_tx001050gb.fm 81
Page 82

Maintenance G 50
7.8.9 Check the high temperature shutdown sender and connecting wiring
on engine block. Check for continuity between sender on engine block
and engine control module. See wiring diagrams.
7.8.10 If sender and wiring are good, consult engine manufacturer’s
operator’s manual or service manual for possible causes of engine
overheating.
Engine Overspeed or Underspeed Shutdown
Restart engine and read the AC frequency meter. Meter should read
aproximately 61.5 Hz under no-load condition.
If frequency is high, adjust engine rpm for correct frequency
(approximately 1850 rpm).
Overcrank Shutdown
7.8.11 Check fuel level.
7.8.12 Check for proper operation of fuel pump.
7.8.13 If engine still does not start, refer to engine manufacturer’s operator’s
manual or service manual for possible engine problems.
Low Fuel Level Shutdown
7.8.14 Check fuel level.
Note: The pre-alarm/shutdown LED will flash when fuel level drops
below 15%. Engine will shut down only when level drops below 5%.
The Low Fuel Level Shutdown can be disabled or modified. See
“Changing/Disabling Low Fuel Fault” for more information.
7.8.15 Check for leaks in fuel tank.
7.8.16 If fuel level is good, check fuel level sender and connecting wiring on
engine. Check for continuity between sender on tank and engine
control module. See wiring diagrams.
82 wc_tx001050gb.fm
Page 83

G 50 Maintenance
7.9 Maintaining the Trailer
Tires - Keep tires inflated to the proper pressure as shown on the tire
sidewall, and check tread periodically for wear. Replace tires as
required.
Wheels - Check that lug nuts holding wheels are tight. Replace any
missing nuts immediately.
Axle Hubs - Grease axle hubs through grease fittings using a good
wheel bearing grease.
Brakes - Check operation of brakes before each trip.
Check level of brake fluid in actuator at front of trailer at regular
intervals. Fill to approximately 25mm (1 in.) below top of reservoir
using DOT-3 heavy-duty brake fluid. Tighten filler plug securely.
Note: If fluid level has fallen too low, bleed brake lines to remove any
air trapped in lines.
wc_tx001050gb.fm 83
Page 84

Technical Data G 50
8 Technical Data
8.1 Engine
Engine Power Rating
Gross standby power rating per ISO 8528-1 and SAE J1995. Actual
power output may vary due to conditions of specific use.
Item Number:
Engine
Engine make John Deere
Model 4045TF280
Emissions Tier 3
Number of cylinders 4
Displacement
Operating speed rpm 1800
Rated standby power @ 1800 rpm kW
Coolant capacity l (qts.) 18.9 (20)
Oil capacity l (qts.) 15 (15.9)
Battery Volts/
l (in
(Hp)
CCa
3
)
G 50
0620964
12/750 12/950 12/750
G 50
0620965
0620966
4.5 (275)
56 (75)
G 50 ERT
0620710
Fuel type No. 2 diesel
Fuel tank capacity l (gal.) 318 (84) 1195 (315.6)
Fuel consumption, prime load l (gal.)/
hr.
Run time at 100% prime load *
Run time at 75% prime load * Hours 27.2 113.1
Run time at 50% prime load * Hours 38.4 159.5
Run time at 25% prime load * Hours 64.5 268.2
* Run times are based on useable fuel volume, not on fuel tank capacity. “Useable fuel volume” does not include fuel
remaining in the tank after a low fuel shutdown.
See “Refueling the Machine” for more information.
** The use of #6 diesel fuel is not recommended.
Hours 21.6 89.7
18.7 (4.9)
84 wc_td000414gb.fm
Page 85

G 50 Technical Data
8.2 Generator
Model:
G 50 G 50 ERT
Generator
Make/Type Mecc Alte / Brushless / 4 pole
Model ECO32-3L/4
Prime rating
kVA
3Ø: 60
1Ø: 34
Voltage selector switch 3 position
AC voltages available 120/240 1Ø zig-zag
120, 127, 139, 240, 254, 277
120/208 3Ø low-wye
277/480 3Ø hi-wye
208, 220, 240, 416, 440, 460, 480
Frequency
Power factor
Hz
1ø
3ø
60
1.0
0.8
Voltage regulation ±1.00%
Insulation class H
8.3
Model:
Machine
G 50 G 50 ERT
Machine
Sound level at 7 m (23 ft.)
dB(A)
68
AC receptacles (2) 120V, 20A, GFI duplex
(2) 120/240V, 50A twist-lock
(1) 120/240V, 30A twist-lock
Standby Output
Prime Output
Main breaker
kW/
kVA
kW/
kVA
Amps
43/54
39/49
175
wc_td000414gb.fm 85
Page 86

Technical Data G 50
8.4 Trailer and Skid
G 50
Standard
G 50
Custom &
Cold
G 50 ERT
Weather
Trailer and Skid
Trailer model MGT 2 MGT 2 MGT 3.1
Dry weight of skid
Operating weight of skid
Trailer weight
Operating weight on trailer
Surge brakes
Tires
kg (lbs.)
kg (lbs.)
kg (lbs.)
kg (lbs.)
Fluid type
size
1442 (3178) 1482 (3268) 1746 (3849)
1716 (3783) 1757 (3873) 2776 (6121)
399 (880) 621 (1370)
2115 (4663) 2156 (4753) 3398 (7491)
DOT3
ST225/75D-15 7.5 x 16E
86 wc_td000414gb.fm
Page 87

G 50 Technical Data
8.5 Dimensions
A
B
C
mm (in.)
Machine A B
G 50 Skid
965
(38)
E
D
C D E F G
— — — 2445
(96.25)
1346
(53)
G
F
wc_gr006389
1476
(58.1)
G 50 Trailer
G 50 ERT
Skid
G 50 ERT
Trailer
— 2032
1156
(45.5)
— 2464
1715
(80)
— — — 2794
(97)
(67.5)
2032
(80)
4064
(160)
4470
(176)
———
(110)
———
1816
(71.5)
1946
(76.6)
wc_td000414gb.fm 87
Page 88

Technical Data G 50
Notes:
88 wc_td000414gb.fm
Page 89

G 50 Schematics
wc_tx001582gb.fm
8 9
9 Schematics
This page is intentionally left blank.
Page 90

Schematics G 50
9 0
9.1 Generator and Receptacle Wiring
9
9
3
5
8
6
T1
G
G
G
GRN
R1
T3
T6
36
36A
AM
STA
VOL
HZ
60HZ
GR
L3
T3
T8
T9
6
3
9
G
GRN/YEL
GRN/YEL
GRN/YEL
GRN/YEL
GRN/YEL
20 BLK
23 BLK
3
5
6
8
5
8
CT-
CT-
CT-
SWITC
CT-
CT-
CT-
OR
YE
6
6
CT
CT
CT
CT
OR
3
3
3
T10
CT
CT
N3
N3
N3
wc_gr007674
Page 91

G 50 Schematics
wc_tx001582gb.fm
9 1
9.2 Generator and Receptacle Wiring Components
Ref. Description Ref. Description
1 Lug safety limit switch 16 Generator
2 Mechanical lugs 17 Voltage regulator with 4A fuse
3 Plug 3 - current transformer 18 Voltage adjustment rheostat
4 Plug 4 - line voltage inputs 19 Terminal block
5 Shunt 20 Exciter rotor windings
6 120V GFI receptacle 21 Exciter stator winding
7 120V 20A breaker 22 Rotor
8 240V 50A breaker 23 Rectifier (diodes)
10 240V 50A receptacle 24 Main rotor winding
12 Engine control module 25 Main stator windings
13 Main breaker 26 Auxiliary stator winding
14 Buss bar 27 Stator
15 Voltage selector switch — —
Wire Colors
BLK Black RED Red WHT White ORG Orange
GRN Green TAN Tan YEL Yellow — —
BLU Blue VIO Violet GRY Gray — —
Page 92

Schematics G 50
9 2
9.3 Engine Wiring
wc_gr007884
12
BLK
13
59
RED
10AWG
12
65
11
GRY
BLK
14
63
51
47
46
WHT
BOND TO
FRONT
PANEL
DOOR
GROUND TO
ENCLOSURE
BOX STUD
RED
10AWG
11
50
L0 GRD
LL2
GROUND TO
ENGINE BLOCK
RED
4AWG
L1
ORG
ORG
45
YEL
47
WHT
YEL
BLK
GROUND TO
ENGINE BLOCK
56
57
87
62
20
17
95
48
51
2
49
53
52
RED
53
BAT+ 3
59
GROUND 1
56
60
OIL PRESSURE 8
REMOTE START 27
WATER TEMP 10
57
61
62
SENDER COM 11
FUEL LEVEL 9
18
63
64
17
65
75
73
ORG
60
45
44
GRN
NO
ORG
2
44
YEL
ORN
34 61
46
93
64
RED
NC
RED
NC
VIO
RED
RED
RED
GRN/YEL
BAT - 2
80
83
84
85
RUN MODE 29
REMOTE START 28
MODE
BREAKER 30
TRIPPED
TRIP BREAKER 56
E-STOP 47
REMOTE ANNUNCIATOR
COMMON 51
PREALARM 53
E-STOP 46
ALARM 52
BAT+ 55
49
GROUND TO
ENCLOSURE
BOX STUD
START
FUEL
PRE
HEAT
93
BLK
RED
WHT/BLU
WHT/VIO
YEL
YEL
VIO
VIO
RED
GRY
GRY
TAN/WHT
TAN
87
81
82
82
83
84
94
94
96
96
86
74
95
90
91
92
80
92
90
VIO
BLK
BLK
BLK
BLK
BLK
GRN
GRN/YEL
BLU
RED
RED
BLU
GRY
TAN
34
GROUND TO
ENGINE BLOCK
RED
10AWG
15
50
15
RED
2/0 AWG
RED
10AWG
B+
97
86
85
97
BLU
RED
98
20
98
RED
99
BLK
99
NOT USED ON
SOME MODELS
47 OHM
GROUND TO
ENCLOSURE
BOX STUD
67
68
BLK
YEL
RED
ORG
BLK
2/0 AWG
BLK
2/0 AWG
48
18
RED
8
8
3
8
SHU
8
8
3
8
1
2
4
7
26
25
19
6
12
13
18
20
8
3
5
24
17
23
16
14
15
11
27
21
10
9
22
Page 93

G 50 Schematics
wc_tx001582gb.fm
9 3
9.4 Engine Wiring Components
Ref. Description Ref. Description
1 Electronic control unit 15 Starter motor
2 Plug 1 - engine sender inputs 16 Alternator
3 Plug 2 - contact inputs 17 Mechanical lugs
4 Remote start-Off-Start/Run switch 18 Main circuit breaker
5 Relay - engine outputs 19 Fuel level indicator
6 Hour meter 20 Lug door interlock switch
7 10A fuse 21 Bond bar
8 7.5A fuse 22 Shunt trip relay
9 Intake heater 23 Battery disconnect (optional)
10 Intake heater relay 24 Plug 4 - E-stop & contact outputs
11 Starter relay 25 Oil pressure indicator
12 Emergency stop switch 26 Water temperature indicator
13 Remote start terminals 27 Fuel throttle
14 Battery — —
Wire Colors
BLK Black RED Red WHT White ORG Orange
GRN Green TAN Tan YEL Yellow — —
BLU Blue VIO Violet GRY Gray — —
Page 94

Schematics G 50
9 4
9.5 Trailer Wiring
Standard and Hydraulic Brakes Electric Brakes
w c _ g r 0 0 0 5 2 2
B r
B rWW
B r
W
G
B r
W
Y
B r WB r W
Y
G
B r
W
1
9
8
6
2
1 0
3
B r
B r
7
7
3
G
Y
Br
W
R
R
R
Br W
R
R
+–
W
W
WWBr
Br
Br
Br
Br
Br W
wc_gr000523
Y
W
G
R
W
R
R
1
4
5
5
2
9
6
8
7
7
10
Br W
Page 95

G 50 Schematics
wc_tx001582gb.fm
9 5
9.6 Trailer Wiring Components
Ref. Description
1 Front right side amber light
2 Front left side amber light
3 Trailer plug
4Battery
5 Brake solenoid
6 Right tail light
7 License plate holder lights
8 Left tail light
9 Rear right side red light
10 Rear left side red light
Ref. Wire Colors Rear Lights Side Lights Harness
B BLACK Ground Ground Battery charge
Br BROWN Tail light Tail, side and license plate
L BLUE
R RED Brake light Power Electric brakes
Y YELLOW Left brake light and directional
G GREEN Right brake light and directional
W WHITE Ground
Page 96

Page 97

Page 98

Wacker Neuson Produktion GmbH & Co. KG, Preußenstraße 41, D-80809 München, Tel.: +49-(0)89-3 54 02-0 Fax: +49 - (0)89-3 54 02-390
Wacker Neuson Limited - Room 1701–03 & 1717–20, 17/F. Tower 1, Grand Century Place, 193 Prince Edward Road West, Mongkok, Kowloon, Hongkong.
Wacker Neuson Production Americas LLC, N92W15000 Anthony Ave., Menomonee Falls, WI 53051
Tel. : (262) 255-0500 Fax: (262) 255-0550 Tel.: (800) 770-0957
Tel: (852) 3605 5360, Fax: (852) 2758 0032
 Loading...