


9 SPEED DRILL PRESS
Item# 7149
Model # ZJ4116QA
PLEASE READ AND SAVE ALL INSTRUCTIONS TO ENSURE THE SAFE AND
EFFECTIVE USE OF THIS TOOL.
TABLE OF CONTENTS

Index P. 1
Important Safety Instructions P. 2
Safety Instruction for Drill Press P. 3 - 7
General Safety Rules P. 8, 9
List of Main Parts P. 10
Tech. Specifications, Contents of
Packaging
Assembly and Operation P. 12 - 16
Maintenance P. 17
Trouble Shooting P. 17, 18
Service Center P. 18
Warranty Information P. 19
Warranty Card P. 20
P. 11
1

IMPORTANT SAFETY INSTRUCTIONS
PLEASE READ THESE INSTRUCTIONS CAREFULLY TO ENSURE THE SAFE AND
EFFECTIVE USE OF THIS TOOL.
WARNING: READ ALL INSTRUCTONS. Failure to follow the IMPORTANT SAFEGUARDS
listed BELOW, and other basic safety precautions, may result in serious personal injury.
1. KEEP TRANSPARENT CHUCK GUARDS IN PLACE and in working order.
2. REMOVE ADJUSTING KEYS AND WRENCHES. Form habit of checking to see that keys
and adjusting wrenches are removed from tool before turning it on.
3. KEEP WORK AREA CLEAN. Cluttered areas and benches invite accidents.
4. DON’T USE IN DANGEROUS ENVIRONMENT. Don’t use power tools in damp or wet
locations, or expose them to rain. Keep work area well lit.
5. KEEP CHILDREN AWAY. All visitors should be kept at a safe distance from work area.
6. MAKE WORKSHOP CHILDPROOF with padlocks, master switches, or by removing
starter keys.
7. DON’T FORCE TOOL. Drill Press will do the job better, and safer at the rate for which
it was designed.
8. USE RIGHT TOOL. Don’t force tool or attachment to do a job for which it was not
designed.
9. USE PROPER EXTENSION CORD. Make sure your extension cord is in good condition.
When using an extension cord, be sure to use one heavy enough to carry the current
your product will draw. An undersized cord will cause a drop in line voltage resulting
in loss of power and overheating.
10. WEAR PROPER APPAREL. Do not wear loose clothing, gloves, neckties, rings,
bracelets, or other jewelry which may get caught in moving parts. Non-slip footwear
is recommended. Wear protective hair covering to contain long hair.
11. ALWAYS USE SAFETY GLASSES. Also use face or dust mask if cutting operation is
dusty. Everyday eyeglasses only have impact resistant lenses, they are NOT safety
glasses.
12. SECURE WORK. Use clamps or a vise to hold work when practical. It’s safer than
using your hand and it frees both hands to operate tool.
13. DON’T OVERREACH. Keep proper footing and balance at all time.
14. MAINTAIN TOOLS WITH CARE. Keep tools sharp and clean for best and safest
performance. Follow instructions for lubricating and changing accessories.
15. DISCONNECT TOOLS before servicing and when changing accessories, such
as blades, bits, cutters, and the like.
16. REDUCE THE RISK OF UNINTENTIONAL STARTING. Make sure switch is in off
position before plugging in.
17. NEVER STAND OR LEAN ON TOOL. Serious injury could occur if the tool is tipped or if
the cutting tool is unintentionally contacted.
SAVE THESE INSTRUCTIONS!
18. CHECK DAMAGED PARTS. Before further use of the tool, a guard or other part that is
damaged should be carefully checked to determine that it will operate properly an d
2

perform its intended function. Check for alignment of moving parts, binding of
moving parts, breakage of parts, mounting, and any other conditions that may affect
its operation. A guard or other part that is damaged should be properly repaired or
replaced.
19. DIRECTION OF FEED. Feed work into a blade or cutter against the direction of
rotation of the blade or cutter only.
20. NEVER LEAVE TOOL RUNNING UNATTENDED. TURN POWER OFF and unplug from
power supply. Don’t leave tool until it comes to a complete stop.
SAFETY INSTRUCTIONS FOR DRILL PRESS
Safety is a combination of common sense, staying alert and knowing how your drill
press works. Read and save this manual to understand this drill press.
When Installing or Moving the Drill Press
Reduce the Risk of Dangerous Environment
z Use the drill press in a dry, indoor place protected from rain.
z Keep work area well lit.
Reduce the Risk of Injury from Unexpected Drill Press Movement
If there is any tendency of the drill press to tilt or move during any use, bolt it to the
floor. Make sure to leave adequate room to fully open the belt guard. If the workpiece is
too large to easily support with one hand, provide an auxiliary support.
z To reduce the risk of injury from electrical shock, make sure your fingers do not
touch the plug’s metal prongs when plugging in or unplugging the drill press.
z Never Stand or Lean on Tool. Serious injury could occur if the tool tips or you
accidentally hit the cutting tool. Do not store anything above or near the tool where
anyone might stand on the tool to reach for tools above them.
Before Each Use
Inspect Your Drill Press
z To reduce the risk of injury from accidental starting, turn the switch off, unplug the
drill press, and remove the switch key before raising the guard, changing the cutting
tool, changing the setup, or adjusting anything. Make sure switch is in OFF position
before plugging in.
z Check for alignment of moving parts, binding of moving parts, breakage of parts,
drill press stability, and any other conditions that may affect the way the drill press
works.
z If any part is missing, bent or broken in any way, or any electrical part does not
work properly, turn the drill press off and unplug the drill press.
z Replace damaged or missing parts before using the drill press again.
z Remove adjusting keys and wrenches. Form a habit of checking for and removing
keys and adjusting wrenches from table top before turning drill press on.
z Make sure all clamps and locks are tight and no parts have excessive play.
Use Only Accessories Designed For This Drill Press To Reduce The Risk of
Serious Injury From Thrown Broken Parts Or Workpieces
z When cutting large diameter holes:
- Clamp the workpiece firmly to the table. Otherwise the cutting may grab and
spin it at high speed.
3

- Use only one piece, cup-type, hole cutters.
- Do not use fly cutters or multi-part hole cutters as they can come apart or
become unbalance in use.
- Keep speed below 1500rpm.
- Drum sanders must never be operated on this drill press at a speed greater
than 1800rpm.
z Do not install or use any drill that exceed 7” in length or extends 6” below the chuck
jaws. They can suddenly bend outward or break.
z Do not use wire wheels, router bits, shaper cutters, circle (fly) cutters or rotary
planers on this drill press.
Kickback
z Kickback is the grabbing of the workpiece by the rotating tool. The workpiece can be
thrown at a very high speed in the direction of rotation. This Can Cause Serious
Injury. To reduce the possibility of injury from kickback:
- Clamp the workpiece firmly to the table whenever possible.
- Buffing or sanding wheels or drums should be contacted on the side moving
away from you, not the side moving toward you.
- Use only recommended accessories and follow the instructions supplied with the
accessory.
This drill press has 9 speeds as listed below:
335 RPM 568 RPM 715 RPM
752 RPM 944 RPM 1200 RPM
1890 RPM 2280 RPM 2815 RPM
See inside of guard for specific placement of belt on pulleys.
Think Safety
Safety is a combination of operator common sense and alertness at all times when the
drill press is being used.
WARNING: Do not allow familiarity (gained from frequent use of your drill
press) to become commonplace. Always reme m ber that a careless fracti on of a
second is sufficient to inflict severe injury.
Plan Your Work
z Don’t force the tool. Drill Press will do the job better and safer at the rate for which
it was designed.
z Use the right tool. Don’t force tool or attachment to do a job it was not designed to
do.
z If any part of your drill press is missing, malfunctioning, has been damaged or
broken, such as the motor switch, or other operating control, a safety device or the
power cord, turn the drill press off and unplug it until the particular part is properly
repaired or replaced.
z Never place your fingers in a position where they could contact the drill or other
cutting tool if the workpiece should unexpectedly shift or your hand should slip.
z To reduce the risk of injury from parts thrown by the spring, follow instructions
exactly as given and shown in adjusting spring tension of quill.
z To prevent the workpiece from being torn from your hands, spinning of the tool,
shattering the tool or being thrown, always properly support your work so it won’t
shift or bind on the tool:
- Always position backup material (use beneath the workpiece) to contact the left
4

side of the column.
- Whenever possible, position the workpiece to contact the left side of the column
– If it is too short to the table, use table slots or clamping ledge around the
outside edge of the table.
- When using a drill press vise, always fasten it to a table.
- Never do any work “Freehand” (hand holding workpiece rather than supporting it
on the table), except when polishing.
- Securely lock head to column, table support to column and table to table support
before operating drill press.
- Never move the head or table while the tool is running.
- Before starting the operation, jog the motor switch to make sure the drill or
other cutting tool does not wobble or cause vibration.
- If a workpiece overhangs the table such that it will fall or tip if n o t held, clamp it
to the table or provide auxiliary support.
- Use fixtures for unusual operations to adequately hold, guide and position
workpiece.
- Use the spindle speed recommended for the specific operation and workpiece
material.
z Never climb on the drill press table, it could break or pull the entire drill press down
on you.
z Turn the motor switch off, unplug from power supply, and put away the switch key
when leaving the drill press.
z To reduce the risk of injury from thrown work or tool contact, do not perform layout,
assembly or setup work on the table while the cutting tool is rotating.
z Don’t overreach. Keep proper footing and balance at all times.
z Maintain tools with care. Keep tools sharp and clean for best and safest
performance. Follow instructions for lubricating and changing accessories.
Plan Ahead to Protect Your Eyes, Hands, Face and Ears Dress for Safety
z Do not wear loose clothing, gloves, neckties or jewelry (rings, wrist watches). They
can get caught and draw you into moving parts.
z Wear non-slip footwear.
z Tie back long hair.
z Roll long sleeves above the elbow.
z Noise levels vary widely. To reduce the risk of possible hearing damage, wear ear
plugs or muffs when using drill press for hours at a time.
z Always wear safety glasses. Any power tool can throw foreign objects into the eyes.
This can result in permanent eye damage. Everyday eyeglasses have only impact
resistant lenses. They are not safety glasses.
z For dusty operations, wear a dust mask along with safety goggles.
Reduce the Risk of Accidental Starting
z Make sure switch is “OFF” before plugging drill press into a pow er outlet.
Keep Children Away
z Keep all visitors at safe distance from the drill press.
z Make sure bystanders are clear of the drill press and workpiece.
Before Leaving the Drill Press
z Turn the drill press off.
5

z Wait for tool bit to stop spinning.
z Unplug the drill press.
z Make workshop child-proof. Lock the shop. Disconnect master switches. Remove the
yellow switch key. Store it away from children and others not qualified to use the
tool.
Electrical Requirements
General Electrical Connections
DANGER: To reduce the risk of electrocution:
1. Use only identical replacement parts when servicing. Servicing should be
performed by a qualified service technician.
2. Do not use in rain or where floor is wet.
This tool is intended for indoor residential use only.
WARNING: Do not permit fingers to touch the terminals of plug when installing
or removing the plug to or from the outlet.
Grounding Instructions
110-120 Volt, 60Hz. Tool Information
NOTE: The plug supplied on your tool may not fit into the outlet you are planning to
use. Your local electrical code may require slightly different power cord plug connections.
If these differences exist refer to and make the proper adjustments per your local code
before your tool is plugged in and turned on.
In the event of a malfunction or breakdown, grounding provides a path of least
resistance for electric current to reduce the risk of electric shock. This tool is equipped
with an electric cord having an equipment grounding conductor and a grounding plug, as
shown. The plug must be plugged into a matching outlet that is properly installed and
grounded in accordance with all local codes and ordinances.
Do not modify the plug provided. If it will not fit th e outlet, have the proper outlet
installed by a qualified electrician.
A temporary adapter may not be used with this item.
WARNING: If not properly grounded, this tool can cause an electrical shock,
particularly when used in damp locations, in proximity to plumbing, or out of
doors. If an electrical shock occurs there is the potential of a secondary hazard,
such as your hands hitting the cutting tool.
Wire Sizes
6

NOTE: Make sure the proper extension cord is used and is in good condition. The use of
any extension cord will cause some loss of power. To keep this to a minimum and to
prevent overheating and motor burnout, use the table as below to determine the
minimum wire size (A.W.G.) extension cord.
Use only 3-wire extension cords which have 3-prong grounding type plugs and 3-pole
receptacles which accept the tools plug.
Extension Cord Length Gauge (A.W.G.)
0-25 12
25-50 10
SAVE THESE INSTRUCTIONS!
7

GENERAL SAFETY RULES
WARNING! Read, understand and save all instructions. Failure to follow all
instructions listed below may result in electric shock, fire or serious personal inju ry. The
warnings, cautions, and instructions discussed in this instruction manual cannot cover all
possible conditions and situations that may occur. It must be understood by the operator
that common sense and caution are a factor which cannot be built into this product, but
must be supplied by the operator.
SAVE ALL INSTRUCTIONS!
WORK AREA
1. Keep your work area clean and well organized. Cluttered benches and dark areas
invite accidents.
2. Do not operate power tools in explosive atmospheres, such as in the presence of
flammable liquids, gases, or dust. Power tools create sparks which may ignite the
dust or fumes.
3. Keep bystanders, children and visitors away while operating a power tool.
Distractions can cause you to lose control.
ELECTRICAL SAFETY
Do not abuse the cord. Never use the cord to carry the tool. Keep cord away from heat,
oil, sharp edges or moving parts. Replace damaged cords immediately. Damaged cords
may create a risk of fire.
PERSONAL SAFETY
1. Stay alert, watch what you are doing and use common sense when operating a
power tool. Do not use tool while tired or under the influence of drugs, alcohol or
medication. A moment of inattention while operating power tools may result in
serious personal injury.
2. Dress properly. Do not wear loose clothing or jewelry. Contain long hair. Keep your
hair, clothing and gloves away from moving parts. Wear protective goggles when
operating the machine. It is recommended to wear protective goggles, gloves, sturdy
non-slipping shoes and an apron.
3. Avoid accidental starting. Be sure switch is in OFF position before connecting to a
power outlet. Carrying tools with your finger on the switch when the switch is ON
invites accidents. Disconnect tool from power outlet before carrying out any work on
the machine.
4. Remove adjusting wrench before turning th e tool on. A wrench or a key that is left
attached to a rotating part of the tool may result in personal injury
5. Do not overreach. Keep proper footing and balance at all times. Proper footing and
balance enables better control of the tool in unexpected situations.
6. Use safety equipment. Always wear eye protection. Dust mask, non-skid safety
shoes, hard hat, or hearing protection must be used for
appropriate conditions.
TOOL USE AND CARE
1. Use clamps or other practical way to secure and support the work piece to a stable
platform. Holding the work by hand or against your body is unstable and may lead to
loss of control.
2. Do not force tool. Use the correct tool for your application. The correct tool will do
the job better and safer at the rate for which it is designed.
3. Do not use tool if switch does not turn ON or OFF. Any tool that cannot be controlled
8

with a switch is dangerous and must be repaired.
4. Place the switch in locked or OFF position before making any adjustments, changing
accessories or storing the tool. Such preventive safety measures reduce the risk of
starting the tool accidentally.
5. Store idle tools out of reach of children and other untrained persons. Tools are
dangerous in the hands of untrained users. They should be kept away from work
area.
6. Maintain tools with care. Keep cutting tools sharp and clean. Properly maintained
tools, with sharp cutting edges are less likely to bind and are easier to control.
7. Check for misalignment or binding of moving parts, breakage of parts and any other
condition that may affect the tools operation. If damaged, have the tool serviced
before using. Many accidents are caused by poorly maintained tools.
8. Use only accessories that are recommended by the manufacturer for your model.
Accessories that may be suitable for one tool may become hazardous when used on
another tool.
SERVICE
1. Tool service must be performed only by qualified repair personnel. Service or
maintenance performed by unqualified personnel could result in a risk of injury.
2. When servicing a tool, use only identical replacement parts. Follow instructions in the
maintenance section of this manual. Use of unauthorized parts or fa ilure to follow
Maintenance Instructions may create a risk of electric shock or injury.
SAVE THESE INSTRUCTIONS!
9
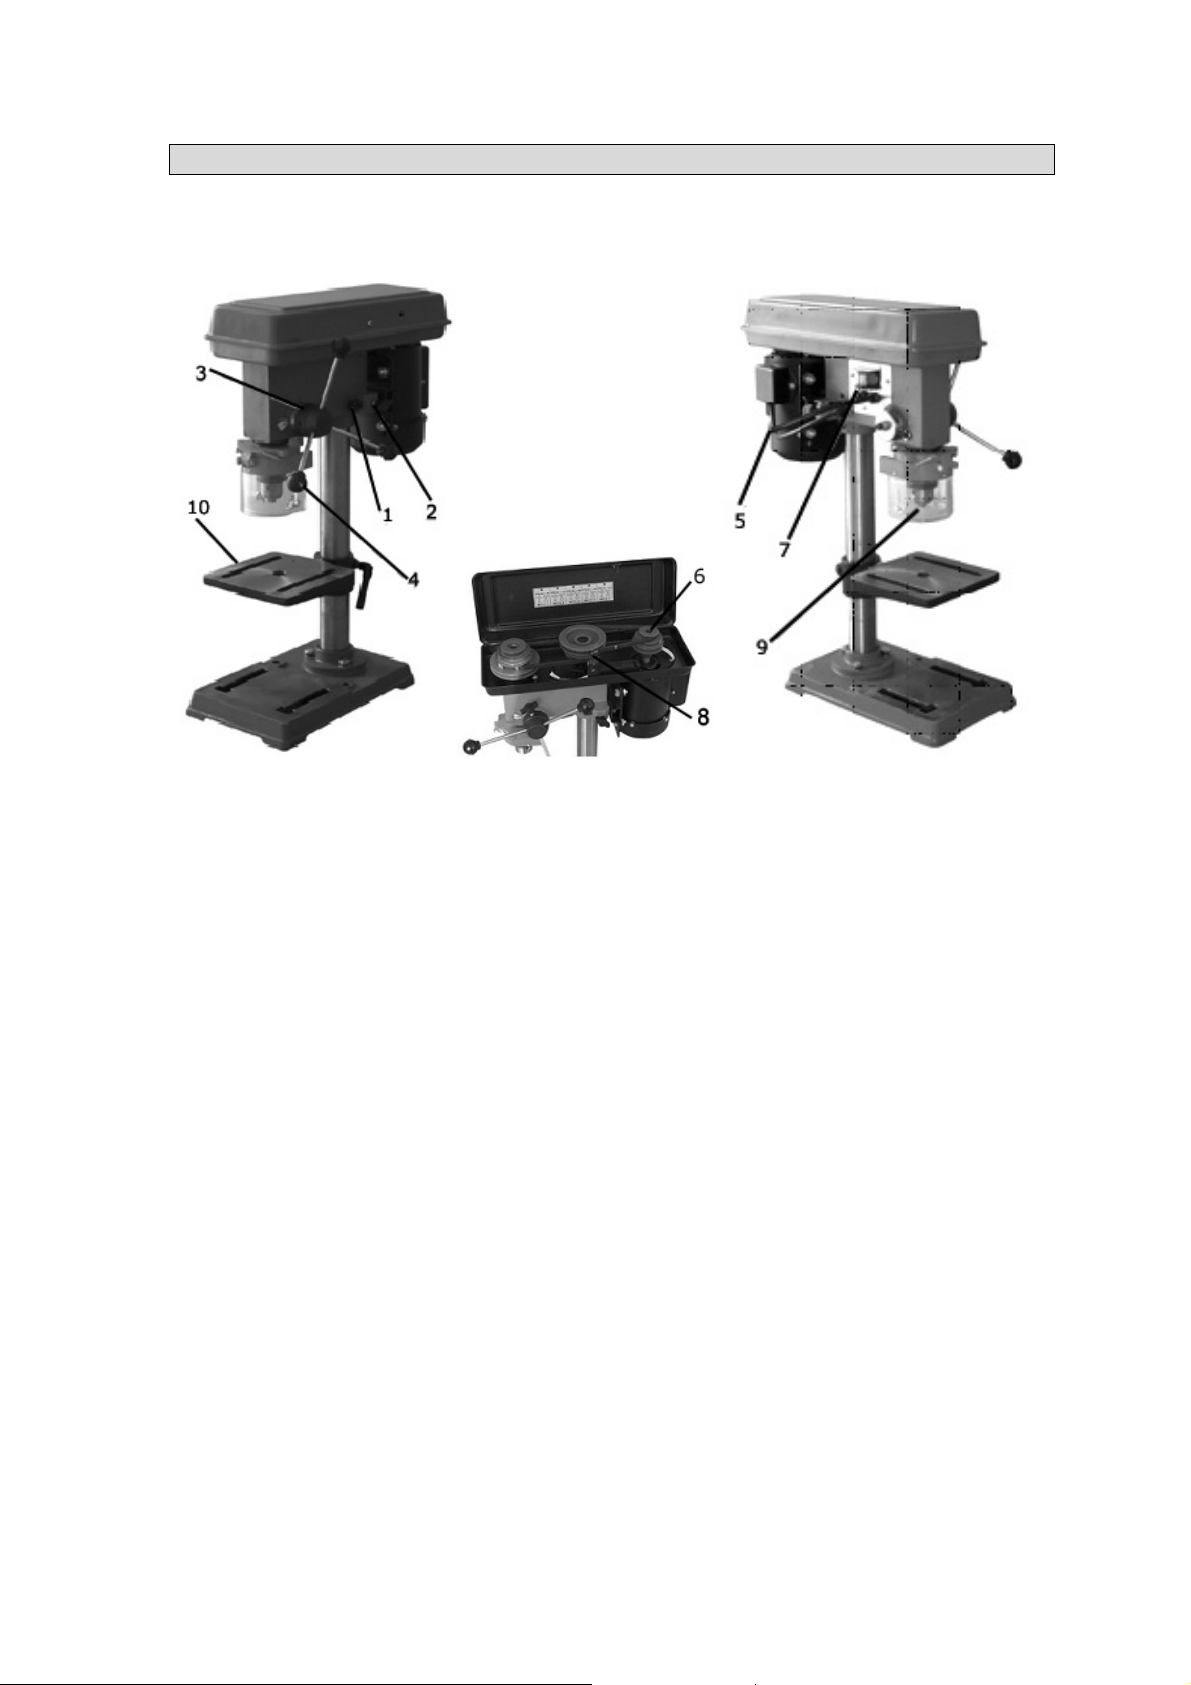
LIST OF MAIN PARTS
Before attempting to use, familiarize yourself with all the operating features and
safety requirements of your drill press.
1. Belt tension lever - The belt tension lever is used to release or tighten belt
tension.
2. Belt tension knob - Belt tension knobs on both sides of the pulley housing lock
the belt tension lever in place.
3. Depth gauge - A depth gauge is located between the pulley housing and
operating handles to aid drilling at desired depth.
4. Operating handles - Operating handles raise and lower the chuck and bit during
the drilling operation.
5. Motor - Equipped with an industrial duty, induction motor for long lasting, smooth
performance.
6. Pulley and belts - Nine spindle speeds can be obtained by adjusting the position
of the belts on the pulleys to allow drilling of a variety of materials (i.e. wood, plastic
or metal).
7. Safety switch and switch key – Your drill press has an easy access power
switch. To lock in the OFF position, remove the switch key. Place the key in a
location inaccessible to children and others not qualified to use the tool.
8. Pulley - The drill press has three pulleys to obtain 9 different speeds.
9. Chuck guard - A transparent chuck guard will help protect hands from the
rotating drill bit during the drilling operation.
10. Worktable - For added versatility, the worktable can be tilted. The slotted
worktable and base allows easy application of clamping devices.
10

TECHNICAL SPECIFICATIONS:
Model Number ZJ4116QA
Rating Voltage 120 Volts,
60Hz, AC
Chuck Size 5/8”
Net Weight 46.2 Lbs
Number Speeds 9
Spindle Stroke 2”
Spindle Taper MT2
CONTENTS OF PACKAGING
Check all loose parts from the box with the list below. Assemble according to the
instruction on the following pages.
1. Drill press head and motor
2. Column and base flange
3. Base
4. Table
5. Chuck guard
6. Bolts for base and column
7. Chuck
8. Chuck key
9. Operating handles
10. 3mm and 4mm wrench
If any of the above items are missing, please contact our service department at
1-888-367-7373 (http://wwwk.wk-usa.com) for replacement.
WARNING! To prevent accidental starting that could cause possible serious personal
injury, assemble all parts to your drill press before connecting it to power supply.
Drill press should never be connected to power supply when you are assembling
parts, making adjustments, installing or removing drill bit, or when not in use.
z Carefully remove all parts from the carton and place the drill press on a level
work surface. Separate and check against the list of loose parts.
WARNING! If any parts are missing, do not operate this tool until the missing parts
are replaced. Failure to do so could result in serious personal injury.
z Do not discard the packing materials until the drill press has been carefully
inspected, all parts identified, and drill press has been satisfactorily operated.
Note: If any parts are damaged or missing, do not attempt to plug in the power cord
and turn the switch on until the damaged or missing parts are obtained and are
installed correctly.
11
ASSEMBLY AND OPERATION
Warning! For your own safety, do
not connect the drill press to the
power source until the machine is
completely assembled and the
entire instruction manual has been
read and understood.
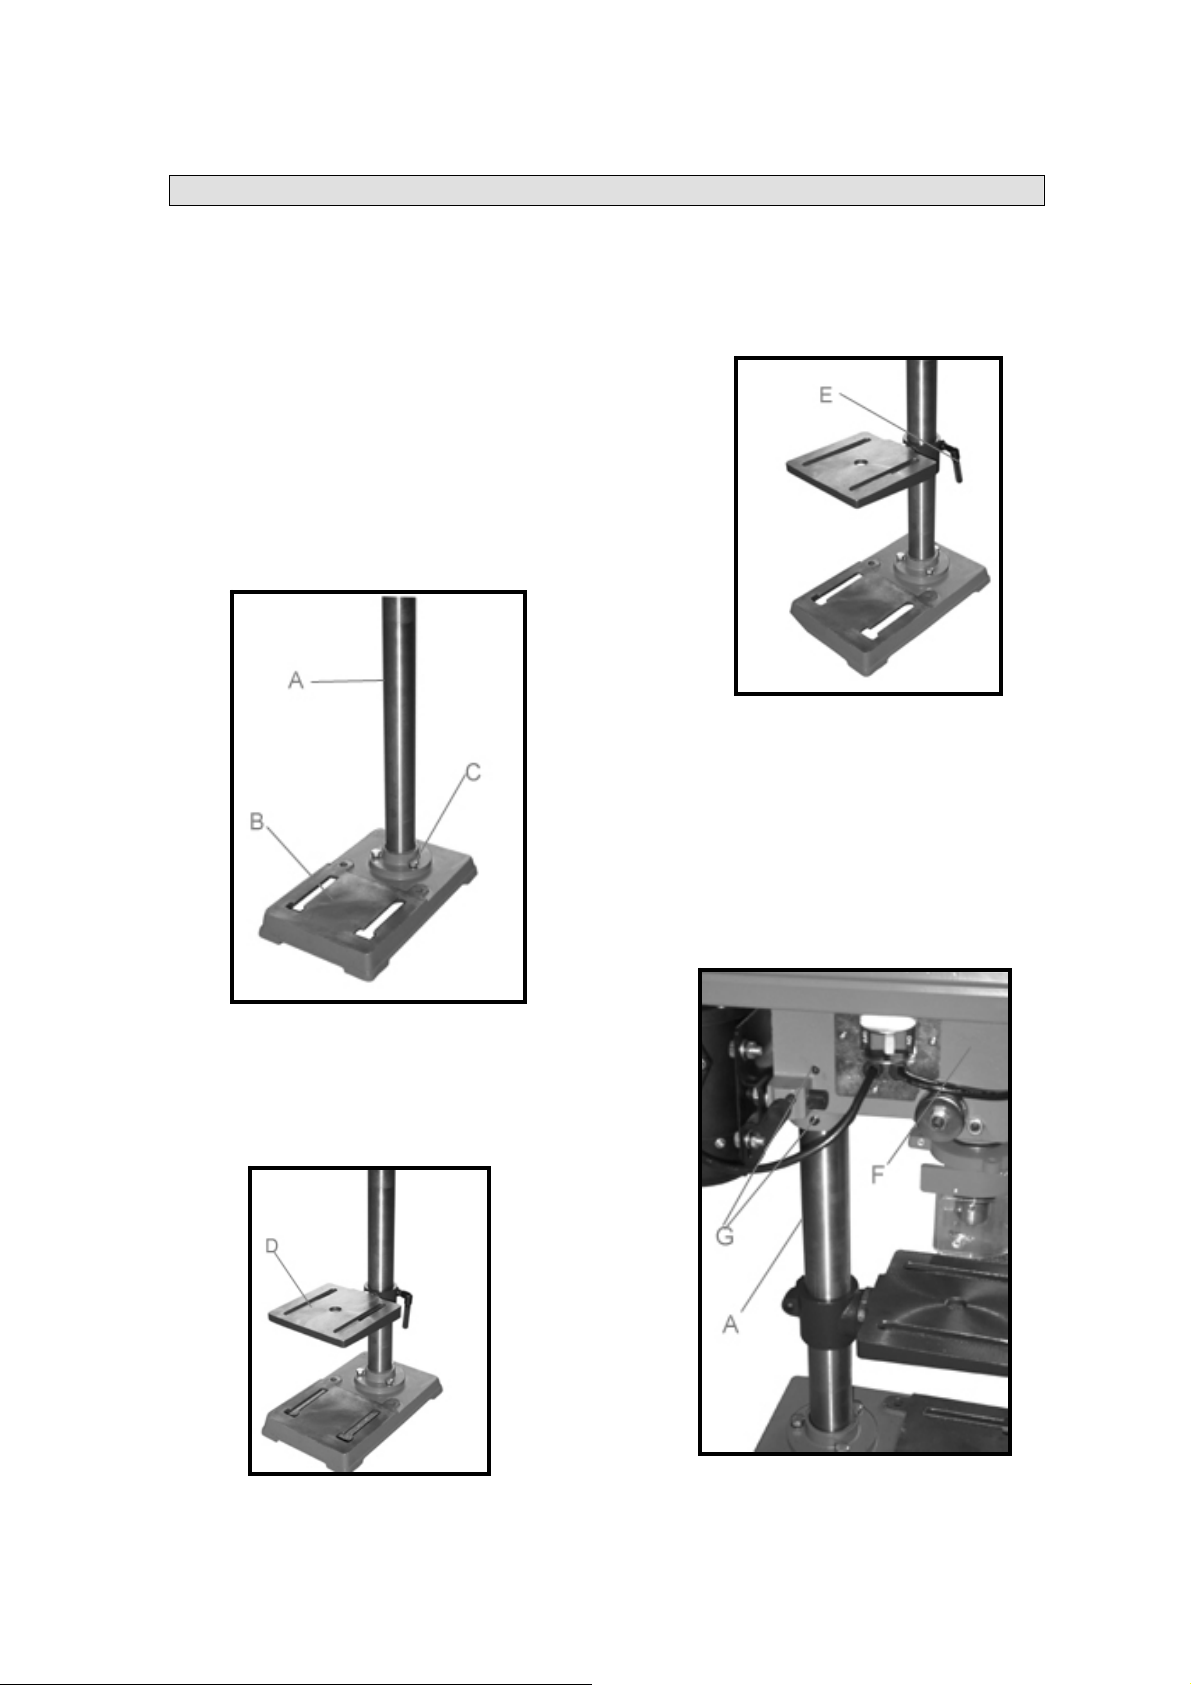
Assembly
1. Assemble the column (A) Fig. 4, to
drill press base (B) as shown, using
the three hex head cap screws (C).
2. Place the table (D) Fig. 5, on the
drill press column (A) as shown.
A
B
Fig. 4
Fig. 5
C
3. Thread stud on clamp handle (E)
Fig. 6, into hole in rear of table
bracket as shown.
Fig. 6
4. Place the drill press head (F), onto
the column (A) as far as it will go.
Align head (A) Fig 7A, to table (B),
and base (C). Tighten the two head
locking screws (G) Fig. 7 with
wrench supplied.
Fig. 7
12

Fig. 7A
5. Thread the three pinion shaft
handles (H) Fig. 8, into the three
holes located in the handles holder
(J) as shown.
Fig. 8
6. IMPORTANT: Make certain the
spindle taper (K) Fig. 9, and
tapered hole in the chuck (L) are
clean and free of any grease,
lacquer or rust preventive coatings.
Carefully follow the manufacturer’s
safety rules concerning its use.
K
L
M
Fig. 9
7. IMPORTANT: Open the chuck jaws
as wide as possible by turning the
chuck sleeve (M) Fig. 10.
8. Holding chuck on taper of spindle,
tap with a soft tip hammer (N) or a
block of wood and hammer to set
chuck, as shown in Fig. 10.
IMPORTANT: To avoid damage to
the chuck, NEVER drive the chuck
onto the spindle with a metal
hammer.
M
N
Fig. 10
13

Fastening drill press to supporting
E
A
surface
If during operation there is any
tendency for the machine to tip over,
slide or walk on the supporting
surface, the machine base must be
secured to the supporting surface with
bolts, through the two holes (A) Fig.
11, located in the machine base.
Fig. 11
A
Table adjustments
1. The table can be raised or lowered
on the drill press column by
loosening the table clamp handle
(A) Fig. 12. Move the table to the
desired position on the column and
tighten table clamp handle (A).
Fig. 12
2. The table can be tilted right or left.
A
Fig. 13
Changing speeds and adjusting
belt tension
Note: A belt positioning speed chart
(E) Fig. 14, is located on the inside top
cover of the drill press.
1. Disconnect machine from power
source.
2. Lift up the belt and pulley cover (A)
Fig. 14.
3. Release belt tension by loosening
tension knob (B) Fig. 14, and
pushing the motor (D) toward the
front of the drill press.
4. While holding the motor toward the
front of the drill press, position the
belt (C) on the desired steps of the
motor and spindle pulleys, as
shown in Fig. 14.
C
Fig. 14
D
B
14

5. After the belt is positioned on the
desired steps the motor and
spindle pulleys, push motor (D)
Fig. 14, away from the drill press
head until the belt is properly
tensioned and tighten tension knob
(B). The belt should be just tight
enough to prevent slipping.
Excessive tension will reduce the
life of the belt, pulleys and
bearings. Correct tension is
obtained when the belt (C) can be
flexed about 1 inch out of line
midway between the pulleys using
light finger pressure.
Operation
Your drill press is to be used with drill
bits with a shank 1/2 inch or less in
diameter. The following will give the
inexperienced operator a start on
common drill press operations. Use
scrap material for practice to get a feel
of the machine before attempting
regular work.
Installing and removing drill press
1. Disconnect machine from power
source.
2. Insert smooth end of drill bit (A)
Fig. 15, into chuck (B), as far as it
will go, and then back the bit out
1.5mm, or up to the flutes for
small bits.
3. Make certain that the drill bit (A)
Fig. 15, is centered in the chuck
(B) before tightening the chuck
with the key (C).
4. Turn the chuck key (C) Fig. 15,
clockwise to tighten and
counterclockwise to loosen the
chuck jaws.
B
A
Fig. 15
5. Tighten all three chuck jaws to
secure the drill bit sufficiently so
that it does not slip while drilling.
6. Make sure chuck key (C) Fig. 15, is
removed from chuck before
starting drill press.
Correct drilling speeds
Factors which determine the best
speed to use are: kind of material
being worked, size of hole, type of
drilling cutter, and quality of cut
desired.
Warning: Use the recommended
speed for the drill press bit and
workpiece material.
C
15

Using vise for clamping the
workpiece
1. Take out the 2-1/2” vice from the
packaging, and put it on the work
table.
2. Use four bolts to fasten the vice on
the work table, and adjust the
position of vice on the work table
at the desired position when
operating.
Adjusting Feeding Depth
1. Mark the depth of the hole on the
side of the workiece.
2. Loosen the depth scale lock screw.
3. With the switch to the off position,
bring the drill bit down until the tip
of the bit is even with the mark on
the side of the workpiece. (Fig 17)
4. Turn the depth scale counter-
clockwise until it stops moving,
5. Tighten the depth scale lock screw.
6. The drill bit will now stop at the
desired depth until the depth scale
is readjusted.
FIG.16
FIG.17
16

MAINTENANCE
WARNING:
When servicing use only identical replacement parts. Use of any other parts may create
a hazard or cause product damage.
WARNING
To avoid serious personal injury make sure the drill press is turned OFF and the cord is
unplugged from the power source before performing any maintenance or adjustment.
GENERAL MAINTENANCE
After using your drill press, clean it completely and lubricate all sliding an d moving parts.
Apply a light coat of automotive type paste wax to the table and column to help keep
the surfaces clean.
LUBRICATION
The ball bearings in the quill and V-belt pulley are permanently lubricated. To lubricate
the spindle, pull quill down to maximum depth and oil moderately once every three
months. Oil all slide bars lightly every two months. If cranking becomes difficult, grease
bracket lightly.
TROUBLE SHOOTING
TROUBLE PROBABLE CAUSE REMEDY
Noisy operation
Excessive drill wobble
Motor won’t start
Drill binds in workpiece
Drill burns or smokes
Table difficult to raise A) Needs lubrication
A) Incorrect belt tension
B) Dry spindle
C) Loose pulley
D) Loose belt
E) Bad bearing
A) Loose chuck
B) Worn spindle shaft or
bearing
C) Bad chuck
A) Power supply
B) Motor connection
C) Switch connections
D) Motor windings burned
E) Bad switch
A) Excessive pressure
on feed handle
B) Loose belt
C) Loose drill
D) Speed too fast
A) Incorrect speed slow
down RPM
B) Chips are not
discharging
C) Dull drill or not cut
properly for material
D) Needs lubrication
E) Feed pressure wrong
B) Bent rack
C) Table lock tightened
A) Adjust tension
B) Remove spindle/quill
assembly and lubricate
C) Tighten pulley
D) Adjust belt tension
E) Replace bearing
A) Tighten by pressing
chuck down against table
B) Replace spindle shaft
or bearing
C) Replace chuck
A) Check power cord
B) Check motor connection
C) Check switch connections
D) Replace motor
E) Replace speed
A) Apply less pressure
B) Check belt tension
C) Tighten drill with key
D) Change speed
A) Refer to speed chart
B) Clean drill
C) Clean sharpness and
taper
D) Use lubrication while
drilling
E) Apply less pressure
A) Lubricate with light oil
B) Straighten rack
C) Loosen clamp
SERVICE CENTER
17

If you have any question in regards to the operation of this power tool or are in need of
a spare part please contact our service center at:
Wachsmuth & Krogmann, Inc.
Tel: 1-888-367-7373
(Business hours Mon-Fri 9:00am - 4:00pm CT)
Website: http://www.wk-usa.com
ENVIRONMENTAL PROTECTION
If the tool should no longer work at all, please make sure that it is disposed in an
environmentally friendly way, by handin g it into a public collection point. Please do not
put it with your household waste.
18

LIMTED WARRANTY
Thank you for purchasing a top quality KingCraft product. This 9 Speed
Benchtop Drill Press tem #7149 was tested and meets our stringent quality
standards. This product is warranted to be free from manufacturing defects in
original materials, including original parts, and work manship until June 20, 2006
or 1 year with proof of purchase.
The warranty is void if the defect is due to accidental damage, misuse, abuse,
neglect, improper repair or alteration by unauthorized persons or failure to follow
operation instructions provided with the product. This warranty does not apply to
commercial use.
The warranty is non-transferable and applies only to the original purchase and
does not extend to subsequent owners of the product. Liability under this
warranty is limited to repair, replacement or refund. In no event shall liability
exceed the purchase price paid by the purchaser of the product. Under no
circumstances shall there be liability for any loss, direct, indirect, incidental,
special or consequential damage arising out of in connection with use of this
product. This warranty is valid only in the United States of America. This Warranty
gives you specific legal rights. However you may have other rights that vary from
state to state. Some states do not allow limitation on implied warranties or
exclusion of consequential damages therefore these restrictions may not apply to
you.
In case you find the product to be defective please send it within the warranty
period to our service center. To avoid transport damages please send the product
in the original packaging. In return you will either receiv e your repaired item, a
new product or a refund. Please fill out the Warranty Card and send it together
with the product and purchase receipt
To arrange pick-up of the defective item please call our service center:
Wachsmuth & Krogmann Inc.
Tel: 1-888-367-7373 (Business hours Mon-Fri 9:00am-4:00 pm CT)
Website:
123 Sivert Court,
Bensenville,IL 60106,
USA
http://www.wk-usa.com
WARRANTY INFORMATION
19

WARRANTY CARD
9 Speed Benchtop Drill Press, item # 7149, model # ZJ4116QA
In case you find this product to be defective please send it within the
warranty period to our service center. To avoid transport damages please
send the product in the original packaging. In return you will receive your
repaired item, a new product or a refund.
This product is warranted to be free from manufacturing defects in
original materials, including original parts, and workmanship until June
20, 2006 or 1 year with proof of purchase.
Please fill in your details below and send it together with the product and
purchase receipt. Please read the Limited Warranty conditions mentioned
in this instruction manual.
Customer Name
Street
City
State
ZIP Code
Purchase Date
Description of Defect :
WARRANTY CARD
PLEASE DETACH THIS SECTION AND RETURN IT WITH YOUR PRODUCT
To arrange pick-up of the defective item please call our service center:
Wachsmuth & Krogmann Inc.
Tel: 1-888-367-7373 (Business hours Mon-Fri 9:00am-4:00 pm CT)
Website: http://www.wk-usa.com
123 Sivert Court,
Bensenville,IL 60106,
USA
 Loading...