


RECHARGEABLE BATTERY
CHARGER
Item#6506
INSTRUCTION MANUAL
- 0 -

IMPORTANT SAFEGUARDS
PLEASE READ AND SAVE THESE INSTRUCTIONS
WARNING
The Tevion Charger is designed for indoor use at normal
temperature. Keep the charger away from direct sunlight,
moisture, or direct heat.
Use only the adaptor that comes with the Tevion Charger.
The battery charger is designed to charge only Ni-Cd and
Ni-MH rechargeable batteries of size AAA, AA, C, D and
9V. Please do not attempt to charge any other type of
battery to avoid safety hazard.
Do not use with leaking or corroded batteries.
It is normal for the batteries and adaptor to become warm
when in operation. Please ensure there is adequate space
and air for the charger to operate.
READ AND SAVE INSTRUCTIONS
- 1 -

TABLE OF CONTENTS
CONTENTS Page
- IMPORTANT SAFEGUARDS 1
- INSTRUCTIONS 3
- CHARGE AND DISCHARGE TIME 4
- QUICK START 5
- SELF-TEST MODE 6
- DEEP CONDITIONING MODE 7
- TECHNICAL SPECIFICATIONS 8
- 2 -

INSTRUCTIONS
Tevion Battery Charger is designed to charge only Ni-Cd
(Nickel Cadium) and Ni-MH (Nickel Metal-Hydride) type of
rechargeable batteries.
This Tevion Charger has a micro-processor built in that can
automatically control the charging of Nickel Cadmium (Ni-Cd) and
Nickel Metal-Hydride (Ni-MH) rechargeable batteries of AAA, AA,
C and D size. It use -V to control the charging of Ni-Cd batteries
and +V for Ni-MH. This ensures that rechargeable batteries with
different brands and capacities will always be fully charged. The
charger can also charge 9V rechargeable batteries using a
continuous trickle charge. There is also discharge, deep
conditioning, and self test function for this charger.
The charger is designed so that if you were charging with both
compartments, the compartment filled first would be charged first,
while the other compartment would be in waiting mode.
As the charger charges two pieces of battery at the same time, it
would work best if both batteries in the same compartment have
similar characteristics. This means that the batteries should have
the same size and same capacity. If they are different, the charger
will charge according to the battery with the smaller capacity. If one
battery is empty and the other is full, it is best to discharge the
batteries first. It is also helpful to deep condition new batteries first.
Please note that batteries should only be removed when in
READY mode. If for some reason that you would need to
remove and re-insert the batteries during charge/discharge,
please press the yellow DISCHARGE button twice to refresh
the charger.
- 3 -

CHARGE AND DISCHARGE TIME
(Reference for 2 rechargeable batteries only)
Battery Size Capacity(mAh) Approximate Charge
Time
AAA/Micro 180 17min
240 22min
AAA/Mignon 500 47min
1100 103min
C/Baby 1800 2 4/5hr
2000 3 1/8hr
D/Mono 2000 3 1/8hr
4000 6 1/4hr
9V/Block 100-120 10 to 14hr
Note: The charge time varies with brand/age/condition of
rechargeable battery.
The charge and discharge time for the batteries can be estimated
by the following equation:
(Battery Capacity /800mA) /80% × 60
This means that the charge time for 2 AAA size 180mAh batteries
is approximately 17 minutes (the time differs if batteries are old,
and not at optimal conditions).
Discharging time = (the remaining capacity of the batteries / discharge
current 300Ma)
If the capacity of the batteries is 2000mAh, the discharging time is
2000mAh / 300mA= 6.7hours
- 4 -

QUICK START
1. Plug the AC/DC adaptor into the electrical outlet, and the jack
plug into the charger.
2. Open the lid by sliding down the “Open” button.
3. Insert the rechargeable batteries you want to charge. For AAA,
AA, C or D size, place two pieces of battery of the same size
into the same compartment. For 9V batteries, place in
either/both slots between the two compartments.
(Step 4 to 7 is for AAA, AA, C or D size rechargeable batteries)
4. If you need to discharge the batteries, press the yellow
Discharge Button.
5. If you need to deep condition the batteries, press the yellow
Discharge Button and hold it until a “beep” sound is heard,
and the “Ready” green LEDs flashes. Release the button.
6. The compartment that has the batteries placed first will be
charged first. Or if both compartments have batteries placed in
at the same time, Compartment 1 will be charged first.
7. The batteries are ready to be removed from the compartment
when the “READY” LED for the corresponding compartment
begins to flash.
(Step 8 to 9 is for 9V rechargeable batteries)
8. The charger can charge 1 or 2 pieces of 9V batteries at the
same time.
9. 9V batteries cannot be discharged or deep conditioned. Once
the battery is placed into the slot, the red LED underneath the
battery will light up until the battery is removed.
- 5 -
SELF TEST MODE
The Tevion Charger can perform a self test to check if the charger
is fully functional. When a “beep” sound is heard, the charger is
ready to be used.
1. Remove all batteries and unplug the jack plug from charger.
2. Connect the AC/DC adaptor to the wall electric socket.
3. Push the DISCHARGE button and hold it down, and then
insert the jack plug into the charger. Release the DISCHARGE
button, and the LEDs will light up as follows:
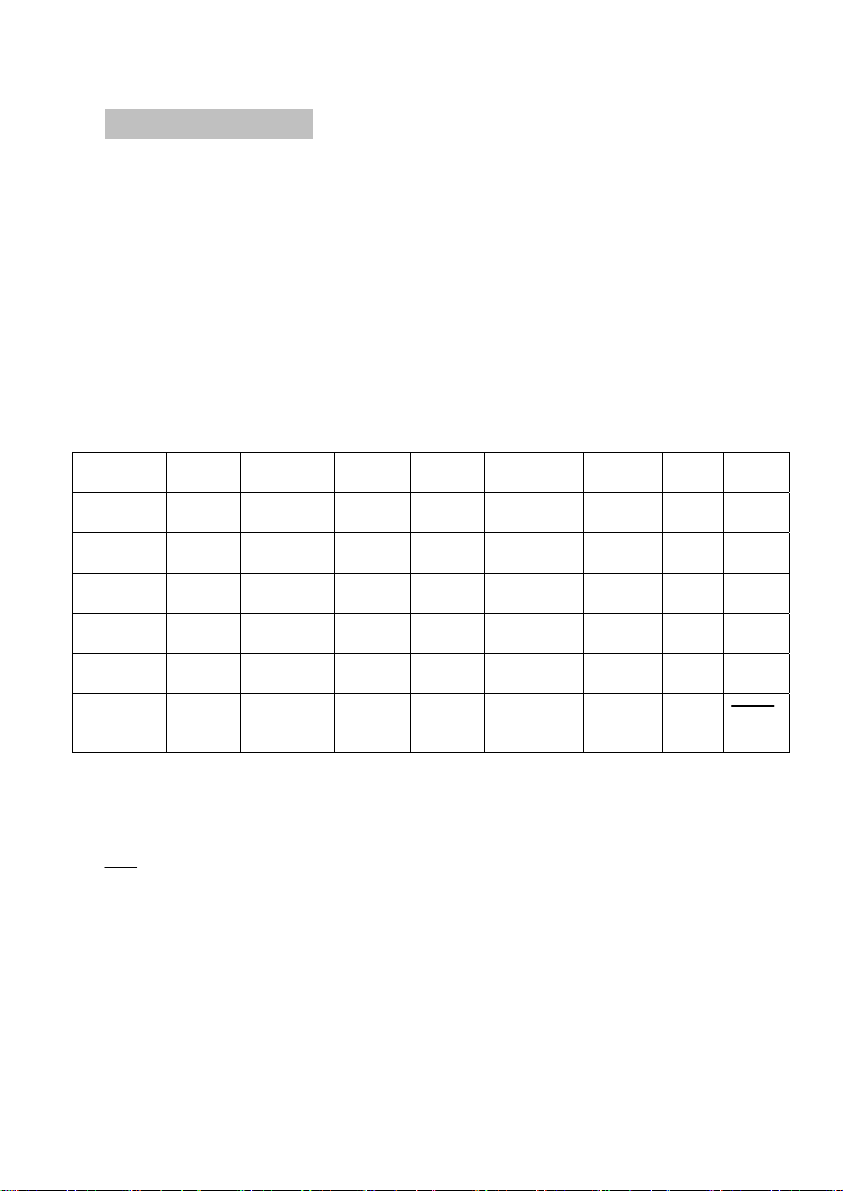
Power Discharge Charge Ready Discharge Charge Ready Sound
Test Start
Mode
Compartm
ent 1
Compartm
ent 2
Ready
Mode
Discharge
Mode
Test
Finish
Mode
○ LED light
☆ LED blink for 5 times
※ LED light once and blink 3 times
○ ○ ○ ○ ○ ○ ○
○
○
○
○ ○
○ ○ ○ ○ ○ ○ ○
○
☆
※
○
☆
○
※
Beeper sound once
4. If the LEDs do not light accordingly, the battery charger is not
fully functional.
- 6 -

DEEP CONDITIONING MODE
This mode can rescue rechargeable batteries damaged by
memory effect. It will automatically discharge and recharge the
batteries in both compartments three times.
1. Insert batteries into either one or both of the compartments.
Please note that this mode will automatically discharge and
recharge the batteries in both compartments three times.
2. Press and hold the yellow DISCHARGE button until the
READY LEDs begin to flash and the charger makes “beep”
sound. Release the button immediately.
3. The LEDs light up as in Discharge and Charge Mode. The
only difference is the flashing of the READY LEDs. During the
1st cycle, the READY LEDs flash three times, stop, and
repeat until the cycle is completed.
4. During the 2nd cycle, the READY LEDs flash twice, stop, and
repeat until the cycle is completed.
5. During the final cycle, the READY LEDs flash once, stop, and
repeat until the whole deep conditioning mode is completed.
6. When this mode is completed, the READY LEDs blinks, and
the CHARGE and DISCHARGE LEDs all go off. The batteries
are now ready for use.
Note: Press the DISCHARGE button to cancel Deep
Conditioning Mode and switch back to Charge Mode at any
time if desired.
Note: The deep conditioning process from beginning to end
may take up to 20 - 40 hours. Please see the charge and
discharge equations on page 4 to estimate approximate time.
- 7 -

TECHNICAL SPECIFICATIONS
Model
MW5798
Input:
Charge Current:
Boost Charge Current:
Trickle Charge Current:
Discharge Current:
Detection:
DC 12V 500mA
120V with AC/DC Adaptor
MW1250UC
Constant pulse current of 800mA
1/2 Constant Pulse Current
1/10 Constant Pulse Current
300mA
-V, +V
- 8 -

LIMITED WARRANTY
Item # 6506
Thank you for purchasing a top quality Tevion product. This Rechargeable
Battery Charger was tested and meets our stringent quality standards. This
product is warranted to be free from manufacturing defects in original materials,
including original parts, and workmanship until November 22, 2005 or 1 YEAR
AFTER DATE OF PURCHASE WITH PROOF OF RECEIPT.
The warranty is void if the defect is due to accidental damage, mis use, abuse,
neglect, improper repair or alteration by unauthorized persons or failure to follow
operation instructions provided with the product. This warranty does not apply to
commercial use.
This warranty is non-transferable and applies only to the original purchaser and does
not extend to subsequent owners of the product. Liability under this warranty is limited
to repair, replacement or refund. In no event shall liability exceed the purchase price
paid by the purchaser of the product. Under no circumstances shall there be liability for
any loss, direct, indirect, incidental, special or consequential damage arising out of or
in connection with use of this product. This warranty is valid only in the United States
of America. This warranty gives you specific legal rights. However you may have other
rights that vary from State to State. Some States do not allow limitation on implied
warranties or exclusion of consequential damages therefore these restrictions may not
apply to you.
In case you find the product to be defective please send it within the warranty
period to our service center. To avoid transport damages please send th e product
in the original packaging. In return you will receive your repaired item, a new
product or a refund. Please fill out the Warranty Card and send it together with
the product and purchase receipt.
To arrange pic k -up of the defective item please call our service center:
Schenker International Inc.
Tel: 1-888-367-7373
(Business hours Mon-Fri 9:00am - 4:00pm CT)
Website:
http://www.wk-usa.com
- 9 -
 Loading...