

Wabi Baby WA-8810N, WA-8811N User Manual
EN ELECTRIC STEAM STERILIZER & DRYER
FR STÉRILISATEUR À VAPEUR & SÉCHEUR ÉLECTRIQUE
ES ESTERILIZADOR DE VAPOR Y SECADOR ELÉCTRICO
WA-8810N / WA-8811N

TABLE OF CONTENTS
ENGLISH ...................................................... 2
safeguards ........................................................................................................ 3
what comes in the box ...................................................................................... 4
control panel guide .......................................................................................... 5
before first use .................................................................................................. 6
preparing for sterilizing ..................................................................................... 6
let’s get started ................................................................................................. 6
how to clean ..................................................................................................... 8
descaling .......................................................................................................... 9
troubleshooting ................................................................................................ 11
faq .................................................................................................................... 11
warranty ............................................................................................................ 12
customer support .............................................................................................. 13
FRANÇAIS .................................................. 14
mises en garde ................................................................................................. 15
le contenu ........................................................................................................ 16
guide de l’affichage électronique ................................................................... 17
avant la première utilisation ...... ..................................................................... 18
préparation pour la stérilisation ..................................................................... 18
étapes d’utilisation ........................................................................................ 18
nettoyage ......................................................................................................... 20
détartrage ........................................................................................................ 21
guide de dépannage ........................................................................................ 23
foire aux questions............................................................................................ 23
garantie ............................................................................................................ 24
soutien à la clientèle ......................................................................................... 25
ESPAÑOL ................................................... 26
precauciones de seguridad ............................................................................... 27
contenido de la caja ......................................................................................... 28
guía del panel de control .................................................................................. 29
guía del panel de control .................................................................................. 30
preparación para la esterilización ...................................................................... 30
empecemos ...................................................................................................... 30
cómo limpiarlo .................................................................................................. 32
descalcificación................................................................................................. 33
resolución de problemas ................................................................................... 35
preguntas frecuentes ........................................................................................ 35
garantía ............................................................................................................ 36
atención al cliente ............................................................................................ 37
1
EN
FR
ES

32
EN EN
SAFEGUARDS
When using electrical appliances, basic safety precautions should always be followed
including the following:
1. Not for space heating purpose.
2. To protect against electrical shock DO NOT IMMERSE cord or plug or sterilizer base in water or other liquid when
cleaning.
3. DO NOT place sterilizer and its cord beside or near damp or hot areas, electric burner or in a heated oven
especially while in use.
4. Do not use outdoors.
5. Always use on a level heat-resistant surface.
6. When in use, the electric sterilizer contains hot water and steam.
7. Extreme caution must be used when moving an appliance containing hot oil or other hot liquids.
8. Do not touch hot surfaces. Use handles and knobs.
9. Always keep the electric sterilizer and its plug out of reach of small children.
10. Ensure that the power supply voltage marked on the appliance corresponds with your main supply.
11. To disconnect, turn any control cycle “off”, then remove plug from wall outlet.
12. Ensure water has been added to the base unit before switching the unit on.
13. Always add 100 ml / 3.3 oz of water before use. If you put too little or too much water into the sterilizer it will not
operate correctly.
14. Always unplug from the electric outlet when not in use. Allow to cool before putting on or taking off any parts.
15. Close supervision is necessary when any appliance is used near children.
16. Do not operate any appliance with a damaged cord or plug or after the appliance malfunctions or has been
damaged in any manner. Return appliance to the nearest authorized service facility for examination, repair, or
adjustment.
17. The use of accessory attachments is not recommended as this may cause injuries.
18. This sterilizer is intended to be used in a household environment such as:
a. staff kitchen areas in shops, ofces and other working environments.
b. farm houses.
c. by clients in hotels, motels and other residential type of environments.
d. bed and breakfast.
19. This appliance is not intended for use by individuals (including children) with reduced physical, sensory or mental
capabilities, or lack of experience and knowledge, unless they are supervised or have been instructed on how to use
the appliance by a person responsible for their safety.
20. Do not open while in use as this product contains boiling water. Beware of steam escaping from the vent holes in
the lid.
21. Allow at least a 30-minute interval between two operations and make sure the unit has cooled down before
pressing the start button for sequential use.
22. Steam from the unit can cause burns. Always allow 5 minutes to cool down after the cycle nishes before lifting the
lid.
23. KEEP CHILDREN AWAY from this sterilizer at all times.
24. NEVER place the power cord on top of the heating plate on the base unit.
25. DO NOT place any cloth on the cover while in use, or it may hinder the steam from venting properly.
26. User maintenance other than cleaning or descaling is not required for this product.
27. DO NOT attempt to dismantle or repair the sterilizer unless done by a qualied person or an authorized service
agent. Damaged supply cord or parts must be replaced by the manufacturer or authorized service agent to prevent
any injuries and hazards.
28. A short power supply cord is provided to reduce any risks resulting from becoming entangled in or tripping over a
longer cord.
29. Extension cords may be used if care is exercised in their use.
30. If an extension cord is used:
a. The marked electrical rating of the extension cord should be at least equal to the electrical rating of the
appliance.
b. The extension cord should be a grounding type 3-wire cord.
c. The longer cord should be arranged so that it will not drape over the countertop or tabletop where it can be
tripped over, snagged, or pulled on unintentionally (especially by children).
31. To provide continued protection against risk of electric shock, connect to properly grounded outlets only.
32. CAUTION: Risk of electric shock; disconnect from outlet before servicing.
33. Do not sterilize very small parts which can fall through the opening in the bottom of the chamber which may cause
damage to the heating plate and cause the small parts to melt in the heating plate.
34. Use only distilled water, bottle water or fresh running water to sterilize. Never use any additives.
35. Do not use for purposes other than those outlined in this user guide.
36. SAVE THESE INSTRUCTIONS.
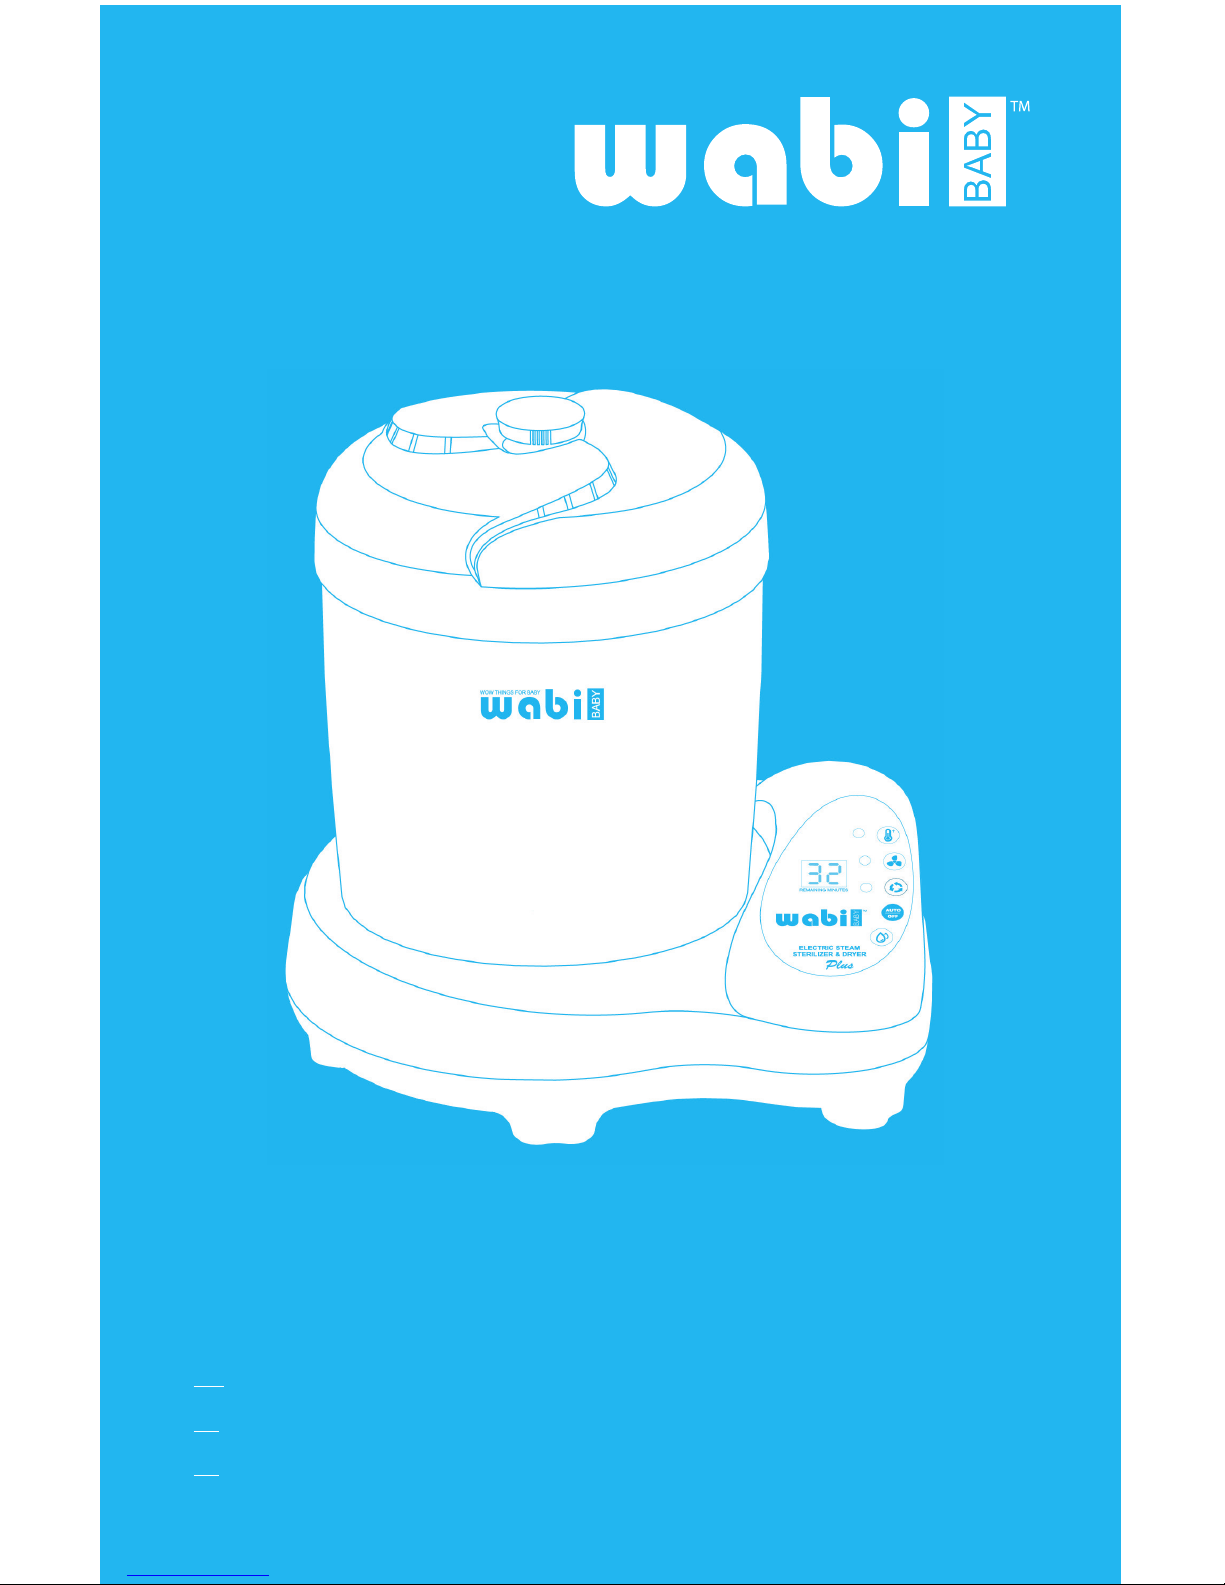
THANK YOU FOR CHOOSING WABI BABY
TM
The WABI BAB YTM sterilizer & dryer is designed to meet the mode rn day
parents’ nee ds to provide a safe, h ealthy and conven ien t choice for y our
bab y. With revoluti onary sterilizing and drying featu res al l b uilt into one uni t,
it allows you to eas ily sterilize and dr y bottles with th e pres s o f a button. Th e
WABI BABY TM sterilizer & drye r is made of 100% BPA-free materi al to ensure
a n ontoxic environment for yo ur baby’s daily use of fe eding items. The design
of the WA BI BABYTM sterilizer & dryer requires minimal cou nte rtop space and
can hold an industry -le ading capacity of 8 tall bottles, nipples, caps and fe eding
ite ms. Although the WABI BABY TM sterilizer & d ryer was original ly designed
for baby bottles, it is also the perfect unit to use for breast pu mp components,
pac ifiers, baby food co ntainers and anyt hing else that yo u want to sterili ze. The
WABI BABY TM sterilizer & drye r is a patented t echnology with in dus try-leading
functions that will give parents more time to enjoy with their families.
Please visit www.wabibaby.com for the most current information and FAQs.
COMPLIANCE
Conforms to UL STD499
Certified to Canada/CSA STD C22.2 No. 64.
Electrical Requirements
Rating: 120 V, 60 Hz
54
EN EN
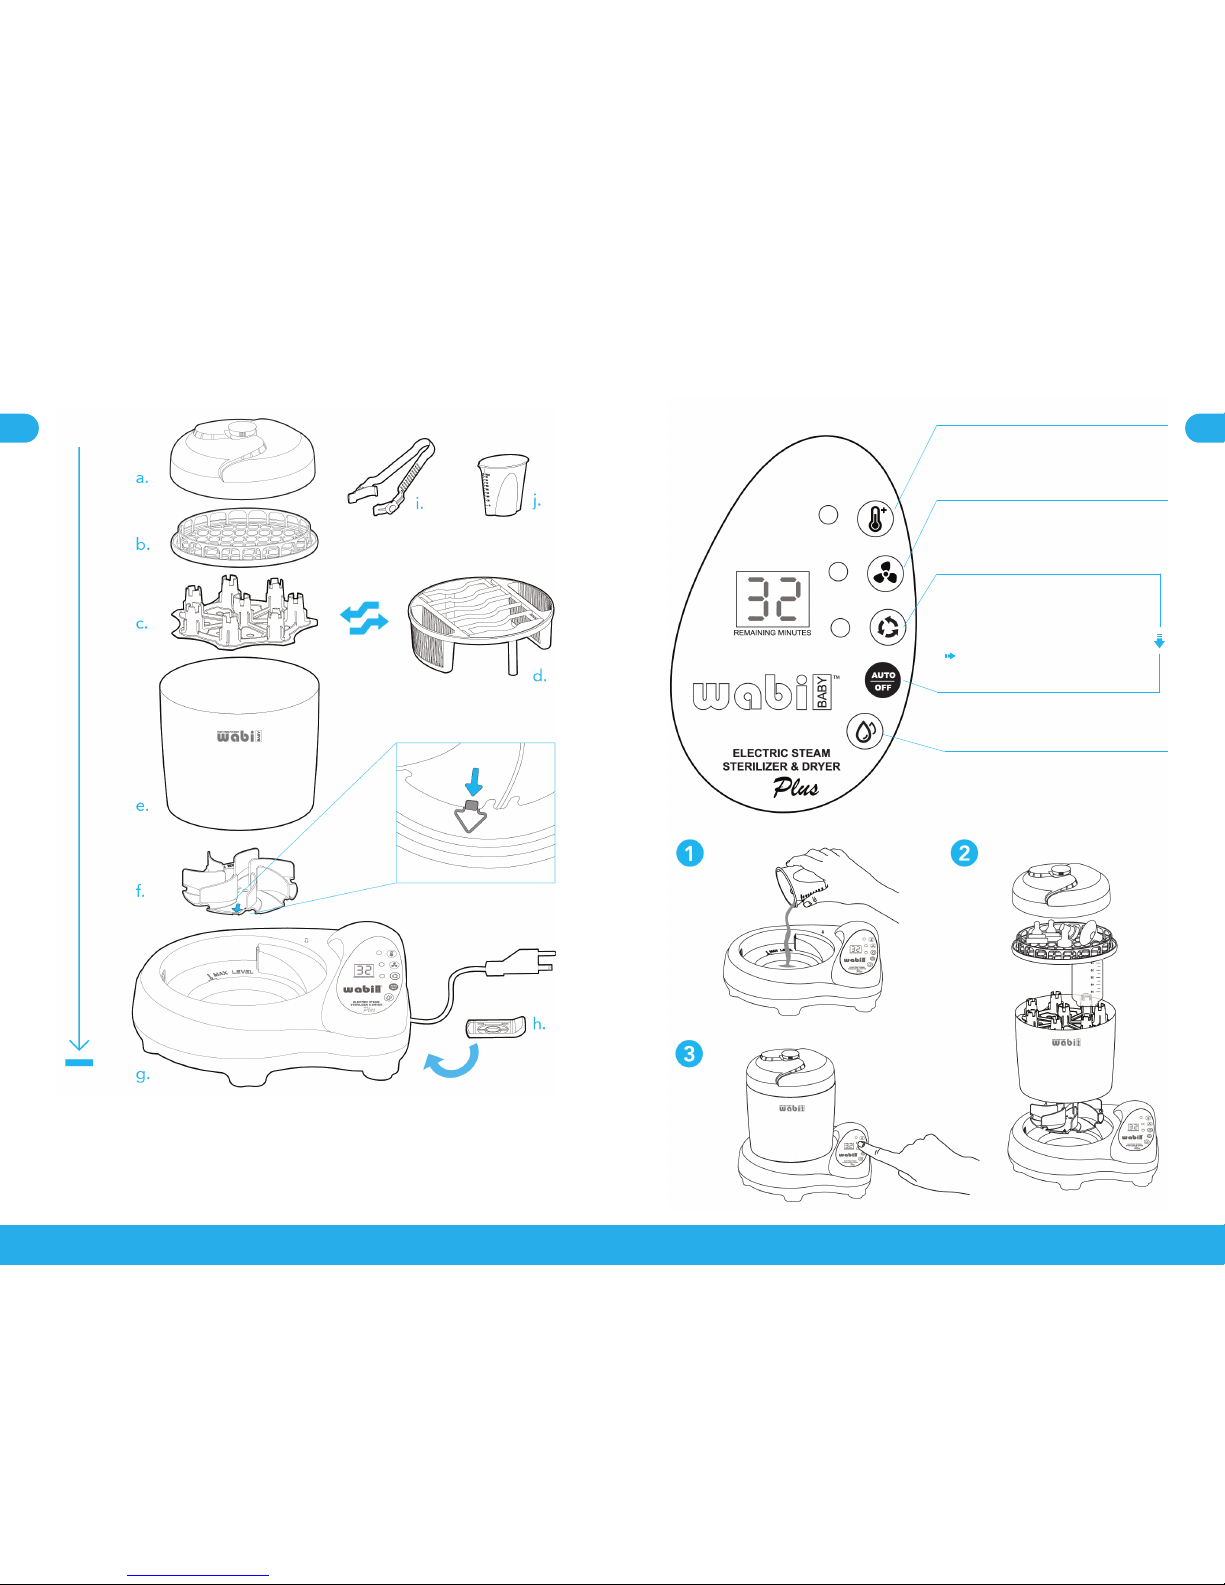
a. Lid b. Accessory Tray c. Bottle Rack d. Plate Rack
e. Chamber f. Air Rotor g. Base Unit h. Filter*
i. Tongs j. Measuring Cup a-j plastic material: Polypropylene
* The lter piece is pre-installed on the bottom of the base unit to prevent foreign objects from getting
into the unit. There is no need for periodic replacement.
WHAT COMES IN THE BOX
assembly order
CONTROL PANEL GUIDE
Sterilize only
The steam sterilization process kills
99.9% of harmful household bacteria in
less than 15 minutes.
Dry only
Circulating hot air dries all contents
efciently without having to wait hours
for air drying.
Storage Mode
Auto activates the drying mode
intermittently to ensure zero or low
humidity inside the Chamber.
Use in conjunction with AUTO mode
only.
Use in conjunction with AUTO mode only.
Auto / Off
Easy descaling, to be used with 100%
food-grade citric acid only. (See Page 9.)
Descale
No-scrub descaling, to be used with
100% food-grade citric acid only. (See
citric acid descaling for details.)

76
EN EN
• Place the Air Rotor on top of the Heating Plate, making sure it is locked in place,
then place the Chamber on top of the Electric Base Unit.
Load items into the Chamber
• Ch oose the appropriate Ra ck and place it i nsi de the Chamber. Smaller items
may fall through the Chamber, so please make sure t o p lace them where
they will stay in place and allow good airflow between them.
Bottle Rack:
Mak e sure th at bottles are placed u pside down, and l oad each one onto a
rac k post. Place bot tle nipples and comp onents on the Acc essory Tray.
TIP: Most bottles have a concave area on the bottom. Try to shake off any excess water
that may have accumulated in the indentations. Excess water may extend the drying time and
prevent the contents from drying completely, so be sure to drain out as much water as possible.
Plate Rack:
Loa d larg er items on the Rack and long, thin i tems in the utens il holder.
Pla ce items with the ir larger open ends facing down to keep wat er fro m
col lecting, and make su re to allow enough spac e for good airflo w.
• Close the Lid. (Use of the Accessory Tray is optional.)
• Pl ug the power cord into an outlet.
Choose an operation mode
STERILIZE ONLY Uses steam to kill 99.9% of harmful household germs.
ON
Press to turn on
Duration: 8-15 minutes.**
Light: on
Countdown: on
OFF
Press to cancel the cycle.
Alert: 3 beeps
** With the built-in smart sensor, the sterilizer runs until all the water on the Heating Plate has
evaporated. See Troubleshooting for sterilization cycles shorter than 6 minutes or longer than 15
minutes.
DRY ONLY Drying is an important step to prevent a breeding ground for germs.
ON
1. Press to turn on.
2. Press repeatedly to select drying time: 10 / 35 / 45 / 60 min.
3. The selected time setting will be memorized for the next use.
Light: on
Countdown: on
OFF
Press to cancel the cycle.
Alert: 3 beeps
Can also be used in conjunction with AUTO mode.
BEFORE FIRST USE
We advise th at you operate th e sterilizer through on e c omplete steril iza tion cycle
with an empty load before first use.
1. Lid, Racks, Chamber, and accessories: Clean in dishwasher or wipe clean with a
damp cloth before rst use.
Electric Base Unit: Wipe clean with a damp cloth.
WARNING: Never immerse the Electric Base Unit in water.
2. Use the included Measuring Cup to pour exactly 100 ml of fresh water onto the
Heating Plate.
3. Place the Air Rotor on top of the Heating Plate, making sure it is locked in place.
4. 4. Place the Chamber on the Electric Base Unit, place the Accessory Tray on top of
the Chamber, then close the Lid.
5. Press the button on the Control Panel. When the sterilize cycle is nished, the
unit will beep 3 times.
6. Let the unit cool for 15 minutes before rst use.
PREPARING FOR STERILIZING
All items intended f or sterilizing must be thoroughly washed cl ean with soapy
water, completely rinsed with fresh water, and thoroughly drained.
IMPORTANT: All items to be sterilized must be able to withstand boiling temperatures (100°
C or 212° F) in order to be processed in this unit. Please consult your feeding gear’s user guide to
ensure it can be sterilized by steam as some items may melt in high temperatures.
WARNING: Do not sterilize items that are lled with liquid, such as a teether with uid inside.
LET’S GET STARTED
The re are just three sim ple steps listed bel ow, but for safety we always
recommend th at you read through the entire manu al before operating the un it for
the first time.
Pour water onto Heating Plate.
Load items into the Chamber.
Press an operation mode.
Pour water onto Heating Plate
• Use the included Measuring Cup to pour exactly 100 ml of fresh water onto th e
Heating Plate.
IMPORTANT: Excess water on the Heating Plate may ow into the air vent openings
causing the Electric Base Unit to fail. Please note that the warranty does not cover this type of
user error.
TIP: We recommend using ltered water to slow down mineral buildup on the Heating
Plate.
98
EN EN
DESCALING YOUR WABI BABYTM STERILIZER
Jus t like all applia nce s with water heat ing elements, cal cium deposits or
sca le may build up a fte r the water evapo rates. Scale is n on-toxic, but if lef t
una ttended, can hind er appliances’ perfo rmance. Des caling your Wab i Baby
ste rilizer on weekly ba sis helps maintai n and extend the life time of the hea ting
ele ment. Depending o n t he mineral conten t of your water, calcium deposits ma y
build up faster, making it necessary to descale more often.
TIP: The mineral content of water varies greatly by region, so we always recommend using ltered
water to slow down scale buildup.
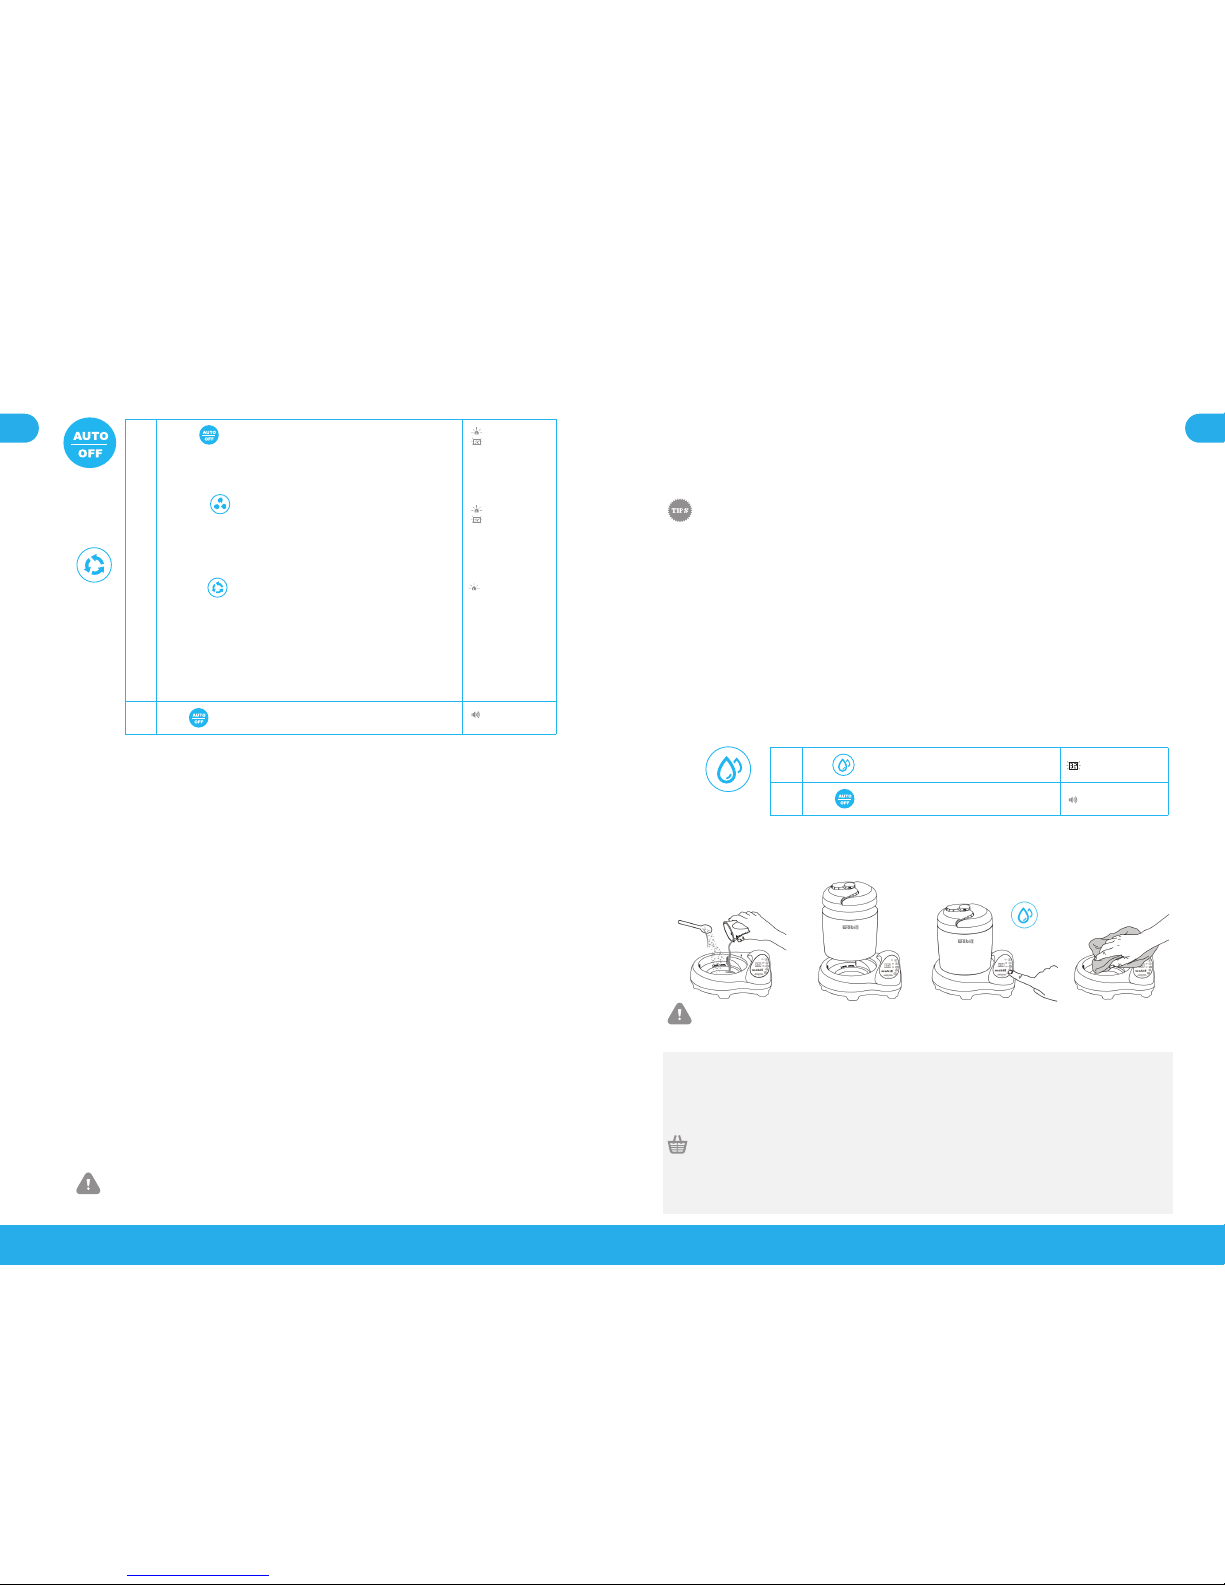
METHOD 1 - USING DESCALING MODE
Onl y available on th e P LUS models and fo r use with food-g rade citric acid
(WA-8810N, WA-8811N).
1. Fil l the Measuring C up with 100 ml water. Pour it onto t he Heating Plate to
cover the entire rim, but do not exceed the maximum level.
2. Add 1 teaspoon of citric acid powder to the water.
3. Pla ce the Chamber on th e Electric Base U nit, then close t he Lid. Please
make sure that no other items are inside the Chamber.
4. DESCALING No-scrub descaling with citric acid.
ON
Press to turn on. Duration: 35 minutes.
Countdown: on
OFF
Press to cancel the cycle.
Alert: 3 beeps
5. The descaling mode t ake s 35 minutes—5 mi nutes of heating the cleaning
solution and 30 minutes of cooling.
6. When the cycle is finished, the unit will beep 3 times.
WARNING: DO NOT use any other cleaning solution with this mode—doing so may cause
heating of the cleaning solution resulting in serious chemical reactions or odors.
CITRIC ACID
Use only 100% food gra de citric ac id in powder form . One tea spoon of cit ric acid wou ld be
a g ood starti ng amount for weekly descaling. P lease mix ac cordin g to the man ufacturer ’s
ins tructions, and adju st the amoun t accordi ng to you r situation.
Where to buy 100% Food grade citric acid?
tWabibaby.com - Wabi B aby Desca ling Powder, Genuine Wabi Baby Product.
tGro cery stor e canning section, under the na me “sour sal t” in the ko sher section , or
spice aisel, home brewing supplier, and natural food store.
AUTO / OFF True automation: Our unique 12-hour storage mode sterilizes, dries and
keeps your items sterile with the push of a button.
ON
1. Press to turn on.
2. Adjust Options
DRY Mode
• Press repeatedly to select time setting: 10 / 35 / 45 / 60
min.
• Setting can be changed any time before drying cycle starts.
PROLONG Mode - Auto activates the drying mode intermittently.
• Press to turn on or off the STORAGE mode.
AUTO – (4hr. later) - DRY: 10 min – (4hr. later) - DRY: 10 min – (4hr.
later) - DRY: 10 min
• This mode only operates in conjunction with AUTO mode.
• Setting can be changed any time before AUTO cycle ends.
3. The selected setting will be memorized for next time AUTO mode
is used.
Light: on
Countdown: on
Light: on
Countdown: on
Light: on
OFF
Press to cancel the cycle anytime during AUTO.
Alert: 3 beeps
• Wh en the cycle is f inished in the ch ose n mode, the un it will beep 3 times
and shut off automatically.
• Al low the unit to c ool for 10 minute s b efore opening the Lid. Be careful to
avoid any residual steam.
• Us e the included Tongs t o remo ve the sterilized it ems. Handle with care a s
the items may still be hot.
HOW TO CLEAN
By performing regular maintenance on your WABI BABYTM st erilizer, you wi ll
prolong t he life of the unit and ensure that it cont inu es to operate at maximum
efficienc y.
• Bottle/Plate Rack, Accessory Tray, and Lid: top-rack dishwasher safe.
• Chamber: bottom-rack dishwasher safe.
• E lectric Base Unit :
a.T he surface can be wi ped with a damp c loth.
b.The Heating Pla te requires wee kly descaling. Pl eas e choose one o f t he
methods listed here.
Method 1: Using descaling mode with citric acid. (see page 9)
Method 2: Unplugged descaling with vinegar or citric acid. (see page 10)
WARNING: Never immerse the Electric Base Unit in water.
 Loading...