

Wabi Baby WA-8800N User Manual
EN ELECTRIC STEAM STERILIZER & DRYER
FR STÉRILISATEUR ÉLECTRIQUE AVEC SÉCHEUR À VAPEUR
ES ESTERILIZADOR DE VAPOR Y SECADO ELÉCTRICO
WA-8800N
All manuals and user guides at all-guides.com
all-guides.com

All manuals and user guides at all-guides.com
1
EN
TABLE OF CONTENTS
ENGLISH ............................................................ 2
what comes in your box ............................................... 3
safeguards .................................................................. 4
control panel guide ...................................................... 5
diagram ..................................................................... 6
prior to first use .......................................................... 7
Let’s get started .......................................................... 7
but really, it’s only 3 steps ........................................... 9
how to clean ............................................................... 9
trouble shooting ........................................................... 01
warranty ..................................................................... 11
FRANÇAIS ........................................................ 13
le contenu de votre boîte .............................................. 14
mises en garde .......................................................... 15
guide du panneau de contrôle ..................................... 17
diagramme ................................................................. 17
avant la première utilisation ........................................ 18
comment vous en servir ............................................... 18
trois étapes simples ................................................... 20
le nettoyage .............................................................. 20
le dépannage ............................................................. 21
garantie ...................................................................... 22
ESPAÑOL ......................................................... 24
lo que viene en su caja ............................................... 25
precauciones ............................................................. 26
guía del panel de control ............................................ 27
diagrama ................................................................... 28
antes del primer uso ................................................... 29
empecemos ............................................................... 29
pero de verdad, son sólo 3 pasos ................................. 31
cómo limpiarlo ........................................................... 31
resolución de problemas ............................................. 32
garantía .................................................................... 33
All manuals and user guides at all-guides.com
2
EN
THANK YOU FOR CHOOSING WABI BABY
TM
The WABI BABYTM sterilizer & dryer is designed to meet the modern
day parents’ needs to provide a safe, healthy and convenient
choice for your baby. With revolutionary features of sterilizing and
drying all built into one unit, it allows you to easily sterilize and dry
bottles with just a press of a button. The WABI BABY
TM
sterilizer
& dryer is made of 100% BPA-free material to ensure a nontoxic
environment for your baby’s daily use of feeding items. The design
of the WABI sterilizer & dryer requires minimal countertop space
and can hold an industry-leading capacity of 8 tall bottles, nipples,
caps and feeding items. Although the WABI sterilizer & dryer was
originally designed for baby bottles, it is also the perfect unit to use
for breast pump components, pacifiers, baby food containers and
anything else that you want to sterilize. The WABI sterilizer & dryer
is a patented technology with industry-leading design functions that
will give parents more time to enjoy with their families.
Please visit www.wabibaby.com for the most current information and
FAQs.
All manuals and user guides at all-guides.com
3
EN
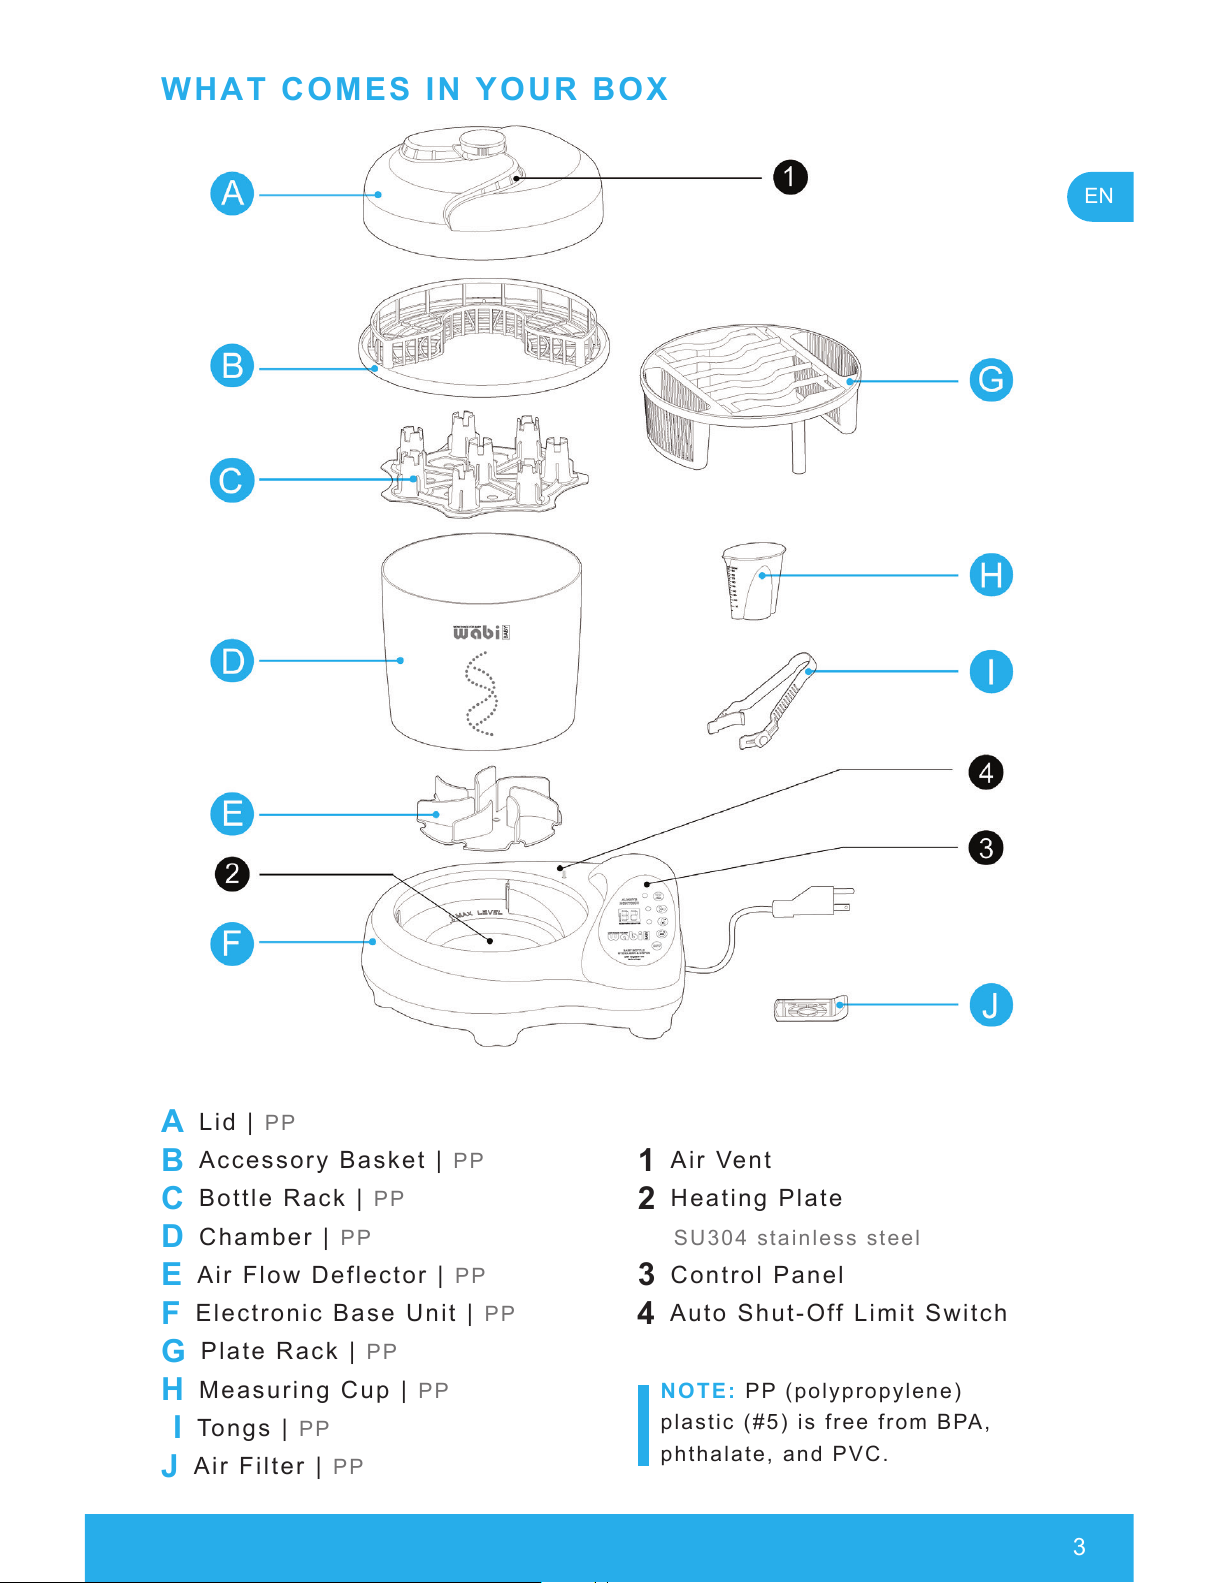
WHAT COMES IN YOUR BOX
A
Lid | PP
B
Accessory Basket | PP
1
Air Vent
C
Bottle Rack | PP
2
Heating Plate
D
Chamber | PP SU304 stainless steel
E
Air Flow Deflector | PP
3
Control Panel
F
Electronic Base Unit | PP 4 Auto Shut-Off Limit Switch
G
Plate Rack | PP
H
Measuring Cup | PP
I
Tongs | PP
J
Air Filter | PP
NOTE: PP (polypropylene)
plastic (#5) is free from BPA,
phthalate, and PVC.
All manuals and user guides at all-guides.com
4
EN
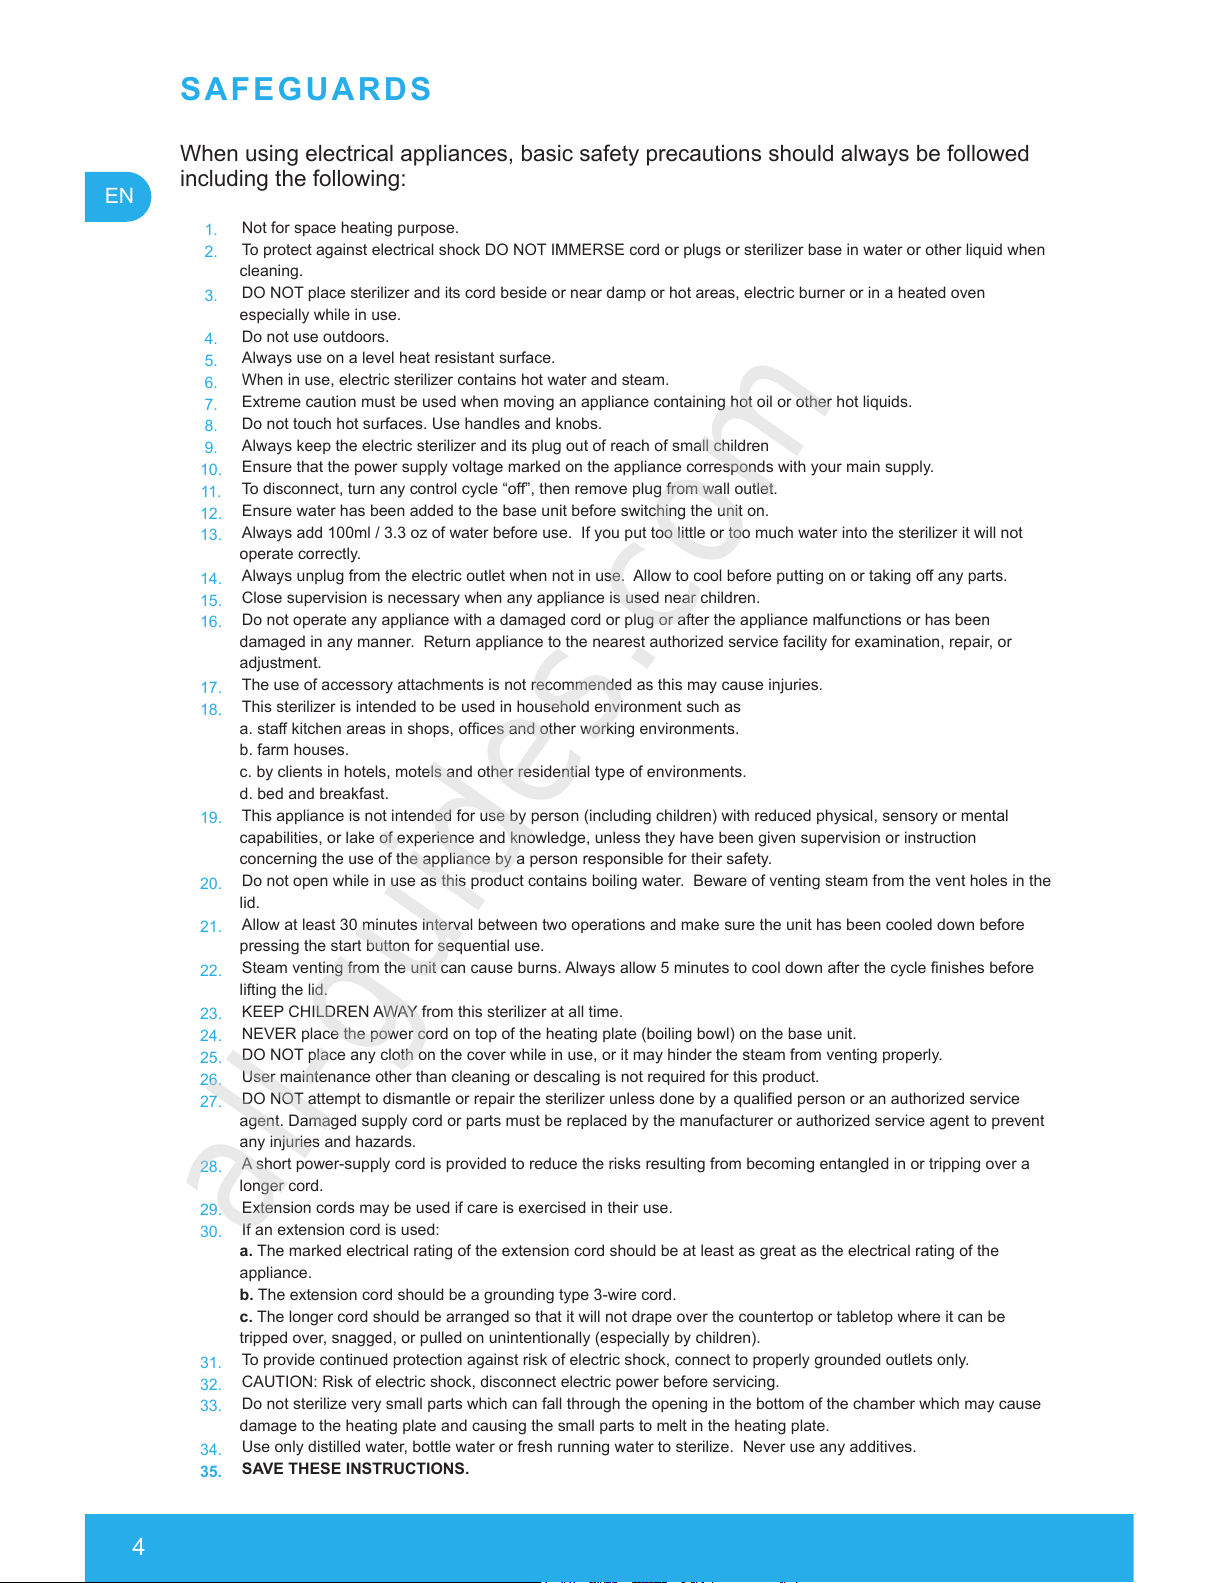
SAFEGUARDS
When using electrical appliances, basic safety precautions should always be followed
including the following:
1.
Not for space heating purpose.
2.
To protect against electrical shock DO NOT IMMERSE cord or plugs or sterilizer base in water or other liquid when
cleaning.
3.
DO NOT place sterilizer and its cord beside or near damp or hot areas, electric burner or in a heated oven
especially while in use.
4.
Do not use outdoors.
5.
Always use on a level heat resistant surface.
6.
When in use, electric sterilizer contains hot water and steam.
7.
Extreme caution must be used when moving an appliance containing hot oil or other hot liquids.
8.
Do not touch hot surfaces. Use handles and knobs.
9.
Always keep the electric sterilizer and its plug out of reach of small children
10.
Ensure that the power supply voltage marked on the appliance corresponds with your main supply.
11.
To disconnect, turn any control cycle “off”, then remove plug from wall outlet.
12.
Ensure water has been added to the base unit before switching the unit on.
13.
Always add 100ml / 3.3 oz of water before use. If you put too little or too much water into the sterilizer it will not
operate correctly.
14.
Always unplug from the electric outlet when not in use. Allow to cool before putting on or taking off any parts.
15.
Close supervision is necessary when any appliance is used near children.
16.
Do not operate any appliance with a damaged cord or plug or after the appliance malfunctions or has been
damaged in any manner. Return appliance to the nearest authorized service facility for examination, repair, or
adjustment.
17.
The use of accessory attachments is not recommended as this may cause injuries.
18.
This sterilizer is intended to be used in household environment such as
a. staff kitchen areas in shops, ofces and other working environments.
b. farm houses.
c. by clients in hotels, motels and other residential type of environments.
d. bed and breakfast.
19.
This appliance is not intended for use by person (including children) with reduced physical, sensory or mental
capabilities, or lake of experience and knowledge, unless they have been given supervision or instruction
concerning the use of the appliance by a person responsible for their safety.
20.
Do not open while in use as this product contains boiling water. Beware of venting steam from the vent holes in the
lid.
21.
Allow at least 30 minutes interval between two operations and make sure the unit has been cooled down before
pressing the start button for sequential use.
22.
Steam venting from the unit can cause burns. Always allow 5 minutes to cool down after the cycle nishes before
lifting the lid.
23.
KEEP CHILDREN AWAY from this sterilizer at all time.
24.
NEVER place the power cord on top of the heating plate (boiling bowl) on the base unit.
25.
DO NOT place any cloth on the cover while in use, or it may hinder the steam from venting properly.
26.
User maintenance other than cleaning or descaling is not required for this product.
27.
DO NOT attempt to dismantle or repair the sterilizer unless done by a qualied person or an authorized service
agent. Damaged supply cord or parts must be replaced by the manufacturer or authorized service agent to prevent
any injuries and hazards.
28.
A short power-supply cord is provided to reduce the risks resulting from becoming entangled in or tripping over a
longer cord.
29.
Extension cords may be used if care is exercised in their use.
30.
If an extension cord is used:
a. The marked electrical rating of the extension cord should be at least as great as the electrical rating of the
appliance.
b. The extension cord should be a grounding type 3-wire cord.
c. The longer cord should be arranged so that it will not drape over the countertop or tabletop where it can be
tripped over, snagged, or pulled on unintentionally (especially by children).
31.
To provide continued protection against risk of electric shock, connect to properly grounded outlets only.
32.
CAUTION: Risk of electric shock, disconnect electric power before servicing.
33.
Do not sterilize very small parts which can fall through the opening in the bottom of the chamber which may cause
damage to the heating plate and causing the small parts to melt in the heating plate.
34.
Use only distilled water, bottle water or fresh running water to sterilize. Never use any additives.
35.
SAVE THESE INSTRUCTIONS.
All manuals and user guides at all-guides.com
all-guides.com
5
EN
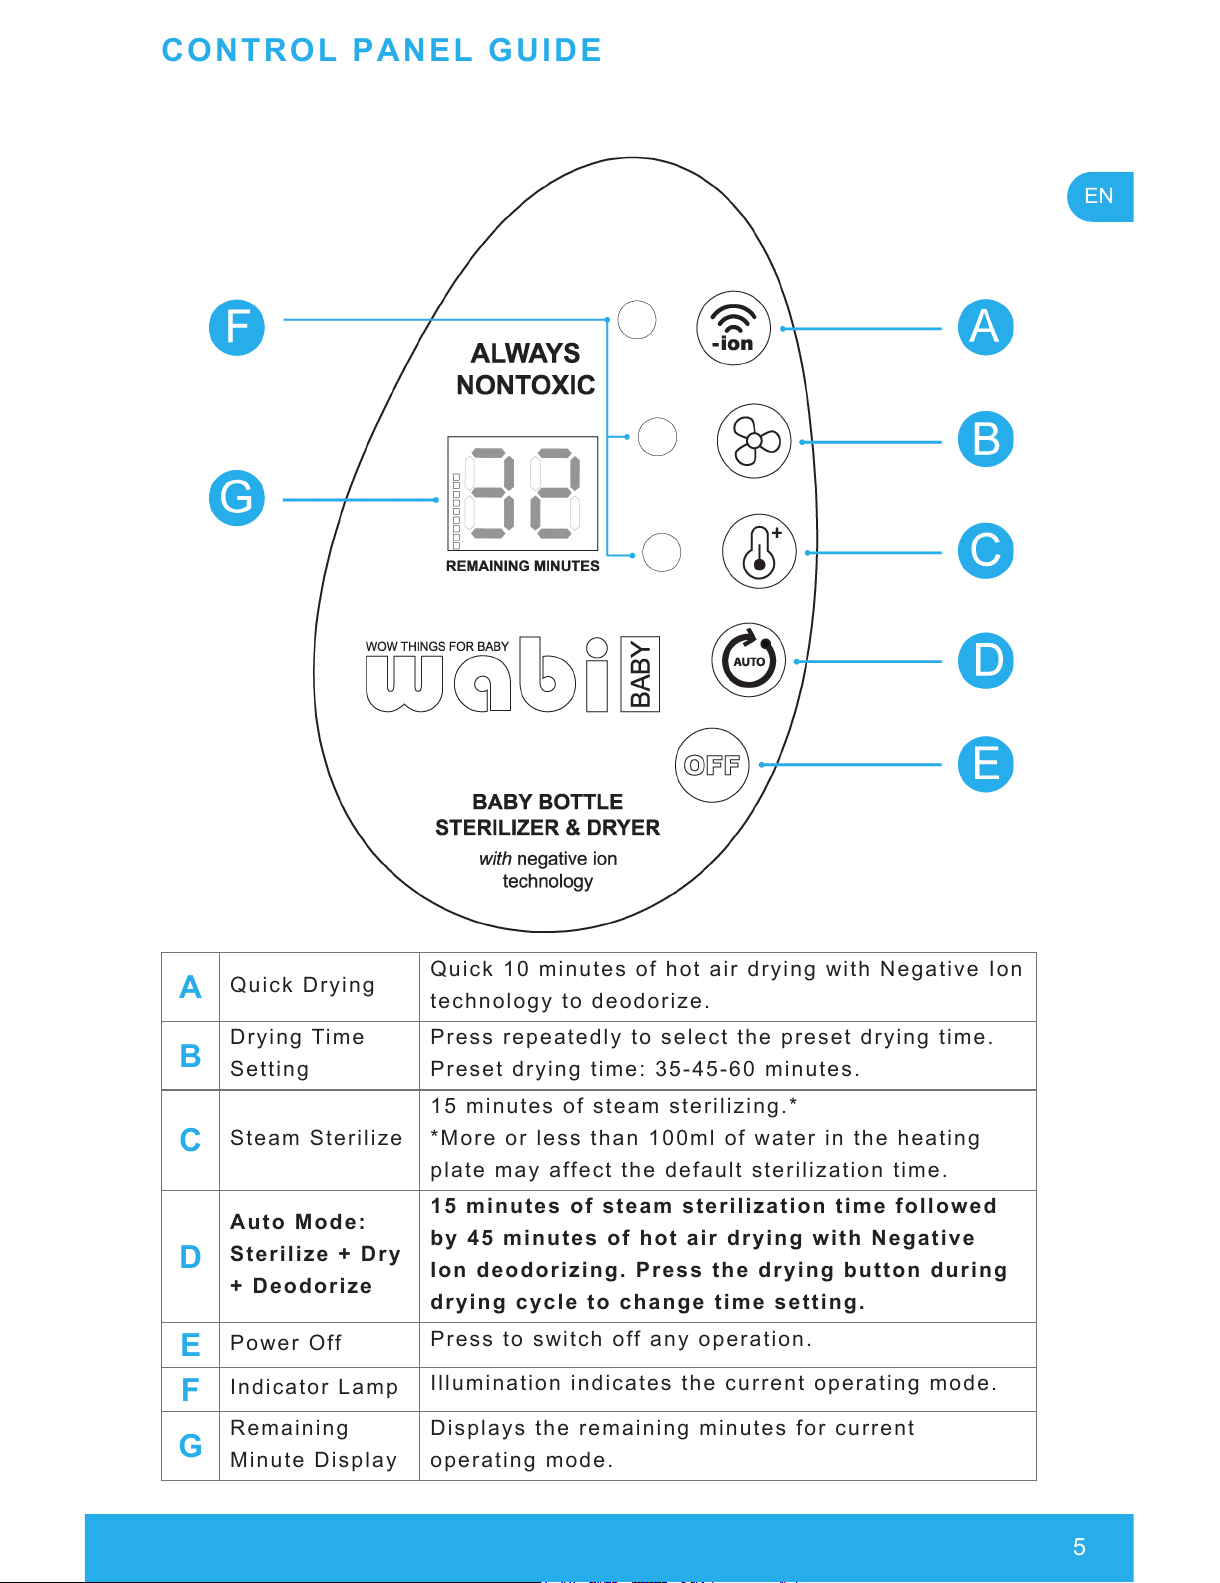
CONTROL PANEL GUIDE
A
Quick Drying
Quick 10 minutes of hot air drying with Negative Ion
technology to deodorize.
B
Drying Time
Setting
Press repeatedly to select the preset drying time.
Preset drying time: 35-45-60 minutes.
C
Steam Sterilize
15 minutes of steam sterilizing.*
*More or less than 100ml of water in the heating
plate may affect the default sterilization time.
D
Auto Mode:
Sterilize + Dry
+ Deodorize
15 minutes of steam sterilization time followed
by 45 minutes of hot air drying with Negative
Ion deodorizing. Press the drying button during
drying cycle to change time setting.
E
Power Off
Press to switch off any operation.
F
Indicator Lamp
Illumination indicates the current operating mode.
G
Remaining
Minute Display
Displays the remaining minutes for current
operating mode.
All manuals and user guides at all-guides.com
All manuals and user guides at all-guides.com
7
EN
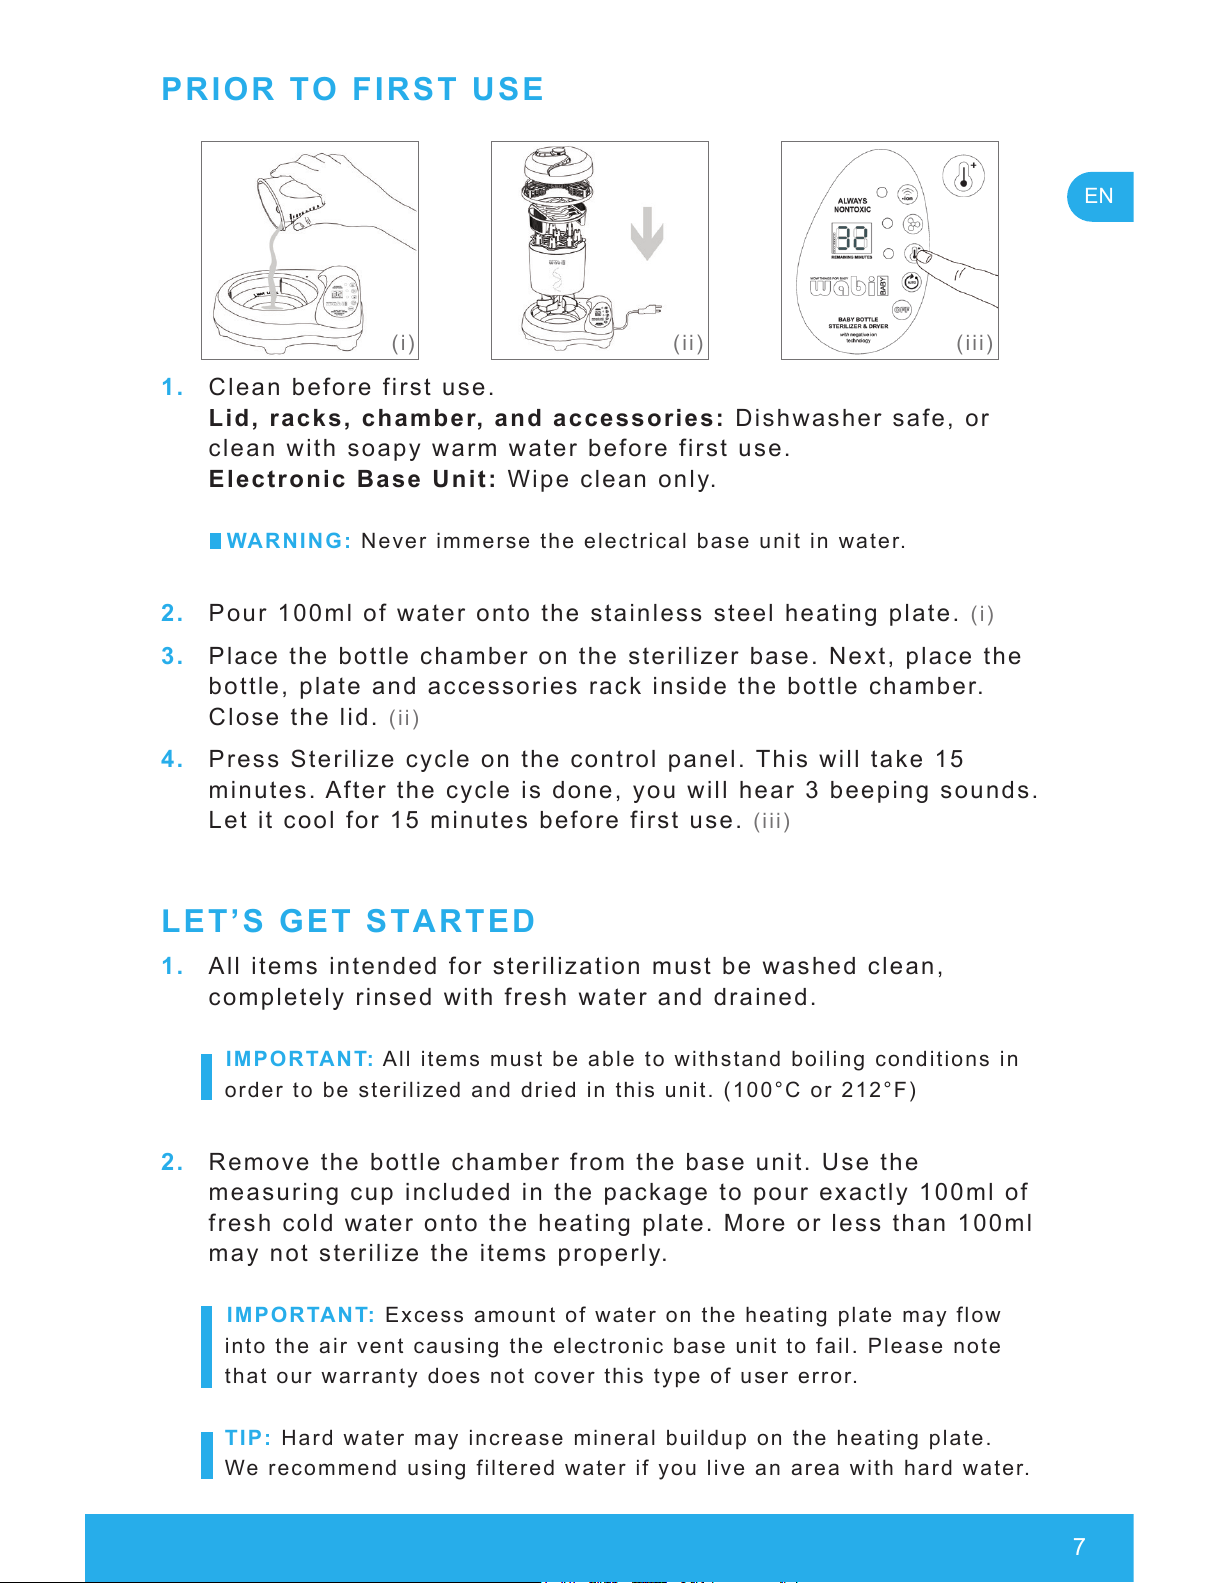
PRIOR TO FIRST USE
1. Clean before first use.
Lid, racks, chamber, and accessories: Dishwasher safe, or
clean with soapy warm water before first use.
Electronic Base Unit: Wipe clean only.
WARNING: Never immerse the electrical base unit in water.
2. Pour 100ml of water onto the stainless steel heating plate. (i)
3. Place the bottle chamber on the sterilizer base. Next, place the
bottle, plate and accessories rack inside the bottle chamber.
Close the lid.
(ii)
4. Press Sterilize cycle on the control panel. This will take 15
minutes. After the cycle is done, you will hear 3 beeping sounds.
Let it cool for 15 minutes before first use.
(iii)
LET’S GET STARTED
1. All items intended for sterilization must be washed clean,
completely rinsed with fresh water and drained.
IMPORTANT: All items must be able to withstand boiling conditions in
order to be sterilized and dried in this unit. (100°C or 212°F)
2. Remove the bottle chamber from the base unit. Use the
measuring cup included in the package to pour exactly 100ml of
fresh cold water onto the heating plate. More or less than 100ml
may not sterilize the items properly.
IMPORTANT: Excess amount of water on the heating plate may flow
into the air vent causing the electronic base unit to fail. Please note
that our warranty does not cover this type of user error.
TIP: Hard water may increase mineral buildup on the heating plate.
We recommend using filtered water if you live an area with hard water.
(i) (ii) (iii)
All manuals and user guides at all-guides.com
8
EN
3. Place the chamber on the sterilizer base.
For bottles:
a. Place the bottle rack inside the bottle chamber.
b. Place the bottle necks downward into the bottle posts and
place all bottle components on top of the bottles, and the bottle
nipples on the accessory tray. Make sure to place all items with
the larger open ends facing down and allow space in between
for steam to travel freely.
TIP: Most bottles have a caved-in area on its bottom. Shake off any
excess water to prevent water from accumulating in those indentions.
Excess water may prolong the drying time, please make sure to drain
out as much water as you can.
NOTE: Due to various sizes of bottles on the market, there may be
cases where you won’t be able to fit exactly all 8 bottles on the bottle
rack.
For dinnerware:
a. Place plate rack inside the bottle chamber.
b. Load the plates on the rack and utensils in the utensil holder.
For bottle nipples, breast pump parts, pacifiers and small
toys:
a. Use either the bottle or plate rack.
b. Place the items inside the chamber with the larger open ends
facing down and make sure to allow space in between for air to
travel freely.
4. Place the accessory tray on top of the bottle chamber; the
accessory tray is necessary in order to close the lid, so always
be sure to use it.
5. Cover the lid.
6. Plug the power cord into the outlet.
7. Choose an operation mode.
(See page 6 for control panel guide)
8. When the chosen cycle is completed, the unit will beep 3 times
and will shut off automatically.
9. Allow to cool for 10 minutes before opening the lid. Be careful to
avoid any residual steam.
10. Use included tongs to remove the sterilized items. Handle with
care, as the items will be hot.
All manuals and user guides at all-guides.com

9
EN
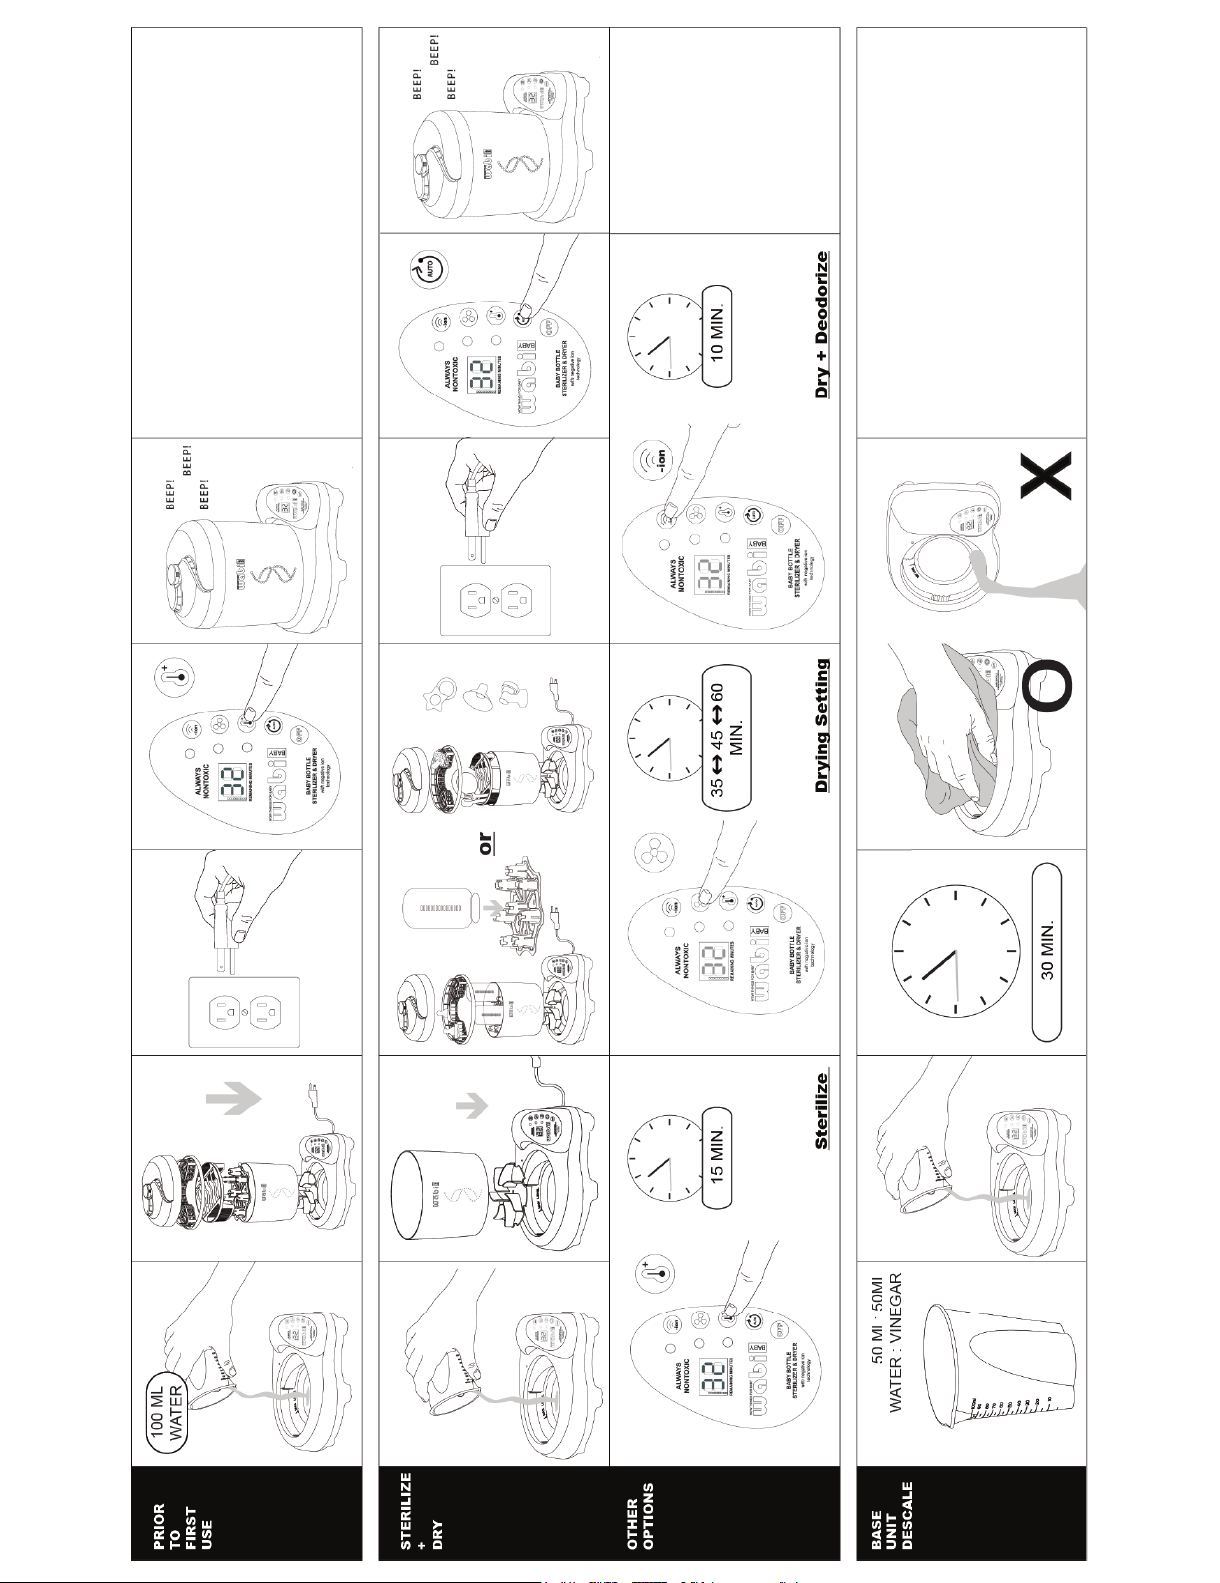
BUT REALLY, IT’S ONLY 3 STEPS
1. Pour water onto heating plate.
2. Load bottles into the chamber.
3. Press the Auto mode.
HOW TO CLEAN
With regular use, the heating plate should be descaled at least once
a week to ensure it continues to work efficiently. Always unplug the
unit and allow it to cool before cleaning.
Bottle chamber, bottle rack, plate rack, accessory tray and lid:
Dishwasher safe.
Base Unit Exterior: Base unit exterior cleaning requires only
wiping with a damp cloth.
Heating Plate Descale:
1. Empty any remaining water from heating plate with a sponge or
clean towel.
2. Fill the measuring cup with 50ml fresh water and 50ml
household vinegar. Pour onto the heating plate.
3. Let it stand for a minimum of 1 hour; repeat if necessary. Make
sure the solution does not overflow the heating plate and find its
way into the air vent.
4. Use a sponge or cloth to absorb the cleaning solution until
empty and then wipe it dry with a clean cloth.
NOTE: Do note use harsh abrasives or solvents to clean the heating
plate or come into contact with the unit. They can cause serious
damage to the unit.
WARNING: NEVER IMMERSE THE STERILIZER BASE UNIT IN
WATER.
IMPORTANT: NEVER POUR THE WATER OUT. WIPE DRY ONLY. There
are many air vent openings on the base unit. Any attempt to pour the
water out directly from the base unit may cause the water to flow into
the circuit board through the vent. This will cause permanent damage
to the unit and will not be covered by the warranty.
All manuals and user guides at all-guides.com
all-guides.com
 Loading...