


W & A
1
WATERMIZER
OPERATOR’S MANUAL
Congratulations on your purchase of a new W & A WaterMizer. Be sure to read all the instructions
in this manual before placing the machine in use. Safety precautions along with adjustments
should be learned and also taught to anyone who operates the machine. Remember, an implement
which is properly maintained, adjusted and safely operated saves time, labor and money.
After operating season, thoroughly clean your WaterMizer and inspect it. Preventive maintenance
pays dividends. Your dealer has original equipment parts which assure proper fit and best
performance.
Thank you for purchasing this W & A product.
**********************************************************************
For Your Convenience, Please Fill In The Following:
Model: WaterMizer Item No. 751000 Serial Number:__________________
Dealer Name: _______________________________ Date Purchased: ________________
Quality Products from
W & A MANUFACTURING COMPANY
P.O. Box 5238, Pine Bluff, Arkansas 71611
SPECIALIZED
FARM
EQUIPMENT
Phone: (870) 534-7420 Fax: (800) 336-1318
Website: www.wamfgco.com

SAFETY
2
SI NO LEE INGLES, PIDA AYUDA A AIGUIEN QUE SI LO LEA PARA
QUE LE TRADUZCA LAS MEDID AS DE SEGURIDAD .
THIS SYMBOL MEANS
-ATTENTION!
-BECOME ALERT!
-YOUR SAFETY IS INVOLVED!
SIGNAL WORDS:
The signal words DANGER, WARNING
and CAUTION are used with the safety
messages in this manual and with each safety
sign. They are defined as follows:
DANGER: Indicates an imminently
hazardous situation that, if not avoided, will
result in death or serious injury. This signal
word is to be limited to the most extreme
situations typically for machine components
which, for functional purposes, cannot be
guarded. The color for DANGER is RED.
• Safety of the operator and bystanders is one of the main concerns in designing
and developing our products. However, every year accidents occur which
could have been avoided by a few seconds of thought and a more careful
approach to handling equipment. Y ou, the operator , can av oid many accidents
by observing the following precautions in this manual. To avoid personal
injury or death, study the following precautions and insist those working with
you, or for you, follow them.
WARNING: Indicates a potentially hazardous
situation that, if not avoided, could result in
death or serious injury , and includes hazards
that are exposed when guards are removed.
It may also be used to alert against unsafe
practices. The color f or W ARNING is ORANGE.
CAUTION: Indicates a potentially hazardous
situation that, if not avoided, may result in
minor or moderate injury . It ma y also be used
to alert against unsafe practices. The color for
CAUTION is YELLOW.
If you have any questions not answered in this manual, require additional copies
or the manual is damaged, please contact your dealer or W & A Manufacturing
Company, P. O. Box 5238, Pine Bluff, Arkansas 71611. (Telephone) 870-5347420, (FAX) 870-534-1318. Manuals can also be found at www.wamfgco.com

This is the safety alert symbol. When you see this symbol on
3
your machine or in this manual, be alert to the potential for
personal injury or death. Follow the Safety Requirements!
GENERAL SAFETY REQUIREMENTS
• Before operating your W aterMiz er , thoroughly read and understand your operator’s manual. If
you do not understand any portion of the operator’s manual, contact your dealer or W & A
Manufacturing Company immediately.
• Never operate the machine under the influence of alcohol or drugs, or while you are otherwise
impaired.
• This equipment is dangerous to children and persons unfamiliar with its operation. The operator
should be a responsible adult familiar with farm machiner y and trained in this equipment’s
operations. Do not allow persons to operate or assemble this unit until they have read
this manual and have developed a thorough understanding of the safety precautions
and of how it works.
• Clear the area of people, especially children, before starting unit.
• Do not allow any one to ride on any part of the equipment for any reason.
• If safety signs are missing, unreadable, or damaged, they should be replaced. See list of
safety signs. Keep safety signs clean and legible. Do not paint over safety signs.
• Furnish this manual to the new owner if the machine is sold.
• Inspect machine daily for worn parts, hydraulic leaks, frayed hoses, and make necessary
repairs. Tighten all bolts and make sure all fasteners are in place.
• Unauthorized modifications to the machine may impair the function and/or safety and affect
machine life. Make NO unauthorized modifications. DO NOT REMOVE orifice fittings from
hydraulic cylinders.
• Never stand between implement and tractor when hitching. Extreme care should be used to
prevent injury to the hands or fingers.
pins.
• Lower wings, unit and front & rear parking stands and relieve hydraulic pressure before
servicing, unplugging, adjusting, leaving, or storing machine.
Stop tractor engine and set brake before installing hitch
• Raised equipment can fall unexpectedly and crush persons underneath. Never allow anyone
to enter the area underneath raised equipment during operation.
• Do not read, eat, drink, talk or text or use a mobile phone while using this equipment.
• Review the safety instructions with all users annually.

TRANSPORTING
4
• Comply with all federal, state, and local laws for implement transport on public roads.
• Travel speed should be such that you maintain complete control and machine stability at all
times. Watch f or obstructions ov erhead and to side while transporting.
• Make sure that the brake pedal latch is engaged. You must lock brake pedals together for
road travel.
• Never transport machine unless hydraulic systems are completely charged with hydraulic
oil and transport safety locks are engaged.
• When transporting on a road or highway, use adequate warning symbols, reflectors, and
SMV (slow moving vehicle) emb lem and appropriate lighting to meet local regulations. A void
transporting at night or low light conditions. Slow down and signal before turning. Pull over
to allow faster traffic to pass.
OPERATIONS
• Nev er start or operate machine unless sitting on tractor seat.
• Make sure front of tractor is properly weighted for safe steering control and operation.
• Blades are sharp. Use extreme care when adjusting or servicing. Keep hands and feet from
beneath blades.
SERVICE / MAINTENANCE
• Before working on this machine stop the tractor, set the brakes, disengage the PTO and
power drive , shut off the engine and remo v e the ignition k ey.
• Securely block machine when working on or under it.
• Always use the proper tools or equipment for the job.
• Properly tighten all hardware.
• After servicing, be sure all tools, parts and service equipment are removed.
• Where replacement parts are necessar y for periodic maintenance and servicing, genuine
factory replacement parts must be used to restore your equipment to original specifications.
The manufacturer will not claim responsibility f or use of unapproved parts and/or accessories
and other damages as a result of their use.
• If equipment has been altered in any way from original design, the manufacturer does not
accept any liability for injury or warranty.

SAFETY SIGNS
5
• Review Operator’s Manual of tool bar for required safety signs.
• Keep safety signs clean and legible at all times.
• Replace safety signs that are missing or have become illegible.
• Replaced parts that displayed a safety sign must also display the current sign.
• Safety signs are available from your dealer or W & A Manufacturing Company.
LUBRICATION & MAINTENANCE
LOWER UNIT BEFORE SERVICING, ADJUSTING OR LEAVING
MACHINE.
WEEKLY OR AFTER 50 HOURS OF OPERATION:
1. Tighten bolts holding Water Shank Assembly to tool bar.
PERIODICALLY:
Thoroughly clean and inspect your WaterMizer. Tighten all bolts as needed and check
that all fasteners and keepers are in place and secure.
Check water furrowers for wear and replace as required.
Review safety instructions with all operators annually.

ADJUSTMENTS & OPERATION
6
LOWER UNIT BEFORE SERVICING, ADJUSTING, OR LEAVING
MACHINE.
1. Make all adjustments on a flat surface.
2. Inspect shanks to insure all are installed at same depth
in clamps.
3. Install stabilizing blocks on hitch to minimize sway.
4. Adjust top link of hitch so tool bar is level during
operation. Water Furrowers are designed to run flat.
5. Adjust tool bar gauge wheels to desired depth between
2” and 4” deep. Remember that the WaterMizer is
designed to create furrows to efficiently move water and
is not a plow.
6. Check all torpedoes to insure rear chains are slack when unit is in operation.
This will allow Torpedoes to run flat and swivel freely. (See diagram on assembly
page) Important: Quick Links must be wrench tightened!
7. Recommended speed for best operation is 6 to 8 miles per hour.
INSTALL PROPER BALLAST ON FRONT OF TRACTOR. INSURE
SAFE AND PROPER STEERING AT ALL TIMES.
EXTREME CARE SHOULD BE USED WHEN HITCHING BAR TO
TRACTOR TO PREVENT INJURY TO HANDS OR FINGERS. DO NOT
STAND BETWEEN THE TOOL BAR AND TRACTOR WHEN IT IS IN
MOTION. STOP TRACTOR ENGINE AND SET BRAKE BEFORE
INSTALLING PINS.
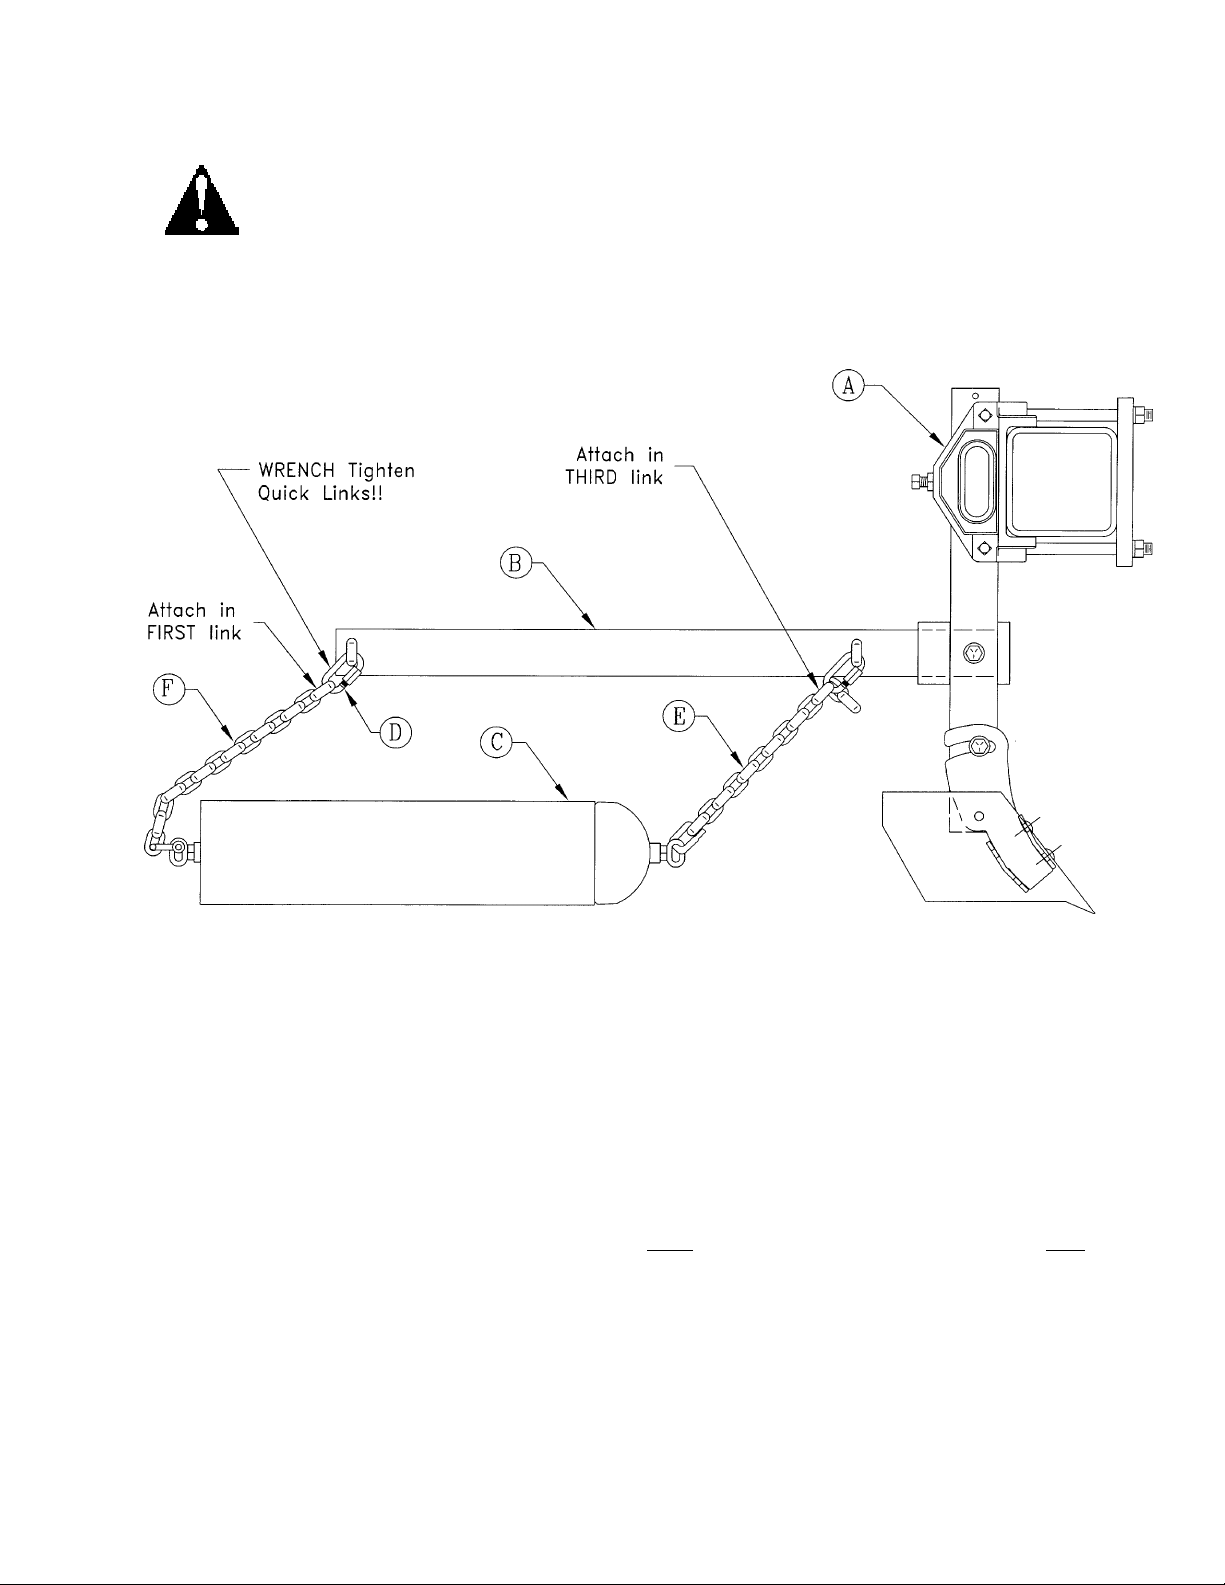
ASSEMBLY
7
EXTREME CARE SHOULD BE USED DURING ASSEMBLY TO
PREVENT INJURY TO HANDS, FINGERS AND FEET.
1. Mount the tool bar, gauge wheels and three point hitch assembly on the tractor three
point hitch.
2. Attach Shank Assemblies (A) to tool bar at desired spacing. If planting on the flat, row
widths may vary from field to field. Closer furrows (30”) on lighter soils to 60” on heavier
soils.
3. Using 5/8” x 2” Bolt, Lock Nut and Flat Washers provided, install Pick Up Arm (B) to
Shank Assembly. When on a folding tool bar, wing mounted Pick Up Arms must be turned
so that chain side is facing center of machine.
4. Attach Torpedoes (C) to Pick Up Arms using Quick Links (D) provided. Quick links must
be wrench tightened. Front chain (E) in third link of chain and rear chain (F) in first link of
chain. Rear chain must be slack when unit is in operation so Torpedo will run level and
be able to rotate.
5. IMPORTANT: Mount Parking Stands on rear side of tool bar to provide stability when
unit not in operation. Always unfold wings before placing unit in storage.

WARRANTY
8
W & A Manufacturing Company warrants all products manufactured and
sold by it to be free of defects in material and workmanship and to perform
as represented, subject to the following conditions
(A) Warranty applies only if installed and operated according to instructions.
(B) Written authorization must be obtained prior to return of material for inspection. Material
is to be returned prepaid.
(C) Warranty does not apply to labor for parts replacement, nor does it apply to damage by
accident, abuse, misuse or failure caused by not operating according to instructions.
(D) Warranty is void if changes are made in the product in the field by other than a W & A
representative or by instructions from the factory.
W & A Manufacturing Company reserves the right at any time to make changes in the
design, materials and/or specifications of any of its products without thereby becoming
liable to make similar changes in equipment previously manufactured.
Written authorization must be obtained prior to the return of any equipment purchased from W
& A Manufacturing Company. No penalties will be charged if equipment had been placed on
display by a W & A representative or if reasons for return are errors or faults of W & A Manufacturing
Company. If return is for the benefit of the customer and the equipment is returned by prepaid
freight in a new, unused and resalable condition, credit (based on original purchase price) will be
issued less a 10% fee for restocking and other handling expenses.
Quality Products from
W & A MANUF A CTURING COMPANY
P.O. Bo x 5238, Pine Bluff, Arkansas 71611
SPECIALIZED
FARM
EQUIPMENT
Phone: (870) 534-7420 Fax: (800) 336-1318
Website: www.wamfgco.com
 Loading...