

Page 1
V-ZUG Ltd
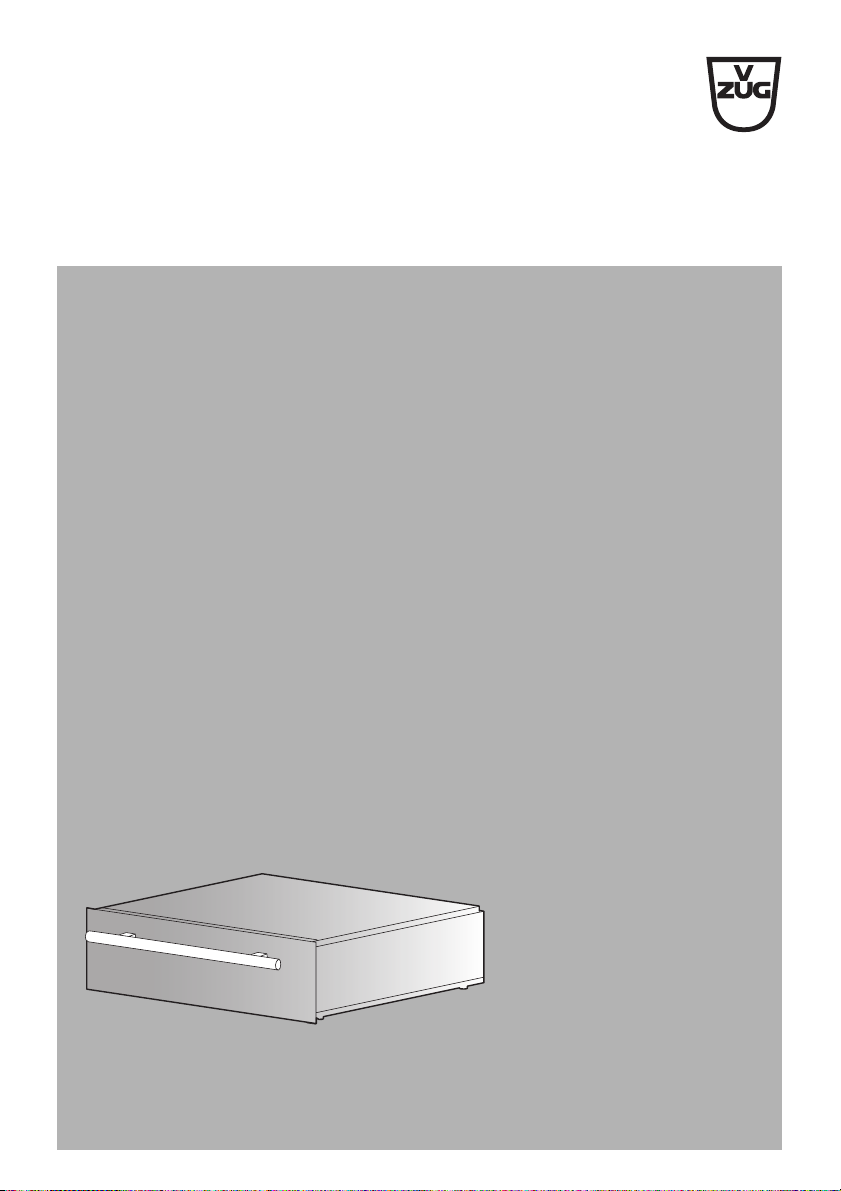
Warming drawer
WS55162
WS55220
WS60144
WS60162
WS60220
WS60283
WS60312
Operating instructions
Page 2

Thank you for choosing to buy one of our products. Your appliance is made
to high standards and is easy to use. Nevertheless, please take the time to
read these operating instructions in order to familiarize yourself with the
appliance and get the best use out of it.
Please follow the safety precautions.
Modifications
Text, diagrams and data correspond to the technical standard of the appliance at the time these operating instructio ns went to p ress. The right to make
technical modifications for the purpose of the further development of the
appliance is reserved.
Symbols used
Denotes important safety precautions. Failure to observe said
precautions can result in injury or damage to the appliance or
fittings!
➤ Indicates step-by-step instructions.
– Describes how the appliance reacts to the steps taken.
• Indicates a list.
Denotes useful tips for the user.
Validity
The model number corresponds to the first digits on the identification plate.
These operating instructions apply to:
Type Model no. Type Model no. Type Model no.
WS55162
WS55162c
WS55220
WS55220c
WS60144
WS60144c
34001
34002
34003
WS60162
WS60162c
WS60220
WS60220c
WS60283
WS60283c
34004
34005
34006
WS60312
WS60312c
34007
Variations depending on the model are noted in the text.
V-ZUG Ltd, CH-6301 Zug, 2012
2
Page 3

Contents
1 Safety information 4
1.1 Before using for the first time . . . . . . . . . . . . . . . . . . . . . . . . . . . . . . . . . . 4
1.2 Correct use . . . . . . . . . . . . . . . . . . . . . . . . . . . . . . . . . . . . . . . . . . . . . . . . 4
1.3 Children in the home . . . . . . . . . . . . . . . . . . . . . . . . . . . . . . . . . . . . . . . . 5
1.4 Note on use . . . . . . . . . . . . . . . . . . . . . . . . . . . . . . . . . . . . . . . . . . . . . . . 5
2 Your appliance 7
2.1 Description . . . . . . . . . . . . . . . . . . . . . . . . . . . . . . . . . . . . . . . . . . . . . . . . 7
3 Preheating tableware 8
3.1 Loading examples . . . . . . . . . . . . . . . . . . . . . . . . . . . . . . . . . . . . . . . . . . 8
3.2 Loading tableware . . . . . . . . . . . . . . . . . . . . . . . . . . . . . . . . . . . . . . . . . . 9
4 Keeping food hot 10
5Uses 11
5.1 Low temperature cooking . . . . . . . . . . . . . . . . . . . . . . . . . . . . . . . . . . . . 12
6 Care and maintenance 14
6.1 Cleaning the exterior . . . . . . . . . . . . . . . . . . . . . . . . . . . . . . . . . . . . . . . 14
6.2 Heating plate . . . . . . . . . . . . . . . . . . . . . . . . . . . . . . . . . . . . . . . . . . . . . 14
7 Trouble-shooting 15
7.1 What to do if … . . . . . . . . . . . . . . . . . . . . . . . . . . . . . . . . . . . . . . . . . . . . 15
8 Technical data 17
9Disposal 18
10 Notes 19
11 Index 22
12 Repair service 23
3
Page 4

1 Safety information
Never place hot saucepans or frying pans straight from the hob on
to the heating plate. This can damage the heating plate.
1.1 Before using for the first time
• The appliance must be installed and connected up to the power supply in
accordance with the separate Installation Instructions. The necessary work
should be done by a qualified fitter or electrician.
• Dispose of the packaging material in accordance with local regulations.
1.2 Correct use
• The appliance is designed for use in the home for preparing food. No
liability is assumed for any damage caused by improper or incorrect use.
• Never use the appliance to dry animals, textiles or paper!
• Not to be used as a room heater.
• Any repairs, modifications or manipulations to the appliance, especially
any electrically live parts, should only be carried out by the manufacturer,
its Customer Services or similarly qualified persons. Repairs if carried out
incorrectly may cause serious injury, damage to the appliance and fittings,
as well as affect the functioning of the appliance. If the appliance is not
working properly or in case of a repair order, follow the instructions given
in the
REPAIR SERVICE section. Please contact Customer Services if
necessary.
• Only original spare parts may be used.
• Retain these operating instructions for future reference. If you sell the
appliance or pass it on to a third party, please ensure these operating
instructions accompany the appliance, together with the instructions on
installation. In this way, the new owner can inform themselves about how
to use the appliance correctly and read the pertinent safety precautions.
4
Page 5

1 Safety information
1.3 Children in the home
• Packaging material e.g. plastic and polystyrene can be dangerous for
children. Danger of suffocation! Please keep packaging material away from
children.
• The appliance is designed for use by adults who are familiar with these
operating instructions. Children are often unable to recognise the danger
of electrical appliances. Ensure proper supervision and do not allow
children to play with the appliance – there is a danger that children could
hurt themselves.
1.4 Note on use
• If the appliance is visibly damaged, do not use it. Contact our Customer
Services.
• If the appliance is not operating property, disconnect it from the power
supply immediately.
• Ensure the mains cables of other electrical appliances do not get caught
as the electrical cable insulation could get damaged.
• If the mains cable of the appliance is damaged, it must be replaced by
Customer Services in order to avoid hazard.
• Ensure there are no foreign bodies or pets in the warming drawer before
closing it.
• Objects that could pose a danger if the appliance were accidentally
switched on should not be stored in the warming drawer. Do not store food
or any temperature-sensitive or inflammable materials, e.g. cleaning
agents, oven sprays, etc., in the warming drawer.
• Improper or incorrect repairs are dangerous. Risk of electric shock. Any
repairs must be carried out by Customer Services technicians.
5
Page 6

1 Safety information
Caution: Risk of burns!
• The heating plate in the appliance getss very hot. Risk of burns! Do not
touch it. Keep children away! Always use a heat-resistant cloth or gloves to
remove the tableware.
• The heating plate will remain hot for some time after it is switched off and
will cool down only slowly to room temperature. Please allow sufficient time
for the appliance to cool down before, for instance, cleaning it.
• Never store flammable plastic containers in the appliance. Risk of fire!
• If you notice smoke possibly coming from the appliance itself or from inside the warming drawer, keep the warming drawer closed. Disconnect the
appliance from the power supply.
Avoiding damage to the appliance
• Do not use high pressure or steam cleaners. Risk of short circuiting!
• If there are fractures, flaws or cracks in the heating plate, there is a risk of
electric shock! Pull the plug out of the mains socket or trip the circuit
breaker in the fuse box. Call Customer Services.
6
Page 7
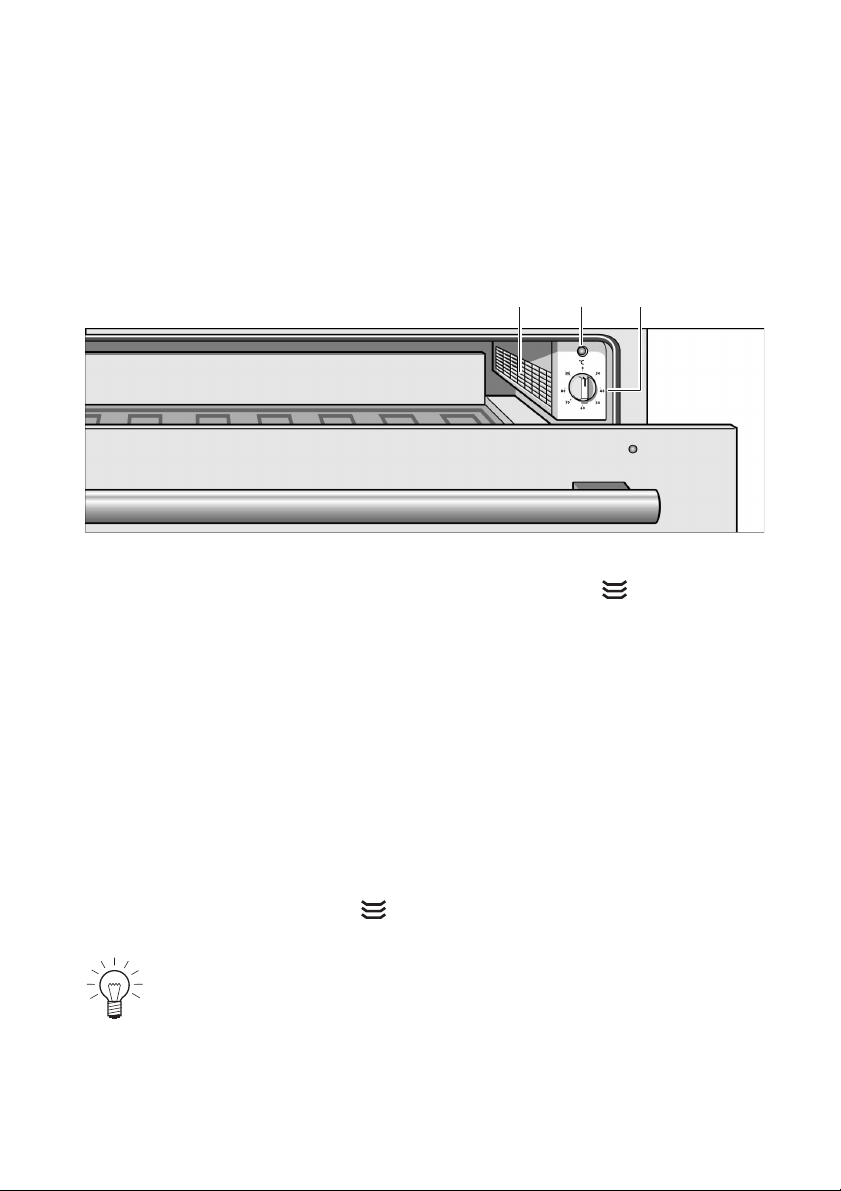
2 Your appliance
2.1 Description
The warming drawer can be used for low temperature cooking, keeping food
warm and preheating tableware.
1
1 Fan and heating
2 Pilot lamp – flashes when the appliance is switched on.
3 Dial 0 °C
➤ To switch on, turn dial to .
– illuminates when drawer is closed.
Off
40 °C
60 °C
80 °C
For defrosting, allowing dough to proof
For preheating drinking vessels,
defrosting, keeping bread warm
For keeping food hot
2
3
For preheating tableware
The temperatures refer to the surface of the hot plate when the
appliance is empty. Own measurements can be imprecise and are not
suitable for checking the temperature accuracy.
The appliance only heats up if the drawer is closed properly.
7
Page 8
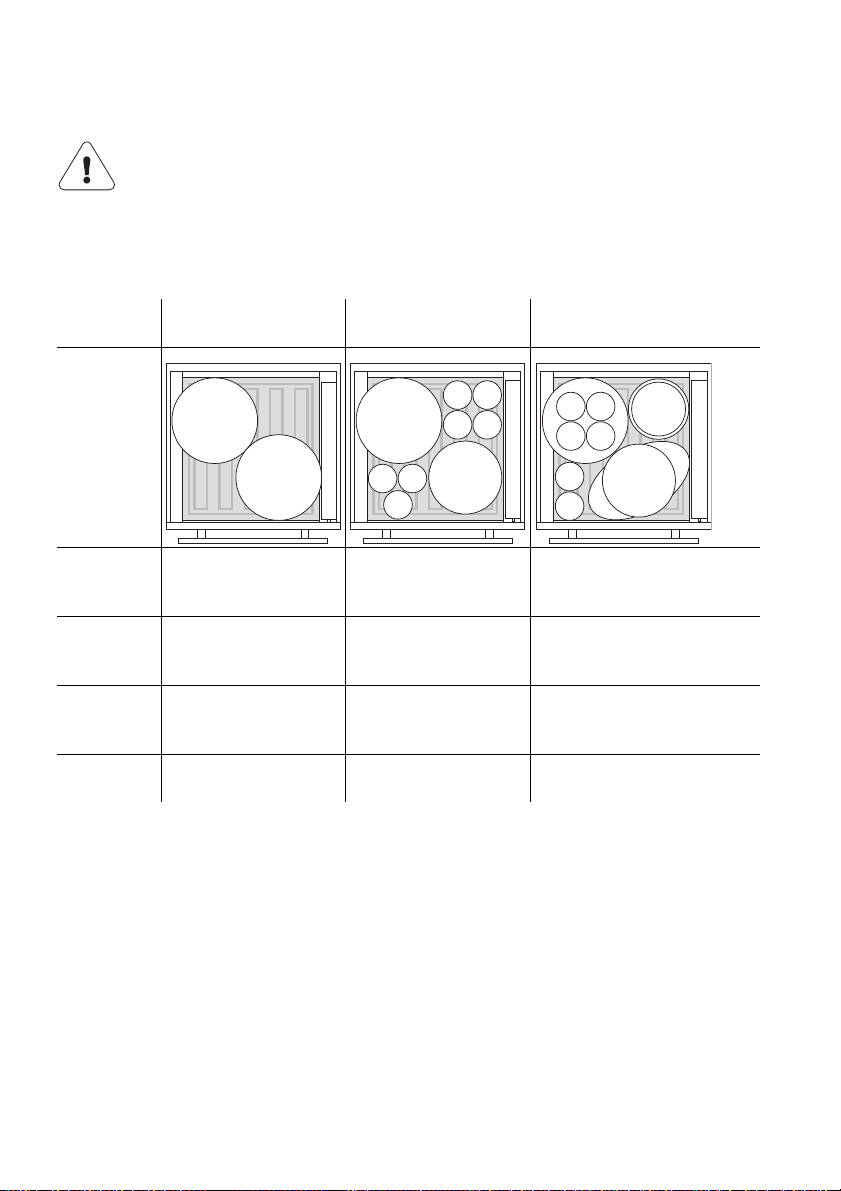
3 Preheating tableware
The maximum drawer load is 25 kg. Damage to the appliance from
overloading can occur if this load weight is exceeded.
3.1 Loading examples
Appliance
height
283/312 mm
220 mm
162 mm
144 mm
plate 27 cm
A
soup plate 23 cm
B
cup 9 cm
C
Plates
A
A
A 40 items
A 30 items
A 20 items
A 14 items
Basic place
settings
A
C
A, B, C
20 of each item
A, B, C
15 of each item
A, B, C
10 of each item
A, B, C
6 of each item
dish 17 cm
D
dish 19 cm
E
platter 34 cm
F
Full place settings and
serving dishes
A
D
E
C
B
B
F
, E
, E
, E
, E, F
12 of each item
1 of each item
2 items
10 of each item
1 of each item
2 items
8 of each item
of each item
1 item
4 of each item
1 of each item
A, B, C
D
F
A, B, C
D
F
A, B, C
D
F
A, B, C
D
8
Page 9

3 Preheating tableware
3.2 Loading tableware
Drinking vessels become very hot at setting level 80 °C or .
Danger of burns!
Do not exceed setting level 60 °C for warming drinking vessels
such as espresso cups.
➤ Place dishes in the drawer and distribute over the entire surface.
➤ Set the dial to setting level (for drinking vessels, set a maximum of
60 °C).
– The pilot lamp illuminates.
➤ Close the drawer.
– The pilot lamp illuminates.
– The appliance heats up.
Preheating duration
The preheating duration depends on the material and thickness of the dishes
and according to their quantity, height and arrangement. Stacked plates take
longer to warm up than individual items.
➤ Distribute the dishes over the entire surface.
It takes approximately 45–60 minutes to preheat place settings for 6 persons.
Unloading tableware
The surface of the heating plate is hot. Items at the bottom of the
drawer get hotter than those at the top. Always use a heat-resistant
cloth or glove to remove the tableware.
➤ Open the drawer.
➤ Switch the dial to Off (0°C).
➤ Remove the tableware with a heat-resistant cloth or glove.
9
Page 10

4 Keeping food hot
Never place hot saucepans or frying pans straight from the hob on
to the heating plate. This can damage the heating plate.
To avoid spillage, do not overfill plates, dishes, cups, etc.
Cover food with a heat-resistant lid or aluminium foil.
We recommend that food is not kept hot for longer than one hour.
➤ Place the dishes in the drawer.
➤ Set the dial to setting level 80 °C and preheat the appliance for 10
minutes.
➤ Place the food in the preheated dishes.
➤ Close the drawer.
– The pilot lamp illuminates.
– The appliance heats at 80°C.
Suitable foods
•Meat
•Poultry
•Fish
•Sauces
• Vegetables
• Side dishes
•Soups
Switching off
➤ Open the drawer.
➤ Switch the dial to Off (0°C).
➤ Remove the dishes with a heat-resistant cloth or glove.
10
Page 11

5Uses
The table lists various uses for the warming drawer.
➤ Set the dial to the required level.
➤ Preheat the tableware according to the table below.
Level Food/dishes Remarks
40 °C
60 °C
80 °C
Delicate deep-frozen food
e.g. cream cakes, butter, sausages, cheese
Leaving proof dough to Cover, possibly in a flat dish
Deep-frozen food
e.g. meat, cakes, bread
Keeping eggs warm
e.g. hard-boiled eggs, scrambled eggs
Keeping bread warm
e.g. toast, bread rolls
Preheating drinking vessels E.g. espresso cups
Keeping delicate foods warm
e.g. meat cooked at a low temperature
Keeping food warm Preheat tableware, cover food
Keeping drinks warm Preheat tableware, cover drinks
Heating flat, dough-based foods
e.g. pancakes, tacos and omelettes
Heating sponge cake
e.g. crumble cake, muffins
Melting cooking chocolate or chocolate
coating
Dissolving gelatine Do not cover, approximately 20 minutes
Preheating tableware Not suitable for drinking vessels
Defrost
Defrost
Preheat tableware, cover food
Preheat tableware, cover food
Cover dishes
Preheat tableware, cover food
Preheat tableware, cover food
Preheat tableware break food up into small
pieces
11
Page 12

5 Uses
5.1 Low temperature cooking
Low temperature cooking is a method for cooking high-quality cuts of meat
to the point of being pink or just done. The meat remains tender and
succulent. Cooking times for the low temperature method are longer than
those for conventional cooking.
➤ Preheat the warming drawer containing the tableware at setting level .
➤ Rapidly heat a little fat in a pan.
➤ Sear the meat at a high temperature and place it immediately in the
preheated tableware.
➤ Cover with the lid.
Place the dish with the meat back in the drawer and cook until tender.
➤ Set the dial to setting level 80 °C.
Suitable dishes
➤ Use suitable glass, porcelain or ceramic dishes with a lid (e.g. a gratin dish
with a lid).
Tips
• Use only fresh, high-quality cuts of meat. Carefully remove sinews and fat.
Fat develops a strong, distinct flavour of its own through low temperature
cooking.
• The meat does not have to be turned.
• The meat can be sliced immediately after low temperature cooking. It
requires no standing time.
• With this method of cooking, the meat can look pink on the inside. This
does not mean however, that it is raw or not properly cooked.
• Meat that has been low temperature cooked is not as hot as conventionally
roasted or braised meat. Sauces or gravy should be served very hot. Place
the plates in the drawer together with the meat for the last 45–60 minutes.
• To keep meat cooked at low temperature hot, switch back to setting level
60 °C after low temperature cooking. Small pieces of meat can be kept hot
for up to 45 minutes, larger pieces for up to 2 hours.
12
Page 13

5 Uses
Searing and completion times
All tender pieces of beef, pork, veal and lamb are suitable for low temperature
cooking. Searing and cooking times depend on the thickness and weight of
the meat.
The searing times refer to the sealing of the meat in hot fat in a pan on the
hob.
Dish Searing on the hob
Completion in the
appliance
Small pieces of meat
Small escalopes 1–3 minutes on all sides 30–50 minutes
Steaks or medallions 1–2 minutes per side 40–60 minutes
Medium sized pieces
Pork fillet (400–600 g) 4–5 minutes on all sides 75–120 minutes
Lamb loin (ca. 150–300 g) 2–3 minutes per side 50–60 minutes
Topside of beef, topside of veal
thick end, chuck of beef, tenderloin
of beef, middle loin of pork,
tenderloin of pork (to 900 g)
10–15 minutes on all sides 120–240 minutes
Large pieces of meat
Fillet of beef, topside of beef,
topside of veal thick end,chuck of
beef, tenderloin of beef
(from 900 g)
Roast beef (1.1–2 kg) 8–10 minutes on all sides 210–300 minutes
10–15 minutes on all sides 180–270 minutes
13
Page 14

6 Care and maintenance
The drawer must be kept closed when carrying out cleaning. The
dial must be set to Off (0°C).
Do not use high pressure water or steam cleaning equipment.
Do not use abrasive, caustic cleaning agents or stainless steel
cleaner. Do not use scouring pads, wire wool, etc. as such
products can damage the surface.
6.1 Cleaning the exterior
➤ Remove any soiling or excess cleaning solution immediately.
➤ Clean the surfaces with a soft cloth dampened with water and a little
washing-up liquid – for metallic surfaces rub in the direction of the original
polish lines. Dry with a soft cloth.
6.2 Heating plate
The drawer can be removed for cleaning.
➤ Clean the heating plate with warm water and a little detergent.
14
Page 15

7 Trouble-shooting
This section lists faults that can be solved simply by following the instructions
given. If another fault is displayed or the fault cannot be remedied, please call
Customer Services.
7.1 What to do if …
… dishes or food remain cold
Possible cause Solution
• Appliance is not switched
on.
• Power supply interruption.
• The drawer is not closed
properly.
… dishes or food are insufficiently heated
➤ Switch on the appliance.
➤ Check the power supply.
➤ Close the drawer.
Possible cause Solution
• Warming duration too
➤ Lengthen the warming duration.
short.
• The drawer is not closed
➤ Close the drawer.
properly.
15
Page 16

7 Trouble-shooting
… the pilot lamp flashes with the drawer closed
Possible cause Solution
• The drawer is not closed
➤ Close the drawer.
properly.
…the pilot lamp flashes rapidly with the drawer closed
Possible cause Solution
• Appliance malfunction. ➤ Call out the Customer Services technician.
… the pilot lamp does not light continuously or flash
Possible cause Solution
• Defective lamp. ➤ Call out the Customer Services technician.
16
Page 17

8 Technical data
External dimensions
➤ See Installation Instructions
Electrical connection
➤ See identification plate 1
1
17
Page 18

9Disposal
Packaging
• All packaging materials (cardboard, plastic film (PE) and polystyrene
(EPS)) are marked and should, if possible, be collected for recycling and
disposed of in an environmentally friendly way.
Disconnection
• Disconnect the appliance from the mains power supply. With a fixed
appliance, this is to be carried out by a qualified electrician!
Safety
• Disable the appliance to prevent accidents caused by improper use,
especially through children playing.
• Pull the plug out of the mains socket or have the appliance disconnected
from the mains by an electrician. Then cut the mains cable off flush with
the appliance.
Disposal
• The old appliance should not be discarded as worthless rubbish. If
disposed of correctly, the raw materials can be recovered for recycling.
• The symbol on the identification plate warns that the appliance may
not be disposed of in normal household waste.
• The appliance must be disposed of in accordance with local regulations
on waste disposal. For more information on the handling, disposal and
recycling of the product, please contact the local authorities, the local
recycling facilities for household waste or the retailer from whom you
purchased the appliance.
18
Page 19

10 Notes
19
Page 20

10 Notes
20
Page 21

10 Notes
21
Page 22

11 Index
A
Accessories
Ordering . . . . . . . . . . . . . . . . . . . 23
B
Before using for the first time . . . . . . 4
C
Care . . . . . . . . . . . . . . . . . . . . . . . 14
Children in the home. . . . . . . . . . . . . 5
Cleaning . . . . . . . . . . . . . . . . . . . . 14
D
Damage from overloading . . . . . . . . 8
Disconnection . . . . . . . . . . . . . . . . 18
Disposal . . . . . . . . . . . . . . . . . . . . 18
E
Electrical connection . . . . . . . . . . . 17
Exterior
Cleaning . . . . . . . . . . . . . . . . . . . 14
External dimensions . . . . . . . . . . . 17
F
Foods . . . . . . . . . . . . . . . . . . . . . . 10
Keeping hot . . . . . . . . . . . . . . . . 10
Suitable foods . . . . . . . . . . . . . . . 10
G
Geschirr vorwärmen . . . . . . . . . . . . . 8
H
Heating plate. . . . . . . . . . . . . . . . . 14
I
Identification plate . . . . . . . . . . . . . 17
L
Loading examples. . . . . . . . . . . . . . . 8
Low temperature cooking . . . . . . . 12
M
Maintenance . . . . . . . . . . . . . . . . . 14
Malfunction . . . . . . . . . . . . . . . . . . 23
Model no. . . . . . . . . . . . . . . . . . . . . . 2
O
Orders. . . . . . . . . . . . . . . . . . . . . . . 23
P
Packaging. . . . . . . . . . . . . . . . . . . . 18
Preheating dishes
Preheating duration . . . . . . . . . . . . 9
Q
Queries . . . . . . . . . . . . . . . . . . . . . . 23
R
Repair service. . . . . . . . . . . . . . . . . 23
S
Safety . . . . . . . . . . . . . . . . . . . . . . . 18
Safety precautions
Before using for the first time . . . . . 4
Children in the home . . . . . . . . . . . 5
Correct use. . . . . . . . . . . . . . . . . . . 4
Note on use . . . . . . . . . . . . . . . . . . 5
Searing and completion times . . . . 13
Service agreement . . . . . . . . . . . . . 23
Service Centre . . . . . . . . . . . . . . . . 23
Spare parts
Ordering . . . . . . . . . . . . . . . . . . . . 23
Symbols . . . . . . . . . . . . . . . . . . . . . . 2
T
Tableware
Loading. . . . . . . . . . . . . . . . . . . . . . 9
Unloading . . . . . . . . . . . . . . . . . . . . 9
Technical data . . . . . . . . . . . . . . . . 17
Trouble-shooting . . . . . . . . . . . . . . . 15
Type . . . . . . . . . . . . . . . . . . . . . . . . . 2
U
Uses . . . . . . . . . . . . . . . . . . . . . . . . 11
V
Validity . . . . . . . . . . . . . . . . . . . . . . . 2
Y
Your appliance . . . . . . . . . . . . . . . . . 7
22
Page 23

12 Repair service
The
TROUBLE-SHOOTING section will help you to correct minor
malfunctions yourself, saving you the time and trouble of calling out a
service technician and the cost that goes along with it.
Whether you contact us about a malfunction or an order, please always state
the serial number (FN) and the model type of your appliance. Enter these
details below and also on the service sticker which comes with the appliance.
Stick it in a conspicuous place or in your telephone or address book.
FN
You will also find the same details on the certificate of guarantee, the original
sales invoice and the identification plate of the appliance.
➤ Pull out the drawer.
– The identification plate is on the left next to the dial.
If the appliance is not working properly, contact your nearest V-ZUG Ltd
Service Centre using freephone 0800 850 850 and stand in close proximity
to the appliance.
Queries, orders, service agreement
For administrative and technical queries or problems, as well as for ordering
spare parts and accessories, please contact our head office in Zug on
telephone number +41 (0)41 767 67 67.
As regards the maintenance of all our products, when the warranty expires
you have the option of taking out a service agreement. We will be happy to
send you the necessary forms.
Appliance
23
Page 24

V-ZUG Ltd
Industriestrasse 66, 6301 Zug
Tel. +41 (0)41 767 67 67, Fax +41 (0)41 767 61 61
vzug@vzug.ch, www.vzug.ch
Service Centre: Tel. 0800 850 850
J34001.013-0
 Loading...