

Page 1

Installation instructions
55162 - 60312
Warming drawer / system drawer / vacuum drawer
The appliance should be installed by qualified personnel only.
Each step must be carried out and checked in full in the order specified.
J34008113-R03
22/04/2016
Validity
These installation instructions apply to the models: 34008, 34009, 34010, 34011, 34012, 34013, 34014, 35001,
35002 and 36001.
General notes
If installing into a combustible material, the guidelines and standards for low voltage installations and fire
protection must be strictly observed.
Identification plate
▸ Remove the drawer. The identification plate is located on the left-hand side next to the dial.
Electrical connections
Electrical connections must be carried out by qualified personnel in accordance with the guidelines and
standards for low-voltage installations and the specifications of the local electricity supply companies.
A plug-in appliance may only be connected to a socket outlet with earthing contact, installed according to specifications. An all-pole mains isolating device with 3 mm contact opening should be provided in the house wiring system. Switches, plug and socket devices, circuit breakers and fusible cut-outs which are accessible after
installation and which have all-poles switching are permissible as isolating devices. Effective earthing and separately installed neutral and earth conductors ensure safe and fault-free operation. After installation, live parts
and cables with basic insulation must not be accessible. Check old installations.
▸ The appliance is designed for use up to a max. altitude of 2000 m above sea level.
▸ Refer to the identification plate for information on the required mains voltage, current type and fuse protection.
The mains plug must not be cut off.
1
Page 2
Installation instructions
A
W
A
W
55162 - 60312
Warming drawer / system drawer / vacuum drawer
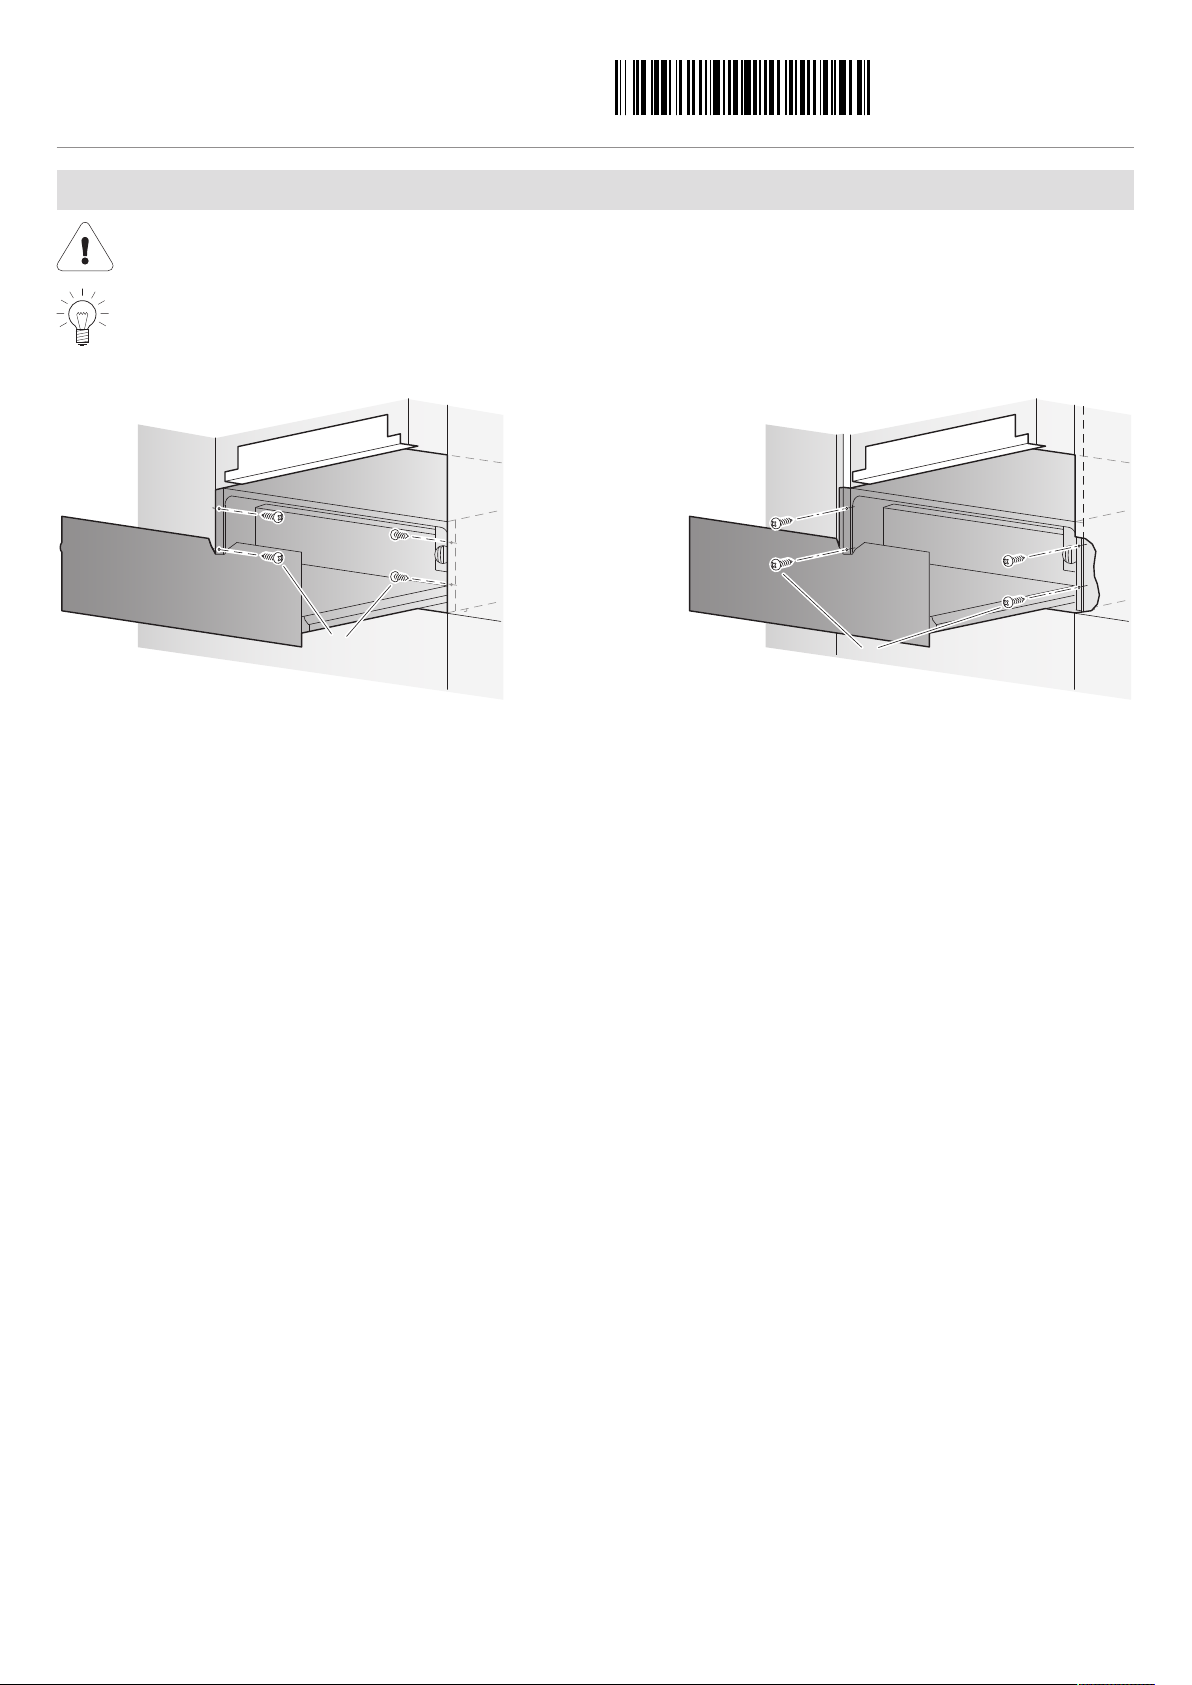
Installation
The drawer must be secured in place by the 4 screws supplied to prevent tipping.
Make sure that the mains cable is not pinched or kinked. After installation, the mains cable must not touch
the back or the bottom of the appliance.
Bracket set 55 Bracket set 60
J34008113-R03
22/04/2016
1. Fix bracket set 55 or 60 (not included in the scope of delivery) for an appliance located above or below.
2. Place appliance in front of the niche and connect the mains plug to the mains socket.
3. Carefully slide appliance into the niche until it is flush with the front of the cabinets, ensuring that the mains cable is
not pinched.
4. Open the drawer and secure in place using the 4 screws A supplied, see table below.
Model Width in cm Height in mm Screw A Designation
34008 55 162 Secure at the sides Warming drawer
34009 55 220 Secure at the sides Warming drawer
34010 60 144 Secure at the front Warming drawer
34011 60 162 Secure at the front Warming drawer
34012 60 220 Secure at the front Warming drawer
34013 60 283 Secure at the front Warming drawer
34014 60 312 Secure at the front Warming drawer
35001 60 144 Secure at the front System drawer
35002 60 76 Secure at the front System drawer
36001 60 144 Secure at the front Vacuum drawer
2
Page 3
Installation instructions
A
B
C
E
F
D
E
D
F
B
C
A
G
560–568
50
594144
738
W
X
W
450144
594
50
560–568
X
≥ 550
≥ 550
Detail X
594
Niche
598
Appliance
55162 - 60312
J34008113-R03
22/04/2016
Warming drawer / system drawer / vacuum drawer
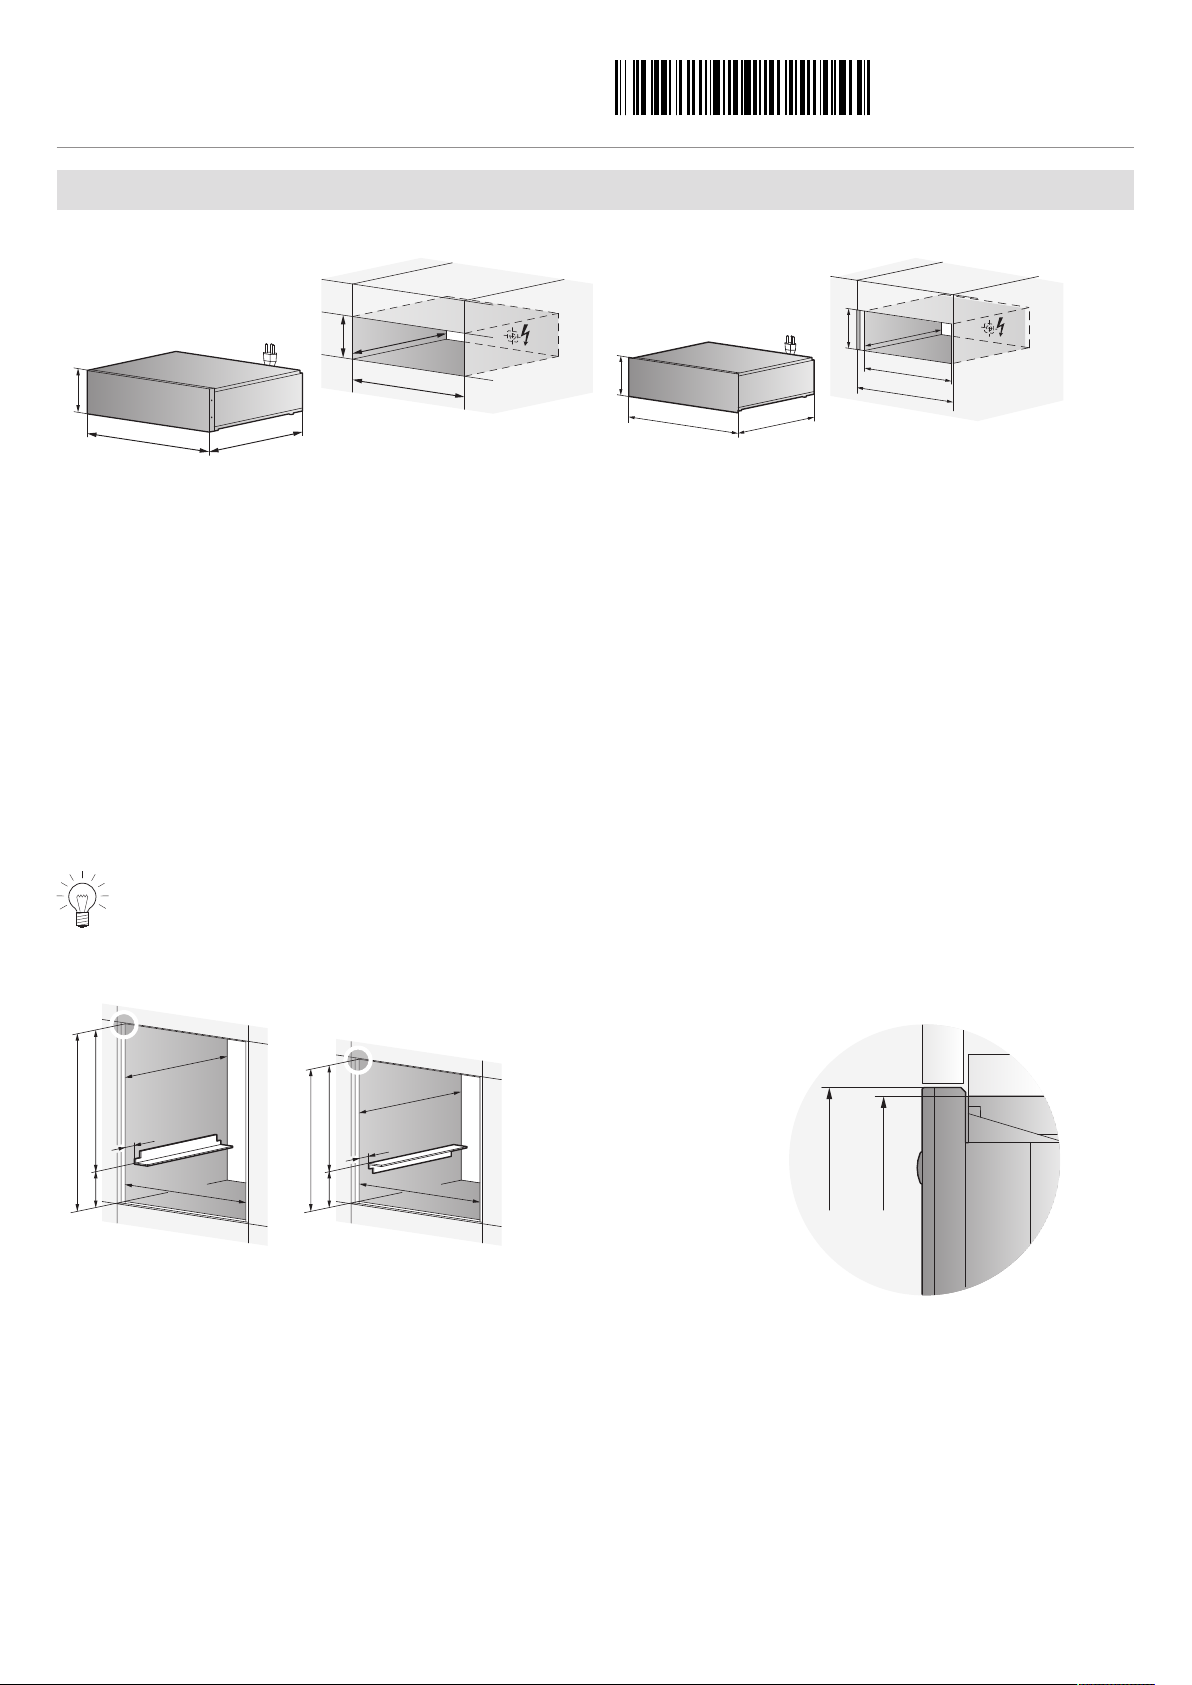
Built-in solo
Size system 55 Size system 60
Model Width in cm Height in mm A B C D E F G
34008 55 162 160 548 547 162 605 550 –
34009 55 220 218 548 547 220 605 550 –
34010 60 144 142 596 547 144 min. 550 560-568 600
34011 60 162 160 596 547 162 min. 550 560-568 600
34012 60 220 218 596 547 220 min. 550 560-568 600
34013 60 283 281 596 547 283 min. 550 560-568 600
34014 60 312 310 596 547 312 min. 550 560-568 600
35001 60 144 142 596 547 144 min. 550 560-568 600
35002 60 76 74 596 547 76 min. 550 560-568 600
36001 60 144 142 596 547 144 min. 550 560-568 600
Installation combinations
If a second appliance is installed in the same niche (above or below), use bracket set W to support the upper appliance.
Below oven, Coffee-Center
3
Page 4

Installation instructions
C
D
AB
E
H
G
F
I
560–568
50
594144
738
W
X
W
450144
594
50
560–568
X
≥ 550
≥ 550
Detail X
594
Niche
598
Appliance
55162 - 60312
Warming drawer / system drawer / vacuum drawer
Installation combinations
Installing with an oven
J34008113-R03
22/04/2016
Model Width in cm Height in mm A B C D E F G H I
34008 55 162 598 160 548 547 567 762 600 550 605
34009 55 220 378 218 548 547 567 600 380 550 605
Installation combinations
If a second appliance is installed in the same niche (above or below), use bracket set W to support the upper appliance.
Below oven, Coffee-Center
4
Page 5

Installation instructions
AB
C
D
K
I
H
F
G
X
E
910 / 881 / 760
Detail X
594 / 450
Niche
598 / 454
Appliances
Detail X
906 / 877 / 756
600
≥ 550
560–568
450
374
X
74
596
560
412
378
Y
Detail X
594
Niche
598
Appliance
55162 - 60312
Warming drawer / system drawer / vacuum drawer
Installation combinations
Installing with oven
J34008113-R03
22/04/2016
Model Width in cm Height in mm A B C D E F G H I K
34010 60 144 454 142 596 547 567 594 450 560-568 min. 550 600
34011 60 162 598 160 596 547 567 756 594 560-568 min. 550 600
34012 60 220 378 218 596 547 567 594 374 560-568 min. 550 600
34013 60 283 598 281 596 547 567 877 594 560-568 min. 550 600
34014 60 312 598 310 596 547 567 906 594 560-568 min. 550 600
35001 60 144 454 142 596 547 567 594 450 560-568 min. 550 600
35002 60 76 378 74 596 547 567 450 374 560-568 min. 550 600
36001 60 144 454 142 596 547 567 594 450 560-568 min. 550 600
Installing system drawer with Coffee-Center
5
Page 6

Installation instructions
± 1 mm
E
± 2 mm
± 2 mm
55162 - 60312
Warming drawer / system drawer / vacuum drawer
Depth and height adjustment
Depth adjustment
Only applicable for warming drawers.
1. 2.
J34008113-R03
22/04/2016
▸ Pull the drawer out as far as it will go.
▸ Slide hand and hexagon wrench between stop
and drawer housing.
Only applicable for model 34010:
▸ Turn eccentric E with hexagon wrench until
drawer is flush with the front.
▸ Remove drawer from drawer housing.
▸ Disassemble drawer.
▸ Turn eccentric E with hexagon wrench.
▸ Fit drawer and check whether it is flush with the front.
▸ Repeat steps if necessary.
Height adjustment
For warming drawers: For vacuum drawers:
▸ Pull the drawer out as far as it will go.
▸ Loosen screws slightly.
▸ Set the required height.
▸ Tighten screws.
▸ Pull the drawer out as far as it will go.
▸ Loosen screws slightly.
▸ Set the required height.
▸ Tighten screws.
6
Page 7

Installation instructions
A
B
C
D
E
F
C
D
A
B
D
F
E
55162 - 60312
Warming drawer / system drawer / vacuum drawer
Air filter assembly
Only applicable for vacuum drawers.
Do not tip vacuum drawer! Vacuum drawer may only be transported and fitted horizontally!
Risk of oil escaping.
J34008113-R03
22/04/2016
1.
▸ Pull out locking cap C with
pliers.
4.
▸ Slide air filter cover B over
air filter opening.
2.
▸ Insert locking cap C in the
holder D provided for it.
5.
3.
▸ Use a slotted screwdriver
to screw air filter A into the
air filter
opening.
▸ Unscrew transport locks E under connection cable F
and holder D.
The transport locks must be removed before starting up for the first time to avoid damage to the appliance.
Disassemble appliance in reverse order. Correctly fit locking cap C in the process.
Risk of oil escaping during transport.
7
 Loading...