

Page 1
Installation instructions
Front
Front
Side
Front,
upside down
Back
Front
Use a stair
climber trolley to
avoid bumps to the
appliance!!
Textile care system
The appliance should be installed by qualified personnel only.
Each step must be carried out and checked in full in the order specified.
Validity
These installation instructions apply to the model: 14001
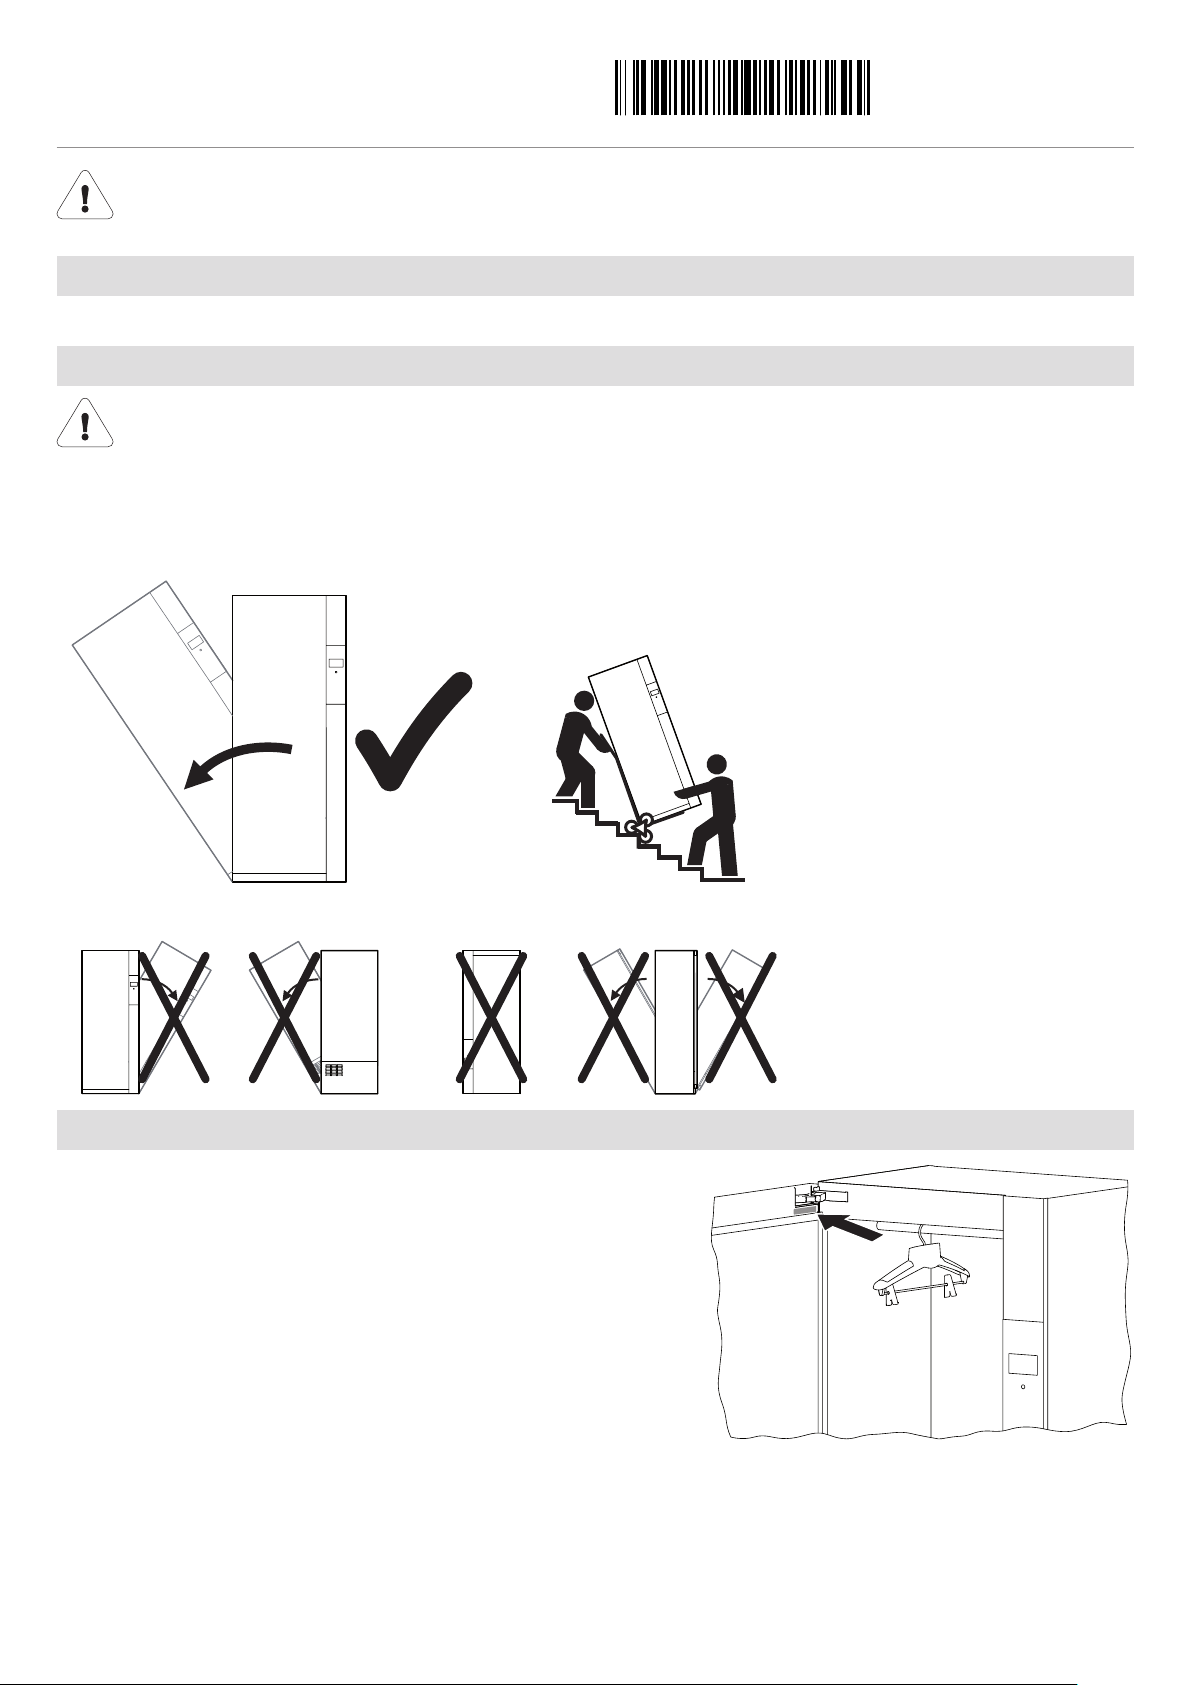
Transport
Transport the appliance in an upright position only! Transporting it in any other position will result in damage to the appliance! When carried carefully without being shaken, the appliance may be tilted a maximum
of 90° to the left (viewed from the front).
The appliance must be allowed to stand in the standard operating position for about 2 hours before using
the heat pump. Failure to observe this can result in damage to the appliance.
J14001113-R04
27/03/2015
Identification plate
► Open the appliance door.
– The identification plate is located on the
inside of the appliance door at the top
(see arrow).
1
Page 2
Installation instructions
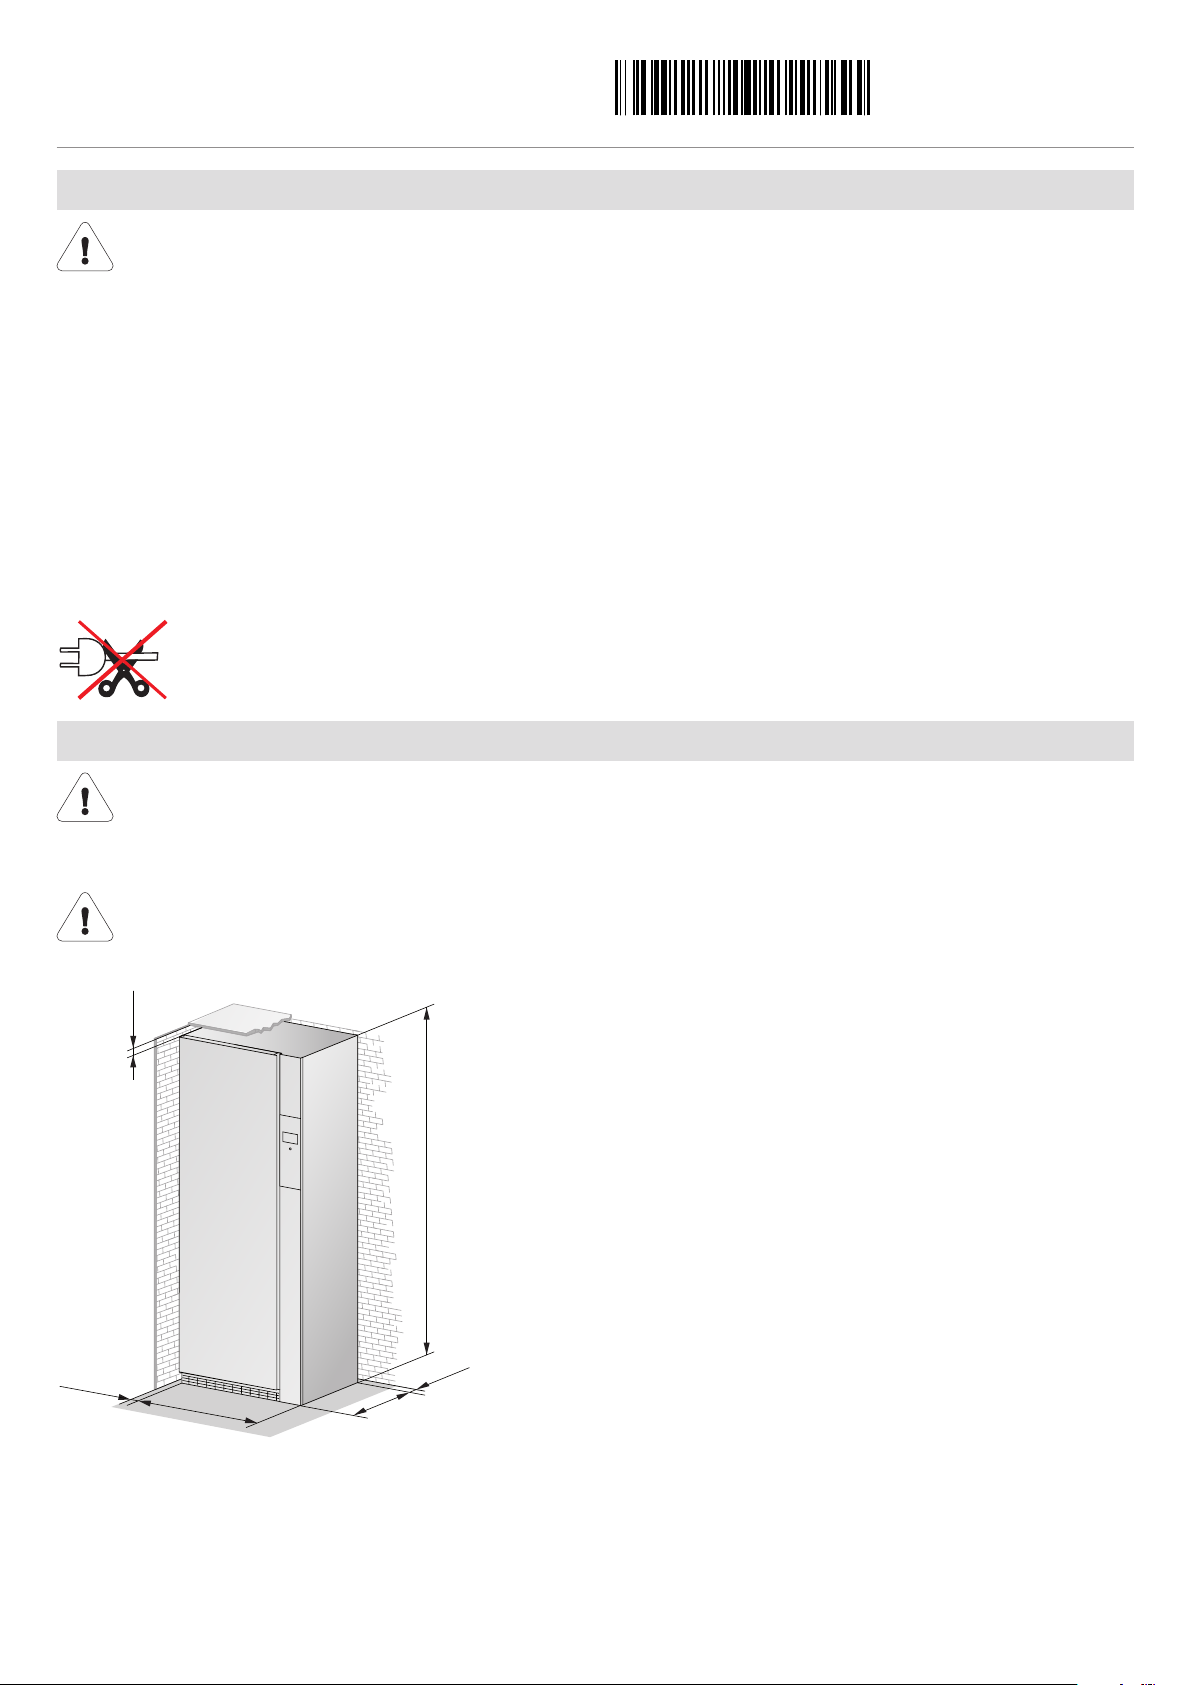
1960
≥ 3
775
570
≥11
≥ 50
Textile care system
J14001113-R04
27/03/2015
Electrical connections
Electrical connections must be carried out by qualified personnel in accordance with the guidelines and
standards for low-voltage installations and the specifications of the local electricity supply companies.
A plug-in appliance may only be connected to a socket outlet with earthing contact, installed according to
specifications. An all-pole mains isolating device with 3 mm contact opening should be provided in the
house wiring system. Switches, plug and socket devices, circuit breakers and fusible cut-outs which are
accessible after installation and which have all-poles switching are permissible as isolating devices. Effective earthing and separately installed neutral and earth conductors ensure safe and fault-free operation.
After installation, live parts and cables with basic insulation must not be accessible. Check old installations.
► The appliance is designed for use up to a max. altitude of 2000 m above sea level.
► Refer to the identification plate for information on the required mains voltage, current type and fuse protection.
Do not cut off the plug.
Installation
Do not install the appliance behind a door that locks, a sliding door or a door with a hinge that lies opposite
the hinge of the appliance.
Free-standing position
When positioning a REFRESH-BUTLER so that it is free-standing, a distance of min. 3mm must be kept to
the walls to the left and right.
2
Page 3
Installation instructions
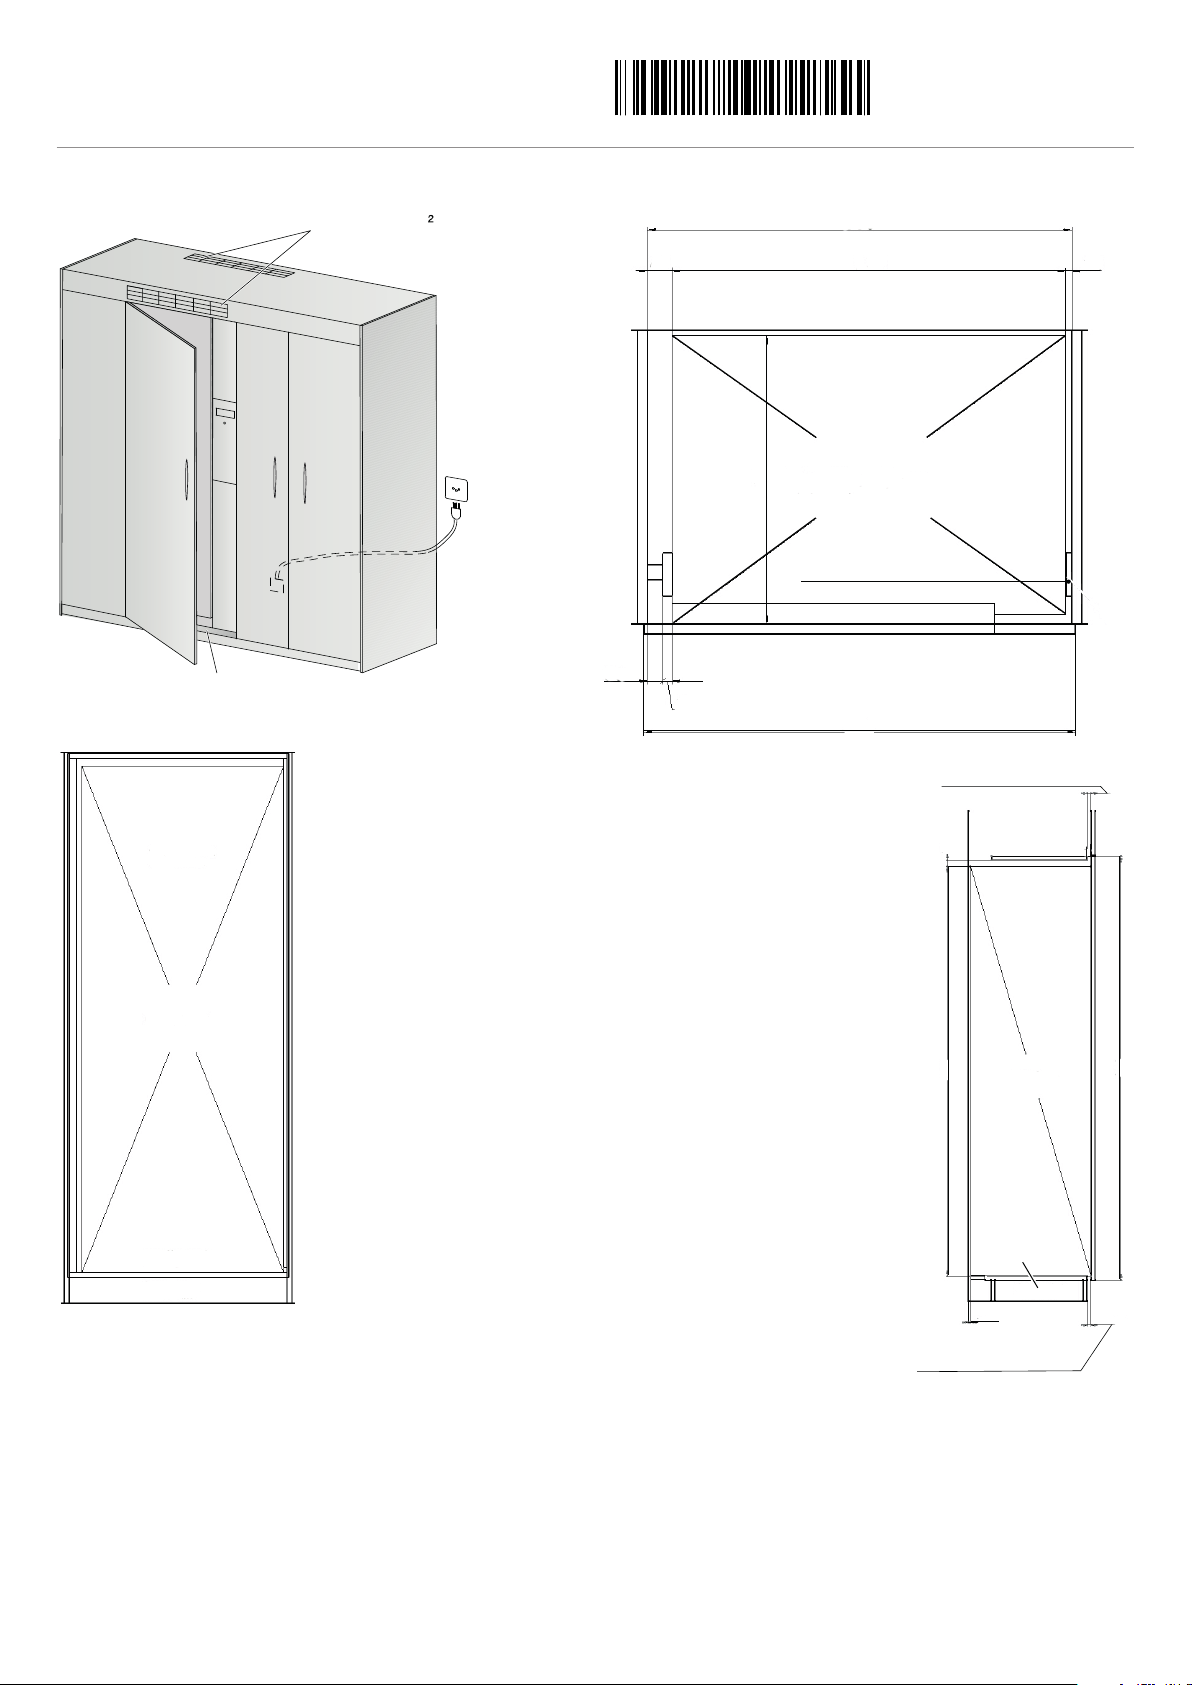
A = ≥ 200 cm
B
REFRESH-BUTLER
570
852
19
30
49 775 12 + 1
837
Mount filler strip
after installing appliance
REFRESH-BUTLER
Cabinet doors with
belt attached at sides
25 mm gap to floor
for air circulation
Base reinforcement for appliance
REFRESH-
BUTLER
1960
≥ 11
25 mm gap to floor
for air circulation
2028
25 mm gap to ceiling
for air circulation
30
Base reinforcement
for appliance
J14001113-R04
27/03/2015
Textile care system
Positioning in a niche (cpl. door across entire width of opening, not connected to door of REFRESH-BUTLER)
A Ventilation slit on the top at the back or above the
cabinet door
B Load-bearing capacity of cabinet floor: min.170kg
3
Page 4

Installation instructions
7
7
5
2028
5
7
0
+
C
A = ≥ 200 cm
B
≥ 11
570
643
9
0°
90°
C
D
49
min. 40
(775)
19
15 + 1
810
Detail W
Detail X
Mount right filler strip
after installing appliance
69
(32)
1922
2028 (Decor panel height)
360
643 (Decor panel width)
866
102
37
22.5
R10
80
10-19 (Decor panel thickness)
4
E
Textile care system
Positioning in a niche (decor panel fixed to door of REFRESH-BUTLER)
J14001113-R04
27/03/2015
Upper angle bracket Medium angle bracket
Lower angle bracket
A Ventilation slit on the top at the back or above the
cabinet door
B Load-bearing capacity of cabinet floor:
min.170kg+weight of decor panel
* Angle brackets are contained in the scope of delivery E Installation drawing for decor panel
C Thickness of decor panel
D REFRESH-BUTLER door with decor panel and five angle
brackets*
Maximum permissible weight of decor panel: 35kg
4
Page 5

Installation instructions
REFRESH-BUTLER door
REFRESH-BUTLER
7
1.2
19
50
Filler strip
Detail W
Decor panel
Inside wall of cabinet
60°
7
643
156
Hinge
Filler strip
4
15
1
REFRESH-BUTLER
Medium angle bracket
Display
50
Detail X
Inside wall of cabinet
Decor panel
Decor panel - display
Textile care system
J14001113-R04
27/03/2015
5
Page 6

Installation instructions
REFRESH-
BUTLER
1960
≥ 11
25 mm gap to floor
for air circulation
2028
30
Base reinforcement
for appliance
Detail Y
Detail Z
25 mm gap to ceiling
for air circulation
4
Detail Y
30
25
REFRESH-BUTLER door
REFRESH-BUTLER
Cabinet top
Decor panel
Detail Z
REFRESH-BUTLER
25
min. 25
Minimum distance to floor
Cabinet base
Decor panel
Textile care system
J14001113-R04
27/03/2015
6
Page 7

Installation instructions
L
K
Textile care system
Levelling
To ensure fault-free operation, the appliance must stand level with all 4 feet firmly on the ground and not
wobble.
Setting the height
Tools: Open-end wrench (SW 10) K and spirit level L
Rear adjuster feet:
Maximum height adjustment of 14 mm / 1.5 mm per turn.
► Align the appliance vertically by turning the feet with the wrench
K.
J14001113-R04
27/03/2015
Front adjuster feet:
► Align the appliance vertically by turning the feet with the wrenchK.
– The appliance must not wobble!
7
 Loading...