

Page 1

Operating instructions
GK46TIMAS | GK46TIMPS | GK57TIMS
Induction hob
Page 2
Thank you for choosing to buy one of our products. Your appliance is made to
high standards and is easy to use. Nevertheless, please take the time to read
these operating instructions in order to familiarise yourself with the appliance
and get the best use out of it.
Please follow the safety precautions.
Modifications
Text, diagrams and data correspond to the technical standard of the appliance
at the time these operating instructions went to press. The right to make technical modifications for the purpose of the further development of the appliance
is reserved.
Validity
The product family (model number) corresponds to the first alphanumerics on
the identification plate. These operating instructions apply to:
Type Product family
GK46TIMPSZ 31080
GK57TIMSZ, GK57TIMSZO 31082
GK46TIMASC, GK46TIMASZ 31091
Variations depending on the model are noted in the text.
© V-ZUG Ltd, CH-6301 Zug, 2017
2
Page 3

Contents
1 Safety precautions 5
1.1 Symbols used ........................................................................................................ 5
1.2 General safety precautions ................................................................................. 6
1.3 Appliance-specific safety precautions............................................................... 6
1.4 Instructions for use ............................................................................................... 7
2 Disposal 10
3 Using for the first time 11
4 Your appliance 12
4.1 Appliance overview.............................................................................................12
4.2 Operating and display elements ......................................................................13
4.3 How induction hobs function ............................................................................14
4.4 Flexible cooking ..................................................................................................14
4.5 Pan detection.......................................................................................................14
4.6 Cookware .............................................................................................................15
4.7 OptiGlass..............................................................................................................16
5 Operating the appliance 17
5.1 Switching the appliance on and off.................................................................17
5.2 Setting a cooking zone ......................................................................................17
5.3 Overview of power levels...................................................................................18
5.4 Switching a cooking zone off ...........................................................................18
5.5 Residual heat indicator ......................................................................................18
5.6 Bridging function.................................................................................................19
5.7 Melting, keeping warm and simmering ..........................................................19
5.8 PowerPlus.............................................................................................................20
5.9 AutoCook..............................................................................................................22
5.10 Operating time.....................................................................................................23
5.11 Timer......................................................................................................................25
5.12 Pause cooking.....................................................................................................27
5.13 Wipe protection ...................................................................................................28
6 User settings 29
6.1 Accessing the user settings..............................................................................29
6.2 Childproof lock ....................................................................................................30
6.3 Language..............................................................................................................30
6.4 Brightness ............................................................................................................31
6.5 Loudness ..............................................................................................................32
3
Page 4

6.6 Button signal ........................................................................................................32
6.7 Recommended value for the timer..................................................................33
6.8 Factory settings ...................................................................................................33
7 Care and maintenance 34
7.1 OptiGlass..............................................................................................................35
8 Trouble-shooting 36
9 Technical data 39
9.1 Product fiche........................................................................................................39
Index 41
10 Service & Support 43
4
Page 5
1 Safety precautions
1.1 Symbols used
Denotes important safety precautions.
Failure to observe said precautions can result in injury or in damage
to the appliance or fittings!
Information and precautions that should be observed.
Information on disposal
Information about the operating instructions
▸ Indicates step-by-step instructions.
– Describes how the appliance reacts to the steps taken.
▪ Indicates a list.
5
Page 6

1 Safety precautions
1.2 General safety precautions
▪ Read the operating instructions before using the appliance for
the first time!
▪ This appliance can be used by children aged 8 and above
and by persons with reduced physical, sensory or mental capabilities, or lack of experience and/or knowledge, provided
they are supervised or have been instructed on the safe use
of the appliance and have understood the hazards involved.
Children shall not play with the appliance. Cleaning and user
maintenance shall not be undertaken by children without supervision.
▪ If an appliance is not equipped with a mains cable and a plug
or other means for disconnecting from the mains with a contact opening on each pole complying with the conditions of
overvoltage category III for full isolation, an isolating device
must be incorporated into the permanently installed electrical
installation in accordance with the installation regulations.
▪ If the mains cable of this appliance is damaged, it must be re-
placed by the manufacturer or its Customer Services or a similarly qualified person in order to avoid hazard.
1.3 Appliance-specific safety precautions
▪ WARNING: Under no circumstances may hot pots or pans be
placed on the display.
▪ WARNING: If the surface has a crack running through the
thickness of the material, switch the appliance off and disconnect it from the mains to avoid possible electric shock.
6
Page 7

1 Safety precautions
▪ WARNING: The appliance and its accessible parts get hot
during use. Be careful not to touch the heating elements.
▪ Under no circumstances use a steam cleaner to clean the ap-
pliance.
▪ Do not place metal objects such as knives, forks, spoons, lids
or aluminium foil on the hob as they can get hot.
▪ After use, switch the hob off using the controls and do not
rely on the pan detector.
▪ WARNING: It can be dangerous to leave the hob unattended
when cooking with fat or oil, as this can lead to fires. NEVER
attempt to extinguish a fire with water. Instead, switch the appliance off and then carefully smother the flames with, for example, a lid or a fire blanket.
▪ WARNING: Never store objects on the hob due to the risk of
fire.
▪ WARNING: The cooking process should always be super-
vised. Shorter cooking processes, in particular, must be supervised the entire time.
▪ Do not operate the appliance using an external time switch or
a separate remote control system.
1.4 Instructions for use
Before using for the first time
▪ The appliance must be installed and connected to the electricity supply in
accordance with the separate installation instructions. Have a qualified fitter/
electrician carry out the necessary work.
Correct use
▪ The appliance is designed for use in the home for preparing food. No liabil-
ity is assumed for any damage caused by improper use or incorrect handling.
7
Page 8

1 Safety precautions
▪ Any repairs, modifications or manipulations to the appliance, especially any
electrically live parts, may only be carried out by the manufacturer, its Customer Services or a similarly qualified person. Repairs if carried out incorrectly may cause serious injury, damage to the appliance and fittings, as
well as affect the functioning of the appliance. If the appliance is not working properly or in case of a repair order, follow the instructions given in the
'Repair service' section. Contact our Customer Services if necessary.
▪ Use original spare parts only.
▪ Retain these operating instructions for future reference. If you sell the appli-
ance or pass it on to a third party, please ensure these operating instructions accompany the appliance, together with the installation instructions.
▪ The appliance corresponds to recognized technology standards and the rel-
evant safety regulations. However, proper use of the appliance is essential
to avoid damage and accidents. Please therefore follow the precautions
given in these operating instructions.
▪ The heated surface will remain hot for some time after it is switched off and
will cool down only slowly to room temperature. Please allow sufficient time
for the appliance to cool down before, for instance, cleaning it.
Note on use
▪ Tests have shown that under normal circumstances there is no risk to car-
diac pacemaker users. If, as the user of a cardiac pacemaker (or a hearing
aid or another type of implant), you would like to be reassured that using
the appliance does not pose a risk, you are advised to consult a competent
medical authority.
Caution: Burns hazard
▪ Overheated fat and oil can easily catch fire. Never attempt to extinguish
burning oil or fat with water. Danger of explosion! Smother the flames with a
fire blanket. Keep doors and windows closed.
Caution: Risk of injury
▪ Keep pets away from the appliance.
Caution: Risk to life
▪ Packaging materials, e.g. plastic film and polystyrene, can be dangerous for
children. Danger of suffocation! Keep packaging material away from children.
8
Page 9

1 Safety precautions
How to avoid damaging the appliance
▪ Under no circumstances place hot pots or pans on the display!
▪ In case of overheating, switch the hotplate off and allow it to cool down
completely. Do not put any dishes on it. Under no circumstances use cold
water to cool it down quickly.
▪ Do not climb on to the appliance.
▪ Do not put hot cookware on the hob frame in order not to damage the silic-
one joints.
▪ Do not cut or prepare food on the surface and avoid impact with hard ob-
jects. Do not drag cookware across the surface.
▪ Take particular care that sugary foods or juices do not get onto the hot
cooking zones as it can damage them. If sugary foods or juices do get on
to the hot cooking zones clean away immediately (while still hot) with a
scraper.
▪ Pots with pure copper or aluminium bases should not be used for cooking
as they can leave behind traces that can be difficult to clean. If the traces
are not removed immediately after cooking with a suitable cleaning agent,
they can be permanently burned on and therefore permanently ruin the
visual appearance of the appliance.
▪ Sliding pans and cookware across the glass ceramic causes scratches.
This can be largely prevented by lifting pans and cookware up and then placing them down in position.
▪ The hob is designed to be used – signs of use, such as scratches or the
wear and tear from pans and cookware, are normal. The more intensively it
is used, the greater the signs of use; however, the appliance remains in perfect working order and therefore does not give a right of complaint. Safety is
guaranteed at all times.
▪ There is no such thing as completely scratch-proof glass; scratches can
even develop on sapphire glass, which is used in watches. The glass
ceramic used is of the best quality available on the market.
9
Page 10

2 Disposal
Packaging
▪ All packaging materials (cardboard, plastic film (PE) and polystyrene (EPS))
are marked and should be collected for recycling and disposed of in an environmentally friendly way.
Disconnection
▪ Disconnect the appliance from the mains. With a fixed appliance, this is to
be carried out by a qualified electrician!
Safety
▪ Disable the appliance to prevent accidents caused by improper use, espe-
cially through children playing.
▪ Pull the plug out of the mains socket or have the appliance disconnected
from the mains by an electrician. Then cut the mains cable off flush with the
appliance.
Disposal
▪ The old appliance should not be discarded as worthless rubbish. If dis-
posed of correctly, the raw materials can be recovered for recycling.
▪ The symbol on the identification plate warns that the appliance may not
be disposed of in normal household waste.
▪ The appliance must be disposed of in accordance with local regulations on
waste disposal. For more information on the handling, disposal and recycling of the product, please contact the local authorities, the local recycling
facilities for household waste or the retailer from whom you purchased the
appliance.
10
Page 11
3 Using for the first time
1 2
The appliance must be installed and connected to the electricity supply in accordance with the separate installation instructions. Have a
qualified fitter/electrician carry out the necessary work.
During the first few hours of use, a cooking zone can give off an unpleasant smell. This is normal for brand new appliances. Ensure that
the room is well ventilated.
Where is the identification plate?
The identification plate and the connection plate are located on the underside
of the hob.
Identification plate with serial number (FN)
1
Connection plate
2
A second identification plate is supplied and should be affixed in the fitted unit
underneath the hob.
Note down the serial number (FN) of your appliance on the back page of
these operating instructions.
The serial number is required for identifying the appliance. Only then
can customer services guarantee a faultless service.
11
Page 12
4 Your appliance
4.1 Appliance overview
GK46TIMASC, GK46TIMASZ
▪ 4 adjustable cooking zones
GK46TIMPSZ
▪ 4 adjustable cooking zones
GK57TIMSZ, GK57TIMSZO
▪ 5 adjustable cooking zones
(central cooking zone
ø 280 mm)
12
Page 13
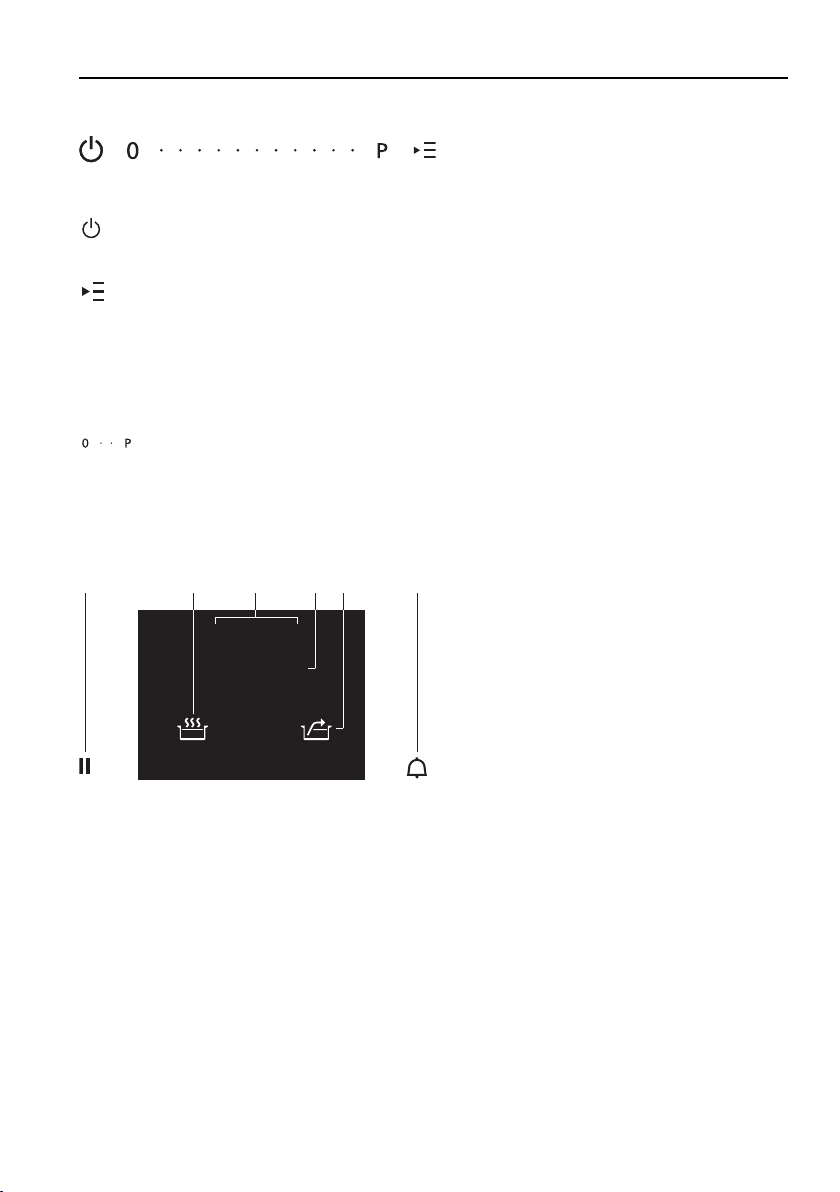
4.2 Operating and display elements
4
1:20
7
1 2 63 4 5
Buttons
ON/OFF button, pause function
▪ Appliance ON/OFF ▪ Pause cooking
Multi-function button
▪ Operating time ▪ Timer
▪ Automatic boost ▪ Wipe protection
▪ Keeping warm, melting,
simmering
Slider
▪ Select cooking zones ▪ Set time
▪ Set power level ▪ PowerPlus
Displays
4 Your appliance
▪ User settings
Pause cooking
1
Simmering
2
Cooking zone power level
3
Operating time
4
Automatic boost
5
Timer
6
13
Page 14

4 Your appliance
4.3 How induction hobs function
Induction hobs work very differently from conventional hobs or hot plates. The
induction coils under the glass ceramic plate produce a rapidly changing magnetic field which directly heats up the magnetic base of the cookware.
The glass ceramic plate is only warmed by the hot cookware. Removing the
cookware from the cooking zone immediately interrupts the supply of energy.
Induction hobs are:
▪ quick reacting
▪ finely adjustable
▪ powerful
▪ energy-efficient
▪ safe.
Induction hobs can only be used with cookware with a complete/full
magnetic base.
4.4 Flexible cooking
In flexible cooking, there are no marked cooking zones.
Pans with different diameters can be placed on any cooking zone. must,
however, be covered for pan detection.
If a large pan covers both circles, both heating zones can be switched
on together with the bridging function.
For even frying, the pan must be centred on .
The diameter of the base of the pan should not be greater than the
diameter of the cooking zone.
4.5 Pan detection
Each cooking zone is equipped with pan detection. This detects suitable induction compatible cookware with a magnetic base.
▪ If the cookware is removed during operation or if unsuitable cookware is
used,
– the power level selected flashes alternately with .
▪ If no suitable cookware is placed on the cooking zone before the pan detec-
tion time (10minutes) elapses,
– the cooking zone switches off.
– the display changes from to «0».
14
Page 15

4 Your appliance
– the appliance switches off after 10seconds if no other cooking zone is in
use.
4.6 Cookware
Suitable cookware
Only cookware with a magnetic base (ø 10 cm to 22 cm) is suitable for use
with the induction hob.
This can be tested in the following ways:
▪ A magnet sticks anywhere on the base of the cookware.
▪ Only the power level set illuminates on the hob.
Do not heat any unsuitable cookware using aids such as metal rings
and the like. This can damage the hob.
Energy-efficient cooking
For maximum energy efficiency and even heat distribution note the following:
▪ The base of the cookware must be clean, dry and smooth.
▪ Centre the cookware in the middle of the cooking zone.
▪ Use a well-fitting lid.
▪ Match the diameter of the cookware to the quantity of food to be cooked.
Coated cookware
▪ Coated cookware may be operated above power level «7» provided that the
bottom of the pan is completely covered with liquid.
– The coating may otherwise become overheated and damaged.
▪ For frying, do not use a higher power level than «7».
Never use PowerPlus with coated frying pans.
Noise during cooking
Cookware can make noise during cooking. This does not indicate any malfunction, nor does it affect the functioning of the appliance in any way.
Noise depends on the cookware used. If the noise causes considerable disturbance, it can help to change the cookware.
15
Page 16

4 Your appliance
4.7 OptiGlass
Applies to GK57TIMSZO
Hobs with OptiGlass have an additional coating on the glass surface.
This coating makes the surface harder, tougher and more scratch resistant
than non-coated glass surfaces.
Under normal circumstances, significantly fewer scratches should occur on the glass surface during cooking. However, even a sharp grain
of sand or particle of grit, for example, under a pan can cause
scratches.
Illumination
▸ Halogen or LED light bulbs are recommended for illuminating hobs with the
OptiGlass coating.
The use of fluorescent tube lighting to illuminate hobs with the OptiGlass coating causes the glass surface to shimmer.
16
Page 17

5 Operating the appliance
0
0
0 0
0
9
0 0
5.1 Switching the appliance on and off
All the appliances are operated in the same way.
▸ To switch the appliance on: Hold the button depressed for 1second.
– «0» illuminates in all the power level displays.
– If no other button is pressed, the appliance switches off after about
10seconds for safety reasons.
▸ To switch the appliance off: Hold the button depressed for 2seconds.
5.2 Setting a cooking zone
▸ Press or swipe the slider to
select the desired cooking zone.
– The cooking zone selected
illuminates red.
▸ Press or swipe the slider to set
the power level while the cooking
zone is illuminated.
17
Page 18

5 Operating the appliance
5.3 Overview of power levels
Power level Cooking method Use
1
2
3
4
5
6
7
8
9
P
Melting, gentle warming Butter, chocolate,
gelatine, sauces
Swelling Rice
Continued cooking, reducing,
stewing, steaming
Continued cooking, braising Pasta, soup, braised meat
Gentle frying Rösti, omelettes, breaded fried
Frying, deep frying Meat, chips
Flash frying Steak
Fast heating Boiling water
Vegetables, potatoes, sauces,
fruit, fish
foods, sausages
5.4 Switching a cooking zone off
▸ Use the slider to select the desired cooking zone.
▸ Touch «0» on the slider.
– If no other entry is made and the other cooking zones are switched off,
the appliance switches off automatically after 10 seconds.
5.5 Residual heat indicator
After a cooking zone is switched off, remains illuminated in the display for
the relevant cooking zone as long as there is a risk of burns.
18
Page 19

5 Operating the appliance
0
0
0 0
5.6 Bridging function
The bridging function allows the two right cooking zones or the two left cooking zones to be switched on together and to be regulated together.
Switching the bridging function on
▸ Use the slider to select the far left
or far right cooking zone and keep
this position pressed for
2seconds.
– Both cooking zones are now
grouped together and can be
operated as one zone.
If, when the bridging function is switched on, one or both cooking
zones are already running, the power level and operating time of
these cooking zones are cleared and «0» illuminates in the power
level displays.
Switching the bridging function off
▸ Use the slider to select the cooking zone and keep this position pressed for
2seconds or set the power level to «0».
– The previous settings for both cooking zones are cleared.
– Each cooking zone can be regulated individually again.
5.7 Melting, keeping warm and simmering
Melting With the melting function, butter, chocolate or honey, for
instance, can be gently melted at 42°C.
Keep warm The keep warm setting keeps cooked food warm at
approximately 65°C.
Simmering With the simmer function, sausages, dumplings and
stuffed pasta, for instance, can be cooked just below
boiling point at about 94°C.
The precision of the simmer function depends on the cookware used.
Water can start to boil. If this is the case, we recommend the pan lid
be left off when using the simmer function.
For locations over 1,500 meters above sea level, it is generally recommended the pan lid be left off when using the simmer function.
19
Page 20

5 Operating the appliance
ok
Keep warm approx. 65 °C
Switching melting, keeping warm and simmering on
▸ Use the slider to select the desired cooking zone.
▸ Touch the button.
– The «Cooking zone
dependent functions» menu
appears. The cooking zone
selected is indicated by
illuminating in the layout.
▸ Use the slider to select , or
.
– The function selected
illuminates brightly and
appears.
▸ Press the slider below .
– , or is taken over for the cooking zone selected and the
function selected illuminates in the power level display.
Switching melting, keeping warm and simmering on
▸ Use the slider to select the cooking zone.
▸ Use the slider to set any power level.
For locations over 1,500 meters above sea level, it is recommended
that the pan lid be left off when using the simmer function.
5.8 PowerPlus
All the cooking zones are equipped with the PowerPlus booster.
When PowerPlus is switched on, the cooking zone selected works at extra
high power for 10minutes. PowerPlus can be used, for instance, to heat a
large quantity of water quickly.
20
Page 21

5 Operating the appliance
1
2 3
4
A B
1
2
3
4
A B
Switching PowerPlus on
▸ Use the slider to select the desired cooking zone.
▸ Press P on the slider.
– «P» illuminates in the display.
– After 10 minutes it automatically switches back to power level 9.
Removing the cookware interrupts PowerPlus. PowerPlus is resumed
as soon as the cookware is returned to the cooking zone.
Ending PowerPlus before time
▸ Use the slider to select the desired cooking zone.
▸ Use the slider to set any power level.
Power management
PowerPlus cannot be used with both cooking zones of a group (AorB) at the
same time. If PowerPlus is activated with both cooking zones of a group, then
the power output is reduced for the cooking zone that was first selected.
PowerPlus with
cooking zone
1
2
*Maximum available power level with cooking zones
If the power level is increased above these levels, PowerPlus switches
off.
Group A * PowerPlus with
cooking zone
1 2 3 4
P 5
5 P
3
4
Group B *
P 5
5 P
21
Page 22

5 Operating the appliance
ok
AutoCo ok
5.9 AutoCook
Do not leave food cooking unattended while using AutoCook. Risk of
boiling over, burning on and igniting!
With AutoCook, a cooking zone works at power level 9 for a certain duration
(see table). When this duration is up, it automatically switches back to the previously set power level.
Power level /
Function
AutoCook duration in
mins.:secs.
If, during AutoCook, a higher power level is selected, the duration will
change automatically.
Switching AutoCook on
To set Automatic boost, a power level must already be set.
▸ Use the slider to select the desired cooking zone.
▸ Touch the button.
– The «Cooking zone dependent functions» menu appears. The cooking
zone selected is indicated by illuminating in the layout.
▸ Use the slider to select .
– illuminates brightly and
appears.
1 2 3 4 5 6 7 8/9
0:45 1:15 2:00 3:00 4:15 7:15 2:00 3:15
▸ Press the slider below .
– is displayed alternately with the power level set in the power level
display.
– When the Automatic boost duration finishes, the appliance automatic-
ally switches back to the previously set power level.
Switching AutoCook off before time
▸ Switch the cooking zone off.
▸ To resume operation without AutoCook, select the cooking zone again and
set a power level.
22
Page 23

5 Operating the appliance
ok
Operating Time
1 h 04
ok
0
9
0 0
1:20
5.10 Operating time
Do not leave the hob unattended during use. Risk of boiling over,
burning on and igniting!
With the operating time function, the cooking zone switches off automatically
after a set time (1 min. to 1 hr. 59 mins.).
An operating time can be set for each individual cooking zone.
Setting operating time
To set the operating time, a power level must already be set.
▸ Use the slider to select the desired cooking zone.
▸ Touch the button.
– The «Cooking zone dependent functions» menu appears. The cooking
zone selected is indicated by illuminating in the layout.
▸ Use the slider to select .
– illuminates brightly and
appears.
▸ Press the slider below .
– The recommended value for
the operating time illuminates
in the settings display and
the cooking zone selected is
indicated by illuminating in
the layout.
▸ Press or swipe the slider to set the operating time.
To increase or decrease the operating time faster, long press the
slider. To clear the operating time, press and hold «0» on the slider.
▸ Press the slider below .
– The operating time is taken
over and displayed below the
power level display for the
relevant cooking zone.
23
Page 24

5 Operating the appliance
Changing the operating time
▸ Use the slider to select the desired cooking zone.
▸ Touch the button.
– The «Cooking zone dependent functions» menu appears. The cooking
zone selected is indicated by illuminating in the layout.
▸ Use the slider to select .
– illuminates brightly and appears.
▸ Press the slider below .
▸ The remaining operating time and the cooking zone selected illuminate in
the settings display.
▸ Use the slider to change the operating time.
▸ Press the slider below .
▸ The new operating time is taken over and displayed below the power level
display for the relevant cooking zone.
Switching the operating time off before time
▸ Use the slider to select the desired cooking zone.
▸ Touch the button.
– The «Cooking zone dependent functions» menu appears. The cooking
zone selected is indicated by illuminating in the layout.
▸ Use the slider to select .
– illuminates brightly and appears.
▸ Press the slider below .
– The remaining operating time and the cooking zone selected illuminate
in the settings display.
▸ Use the slider to set the operating time to 0h00.
▸ Press the slider below .
– The cooking zone continues to run.
End of operating time
When the operating time is up
– the relevant cooking zone switches off
– an acoustic signal is emitted
– 0h00 flashes in the display.
▸ Press to switch off the acoustic signal and the display.
24
Page 25

5 Operating the appliance
ok
Timer
0 h 46
ok
5.11 Timer
The timer functions like an egg timer (1 min.–9 h 59 min.).
It can be used at any time and independently of all other functions.
Setting the timer
In order to set the timer, no cooking zone may be selected.
▸ Touch the button.
– The «Cooking zone
dependent functions» menu
appears.
▸ Use the slider to select .
– illuminates brightly and
appears.
▸ Press the slider below .
– The recommended value for
the timer illuminates in the
settings display.
▸ Press or swipe the slider to set the timer.
To increase or decrease the timer faster, long press the slider. To
clear the timer, press and hold «0» on the slider.
▸ Press the slider below .
– The timer is taken over.
– illuminates above the button.
25
Page 26

5 Operating the appliance
0 h 46
Querying the duration remaining of the timer
In order to display the duration remaining of the timer, no cooking zone may
be selected.
▸ Touch the button.
– The "Cooking zone
independent functions" menu
is displayed. The duration
remaining of the timer is
displayed above function
selection.
Changing the duration remaining of the timer
In order to change the duration remaining, no cooking zone may be selected.
▸ Touch the button.
– The «Cooking zone dependent functions» menu appears. The duration
remaining of the timer is displayed above function selection.
▸ Use the slider to select .
– illuminates brightly and appears.
▸ Press the slider below .
– The duration remaining of the timer illuminates in the settings display.
▸ Use the slider to change the timer.
▸ Press the slider below .
– The new timer value is taken over.
Switching the timer off before time
In order to switch the timer off before time, no cooking zone may be selected.
▸ Touch the button.
– The «Cooking zone dependent functions» menu appears. The duration
remaining of the timer is displayed above function selection.
▸ Use the slider to select .
– illuminates brightly and appears.
▸ Press the slider below .
– The duration remaining of the timer illuminates in the settings display.
▸ Use the slider to set the timer to 0h00.
▸ Press the slider below .
– The timer is deactivated.
– goes out above the button.
26
Page 27

5 Operating the appliance
Timer finished
When the timer finishes,
– an acoustic signal is emitted
– flashes above the button.
– 0h00 flashes in the display.
▸ Press to switch off the acoustic signal and the display.
5.12 Pause cooking
With this function, the power level of all the cooking zones that are switched
on can be temporarily reduced to 1 for up to 10 minutes. Thereafter, the appliance can continue to be operated using the previous settings.
Switching pause cooking on
▸ Briefly press the button.
– All cooking zones switch to power level 1. 1 and the previously set
level/function flash alternately in the power level displays.
– illuminates above the button.
– Operating times are stopped.
– Timers continue to run.
– Only the button is still active.
The maximum pause time is 10 minutes. By which time, if it has not
already been turned off, the appliance switches off completely.
Switching pause cooking off
▸ Briefly press the button.
– All cooking zones switch back to the previous setting.
– Operating times continue to run again.
– All the buttons and the slider are active again.
27
Page 28

5 Operating the appliance
5.13 Wipe protection
This function prevents the power level from being changed accidentally, for instance when wiping the control panel with a cloth.
Switching wipe protection on
To set wipe protection, the cooking zones may be active. However no cooking
zone may be selected.
▸ Touch the button.
▸ The «Cooking zone dependent functions» menu appears.
▸ Use the slider to select .
– illuminates brightly and appears.
▸ Press the slider below .
– Wipe protection is activated for 20 seconds or until cancelled.
Press the button to switch the appliance off at any time.
Switching wipe protection off
▸ Keep the slider below «Stop» pressed for 2seconds.
▸ Wipe protection has been cancelled and the appliance may be operated
again.
28
Page 29

6 User settings
User set tings
The following user settings can be set and stored individually:
User settings Function Possible settings
Childproof lock
Language
Individual settings
Factory settings
* Factory settings
Brightness
Loudness
Button signal
Recommended value
6.1 Accessing the user settings
To change the user settings, the cooking zones may be active. However no
cooking zone may be selected.
▸ Touch the button.
– The «Cooking zone dependent functions» menu appears.
▸ Use the slider to select .
▸ Press the slider below .
– The «User settings» menu
appears.
On
Off*
German*
French
Italian
English
Levels 1–9
Level 5*
Levels 1–9
Level 5*
On
Off*
0h00* – 2h00
Reset
29
Page 30

6 User settings
1 2 3 4 5 6
Override code: 2 2 6
Childproof lock ON
Activating/deactivating function
▸ Use the slider to select a function.
– The function illuminates brightly and appears.
▸ Press the slider below .
– The settings screen for the function appears. The function is activated
or deactivated.
▸ Use the slider to select the desired setting.
▸ Press the slider below .
– The function is now activated or deactivated.
6.2 Childproof lock
Activate childproof lock (see page 29)
Overriding the childproof lock off
▸ Switch the appliance on.
– The following display appears
indicating that a code is
required to unlock the
appliance:
▸ Use the slider to enter the code given.
– The set numbers flash brightly.
– The childproof lock has now been overridden and it is possible to cook
without any restrictions.
After the appliance is switched off again, the childproof lock is immediately activated again.
Deactivating the childproof lock (see page 29)
6.3 Language
The preferred language can be set in the user settings.
Changing the language settings (see page 29)
30
Page 31

6 User settings
Individual settings
ok
7
6.4 Brightness
The preferred brightness level for the display can be set in the user settings.
Changing the brightness settings
▸ Access the user settings (see page 29).
▸ Use the slider to select .
– illuminates brightly and appears.
▸ Press the slider below .
– The «Individual settings»
menu appears.
▸ Use the slider to select .
▸ Press the slider below .
– The settings screen for
brightness appears. The level
of brightness selected is
displayed.
▸ Use the slider to set the desired level of brightness.
▸ Press the slider below .
– The display is set to the new level of brightness.
31
Page 32

6 User settings
ok
7
6.5 Loudness
The preferred loudness for the acoustic signals can be set in the user settings.
Changing the volume settings
▸ Access the user settings (see page 29).
▸ Use the slider to select .
– illuminates brightly and appears.
▸ Press the slider below .
– The «Individual settings» menu appears.
▸ Use the slider to select .
▸ Press the slider below .
– The loudness settings screen
appears. The level of
loudness selected is
displayed.
▸ Use the slider to set the desired level of loudness.
▸ Press the slider below .
– The hob is set to the new level of loudness.
6.6 Button signal
The button signal (single acoustic signal when a button/slider is pressed) can
be switched on or off in the user settings.
Switching the button signal on/off (see page 29)
32
Page 33

6 User settings
0 h 15
ok
6.7 Recommended value for the timer
The recommended value for the timer can be set in the user settings. If, at a
later stage, the operating time or the timer are set, the recommended value for
the timer appears as the default setting.
Setting and changing the recommended value for the timer
▸ Access the user settings (see page 29).
▸ Use the slider to select .
– illuminates brightly and appears.
▸ Press the slider below .
– The «Individual settings» menu appears.
▸ Use the slider to select .
▸ Press the slider below .
– The settings screen appears.
The set recommended value
for the timer is displayed.
▸ Press or swipe the slider to set the desired recommended value for the
timer.
To increase or decrease the recommended value for the timer faster,
long press the slider. To clear the recommended value for the timer,
press and hold «0» on the slider.
▸ Press the slider below .
– The newly selected recommended value for the timer is activated.
6.8 Factory settings
If one or more user settings have been changed, these can be reset to the
factory settings.
33
Page 34

7 Care and maintenance
Clean the appliance only when it has completely cooled down.
Risk of burns!
Always clean the hob after use. This prevents food residue from burning on.
Dried-on or burned-on food residue is harder to clean off.
Use of improper cleaning techniques can result in damage to the markings or
surface.
Avoid cleaning the surface of the glass ceramic hob with abrasive
cleaning agents, scouring pads, wire wool, etc. as they can damage it.
▸ Use only a soft cloth or sponge with water and a suitable detergent for
cleaning everyday soiling. Always follow the detergent manufacturer’s instructions for use. Using a detergent with a protective additive is recommended.
▸ Remove stubborn soiling, e.g. boiled-over milk, while still warm using a
glass ceramic hob scraper. Always follow the scraper manufacturer's instructions for use.
▸ Foods with a high sugar content, e.g. marmalade, that boil over should be
removed while still hot using a glass ceramic hob scraper. The surface of
the glass ceramic hob could otherwise become damaged.
▸ Remove melted plastic while still warm using a glass ceramic hob scraper.
The surface of the glass ceramic hob could otherwise become damaged.
▸ Remove limescale stains when cool with a small amount of limescale re-
mover, e.g. vinegar or lemon juice. Then wipe clean with a damp cloth.
34
Page 35

7 Care and maintenance
Cleaning
For good results, follow these cleaning instructions.
▸ To clean thoroughly, remove most of the soiling using a hob scraper or a
special cleaning sponge for glass ceramic hobs.
▸ Add a few drops of a suitable cleaning fluid to the cold hob surface and rub
over the surface using kitchen towel or a clean cloth.
▸ Wipe off with a wet cloth and then polish with a dry cloth or the soft side of
a suitable cleaning sponge.
Only use the cleaning agents and methods recommended on our
«Homepage».
7.1 OptiGlass
Unsuitable cleaning agents may attack and damage the coating.
35
Page 36

8 Trouble-shooting
What to do if …
… the appliance is not working and the display is dark?
Possible cause Solution
▪ The fuse or circuit breaker for
electrical installations in the home is
defective.
▪ The fuse or circuit breaker keeps
blowing.
▪ An interruption in the power supply. ▸ Check the power supply.
… flashes alternately with the power level in the display?
Possible cause Solution
▪ Cookware is not suitable for use with
induction hobs.
▪ Cookware is too small for the cooking
zone selected.
… after switching the appliance on, a prompt to enter a code appears in the
display?
Possible cause Solution
▪ The childproof lock is activated. ▸ For operating the appliance with
▸ Change the fuse.
▸ Reset the circuit breaker.
▸ Call Customer Services.
▸ Use suitable magnetic
cookware. See «Cookware».
section.
▸ The diameter of the base of the
cookware must be at least 10
cm.
the childproof lock activated, see
the «User settings» section.
▸ Switch the childproof lock off.
… a continuous acoustic signal is
emitted and the following display
flashes?
Possible cause Solution
▪ A button was touched for longer than
10seconds.
▪ Object (e.g. pan, dish) on the control
panel.
▪ Food boiled over onto the control
panel.
36
▸ Remove object or food that has
boiled over.
▸ The appliance can be used
again as normal.
Page 37

... and «0» flash alternately in the display?
Possible cause Solution
▪ The automatic safety
shut-off was triggered.
▸ Switch the cooking zone back on again if
required.
If a cooking zone has been running for longer without any settings being changed, the appliance switches the cooking zone off automatically, after how much time depends on the power level set.
8 Trouble-shooting
Power level /
1 2 3 4 5 6 7 8 9
Function
Safety
2:00 8:30 6:30 5:30 4:30 3:30 3:00 2:30 2:00 1:30
shut-off after
hrs.:mins.
... flashes in the display?
Possible cause Solution
▪ The excess temperature
protection of a cooking
zone was triggered.
▸ Allow the cooking zone to cool down.
▸ Continue cooking on a different cooking
zone.
▸ Check cookware.
… «E» and «8» flash alternately in the display?
Possible cause Solution
▪ An object (e.g. paper)
underneath the hob is
obstructing the air intake.
▸ Remove any objects in the drawer
underneath the hob.
▸ Touch any button to cancel the error.
▸ After 10 minutes the appliance can be used
again as normal.
▪ Ventilation is defective. ▸ Note down the error number.
▸ Note down the serial number (FN) of the
appliance. See the identification plate for
this.
▸ Call Customer Services.
37
Page 38

8 Trouble-shooting
… «E» or «Er» and a number flash or illuminate alternately in the display?
Possible cause Solution
▪ Internal error occurred. ▸ Note down the error number.
▸ Note down the serial number (FN) of the
appliance. See the identification plate for
this.
▸ Call Customer Services.
If the error is only displayed in one or two cooking zones, the remaining cooking zones can still be used until repaired.
… an acoustic signal is emitted and «Er57» illuminates in the display?
Possible cause Solution
▪ Display has overheated
due to, for instance, hot
cookware or food on the
display.
▪ An object (e.g. paper)
underneath the hob is
obstructing the air intake.
▸ Immediately remove the hot cookware or
food that has boiled over from the display.
▸ Press the multi-function button or the slider
to cancel the error message.
▸ Remove any objects in the drawer
underneath the hob.
▸ Touch any button to cancel the error.
▸ After 10 minutes the appliance can be used
again as normal.
▪ Ventilation is defective. ▸ Note down the error number.
▸ Note down the serial number (FN) of the
appliance. See the identification plate for
this.
▸ Call Customer Services.
38
Page 39

9 Technical data
9.1 Product fiche
In accordance with EU Regulation No. 66/2014
Model number GK 31080
Type designation GK GK46TIMPSZ
Number of cooking zones 4
Heating technology Induction cooking zone
Dimensions of cooking
zone
Energy consumption per
cooking zone
Energy consumption of
the entire hob EC
Model number GK 31082
Type designation GK GK57TIMASZ, GK57TIMSZO
Number of cooking zones 5
Heating technology Induction cooking zone
Dimensions of cooking
zone
Energy consumption per
cooking zone
Energy consumption of
the entire hob EC
cm 18 × 20 18 × 20 18 × 20 18 × 20
Wh/kg 183.8 184.6 185.9 186.8
Wh/kg 185.3
cm 18 × 20 18 × 20 ø 28 18 × 20 18 × 20
Wh/kg 184.7 191.4 192.5 189.1 198.1
Wh/kg 190
39
Page 40

9 Technical data
Model number GK 31091
Type designation GK GK46TIMASC, GK46TIMASZ
Number of cooking zones 4
Heating technology Induction cooking zone
Dimensions of cooking
cm 18 × 20 18 × 20 18 × 20 18 × 20
zone
Energy consumption per
Wh/kg 177.5 183.6 180.1 210.2
cooking zone
Energy consumption of
Wh/kg 187.9
the entire hob EC
40
Page 41

Index
A
Appliance overview ...................................... 12
Appliance-specific safety
precautions ............................................... 6
AutoCook........................................................ 22
Switching off before time ................. 22
Automatic boost
Switching on....................................... 22
B
Bridging function........................................... 19
Switching off....................................... 19
Switching on....................................... 19
Brightness ...................................................... 31
Brightness settings
Changing ............................................ 31
Button signal.................................................. 32
C
Care and maintenance ................................ 34
Childproof lock .............................................. 30
Overriding ........................................... 30
Connection plate........................................... 11
Cookware
Coated cookware .............................. 15
Energy-efficient cooking................... 15
Noise during cooking ....................... 15
Suitable cookware............................. 15
D
Disconnection................................................ 10
Disposal.......................................................... 10
F
Factory settings............................................. 33
I
Instructions for use ......................................... 7
L
Language........................................................ 30
Loudness ........................................................ 32
Loudness settings
Changing ............................................ 32
M
Melting, keeping warm and simmering .... 19
Switching off....................................... 20
Switching on....................................... 20
Model number ................................................. 2
O
Operating and display elements................ 13
Buttons ................................................ 13
Displays............................................... 13
Operating time............................................... 23
Changing ............................................ 24
Finished............................................... 24
Setting ................................................. 23
Switching off before time ................. 24
OptiGlass........................................................ 16
Cleaning.............................................. 35
Illumination.......................................... 16
Overview of power levels ............................ 18
P
Packaging ...................................................... 10
Pan detection................................................. 14
Pause cooking............................................... 27
Switching off....................................... 27
Switching on....................................... 27
Power management ..................................... 21
PowerPlus....................................................... 20
Ending before time............................ 21
Switching on....................................... 21
Product family.................................................. 2
Product fiche.................................................. 39
Q
Quick instructions ......................................... 44
R
Recommended value for the timer............ 33
Setting and changing ....................... 33
Residual heat indicator................................ 18
S
Safety .............................................................. 10
Safety precautions
General...................................................6
Safety shut-off ................................................ 37
Selecting a cooking zone............................ 17
41
Page 42

Serial number (FN) ....................................... 11
Service & Support......................................... 43
Switching a cooking zone off ..................... 18
Switching the appliance on and off........... 17
Symbols ............................................................ 5
T
Technical data ............................................... 39
Technical questions...................................... 43
Timer ............................................................... 25
Changing the duration remaining .. 26
Finished............................................... 27
Querying duration remaining .......... 26
Setting ................................................. 25
Switching off before time ................. 26
Trouble-shooting ........................................... 36
Type................................................................... 2
U
User settings.................................................. 29
Accessing ........................................... 29
Using for the first time.................................. 11
V
Validity............................................................... 2
W
Warranty extensions ..................................... 43
Where is the identification plate?............... 11
Wipe protection ............................................. 28
Switching off before time ................. 28
Switching on....................................... 28
42
Page 43

10 Service & Support
The «Troubleshooting» chapter provides valuable information for dealing with
minor operating faults. This saves you the time, effort and potential cost of having
to call out a service technician.
Information on the V-ZUG warranty can be found at www.vzug.com →Service →Warranty information. Please read this information carefully.
Please register your V-ZUG appliance online immediately at www.vzug.com →Service
→Warranty registration. This will allow you to take advantage of the best possible support
in the event of an fault in the appliance during the warranty period. You will require the
serial number (FN) and appliance designation to complete the registration process. This
information can be found on the identification plate for your appliance.
My appliance information:
FN:
___________________
Always have this appliance information to hand when you contact V-ZUG. Thank you.
The identification plate and connection plate are located on the underside of the hob.
Appliance
: _____________________
Your repair order
At www.vzug.com →Service→Service number you will find the telephone number of your
nearest V‑ZUG service centre.
Technical questions, accessories, warranty extensions
V-ZUG is happy to help you with any general administrative or technical queries, to take
your orders for accessories and spare parts and to inform you about our progressive ser-
vice agreements.
43
Page 44

Quick instructions
0
0
0 0
0
9
0 0
Please first read the safety precautions in the operating instructions!
Switching the appliance on
▸ Hold the button depressed for 1second.
Selecting a cooking zone
▸ Press the required cooking zone on
the slider.
▸ Press or swipe the slider to set the
power level while the cooking zone
is illuminated.
– The cooking zone selected
illuminates red.
To switch appliance off
▸ Hold the button depressed for 2seconds.
V-ZUG Ltd, Industriestrasse 66, CH-6301 Zug
info@vzug.com, www.vzug.com
1033891-R02
 Loading...