

Page 1
DW-N6 / DW-N9
DE Betriebsanleitung
FR Manuel d’utilisation
IT Manuale d’uso
EN Instruction manual
ES Manual de utilización
PT Manual de utilização
NL Instructiehandleiding
RU Руководство по эксплуатации
Page 2

Danke, dass Sie sich für den Kauf eines unserer Produkte entschieden haben. Ihr Gerät genügt
hohen Ansprüchen und seine Bedienung ist einfach. Nehmen Sie sich trotzdem Zeit, diese
Betriebsanleitung zu lesen. So werden Sie mit Ihrem Gerät vertraut und können es optimal und störungsfrei
benutzen.
Beachten Sie bitte die Sicherheitshinweise.
Änderungen
Text, Bild und Daten entsprechen dem technischen Stand des Gerätes zur Zeit der Drucklegung dieser Bedienungsanleitung. Änderungen im Sinne der Weiterentwicklung bleiben vorbehalten.
DE
Merci d’avoir porté votre choix sur l’un de nos produits. Votre nouvel appareil répond aux
exigences les plus élevées et son utilisation est des plus simples. Accordez-vous le temps
nécessaire pour lire attentivement ce mode d’utilisation. Vous vous familiariserez ainsi avec votre appareil, ce
qui vous permettra de l’utiliser de manière optimale et sans dérangement.
Veuillez tenir compte des conseils de sécurité.
Modications
Le texte, les illustrations et les données correspondent au niveau technique de l’appareil au moment de la mise
sous presse de ce mode d’emploi. Sous réserve de modications dans le cadre du progrès technique.
Grazie per aver scelto uno dei nostri prodotti. Il vostro apparecchio soddisfa elevate esigenze, e il suo uso è
molto semplice. E’ tuttavia necessario che vi prendiate il tempo per leggere questo manuale d’uso che vi permetterà di comprendere meglio l’apparecchio e di utilizzarlo in modo ottimale e senza problemi.
Vi preghiamo di attenervi alle osservazioni sulla sicurezza.
Modiche
Testo, immagine e dati corrispondono al livello tecnico dell’apparecchio al momento della
stampa di queste istruzioni per l’uso, con riserva di modiche intese come ulteriore sviluppo.
Thank you for choosing to buy one of our products. Your appliance is made to high standards and is easy to
use. Nevertheless, please take the time to read these instruction manual in order to familiarize yourself with the
appliance and get the best use out of it.
Please follow the safety precautions.
Modications
Text, diagrams and data correspond to the technical standard of the appliance at the time these operating instructions went to press. The right to make technical modications for the purpose of the further development
of the appliance is reserved.
FR
IT
EN
- 2 -
Page 3

Le agradecemos que se haya decidido a comprar uno de nuestros productos. Su aparato
cumple altos requisitos y su manejo es sencillo. No obstante, debe dedicar el tiempo necesario para leer este
manual de utilización. Así, tendrá conanza en su aparato y podrá utilizarlo de forma óptima y sin fallos.
Por favor, tenga en cuenta las indicaciones de seguridad.
Modicaciones
El texto, la imagen y los datos corresponden al estado técnico del aparato en el momento de la publicación de
este manual de instrucciones. Reservado el derecho arealizar modicaciones para el perfeccionamiento.
ES
Muito obrigado por ter optado pela aquisição de um dos nossos produtos. O aparelho satisfaz elevadas exigências e o seu manuseamento é simples. Todavia, leia cuidadosamente este manual de utilização. Assim,
familiariza-se com o aparelho e pode utilizar o mesmo de forma optimizada e sem falhas.
Observe as indicações de segurança.
Alterações
Os textos, as imagens e os dados correspondem ao estado técnico do aparelho no momento da impressão
deste manual de instruções. No âmbito do aperfeiçoamento, reservamos o direito de efectuar alterações.
Hartelijk dank dat u heeft gekozen voor een van onze producten. Uw toestel voldoet aan de
hoogste eisen en de bediening is eenvoudig. Neemt u niettemin de tijd deze instructiehandleiding te lezen. Op die manier raakt u vertrouwd met uw toestel en kunt u het optimaal en zonder storingen
gebruiken.
Volg de veiligheidsvoorschriften op.
Wijzigingen
Tekst, afbeeldingen en gegevens komen overeen met de technische conditie van het toestel ten tijde van
het ter perse gaan van deze bedieningshandleiding. Wijzigingen in de zin van verdere ontwikkeling blijven
voorbehouden.
Благодарим Вас за выбор нашего изделия. Прибор соответствует самым высоким требованиям, а
управление им отличается простотой. Просим Вас внимательно прочитать данное руководство. Знание
принципов работы и возможностей прибора позволит Вам использовать его оптимальным образом и
избежать неисправностей.
Выполняйте указания по технике безопасности.
Изменения
Текстовая и графическая информация, а также технические данные соответствуют техническому уровню
прибора на момент публикации данного руководства. Производитель оставляет за собой право вносить
изменения в конструкцию прибора, направленные на усовершенствование изделия.
PT
NL
RU
© V-ZUG AG, CH-6301 Zug, 2013
- 3 -
Page 4
A B
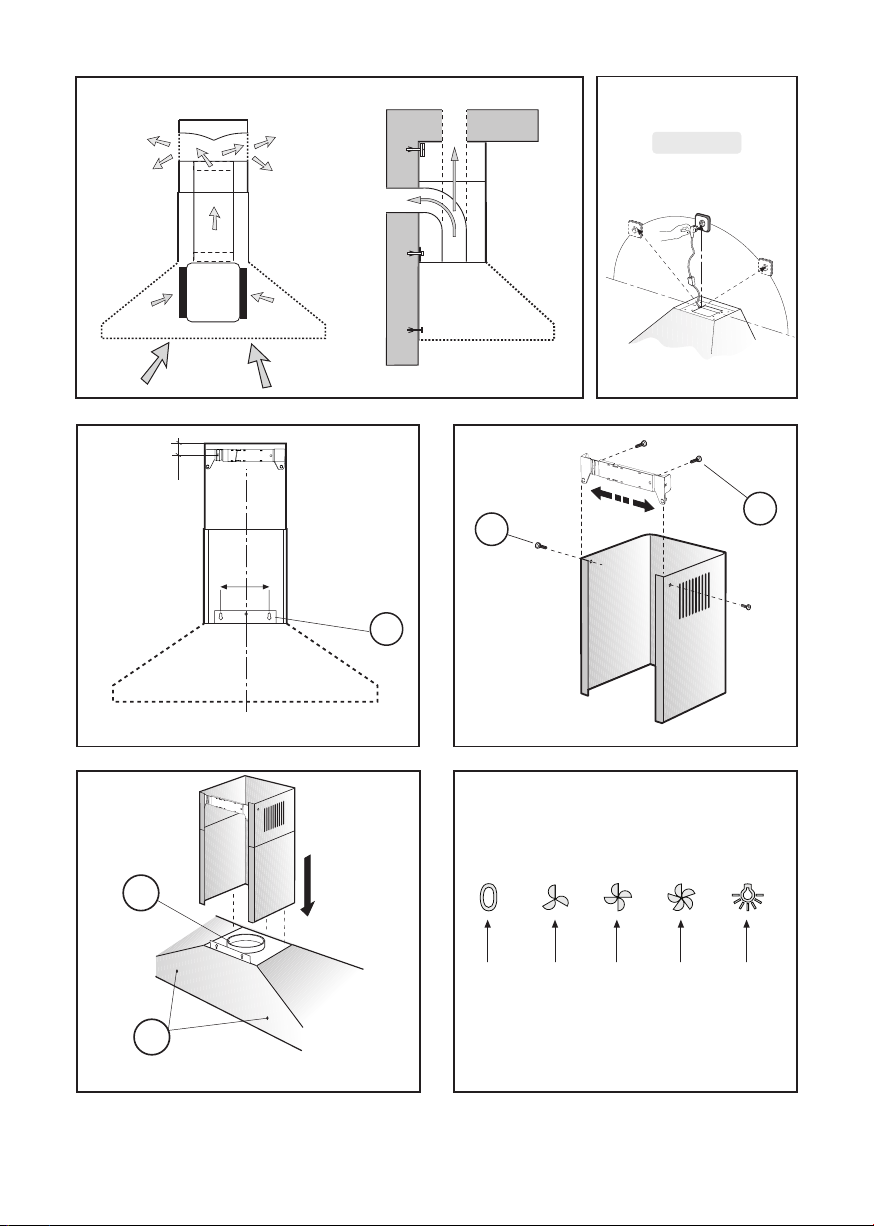
Fig.1
Fig.2 Fig.3
Fig.4
Fig.5
- 4 -
Page 5
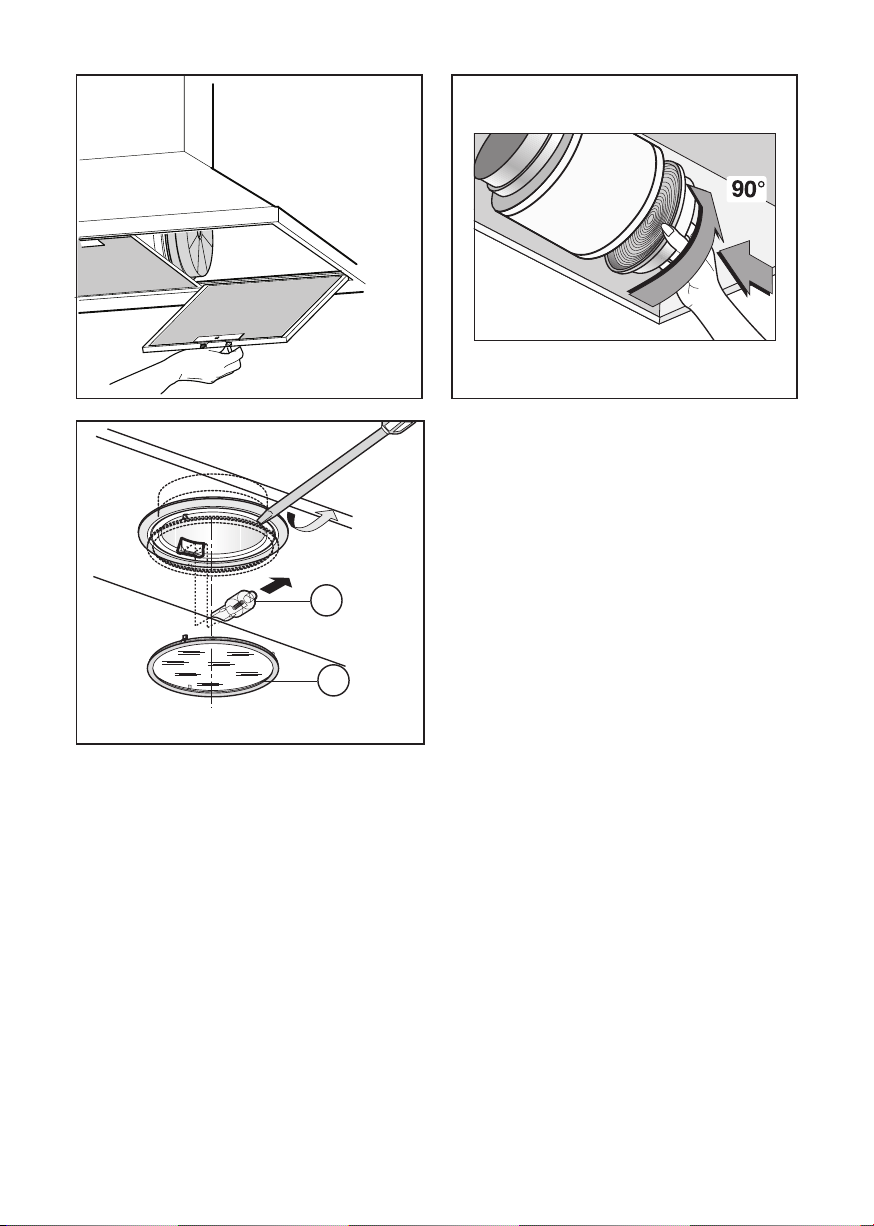
Fig.6
Fig.8
Fig.7
- 5 -
Page 6
DEUTSCH
DE
ALLGEMEINES
Diese Anleitung bitte aufmerksam durchlesen, da sie wichtige
Sicherheitshinweise zur Installation, zum Gebrauch und zur
Wartung enthält. Die Anleitung für eventuelle zukünftige
Konsultationen aufbewahren. Das Gerät wurde zum Gebrauch
in Abluftsversion (Luftausscheidung nach außen - Abb.1B),
Umluftversion (innerer Luftumlauf - Abb.1A)
SICHERHEITSHINWEISE
1. Vorsicht ist geboten, wenn gleichzeitig eine Abzugshaube
und ein raumluftabhängiger Boiler oder ein oenes Feuer in
Betrieb sind, die von einer anderen Energiequelle als Strom
versorgt werden, da die Küchenhaube die Raumluft absaugt,
die auch der Boiler oder das Feuer zur Verbrennung benötigen.
Der Unterdruck im Raum darf den Wert von 4Pa (4x10⁻⁵ bar)
nicht übersteigen. Um einen sicheren Betrieb der Abzugshaube zu gewährleisten, ist daher immer auf eine ausreichende
Belüftung des Raumes zu achten. Bei der Ableitung der Luft
nach aussen müssen die nationalen Vorschriften eingehalten
werden.
Vor Anschluss des Modells an das Stromnetz:
- Kontrollieren Sie das Typenschild an der Geräteinnenseite
um sich zu vergewissern, ob Spannung und Stromstärke der
des Stromnetzes entsprechen und die Steckdose geeignet ist.
Im Zweifelsfall wenden Sie sich bitte an einen qualizierten
Elektriker.
- Sollte das Speisekabel beschädigt sein, ist es durch ein anderes - beim Hersteller oder dessen Kundendienst erhältliches
- Kabel oder mit einem speziellen Bausatz - zu ersetzen.
2. Achtung!
Elektrogeräte können unter gewissen Umständen gefährlich sein!
A) Niemals die Filter kontrollieren, wenn die Dunstabzugshaube in Betrieb ist.
B) Die Lampen und die umliegenden Bereiche nicht während oder nach längerer Benutzung des Lichts berühren.
C) Es ist verboten, Speisen unter der Dunstabzugshaube
zu flambieren.
D) Offene Flammen sind unbedingt zu vermeiden, da
diese die Filter beschädigen und einen Brand verursachen
können.
E) Beim Frittieren sind die Speisen ständig zu kontrollieren,
um eine Entzündung von überhitztem Öl zu verhindern.
F) Vor jeglichen Wartungsarbeiten unbedingt den Netzstecker aus der Steckdose entfernen.
G) Das Gerät sollte nicht von kleinen Kindern oder gebrechlichen Personen ohne Beaufsichtigung benutzt werden.
H) Kleine Kinder sollten beaufsichtigt werden, um sicherzugehen, dass sie nicht mit dem Gerät spielen.
I) Der Raum muss über eine hinreichende Belüftung verfügen, wenn die Dunstabzugshaube mit anderen gas- oder
brennstoffbetriebenen Geräten gleichzeitig verwendet
wird.
L) Es besteht Brandgefahr, wenn die Reinigung nicht
entsprechend den Anleitungen durchgeführt wird.
Dieses Gerät ist gemäß der EU-Richtlinie 2002/96/EC, Waste
Electrical Electronic Equipment (WEEE) gekennzeichnet. Sorgen Sie bitte dafür, dass das Gerät korrekt entsorgt wird, der
Benutzer trägt dazu bei, den potentiellen negativen Folgen
für Umwelt und Gesundheit vorzubeugen.
Das auf dem Produkt oder auf den Begleitpapieren be
ndliche Symbol sagt aus, dass dieses Produkt nicht wie
normaler Hausmüll behandelt werden darf, sondern
dass es einer geeigneten Sammelstelle für das Recycling
der elektrischen und elektronischen Geräteteile zugeführt
werden muss. Entsorgen Sie bitte das Altgerät gemäß der lokalen Richtlinien. Für weitere Informationen hinsichtlich der
Behandlung, der Wiederverwertung und des Recycling des
Produkts wenden Sie sich bitte an die zuständige lokale Stelle, an die Sammelstelle für Hausmüll, oder an den Händler, bei
dem Sie das Gerät erworben haben.
INSTALLATIONSANLEITUNG
Montage und Anschluss müssen von einem Fachmann durchgeführt werden.
• Elektroanschluss
Die Küchenhaube gehört zur Geräteklasse II, daher muss
keine der Leitungen geerdet werden. Der Anschluss an das
Stromnetz ist folgendermassen durchzuführen:
BRAUN = L Leitung
BLAU = Neutrale Linie
Falls nicht vorhanden, muss ein Normstecker mit den auf dem
Typenschild angegebenen Werten an das Kabel angeschlossen
werden. Wenn die Küchenhaube mit einem Netzstecker ausgestattet ist, muss diese so installiert werden, dass der Stecker
gut zugänglich ist. Beim Direktanschluss an das Stromnetz
muss zwischen Gerät und Netz ein der Netzlast und den
geltenden Vorschriften entsprechender Mehrpolstecker mit
einer Mindestönung von 3 mm zwischen den Kontakten
installiert werden.
• Der Mindestabstand zwischen der Stelläche für die Kochbehälter auf der Kochvorrichtung und dem unteren Teil der
Abzugshaube muss mindestens 65 cm betragen. Falls ein
Verbindungsrohr verwendet wird, das aus zwei oder mehr
Teilen zusammengesetzt ist, muss der obere Teil über den
unteren gestülpt werden. Auf keinen Fall darf das Abluftrohr
der Küchenhaube an ein Rohr angeschlossen werden, in
dem Warmluft zirkuliert oder das zur Entlüftung von Geräten
verwendet wird, die an eine andere Energiequelle als an
Strom angeschlossen sind. Vor der Durchführung der Montagevorgänge, den/die Fettlter entfernen, damit sich das Gerät
leichter handhaben läßt (Abb.6).
- Sollte das Gerät mit Abzugsvorrichtung montiert werden,
bereiten Sie eine Luftabzugsönung vor.
• Es empehlt sich der Einsatz eines Abluftrohres, das einen
Durchmesser von 150 mm aufweist. Die Verwendung eines
Reduzierstücks könnte die Leistungen des Erzeugnisses beeinträchtigen und das Betriebsgeräusch erhöhen.
• Befestigung an der Wand
Unter Einhaltung der angegebenen Maße die Löcher A bohren
(Abb.2). Das Gerät an der Wand befestigen und waagrecht mit
den Hängeschränken ausrichten.
Wenn die Abzugshaube justiert ist, anhand der 2 Schrauben
A (Abb.4) befestigen.
Für die verschiedenen Montagen dem Mauertyp (z. B. Eisenbeton, Gipskarton, usw.) entsprechende Schrauben und
- 6 -
Page 7

Dübel verwenden. Falls die Schrauben und Dübel mit dem
Produkt mitgeliefert wurden, sich vergewissern, daß sie für
die Art der Wand, an der die Abzugshaube befestigt werden
soll, geeignet sind.
• Befestigung der Teleskopverschalung
Die Stromzuleitung innerhalb der Teleskopverschalung verlegen. Falls Ihr Gerät in Abluftversion oder Version mit externem
Motor zu installieren ist, das Luftaustrittsloch vorbereiten.
Die Breite des Haltebügels anhand der oberen Teleskopverschalung einstellen (Abb.3). Dann mit den Schrauben A (Abb.3)
so an der Wand befestigen, daß er mit der Abzugshaube
ausgerichtet ist und die in Abb. 2 angegebene Entfernung von
der Decke einhalten. Mittels eines Abluftrohrs den Flansch C
mit dem Luftaustrittsloch verbinden (Abb.4).
Die obere Teleskopverschalung in die untere stecken und
in die obere stecken und auf die Haube stellen. Die obere
Teleskopverschalung bis zum Bügel ausziehen und mit
den Schrauben B (Abb.3) befestigen. Zur Verwandlung der
Abzugshaube von der Abluftversion in die Umluftversion,
beim Händler die Aktivkohlefilter besorgen und die
Montageanleitung befolgen.
• Umluftversion
Die Abzugshaube und die Teleskopverschalung laut den Anweisungen des Abschnitts über die Montage der Abzugshaube
in Abluftversion befolgen. Zur Montage der Umluftweiche
auf die dem Kit beiliegenden Anweisungen Bezug nehmen.
Wurde das Kit nicht mitgeliefert, beim Händler als Zubehör
bestellen.
Die Aktivkohlelter müssen am Motorgehäuse angebracht
werden, das sich im Innern der Haube bendet, wobei sie nach
ihr ausgerichtet werden und um 90 Grad bis zur Auslösung der
Sperrung gedreht werden müssen (Abb.7).
BENUTZUNG UND WARTUNG
• Es wird empfohlen, die Dunstabzugshaube schon vor
Kochbeginn der Speisen einzuschalten. Es wird weiterhin
empfohlen, das Gerät nach Beendigung des Kochvorgangs
noch 15 Minuten weiterlaufen zu lassen, um den vollständigen
Abzug der Kochdünste zu gewährleisten.
Die Leistungsfähigkeit der Dunstabzugshaube hängt entscheidend von der Sorgfalt und Regelmäßigkeit der Wartung ab,
insbesondere die des Fettlters und die des Aktivkohlelters.
• Der Antifett-Filter hat die Aufgabe, die in der Luft schwe-
benden Fettpartikel zu fangen, daher kann er in unterschiedlichen Zeitspannen verstopfen, je nach Gebrauch des Geräts.
- Um der Brandgefahr vorzubeugen, müssen mindestens alle
2 Monate die Antifett-Filter per Hand gereinigt werden; dazu
verwendet man neutrale, nicht scheuernde Reinigungsmittel
oder man gibt ihn in die Spülmaschine bei niedriger Temperatur und kurzem Zyklus.
- Nach der Reinigung kann die Farbe etwas verändert sein.
Diese Tatsache ist kein Grund für eine Beschwerde, damit er
ausgewechselt wird.
• Die Aktivkohlefilter dienen dazu, die Luft, die in die Umgebung zurückgeleitet wird zu reinigen; sie haben die Aufgabe, die unangenehmen Gerüche, die während des Garvorgangs entstehen, zu beseitigen.
- Die nicht regenerierbaren Aktivkohlefilter müssen mindestens alle 4 Monate ausgewechselt werden. Die Sättigung
der Aktivkohle hängt davon ab, wie oft das Gerät benutzt
wird, vom Gartyp und von der Häufigkeit, mit der die Reinigung des Antifett-Filters durchgeführt wird.
- Die regenerierbaren Aktivkohlefilter müssen per Hand mit
neutralen, nicht scheuernden Reinigungsmitteln gewaschen
werden oder man gibt ihn in die Spülmaschine bei einer Temperatur, die 65°C nicht überschreiten darf (der Waschzyklus
muss ohne Geschirr vollendet werden). Das überschüssige
Wasser entfernen ohne den Filter dabei zu beschädigen, die
Bauteile aus Kunststoff entfernen und das Vlies im Ofen mindestens 15 Minuten lang circa bei einer Temperatur von max.
100°C trockenen. Um den regenerierbaren Aktivkohlefilter
wirkungsvoll zu erhalten, muss diese Operation alle 2 Monate wiederholt werden. Max. alle drei Jahre muss ein Auswechseln vorgenommen werden bzw. jedes Mal, wenn das Vlies
beschädigt ist.
• Vor der Montage des Antifett-Filters und des regenerierbaren Aktivkohlefilters ist es unbedingt nötig sicherzustellen, dass diese gut getrocknet sind.
• Die Haube muss häufig sowohl Innen als auch Außen gereinigt werden; dazu verwendet man ein mit denaturiertem
Alkohol befeuchtetes Tuch oder ein neutrales nicht scheuerndes Reinigungsmittel.
• Die Beleuchtungsanlage ist für den Gebrauch während des
Kochvorgangs realisiert worden und nicht für eine längere
Beleuchtung der Umgebung im Allgemeinen. Wird die Beleuchtung lange Zeit angelassen, wird die durchschnittliche
Lebensdauer der Glühbirne erheblich verringert.
• Achtung: Das Nichteinhalten dieser Hinweise für die Reinigung der Haube und deren Auswechseln und die Reinigung
der Filter, führen zu Brandgefahr. Es wird daher empfohlen,
die hier gegebenen Ratschläge zu befolgen.
• Austausch der Halogenlampen (Abb. 8).
Nehmen Sie zum Austausch der Halogenlampe B die
Glasabdeckung C (an den kleinen Schlitzen anheben) ab.
Tauschen Sie die Lampe durch eine desselben Typs aus.
Achtung: Fassen Sie die Halogenlampe nicht mit bloßen
Händen an.
• Bedienung: (Abb.5) die Symbolbezeichnungen sind folgend
wiedergegeben:
A = Taste BELEUCHTUNG Ein/Aus
B = Taste GESCHWINDIGKEIT AUS
C = Taste ERSTE GESCHWINDIGKEIT
D = Taste ZWEITE GESCHWINDIGKEIT
E = Taste DRITTE GESCHWINDIGKEIT
FÜR SCHÄDEN, DIE AUF DIE NICHTBEACHTUNG DER OBEN
GENANNTEN ANWEISUNGEN ZURUCKZUFÜHREN SIND,
WIRD KEINERLEI VERANTWORTUNG ÜBERNOMMEN.
- 7 -
Page 8
FRANÇAIS
FR
GÉNERALITÉS
Lire attentivement le contenu du mode d’emploi puisqu’il
fournit des indications importantes concernant la sécurité
d’installation, d’emploi et d’entretien. Le conserver pour d’
ultérieures consultations. L’appareil a été conçu pour être
utilisé dans le modèle aspirant (évacuation de l’air à l’extérieur
– Fig.1B) ou ltrant (retour de l’air à l’intérieur – Fig.1A).
CONSEILS POUR LA SÉCURITÉ
1. Attention, lorsque dans la même pièce vous utilisez simul-
tanément la hotte à évacuation avec un brûleur ou une cheminée alimentés par une énergie autre que l’électricité, vous
pouvez créer un problème “d’inversion de ux”. Dans ce cas la
hotte aspire l’air nécessaire à leur combustion. La dépression
dans le local ne doit pas dépasser les 4Pa (4x10⁻⁵ bar). Pour un
fonctionnement en toute sécurité, n’oubliez pas de prévoir une
ventilation susante du local.Pour l’évacuation vers l’extérieur,
veuillez vous référer aux dispositions en vigueur dans votre
pays.
Avant de brancher la hotte au réseau de distribution
électrique:
- Lire les données reportées sur la plaquette d’identication
(appliquée à l’intérieur de la hotte) pour vérier si le voltage et
la puissance correspondent à ceux du réseau. Contrôler aussi
si la prise est adaptée.
- En cas de doutes, contacter un électricien qualié.
Si le câble d’alimentation est abîmé, il faut le remplacer par
un autre câble ou par un ensemble, spécialement prévus, que
vous pouvez commander au fabricant ou à un de ses services
d’assistance technique.
2. Attention!
Dans certaines circonstances les électroménagers peuvent
être dangereux.
A) N’essayez pas de contrôler l’état des ltres quand la
hotte est en marche.
B) Ne jamais toucher les lampes et les zones adjacentes,
pendant et tout de suite après l’utilisation prolongée de
l’éclairage.
C) Il est absolument interdit de amber sous la hotte.
D) Évitez de laisser des ammes libres, elles sont dangereuses pour les ltres et pour les risques d’incendie.
E) Surveillez constamment les fritures pour éviter que
l’huile surchauée prenne feu.
F) Avant de procéder à toute opération d’entretien, coupez
l’alimentation électrique de la hotte.
G) Cet appareil ne peut pas être utilisé par des enfants ou
par des personnes nécessitant une surveillance.
H) Veillez à ce que les enfants ne jouent pas avec l’appareil.
I) Lorsque la hotte est utilisée en présence d’appareils
utilisant du gaz ou d’autres combustibles, la pièce doit
être correctement ventilée.
L) Si le nettoyage n’est pas réalisé conformément aux
instructions, un incendie peut se déclarer.
Cet appareil est marqué conformément à la Directive européenne 2002/96/CE sur les déchets d’équipements électriques
et électroniques (DEEE). Assurez-vous que cet appareil soit mis
au rebus selon la réglementation en vigueur, vous éviterez ainsi
des conséquences néfastes sur l’environnement et la santé.
Le symbole appliqué sur le produit ou sur la documen-
tation jointe rappelle que cet appareil ne doit pas être
traité comme un déchet domestique mais faire l’objet
d’une collecte sélective dans une déchetterie spécialisée
dans le recyclage des appareils électriques et électroniques.
Conformez-vous aux réglementations locales sur la collecte
et l’élimination des déchets. Pour tout autre renseignement
sur le traitement, la récupération et le recyclage de cet appareil, veuillez contacter le bureau concerné de votre ville, le
service de collecte des déchets domestiques ou le magasin
où vous avez acheté votre appareil.
INSTRUCTIONS POUR L’INSTALLATION
Le montage et le branchement électrique doivent être
eectués par un personnel spécialisé.
• Connexion électrique
L’appareil est construit en classe II, pour cela aucun cable ne
doit être connecté avec la prise terre.
La connection avec le réseau électrique doit être éxécutée
comme suit:
MARRON = L ligne
BLEU = N neutre
Si elle n’a pas été prévue, monter sur le cable une che normalisée pour la charge indiquée sur l’etiquette des caractéristiques.
Si elle est dotée d’une che, la hotte doit être installée en sorte
que la che soit accessible.
En cas de connection directe avec le réseau électrique, il est
nécessaire d’interposer entre l’appareil et le réseau un interrupteur omnipolaire avec une ouverture minimale entre les
contacts de 3 mm, proportionnel à la charge et correspondant
aux normes en vigueur.
• La distance minimum entre la surface de support des récipients de cuisson sur le dispositif de cuisson et la partie la plus
basse de la hotte pour cuisine doit être de 65 cm au moins.
S’il doit être utilisé un tuyau de connection composé de deux
ou plusieurs parties, la partie superieure doit être à l’exterieur
de celle inférieure. Ne pas relier le tuyau d’échappement de
la hotte à un conduit dans lequel circule de l’air chaud ou
employé pour évacuer les fumées des appareils alimentés par
une énergie dierente de celle électrique.
En vue d’une manœuvrabilité de l’appareil plus facile, avant
d’exécuter les opérations de montage, déconnecter le ltre/
les ltres anti-graisse (Fig.6).
S’il s’agit d’une hotte aspirante, il faudra prévoir une ouverture
pour l’évacuation de l’air.
• Nous conseillons d’utiliser un tuyau d’évacuation de l’air
diamètre 150.
L’utilisation d’une réduction pourrait diminuer les performances du produit et augmenter le niveau sonore
• Fixation murale
Exécuter les trous A en respectant les cotes indiquées (Fig. 2).
Fixer l’appareil au mur et l’aligner dans la position horizontale
- 8 -
Page 9

avec les éléments suspendus. Cette opération terminée, xer
la hotte dénitivement au moyen des 2 vis A (Fig. 4). En cas de
diérents montages utiliser des vis et des goujons à expansion
adéquats au type de mur (par exemple béton armé, placoplâtre, etc.). Au cas où les vis et les goujons seraient fournis
avec l’appareil, s’assurer qu’ils sont adéquats au type de paroi,
où sera xée la hotte.
• Fixation des raccords télescopiques de décoration
Prévoir l’alimentation électrique à l’intérieur de l’encombrement
du raccord de décoration. Si votre appareil doit être installé
dans le modèle aspirant ou doté d’un moteur externe, prévoir
le trou de l’évacuation de l’air. Régler d’abord la largeur de
la bride de support du raccord supérieur (Fig.3), ensuite
la fixer au plafond, de manière à ce qu’elle soit sur l’axe de
votre hotte au moyen des vis A (Fig.3), tout en respectant la
distance depuis le plafond indiquée à la Fig.2. Raccorder la
bride C au trou d’évacuation de l’air au moyen d’un tube de
raccordement (Fig.4).
Introduire le raccord supérieur à l’intérieur du raccord inférieur
et appuyer sur la coque.
. Retirer le raccord supérieur jusqu’à la bride et le fixer au moyen
des vis B (Fig.3). Si on veut transformer la hotte du modèle
aspirant au modèle filtrant, demander à votre revendeur les
filtres au charbon actif et suivre les instructions de montage.
• Modèle ltrant
Installer la hotte et les deux raccords suivant l’indication
reportée au paragraphe concernant le montage de la hotte
dans le modèle aspirant. En cas de montage du raccord ltrant, se rapporter aux instructions gurant dans le jeu. Si le
jeu n’est pas fourni, commandez-le à votre revendeur comme
accessoire. Les ltres doivent être appliqués au groupe aspirant situé à l’intérieur de la hotte en les centrant par rapport
au groupe aspirant et en les tournant de 90 degrés jusqu’au
déclic d’arrêt (Fig.7).
EMPLOI ET ENTRETIEN
• Il est conseillé de mettre en service la hotte quelques minutes
avant de commencer à cuisiner. De même il est conseillé de
l’arrêter 15 minutes après avoir terminé la cuisson pour éliminer au maximum les odeurs et évacuer l’air vicié.
Le bon fonctionnement de la hotte est lié à la fréquence des
opérations d’entretien et, plus particulièrement, à l’entretien
du ltre anti-graisse et du ltre à charbon actif.
• Le ltre anti-graisse à pour rôle de retenir les particules
grasses en suspension dans l’air; par conséquent, il peut se
boucher en un temps qui varie en fonction de l’utilisation de
l’appareil.
- Pour prévenir le danger d’incendie, chaque 2 mois au maximum, il est nécessaire de laver les ltres anti-graisse à la main
en utilisant des détergents liquides neutres non abrasifs ou
dans le lave-vaisselle à température basse et cycle court.
- Après plusieurs lavages, la couleur peut changer. Cela ne
donne pas le droit à une requête pour leur remplacement.
• Les ltres au carbone actif servent à purier l’air qui sera
rejeté dans la pièce et à atténuer les odeurs générées par la
cuisson.
- Les ltres à carbone actif non régénérables doivent être
remplacés chaque 4 mois au maximum. La saturation du carbone actif dépend de l’utilisation plus où moins prolongée de
l’appareil, du type de cuisine et de la régularité avec laquelle
vous eectuez le nettoyage du ltre anti-graisse.
- Les ltres de carbone actif régénérables doivent être lavé
à la main, avec des détergents neutres non abrasifs, ou dans
le lave-vaisselle à température maximale de 65°C (le cycle de
lavage doit être complet et sans plats) Enlever l’eau en excès
sans abîmer le ltre, retirer les parties en plastique, faire sécher
le matelas au four pendant au moins 15 minutes environ et à
la température maximale de 100°C. Cette opération doit être
répétée chaque 2 mois pour maintenir ecace la fonction
du ltre à carbone régénérable. Ces derniers doivent être
remplacés au maximum chaque 3 ans ou lorsque le matelas
est endommagé.
• Avant de monter les ltres anti-graisses et les ltres à
carbone actif régénérables, il est important que ceux-ci
soient bien secs.
• Nettoyer fréquemment la hotte, soit à l’intérieur que à l’ex térieur en utilisant un chion humidié avec de l’alcool dénaturé
ou des détergents liquides neutres non abrasifs.
• L’installation d’illumination est conçue pour l’utilisation
pendant la cuisson et non pour l’utilisation prolongée pour
illuminer la pièce. L’utilisation prolongée de l’illumination
réduit considérablement la durée moyenne de la lampe.
• Attention: La non-observation de ces remarques de nettoyage de la hotte et du remplacement et nettoyage des ltres
comporte des risques d’incendie. Il est donc recommandé de
suivre les instructions suggérées.
• Remplacement des lampes halogènes (Fig. 8).
Pour changer les lampes halogènes B retirez le verre C en
faisant levier dans les fentes prévues.
Remplacez-les par des lampes de même type.
Attention : ne touchez pas aux lampes mains nues.
• Commandes: (fig.5) mécaniques les symboles sont les
suivants:
A = touche ECLAIRAGE
B = touche OFF
C = touche PREMIERE VITESSE
D = touche DEUXIEME VITESSE
E = touche TROISIEME VITESSE
NOUS DECLINOS TOUTE RESPONSABILI TE POUR LES
EVENTUELS DÉGATS PROVOQUÉS PAR L’INOBSERVATION
DES SUSDITES INSTRUCTIONS.
- 9 -
Page 10
ITALIANO
IT
GENERALITÀ
Leggere attentamente il contenuto del presente libretto in
quanto fornisce importanti indicazioni riguardanti la sicurezza
di installazione, d’uso e di manutenzione. Conservare il
libretto per ogni ulteriore consultazione. L’apparecchio è stato
progettato per uso in versione aspirante (evacuazione aria
all’esterno - Fig.1B), ltrante (riciclo aria all’interno - Fig.1A).
AVVERTENZE PER LA SICUREZZA
1. Fare attenzione se funzionano contemporaneamente una
cappa aspirante e un bruciatore o un focolare dipendenti
dall’aria dell’ambiente ed alimentati da un’energia diversa
da quella elettrica, in quanto la cappa aspirando toglie
all’ambiente l’aria di cui il bruciatore o il focolare necessita
per la combustione. La pressione negativa nel locale non
deve superare i 4Pa (4x10⁻⁵ bar). Per un funzionamento sicuro,
provvedere quindi ad un’opportuna ventilazione del locale.
Per l’evacuazione esterna attenersi alle disposizioni vigenti
nel vostro paese.
Prima di allacciare il modello alla rete elettrica:
- Controllare la targa dati (posta all’interno dell’ apperecchio)
per accettarsi che la tensione e potenza siano corrispondenti a
quella della rete e la presa di collegamento sia idonea. In caso
di dubbio interpellare un elettricista qualicato.
- Se il cavo di alimentazione è danneggiato, esso deve essere
sostituito da un cavo o un assieme speciali disponibile presso
il costruttore o il suo servizio assistenza tecnica.
2. Attenzione!
In determinate circostanze gli elettrodomestici possono
essere pericolosi.
A) Non cercare di controllare i ltri con la cappa in funzione.
B) Non toccare le lampade e le zone adiacenti, durante
e subito dopo l’uso prolungato dell’impianto di
illuminazione.
C) E’ vietato cuocere cibi alla amma sotto la cappa.
D) Evitare la amma libera, perché dannosa per i ltri e
pericolosa per gli incendi.
E) Controllare costantemente i cibi fritti per evitare che
l’olio surriscaldato prenda fuoco.
F) Prima di eettuare qualsiasi manutenzione, disinserire
la cappa dalla rete elettrica.
G) Questo apparecchio non è destinato all’utilizzo da parte
di bambini o persone che necessitano di supervisione.
H) Controllare che i bambini non giochino con
l’apparecchio.
I) Quando la cappa viene utilizzata contemporaneamente
ad apparecchi che bruciano gas o altri combustibili, il locale
deve essere adeguatamente ventilato.
L) Se le operazioni di pulizia non vengono eseguite nel
rispetto delle istruzioni, esiste il rischio che si sviluppi un
incendio.
Questo apparecchio è contrassegnato in conformità alla
Direttiva Europea 2002/96/EC, Waste Electrical and Electronic
Equipment (WEEE). Assicurandosi che questo prodotto sia
smaltito in modo corretto, l’utente contribuisce a prevenire
le potenziali conseguenze negative per l’ambiente e la salute.
Il simbolo sul prodotto o sulla documentazione di ac-
compagnamento indica che questo prodotto non deve
essere trattato come rifiuto domestico ma deve essere
consegnato presso l’idoneo punto di raccolta per il riciclaggio di apparecchiature elettriche ed elettroniche. Disfarsene seguendo le normative locali per lo smaltimento dei rifiuti. Per ulteriori informazioni sul trattamento, recupero e riciclaggio di questo prodotto, contattare l’idoneo ufficio locale,
il servizio di raccolta dei rifiuti domestici o il negozio presso il
quale il prodotto è stato acquistato.
ISTRUZIONI PER L’INSTALLAZIONE
Le operazioni di montaggio e collegamento elettrico
devono essere eettuate da personale specializzato.
• Collegamento elettrico
L’apparecchio è costruito in classe II, perciò nessun cavo deve
essere collegato alla presa di terra.
L’allacciamento alla rete elettrica deve essere eseguito come
segue:
MARRONE = L linea
BLU = N neutro
Se non prevista, montare sul cavo una spina normalizzata per
il carico indicato nella etichetta caratteristiche. Se provvista
di spina, fare in modo che sia facilmente accessibile dopo
l’installazione dell’apparecchio. Nel caso di collegamento
diretto alla rete elettrica è necessario interporre tra
l’apparecchio e la rete un interruttore onnipolare con
apertura minima tra i contatti 3 mm, dimensionato al carico e
rispondente alle norme vigenti.
• La distanza minima fra la supercie di supporto dei recipienti
di cottura sul dispositivo di cottura e la parte più bassa della
cappa da cucina deve essere di almeno 65 cm. Se dovesse
essere usato un tubo di connessione composto di due o
più parti, la parte superiore deve essere all’esterno di quella
inferiore. Non collegare lo scarico della cappa ad un condotto
in cui circoli aria calda o utilizzato per evacuare fumi degli
apparecchi alimentati da un’energia diversa da quella elettrica.
Prima di procedere alle operazioni di montaggio, per una
più facile manovrabilità dell’apparecchio disinserire i ltro/i
antigrasso (Fig.6).
Nel caso di montaggio dell’apparecchio in versione aspirante
predisporre il foro di evacuazione aria.
• Si consiglia l’utilizzo di un tubo evacuazione aria con diametro 150. L’utilizzo di una riduzione potrebbe diminuire le
prestazioni del prodotto ed aumentare la rumorosità.
• Fissaggio a parete
Eseguire i fori A rispettando le quote indicate (Fig.2). Fissare
l’apparecchio al muro ed allinearlo in posizione orizzontale
con i pensili. A regolazione avvenuta fissare la cappa
denitivamente tramite le 2 viti A (Fig.4).
Per i vari montaggi utilizzare viti e tasselli ad espansione idonei
al tipo di muro (es. cemento armato, cartongesso, ecc). Nel
caso in cui le viti e i tasselli siano forniti in dotazione con il
prodotto accertarsi che siano idonei per il tipo di parete in cui
deve essere ssata la cappa.
- 10 -
Page 11

• Fissaggio dei raccordi telescopici decorativi
Predisporre l’alimentazione elettrica entro l’ingombro del
raccordo decorativo. Se il vostro apparecchio deve essere
installato in versione aspirante o in versione motore esterno,
predisporre il foro evacuazione aria. Regolare la larghezza
della staffa di supporto del raccordo superiore (Fig.3).
Successivamente fissarla al soffitto in modo che sia in asse con
la vostra cappa tramite le viti A (Fig.3) e rispettando la distanza
dal soffitto indicata in Fig.2. Collegare, mediante un tubo di
raccordo, la flangia C al foro evacuazione aria (Fig.4).
Infilare il raccordo superiore all’interno del raccordo inferiore
ed appoggiare sopra la scocca.Sfilare il raccordo superiore fino
alla staffa e fissarlo tramite le viti B (Fig.3). Per trasformare la
cappa da versione aspirante a versione filtrante, richiedere al
vostro rivenditore i filtri al carbone attivo e seguire le istruzioni
di montaggio.
• Versione ltrante
Installare la cappa e i due raccordi come indicato nel
paragrafo riguardante il montaggio della cappa nella versione
aspirante.
Per il montaggio del deviatore aria ltrante fare riferimento
alle istruzioni contenute nel kit.
Se il kit non è in dotazione, ordinarlo al Vs. rivenditore come
accessorio.
I filtri devono essere applicati al gruppo aspirante posto
all’interno della cappa centrandoli ad esso e ruotandoli di 90
gradi no allo scatto d’arresto (Fig.7).
USO E MANUTENZIONE
• Si raccomanda di mettere in funzione l’apparecchio prima di
procedere alla cottura di un qualsiasi alimento. Si raccomanda
di lasciar funzionare l’apparecchio per 15 minuti dopo aver
terminato la cottura dei cibi, per un’evacuazione completa
dell’aria viziata.
Il buon funzionamento della cappa è condizionato da
una corretta e costante manutenzione; una particolare
attenzione deve essere data al filtro antigrasso e al filtro al
carbone attivo.
• Il filtro antigrasso ha il compito di trattenere le particelle
grasse in sospensione nell’aria, pertanto è soggetto
ad intasarsi in tempi variabili relativamente all’uso
dell’apparecchio.
- Per prevenire il pericolo di eventuali incendi, al massimo
ogni 2 mesi, è necessario lavare i filtri antigrasso a mano,
utilizzando detersivi liquidi neutri non abrasivi, oppure in
lavastoviglie a basse temperature e con cicli brevi.
- Dopo alcuni lavaggi, si possono verificare delle alterazioni
del colore. Questo fatto non dà diritto a reclamo per
l’eventuale loro sostituzione.
• I filtri al carbone attivo servono per depurare l’aria che
viene rimessa nell’ambiente ed ha la funzione di attenuare
gli odori sgradevoli generati dalla cottura.
- I filtri al carbone attivo non rigenerabili devono essere
sostituiti ogni 4 mesi al massimo. La saturazione del
carbone attivo dipende dall’uso più o meno prolungato
dell’apparecchio, dal tipo di cucina e dalla regolarità con cui
viene effettuata la pulizia del filtro antigrasso.
- I filtri al carbone attivo rigenerabili devono essere lavati a
mano, con detergenti neutri non abrasivi, o in lavastoviglie
con una temperatura massima di 65°C (il ciclo di lavaggio
deve essere completo senza stoviglie). Togliere l’acqua in
eccesso senza rovinare il filtro, rimuovere le parti in plastica,
- 11 -
e far asciugare il materassino in forno per almeno 15 minuti
circa ad una temperatura di 100°C massimo. Per mantenere
efficiente la funzione del filtro al carbone rigenerabile questa
operazione deve essere ripetuta ogni 2 mesi. Questi devono
essere sostituiti al massimo ogni 3 anni oppure quando il
materassino risulta danneggiato.
• Prima di rimontare i filtri antigrasso e i filtri al carbone
attivo rigenerabili è importante che questi siano
asciugati bene.
• Pulire frequentemente la cappa, sia internamente che
esternamente, usando un panno inumidito con alcool
denaturato o detersivi liquidi neutri non abrasivi.
• L’ impianto di illuminazione è progettato per l’uso durante la
cottura e non per l’uso prolungato di illuminazione generale
dell’ambiente. L’uso prolungato dell’illuminazione diminuisce
notevolmente la durata media delle lampade.
• Attenzione: L’inosservanza delle avvertenze di pulizia della
cappa e della sostituzione e pulizia dei filtri comporta rischi
di incendi. Si raccomanda quindi di attenersi alle istruzioni
suggerite.
• Sostituzione delle lampade alogene (Fig.8).
Per sostituire le lampade alogene B togliere il vetrino C facendo
leva sulle apposite fessure.
Sostituire con lampade dello stesso tipo.
Attenzione: non toccare la lampadina a mano nude.
• ComandI: (Fig.5) meccanici la simbologia è di seguito
riportata:
A= tasto ILLUMINAZIONE
B= tasto OFF
C= tasto PRIMA VELOCITA’
D= tasto SECONDA VELOCITA’
E= tasto TERZA VELOCITA’
SI DECLINA OGNI RESPONSABILITA’ PER EVENTUALI DANNI
PROVOCATI DALLA INOSSERVANZA DELLE SUDDETTE
AVVERTENZE
Page 12
ENGLISH
EN
GENERAL
Carefully read the following important information regarding
installation safety and maintenance. Keep this information
booklet accessible for further consultations.
The appliance has been designed for use in the ducting version (air exhaust to the outside – Fig.1B) or ltering version (air
circulation on the inside – Fig.1A).
SAFETY PRECAUTION
1. Take care when the cooker hood is operating simultaneously
with an open replace or burner that depend on the air in the
environment and are supplied by other than electrical energy,
as the cooker hood removes the air from the environment
which a burner or replace need for combustion. The negative
pressure in the environment must not exceed 4Pa (4x10⁻⁵ bar).
Provide adequate ventilation in the environment for a safe
operation of the cooker hood. Follow the local laws applicable
for external air evacuation.
Before connecting the model to the electricity network:
- Control the data plate (positioned inside the appliance)
to ascertain that the voltage and power correspond to the
network and the socket is suitable. If in doubt ask a qualied
electrician.
- If the power supply cable is damaged, it must be replaced with
another cable or a special assembly, which may be obtained
direct from the manufacturer or from the Technical Assistance
Centre.
2. Warning!
In certain circumstances electrical appliances may be a
danger hazard.
A) Do not check the status of the lters while the cooker
hood is operating.
B) Do not touch bulbs or adjacent areas, during or straight
after prolonged use of the lighting installation.
C) Flambè cooking is prohibited underneath the cooker
hood.
D) Avoid free ame, as it is damaging for the lters and a
re hazard.
E) Constantly check food frying to avoid that the
overheated oil may become a re hazard.
F) Disconnect the electrical plug prior to any maintenance.
G) This appliance is not intended for use by young children
or inrm persons without supervision.
H) Young children should be supervised to ensure they do
not play with the appliance.
I) There shall be adequate ventilation of the room when
the rangehood is used at the same time as appliances
burning gas or other fuels.
L) There is a risk of re if cleaning is not carried out in
accordance with the instructions.
This appliance conforms to the European Directive EC/2002/96,
Waste Electrical and Electronic Equipment (WEEE).
By making sure that this appliance is disposed of in a suitable
manner, the user is helping to prevent potential damage to
the environment or to public health.
The symbol on the product or on the accompanying
paperwork indicates that the appliance should not be
treated as domestic waste, but should be delivered to
a suitable electric and electronic appliance recycling
collection point. Follow local guidelines when disposing of
waste. For more information on the treatment, re-use and
recycling of this product, please contact your local authority,
domestic waste collection service or the shop where the appliance was purchased.
INSTALLATION INSTRUCTIONS
Assembly and electrical connections must be carried out
by specialised personnel.
• Electric Connection
The appliance has been manufactured as a class II, therefore
no earth cable is necessary.
The connection to the mains is carried out as follows:
BROWN = L line
BLUE = N neutral
If not provided, connect a plug for the electrical load indicated on the description label. Where a plug is provided, the
cooker hood must be installed in order that the plug is easily
accessible.
An omnipolar switch with a minimum opening of 3mm between contacts, in line with the electrical load and local standards, must be placed between the appliance and the network
in the case of direct connection to the electrical network.
Warning:
When connecting the appliance to the electricity supply, make
sure that the mains socket has an earth connection.
After tting the ducted cooker hood, make sure that the
electrical plug is in a position where it can be accessed
easily.
If the appliance is connected directly to the electricity supply,
an omnipolar switch with a minimum contact opening of
3 mm must be placed in between the two; its size must be
suitable for the load required and it must comply with current
legislation.
• The minimum distance between the support surfaces of
the cooking pots on the cooker top and the lowest part of
the cooker hood must be at least 65 cm. If a connection tube
composed of two parts is used, the upper part must be placed
outside the lower part. Do not connect the cooker hood
exhaust to the same conductor used to circulate hot air or for
evacuating fumes from other appliances generated by other
than an electrical source.
Before proceeding with the assembly operations, remove the
anti-grease lter(s) (Fig.6) so that the unit is easier to handle.
In the case of assembly of the appliance in the suction version
prepare the hole for evacuation of the air.
• We recommend the use of an air exhaust pipe with a
diameter of 150. If a pipe with a smaller diameter is used, the
eciency of the product may be reduced and its operation
may become noisier.
- 12 -
Page 13

• Fixing to the wall
Drill the holes A respecting the distances indicated (Fig.2). Fix
the appliance to the wall and align it in horizontal position
to the wall units. When the appliance has been adjusted,
denitely x the hood using the screws A (Fig.4). For the various installations use screws and screw anchors suited to the
type of wall (e.g. reinforced concrete, plasterboard, etc.). If
the screws and screw anchors are provided with the product,
check that they are suitable for the type of wall on which the
hood is to be xed.
• Fixing the decorative telescopic ue
Arrange the electrical power supply within the dimensions of
the decorative flue. If your appliance is to be installed in the
ducting version or in the version with external motor, prepare
the air exhaust opening. Adjust the width of the support
bracket of the upper flue (Fig.3). Then fix it to the ceiling using
the screws A (Fig.3) in such a way that it is in line with your
hood and respecting the distance from the ceiling indicated
in Fig.2. Connect the flange C to the air exhaust hole using a
connection pipe (Fig.4). Insert the upper flue into the lower
flue and rest above the frame. Extract the upper flue up to the
bracket and fix it with the screws B (Fig.3).
To transform the hood from a ducting version into a filtering
version, ask your dealer for the charcoal filters and follow the
installation instructions.
• Filtering version
Install the hood and the two ues as described in the paragraph
for installation of the hood in ducting version. To assemble the
ltering ue refer to the instructions contained in the kit.
If the kit is not provided, order it from your dealer as accessory.
The lters must be applied to the suction unit positioned inside
the hood. They must be centred by turning them 90 degrees
until the stop catch is tripped (Fig.7).
USE AND MAINTENANCE
• We recommend that the cooker hood is switched on before
any food is cooked. We also recommend that the appliance is
left running for 15 minutes after the food is cooked, in order
to thoroughly eliminate all contaminated air.
The eective performance of the cooker hood depends on
constant maintenance; the anti-grease lter and the active
carbon lter both require special attention.
• The anti-grease lter is responsible retaining the grease
particles suspended in the air, therefore it is subject to clogging
with variable frequency according to the use of the appliance.
- To prevent the danger of possible fires, at least every 2
months one must wash the anti-grease lters by hand using
non-abrasive neutral liquid detergents or in the dishwasher at
low temperatures and on short cycles.
- After a few washes, colour alterations may occur. This does
not give the right to claim their replacement.
• The active carbon lters are used to purify the air that is
sent back into the room and its function s to mitigate the
unpleasant odours produced by cooking.
- The non-regenerable active carbon lters must be replaced
at least every 4 months. The saturation of the active charcoal
depends on the more or less prolonged use of the appliance,
on the type of kitchen and on the frequency with which antigrease lter is cleaned.
- Regenerable active charcoal lters must be washed by hand,
with non abrasive neutral detergents, or in the dishwasher at
a maximum temperature of 65°C (the washing cycle must be
complete without dishware). Remove excess water without
damaging the lter, remove the plastic parts, and let the mat
dry in the oven for at least 15 minutes approximately at a
maximum temperature of 100°C. To keep the regenerable
charcoal lter functioning ecient this operation must be
repeated every 2 months. These must be replaced at least
every 3 years or when the mat is damaged.
• Before remounting the anti-grease lters and the regenerable active charcoal lters it is important that they are
completely dry.
• Clean the hood frequently, both internally and externally,
using a cloth dampened with denatured alcohol or neutral
liquid detergents that are non abrasive.
• The lighting .system is designed for use during cooking
and not for the prolonged general lighting of the room. The
prolonged use of the lighting system signicantly decreases
the average duration of the bulbs.
• Attention: The non compliance with the hood cleaning
warnings and with the replacement and cleaning of the lters
entails risk of res. One therefore recommends keeping to the
suggested instructions.
• Replacing halogen light bulbs (Fig. 8).
To replace the halogen light bulbs B, remove the glass pane
C using a lever action on the relevant cracks.
Replace the bulbs with new ones of the same type.
Caution: do not touch the light bulb with bare hands.
•Commands: (g.5) mechanical the key symbols are explained
below:
A = LIGHT
B = OFF
C = SPEED I
D = SPEED II
E = SPEED III
THE MANUFACTURER DECLINES ALL RESPONSIBILITY
FOR EVENTUAL DAMAGES CAUSED BY BREACHING THE
ABOVE WARNINGS.
- 13 -
Page 14
ESPAÑOL
ES
GENERALIDADES
Lea atentamente el contenido del presente libro de instrucciones pues contiene indicaciones importantes para la seguridad
en la instalación, el uso y el mantenimiento (Consérvelo para
un posible consulta posterior). El aparato ha sido diseñado
para el uso en versión aspiradora (evacuación de aire hacia
el exterior – Fig.1B), ltrante (reciclaje del aire en el interior
– Fig.1A) .
SUGERENCIAS PARA LA SEGURIDAD
1.Preste atención si funcionan contemporáneamente una
campana aspirante y un quemador o una chimenea que
toman el aire del ambiente y están alimentados por energía
que no sea eléctrica, pues la campana aspirante toma del
ambiente el aire que el quemador o la chimenea necesitan
para la combustión.
La presión negativa del local no debe superar los 4 Pa (4x10⁻⁵
bares). Para un funcionamiento seguro, realice primero una
adecuada ventilación del local. Para la evacuación externa,
aténgase a las disposiciones vigentes en su país.
Antes de enchufar el modelo a la corriente eléctrica:
- controlar los datos de matrícula (que se encuentran en el
interior del aparato) para constatar que la tensión y la potencia
correspondan a la de la red y el enchufe de conexión sea idóneo. En caso de dudas, recurra a un electricista calicado.
- Si el cable de alimentación está dañado, se debe cambiar con
un cable o conjunto especial de cables que puede suministrar
tanto el fabricante como el servicio de asistencia técnica.
2. ¡Atención!
En determinadas circunstancias los electrodomésticos
pueden ser peligrosos.
A) No intente controlar los filtros cuando la campana está
en funcionamiento
B) Durante el uso prolongado de la instalación de
iluminación o inmediatamente después, no toque las
lámparas ni las zonas adyacentes a ellas.
C) Está prohibido cocinar a fuego directo debajo de la
campana
D) Evite dejar la llama libre porque puede dañar los filtros
y constituye un riesgo de incendio
E) Controle constantemente los alimentos fritos para evitar
que el aceite sobrecalentado se prenda fuego
F) Antes de efectuar cualquier operación de mantenimiento,
desconecte la campana de la red eléctrica.
G) Este aparato no debe ser utilizado por niños o personas
que necesiten de supervisión.
H) Controle que los niños no jueguen con el aparato.
I) Cuando la campana se utiliza simultáneamente con
aparatos que queman gas u otros combustibles, el
ambiente debe estar adecuadamente ventilado.
L) Si las operaciones de limpieza no se realizan respetando
las instrucciones, hay peligro de incendio.
Este aparato está fabricado en conformidad con la Norma Europea 2002/96/EC, Waste Electrical and Electronic Equipment
(WEEE). Controlando que este producto sea eliminado de
modo correcto, el usuario contribuye a prevenir consecuencias
negativas para el ambiente y la salud.
El símbolo en el producto o en la documentación ad-
junta, indica que este producto no debe ser tratado
como residuo doméstico sino que debe ser entregado
a un punto de recolección para reciclar aparatos eléctricos y electrónicos. Elimínelo siguiendo las normas locales
para la eliminación de desechos. Para mayor información sobre
el tratamiento, recuperación o reciclaje de este producto, llame
a la oficina local encargada, al servicio de recolección de desechos domésticos o al negocio en el cual ha comprado el
producto.
INSTRUCCIONES PARA LA INSTALACIÓN
Las operaciones de montaje y conexión eléctrica deben ser
efectuadas por personal especializado.
• Instalación eléctrica
El aparato está construido en clase II, por lo tanto no se debe
e conectar ningún cable a la toma de tierra.
La conexión a la corriente eléctrica debe realizarse de la
siguiente manera:
MARRÓN = L línea.
AZUL = N neutro.
Si no está incluido, monte en el cable un enchufe normalizado
para la carga indicada en la etiqueta de las caracteristicas. Si
está provista de enchufe,coloque la campana de tal manera
que el enchufe quede en un sitio accesible. En caso de conexión directa a la corriente eléctrica, es necesario interponer
entre el aparato y la red un interruptor omnipolar con abertura
mínima de 3mm, adecuado a la carga y que responda a las
normas vigentes.
• La distancia mínima entre la supercie de soporte de los
recipientes de cocción en el dispositivo de cocción y la parte
más baja de la campana de cocina debe de al menos 65 cm.
Si debe usarse un tubo de conexión compuesto de dos o más
partes, la parte superior debe estar fuera de la parte inferior.
No conecte la descarga de la campana a un conducto en el
que circúle airecaliente o que sea utilizado para evacuar los
humos de aparatos alimentados por una energía que no sea
eléctrica.
Antes de efectuar las operaciones de montaje, para una
más fácil maniobrabilidad del aparato, extraer el/los ltro/s
antigrasa (Fig.6).
En el caso de montaje del aparato en la versión aspirante,
predisponer el oricio de evacuación aire.
• Se aconseja el uso de un tubo de evacuación de aire con un
diámetro de 150. El uso de una reducción podría disminuir las
prestaciones del producto y aumentar el ruido.
• Fijar a la pared
Efectúe los agujeros A respetando las cuotas indicadas (Fig.2).
Fije el aparato a la pared y póngalo en línea en posición
horizontal con los armarios de pared. Una vez efectuada la
regulación, fije la campana definitivamente mediante los
dos tornillos A (Fig.4). Para los montajes en general, utilice
los tornillos y los tacos que expanden adecuados al tipo de
pared (por ejemplo cemento armado, cartón piedra, etc.). En
- 14 -
Page 15

el caso de que los tornillos y los tacos estén en dotación con el
producto, asegúrese de que sean adecuados al tipo de pared
en que se debe jar la campana.
• Fijar los racores telescópicos decorativos
Predisponga la alimentación eléctrica dentro del espacio
ocupado por el racor decorativo. Si su aparato se debe instalar
en versión aspiradora o en versión motor externo, predisponer
el agujero para la evacuación de aire. Regular la largura del
estribo de soporte del racor superior (Fig.3). A continuación fije
al techo de modo que esté en línea con su campana mediante
los tornillos A (Fig.3) y respetando la distancia del techo
indicada en la Fig.2. Conecte, mediante un tubo de empalme,
la brida C al agujero para la evacuación del aire (Fig.4).
Insertar el racor superior al interior del racor inferior y apoyar
sobre la caja
Extraiga el racor superior hasta el estribo y fíjelo mediante los
tornillos B (Fig.3). Para transformar la campana de la versión
aspiradora a la versión filtrante, solicite a su vendedor los filtros
al carbón activo y seguir las instrucciones de montaje.
• Versión ltrante
Instale la campana y los dos racores como indicado en el
párrafo correspondiente al montaje de la campana en la
versión aspiradora. Para el montaje del racor ltrante seguir
las instrucciones contenidas en el juego. Si el juego no está
en dotación, pídalo a su vendedor como accesorio. Los ltros
deben ser aplicados al grupo aspirante dentro de la campana, centrándolos y rotándolos 90 grados hasta el disparo de
dentención (Fig.7).
USO Y MANTENIMIENTO
• We recommend that the cooker hood is switched on before
any food is cooked. We also recommend that the appliance is
left running for 15 minutes after the food is cooked, in order
to thoroughly eliminate all contaminated air.
The eective performance of the cooker hood depends on
constant maintenance; the anti-grease lter and the active
carbon lter both require special attention.
• The anti-grease lter is responsible retaining the grease
particles suspended in the air, therefore it is subject to clogging
with variable frequency according to the use of the appliance.
- To prevent the danger of possible fires, at least every 2
months one must wash the anti-grease lters by hand using
non-abrasive neutral liquid detergents or in the dishwasher at
low temperatures and on short cycles.
- After a few washes, colour alterations may occur. This does
not give the right to claim their replacement.
• The active carbon lters are used to purify the air that is
sent back into the room and its function s to mitigate the
unpleasant odours produced by cooking.
- The non-regenerable active carbon lters must be replaced
at least every 4 months. The saturation of the active charcoal
depends on the more or less prolonged use of the appliance,
on the type of kitchen and on the frequency with which antigrease lter is cleaned.
- Regenerable active charcoal lters must be washed by hand,
with non abrasive neutral detergents, or in the dishwasher at
a maximum temperature of 65°C (the washing cycle must be
complete without dishware). Remove excess water without
damaging the lter, remove the plastic parts, and let the mat
dry in the oven for at least 15 minutes approximately at a
maximum temperature of 100°C. To keep the regenerable
charcoal lter functioning ecient this operation must be
repeated every 2 months. These must be replaced at least
every 3 years or when the mat is damaged.
• Before remounting the anti-grease lters and the regenerable active charcoal lters it is important that they are
completely dry.
• Clean the hood frequently, both internally and externally,
using a cloth dampened with denatured alcohol or neutral
liquid detergents that are non abrasive.
• The lighting .system is designed for use during cooking
and not for the prolonged general lighting of the room. The
prolonged use of the lighting system signicantly decreases
the average duration of the bulbs.
• Attention: The non compliance with the hood cleaning
warnings and with the replacement and cleaning of the lters
entails risk of res. One therefore recommends keeping to the
suggested instructions.
• Sustitución de las lámparas halógenas (Fig.8).
Para sustituir las lámparas halógenas B quite el vidrio C
haciendo palanca en las ranuras correspondientes.
Sustitúyalas con lámparas del mismo tipo.
Atención: no toque la bombilla con las manos sin protección.
• Mandos: (g.5) mecánicos la simbología es la siguiente:
A= botón ILUMINACION.
B= botón OFF
C= botón PRIMERA VELOCIDAD.
D= botón SEGUENDA VELOCIDAD.
E= botón TERCERA VELOCIDAD.
EL FABRICANTE NO SE HACE RESPONSABLE DE LOS DAÑOS PRODUCIDOS POR EL INCUMPLIMIENTO DE ESTAS
ADVERTENCIAS.
- 15 -
Page 16
PORTUGUÊS
PT
GENERALIDADES
Ler cuidadosamente o conteúdo do presente manual já que
este fornece indicações importantes referentes à segurança
de instalação, de uso e de manutenção. Conservar o manual
para qualquer ulterior consulta. O aparelho foi projectado para
utilização em versão aspirante (evacuação de ar para o exterior
- Fig.1B) ou ltrante (circulação de ar no interior - Fig.1A).
ADVERTÊNCIAS PARA A SEGURANÇA
1. Prestar atenção se estão funcionando contemporaneamente
uma coifa aspirante e um queimador ou um fogão dependentes do ar ambiente e alimentados por uma energia que não a
elétrica, já que a coifa, aspirando, tira do ambiente o ar que o
queimador ou o fogão necesitam para a combustão. A pressão
negativa no local não deve ser superior a 4 Pa (4x10⁻⁵ bar).
Para um funcionamento seguro, providenciar uma oportuna
ventilação do local. Para a evacuação externa, ater-se às disposições vigentes no seu País.
Antes de ligar o modelo à rede eléctrica:
- controle a placa dos dados (posta no interior do aparelho)
para vericar que a tensão e a potência correspondam às da
rede e que a tomada seja apropriada. Em caso de dúvidas
interpele um electricista qualicado.
- Se o cabo de alimentação estiver danicado, deverá ser substituído por um cabo ou um conjunto especiais fornecidos pelo
fabricante ou pelo seu serviço de assistência técnica.
2. Atenção!
Em determinadas circunstâncias, os electrodomésticos
podem ser perigosos.
A) Não procure controlar os filtros com o exaustor em
funcionamento.
B) Não toque as lâmpadas e as áreas adjacentes,
durante e logo pós o uso prolongado da instalação de
iluminação.
C) É proibido cozinhar alimentos flambé sob o exaustor.
D) Evite a chama livre, porque é danosa para os filtros e
perigosa para os incêndios.
E) Controle constantemente os alimentos fritos para evitar
que o óleo aquecido pegue fogo.
F) Antes de efectuar qualquer manutenção, desligue o
exaustor da rede eléctrica.
G) Este aparelho não é destinado ao uso por parte de
crianças ou pessoas que precisem de supervisão.
H) Não permita que as crianças brinquem com o
aparelho.
I) Quando o exaustor for utilizado contemporaneamente
a aparelhos que queimam gás ou outros combustíveis,
o local deverá ser adequadamente ventilado.
L) Se as operações de limpeza não forem efectuadas no
respeito das instruções, existe o risco de incêndio.
Este aparelho está marcado em conformidade com a Directiva
Europeia 2002/96/EC, Waste Electrical and Electronic Equipment (WEEE). Assegurar-se que este aparelho seja eliminado
de maneira certa, o utilizador contribui a prevenir as consequências potenciais negativas para o meio ambiente e a saúde.
O símbolo no aparelho ou na documentação de acompanhamento indica que o mesmo não deve ser tratado
como resíduo doméstico, mas deve ser levado a um
ponto de colecta idóneo para reciclar equipamento eléctrico
e electrónico. Para eliminá-lo obedecer os regulamentos locais
sobre a eliminação de resíduos. Para maiores informações
sobre o tratamento, a recuperação e a reciclagem deste aparelho, contactar o serviço local encarregado pela colecta de
resíduos domésticos ou a loja onde o mesmo foi comprado.
ISTRUÇÕES PARA A INSTALAÇÃO
As operações de montagem e ligação eléctrica devem ser
efectuadas por pessoal especializado.
• Conexão elétrica
O aparelho é construído em classe II, portanto nenhum cabo
deve ser ligado à tomada de terra.
A ligação à rede elétrica deve ser feito como segue:
MARROM = L fase
AZUL = N neutro
Se não for prevista, montar no cabo uma tomada normalizada
para a capacidade indicada na etiqueta características. Se
tiver a tomada, a coifa deve ser instalada de maneira tal que
a tomada seja acessível.
Em caso de conexão direta à rede elétrica é necessário interpor
entre o aparelho e a rede um interruptor unipolar com abertura
mínima entre contatos de 3mm, dimensionado para a carga e
de acordo com as normas vigentes.
Atenção:
Na realização da ligação eléctrica assegurar-se que a tomada
eléctrica seja dotada de uma ligação à terra.
Depois de ter montado o exaustor, tomar cuidado para a
posição da cha eléctrica ser de fácil acesso.
No caso de ligação directa à rede eléctrica, é necessário, entre
o aparelho e a rede, interpor um interruptor omnipolar com
abertura mínima de 3 cm. entre os contactos, dimensionado
para a carga e que atenda aos regulamentos em vigor.
• A distância mínima entre a superfície de suporte dos recipientes de cozedura no dispositivo de cozedura, e a parte mais
baixa do exaustor da cozinha, deve ser pelo menos de 65 cm.
Tendo que ser usado um tubo de conexão composto de duas
ou mais partes, a parte superior deve car externamente àquela inferior.Não conectar a descarga da coifa a um duto pelo qual
circule ar quente ou utilizado para evacuar fumos de aparelhos
alimentados por uma energia que não a elétrica. Antes de
proceder às operações de montagem, para um manejo mais
fácil do aparelho retirar os ltros anti-gordura (Fig.6).
- No caso de montagem do aparelho em versão aspirante
predisponha o furo de evacuação do ar.
• Aconselha-se o uso de um tubo de evacuação do ar de diâmetro 150. O uso de uma redução poderia diminuir as prestações
do produto e aumentar o ruído.
• Fixação na parede
Efectuar os furos A respeitando as cotas indicadas (Fig.2).
Fixar o aparelho à parede e alinhá-lo na posição horizontal
com os prumos. Conseguida a regulação xar a campânula
- 16 -
Page 17

denitivamente mediante os 2 parafusos A (Fig.4). Para as
várias montagens utilizar parafusos e buchas de expansão
adequadas ao tipo de parede (ex. cimento armado, gesso
cartonado, etc). No caso de os parafusos e as buchas serem
fornecidos com o produto, assegurar-se que são adequados
para o tipo de parede em que vai ser xada a campânula.
• Fixação das junções telescópicas decorativas
Preparar a alimentação eléctrica dentro do espaço previsto para
a fixação decorativa. - Se o aparelho se destinar a instalação em
versão aspirante ou em versão com motor exterior, preparar o
furo de evacuação de ar. Regular o comprimento do estribo de
apoio da junção superior (Fig.3). Em seguida, fixá-la ao tecto
de modo a ficar em simetria com a campânula mediante os
parafusos A (Fig.3) e respeitando a distância ao tecto indicada
na Fig.2. Ligar, mediante um tubo de união, a junção C ao furo
de evacuação de ar (Fig.4).
Introduzir a junção superior no interior da junção inferior e
apoiar sobre o casco
Deslizar a junção superior até ao estribo e fixá-la mediante os
parafusos B (Fig.3). Para transformar a campânula da versão
aspirante para versão filtrante, solicite ao seu revendedor os
filtros de carbono activo e siga as instruções de montagem.
• Versão ltrante
instalar a campânula e as duas junções como indicado no parágrafo relativo à montagem da campânula na versão aspirante.
Para a montagem da junção ltrante consultar as instruções
contidas no kit. Se o kit não tiver sido fornecido, solicite-o ao
seu revendedor como acessório. Os ltros de carbono activo
devem ser aplicados ao grupo aspirante situado no interior
da campânula (Fig.7).
USO E MANUTENÇÃO
• É recomendável colocar o aparelho a funcionar antes de
proceder com a cozedura de qualquer alimento. É recomendável deixar o aparelho 15 minutos a funcionar, depois de
ter terminado a cozedura dos alimentos, para descarregar
inteiramente o ar impuro.
O bom funcionamento do exaustor depende de uma correcta
e constante manutenção; uma atenção especial deve ser
dedicada ao ltro anti-gordura e ao ltro de carvão activado.
• O ltro anti-gordura tem como função reter as partículas de
gordura em suspensão no ar e, portanto, é sujeito a obstruirse, com tempos que variam de acordo com a utilização do
aparelho.
- Para evitar o perigo de incêndio é necessário lavar os ltros
anti-gordura, manualmente, a cada 2 meses, no máximo, com
detergente líquido neutro não abrasivo ou na máquina de lavar
pratos, com baixas temperaturas e ciclos breves.
- Depois de algumas lavagens pode ocorrer alterações de cor.
Este fato não dá direito à reclamação para eventuais substituições.
• Os ltros de carvão ativado são utilizados para depurar o
ar que é introduzido no ambiente e tem a função de atenuar
os odores desagradáveis gerados pelo cozimento.
- Os ltros de carvão ativo não regeneráveis devem ser substituídos a cada 4 meses, no máximo. A saturação do carvão ativo
depende do uso mais ou menos prolongado do aparelho, tipo
de alimento e regularidade de lavagem do ltro anti-gordura.
- Os ltros ao carvão ativado regeneráveis devem ser lavados
manualmente, com detergentes neutros não abrasivos ou na
máquina de lavar louças, com temperatura máxima de 65°C
(o ciclo de lavagem deve ser completo e sem louças). Retirar a
água em excesso sem danicar o ltro, remover as partes plásticas e secar a forração no forno por 15 minutos, pelo menos,
em 100°C de temperatura, no máximo. Para manter eciente
a função do ltro ao carvão regenerável, esta operação deve
ser repetida a cada 2 meses. Estes devem ser substituídos, no
máximo, a cada 3 anos ou quando a forração estiver danicada.
• Antes de montar os ltros anti-gordura e os ltros ao
carvão ativado regeneráveis é importante que estejam
bem secos.
• Limpar frequentemente o exaustor, por dentro e por fora,
utilizando um pano húmido com álcool desnaturado ou
detergentes líquidos neutros não abrasivos.
• O sistema de iluminação é projetado para o uso durante o
cozimento e não para o uso prolongado de iluminação geral
do ambiente. O uso prolongado da iluminação diminui notavelmente a duração média das lâmpadas.
• Atenção: A inobservância das advertências de limpeza e do
exaustor e da substituição e limpeza dos ltros comporta riscos
de incêndios. Aconselha-se seguir as instruções mencionadas.
• Substituição das lâmpadas de halogéneo (Fig.8).
Para substituir as lâmpadas de halogéneo B tire o vidro C
fazendo forças nas especícas espessuras.
Substitua com lâmpadas do mesmo tipo.
Atenção: não toque a lâmpada directamente com as mãos.
• Comandos: (g.5) mecânicos a simbologia é indicada a
seguir:
A = botão ILUMINAÇÃO
B = botão OFF
C = botão PRIMEIRA VELOCIDADE
D = botão SEGUNDA VELOCIDADE
E = botão TERCEIRA VELOCIDADE
DECLINA-SE DE QUALQUER RESPONSABILIDADE POR
EVENTUAIS DANOS PROVOCADOS PELA INOBSERVÂNCIA
DAS ADVERTÊNCIAS ACIMA.
- 17 -
Page 18
NEDERLANDS
NL
ALGEMEEN
De inhoud van dit boekje grondig doorlezen, daar het belangrijke informatie bevat voor veilige installatie, gebruik en
onderhoud.Het boekje bewaren voor verdere raadpleging.Het
apparaat is ontworpen als afzuigkap (Iuchtafvoer naar buiten,
waarbij gezorgd moet worden voor voldoende luchttoevoer
naar de keuken) of als lter (Iuchtrecirculatie binnen). Het apparaat is ontworpen om gebruikt te worden in de afzuigversie
(externe afvoer van de lucht - Afb.1B) of met lterversie (interne
hercirculatie van de lucht - Afb.1A).
VEILIGHEIDSVOORSCHRIFTEN
Opletten indien tegelijkertijd een afzuigkap en een brander
of haard functioneren die afhankelijk zijn van de omgevingslucht en gevoed worden door een andere energiebron dan de
elektrische energie. De afzuigkap kan de lucht die de brander
of haard nodig heeft voor de verbranding aan de omgeving
onttrekken. De negatieve druk in de omgeving mag niet boven
de 4 Pa (4x10⁻⁵ bar) liggen. Voor een veilige werking dient u te
zorgen voor een goede ventilatie van de ruimte. Voor de afvoer
naar buiten moet u zich houden aan de geldende voorschriften
die van toepassing zijn in uw land.
Voordat u het model op het elektriciteitsnet aansluit:
- controleer op het gegevensplaatje (aan de binnenkant van
het apparaat) of de spanning en het vermogen overeenkomen met die van het net, en of de stekker geschikt is voor
de aansluiting. Neem in geval van twijfel contact op met een
gekwaliceerde elektricien.
- Als de voedingskabel beschadigd is dient deze te worden
vervangen door een andere kabel of een speciale kabelcombinatie, beschikbaar bij de fabrikant of de technische
servicedienst.
2. Attentie!
In bepaalde omstandigheden kunnen huishoudelijke
apparaten gevaarlijk zijn.
A) Probeer niet om de filters te controleren terwijl de
afzuigkap werkt
B) Raak de lampen en de zones vlakbij niet aan als de
verlichting lang aan is of kort daarna.
C) Het is verboden om eten met open vlam te bereiden
onder de kap
D) Voorkom open vlammen, deze zijn schadelijk voor de
filters en brandgevaarlijk
E) Controleer voortdurend gebakken waren om te
voorkomen dat hete olie vlam vat
F) Voor elke willekeurige onderhoudsbeurt moet men de
elektrische energie afschakelen.
G) Dit apparaat is niet bestemd voor gebruik door kinderen
of andere personen die toezicht nodig hebben.
H) Controleer dat kinderen niet met het apparaat spelen.
I) Als de afzuigkap tegelijk met andere apparaten wordt
gebruikt die gas of andere brandstoffen verbranden,
moet het vertrek goed worden geventileerd.
L) Als de reinigingswerkzaamheden niet worden uitgevoerd
zoals aangegeven in de handleiding loopt u het risico
dat er brand uitbreekt.
Dit apparaat is voorzien van het keurmerk Waste Electrical
and Electronic Equipment (WEEE), zoals vastgesteld door de
Europese Norm 2002/96/EC. Door te zorgen dat de afvalverwijdering van dit product correct wordt uitgevoerd, werkt de
gebruiker mee aan het voorkomen van potentiële negatieve
consequenties voor omgeving en gezondheid.
Het symbool op het product of op het bijgeleverde
documentatiemateriaal geeft aan dat het niet moet
worden behandeld als normaal huisvuil, maar dat het
moet worden ingeleverd bij een speciaal verzamelpunt voor
het recyclen van elektrische en elektronische apparatuur. De
afvalverwijdering moet plaatsvinden in het respect van de
gemeentelijke normen. Voor meer informatie over het onderhoud en het recyclen van dit product kunt u contact opnemen
met uw gemeente, de locale reinigingsdienst, of de winkel
waar u het product heeft aangeschaft.
INSTALLATIE INSTRUCTIES
De werkzaamheden m.b.t de montage en de elektrische
aansluiting dienen verricht te worden door gespecialiseerd
personeel.
Elektrische aansluiting
Het apparaat is gemaakt in klasse II (dubbel geïsoleerd), het
snoer hoeft derhalve niet op een geaard stopcontact aangesloten te worden.
De aansluiting op het elektriciteitsnet moet als volgt uitgevoerd worden:
BRUIN = L fase
BLAUW = N nulleiding
Als deze niet reeds voorzien is moet u een stekker op het snoer
aansluiten die genormaliseerd is voor de belasting die op het
typeplaatje is aangegeven. Indien van stekker voorzien moet
de afzuigkap zodanig geïnstalleerd worden dat de stekker
bereikbaar is. In het geval van een rechtstreekse aansluiting
op het elektriciteitsnet moet u tussen het apparaat en het
net een meerpolige schakelaar plaatsen met een minimale
opening tussen de contacten van 3 mm. Deze schakelaar moet
berekend zijn op de belasting vermeld op het typeplaatje en
moet aan de geldende voorschriften voldoen.
• De minimumafstand tussen het oppervlak dat de pannen
op het fornuis ondersteunt en de onderkant van de afzuigkap
moet minstens 65 cm bedragen Indien een verbindingsbuis
bestaande uit twee of meer delen gebruikt wordt, dan moet
het bovenste gedeelte aan de buitenkant van het onderste gedeelte zitten. Sluit de afvoer van de afzuigkap niet aan op een
leiding waardoor warme lucht circuleert of die gebruikt wordt
voor de afvoer van rook van apparaten die door een andere
energiebron dan elektrische energie gevoed worden.
Voordat u verder gaat met de montage dient u, om het
apparaat makkelijker te kunnen verplaatsen, de anti-vetlter(s)
te verwijderen (Afb.6).
Bij montage van het apparaat in de afzuigversie dient u voor
een gat voor de luchtafvoer te zorgen.
• We raden u aan een luchtafvoerbuis te gebruiken met een
diameter van 150. Het gebruik van een reduceerelement zou
de prestaties van het product kunnen beperken en het lawaai
kunnen doen toeneme.
• Bevestiging aan de muur
Maak de gaten A en neem daarbij de aangegeven maten
in acht (Afb. 2). Bevestig het apparaat aan de muur op één
- 18 -
Page 19

horizontale lijn met de keukenkastjes. Na de instelling bevestigt u de kap denitief met de 2 schroeven A (Afb.4). Voor
de verschillende montages maakt u gebruik van geschikte
schroeven en expansiepluggen afhankelijk van het type muur
(bv. gewapend beton, gipsplaat, enz.). Mochten de schroeven
en de pluggen bij het product geleverd zijn, dan dient u te
controleren of ze geschikt zijn voor het type muur waaraan
de kap bevestigd wordt.
• Bevestiging van de decoratieve telescoopverbindingen
Zorg ervoor dat de elektrische voeding zich in de ruimte
bevindt die door de decoratieve verbinding in beslag
genomen wordt. Indien de afzuigversie of de versie met
externe motor geïnstalleerd moet worden, dan maakt u een
gat voor de luchtafvoer. Regel de breedte van de steunbeugel
van het bovenste verbindingsstuk (Afb.3). Vervolgens bevestigt
u deze met de schroeven A (Afb.3) zo aan het plafond dat
het in lijn staat met uw kap. Neem hierbij de afstand vanaf
het plafond in acht die aangegeven wordt in Afb. 2. Bevestig,
met behulp van een verbindingsbuis, flens C op het gat van
de luchtafvoer (Afb.4). Plaats het bovenste verbindingsstuk in
het onderste En plaats het op de behuizing.
Trek het bovenste verbindingsstuk naar buiten tot aan de
beugel en zet het vast met de schroeven B (Afb.3). Om de
afzuigversie in de filterversie te veranderen dient u uw
verkoper om de actieve koolstoffilters te vragen en de
montageinstructies te volgen.
• Filterversie
Installeer de kap en de twee verbindingsstukken zoals beschreven wordt in de paragraaf over de montage van de afzuigversie
van de kap. Voor de montage van het verbindingsstuk van
de lter dient u de instructies te raadplegen die zich in de
kit bevinden. Indien geen kit bijgeleverd is, dient u deze als
accessoire bij uw verkoper te bestellen.De lters moeten op
de afzuiggroep aangebracht worden, aan de binnenkant van
de kap, en daarop gecentreerd worden door ze 90 graden te
draaien tot ze vastklikken (Afb.7).
GEBRUIK EN ONDERHOUD
• We raden aan het apparaat aan te zetten voordat u met de
bereiding begint van elke willekeurige maaltijd. We raden u
aan het apparaat 15 minuten aan te laten nadat het eten bereid
is, voor een optimale luchtverversing.
De goede werking van de afzuigkap hangt af van een regelmatig en correct onderhoud; in het bijzonder moet men aandacht
besteden aan het vetfilter en aan het filter met actieve koolstof.
• De vetfilter heeft als doel de vetdeeltjes die in de lucht hangen tegen te houden, bijgevolg is deze filter onderhevig aan
verstoppen na een bepaalde tijd, afhankelijk van het gebruik
van het apparaat.
- Om brandgevaar te voorkomen, moeten de vetfilters hoogstens iedere 2 maanden met de hand gewassen worden met
neutrale vloeibare reinigingsmiddelen die niet schuren ofwel
in de vaatwasser op lage temperatuur met korte cycli.
- Na enkele wasbeurten kunnen er kleurveranderingen optreden. Dit feit geeft u geen recht op een klacht voor eventuele
vervanging.
• De actieve koolstoffilters dienen om de lucht te zuiveren
die in het milieu wordt uitgestoten, en heeft als functie de onaangename geuren die bij het koken vrijkomen op te vangen.
- De actieve koolstoffilters die niet regenereerbaar zijn, moeten
hoogstens iedere 4 maanden worden vervangen. De verzadiging van de actieve koolstof hangt af van een min of meer
langdurig gebruik van het apparaat, van het type keuken en
van de regelmaat waarmee de schoonmaak van de vetfilter
wordt uitgevoerd.
- De regenereerbare actieve koolstoffilters moeten met de
hand worden gewassen met neutrale detergenten die niet
schuren, of in de vaatwasser bij een maximumtemperatuur
van 65°C (de wascyclus moet gebeuren zonder vaat). Neem
het overtollige water weg zonder de filter te beschadigen,
verwijder de plastic delen en laat het matrasje in de oven
drogen gedurende minstens 15 minuten bij een maximumtemperatuur van 100°C. Om de werking van de regenereerbare
koolstoffilter efficiënt te houden, moet deze handeling iedere
2 maanden worden herhaald. Ze moeten worden vervangen
na hoogstens 3 jaar ofwel wanneer het matrasje beschadigd
geraakt is.
• Het is belangrijk dat de vetfilters en de regenereerbare
actieve koolstoffilters goed droog zijn vooraleer ze opnieuw te monteren.
• Reinig regelmatig de binnen- en buitenzijde van de
kap middels een vochtig doek , gedrenkt in water en een
vloeibare, neutrale, niet schurende detergent.
• De verlichtingsinstallatie is ontworpen voor het gebruik
tijdens het koken en niet voor langdurig gebruik als algemene
verlichting van het vertrek. Langdurig gebruik van de verlichting vermindert gevoelig de gemiddelde levensduur van de
lampen.
• Als het apparaat uitgerust is met de serviceverlichting dan
kan deze gebruikt worden voor langdurig gebruik van de
algemene verlichting van het vertrek.
• Attentie: het niet naleven van de waarschuwingen voor
schoonmaak van de kap en de vervanging en schoonmaak
van de filters brengt brandgevaar met zich mee. Het is daarom
aangeraden om zich te houden aan de voorgestelde instructies.
• Vervanging van de halogeenlampen (Fig.8).
Om de halogeenlampen B te vervangen moet men het glaasje
C verwijderen door een voorwerp als hefboom in de daarvoor
bestemde spleten te steken.
Vervang met lampen van hetzelfde type.
Opgelet: raak de lampen niet met de blote handen aan.
• Kontroller: (g.5) mekaniske zijn de symbolen hieronder
weergegeven:
A = knop LICHT
B = knop UIT
C = knop EERSTE SNELHEID
D = knop TWEEDW DERDE SNELHEID
E = knop DERDE SNELHEID
DE FABRIKANT IS NIET AANSPRAKELIJK VOOR SCHADE
DIE VOORTVLOEIT UIT HET NIET IN ACHT NEMEN VAN DE
BOVENSTAANDE VOORSCHRIFTEN.
- 19 -
Page 20
РУССКИЙ
RU
ОБЩИЕ СВИДЕНИЯ
Внимательно прочитайте содержание данной инструкции,
поскольку содержит важные указания, относящиеся к
безопасности установки, эксплуатации и техобслуживания.
Сохраните инструкцию для любой дальнейшей
консультации. Устройство разработано в следующих
вариантах исполнения: вытяжное устройство (удаление
воздуха из помещения - рис.1В), фильтрующее устройство
(рециркуляция воздуха внутри помещения - рис.1А).
МЕРЫ ПРЕДОСТОРОЖОСТИ
1. Быть внимательным, если одновременно работает
вытяжка и горелка или очаг, нуждяющиеся в окружающем
воздухе и запитывающиеся иной энергией, кроме
электрической. В таком случае вытяжка удаляет из
помещения воздух, нужный для процесса сгорания в
горелке или очаге. Отрицальное давление в помещении
не должно превышать 4Pa (4x10
Для надежной и безопасной работы следует обеспечить
вентиляцию помещения. Для наружных выбросов
соблюдать правила, действующие в Вашей стране.
Перед подключением изделия к сети электропитания:
- проверьте, чтобы напряжение и мощность, указанные
на заводской табличке (расположена внутри изделия)
соответствовали данным сети электропитания и
электрической розетки. В случае сомнений обратитесь к
квалифицированному электрику.
- Если провод электропитания поврежден, замените
его или весь специальный узел у производителя или в
уполномоченном центре технического обслуживания.
2. Внимание!
В некоторых случаях электрические приборы могут
быть опасными.
А) Не проверяйте состояние фильтров при работающей
вытяжке
В) Не прикасайтесь к лампочкам или к прилегающим
зонам в процессе работы системы освещения или
сразу же после ее выключения
С) Запрещается готовить блюда на открытом пламени
под кухонной вытяжкой
D) Избегайте открытого пламени, так как оно повреждает
фильтры и может привести к возгоранию
Е) В процессе жарки во фритюре непрерывно следите
за процессом во избежание возгорание кипящего
масла
F) Отсоединяйте штепсельную вилку от сетевой розетки
перед началом технического обслуживания
G) Изделие не расчитано на эксплуатацию детьми или
недееспособными лицами без контроля.
Н) Не разрешайте детям играть с изделием
I) Если вытяжка используется одновременно с другими
приборами, в которых используется топливный газ
или другие виды топлива, в помещении должна быть
обеспечена надлежащая вентиляция
L) В случае выполнения операций по чистке без
соблюдения инструкций существует опасность
возгорания
Данное изделие имеет маркировку соответствия Европей-
–5
bar).
скому Нормативу 2002/96/ЕС, Утилизация электрических и
электронных изделий (WEEE). Роверьте, чтобы по окончании его срока службы данное изделие было сдано в утиль.
Этим Вы поможете сохранить окружающую среду.
Символ на изделии или в прилагающейся к нему
документации означает, что данное изделие не
должно рассматриваться как бытовые отходы, а
должно быть сдано в специальный центр утилизации, занимающийся уничтожением электрических и электронных
приборов. Изделие должно быть сдано в утиль в соответствии с местными нормативами по утилизации отходов. За
дополнительными сведениями касательно обработки,
утилизации и уничтожения данного изделия обращайтесь
в местное отделение сбора домашних бытовых приборов
или в магазин, в котором было куплено изделие.
ИНСТРУКЦИИ ПО УСТАНОВКЕ
Монтаж и электрическое подключение должны
выполняться квалифицированным техником.
Электрическое подключение
Прибор имеет класс II, поэтому к заземлению не надо
подсоединять никакой провод, подсоединение к
электросети выполняется следующим образом:
коричневый-L-линия
синий-N-нейтралный
Если на кабеле нет штепселя, установить штепсель,
расcчитанный на работу с нагрузкой, указанной на табличке
характеристик. Если вытяжка оснащена штепселем,
она устанавливается, при условиях, что штепсель
будет доступным. В случае прямого подсоединения к
электросети нужно разместить между прибором и сетью
многоплюсный выключатель с зазором контактов минимум
3 мм, расcчитанный на нужную нагрузку и отвечающий
действующим нормам.
• Минимальная дистанция между опорной нагревающейся
плоскостью и нижней частью кухонного дымососа должна
быть не менее 65 см. Если применяется соединительная
труба из двух и более частей, то верняя часть должна
располагаться снаружи нижней части. Не соединять выброс
из вытяжки с каналом циркуляции горячего воздуха или с
каналом, используемым для отвода дыма от устройств,
запытываемых иной энергией кроме электрической. Перед
тем как приступить к сборке устройства, для облегчения
его монтажа отсоедините фильтр/жироулавливающий
фильтр (рис.6).
В том случае, если прибор монтируется с вытяжным
устройством, рекомендуется обеспечить помещение
выводным отверстием.
• Рекомендуется использовать трубу дымохода диаметром
150. Использование суженной трубы может сократить КПД
вытяжки и увеличить ее шумовой уровень
Прикрепление к стене
выполните отверстия A, соблюдая указанные расстояния
(рис.2). Прикрепите устройство к стене при помощи
регулируемого кронштейна, выровняйте устройство в
горизонтальном положении. Прикрепите окончательно
колпак двумя винтами A (рис.4). В зависимости от
- 20 -
Page 21

варианта монтажа используйте винты (шурупы) и дюбели,
соответствующие типу стены (например, железобетон,
гипсокартон и т. д.). Если винты и дюбели входят в комплект
поставки, следует удостовериться в том, что они подходят
для того типа стены, на которой должен быть смонтирован
колпак.
Монтаж декоративных телескопических сборочных
элементов
Предварительно выполните подводку электропроводов
внутри декоративного сборочного элемента. Если
ваше устройство устанавливается как вытяжное или с
наружным электродвигателем, предварительно сделайте
отверстие для отвода воздуха. Отрегулируйте ширину
поддерживающего кронштейна верхнего сборочного
элемента (рис.3). Прикрепите его к потолку винтами A так,
чтобы обеспечить его соосность с вашим колпаком (рис.3),
соблюдая расстояние от потолка, указанное на рис. 2.
Соедините фланец C с отверстием для выведения воздуха
посредством соединительной трубы (рис.4).
Вставьте верхний сборочный элемент в нижний И
поставить на кузов.
Cместите верхний сборочные элемент до кронштейна
и прикрепите его винтами B (рис.3). Для превращения
колпака из вытяжного в фильтрующий обратитесь к своему
дилеру для получения фильтров с активированным углем
и следуйте инструкциям по установке.
Колпак в варианте фильтрующего устройства
установите колпак и два сборочных элемента как указано
в разделе по сборке колпака в варианте вытяжного
устройства. Для сборки фильтрующего элемента
следуйте инструкциям, содержащимся в комплекте
принадлежностей. Если комплект отсутствует, закажите
его дополнительно у своего дилера. Фильтры должны быть
помещены на всасывающее устройство, расположенное
во внутренней части дымососа. Установить фильтры
строго по центру и затем повернуть на 90 градусов до
щелчка(Рис.7).
ЭКСПЛУАТАЦИЯ И ТЕХХОД
• Рекомендуем ввести аппарат в эксплуатацию, прежде чем
приступать к варке какого-либо элемента. Рекомендуем
оставить работать аппарат на 15 минут, после завершения
приготовления пищи, чтобы полностью выпустить тяжелый
воздух. Хорошее функционирование колпака обусловлено
правильным и постоянным техническим обслуживанием;
особое внимание следует уделить фильтру жира и активированного угля.
• Жироудаляющий фильтр должен удерживать жирные
взвешенные частицы в воздухе, следовательно, его загрязнение зависит от времени работы прибора.
- Во избежание риска пожара, не реже двух раз в месяц необходимо промывать жироудаляющие фильтры вручную с
использованием жидких нейтральных моющих средств без
абразивных добавок, или мыть в посудомоечной машинке
при низкой температуре и в короткие циклы.
- Цвет может измениться, после нескольких промывок.
Этот факт не даёт права на жалобу и замену детали.
• Фильтры с активированным углём необходимы для
очистки воздуха в помещении и удаляют неприятные запахи при приготовлении пищи.
- Не регенерируемые фильтры с активированным углём необходимо заменять не реже 1 раза в 4 месяца. Насыщение
активированного угля зависит от того, часто использовался
прибор, от вида кухни и от регулярности очистки жироудаляющего фильтра.
- Регенерируемые фильтры с активированным углём необходимо мыть вручную, с использованием нейтральных
моющих средств без абразивных добавок, или в посудомоечной машине при температуре не выше 65°C (при этом в
машине не должно находиться посуды). Удалить лишнюю
воду, не повреждая фильтр, снять пластмассовые детали
и высушить коврик в печи, не менее чем 15 минут при
температуре не выше 100°C. Чтобы поддерживать фильтр
с активированным углём в эффективном состоянии, это
операцию необходимо проводить каждые 2 месяца. Не
менее чем раз в 3 года фильтр необходимо заменять, или
когда на коврике обнаружены повреждения.
• Перед тем, как установить жироудаляющие фильтры
и фильтры с активированным углём, необходимо их
тщательно высушить.
• Часто проводить внутреннюю и внешнюю очистку вытяжки, использовать ткань, намоченную в денатурированном
спирте или в жидком нейтральном моющем средстве без
абразивных добавок.
• Система освещения разработана для использования во
время приготовления пищи, а не для длительного применения для освещения помещения. Длительное применение
системы освещения значительное сокращает средний
рабочий срок лампочек.
• Внимание: Несоблюдение рекомендаций по очистке
вытяжке и замене и очистки фильтров, приводит к опасности пожара. Рекомендуется следовать приведённым
инструкциям.
Замена галогенных ламп (Схема 8).
Для замены галогенных ламп В снимите стеклянную крышку С, поддев ее отверткой в специальных пазах.
Замените лампы на лампы такого же типа.
Внимание: не прикасайтесь к лампам голыми руками.
Органы управления: (рис.5) Механические
A = кнопка освещения
B = кнопка нулевой
C = кнопка первой скорости
D = кнопка второй скорости
E = кнопка третей скорости
ФИРМА НЕ НЕСЕТ НИКАКОЙ ОТВЕТСТВЕННОСТИ ЗА
УШЕРБ, ВЫЗВАННЫЙ НЕСОБЛЮДЕНИЕМ ВЫШЕПРИВЕДЕННЫХ ПРЕДУПРЕЖДЕНИЙ.
- 21 -
Page 22

Page 23

Page 24

 Loading...