

Page 1

Operating instructions
VS 60 144
Vacuum drawer
Page 2

Thank you for choosing to buy one of our products. Your appliance is made to high
standards and is easy to use. Nevertheless, please take the time to read these operating
instructions in order to familiarize yourself with the appliance and get the best use out of
it.
Please follow the safety precautions.
Modifications
Text, diagrams and data correspond to the technical standard of the appliance at the
time these operating instructions went to press. The right to make technical modifications
for the purpose of the further development of the appliances is reserved.
Validity
The model number corresponds to the first alphanumerics on the identification plate.
These operating instructions apply to:
Model designation Model number Type Size system
Vacuum drawer 60 144 36001 VS60144, VS60144g,
VS60144c
Vacuum drawer 60 144 Vi 36003 VS60144Vi 60-144
Variations depending on the model are noted in the text.
60-144
© V-ZUG Ltd, CH-6302 Zug, 2019
2
Page 3

Contents
1 Safety precautions 4
1.1 Symbols used......................................................... 4
1.2 General safety precautions.................................. 4
1.3 Appliance-specific safety precautions ............... 4
1.4 Before using for the first time.............................. 5
2 General appliance description 7
2.1 Using for the first time .......................................... 7
2.2 Construction ...........................................................7
2.3 Operating and display elements......................... 8
2.4 Explanation of the displays.................................. 8
3 Opening and closing the drawer 8
4 Operating the appliance 9
5 Food handling 10
5.1 Quality and hygiene ............................................10
5.2 Preparing special types of food........................11
5.3 Storage .................................................................. 11
5.4 Vacuisine © .......................................................... 11
6 Vacuum sealing food 12
6.1 Food .......................................................................12
6.2 Recommended vacuuming levels ....................12
6.3 Selecting the level for sealing time .................. 14
7 Overview of applications 14
7.1 Vacuuming and sealing...................................... 14
7.2 Vacuuming only ...................................................14
7.3 Sealing only .......................................................... 14
7.4 External vacuuming* ........................................... 15
8 Care and maintenance 16
8.1 General notes.......................................................16
8.2 Cleaning ................................................................16
8.3 Replacing the sealing bar..................................17
8.4 Replacing the appliance lid gasket..................17
8.5 Replacing the seal pad ......................................18
8.6 System check.......................................................18
8.7 Dehumidifying.......................................................18
2
9 Trouble-shooting 19
9.1 What to do if …......................................................19
10 Accessories and spare parts 21
11 Technical data 22
12 Tips and tricks 22
13 Disposal 23
14 Index 24
15 Notes 25
16 Service & Support 27
3
Page 4

1 Safety precautions
1.1 Symbols used
Denotes important safety precautions.
Failure to observe said precautions
can result in injury or in damage to
the appliance or fittings!
Information and precautions that
should be observed.
Information on disposal
Information about the Operating Instructions
▸ Indicates step-by-step instructions.
– Describes how the appliance reacts
to the steps taken.
▪ Indicates a list.
1.2 General safety precautions
▪ Read the operating instruc-
tions before using the appliance for the first time!
Cleaning and user maintenance shall not be undertaken
by children without supervision.
▪ If an appliance is not
equipped with a mains cable
and a plug or other means for
disconnecting from the mains
with a contact opening on
each pole complying with the
conditions of overvoltage category III for full isolation, an
isolating device must be incorporated into the permanently installed electrical installation in accordance with the
installation regulations.
▪ If the mains cable of this ap-
pliance is damaged, it must
be replaced by the manufacturer or its Customer Services
or a similarly qualified person
in order to avoid hazard.
▪ This appliance can be used
by children aged 8 and above
and by persons with reduced
physical, sensory or mental
capabilities, or lack of experience and/or knowledge,
provided they are supervised
or have been instructed on
the safe use of the appliance
and have understood the hazards involved. Children shall
not play with the appliance.
4
1.3 Appliance-specific safety precautions
The sealing bar gets hot during use.
Care should be taken. Avoid touching the sealing bar. Burns hazard.
Other accessible parts can get hot
during use. Keep young children
away from the appliance.
▪ Do not use aggressive or ab-
rasive detergent or sharp
metal scrapers for cleaning
the glass lid of the appliance
Page 5

as they could scratch the surface. This could result in damage to or destruction of the
glass.
▪ Never use a high-pressure or
steam cleaner for cleaning
the appliance. Risk of short
circuiting!
▪ Use the vacuum bags recom-
mended for this appliance!
Using non-original bags may
damage the sealing bar.
▪ For external vacuuming of
glass bottles, only use bottles
that are suitable for vacuuming. Bottles that are unsuitable or already damaged
could implode during external
vacuuming and cause injury.
1.4 Before using for the first time
▪ The appliance must be installed and
connected to the electricity supply in
accordance with the separate installation instructions. The necessary work
must be carried out by a qualified fitter/
electrician.
Correct use
▪ The appliance is designed for use in
the home for preparing food. No liability
is assumed for any damage caused by
improper use or incorrect handling.
▪ The appliance should only be installed
and operated in a room with an ambient temperature of between 5 °C and
35 °C.
1 Safety precautions
▪ Any repairs, modifications or manipula-
tions to the appliance, especially any
electrically live parts, may only be carried out by the manufacturer, its Customer Services department or similarly
qualified persons. Repairs if carried out
incorrectly may cause serious injury,
damage to the appliance and fittings,
as well as affect the functioning of the
appliance. If the appliance is not working properly or in case a repair is
needed, follow the instructions given in
the 'Service & Support' section. Contact
our Customer Services if necessary.
▪ Use original spare parts only.
▪ Retain these operating instructions for
future reference. If you sell the appliance or pass it on to a third party,
please ensure these operating instructions accompany the appliance, together with the installation instructions.
In this way, the new owners can inform
themselves about how to use the appliance correctly and read the pertinent
safety precautions.
▪ The appliance corresponds to recog-
nized technology standards and the relevant safety regulations. Proper use of
the appliance is essential to avoid damage and accidents. Please therefore follow the precautions given in these operating instructions.
▪ Make sure the silicone tube and the va-
cuum stopper for bottles are intact and
working properly. Replace any damaged parts.
Children in the home
▪ The appliance is designed for use by
adults who are familiar with these operating instructions. Children may not always be aware of the danger involved
in using electrical appliances. Ensure
proper supervision and do not allow
children to play with the appliance –
there is a danger that children could
hurt themselves.
5
Page 6

1 Safety precautions
Note on use
▪ If the appliance is visibly damaged, do
not use it. Call Customer Services.
▪ If the appliance is not functioning prop-
erly, disconnect it from the power supply immediately.
▪ Ensure the mains cables of other elec-
trical appliances do not get trapped in
the appliance. The electrical cable insulation could become damaged.
▪ If the mains cable of the appliance is
damaged, it must be replaced by our
Customer Services in order to avoid
hazard.
▪ Ensure there are no foreign bodies or
pets in the vacuum drawer before closing it.
▪ Objects that could pose a danger if the
appliance were accidentally switched
on must not be stored in the vacuum
drawer. This includes in particular containers with gas or air chambers (e.g.
spray cans).
▪ Repairs if carried out incorrectly may
cause a safety hazard. Risk of electric
shock! Only a technician from our Customer Services may carry out repairs.
Caution: Burns hazard
▪ The sealing bar on the appliance gets
very hot. The sealing seam of the vacuum bag also heats up strongly during
the sealing process.
Caution: Risk to life
▪ Danger of suffocation! Keep packaging
material, e.g. plastic film and polystyrene, away from children and animals. Packaging material can be dangerous for children and animals.
How to avoid damaging the appliance
▪ Open and close the appliance lid
slowly.
▪ Do not put any objects on the appli-
ance, especially any sources of heat or
cold. Do not drop any objects on the
appliance lid.
▪ Only chilled food should be vacuum
sealed.
▪ A maximum of 40 vacuum and sealing
processes can be carried out one after
the other.
▪ When vacuuming or cleaning make
sure no water gets inside the appliance
and in particular into the suction inlet of
the vacuum pump. Use a moderately
damp cloth for cleaning. Do not spray
the outside or the inside of the appliance with water. If water gets inside the
appliance, it will cause damage.
▪ Take care not to damage the lid gasket
with pointed or sharp objects. Do not
use any cleaning agent to clean the lid
gasket – use just a damp cloth.
Caution: Risk of injury
▪ Do not sit or lean on the appliance or
use it as a storage surface.
▪ Made from glass, the appliance lid is
under tension. Damage to the surface
of the glass may cause it to shatter. The
appliance must not be operated if the
lid is cracked or broken. Contact Customer Services.
6
Page 7
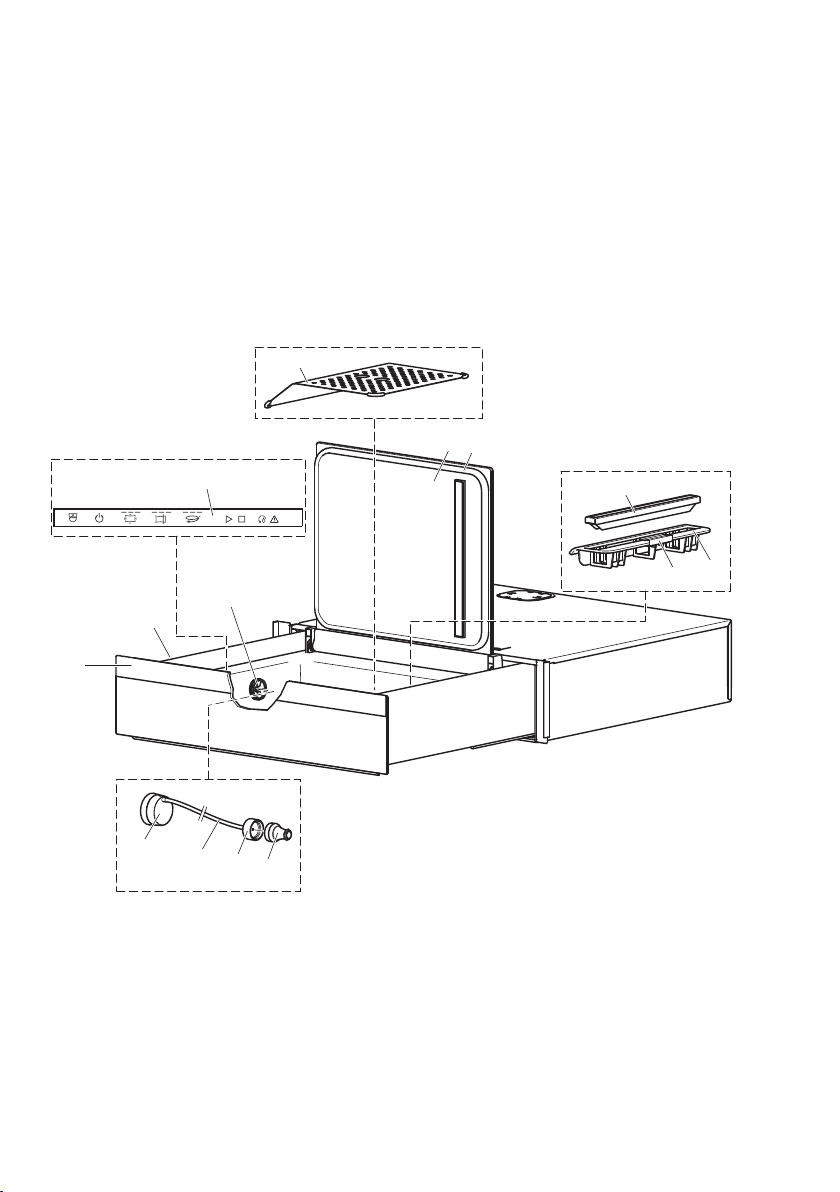
2 General appliance description
1
2
3
4
5
6
7
8
9
10
11
12
13
14
Food can be vacuum sealed in bags in the vacuum drawer. The vacuum-packed food
can be cooked gently in a steam cooker (Vacuisine) or in a water bath. Vacuum-packing
can prolong the shelf life of certain foodstuffs.
2.1 Using for the first time
Before operating the newly installed appliance for the first time, the following steps
should be taken:
▪ Remove packaging and transport materials from out of the vacuum tank.
▪ Remove the operating instructions, bags and any unneeded accessories.
2.2 Construction
Bag tray
8
Cover for sealing bar
9
Identification plate
10
Suction inlet adapter*
11
Tube*
12
Adapter for vacuum stopper*
13
Vacuum stopper*
14
Appliance lid made from glass
1
Sealing bar
2
Bag clip
3
Operating and display elements
4
Drawer front (push-and-pull
5
opening and closing mechanism)
Appliance lid gasket
6
Suction inlet
7
7
Page 8
3 Opening and closing the drawer
A
B
C
1
2
3
4
5
6
7
8
* Depending on the software version
2.3 Operating and display elements
Displays Buttons
Vacuuming level
A
Sealing time
B
Vacuuming level – external
C
vacuuming*
1
2
3
4
5
6
7
8
On/Off
Vacuuming level
Sealing time
External vacuuming*
Start
Stop
Dehumidifying
Maintenance
* Depending on the software version
2.4 Explanation of the displays
Inactive (no displays, dark)
Preselection (number of selected levels, illuminated)
Process running (number of selected levels, flashing)
3 Opening and closing the drawer
8
Page 9

Opening Closing
20
1
40
2
▸ Push in the middle of the drawer front.
– The drawer opens.
Never force the drawer open
as this could damage the closing mechanism (push/pull system).
▸ Close in the middle of the drawer front.
– The drawer engages and closes.
4 Operating the appliance
Switching on
▸ Touch the button.
– The appliance is ready for opera-
tion.
▸ Open the appliance lid.
4 Operating the appliance
Inserting bag
▸ Put the food into the vacuum bag.
▸ Push the opening of the bag under
the bag clip 1.
▸ Use the bag tray 2 supplied for smal-
ler amounts of food.
Settings
▸ Select the vacuuming level with the button and the sealing time with the button.
9
Page 10

5 Food handling
Starting the process
▸ Close the appliance lid.
There must be plenty of room in the vacuum tank for the bag with food.
The appliance lid must close easily without any resistance.
The gasket and the contact surface of the gasket must be clean and free of objects.
The bag must lie completely flat on the sealing bar, without any overlap or wrinkles.
▸ Push the appliance lid shut and touch the button to start the process.
– The displays for the level of vacuuming and sealing time flash during the vacuum-
ing process.
End of operation
– An acoustic signal is emitted when the process is finished.
▸ Open the appliance lid and remove the vacuum-sealed product.
Aborting or switching off before time
Touch the or button to interrupt the vacuuming process while it is running. The bag
is not sealed. The end of the vacuuming process (ventilation running) cannot be interrupted.
Switching the appliance off
▸ Touch the button.
– The appliance switches off.
Sealing sooner
The vacuuming process can be interrupted and the bag sealed sooner.
▸ Touch the sealing time button.
Liquids already start to boil at low temperatures when under a vacuum. This produces steam, which can cause the appliance to malfunction. Carefully watch the
vacuuming process and seal the bag sooner if bubbles start to form (boiling).
5 Food handling
Vacuum sealing food can generally extend its shelf life.
5.1 Quality and hygiene
The bacterial content of food determines how long a product can be preserved.
The higher the bacterial content, the shorter the maximum storage time.
In order to preserve food for as long as possible, only vacuum seal food that is in perfect
condition. Products that have been kept for some time before vacuum sealing have a
higher bacterial content and are therefore not suitable for long-term storage.
To prevent fresh food from being contaminated with bacteria, the following points should
be observed:
▪ Wash hands well before handling food.
▪ Ensure food preparation surfaces are smooth and hygienically clean. Clean food pre-
paration surfaces before use.
▪ Clean all utensils (knives, forks, spoons, etc.) before use.
10
Page 11

5 Food handling
5.2 Preparing special types of food
Some types of food have to be specially prepared so that they can be stored.
Brassicas, pulses, stalks and shoots
All brassicas (cauliflower, broccoli, white cabbage, red cabbage, etc.), pulses (fresh
beans, peas, etc.), and stalks and shoots (asparagus, etc.) release gas when vacuum
sealed. These foods have therefore to be blanched in a steam cooker or in plenty of boiling water, then run under cold water until cold. The vacuum-sealed food can then be
frozen (as it is compact it takes little space in the freezer).
Only a few varieties of vegetables, e.g. carrots, leeks, sweet peppers, bunching onions,
Chinese cabbage, Pascal celery, tomatoes (for cooking) and herbs, can be frozen in
their raw state Portion the prepared and chopped vegetables in freezer bags and deepfreeze. For making your next Swiss barley soup or minestrone, ideally dice, vacuum seal
and deep-freeze the raw vegetables
5.3 Storage
To store food safely, the following points must be observed:
▪ Food that is to be stored must be fresh and in perfect condition.
▪ The product must be already at the storage temperature before vacuum sealing.
▪ Keep any interruptions to the cool chain as short as possible.
▪ Where possible, dry the food before vacuum sealing.
▪ Avoid mixing raw and cooked foods.
▪ Select the highest level of vacuuming possible, as given in the section: Recommen-
ded vacuuming levels (see page 12).
▪ Large pieces of food can be preserved for longer than smaller pieces.
▪ Store food at as low a temperature as possible.
▪ Place the food in the refrigerator or freezer immediately after evacuating the air.
▪ Perishables should always be kept in a refrigerator or freezer, even when vacuum-
packed. Vacuum sealing food is not the same as preserving it!
5.4 Vacuisine ©
Vacuum-sealed food can be prepared using the sous-vide method of cooking. At V-ZUG,
we call this method Vacuisine.
Only use original V-ZUG vacuum bags for the Vacuisine method.
For detailed information and Vacuisine recipes, go to vzug.com.
11
Page 12

6 Vacuum sealing food
6 Vacuum sealing food
6.1 Food
Several points have to be considered when vacuum sealing food and preparing for sousvide cooking.
Choice of bag
For sous-vide cooking, use original V-ZUG vacuum bags only. These vacuum bags are
suitable for use between a temperature range of -40°C to +115°C and thus also for
sous-vide cooking. The vacuum bags are microwave-safe (e.g. for defrosting frozen
food). A bag containing food that has been sealed under vacuum must be pierced or
opened before microwaving. Overpressure can otherwise develop and cause the vacuum bag to burst.
If bags other than V-ZUG vacuum bags are used for sous-vide cooking, these could become soft, the sealing seam may not hold or may melt. Only use other bags for vacuum
sealing and adjust the sealing time to the material of the bag.
Using non-original bags may damage the sealing bar. The use of such bags is at
the owner's own risk.
Size of bag
Select size of bag so that the food to be vacuum sealed fills max. two-thirds of the
volume of the bag.
Food
For optimal results, the food must be chilled before vacuum sealing.
Refrigerate the food at a maximum of 5°C for at least two hours before vacuum sealing.
Liquid foodstuffs, in particular, should not be warmer than 10°C.
Never vacuum seal warm or hot food.
Filling the vacuum bag
When filling the bag make sure the area where the bag is to be sealed remains clean,
otherwise the bag may not seal properly. Fold the top of the bag down (inside facing out)
about 5cm before filling it.
6.2 Recommended vacuuming levels
Selecting the vacuuming level
The following vacuuming levels are available for selection (after portioning) for packaging, marinating, sous-vide cooking (Vacuisine ©), freezing or storing:
12
Page 13

Vacuuming level
with display
0
(sealing )
1 ▪ Fragile and delicate
2 ▪ Firmer fruit, e.g.
3 ▪ Meat, e.g. medal-
Food category with ex-
amples
▪ Very fragile and del-
icate food, e.g.
crisps and salad.
fruit, e.g. berries,
plums, apricots, bananas.
▪ Liquids and solids
with a lot of liquid,
e.g. soups, sauces
and meat with a lot
of marinade.
▪ Jars and bottles, e.g.
jars of nuts, seeds
and kernels, opened
jars of pesto.
pears and quinces.
▪ Less firm vegetables
such as sweet peppers, tomatoes and
courgettes.
▪ Fish, whole un-
skinned or filleted.
▪ Solids with a little li-
quid, e.g. meat with a
little marinade.
lions, steak.
▪ Firm vegetables, e.g.
carrots, beetroot.
▪ Food for freezing
▪ Hard cheese for stor-
ing
6 Vacuum sealing food
Tips and uses
For very fragile and delicate foods that are
originally packed with an air cushion, the
original or vacuum bag should not be filled
more than a third full. Loosely place the bag
with the air cushion in the vacuum drawer
so that the form and consistency of the food
remains intact.
With vacuuming level 1, fragile and delicate
fruit keeps its shape and consistency and is
not deformed.
Vacuum pure liquids or meat with a lot of
vinegar- or wine-based marinade on vacuuming level 1 only. The vacuum is sufficient
for reduced oxidation of wine and vinegar.
Opened jars of pesto can be sealed airtight
again using vacuuming level 1, provided
they are not too tall. Nuts, seeds and kernels can be similarly vacuum-packed to protect against infestation.
Air and hence also oxygen is evacuated out
of bottles of oil and wine ideally using external vacuuming level 1.
▪ Firmer fruit and solids with a little liquid
can be vacuum sealed using vacuuming
level 2.
▪ Vegetables and fish with a little or no li-
quid can be vacuum sealed ideally using
vacuuming level 2.
▪ Meat in a sauce or with a little marinade
is also suitable for vacuum sealing on vacuuming level 2. If there is a lot of liquid,
use vacuuming level 1.
▪ Meat without any added liquid, e.g. just
with herbs, and firmer vegetables can be
prepared, e.g. for sous-vide cooking
(Vacuisine ©), ideally using vacuuming
level 3. Vacuuming level 3 should be
used for food that is going to be frozen
as extracting the air prevents freezer
burn.
13
Page 14

7 Overview of applications
6.3 Selecting the level for sealing time
If using original V-ZUG vacuum bags, set the sealing time to level 2.
If using non-original bags, the sealing time must be adjusted to the material of the bag.
Using non-original bags may damage the sealing bar. The use of such bags is at
the owner's own risk.
7 Overview of applications
All possible applications are described below.
See also the advice in the Tips and tricks (see page 22) section.
7.1 Vacuuming and sealing
This is the standard application of the vacuum drawer. The process starts and an underpressure is created inside the vacuum tank. The opening of the bag placed inside it is
sealed. Then the pressure in the appliance is equalized again and the process is finished.
The vacuum drawer must be ready for operation.
▸ Touch the button once or more to select a suitable vacuuming level.
▸ Touch the button once or more to select a suitable level for the sealing time.
▸ Press down the appliance lid and start the process with the button.
More detailed information on vacuuming and sealing can be found in the Operating the appliance (see page 9) section.
7.2 Vacuuming only
Jars with screw-top lids, containing e.g. nuts or kernels, can be vacuumed and sealed
airtight at the same time using this application.
Only use jars with intact screw-top lids. Check that the jars are not too tall before
closing the appliance lid.
Do not use the bag tray.
The jars may be max. 8.5cm tall to avoid damage to the appliance.
This application is not suitable for making jam (filling with hot content). Only
chilled food should be vacuum sealed.
The vacuum drawer must be ready for operation.
▸ Lightly close the screw-top lids of the jars and place the jars in the vacuum tank.
▸ Touch the button once or more to select a suitable vacuuming level.
▸ Touch the button repeatedly until the display for the sealing time goes out com-
pletely.
▸ Press down the appliance lid and start the process with the button.
7.3 Sealing only
Using this application, a bag can be closed airtight without creating a vacuum.
Despite the setting, a slight underpressure is created in the bag, and this is necessary to create a successful seal.
The vacuum drawer must be ready for operation.
14
Page 15

7 Overview of applications
▸ Touch the button repeatedly until the display for the vacuuming level goes out
completely.
▸ Touch the button once or more to select a suitable level for the sealing time.
▸ Press down the appliance lid and start the process with the button.
7.4 External vacuuming*
* Depending on the software version
Using this application, air can be evacuated out of glass bottles of oil and wine, for instance, to prevent the contents reacting with the oxygen. This function can also be used
to vacuum seal commercially available vacuum containers. Make sure that the vacuum
containers are safe for use with food and can be connected to the vacuum drawer tube,
which has a 3 mm internal diameter, using a suitable adapter.
For external vacuuming of glass bottles, only use bottles that are suitable for vacuum sealing. Unsuitable or damaged bottles could implode during external vacuuming. There is a risk of injury.
The vacuum drawer must be ready for operation and the lid open.
▸ To evacuate a bottle, push either end of the tube onto the right connector for each ad-
apter.
▸ Put the larger adapter on the suction inlet in the vacuum tank. To evacuate a bottle,
put the smaller adapter with the other end of the tube on the vacuum stopper, which
is pressed into the bottle mouth. To evacuate a vacuum container, connect the end of
the tube to the vacuum container – rather than to the bottle – using an adapter if ne-
cessary.
Place the bottle for external evacuating on a flat and stable surface near the vacuum drawer.
▸ Touch the button once or more to select a suitable vacuuming level. See "Re-
commended vacuuming levels (see page 12)”.
Vacuum seal large quantities of liquid in solid containers with an appropriate
volume.
15
Page 16

8 Care and maintenance
1
2
To evacuate wine bottles, only use external vacuuming on level 1 as otherwise the
gas in the wine will be affected.
▸ Start external vacuuming with the button.
8 Care and maintenance
8.1 General notes
The drawer must be switched off for cleaning.
Incorrect handling can result in damage to the appliance!
▪ Do not use any abrasive cleaning agents, metal scrapers that are sharp or scratch,
steel wool, abrasive scouring pads, etc. to clean the appliance, as they will damage
the surface. Scratches to the glass lid can cause it to crack.
▪ Never use a high-pressure or steam cleaner to clean the appliance.
▪ Ensure no liquids or solids get into the suction inlet of the vacuum pump. This would
cause irreparable damage to the pump.
8.2 Cleaning
Outside
▸ Remove any soiling or excess cleaning agent immediately.
▸ Clean the surfaces with a soft cloth dampened with water and a little washing-up liquid
– for metallic surfaces rub in the direction of the original polish lines.
▸ Dry with a soft cloth.
Inside
▸ Remove the sealing bar 1 incl. sealing bar cover 2 from the appliance.
▸ Remove any soiling or excess cleaning agent immediately.
▸ Clean the surfaces with a soft cloth dampened with water and a little washing-up li-
quid – for metallic surfaces rub in the direction of the original polish lines.
▸ Dry with a soft cloth.
▸ Clean the sealing bar 1 with a soft cloth dampened with water and a little washing-up
liquid and dry with a soft cloth. The sealing bar cover 2 can be cleaned in the dish-
washer.
▸ Put the sealing bar cover 2 back in
place in the appliance.
▸ Position the sealing bar 1 on the two
locating pins in the appliance.
16
Page 17

8 Care and maintenance
1
2
3
Appliance lid gasket
▸ Clean the appliance lid gasket with a soft cloth dampened with water.
Do not use detergent!
▸ Dry with a soft cloth.
Parts used in external vacuuming
Clean the parts used in external vacuuming (suction inlet adapter, tube, adapter for vacuum stopper and vacuum stopper) with hot water, a little washing-up liquid and a soft
cloth or sponge and then wipe dry.
Accessories
The bag tray can be cleaned in the dishwasher.
8.3 Replacing the sealing bar
▸ Remove the damaged sealing bar 1
together with the sealing bar cover 2
from the appliance.
▸ Put the sealing bar cover 2 back in
place in the appliance.
▸ Position the new sealing bar 1 on the
two locating pins in the appliance.
No aids or tools are needed.
8.4 Replacing the appliance lid gasket
▸ Remove the damaged appliance lid
gasket 3.
▸ Fit the new appliance lid gasket.
No aids or tools are needed.
17
Page 18

8 Care and maintenance
5
4
8.5 Replacing the seal pad
The seal pad 4 is located on the underside of the appliance lid.
▸ Take the damaged seal pad 4 out of
its holder 5.
▸ Insert the new seal pad 4 in the
holder 5 .
No aids or tools are needed.
8.6 System check
If the maintenance button illuminates, the vacuum pump cannot achieve the required underpressure in the allotted time. The appliance lid may not be closed
properly or the appliance lid gasket may be dirty or damaged.
▸ Cleaning the lid gasket (see page 16). Do not use detergent!
▸ Close the appliance lid and press down.
If after the next vacuuming process the maintenance button remains
illuminated:
▸ Select a lower vacuuming level.
If the maintenance button repeatedly illuminates:
▸ Wait until the symbol illuminates.
▸ Dehumidify the vacuum pump (see page 18).
8.7 Dehumidifying
Dehumidification is necessary when the oil in the vacuum pump contains too much
water (from frequently vacuuming moist foodstuffs).
If the and buttons illuminate, …
… the oil in the vacuum pump can be dehumidified.
▸ Close the appliance lid and press down.
▸ Touch the button.
– The oil in the vacuum pump is being dehumidified.
If the and buttons illuminate, …
… the oil in the vacuum pump must be dehumidified.
▸ Close the appliance lid and press down.
▸ Touch the button.
18
– The oil in the vacuum pump is being dehumidified.
Page 19

9 Trouble-shooting
The dehumidifying process takes a maximum of 20 minutes. If the button remains illuminated, the process must be repeated.
It is necessary to wait for one hour between dehumidifying processes as the oil in
the vacuum pump gets hot. During this time, the and buttons are illuminated,
but they cannot be operated.
9 Trouble-shooting
9.1 What to do if …
This section lists faults that can be solved simply by following the instructions given. If
another fault is displayed or the fault cannot be remedied, please call Customer Services.
… the appliance is not working
Possible cause Solution
▪ A household fuse or circuit
breaker has tripped due to
an overload.
▪ The fuse or circuit breaker
keeps blowing.
▪ An interruption in the power
supply.
▪ The appliance is faulty. ▸ Call Customer Services.
▪ Repeated vacuuming has
caused the appliance to
overheat.
▪ The appliance is in a cool-
ing phase between two de-
humidifying processes. Dur-
ing this time, the and
buttons are illuminated, but
they cannot be operated.
… insufficient vacuum in the bag
Possible cause Solution
▪ The vacuuming level selec-
ted was too low for the par-
ticular foodstuff used.
▪ The suction inlet of the va-
cuum pump is obstructed.
▪ The bag is not airtight. ▸ Vacuum seal the food in a new bag, selecting a
▸ Replace or switch the fuse back on.
▸ Call Customer Services.
▸ Check the power supply.
▸ Allow the appliance to cool down before using again.
▸ Wait one hour before repeating the dehumidifying
process.
▸ Select the next highest level.
▸ Ensure the bag is not obstructing the suction inlet of
the vacuum pump.
higher level for the sealing time if necessary.
19
Page 20

9 Trouble-shooting
… the vacuum bag is incorrectly sealed
Possible cause Solution
▪ The sealing time set was in-
sufficient for the vacuuming
level selected.
▪ The vacuum bag is not posi-
tioned correctly on the seal-
ing bar.
▪ The vacuum bag is contam-
inated around the sealing
seam.
▪ The seal pad, located on the
appliance lid, is very worn.
▪ Repeated vacuuming has
caused the appliance to
overheat.
… the appliance lid will not open
Possible cause Solution
▪ The appliance is in opera-
tion.
▪ Power supply was interrup-
ted.
… noises can be heard during operation
Possible cause Solution
▪ Appliance can make noises
during operation (e.g.
switching and pumping
noises).
… the maintenance button illuminates
Possible cause Solution
▪ The appliance cannot reach
the desired underpressure.
▪ The pump output is re-
duced.
▸ Select the next highest sealing time level.
▸ Position the vacuum bag correctly.
▸ Clean the sealing area before the process.
▸ Replace the seal pad.
▸ Allow the appliance to cool down before using
again.
▸ Wait until the appliance is ventilated at the end of the
process and an acoustic signal is emitted.
▸ Reconnect the power supply. The appliance is ventil-
ated.
▸ Such noise is normal.
▸ Hold the appliance lid down well when starting the va-
cuum-sealing process.
▸ Check the appliance lid gasket and the contact sur-
face of the gasket and clean if necessary. If the gasket is not lying flat, smooth it out with a finger.
▸ Select a lower vacuuming level, e.g. for food with li-
quid.
▸ If the vacuum bag is protruding from under the appli-
ance lid gasket, position the bag correctly.
▸ Dehumidify the oil in the vacuum pump when the
button illuminates.
20
Page 21

10 Accessories and spare parts
… the liquid in the vacuum bag is boiling vigorously while being vacuumed
Possible cause Solution
▪ Liquids already start to boil
at low temperatures when
under vacuum.
... very fragile and delicate food such as crisps and breakfast cereals is damaged during vacuum sealing
Possible cause Solution
▪ The vacuuming level selec-
ted is too high.
▪ There is not a sufficient air
cushion in the bag.
... no vacuum is being created in the bottle during external vacuuming*
* Depending on the software version
Possible cause Solution
▪ The tube and vacuum stop-
per are showing clear signs
of wear and tear and there-
fore not sealing tightly so
that no sufficient vacuum
can be obtained.
▸ Sealing sooner.
▸ Select vacuuming level 1 for vacuum sealing liquid
foodstuffs.
▸ Liquids or foods with a high liquid content should not
be warmer than 10°C.
▸ Select vacuuming level «0».
▸ Ensuring there is a sufficient air cushion in the bag,
place it in the vacuum drawer
▸ Replace the tube and vacuum stopper with new ones.
10 Accessories and spare parts
Please give model number of the appliance and exact designation of the accessory or
spare part when ordering parts.
▪ Bag tray: For vacuum sealing flat foodstuffs
▪ Appliance lid gasket
▪ Cover for sealing bar
▪ Complete sealing bar
▪ Seal pad
21
Page 22

11 Technical data
Vakuumierbeutel
Vakuumierbeutel
Sachet de mise sous vide
Sacchetti per sottovuoto
Vacuum bags
▪ Vacuum bags:
Dimensions: 180 × 280mm and 240 × 350mm,
range of use: -40 to +115°C
▪ Suction inlet adapter*
▪ Adapter for vacuum stopper*
▪ Tube*
▪ Vacuum stopper*
* Depending on the software version
11 Technical data
Type VS60144
Appliance measurements
External dimensions (height × width × depth) 142 × 596 × 547 mm
Capacity of vacuum tank (height × width × depth) 95 × 350 × 285 mm
Volume of vacuum tank 7.83 dm³
Empty weight 25 kg
Electrical connection
Connection 220–240 V ~ 50/60 Hz
Connected load 320 W
Fuse 10 A
Stand-by consumption 0.5 W
12 Tips and tricks
Here are a few tips to make using your vacuum drawer even easier.
22
Page 23

13 Disposal
▪ Working hygienically: Hands, utensils and surfaces must be clean!
▪ The opening of the bag must lie completely flat on the sealing bar, without any overlap
or wrinkles.
▪ Put only as much food into the bag as will allow it to be sealed closed at the top
without any overlap or wrinkles.
▪ Make sure there is no liquid around the sealing seam. Fold the top of the bag down
before filling it so as to keep the area where it is to be sealed clean. A funnel can be
used as a filling aid. Place the bag to be filled in a measuring jug, then turn back the
top of the bag a few centimetres.
▪ The last used settings for the «Vacuuming and sealing» application are saved, even
when the appliance is switched off.
▪ To seal jars with screw-top lids under vacuum, lightly close the screw-top lids and
place the jars in the vacuum drawer. These jars can be vacuumed and closed airtight
at the same time using the «Vacuuming only» application.
▪ For liquids, to achieve maximum vacuum the liquid must be frozen before vacuuming.
▪ Vacuum seal large quantities of liquid not in vacuum bags but in solid containers with
an appropriate volume. This makes for easier handling. External vacuuming is also
possible given the use of suitable containers and the accessories.
▪ Freeze fruit before vacuum sealing it.
▪ Foodstuffs that do not have to be stored in the refrigerator such as cereals, flour, cake
mixes, etc. can be preserved for longer by vacuum-packing them.
▪ Vacuuming is ideal for nuts, cereals, herbs and spices. Vacuum-packed, they remain
fresh longer and do not go rancid.
13 Disposal
13.1 Packaging
Never allow children to play with packaging material due to the danger of injury or
suffocation. Store the packaging material in a safe location or dispose of it in an
environmentally-friendly way.
13.2 Safety
Render the appliance unusable to prevent accidents caused by improper use (e.g.
through children playing):
▸ Disconnect the appliance from the mains. With a fixed appliance, this is to be carried
out by a qualified electrician. Then cut the mains cable off flush with the appliance.
13.3 Disposal
▪ The «crossed‐out wheeled bin» symbol requires the separate collection of waste
electrical and electronic equipment (WEEE). Such equipment can contain hazardous,
environmentally harmful materials.
▪ These appliances are to be handed over to a designated collection point for the recyc-
ling of electrical and electronic equipment and must not be disposed of with unsorted
household waste. And in this way, you will be helping to protect resources and the environment.
▪ For more information, please contact the local authorities.
23
Page 24

14 Index
A
Accessories ...................................................... 21
Appliance description ........................................ 7
Appliance disposal .......................................... 23
Applications ...................................................... 14
B
Before using for the first time........................... 5
C
Cleaning............................................................. 16
Accessories .................................................. 17
Appliance lid gasket ................................... 17
Inside.............................................................. 16
Outside .......................................................... 16
Construction......................................................... 7
D
Dehumidifying................................................... 18
Display elements................................................. 8
Disposal............................................................. 23
E
Explanation of the displays............................... 8
External vacuuming ......................................... 15
F
Food ................................................................... 12
Vacuum sealing ........................................... 12
Food handling .................................................. 10
G
General notes ................................................... 16
L
Level for sealing time
Selecting........................................................ 14
M
Model designation .............................................. 2
Model number ..................................................... 2
N
Notes.................................................................. 25
O
Operating elements............................................ 8
Operating the appliance.................................... 9
Cancelling ..................................................... 10
Inserting bag....................................................9
Starting process........................................... 10
Switching off before time ........................... 10
P
Preparations
Special types of food .................................. 11
Q
Quality and hygiene......................................... 10
R
Recommended vacuuming levels ................ 12
Replacing appliance lid gasket..................... 17
Replacing seal pad ......................................... 18
S
Safety precautions
Appliance-specific .......................................... 4
General ............................................................. 4
Sealing ............................................................... 14
Sealing bar
Replacing ...................................................... 17
Sealing sooner ................................................. 10
Selecting vacuuming levels ........................... 12
Service & Support............................................ 27
Sous-vide method
Vacuisine....................................................... 11
Spare parts ....................................................... 21
Storage .............................................................. 11
Symbols................................................................ 4
System check ................................................... 18
T
Technical data .................................................. 22
Technical questions......................................... 27
Tips and tricks.................................................. 22
Type....................................................................... 2
U
Using for the first time........................................ 7
V
Vacuisine ........................................................... 11
Vacuuming ........................................................ 14
Validity................................................................... 2
W
Warranty extensions........................................ 27
24
Page 25

15 Notes
25
Page 26

26
Page 27

16 Service & Support
The «Trouble-shooting» section gives you valuable tips on how to deal with minor
malfunctions yourself, saving you the time and trouble of calling out a service technician and any cost that goes along with it.
Information on the V-ZUG warranty can be found at www.vzug.com →Service
→Warranty information. Please read this information carefully.
Please register your appliance straightaway online at www.vzug.com →Service
→Warranty registration. This will allow you to take advantage of the best possible support
in the event of a fault in the appliance during the guarantee period. You will require the
serial number (SN) and appliance designation to register your appliance. You will find
them on the identification plate of your appliance.
My appliance information:
SN: __________________________ Appliance: _______________________________
Please have this appliance information to hand when contacting V-ZUG. Thank you.
▸ Open the vacuum drawer.
– The identification plate is located on the
left side panel.
Your repair order
At www.vzug.com →Service→Service number you will find the telephone number of your
nearest V‑ZUG service centre.
Technical questions, accessories, warranty extensions
V-ZUG is happy to help you with any general administrative or technical queries, to take
your orders for accessories and spare parts and to inform you about our progressive
service agreements.
27
Page 28

Quick instructions
J36001352-R06
Open appliance Switch appliance on
Operate vacuuming level Operate level for sealing time
Vacuuming Switch appliance off and close
V-ZUG Ltd, Industriestrasse 66, CH-6302 Zug
info@vzug.com, www.vzug.com
 Loading...