

MFW1600 4-IN-1 WET & DRY VACUUM,
CARPET WASHER & BLOWER
INSTRUCTION MANUAL
w w w . v y t r o n i x . c o m

- BLANK PAGE -

- BLANK PAGE -
Product Introduction
The product is for domestic use only, its functions include wet vacuum, dry vacuum, carpet washer/cleaner
and a rear blower function. It can be operated easily and safely. This product has a float chamber which is
designed to prevent water/solution entering the motor in the chamber in the event of misuse. The solution
tank is fully detachable for ease of emptying/cleaning however the product must not be operated without it
in place.
Safety Advice
• Please read the manual carefully before operating and select suitable accessories for different
cleaning purposes.
• Don’t leave the appliance on while unattended.
• For indoor, domestic use only.
• The appliance is not suitable for use by children.
• Only supplied accessories should be used.
• Always consult Vytronix before attempting to carry out any repairs on the appliance beyond normal
maintenance.
• Check the hose for any blockage before operation.
• In the event of any blockage or malfunction, switch the appliance off immediately and unplug.
• Please make sure that all filter components are correctly fitted prior to use.
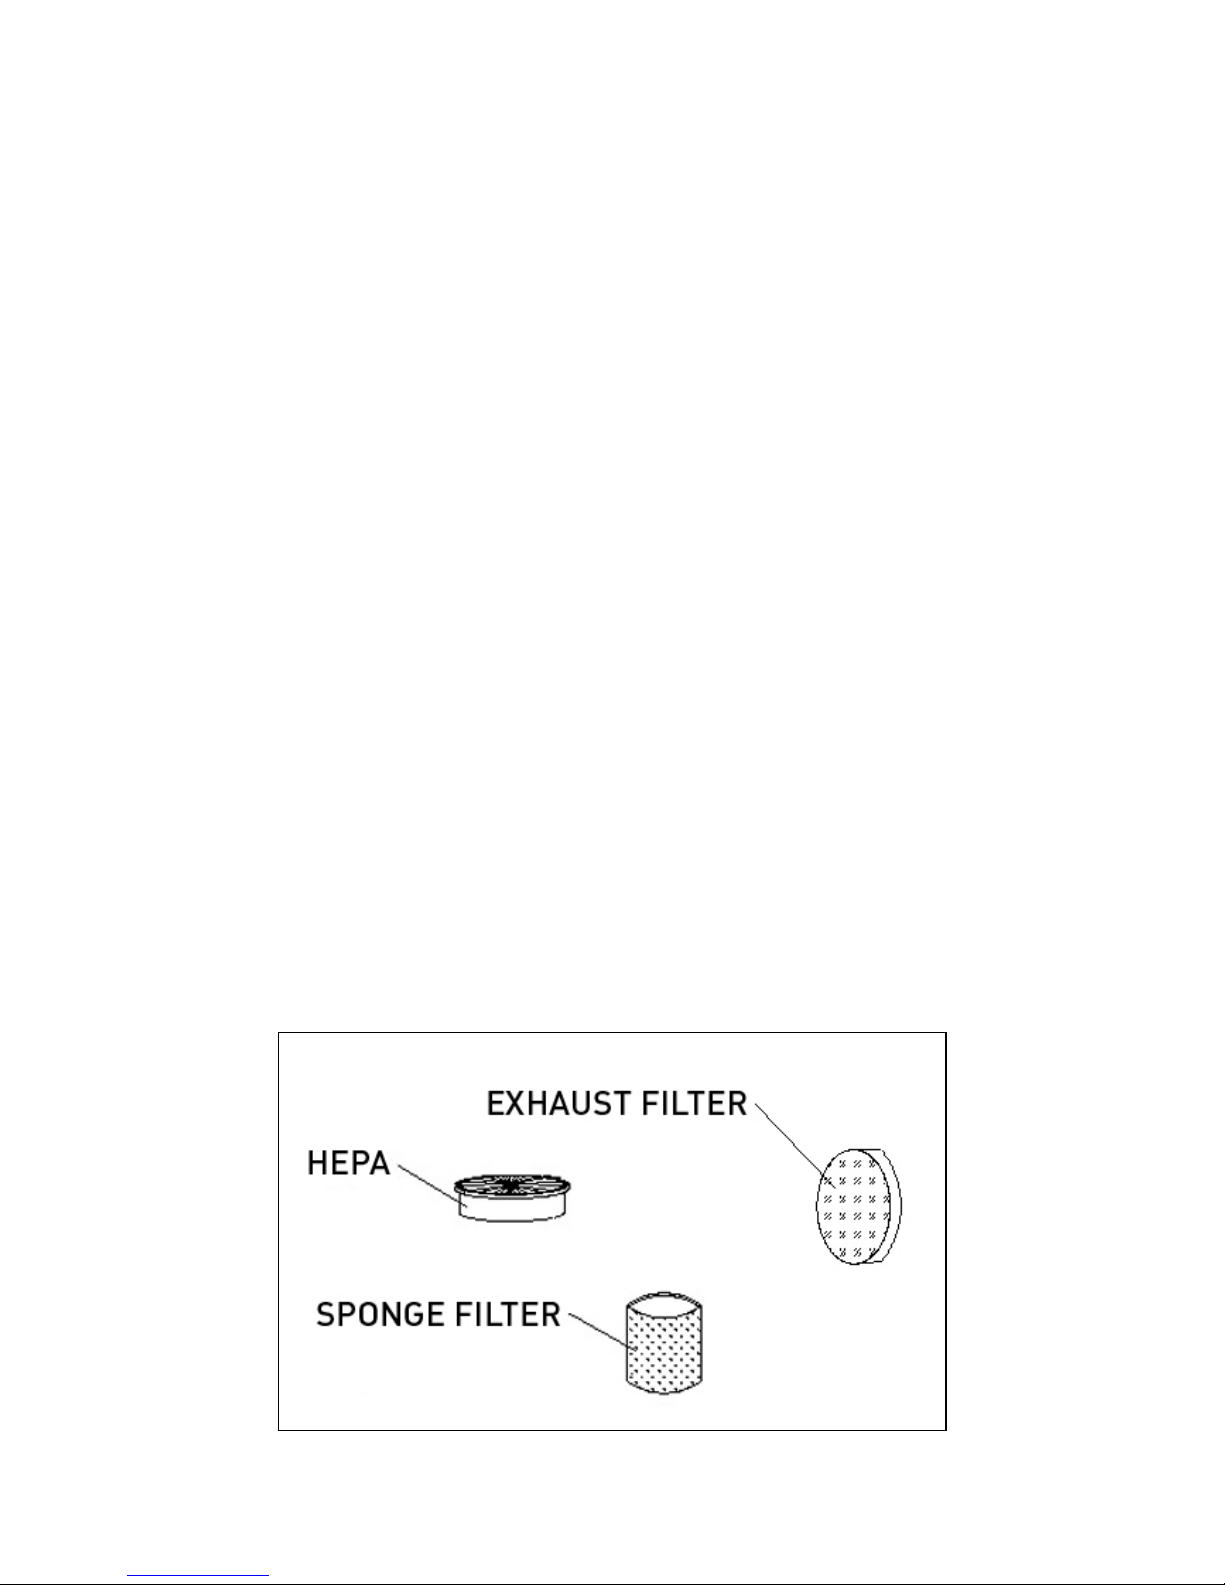
Filters Inside The Product
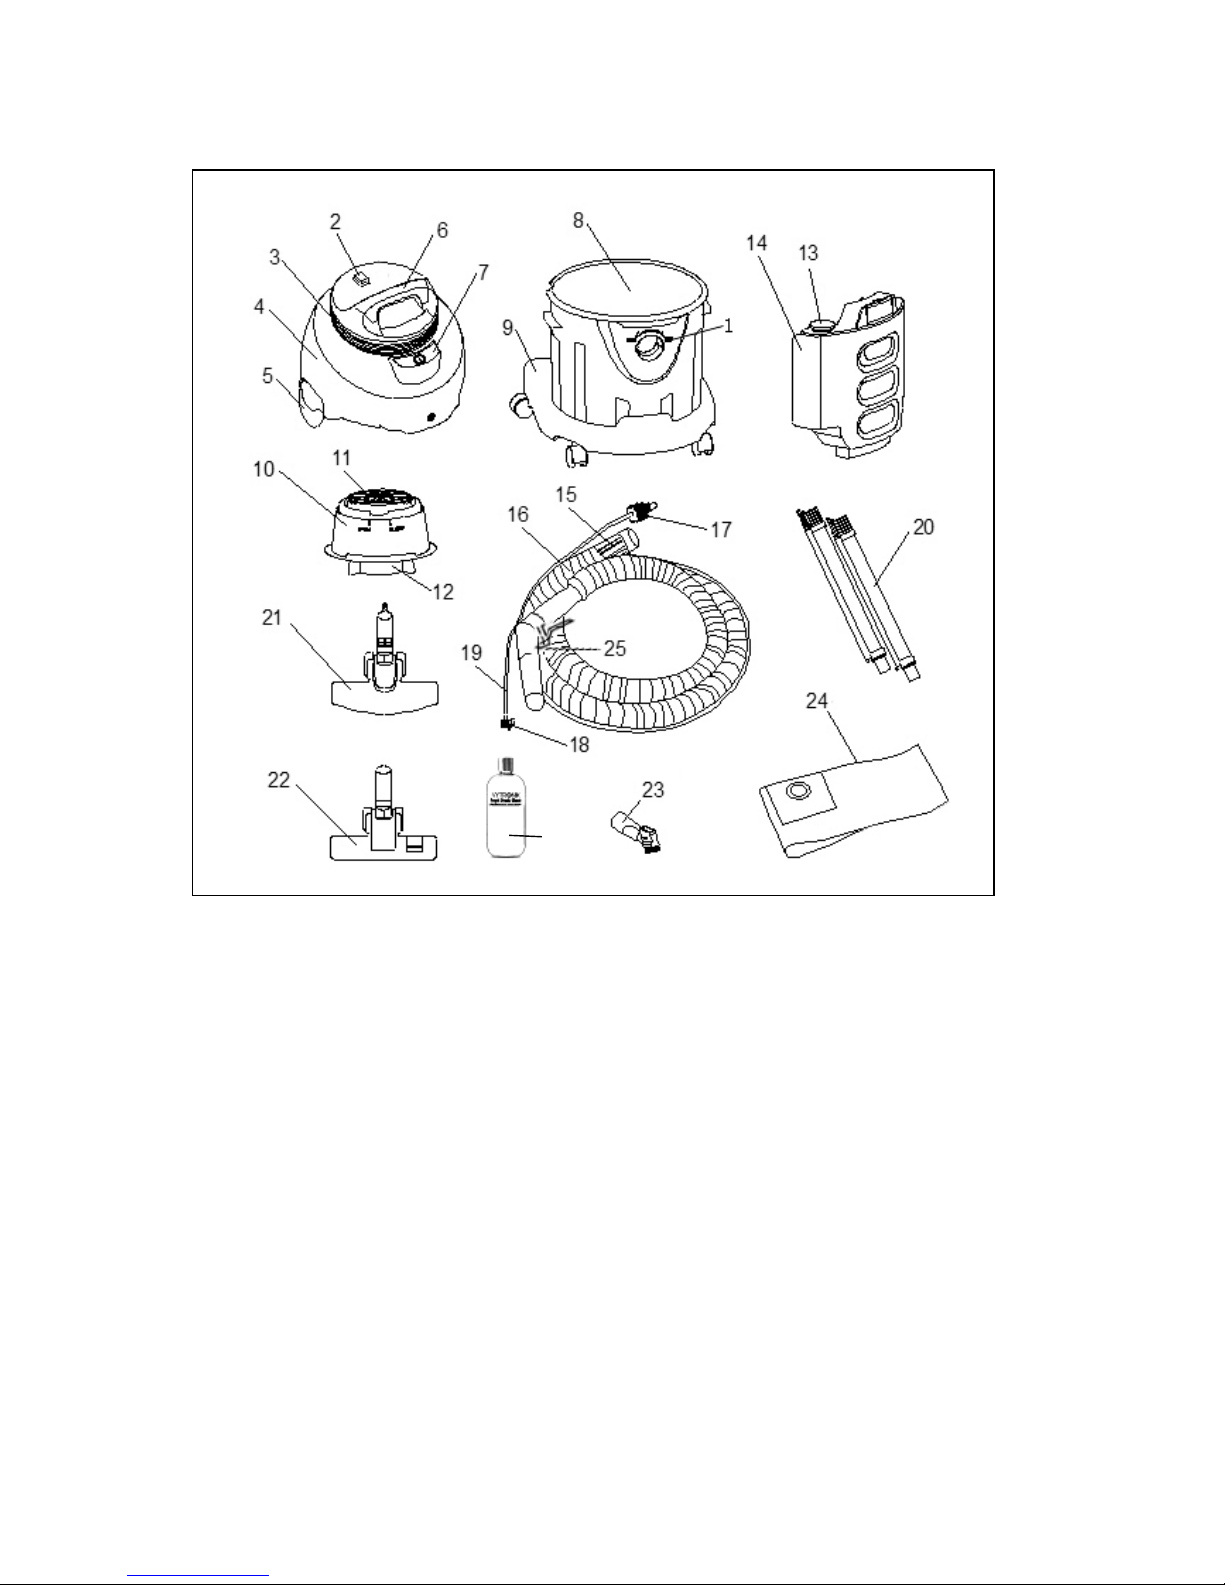
Contents
1. Hose inlet
2. Solution pump on/off switch
3. Power cord
4. Top cover
5. Tank locking clip
6. Top handle
7. Vacuum power on/off switch
8. Tank
9. Base/wheel assembly
10. Float frame
11. HEPA filter
12. Floater bottom
13. Solution tank
14. Solution tank cover
15. Hose main connector
16. Hose
17. Front solution tube adapter
18. Rear solution tube adapter
19. Solution tube
20. Aluminium extension tubes
21. Wet pick-up/Wash head
22. Floor brush
23. 2 in 1 nozzle
24. Disposable high filtration dust bag
25. Water/solution stop trigger
26. Carpet Shampoo*
*(located inside vacuum tank for shipping)
26.
Operating In Carpet Washer Mode
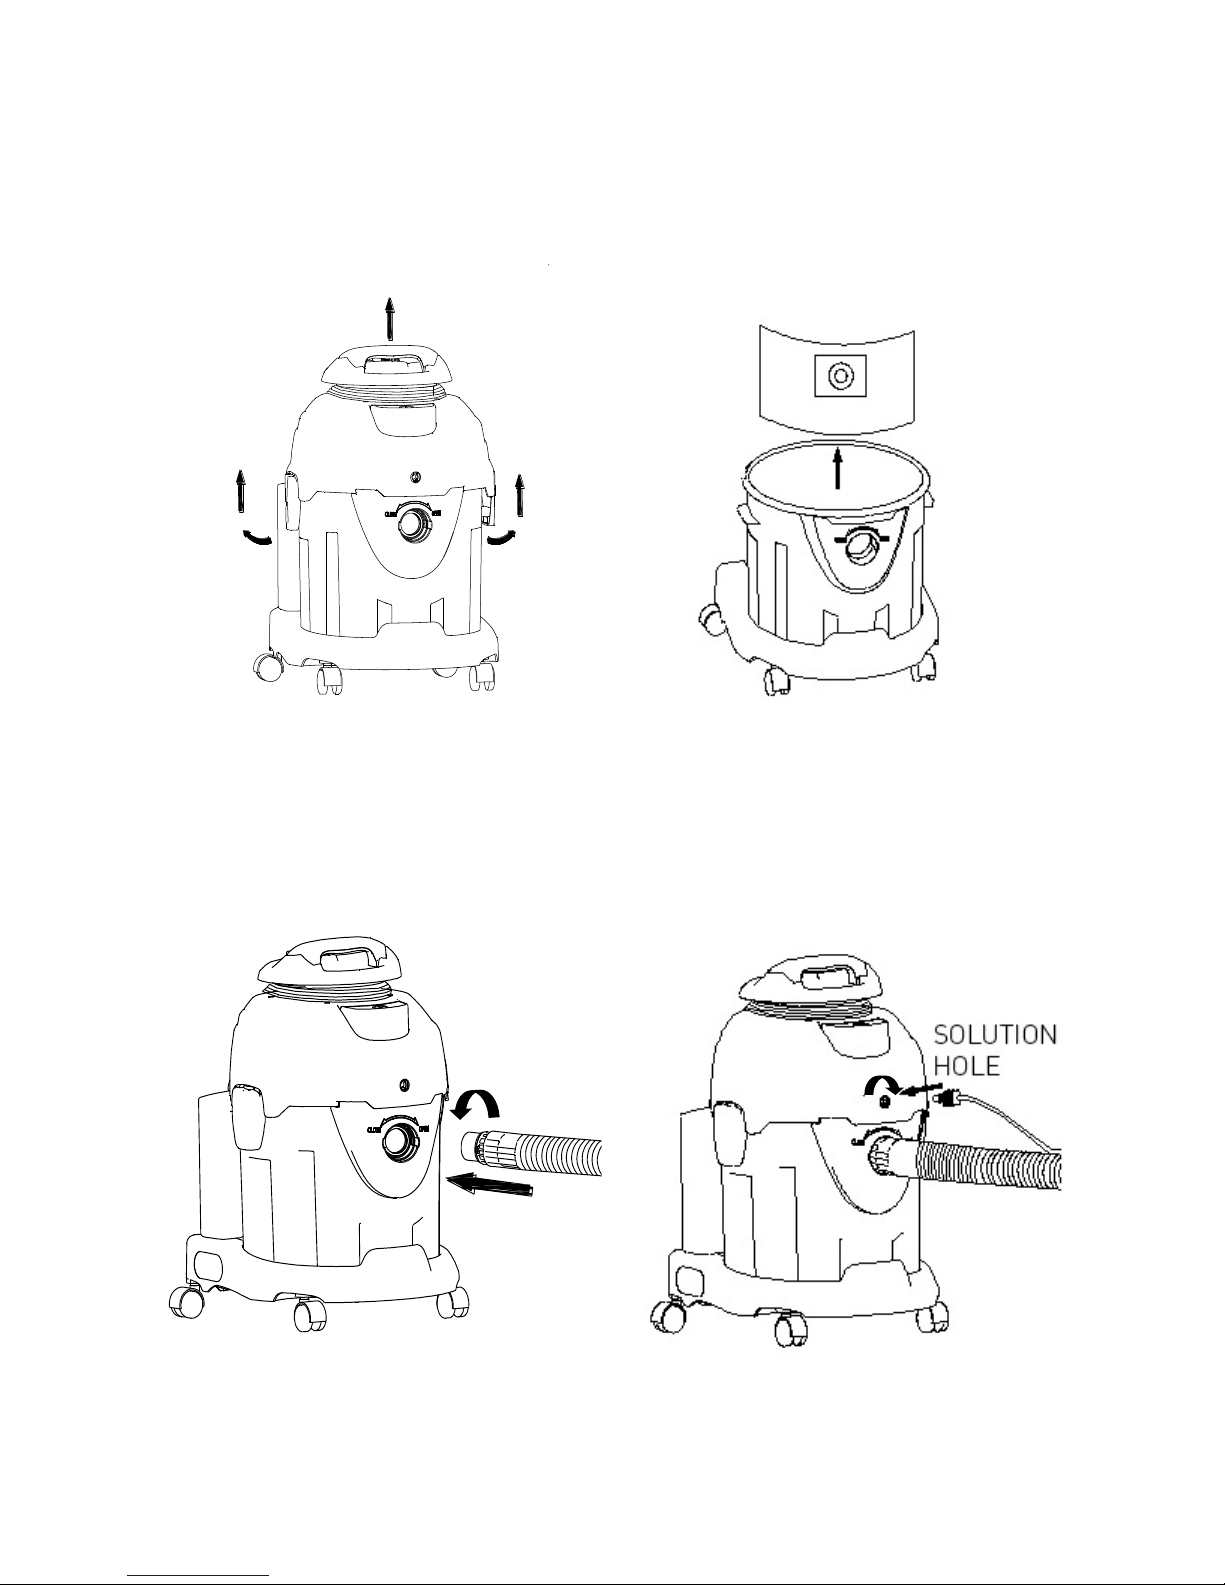
1. Release tank clips, take out the top cover and remove the vacuum dust bag.
2. Insert the main hose adapter, rotate according to direction instruction and fix firmly. Then fix the front
solution nozzle in anticlockwise.

3. Connect the two parts of the aluminium tube together with the hose/handle.
4. Connect the wet pick-up/wash head with the aluminium tube and connect all solution tubes/fittings.

5. Release solution tank clip and remove the tank. Fill with clean, cold or warm but not hot water and
solution if desired – if using solution, read the instructions on the bottle before use.
PLEASE NOTE – The clean water/solution tank will hold up to 3.5L which should provide approx. 20 –
25 minutes use.
6. Refit the solution tank onto the vacuum base.

PLEASE NOTE: When the pump is powered on, water will automatically begin to flow through the wash
head. To stop the flow of water, the trigger must be pulled as shown below.
7. Plug in and power on the vacuum first, then switch on solution pump.
IMPORTANT: always turn on the main power button first, before switching on the pump when using
as a carpet washer.

8. When in use, ensure that recovered/collected dirty water does not exceed the MAX fill line on the
collection tank.
9. When finished, Power off the pump for 30 seconds before switching off the vacuum.

10. After vacuuming, take out the solution nozzles and solution tank for cleaning.
11. Remove the top of the vacuum as shown below, empty and clean the recovery/collection tank.
IMPORTANT: When removing the tubes after wet use, there may be residual fluid still in the tubes which
will trickle out, it is recommended to have a container ready to collect the excess fluid to avoid spillages.
Operating In Wet-Vacuum Mode
Follow carpet washer instructions like-for-like without filling of the clean water/solution tank or activation
of the pump power button.

Using In Dry Vacuum Mode
1. Take out top vacuum part and install the dust bag.
2. Connect the hose onto the main inlet on the front of the vacuum.
5. Connect the two parts of the aluminium tube with the hose.

6. Connect the floor brush with the tube.
7. Plug in and switch on the machine. IMPORTANT: Do not switch on the water pump.
8. After use, take out the bag and clean the dust tank.

Operating The Rear Blower Function
1. Remove solution tank and take off exhaust filter cover.
2. Fix the hose into the exhaust port.

3. Plug in and switch on the machine.
IMPORTANT: Don’t switch on solution pump to avoid pump overheating.
4. After use, remove the hose and replace the exhaust filter cover.
TOP TIP: After using as a wet vacuum or carpet washer, set up as above and use the blower function to
quickly blow-dry the hose and remove any residual fluid before using the product for dry vacuuming.

Product Maintenance
Check filters after each use and clean if necessary.
1. Remove the top of the vacuum cleaner.
2. Disassemble float and filter housing and clean the HEPA and sponge filters per instructions on next
page.
CLOSE
OPEN

3. Clean the filters regularly and ensure filters are completely dry before reusing.
40¡ æ
max
40¡ æ
max
40¡ æ
max
24hr
4. After maintenance has been carried out/completed, reassemble all components in reverse order to
which they were disassembled in steps 1 and 2.
CLOSE
OPEN
OPEN
CLOSE

Warranty Registration
To register you free one year Vytronix warranty visit www.vytronix.com using product code:
brandnew-vytronix-mfw1600
Safe Disposal
This marking indicates that this product should not be disposed with other household waste throughout the
EU. To prevent possible harm to the environment or human health from uncontrolled waste disposal,
recycle it responsibly to promote the sustainable reuse of material resources. To arrange safe disposal of
your used device, please use the return and collection systems or contact the retailer where the product
was purchased.

- BLANK PAGE -

Register your warranty at www.vytronix.com
 Loading...