

Page 1
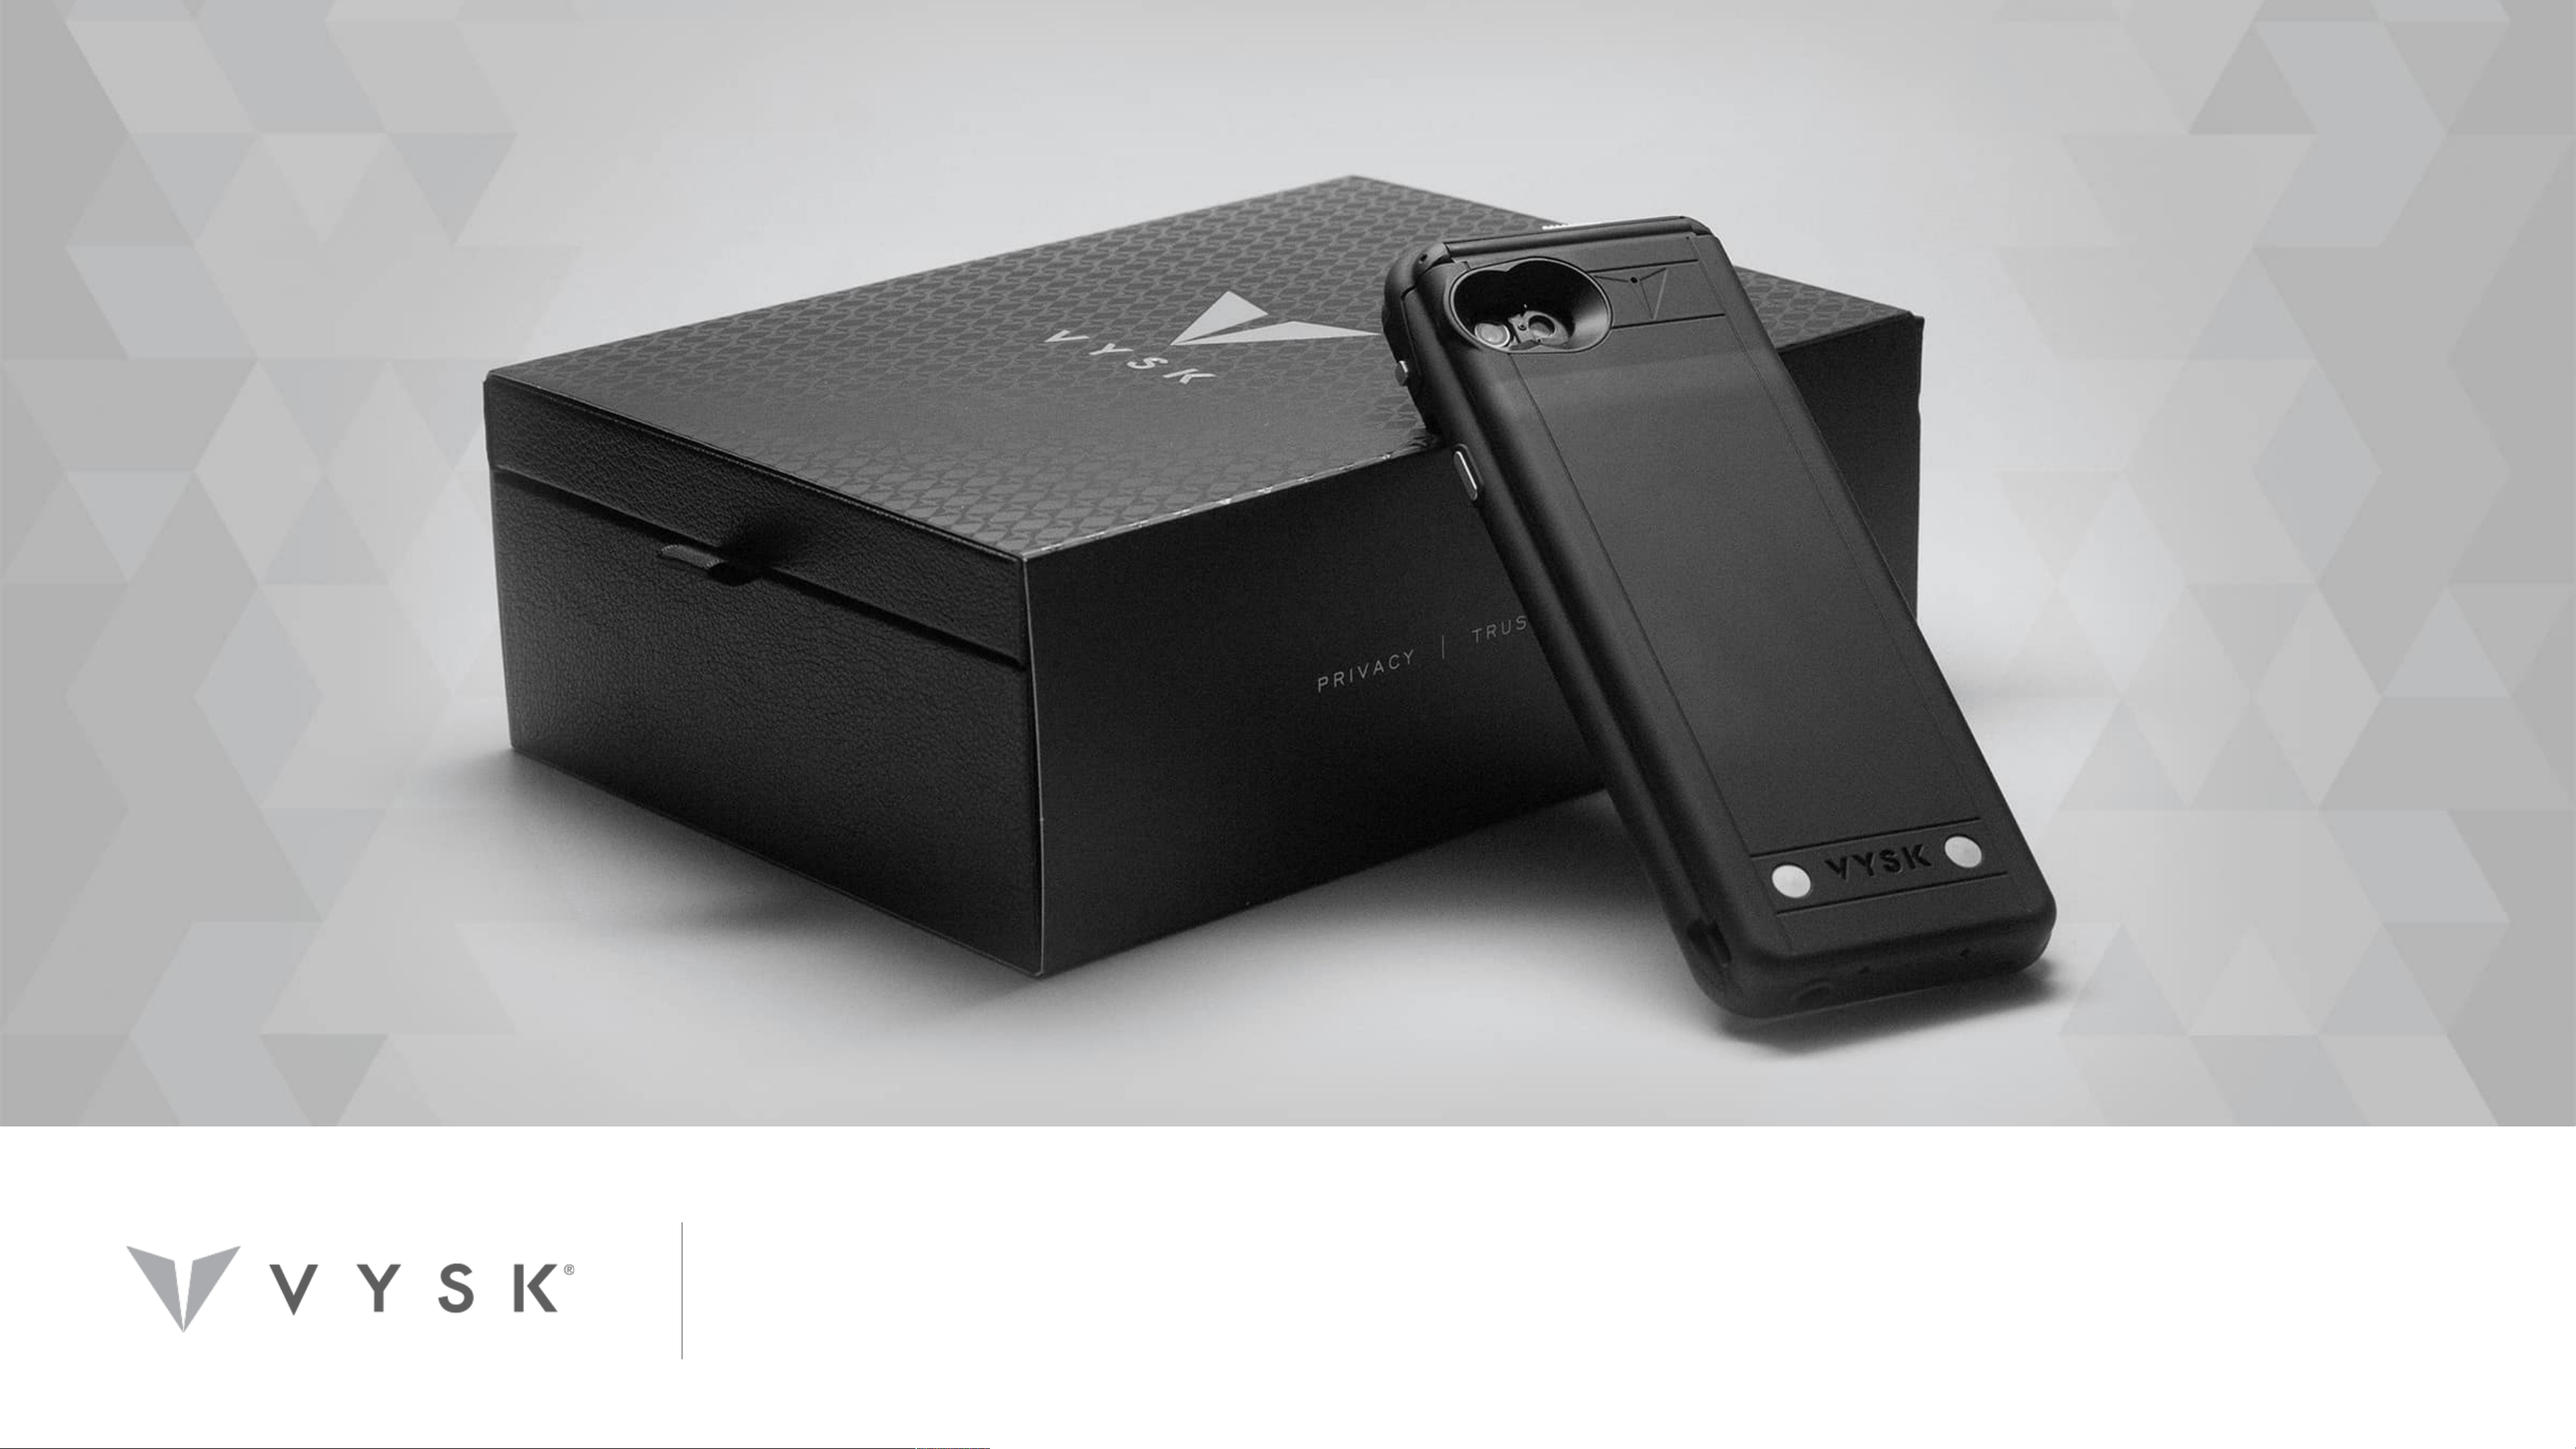
QSI TRAINING & TECHNICAL SUPPORT
V2.0 – Nov. 29, 2017
Page 2
INTRODUCTION
This presentation is intended to:
• Provide a technical and operational overview of the
Vysk QS1 Quantum Security Case for iPhone 6/7/8
• Identify potential support & troubleshooting issues
• Empower your organization to support its QS1 End
Users
Page 3

GETTING STARTED
Page 4
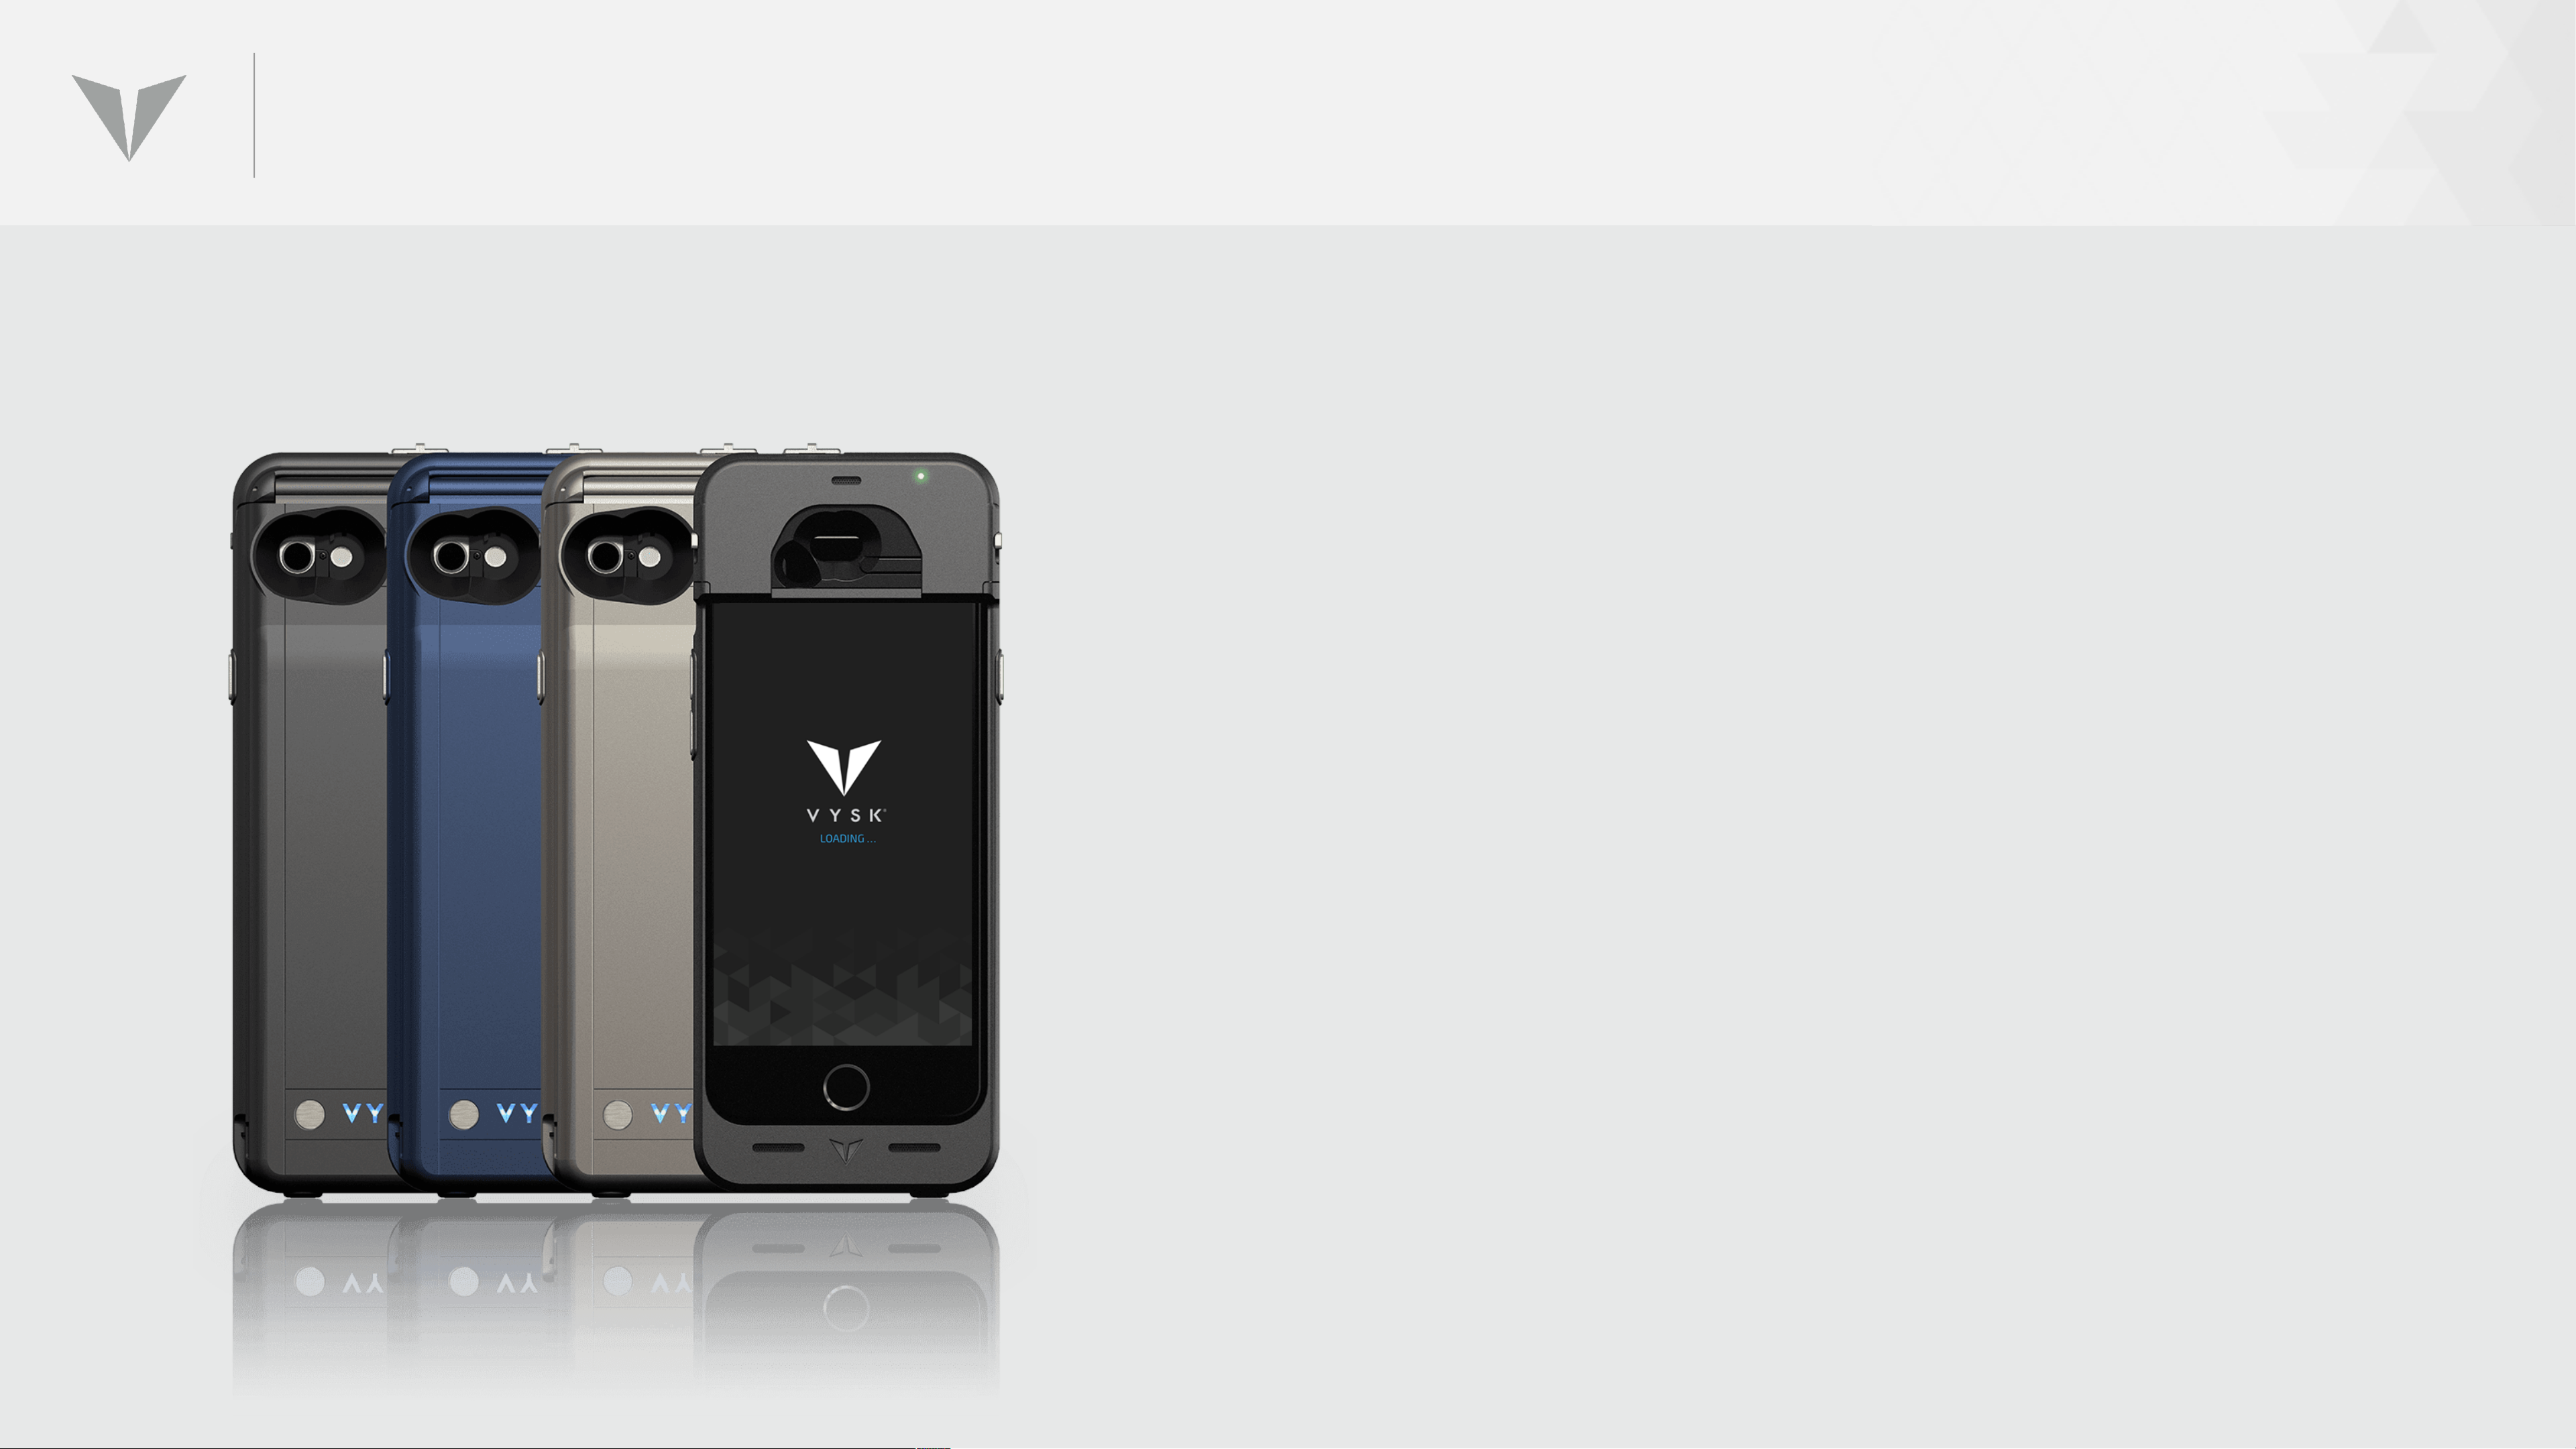
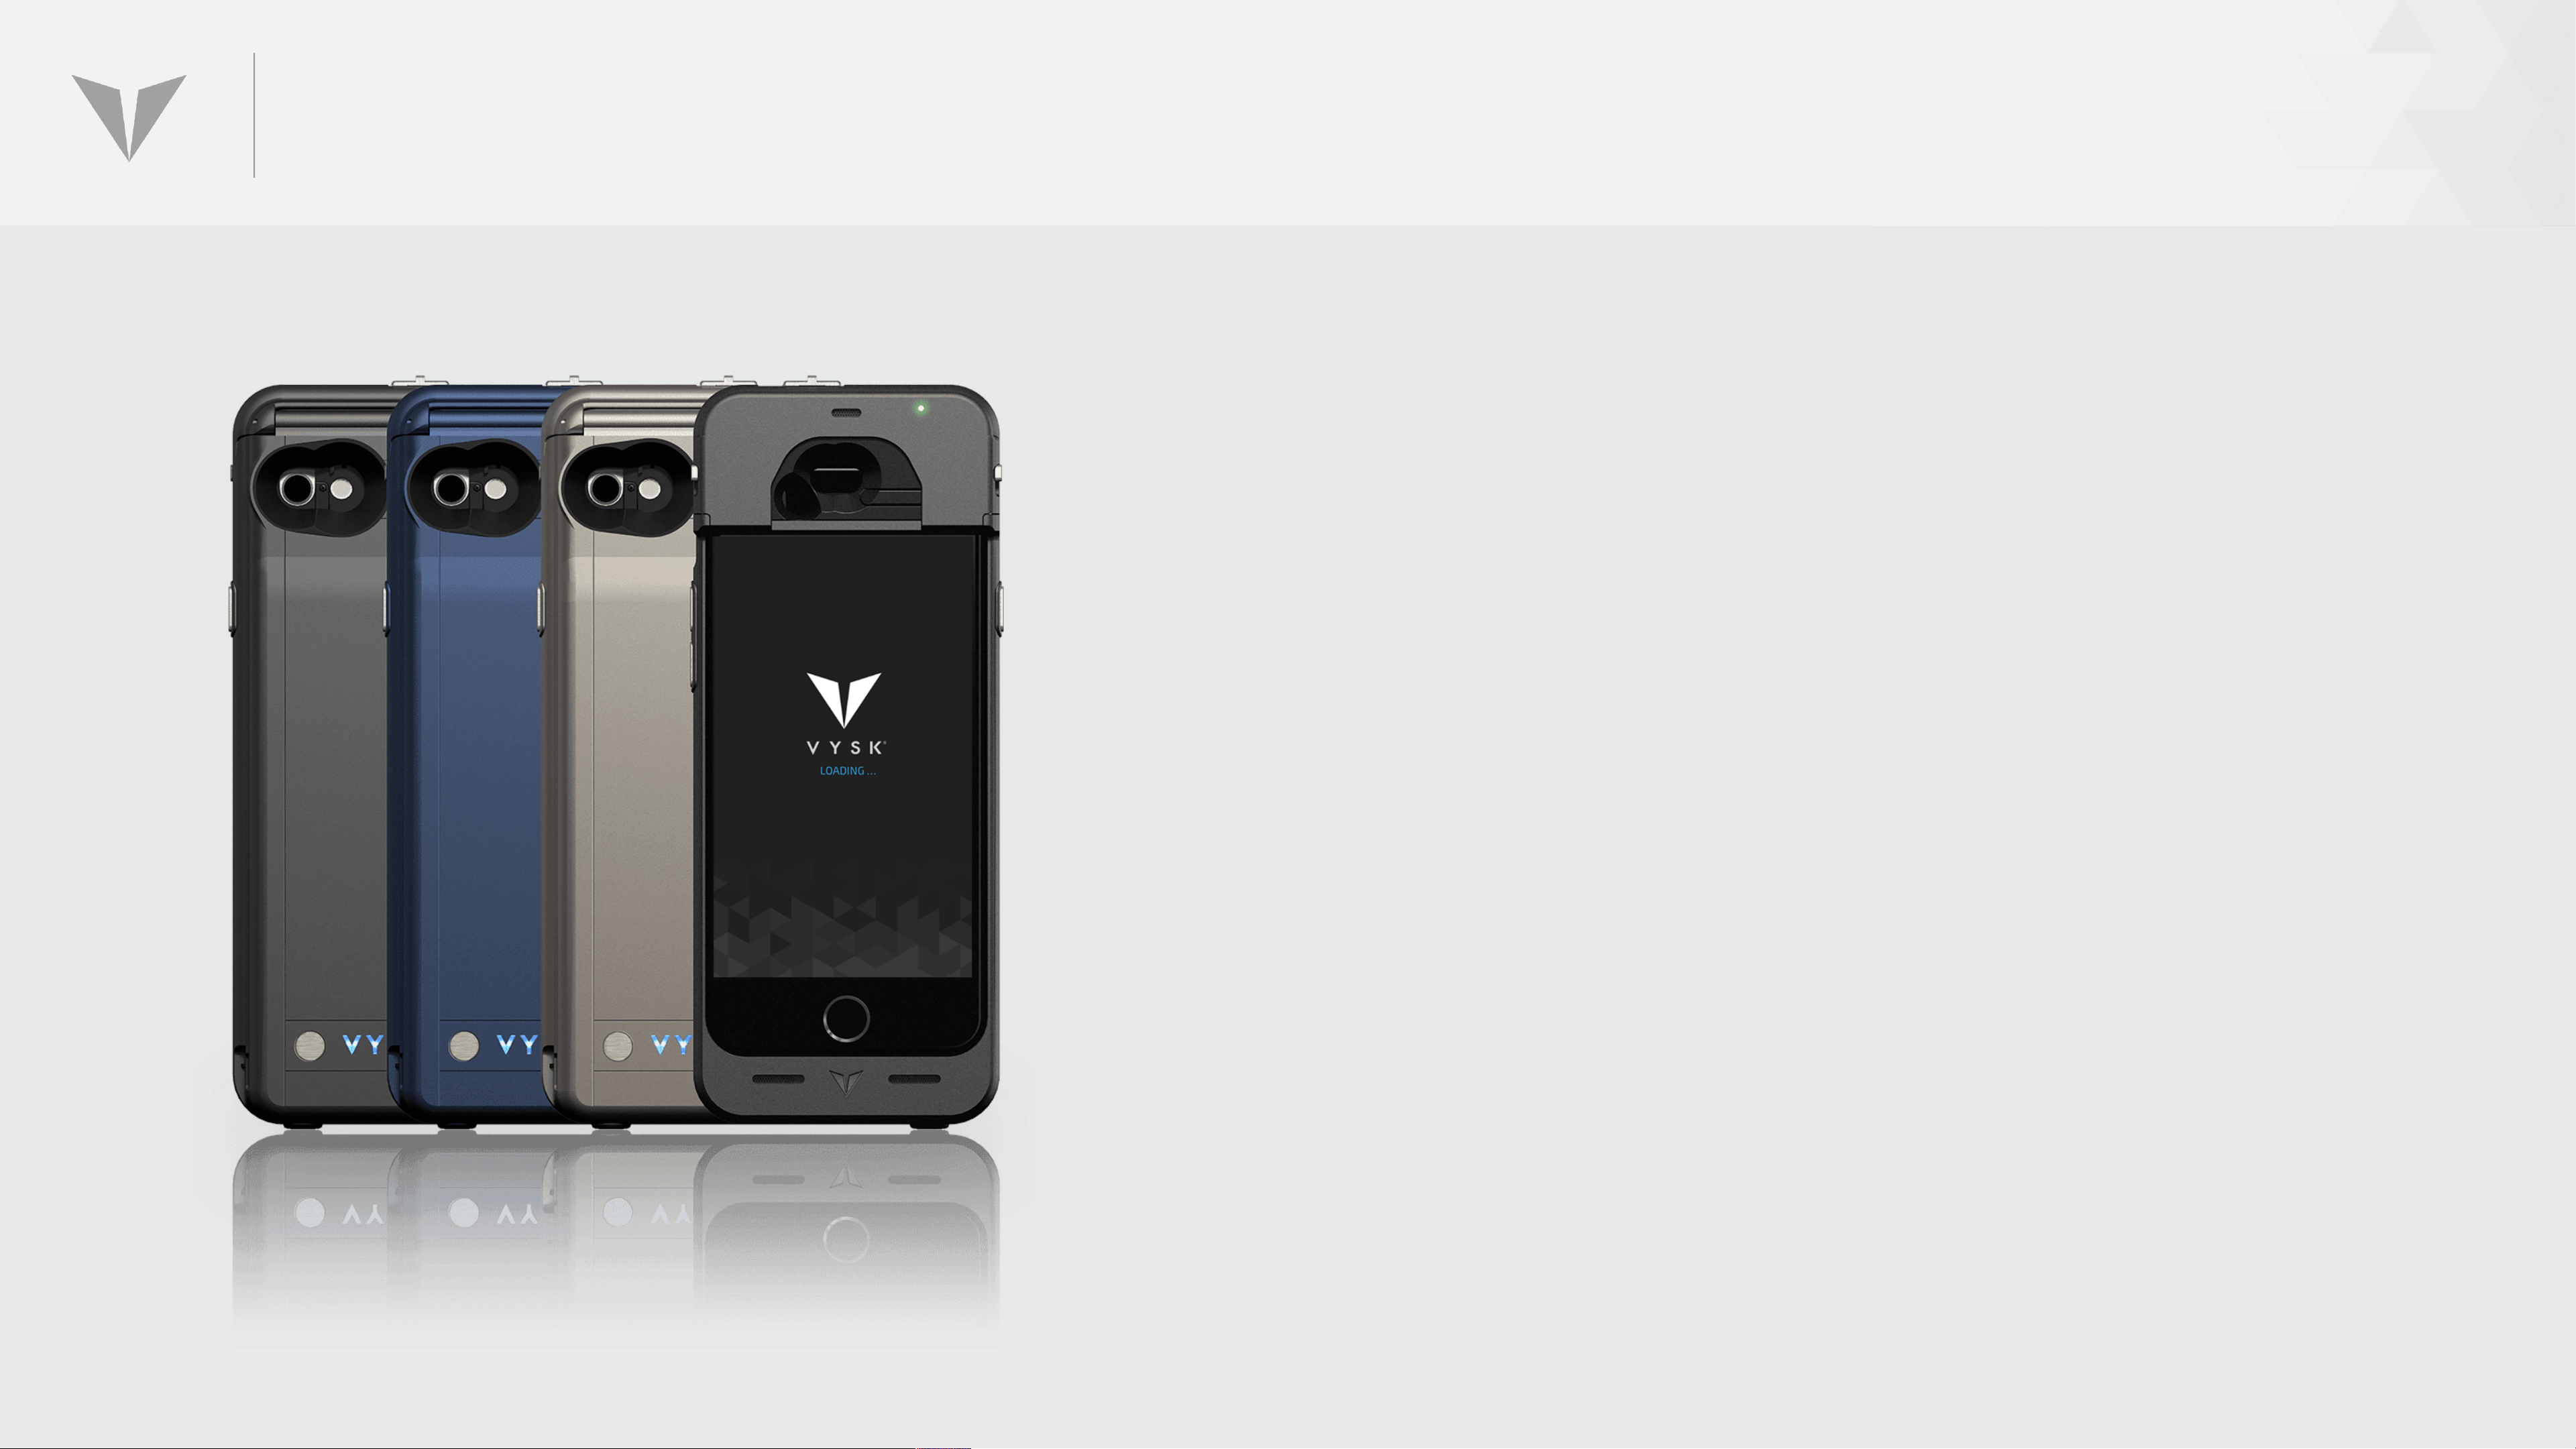
WHAT IS THE QSI?
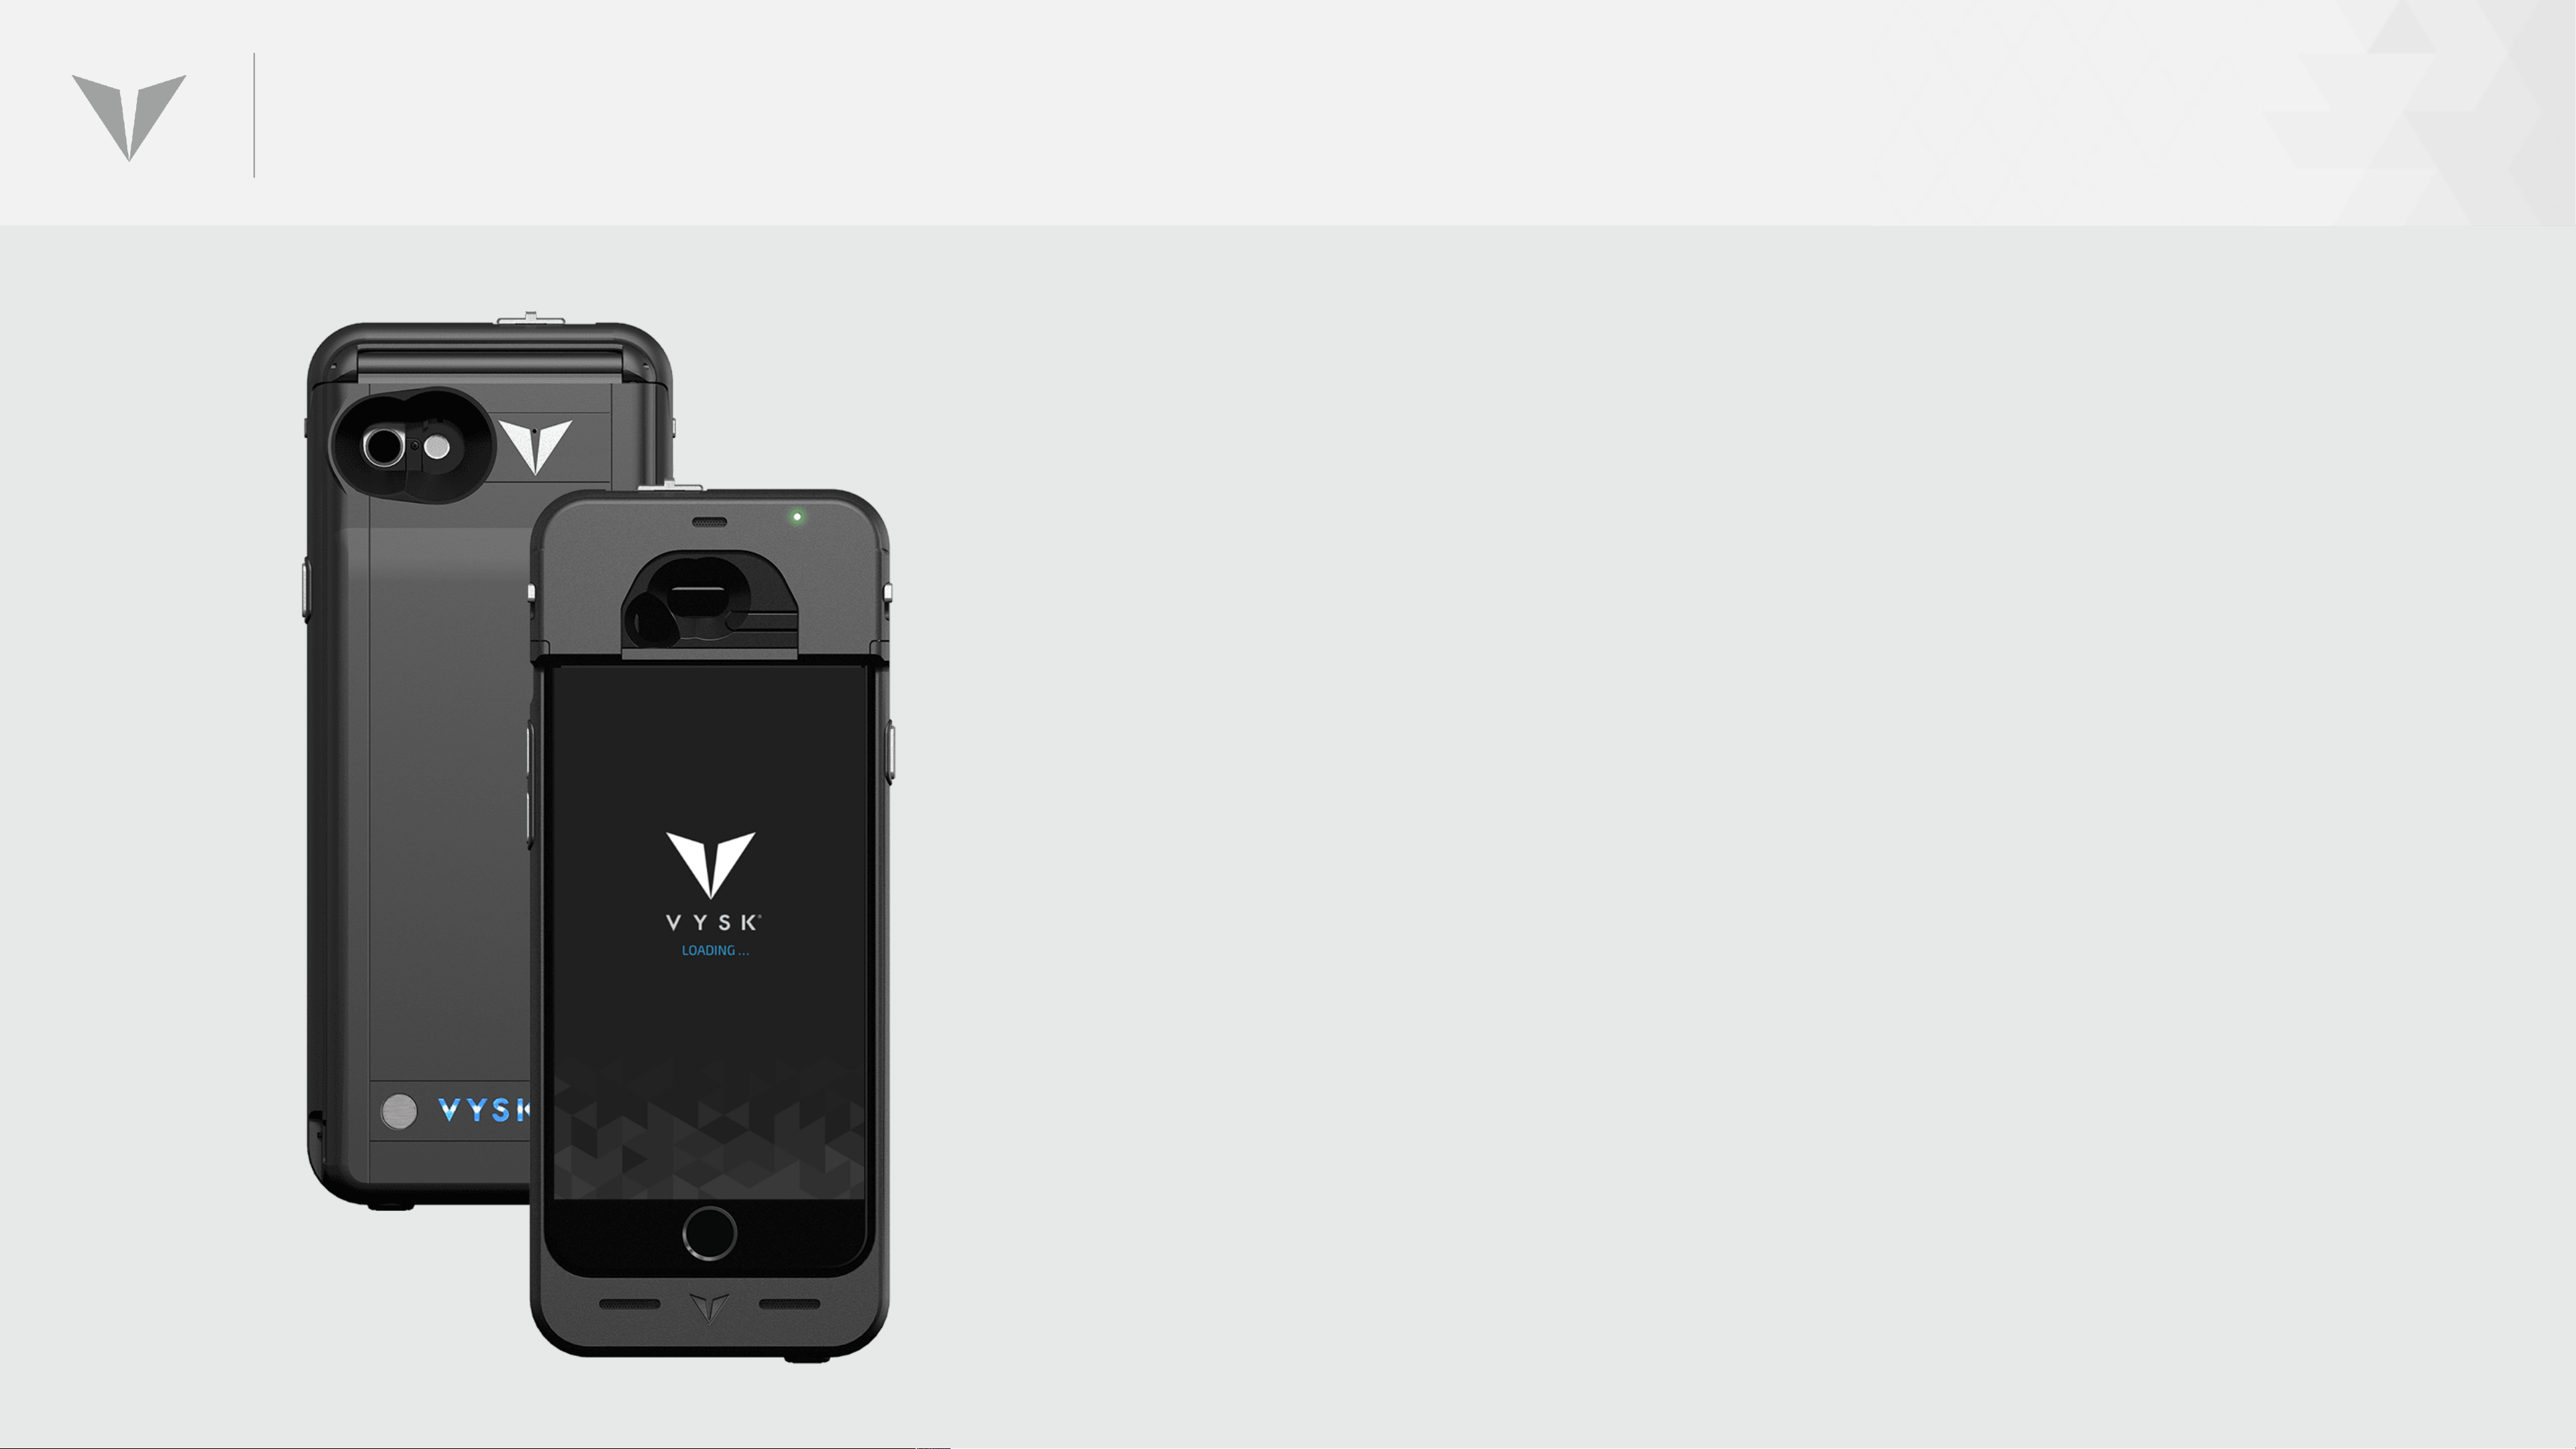
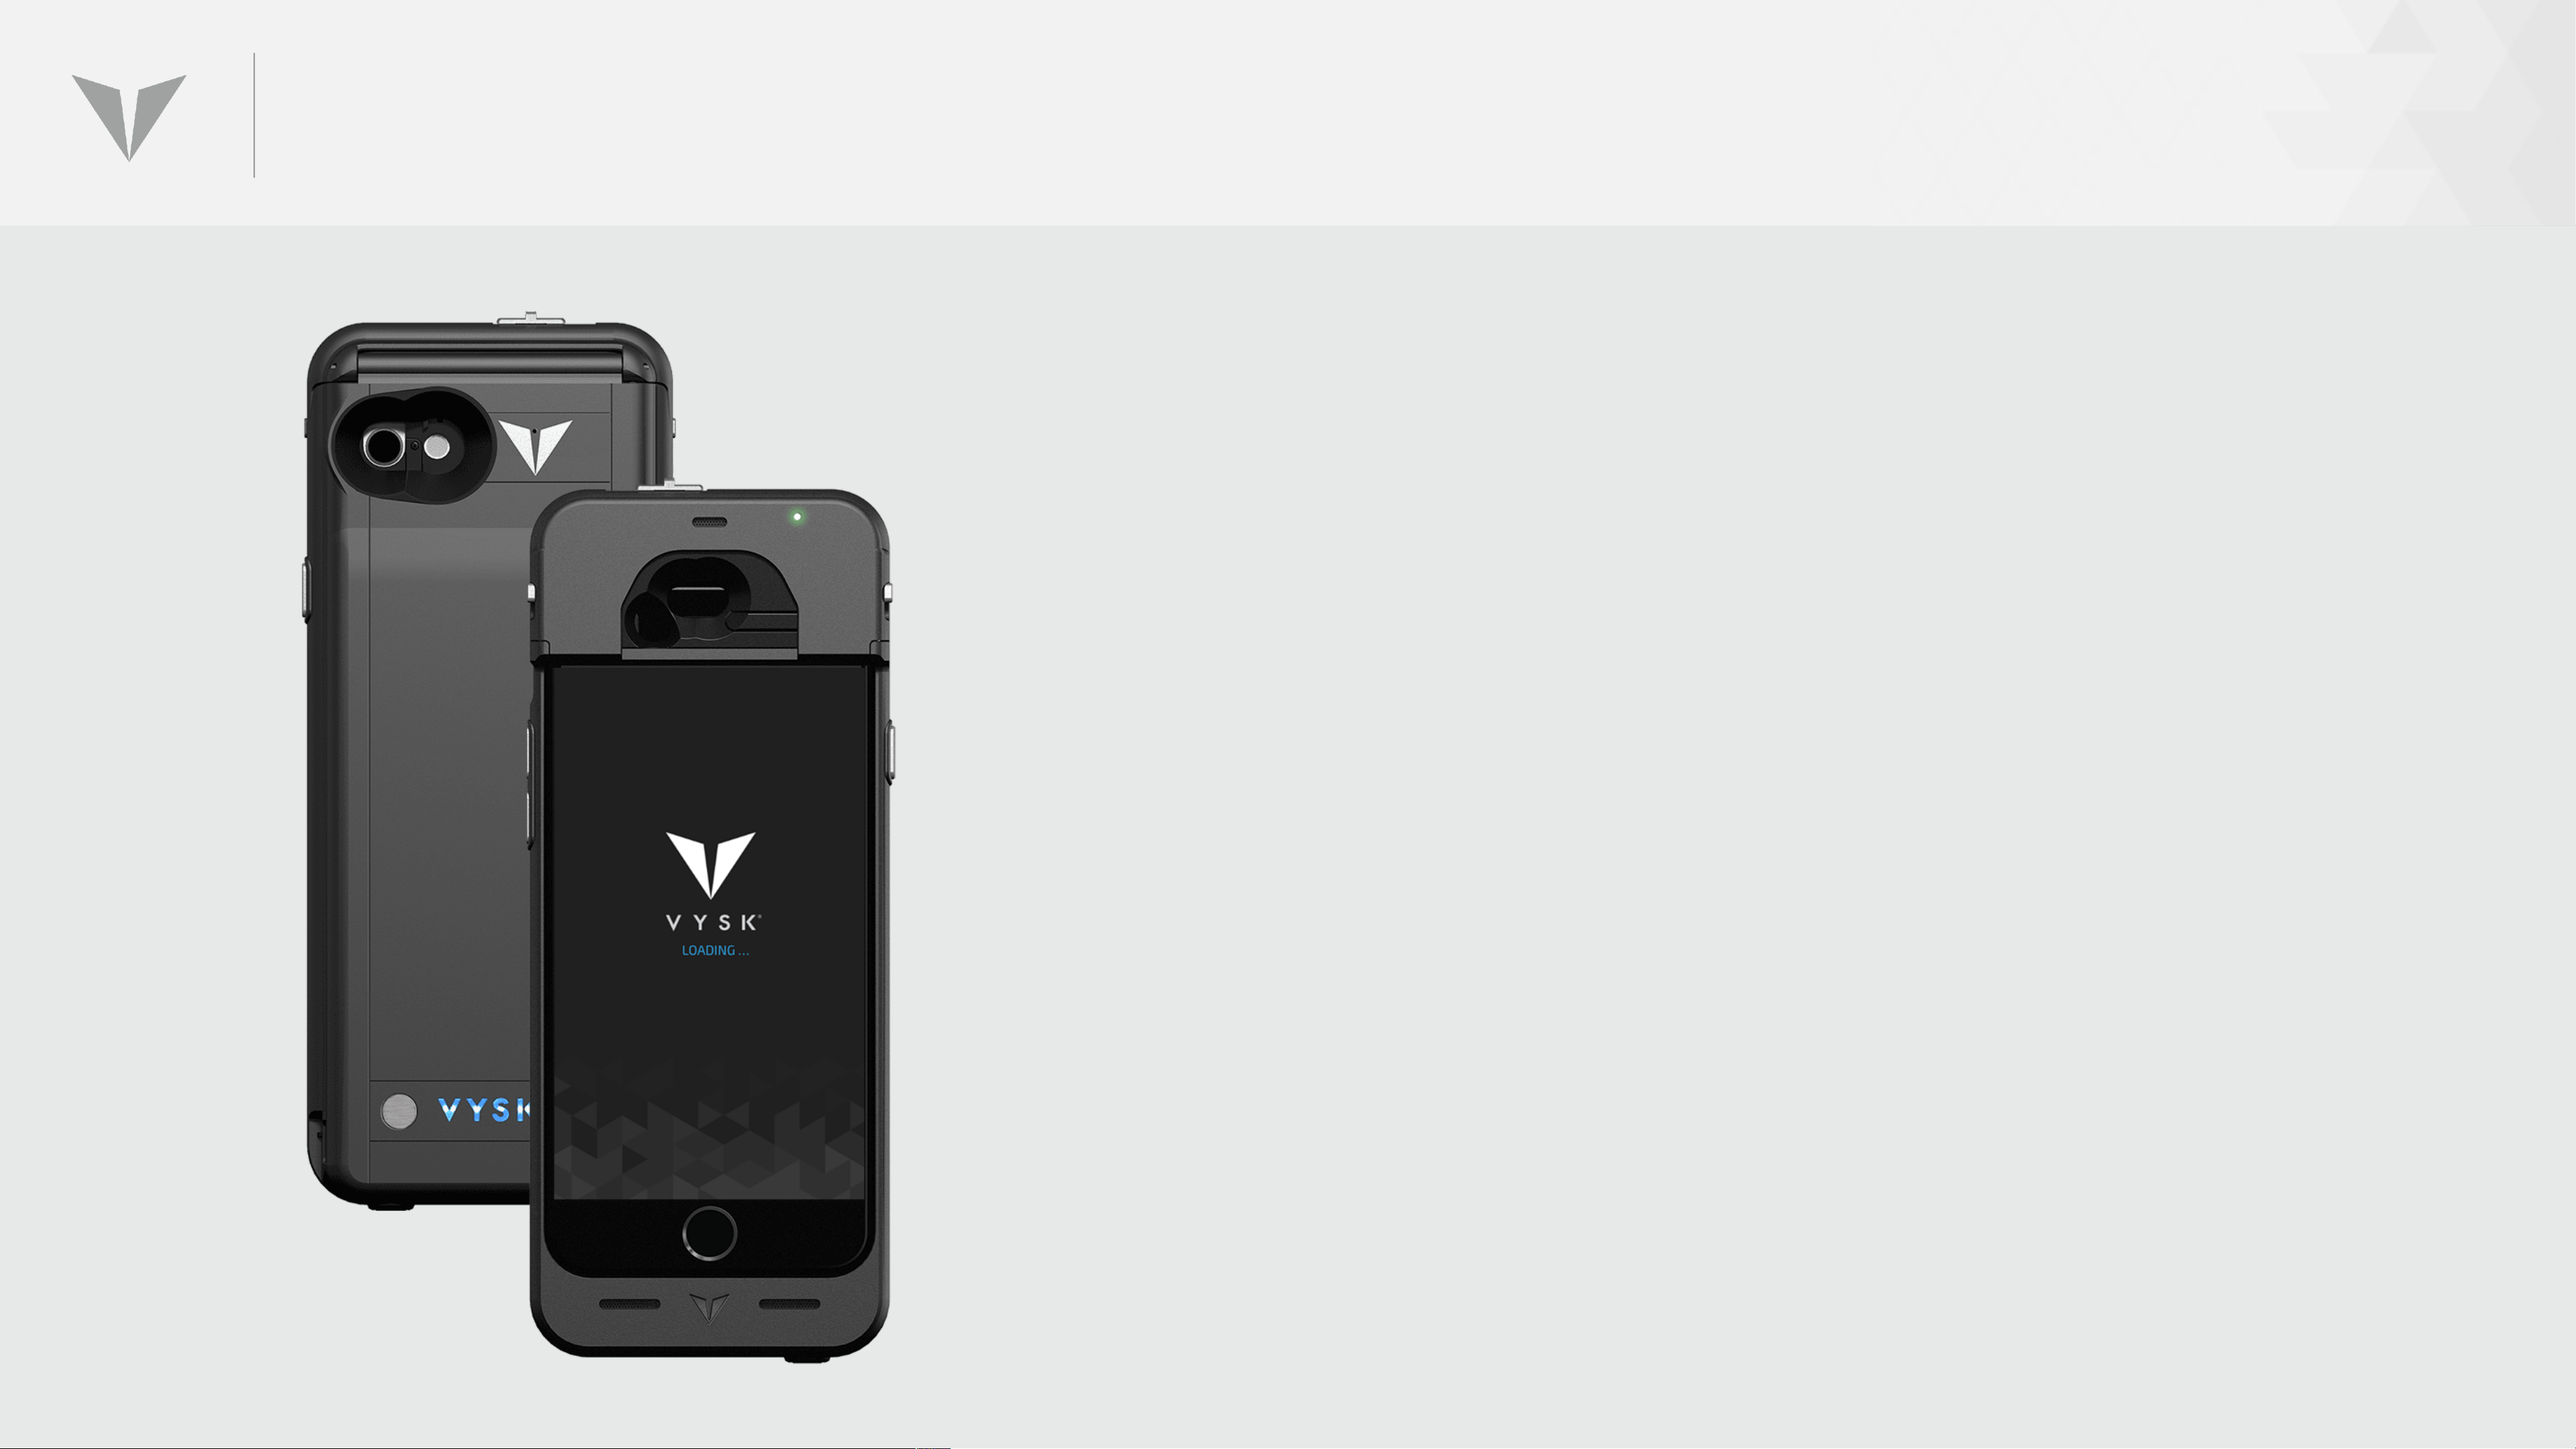
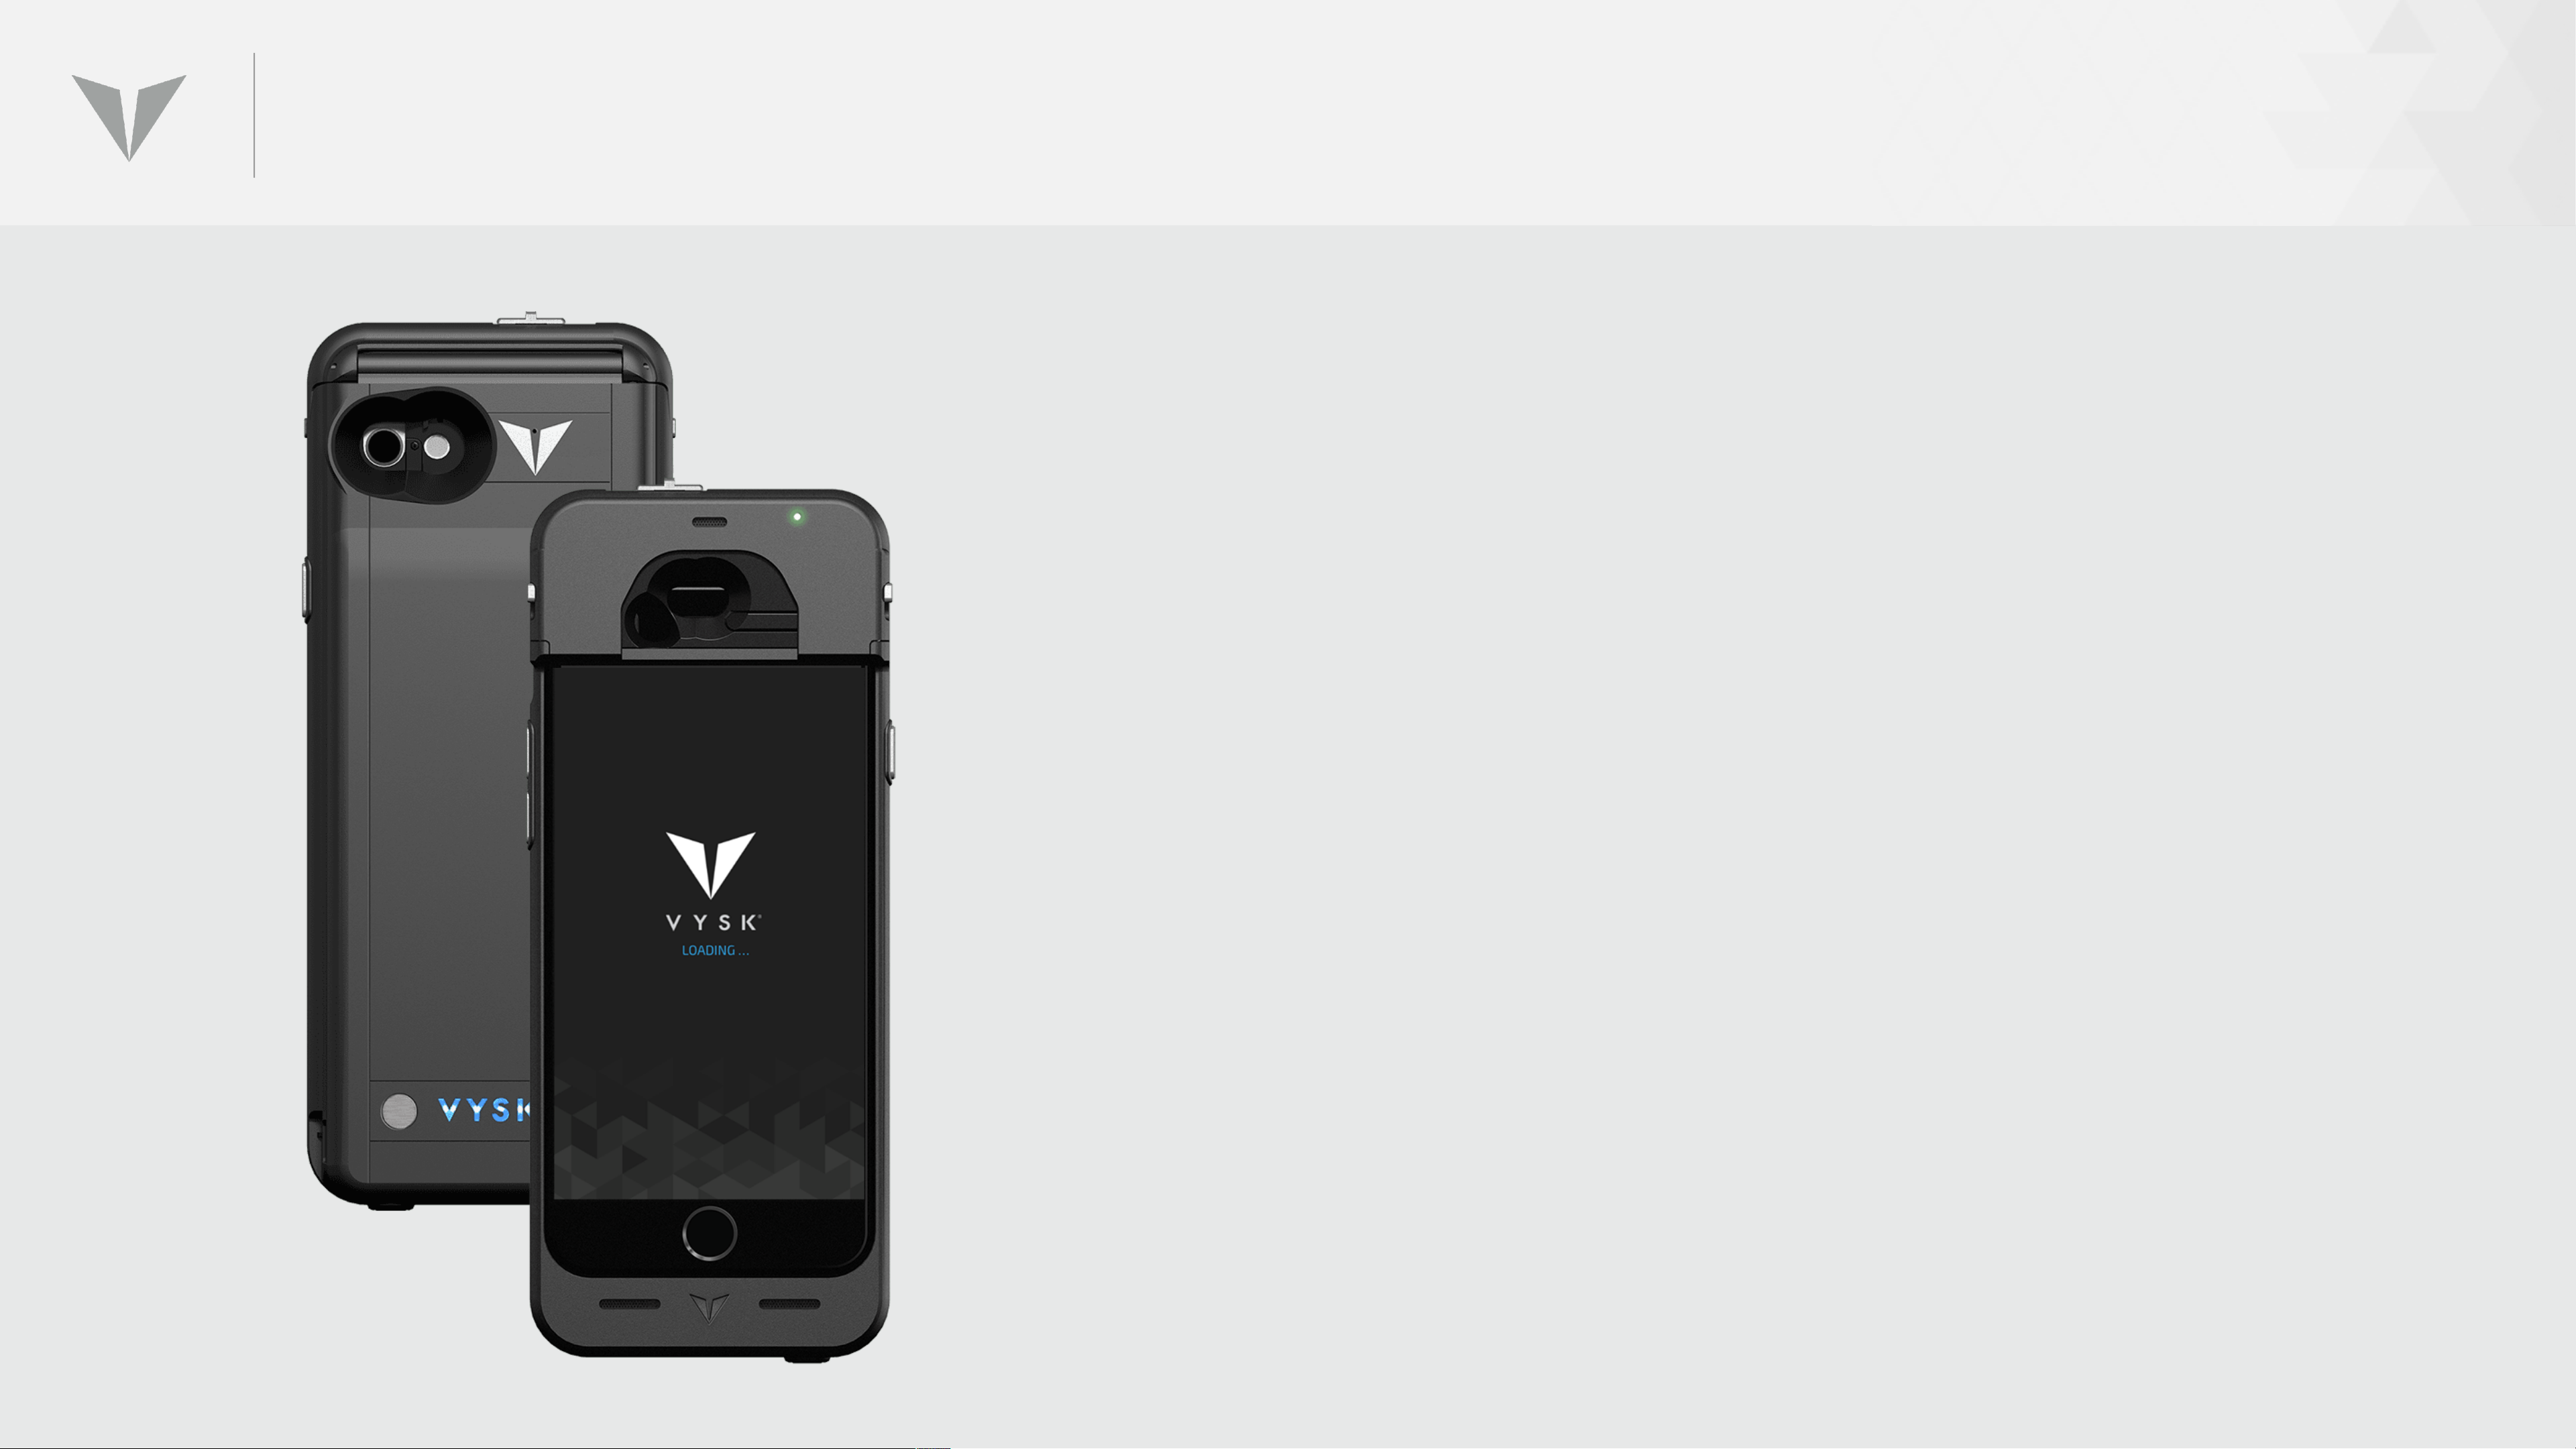
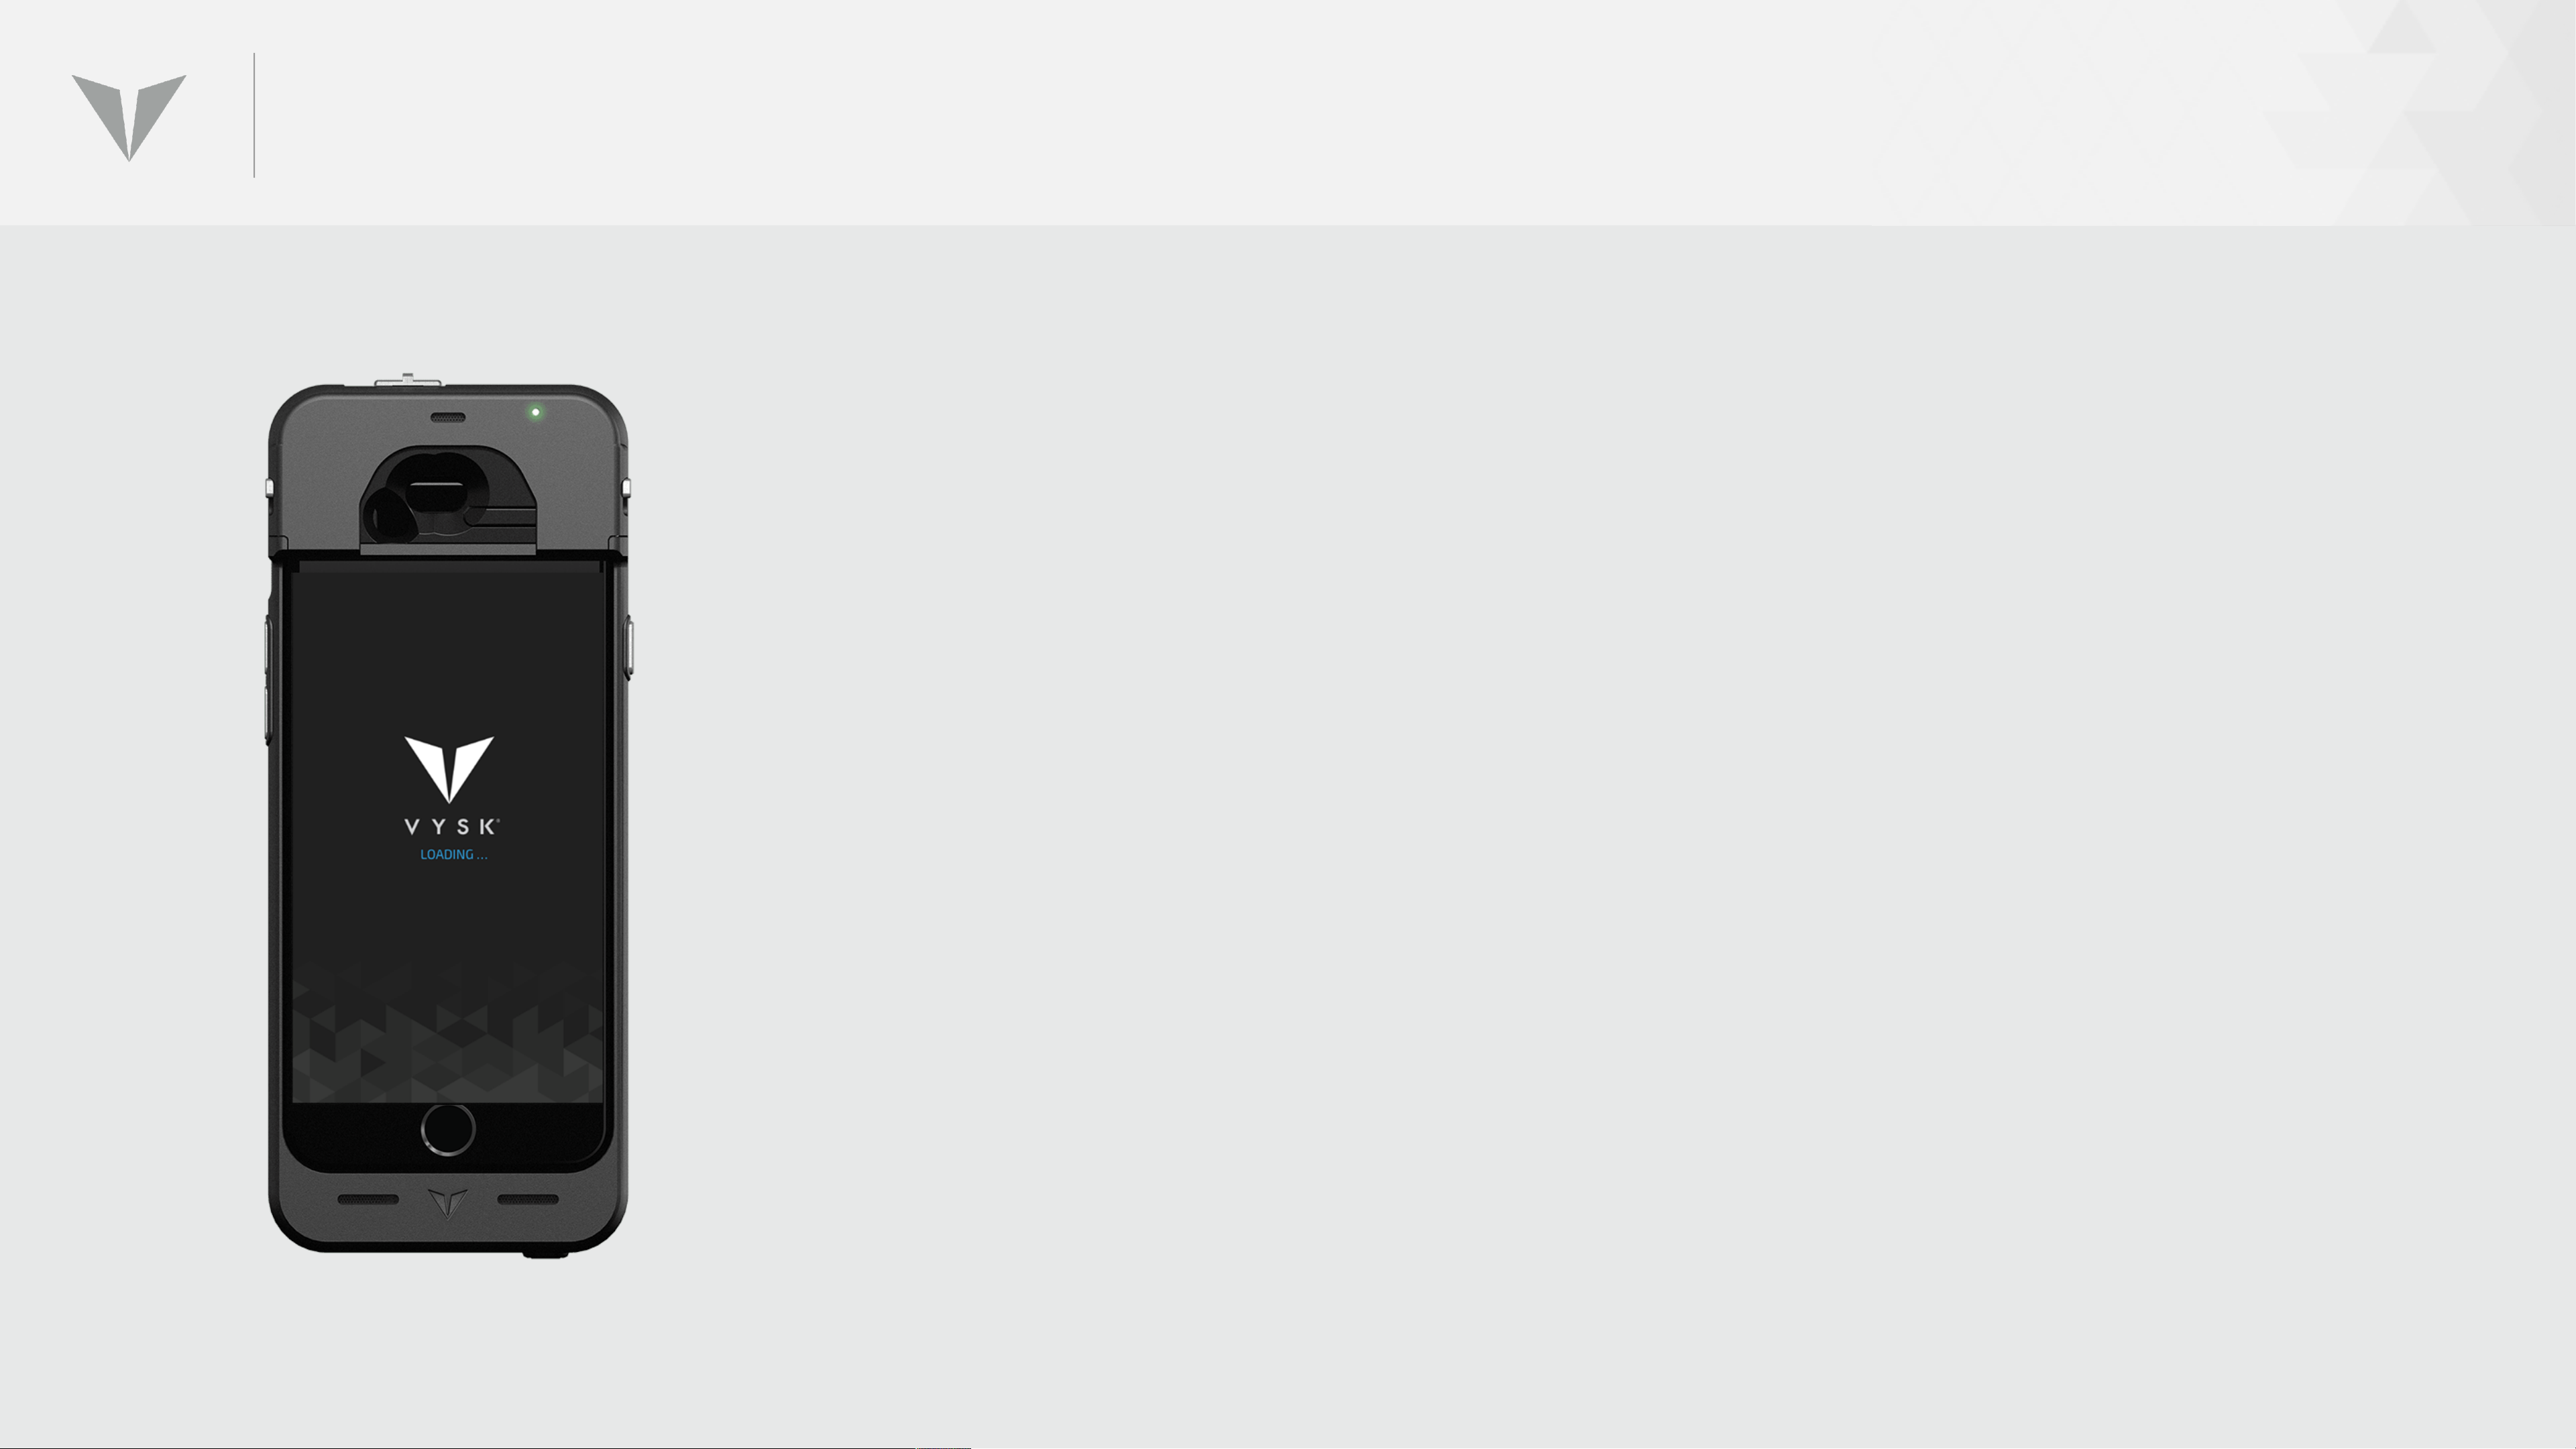
The Vysk QS1 Quantum Security Case
is a revolutionary new mobile security
solution that allows users to make
truly confidential voice calls without
fear of interception or compromise.
Page 5
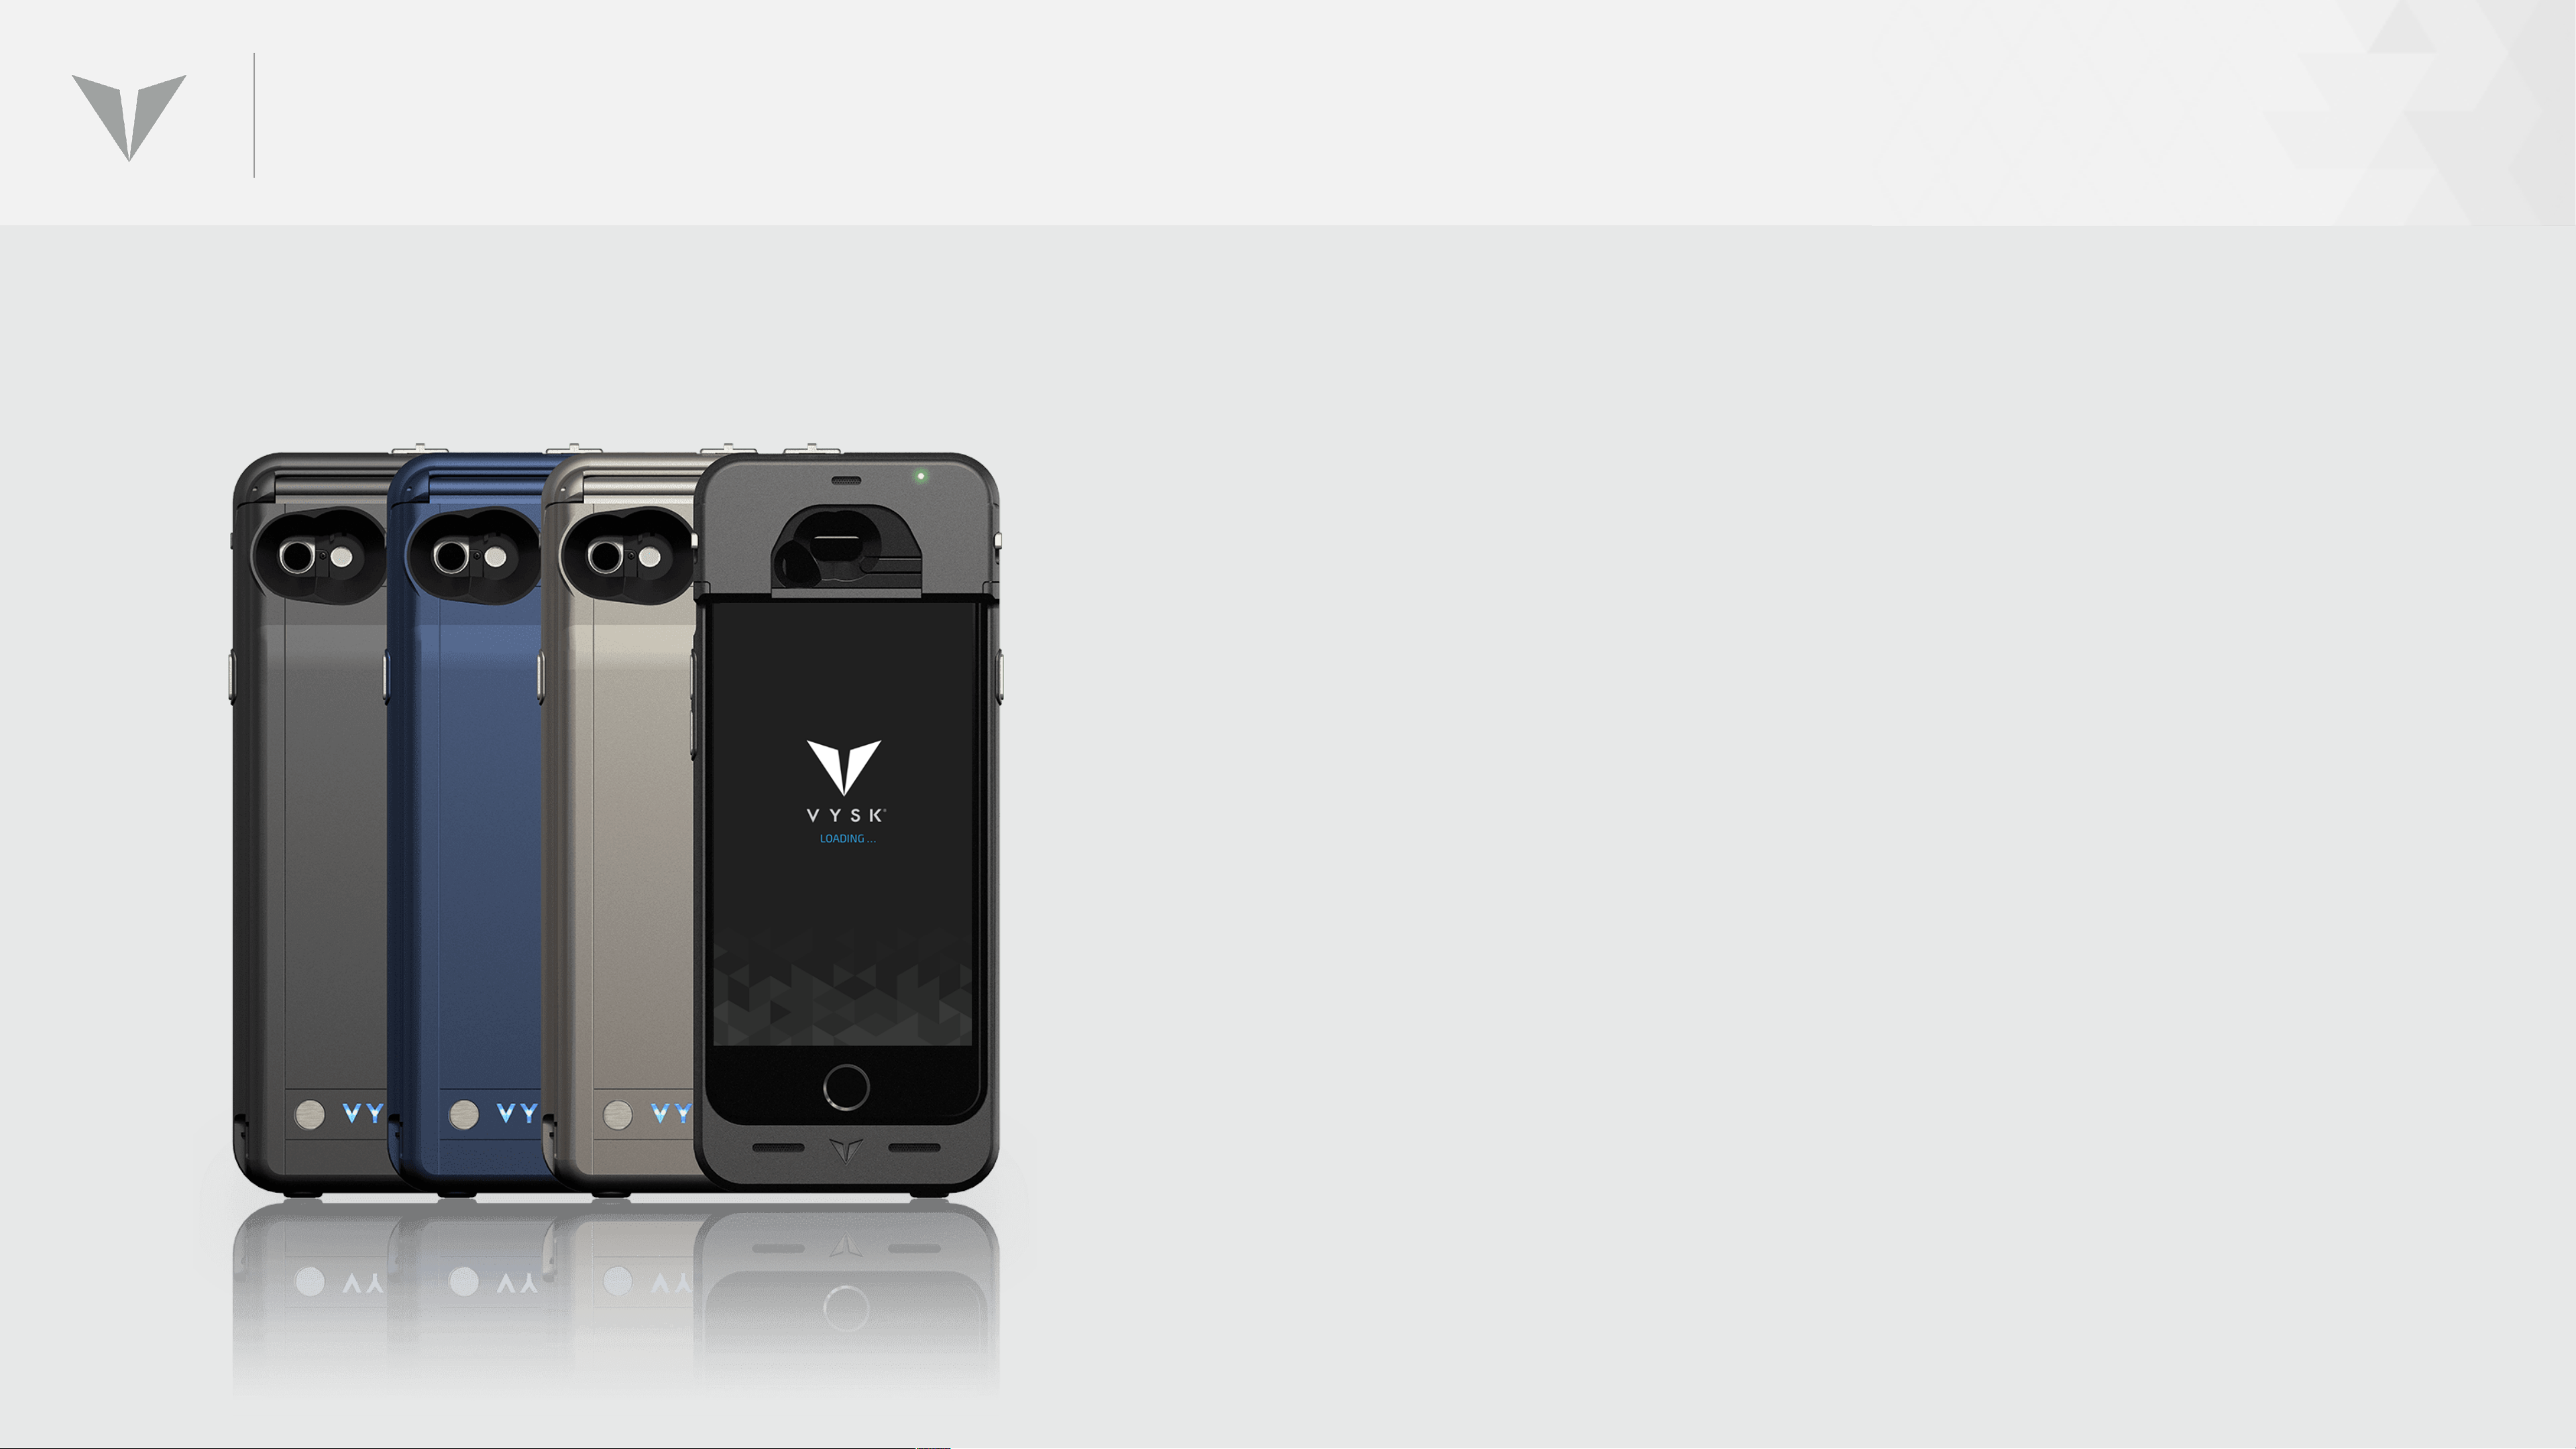
WHAT DOES THE QSI DO?
• Impact-resistant hard-shell case with soft-touch paint
• Sliding dual camera shutters (front and back)
• LED battery charge indicator (“VYSK” on back of case –
each letter = 25% charge)
• All iPhone buttons extended onto case (mute, volume,
sleep)
• Apple “Lightning” plug extended to micro-USB
Page 6
WHAT DOES THE QSI DO?
• Non-hackable microphone jammers
• High-fidelity audio processors and speakers
• State-of-the-art voice encryption app provides
secure calling
• Convenient annual subscription model
Page 7
MICROPHONE JAMMING
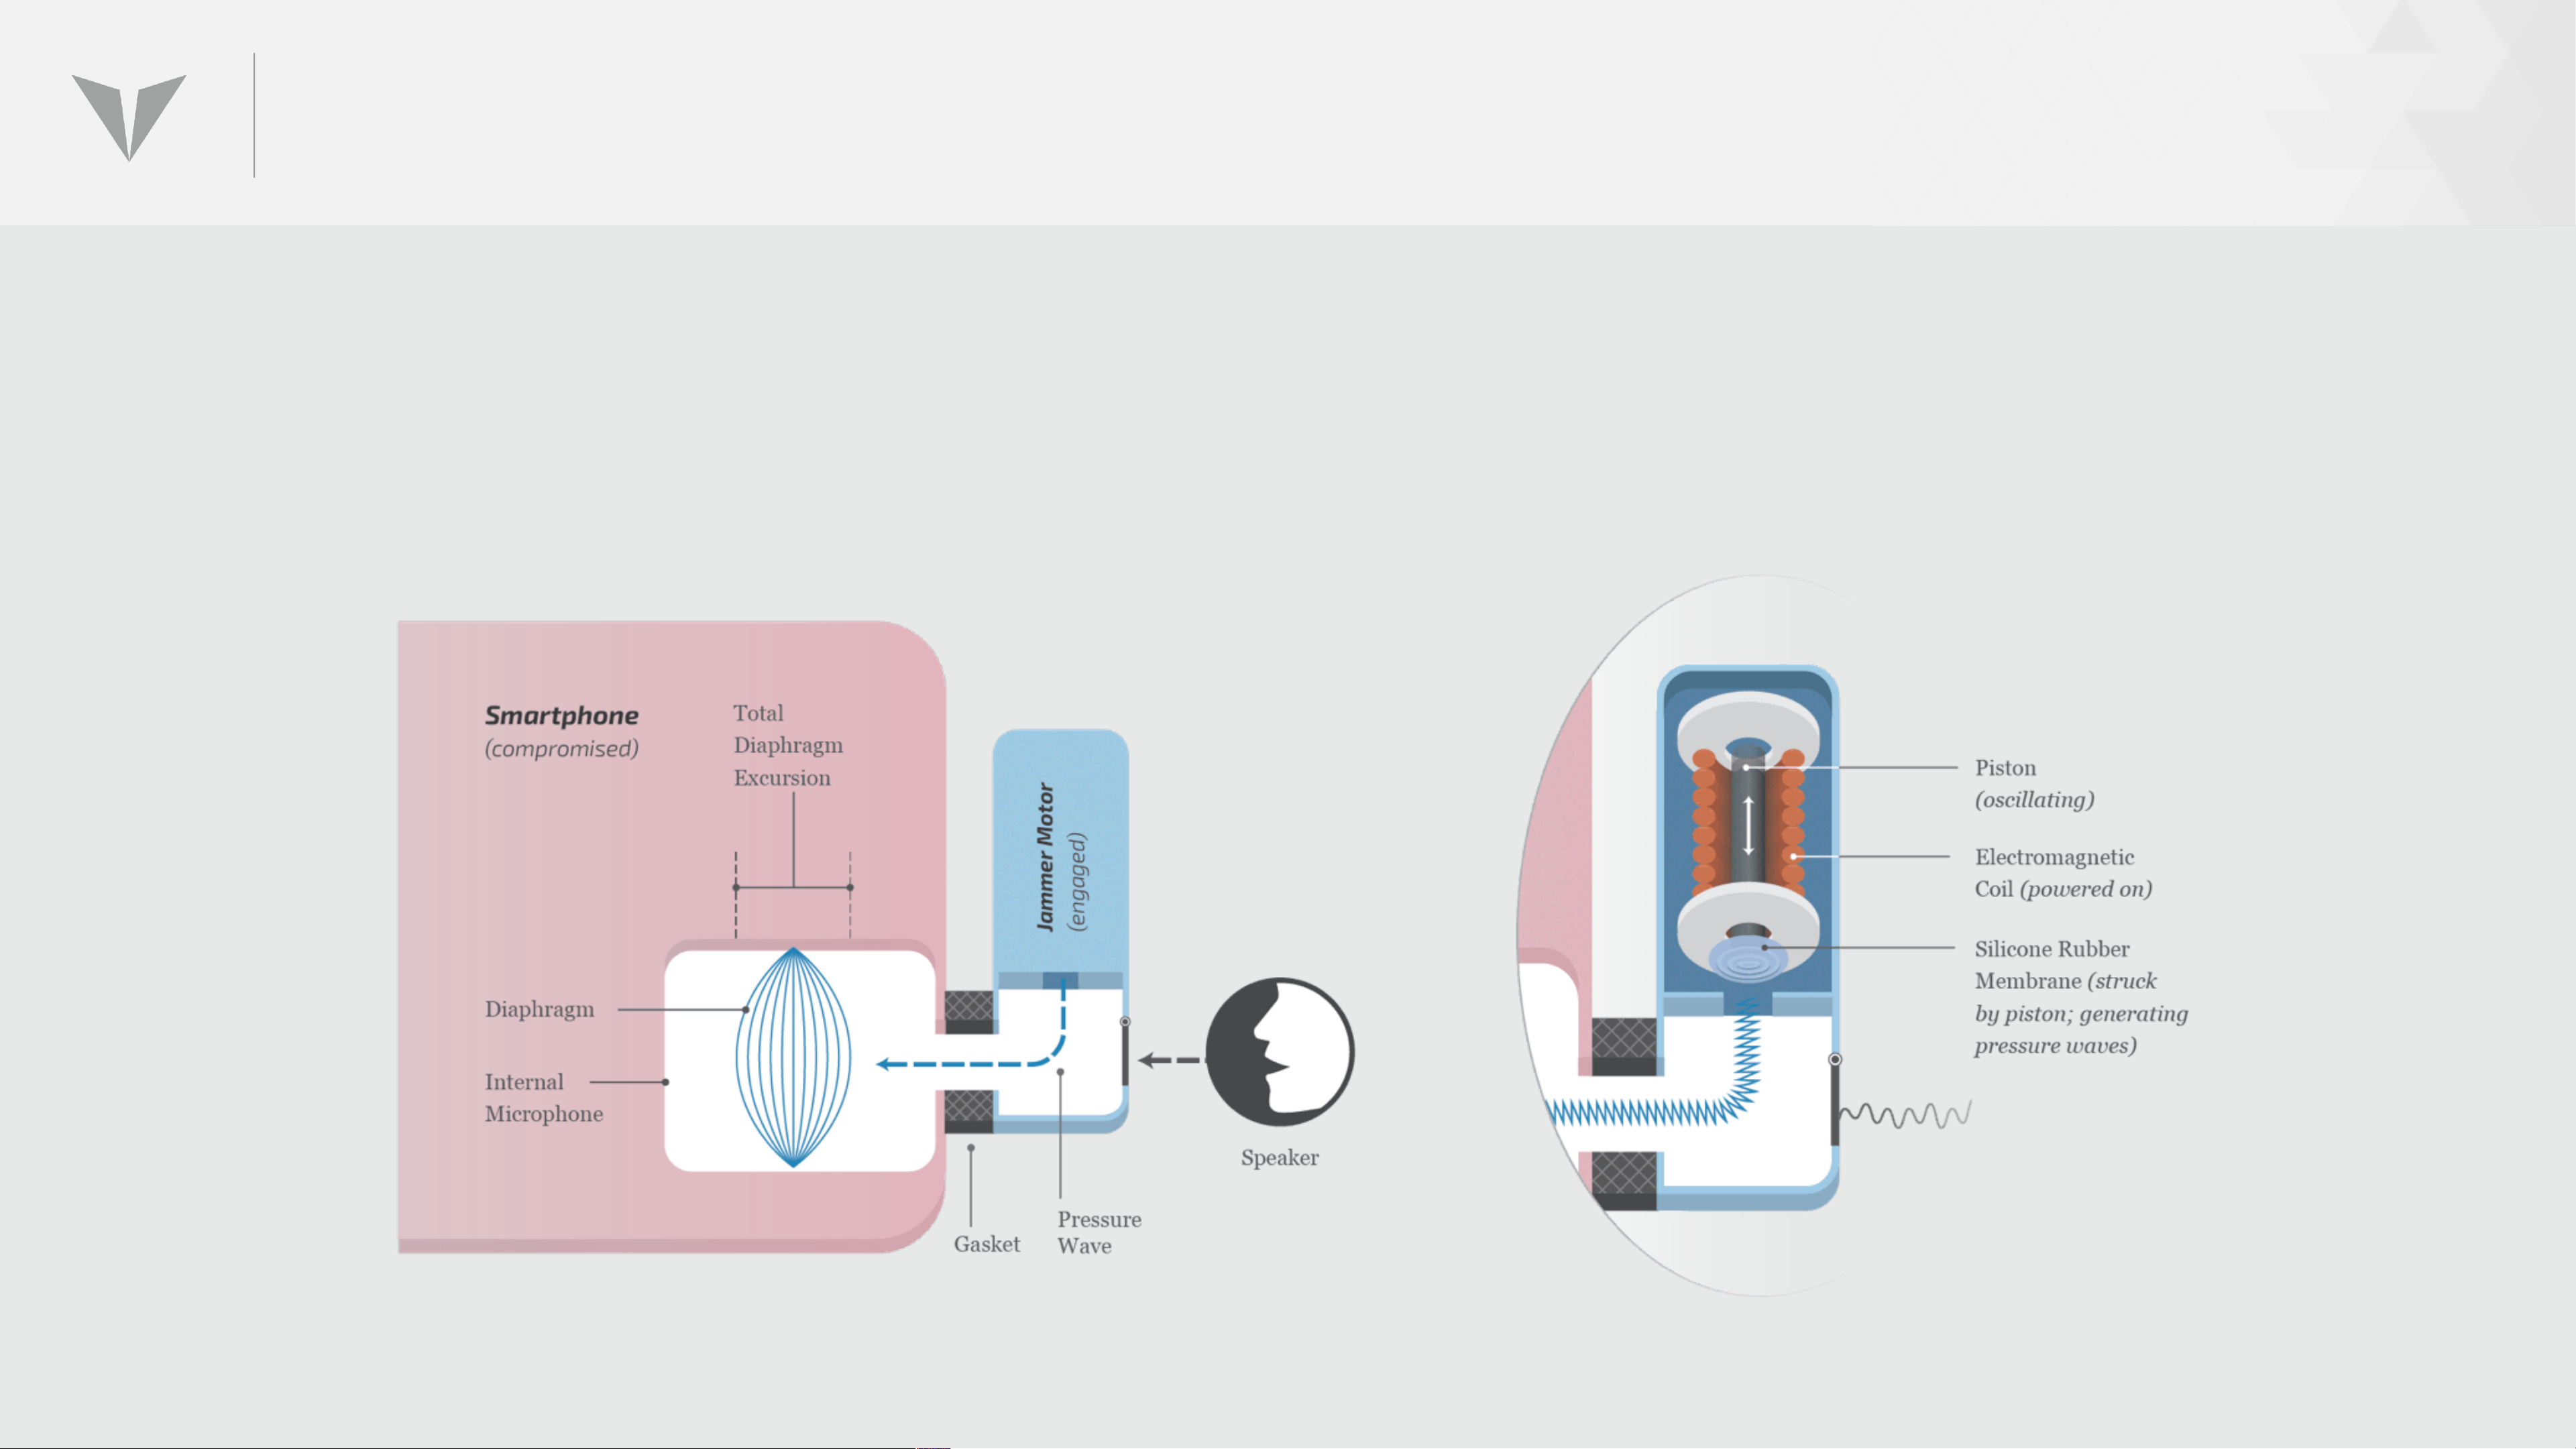
Each QS1 contains several patented microphone jammers. These jammers use air pulses to overdrive
the microphones of the iPhone. The result is a faint buzzing sound, and anyone attempting to hack
the phone’s microphones hears only this buzzing and not the conversation taking place.
Page 8
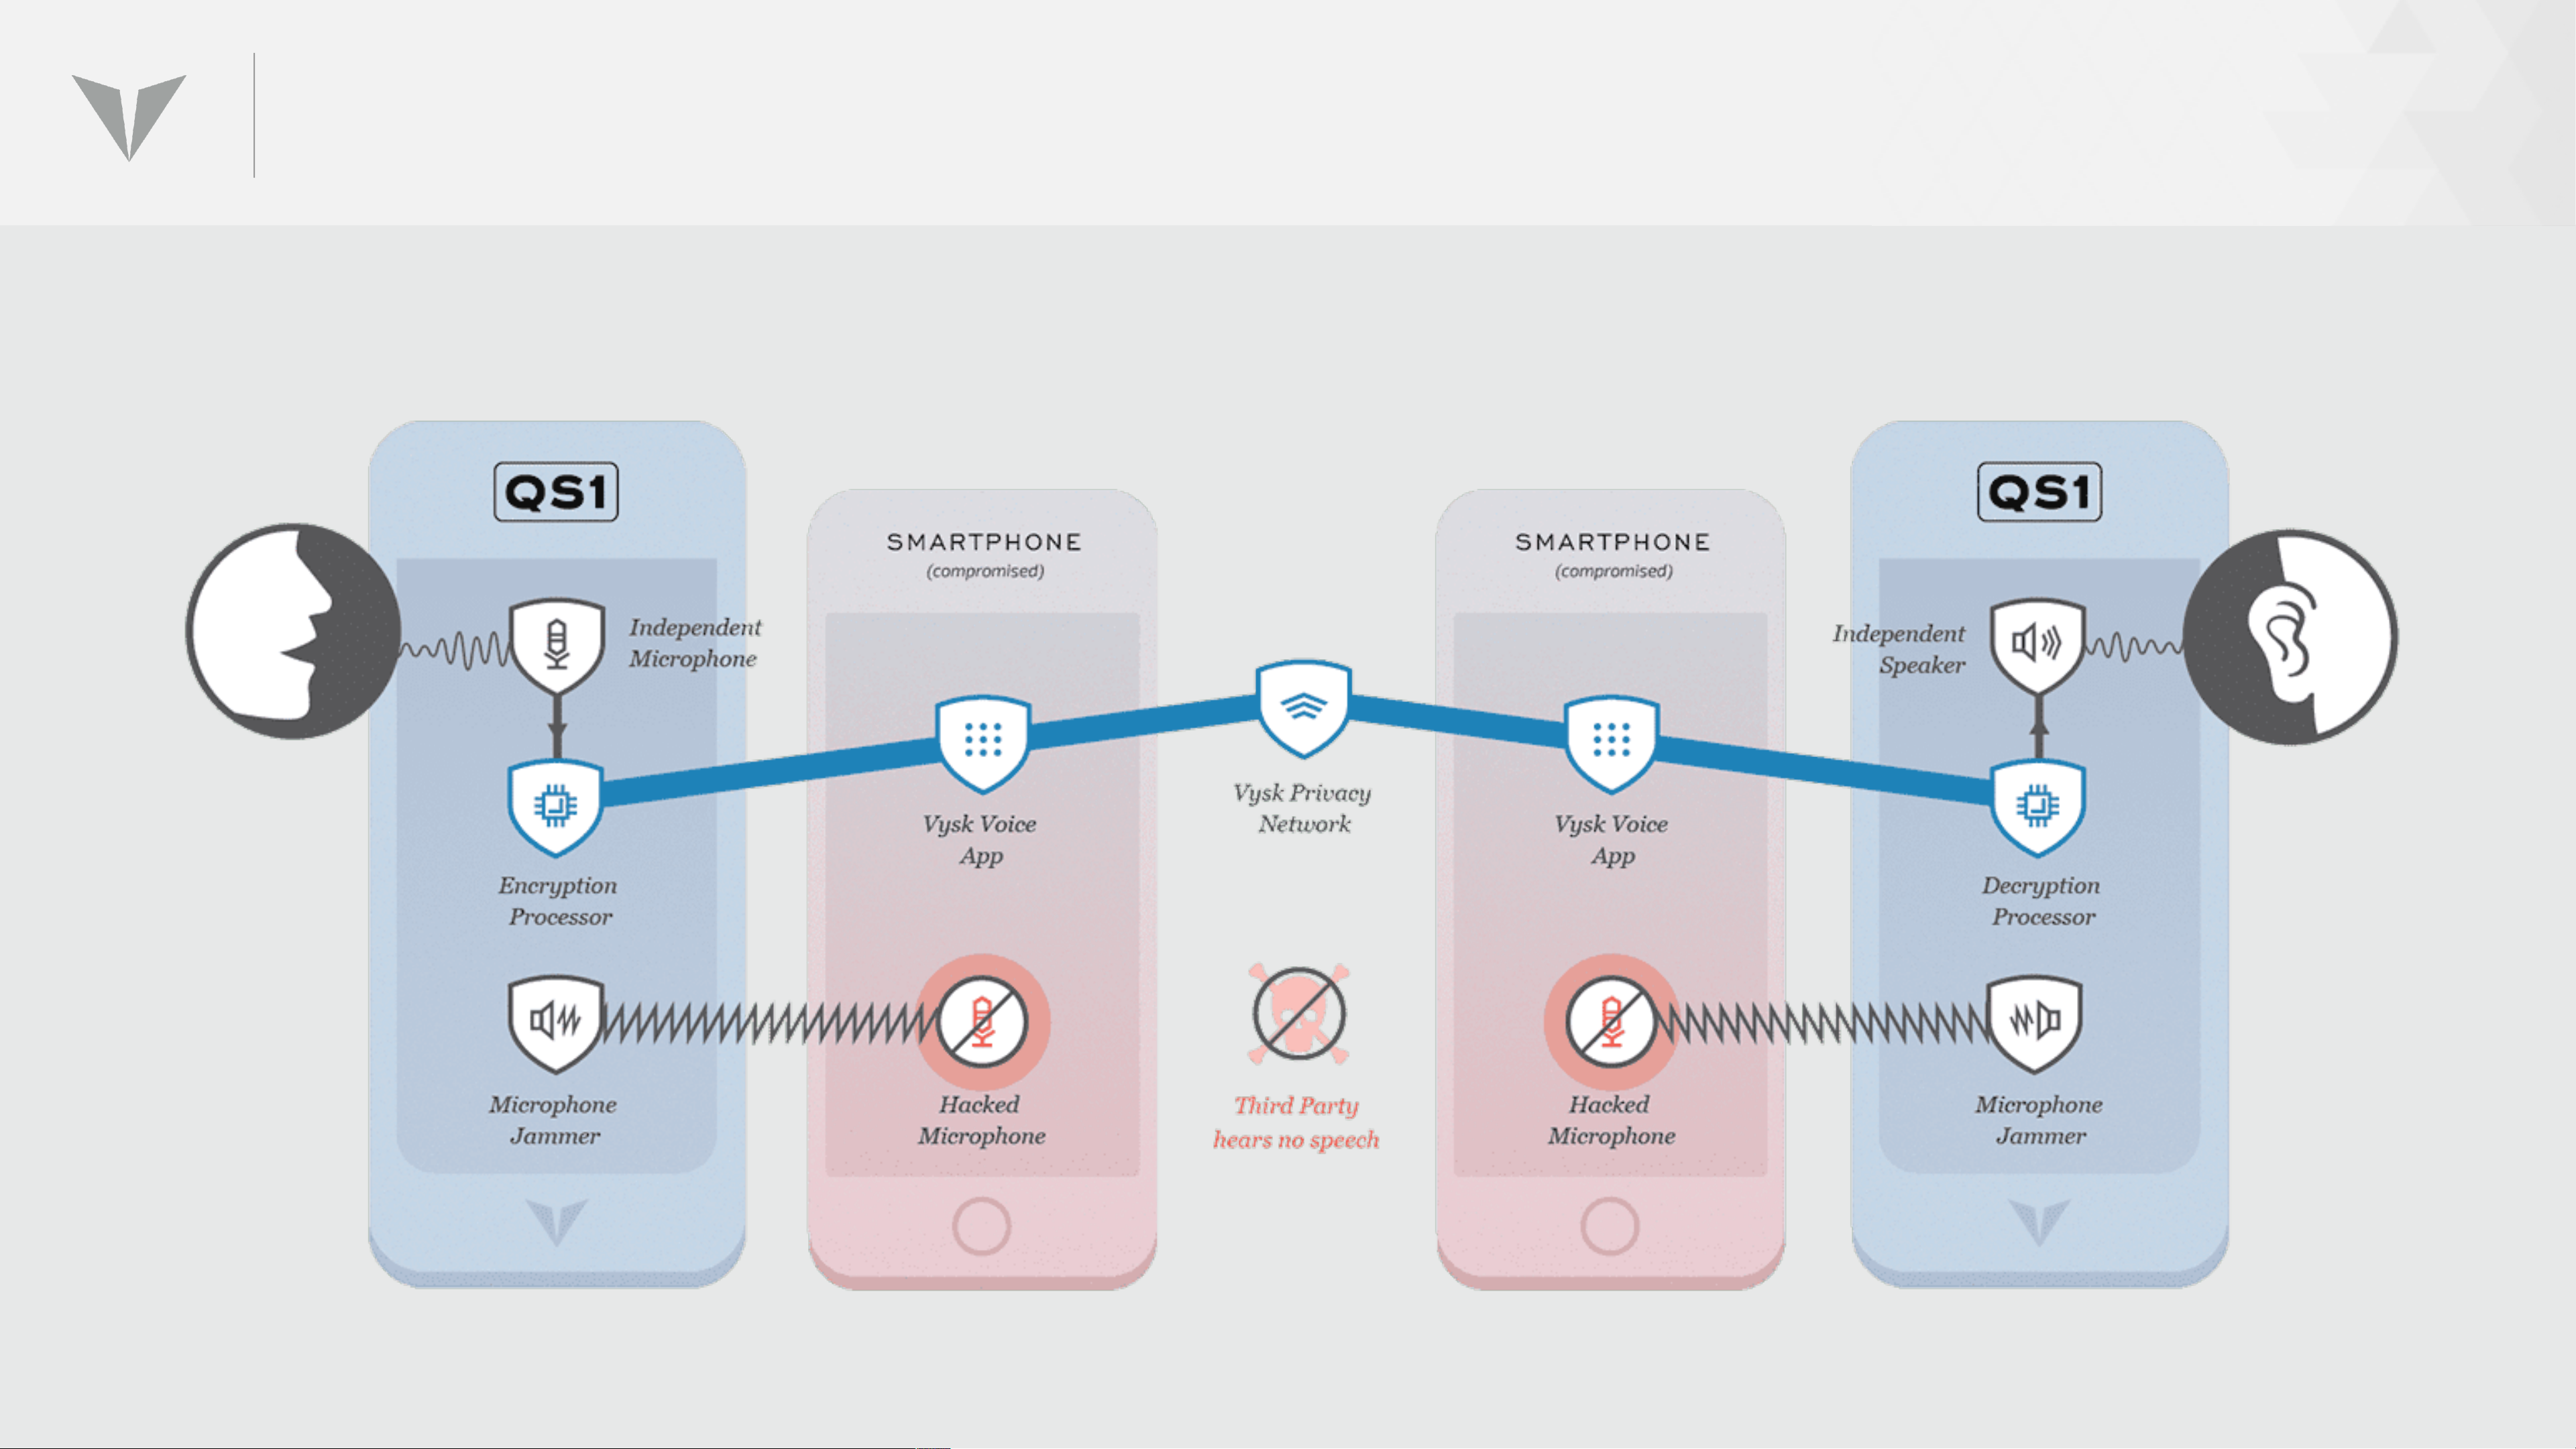
TRUE END-TO- END ENCRYPTION
Page 9
GETTING STARTED
End Users will require instruction in the proper use of QS1s:
• Attaching/detaching the QS1
• Initial configuration of iPhone and QS1 (if not
pre-configured), including Vysk Voice App download
• Putting QS1 in Lockdown Mode
• Initiating and receiving Vysk Secure Voice Calls
• Using the Vysk contact database and other administrative
functions
• Keeping software (App) and firmware versions current
• Correctly charging the device
Page 10
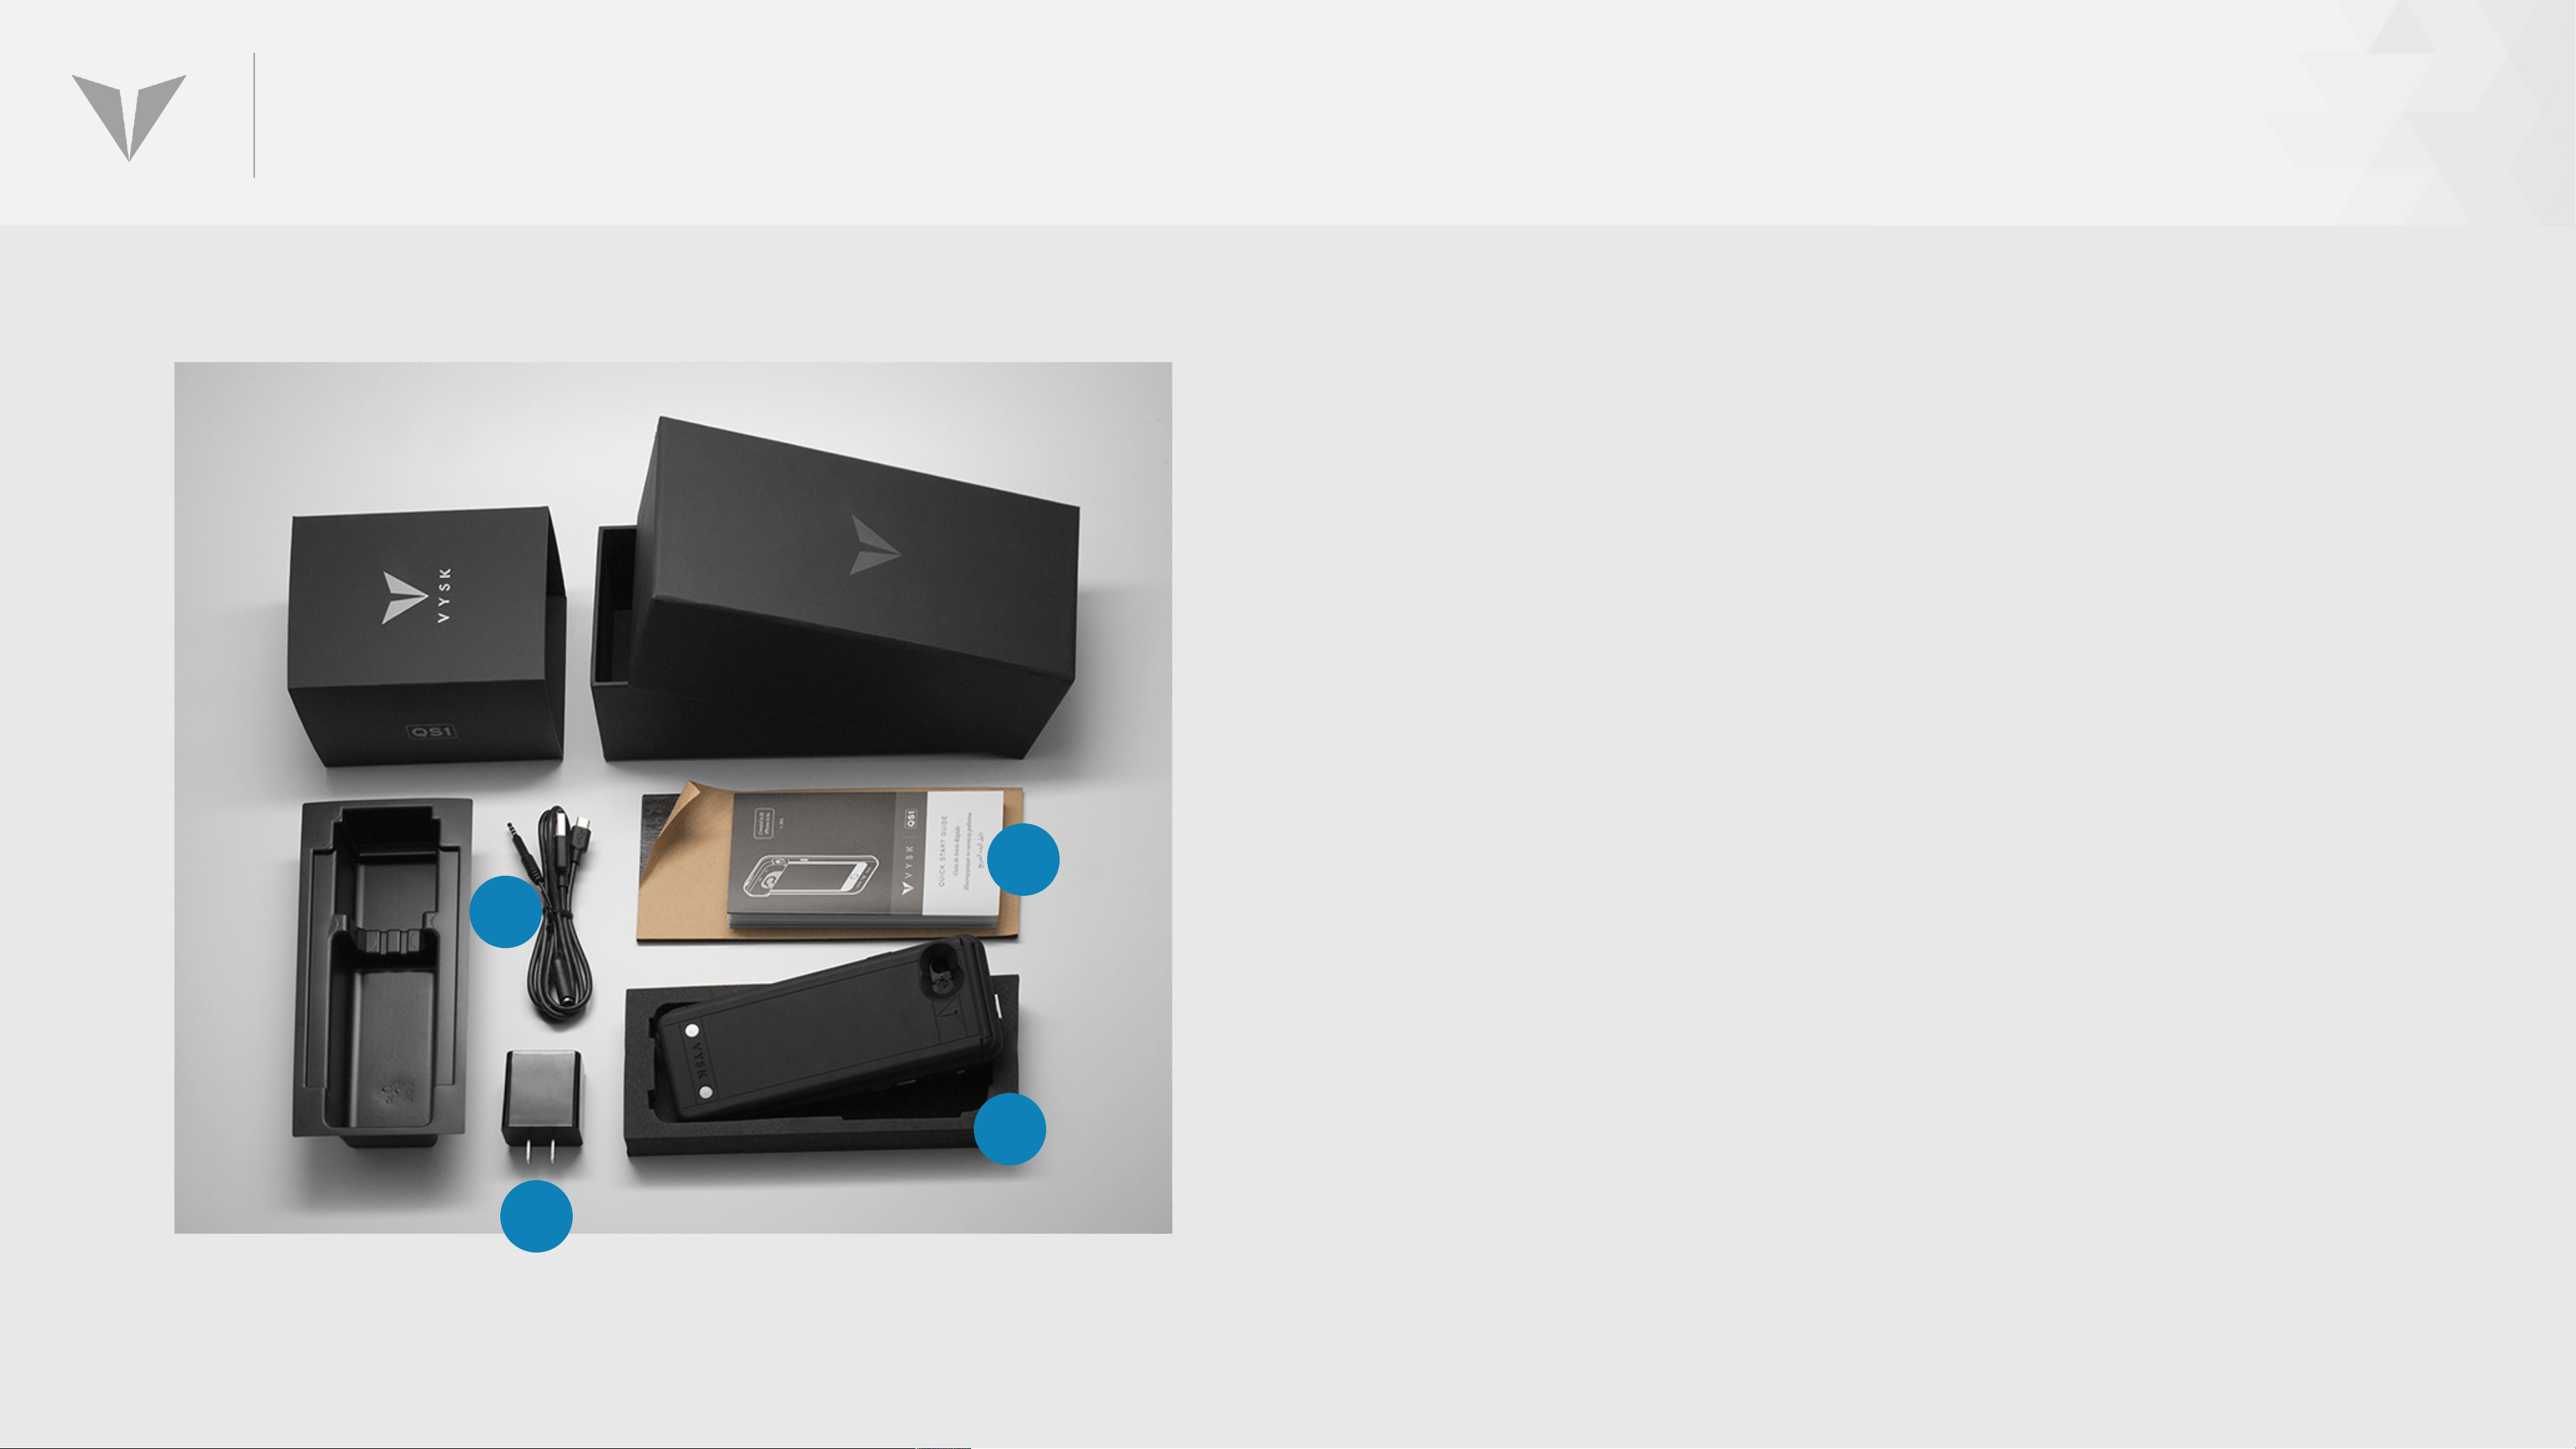
PACKAGING & CONTENTS
C
A. QS1 case
B. 2.1-amp charger
D
C. USB cable & Headphone passthrough dongle
D. Quick-start guide
B
A
Page 11
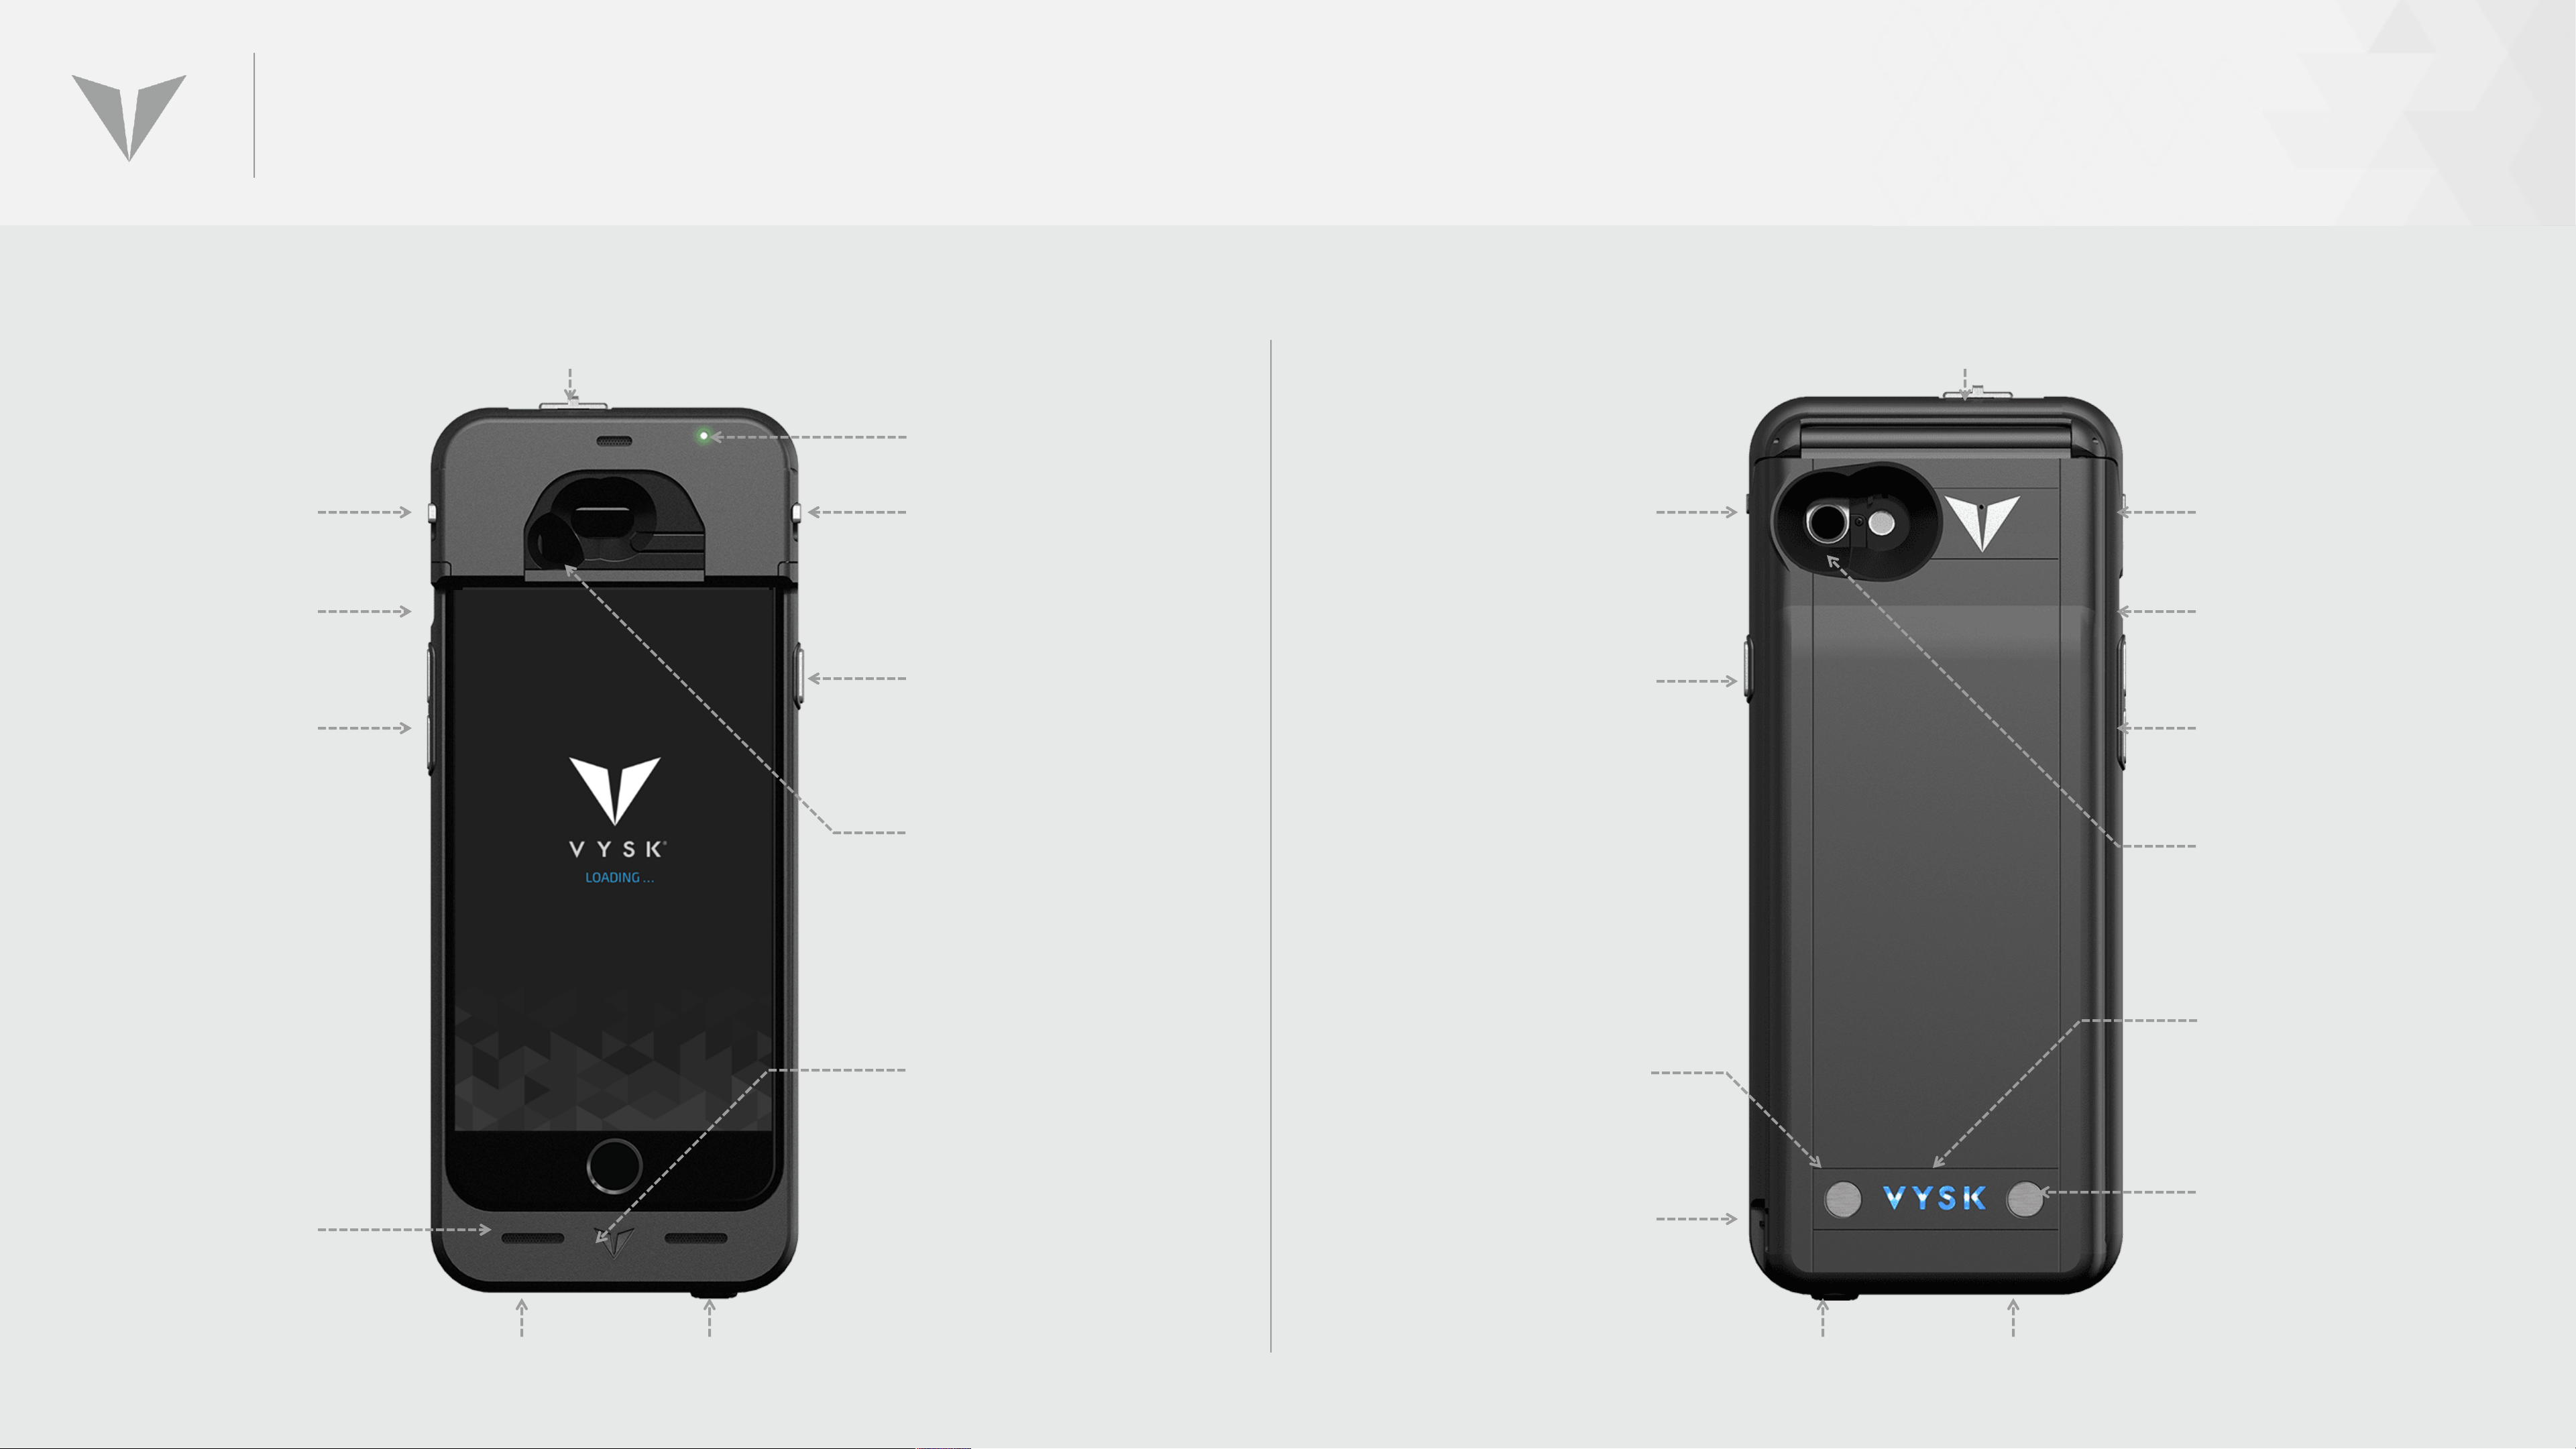
SWITCHES, BUTTONS, & FEATURES
Case Latch
iPhone
mute switch
iPhone volume
Lockdown switch
Lockdown
Indicator LED
Case Latch
iPhone Power
Button
iPhone Power
Button
Lockdown switch
Case LatchCase Latch
iPhone
mute switch
iPhone volume
buttons
Front camera
shutter
Microphone
Jammer
Battery Status
Indicator Button
buttons
Back camera
Shutter
Battery Status
Indicator
Vysk secure
microphones
Headphone pass-
through*
Secure Headphone Port
VAC Button
Charging port
Headphone pass-
Secure Headphone Port
through*
*Applies ONLY to iPhone 6 ca se
Page 12

CARE AND FEEDING
To maximize the effectiveness and lifetime of the QS1, keep in
mind:
• The QS1 is not a battery case; it is not designed or intended to
extend the normal battery life of the smartphone to which it
is attached. The onboard battery on the QS1 is intended only
for operation of the encryption and jamming systems.
• The QS1 case is not designed to protect a smartphone from
physical shock or damage
Page 13

CARE AND FEEDING (CONT’D)
• Do not use an iPhone that has been
“jailbroken,” “rooted,” refurbished,
or modified in any way
• Do not attach/detach phone from QS1
any more often than necessary
• Do not get the QS1 wet (there is an internal
• Do not allow dirt, grime, dust to get on
QS1, as this may affect mechanical
operation of moving parts
• Do not use a charger other than the one
provided with the QS1
• Do not use a clear plastic screen
sensor that will indicate if this happens)
• Do not attempt to clean with any solvents
(alcohol, acetone, etc.)
protector with the QS1
• Do not bend, twist, or drop the QS1
Page 14
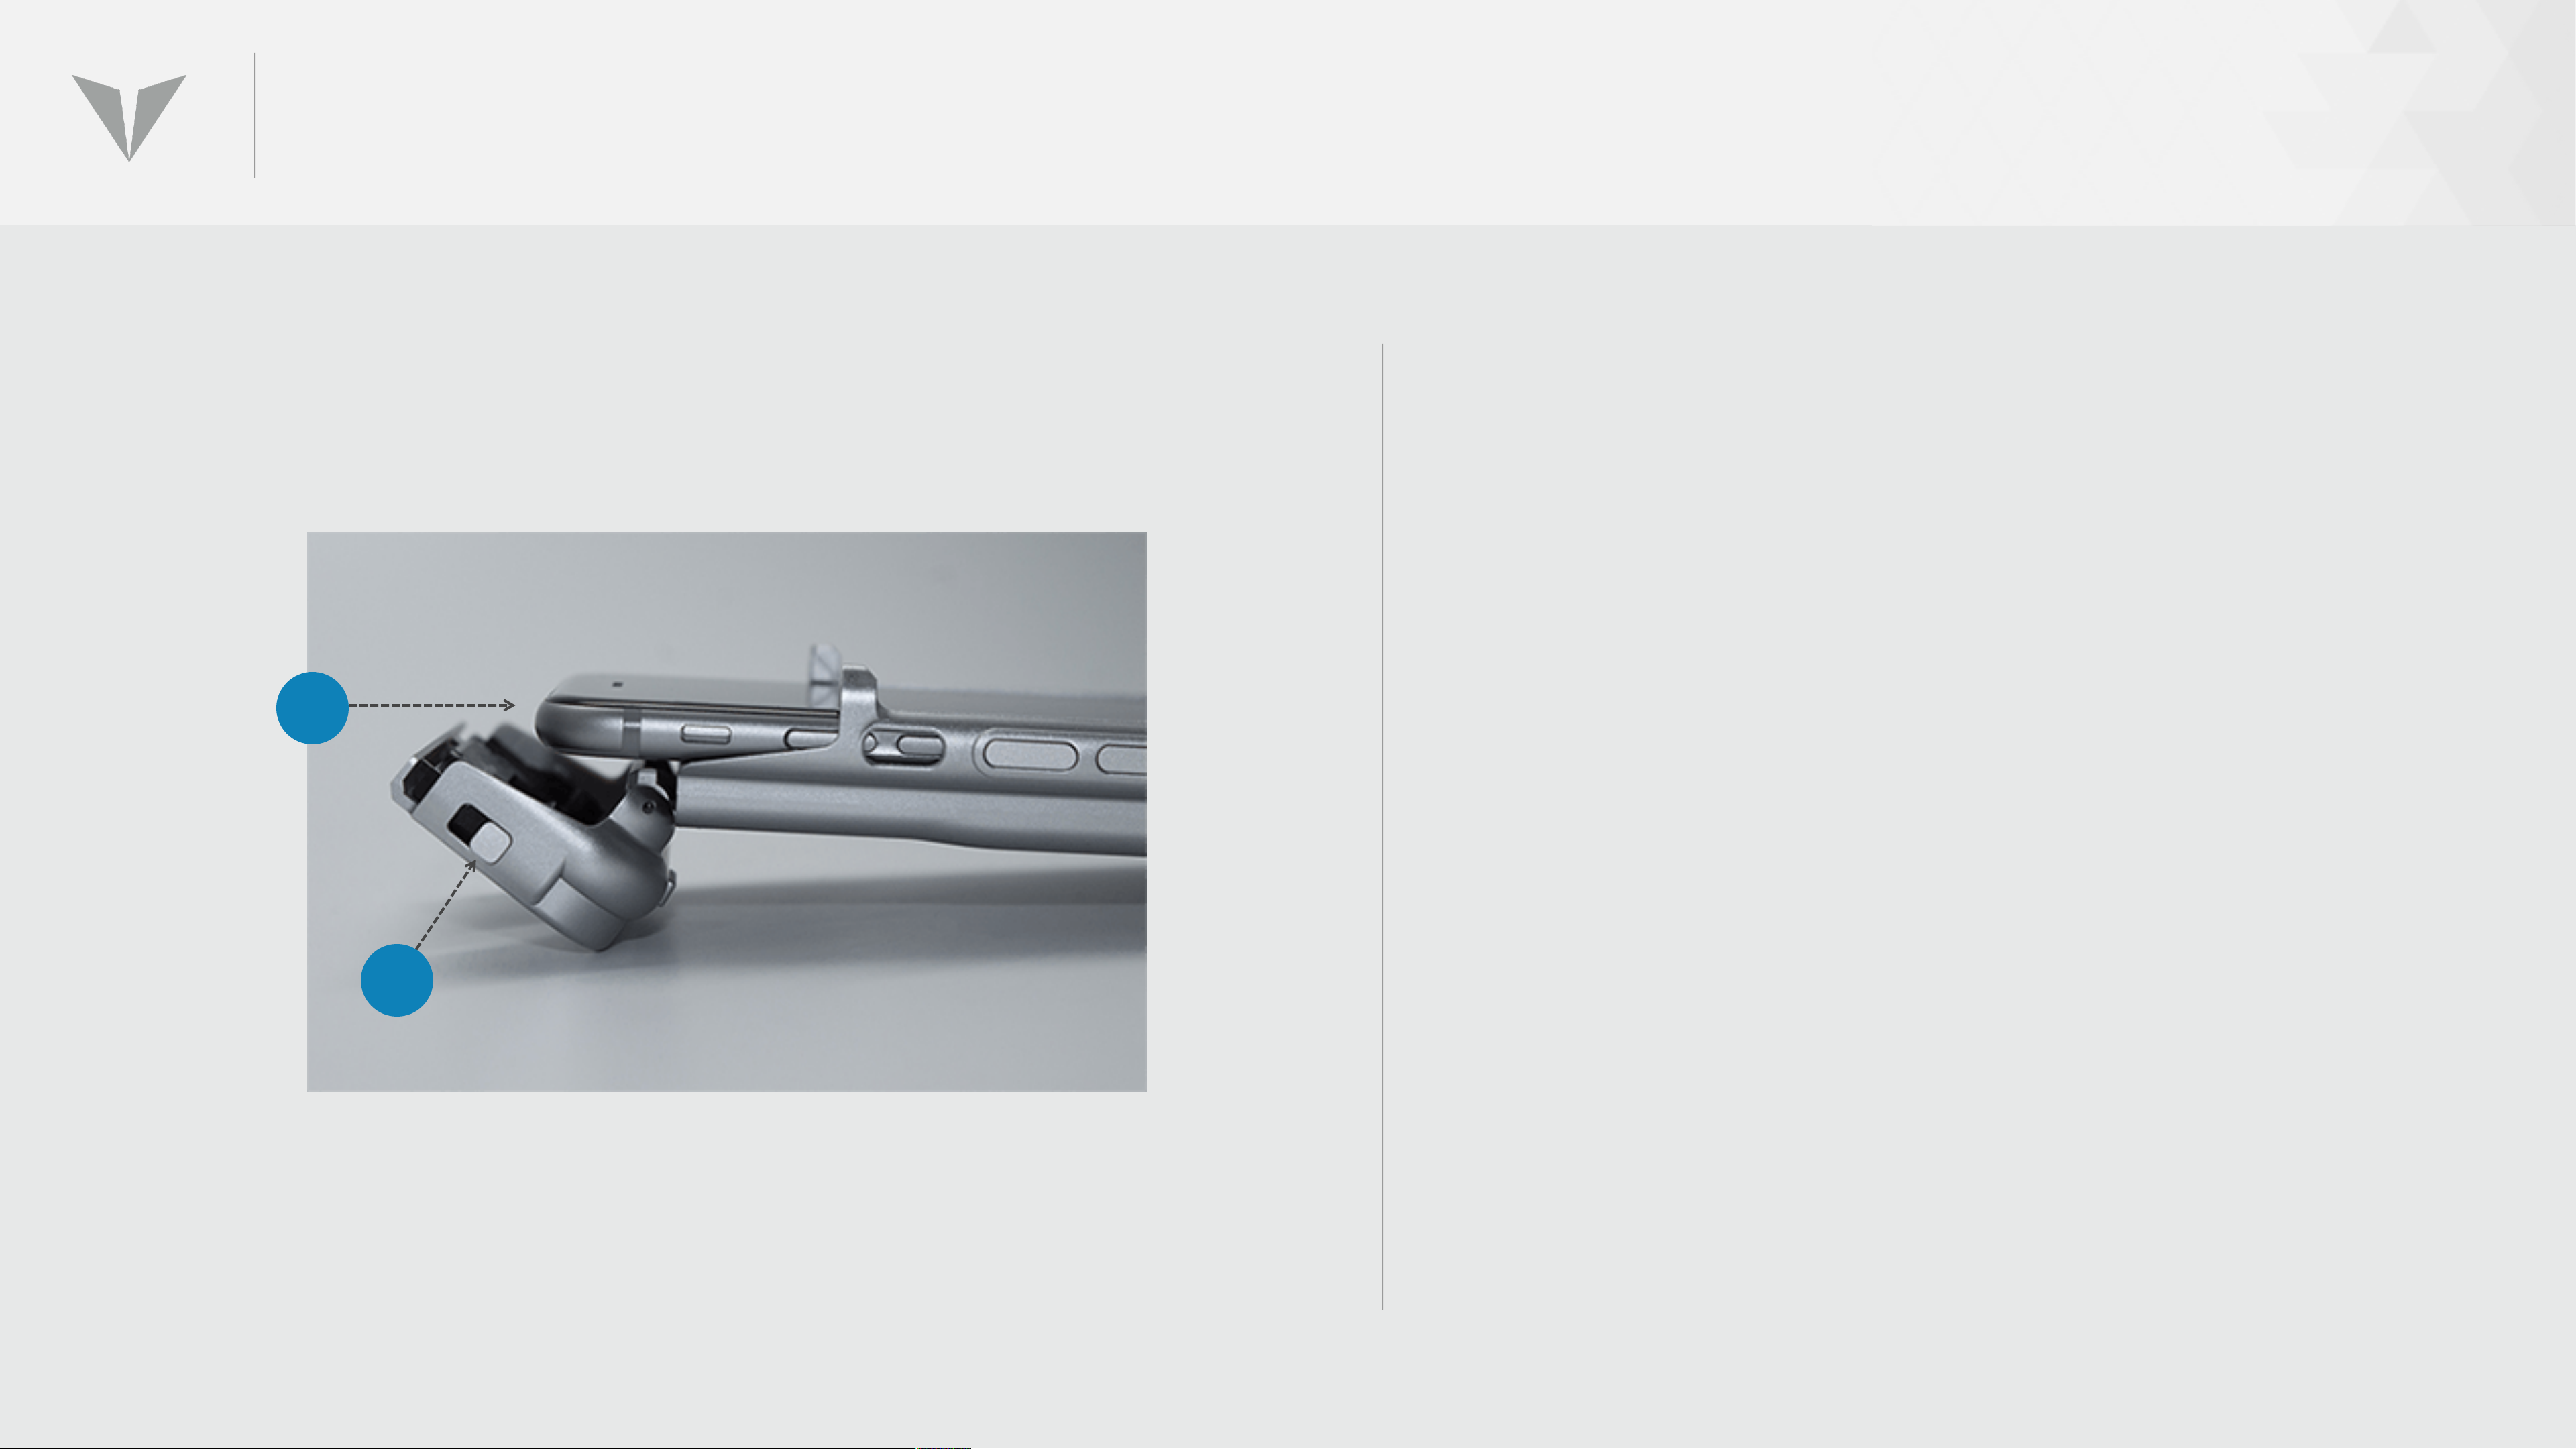
ATTACHING / DETACHING THE QSI
To attach the QS1, release the two locking
2
clips (1) on either side of the upper portion
of the case. Then flip open the upper
hinged section. Slide the iPhone downward
into the bottom section of the QS1 (2), then
flip the upper portion closed and secure in
place by reengaging the two side locking
clips.
1
To detach the QS1, reverse the installation
process, i.e., release the two side locking
clips, flip open the upper section of the
case, and remove the iPhone.
Page 15
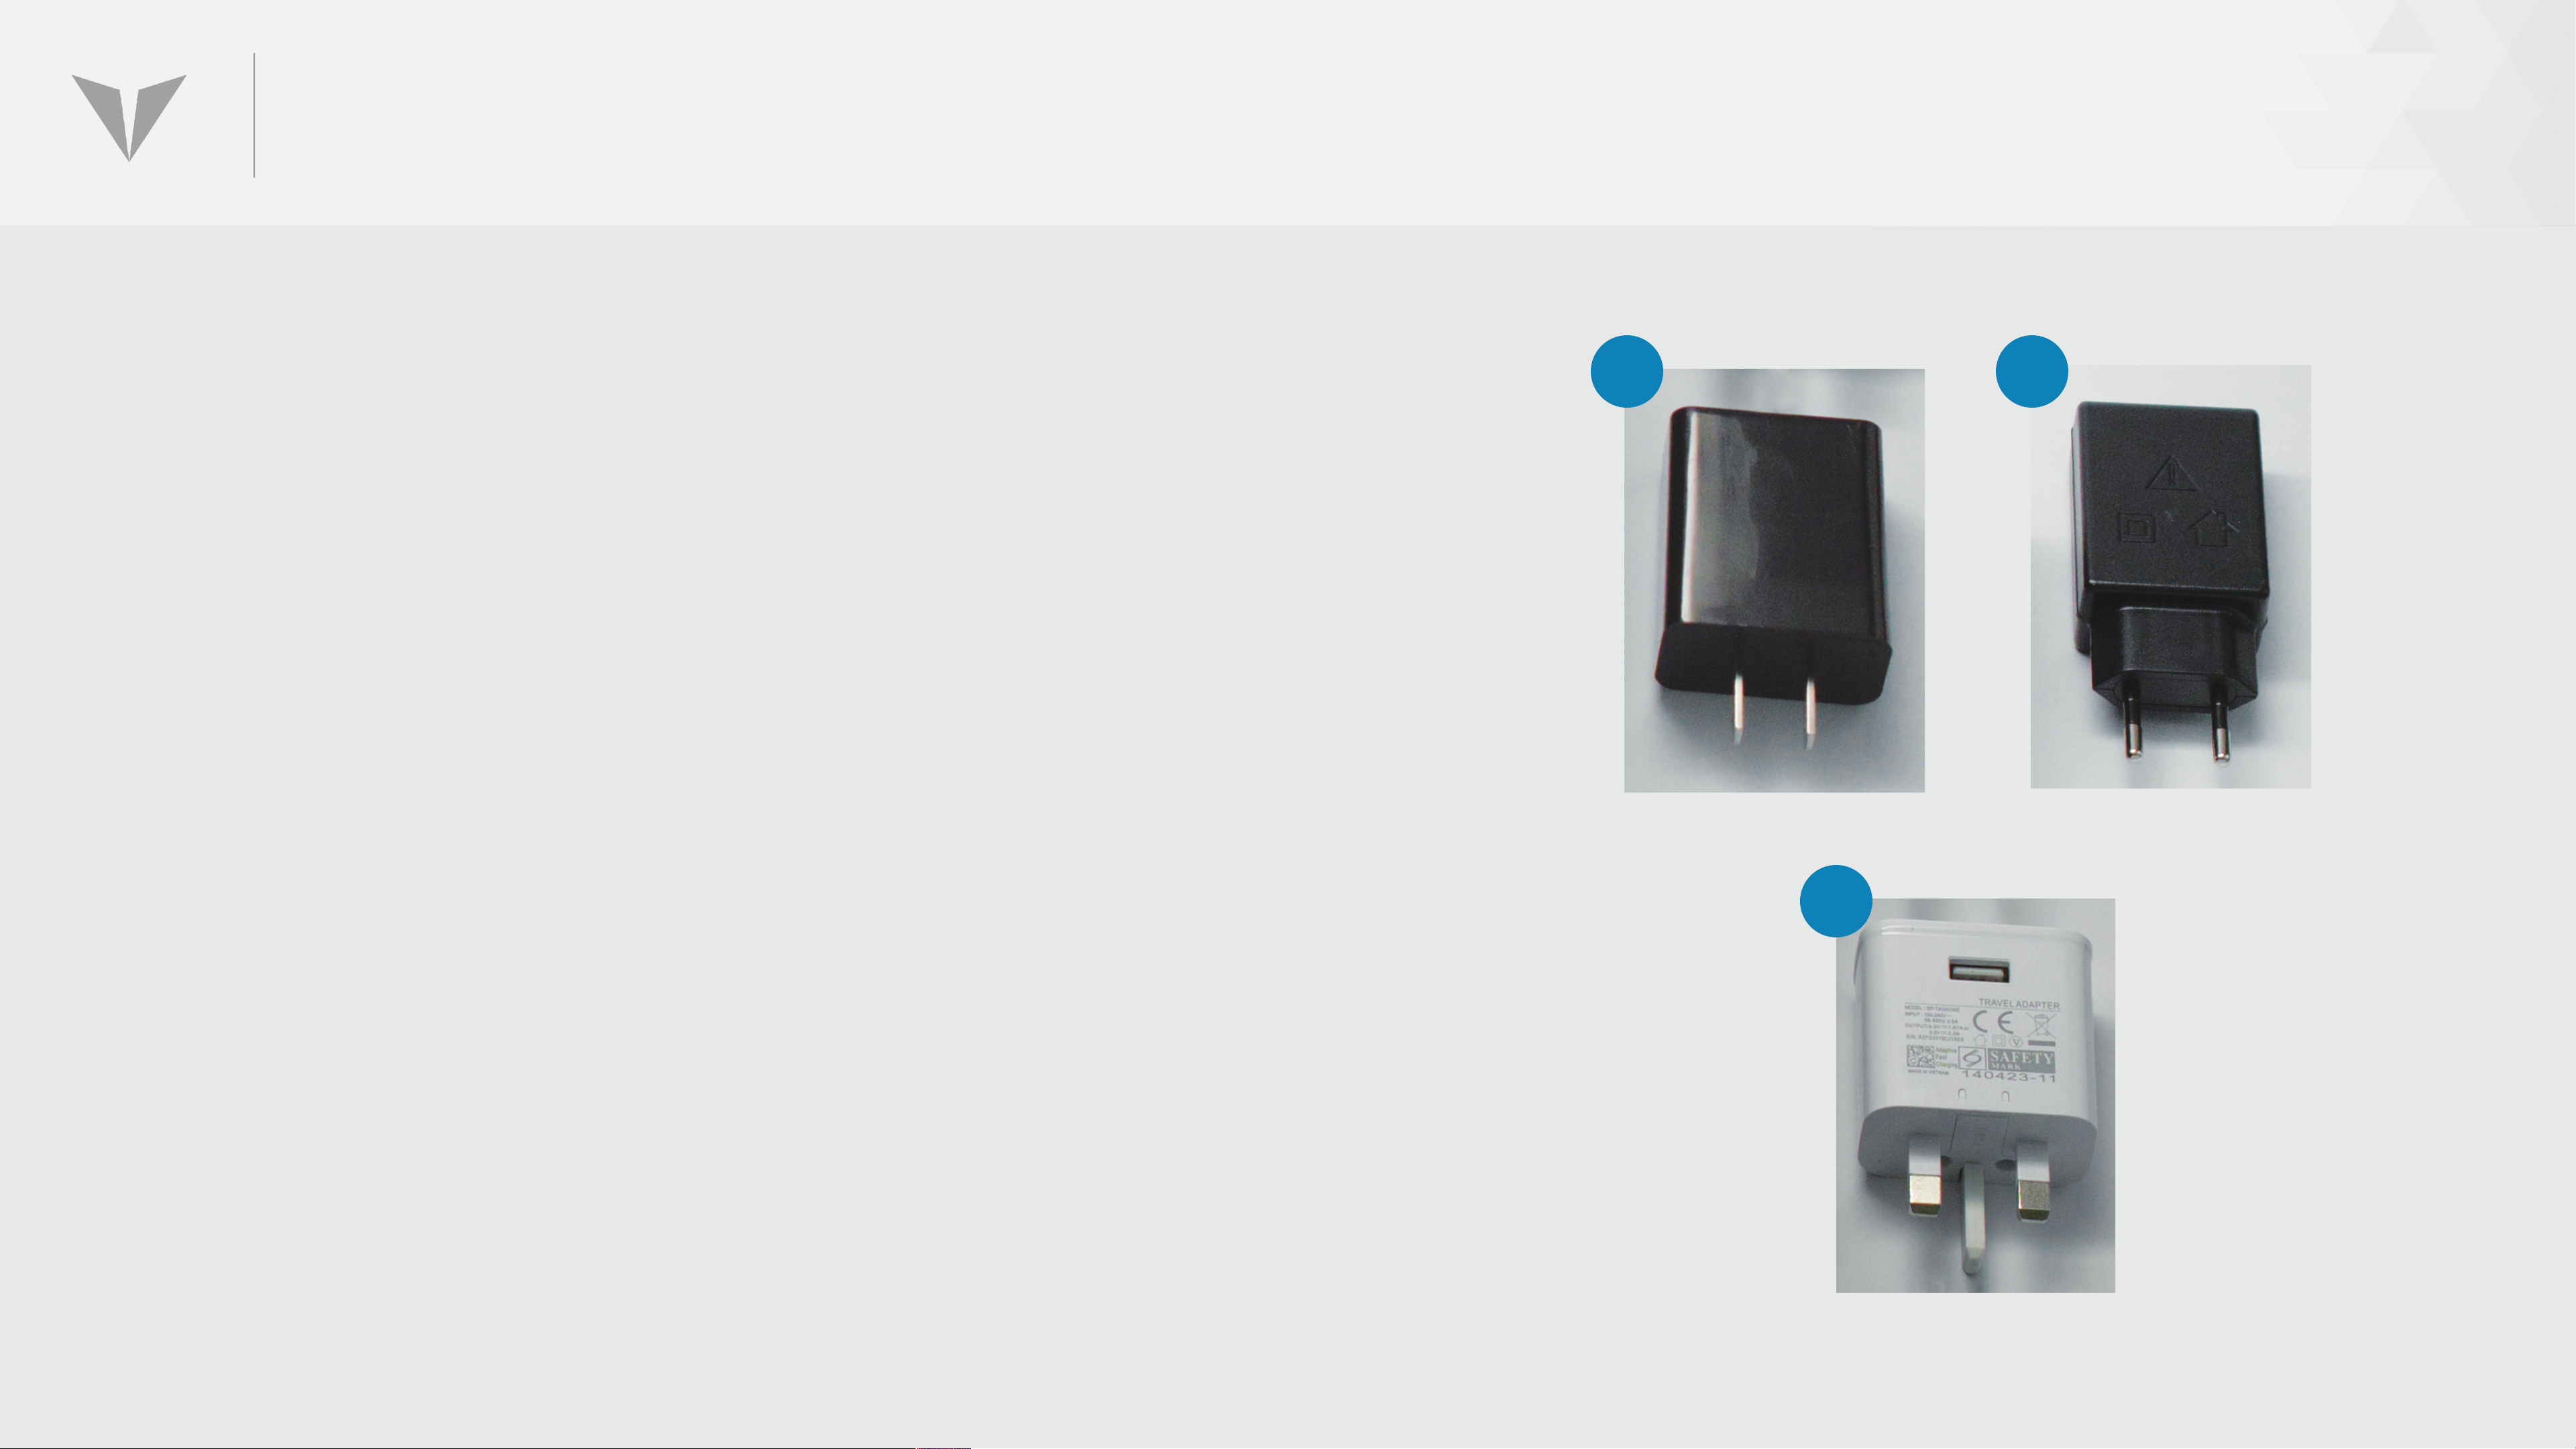
GEOGRAPHY- SPECIFIC CHARGER TYPES
QS1s are delivered with one of three charging block
types, depending on geography.
• Type A – U.S. standard
2-prong, 115 VAC, 60 Hz
• Type C – European standard
2-prong, 230 VAC, 50/60 Hz
A C
• Type G – UK/Commonwealth standard
3-prong, 23o VAC, 50/60 Hz
The output voltage and current are identical for all
three of these variants, i.e., 2.1 A 5 VDC
G
Page 16
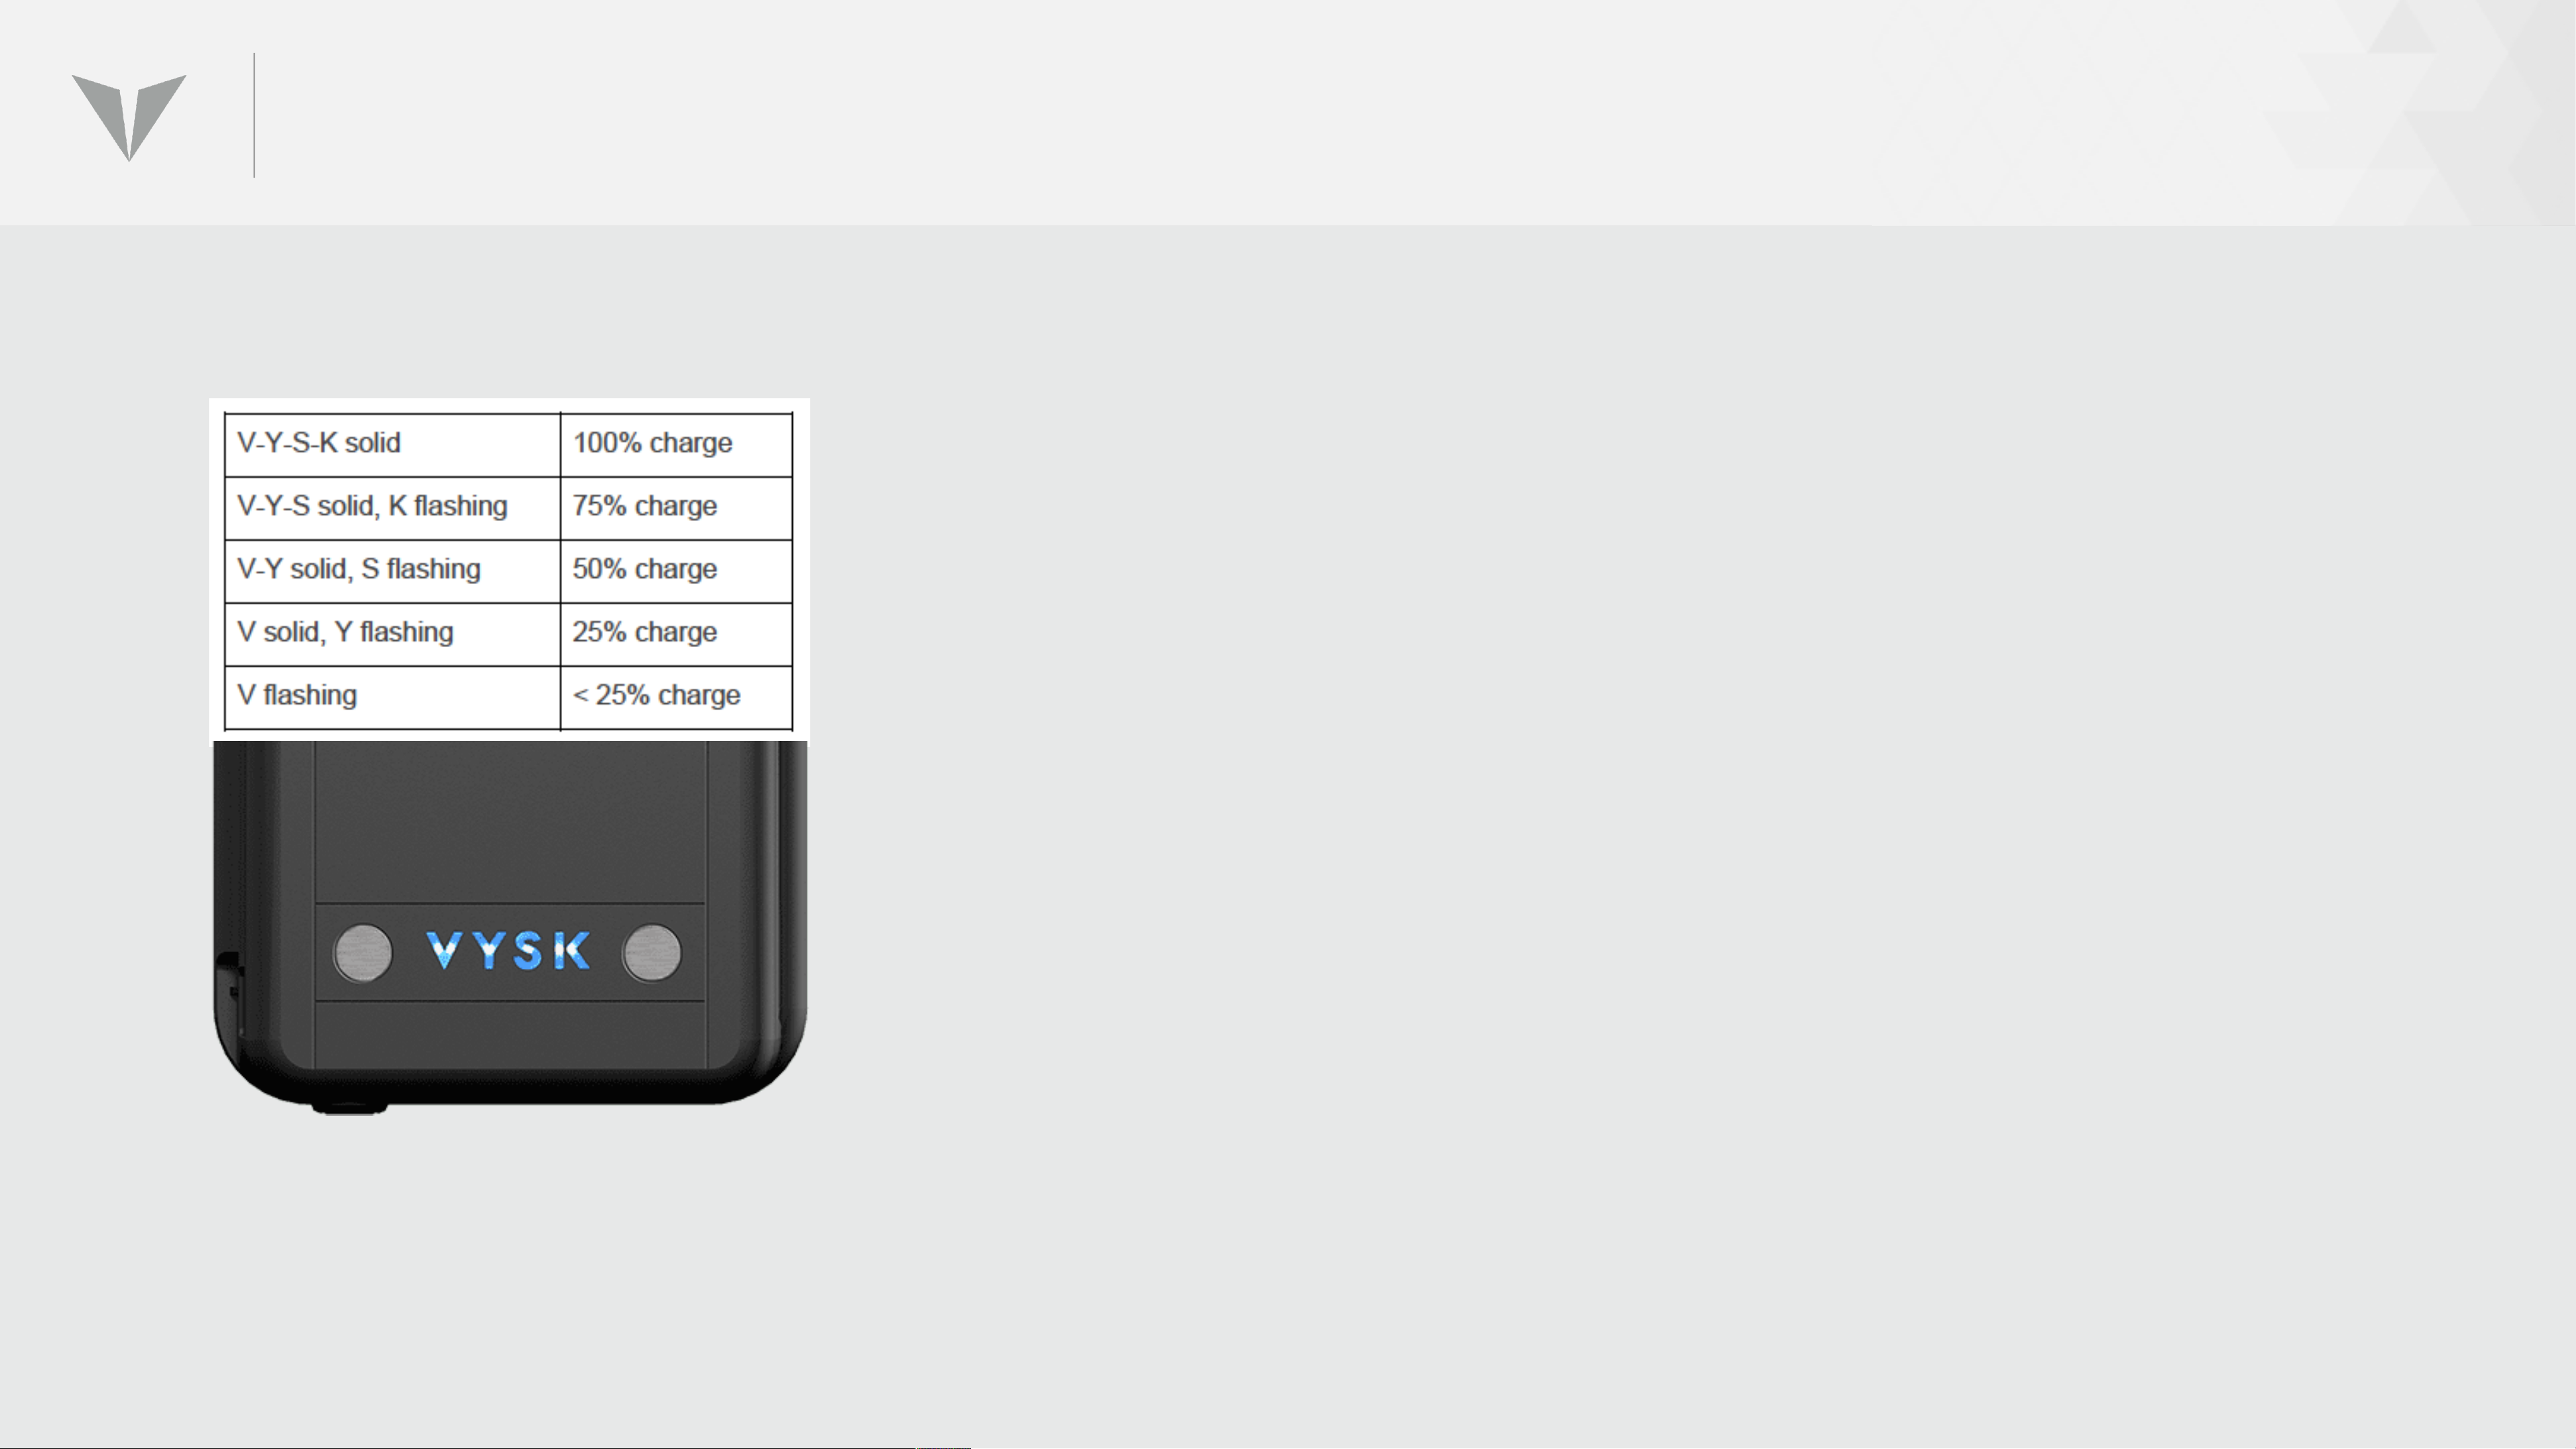
CHARGING THE QSI CASE
1. Connect the QS1 case to a power source using the supplied USB
Wall Adapter and Micro USB Charging Cable. The QS1 case should
only be charged with the included USB Wall Adaptor.
2. Once the QS1 case is connected to a power source, the Battery Life
Indicator will illuminate, spelling V-Y-S-K on the back of the case.
The current battery charge level will be indicated as shown at left.
3. Lower portion of the QS1 will be slightly warm during charging.
Page 17

QSI CHARGING TIPS
• When the QS1 and iPhone are charged together, the iPhone and the QS1 will
charge simultaneously
• The QS1 can be charged without an iPhone connected to it but will charge
at the same rate as when an iPhone is connected
• If the iPhone battery is dead and the QS1 case is NOT plugged into a
charging source while there is a charge remaining on the QS1, the iPhone
will only charge until the iPhone first boots up
Page 18
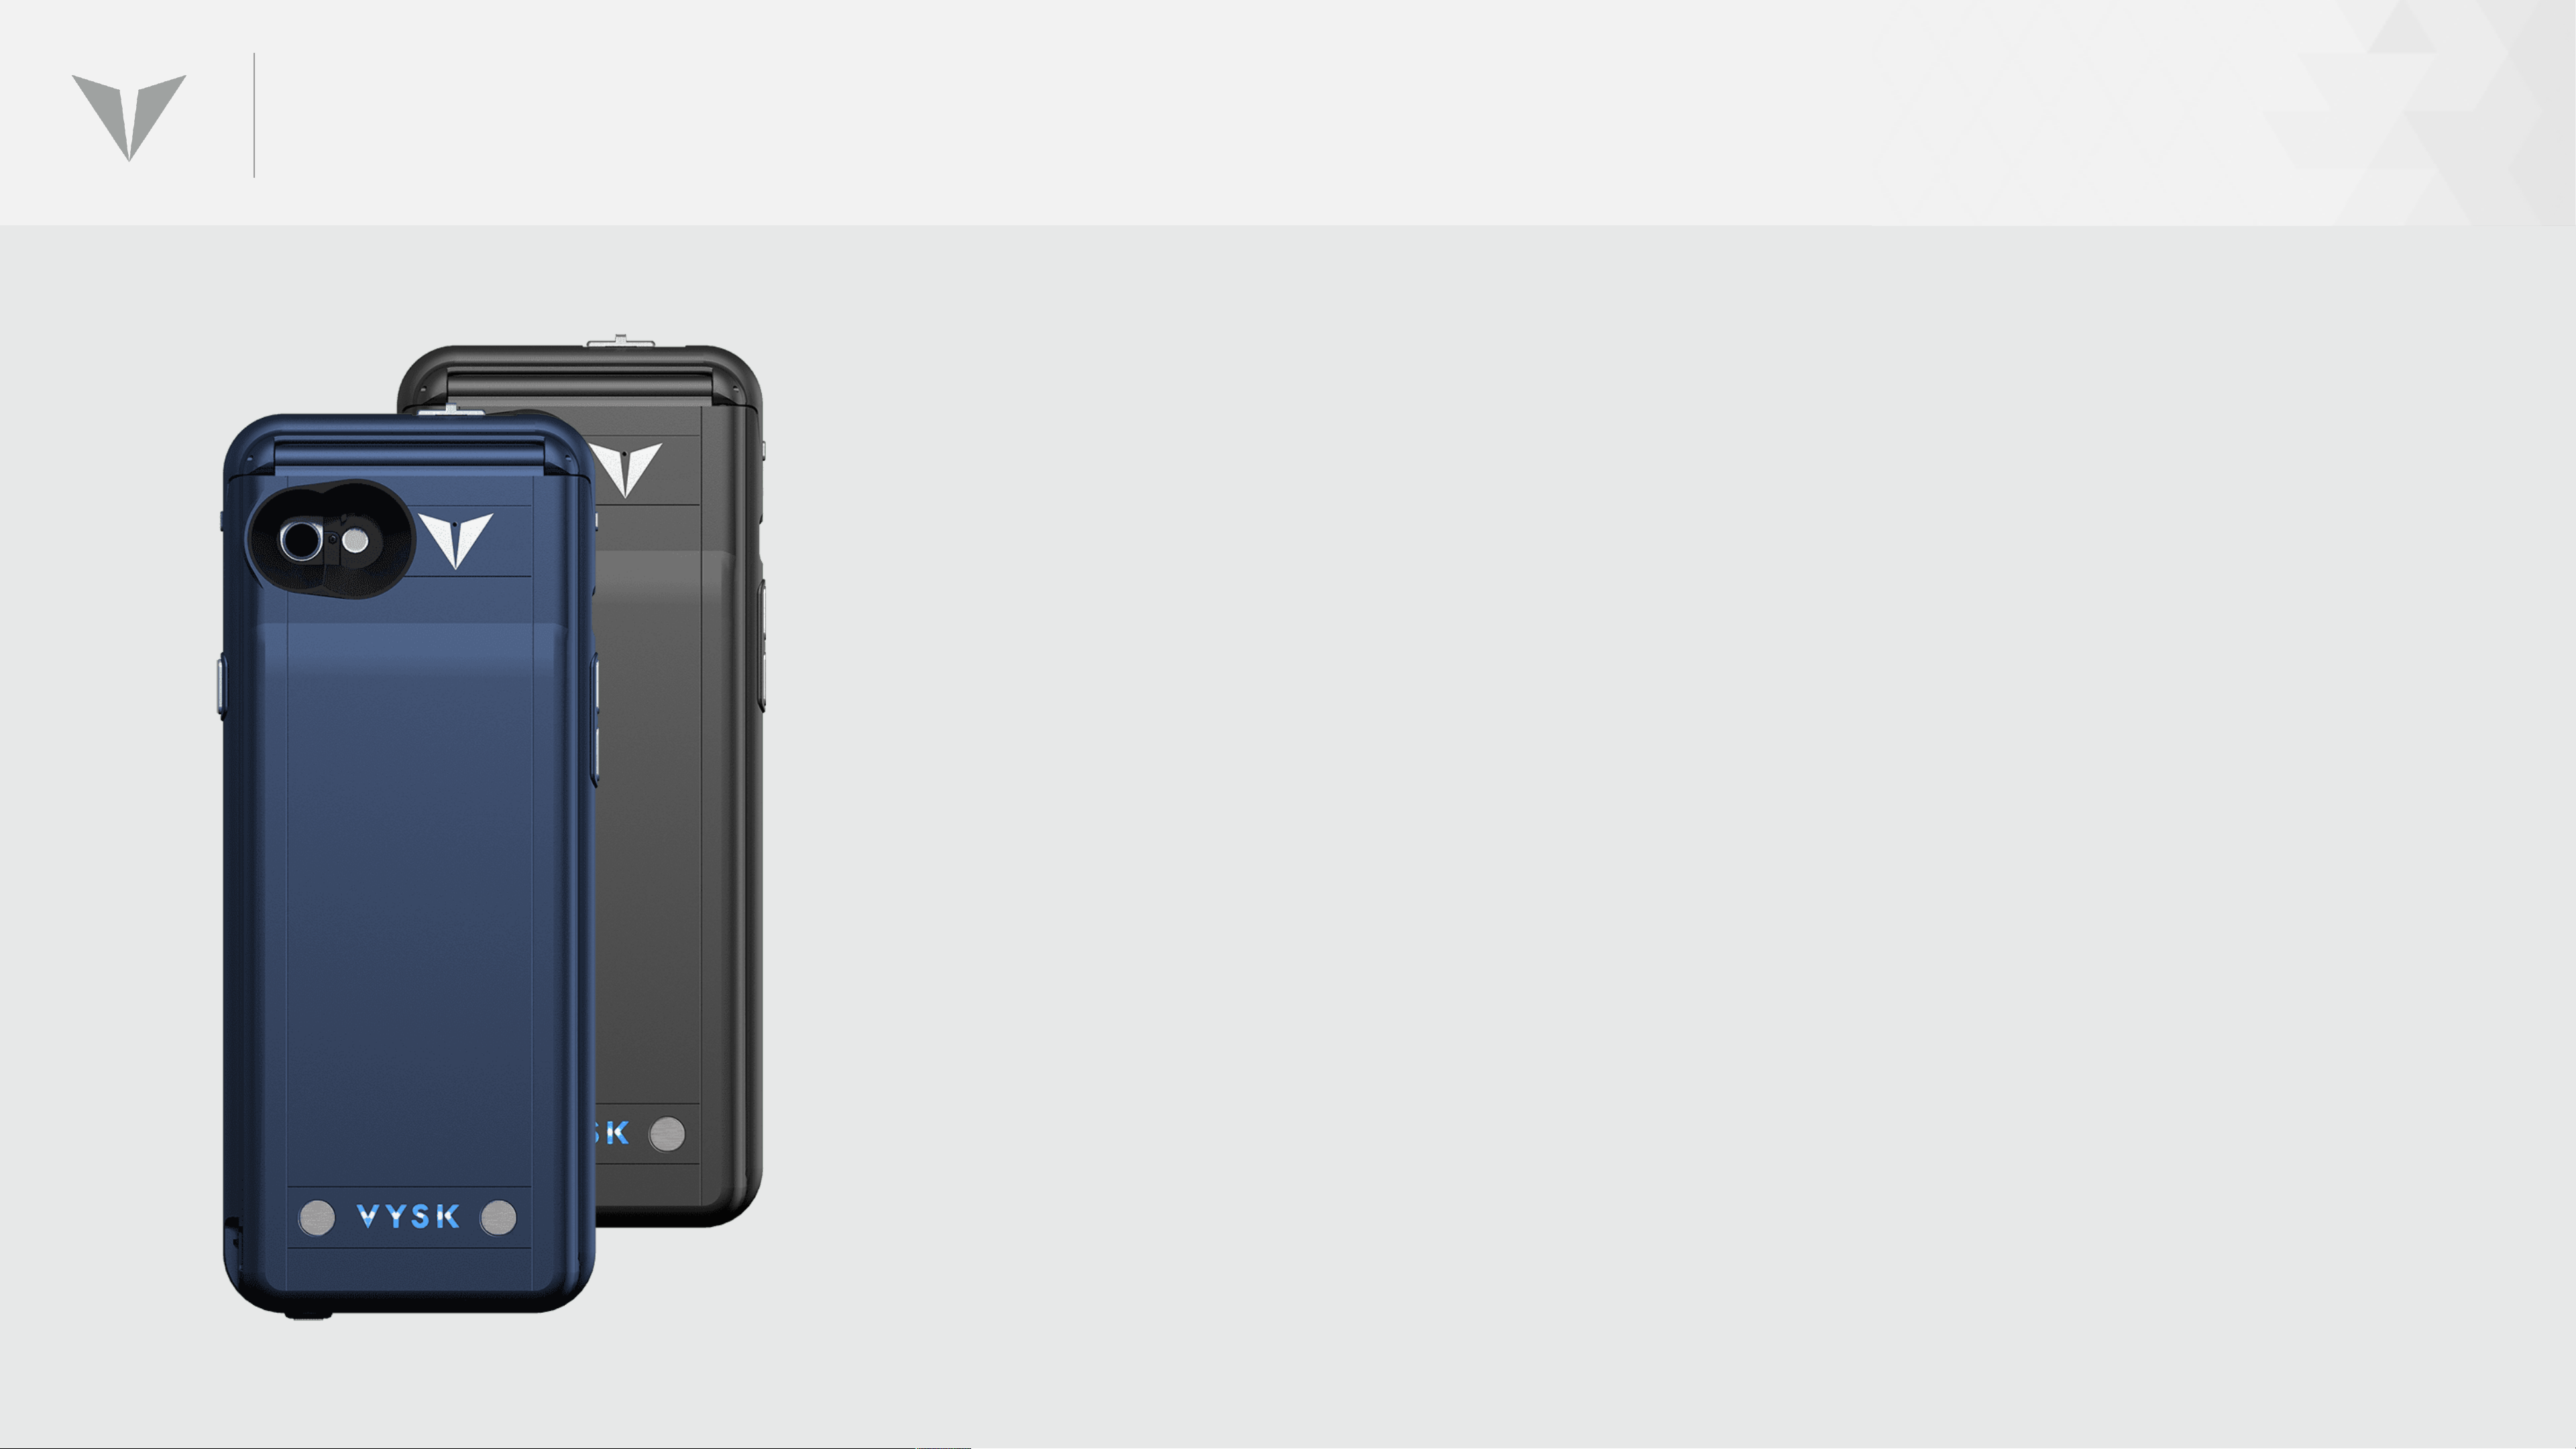
CHARGING PERFORMANCE BENCHMARKS
• A completely dead QS1 will fully charge in 2.5 hours using the provided
2.1A charging block.
• If combined iPhone and QS1 are BOTH totally empty, the pair will fully
charge in 2.5 hours.
• A fully charged QS1 will hold charge for 72 hours if microphone
jamming is OFF.
• A fully charged QS1 will hold charge for 22 hours if microphone
jamming is ON, and will provide 16 hours of talk time.
• Battery performance is improved somewhat in cooler temperatures.
• A QS1 in deep-sleep mode will retain charge for approximately 32 days.
Page 19
DEEP-SLEEP MODE
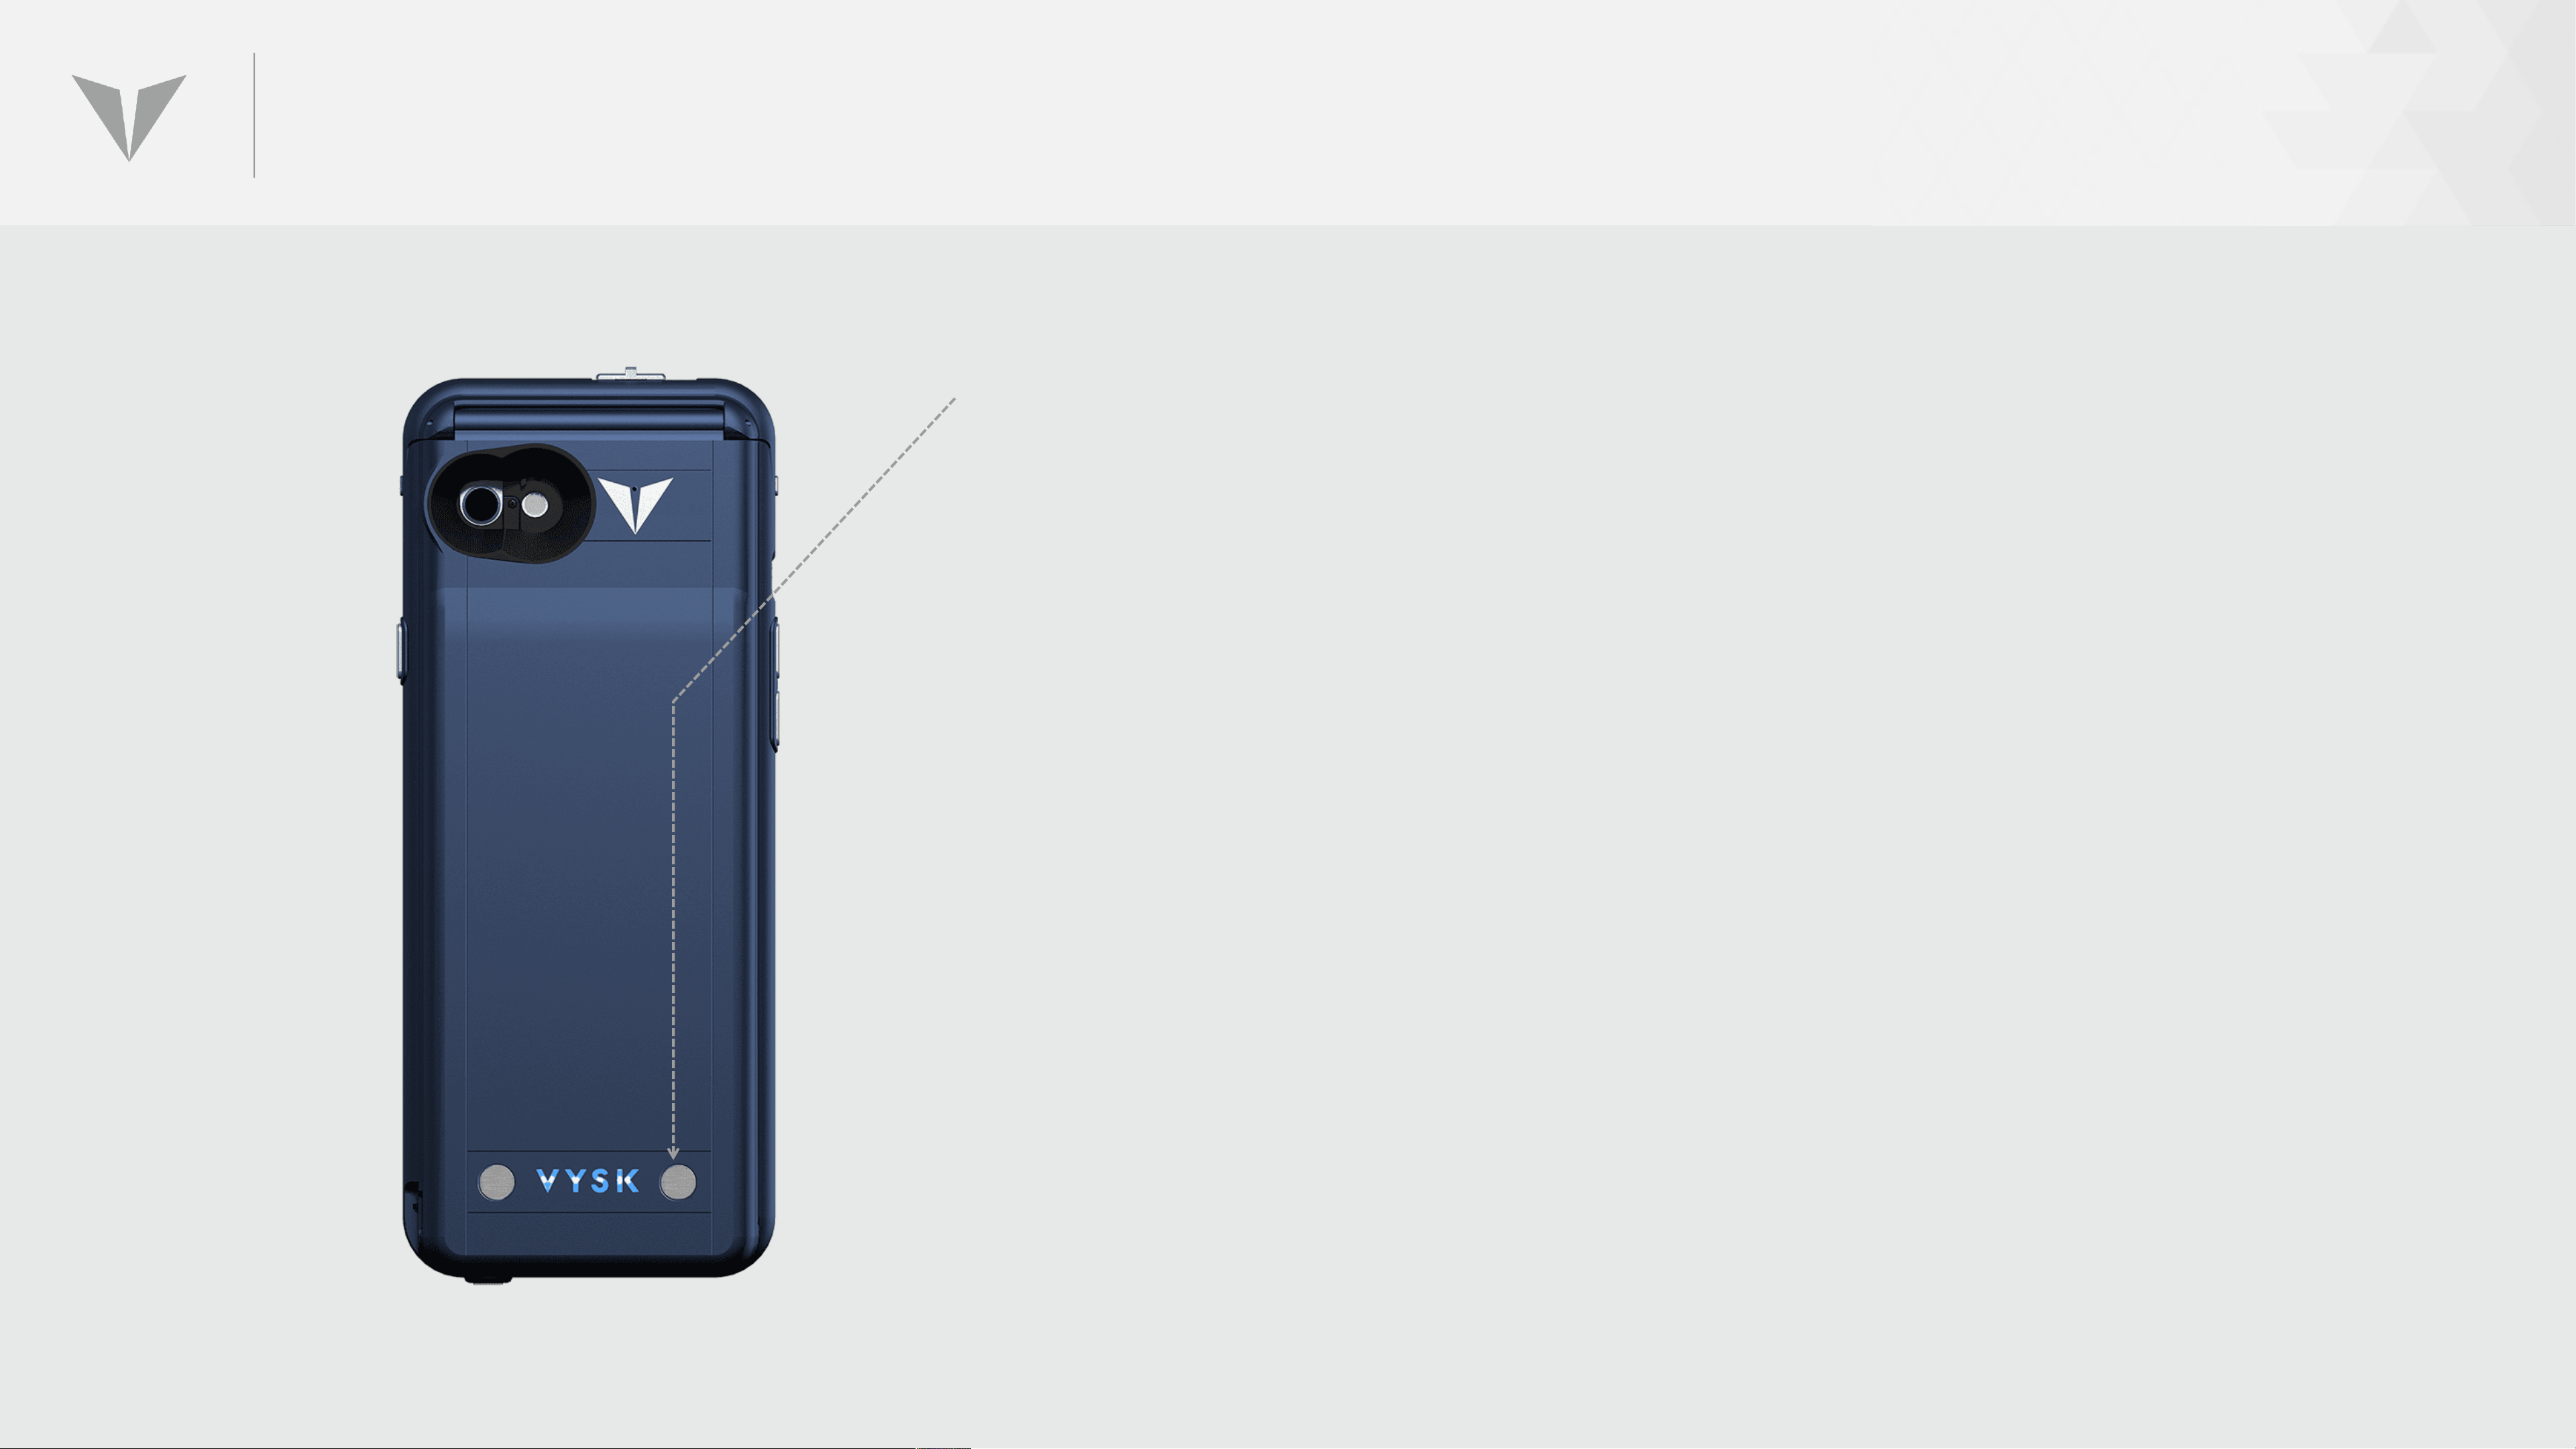
• To place the QS1 into deep-sleep mode, ensure that the Lockdown
switch is disengaged and press the lower right-hand button on the
rear of the case three consecutive times within five seconds.
• Successful initiation of deep-sleep mode is indicated by the V-Y-S-K
lights flashing three consecutive times.
• Deep-sleep mode is recommended only for situations in which the QS1
is going to be stored without an accompanying phone or charger for
extended periods of time.
• The case will NOT receive calls or notifications in this mode.
• To return to active mode, push either button on the rear of the case or
slide the lockdown switch. The phone will also wake from deep-sleep
if the charging cable is inserted.
• Return to active mode will be indicated by scrolling V-Y-S-K lights.
Page 20
CAMERA SHUTTERS
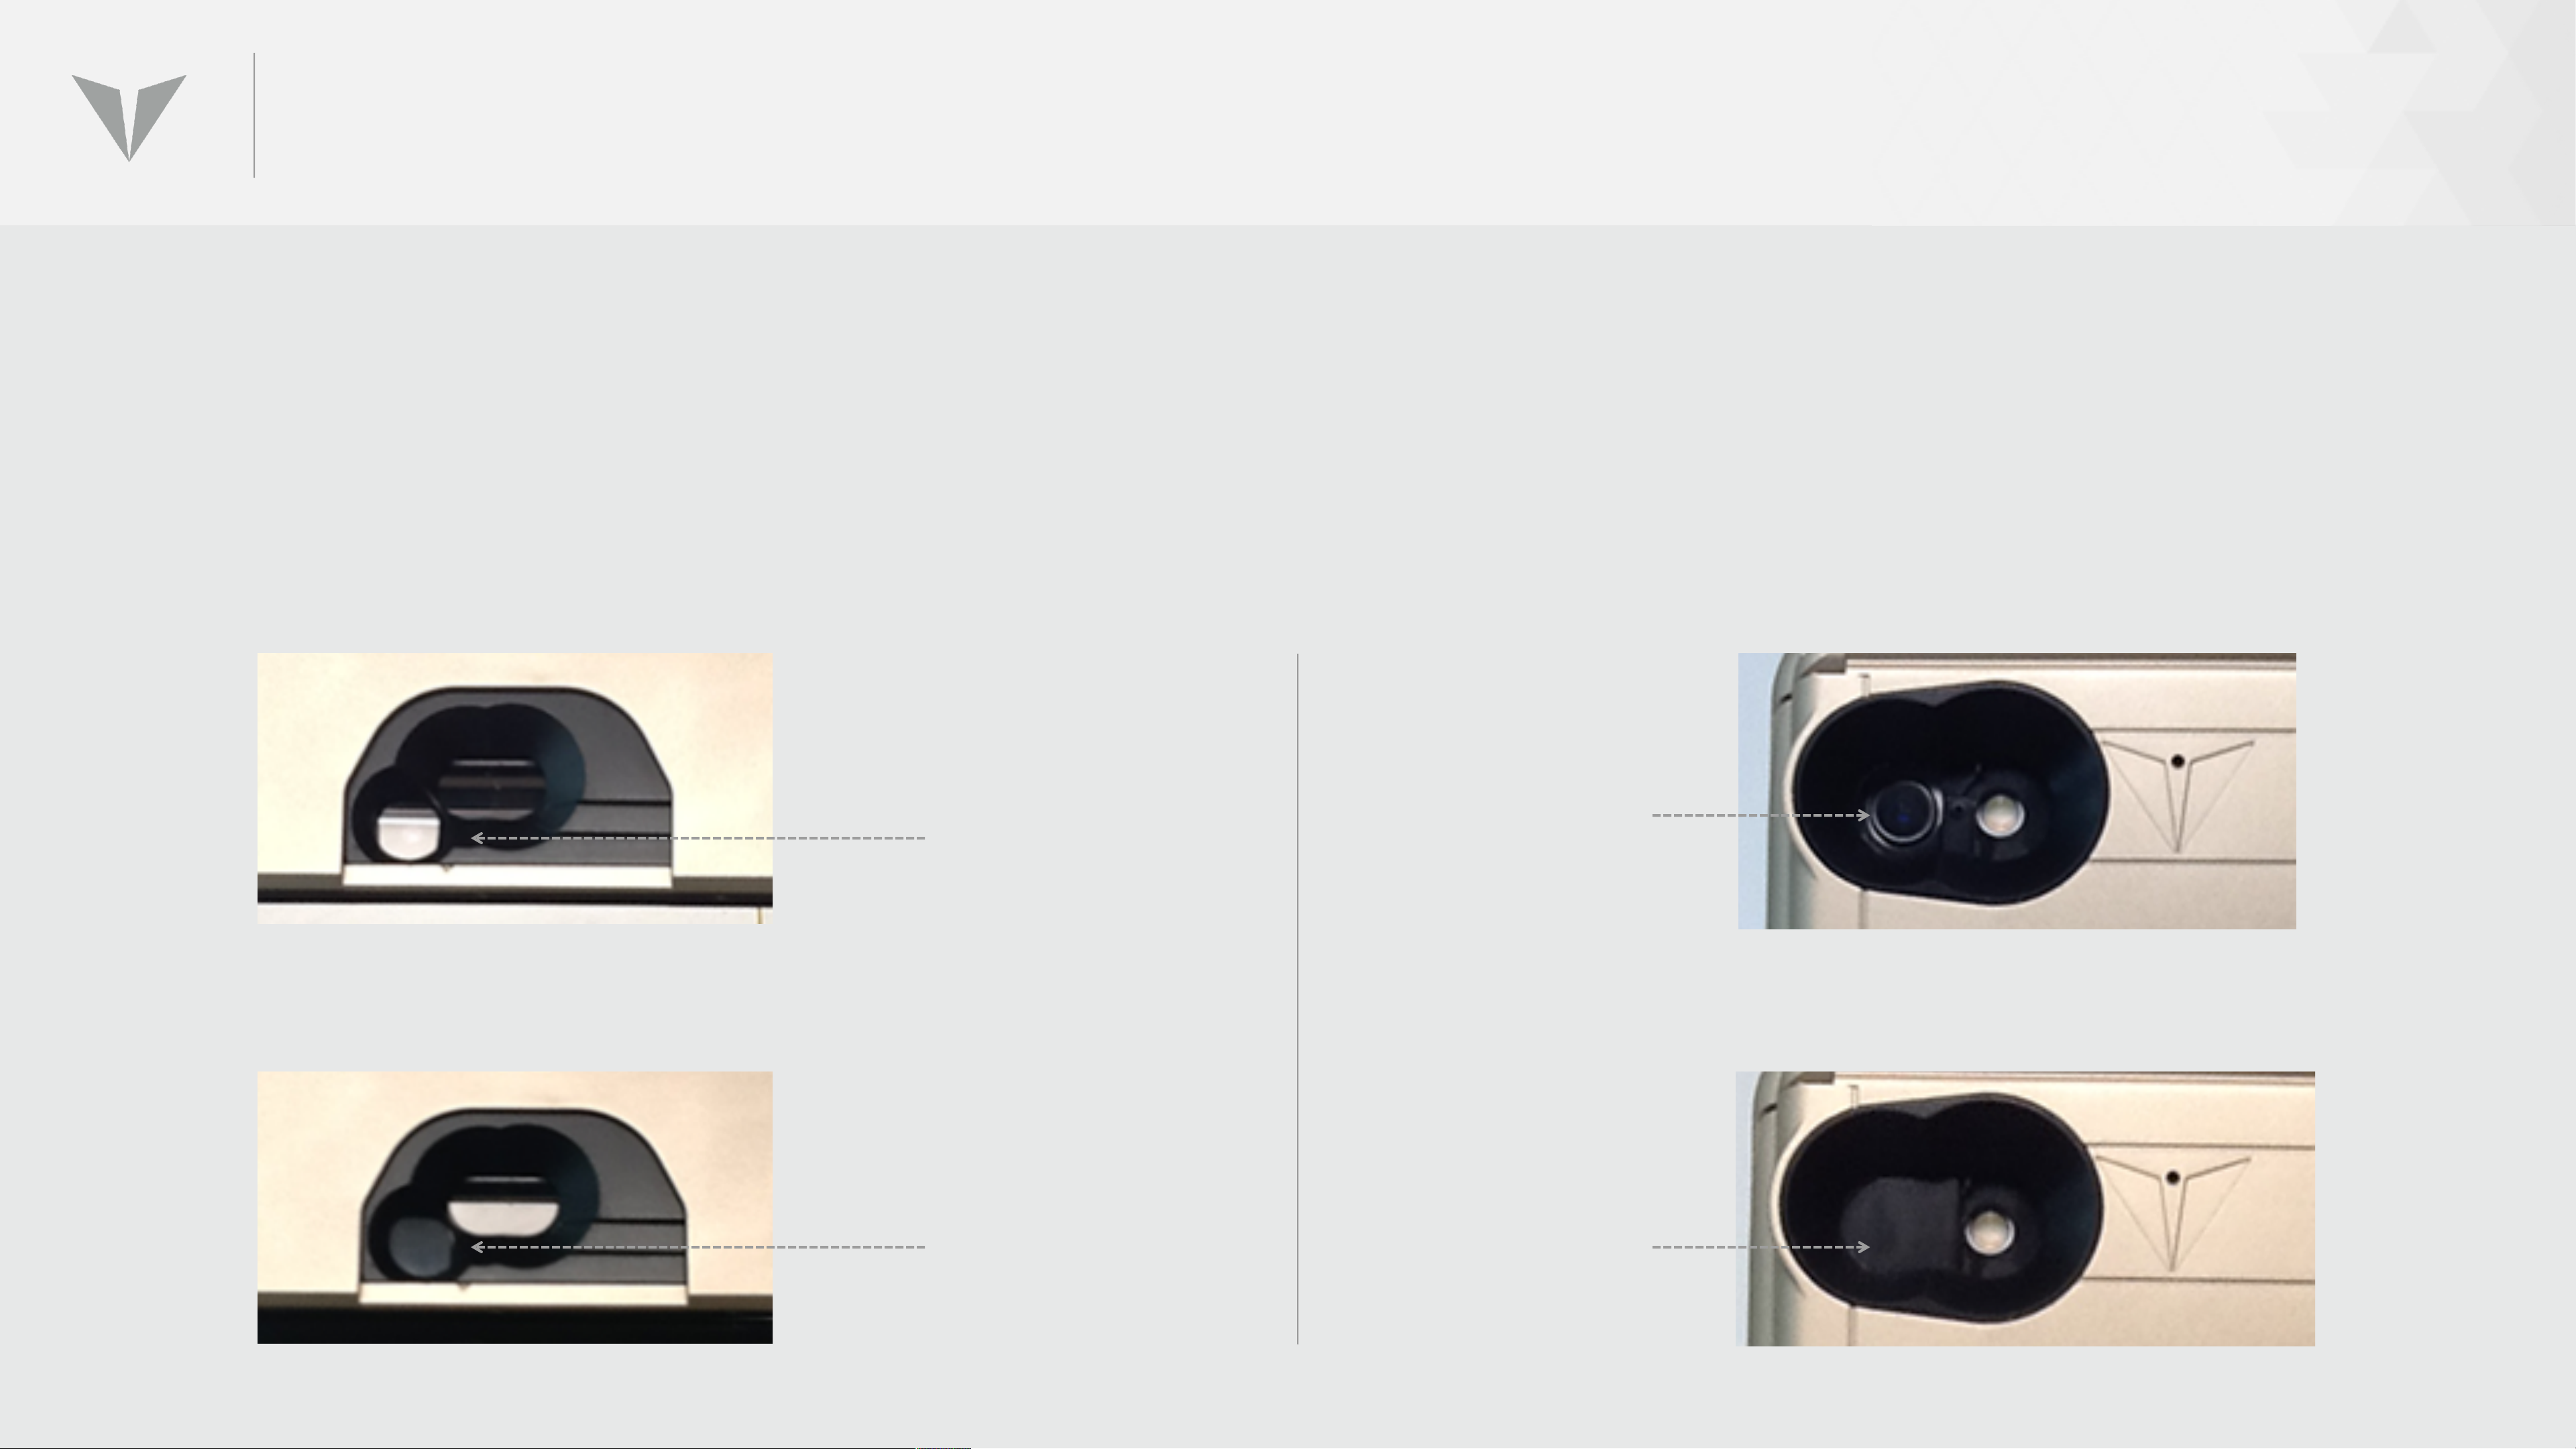
Both camera shutters are activated when the lockdown slide switch
is moved to the leftmost position.
Front camera
open
Rear camera
open
Front camera
shuttered
Rear camera
shuttered
Page 21

LOCKDOWN MODE
The QS1 case must be placed in “Lockdown Mode” both to make and receive
secure calls, as well as to secure the device for face-to-face meetings. When
activated, Lockdown Mode:
• Shutters front and rear cameras
• Jams all native iPhone microphones
(and activates the independent QS1 microphones)
• Powers the standalone encryption processor
Page 22
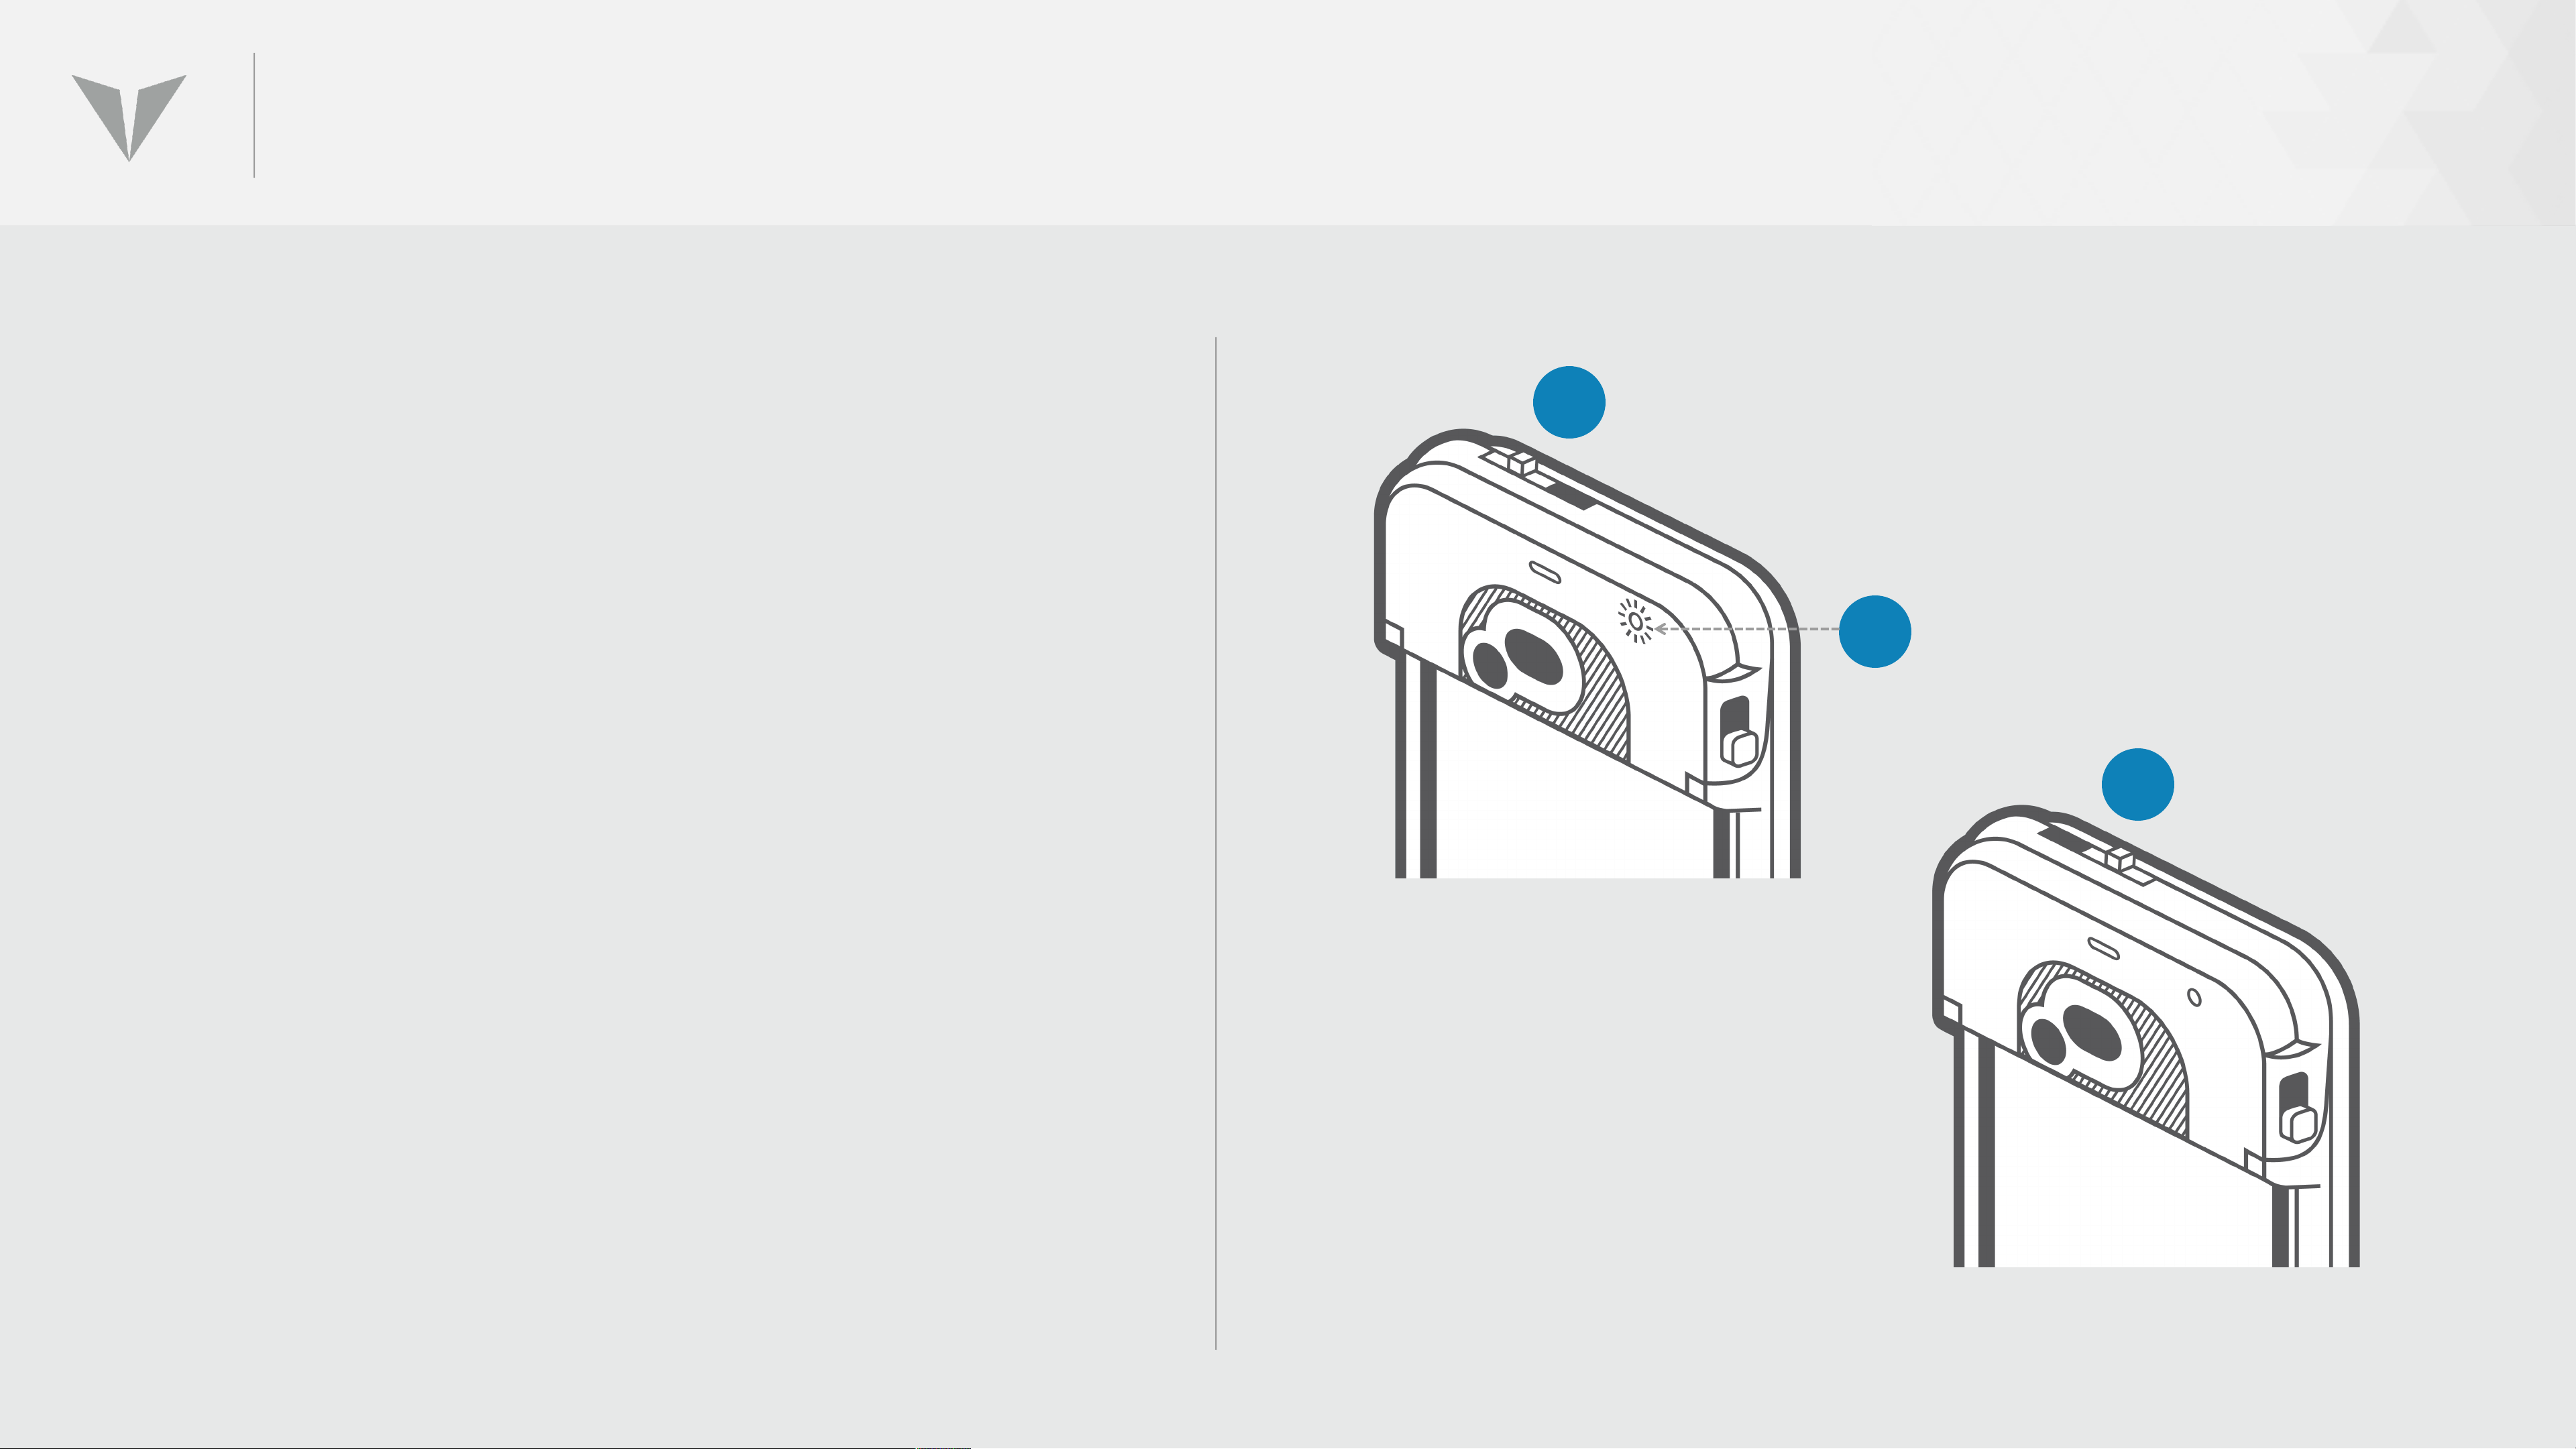
LOCKDOWN MODE
1
To activate Lockdown Mode:
Slide the Lockdown Mode Switch all
the way to the left (1). The LED Status Indicator
(2) will turn green to indicate
that Lockdown Mode is properly engaged.
2
3
To deactivate Lockdown Mode:
Slide the Lockdown Mode Switch to
the right (3). The LED Status Indicator
will turn off.
Page 23
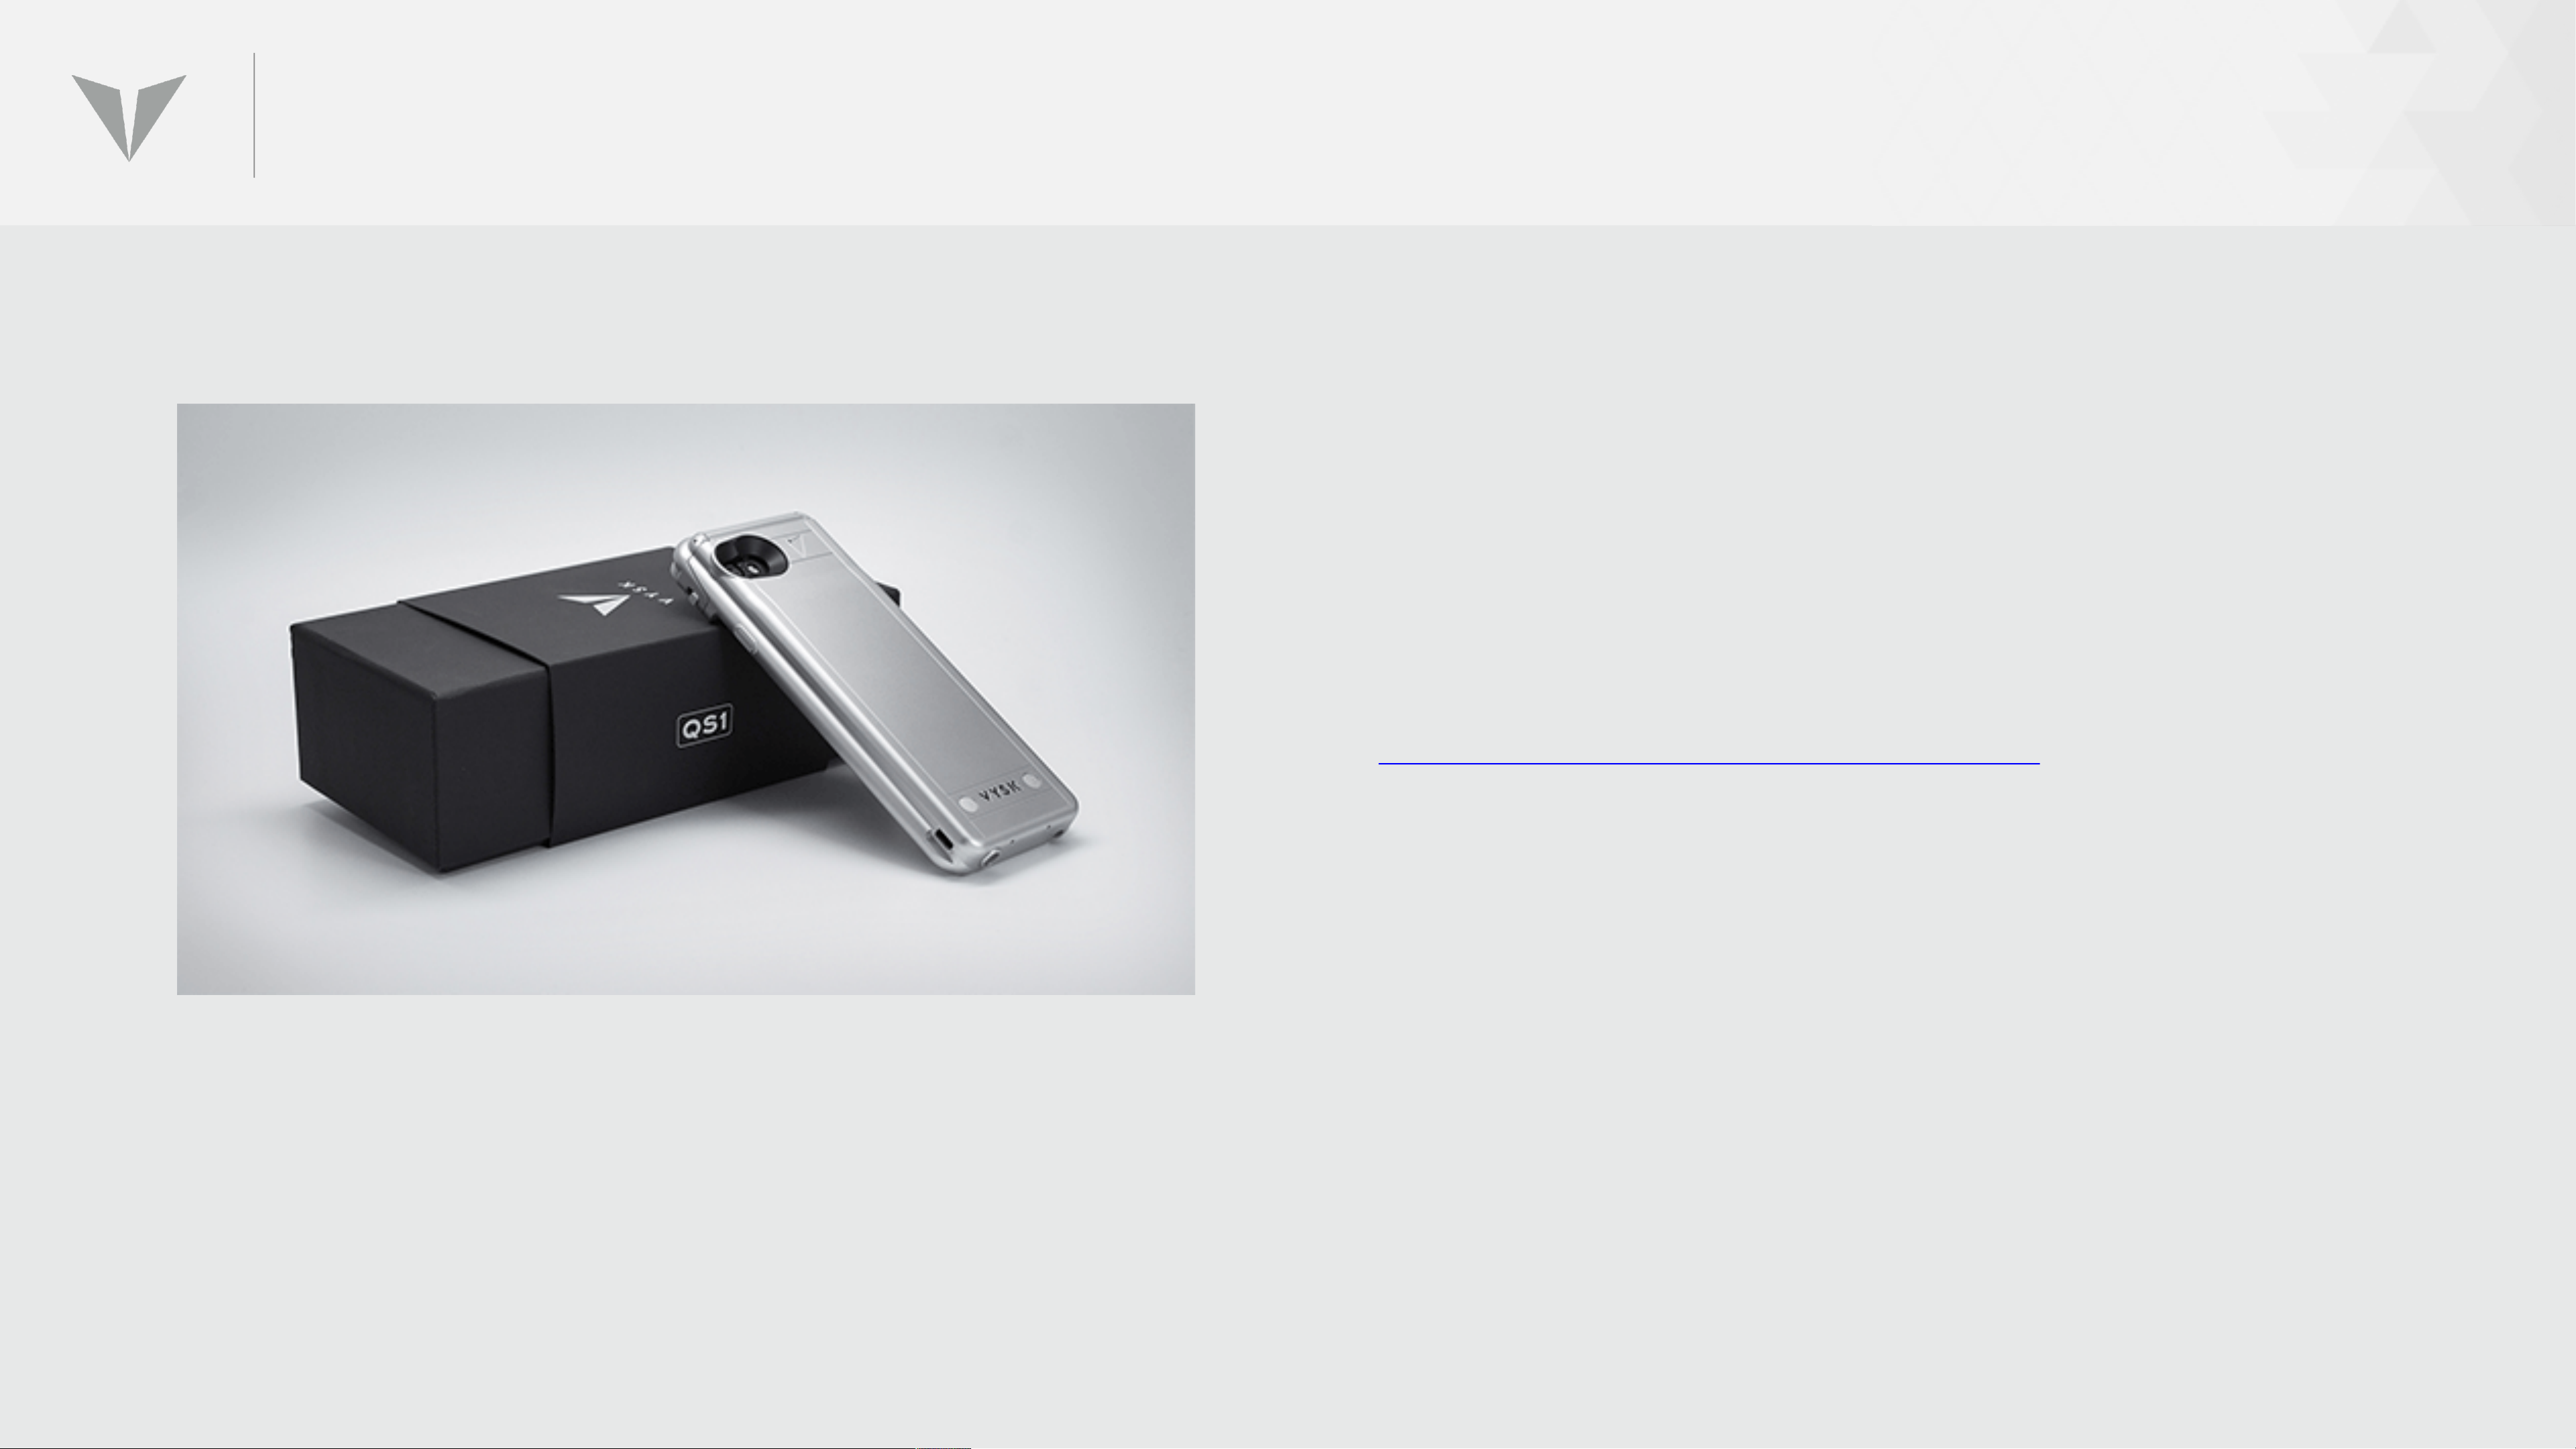
INSTALLING THE VYSK VOICE APP
• The Vysk Voice App and an active subscription/license are
required to make encrypted calls.
• Users must have at least Apple iOS Version 9.3 installed in
order to use the QS1 system.
• The Vysk Voice App can be downloaded securely from:
https://appdist.vysk.com/dist/voice
• In order to conduct secure voice calling, BOTH parties must
have a QS1 device.
• Both parties on a secure voice call must also have the
most current version of the Vysk Voice App and firmware.
Page 24
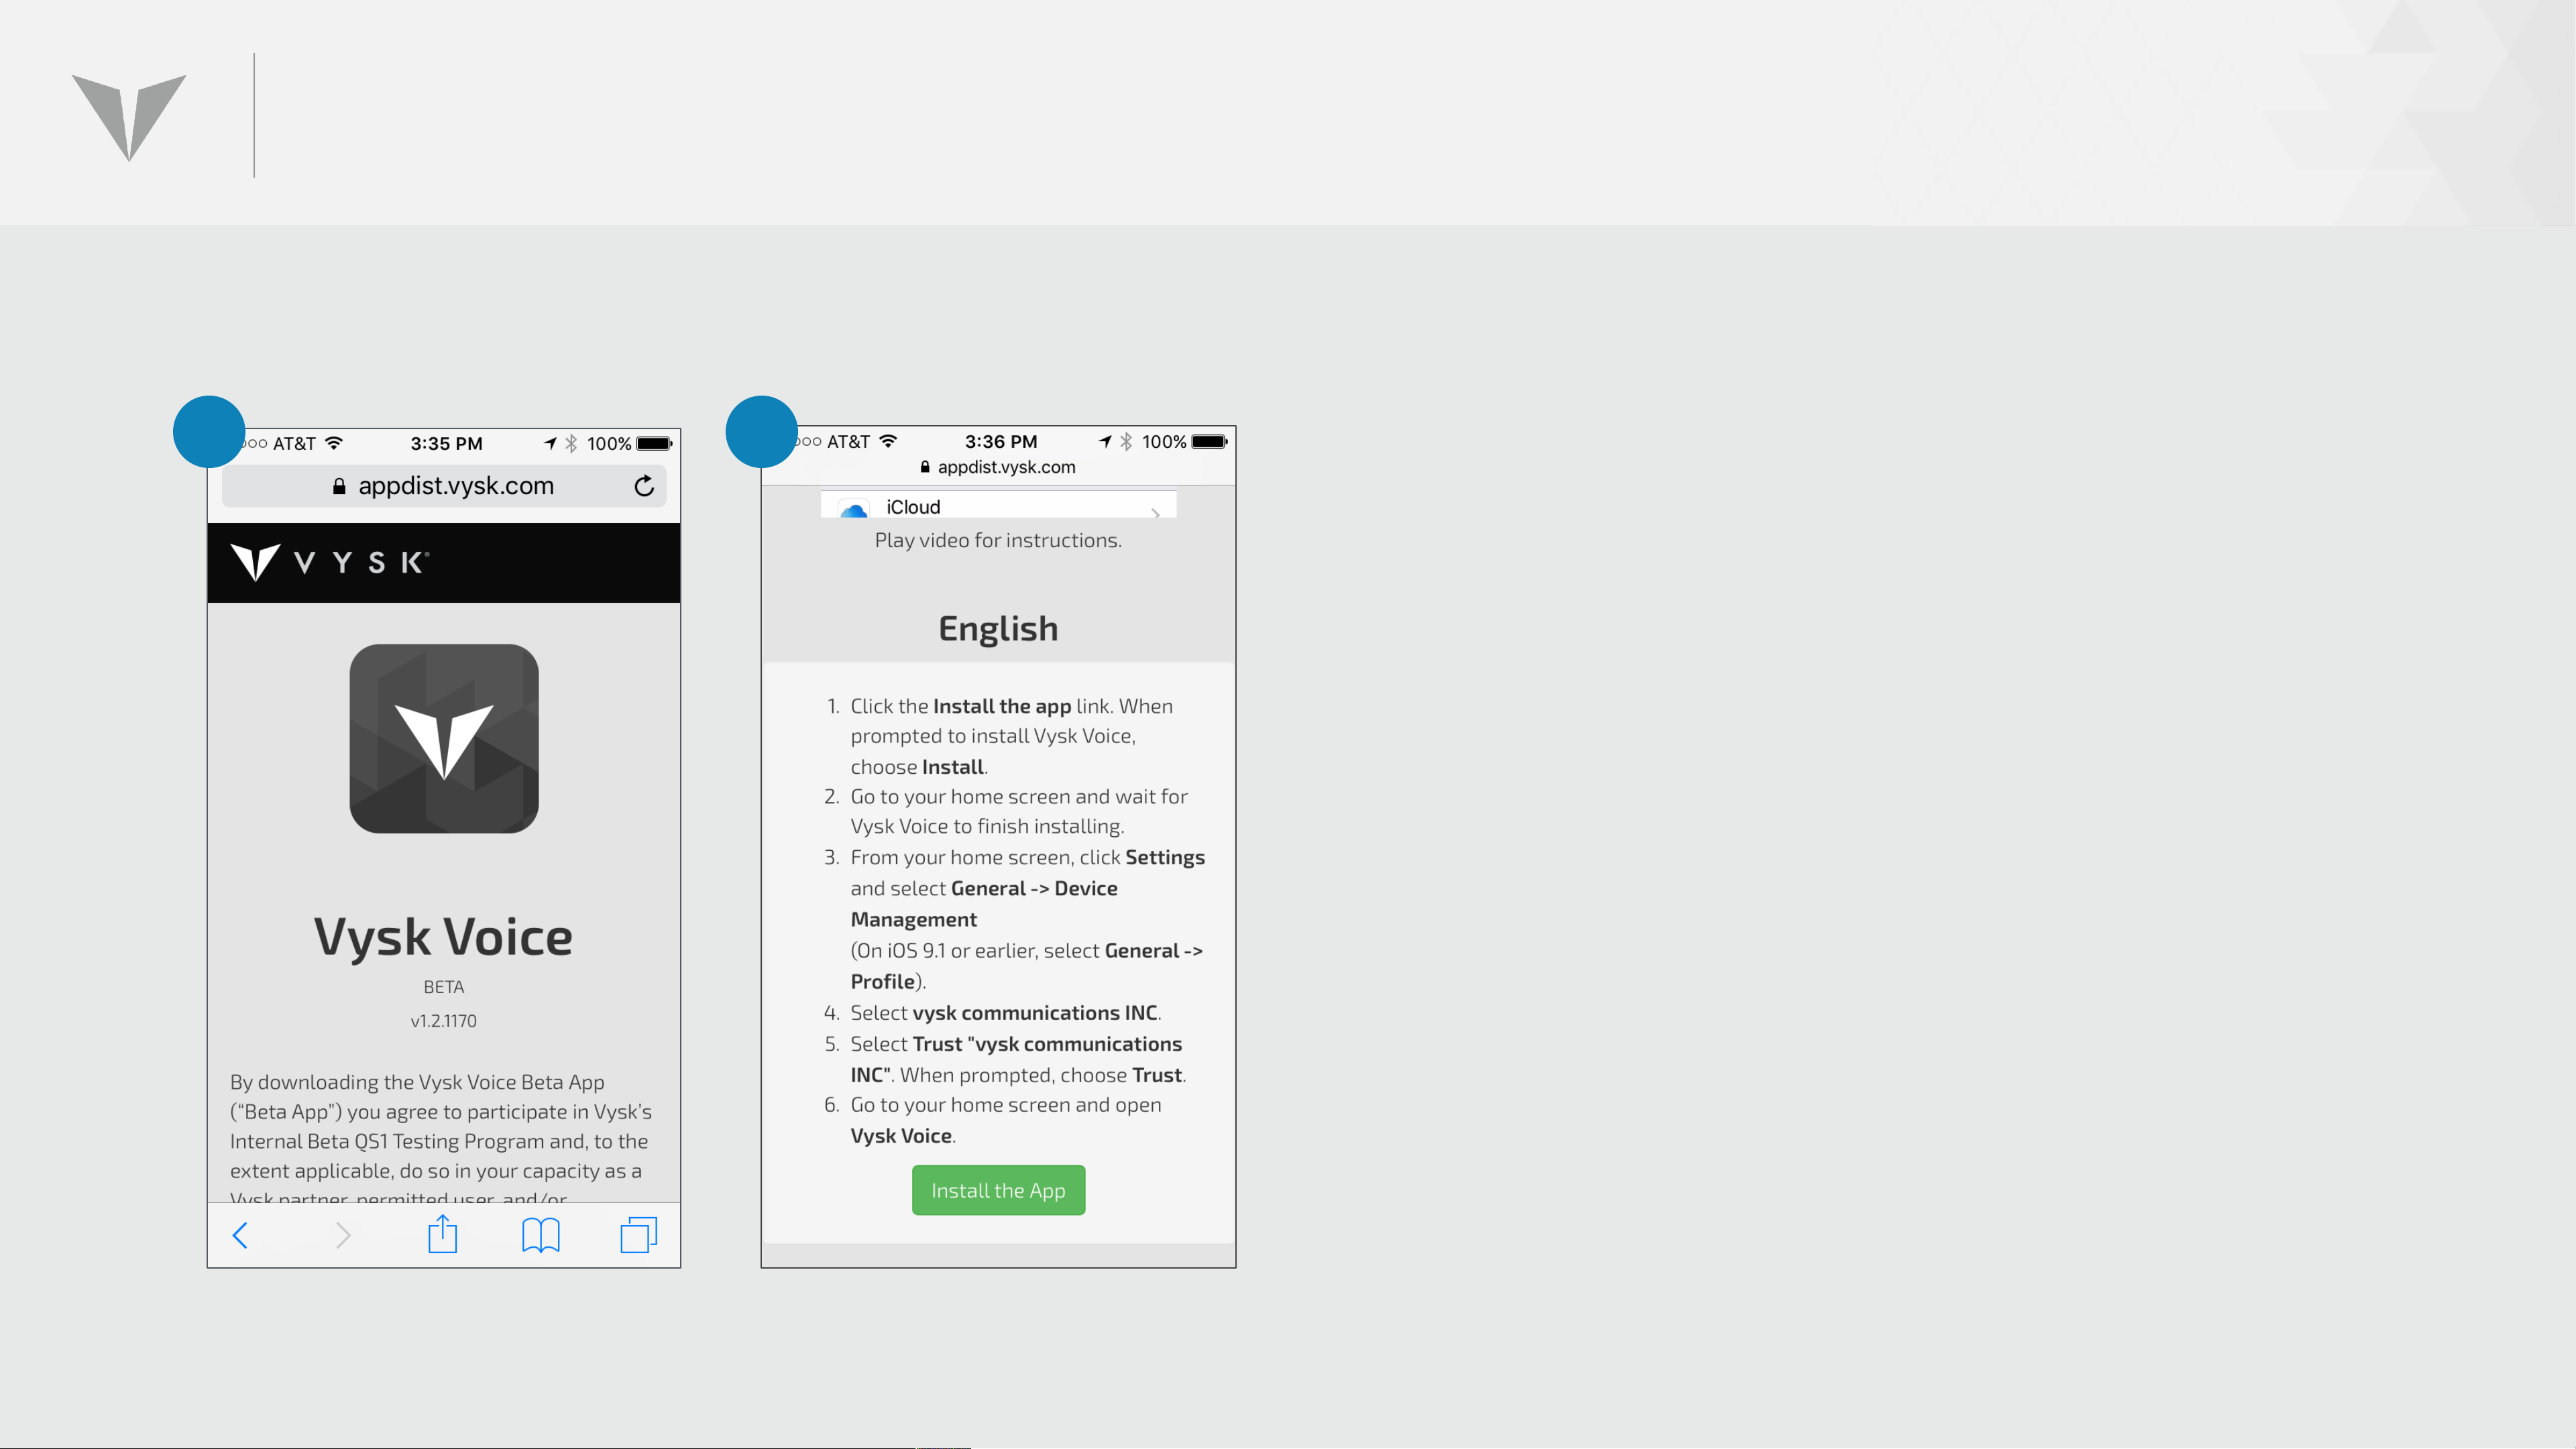
INSTALLING THE VYSK VOICE APP (CONT’D)
1 2
1. To begin downloading
the Vysk Voice App, enter
https://appdist.vysk.com/dist/
voice in the iPhone browser.
2. Scroll down on the page until
the button labeled “Install the
App” appears. Click on this
button.
Page 25
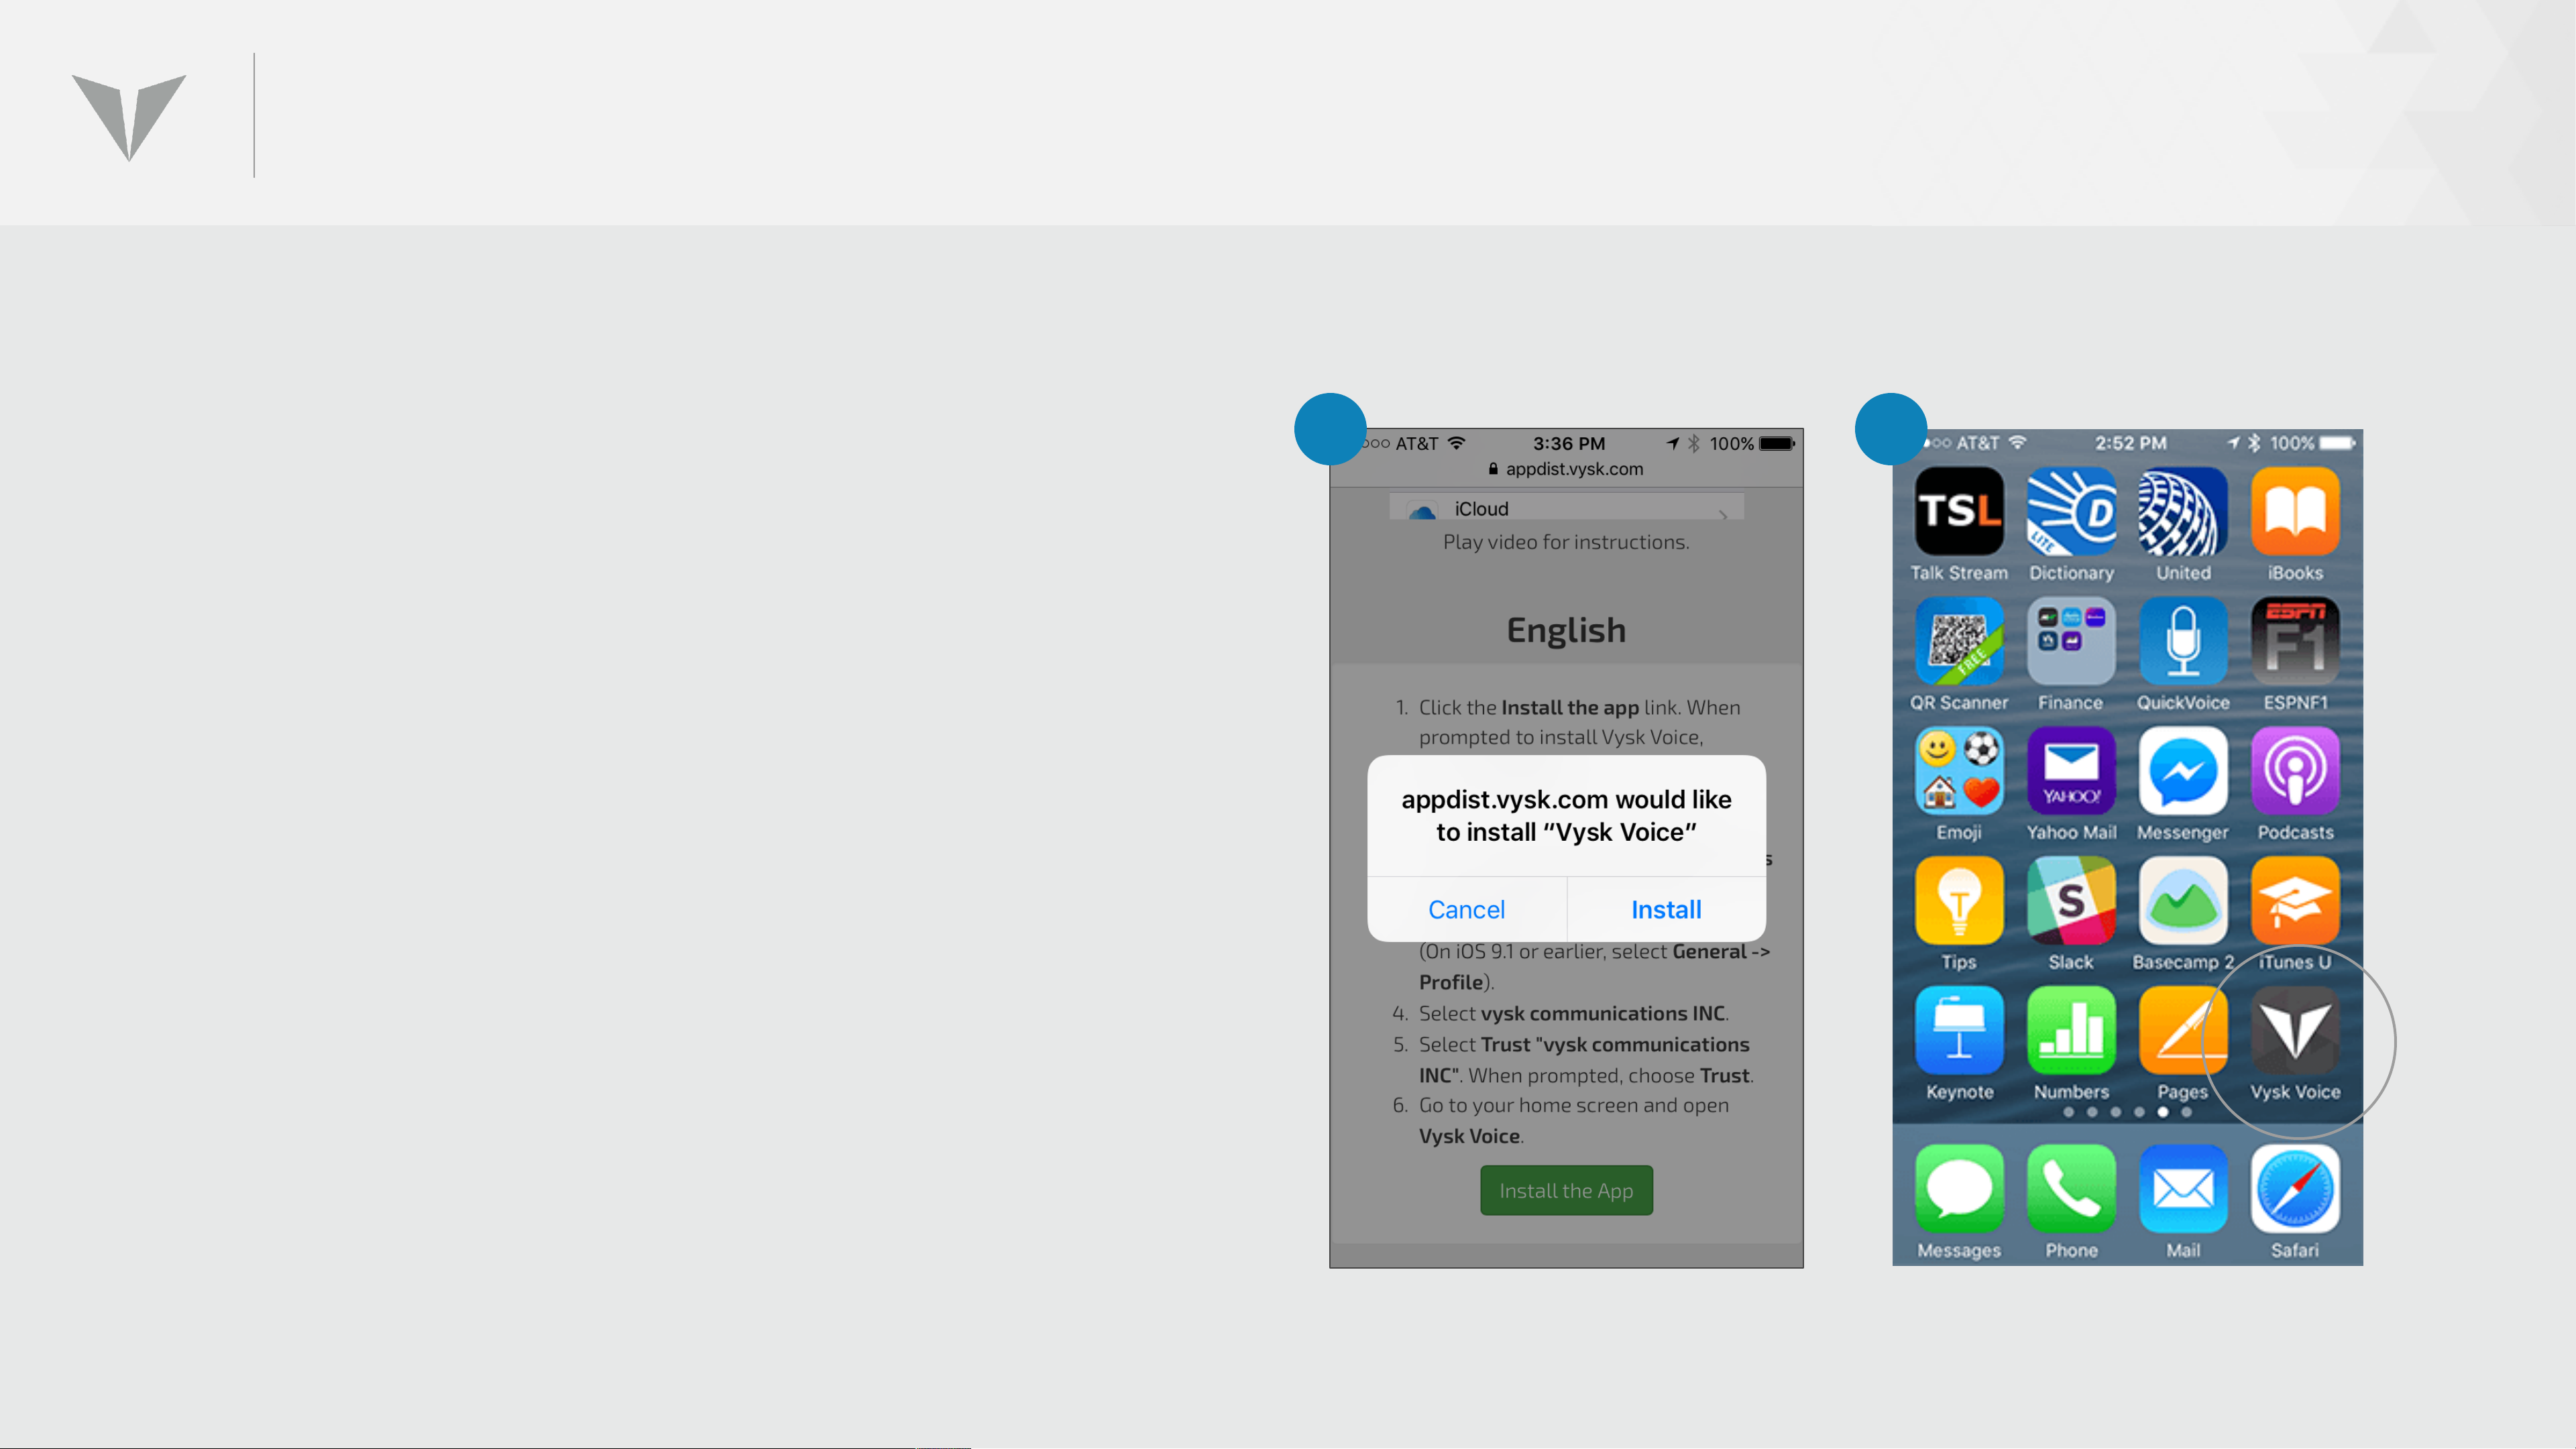
INSTALLING THE VYSK VOICE APP (CONT’D)
3. When the Install/Cancel dialog
box appears, click on the “Install”
button
4. The Vysk Voice App will
download/install and the app icon
will appear on the iPhone menu.
3
4
Page 26
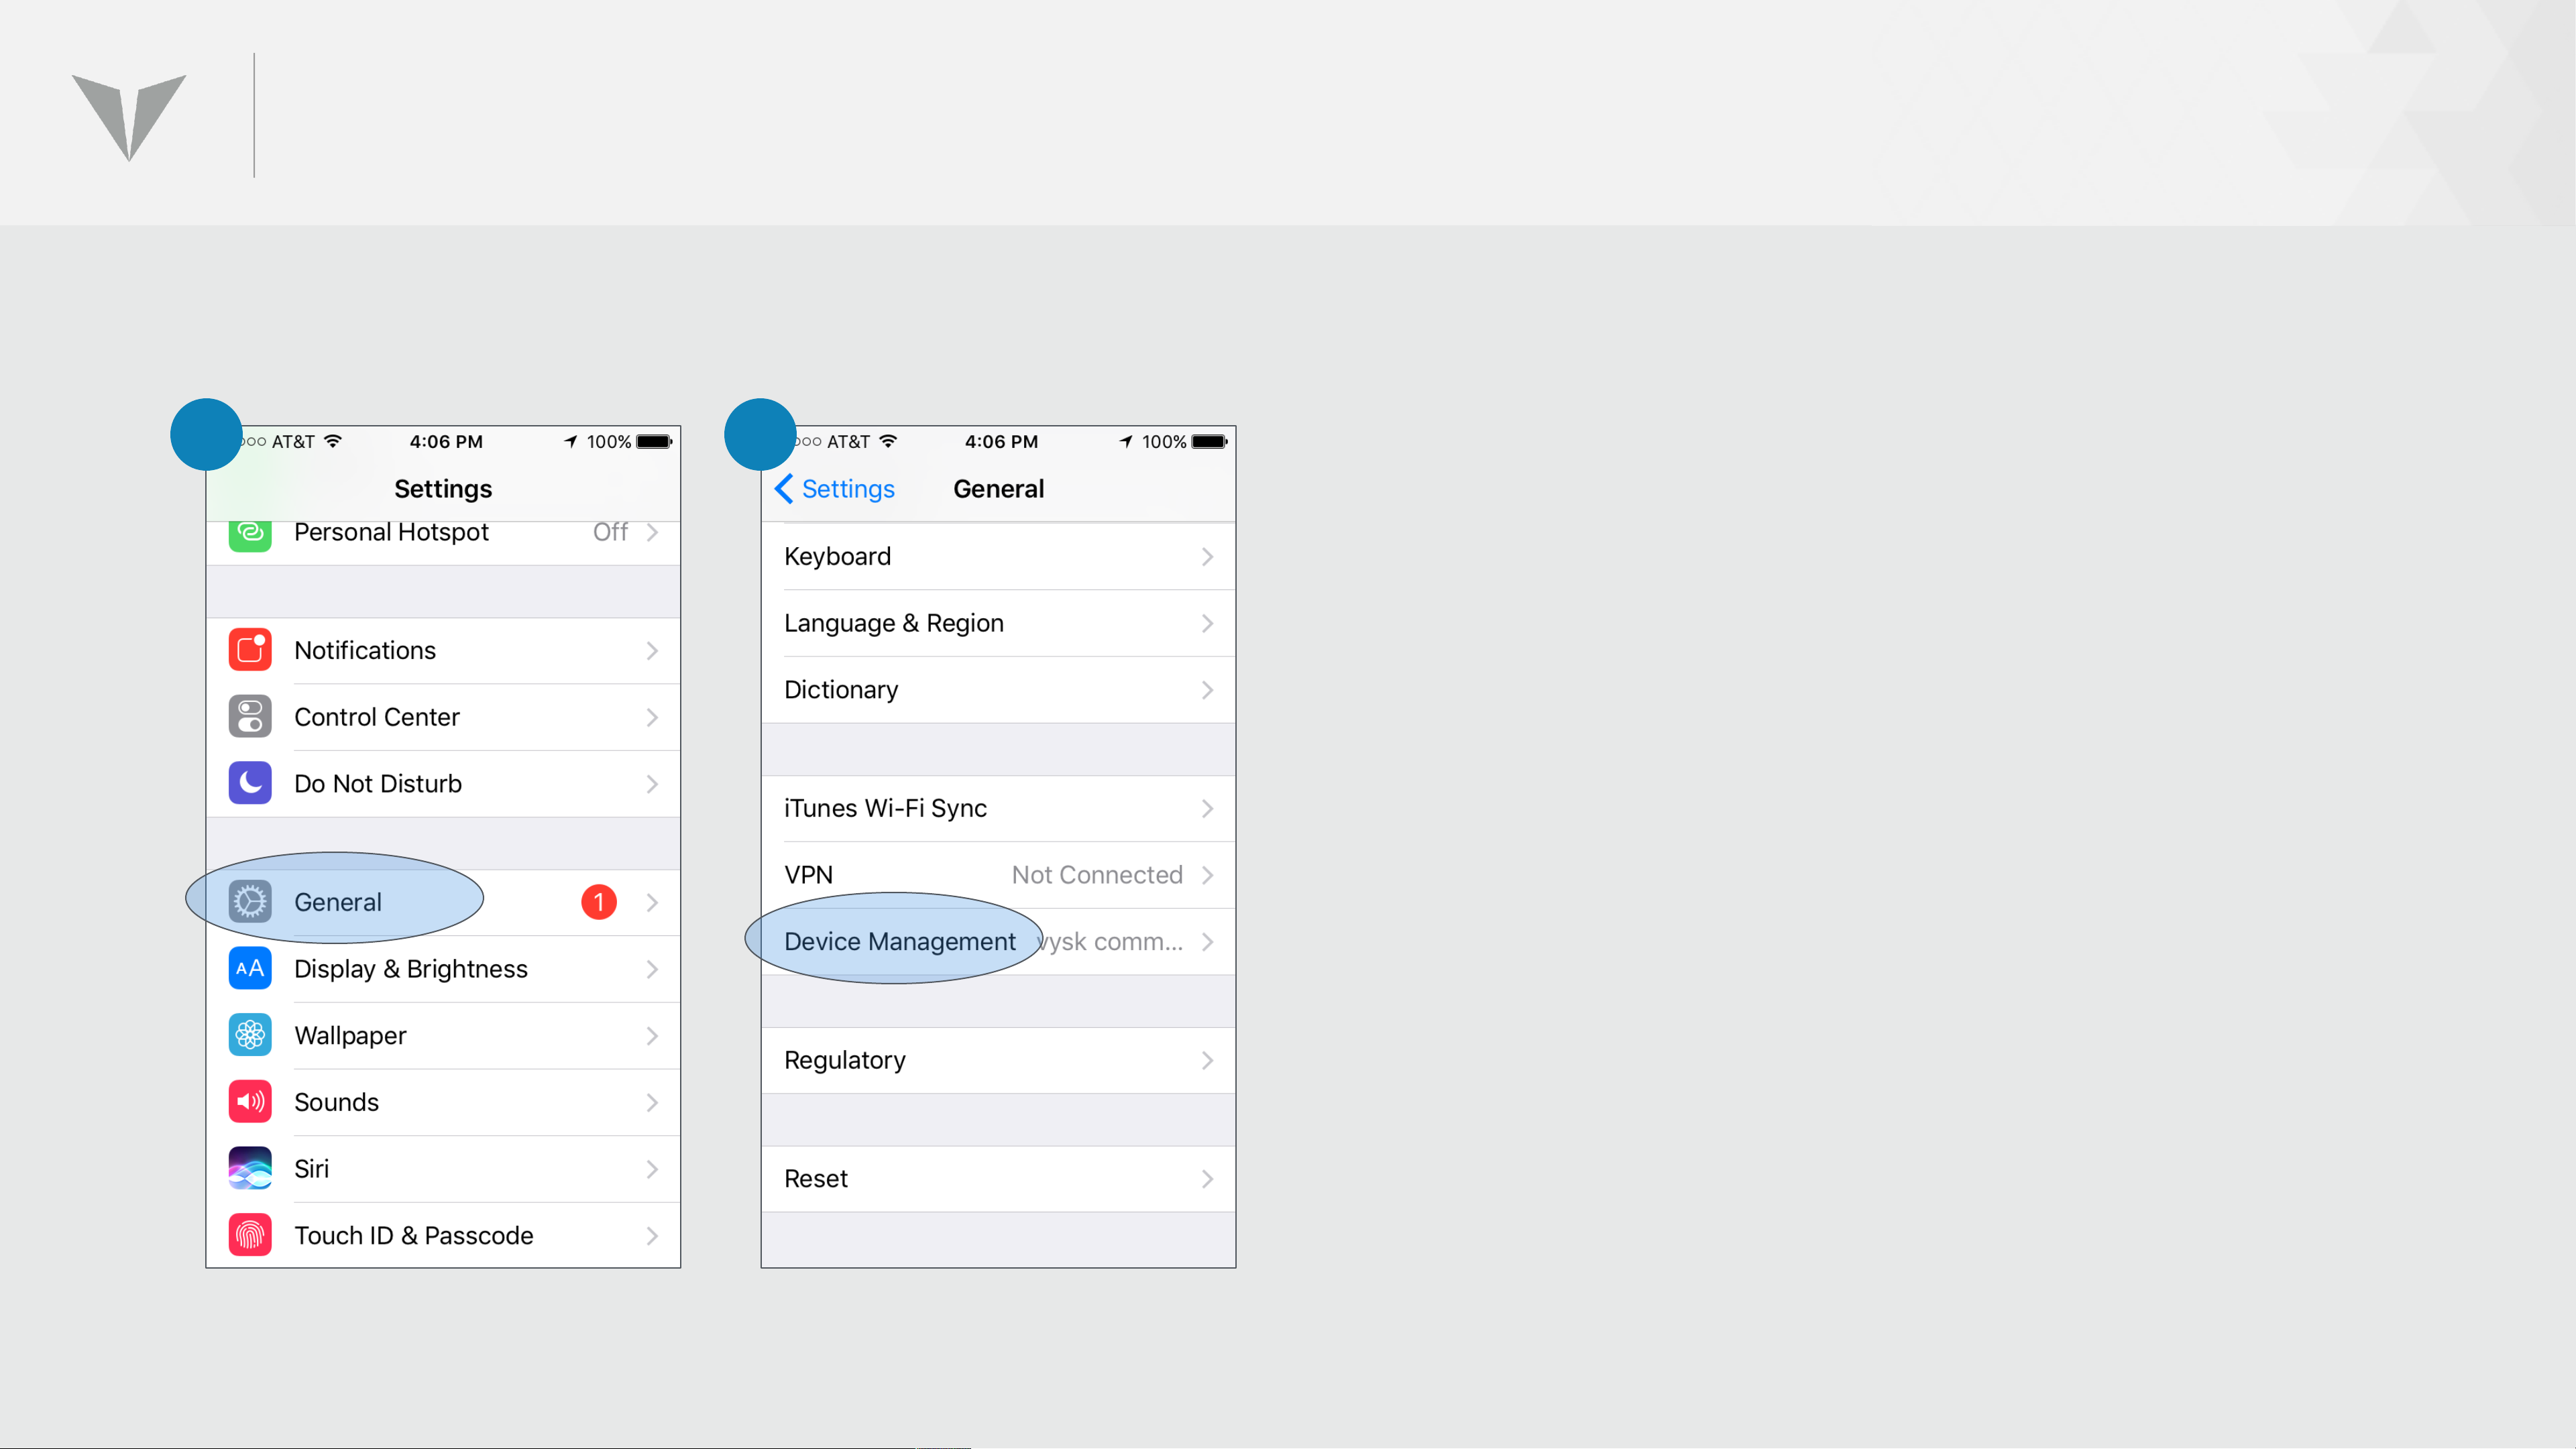
INSTALLING THE VYSK VOICE APP (CONT’D)
5 6
5. After the Vysk Voice App is
downloaded, click on Settings
in iOS (Ver. 10.0.2). Click on
General.
6. Click on Device Management
Page 27
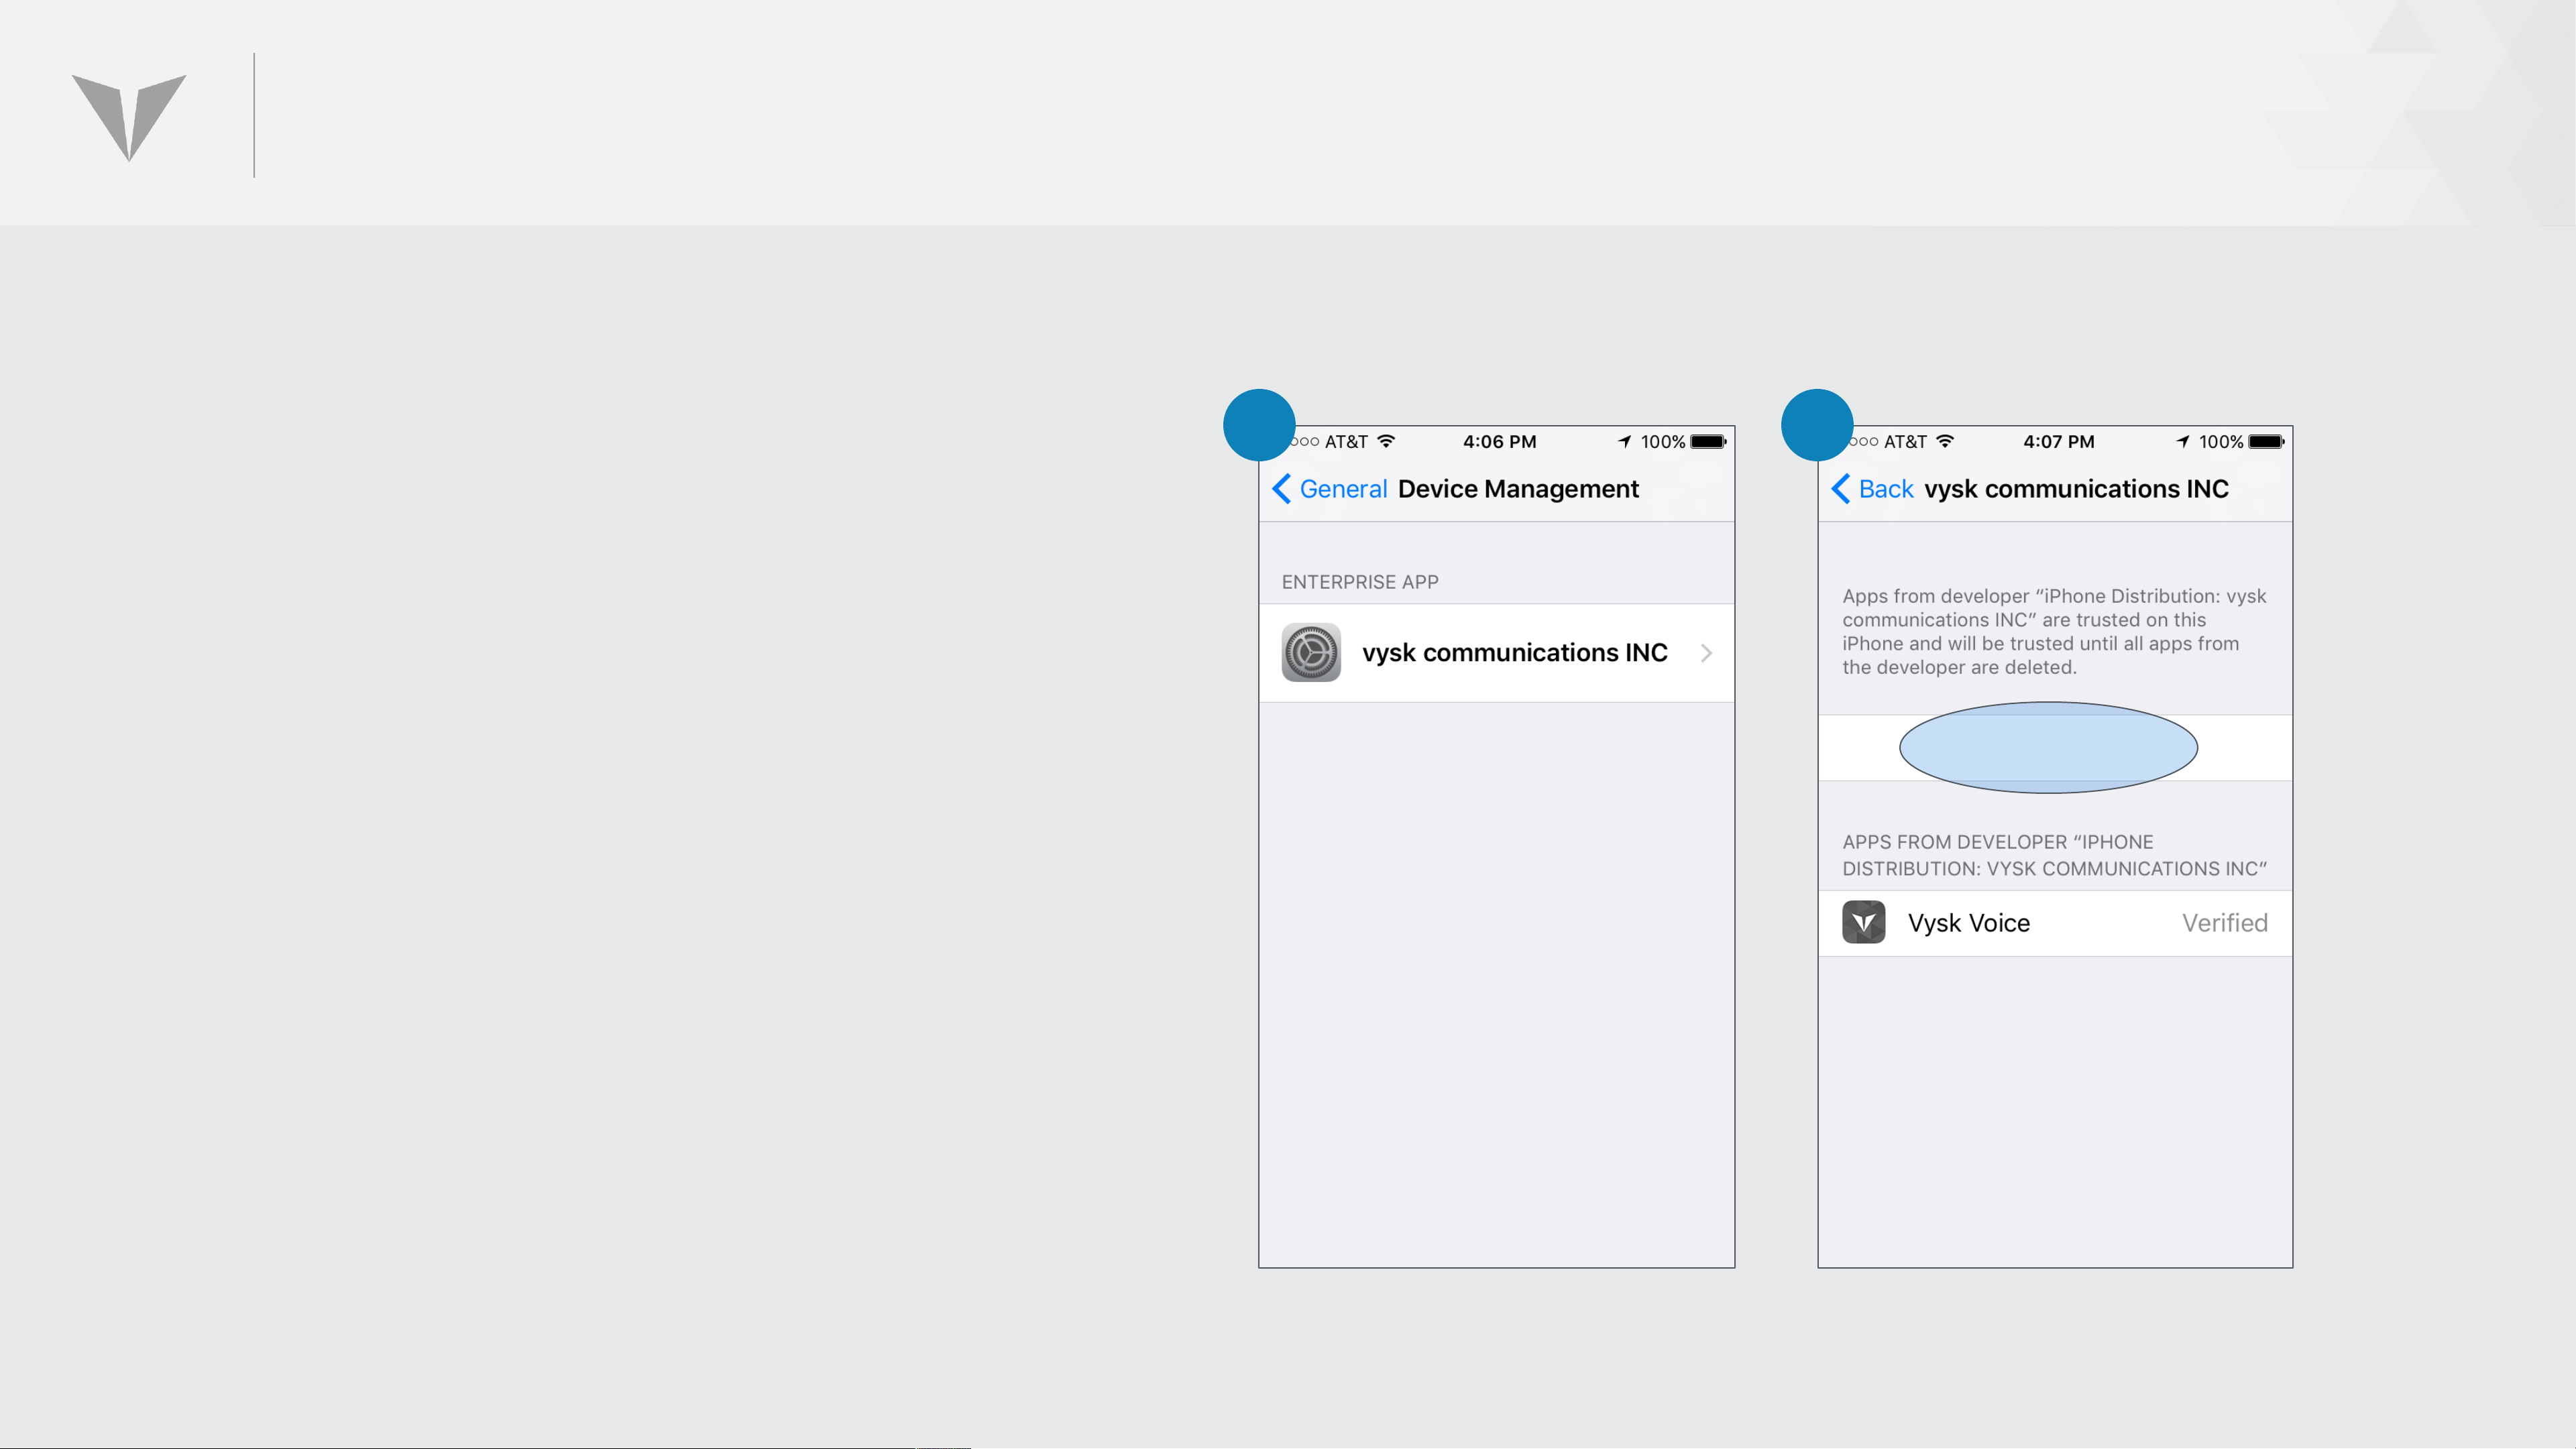
INSTALLING THE VYSK VOICE APP (CONT’D)
7. Click on “vysk
communications INC.”
8. Click on Trust App. The
Vysk Voice App is now
ready for use!
7
8
Trust App
Page 28
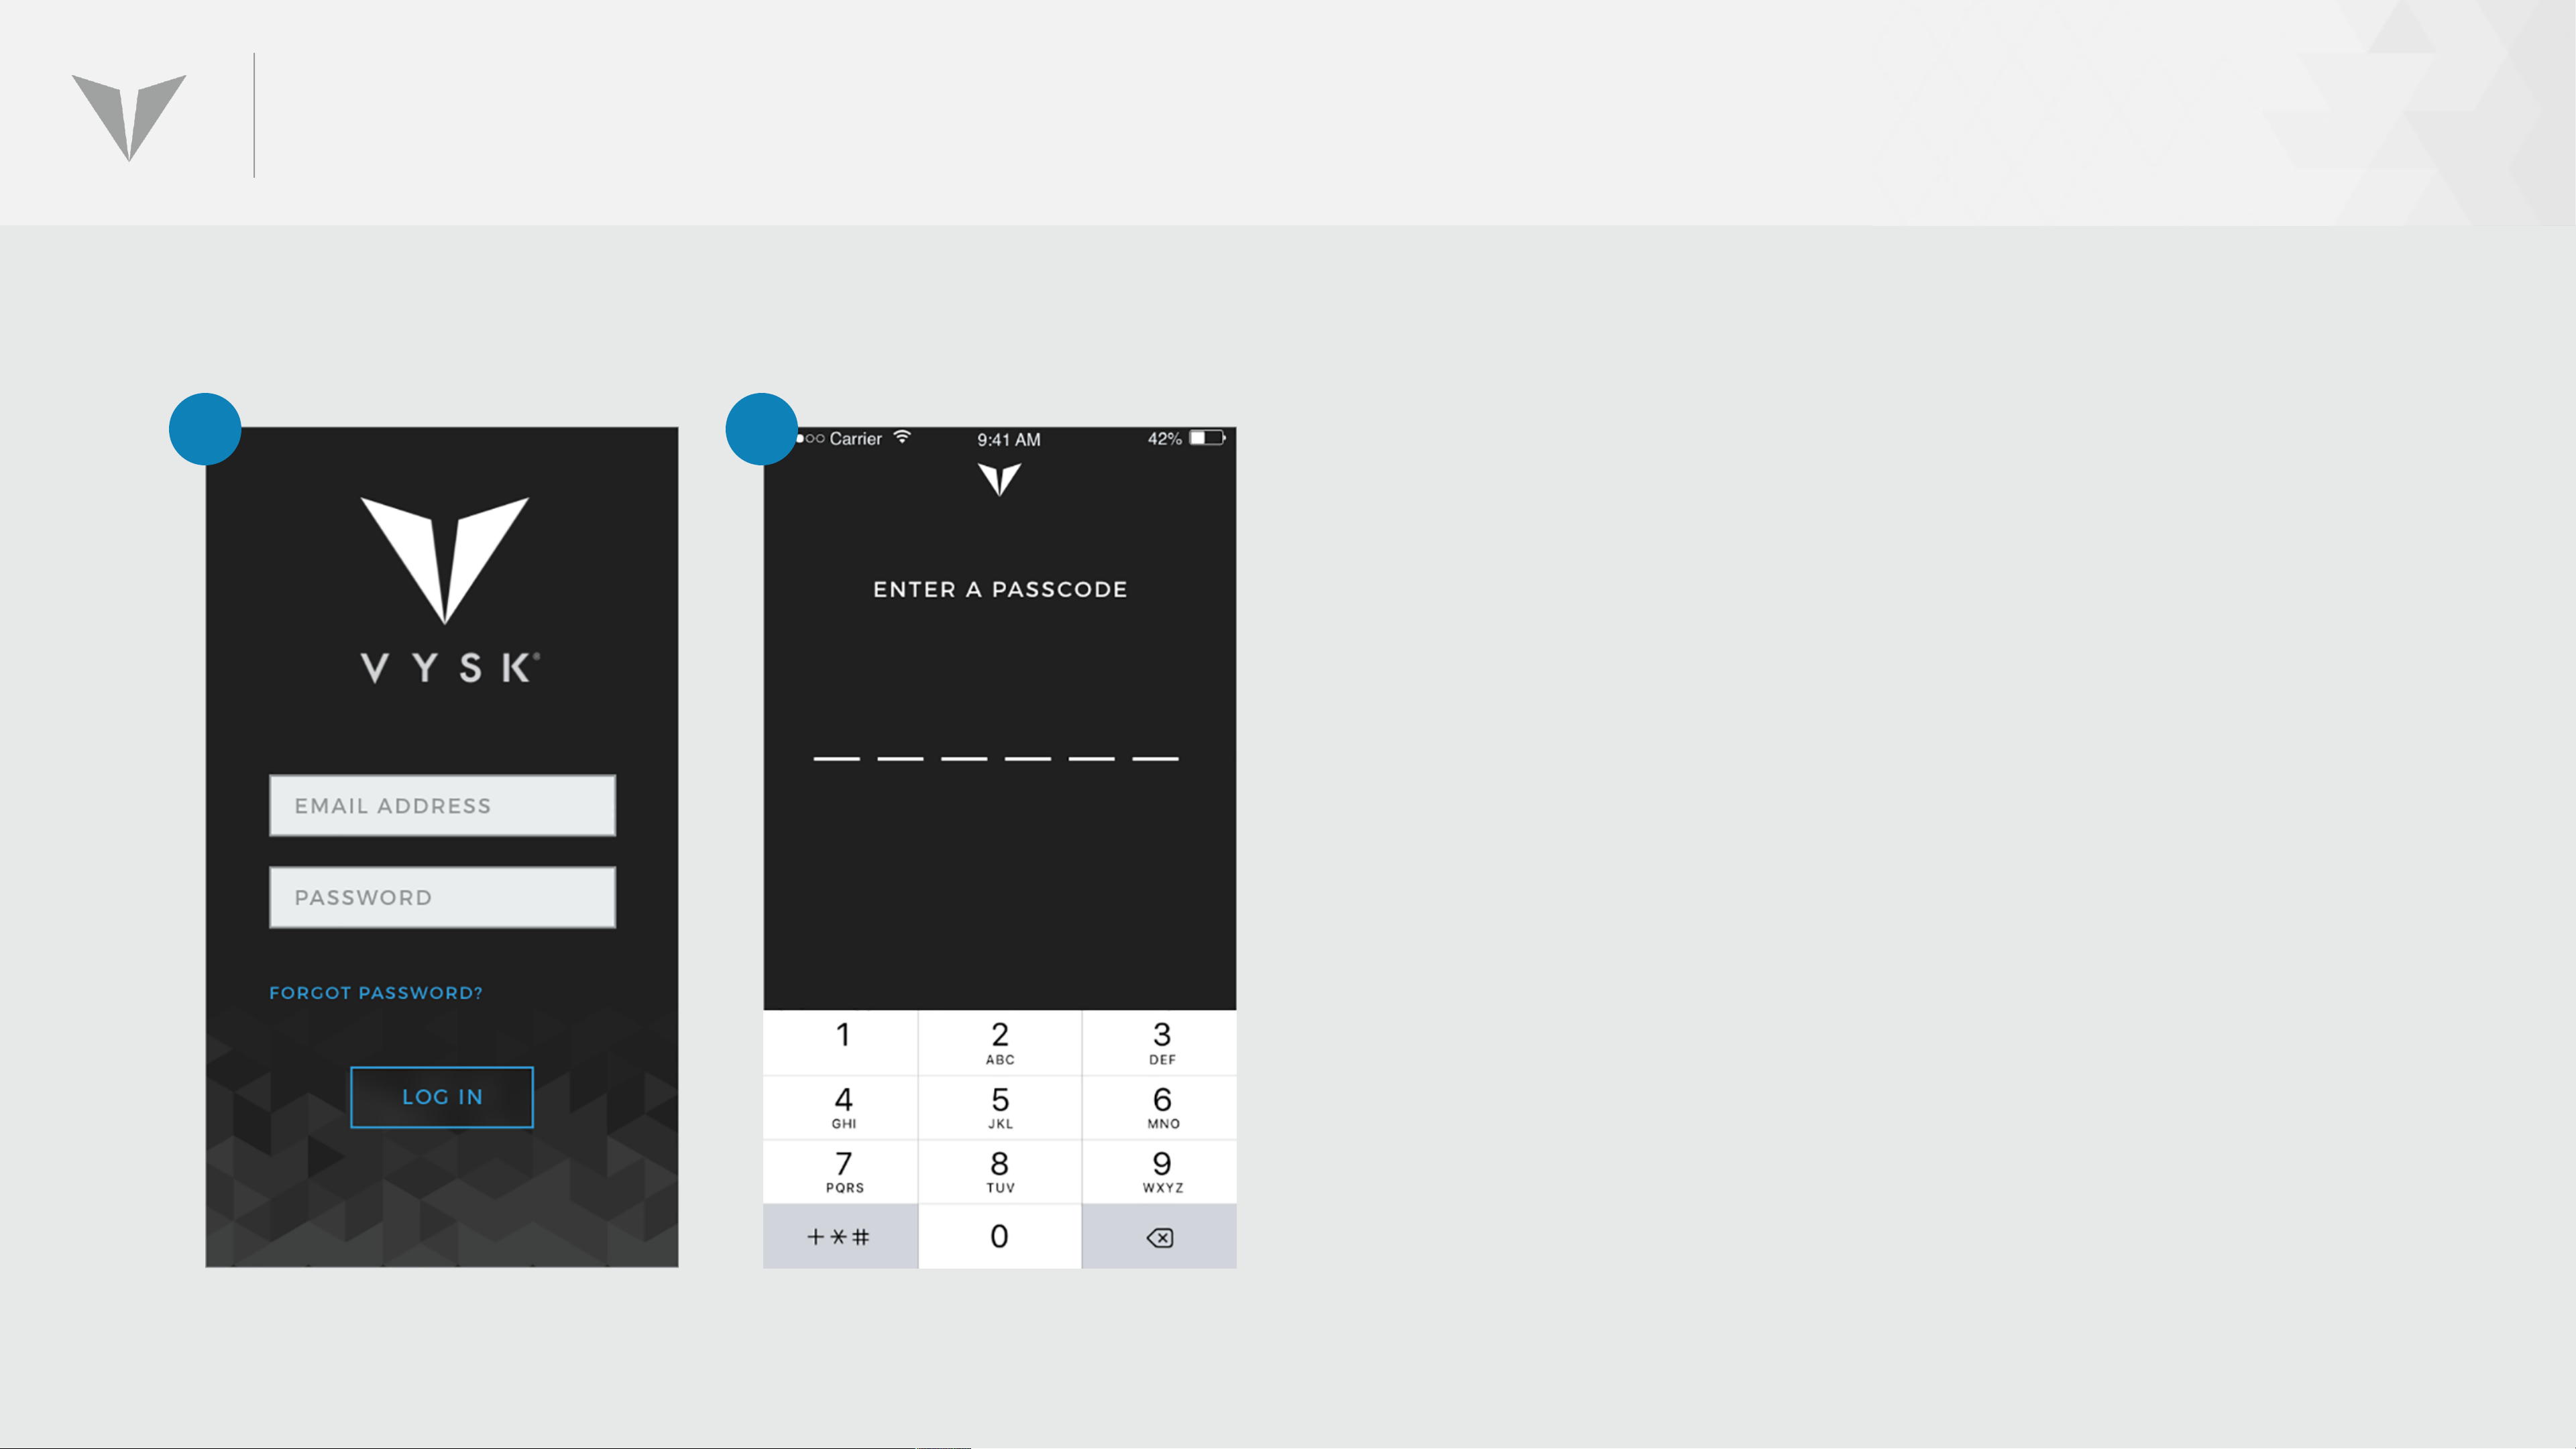
GETTING STARTED WITH THE VYSK VOICE APP (CONT’D)
1 2
Clicking on the Vysk Voice App icon opens this login
screen to the far left.
1. Enter your email address and enter the
password you created when you configured
your account in the admin portal. (If you have
forgotten your password, click the “Forgot
Password” link, and you will receive an email
to reset your password.)
2. Once you have logged in, you will be prompted
to create a 6 digit passcode. You will be asked
to verify your passcode by entering it again.
Page 29
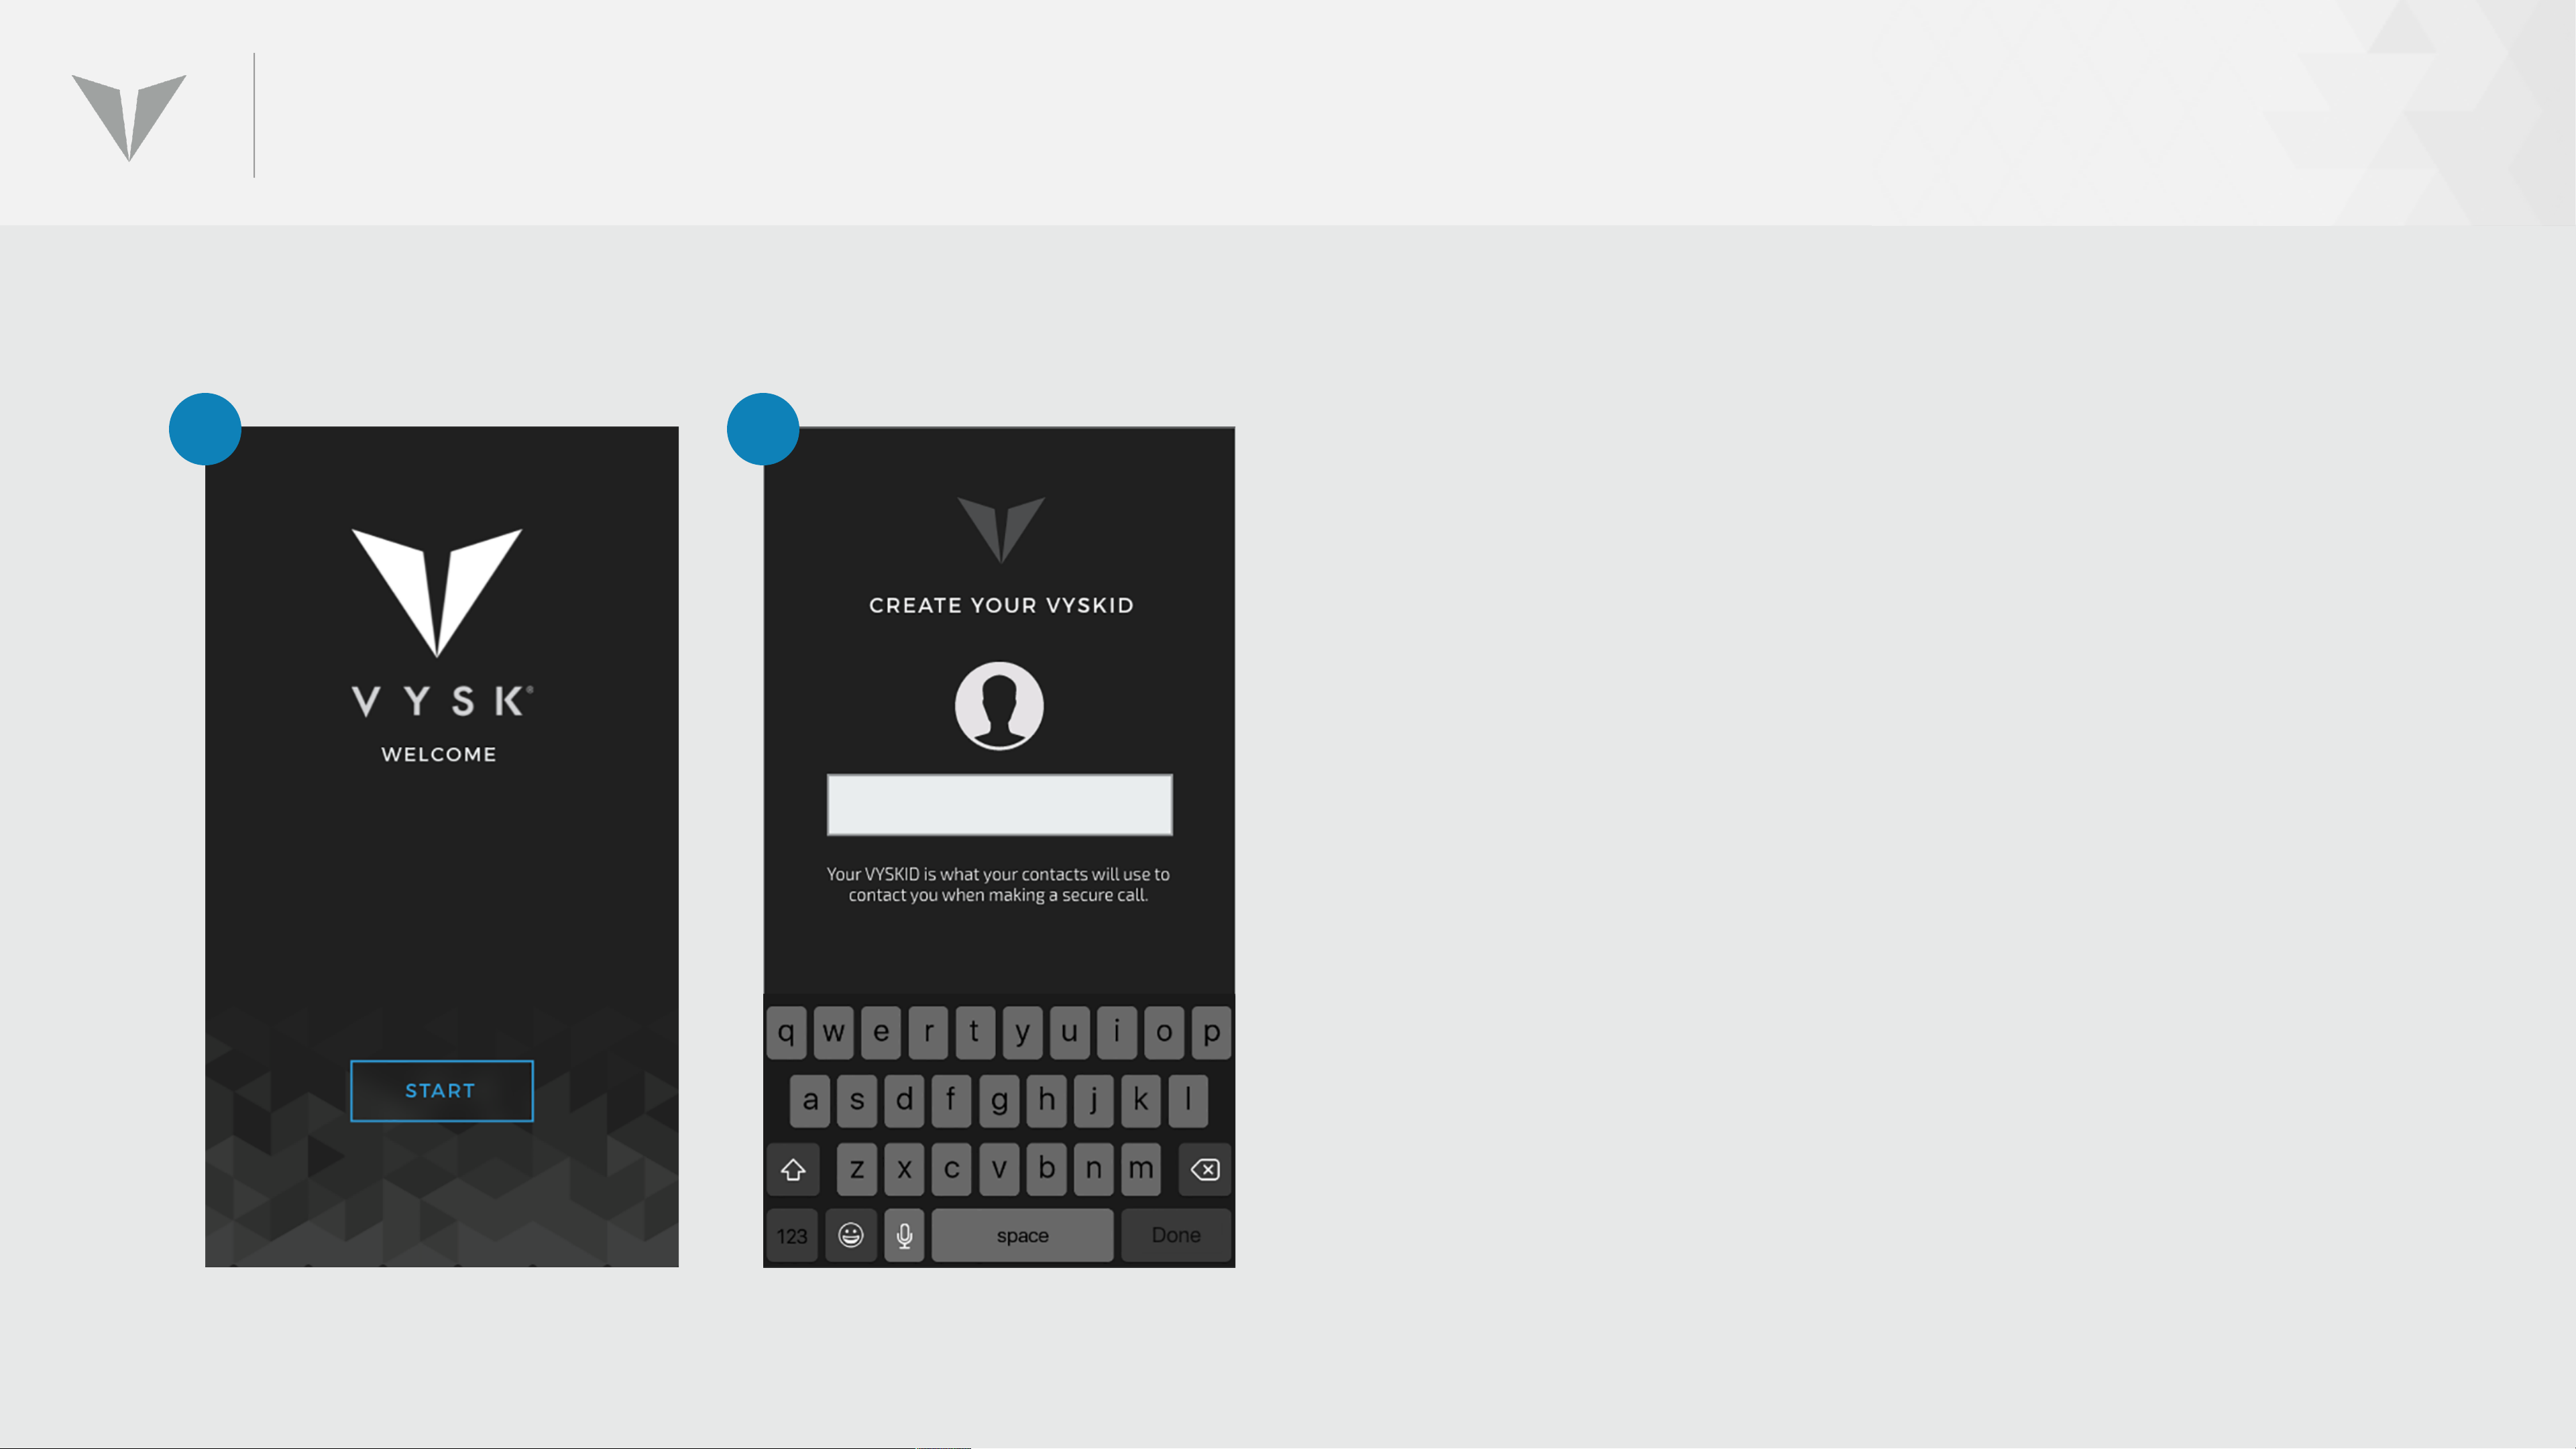
GETTING STARTED WITH THE VYSK VOICE APP (CONT’D)
3 4
3. Press START
4. The onboarding process begins by choosing a Vysk
ID. Your Vysk ID is what identifies you to other QS1
users and serves as your username in the system.
Enter your Vysk ID in the text field.
NOTE: Your Vysk ID can include any combination of
alpha numeric characters, and it is NOT case sensitive.
If you happen to pick a Vysk ID that is already taken,
you will be prompted to choose a new one.
Your Vysk ID cannot change once it has been chosen
(unless you create an entirely new account).
Page 30
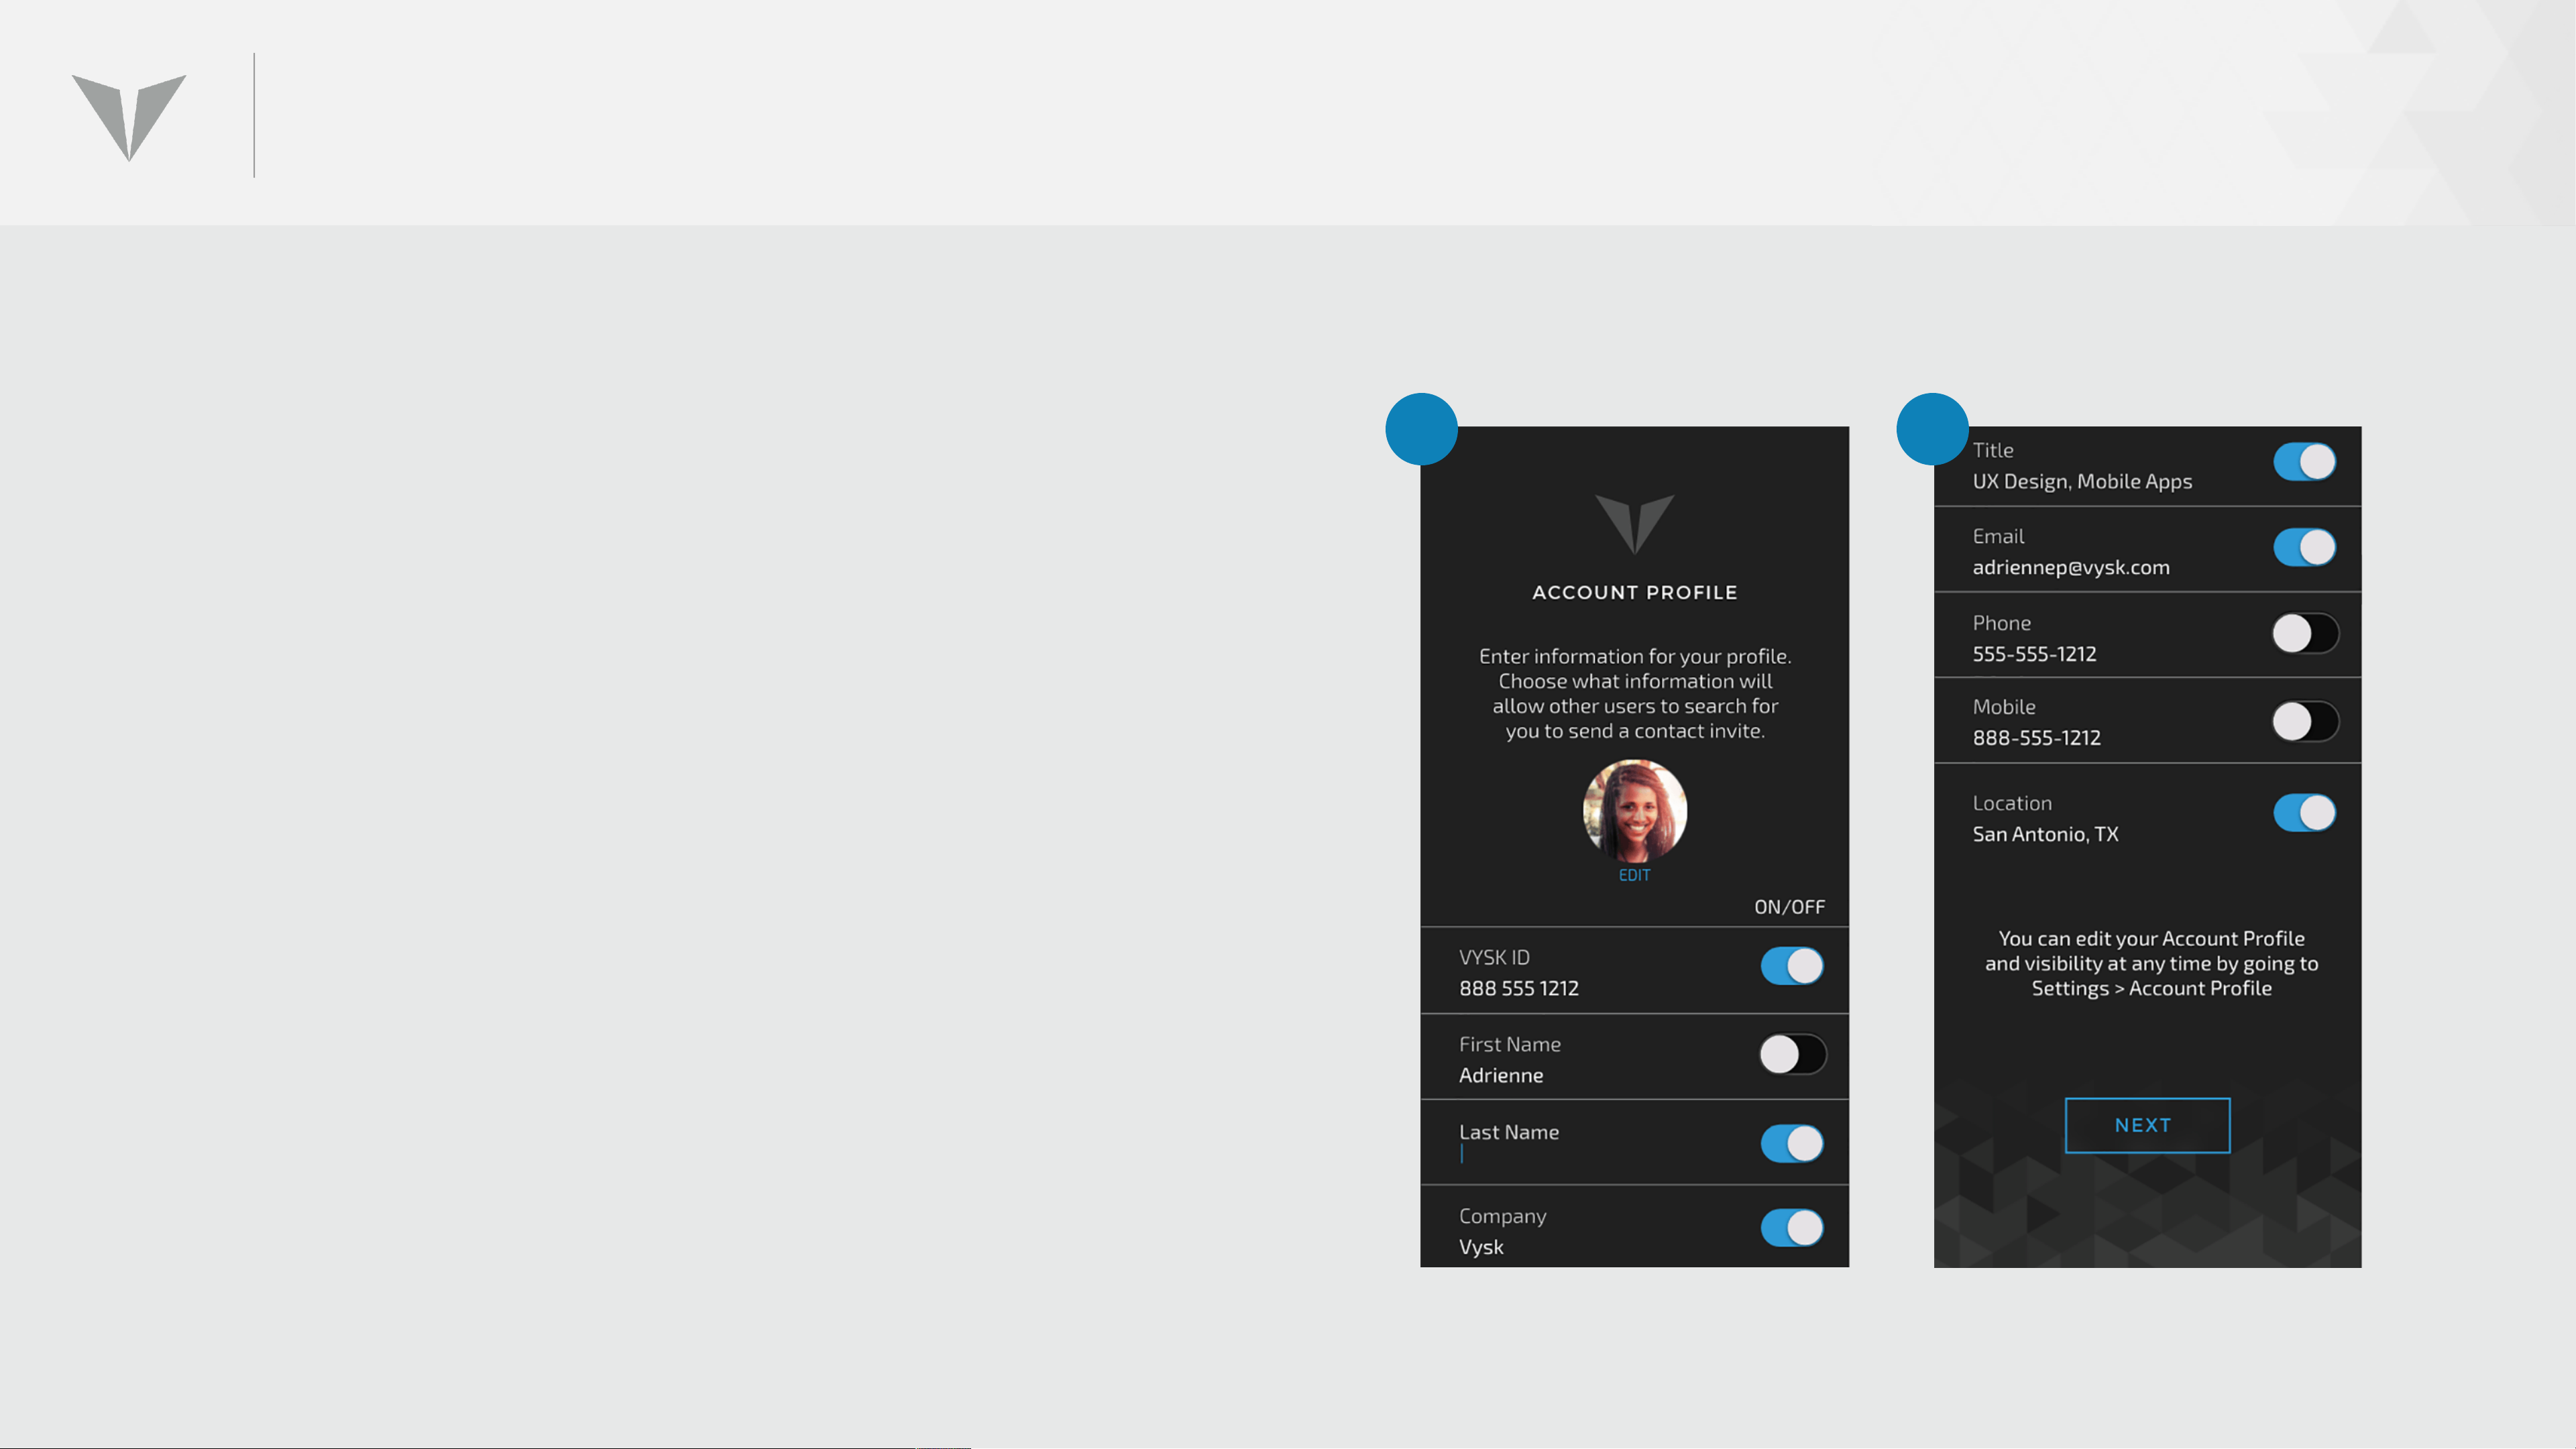
GETTING STARTED WITH THE VYSK VOICE APP (CONT’D)
5. Next, the ACCOUNT PROFILE screen will
appear, allowing the user to decide which
5.1 5.2
information they want to share and have
searchable by other QS1 users.
Vysk ID will always remain searchable. The
user can choose what other items will be
searchable. All other profile information can
be modified at any time in the Settings.
Once the profile is configured, hit the NEXT
button to proceed to the next step in the on
boarding process.
Page 31
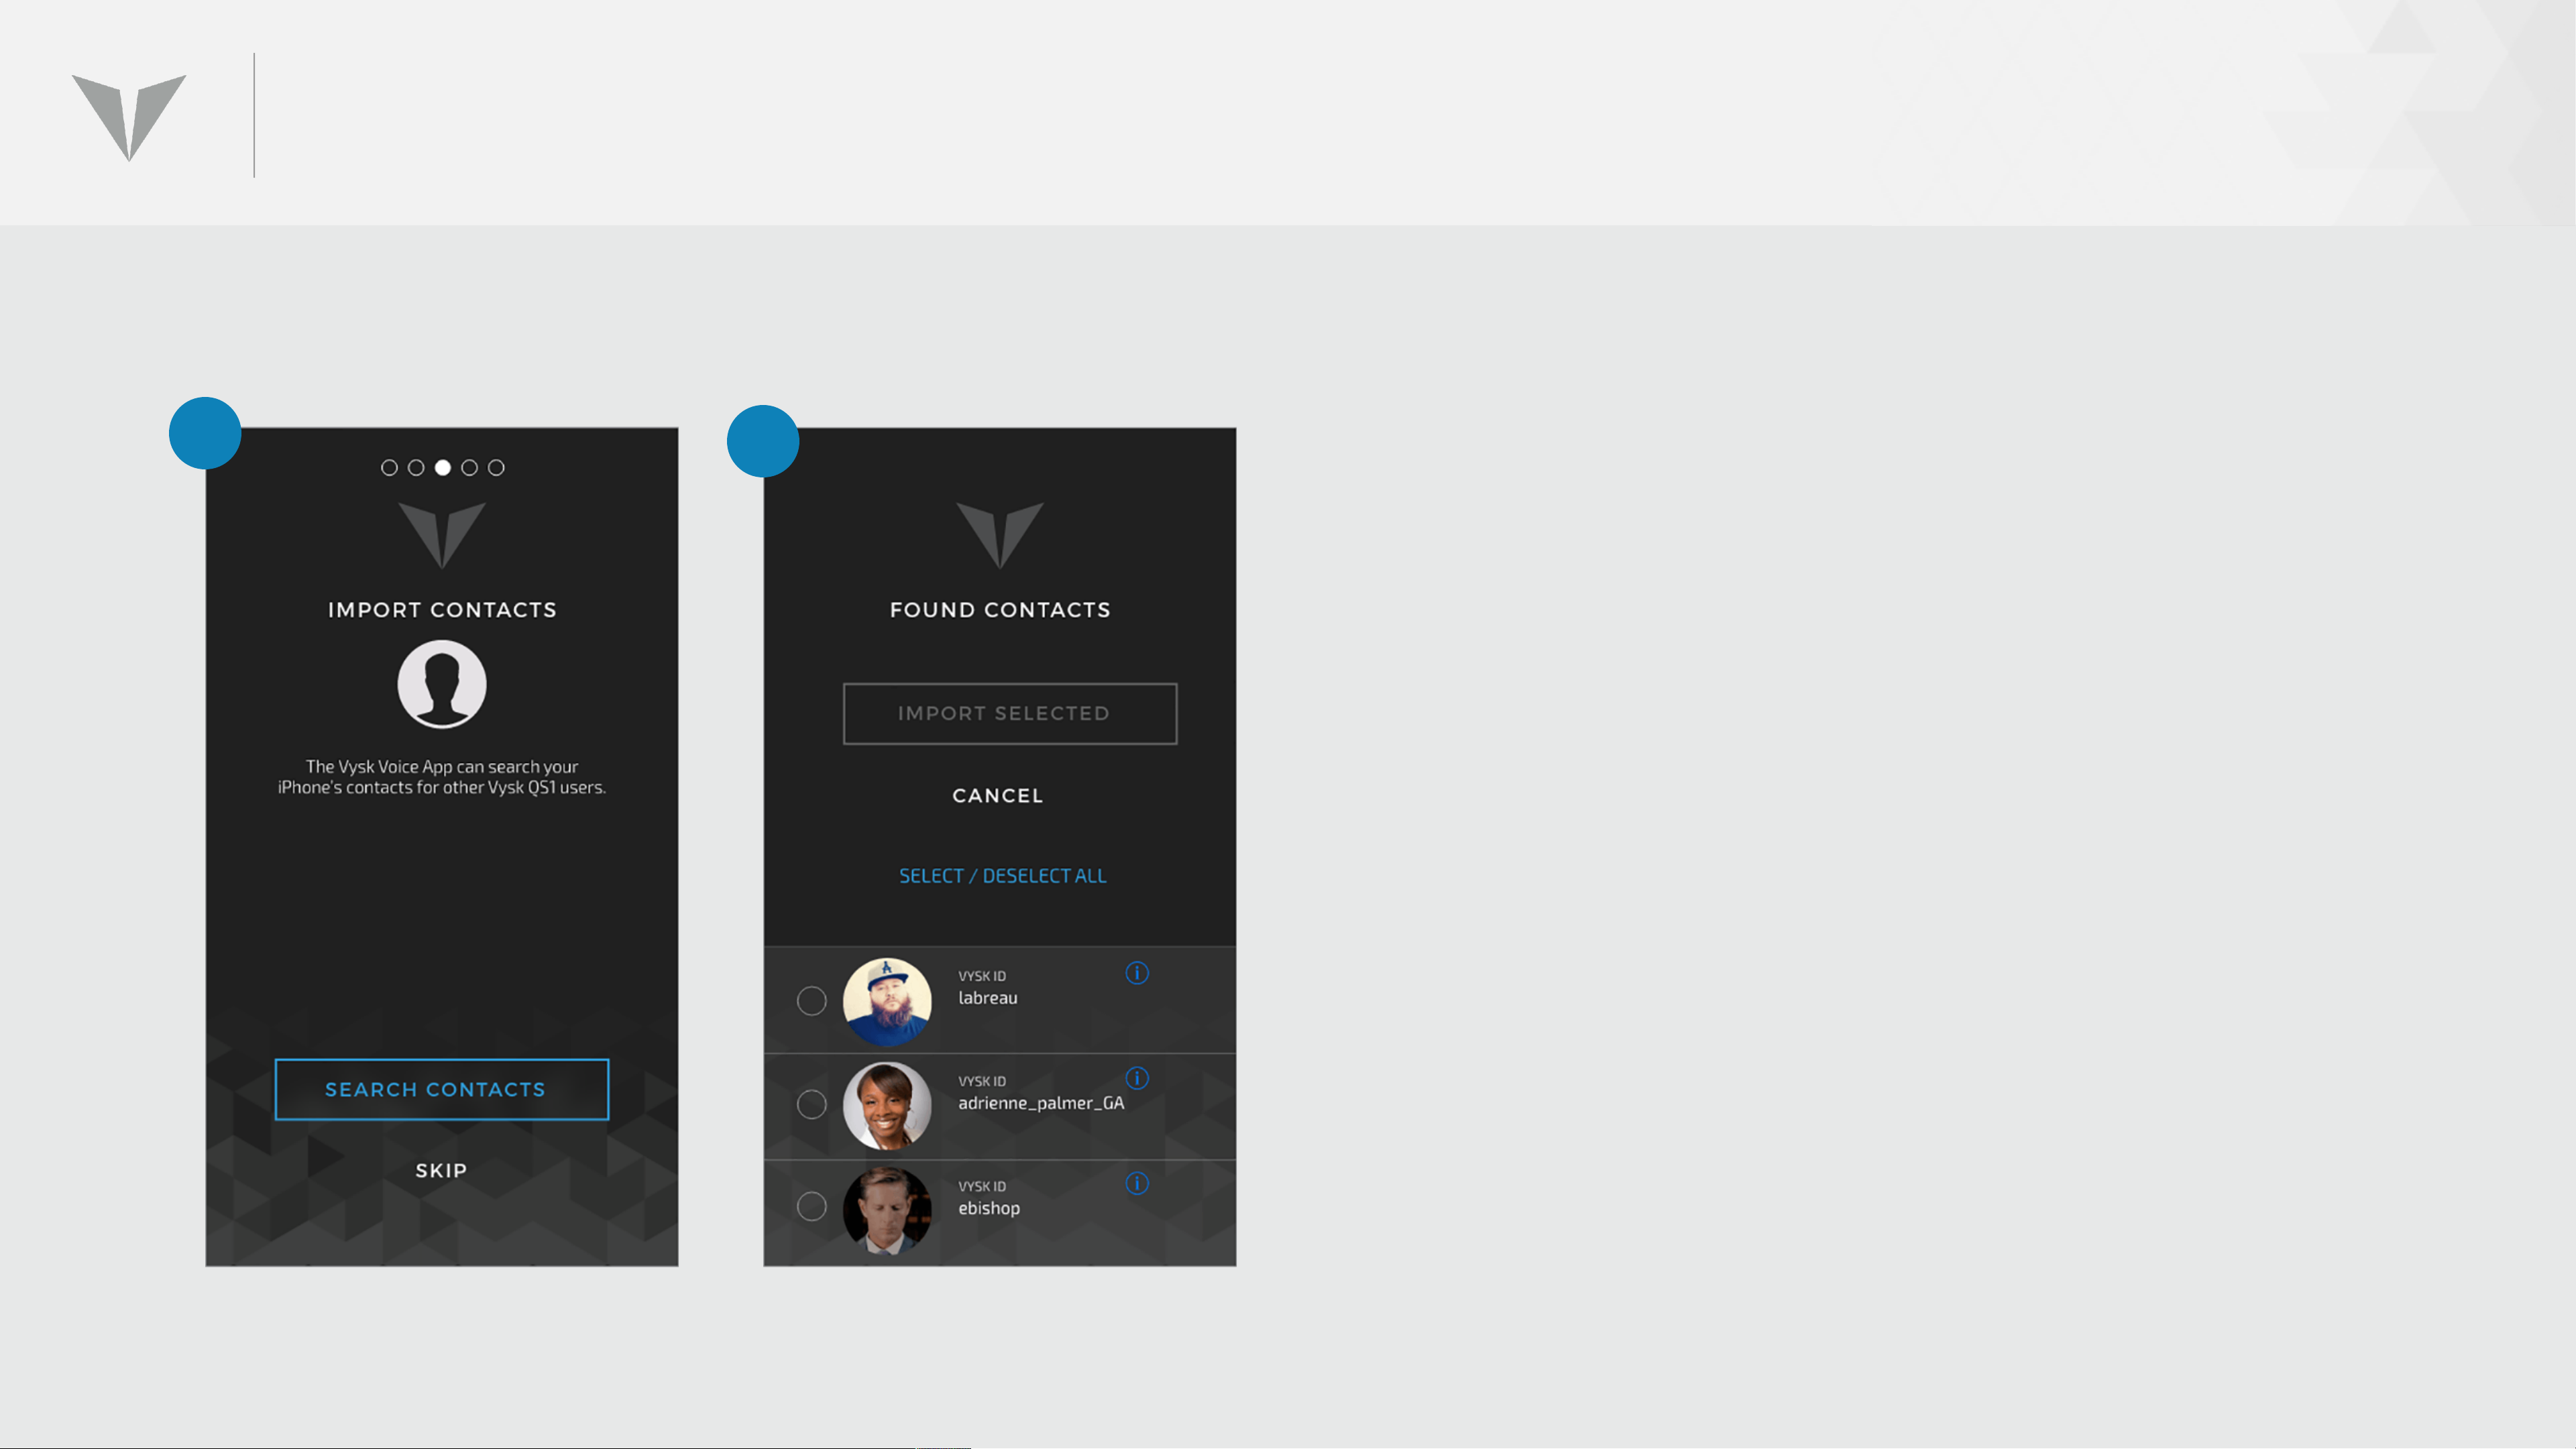
GETTING STARTED WITH THE VYSK VOICE APP (CONT’D)
6
7
6. Hitting the SEARCH CONTACTS
button will search your iPhone’s
contacts for any QS1 users and
present them in a list.
7. The user can select which of these
contacts to add into their Vysk
contact list. Selections can be made
individually or by hitting select all.
Page 32
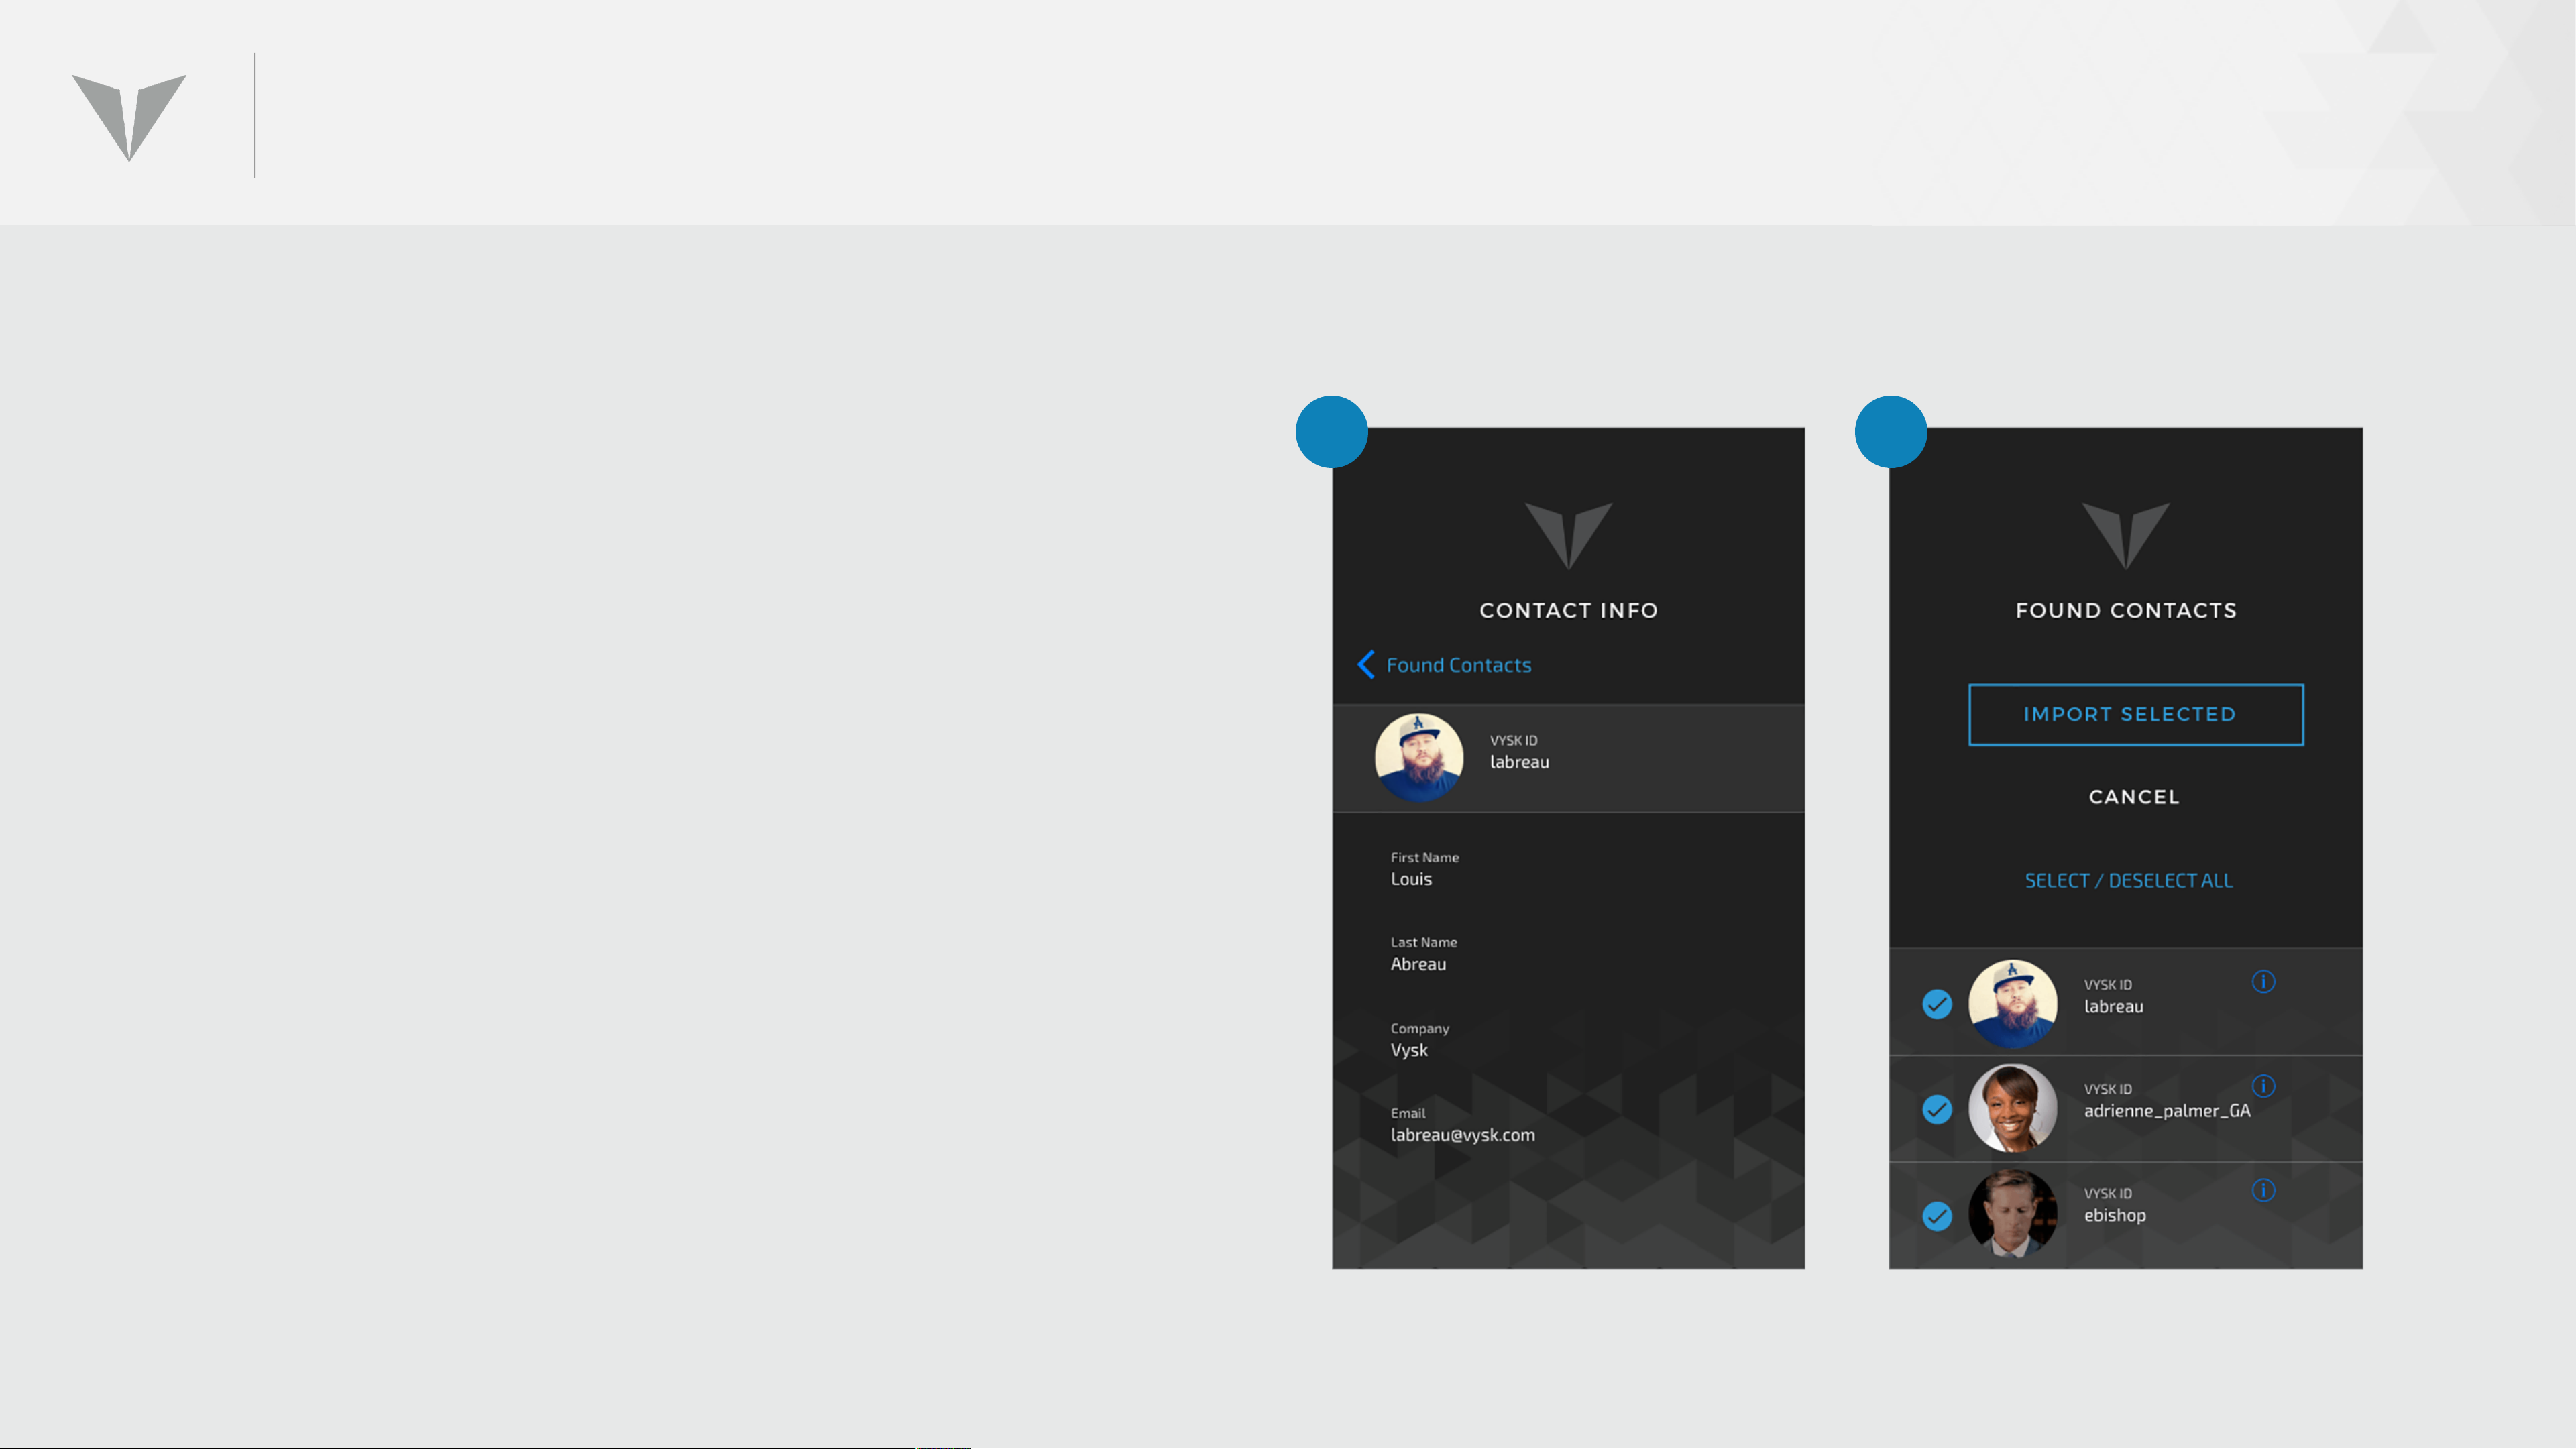
GETTING STARTED WITH THE VYSK VOICE APP (CONT’D)
8. To obtain more information about a
specific user, hit the info icon to access
the CONTACT INFO page.
9. Once you have selected the users you
wish to import, hit the IMPORT SELECTED
button. This will import the selected
users.
8
9
Page 33
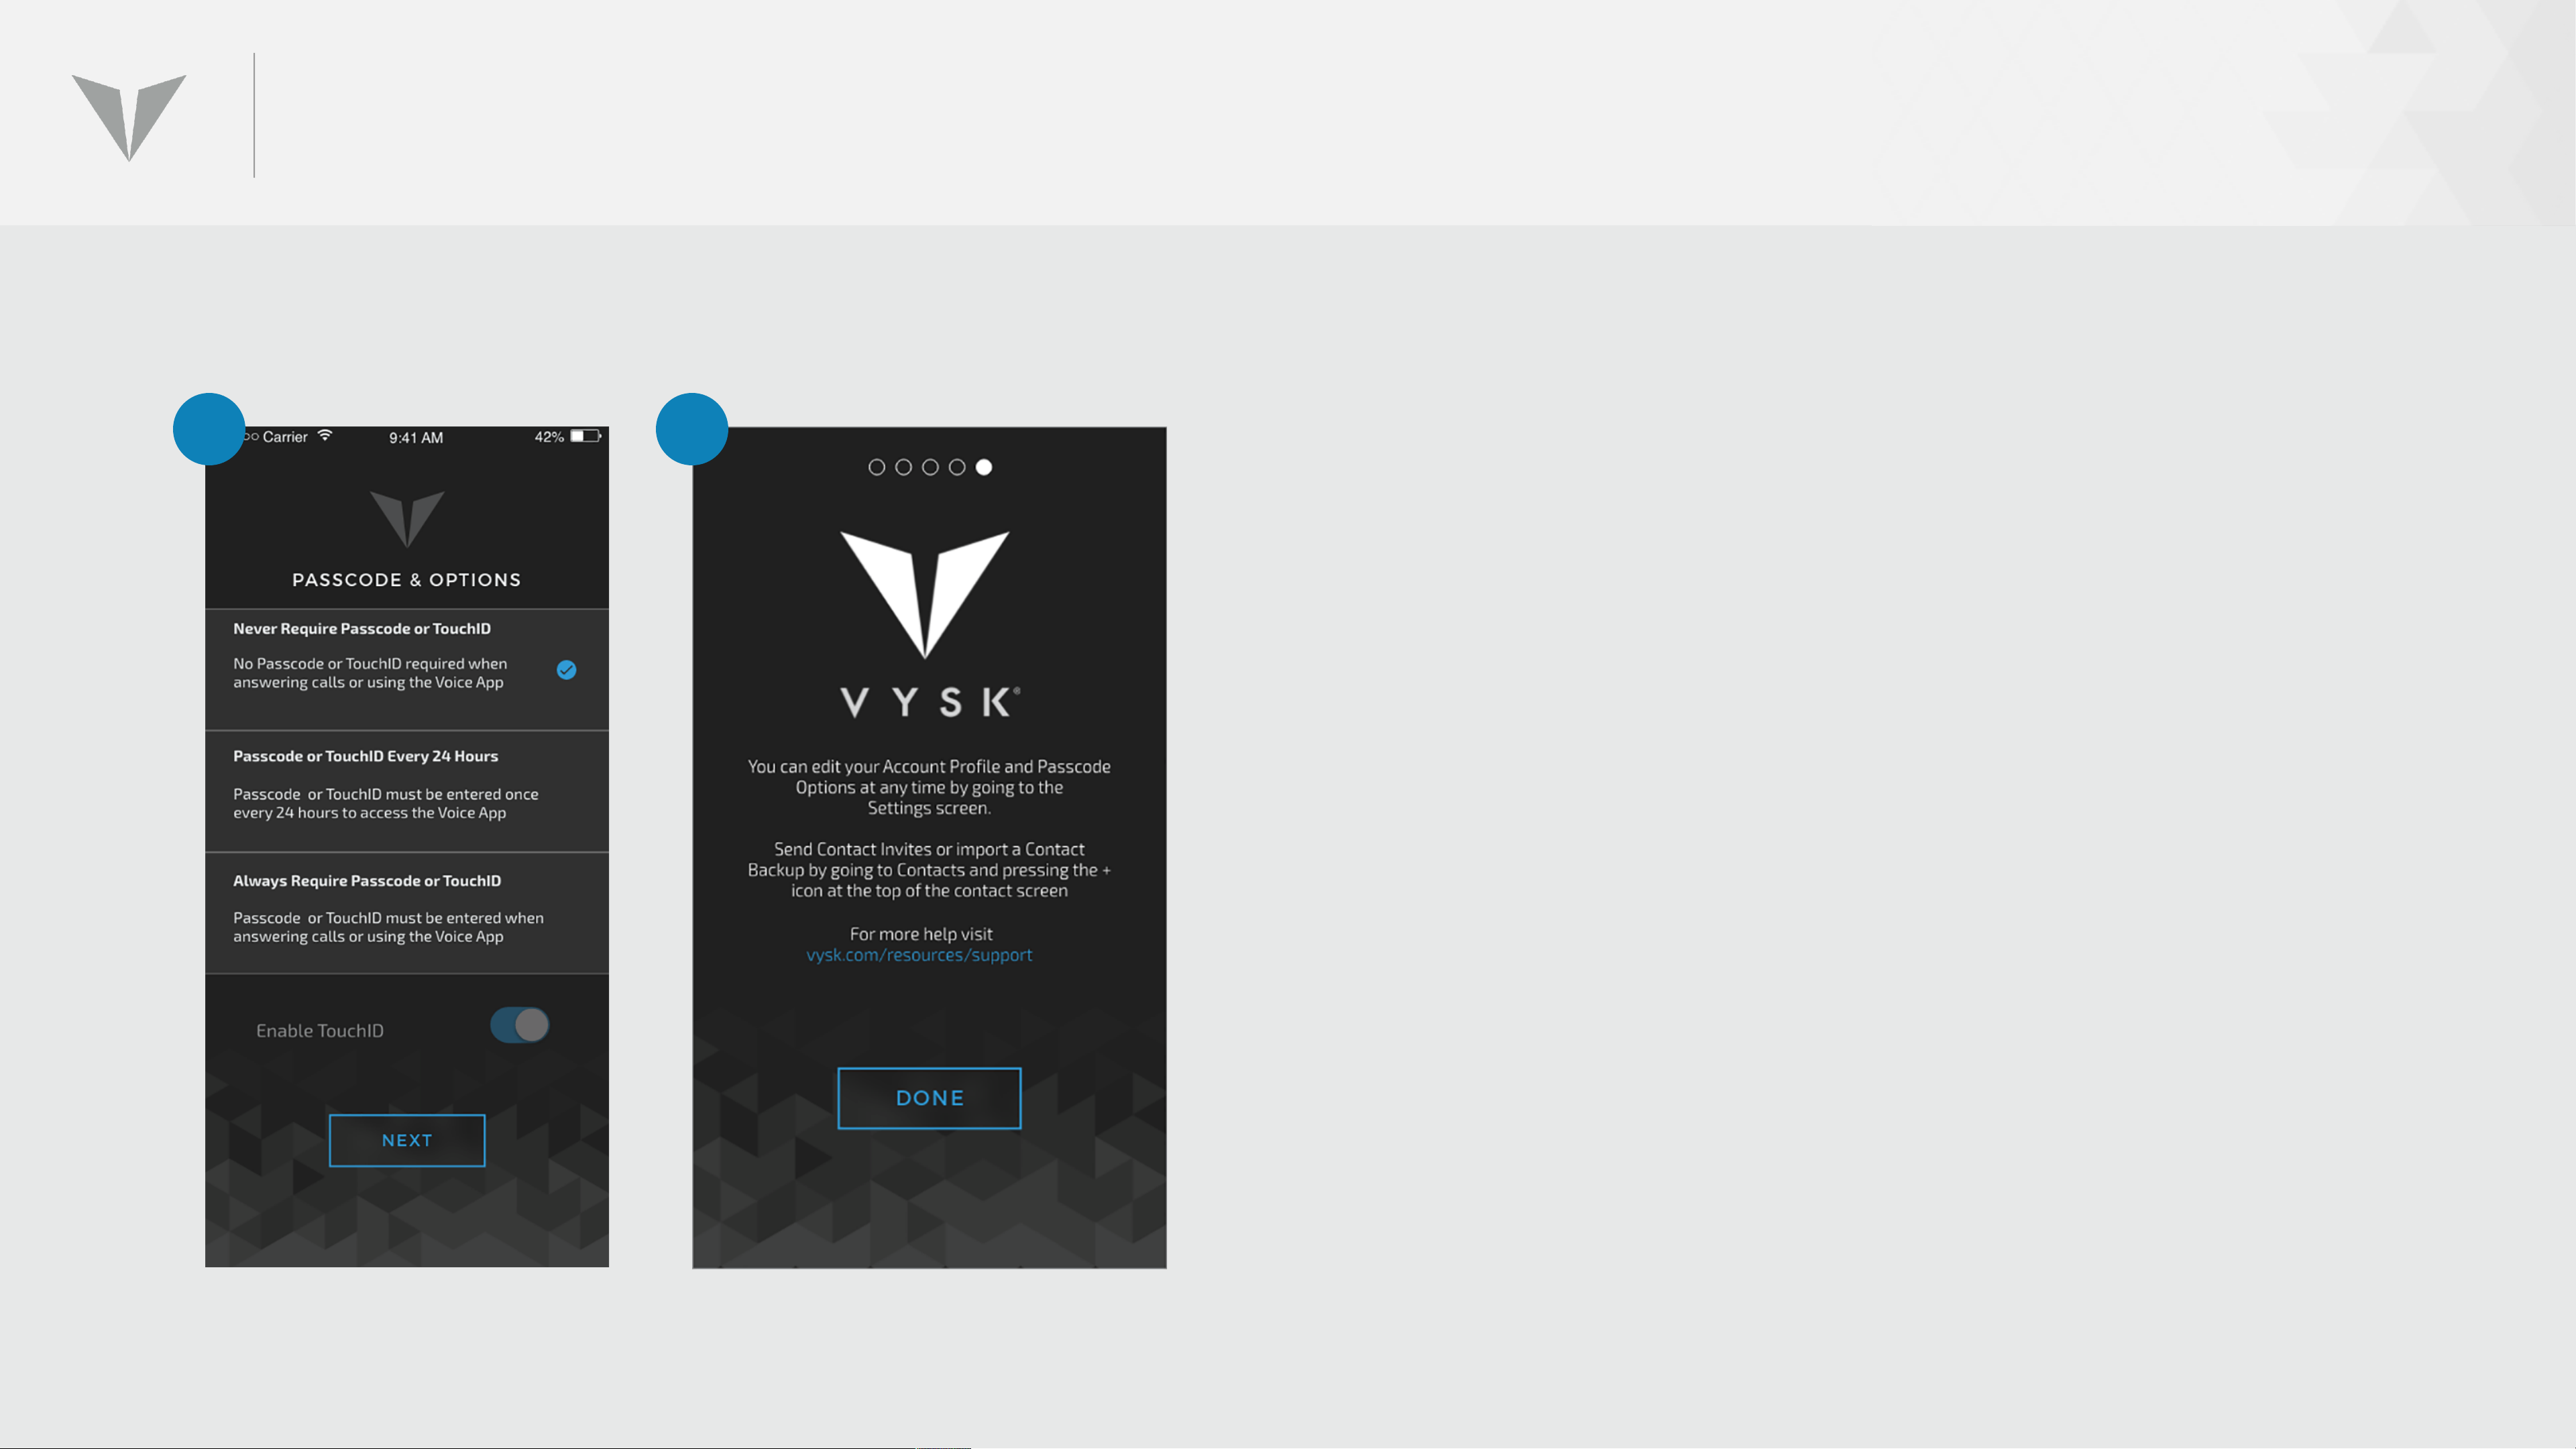
GETTING STARTED WITH THE VYSK VOICE APP (CONT’D)
10 11
10. QS1 users can select how frequently they
will be required to enter their Passcode
when accessing the app (Never, Every 24
Hours, Always) In addition, the user can
choose to use TouchID biometric by hitting
the Enable TouchID toggle switch to enable
this feature. Hit NEXT to save your passcode
options to your settings.
11. Hit DONE to complete the onboarding
process.
Page 34

UPDATING THE APP
Page 35
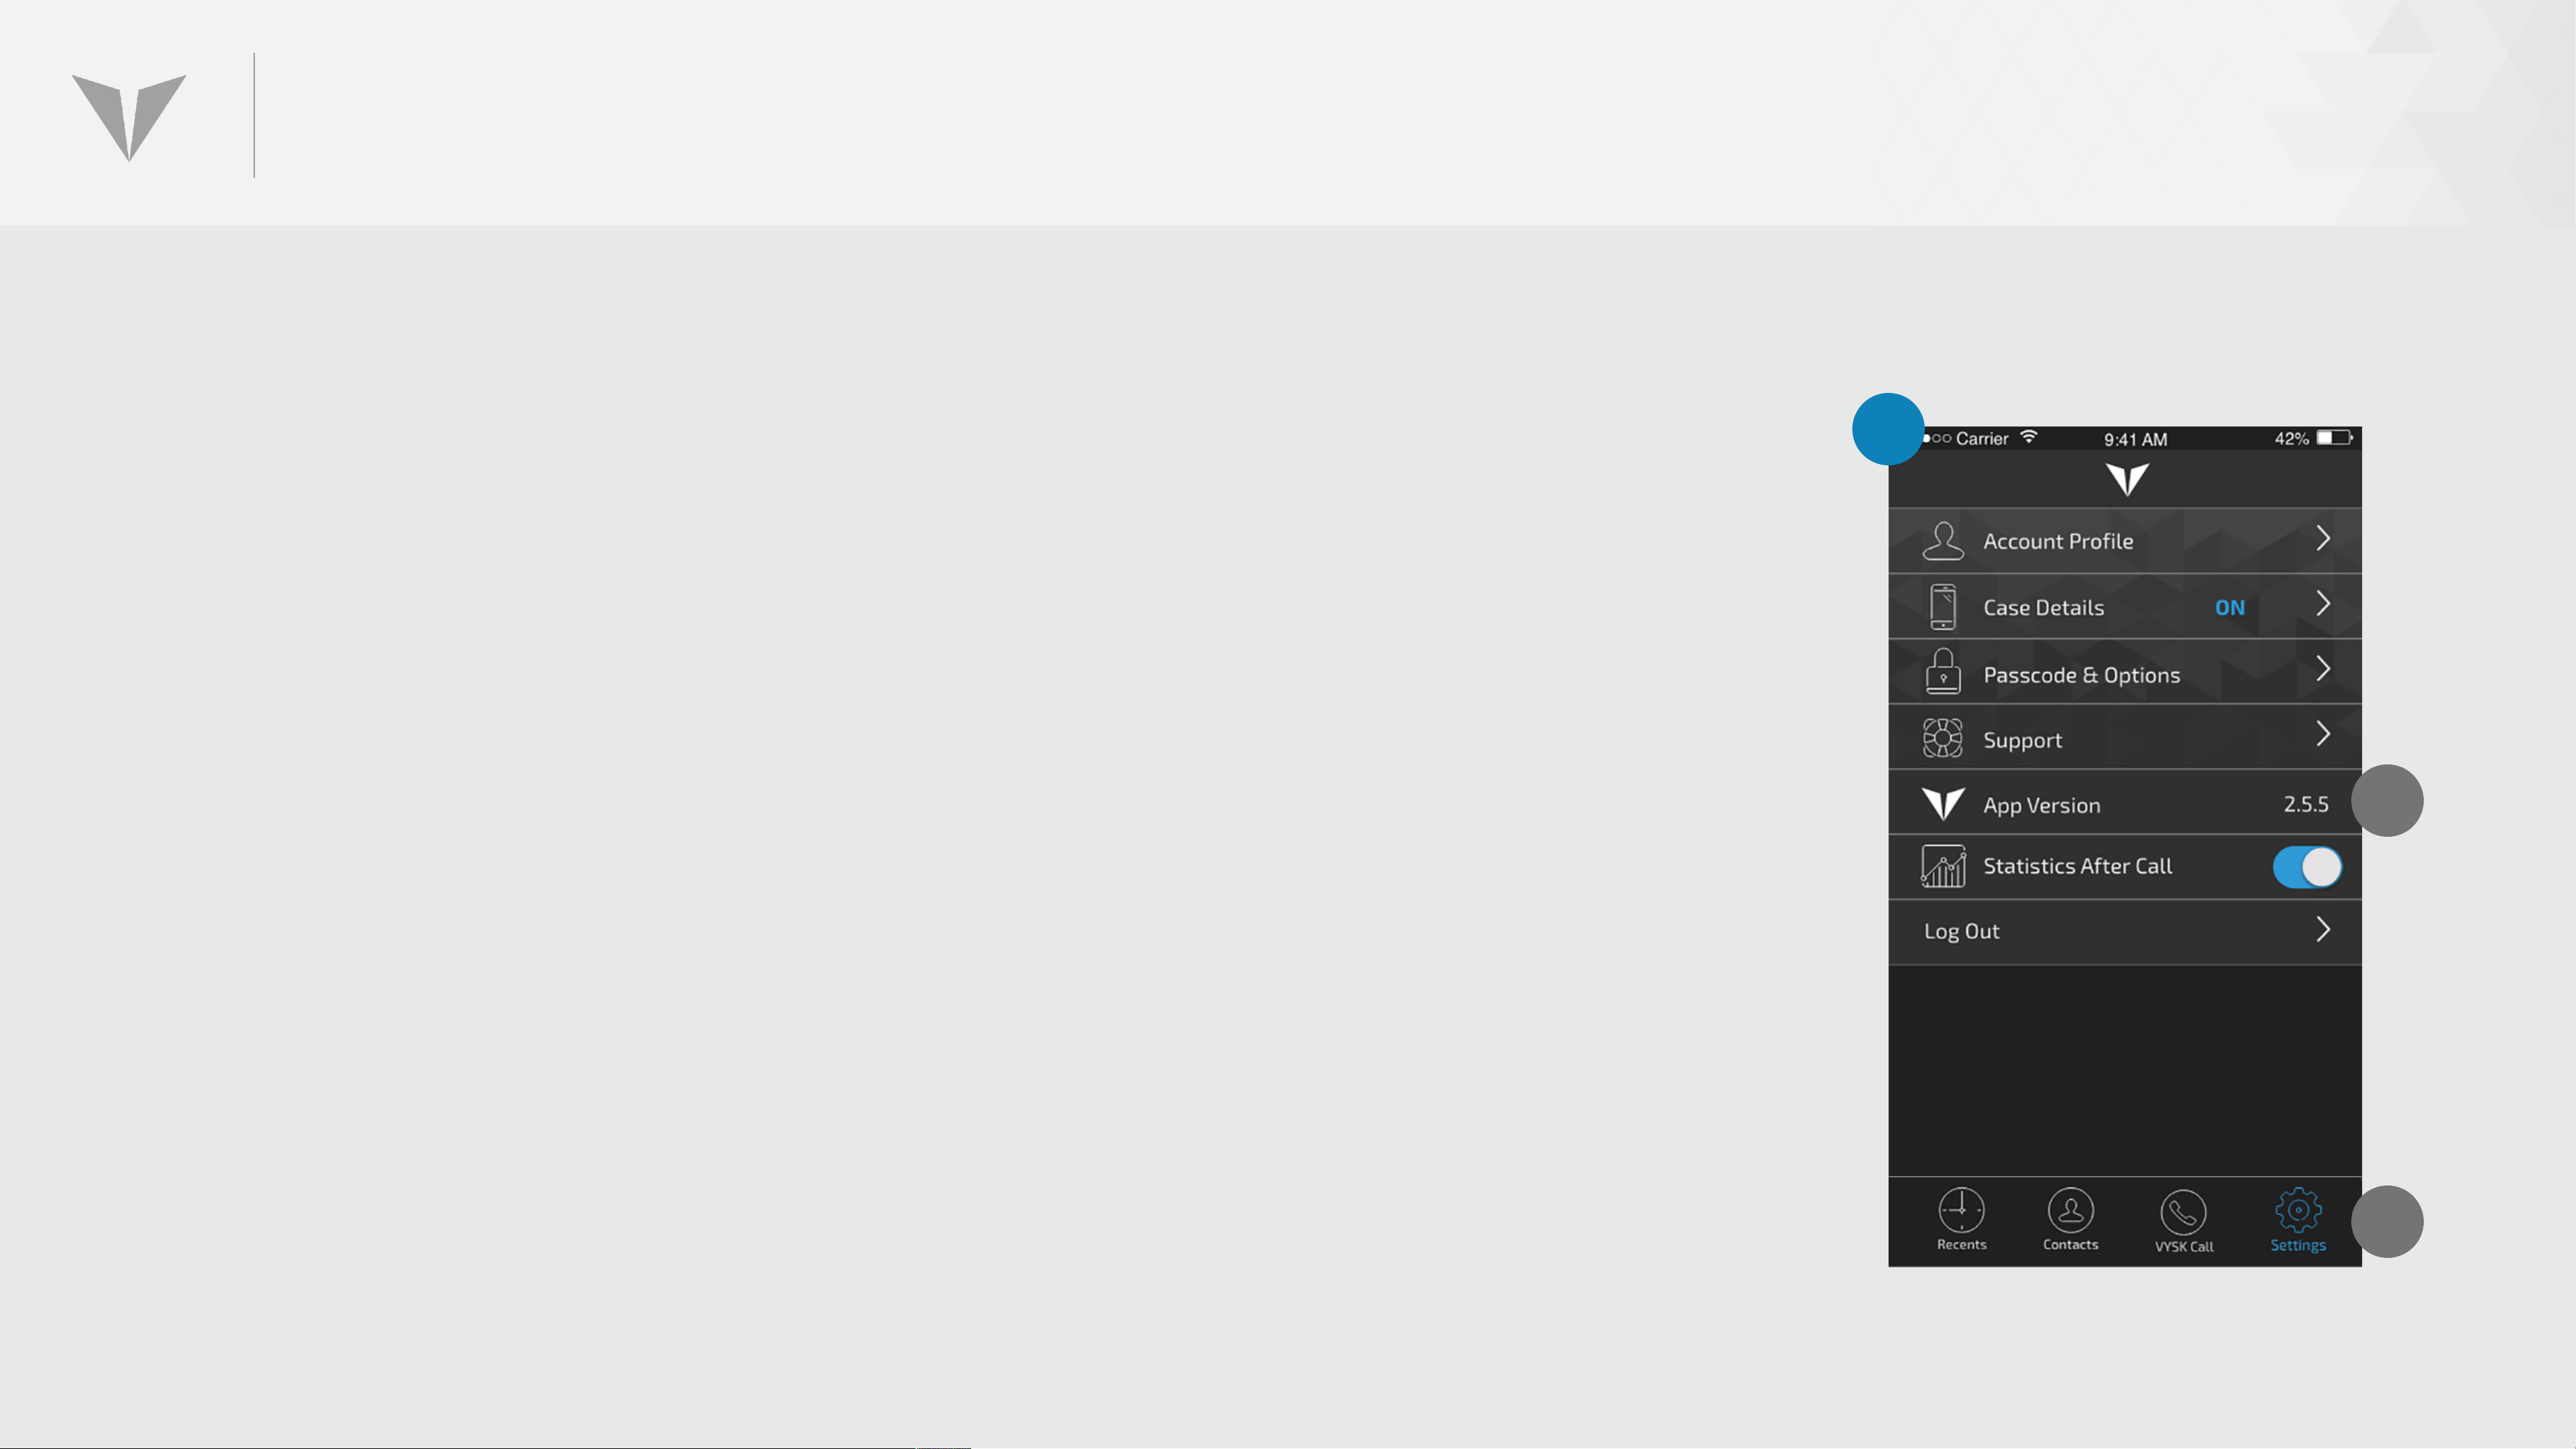
UPDATING THE APP
The currently installed version of the Vysk Voice App is viewable by
clicking on the Settings (A) icon in the Vysk Voice App toolbar. The
App Version appears on the fifth line of the menu (App Version). (B)
If the Vysk Voice App version is incorrect, download the newest
version using the instructions on the preceding pages.
The user does not need to delete the current App in order to update
1
B
it; the new App download will overwrite the old version.
Note: Users will receive an in-app (“push”) notification when a new
App version is released.
A
Page 36

UPDATING THE FIRMWARE
Page 37
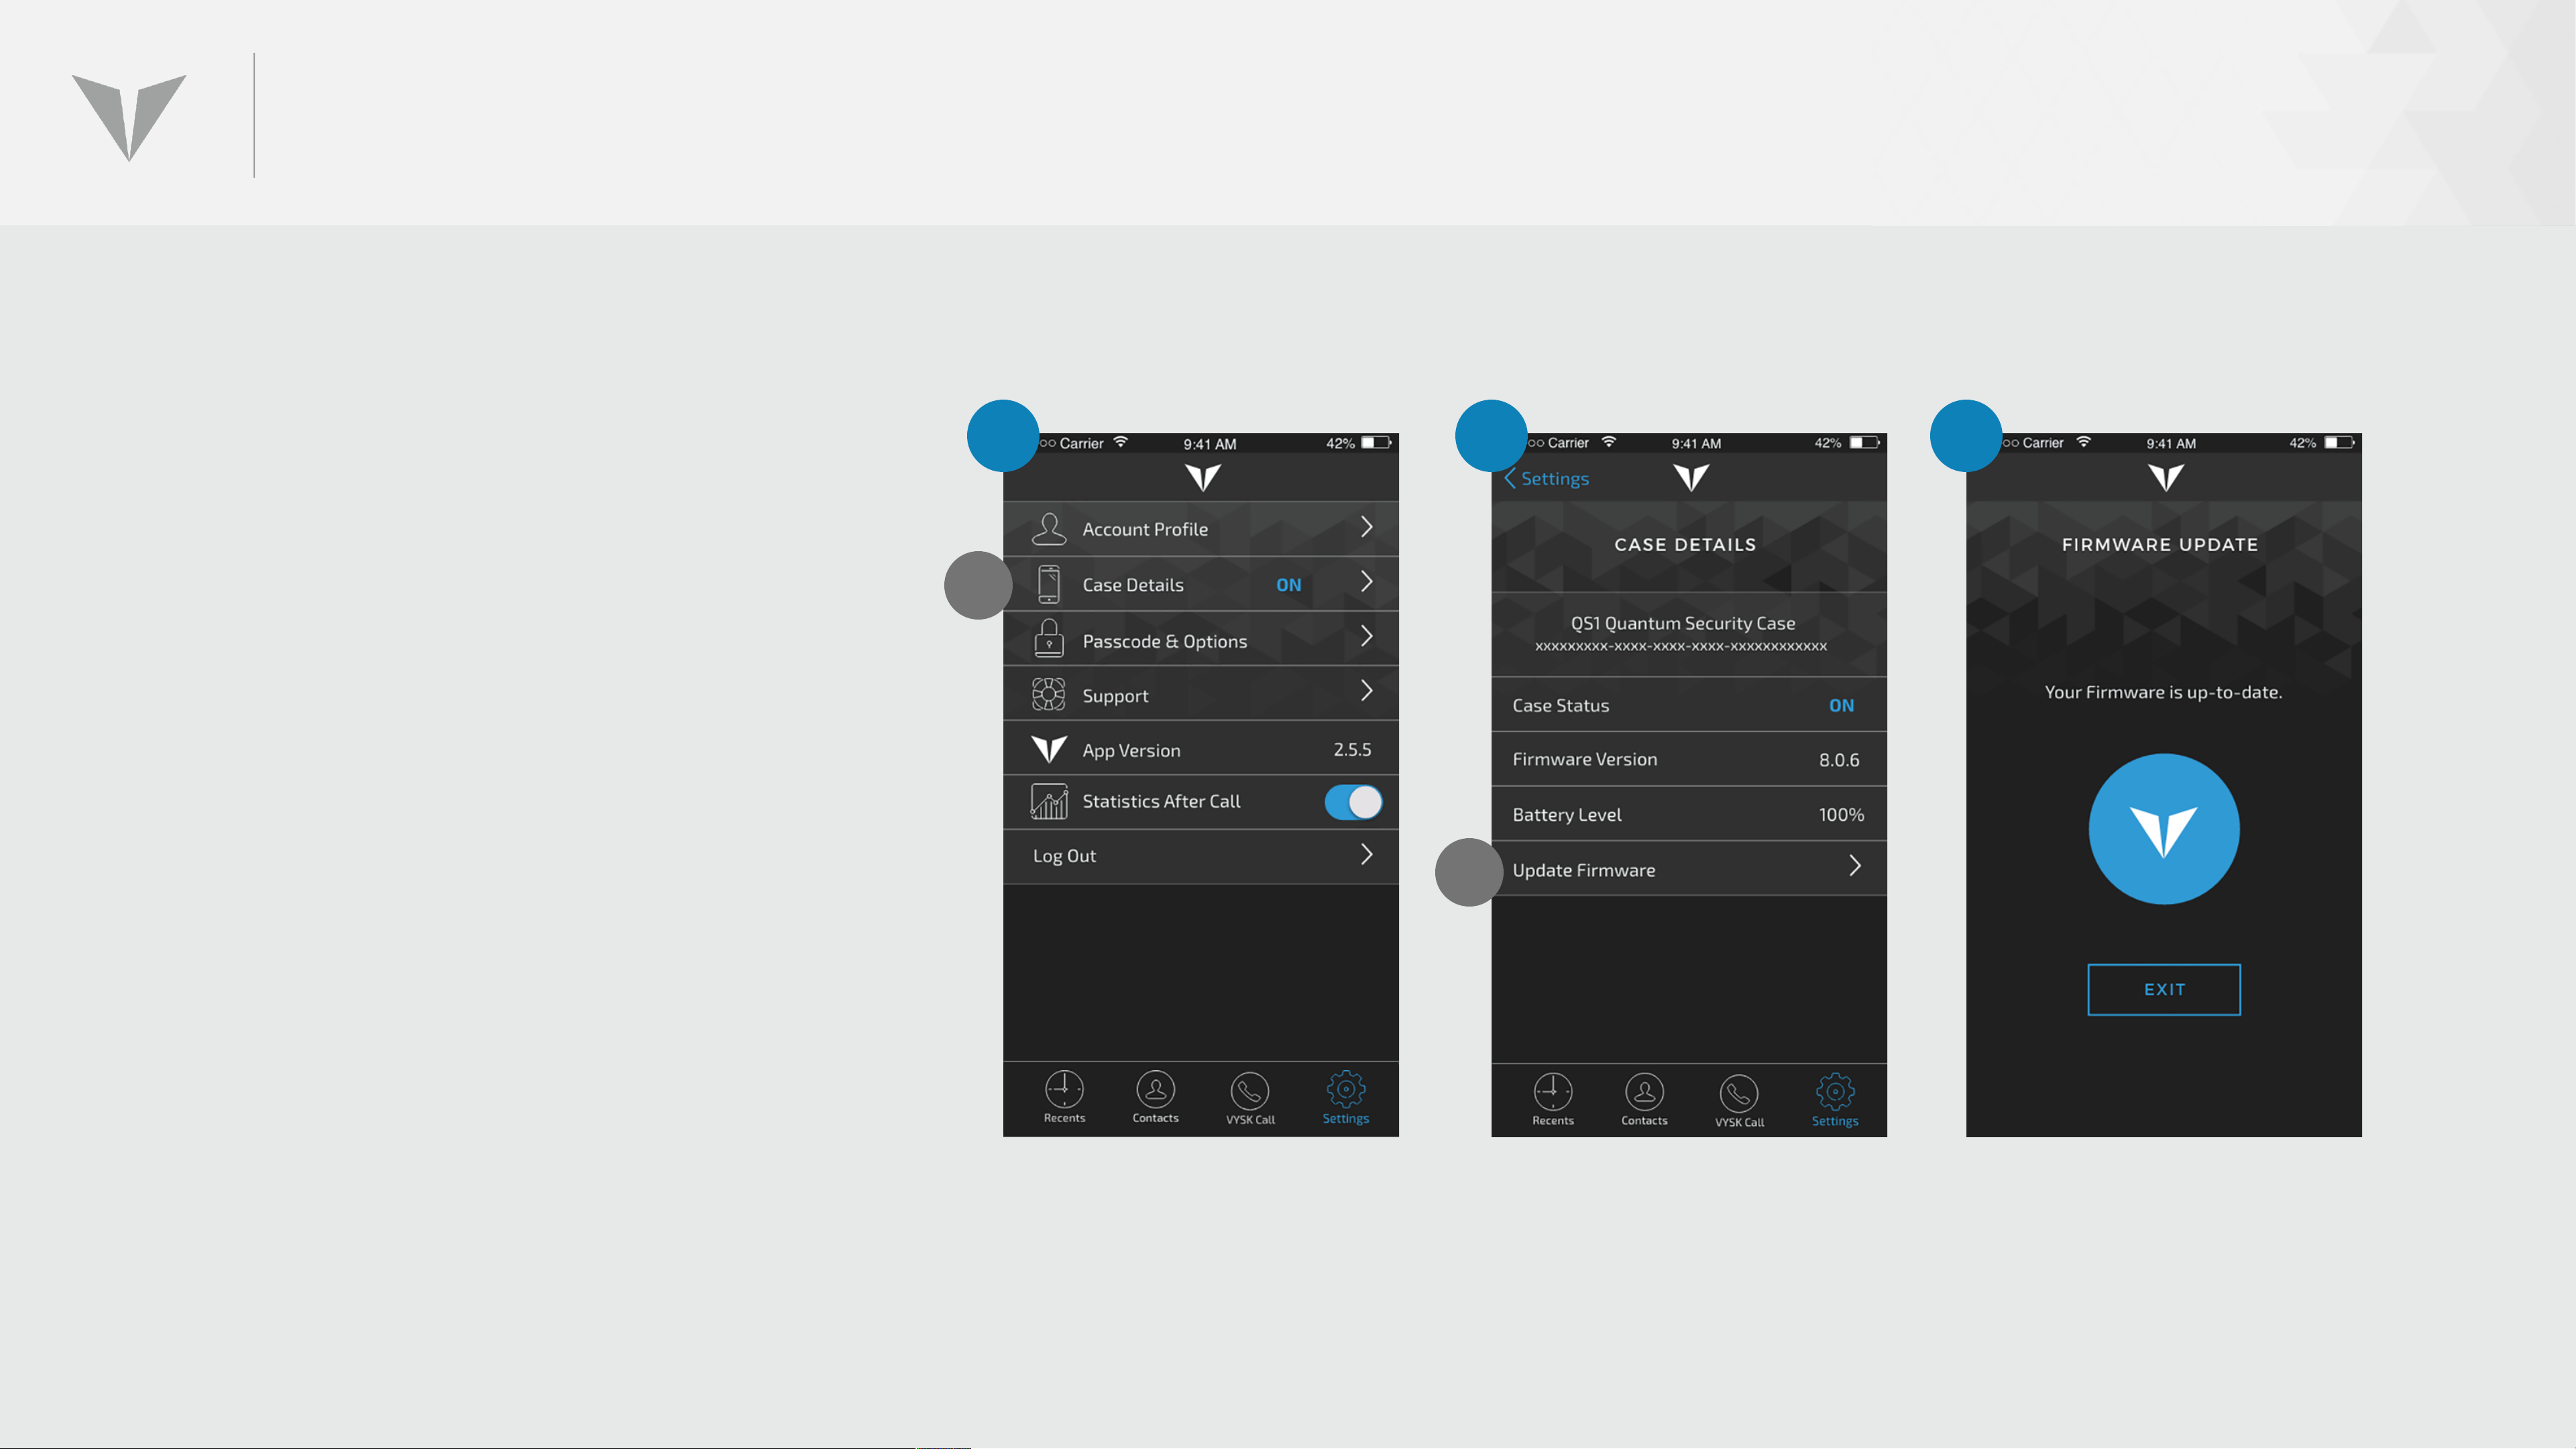
UPDATING THE FIRMWARE
1. To view the current version of
loaded firmware in the QS1, click on
Case Details (A) from the Settings
screen.
2. If the firmware version is not
current, click on the Update
Firmware (B) menu option and the
1 2 3
A
system will automatically
download and update the firmware.
3. During the update process, the
blue VYSK lights will cycle on the
rear of the case and the blue LED on
front of the QS1 will illuminate.
Once the firmware update is
B
IMPORTANT NOTE: DO NOT detach the QS1 while
complete, the case will restart
automatically.
firmware update is taking place.
Page 38
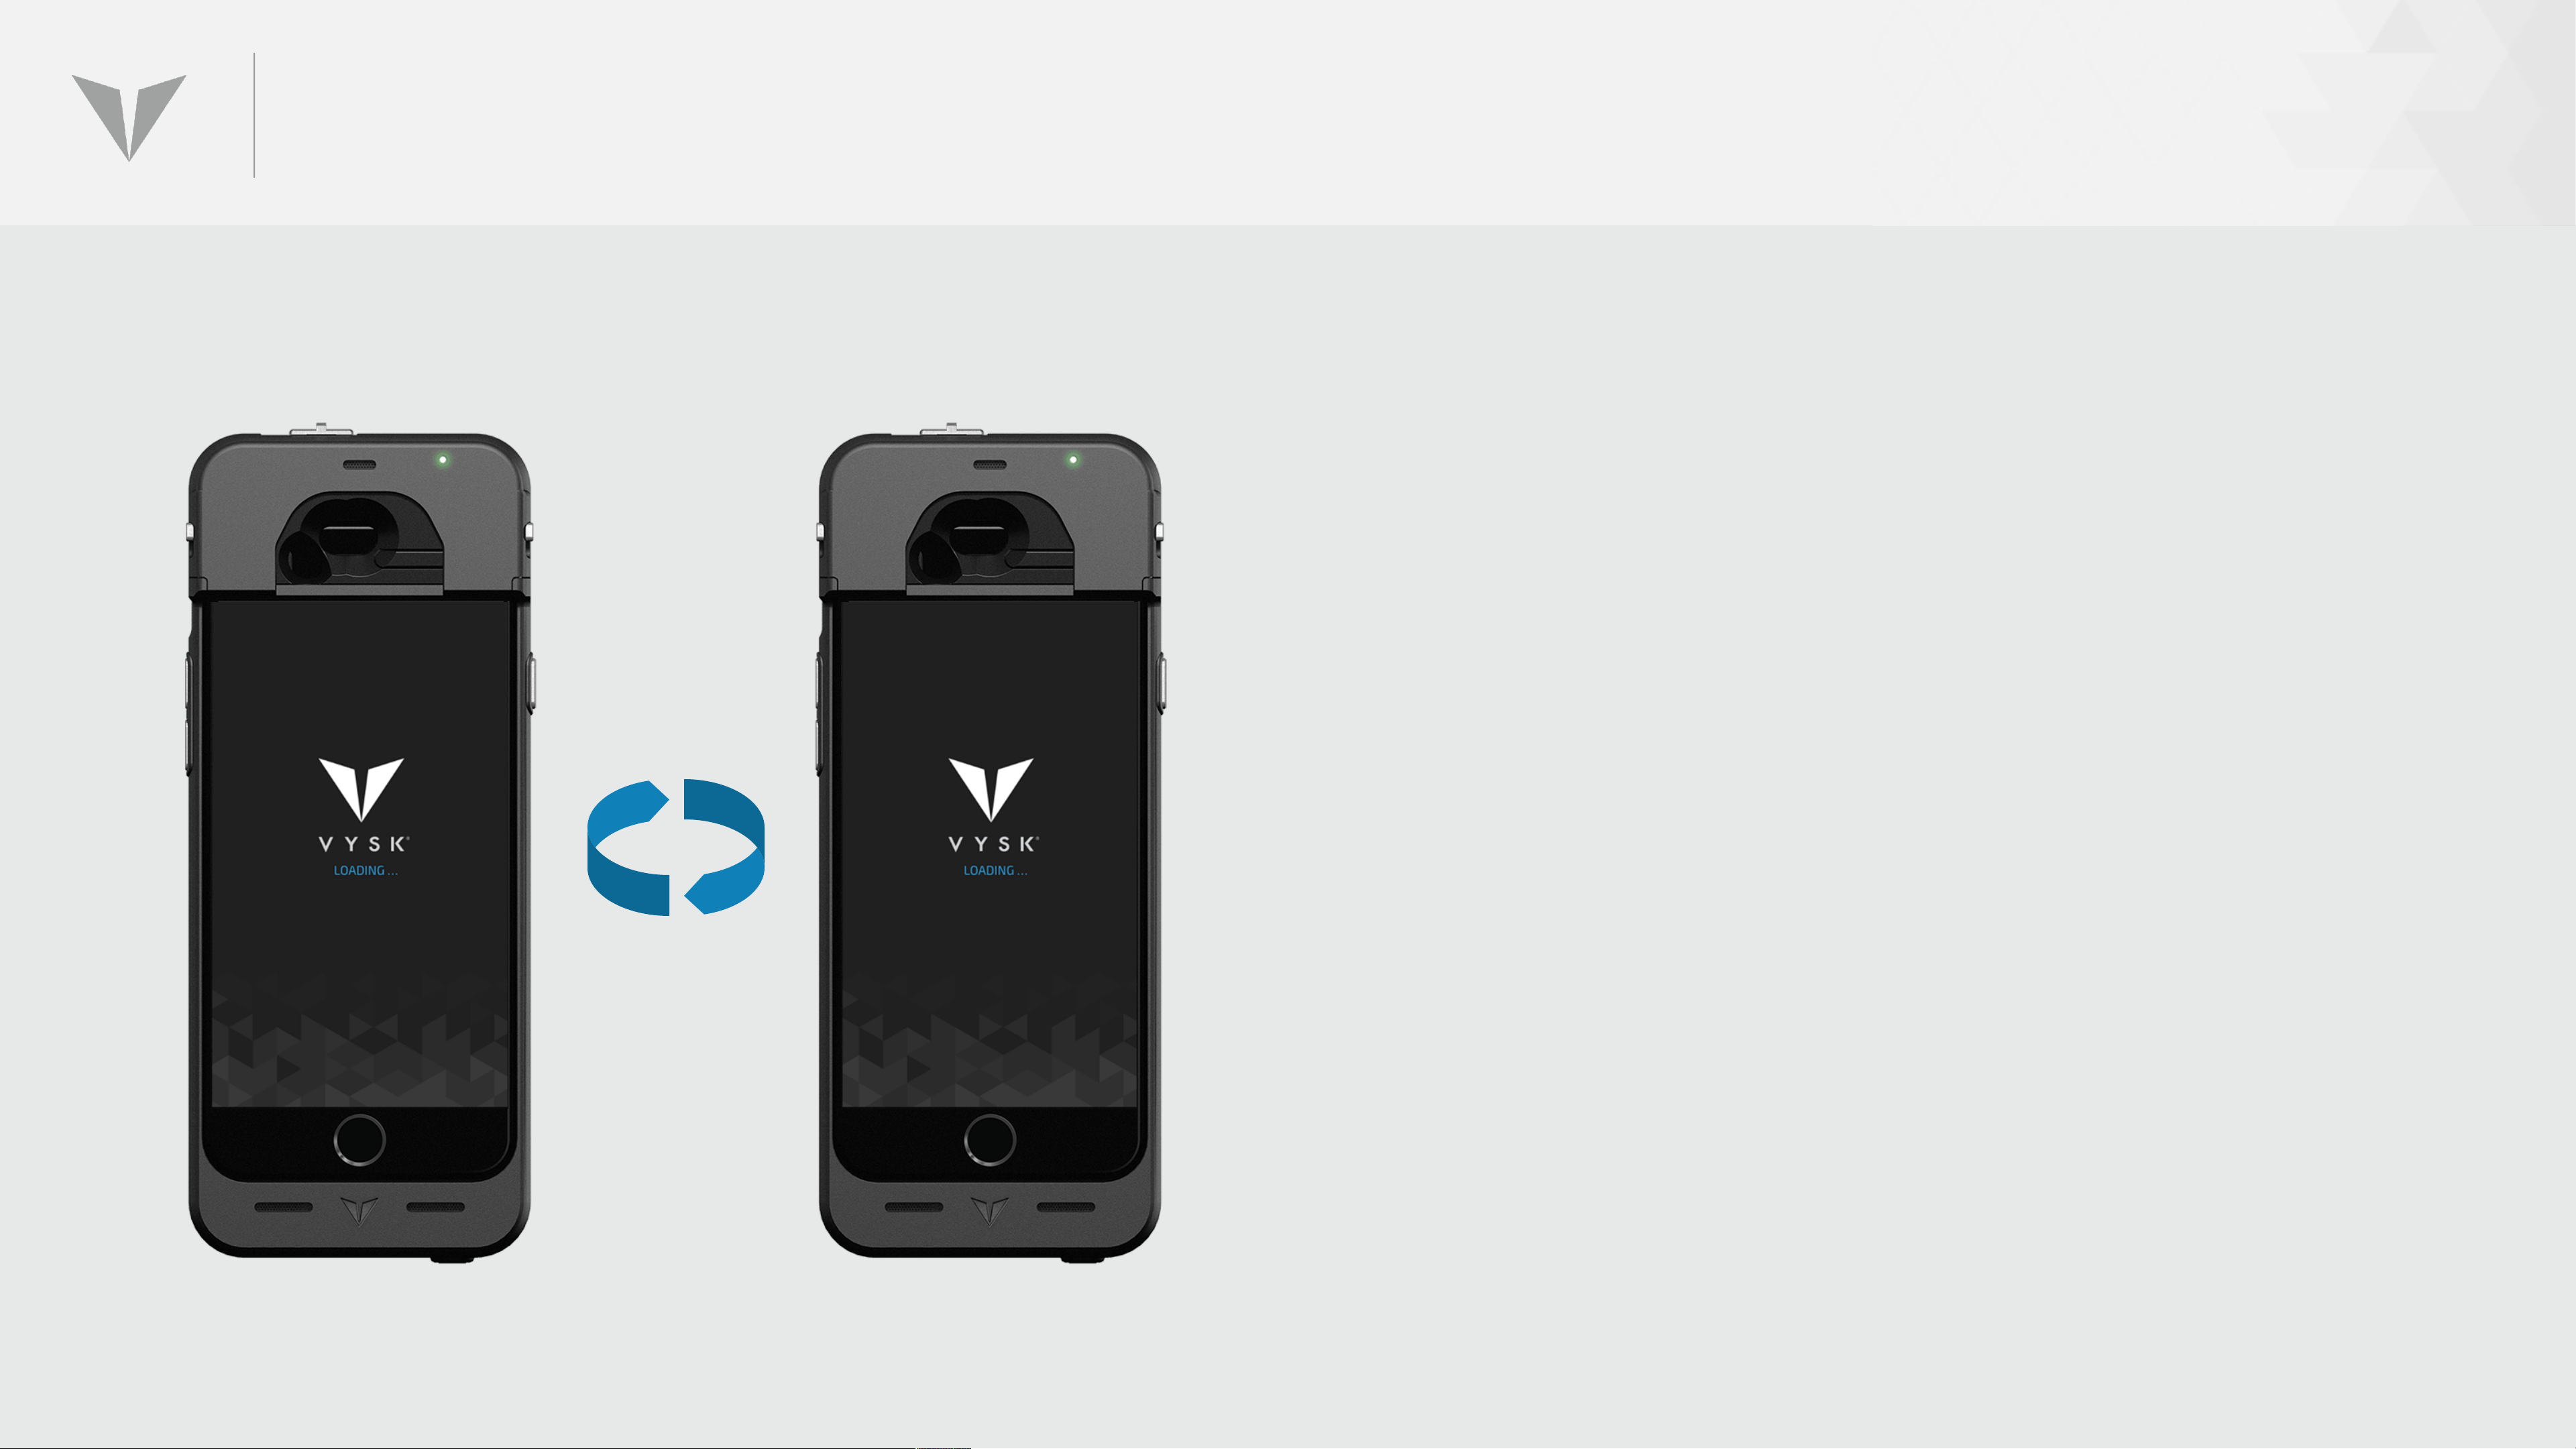
FORWARD/BACKWARD COMPATIBILITY
Ideally, users should always have the most current
version of Vysk software and firmware on their devices
to ensure they have the most up-to-date features and
functions on their QS1s.
There are no forward or backward compatibility issues
with firmware release number 8.0.x (starting with
8.0.0-beta_bn.16). Also, the voice app will always
support one prior version.
Any combinations of these releases on both ends of the
call will allow for successful secure voice calls.
Page 39

LOGGING INTO THE VYSK VOICE APP
Page 40
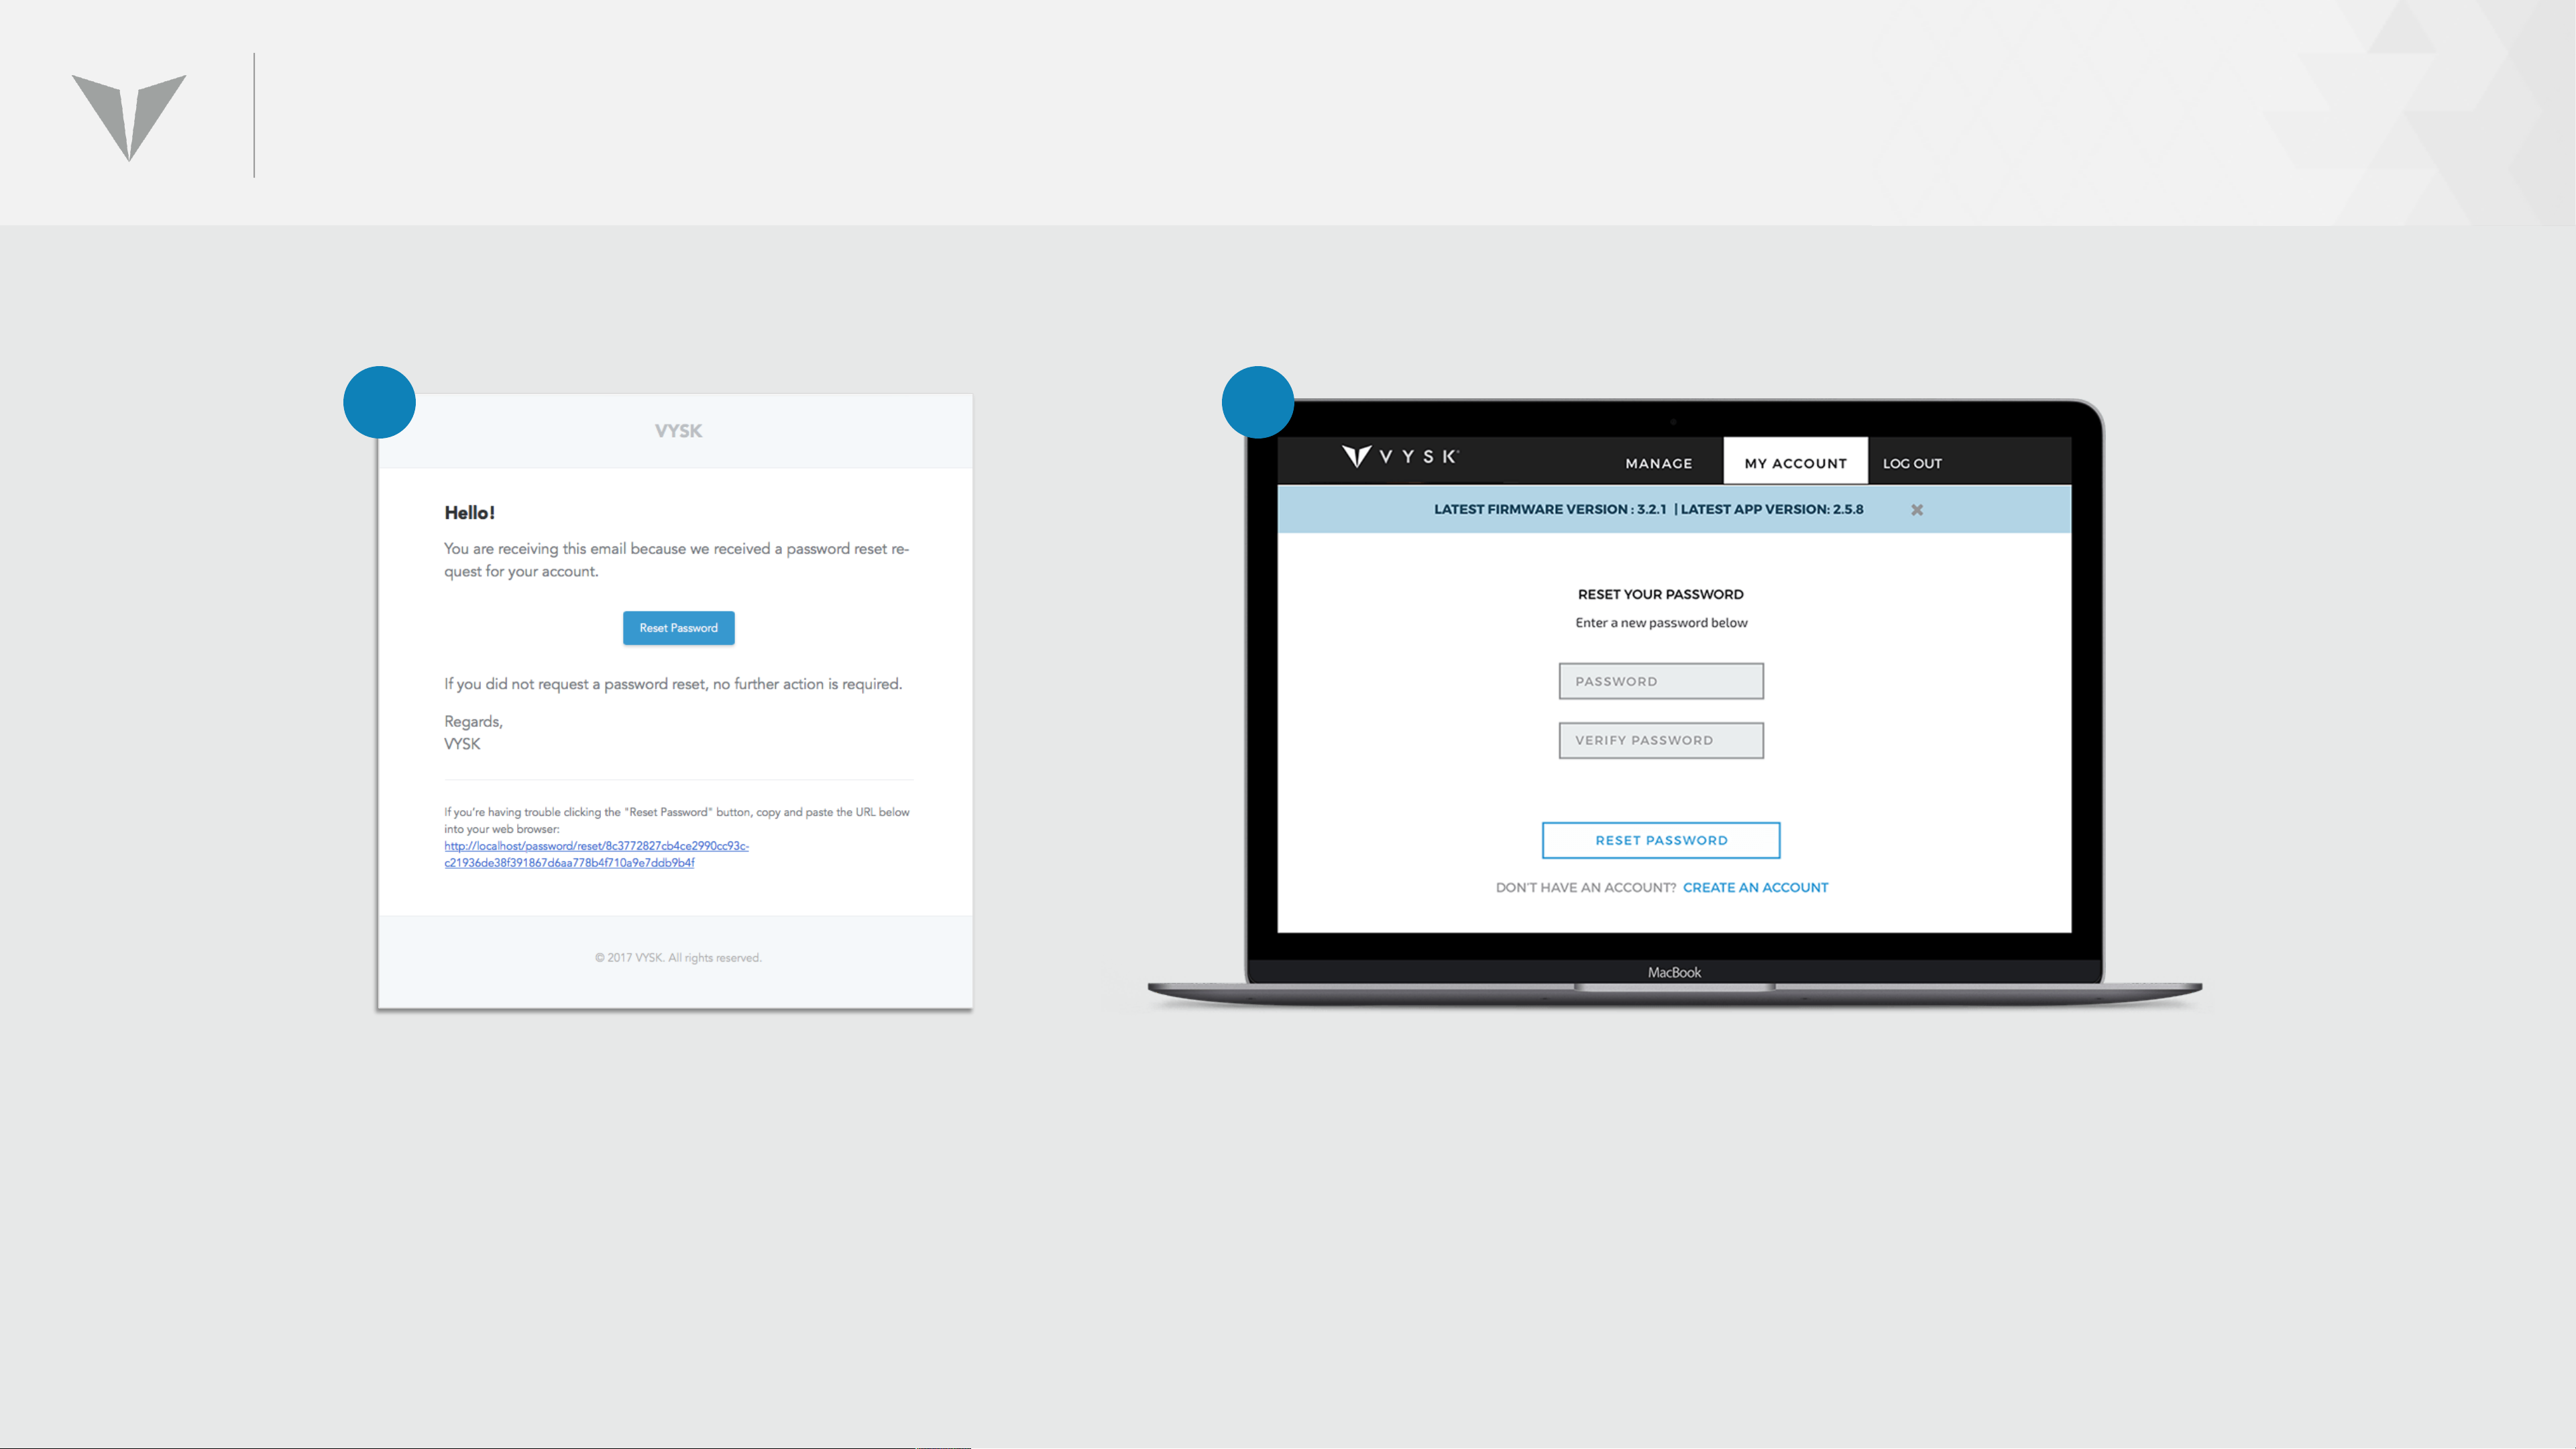
PASSWORD RESET
1 2
1. Upon receiving the password reset email, click on Reset Password.
2. A screen in the QS1 admin portal will open to allow users to enter a new password. After the new
password is entered (8-character min length, entered twice), click on RESET PASSWORD. Login can
now be completed with the new password.
Page 41
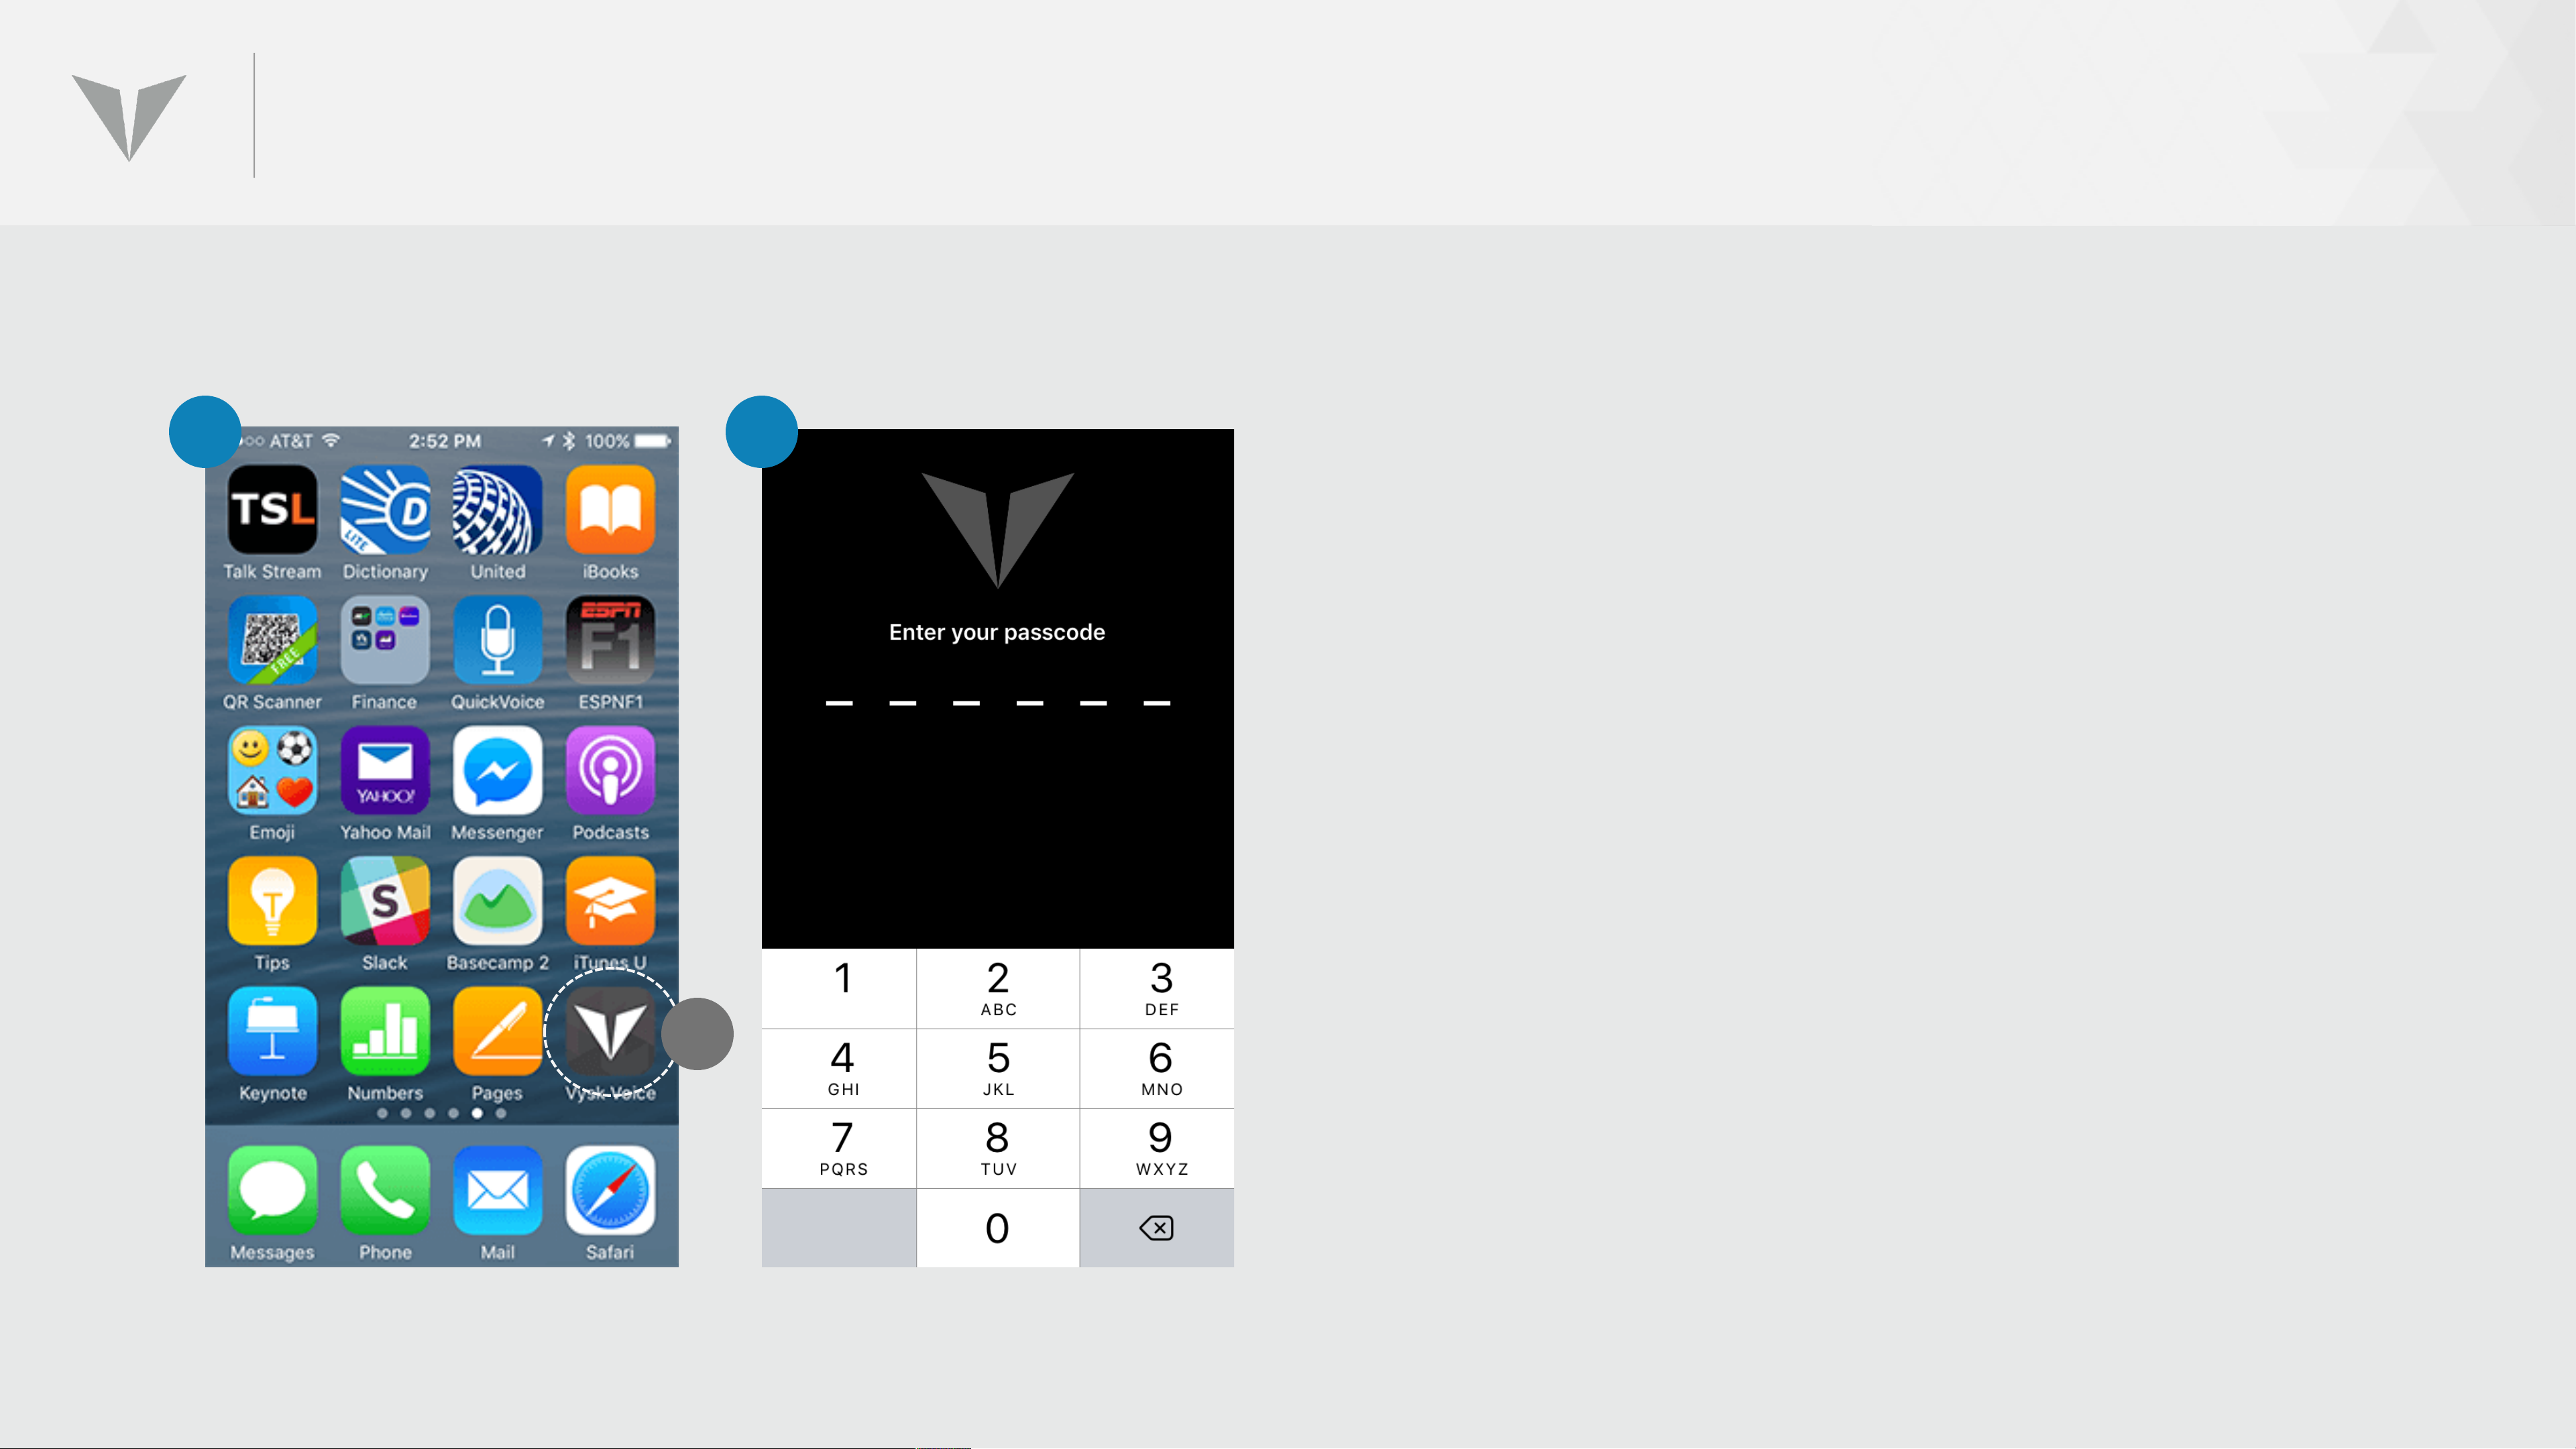
LOGGING INTO THE VYSK VOICE APP
1 2
1. To begin using the App, click on the Vysk
Voice App icon (A).
2. The passcode screen will then open if the
user has opted to require a passcode.
A
Page 42
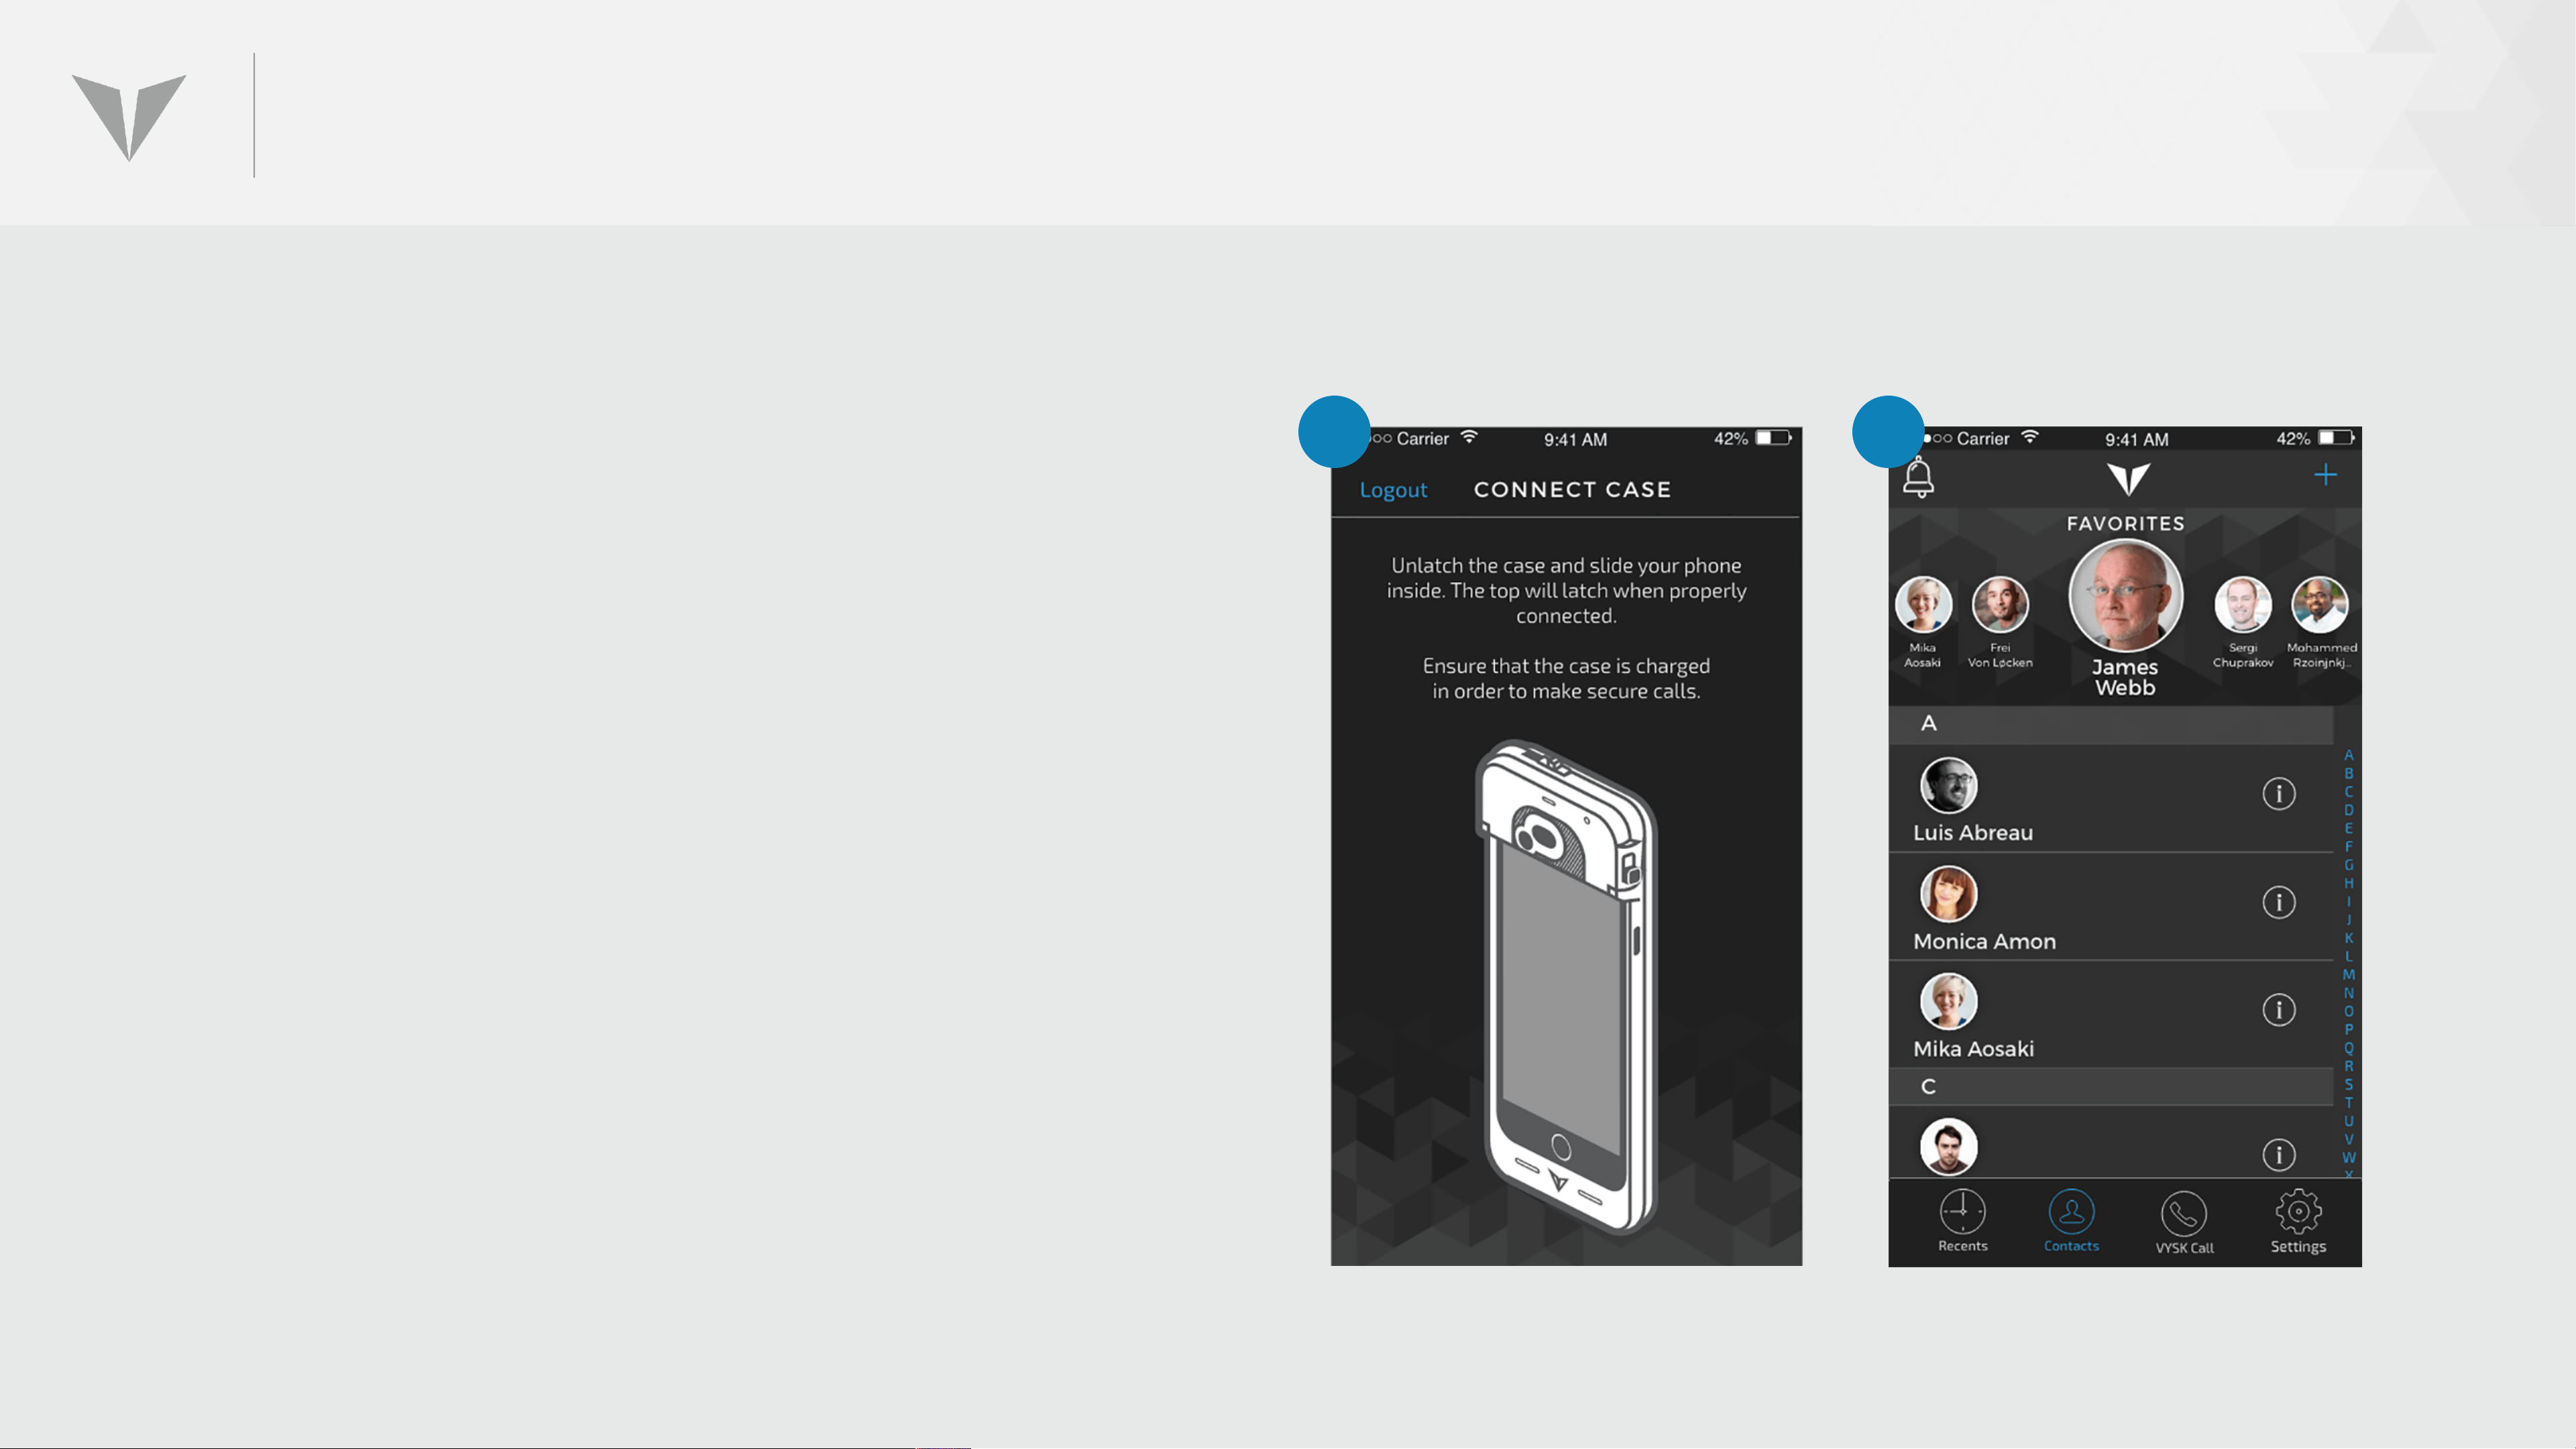
LOGGING INTO THE VYSK VOICE APP (CONT’D)
3. Once the 6-digit passcode is entered, if
the case is not connected, a screen will
appear prompting the user to do so
4. Once the app detects that the case is
connected, the Vysk Voice App Contacts
screen will appear
3 4
Page 43
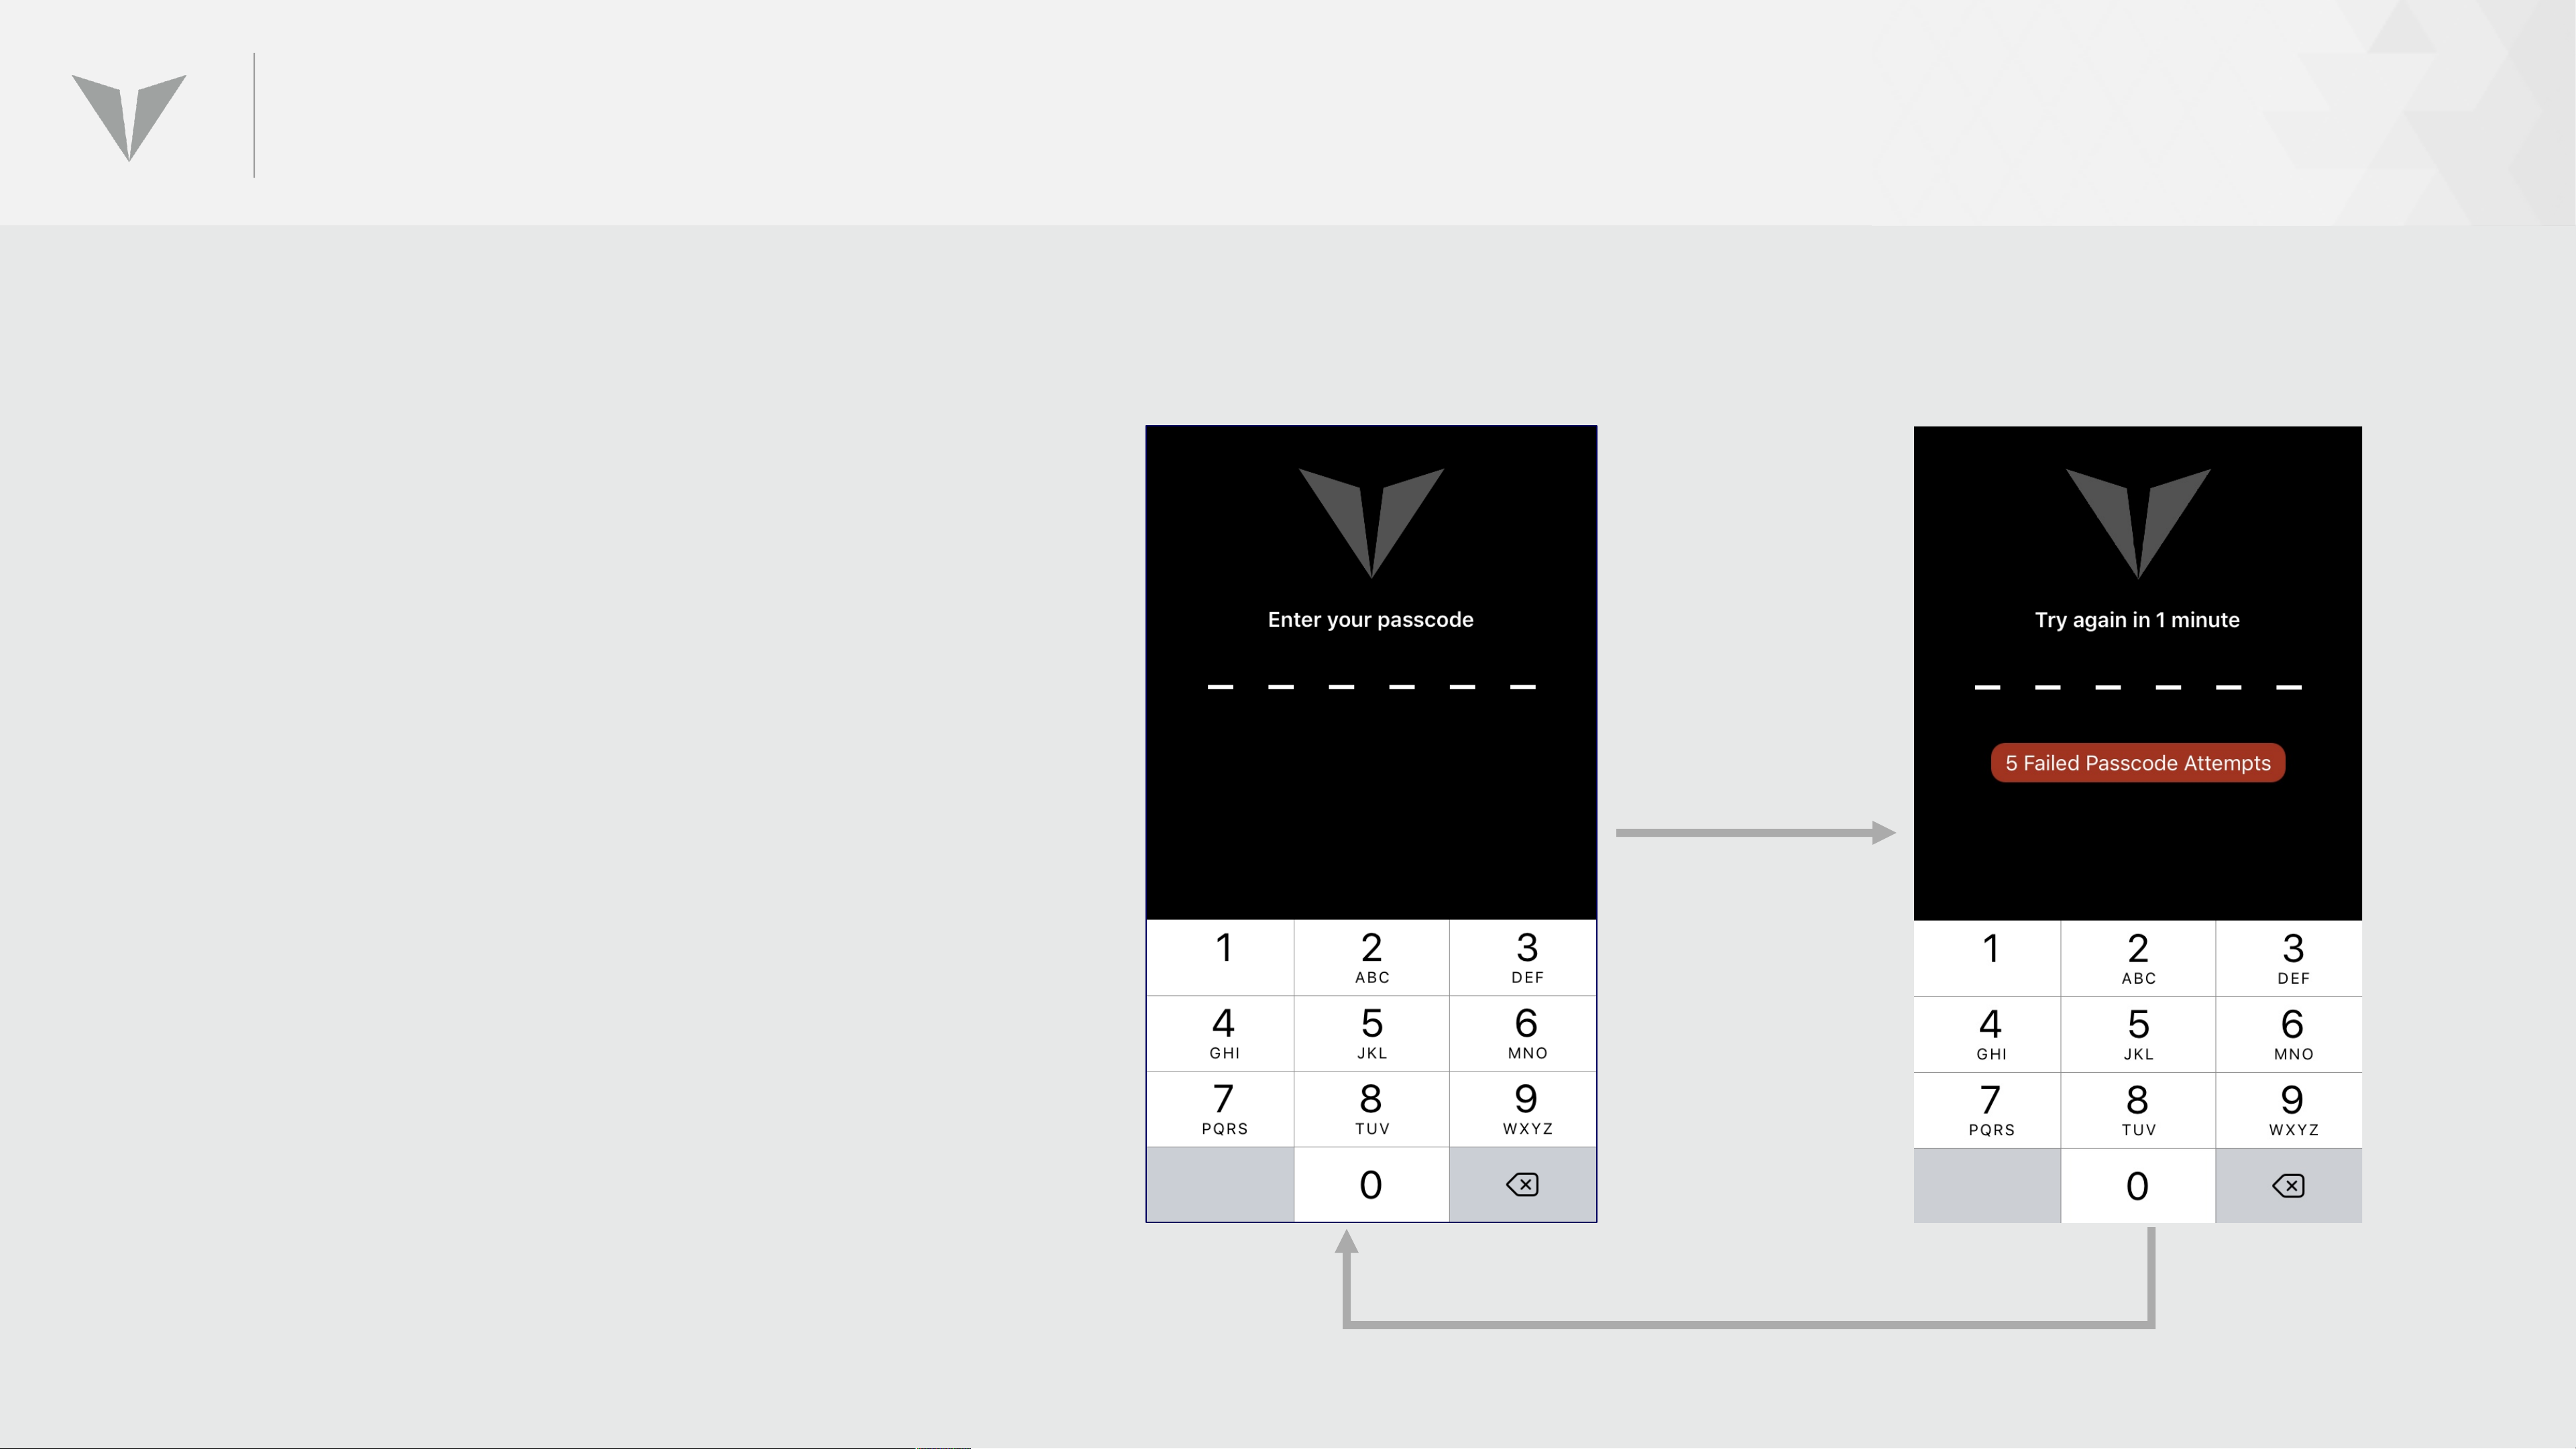
PASSCODE LOCK
The QS1 requires a six-character passcode
upon log-in for maximum security. If the
user attempts to enter five consecutive
incorrect passcodes, the app will lock and
prohibit further attempts.
In order to login after a lock-out, wait 1
minute, then retry. Once in the app, user can
manually log out at any time by clicking
5 wrong
passcodes
Settings>Account Options>Log Out.
Wait 1 minute, retry
Page 44

REBOOTING & RESTARTING
Page 45
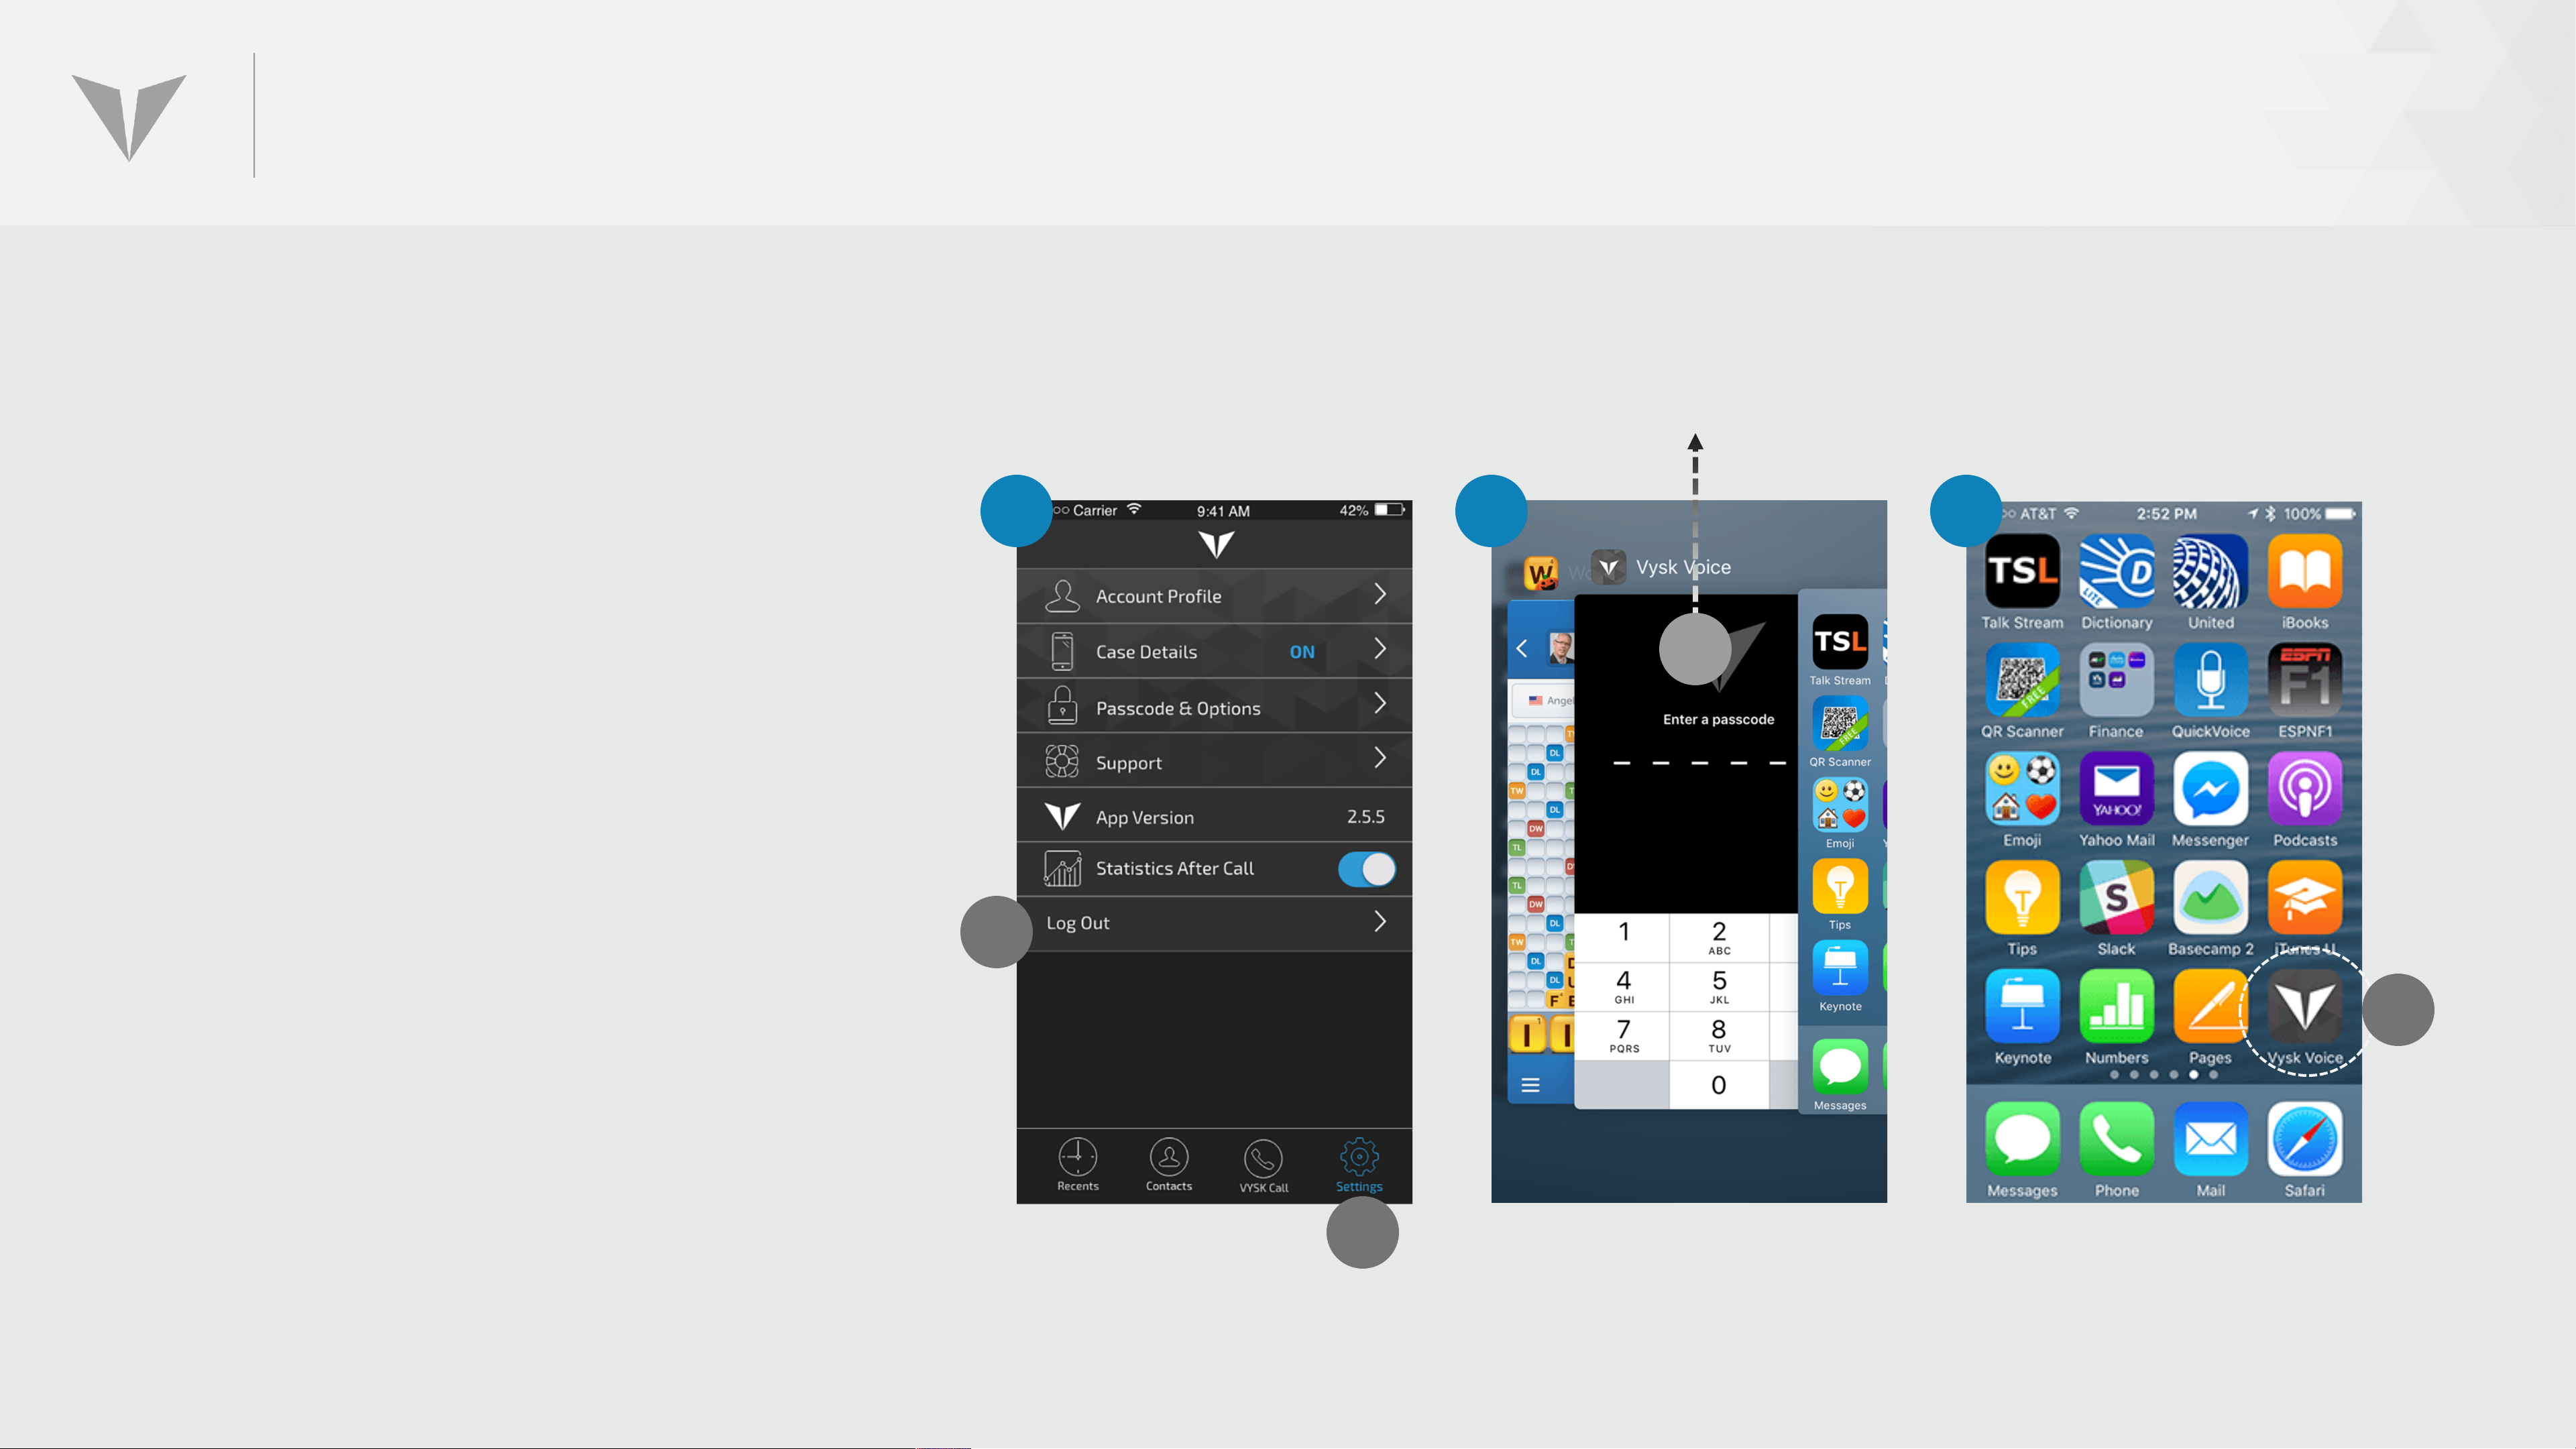
REBOOTING THE VYSK VOICE APP
To reboot the App:
1. Log out of the Vysk Voice App
by clicking on Settings (A) and
then click Log Out (B).
2. Double click the iPhone main
function button. Shut down the
1 2 3
C
App by swiping up from the
iPhone (C).
3. Click on the Vysk Voice App icon
(D) and log back in.
B
D
A
Page 46
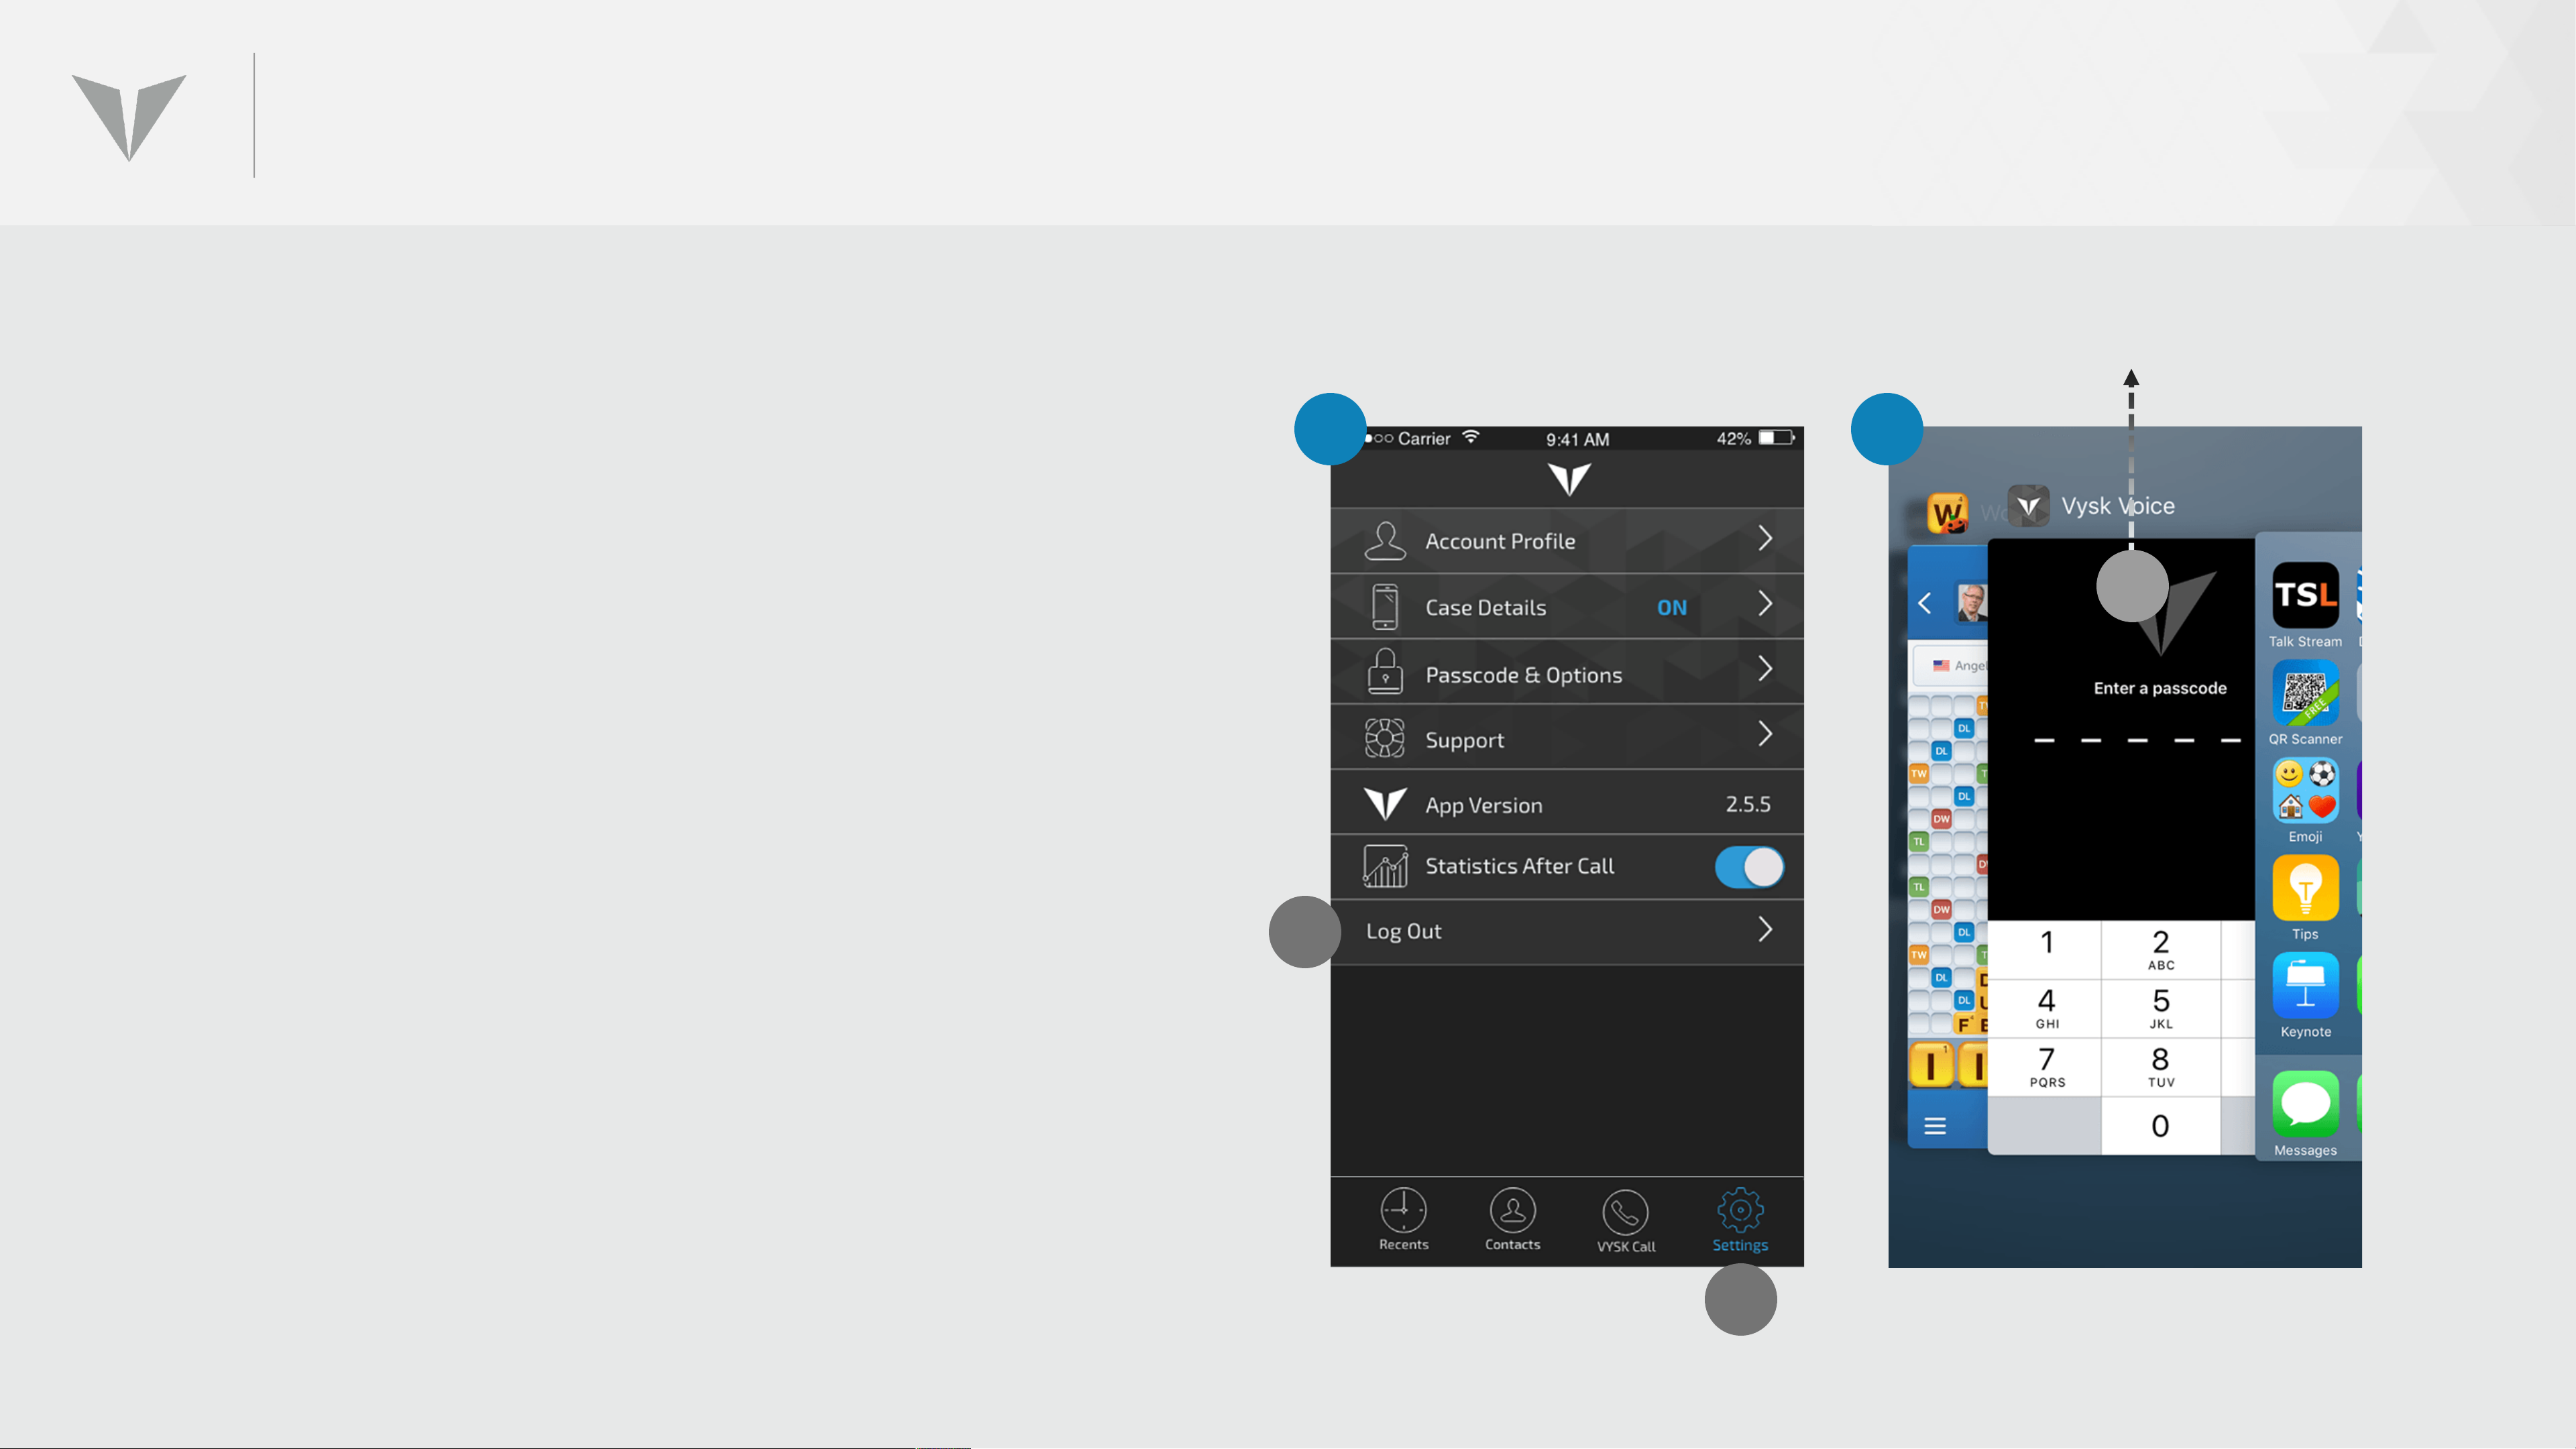
RESTARTING THE QSI
To restart the QS1
1. Log out of the Vysk Voice App by clicking
on Settings (A), then Log Out (B)
2. Shut down the App by swiping it from the
iPhone (C) after double clicking the main
iPhone function button
1
2
C
B
A
Page 47
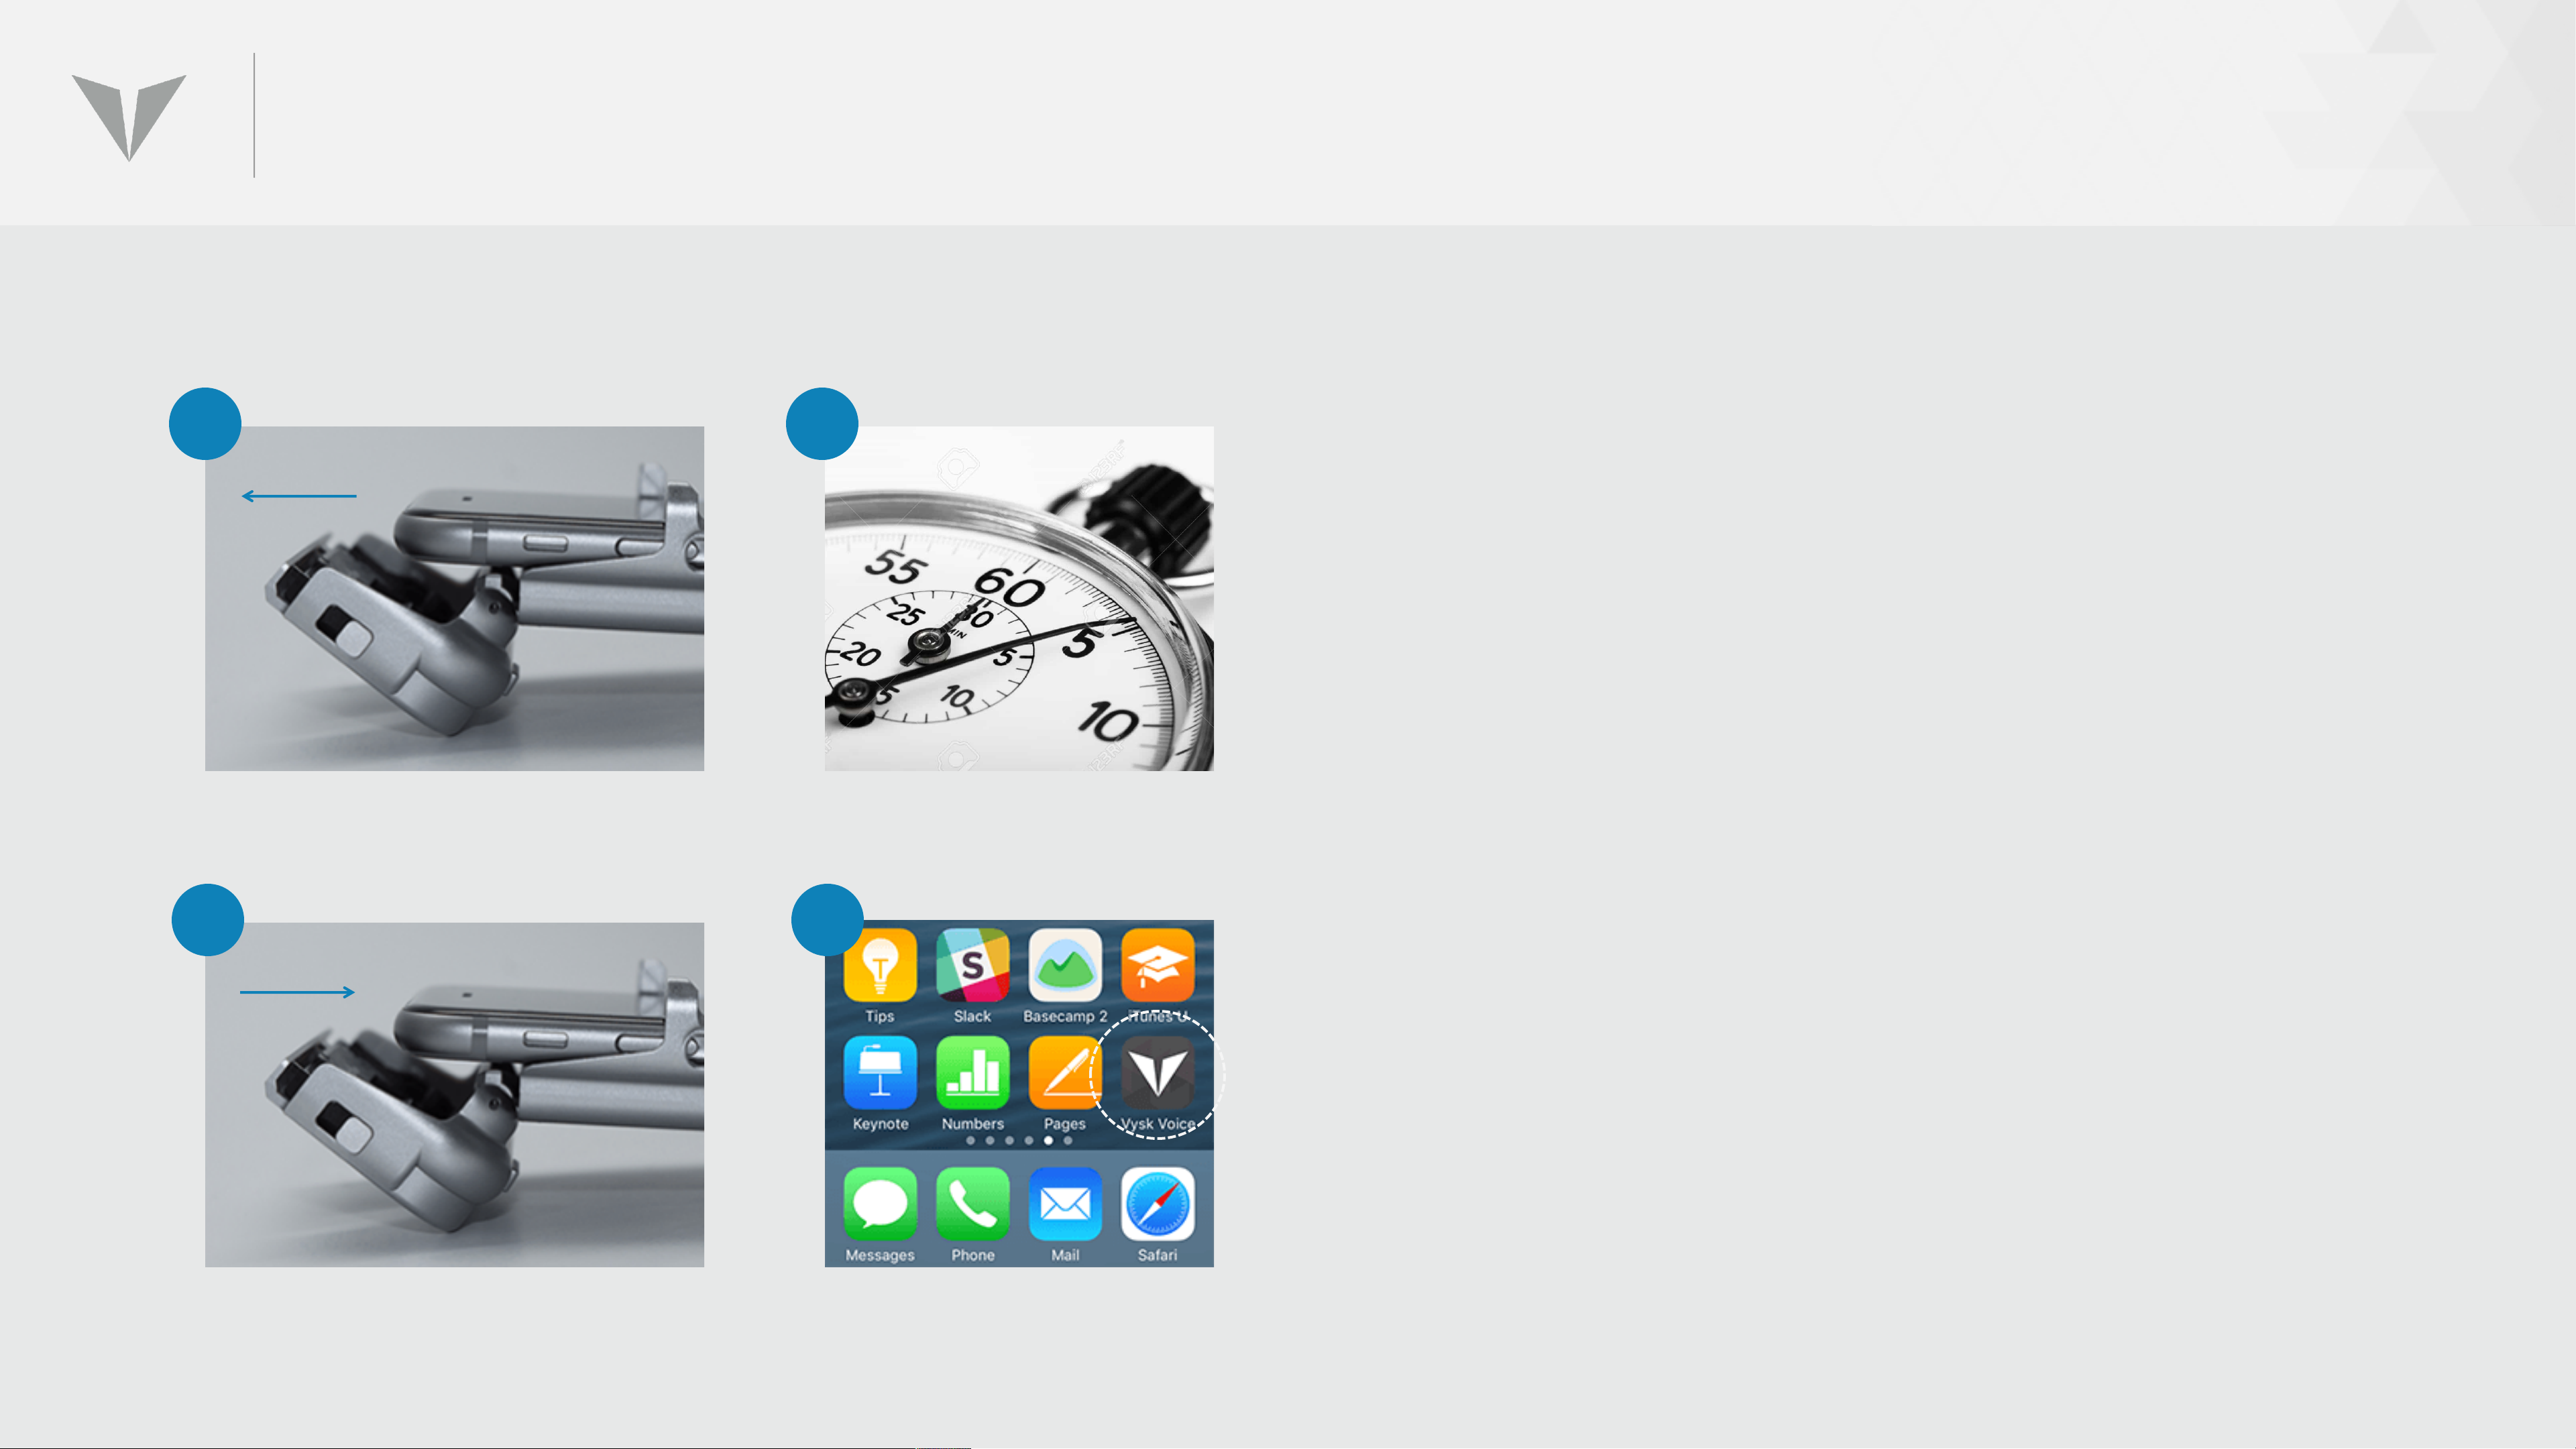
RESTARTING THE QSI (CONT’D)
3
4
3. Detach case from iPhone by unlatching
the upper section and removing the
phone.
4. Wait 5 seconds
5. Re-attach case to phone
5 6
6. Click on the Vysk Voice App icon
and log back in.
Page 48

PLACING A SECURE CALL
Page 49
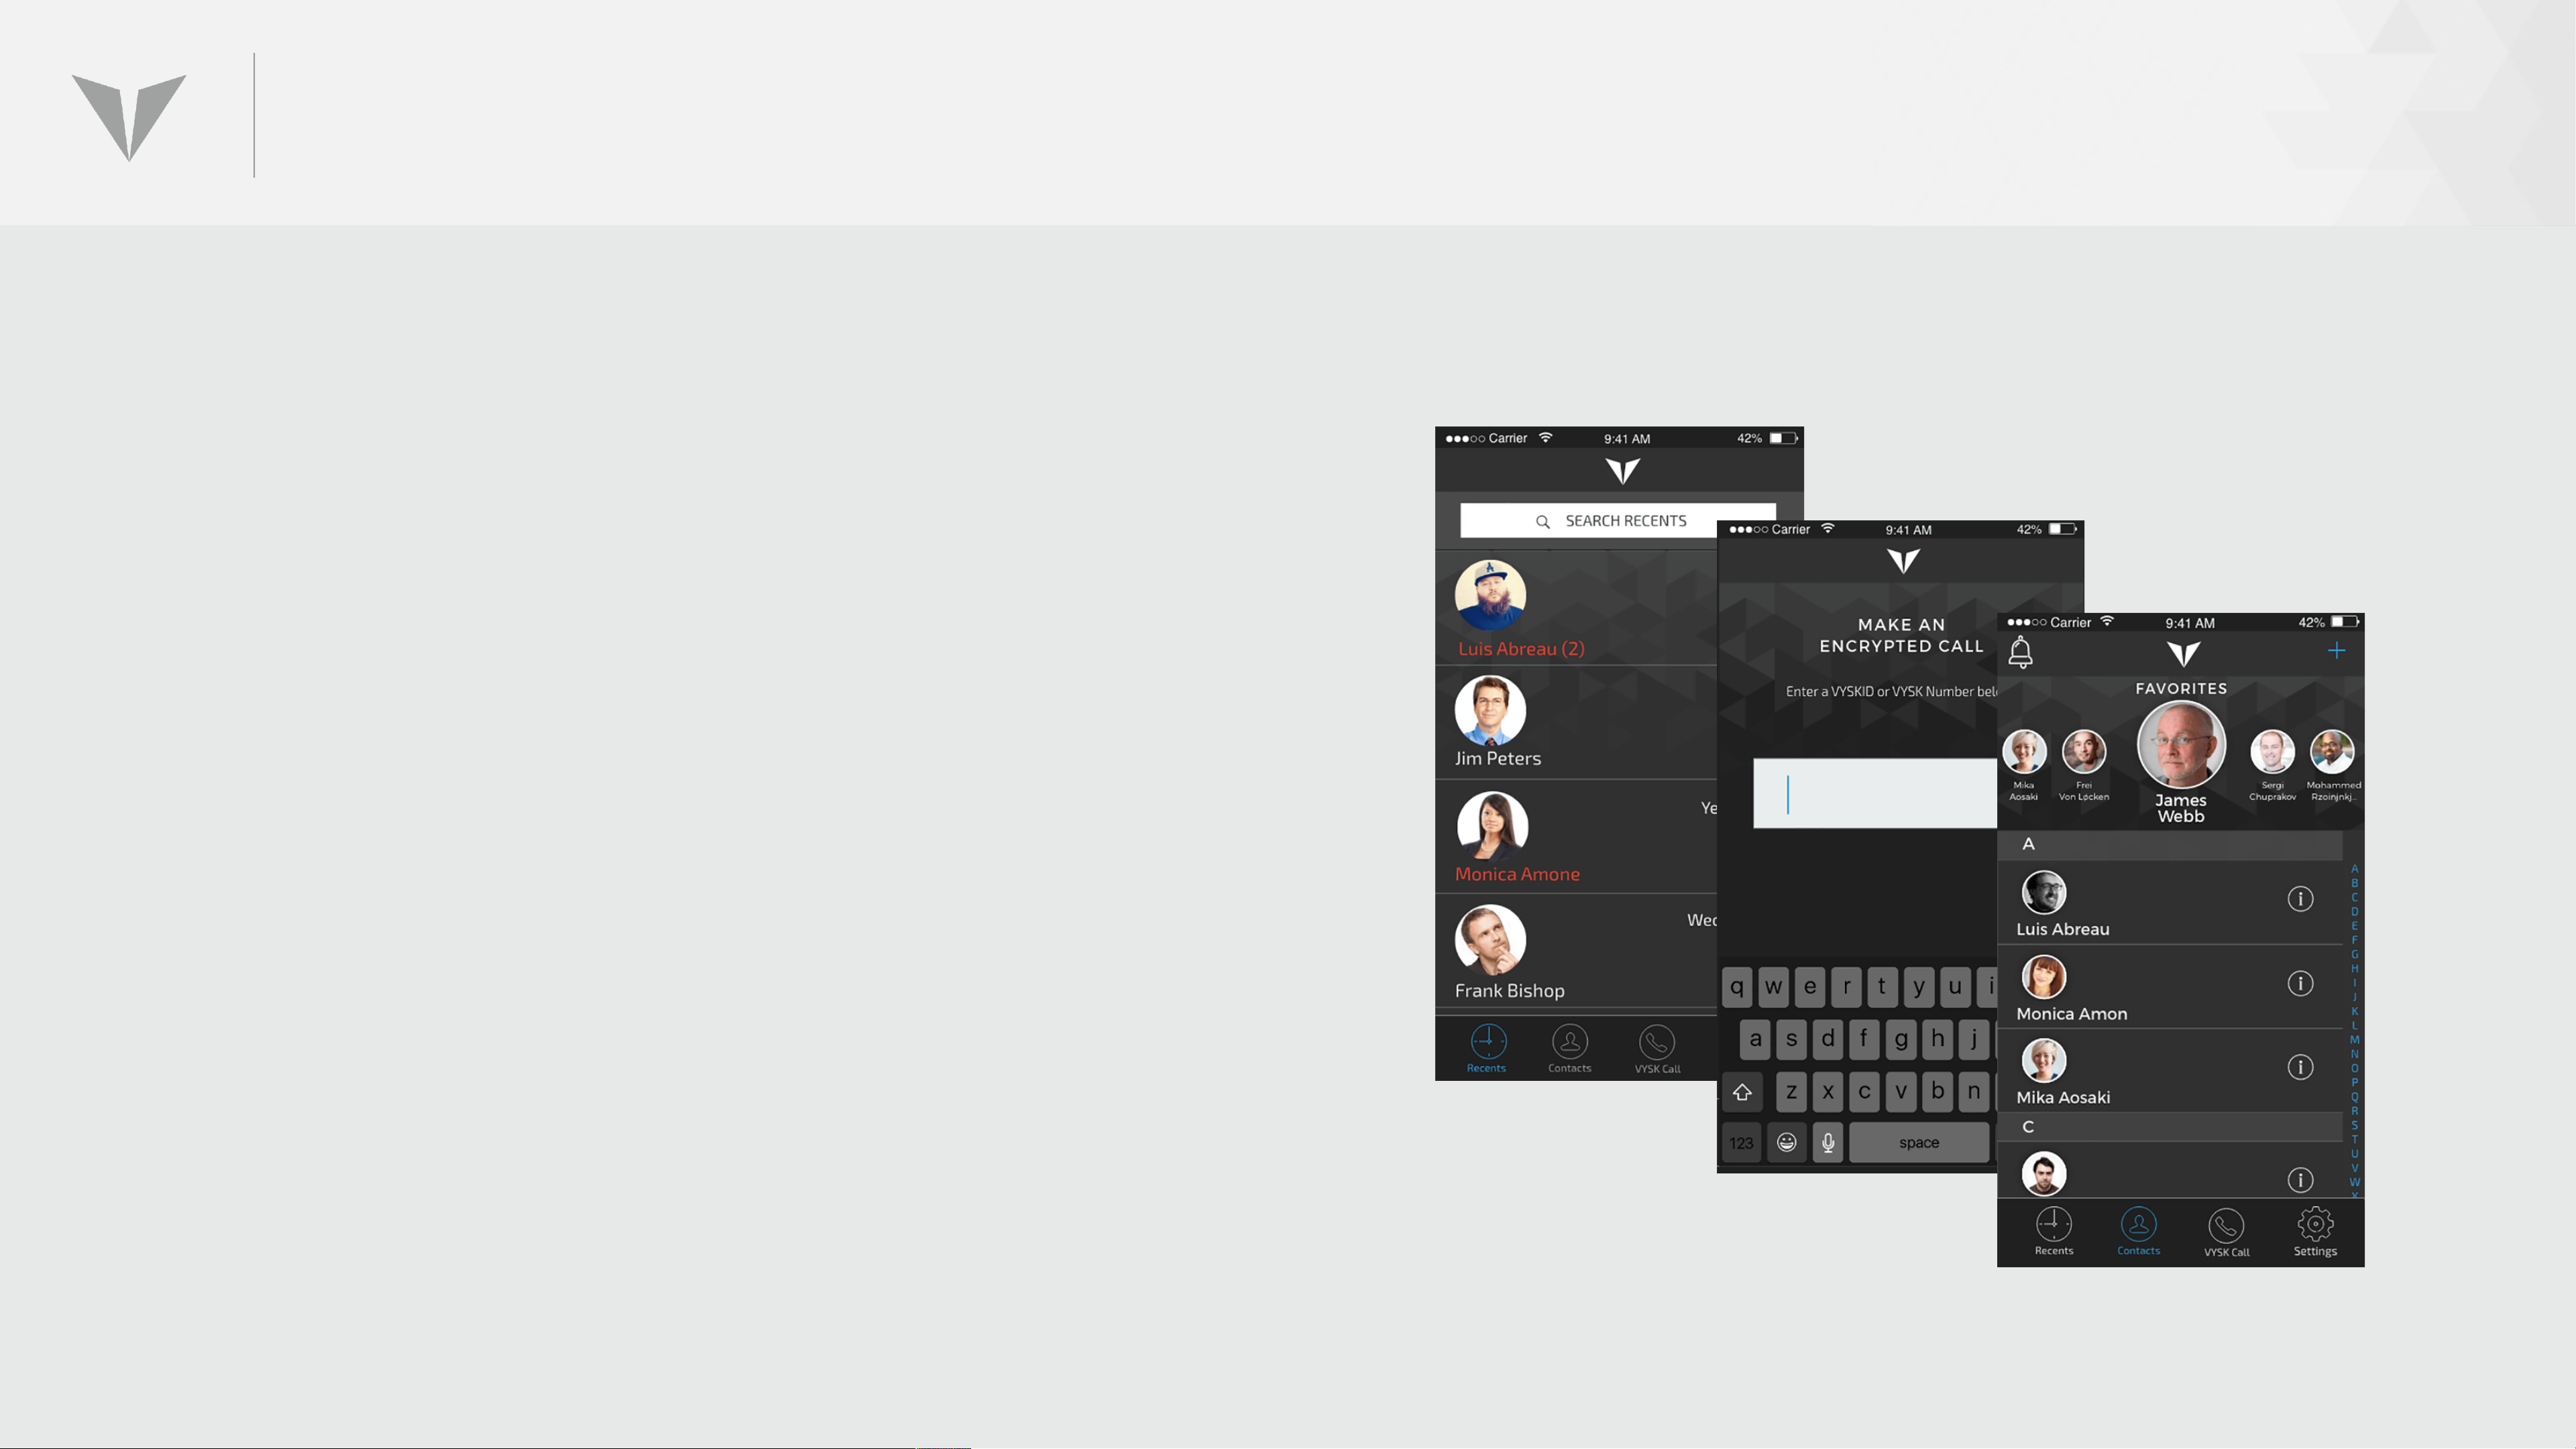
PLACING A SECURE CALL
Vysk secure voice calls can be initiated in
three different ways:
• Recents
• Vysk Call
• Contacts
NOTE: QS1 must be in Lockdown Mode in
order to initiate a Secure Voice Call (see
earlier section for Lockdown Mode
instructions).
Page 50
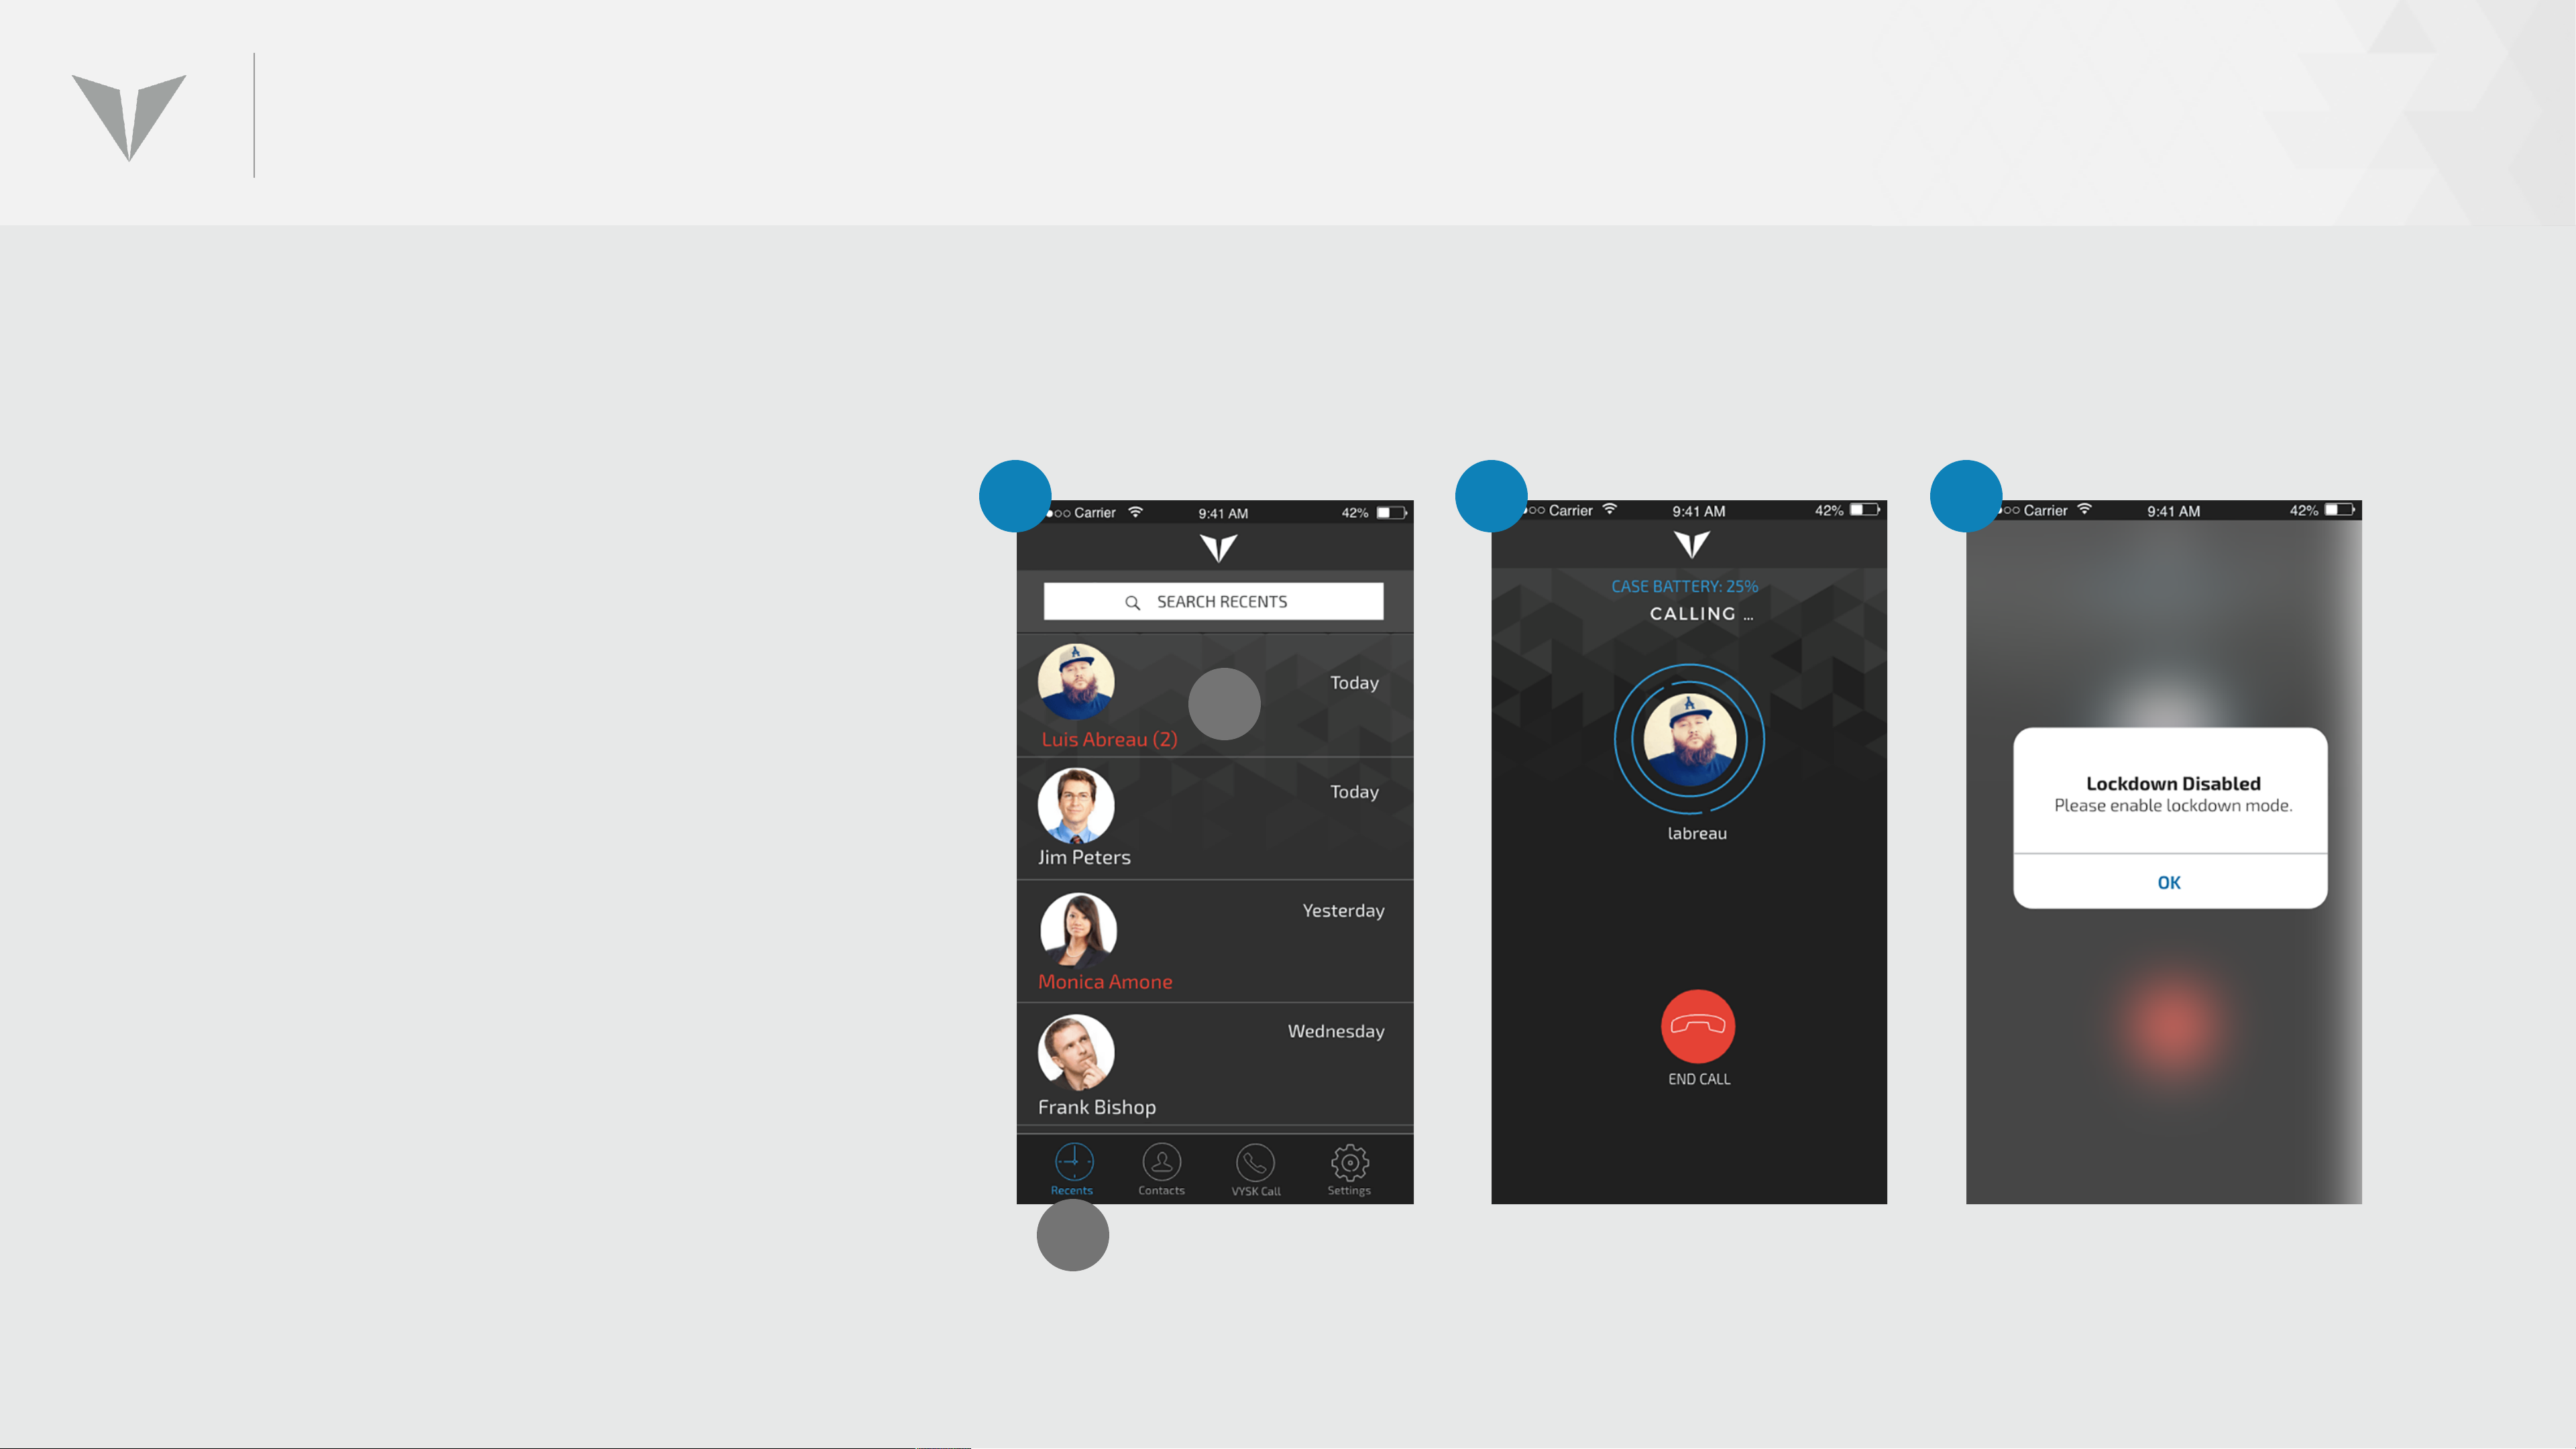
INITIATING A SECURE CALL FROM ‘RECENTS’
1. Users can initiate calls from the
Recent screen by opening up that
screen using the Recents button on
the toolbar (A) and clicking on the bar
from a previous call (B).
2. If the Lockdown Mode switch is
1
2 3
B
already ON, the call will begin
initiating.
3. If the Lockdown Mode switch is not
already on, the user will be prompted
to slide it to the engaged position
before the call can be set up.
A
Page 51
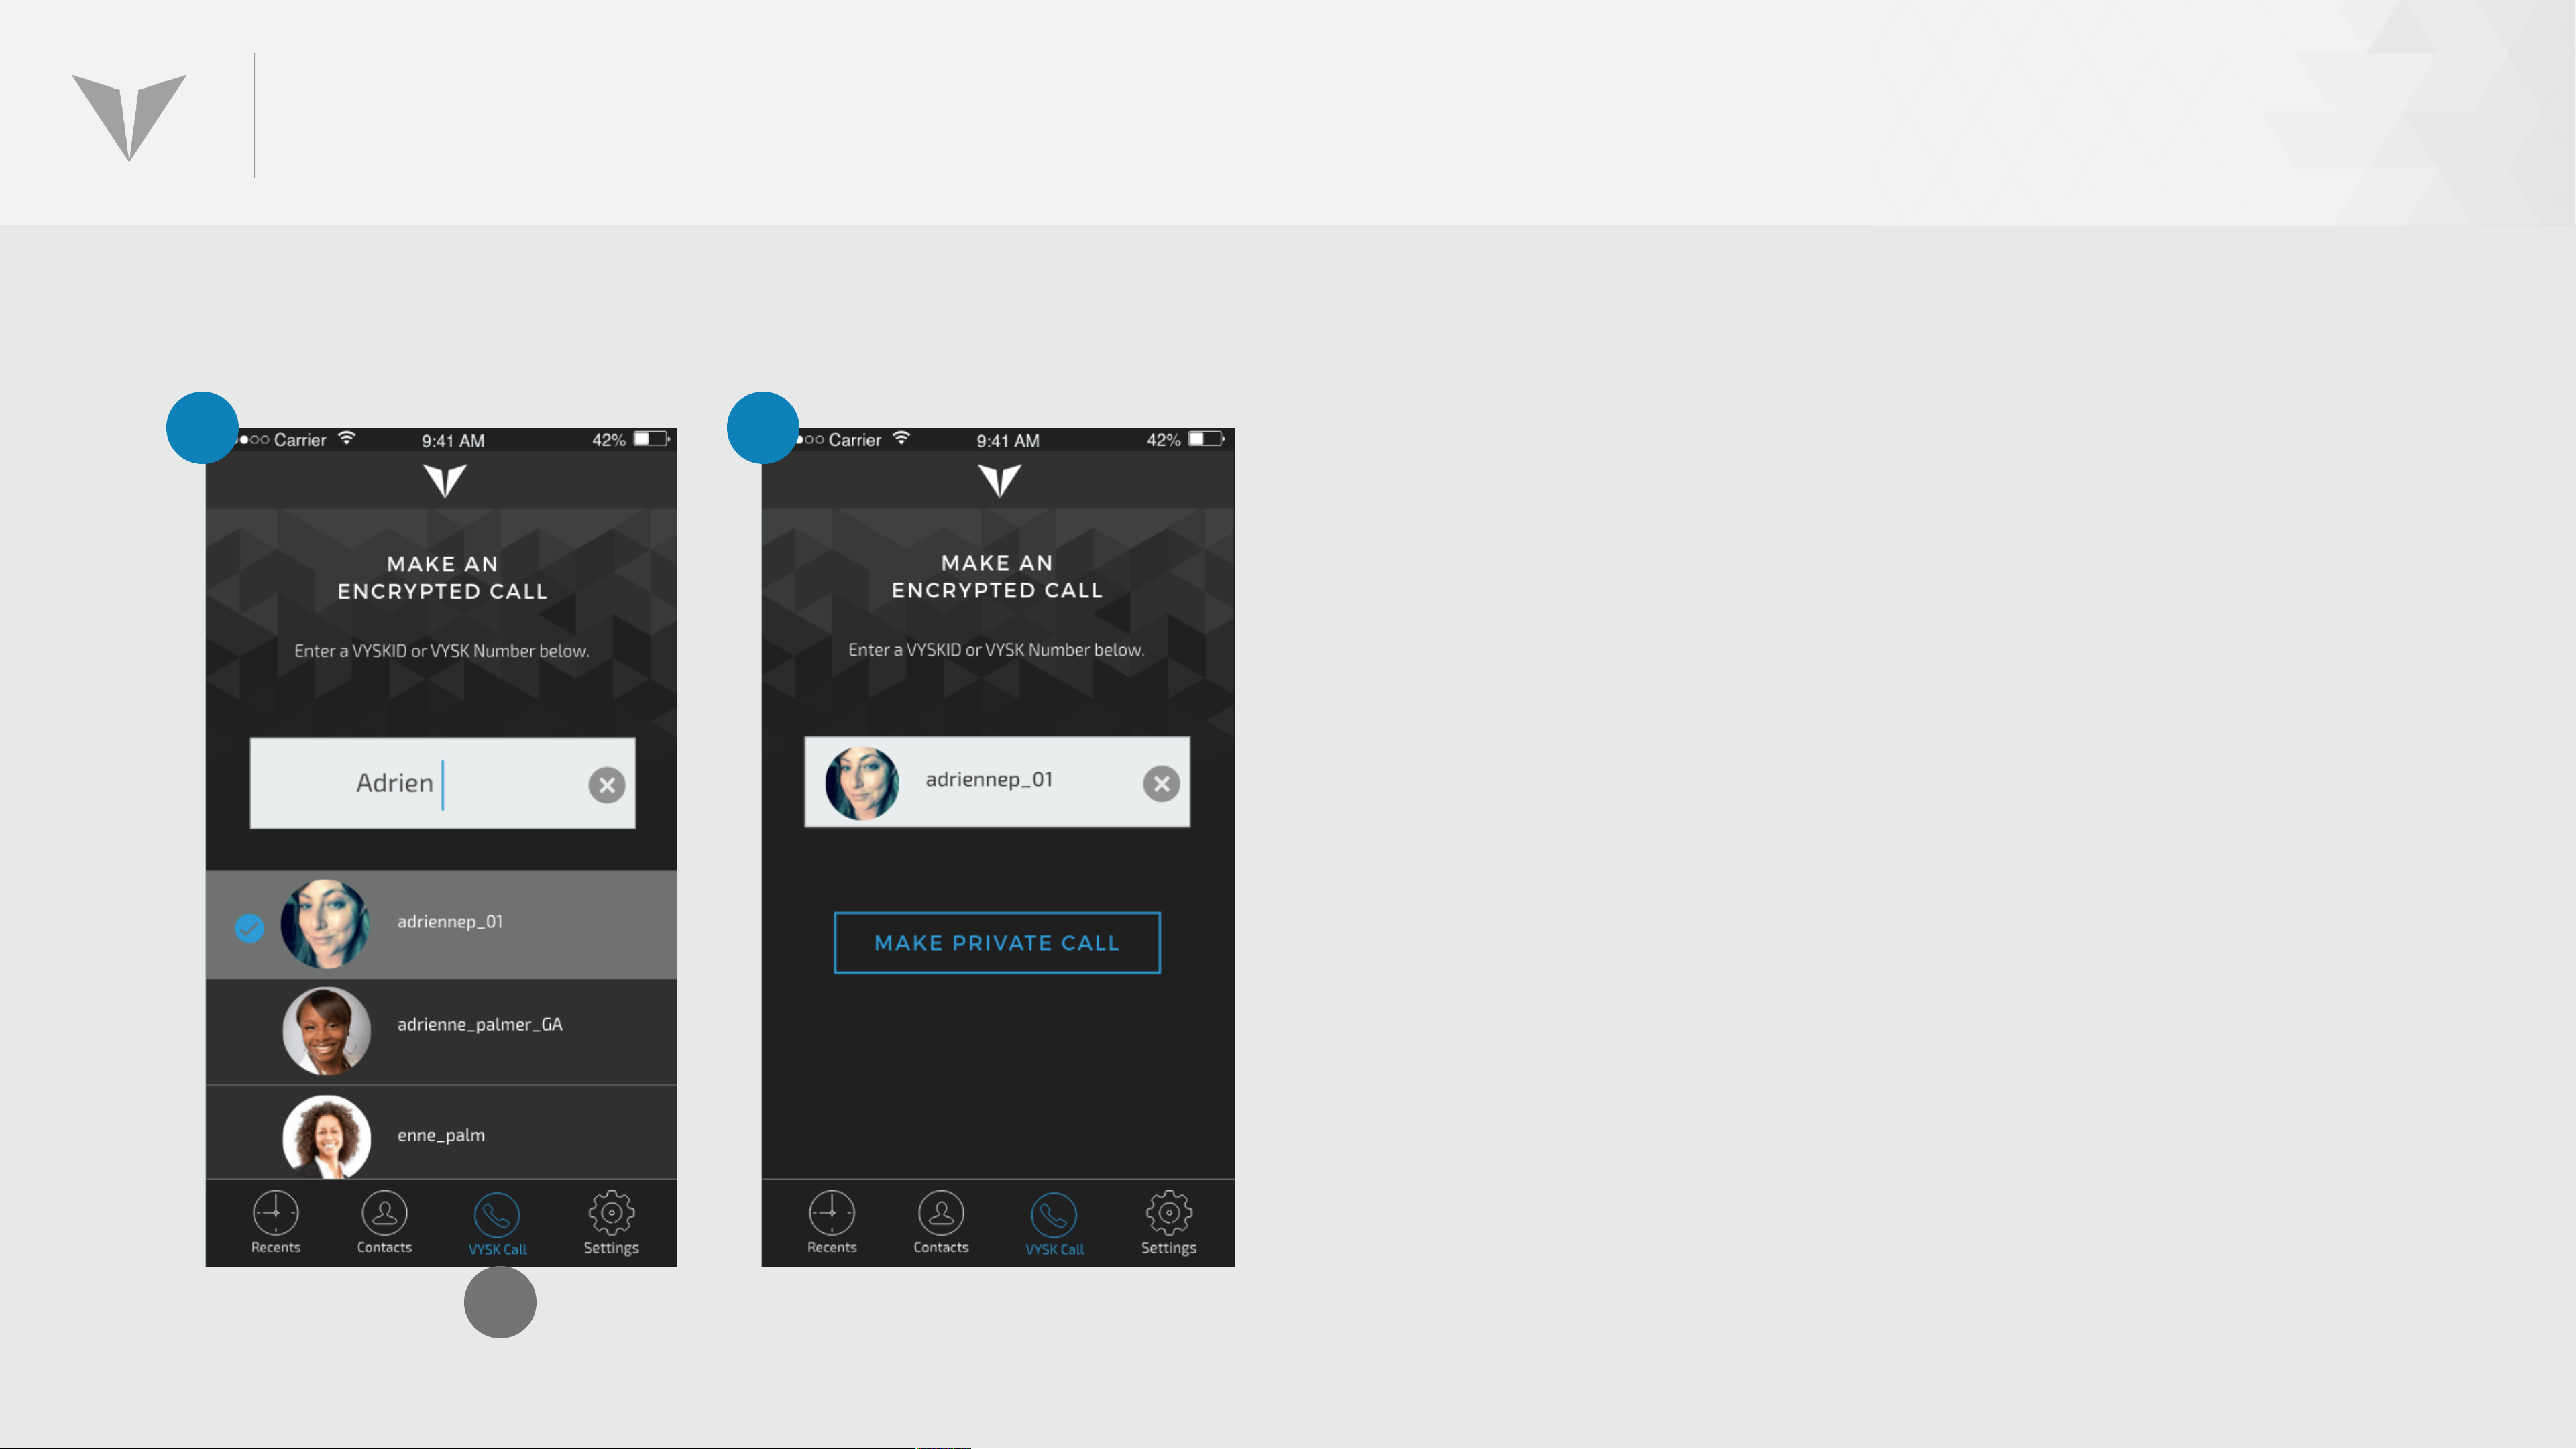
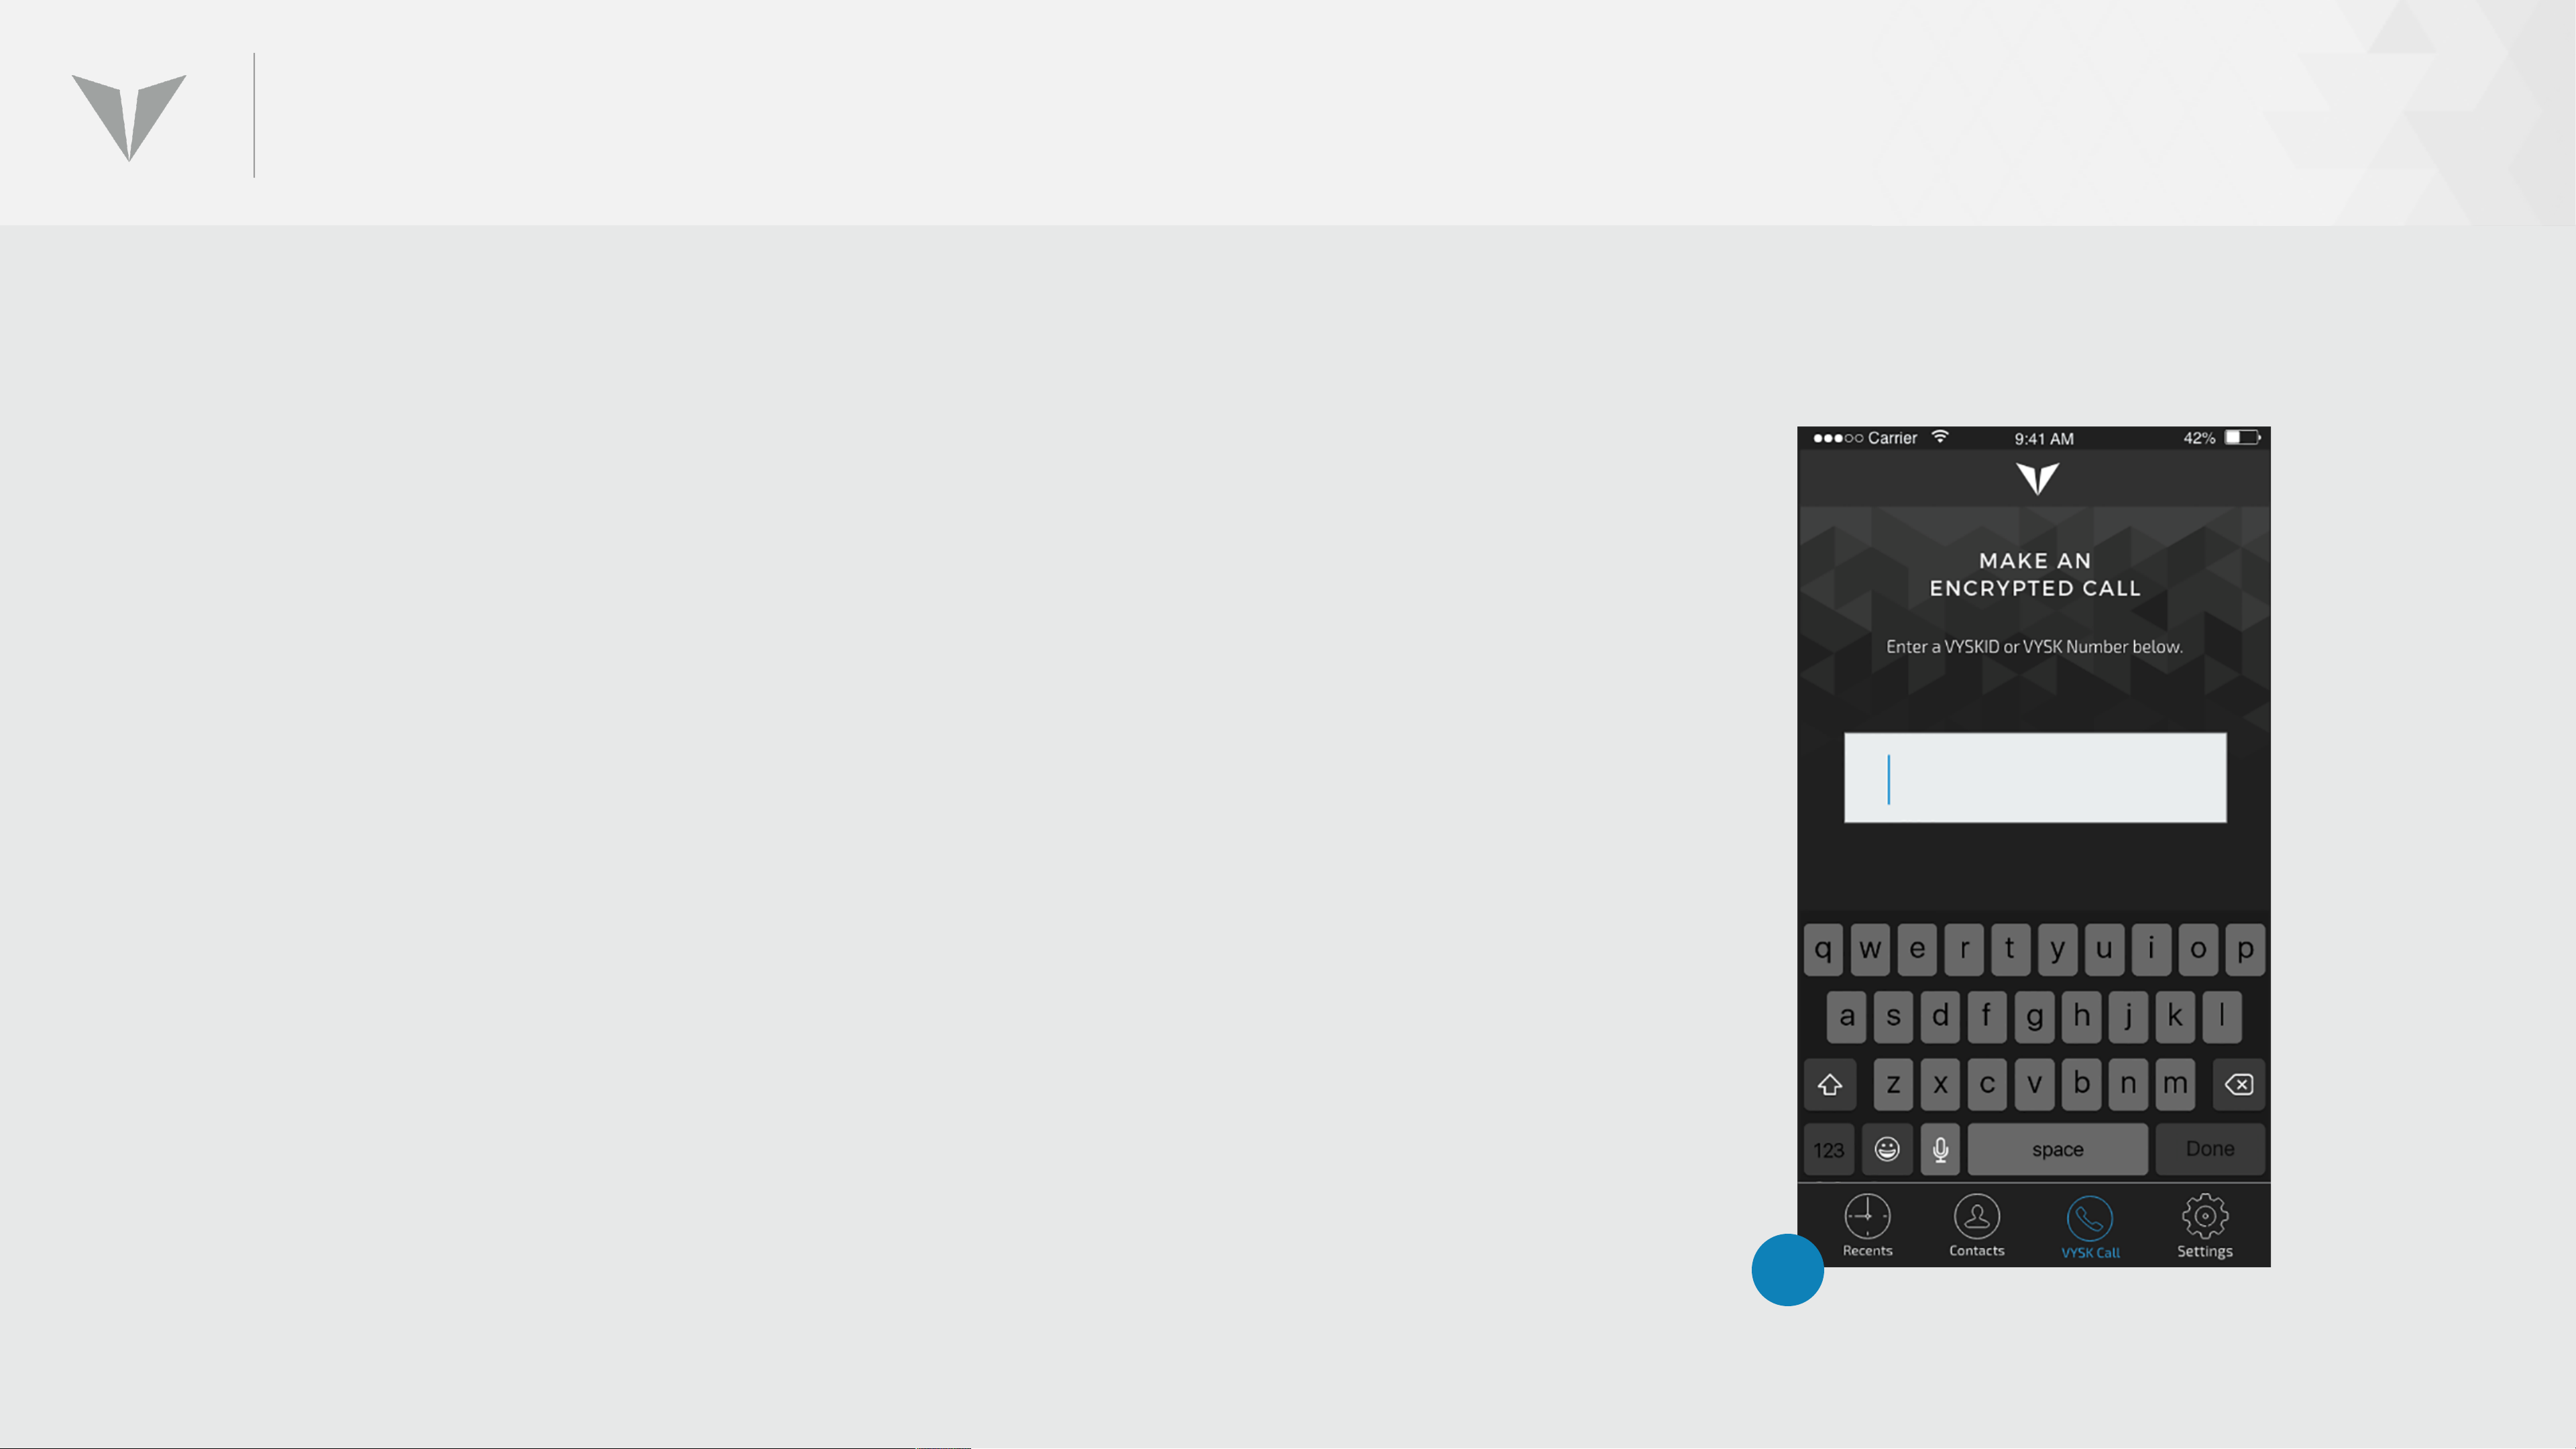
INITIATING A SECURE CALL FROM ‘VYSK CALL’
1
2
1. To initiate a Vysk secure voice call from the call
screen, click the Vysk Call icon (A) on the toolbar
at the bottom of any page and the Vysk Call
screen will appear. Start typing the name or Vysk
ID of the contact you would like to call.
Suggestions will appear as you type.
2. Press MAKE PRIVATE CALL to initiate the call.
NOTE: Lockdown Mode switch must be engaged in
order to initiate a secure call. If the user attempts
to initiate a call with the Lockdown switch OFF, a
prompt will appear indicating that the switch
must first be turned ON.
A
Page 52
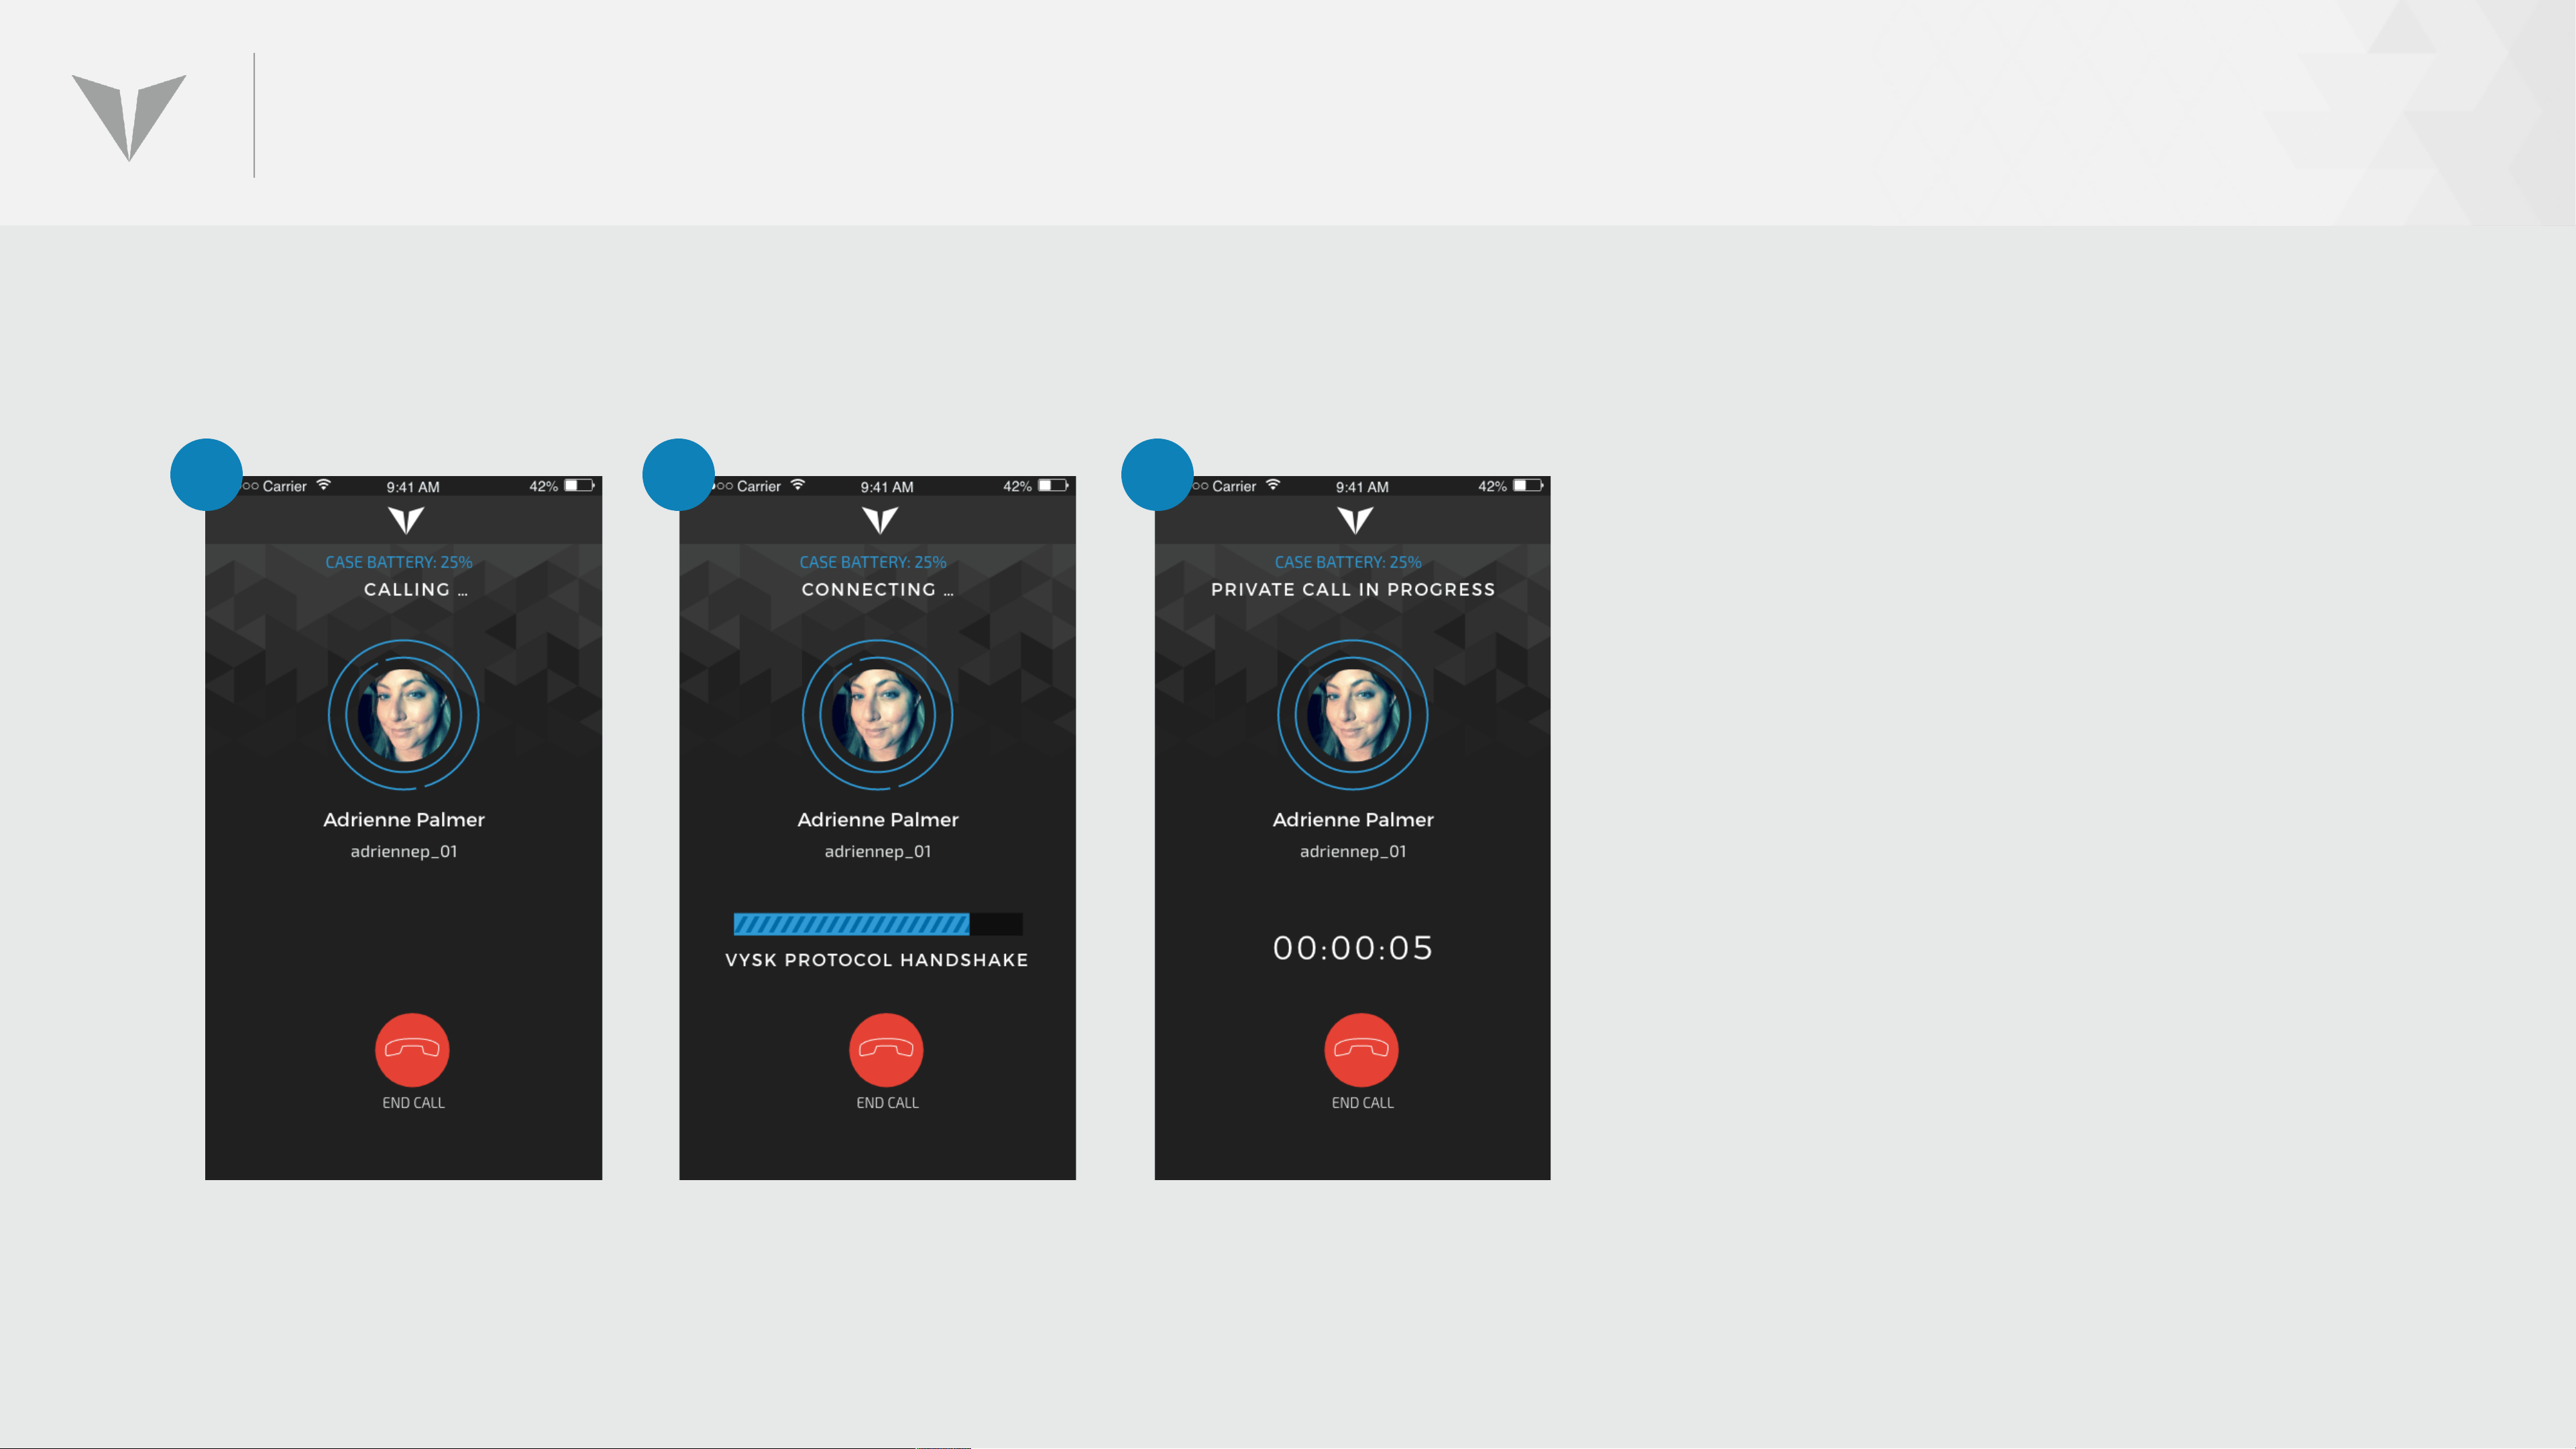
INITIATING A SECURE CALL FROM ‘VYSK CALL’
3 4 5
3. Once the call has been initiated,
the “calling…” screen will appear
while finding the other QS1 user.
4. Once found, the “connecting…”
screen will appear with a progress
bar to indicate the status of
establishing a secure connection
via the Vysk Protocol handshake.
5. After the progress bar completes
and the call has been established,
the call connected screen will
appear and the call timer will
begin counting.
Page 53
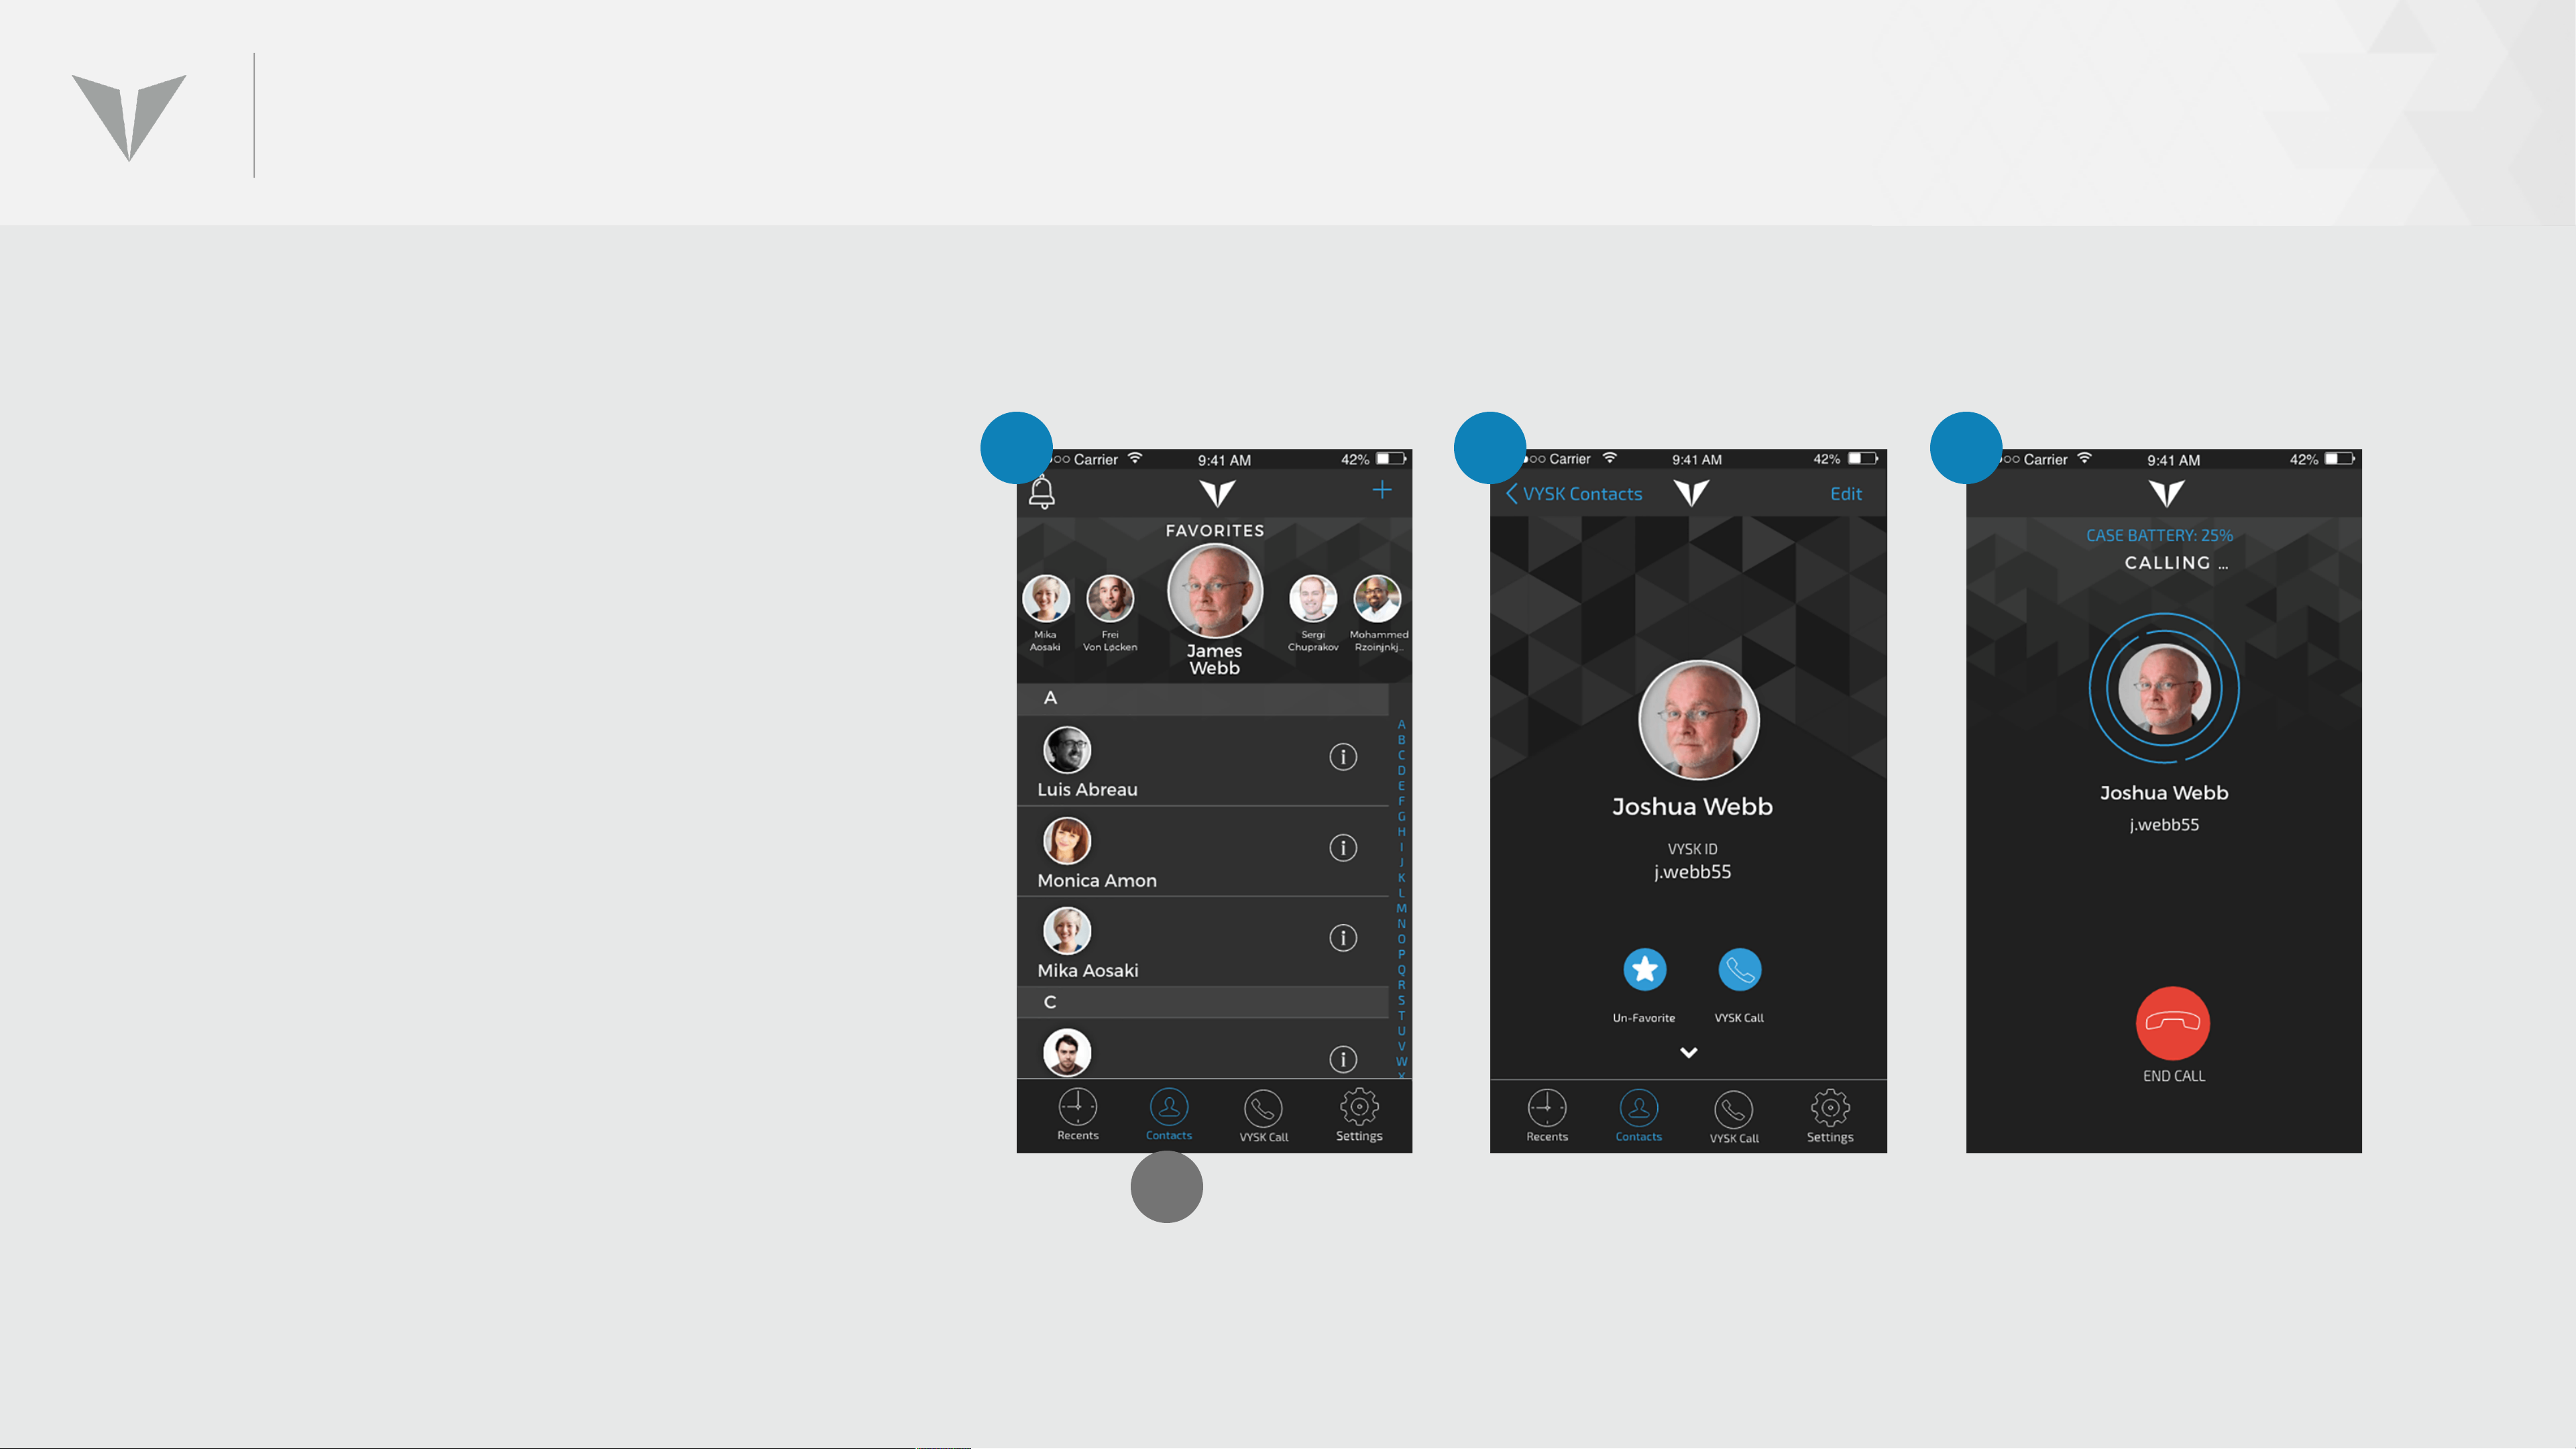
INITIATE SECURE CALL FROM ‘CONTACTS’
1. Select “contacts” (A) from the lower
toolbar. Select a name from the
Contacts list either by searching,
selecting from Favorites, or scrolling
alphabetically. Click on that individual
to enter their contact page
1 2 3
2. On an individual’s contact page, click
the “Vysk call” button to initiate call
3. If Lockdown Mode switch is already
engaged, call will begin immediately.
If the switch is OFF, user will be
prompted to turn it ON before call
A
set-up commences.
Page 54

RECEIVING SECURE CALLS
Page 55
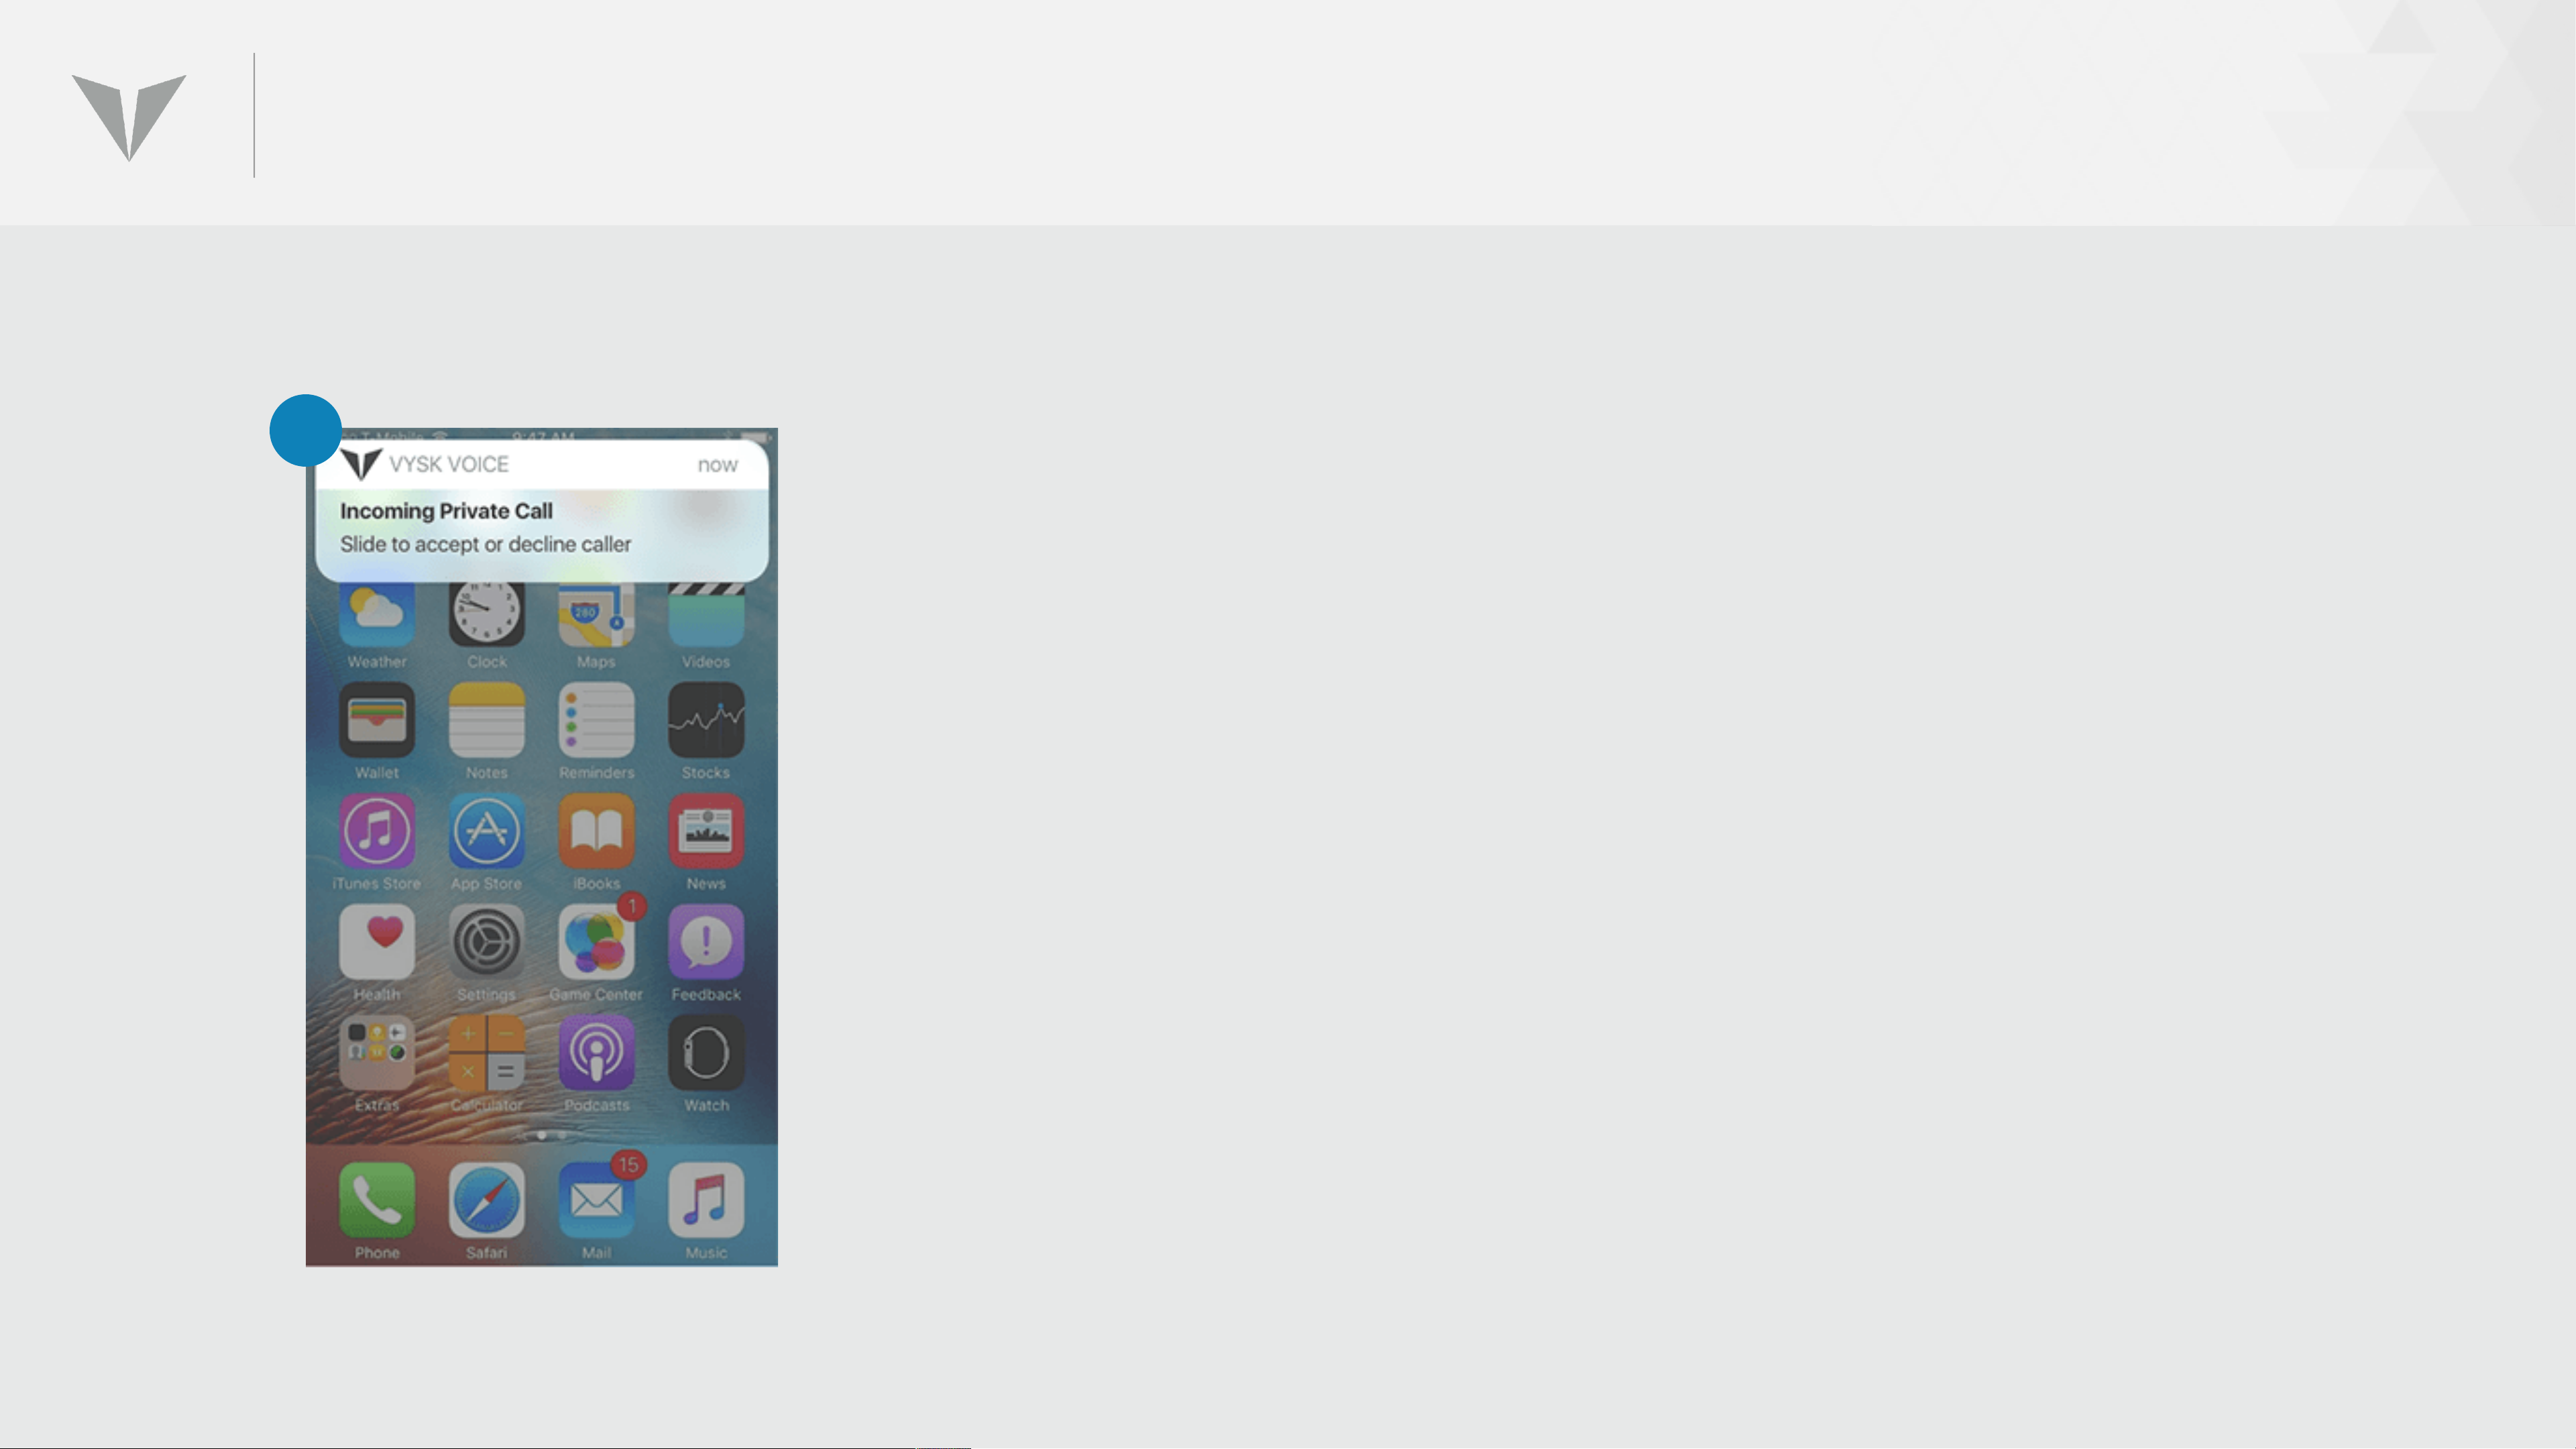
RECEIVING A SECURE CALL
1
To receive a call, the Vysk Voice App must be turned on
(foreground or background), and the lockdown switch must be
engaged. The iPhone may be ON or in IDLE mode.
1. An incoming call will be indicated by a distinct tone, followed
immediately by a dialog box at the top of the screen. At this
point, the caller’s identity is not yet known.
If the iPhone is unlocked, TAP on the notification to initiate the
call. If the iPhone is locked, SWIPE the notification.
Page 56
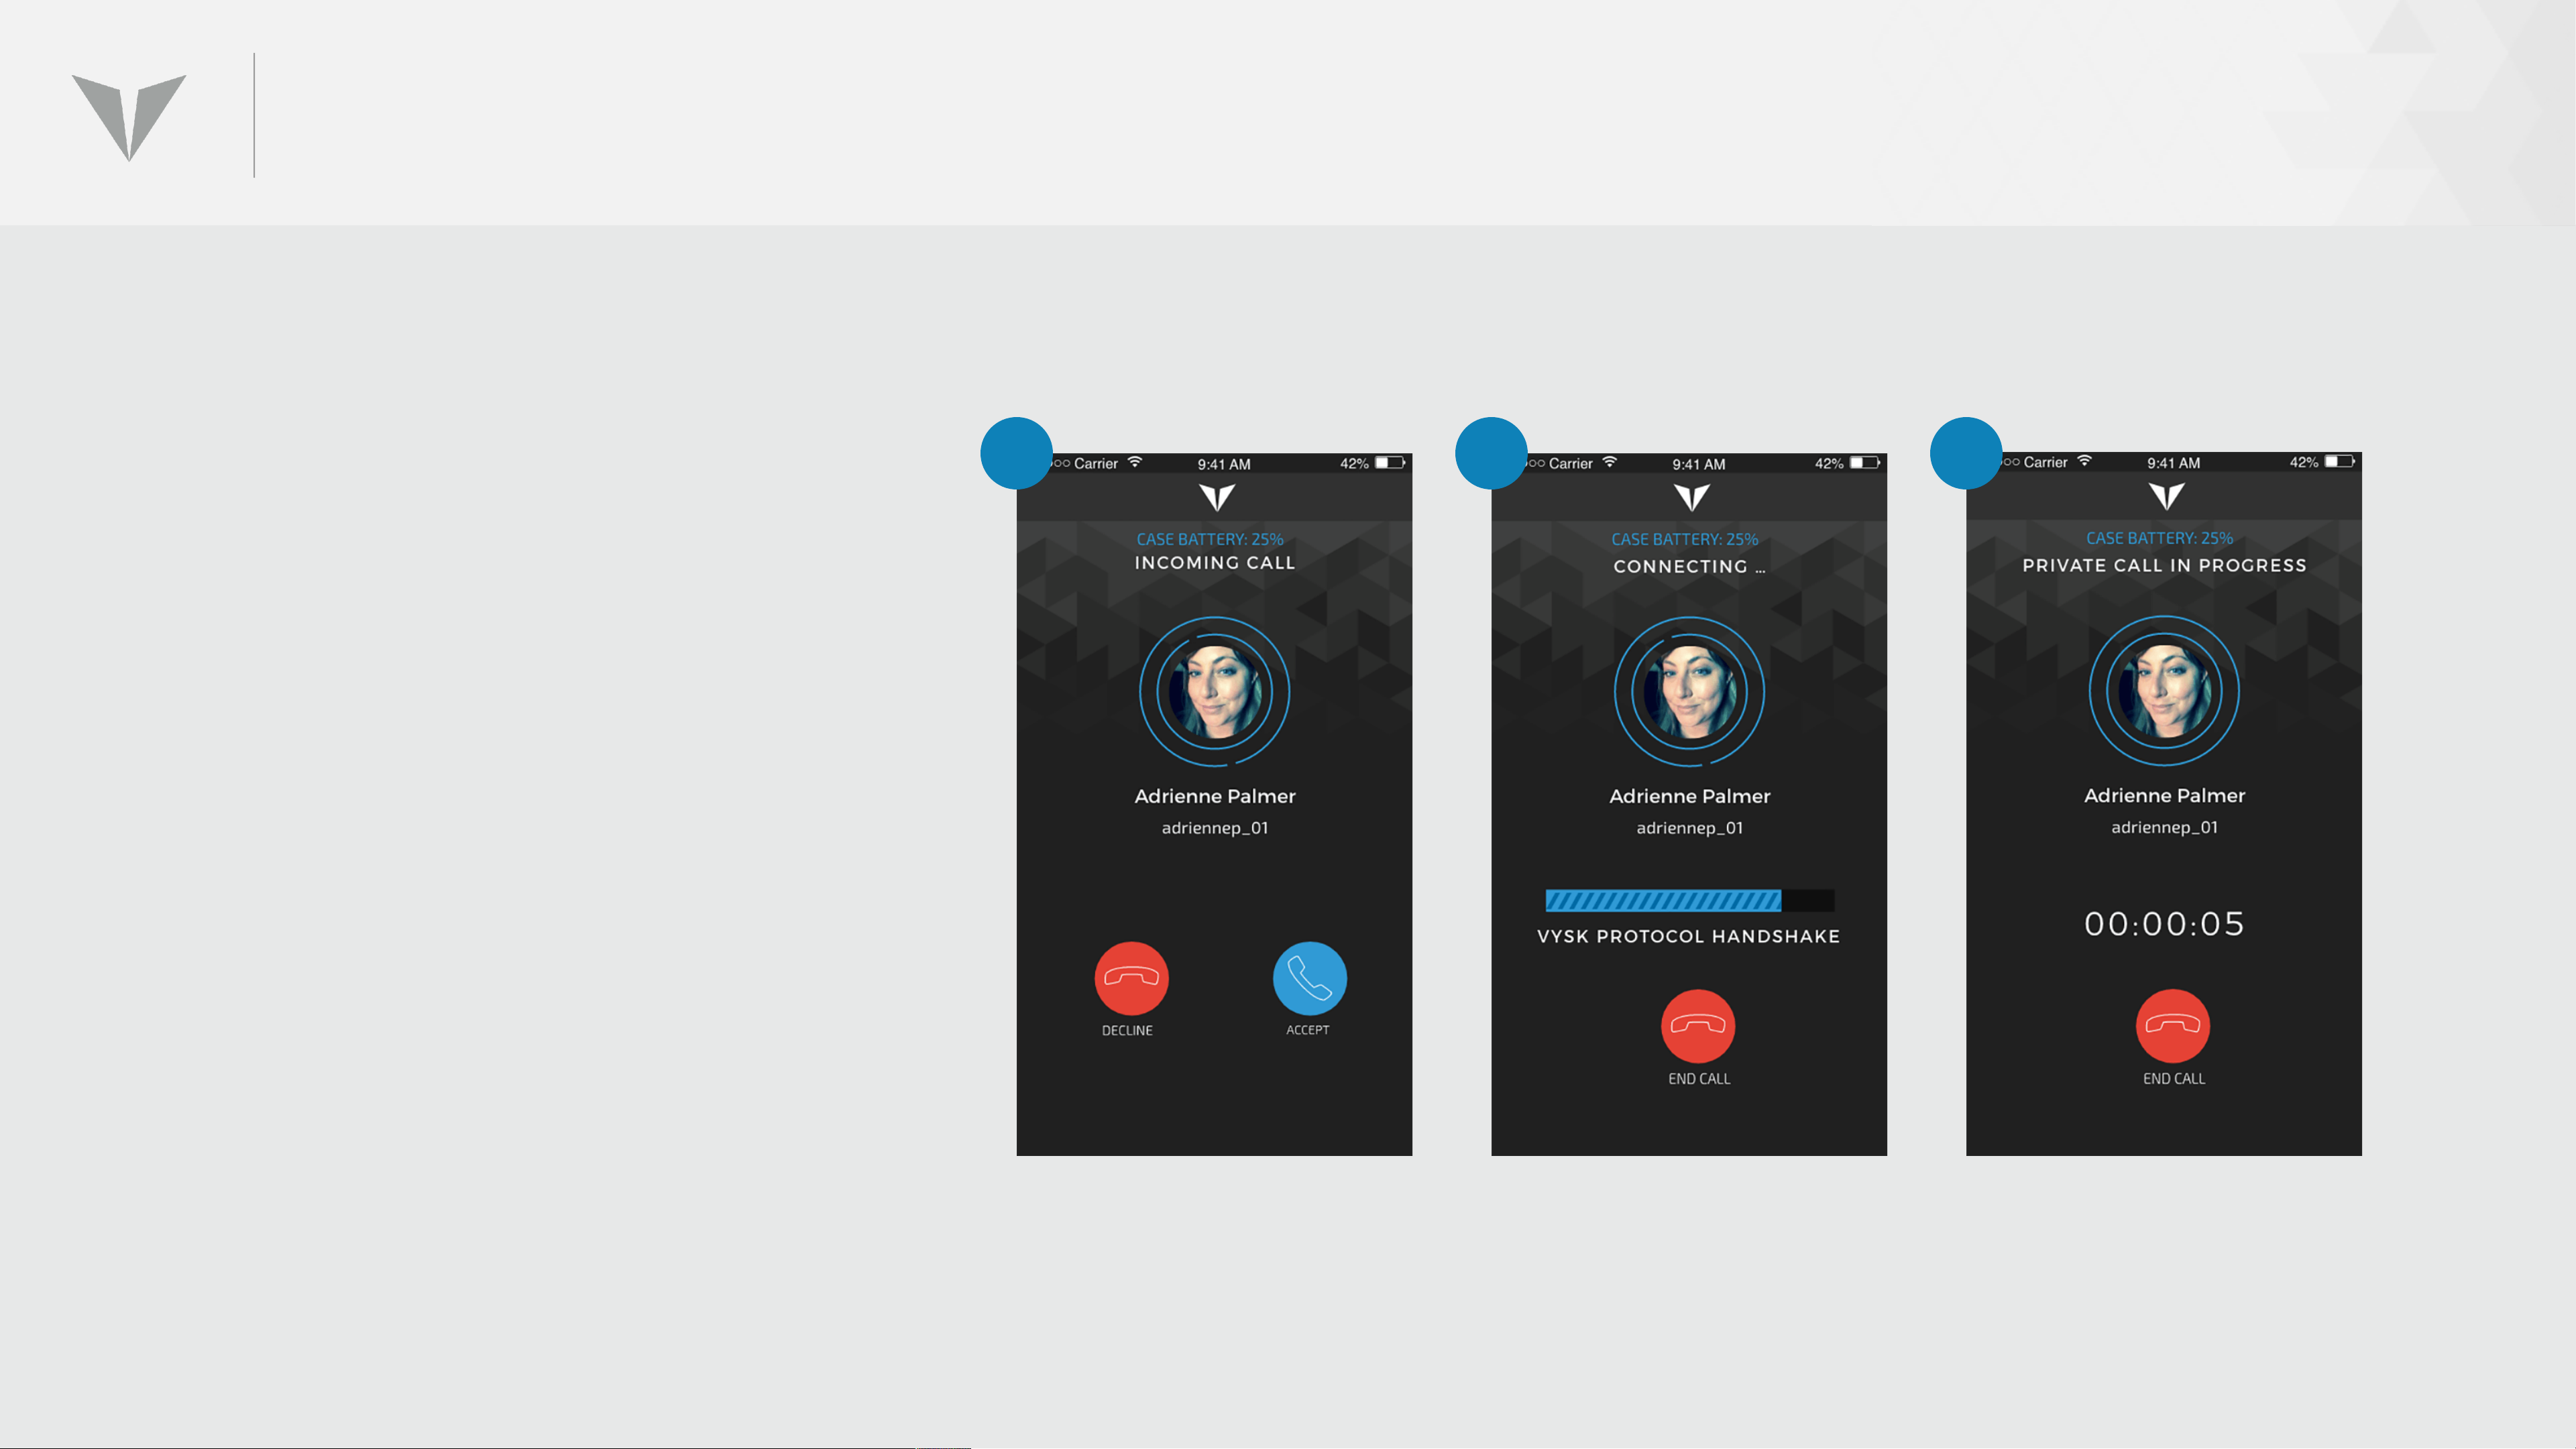
RECEIVING A SECURE CALL
2. When the user taps on the
2 3 4
notification, they will see the initial
response screen, indicating the
identity of the caller, and allowing
the recipient to either ACCEPT or
DECLINE the incoming call.
3. To begin the call, hit ACCEPT and
the Vysk secure handshake protocol
will attempt to connect the call. The
user can end a call at any time by
hitting the END CALL button.
4. One the call is connected, the call
timer will begin counting
Page 57
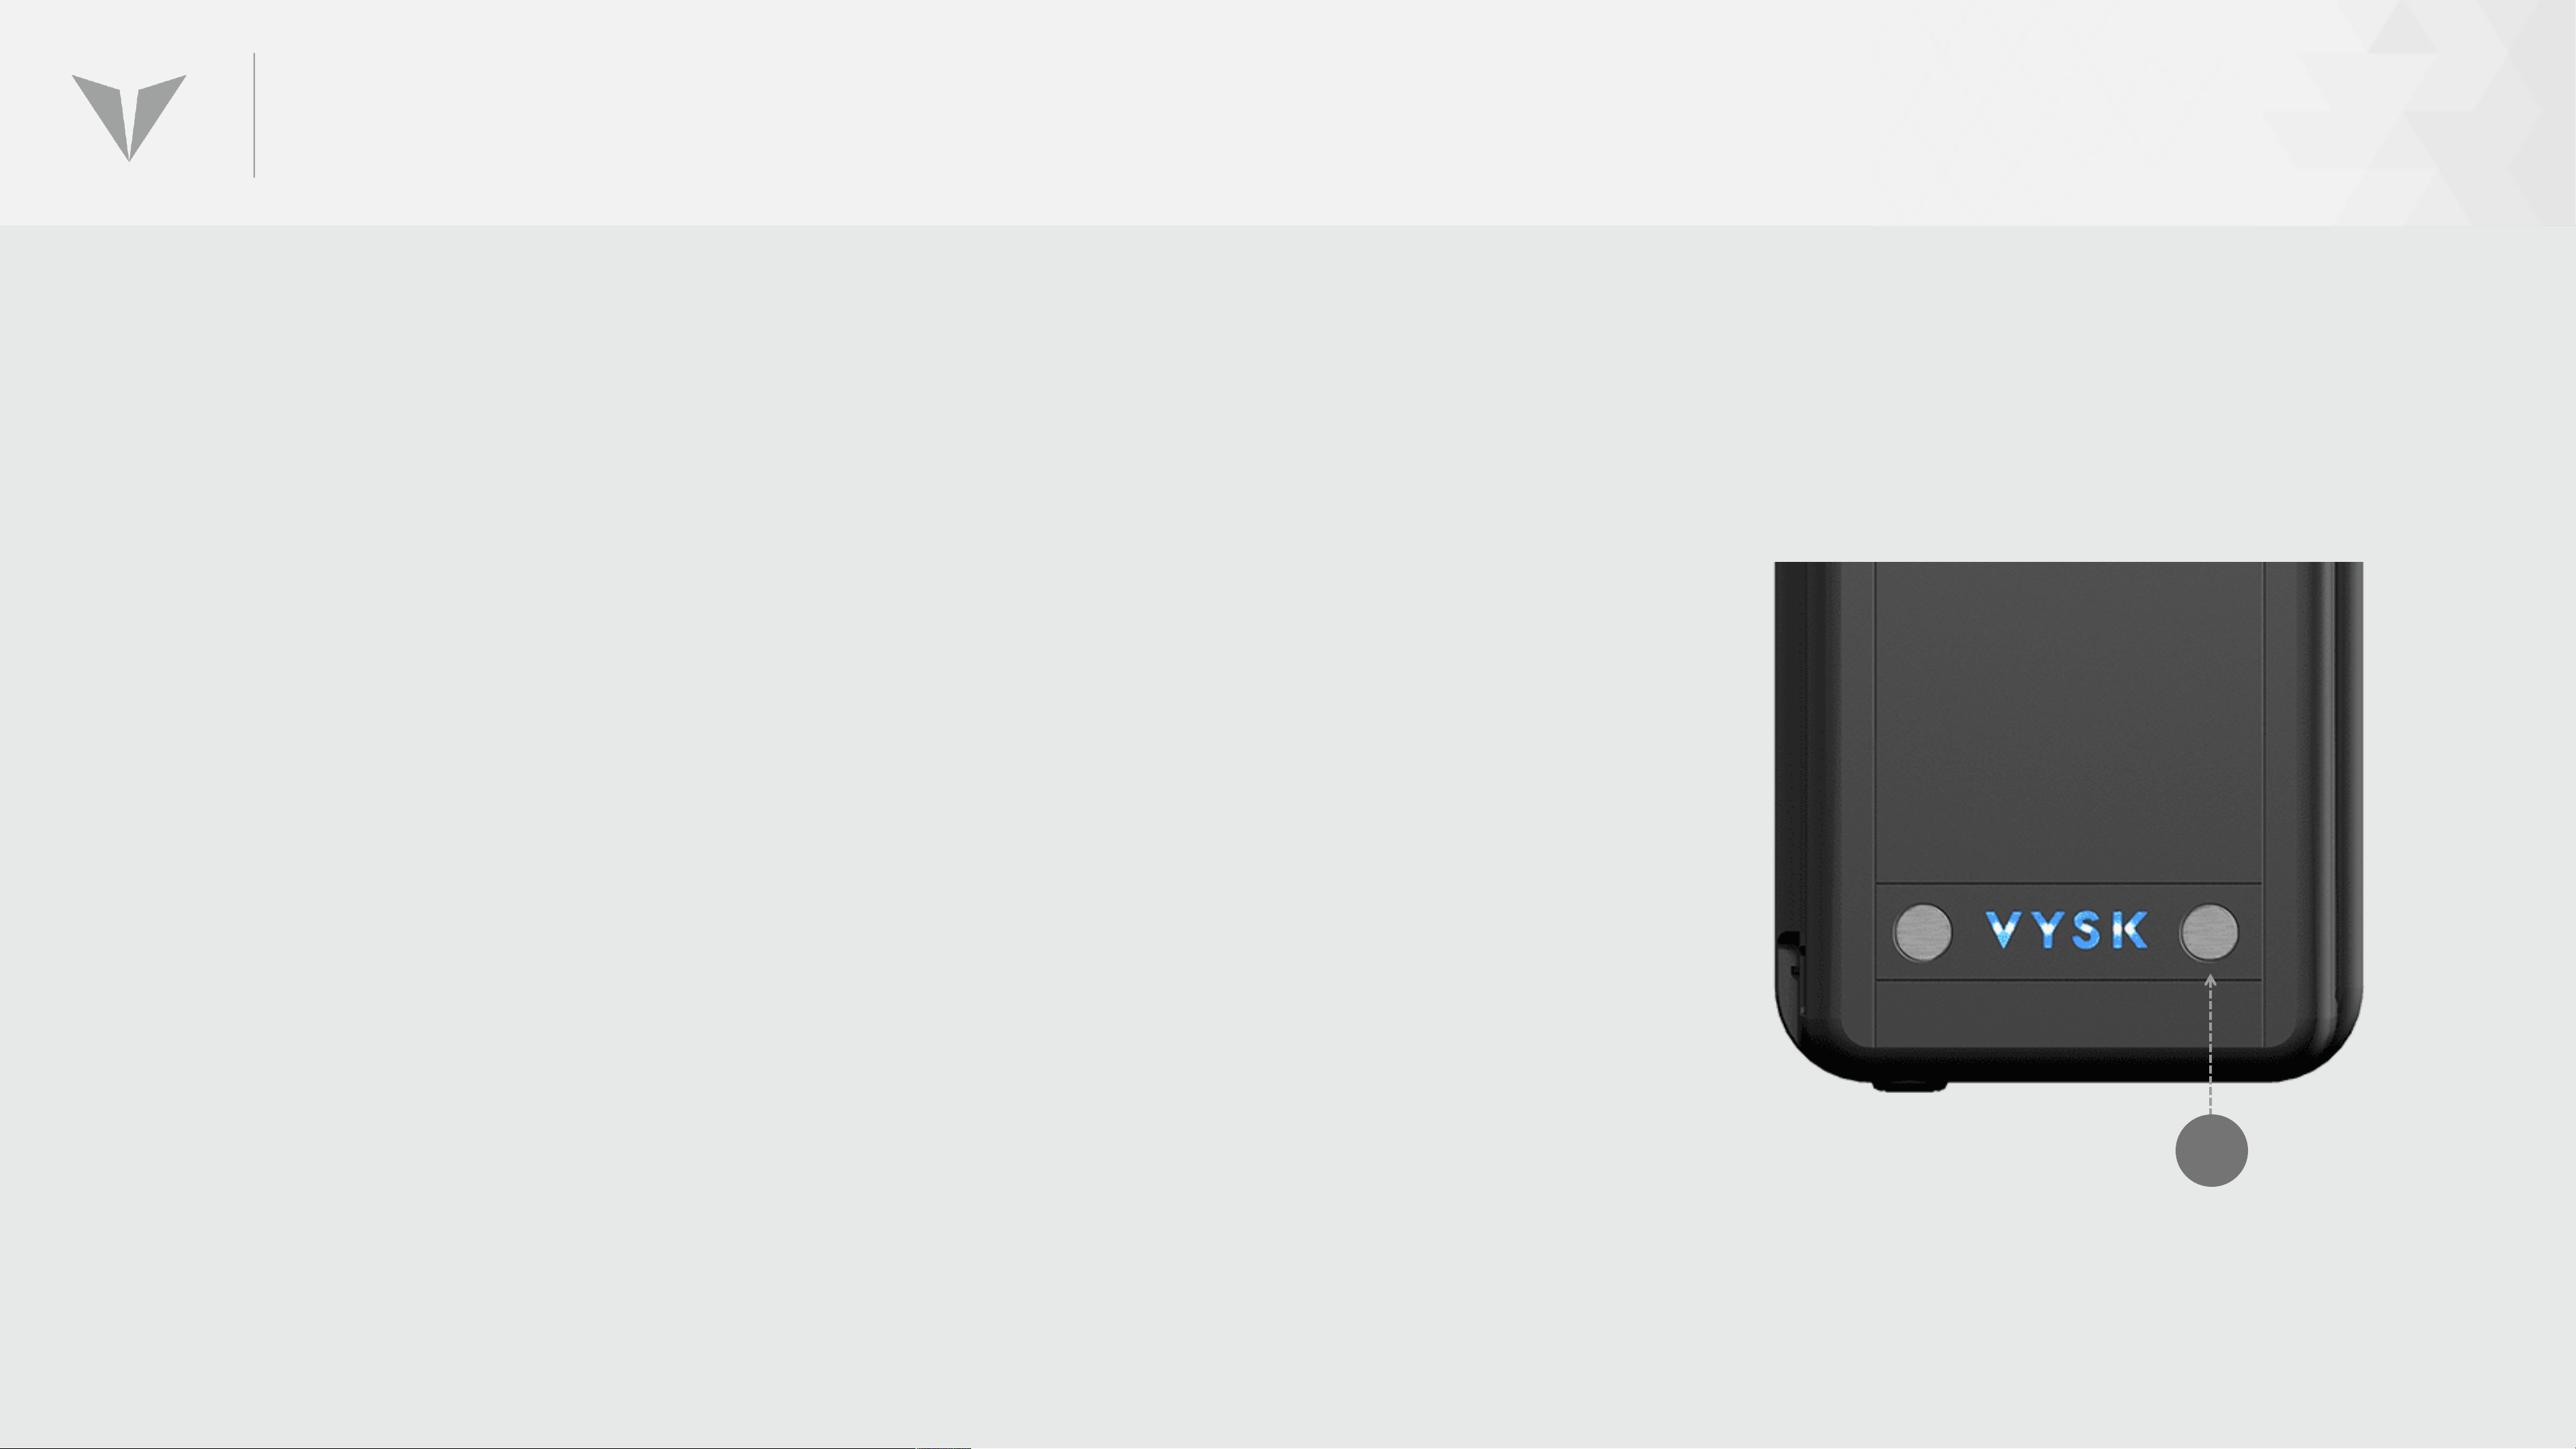
USING VOICE AUTHENTICATION CODES
The Voice Authentication Code (VAC) feature allows both voice call
participants to verify in real time that their call is correctly encrypted and
totally secure. To use the feature:
• Both caller and recipient must push VAC button (A) on the rear of QS1.
• The VAC voice on each case will speak a code phrase composed of five
characters from the NATO phonetic alphabet (“alpha,” “bravo,” etc.),
corresponding to the unique ID of the call.
• Caller and recipient should then repeat out loud to each other the
string of characters they heard.
• If both character strings match, the call is encrypted and secure.
• If the repeated character strings do not match, this is evidence of
potential call intrusion by a network-based hacker. Call participants
should hang up immediately to initiate a new secure voice call.
A
Page 58

USING CONTACTS
Page 59
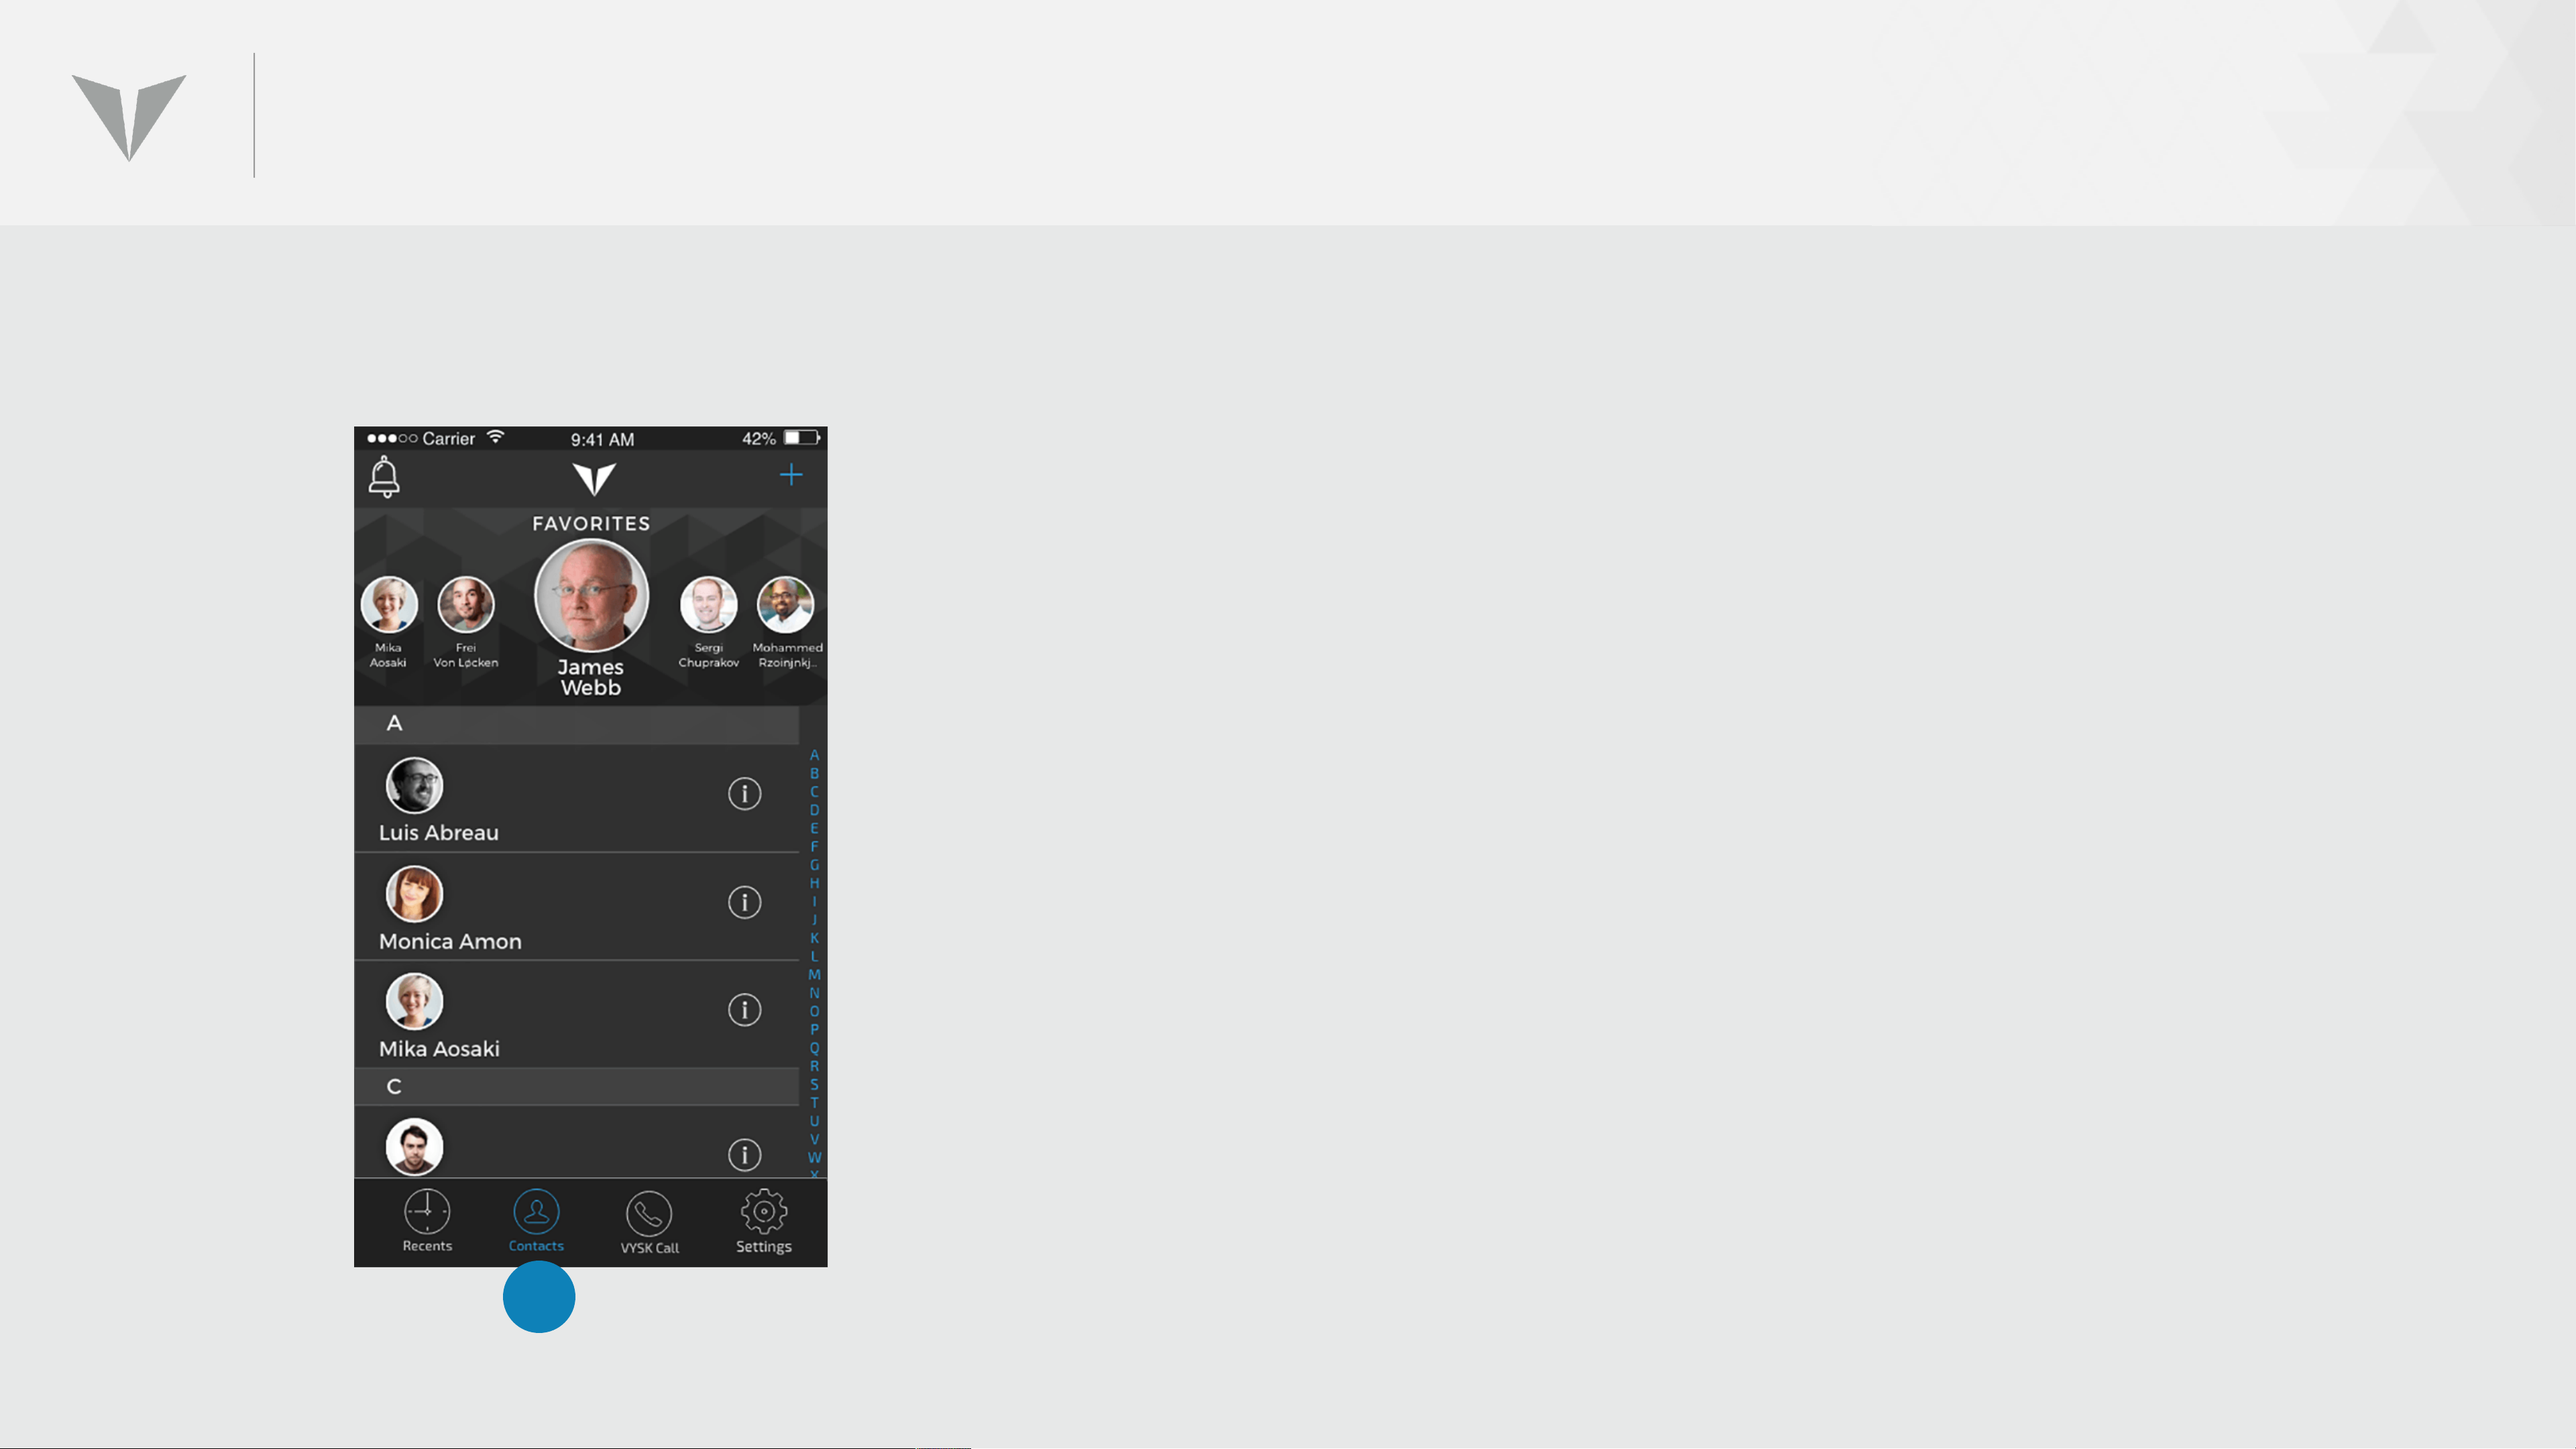
USING THE CONTACTS FEATURE
Users access the Contacts screen by clicking on the
Contacts icon (1) on the bottom toolbar. Functions of
the contacts page include:
• Searching / Adding new contacts
• Deleting contacts
• Customizing user information
• Accepting Contact Invites
1
Page 60
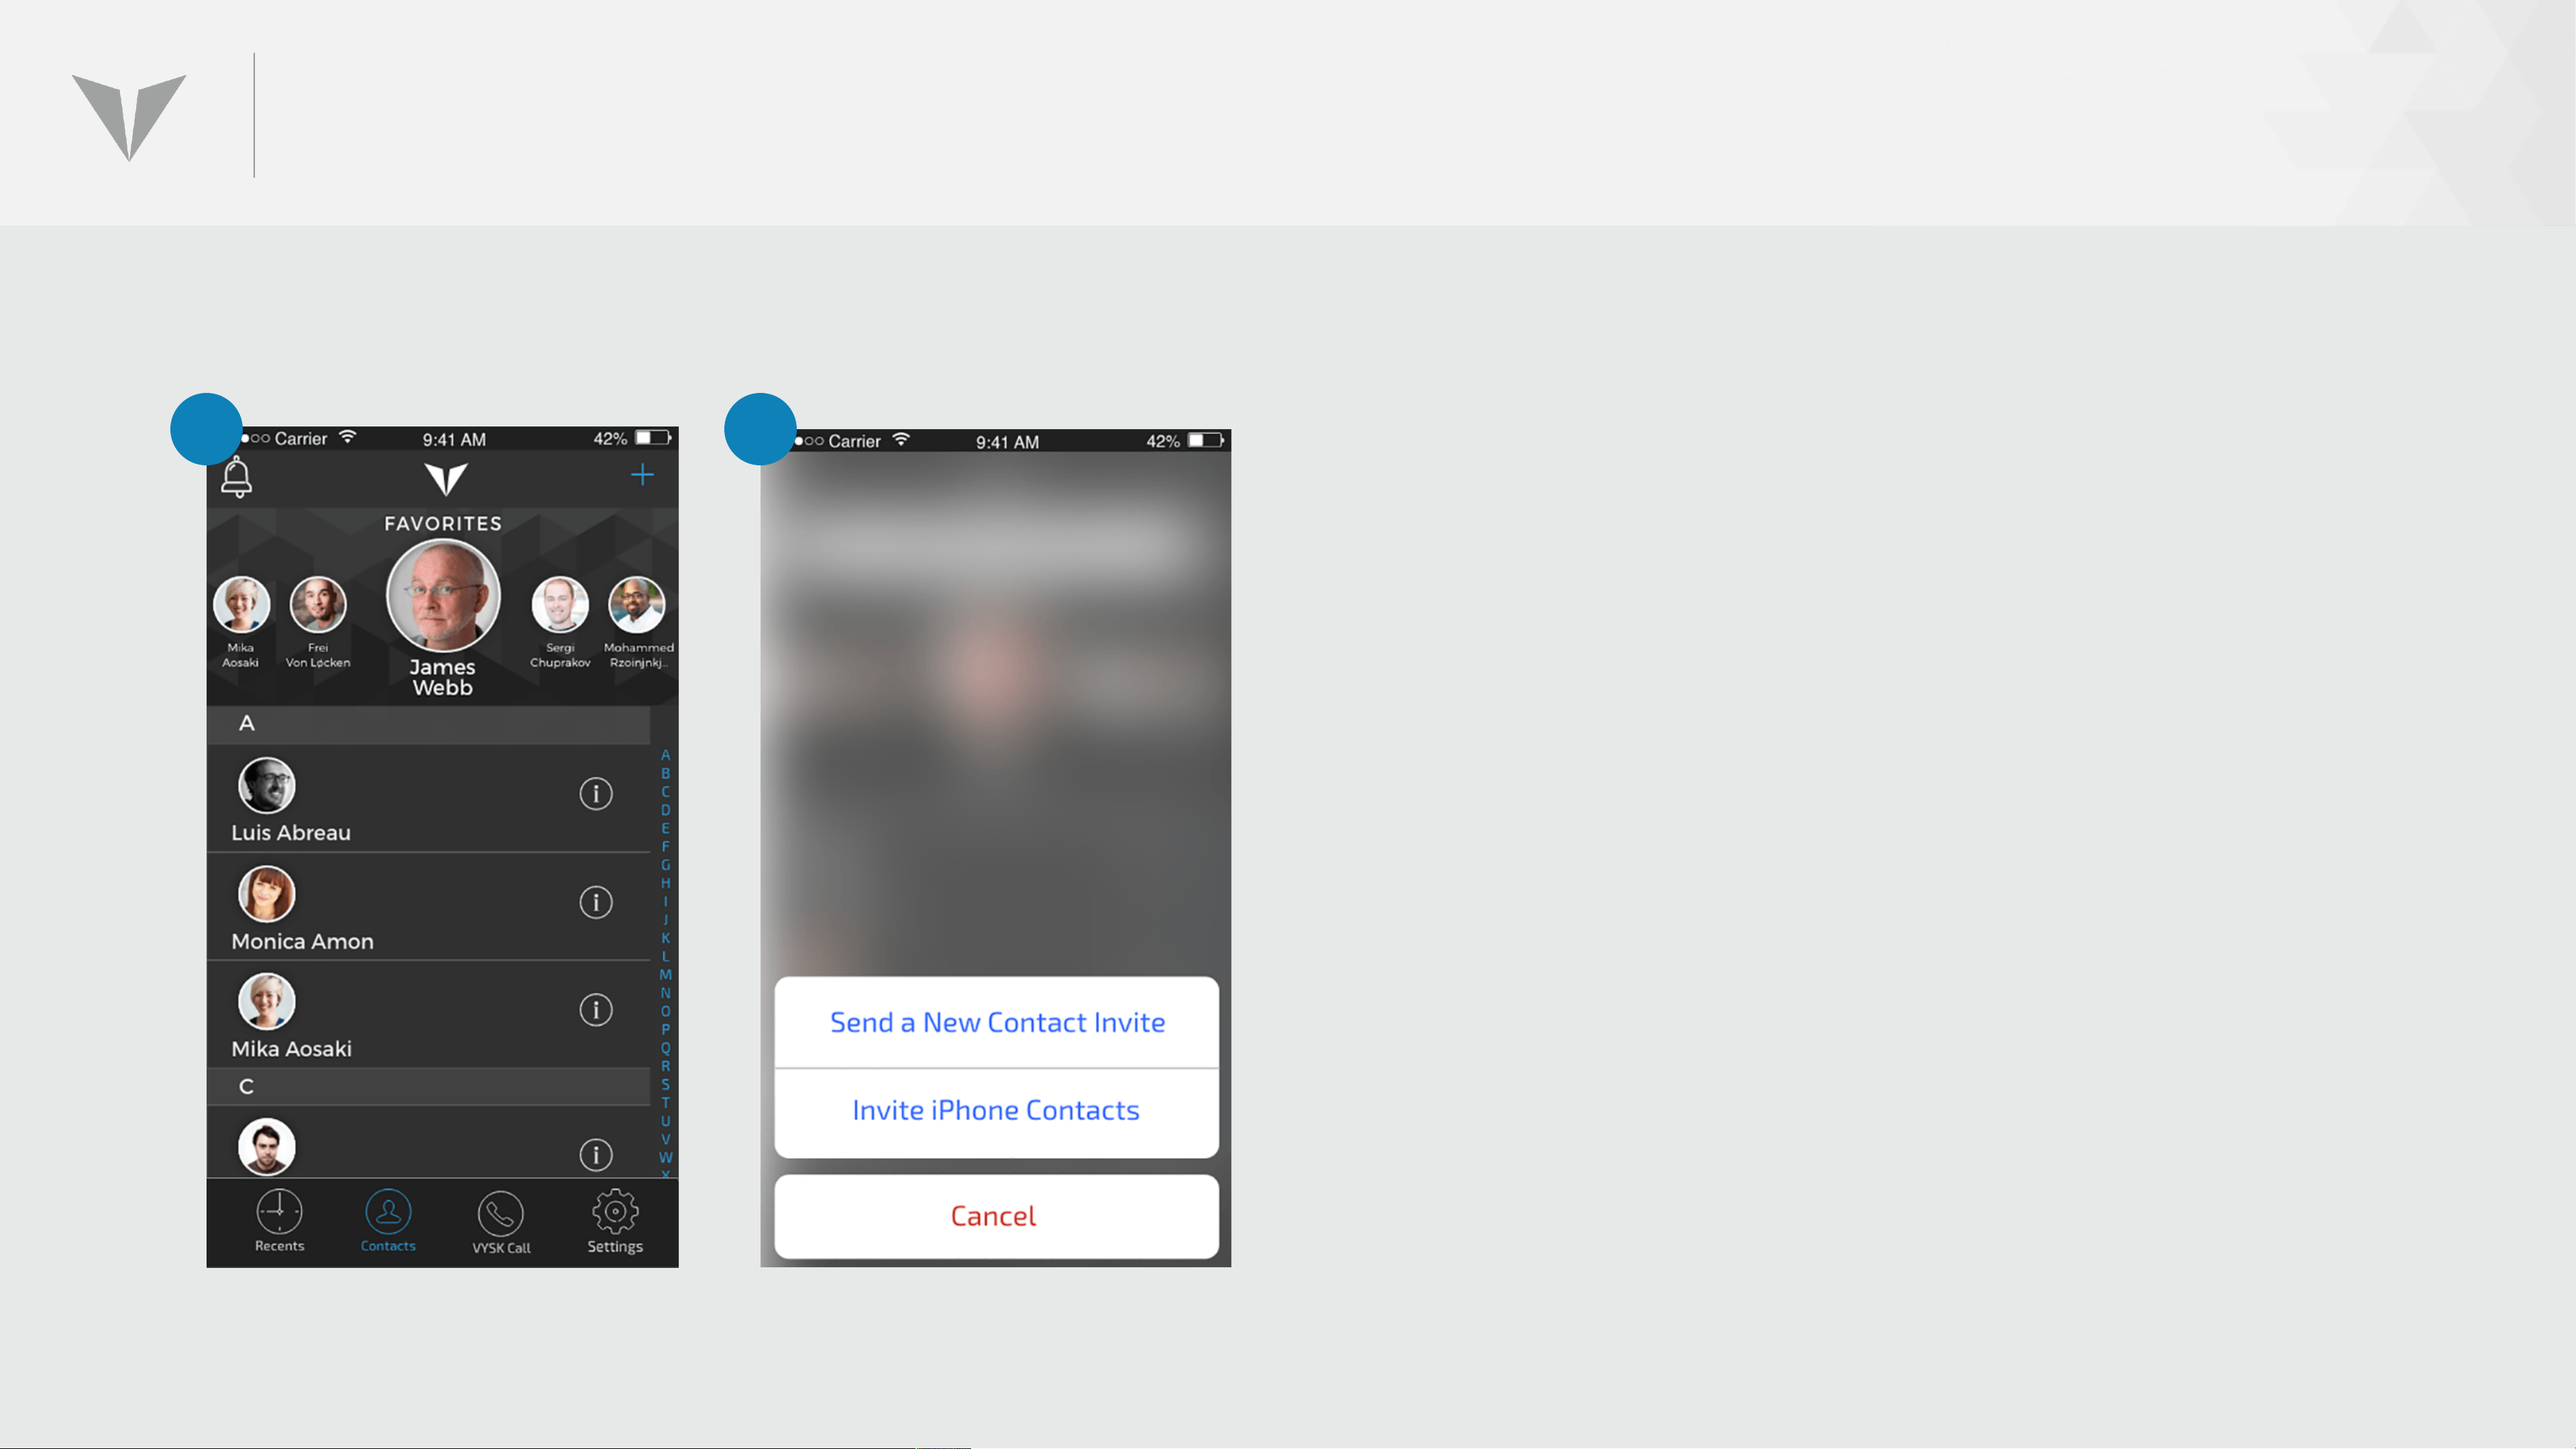
SEARCHING/ADDING NEW CONTACTS
1
2
1. To add a new Contact, hit the (+) icon on the
top right of the screen.
2. Next, choose either Send a New Contact
Invite to search the Vysk network and
manually invite users to join your Vysk
contacts list or choose Invite iPhone
Contacts to invite your existing iOS contacts
to join your Vysk contacts list
Page 61
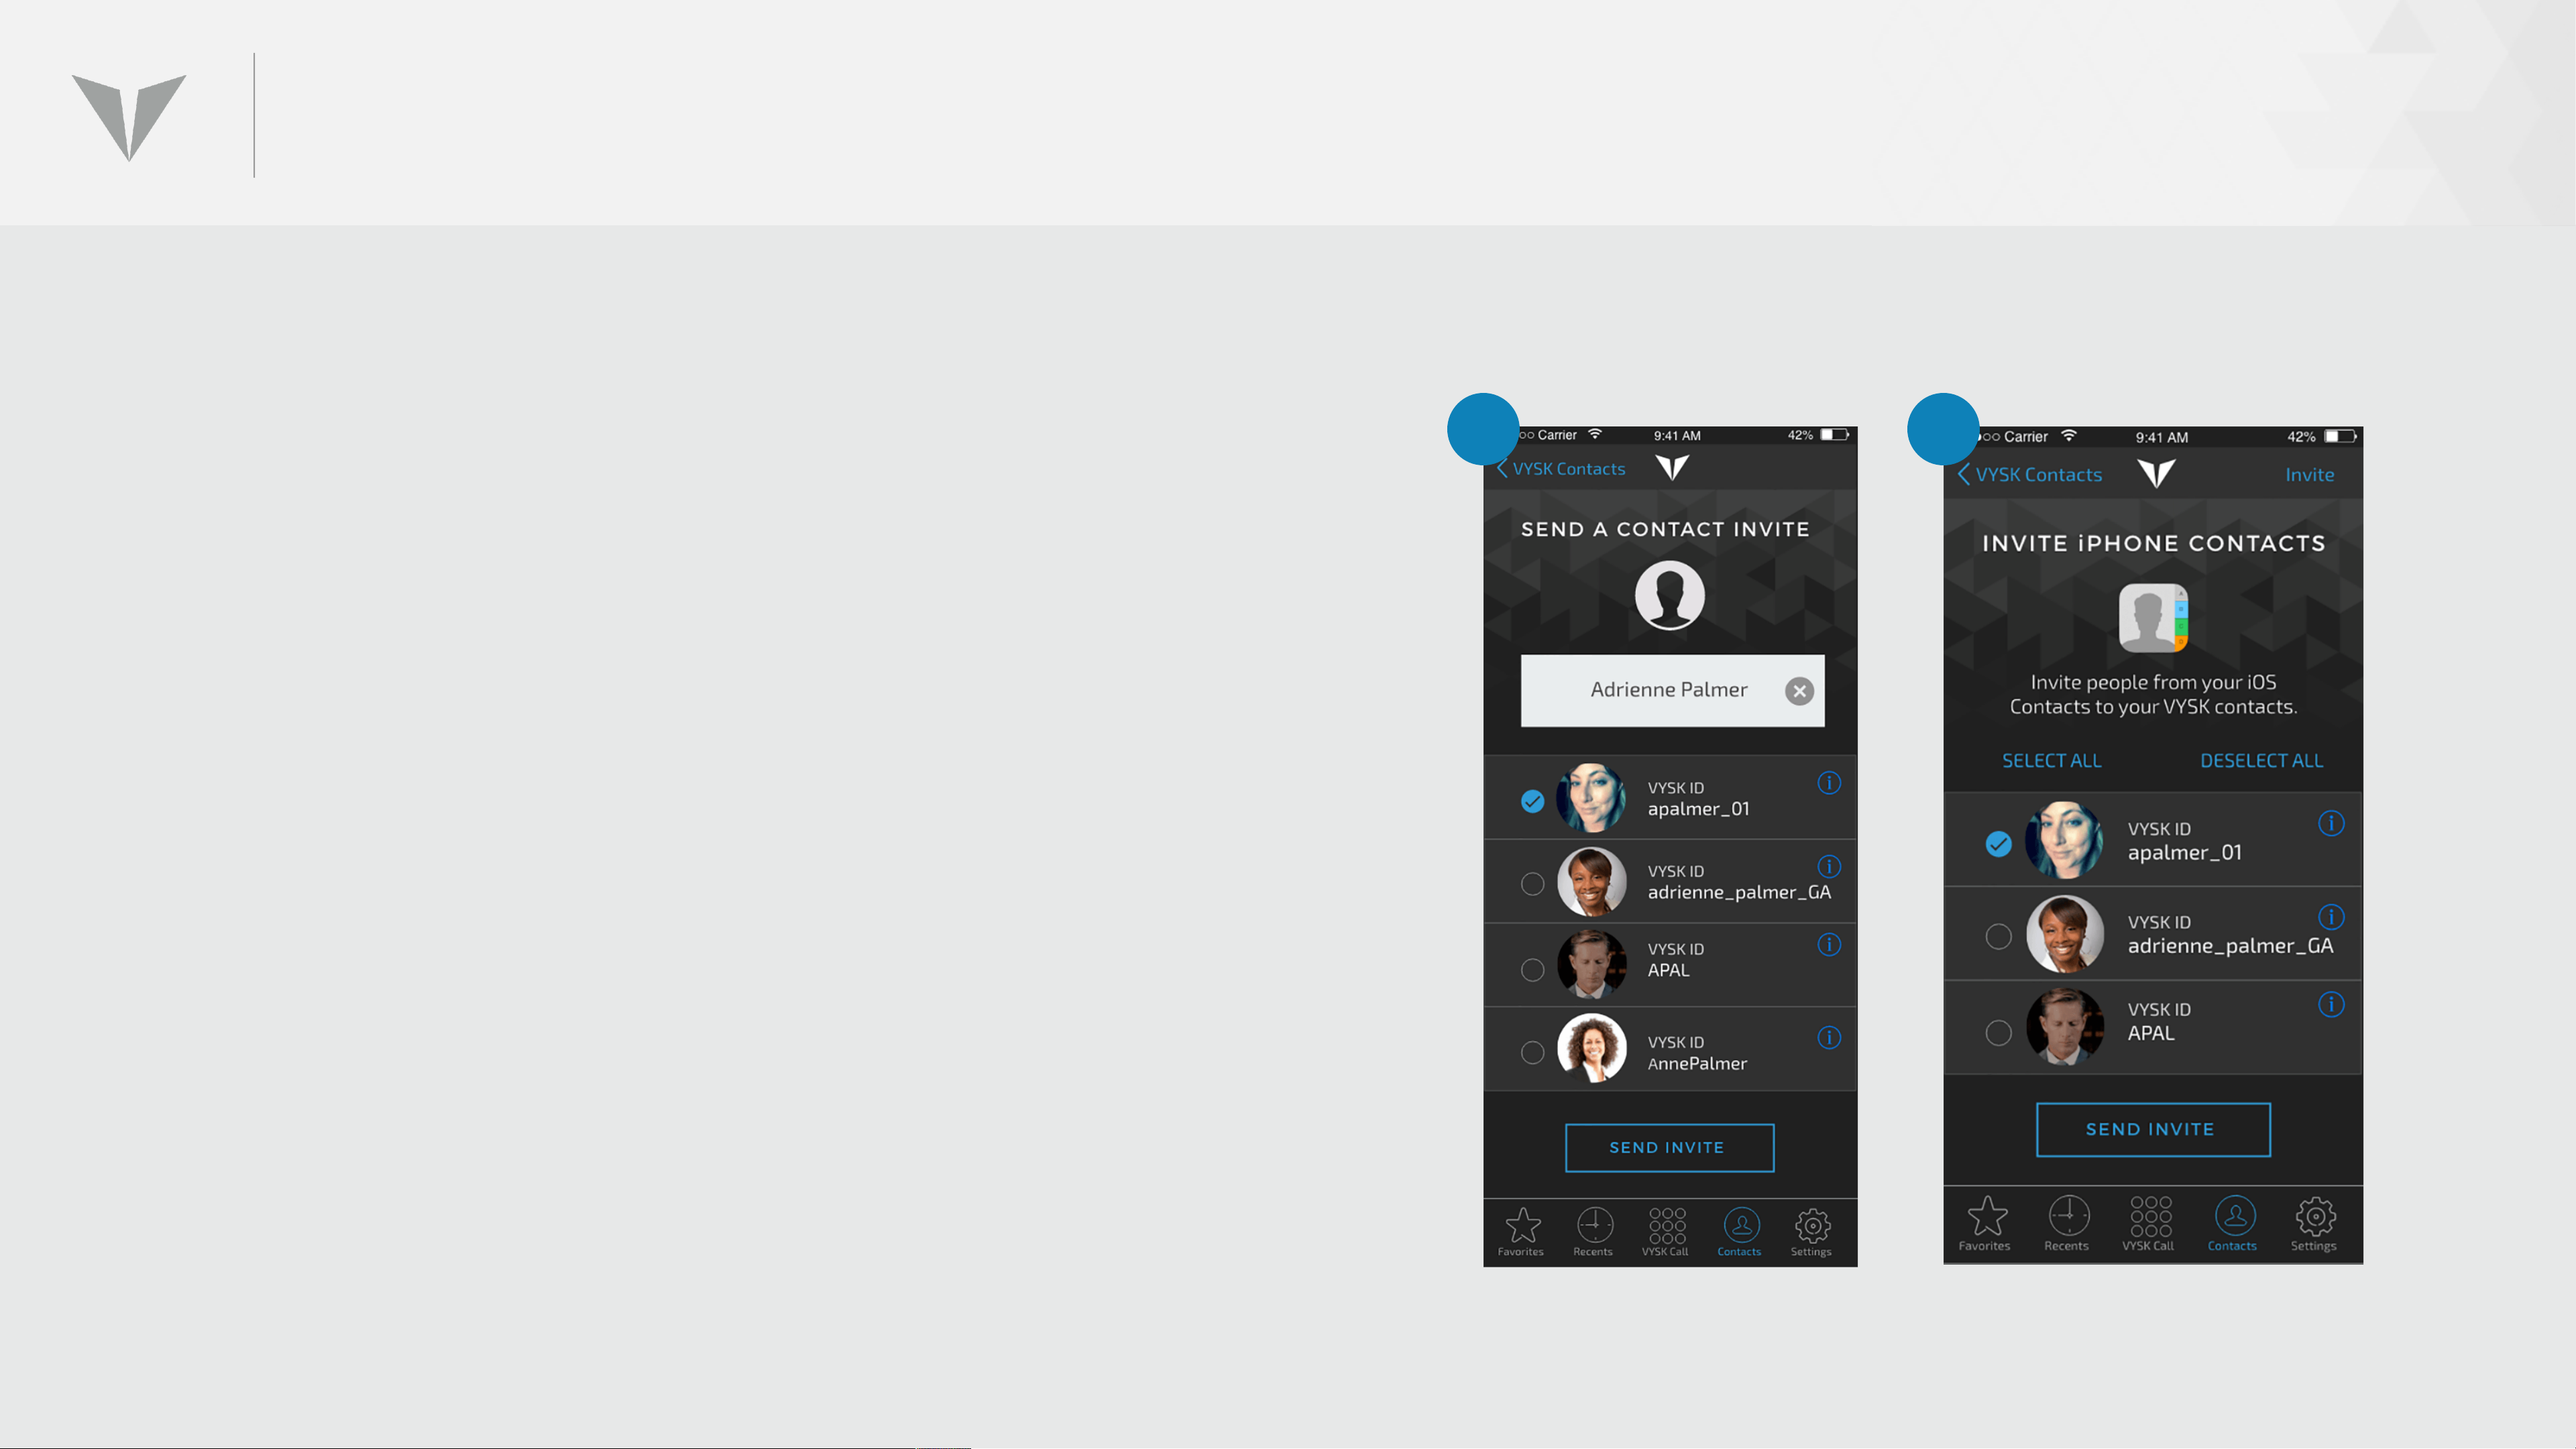
SEARCHING/ADDING NEW CONTACTS
3. To send a new contact invite to someone in the
Vysk database, search for a contact by Name, Email,
Company, or Vysk ID. Select the contact you want
to invite by checking the corresponding circle to the
left of their profile picture and clicking Send Invite.
4. To find potential Vysk contacts that are already in
3 4
your iOS contacts, choose Invite iPhone Contacts.
Select the contact you want to invite by checking
the appropriate circle and clicking Send Invite.
Page 62
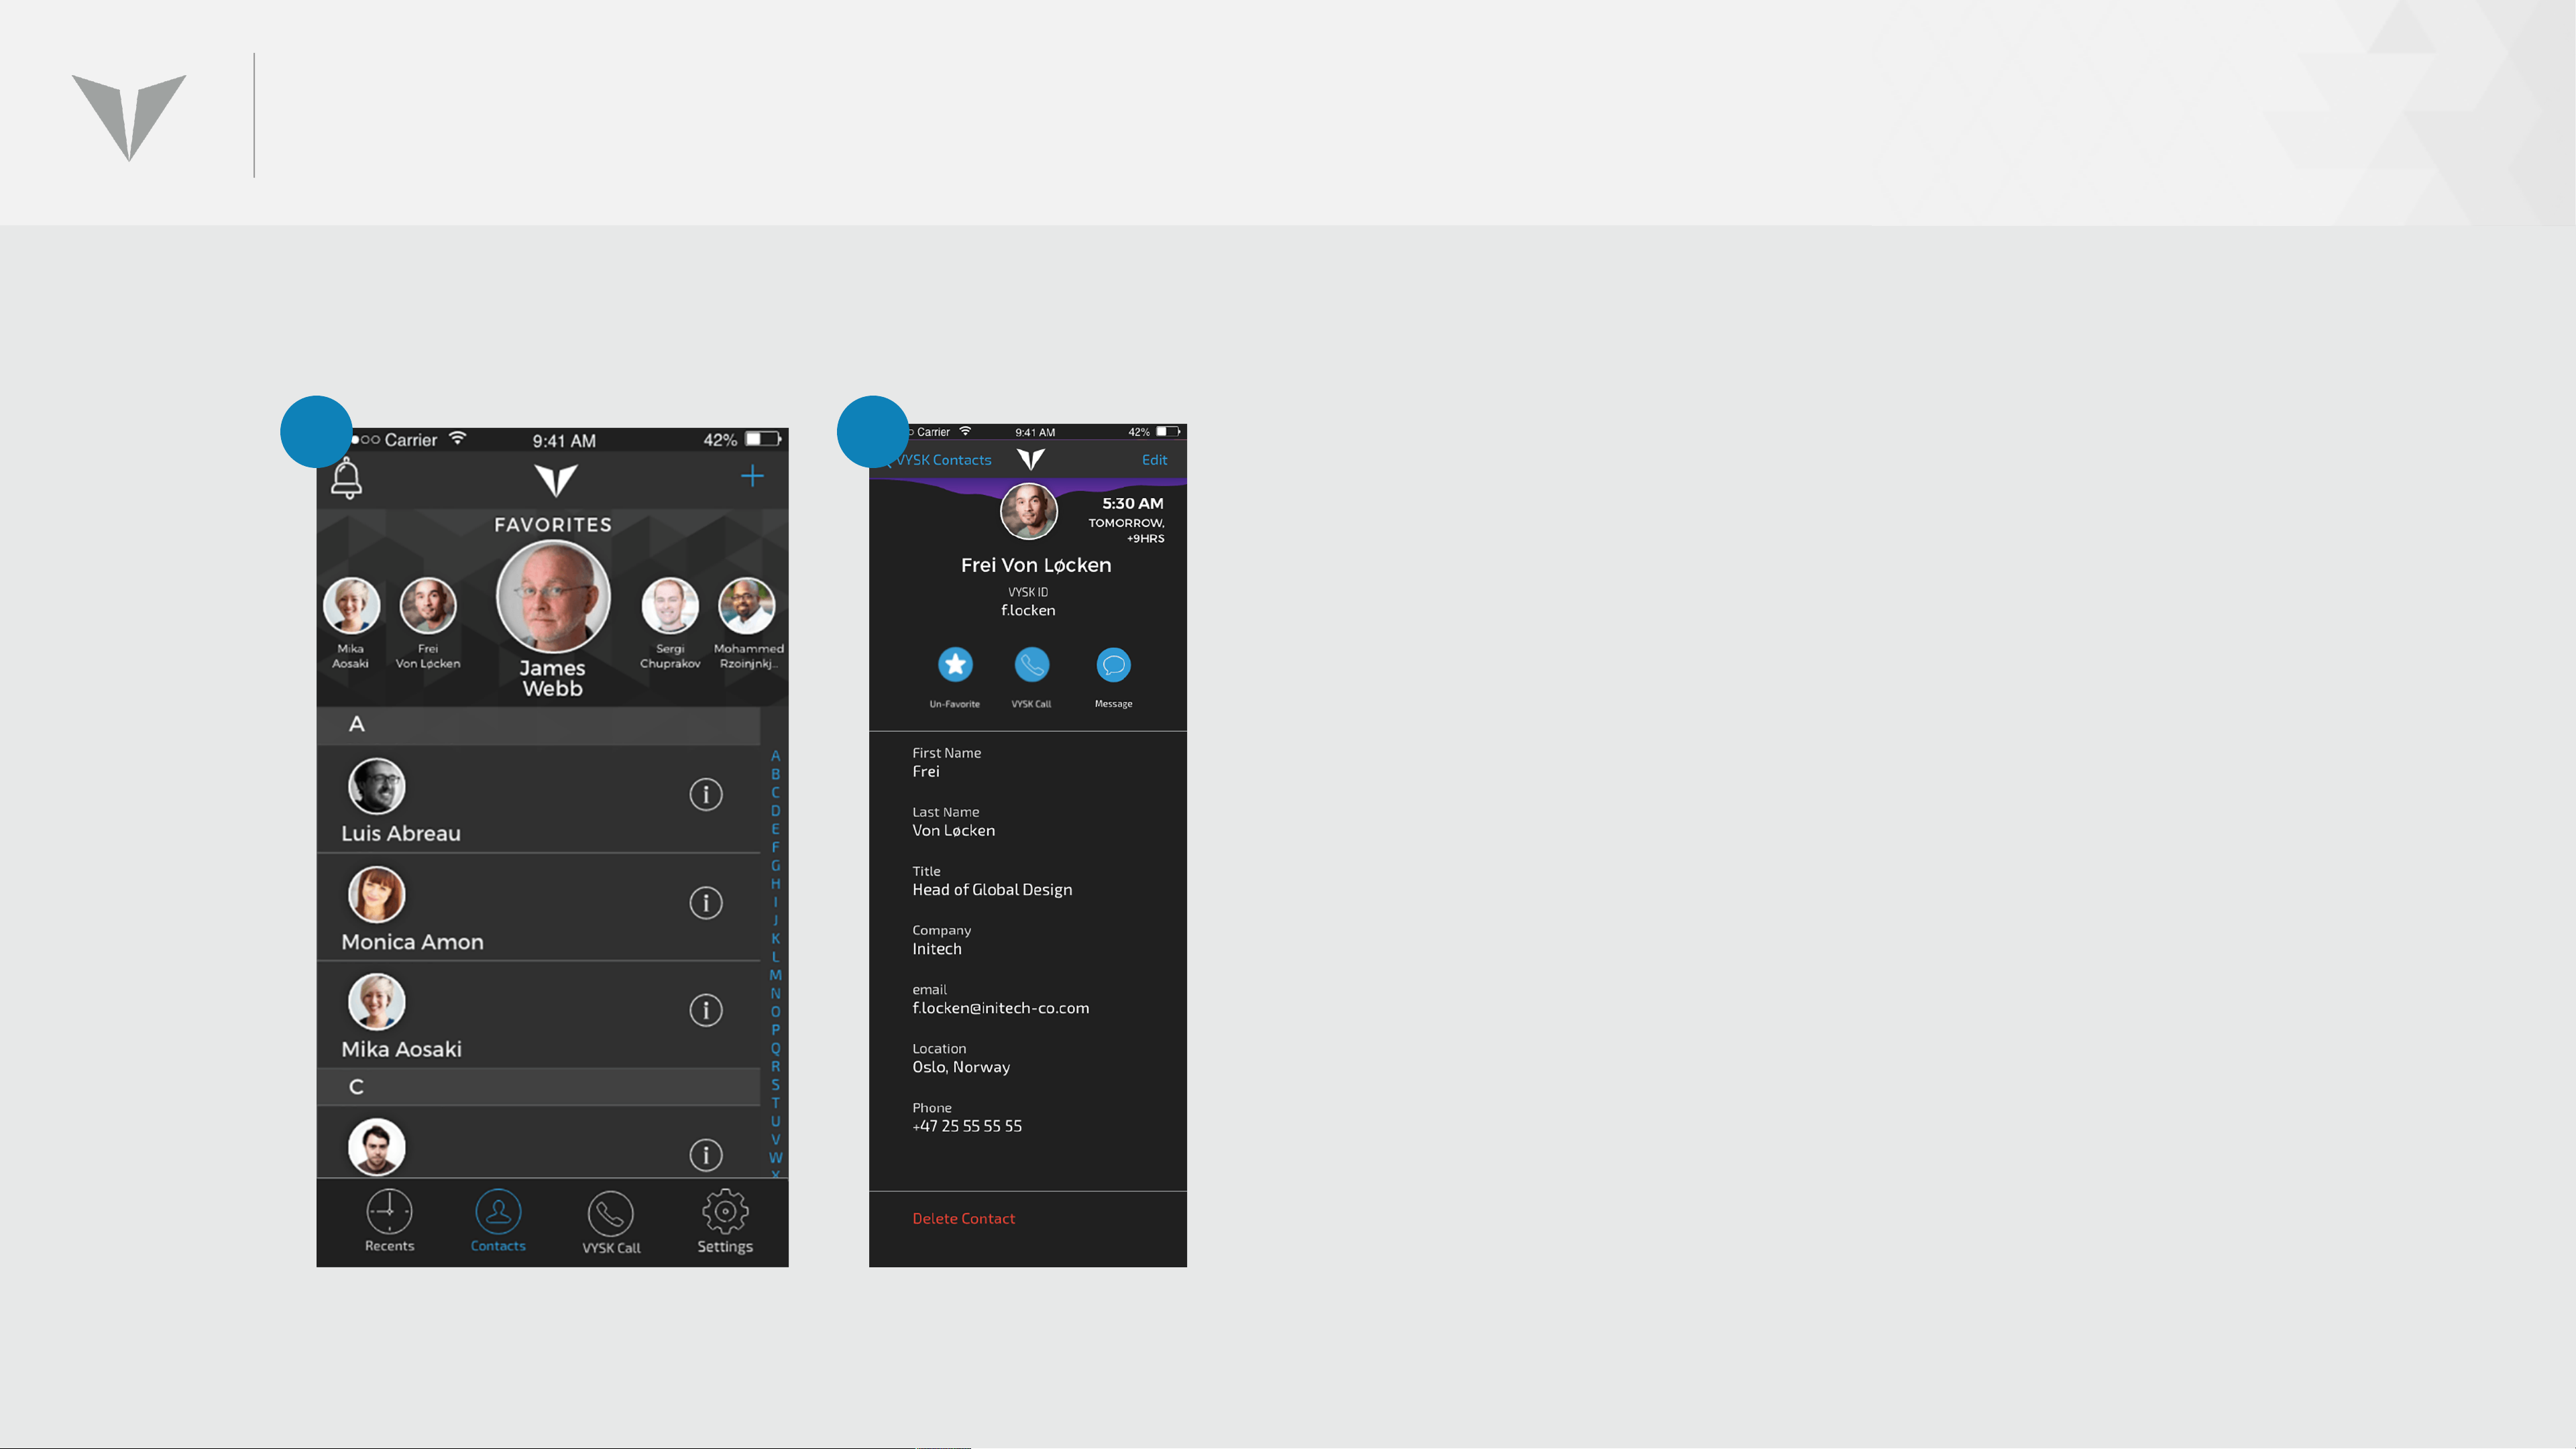
DELETING CONTACTS
1
2
1. To delete a contact, click on the
contact from the Contacts screen to
enter the the contact detail page.
2. Select Delete Contact from the
bottom of the page
Page 63
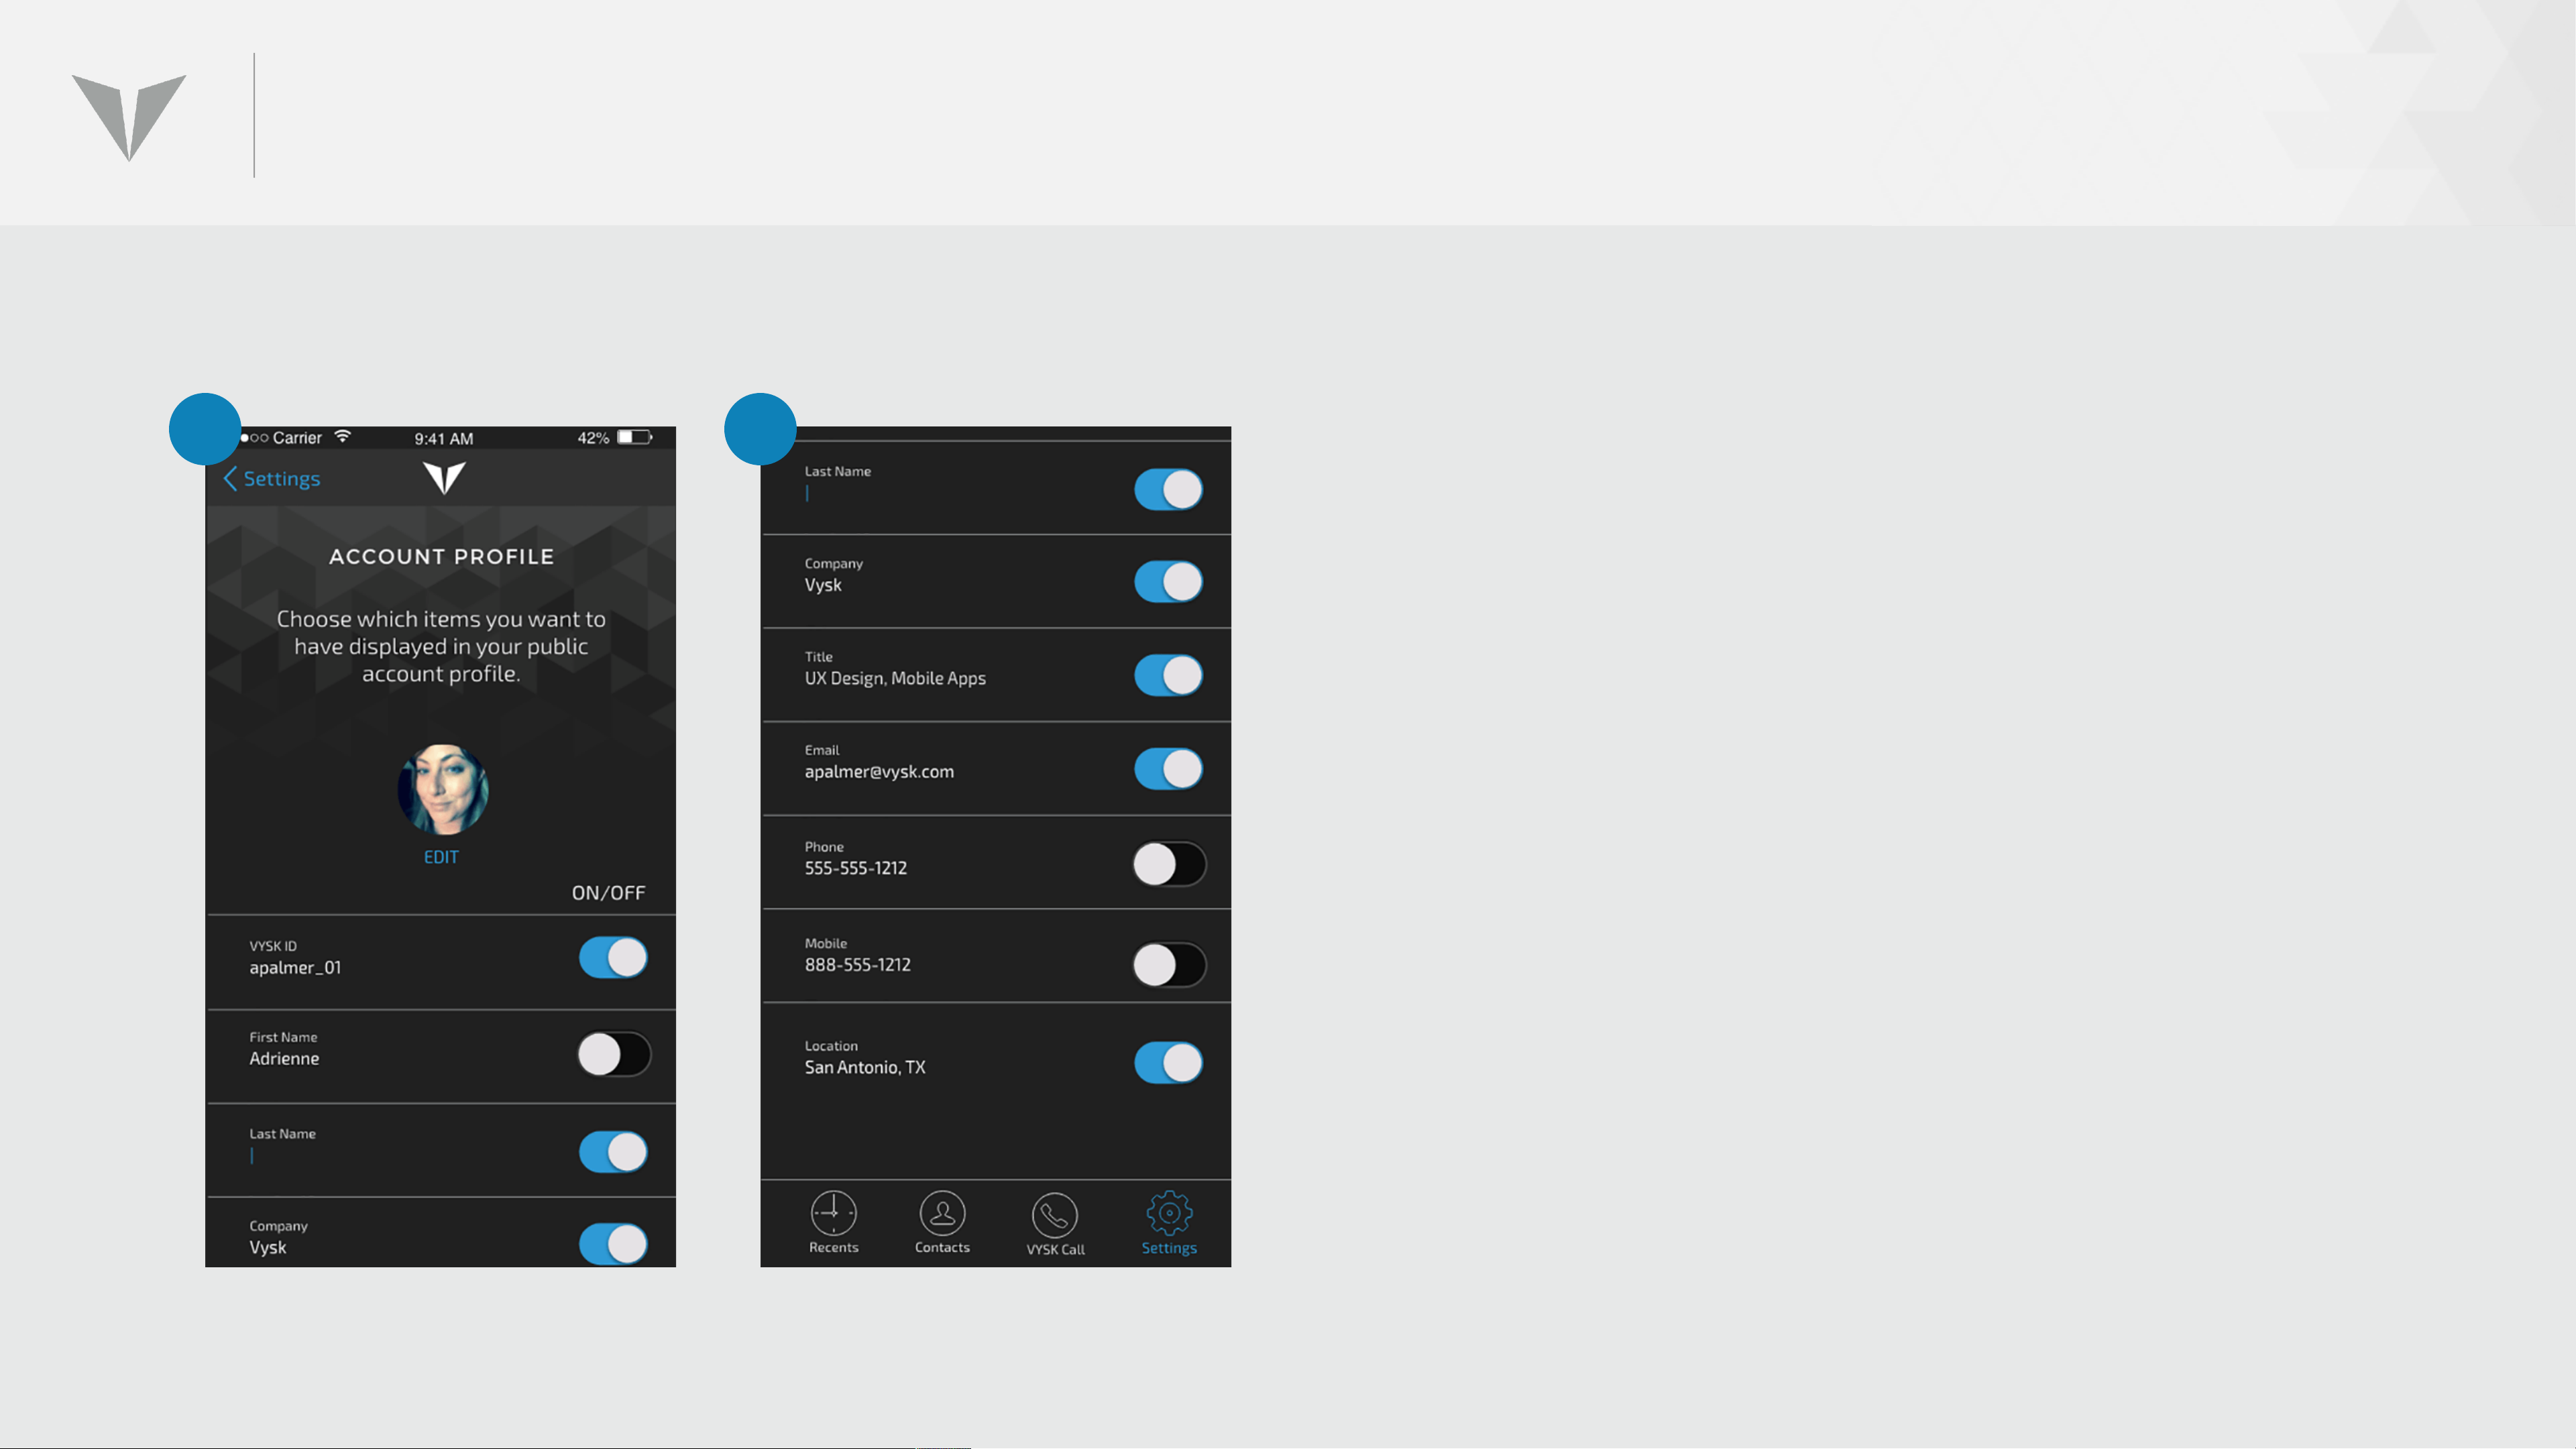
CUSTOMIZING USER INFORMATION
1.1 1.2
1. To access the user’s profile, go to Settings
> Account Profile. The Account Profile
screen will appear, allowing the user to
decide which information they want to
share and make searchable by other QS1
users.
Vysk ID will always remain searchable.
Turn on the other profile items to make
them searchable. Profile information can
be modified at any time.
Page 64
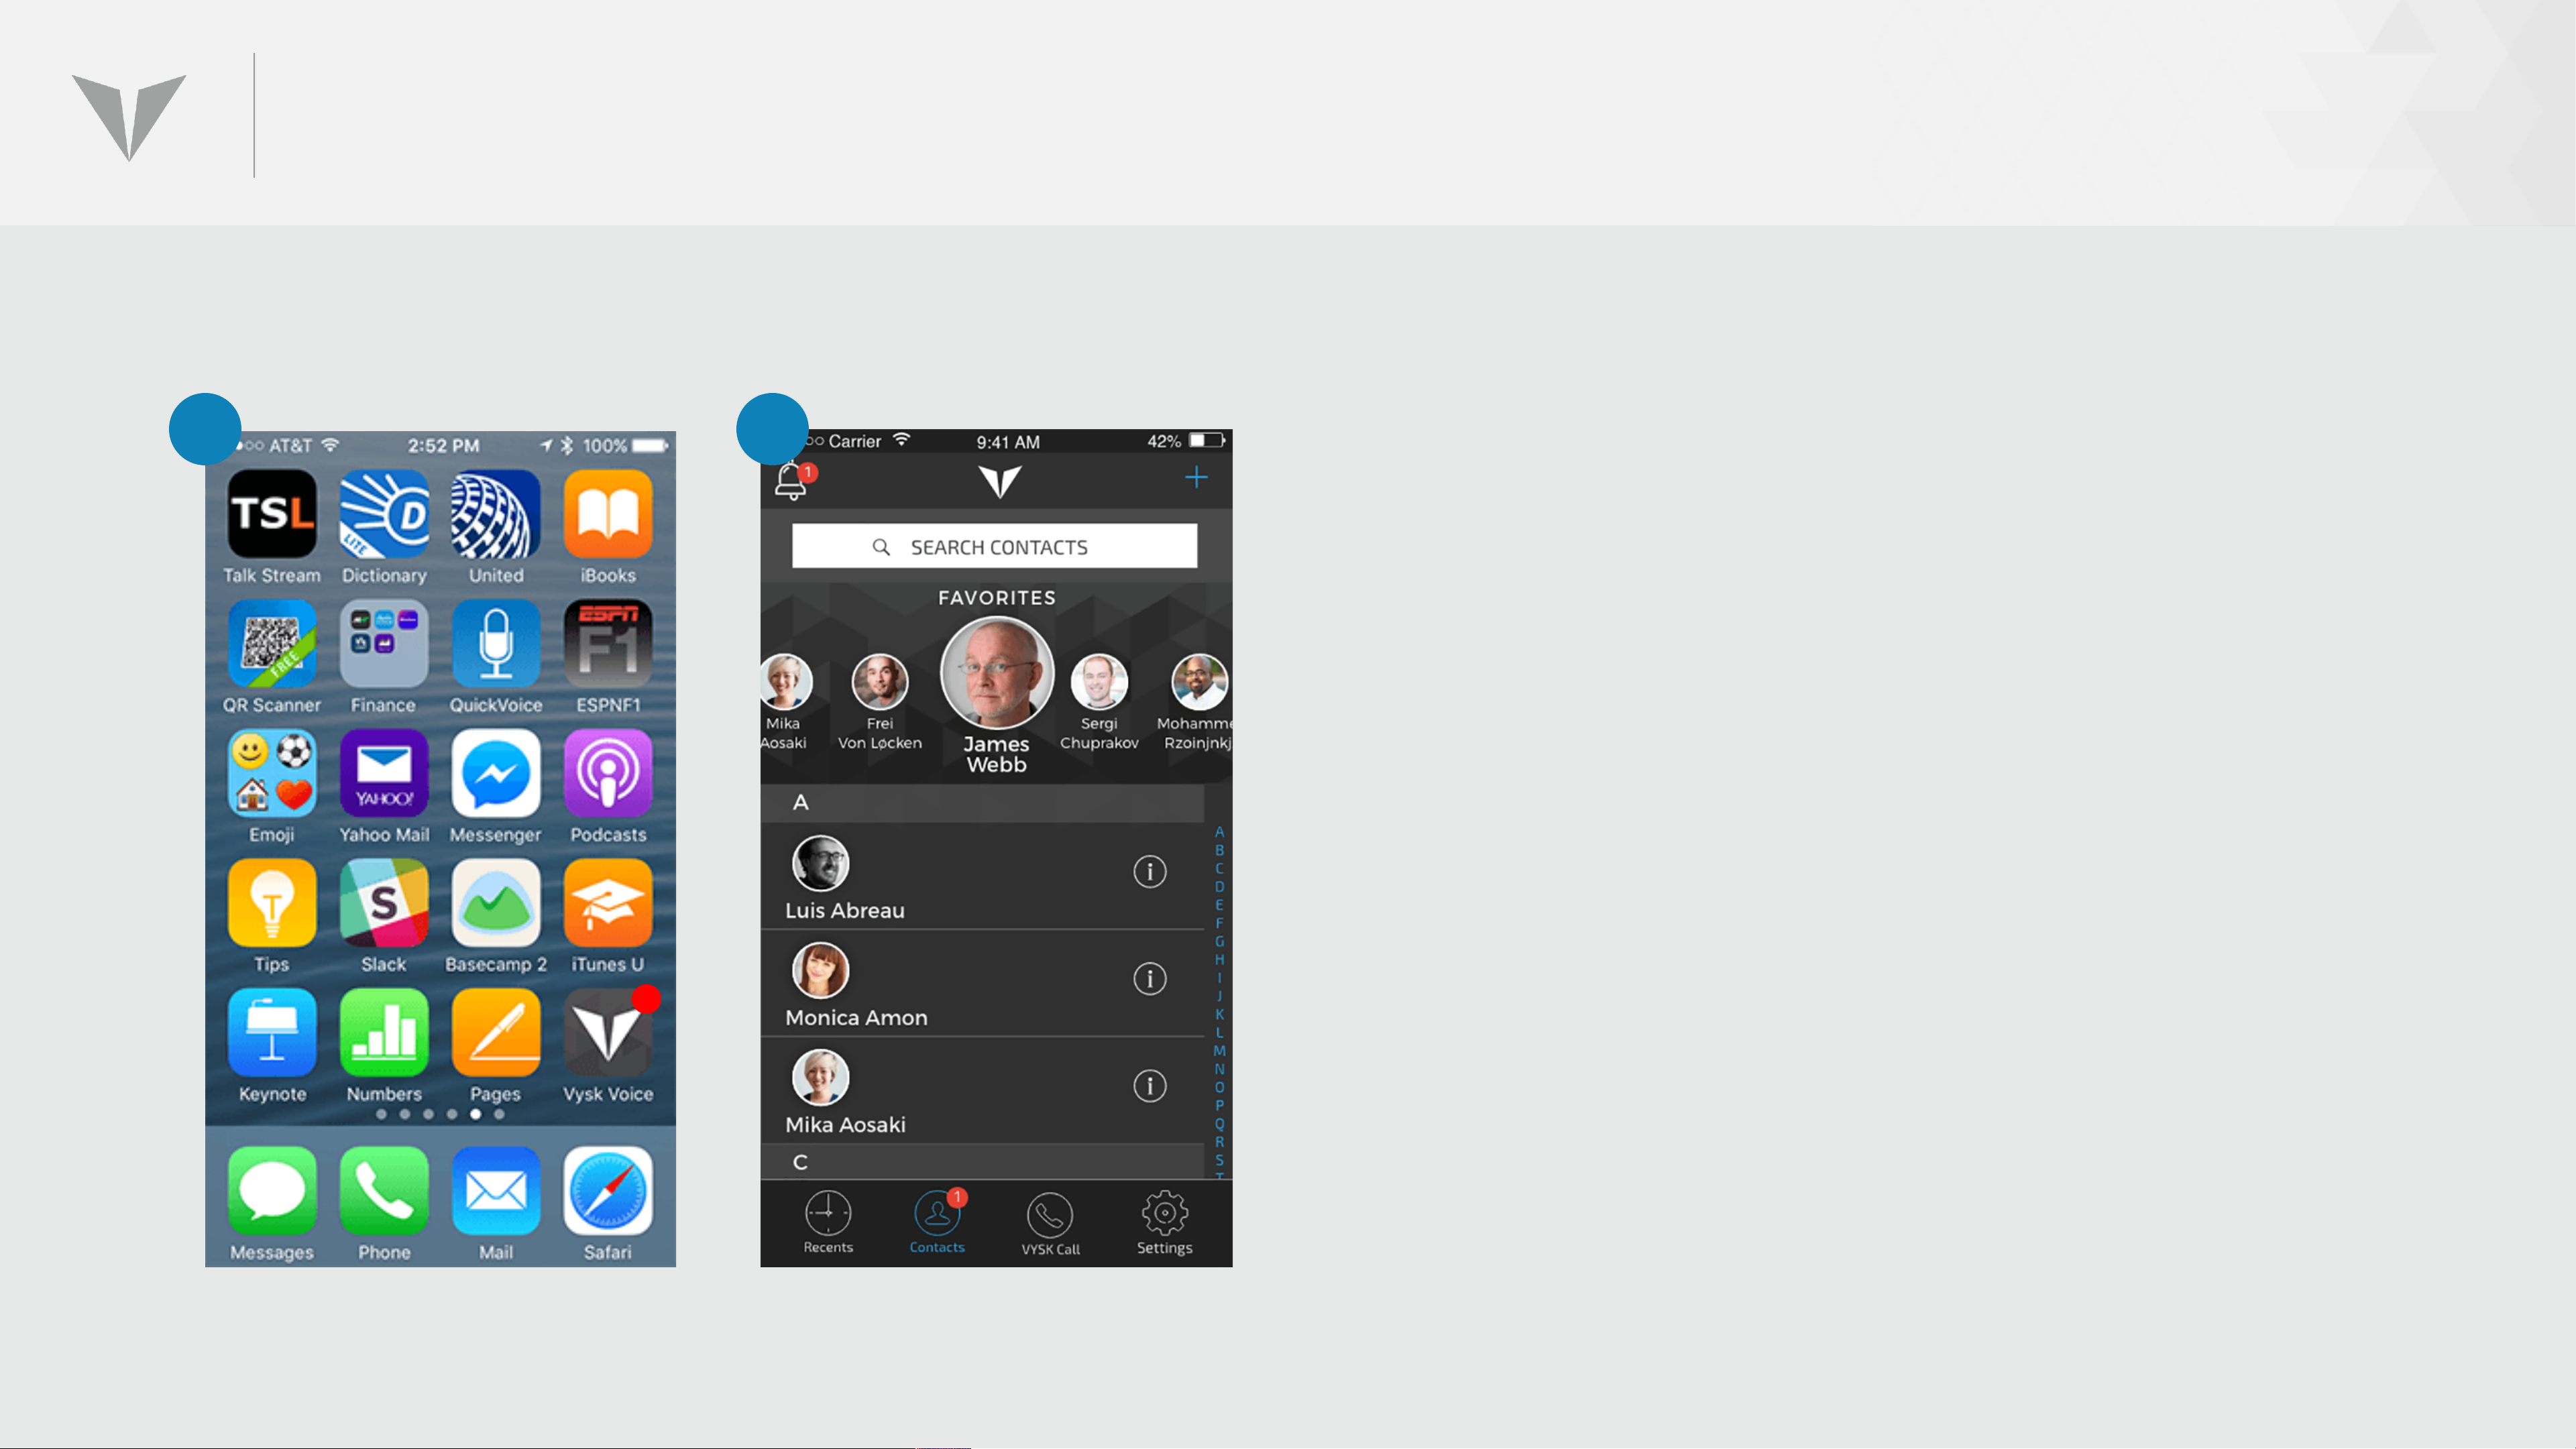
ACCEPTING CONTACT INVITES
1
2
1. When a user receives an invite, a
notification appears on the app icon
2. This notification will also appear
within the app on the Contacts screen.
Click on the Notification Bell at the top
left to see the Contact Requests
screen.
1
Page 65
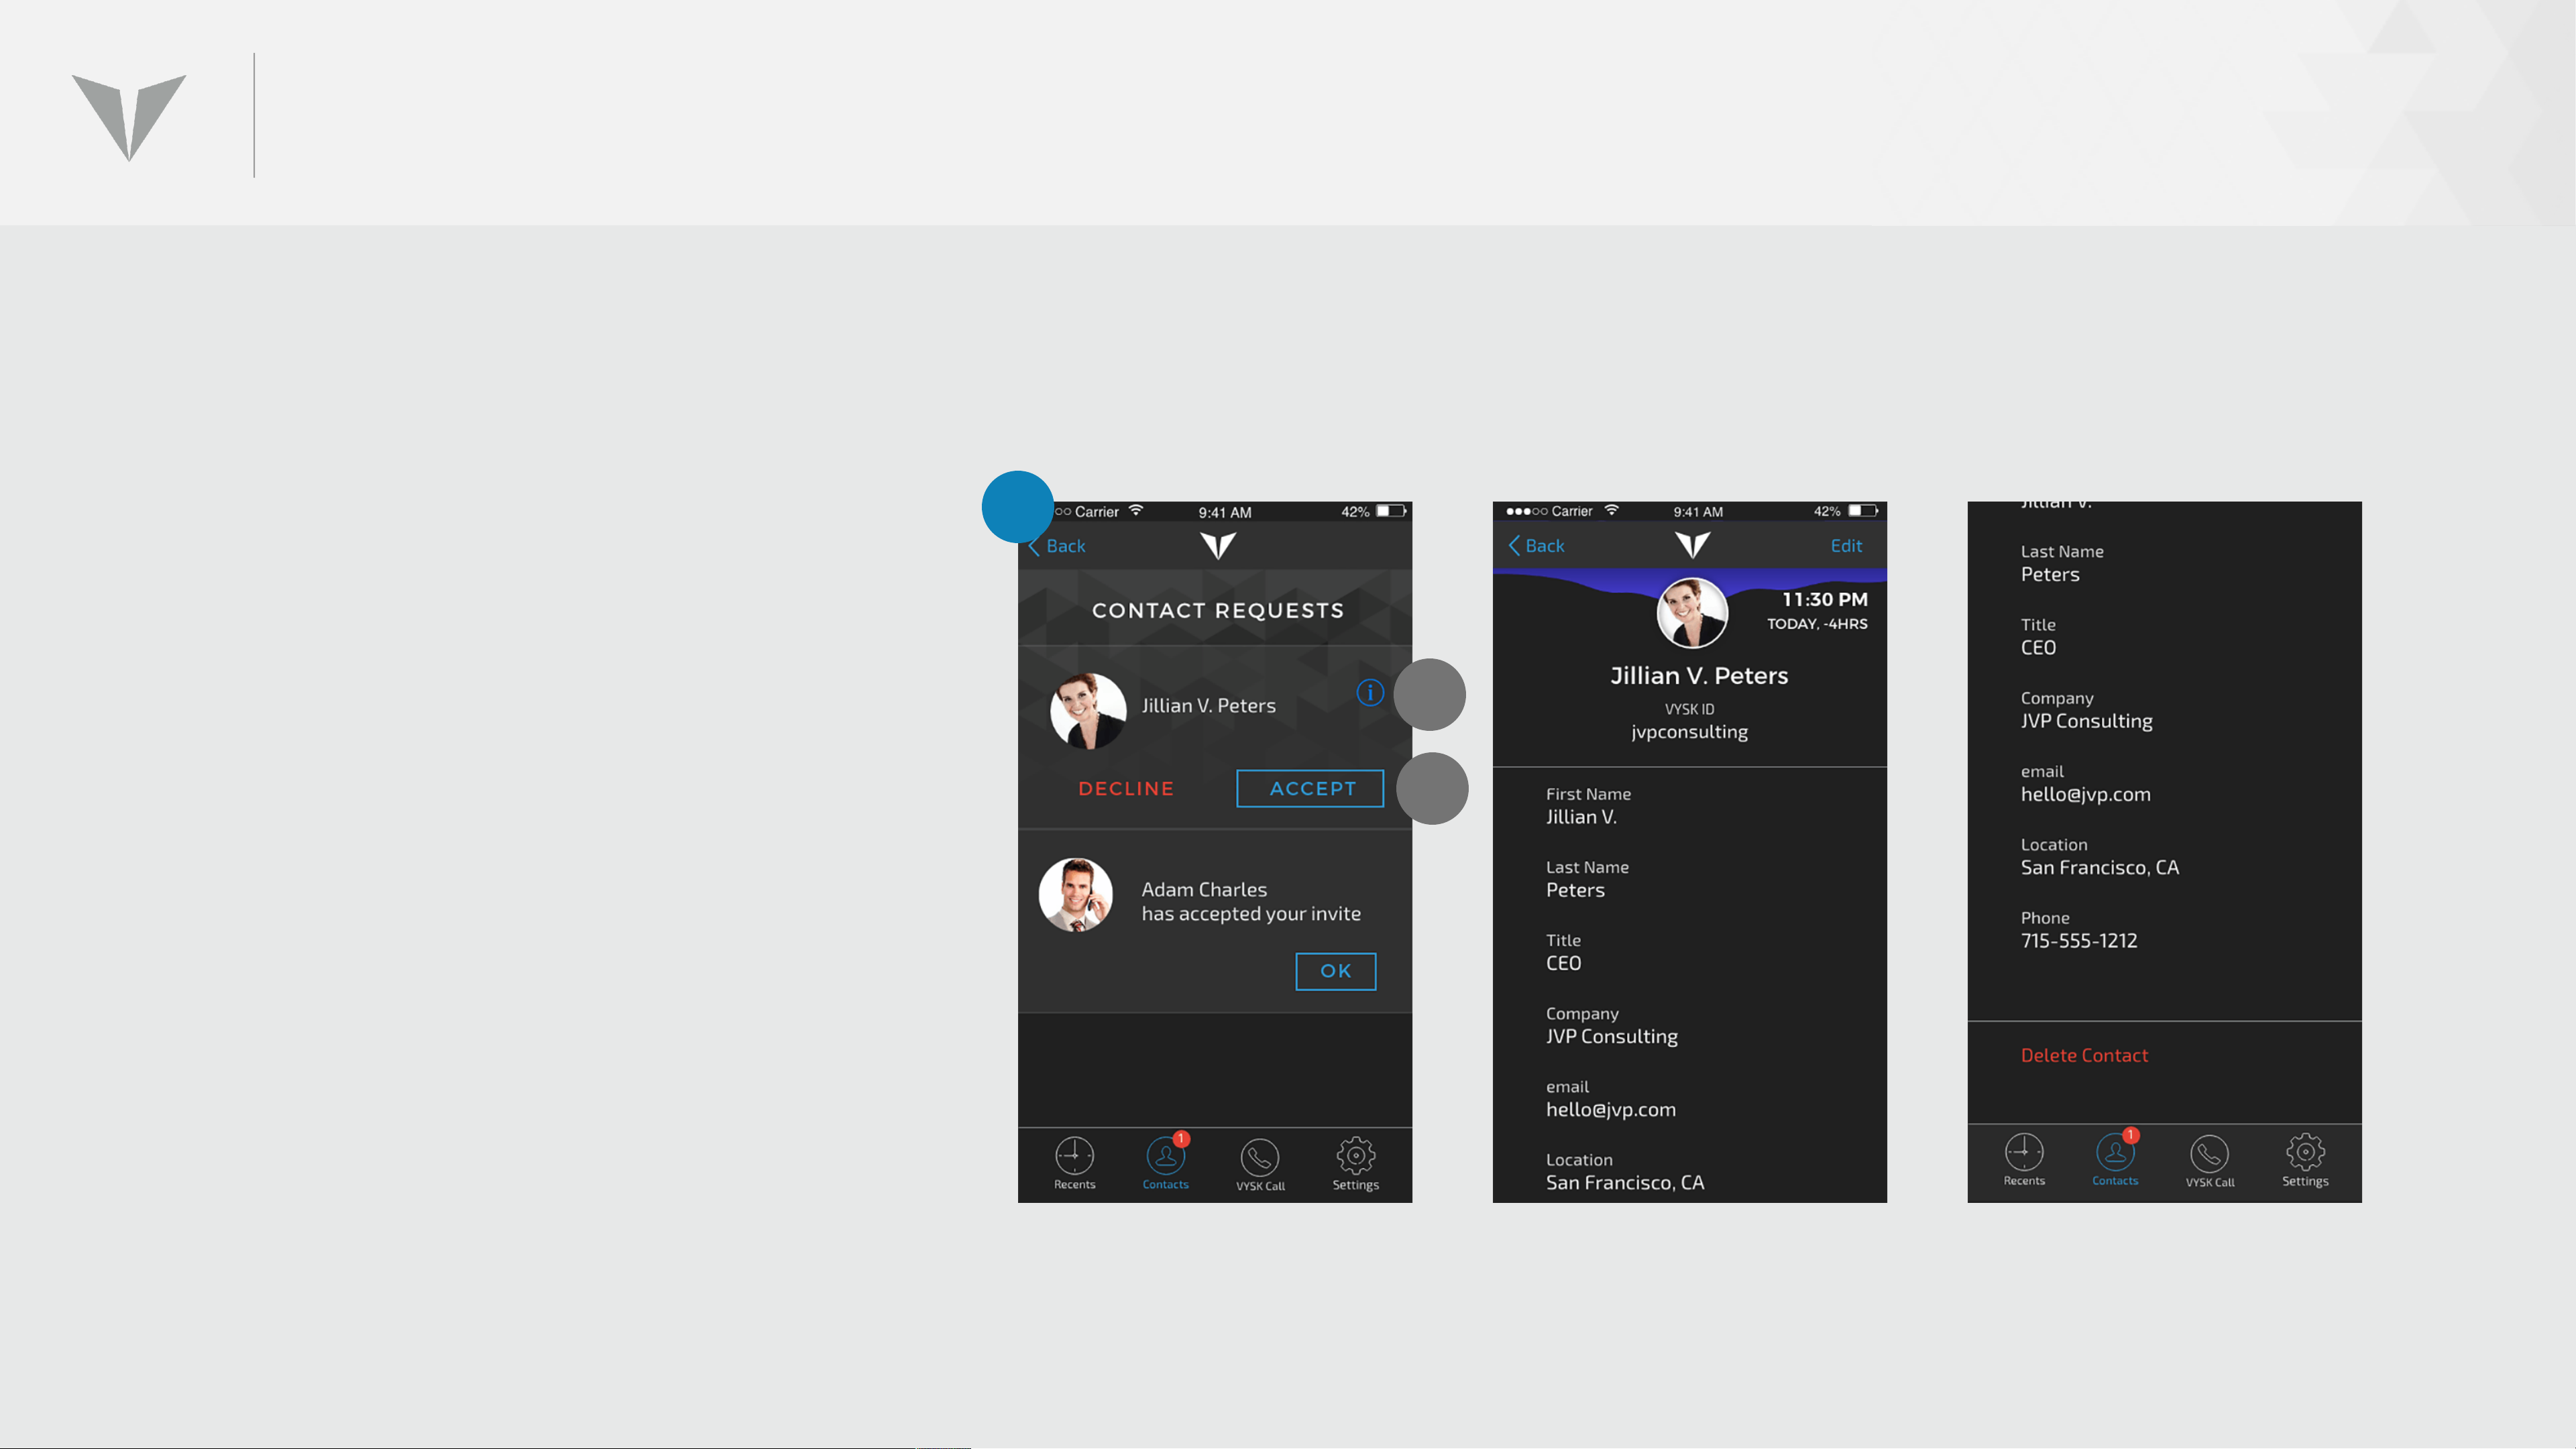
ACCEPTING CONTACT INVITES
3. To access more information about
the contact requester, click the
info icon on the Contact Requests
screen (A).
To accept the invite, click the
ACCEPT button on the Contact
3
A
B
Request Page (B)
Page 66

USING ADMIN & TOOLBAR FUNCTIONS
Page 67
QSI ADMIN AND TOOLBAR FUNCTIONS
The QS1 has a number of easy-to-use administrative functions that are
accessible using the icons on the toolbar that appears at the bottom of
each screen (1). These functions include:
• Recents
• Contacts
These functions are described in detail on the following pages. To utilize
each function, simply click on that icon and a new page will appear with
additional menu items.
• Vysk Call
• Settings
1
Page 68
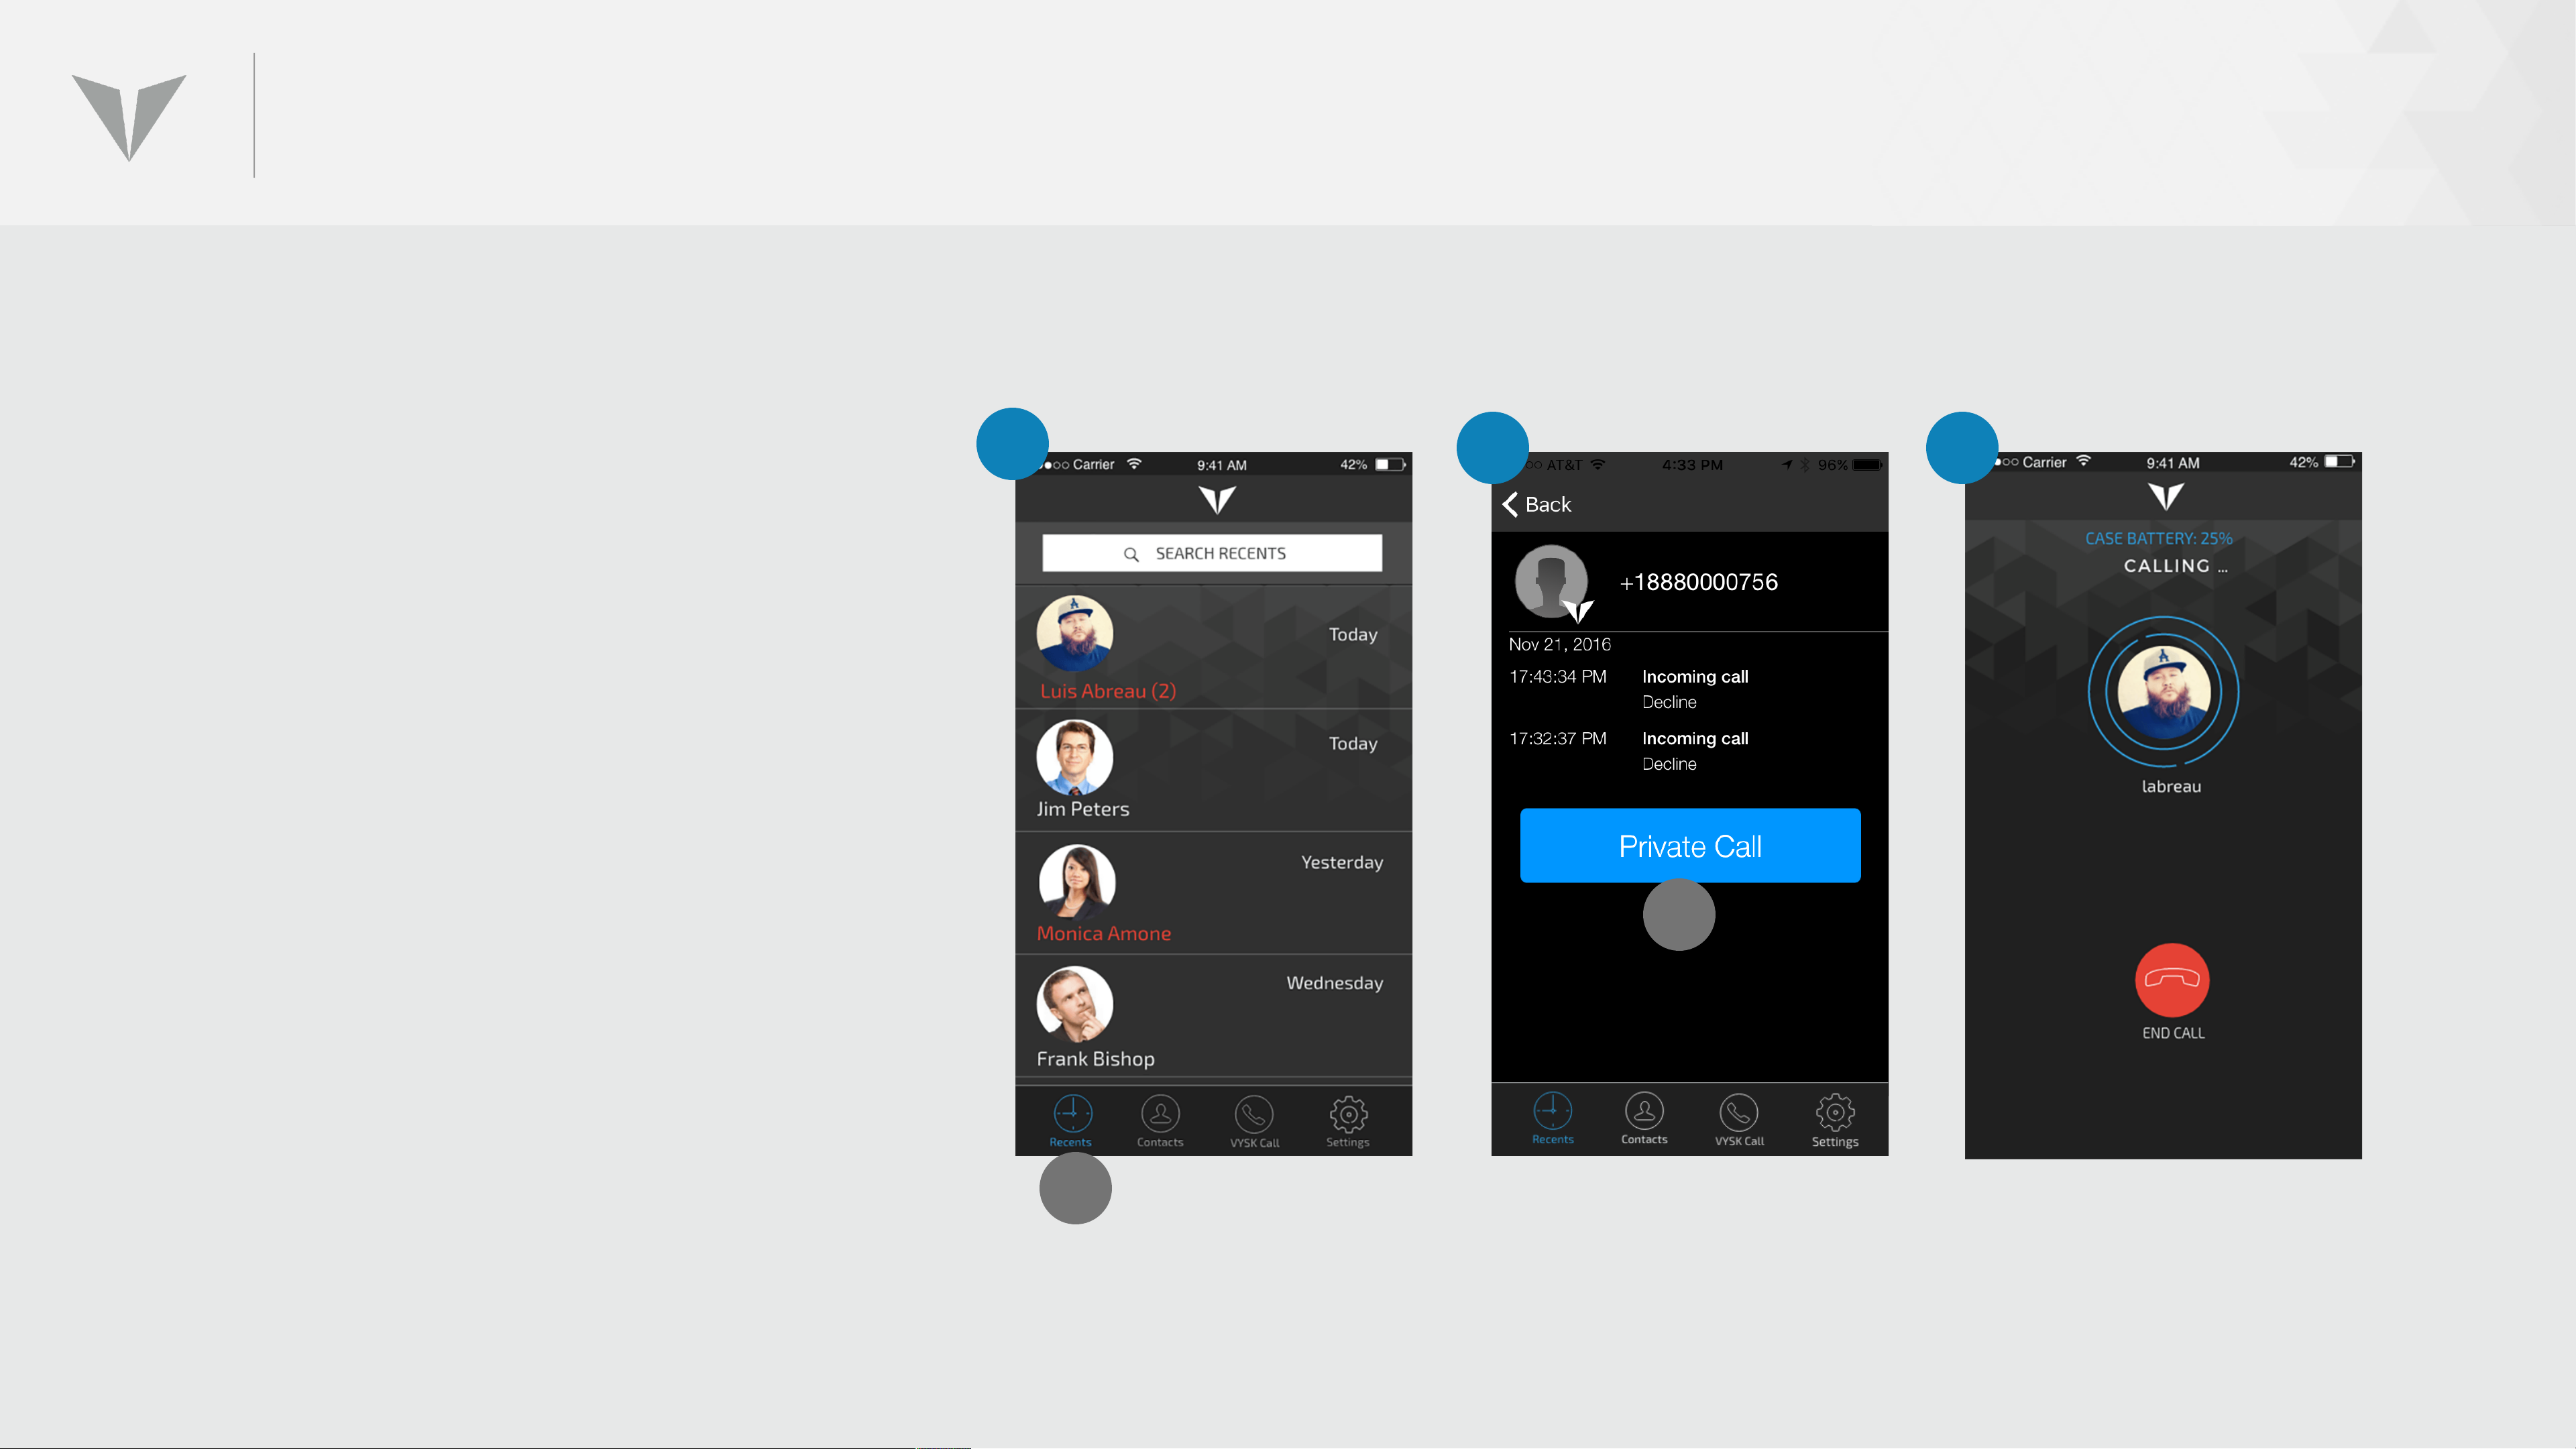
RECENTS
The Recents feature works the same
as the Recents feature in Apple iOS.
1. When the Recents toolbar icon is
clicked (A) a page appears that lists
the most recent Vysk secure calls,
VYSK ID and an indication of when
1
2
3
the call took place.
2. Clicking on the record shows
information related to previous
calls to/from the same number.
3. A call can be reinitiated by clicking
on the Private Call button (B).
B
A
Page 69
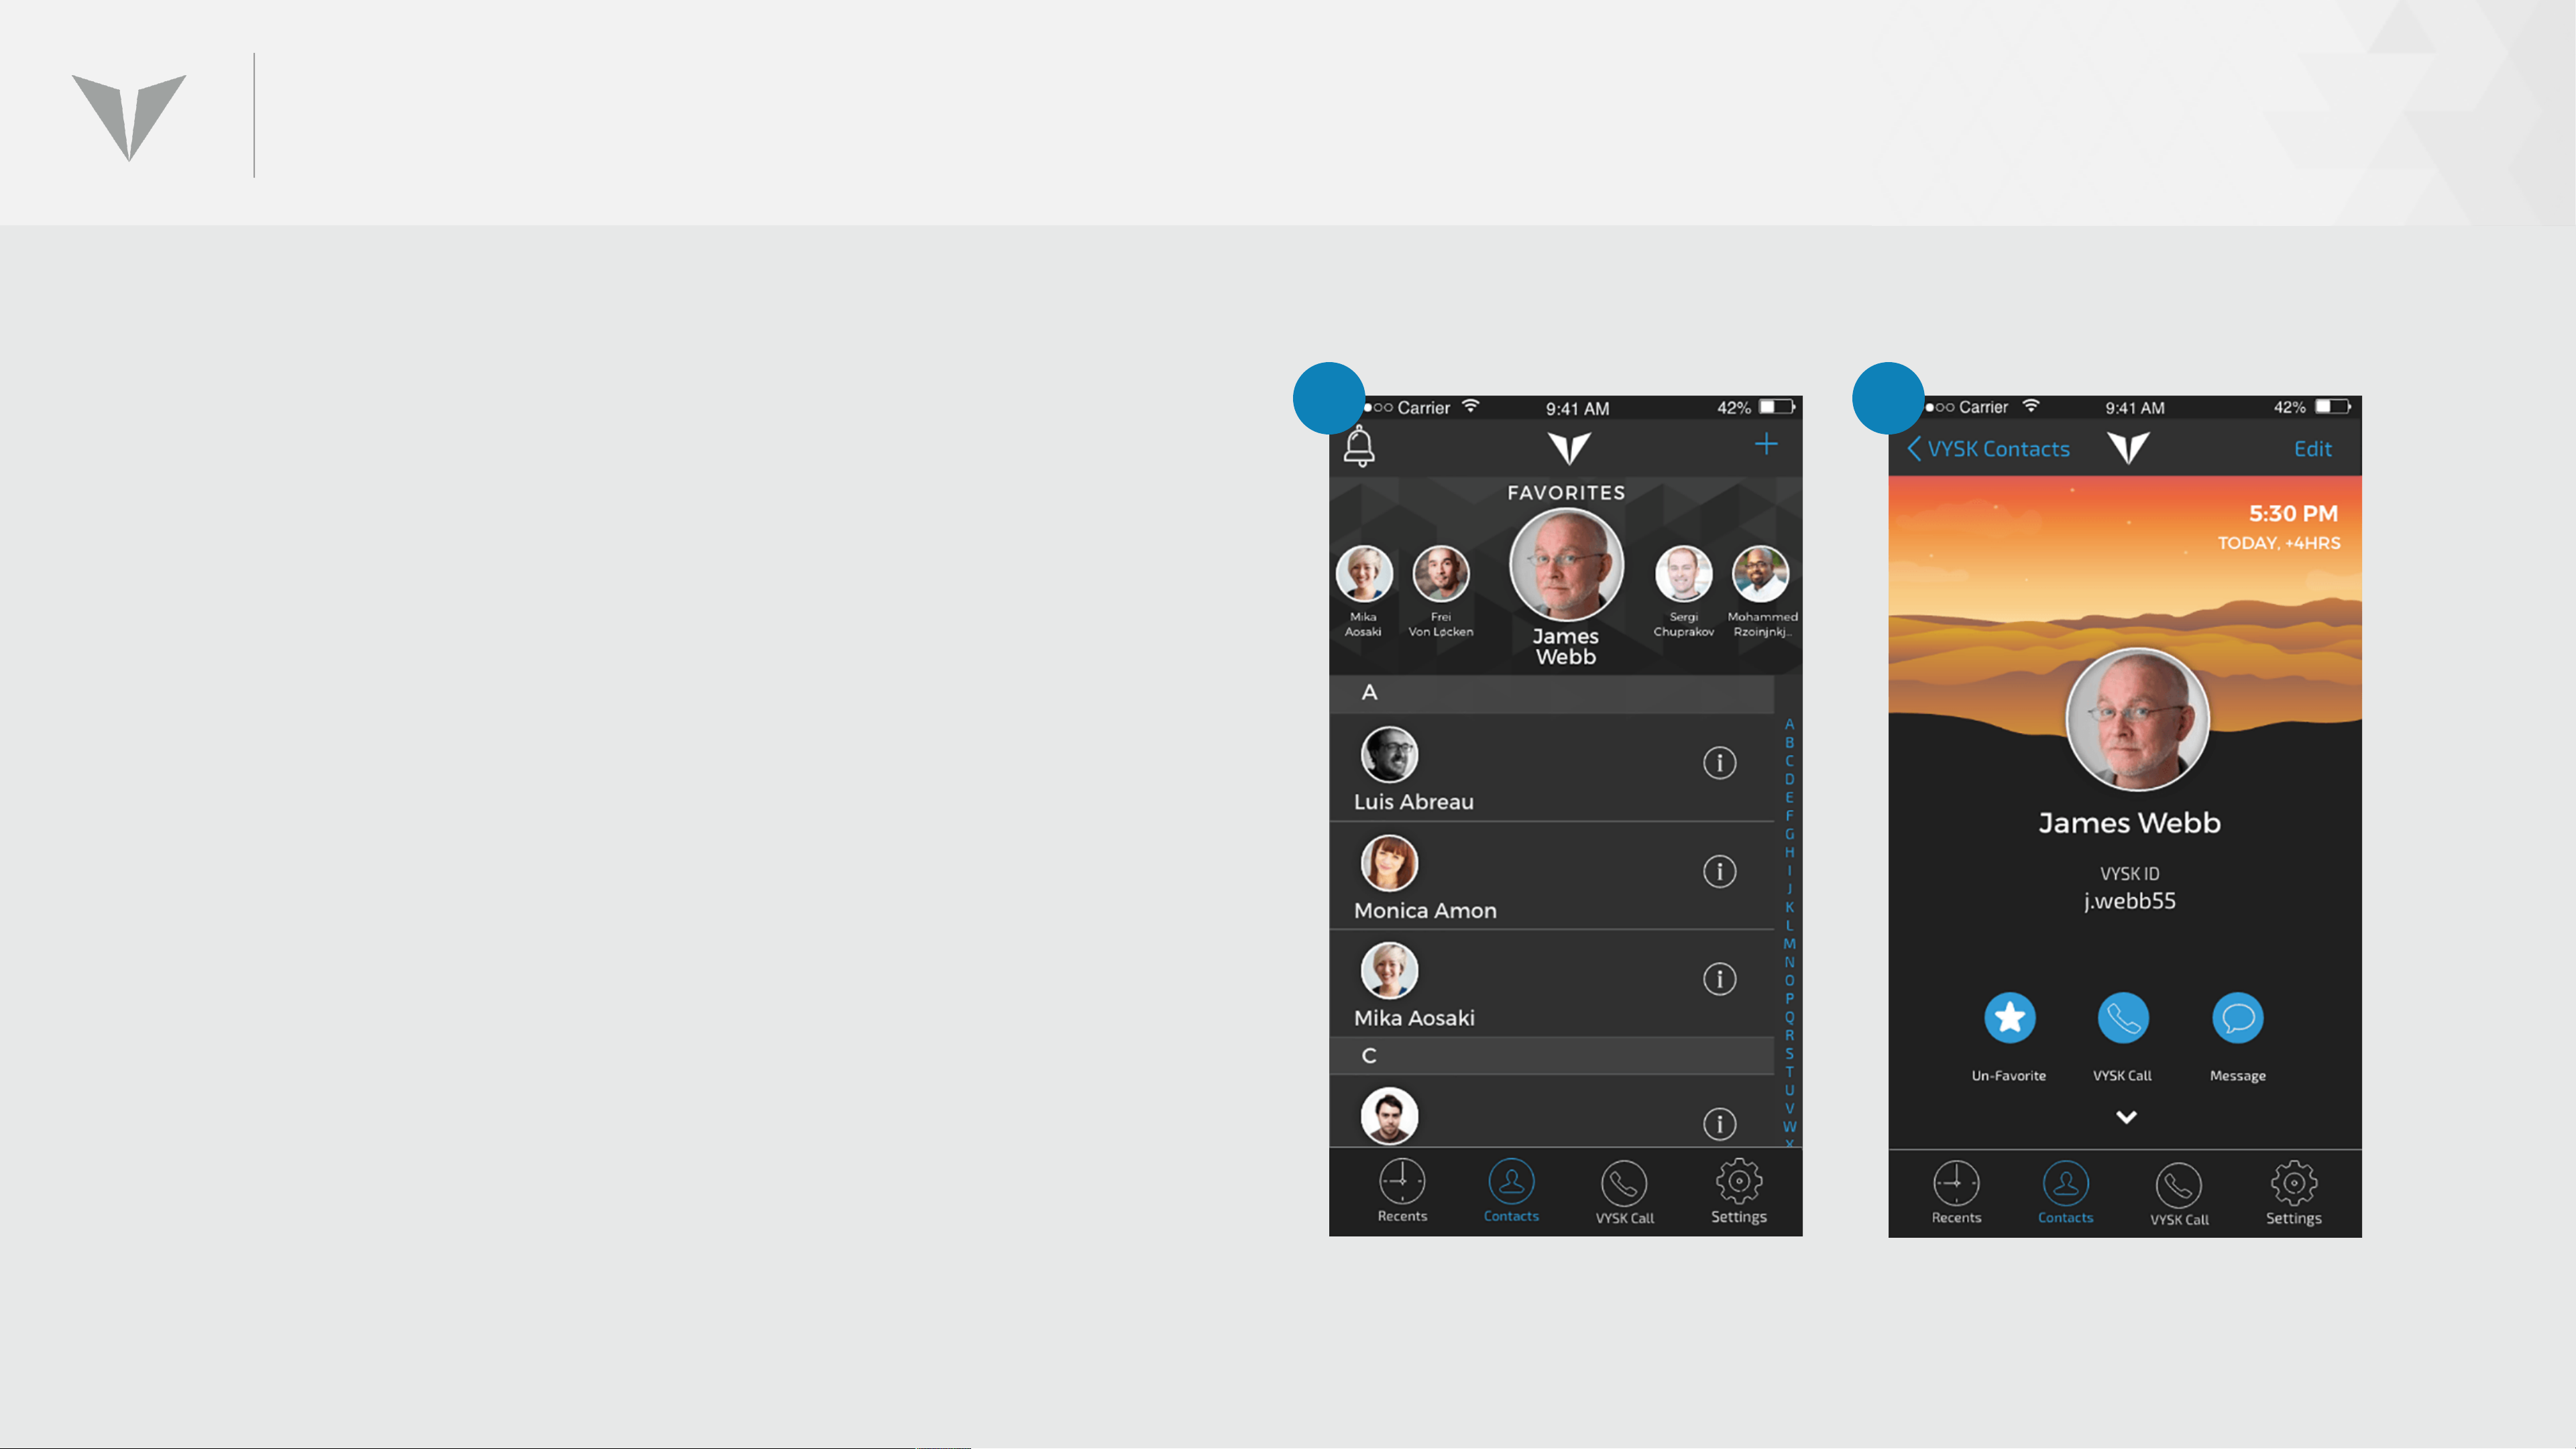
CONTACTS
1. The Contacts menu item opens up the list of QS1
contacts that has been created by the user. This
1 2
feature set allows users to add, delete, and edit a
list of other QS1 users within their organization.
Access an individual contact page by clicking on
the bar of the corresponding user whose profile
you wish to view.
2. Users can then be called directly from an
individual contact/profile page by clicking the
“vysk call” button. Users can also control which
attributes of their personal profile are shared
with other users.
The detailed capabilities of the Contacts feature are
described in the Contacts section.
Page 70
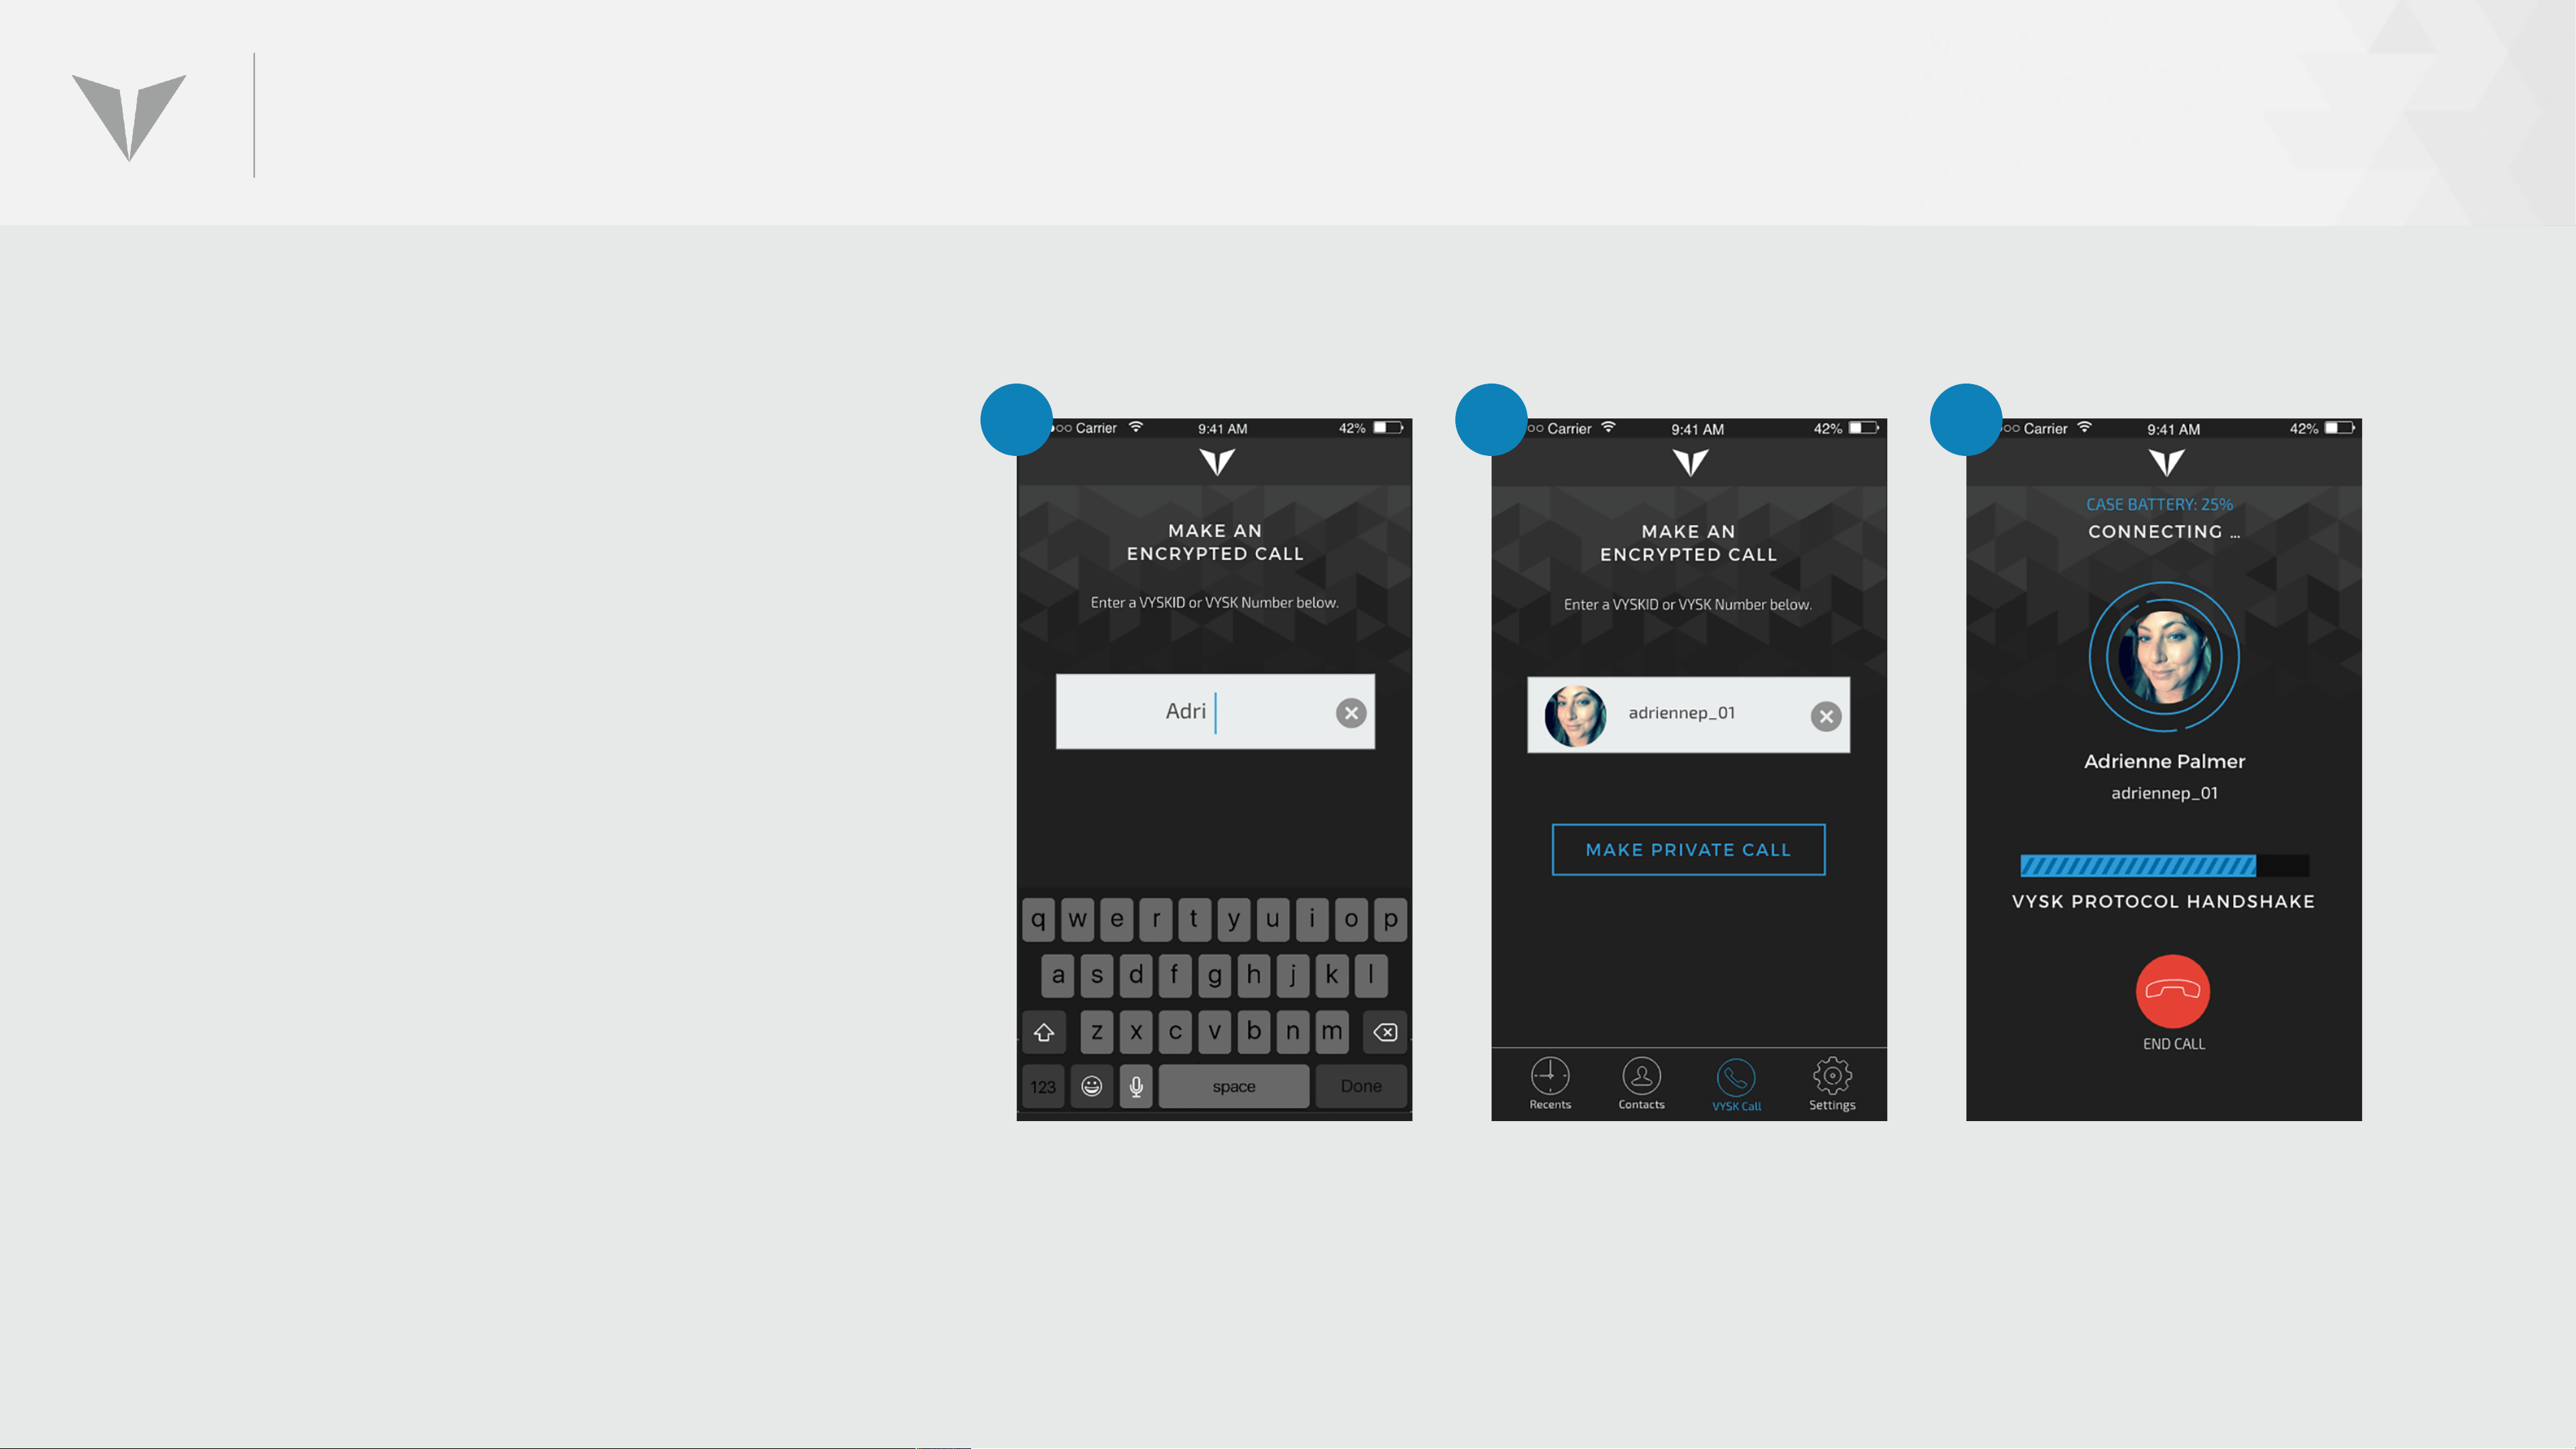
VYSK CALL
1. The Vysk Call screen is used for
making secure voice calls by
1 2 3
entering the VYSK ID of another
QS1 user.
2. Simply click on the MAKE PRIVATE
CALL button to initiate the call.
3. Vysk will then attempt to connect
your call with the other user
As always, the Lockdown Mode
switch must be engaged prior to
making the call. If it is not, a warning
message will appear reminding the
user to engage the switch.
Page 71

SETTINGS
Page 72
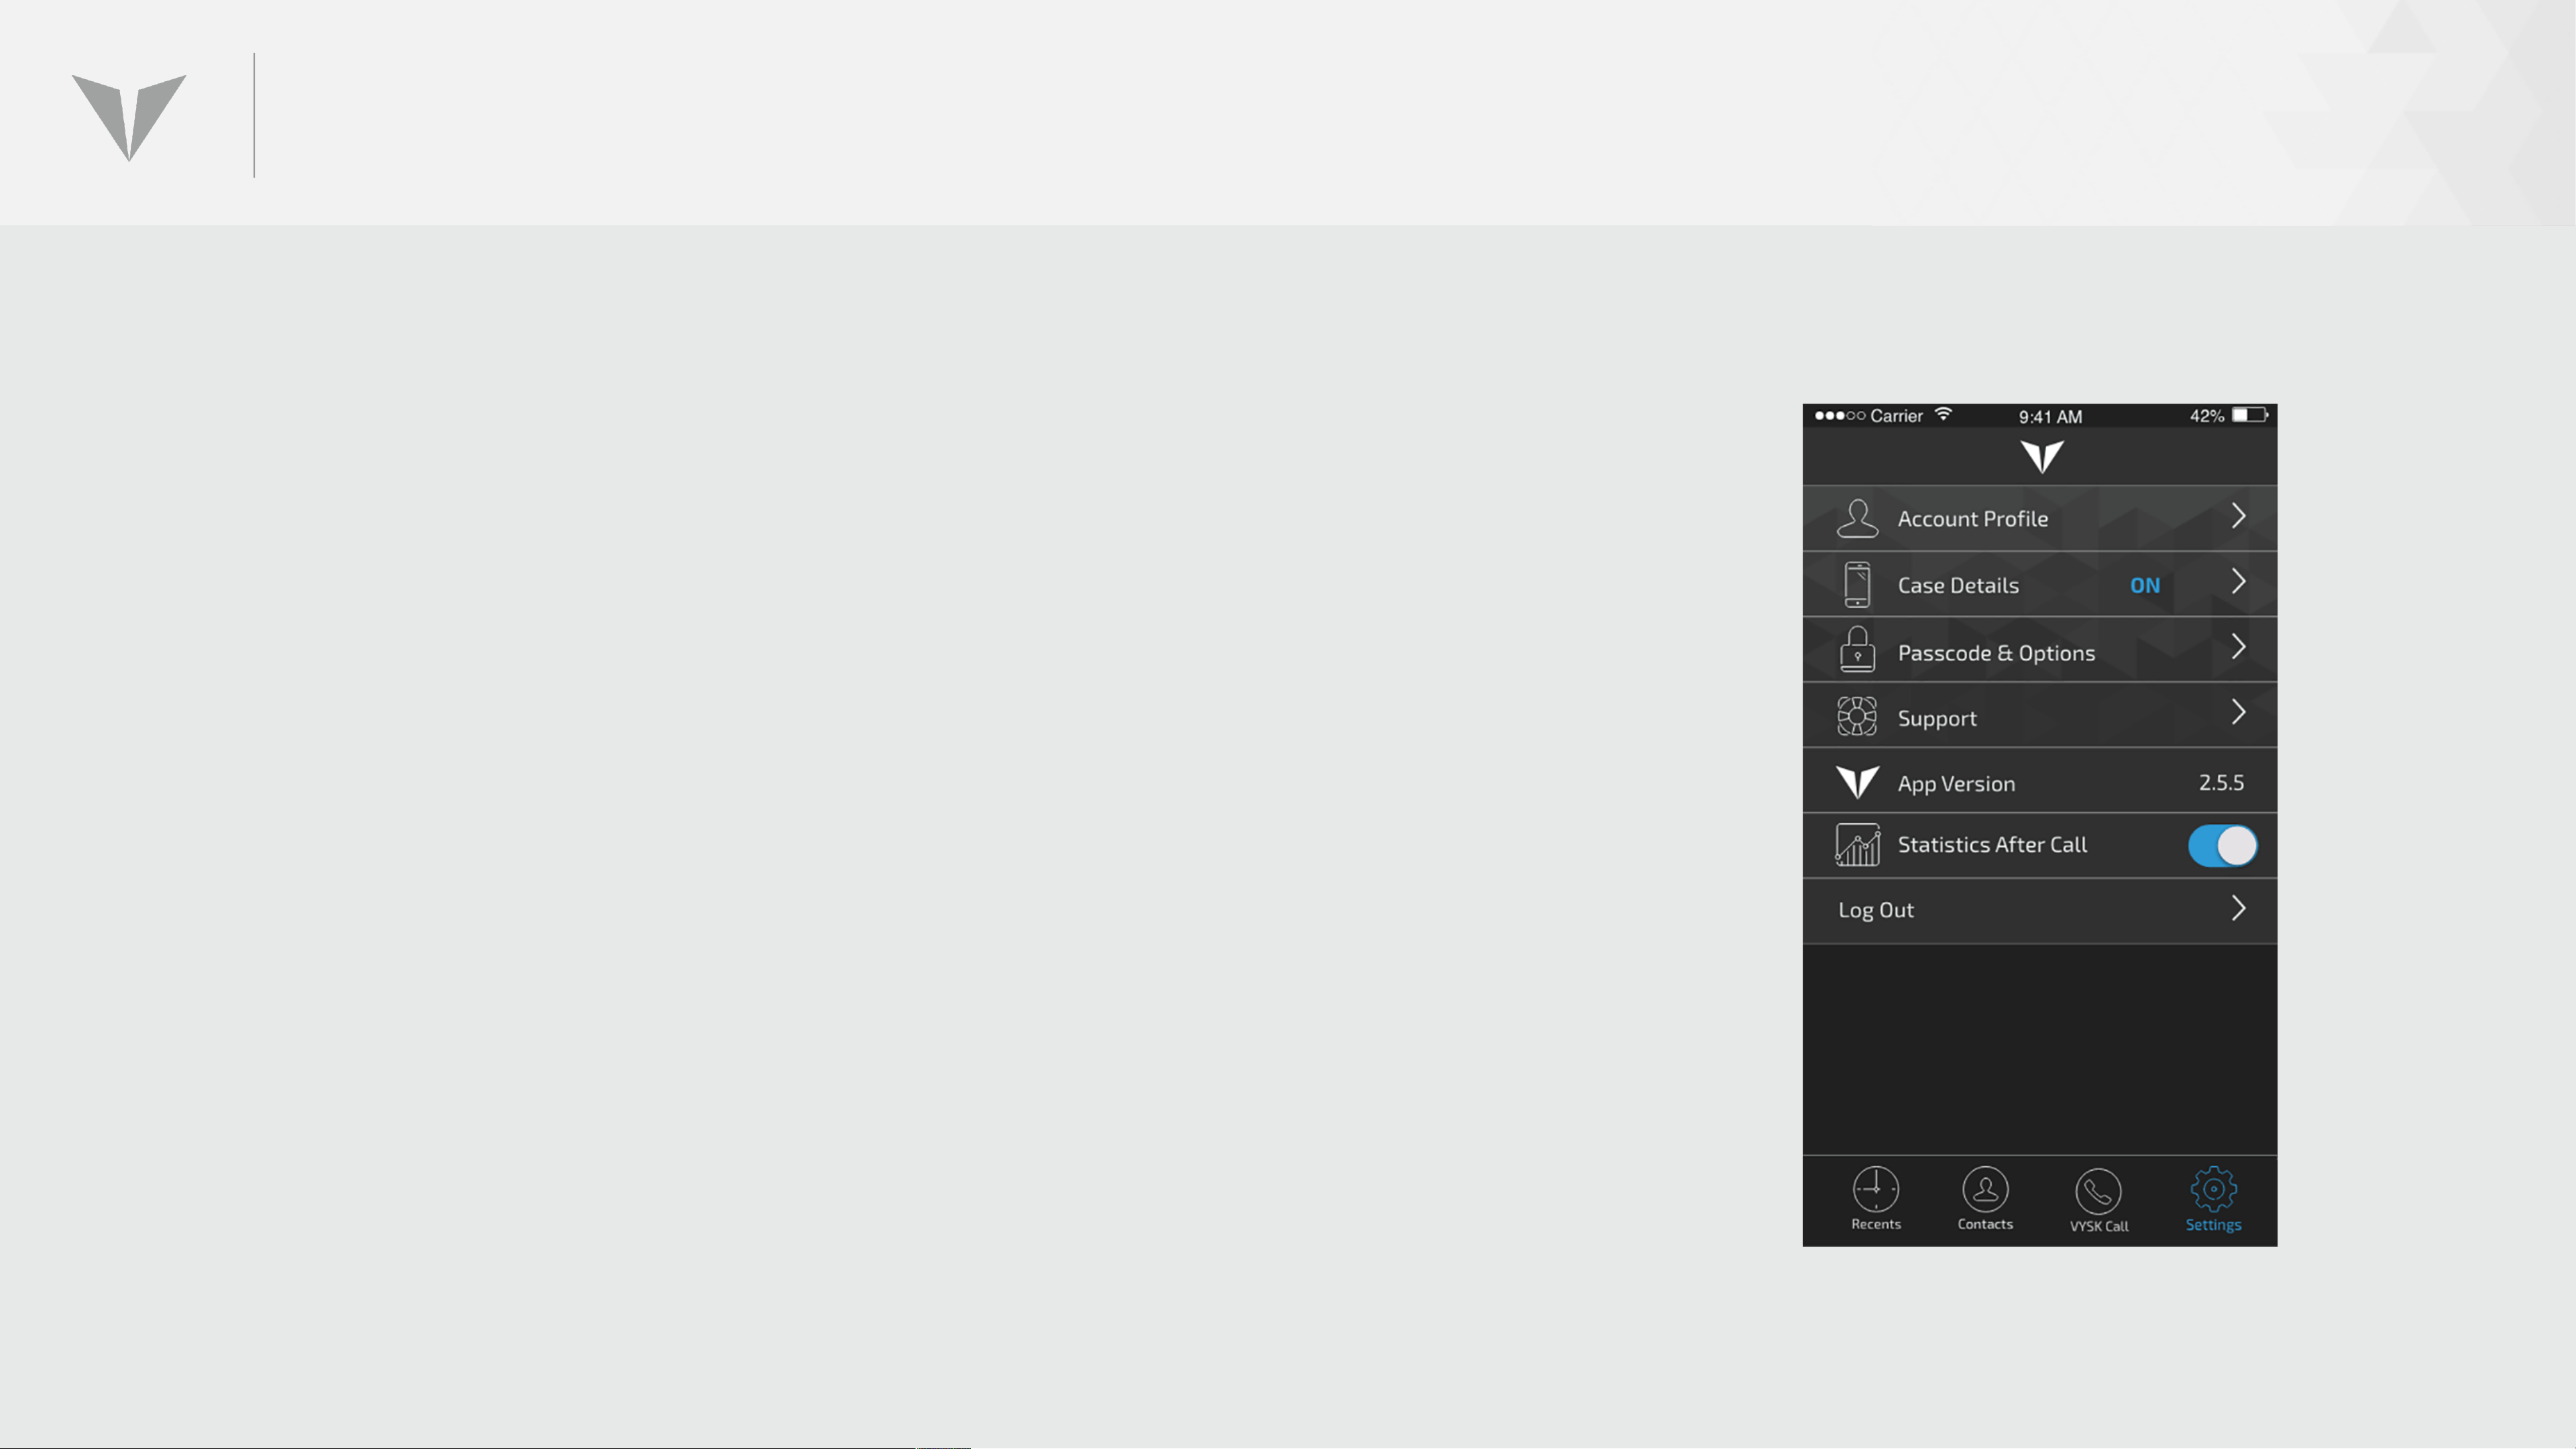
SETTINGS: OVERVIEW
Settings comprises a set of administrative utilities that allow users to obtain info
about calls, software/firmware versions, and other activities. These functions are
organized into the following major categories:
• Account Profile
• Case Details
• Passcode & Options
• Support
• App Version
• Statistics After Call
• Log Out
These are each described on the following pages.
Page 73
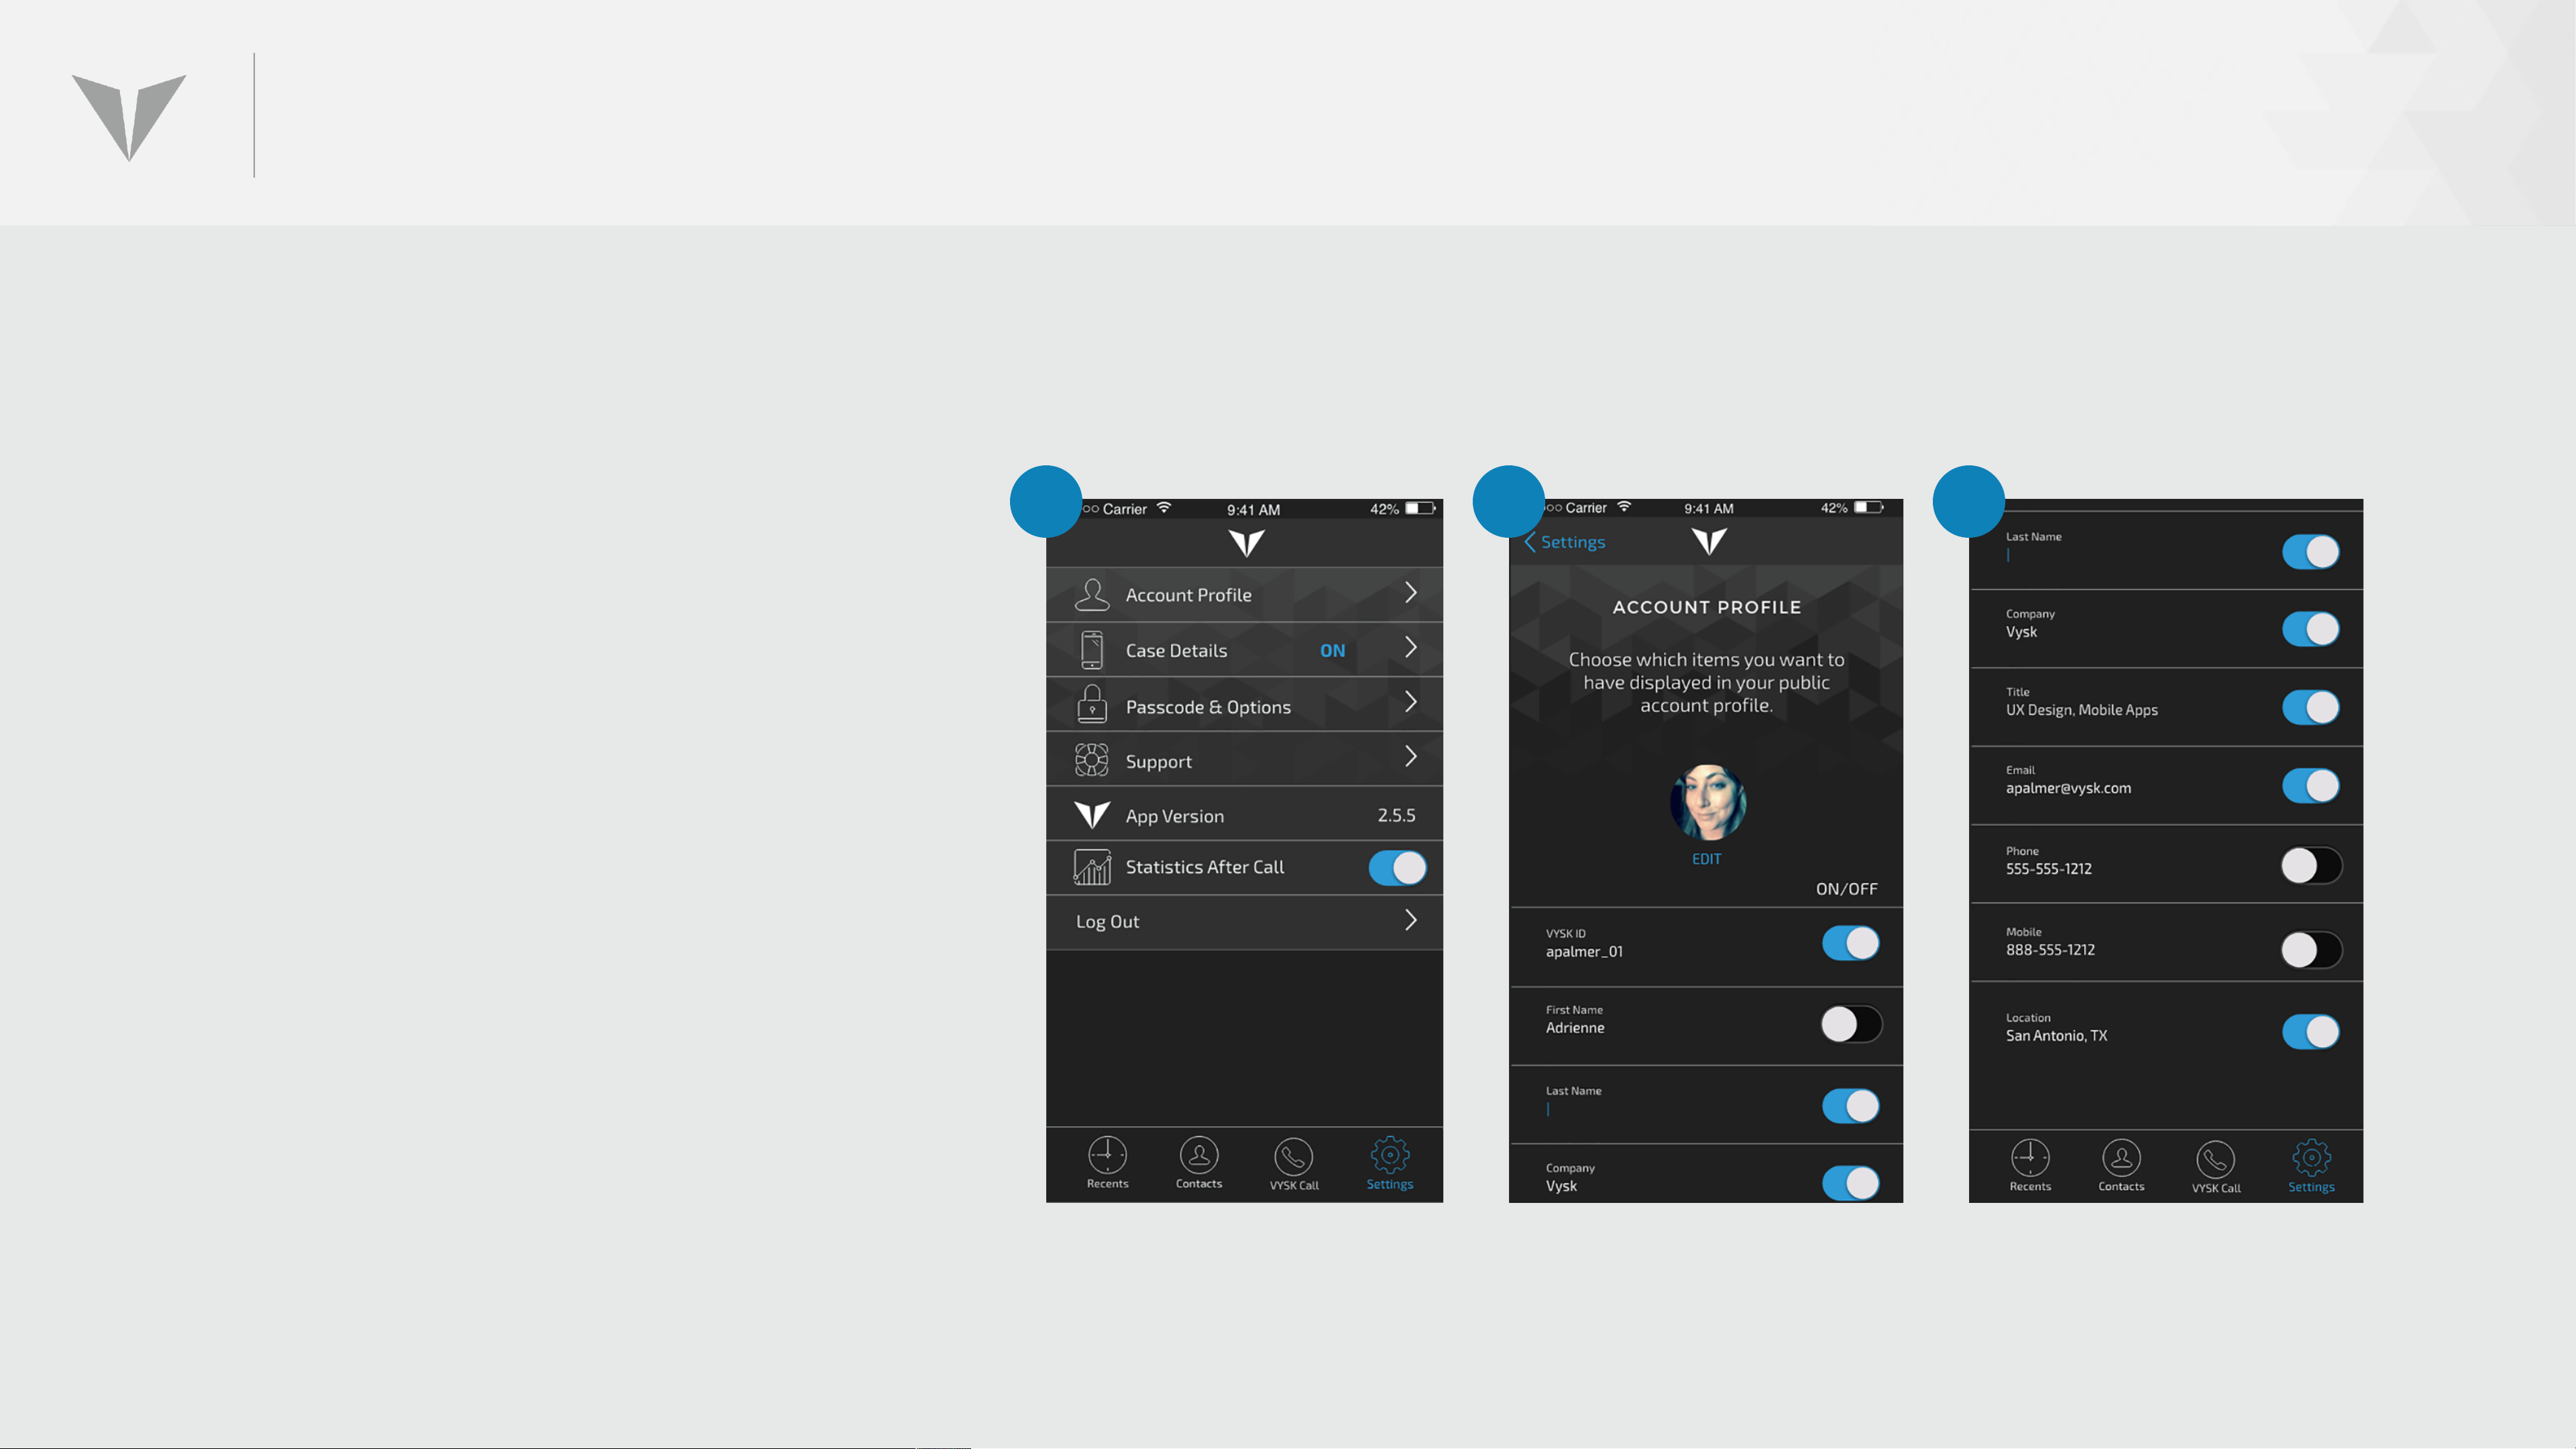
SETTINGS: ACCOUNT PROFILE
1. Account Profile, is the first
settings option. It allows the user
to decide which information they
want to share and make
searchable by other QS1 users.
2. Vysk ID will always remain
1
2.1 2.2
searchable. Turn on or off the
other profile items to make them
searchable or not. Profile
information can be modified at
any time.
Page 74
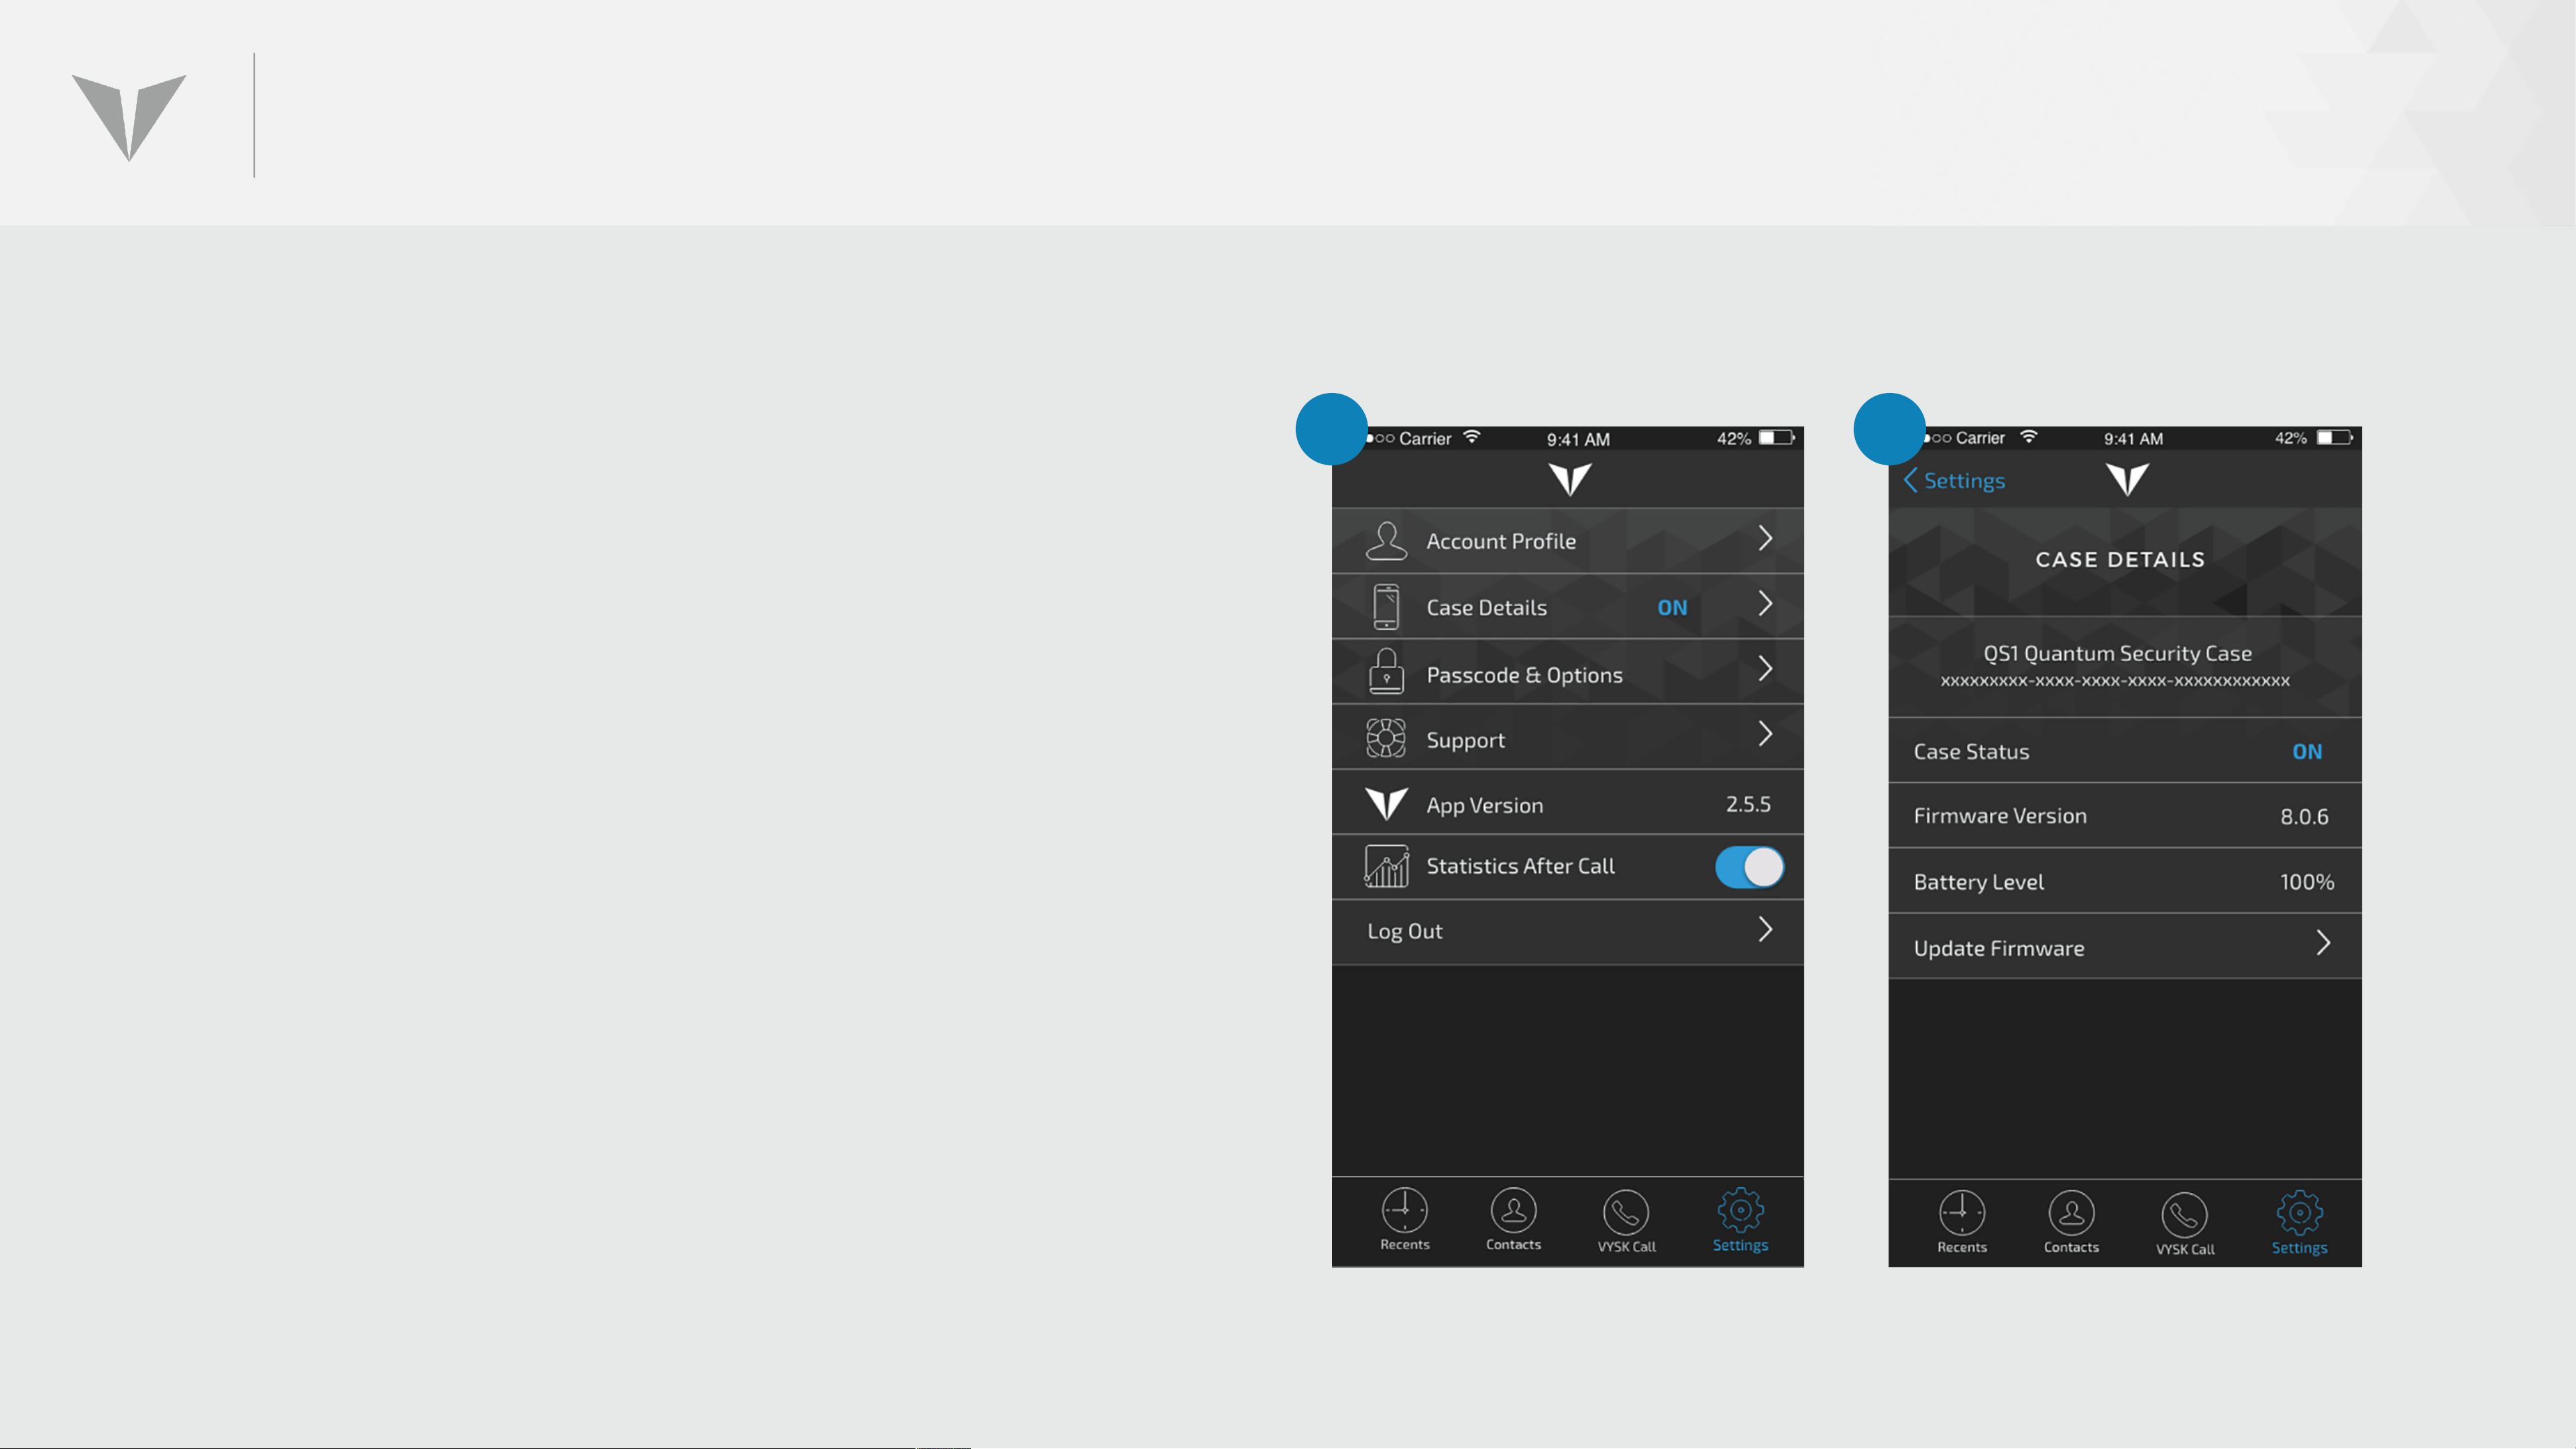
SETTINGS: CASE DETAILS
1. Case Details contains several sub-menu items and
useful pieces of information:
2. UUID – 32-digit alphanumeric code unique to each
QS1 case. Used for tracking case performance.
Case Status – Shows Lockdown status (ON/ OFF)
Firmware Version – Shows current QS1 firmware
Battery Level – displays current QS1 battery level
1 2
Update Firmware – Allows user to update QS1
firmware
All of these items are endpoints in the Settings tree,
aside from “Update Firmware”
Page 75
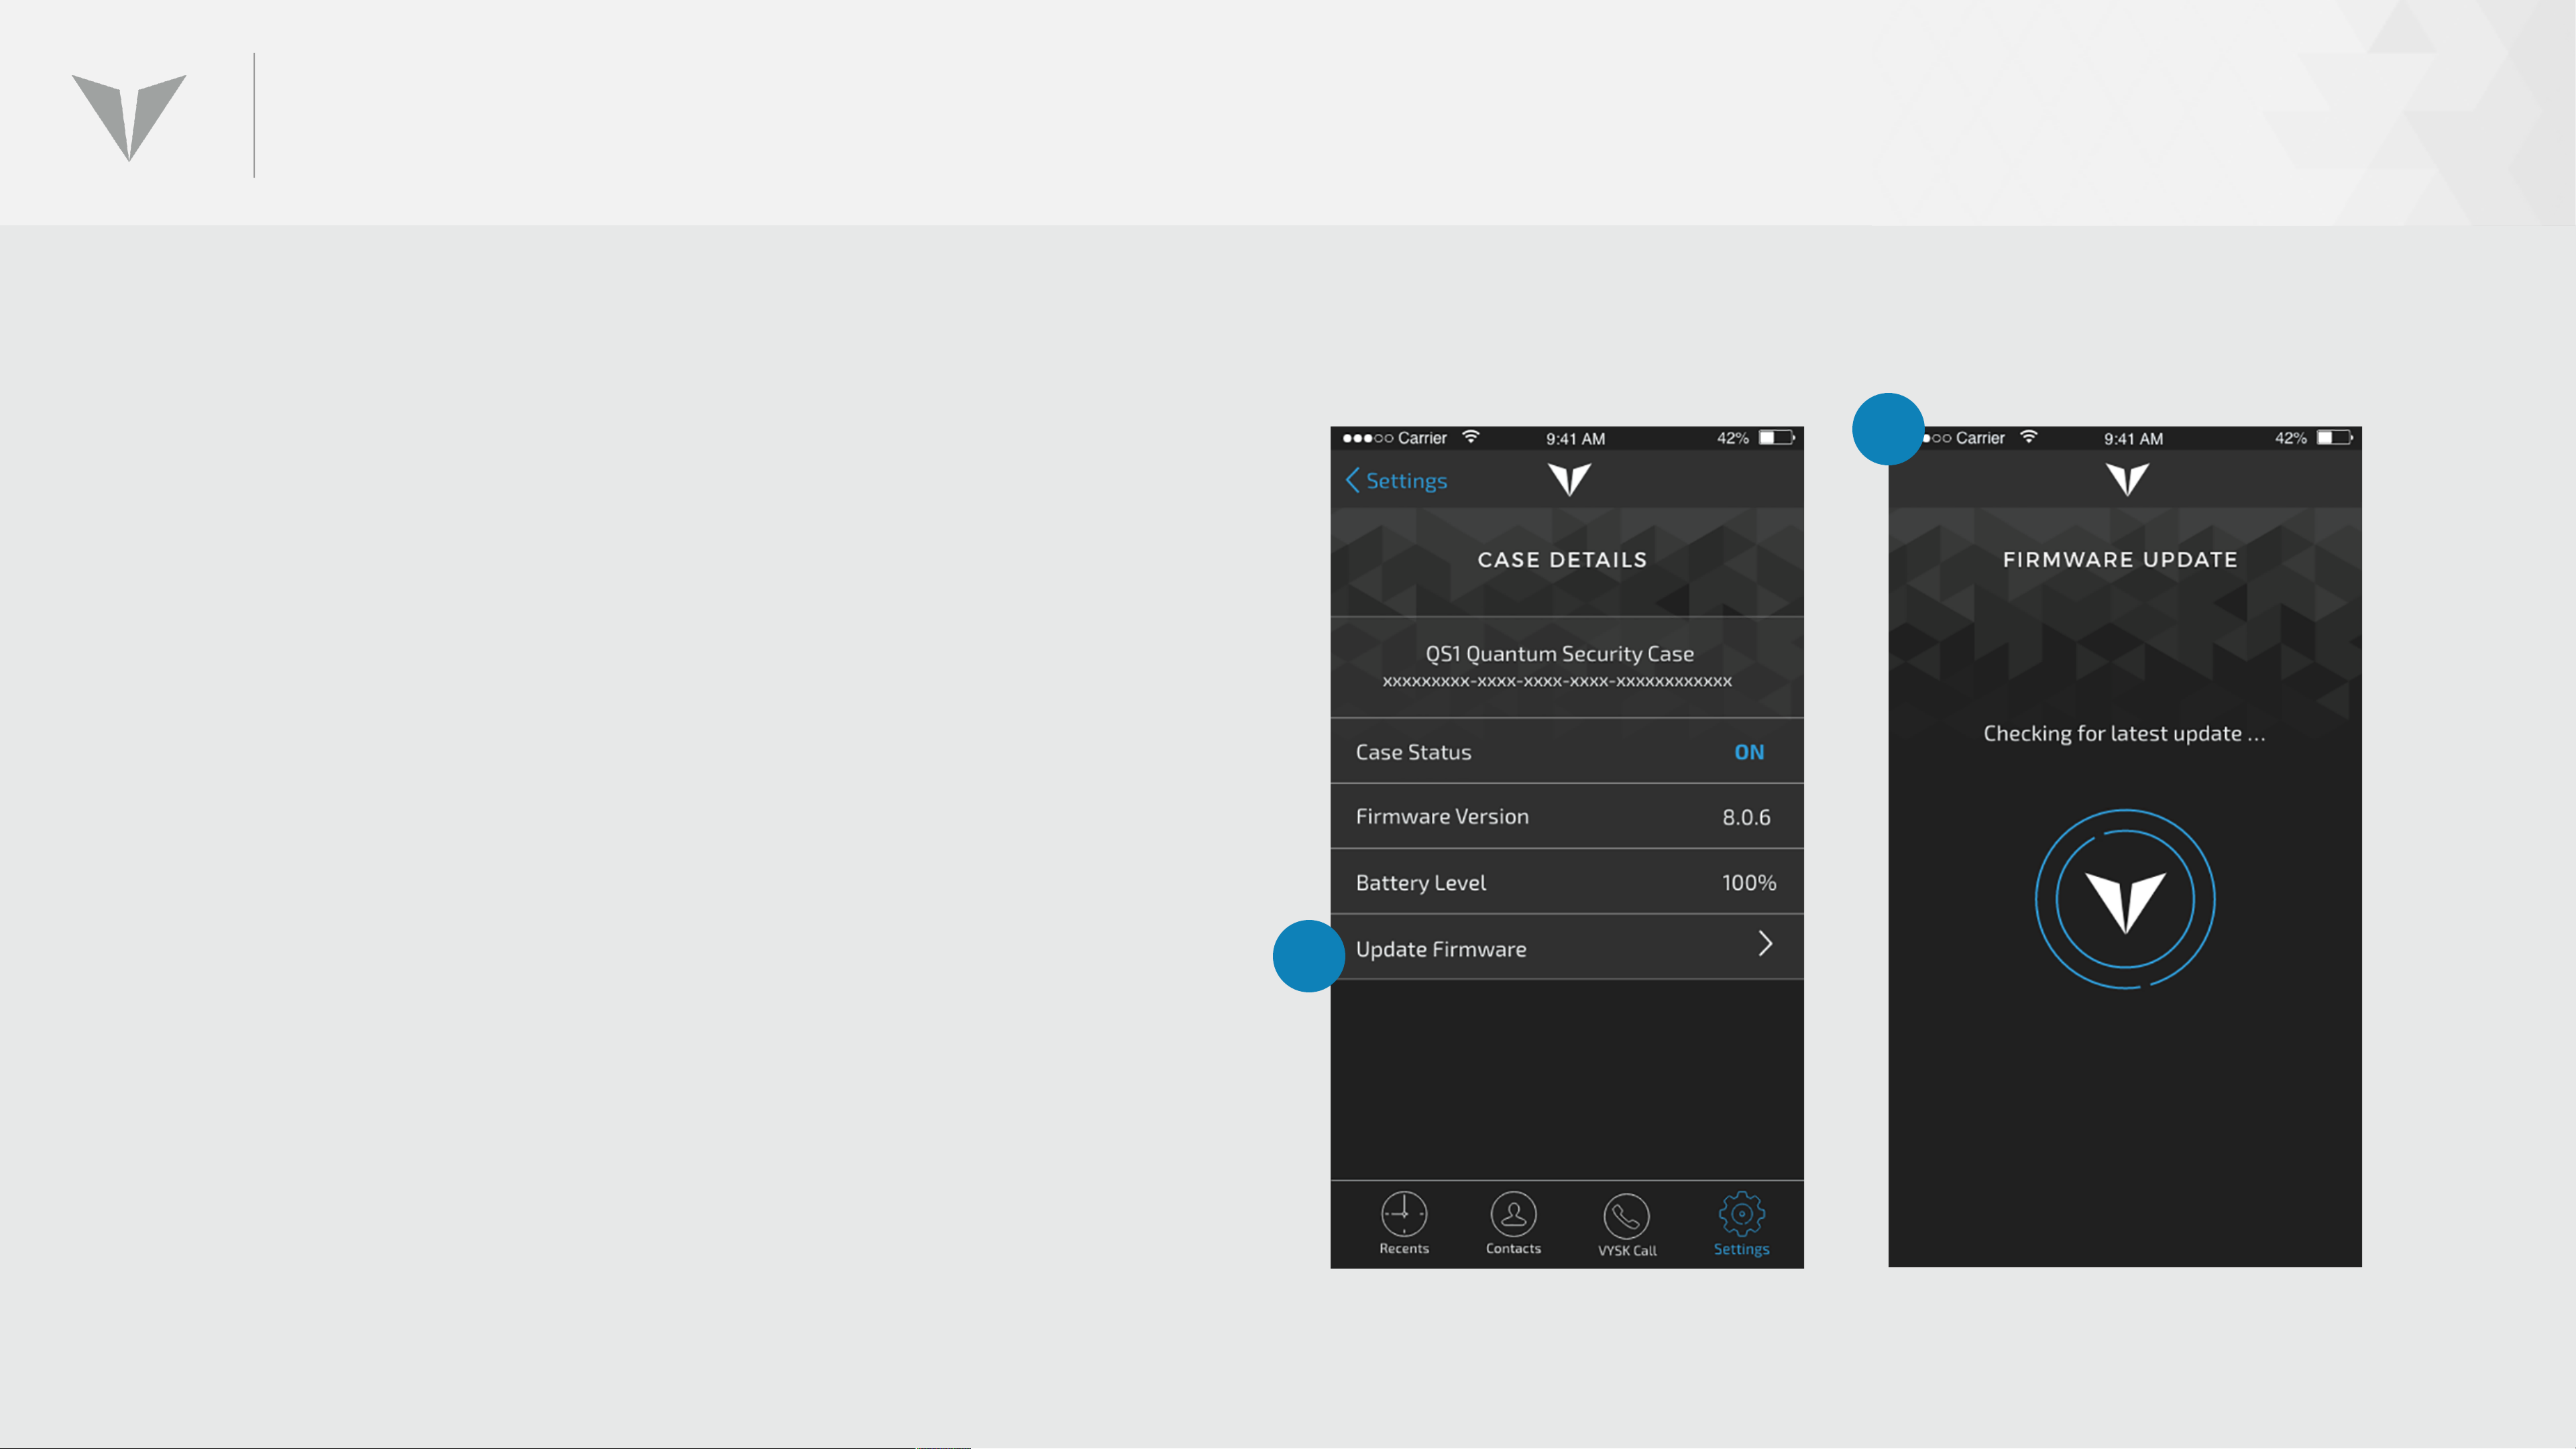
SETTINGS: FIRMWARE UPDATE
1. If the user determines that the firmware
version on their QS1 is not current, they
can update this by clicking on the Update
Firmware (1) link under Case Details.
2. The latest version of firmware will
automatically download and install on the
2
QS1. Once the firmware update is
complete (2), the case will restart and the
user does not need to log back in.
1
Page 76
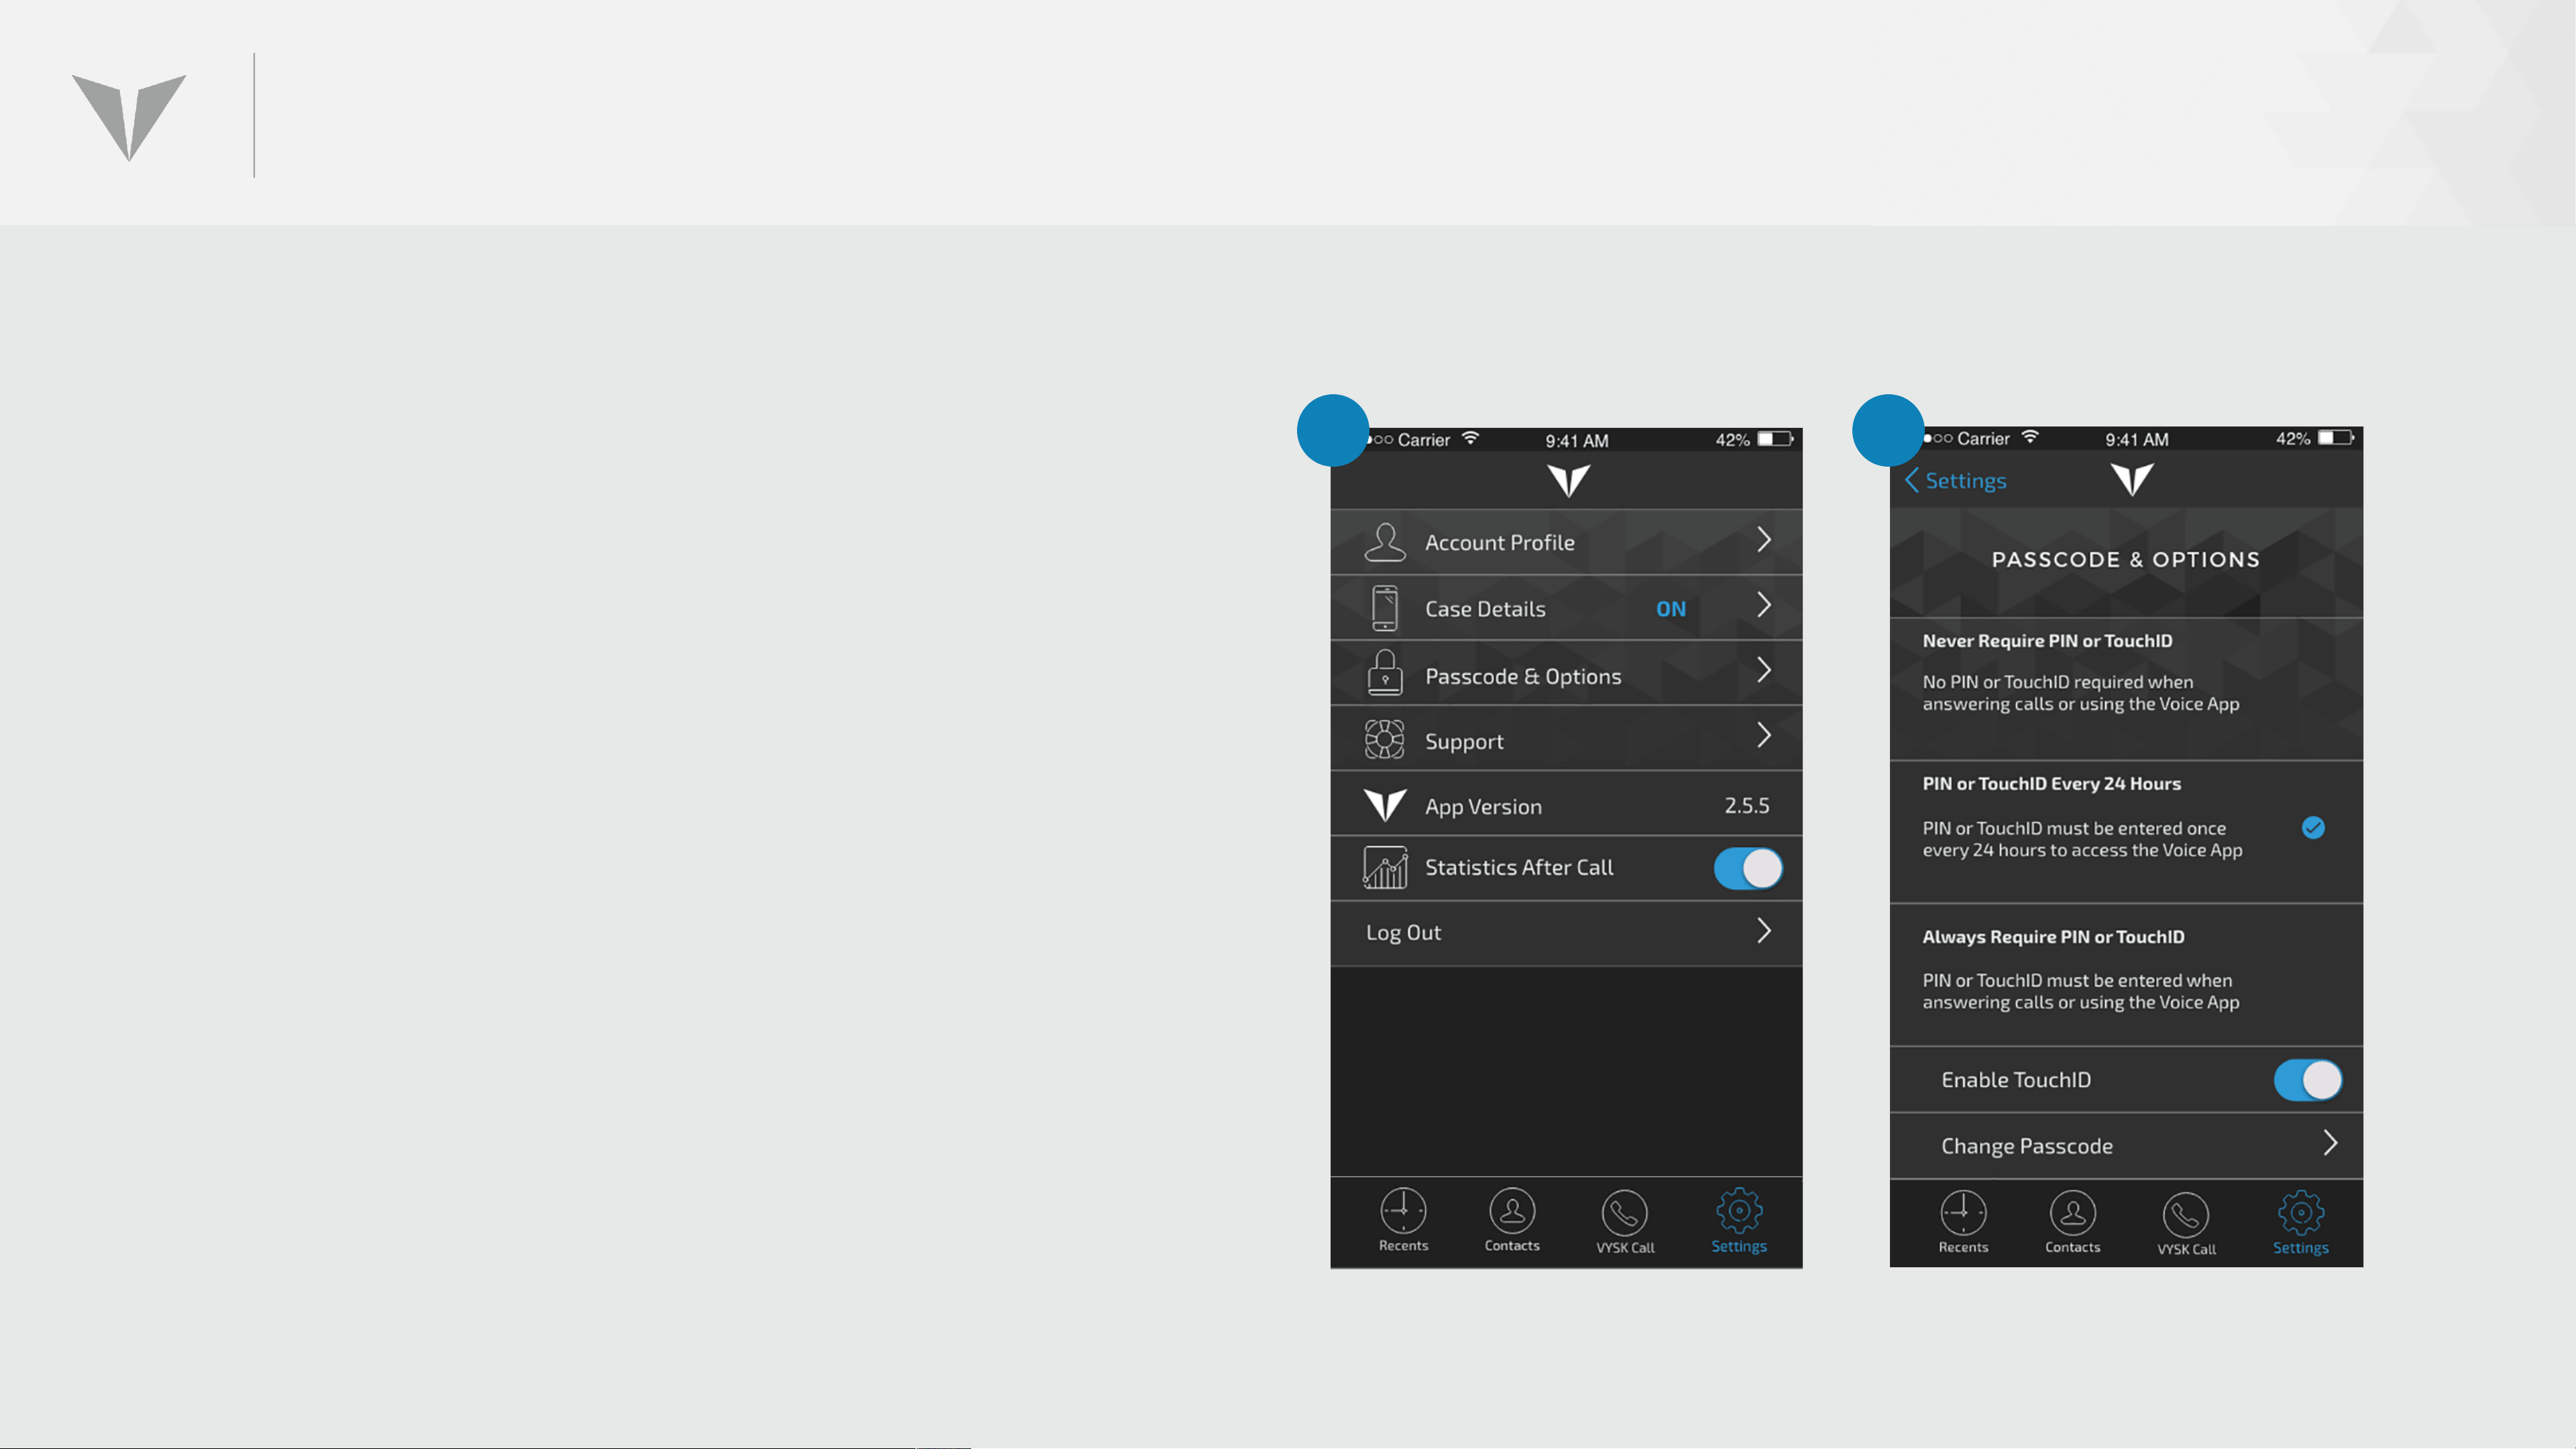
SETTINGS: PASSCODE & OPTIONS
1. PASSCODE & OPTIONS provides useful security
functions
2. Passcode Options allow the user to choose a
preference for PIN entry frequency.
Enable Touch ID allows users to utilize this
iPhone biometric security feature to gain access
to the app in lieu of using the six-digit PIN.
1 2
Change Passcode allows the user to change the
six-digit passcode that is used to enter the app.
Page 77
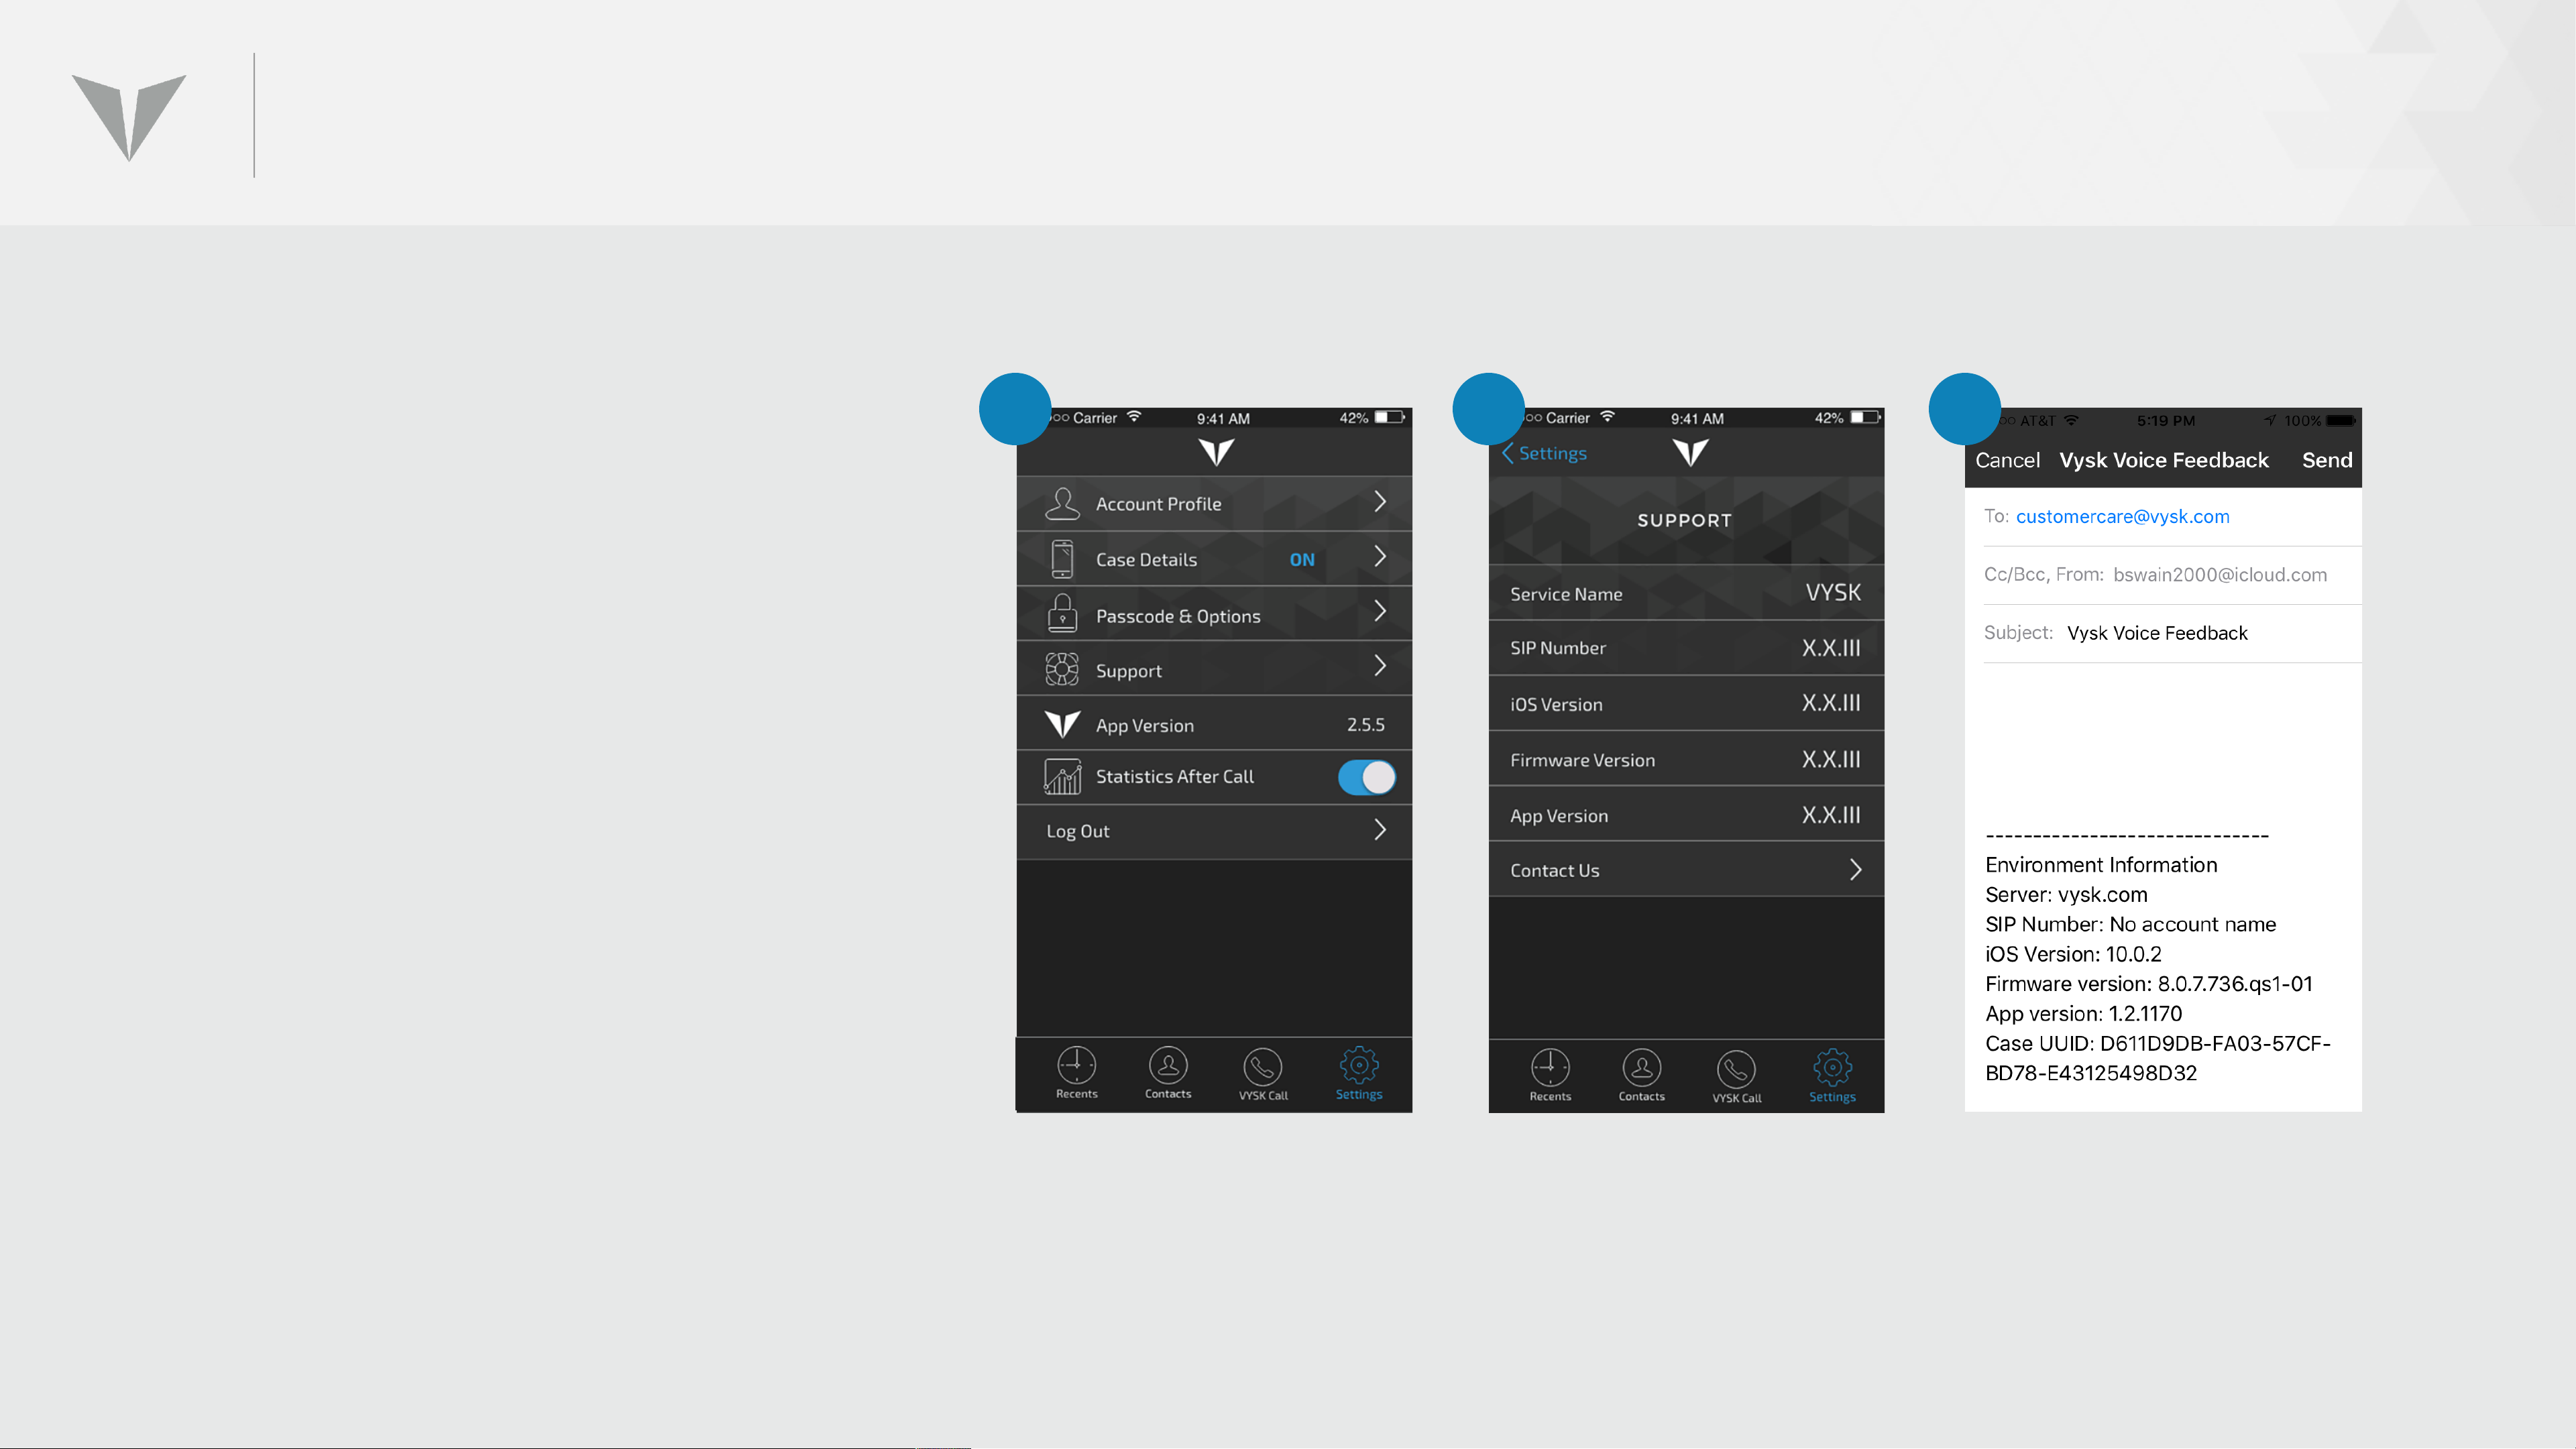
SETTINGS: SUPPORT
1. For information and helpful
resources, select the Support
option
2. Support provides a summary of
technical information concerning
the QS1 (software, firmware, etc).
1 2 3
3. Contact Us allows the user to
provide feedback to Vysk in the
form of an email message.
Page 78
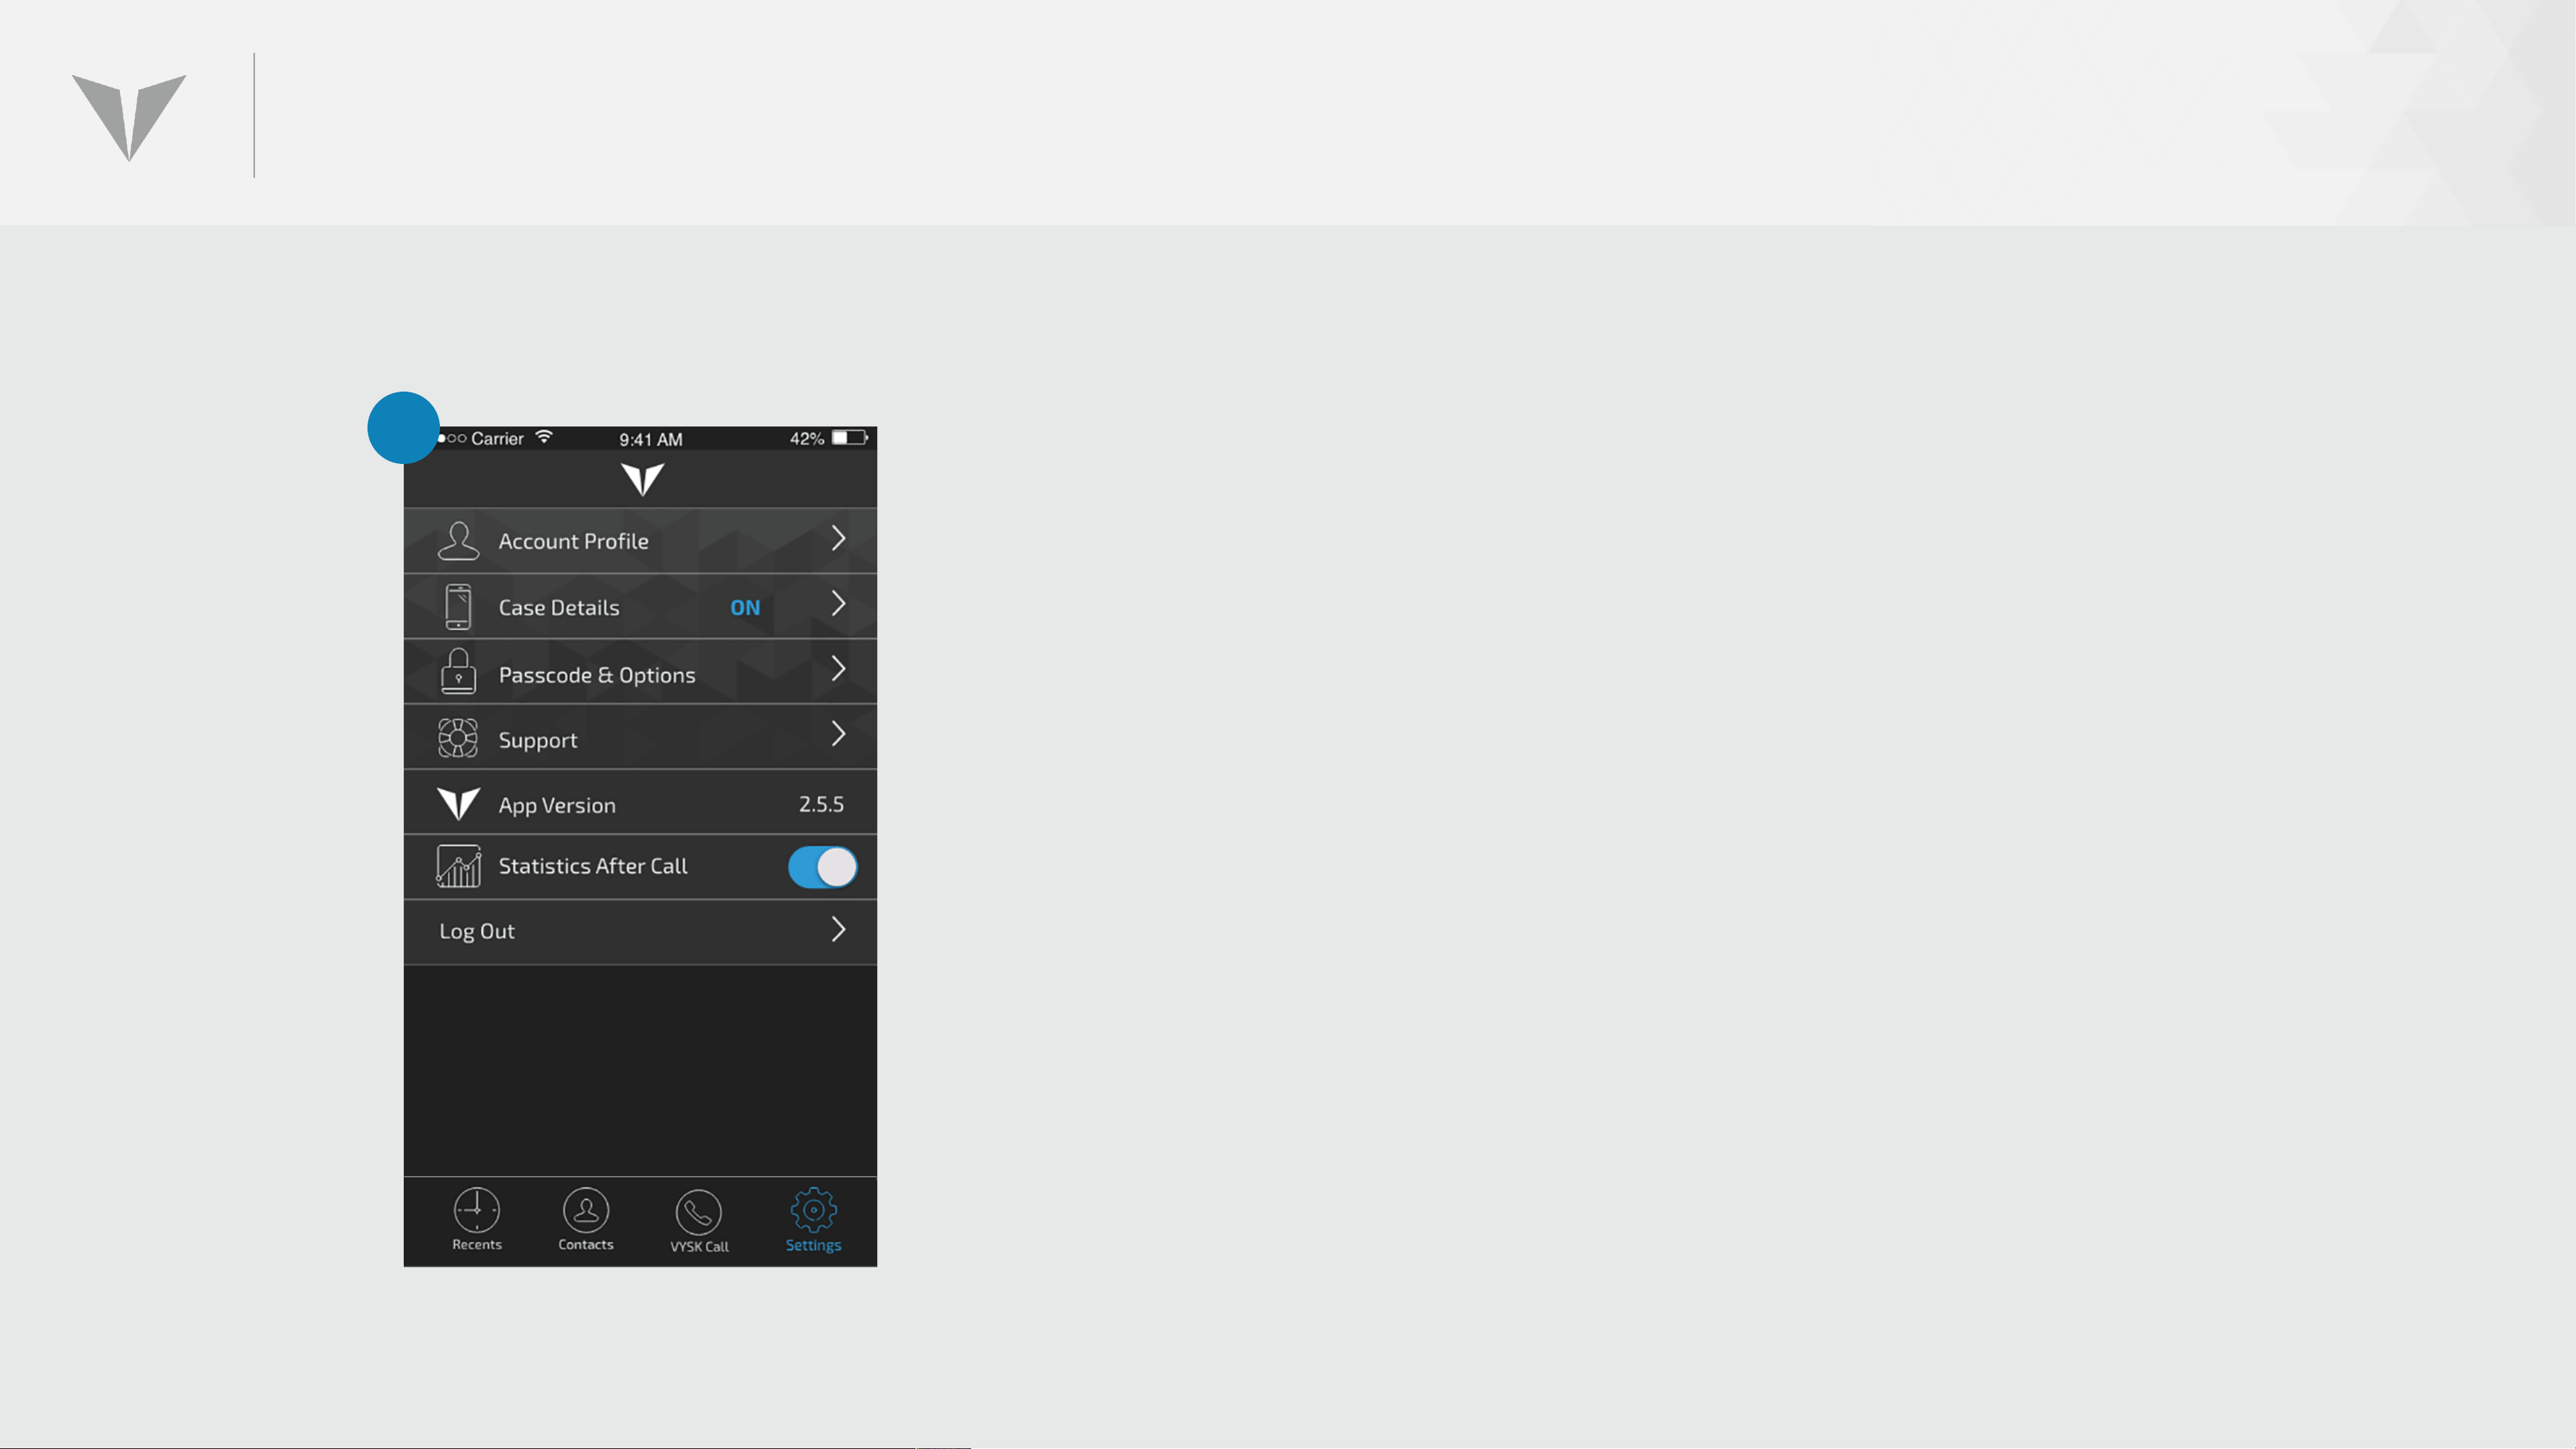
SETTINGS: APP VERSION
1
1. App Version simply identifies the current version of the
Vysk Voice App that is running on the QS1. If it is
determined that this app version is no longer current, the
user should close out of the app and download the new
version per the instructions provided earlier.
Page 79
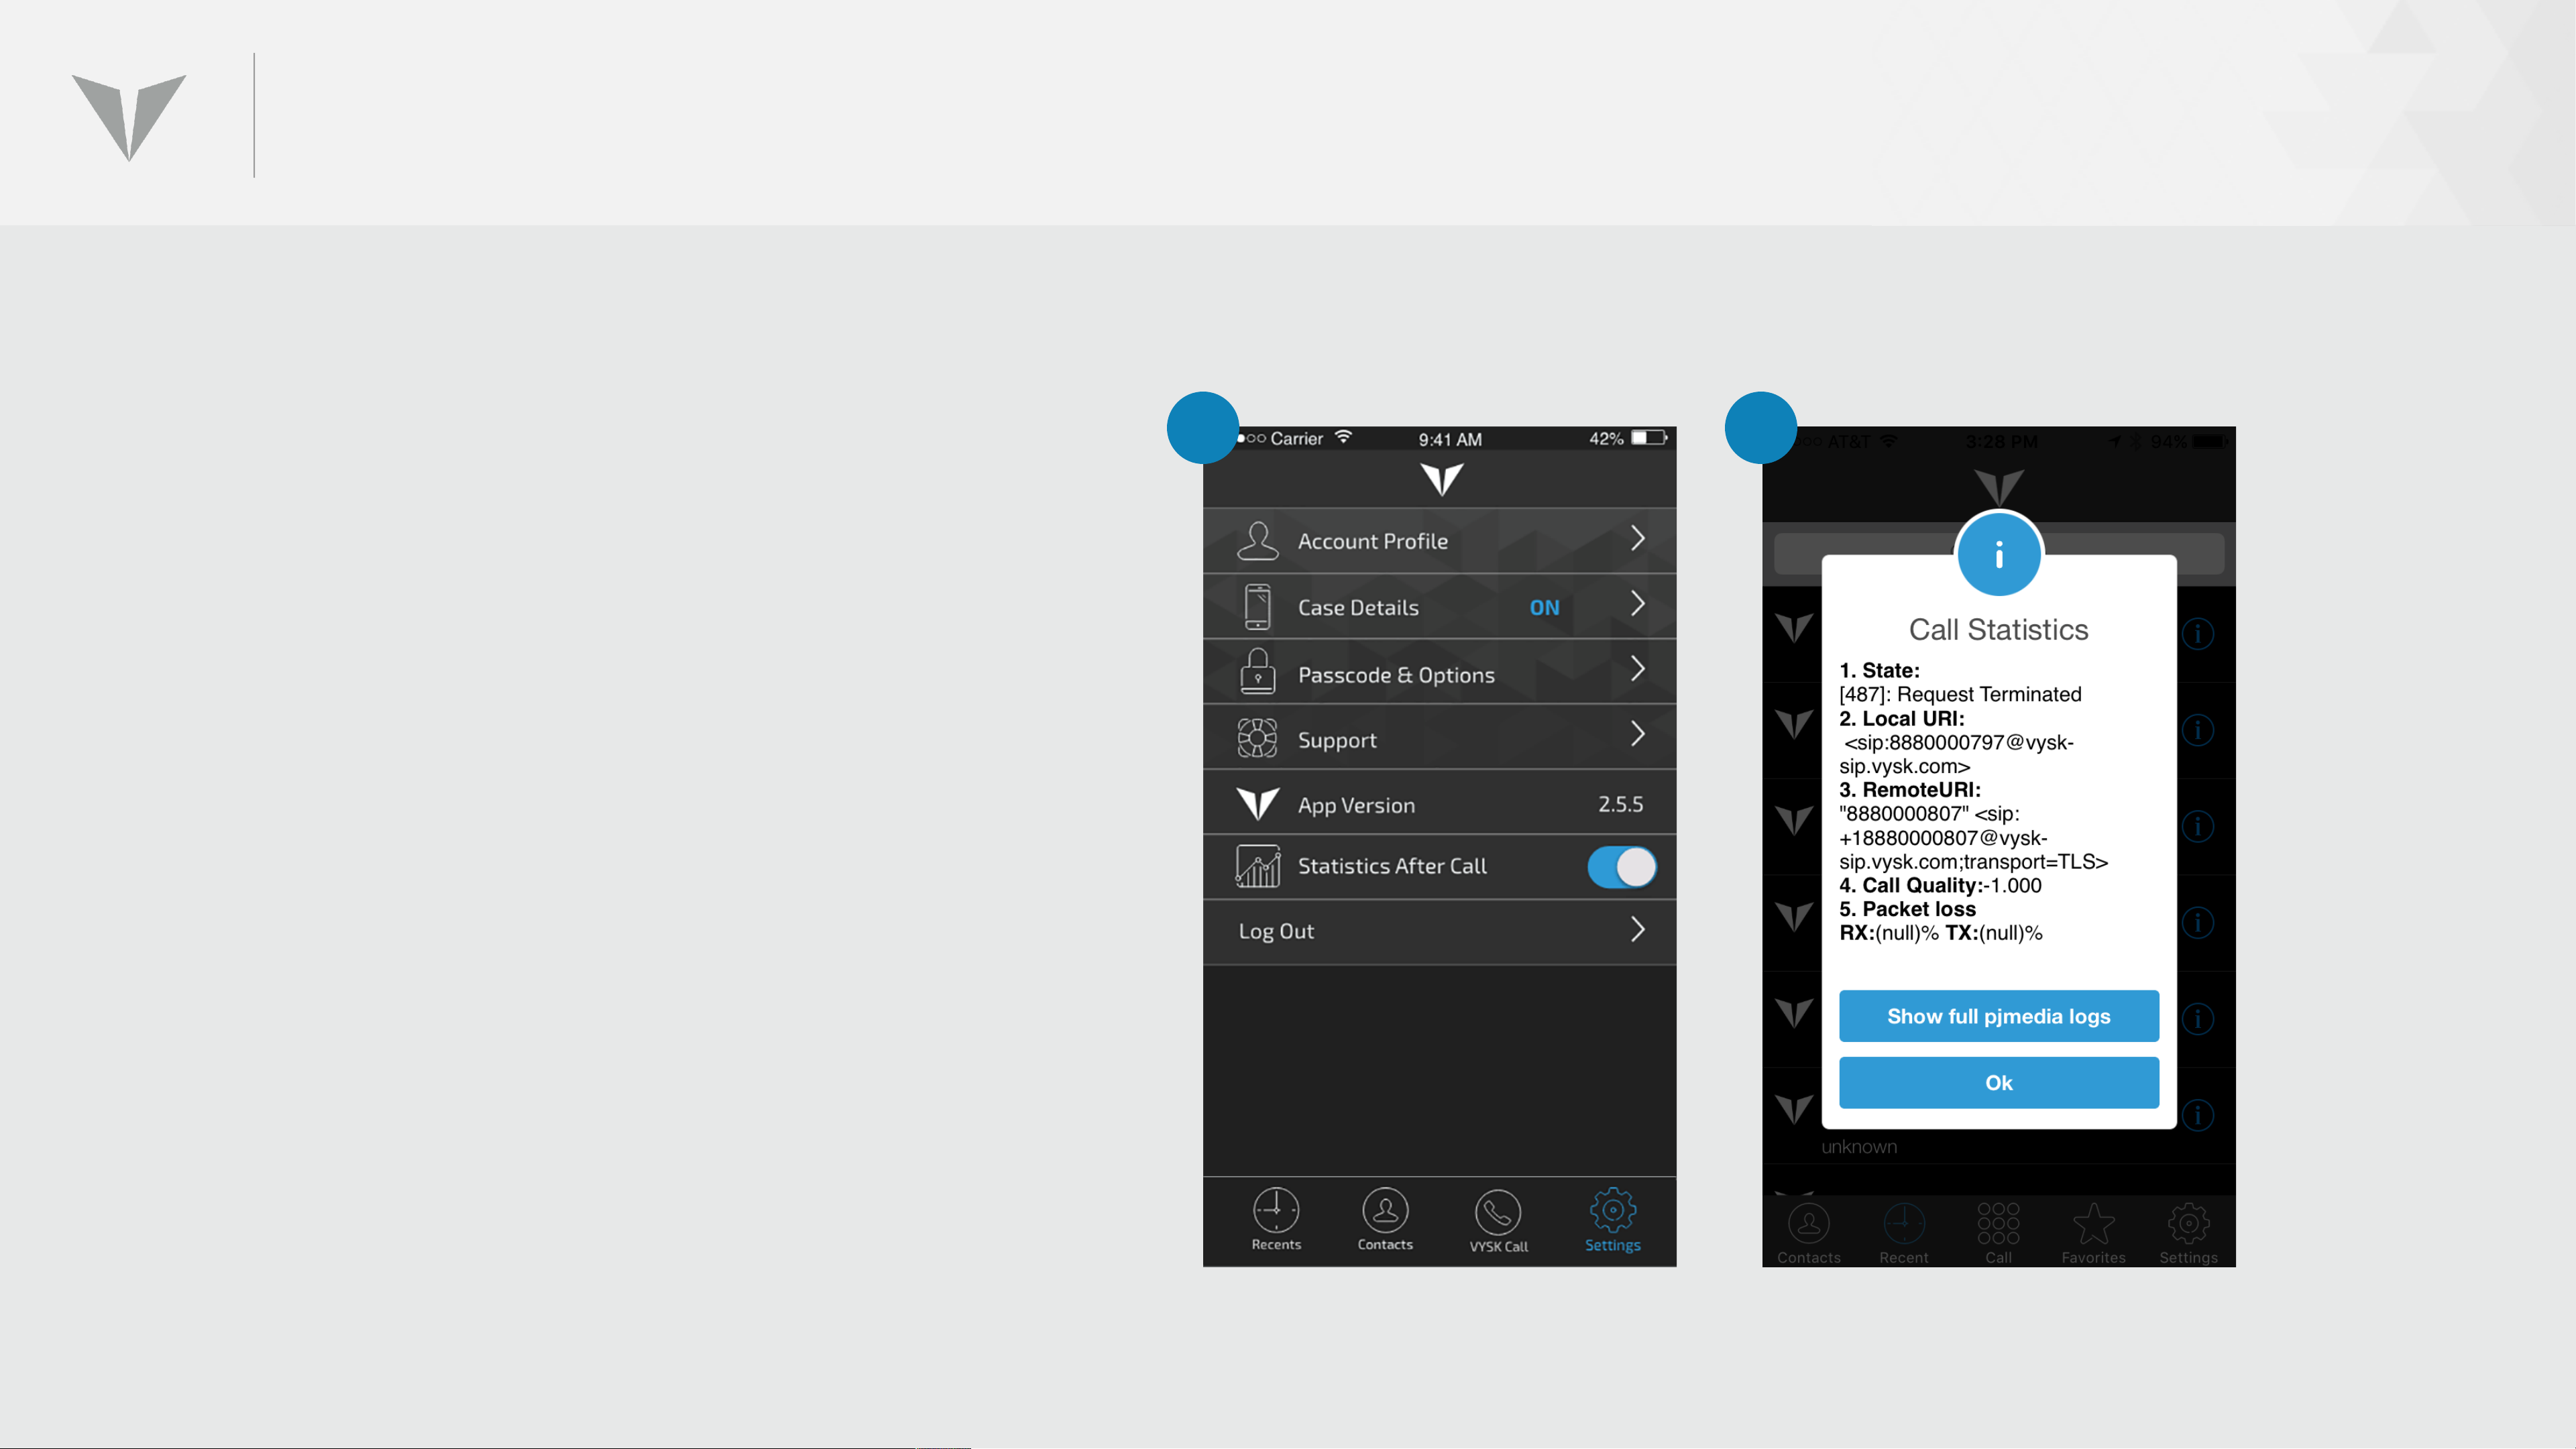
SETTINGS: STATISTICS
1. Statistics After Call provides users with
summary information concerning the most
recent call on the QS1, whether that call
was completed or not.
2. Information provided includes Call Quality,
Packet Loss, and other technical details.
1 2
Page 80
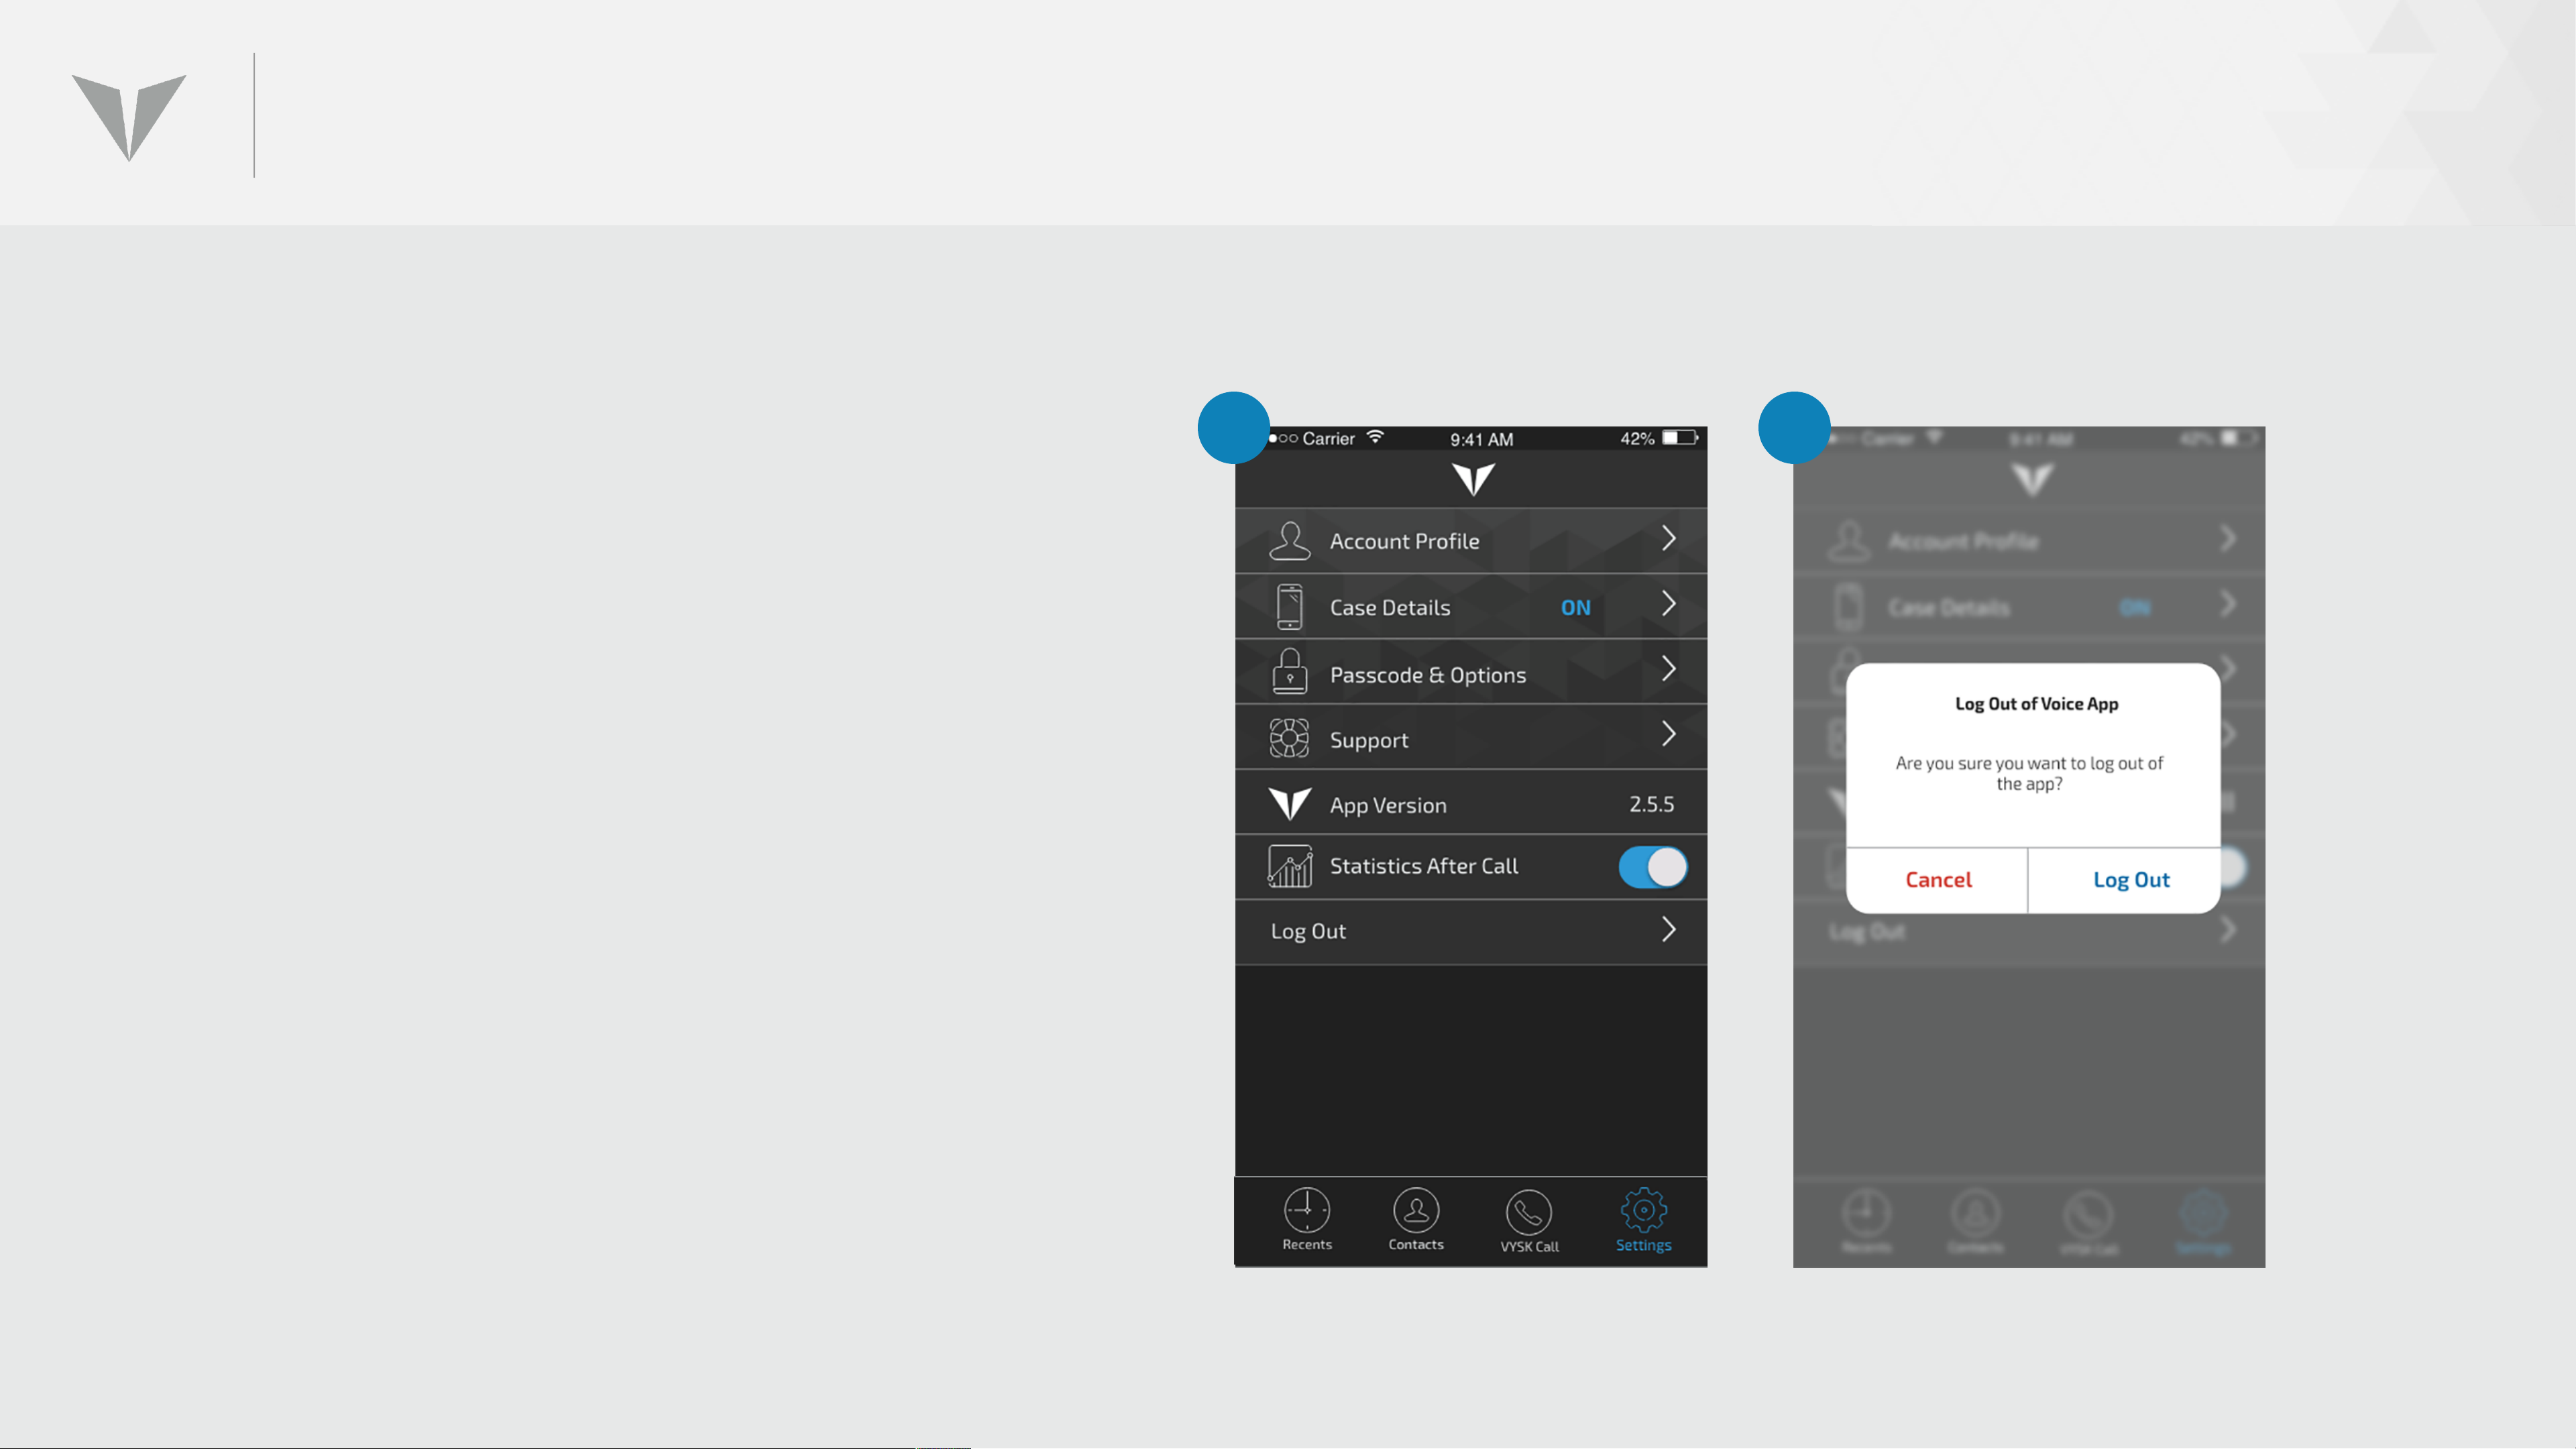
SETTINGS: LOG OUT
1. To log out of the Vysk Voice
app, click on Log Out (1).
2. The user will be prompted to
ensure that they do, indeed,
intend to log out.
1 2
Page 81

MISCELLANEOUS
Page 82
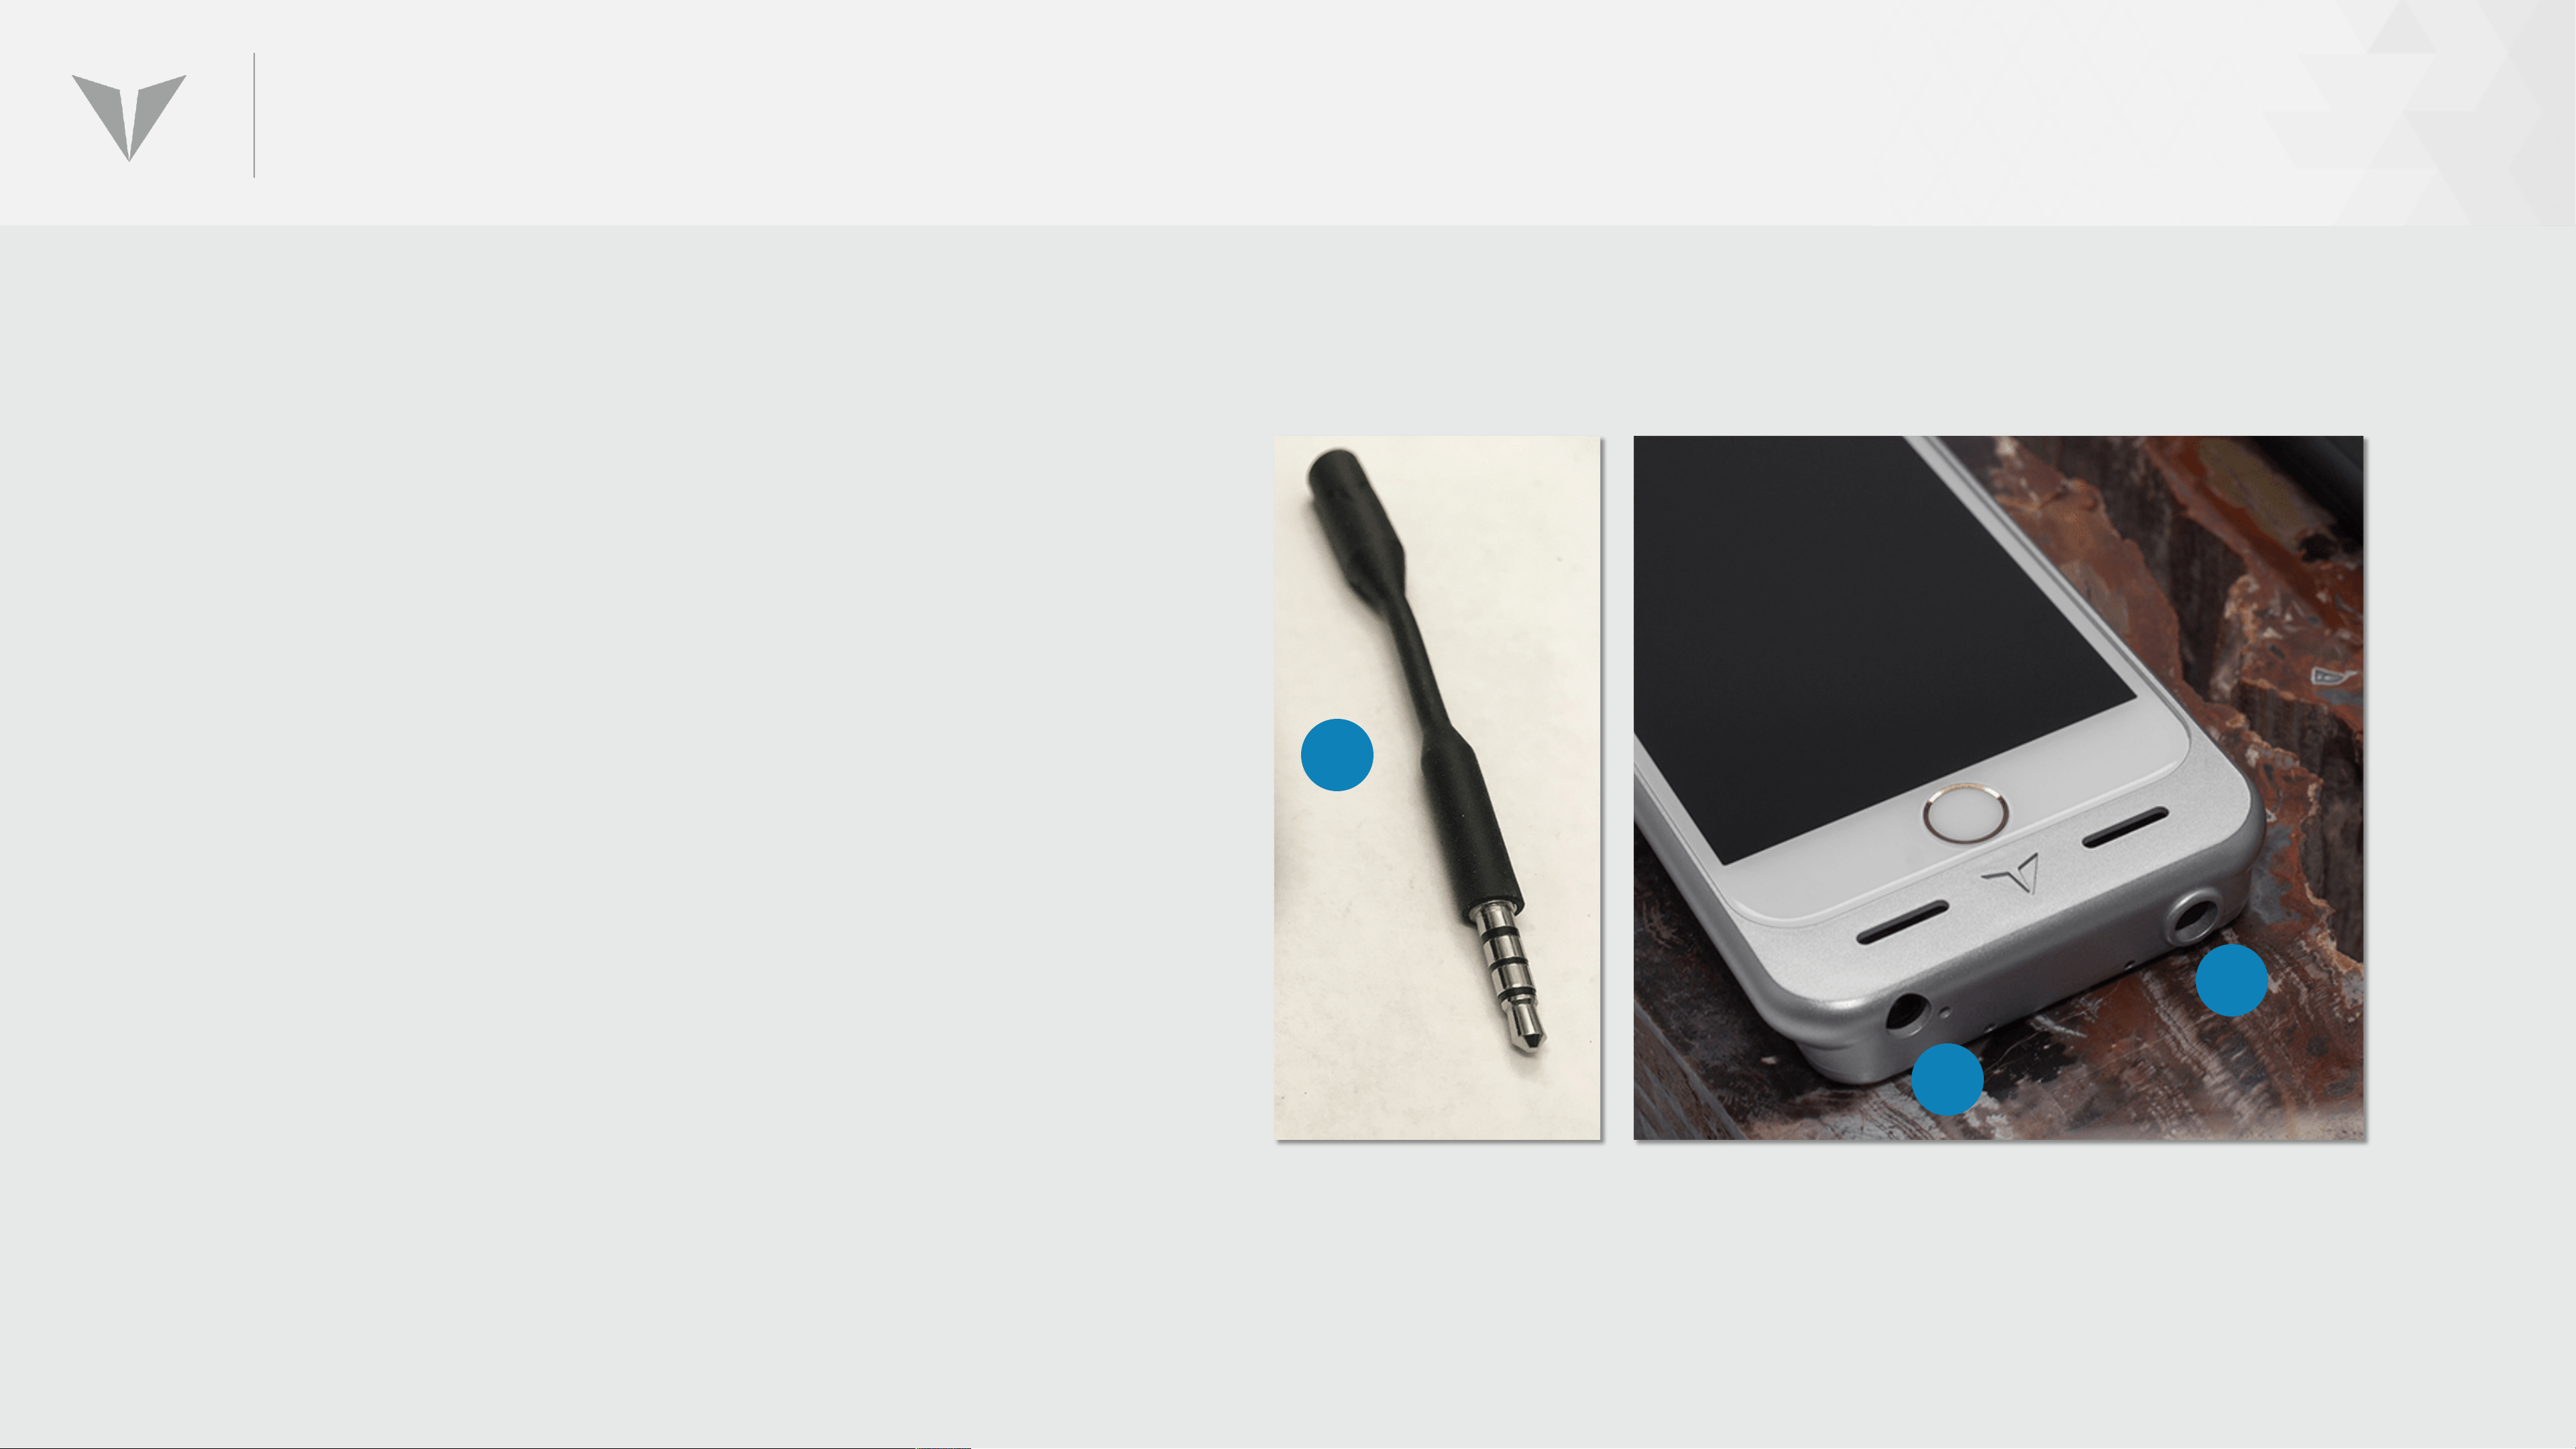
USING THE HEADPHONE JACKS
1. Each QS1 for iPhone 6* comes with a 3.5mm
headphone adaptor (1), a.k.a the “dongle.”
2. To listen to normal audio (either phone calls or
music), insert the male end of the adaptor into
the normal iPhone receptacle (2), then connect
the headphones to the female end of the
adaptor.
3. To use headphones for Vysk secure Voice
calls, insert the male end of the adaptor into
1
3
the QS1 receptacle (3), then connect the
headphones.
*The QS1 for iPhone 7/8 does not require a dongle, as there is no 3.5mm receptacle on the phone.
2
Page 83

ISSUES & TROUBLESHOOTING
Page 84
ISSUE TYPES
The QS1 is one component of a complex privacy/security system
with a limited number of use cases and a discrete number of
solutions, making it easy for IT Managers to support:
• Call set-up doesn’t complete correctly
• Disconnect doesn’t occur correctly
• Calls get dropped
• Call quality is compromised (noise, delay, echo, etc.)
• Encryption validation (VAC) fails
In some situations, the solution will be to reset/reboot the Vysk
Voice App and/or the QS1 itself. To reset the Vysk Voice App, log out
and close the app (by swiping it away on the iPhone). To reboot the
QS1, follow the detailed instructions on preceding pages.
Page 85

SUPPORT TIERS
• Tier 1 – The easiest troubles to resolve, e.g., routine subscription issues, questions about QS1
operation, initial set-up, etc. These issues can typically be resolved by the initial CSR
responding to the request.
• Tier 2 – More challenging trouble types, but still often resolvable by appropriately trained
contractors or distribution partners, e.g., isolated call quality issues, warranty claims, basic
software/firmware upgrades, etc.
• Tier 3 – The most difficult troubles, i.e., those which could require the expertise of Vysk
engineers, e.g., widespread network outages, call quality issues, extensive software/firmware
upgrades, etc.
Page 86

QSI CALL SET-UP TROUBLESHOOTING STEPS
Check that power
and Lockdown
Mode switches
If the QS1 is having issues completing calls,
troubleshoot the issue in the following order:
Close Voice
App, detach
QS1, and
Verify QS1
Update
status in
firmware/
Admin
software
Replace
QS1
are ON
reboot
Portal
Page 87

QSI CALL QUALITY TROUBLESHOOTING STEPS
If the QS1 is having issues dropping calls or maintaining suitable call quality
(noisy, echo, delays, etc.), troubleshoot the issue using the following steps:
Close Voice
App, detach
QS1, and
reboot
Verify
telecom
network is
working
correctly
Replicate
problem with
other QS1s
Test calls
on Wi-Fi
vs. Cell
Network
Replace
QS1
Test calls
Test calls
on various
on
network
alternate
configs (3G,
cell carrier
4G/LTE)
NOTE: If the QS1 is generating excessive buzzing noise through the speakers,
this is likely caused by a defective jammer device and is not a network issue.
Page 88
SUMMARY
There are a limited number of reparative actions that can be taken to
address QS1 quality and performance issues:
• Inspect/clean mechanical parts that do not function properly (switches,
slides, etc.)
• Detach/reattach QS1
• Reboot (turn off/on) QS1
• Check and update software/firmware
• Confirm correct battery charging
• Replace unit when necessary
Detailed trouble scenarios are provided in other Vysk support documents,
including symptoms, troubleshooting techniques, and appropriate repair
actions.
Page 89
SUMMARY
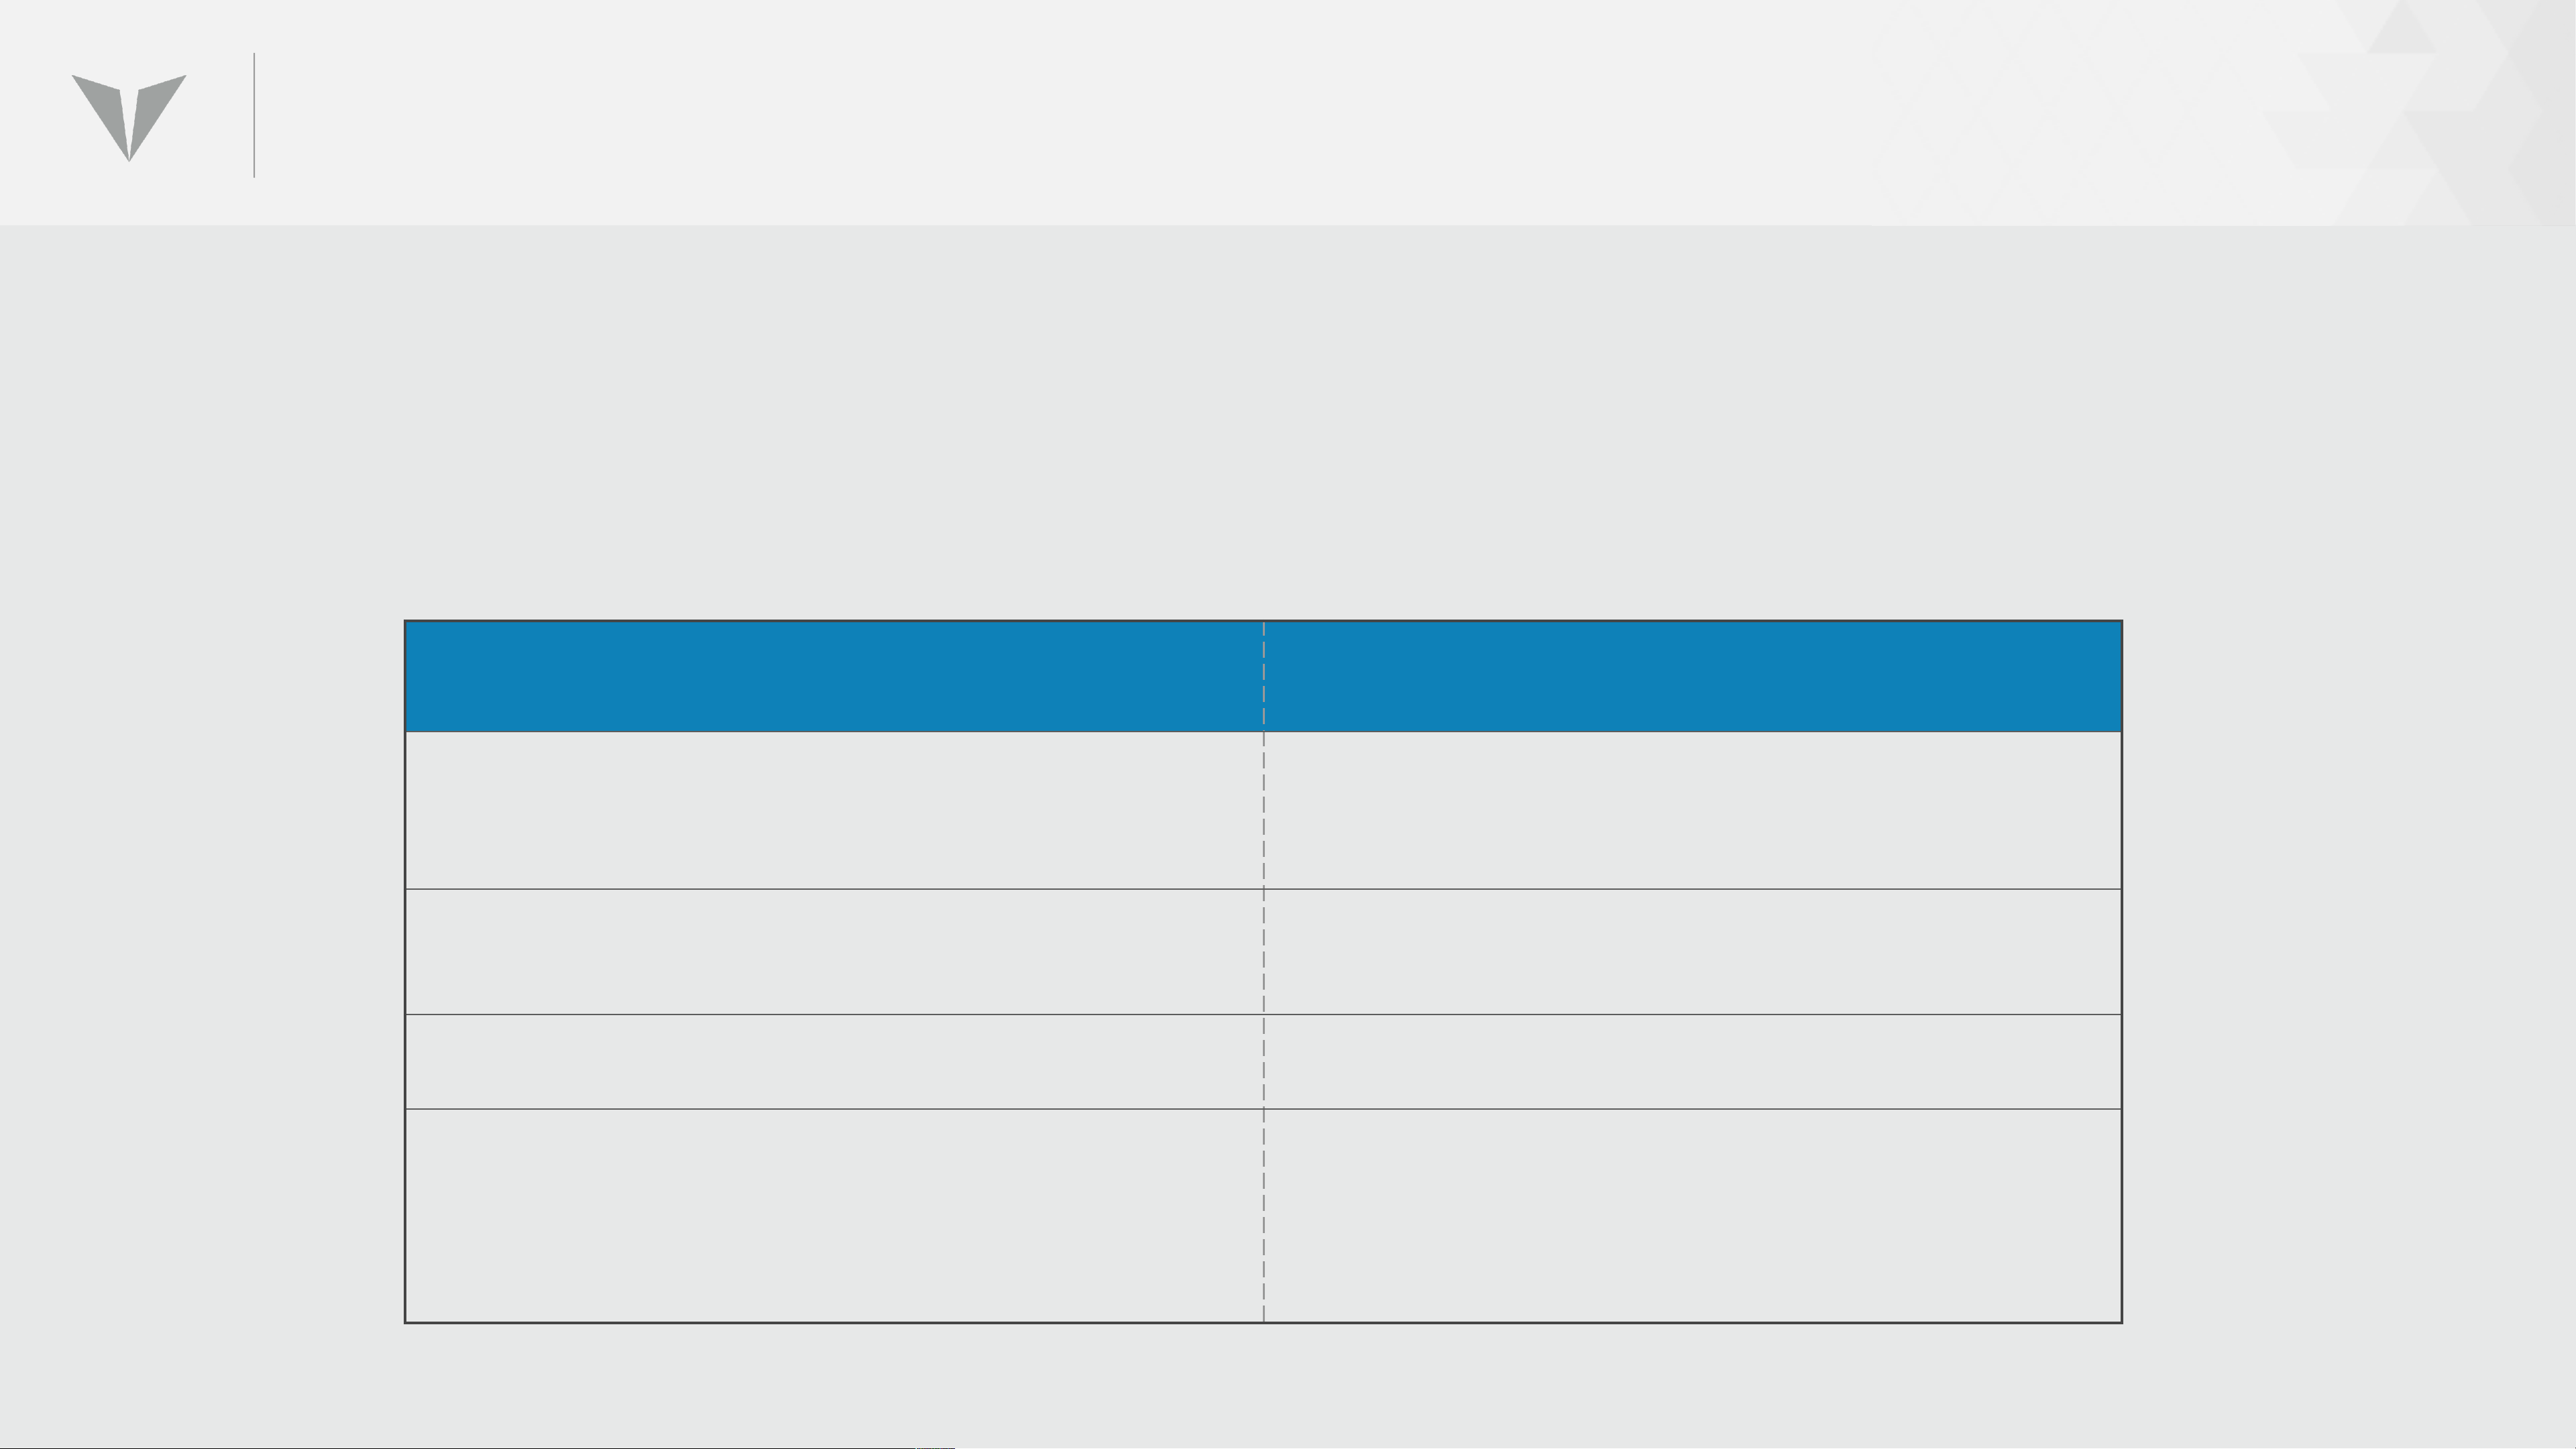
Troubleshooting the QS1 system is typically straightforward, especially given that there are
only a small number of potential issues and an equally small number of associated solutions.
Following is a representative summary of potential troubles and their likely solutions:
Trouble Resolution
Calls drop, calls won’t initiate/hang up correctly,
contact d/b problems
Call to certain specific QS1 users fail to initiate or
complete
Call quality issues (noise, delay, echo) Test networks, Wi-Fi, carriers, etc.
Detach/reattach/reboot QS1
Update firmware/app/software
Battery overheating, charging incorrectly,
won’t hold charge, mechanical failure,
breakage, moisture, noisy jammer
Replace QS1
Page 90

CONTACT INFO
To contact Vysk Customer Support,
call 1-855-GET-VYSK or email
M-F, 8 a.m. – 6 p.m. CDT
 Loading...