

Page 1
Page 2
APRROVALS & OPERATING CONDITIONS
EQUIPMENT WITHOUT RADIO TRANSMITTERS – WORLDWIDE MARKET
VX Log™ – Models 90 & 230, – CE stamped for use in EU. FCC Stamped for USA
Independently tested to meet:
• FCC Part 15 Sub parts A and B for Class B device, (no intentional transmission).
• EN55024: 1998 + A1 + A2
• AS/NZS CISPR 22 – 2006
• RSS-GEN Issue 2 & RSS 3001 Issue 1,
• Equipment meets RoHS regulations for EU.
EQUIPMENT WITH RADIO TRANSMITTERS – MARKET: Europe, UK, Africa, Middle East, Asia
VX Log™ M1a
Independently tested to meet:
• EN55024: 1998 + A1 + A2
• Equipment meets RoHS regulations for EU.
• EQUIPMENT MUST ONLY BE OPERATED WITH THE ANTENNA SUPPLIED.
VX Log™ 340a – CE stamped for use in EU.
Independently tested to meet:
• EN55024: 1998 + A1 + A2
• Equipment meets RoHS regulations for EU.
EQUIPMENT WITH NON-ADJUSTIBLE RADIO TRANSMITTERS – MARKET: North & South America: USA, Canada, Australia, New Zealand
VX Log™ M1b
Independently tested to meet:
• AS/NZS CISPR 22 – 2006
• RSS-GEN Issue 2 & RSS 3001 Issue 1,
• Equipment meets RoHS regulations.
• FCC ID: SR2VSILM1B
This device complies with Part 15 of the FCC Rules.
Operation is subject to the following two conditions:
(1) This device may not cause harmful interference, and
(2) This device must accept interference received, including interference that may cause undesired operation.
• EQUIPMENT MUST ONLY BE OPERATED WITH THE ANTENNA SUPPLIED.:
VX Log™ 340b
Independently tested to meet:
• AS/NZS CISPR 22 – 2006
• RSS-GEN Issue 2 & RSS 3001 Issue 1,
• Equipment meets RoHS regulations.
• FCC ID: SR2VSIL340B
Operation is subject to the following two conditions:
(1) This device may not cause harmful interference, and
(2) This device must accept interference received, including interference that may cause undesired operation.
ALL MODELS:
Operate only within temperature range 0°C to +45°C (32°F to 113°F);
Do not immerse in water or use is a wet garment unless enclosed in a watertight plastic bag
Page 3

VX Sport User Manual Page 1
.
1.0 Software (PC Only – Windows XP SP2 onwards, Vista, Windows 7 - 32 and 64 bit, Windows 8*)
Minimum hardware requirements:
• 2.0 GHz CPU
• 2 GB RAM
• 1 GB free HDD space.
NOTE: VX View™ will run on Apple Mac™ using Windows XP™ or Windows 7™ emulation software. Use
Parallels™ V4.0 or later. Boot Camp™ may also work. Refer to Apple™ for support of this software.
* VX Sport™ software will operate on most Windows 8 PCs but is not guaranteed.
1.1 Installation
- Insert VX Sport™ CD into your PC. Alternatively: Arrange for a software download from VX Sport™.
- VX View™ should automatically open an installer menu
- Follow instructions on screen
- Accept any prompts for Registry changes during the installation.
-
Refer to Appendix 1 of this guide for help and detailed troubleshooting for installation
.
- VX View™ has been developed to work with both Windows XP™ (SP2 onwards), Vista™ and 7 operating
systems, including Windows 7 – 64 bit. Unfortunately owing to individual PC and software setups, user may
occasionally experience problems on installation.
- Check first that there are not conflicts with virus checkers, port filters, firewall or other protection suites that might
be preventing VX View™ to be correctly and fully installed.
- There is a known problem of conflict with finger print scanners on some Toshiba PCs, which requires the finger
print reader to be disabled.
- Your PC must be running Microsoft™ Dot Net 2.0 or later framework to correctly handle VX View™ code.
1.2 Activation of VX View™ Software
To activate your software on your PC it must be connected to the Internet with a broadband connection. Enter the
activation code
supplied with your system (typically we advise you of this by email at time of purchase).
Note: The VX Sport™ activation service uses a third party in the US to track and verify all licences.
* In some circumstances Windows 8 software may not work with the activation service, for certain PC models.
Installing the Software
Page 4
VX Sport User Manual Page 2
The VX Sport™ user software suite includes VX View™ and VX Live™.
VX View™is used for the setup, management and reporting of all the VX Log™ products; (Models 90, 230 and 340),
and is used to initially pair the VXM1 basestation to the software and hardware.
VX Live™ software is used only for conducting realtime (live data) sessions, and requires the VX Log™ 340
hardware and a VXM1 base station.
IMPORTANT: VX Log™ 340 realtime sessions cannot be conducted until the VX Log™ M1 basestation is first
plugged into the USB port of the PC, and recognised by VX View ™software. Read set up notes and operating
instructions for VX View software before setting up your hardware for realtime data transmission.
The program icon represents the company logo of Visuallex® Sport.
Open VX View™ when you wish to:
• Set up the users of your VX Sport™ system; ie the Athletes and Teams you define
• VX340/VXM1 only: Pair the VXM1 realtime base station to the software and VX Log™ 340 hardware
• Issue your VX Log™ with specific details, such as date, athlete, sport and event.
• Run analysis of data recorded by your VX Log™ monitor during training or games
• Erase data from your VX Log™ memory
• View reports, and print all or part of your logged games, training or fitness workout
Open VX Live™ when you wish to:
• Conduct a realtime (live data) session for one or more athletes, using VX Log™ 340 hardware and a VX Log™
M1 basestation.
•
Note: Prior to the first realtime session it is essential to do the following
:
• 1. Open VX View™ software; plug in VX Log™ M1 basestation via USB cable to PC; observe that USB driver for
VXM1 is loaded and that VXM1 appears in control panel display at left of VX View™ screen.
• 2. As soon as VXM1 is recognised by VX View control panel it must be disconnected from USB. Do not attempt
to issue details to VXM1.
• 3. Plug in one or more VX Log™ 340 via USB to the PC, and observe that they are identified in the control panel
at left of VX View screen.
• 4. Issue each VX Log™ 340 (See Page 5).
• 5. Remove VX Log™ 340 from USB; Reconnect VX Log™ M1 to USB.
• 6. Close VX View™ software and open VX Live™ software. Continue with set up of realtime session by
completing the “Game Setup” form in VX Live™.
NOTE: There are no user adjustments required or possible, for radio transmission using the VX Log™
340 and VX Log™ M1 hardware.
VX View™& VX Live™
Page 5
VX Sport User Manual Page 3
TERMINOLOGY:
In this manual the hardware models VX Log™ 90, VX Log™ 230, VX Log™ 340 (a or b) and
basestation VX Log™ M1(a or b), are usually shortened to: VX90, VX230, VX340 and VXM1
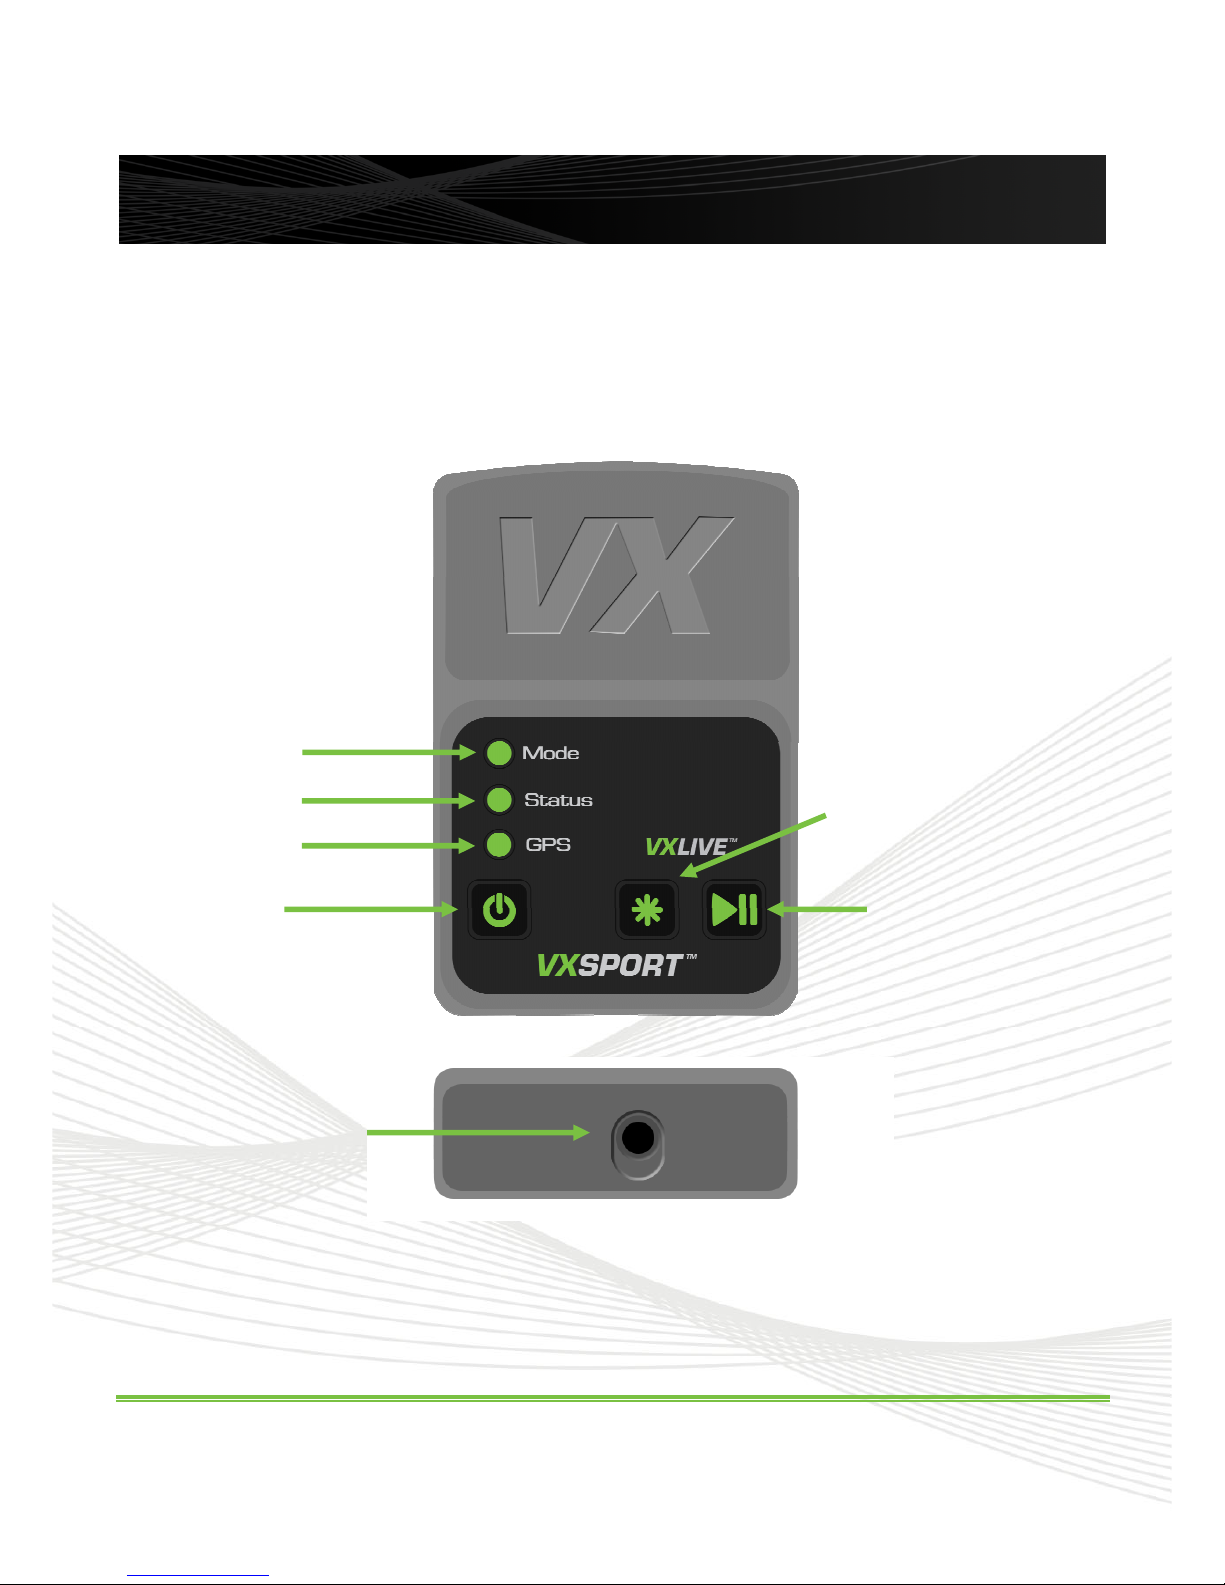
USB Connector
Your VX Log™
Mode Light
Status Light
GPS Light
Power Button
Play/Pause Button
Function Button
Page 6

VX Sport User Manual Page 4
Your VX Log™ – M1 Base Station
Power Light
Status Light
Data Light
Antenna Connector
Antenna Connector
Page 7
VX Sport User Manual Page 5
Before you start using your
VX Sport™
system you need to define the athletes and teams.
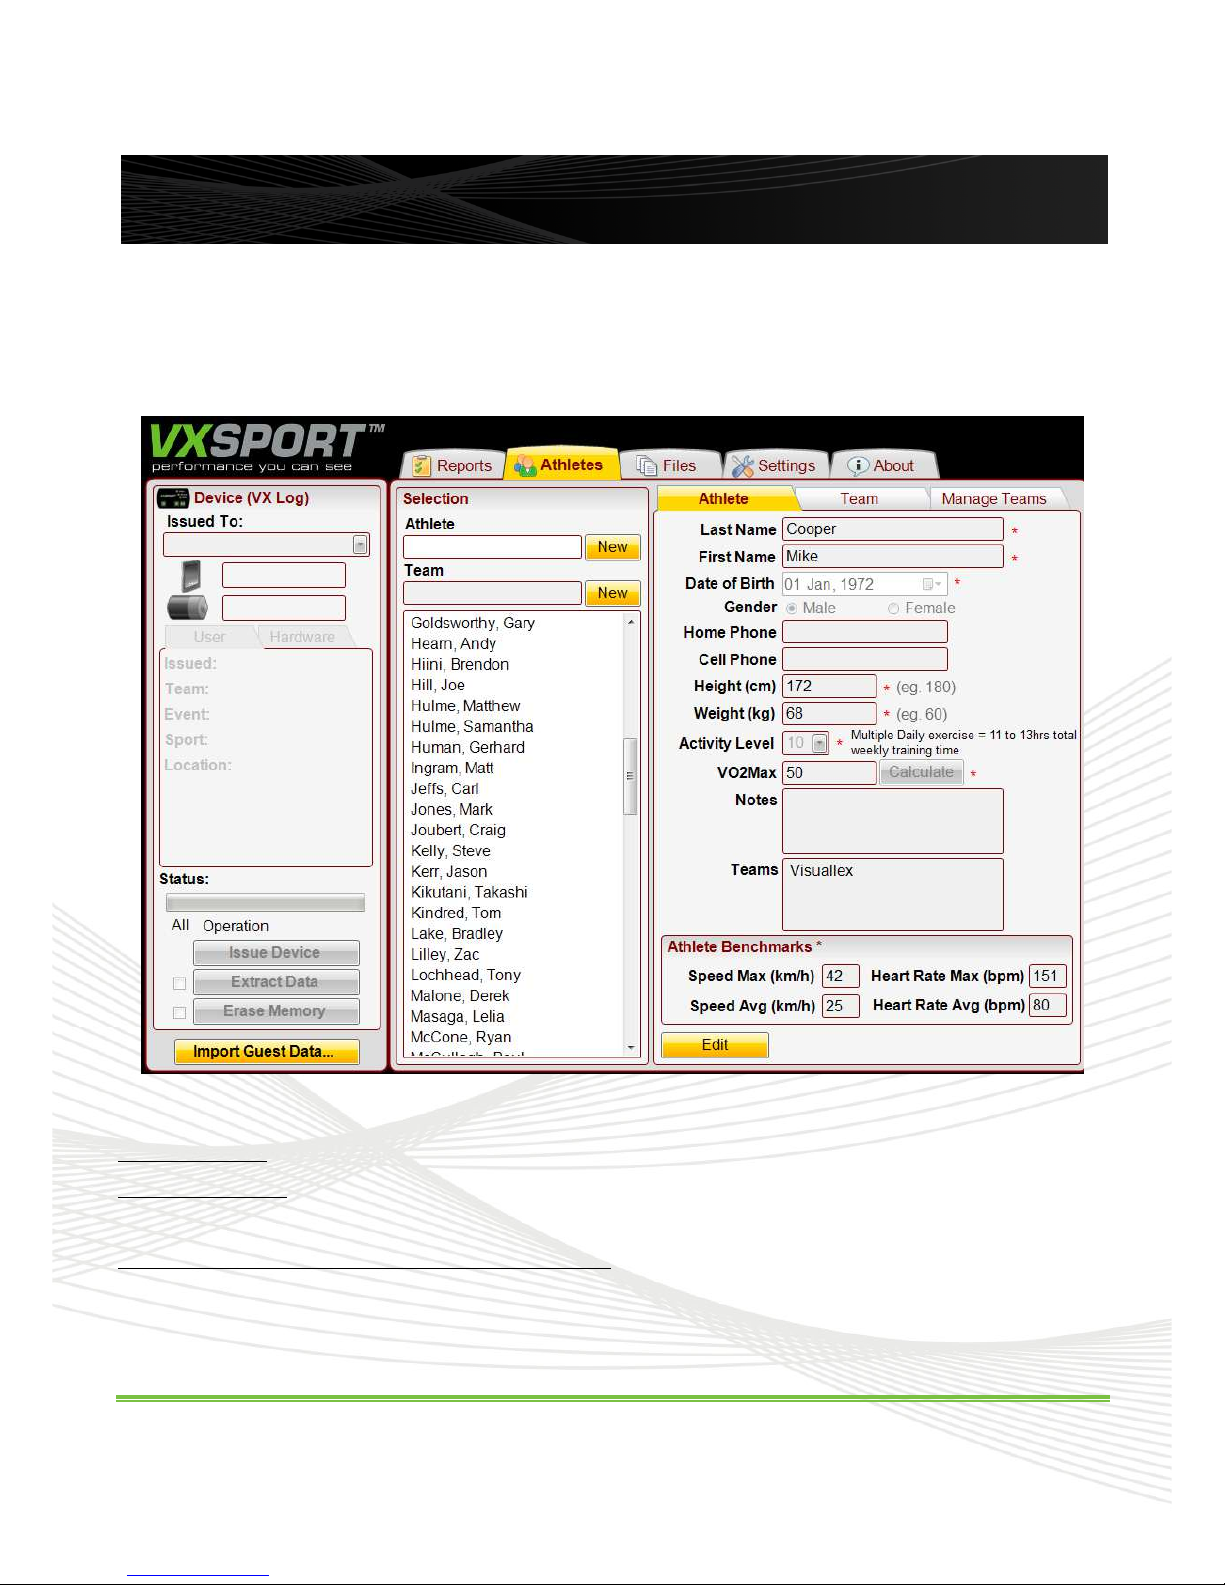
To do this select the [ATHLETES] tab on
VX View™.
Note the example below:
For example:
To Create a Team: Place cursor on Team and click [New] button. Fill in required fields. Items marked * are compulsory.
To Create an Athlete: Place cursor on Athlete and click [New] button. Fill in required fields,
one athlete at a time. If you know your VO2MAX then enter it directly. The software can set a VO2MAX based on your
age and fitness; simply press the [Calculate] button.
After an athlete has been created the name cannot be edited. The other athlete information can be edited.
When filling in the forms for athletes & teams, don’t forget to hit the [Save] button on screen after
completing each form
Creating Athletes and Teams
Page 8
VX Sport User Manual Page 6
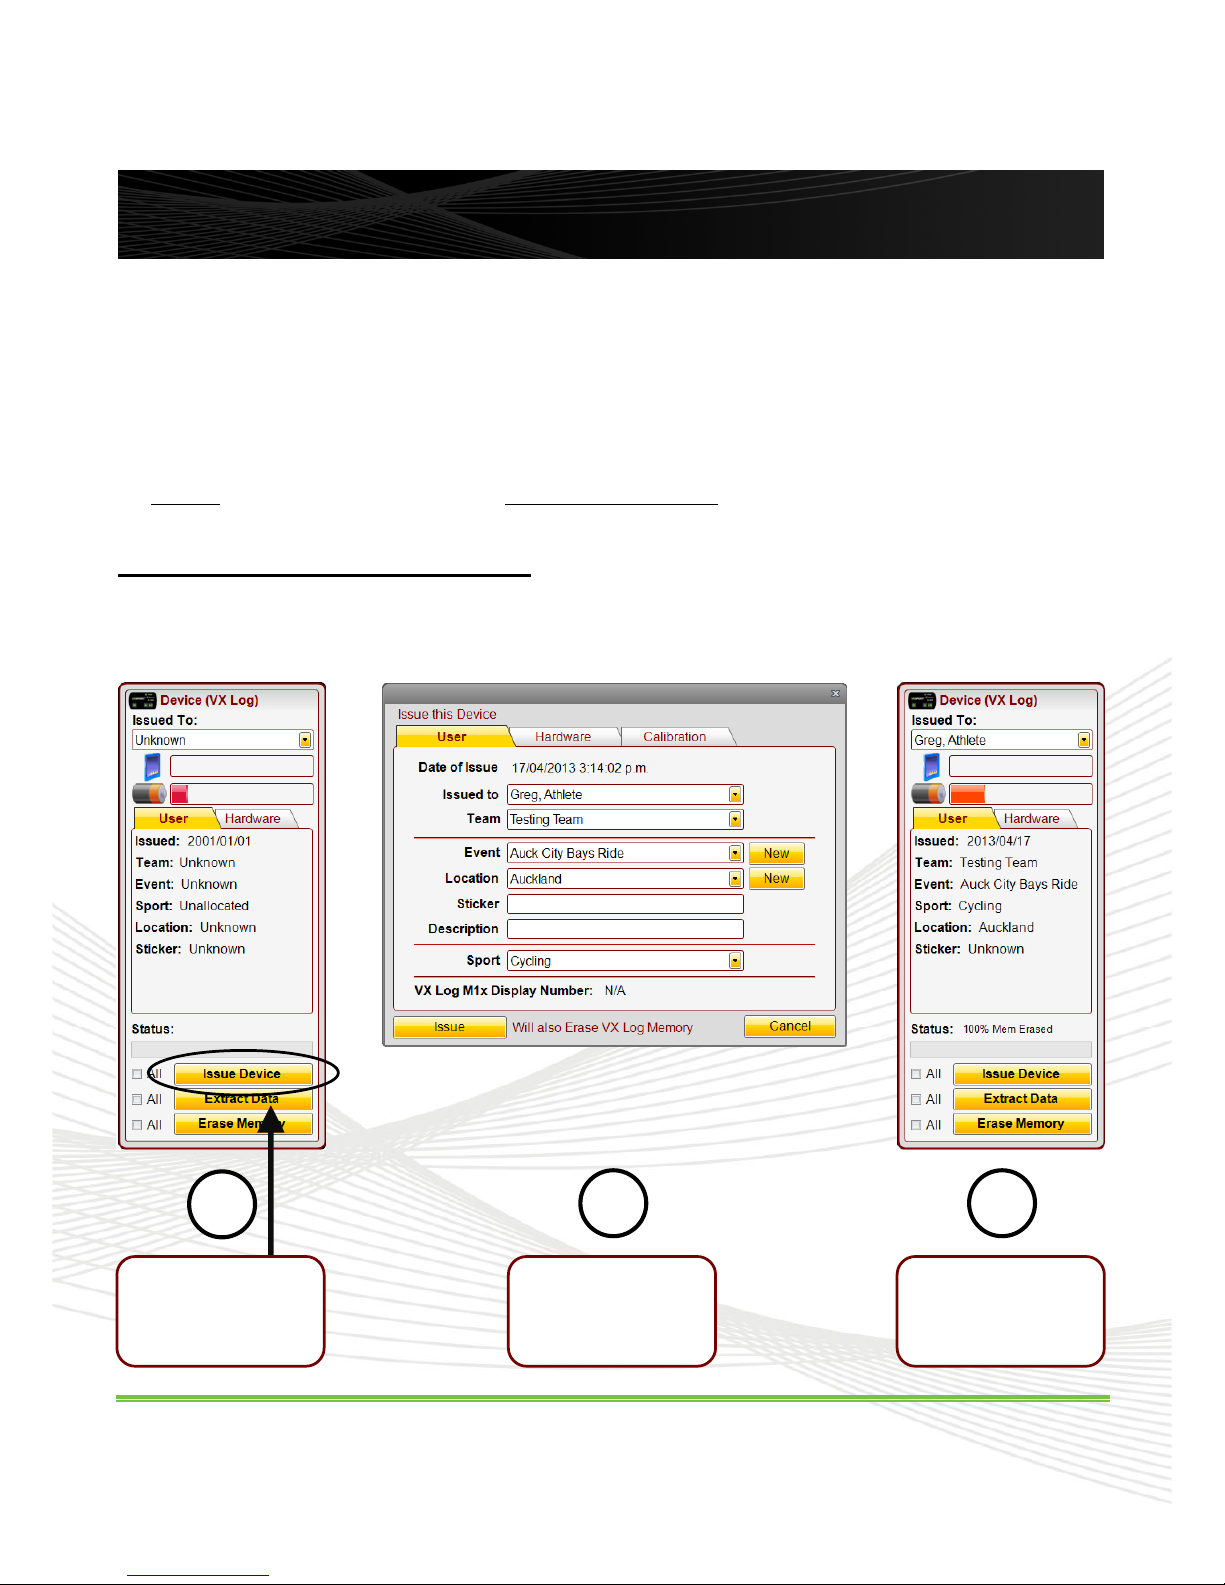
2
Enter your
information,
including sport
3
You have now
issued your
device!
Before the VX Log™ is used it will need to be issued to both a User and a sport.
Setting the sport tells the GPS chip which mode it should be in to give the most accurate results. It is not possible to
change the selected sport after a session has been recorded because the GPS is only operating while the VX Log™ is
recording.
The GPS chip in VX Log™ monitors has multiple modes for calculating position and speed. Because of this it is essential
to set the VX Log™ to the correct sport before using it.
For constant slow speed activities, like jogging (where there are no sprints), the sport should be selected as “Walking”,
rather than “Running”.
Issuing a device using VX View™.
• Connect the VX Log™ monitor to your PC via the USB Cable provided.
• Start the VX View™ software (See Page 1 if you have not yet installed VX View™).
Issuing the VX Log
1
Click the “Issue
Device” Button
Circled above
Page 9

VX Sport User Manual Page 7
All buttons operate only when pressed for 3 seconds continuously. This is to avoid accidental
operation.
GPS units rarely work indoors. You can use your VX Log™ monitor indoors, but only for heart rate and
body force recording.
Normal Operation
Press power button for 3 seconds
Mode
light should go green (steady).
Status
light should go green (will flash green-red-green once per second when wearing a heart rate strap).
GPS light will go green in 1–3 minutes, once the receiver has locked-on to enough satellites to provide your
accurate position.
Long Play Mode
For sessions greater than 2 hours recording you should select a long play mode by pressing the button for at least
three seconds.
In “Long Play Mode” the mode light will flash green. “Long Play” allows 3 to 5 hours of recording, (depending on
battery age and charge). In “Long Play” mode the magnetometer and accelerometer data is not recorded, allowing
for longer recording.
You may return the unit to normal mode by pressing the function button again for at least seconds.
Mode Light Flashes
Green once per
Second
Long Play Mode Selected
Hold the mode button
for at least three
seconds to return to
normal logging mode
Pause Mode
You can temporarily suspend recording by up to 30 minutes, by pressing the button for >3 seconds. The mode light
will go red. The VX Log™ will turn off after being paused for 30 minutes.
Return the VX Log™ to record by pressing the button for >3 seconds.
Solid red mode light,
with other lights any
colour
Low Battery
Plug in USB cable to
charge device (see 'USB
mode').
(Unit will not start
logging unless
sufficiently charged)
VX Log™ Operations
Page 10
VX Sport User Manual Page 8
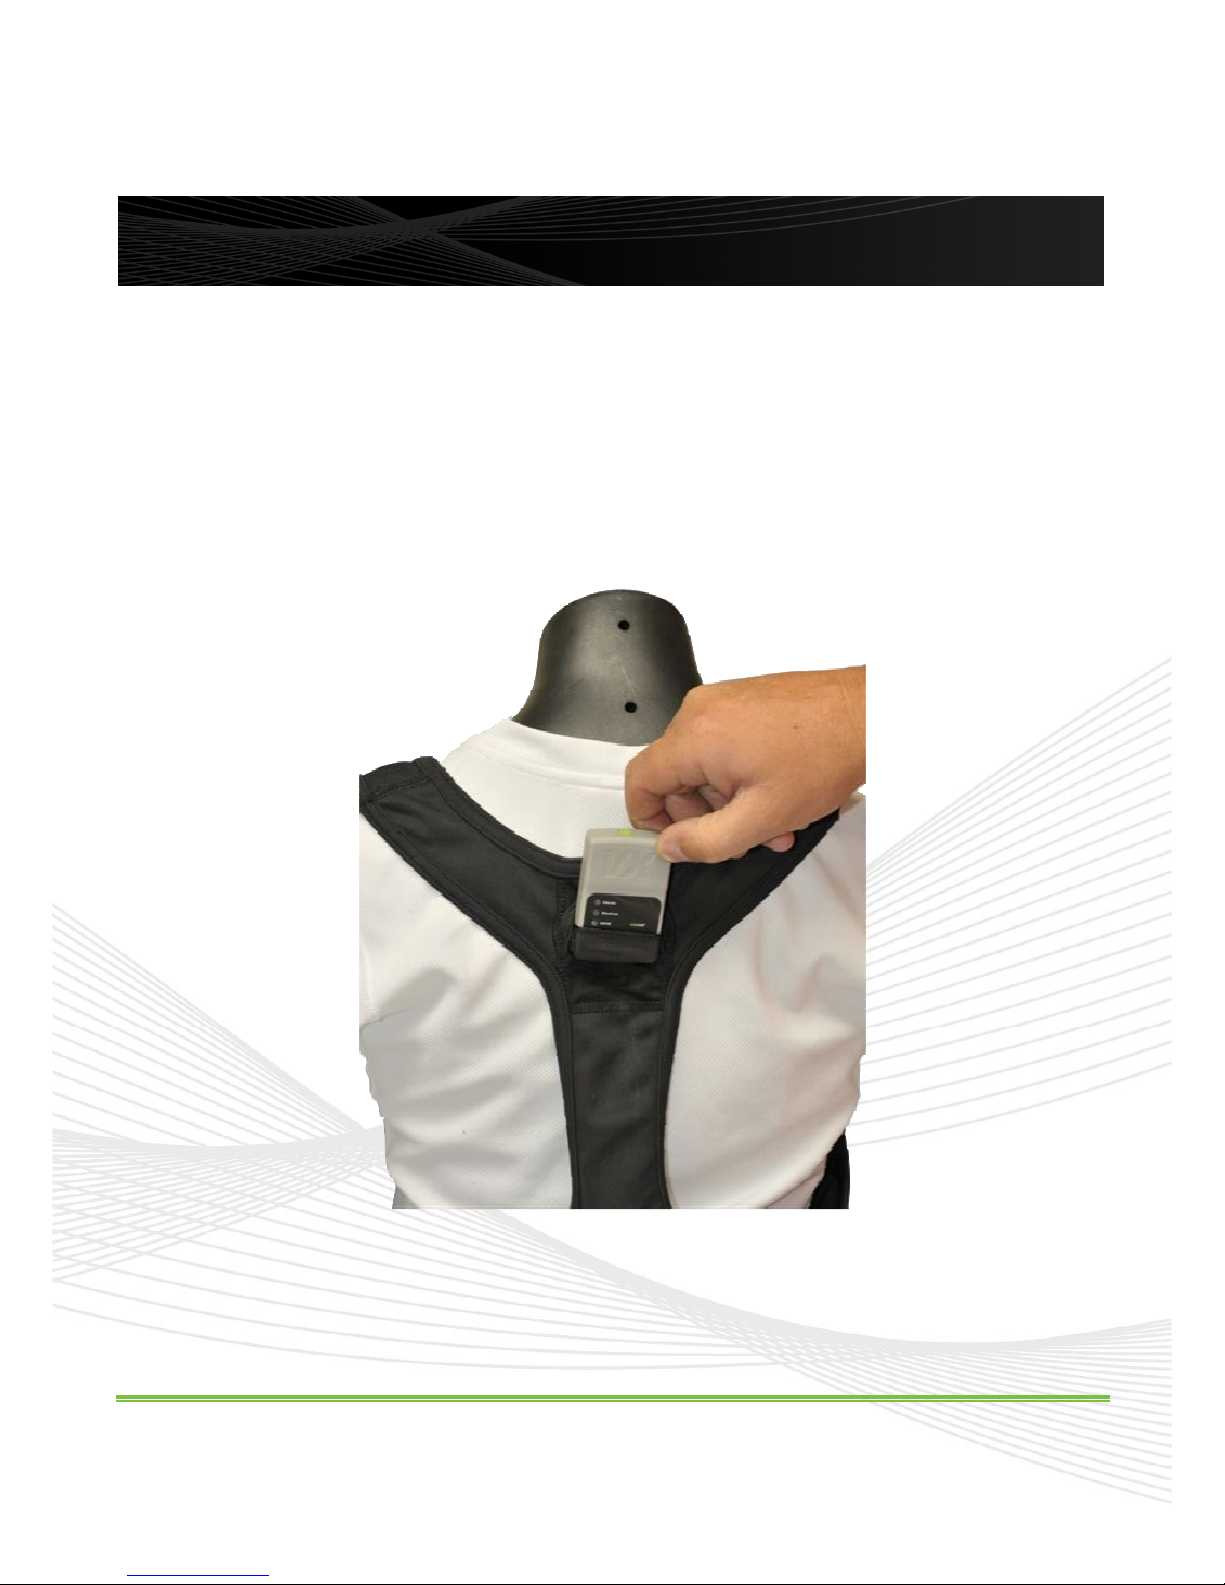
The VX Log™ is worn in the pocket of the armband or vest, available separately from VX Sport™.
Before using your VX Log™ for the first time you must issue the device. (See page 4 if you have not done this).
Turn the VX Log™ on before placing in the vest or armband.
The VX Log™ must be placed in the vest with the green USB Plug facing upwards.
When you are finished playing or training remove the VX Log™ monitor and switch it off (by pressing the power
button for at least 3 seconds).
Wearing the VX Log™
Page 11

VX Sport User Manual Page 9
The cable supplied with your VX Sport™ system allows the USB connection port (hidden behind the rubber plug on your
VX Log™) to connect to the USB port on your PC.
Note: the VX View™ software will manage multiple downloads from several VX Log™ devices, if they are plugged into a
multi-port USB hub. Select the check box on screen and follow the instructions there.
Start your VX View™ software; plug VX Log™ into PC USB port.
Select [Extract Data] on the left side of the VX View™ screen.
Choose the sessions you wish to import into VX View™ for analysis, and then click save.
VX View™
automatically uploads all data in the
VX Log™
memory.
If you do not erase data after uploading, then it will reappear on the next upload as a duplicate. To avoid
confusion and manage your session results it is recommended that you select the check box to <Erase Device>.
You may separately erase the
VX Log™
memory at any time you have it connected to your PC, using the labelled
button on the left of the
VX View™
screen.
Importing Your Data to VX View™
Page 12

VX Sport User Manual Page 10
In the Reports tab can select the session(s) you wish to view from the Athlete/Team/File list on the left, which can be
searched using the Athlete and Team boxes at the top of the screen.
Click the session(s) you wish to view, and then move it to the right hand section using the arrow buttons.
•
The > Arrow moves a session from the left hand list to the right hand box to view.
•
The < Arrow removes a session from the right hand box and allows you to add more.
•
The << Arrow removes all items in the right hand box.
You can move up to two sessions into the right hand box in order to compare. Once you have the session(s) you wish to
view on the right hand side, click the Show Reports button in order to launch the Report Viewer.
Stored files are cross referenced under both Athlete and Team names. An athlete can be a member of one or many
teams (if required).
Analyse and View Your Results
Page 13

VX Sport User Manual Page 11
Viewing Reports
1 2 3 4 5 6
7 8
Page 14

VX Sport User Manual Page 12
Report Selection
There are 8 standard ways of viewing your recorded session.
Field Reports
Includes all sprint, speed & distance data and
includes pie-chart graphs of activity, which is useful
for game play, such as soccer, cricket, rugby etc.
Track Reports
Includes all tabled data for sprints, distance &
speed. Graphs are continuous traces of speed and
heart rate, with ability to zoom in on any part of the
session, down to a few minutes.
Location Reports
Full route, speed and heart rate data plotted each ¼
second on a satellite map. Note: You need a
broadband internet connection to your PC to run
this report.
Link
Step Report
*
1
Step reports are most useful and relevant for short
sprints, runs, or run-ups in track and field training
sessions.
Acceleration Report*
The VX 230 Log and the VX 340 Log have
additional sensors to provide advanced analysis of
body forces.
Export Report**
Creates a .csv (Comma Separated Value) file
(which can be opened in Excel), for any report or
screen view that the user selects within the
software.
Print Report
You may print your selected report by pushing the
<Print> button at the bottom right of the report
screen.
*
Not available for the VX90
**
Only available for VX View™ Pro Users
1
Step reports are designed for analysis of motion, starting at rest and ending at rest. The motion between
rests is defined by VX Sport™ as a “run”. The software requires that the athlete remains upright and stationary
for at least 3 seconds at both the start and end of the “run”.
Viewing Reports (contd.)
1
2
3
4
5
6
7
8
Page 15

VX Sport User Manual Page 13
When you first open your report the lower section will be empty. You must first select a period using in the overview panel,
and then use the Zoom function to display your full report.
To view the report for a whole session, just click the zoom button. If you want to focus on specific areas however, you can
use the sliders and arrows to narrow your selection down. When you have made the selection you want, hit zoom and the
report will be generated. When viewing, changing and updating reports remember to use the Zoom, Analyze and Update
buttons on the screen. To start another report you must first return to the Reports screen by selecting the Exit button on
the top bar.
Viewing Reports (contd.)
Slide the
Green
and
Orange circles to select
an area to view.
Page 16

VX Sport User Manual Page 14
By selecting the [SETTINGS] tab you can customize the bands (zones) for speed and heart rate that VX View™ uses for
the reports. Note: the default values in the [SETTINGS] tab are applied to all athletes.
The default Speed Bands and Heart Rate Bands are based on nominal bands, arranged from still to 100% pace for world
class athletes. You may choose to change zones to target speeds and heart rates that better suit your fitness or type of
sport.
The Default Benchmarks are values used in the Track Reports to show target lines on the report graphs. Note: These may
be changed to suit an individual athlete by editing the athlete profile, using the [ATHLETES] tab.
We recommend that you do not change the Sundry Options and Colour Scheme for Charts settings.
Settings and Customised Setup
Page 17

VX Sport User Manual Page 15
The VX Sport™ system creates two types of files, which are stored on your PC.
•
.bin files include all raw data that was downloaded from your VX Log™ at a given time.
•
.vxs files are the individual sessions (one or more) that are created from a single bin file.
Note: If you do not erase your data after uploading it from your VX Log™ to VX View™ then the data will appear again in
the next bin file that you create by uploading from the VX Log™.
You may share data (both
.bin
&
.vxs
files) with other users. The only limitation on this is the size of VX View™ license
that you purchased with your VX Sport™ system.
To import a file into VX View™ select Import Guest Data at bottom left of screen. Select path to imported file with browser
window.
Managing and Sharing Data
1. Insert Guest Data…
2. Navigate to VXS file
Page 18

VX Sport User Manual Page 16
Depending upon the type of licence and support contract that you purchased you may install your software on 1 PC, or
more if you have a multi-user licence (Activation Code).
If you move your software from your PC to another PC you must take care to move the licence. Failure to do this will
prevent you from reactivating your software if you have a single activation.
To move your licence
: Open the [ABOUT] tab in VX View™. Ensure that your PC is connected to the Internet via
broadband. Click the (Move Licence) button, and then follow the instructions on screen. Once your licence is removed
you should complete the uninstall of VX View™ on the original PC.
Install VX View™ on the new PC and follow same procedure for activation as you did originally.
Moving VX View™ To Another PC
Page 19

VX Sport User Manual Page 17
Charging the Battery
Charge the internal battery in your VX Log™ by connecting the USB cable to your PC and VX Log™.
The battery charges in around 3 hours to 90% capacity. Your PC normally must be on to allow USB port to supply power.
The lithium ion battery in the VX Log™ is good for between 300 to 500 recharging cycles. To obtain best battery life you
should recharge your battery when it gets to about half capacity.
Do not recharge your VX Log™ unnecessarily. The battery will hold its charge well.
Every few months you should run your battery down to a low level then fully charge for 12 hours. Although lithium
batteries do not have a "memory", it can help to improve the battery life.
If you do not use your VX Log™ for an extended time it will eventually go flat. The VX Log™ has a battery low-level
protection device. Caution: if the battery is not charged for more than a year there is a possibility of permanently
damaging it.
Battery Status Indicators:
Solid Orange Light
for 10 Seconds
Low Battery
Plug in USB cable to
charge device (see 'USB
mode').
(Unit will not start
logging unless
sufficiently charged)
Solid Red Mode and
Status Lights Light
when plugged into
PC
Battery Charging
Unplug USB Cable to
turn device off. All lights
will turn off.
Solid Red Mode
Light when plugged
into PC
Battery Fully Charged
Unplug USB Cable to
turn device off. All lights
will turn off.
Battery
Page 20

VX Sport User Manual Page 18
Using Third Party Heart Rate Straps
The VX Log™ hardware is tuned to pick up sensor signals within a 0.5 metre distance. However we do not recommend
that two or more athletes stand closer than 1metre apart while wearing heart rate straps, to avoid interference between
VX Log™ monitors.
It is important to make sure that heart rate chest straps are correctly placed (typically just below the line of the nipples on
the chest), and are adjusted for firm contact. Heart rate straps require moisture to operate correctly, so it can be useful to
initially moisten the strap contact areas with water to improve performance.
Our VX Log™ use ANT coded heart rate detection only, and are compatible with the Suunto Dual belt SS014543000.
Heart Rate
The VX Log™ 90/230/340 will automatically detect a signal from a Suunto™ ANT heart rate chest strap when the unit is
turned on.
Note: Visuallex Sport International Ltd has no formal or technical association with Suunto™, apart from being an
authorised reseller of Suunto™ products in New Zealand.
Heart Rate Straps
Page 21

VX Sport User Manual Page 19
The “Location Report” feature in VX View™ uses a software “plug-in” supplied by Google™ and controlled by their terms
and conditions. When prompted to download the plug-in you must accept the Google™ terms. To run Location Reports
and to download the plug-in your must have a broadband connection operating to your PC.
Visuallex® Sport cannot guarantee that the plug-in has detailed maps for everywhere on the globe. There are parts of the
world, including some cities, where high resolution images are not yet available.
Google Earth Plug-in
Page 22

VX Sport User Manual Page 20
NOTES:
To conduct a realtime (live data) session requires a VX Log™ M1base station and one of more VX Log™ 340 devices.
There are no user settings required for adjusting radio transmission. The hardware is factory set to provide radio power
and protocols to conform to rules in the countries where the products are sold.
To avoid any problems with GPS location we suggest you reboot each of the VX340 units when you first receive them, or
when you have moved to another country. Push 3 buttons at same time for >7 seconds until reboot operation starts. Total
reboot time is less than 30 seconds.
There are some things to remember when setting up the realtime system:
1. First, start VX View™ software, and plug in the base station (VXM1) to the USB port of the PC
2. The VXM1 should be recognised in the left hand control panel on screen. Once the VXM1 detail appears in
control panel at the left of VX View™ please unplug it from USB and continue to step 3.
3. Plug in one or more VX340 logs. Wait for log details to appear in left hand control panel in VX View™.
4. Click ‘Issue Device” and each VX340 unit will automatically identify with the VXM1 base station. When you start
the VX Live™ software the VXM1 should be plugged in first to USB port of PC. The VX Live™ software will
automatically recognise the VXM1, which will start transmitting.
5. Next, turn on one or more VX340 units. VX Live™ will take about 60 seconds to automatically find these units
(and will display all information of each unit – this is loaded during the issuing procedure).
Using VX340 + VXM1 System in Realtime Mode
Page 23

VX Sport User Manual Page 21
• The VX Log™ hardware includes a high precision 4 Hz GPS chip made in Europe.
• VX Log™ monitors only operate using the US GPS satellites
• VX Log™ will use SBAS enhanced broadcasts in countries where this is available (EU and US).
The GPS system is latest generation and includes very fast lock times to lock onto satellites (typically in less than 1
minute). Once the VX Log™ has been in use and is restarted after an hour or so the time to re-lock onto GPS satellites
can be as little as 5 seconds. The GPS chip in the VX Log™ can determine a position with 3 satellites and will normally
give reliable information if 4 or more satellites are detected. The chip calculates speed and position 4 times each second.
There are several factors that can affect GPS performance with the VX Log™ monitor:
• The user must set the sport correctly in the VX Log™ before use.
• There is some variation in GPS reception quality throughout the day.
• The VX Log™ may have reduced position accuracy if it is used under significant tree cover.
• The VX Log™ will have reduced position and speed accuracy if used in locations with buildings shadow the user
from a good view of the sky and horizon. This may be noticeable when using the VX Log™ in a stadium with very
high stands on all sides.
Note: For Northern Hemisphere use most satellites are seen in the south, east and west of the sky.
For Southern Hemisphere use most satellites are seen in the north, east and west of the sky.
GPS Status Indicators:
Solid red GPS light with
other lights any colour.
No GPS lock
Flashing GPS light, Red
to Green
2D GPS Lock (No altitude
information)
Solid Green GPS light 3D GPS Lock
GPS Settings and Information
Page 24

VX Sport User Manual Page 22
For further information and support we recommend you:
Refer to your CD that came with your VX Sport™ system.
Also refer to the FAQ page at vxsport.com
Have a look at our support forums at http://www.suport.vxsport.com/
Further Information
Page 25

VX Sport User Manual Page 23
APPENDIX 1: SOFTWARE INSTALLATION NOTES – VX VIEW™
Note: To install your VX View™ software you need an Activation Code, which will be emailed to you at time of purchase.
CORPORATE NETWORK USERS
Caution: To get the software to successfully install on a PC connected to a corporate network you should first ensure that
you have adequate administrator rights to install the software. Secondly you need to ensure that the intranet, firewall or
security protocols in place at your company will allow the VX View install to connect to the following websites:
1. Used by Nalpeiron Activation, activating the software.
https://www.internetactivation.com/ECOSYSTEM/ControlActivation.asmx
2. Used by VX View™ for VX Sport™ user management.
https://www.internetactivation.com/ECOSYSTEM/ActivationWS.asmx
3. Requesting VX View™ updates. http://ws.vxsport.com/Service.asmx
The port numbers are:
Nalpeiron HTTPS: 443
VX Updates HTTP: 80
Note: even if those ports are open by the network administrator it may not mean that it will work properly as your
PC may be configured using a proxy server.
For example, using a proxy server, all HTTP traffic can be operated on a different port number from your PC to
proxy server.
From your proxy server to the real servers (Nalpeiron and VX Sport), ports have to be 443 and 80.
If you are installing VX View™ software and receive an error message such as: “Activation Manager is Not Available”…,
or “Cannot Access Port 2”, or similar then it typically indicates that the installation and activation is being blocked by a
corporate security regime. Contact your own company network support staff in this case.
INSTALLING SOFTWARE ON PC RUNNING WINDOWS™ XP™ – MANUAL METHOD
1. Put VX View™ CD in the CD/DVD ROM.
2. Use mouse to “right click” on CD/DVD ROM and choose "Explore"
3. There will be three files (setup.exe, VXView.ico and autorun.inf) there.
4. “Double click” on "setup.exe".
5. Then follow the procedures on screen to complete the installation of the software.
INSTALLING SOFTWARE ON PC RUNNING WINDOWS™ VISTA™ and WINDOWS 7™ – MANUAL METHOD
1. Put VX View™ CD in the CD/DVD ROM.
2. Use mouse to “right click” on CD/DVD ROM and choose "Explore"
3. There will be three files (setup.exe, VXView.ico and autorun.inf) there.
4. Use mouse to “right click” on "setup.exe", and choose “Run as Administrator”.
5. Then follow the procedures on screen to complete the installation of the software.
INSTALLATION OF USB DRIVER – VX LOG™ HARDWARE – MANUAL METHOD
Browse the CD that comes with VX Sport and locate the folder “Silab Driver”. Open the folder and double click on
“USBXpressInstaller.exe”. Follow on screen instructions. Driver should fully install on most PCs without further invention.
If a window appears that asks for location of SIUSBXP.sys then select the “browse” button and point to the correct path of
that file; (for 32 bit PCs the correct file inside the Silab Driver/x86 folder).
WHAT IF MY SOFTWARE IS INSTALLED AND ACTIVATED BUT THE VX LOG™ UNIT IS NOT RECOGNISED BY
THE SOFTWARE
1. When you run VX View™ software you should notice the left panel of the screen, which is the “Control Panel” for
communicating with your VX Log™ hardware (ie the athlete monitor).
Appendices
Page 26

VX Sport User Manual Page 24
2. Any time that the VX Log™ is plugged into your PC with the USB cable the “Control Panel” should light up,
showing you the memory used, battery status and buttons to issue or extract data from the hardware.
3. If the VX Log™ is not recognised by the hardware, try reconnecting the cable.
4. If the situation is permanent it is likely that your PC security has prevented the driver from being loaded.
5. In this case first try reducing your security settings (Windows Bit Defender and McAfee are particularly
intrusive and may cause problems), then try installing the USB driver again.
6. If the VX Log™ still cannot be recognised by VX View™ on your PC then email VX Sport for assistance.
(sales@vxsport.com)
Page 27

VX Sport User Manual Page 25
APPENDIX 2: Health & Safety Conditions
The products manufactured and sold by Visuallex® Sport International Ltd (VX Sport™) are for use by fit and healthy
individuals.
The VX Sport™ system is designed to monitor performance, such as speed, leg forces, distance travelled and heart rate
of athletes, but makes no claims whatsoever to the health or physical condition of the user. Before engaging in any
training or sport activity the user should consult their doctor or a health professional.
By using the VX Sport™ products you acknowledge and agree that Visuallex® Sport International Ltd (VX Sport™) will
not be liable for any injuries from wearing the products or for consequences from: using the software, the analysis or data
produced by the system.
The athlete monitoring hardware (VX Log™) and the waist belt must be used as shown in the Quick Start Instructions
booklet and any other diagrams or video included on the website.
The accuracy of any heart rate strap that the user may wear with the VX Sport™ system is determined by the
performance of that third party equipment. Heart rate results will vary depending on a number of factors, including how
the heart rate monitor is worn, and whether there is outside electrical or magnetic interference. Visuallex® Sport
International Ltd (VX Sport™) makes no claims or warranty about the accuracy of heart rate monitoring made using VX
Sport™ hardware. Users should consult a medical professional if they have concern over heart rate results.
Page 28

VX Sport User Manual Page 26
APPENDIX 3: VX LOG™ LED Codes
This section describes the behaviour of the VX Log™ device user interface.
Operation is divided into three modes: OFF, ON and USB mode
OFF Mode
Lights Status Actions
All LEDs Off Unit is Off
Press and hold the power button for
3 seconds to turn on.
Plug in USB Cable to charge
Device.
Solid Orange Status LED Low Battery
Plug in USB Cable to charge
Device.
(Unit will not start logging unless
sufficiently charged)
ON Mode
Logging (Recording)
Lights Status Actions
Flashing Green Mode LED Starting Logging
Flashing Red Mode LED Stopping Logging
Solid Red GPS LED, other LEDs any
colour
No GPS Lock
Press and hold the Play/Pause
button for three seconds to pause
logging.
GPS LED flashing between Red and
Green. Other LEDs any colour
2D GPS Lock (No Altitude Data)
Press and hold the Function button
to check or change the current
logging mode.
Solid Green GPS LED, other LEDs
any colour
3D GPS Lock
Press and hold the Power button for
three seconds to stop logging and
turn off the device.
Green Status LED, brief blink to red.
Other LEDs any colour
Heartbeat Detected
Page 29

VX Sport User Manual Page 27
ON Mode
Error Conditions
Lights Status Actions
Solid Red Status LED, other LEDs any
color
Logger Memory Full
Turn off logger by holding the power
button for three seconds. Connect
logger to compter and download
data using the VX View™
application. Erase the device
memory when data is downloaded.
Solid Orange Status LED, other LEDs
any color
Low Battery
Unit will automatically stop logging
and return to Off mode when
battery is empty.
Plug in USB Cable to charge
Device.
ON Mode
Changing the Logging Mode
Lights Status Actions
Solid Green LED, other LEDs any
colour
Normal logging mode selected
Press and hold the function button
for three seconds to toggle between
logging modes.
Green LED flashing once per second.
Other LEDs flashing any colour
Long Play mode selected
Release the function key and repeat
above to change logging mode
again.
ON Mode
Pause
Lights Status Actions
Solid Red LED, other LEDs any colour.
Paused
Press and hold the Play/Pause
button for 3 seconds to resume
logging.
Page 30

VX Sport User Manual Page 28
USB Mode (With Cable Connected)
Logging (Recording)
Lights Status Actions
Solid Red Mode and Status LEDs Battery Charging
Solid Red Mode LED Battery Full
Unplug USB cable to turn device
off. All lights will turn off.
Solid Red Move LED, flashing Green
Status LED
Communicating with Computer
Wait until status light stops flashing,
indicating download or erase
operation is complete.
Do not unplug the USB cable whilst
the status light is flashing green.
Doing so will cause the current
operation to fail. If an accidental
disconnect occurs, restart the last
download/erase operation.
Solid Red Mode LED and solid Green
Status LED
Communications Port Open (idle)
Device is ready to communicate
with computer.
Page 31

CONTACT DETAILS
ph. +64 4 569 1333
fax. +64 4 569 1334
P O Box 27054
Wellington 6141
New Zealand
www.vxsport.com
© 2009 – 2013 VX Sport™ Quick Start Instructions - User Manual V3.0
Made in New Zealand
 Loading...