

Page 1

VEHS-P1User Guide
For use with SoundPoint IP series Polycom®phones*
1. VXi warrants that your product will be free from defects in material and workmanship for one year from
the date of purchase. If, during that period from the date of purchase, your product fails to work due to
a defect in material or workmanship, VXi will repair or replace the product, at its election, free of charge.
Without proof of purchase, the warranty period begins on the date of manufacture. Consumable
components (for example, cushion, batter y and fuse) are not included in this warranty.
2. The foregoing limited warranty does not cover equipment failure attributable to accident,improper operation,
misuse, abuse, or any cause other than defects in the materials or workmanship of VXi’s products.
3. VXi’s obligations under this warranty are limited to repair or replacement (at our option) of any defective part
returned to VXi at the customer’s expense. Returned products require a Return Authorization that may be
obtained by calling 800-742-8588. Products returned to VXi for repair under this warranty will be return
shipped to the customer at VXi’s expense.
4. THIS LIMITED WARRANTY IS IN LIEU OF ALL OTHER WARRANTIES, EXPRESS OR IMPLIED, INCLUDING THE
IMPLIED WARRANTIES OF MERCHANTABILITY AND FITNESS FOR A PARTICULAR PURPOSE. Some jurisdictions
do not permit the exclusion of implied warranties and the foregoing exclusions may not apply to you.
5. In no event shall VXi be responsible for any other damages whatsoever, including direct, indirect, special,
incidental, consequential, or other damages for breach of this or any other warranty, express or implied.
*This user guide describes the installation steps to connect the VEHS to your phone. For information about you r
phone’s capabi lities or provisioning requirements go to www.vxicorp.com/resources/vehs, visit your phone system
manufacturer’s website, or contact your IT administrator.
*Le manuel de l’utilisateur décrit les étapes de branchement du VEHS à votre téléphone.Pour des
renseignements sur les capacités de votre téléphone ou sur les exigences en matière d’approvisionnement, visitez le
www.vxicorp.com/resources/vehs ou le site Web du fabricant de votre téléphone, ou communiquez avec votre
administrateur TI.
*Esta guía de usuario describe los pasos de instalación para conectar el VEHS a su teléfono.Para obtener información
sobre las capacidades de su teléfono o requerimientos de provisiones visite www.vxicorp.com/resources/vehs, visite
el sitio web del fabricante del sistema de su teléfono o comuníquese con su administrador TI.
VXi LIMITED WARRANTY
VXi Corporation | 271 Locust Street, Dover, NH 03820 USA
Toll Free | Sans frais | Número gratuito: (800) 742-8588
Phone | Téléphone | Teléfono: 1 603 742-2888
www.vxicorp.com
© 2013 VXi Corpo rati on. Al l ot her trad emar ks are p roper ty of th eir resp ecti ve owners .
Pri nted in China | Impri mé en Ch ine | Im pres o en Chi na
APN 203 426B
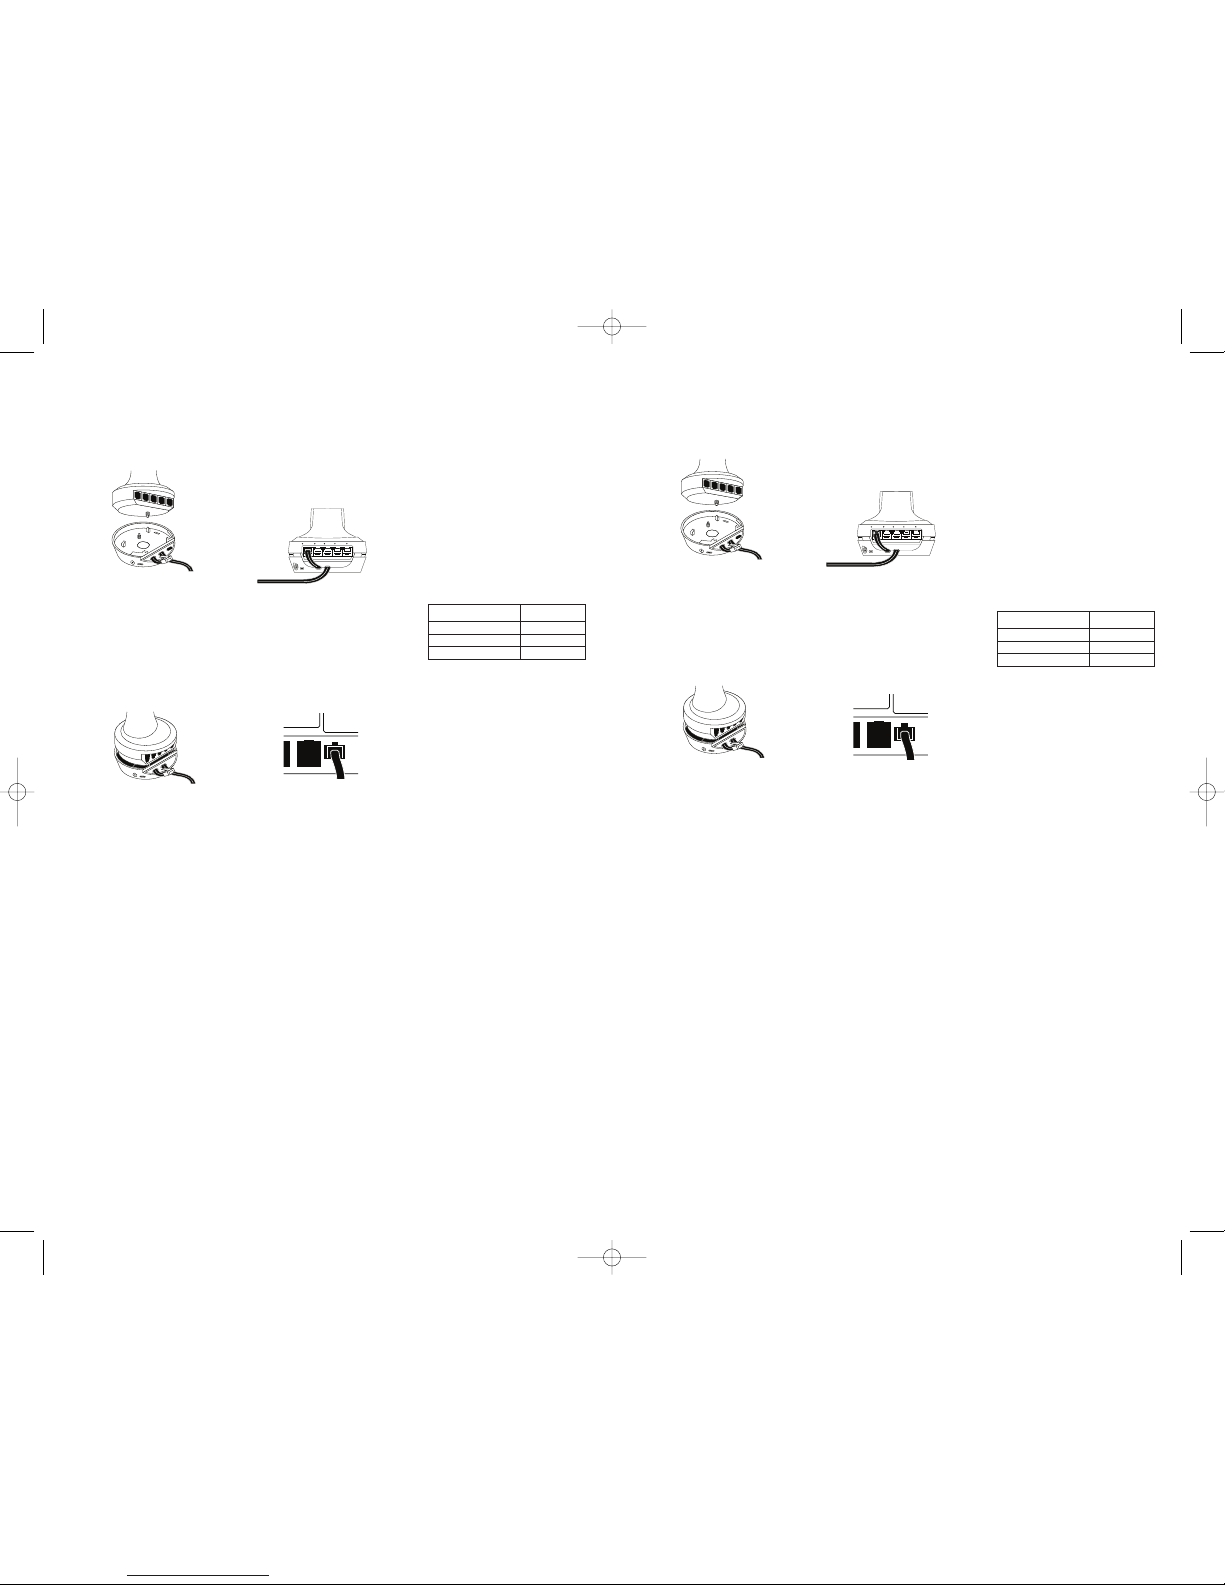
INSTALLATION
1. Remov e the pan el from the bottom of
the ba se station (refer to th e V150
User Gui de for addi tional inform ation).
2. Attac h the VEHS- P1 to th e bottom of
the V150 by ca refully i nserting t he
p
lastic guide pin int o the scr ew-hole
s
ocket on the base o f the V150, then
press together the rear of th e V150
base a nd VEHS-P1 until i t snaps into
place.
3. Inser t the col or-coded ca bles from
the VEHS -P1 into the cor responding
color-cod ed jacks of the V 150 base
s
tation; the c onnectors should ‘s nap’
i
n plac e when fu lly inser ted.
4. Conne ct the lo nger VEHS-P1 cable
into t he AUX por t of the phone taking
c
are to align the pi ns of the cable
w
ith th e socket of the phone’s AU X
port (th e AUX port i s generally located
on the bottom of th e phone).
Additio nal V150 Se tup
-
V150 s hould be in MODE 2.
- V150 ‘Compat ibility Sw itch’ shou ld be
placed in the ‘D’ pos ition.
- Connect on e end of the ba se jack cord
(orange tag) into th e V150 base jack
(orange dot o n base) a nd the o ther end
into t he headset port of the telepho ne.
LED St atus Indic ator
The LE D status indicator indicat es the
phone’s m ode as s hown by t he table
below.
EHS/LIFTER
P
OWERBASE JACKHANDSET
TEL WALL
J
ACK
P
hone M ode
On-hook
Off-hook
Incoming ring detected
LED in dicator
Solid on
Slow flash
Fast flash
HS
203426B_VEHS-P1_User_Guide_102913:Layout 1 10/29/13 1:05 PM Page 1
Page 2
1. VXi garantiza que su producto estará libre de defectos materiales y de fabricación por un año desde
la fecha de compra. Si, durante ese periodo desde la fecha de compra, su producto falla por un defecto
material o de fabricación, VXi reparará o reemplazará el producto, a su criterio, sin cargo. Sin prueba de
compra, el periodo de garantía comienza desde la fecha de fabricación. Los componentes de consumo
(por ejemplo, fundas, batería y fusible) no se incluyen en esta garantía.
2. La garantía limitada anterior no abarca fallas del equipo que se atribuyan a accidentes, operación incorrecta,
mal uso, abuso o cualquier otra causa que no sea defectos materiales o de fabricación de los productos VXi.
3. Las obligaciones de VXi bajo esta garantía quedan limitadas a reparar o reemplazar (a nuestro criterio)
cualquier parte defectuosa que se devuelva a VXi a expensas del cliente. Los productos devueltos
requieren una autorización de retorno que se puede obtener llamando al +1-603-742-2888. Los productos
que se devuelvan a VXi para ser reparados con esta garantía serán enviados al cliente a cargo de VXi.
4. LA PRESENTE GARANTÍA ES LIMITADA Y SUSTITUYE A CUALQUIER OTRA GARANTÍA,TANTO EXPRESA COMO
IMPLÍCITA, INCLUIDAS LAS GARANTÍAS IMPLÍCITAS DE COMERCIABILIDAD Y LAS GARANTÍAS IMPLÍCITAS
DE IDONEIDAD PARA UN FIN EN PARTICULAR.Algunas jurisdicciones no permiten la exclusión de garantías
implícitas y las exclusiones anteriores pueden no aplicarse en su caso.
5. En ningún caso, VXi será responsable de ningún otro daño, entre ellos, daños directos, indirectos, especiales,
accidentales, consecuentes u otros daños por el incumplimiento de esta o cualquier otra garantía,
expresa o implícita.
GARANTÍA LIMITADA DE VXi
1. VXi garantit que ce produit est exempt de tout vice de matériau et de fabrication pour une période de
un an à partir de la date d’achat. Si durant cette période consécutive à la date d’achat, votre produit
devient défectueux en raison de ses matériaux ou de sa fabrication, VXI le réparera ou le remplacera, à
sa discrétion, gratuitement. À défaut de preuve d'achat, la garantie commence à partir de la date de
fabrication. Les composants consommables (par exemple, les coussinets, piles ou fusibles) ne sont pas
couverts par cette garantie.
2. La garantie limitée susmentionnée ne couvre pas les dommages causés par un accident, un mauvais usage,
une utilisation abusive ou tout autre défaut n'étant pas lié aux matériaux ou à la fabrication des produits VXi.
3. Au titre de cette garantie, les obligations de VXi se limitent à réparer ou remplacer (à notre discrétion)
toute pièce défectueuse envoyée à VXi aux frais du client. Les produits renvoyés doivent être accompagnés
d’un numéro d’Autorisation de renvoi, pouvant être obtenu en appelant au +1-603-742-2888. Les produits
renvoyés à VXi pour réparation sous cette garantie seront ensuite renvoyés au client aux frais de VXi.
4. CETTE GARANTIE LIMITÉE REMPLACE TOUTE AUTRE GARANTIE, EXPRESSE OU IMPLICITE, Y COMPRIS
LES GARANTIES IMPLICITES DE CONFORMITÉ ET D'USAGE. Certaines juridictions n'acceptent pas
l’exclusion des garanties implicites, et il est possible que les exclusions ci-dessus ne soient pas applicables.
5. VXi ne peut en aucun cas être tenu responsable de n'importe quels autres dommages, qu'ils soient directs,
indirects,spéciaux ou accessoires, ni de la rupture de cette garantie ou d'une autre, expresse ou implicite.
GARANTIE LIMITÉE DE VXi
INSTALLATION
INSTALACIÓN
1. Retir ez le pan neau au bas de la
s
tation de bas e (consult ez le ma nuel
d
e l’ut ilisateur du V150 pour plus de
r
enseign ements).
2
. Fixez le VESH- P1 au bas du V15 0 en
i
nsérant avec précautio ns le te non de
guidage en pl astique da ns la do uille
avec t rou de vi s à la base du V150,
puis p ressez l’a rrière de la base du
V150 e t le VEHS-P 1 ensembl e
jusqu’à ce qu e ce dern ier se m ette
en pla ce dans u n déclic.
3. Insér ez les câ bles chromocodés
d
u VEHS-P 1 dans l es prises
c
hromoco dés corres pondantes de
l
a stat ion de b ase du V150 ; les
connect eurs devra ient se m ettre en
place dans un déclic une f ois inséré s
jusqu’a u bout.
4
. Branch ez le câb le du VEHS -P1 le
plus l ong dans le port auxili aire
(AUX) du télé phone en prenant soin
d’align er les fi ches du câble à la
prise du port auxili aire (le port
auxilia ire est g énéralement situé
sous l e téléphon e).
Autres réglages du V150
- Le V150 dev rait être en MOD E 2.
- L’interru pteur de compatib ilité du V 150
d
evrait être p lacé en p osition D.
- Branchez l ’une des extrémit és du câb le
(étique tte orange ) dans la prise de la
base d u V150 (po int orange sur l a
base) et l’au tre dans le port du ca sque
sur le téléph one.
Voyant DEL d’état
Le voy ant DEL d ’état ind ique le m ode du
t
éléphon e tel qu’ affiché d ans le ta bleau
ci-dess ous.
EHS/LIFTER
P
OWERBASE JACKHANDSET
TEL WALL
JACK
Mode d u téléphon e
Raccroché
D
écroché
Sonnerie entrantedétectée
V
oyant D EL
Allumé
C
lignotement lent
Clignotement rapide
1
. Retira r el pane l del fo ndo de la
estació n base (c onsultar e l manual
V
150 pa ra mayor informac ión).
2. Fijar el VEHS -P1 a la parte inferior
d
el V150 inserta ndo cuidad osamente
el pas ador guía de plá stico dentro de
l
a toma de co rriente en la ba se del
V150, lu ego unir la part e posterior
de la base V15 0 con el VEHS-P1
presion ando hasta que e ncajen.
3
. Insert ar los ca bles codi ficados po r
colores del VEH S-P1 dentr o de las
t
omas c odificadas por co lores de la
base estació n V150 correspondiente s;
los cone ctores deben "encajar"
c
uando se inse rten por completo .
4
. Conect ar el cab le VEHS-P1 más la rgo
al pue rto AUX de l teléfono tenien do
c
uidado de ali near los pines d el
cable con el conecto r de puer to
AUX de l teléfon o (el pue rto AUX
general mente se encuentr a en la
parte inferior del teléfono).
I
nstalac ión adicio nal del V150
-
El V150 debe e star en MODO 2.
- El "Interr uptor de Compatib ilidad" V150
debe p onerse en la pos ición "D" .
- Conectar un extremo del ca ble de la
estació n base (e tiqueta an aranjada) en
la estación base V150 (punto anaranjado
en la base) y el o tro extrem o en el
puerto de los auricu lares del teléfon o.
I
ndicado r de Esta do LED
El ind icador de estado LED in dica el
modo d el teléfon o como s e muestra en
l
a sigu iente tabl a:
EHS/LIFTER
P
OWERBASE JACKHANDSET
TEL WALL
J
ACK
Modo d el teléfon o
Modo encendido
Modo apagado
L
lamada entrante detectada
Indicad or LED
Luzencendida
Parpadeolentode luz
P
arpadeorápidode luz
HS
HS
203426B_VEHS-P1_User_Guide_102913:Layout 1 10/29/13 1:05 PM Page 2
 Loading...