

Page 1
VXi V200
User Guide
Page 2

TABLE OF CONTENTS
Welcome .........................................................................................3
• V200 Headset Features
• V200 Base Features
Safety Information ..................................................................................4
What’s in the Box...................................................................................5
Base Overview.....................................................................................6
Headset Overview ..................................................................................7
Optional Accessories ................................................................................7
How to Wear ......................................................................................8
• Changing Wearing Styles
• Headset Positioning
Connect to Your Phone and Computer ..................................................................10
• Connect Power to Base
• Install Battery and Charge Headset
• Connect and Configure Phone
– Office Phone
– Office Phone with EHS
– Office Phone with L50 Lifter
– Analog (Home) Phone
• Connect to a Computer
• Position Base
Making Calls with an Office Phone.....................................................................14
• Place a Call
• Answer a Call
• End a Call
• Mute a Call
• Reject a Call (Desk Phone)
• Answer a Second Incoming Call
Making Calls with an Analog (Home) Phone ..............................................................15
• Place a Call
• Answer a Call
• End a Call
• Mute a Call
• Reject a Call (Desk Phone)
• Answer a Second Incoming Call
• Switching a Call Between Headset and Handset
Making Calls with a Computer ........................................................................16
• Make, Answer or End a Call in PC Mode
• Switch Between Phone and PC Mode
• Conference Phone and PC Calls Together
Registering/Pairing Headsets to the Base................................................................17
• Identifying Registered and Unregistered Headsets
• Registering a Headset to the Base
• Deregistering/Unpairing a Headset from the Base
• Using Two Headsets on One Base
Energy-Saving Charging Mode........................................................................18
Functions & Indicators Tables.........................................................................19
VXi V200 User Guide
PAGE 2
Page 3

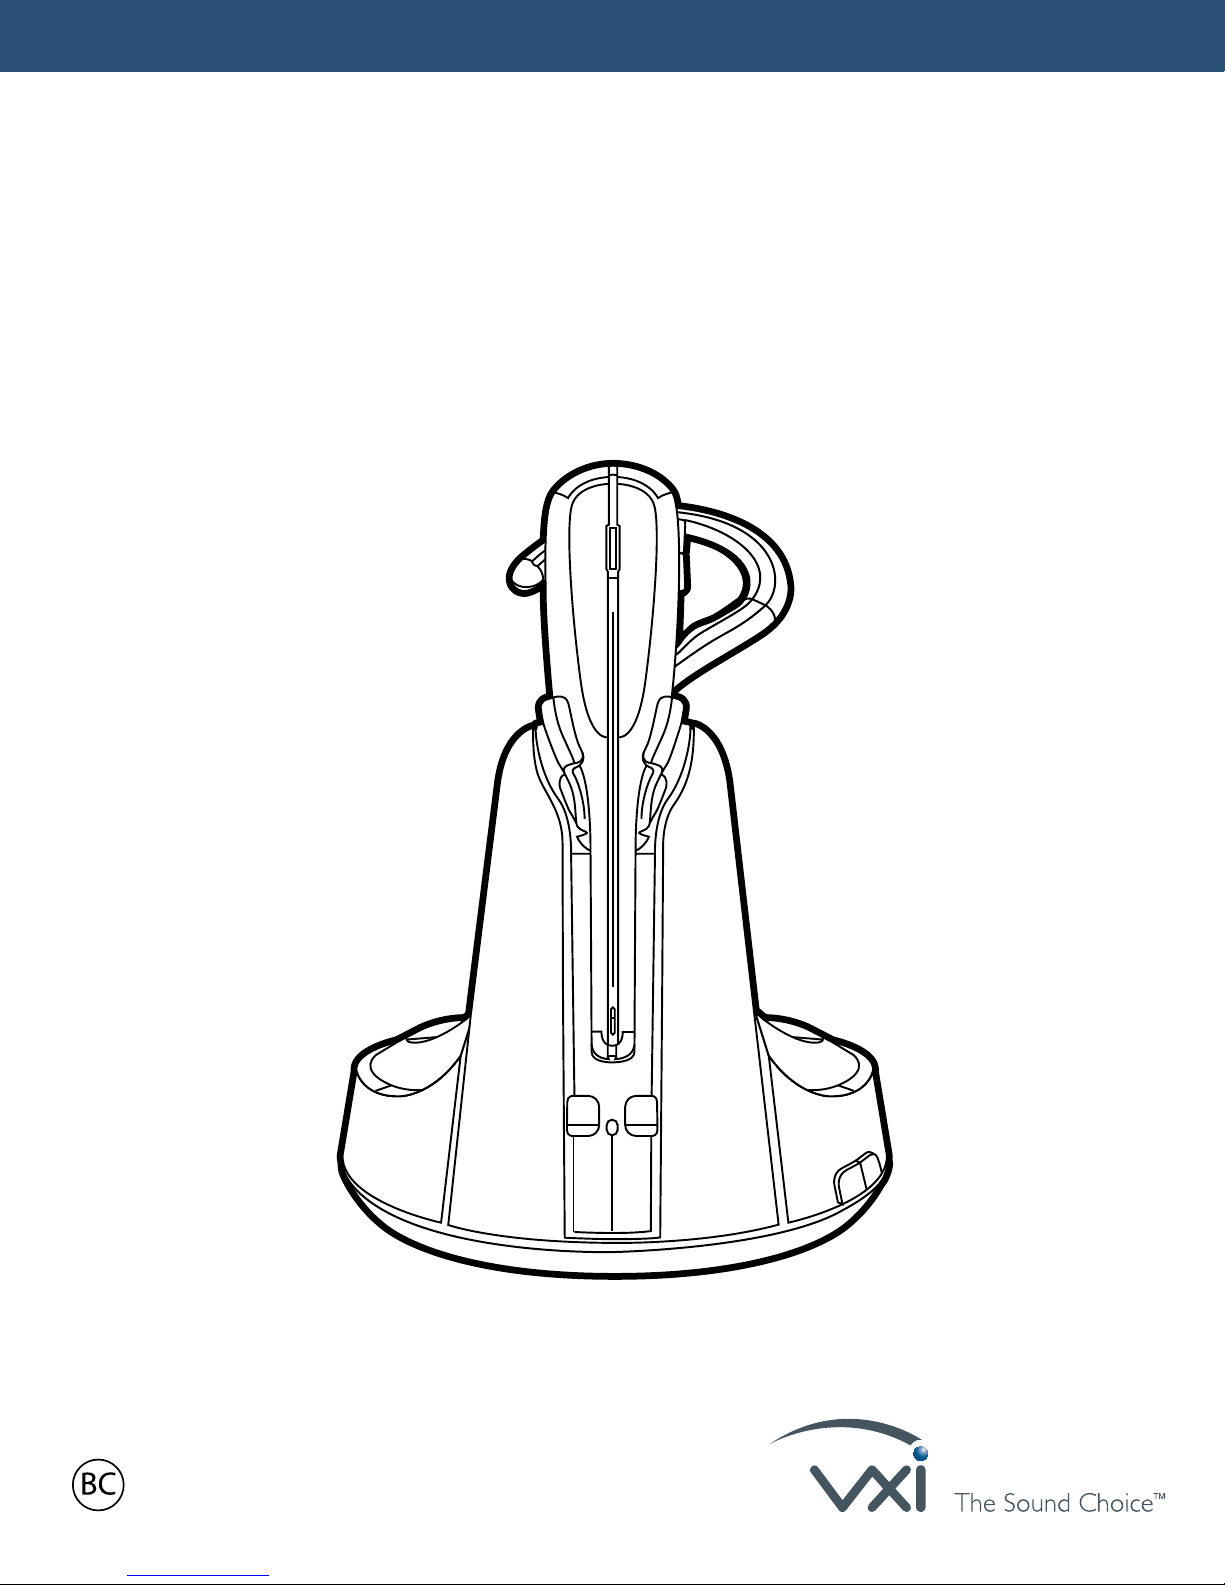
WELCOME
Congratulations on purchasing your new VXi office wireless product. This guide contains instructions for
setting up and using your VXi V200 Wireless Headset System.
V200 Headset Features
• Advanced noise-canceling microphone
• Choice of wearing styles: headband, ear hook or neckband
• 300+ feet of wireless range
• 10 hours of talk time
V200 Base Features
• Headset docking/charging cradle
• Connects to desk phone
• Connects to PC via USB
VXi V200 User Guide
PAGE 3
Page 4

SAFETY INFORMATION
IMPORTANT SAFETY NOTE: Prolonged exposure to high volume levels can damage your hearing. To avoid
injury, set the volume to the lowest comfortable level. If you experience ringing in your ears, or voices sound
muffled, stop using the headset. Avoid turning up the volume to block noisy surroundings. It’s possible for
your ears to adapt to volume that is too high, and this could result in permanent hearing damage without
any noticeable discomfort.
• Plastic bags and small parts may cause choking if ingested. Keep them away from small children and pets.
• Use only the power adapter included with this product.
• Do not immerse any part of this product in water.
• Unplug product from the wall outlet before cleaning.
• Clean your headset with a slightly damp cloth as required. Dampen the cloth with only water or a mild soap
and apply only on plastic parts. Do not use liquid cleaners or aerosol cleaners.
• This product contains a replaceable lithium-ion rechargeable battery. Use only the supplied rechargeable
battery. When replacing, use the VXi replacement battery.
• Dispose of batteries in a safe manner. Do not burn or puncture which could release caustic material and
cause injury. Do not dispose of battery in a fire. The cells may explode. Check with local codes for disposal
instructions.
• Avoid temperatures exceeding 140° F (will cause equipment failure).
VXi V200 User Guide
PAGE 4
Page 5
C
Y
C
1
.
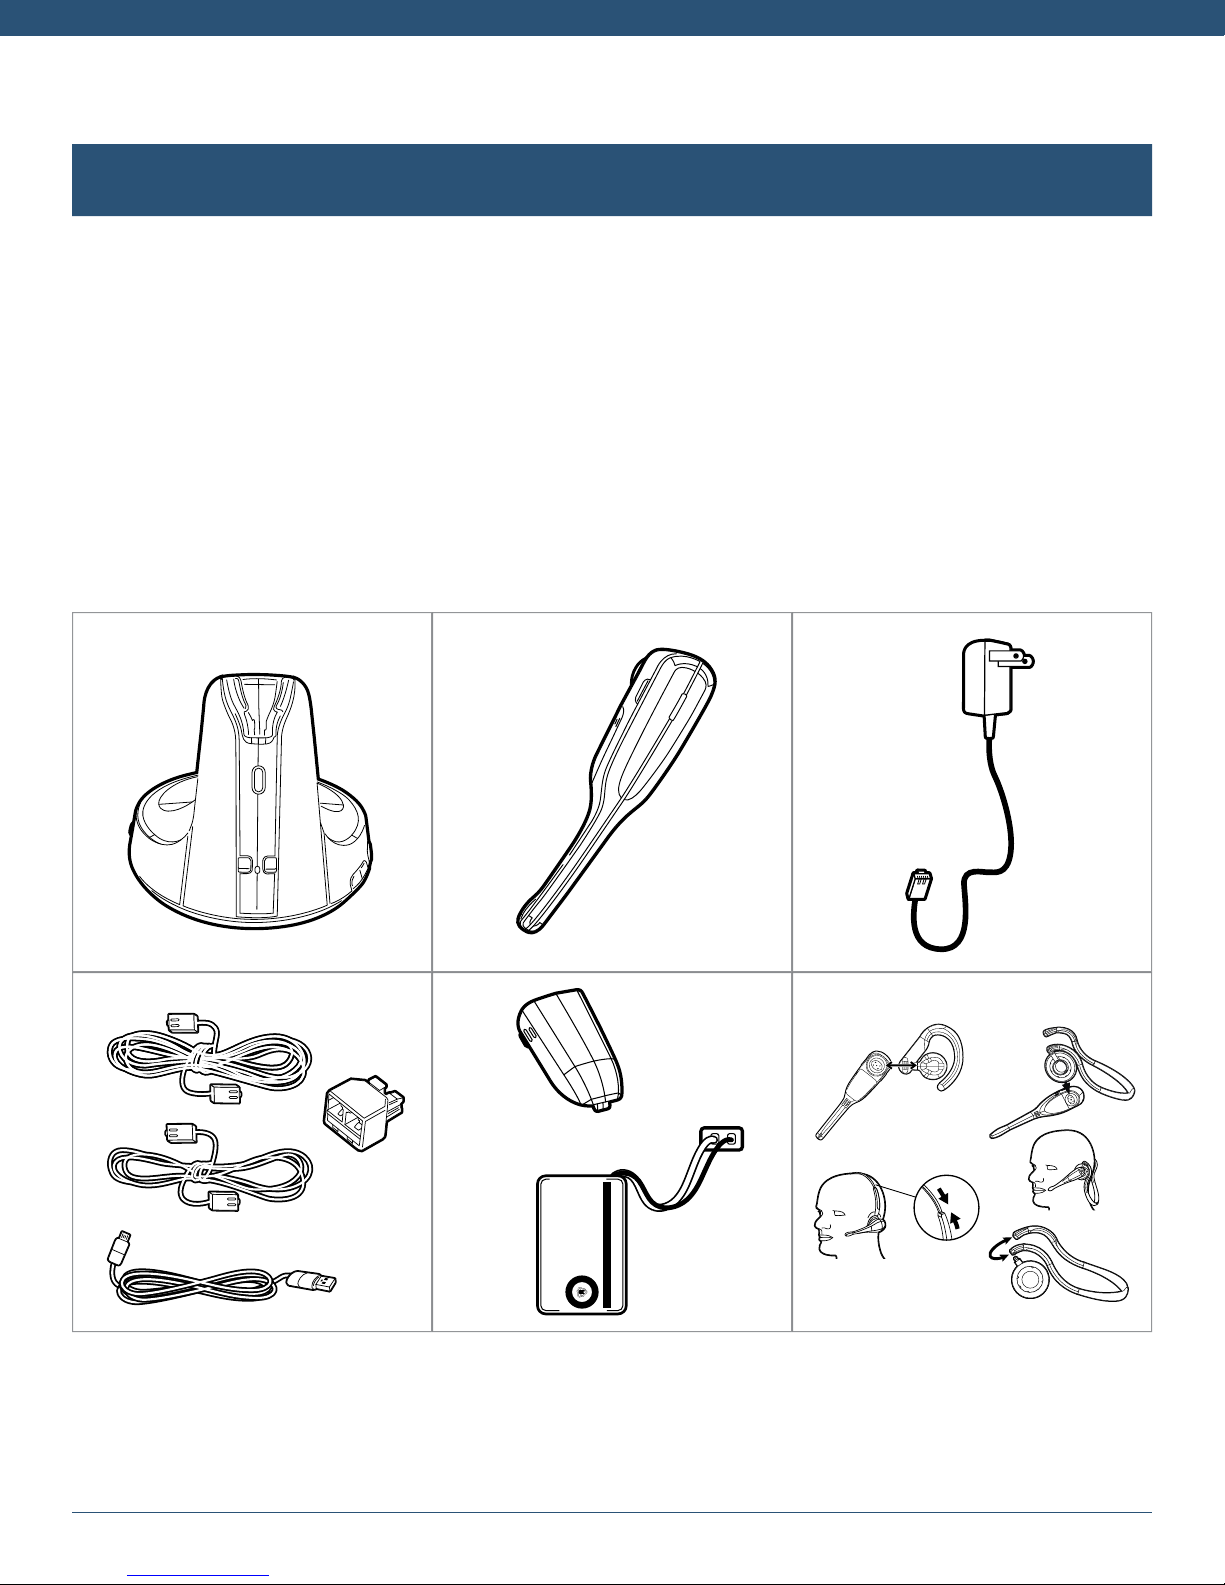
WHAT’S IN THE BOX?
1. Base
2. Headset
3. Power Supply
4. Phone and USB Connection Cables
5. Headset Battery and Battery Door
6. Wearing Accessories
– Headband
– Neckband
– Ear Hook
1
4
2
5
3
6
NeckbandEar Hook
Headband
Battery Pack
BT191545
3.7V 260 mAh Li-ion Polymer
WARNING: DO NOT BURN
OR DISASSEMBLE OR
PUNCTURE BATTERIES
MADE IN CHINA
THIS SIDE UP
VXi V200 User Guide
8
0
0
R
.
E
8
RBRC
Li-ion
2
2
L
.
E
8
8
3
7
PAGE 5
Page 6

BASE OVERVIEW
Front
A. Headset Docking/Charging Cradle
B. PC Button/LED
C. Mute LED
D. Phone Button/LED
E. Pairing Button
Back
A. Micro-USB Port
B. EHS/Lifter Port
C. Power Port
D. Analog Telephone Port
E. Base Jack Port
F. Handset Port
A
E
B
D
C
C D
B
E
A F
Left Side
A. Phone Compatibility Switch
Right Side
A. Headset Microphone Level Adjustment Buttons
B. Mode Button
C. Micro-USB Port
A
A
B
C
VXi V200 User Guide
PAGE 6
Page 7
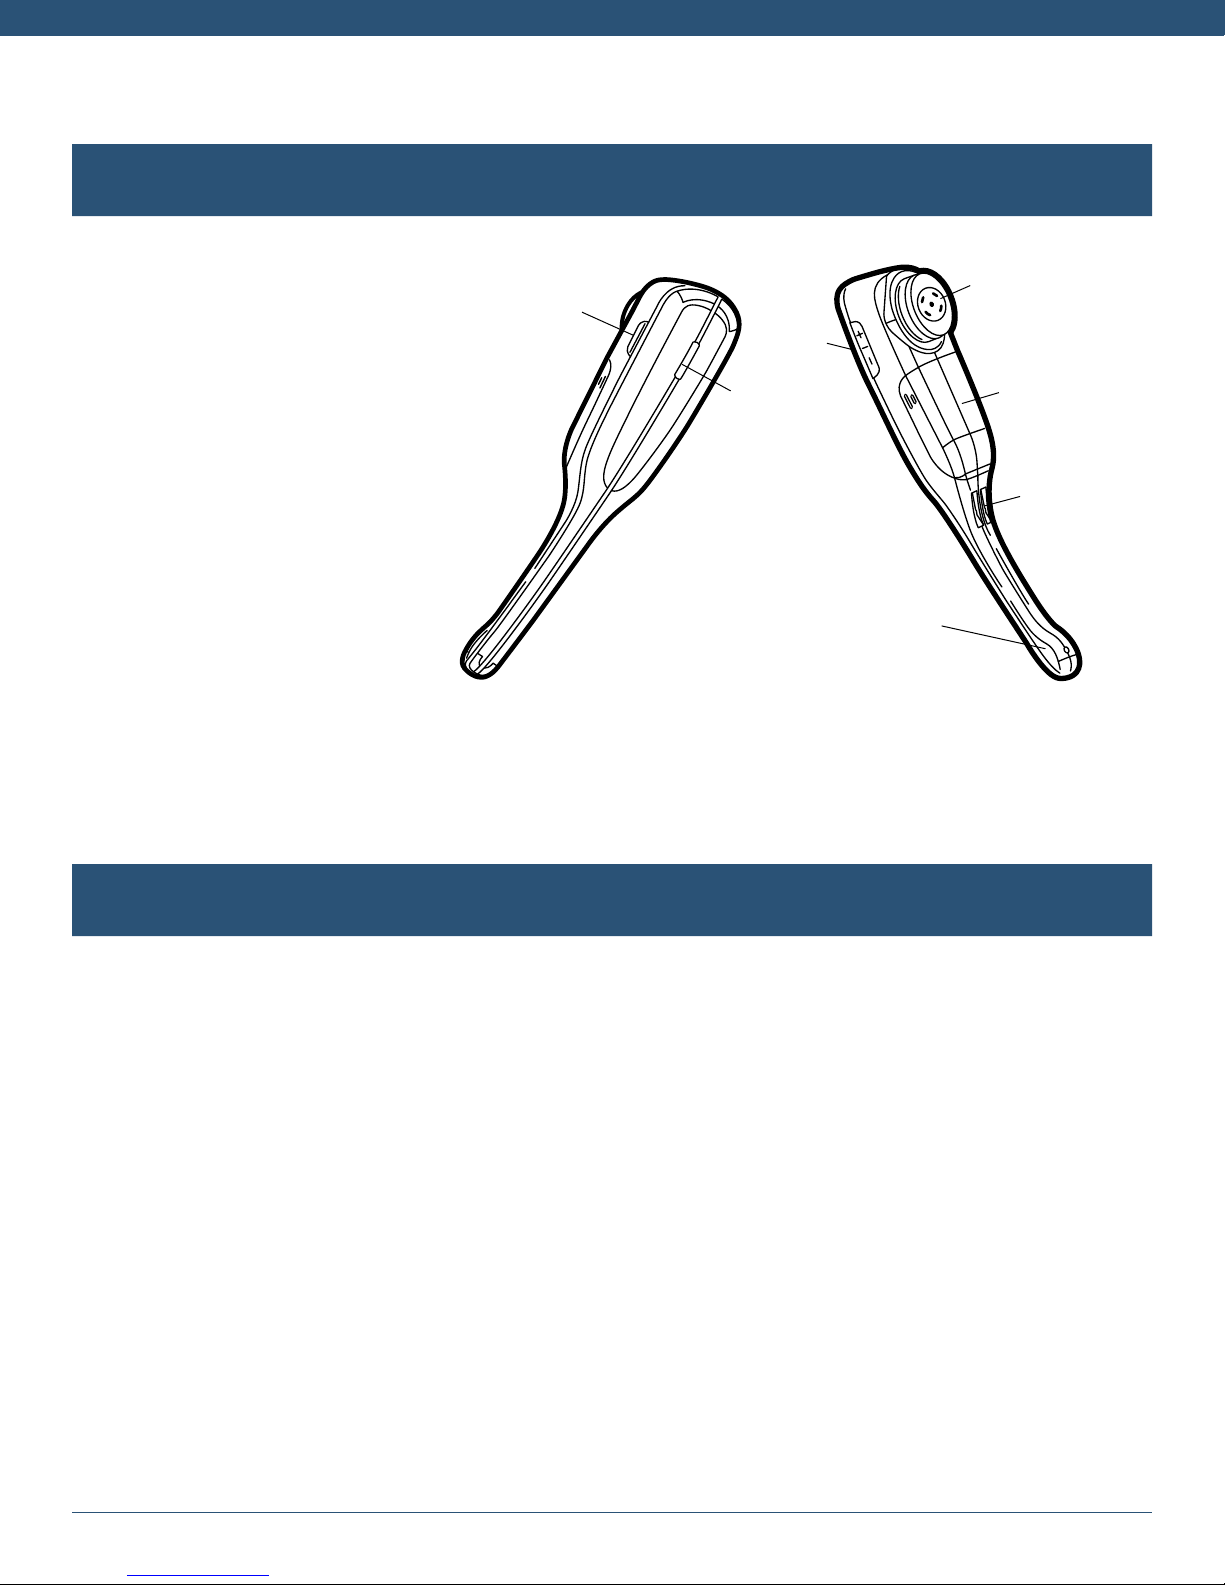
HEADSET OVERVIEW
A. Mute
B. Call Control On/Off
C. Volume + / -
D. Earpiece
E. Battery Cover
F. Headset Charging Contacts
G. Microphone
D
A
C
B
G
E
F
OPTIONAL ACCESSORIES
Replacement Wearing Styles Kit
Replacement Headset Battery
Replacement Headset
VEHS Electronic Hook Switch (EHS) – Electronically takes your desk phone off hook. Enables remote
call answer/end with your headset. See www.vxicorp.com/VEHS for VEHS variants and supported phones.
L50 Lifter – Automatically depresses/releases the handset hook switch of your desk phone. Enables
remote call answer/end with your headset.
VXi V200 User Guide
PAGE 7
Page 8

HOW TO WEAR
Changing Wearing Styles
The V200 office wireless headset comes with a choice of wearing styles:
Ear Hook
A. Choose the ear bud that fits
your ear most comfortably.
B. Place the ear bud over the
post on the ear hook.
C. To attach the ear hook, place
it over the earpiece and
gently press it into place.
D. Loop the ear hook over the
ear and rotate the headset
so the microphone is angled
toward the mouth.
Headband
A. Position the headset
earpiece over the
headband ring and press
until it clicks into place.
B. Angle the headset so the
microphone boom points
toward the corner of the
mouth.
C. Slide the headband in or
out to adjust fit.
VXi V200 User Guide
PAGE 8
Page 9

HOW TO WEAR (continued)
Neckband
A. Position the headset earpiece over
the neckband ring and press until
it clicks into place.
B. To wear, position the neckband
around the back of the neck
and over both ears. Angle the
microphone boom toward the
corner of the mouth.
C. To switch neckband wearing
sides, remove the headset from
the neckband, and then remove
the ring from the neckband arm.
Insert the ring post into the bottom
hole of the other neckband arm
until it clicks into place.
VXi V200 User Guide
PAGE 9
Page 10

CONNECT TO YOUR PHONE AND COMPUTER
Connect Power to Base
A. Remove the panel from the bottom
of the base.
B. Connect the power adapter cable
into the base power port (green dot)
and plug the power adapter into an
electrical socket.
Install Battery and Charge Headset
A. Remove the battery cover from the
headset.
B. Insert the battery into position with the
label “THIS SIDE UP” facing up.
C. Connect the battery lead to the headset.
D. Replace the battery cover and place the
headset in the charging cradle. The LED
on the headset will be red when charging
and will change to blue when the headset
is fully charged.
VXi V200 User Guide
PAGE 10
Page 11

CONNECT TO YOUR PHONE AND COMPUTER (continued)
Connect and Configure Phone
There are four options for setting up the V200 with your phone. Select the best option for your situation:
• Office Phone (standard)
• Office Phone with EHS (sold separately)
• Office Phone with L50 Lifter (sold separately)
• Analog (Home) Phone
Office Phone (standard)
1. Remove the panel from the bottom of the base.
2. Connect the base jack cable (orange flag) to the
base jack port (orange dot) on the base and the
other end to the headset port of the phone. If you
do not have a headset port, you will need to use
the handset port.
3. Check Configuration and Make a Test Call:
• Set your desk phone volume to mid-range.
• Make sure the base shows the phone output is
selected. A green LED indicates the mode is set
for office phone use. If it is red, press the mode
button on the side of the base to change to the
correct mode.
• Check that the phone compatibility switch on the
side of the base is correct for your phone. Most
phone makes use setting D (default), but many
Cisco phones will use setting A.
• Open the headset line on your desk phone, or remove the handset from the cradle if you are
connected to the handset port.
• While wearing the headset, press the call control button on the headset.
• If you do not hear a dial tone (or tones) when pressing the dial pad buttons, try the other base
compatibility switch settings until you do.
• Dial a test call from the desk phone.
– You can fine-tune the earpiece volume using the headset volume buttons.
– If additional microphone gain (speaking volume) is needed, or if you hear your voice echo in the
earpiece (excessive side tone), you can adjust this with the microphone volume buttons on the
side of the base.
VXi V200 User Guide
PAGE 11
Page 12

CONNECT TO YOUR PHONE AND COMPUTER (continued)
Office Phone with EHS (sold separately)
1. Remove the panel from the bottom of the base.
2. Connect the base jack cable to the headset port of the phone and configure as described above.
3. Snap the EHS onto the base unit.
4. Connect the EHS cable to the EHS/lifter port on the base station. Refer to the EHS setup instructions for
further installation details.
Office Phone with L50 Lifter (sold separately)
1. Connect the desk phone connection cable to the handset
port of the phone.
2. Check “Configuration and Make a Test Call” (see above).
3. Attach the L50 Lifter to your phone. Refer to the L50 user’s
guide for lifter setup and adjustment details.
Home (Analog) Phone
1. Remove the panel from the bottom of the base.
2. Connect the telephone line cord (red flag) to the “Tel Wall
Jack Port” (red dot) on the base. Plug the other end of
the cord into the line splitter.
3. Plug the line splitter into the telephone wall jack.
4. Connect the analog (home) phone to the other port of the
line splitter.
5. Replace the panel on the bottom of the base station.
6. Check “Configuration and Make a Test Call”:
• Make sure the phone output on the base station is lit.
• Press the mode button until the phone LED on the
base is lit red.
• Lift the phone’s handset (if cordless, activate handset).
• Press the call control button on the headset and listen
for a dial tone in the headset. If there is no dial tone,
or the call is unclear, slide the compatibility switch
from A-G, one setting at a time until the dial tone/call
is clear.
• Dial a call on the phone as normal. Once the call is connected, you may replace the phone handset
(or turn the cordless handset off).
– You can fine-tune the earpiece volume using the headset volume buttons.
– If additional microphone gain (speaking volume) is needed, or if you hear your voice echo in the
earpiece (excessive side tone), you can adjust this with the microphone volume buttons on the side
of the base.
• Press the call control button on the headset again to end the call.
VXi V200 User Guide
PAGE 12
Page 13

CONNECT TO YOUR PHONE AND COMPUTER (continued)
Connect to a Computer
Connect USB
1. Plug the small connector on the end of the USB cable provided into the micro USB port on the side of
the base.
2. Plug the other end into the USB port on your computer.
3. Wait for your operating system to indicate that it has recognized the headset and that it is ready to use.
Configure Computer Audio Settings
1. Press the PC button on the base. The PC indicator LED will be lit red.
2. Go to your computer’s audio settings and make sure that “VXi V200” is selected under both playback
and recording.
3. If necessary, make sure the “VXi V200” is also selected for use in your communications software
settings.
Position Base
To reduce the possibility of noise and interference problems, position the base at least 6 inches away from
your desk phone and at least 12 inches away from your computer.
VXi V200 User Guide
PAGE 13
Page 14

MAKING CALLS WITH AN OFFICE PHONE
Place a Call
• While wearing the headset, press the headset call control button.
• Open an active line on your desk phone. If you are using an EHS or the L50 Lifter, this step will be
automatic.
• Dial the number on your desk phone.
• To end the call, either press the headset call control button, or replace the headset in the base-charging
cradle. If needed, hang up on your desk phone (automatic with EHS or L50).
Answer a Call
• Put the headset on and press the headset call control button.
• Answer the call with your desk phone controls (automatic with EHS or L50).
End a Call
• To end a call, either press the headset call control button, or replace the headset in the base-charging
cradle. If needed, hang up on your desk phone (automatic with EHS or L50).
Mute a Call
• During a call, you can mute the headset by pressing the mute button.
• The mute indicator on the base will light and you will hear a short beep in the headset every 15
seconds until mute is deactivated.
• To unmute, press the mute button on the headset again.
Reject a Call
• To reject an incoming call, use the call reject function on your desk phone (if supported).
Answer a Second Incoming Call
• Your desk phone may have call management features that are better suited for specific second-call-
management needs.
• If you are using an EHS or L50, and if your desk phone supports it, answer a second call by pressing
the call control button on the headset once (to end the first call) and again (to answer the second call).
Note: Unless you have an EHS or the L50 Lifter attached, the call on the desk phone will also need to be
ended using your desk phone’s call-management features.
VXi V200 User Guide
PAGE 14
Page 15

MAKING CALLS WITH AN ANALOG (HOME) PHONE
Place a Call
• Lift the phone’s handset (if cordless, activate the handset).
• Press the call control button on the headset and listen for a dial tone in the headset. Dial the desired
number on your phone. You will hear the call in the headset.
• Once the call is connected, you may replace the phone handset, or turn the cordless handset off.
• To end the call, either press the headset call control button, or replace the headset in the base-charging
cradle.
Answer a Call
• When you receive a call, you will hear ring tones in the headset. Press the headset call control button
once to answer the call.
• To end the call, either press the headset call control button, or replace the headset in the base-charging
cradle.
End a Call
• To end a call, either press the headset call control button, or replace the headset in the base-charging
cradle.
Mute a Call
• During a call, you can place the headset into mute by pressing the mute button.
• The mute indicator on the base will light and you will hear a short beep in the headset every 15 seconds
until mute is deactivated.
• To unmute, press the mute button on the headset again.
Answer a Second Incoming Call
• While on a call, you will hear a beep in your headset if you have an incoming call. Press and hold the
mute button on the headset to put your current call on hold and answer the new call.
Note: Only available with standard (analog) telephone lines. Feature may be dependent on your telephone
provider subscription.
Switching a Call Between Headset and Handset
• To switch a call from the headset to the handset without hanging up the call, first lift the telephone
handset (or activate cordless handset). Then, press the headset call control button or place the headset
in the base-charging cradle.
VXi V200 User Guide
PAGE 15
Page 16

MAKING CALLS WITH A COMPUTER
Make, Answer or End a Call in PC Mode
• Press the PC button on the base. The PC indicator LED will be lit red.
• Press the call control button on the headset to open a channel to your computer.
• Make the call using your communications software as usual. You will need to use the software controls
to answer and end calls.
• When you are finished, press the call control button on the headset or place it back on the base-charging
cradle to close the USB channel.
Switch Between Phone and PC Mode
Place your current call on hold
• While in PC mode, press the phone button on the headset base to place your PC call on hold.
• While in phone mode, press the PC button on the headset base to place your phone call on hold.
Conference Phone and PC Calls Together
Conference a PC call into a phone call
• Press and hold the PC button on the base until both the PC and phone buttons flash together.
End a PC and phone conference call
• To end both calls, press the headset call control button.
Placing one side of a conference call on hold
• Phone call on hold
– To put the phone call on hold and speak to the person on the PC call, press the PC button on the base.
To resume, press and hold the phone button until both the PC and phone buttons flash together.
• PC call on hold
– To put the PC call on hold and speak to the person on the phone call, press the phone button on the base.
To resume, press and hold the PC button until both the PC and phone buttons flash together.
VXi V200 User Guide
PAGE 16
Page 17

REGISTERING / PAIRING HEADSETS TO THE BASE
The V200 supports up to two wireless headsets on one base station. The original V200 headset is
registered and paired to the base at the factory. However, if you wish to add a second headset, you must
register/pair it with the V200 base before use.
Identifying Registered and Unregistered Headsets
• A fully charged, registered headset will have a blue call control LED.
• An unregistered headset (not paired to a base) will have a call control LED that flashes red and blue.
Registering a Headset to the Base
• Make sure the battery is properly installed and the headset is charged. If it has not been charged, place
the headset into base charging cradle and charge for at least five minutes.
• Remove the headset from the base. Press and hold the pair button until the mute LED turns on (about
four seconds). Release the pair button.
• Return the headset to the base charging cradle until registration is complete (about 30 seconds) and
the mute LED turns off.
• Registration verification: Press the headset call control button and make a test call. If registration was
not successful, the LED by the headset call control button will flash two times every five seconds.
• If the registration process was not successful, repeat. If still not successful, remove the headset from
the base and reset the headset by pressing the call control button. Unplug the power supply from the
base, wait 15 seconds, and then reconnect the power.
Deregistering/Unpairing a Headset from the Base
You must deregister a headset from its original base station before you can register it to a different base
station.
• Press and hold the pair button for at least 10 seconds until the mute LED turns on and starts to flash.
Release the pair button. While the mute LED is still flashing, immediately press and release the pair
button again. This will deregister all headsets paired to the base.
• Deregistration verification: If successful, the mute LED is off and the headset call control LED will
continually flash red and blue.
• If the deregistration process was not successful, repeat. If still not successful, remove the headset from
the base and reset the headset by pressing the call control button. Unplug power supply from the base,
wait 15 seconds, and then reconnect the power.
Using Two Headsets on One Base
• Once both headsets (primary and secondary) are registered to the same base, either headset can be
used to answer or drop in and out of an active call at any time. As long as one of the two headsets is
on and part of the active call, the call will not end. The call will only end when the active connection on
both headsets has been ended, or the party at the opposite end of the call hangs up.
VXi V200 User Guide
PAGE 17
Page 18

ENERGY-SAVING CHARGING MODE
When this mode is activated, all headset functions will be disabled, except for headset battery charging.
To Activate the Energy-Saving Charging Mode:
• Unplug the headset base power adapter from the power outlet. Make sure all headsets are charged
before proceeding.
• Press and hold the pair button on the base, and, at the same time, plug the base power adapter back
into the power outlet. The mute LED on the headset base will start flashing after about 20 seconds
and then go out and the phone LED will begin to flash. Do not release the pair button until the phone
LED is flashing.
• Release the pair button and then press it again within 2 seconds.
• After 60 seconds, the base will enter energy-saving charging mode and all base LEDs will be off.
Note: When the energy-saving charging mode is successfully enabled, all LEDs on the base will be off.
Any headsets will also be deregistered from the base and will need to be registered back to the base
prior to use.
If the headset fails to enter this mode, repeat all steps above.
To Deactivate the Energy-Saving Charging Mode:
• Unplug the base power adapter from the power outlet, and then plug it back in. The headset base will
power up as normal.
• Register the headset back to the headset base. See the “Adding and Registering a Headset” section of
the user guide for instructions.
VXi V200 User Guide
PAGE 18
Page 19

FUNCTIONS & INDICATORS TABLES
Base
Base/Headset Function
Base PC output path PC
Base Phone output
path
Base Analog phone
mode
Base Office
(digital/VoIP)
phone mode
Base Conference
PC with active
phone call
Base Conference
phone call
with active
PC call
Button/Duration
of Press
(quick press)
Phone
(quick press)
Mode
(quick press)
Mode
(quick press)
PC
(press and
hold)
Phone
(press and
hold)
Base LED
Indicator
Red PC LED - - -
Green or red
phone LED
Red phone
LED
Green phone
LED
PC and phone
LEDs flash
together
PC and phone
LEDs flash
together
Headset LED
Indicator
- - -
- - -
- - -
- 3 beep rising
- 3 beep rising
Headset Audio
Indicator
tone
tone
Voice Indicator
(in English)
-
-
VXi V200 User Guide
PAGE 19
Page 20

FUNCTIONS & INDICATORS TABLES (continued)
Headset
Base/Headset Function
Headset Charging in
base station
Headset Volume up Volume Up
Headset Volume down Volume Down
Headset
Headset Mute (On/Off) Mute Button
Headset Mute
Headset Answer a call Call Control
Headset End a call Call Control
Headset Call control
Headset Out of range Any headset
Headset Very low
Headset Low battery - - Flashes every
Headset Incoming call
Headset
Headset Headset not
Maximum
or minimum
volume reached
Reminder
key pressed
battery
(analog mode)
Answer second
incoming call
(analog mode only)
registered
Button/Duration
of Press
- - Red while
(quick press)
(quick press)
Volume Up or
Volume Down
(quick press)
(quick press)
- Red mute LED - 1 tone (every
Button
(quick press)
Button
(quick press)
1 short beep - - - -
button
- -
- - Flashes
Mute button
(long press)
Any headset
button
Base LED
Indicator
- - 1 short tone -
- - 1 short tone -
- - 3 quick beeps -
- - 1 short tone -
- Blue light
- Blue light
- - - “Out of range”
- - 1 short tone -
- Red and blue
Headset LED
Indicator
charging; blue
when charged
flashes slightly
faster
flashes slightly
slower
Flashes 3 times,
pauses, repeats
3 more times,
then shuts down
20 seconds
quickly
alternating
flash
Headset Audio
Indicator
- -
15 seconds)
1 short tone -
1 short tone -
-
- -
- “Not
Voice Indicator
(in English)
-
“Low battery”
registered”
VXi V200 User Guide
PAGE 20
Page 21

VXi Corporation | 271 Locust Street | Dover, NH 03820 USA
Toll-Free (USA): 800-742-8588 | Phone: +1 603-742-2888
vxicorp.com
© 2016 VXi Corporation. All rights reserved.
APN 203948A
09/16
 Loading...