

Page 1
Turn Headset On: Hold down the MFB for 2-3 seconds
until you hear 2 rising tones. The red light will fl ash
once every second.
Standby Mode: After the headset is turned on, it will
attempt to connect to the last device that it was paired
with, putting itself into standby mode. The headset can
also be put into standby mode with a quick press and
release of the MFB. The blue light will fl ash ind icat i ng
an active Bluetooth link.
Turn Headset Off (conserves battery power): Hold
down the MFB for 2-3 seconds until you hear 2 falling
tones. A red light will fl ash 4 times and the headset will
turn off.
Position microphone near corner of your mouth.
Correct positioning ensures that the noise
cancellation technology works properly. Slight
adjustment of the microphone may help to achieve
optimum performance.
HEADSET CONTROLS
4
Volume Increase: Quickly press and release the Volume
Up/Mute button. Repeat until desired volume is attained.
Volume Decrease: Quickly press and release the Volume
Down button. Repeat until desired volume is attained.
Microphone Mute/Un-Mute: Hold down the Volume Up/
Mute button for 2 seconds until you hear a beep. A mute
reminder beep will be heard every 10 seconds.
Repeat to un-mute.
Multifunction Button (MFB)
& Indicator Lights
Volume Up
& Microphone Mute
Volume Down
After the initial 12 hour charge, the indicator lights will
indicate the level of battery power as follows.
Green light: Fully charged. Up to 16 hours talk time.
Green & red lights together: Approximately 60 seconds
away from full charge.
Red light: Less than a full charge.
TIPS
BATTERY POWER INDICATORS
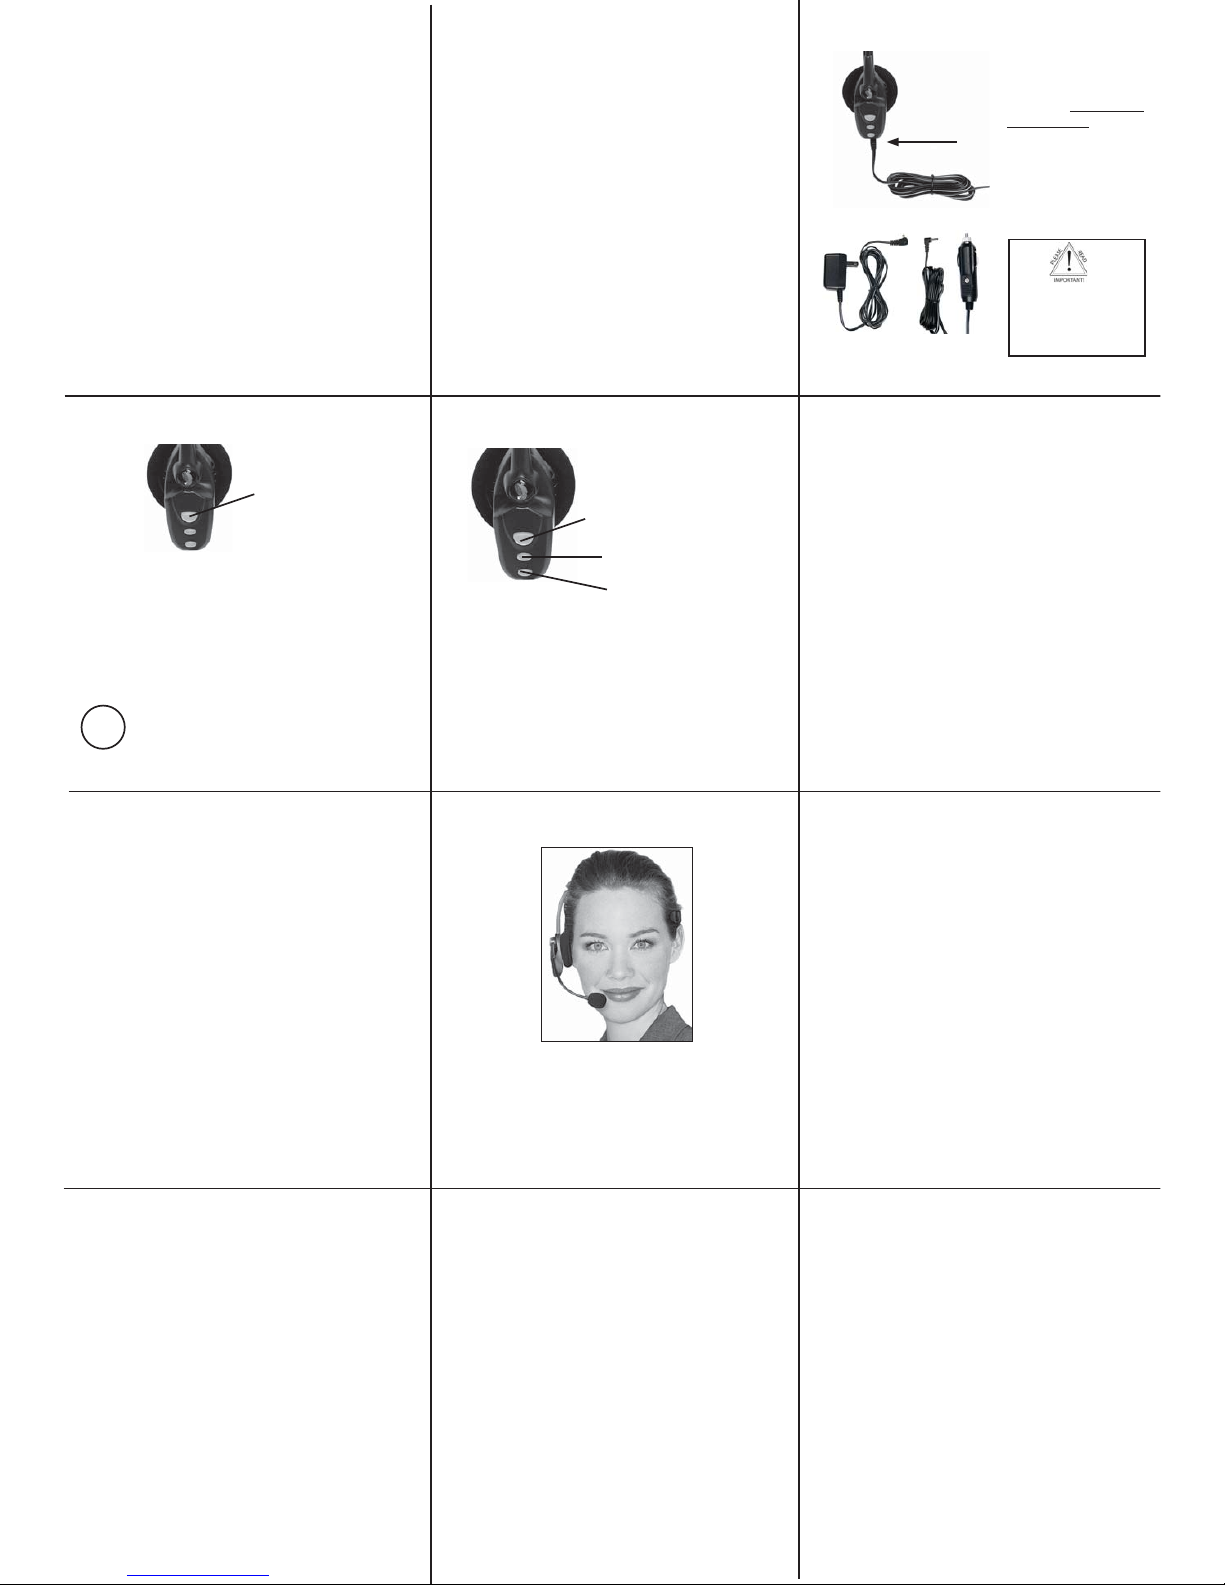
3
Select charger cord and
plug it into the charger
port on the headset.
Charge for 12 full hours
before fi rst use.
Note: If you do not use your
headset for a long period of
time, you should repeat this
12
hour charge.
AC Charger
DC Charger
TABLE OF CONTENTS
1 - Safety Instructions / Glossary
2 - Charge the Headset
3 - Battery Power Indicators
4 - Headset Controls
5 - On / Standby / Off
6 - Pair Headset with the Phone
7 - Microphone Positioning
8 - Make a Call / End a Call
9 - Answer a Call / End a Call
10 - Pairing with a Computer
11 - Operation While Using the Charger/Adapter
12 - Last Number Redial
12- Reject a Call
13 - Voice Dial
13 - Transfer Audio
14- Turn Headset Indicator Lights Off/On
14- Automatic Bluetooth Connection
15- Multiple Device Pairing
16- Reset Paired Devices List
17- Specifi cations
Keep charger plugged into headset when not in use to
avoid battery drain. It’s not necessary for the charger to
be plugged into a power source to take advantage of this.
Avoid hearing damage. Set volume at lowest comfortable level. If
you experience ringing in your ears or people sound muffl ed, stop using
the headset. Avoid turning up volume to block noisy surroundings (it’s
possible to adapt to volume that is too high).
Check with local and state laws regarding cell phone handset usage
while operating a motor vehicle.
Replace only with same or equivalent battery.
Dispose of batteries according to local regulations.
Do not throw batteries in a fi re, as they could explode.
Do not immerse any part of this product in water.
Plastic bags and small parts may cause choking if ingested. Keep
them away from small children and pets.
Use only the power cords included with this product.
Avoid temperatures exceeding 140°F (will cause equipment failure).
GLOSSARY OF TERMS
Paired- Two Bluetooth devices agree to communicate with one another.
On - Headset is on but there is no connection to the phone (red light will
fl ash).
Standby Mode - Headset is on, Bluetooth link is active, the user is not
on a call (blue light will fl ash).
Talk Mode- Headset is being used with the cell phone while the cell
phone is on an active call.
PAIR HEADSET WITH THE PHONE
6
PAIRING WITH A COMPUTER
10
MAKE A CALL / END A CALL
8
OPERATION WHILE
USING THE CHARGER / ADAPTER
11
SAFETY INSTRUCTIONS/GLOSSARY
1
5
ON / STANDBY / OFF
1. Turn headset off (panel 5).
2. Hold down the headset’s MFB until the red and blue lights
fl ash and you hear 2 rising tones, followed by 4 more tones.
Important: Wait for all tones and for both lights to fl ash. This
may take up to 15 sec. Release the MFB.
3. Follow the manufacturer’s instructions for putting your
cellular phone into Bluetooth discovery mode.
4. Wait 5-15 sec. while the devices discover each other.
When the phone discovers the headset, select “Pair” and
enter a passcode of 0000 when instructed. When pairing
is complete the headset’s blue light will stop fl ash i ng and
the phone will prompt you to ‘connect’ to the headset.
Enter “Yes” on the phone to connect to the headset. When
connected, the blue light will fl ash indicating that the
headset is in standby mode ready to receive a call.
Keep headset & phone no less than 3 inches and no more than
3 feet apart while pairing. Keep other Bluetooth devices at
least 50 ft. away or turn them off. Note: The headset can be
paired with up to 3 different devices.
If you have not paired the headset and phone together yet, you
must do so (panel 6).
1. Turn on your cell phone. Be sure the Bluetooth option is
enabled on your phone (refer to your phone’s user guide for
instruction).
2. Put headset on and properly position the microphone
(panel 7). To turn headset on press MFB for 2-3 seconds.
The headset will automatically attempt to connect with the
last device it was paired or connected with. Once connected,
the headset will enter standby mode.
3. Dial the phone and make a call as usual.
4. To end call, quickly press the MFB on the headset and
release. You will hear 2 falling tones; the call will end and
the headset will enter standby mode.
In order to answer a call, the headset must be in
standby mode (panel 5).
1. Put headset on. Position the microphone (panel 7).
2. When your cell phone rings, you will hear ring tones
in the headset. Answer the call by quickly pressing the
headset’s MFB and release.
3. To end the call, quickly press the MFB on the
headset and release. You will hear 2 falling tones; the
call will end and the headset will enter standby mode.
MICROPHONE POSITIONING
7
ANSWER A CALL / END A CALL
9
Indicator Lights
CHARGE THE HEADSET
2
Keep headset & computer no less than 3 inches and no more
than 3 feet apart while pairing. Keep all other Bluetooth
devices at least 50 ft. away or turn them off.
1. Turn headset off (panel 5).
2. Open the computer’s Bluetooth connection manager.
3. Put headset into pairing mode (Panel 6- Step 2).
4. Instruct Bluetooth connection manager application to discover
Bluetooth device. Enter passcode 0000 when prompted.
5. Wait 5-15 seconds while the devices discover each other.
The headset’s blue light will stop fl ashing and the red light
will continue to fl ash. After pairing is complete, the Bluetooth
computer will ‘ring’ the headset. Press and release the MFB
once to establish a Bluetooth link to the computer. Press and
release the MFB again to disconnect from the computer.
Once paired, connection can be made by pressing the volume
down button for 1-2 seconds. Tones will be heard and a
connection should be established.
The B250-XT headset will operate from battery power or
from the AC or DC charger/adapter.
Note: Do not attach the charger mid-call. This causes the
headset to turn off (call will not be lost).
When the headset is operating from the battery, all indicator
lights and sounds will function as described in this guide.
When the headset is operating from the charger/adapter,
the headset, including the audio indicators will function as
described in this user guide. However the MFB lights will
indicate the battery charge status (see Panel 3).
After the battery is fully charged, the MFB charge light
will turn and stay green as long as the charger/adapter
is connected to the headset. While the headset is fully
charged and the charge light is green, the blue indicator
light will also be on if the headset is powered on.
For best performance, keep charging headset when not in use.
Failure to charge
less than 12 hours
may result in shorter
talk time.
Page 2
FCC NOTICE TO USER S
This device complies with part 15 of the FCC rules. Operation is subject to the
following two conditions: (1) This device may not cause harmful interference, and
(2) This device must accept any interference received, including interference that may
cause undesired operation. Users are not permitted to make changes or modify the
device in any way. Changes or modications not approved by VXI Corporation will
void the user’s authority to operate the equipment. NOTE: This equipment has been
tested and found to comply with the limits for a Class B digital device pursuant to part
15 of the FCC rules. These limits are designed to provide reasonable protection against
harmful interference in a residential installation. This equipment generates, uses and
can radiate radio frequency energy and, if not installed and used in accordance with
the instructions, may cause harmful interference to radio communications. However
there is no guarantee that interference will not occur in a particular installation. If this
equipment does cause harmful interference to radio or television reception, which can
be determined by turning the equipment on and off, the user is encouraged to try to
corre ct the interfe rence by one or more of t he following mea sures:
- Reorien t or relocate the re ceiving ante nnae
- Increa se the separa tion between t he equipment a nd the receiver
- Connect the equipment into an outlet on a circuit different from that to which the
receiver i s connected .
- Consult the dealer or an experienced radio/TV technician for help.
VXI WARR ANTY
1. VXI war rants that you r B250-XT headset sy stem will be fr ee from defects
in mate rial and workm anship for one year f rom the date of pu rchase. If,
duri ng the rst year f rom the date of pur chase, your B250-XT h eadset
system fa ils to work due to a defe ct in materia l or workmanshi p, VXI will
repai r or replace the pro duct, at its elect ion, free of char ge. Without proof of
purcha se, the warra nty period beg ins on the date of m anufactu re. Consumable
compone nts (for example, cush ions, batter y and fuse) are not i ncluded in thi s
one-year w arranty. You may regis ter your warr anty online a t www.vxicorp.
com or by cal ling customer s ervice at 1-800 -742-8588.
2. The foreg oing limited wa rranty doe s not cover equipme nt failure
attr ibutable to accid ent, imprope r operation, m isuse, abuse, or a ny cause other
than defe cts in the mate rials or workma nship of VXI’s produ cts.
3. VXI’s obligat ions under th is warranty a re limited to r epair or repla cement
(at our optio n) of any defect ive part retu rned to VXI a t the customer’s expe nse.
Retur ned products r equire a Retu rn Authori zation that may be o btained
by calli ng 1-800-742-8588. Produ cts return ed to VXI for repa ir under thi s
warr anty will be ret urn shipp ed to the custome r at VXI’s expense.”
4. THIS LI MITED WARRA NTY IS IN LIEU OF A LL OTHER
WARRAN TIES, EXPR ESS OR IMPLIED, IN CLUDING THE IM PLIED
WARRAN TIES OF MERCHA NTABILITY A ND FITNESS FOR A
PARTICULA R PURPOSE. Some j urisdictio ns do not permit t he exclusion of
implied w arranties a nd the foregoing exclu sions may not apply to yo u.
5. In no event sh all VXI be resp onsible for any othe r damages what soever,
includi ng direct, i ndirect, spe cial, incident al, conseque ntial, or other d amages
for breach of t his or any other w arranty, expr ess or implied.
VXI Cor poration 271 Loc ust Street, Dove r, NH 03820 USA
1-800-742-8588 / 603 -742-2888 / www.blue parrott.co m
PN202710D ©2011 VXI Cor poration
B250-XT
USER GUIDE
Compatible with Bluetooth phones & Bluetooth enabled
computers (Windows® or Macintosh®)
FUNCTIONS AND INDICATORS AT A GLANCE
Function Button/Duration of press Audio Indicator Visual Indicator Lights
Power on MFB / 2-3 sec. Two rising tones Blue light ashes
Power off MFB / 2-3 sec. Two falling tones All lights go off
Enter pairing mode MFB / 5-15 sec. Two + Four rising tones Red & blue lights ash alternately
Volume up Vol Up / quick press Single tone None
Volume down Vol Dwn / quick press Single tone None
Mute on Vol Up / 2 sec. Single tone None
Mute off Vol Up / 2 sec. Singe tone None
(Short reminder beep every 10 seconds while mute is on)
Voice dial (start) MFB / 1 quick press Single tone None
Voice dial (end) MFB / 1 quick press Single tone None
Last number redial Vol Dwn / 1 sec. Single tone None
Answer a call MFB / quick press Two rising tones Blue light ashes slightly slower
End a call MFB / quick press Two falling tones Blue light ashes slightly faster
Reject a call* MFB / 2 sec. Two falling tones None
*Sends call to Voice Mail (if available)
Transfer audio Vol Dwn / 1-2 sec. Long tone None
(MFB = Multifunction Button)
Range: Up to 66 feet. Best range is achieved with line-of-
sight positioning of headset and cell phone.
Certain conditions and obstructions, such as wireless
devices, placing your phone on a metal surface (such as
your vehicle’s hood), walls, etc., can inhibit radio wave
transmission and reduce range.
Talk Time: 16+ hours on a 12 hour charge.
Standby Time: Up to 150 hours on a 12 hour charge.
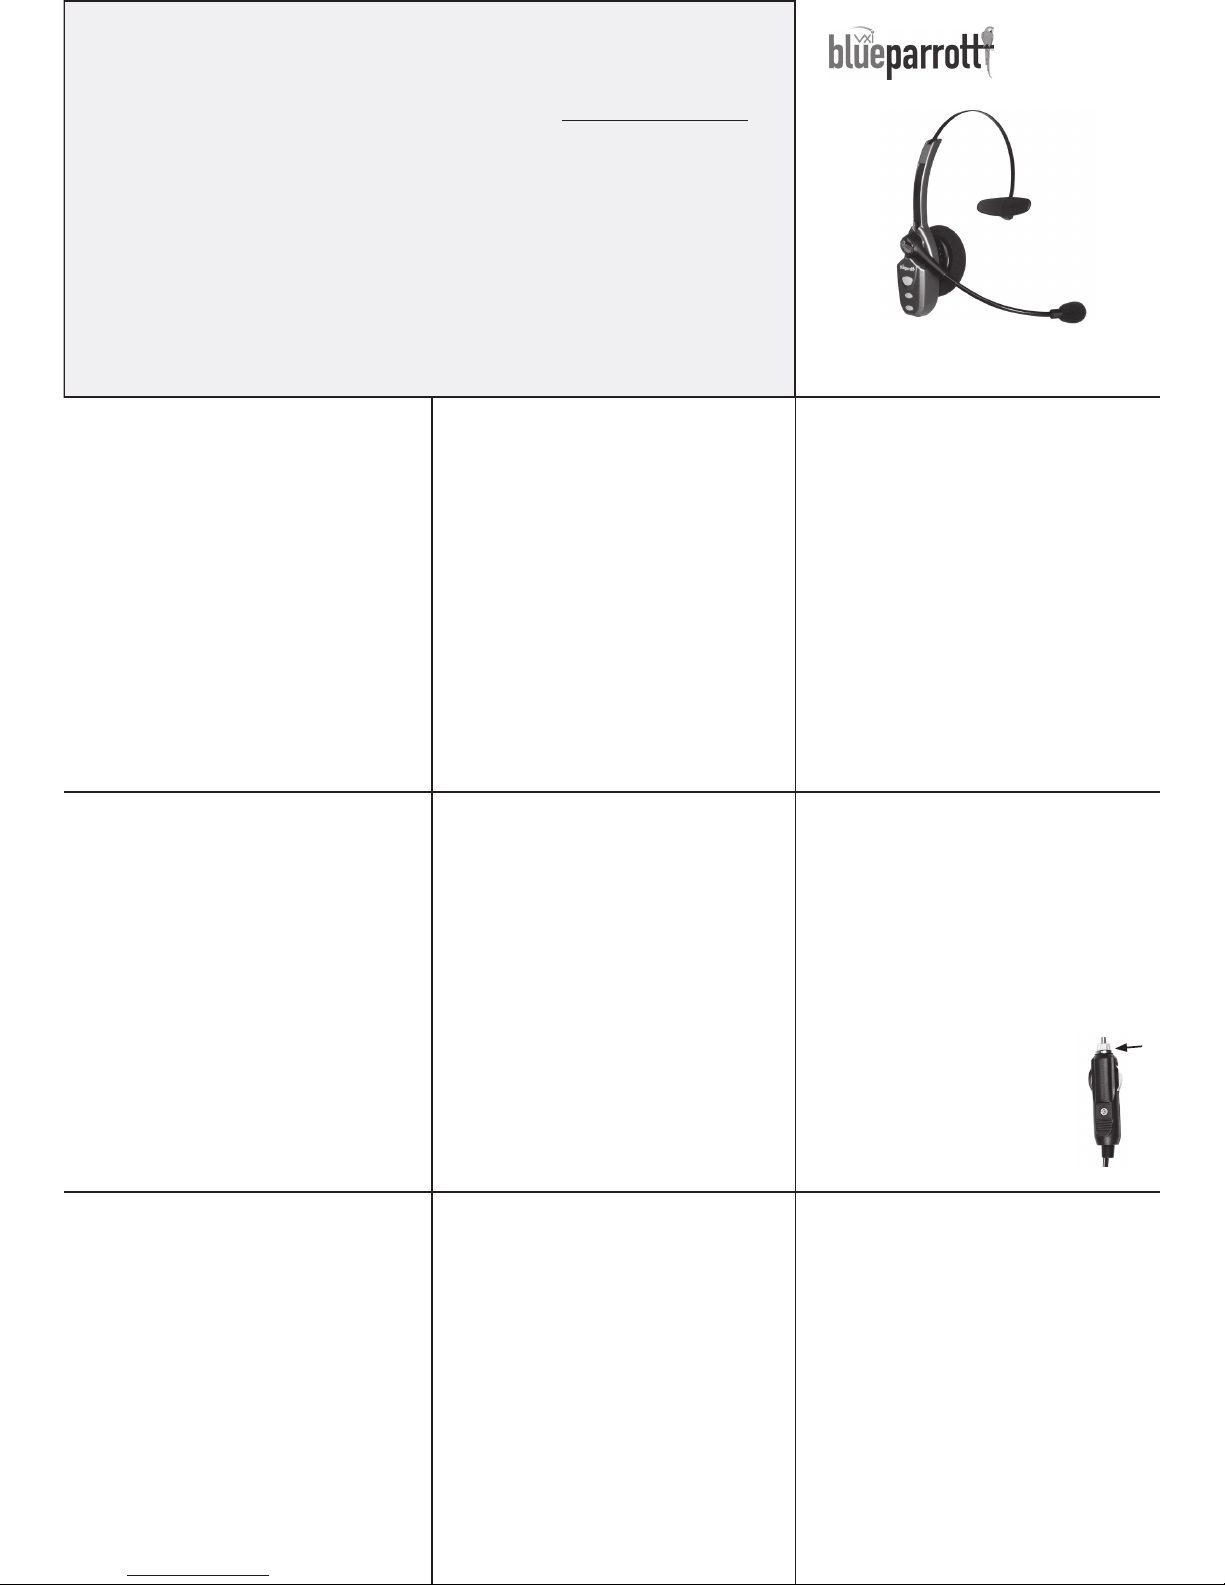
Auto (DC) Charger Inline Fuse Replacement:
If neither of the headset charging indicators
light when the auto adapter is connected to the
headset and power source, check the charger’s
inline fuse. Replace with 1A 250V Slow-Blow
glass fuse (3AG) if necessary. Fuses are available
at most automotive stores. To replace, simply
unscrew the tip of the auto adapter (see photo,
right) and remove the fuse (be careful not to lose
the spring that is inside). Put new fuse in and
screw the t ip back on.
SPEC IFICAT IONS
12
ADDITIONA L FUNCTIONS
Note: Your cell phone must support the following functions
(consult the phone owner’s manual).
LAST NUMBER REDIAL
To re-dial the last number that was dialed from the
cell phone, press and hold the volume down button for
approximately 1 second. A beep will be heard and the phone
will redial the last number.
REJECT A CALL
To reject an incoming call, press and hold the MFB for 2
seconds. You will hear 2 falling tones and the incoming call
will be transferred to your voice mail (if available).
More functions on panel 13
13
ADDITIONA L FUNCTIONS
VOICE DIAL
To use the voice dial feature of the cell phone, quickly
press the MFB on the headset; a tone will be heard and
the phone’s voice dialer should open; clearly speak the
command. Repeat quick press of the MFB to end voice
dial. The headset must be in standby mode to use this
feature.
TRA NSFER AUDIO
To transfer audio from the headset to the cell phone
while on a call, press and hold the volume down button
for 1-2 seconds. A tone will be heard and audio will
transfer to the phone; repeat to transfer audio back to
the headset. When audio is transferred to the phone, the
red light will ash until audio is transferred back to the
headset.
14
ADDITIONA L FEATUR ES
TURN HEADSET INDICATOR LIGHTS OFF/ON
A quick press of both the volume up and volume down
buttons at the same time will turn the headset indicator
lights off, repeat to turn the indicator lights on. Headset
must be paired to a phone and in standby mode or on a
call to use this feature. When powering on the headset, the
indicator lights will be in the same state as they were when
last powered off.
AUTOMATIC BLUETOOTH CON NECTION
When the headset is powered on, it will automatically
attempt to connect to the last device it was paired with. If
the headset was paired with multiple devices and the last
connected device is not available (turned off, out of range,
etc.), the headset will attempt to connect to the second to
the last device it was connected to, etc. It is also possible to
reconnect to the device with a quick press of the headset’s
MFB. A tone will be heard and the two devices should
connect.
MULTIPLE DEV ICE PAIRING
15
The B250-XT can pair with up t o seven devices at the
same time; however, only one device may be connected to
the headset at a time. To pair the headset with a Bluetooth
cell phone or other Bluetooth device such a s a Bluetooth
enabled computer, follow the instructions i n panel 6 and
10 of this manual. Remember t hat all dev ices except for
the one being paired must either be powered off or at least
50 ft. away during the pairing process.
Once all devices are paired, connection to the last paired
device can be made by turning the headset off and then
on again, or with a quick press of the MFB. The headset
will connect to the devices in opposite order of pairing.
For instance, if device A, B and C were paired in that
order, connection will be established to C rst. If C is
not available (turned off, out of range), the headset will
connect to B, etc.
To reset the headset’s internal paired devices list, press and
hold both the volume up and the volume down buttons for
5-6 seconds.
A double beep with be heard and the list will be reset.
This procedure may be necessary if the headset will not pair
or connect to a device.
NOTE: Pairing information for devices previously paired
with the headset will be lost. Headset will need to be paired
to the device after reset has occurred.
RESET PAIRED DEVICES LIST
16
Printed in China
17
CANADA / IC NOTICE T O USER
This device complies with Industry Canada licence-exempt RSS standard(s).
Operation is subject to the following two conditions: (1) this device may not cause
interference, and (2) this device must accept any interference, including interference
that may cause undesired operation of the device.
This device complies with RSS-310 of Industry Canada. Operation is subject to the
condition that this device does not cause harmful interference. This Class B digital
apparatus complies with Canadian ICES-003 (Cet appareil numérique de la classe B
est confor me à la norme N MB-003 du Ca nada).
 Loading...