

Page 1

BASIC OPERATION
Charge headset in base for 4 hours
before first use. The multifunction
button on the headset will turn green
when fully charged. After use, this light
will turn red. It is not necessary for the
light to turn green to use the headset.
Microphone Adjustment: To ensure
proper microphone performance, do the
following.
1. The microphone has
the word TALK or a dot
printed or embossed
on it (under the
cushion). This mark
must face your mouth.
2. For quality sound and effective
background noise cancellation, position
microphone a finger’s width away from
your face just below your bottom lip.
The microphone is sensitive, minor
adjustments may be needed to achieve
optimum voice quality.
Standby/Talk Time Mod
es: The headset
is in standby mode whenever you see a
slow-flashing yellow light on the headset
and the handset icon is lit on the front
of the base. If the headset icon is lit,
then the headset is active and Talk Time
is being used (even if you are not on a call).
Installation A
For phones without headset ports
BLUEPARROTT B200
Controls & Components
Standby/Pairing indicator lights
Volume decrease
Volume increase / Microphone mute
Multifunction button / Indicator lights
Pairing button
The headset battery charges
continuously while the
headset is in the base.
Headset active indicator light
Microphone volume adjustment
(located under base)
USE T-CORD
Installation B
For phones with headset ports
(Cisco phones see Installation C)
1. Leave handset plugged into your phone.
2. Plug short end of T-cord into headset
port on phone.
3. Plug longer end of T-cord into port on B200
base marked “Phone” . Thread cord under
hook.
4. Plug AC adapter into port on B200 base
marked and then plug AC adapter into
the wall electrical outlet.
USE T-CORD
Installation C
For Cisco models 7940 or higher
with a headset port
USE PATCH CORD
1. Leave handset plugged into your phone.
2. Plug the blue-banded end of the patch cord
into the headset port on your phone.
3. Plug other end of the patch cord into port
on the B200 base marked “Phone” .
Thread cord under hook.
4. Plug AC adapter into port on B200 base
marked and then plug AC adapter into the
wall electrical outlet.
1. Remove handset cord from phone’s base.
2. Plug short end of T-cord into now empty
handset port on phone.
3. Plug longer end of T-cord into port on B200
base marked “Phone” . Thread cord under
hook.
4. Plug handset cord into port on T-cord.
5. Plug AC adapter into port on B200 base
marked and then plug AC adapter into
the wall electrical outlet.
T-cord
Patch cord
Cord wraps
AC adapter
Page 2
The Microphone Volume Adjustment is located on the bottom of
the B200 base . If the person on the other end of the call is
having trouble hearing you, position the base as shown, and
with a paperclip inserted in the slot of the knob, turn the knob
clockwise to increase the volume. If they say your voice is too
loud, turn the knob counterclockwise to decrease volume.
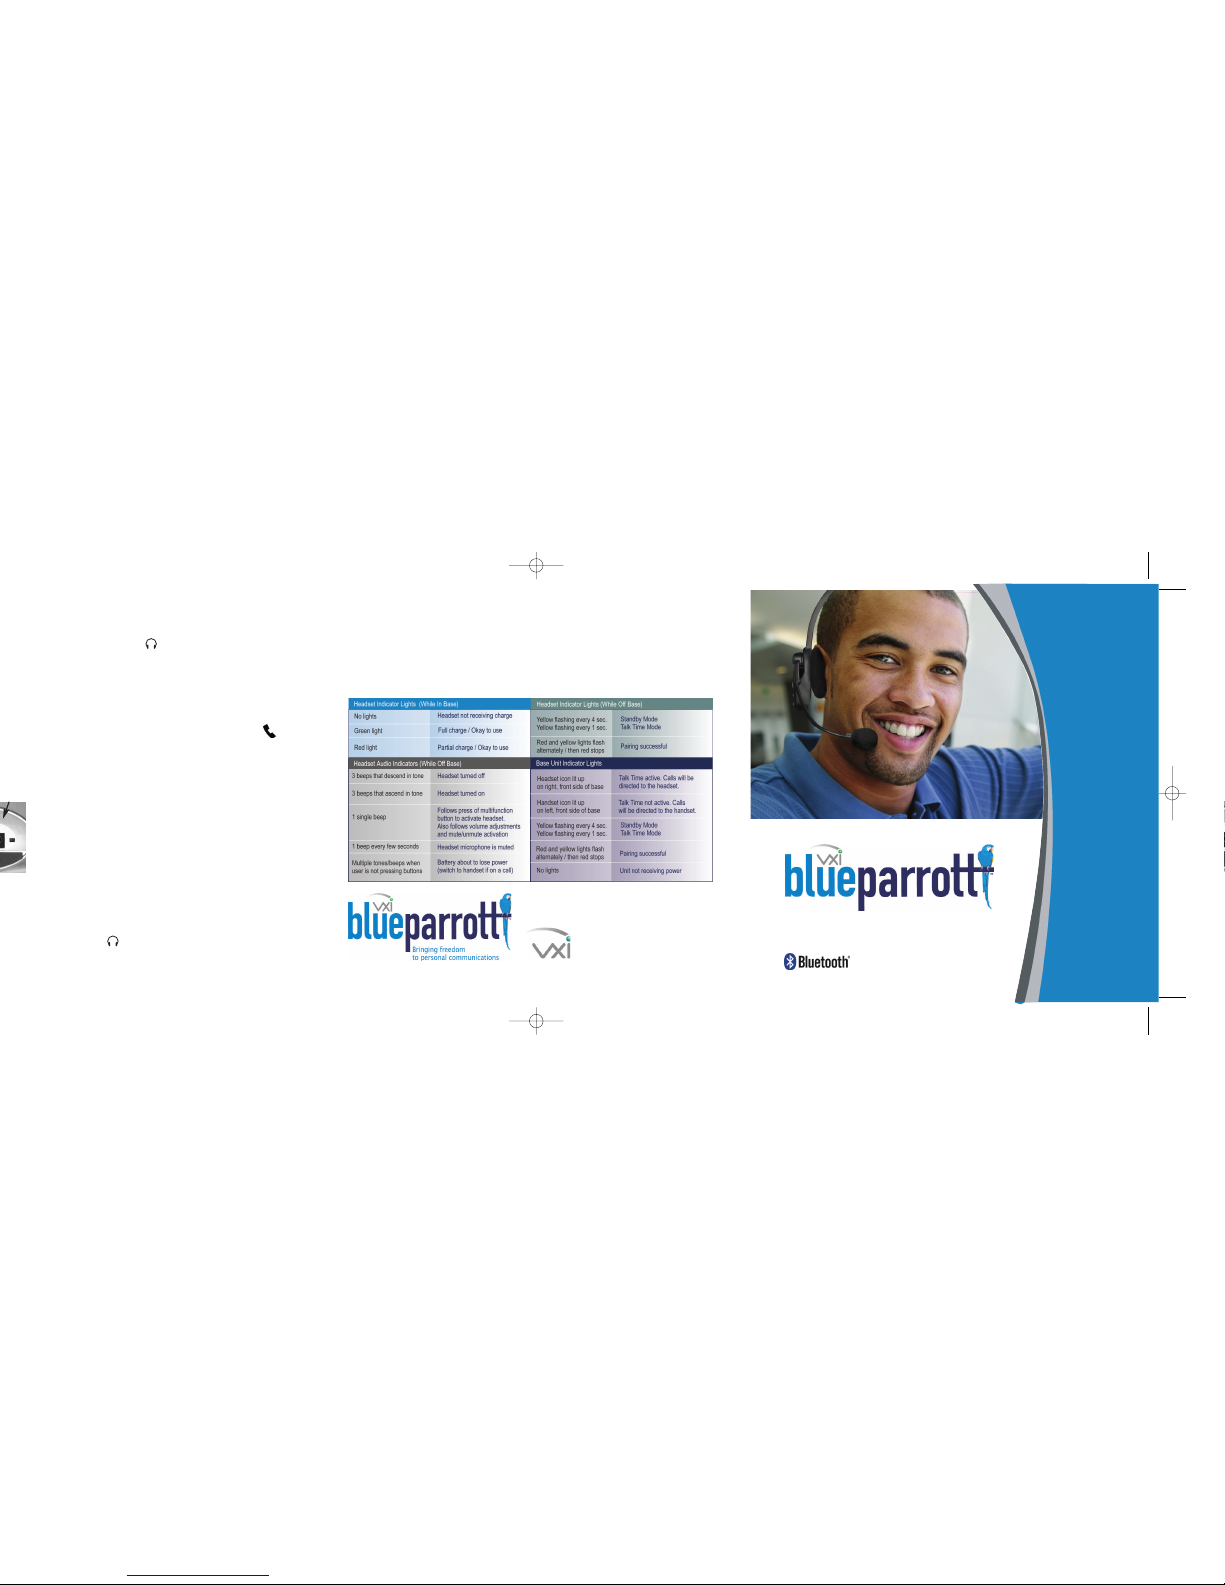
VISUAL AND AUDIO INDICATORS EXPLAINED
B200 Quick
Start Guide
A brand of VXI Corporation
One Front Street. Rollinsford, NH 03869
800-742-8588 I 603-742-2888
PN201955B
www.blueparrott.com
B200 Wireless Headset for Office
Phone Systems
4. To end the call, place the handset back in cradle, or press the line or headset button
on the phone to end the call. Press multifunction button for 1 second to end Talk Time.
The handset icon should will light up on the base within 1-5 seconds.
Adjust Speaker Volume
To adjust the volume in your earpiece, press the increase or decrease volume button for 1 second,
then release. Repeat until volume is at desired level.
 Loading...