

Page 1

B200 Wireless Headset System
Page 2

2
VXI. Connecting people to a digital world.
Page 3

3
Table of Contents
Box Contents ........................................................................................4
Basic Safety Instructions ........................................................................5
Product Features ................................................................................... 6
Glossary of Terms .................................................................................8
Operation Summary...............................................................................8
Compatibility Information......................................................................8
Maximizing Range. ............................................................................... 9
Installation ..........................................................................................10
Charging the Headset / How to Maximize Talk Time ...........................12
Battery Information ......................................................................... ....12
Talk and Standby Times ......................................................................13
Headset Adjustments / Microphone Positioning ..................................13
Basic Operation
Standby and Talk Time / Turn Headset On /Off ..................................14
Make A Call/ End A Call ..................................................................... .14
Adjust Microphone Volume............................................................... ..15
Answer A Call / End A Call............................................................. .....16
Adjust Speaker Volume .................................................................... ...16
Microphone Mute On /Off ............................................................... ....16
Switch From Handset to Headset .........................................................17
Switch From Headset to Handset .........................................................17
Pairing
Pair The BlueParrott Base with the BlueParrott Headset ........................18
Pair The BlueParrott Base with a Different Bluetooth Headset ........... ...19
Pair The BlueParrott Headset with a Bluetooth Cellular Phone..............19
Visual and Audio Indicators Explained ..................................................................20
FAQs & Troubleshooting ........................................................................ .............21
Legal ................................................................................................................22
Warranty Information ..........................................................................................23
Page 4
4
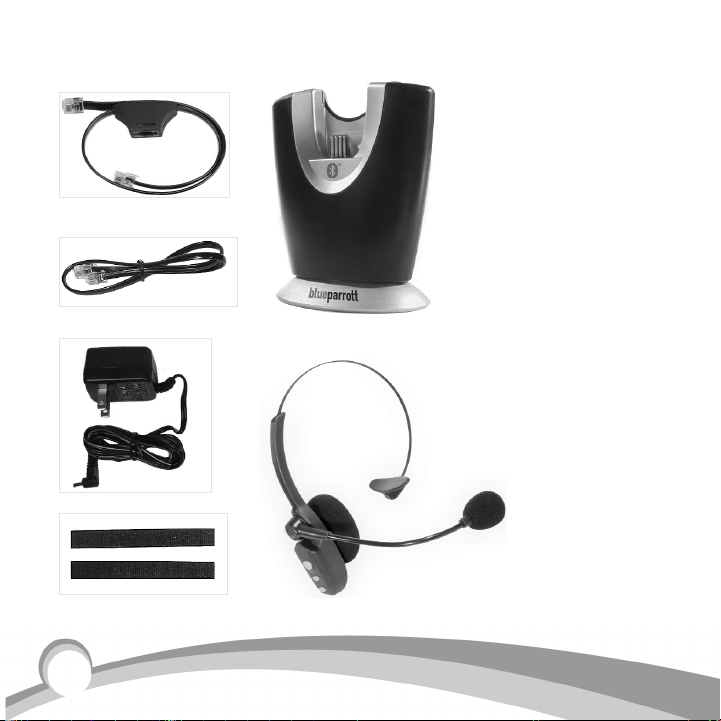
BOX CONTENTS
1. T-cord (for office phones
other than Cisco)
2. Patch cord (for Cisco
phones- models 7940 or
higher)*
3. AC adapter
4. Cord wraps
5. B200 base
6. B200 headset
Also included (not shown)
User Guide
Quick Start Card
1
2
3
4
5
6
*There may be other brand phones that
are compatible with this cord. Please call
tech support for further compatibility
information 1-800-742-8588.
Page 5

BASIC SAFETY INSTRUCTIONS
CAUTION
Danger of explosion if battery incorrectly replaced.
Replace only with the same or equivalent type recommended by
the manufacturer.
Dispose of used batteries according to the manufacturer’s
instructions.
Do not dispose of batteries in fire, as they could explode.
Do not immerse the BlueParrott B200 in water.
Plastic bags and small parts may cause choking if ingested. Keep
them away from children and pets.
Use only the power cord included with this product.
Avoid using during lightning storms.
5
Page 6
6
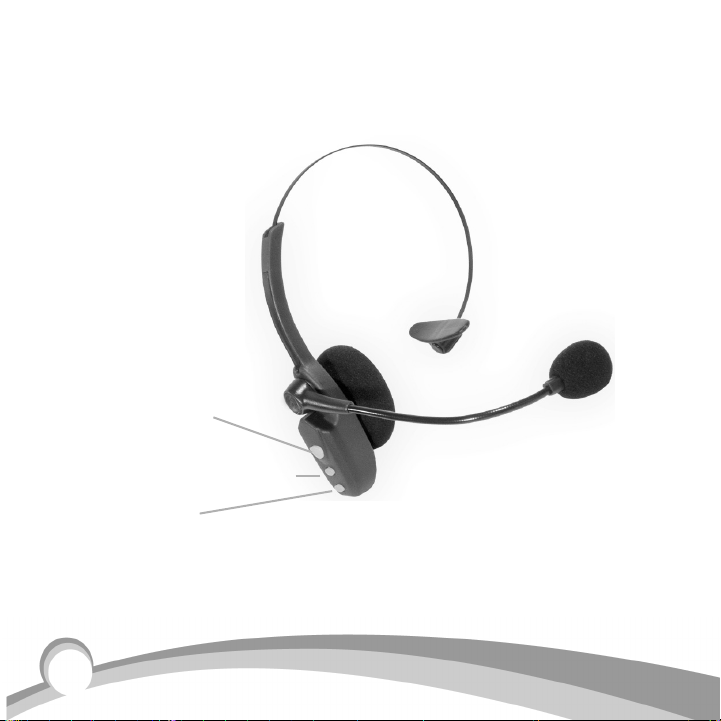
Adjustable headband
T-bar
Noise canceling
microphone
Multi-function button
with indicator lights
Volume (increase)/Mute control
Volume (decrease)
PRODUCT FEATURES
BlueParrott B200 Headset
Page 7
7
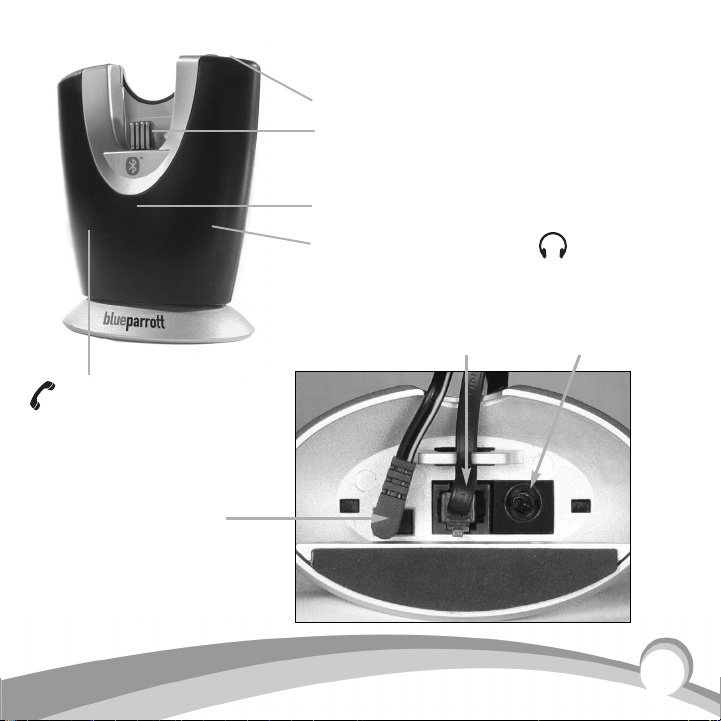
PRODUCT FEATURES
BlueParrott B200 Base
AC adapter
plug
T-cord or
Patch cord
Microphone
volume adjustment
Headset charge contact
On/Pairing indicator lights
Handset indicator light
Headset indicator light
Pairing button
Page 8

8
GLOSSARY OF TERMS
Standby Mode – Headset is on, but not using Talk Time. Battery power is conserved
in this mode. The handset icon on the base will be lit and the headset’s yellow indicator light will flash slowly, about every 4-5 seconds. Standby Mode is automatic after
removing headset from the base. Standby Time is up to 100 hours on a full charge.
Talk Time Mode– When the headset is in Talk Time mode you will be able to answer
the call with a single press of the multifunction button. The headset icon will be lit
on the base and the headset’s yellow indicator light will flash faster, about once every
second. Talk Time is up to 6 hours on a full charge.
Pair / Pairing – Pairing is a simple and quick procedure that enables one Bluetooth
product to communicate with another Bluetooth product. Your BlueParrott B200 headset and base have already been paired at the factory. However, pairing is necessary
when using other Bluetooth products with either the BlueParrott headset or base.
OPERATION SUMMARY
Your BlueParrott B200 system consists of a base unit and a wireless headset.
It allows you to communicate on a phone call, hands free, via Bluetooth technology.
COMPATIBILITY INFORMATION
• Landline Phones: Compatible with corded telephones. The telephone does not need to
be Bluetooth-enabled. Dial pad must be on the base of the phone, not on the handset.
Not compatible with cordless phones.
• Bluetooth Headsets: Bluetooth headsets that have a 0000 passcode are compatible with
the BlueParrott base. Check your headset user guide for passcode information.
Page 9

• Bluetooth Enabled Computers: Your computer must have either Bluetooth technology
built-in or have the addition of a Bluetooth adapter (also called a dongle). Range will
vary and is determined by the computer’s (or the adapter’s) Bluetooth specification.
• Bluetooth Cellular Phones: Bluetooth cellular phones are compatible with the
BlueParrott B200 headset when the cell phone’s passcode is set to 0000. Please
consult your phone’s user manual to set the passcode. Bluetooth must be built into
the phone or you may use a Bluetooth adapter (also called a dongle).
MAXIMIZING RANGE
The range of communication distance between the BlueParrott B200 base and B200
headset is up to 75 feet.
Certain environmental conditions can inhibit radio wave transmission, such as metal
structured beams or other wireless technology inside a building. If range is less than
expected, try placing the base in another location. Headset audio quality will suffer
when you travel out of range. If this happens, simply move closer to the base.
The range of communication distance between the BlueParrott B200 headset and a
Bluetooth cellular phone or computer is approximately 33 feet. The range of communication distance between the BlueParrott B200 base and a different Bluetooth
headset varies and is dependent on the range capabilities set by the headset manufacturer (usually up to 33 feet).
9
Page 10

10
INSTALLATION A: Phones without headset ports
STEP 1: Disconnect the handset cord from your telephone’s base.
STEP 2: Plug short end of T-cord into the now empty handset port on your phone.
STEP 3: Plug the other (longer) end of the T-cord into the port on the B200 base
marked Phone . Thread cord under the hooks on the base.
STEP 4: Plug the handset into the port on the T-cord.
STEP 5: Plug the AC Adapter into the AC port on the bottom of the B200 base
and then plug the AC adapter into a standard electrical outlet.
INSTALLATION B:Phones with headset ports (Cisco phones see Installation C).
STEP 1: Plug the short end of the T-cord into the headset port on your phone.
STEP 2: Plug the other (longer) end of the T-cord into the port on the B200 base
marked Phone . Thread cord under the hooks on the base.
STEP 3: Plug the AC Adapter into the AC port on the bottom of the B200 base
and then plug the AC adapter into a standard electrical outlet.
INSTALLATION C: Cisco Phones (Models 7940 or higher. Headset port required.)
STEP 1: Plug blue banded end of patch cord into headset port your phone.
STEP 2: Plug the other end of the patch cord into the port on the B200 base,
marked Phone . Thread cord under the hooks on the base.
STEP 3: Plug the AC adapter into the AC port on the bottom of the B200 base
and then plug the AC adapter into a standard electrical outlet.
Allow cords to exit through the curved opening on the base. Cords may be bundled
together with the cord wraps.
Page 11

11
Use T-cord (plug short
end into the phone)
Use T-cord (plug short
end into the phone)
Use patch cord (plug blue-banded end into headset port on the phone)
A: For phones without headset ports
B : For phones with headset ports
BASE CONNECTIONS
AC adapter
C : For Cisco phones (7940 or higher)
T-cord or
patch cord port
Page 12

12
CHARGING THE HEADSET
Before first time operation, place the headset securely in the base
and allow the unit to charge undisturbed for 4 full hours. When
fully charged, the headset indicator light will turn bright green. A
full charge will provide up to 6 hours of talk time before needing
to be recharged. A red light when placed in the base simply indicates less than a full charge and the headset is operative and may
be used. When the battery is at the end of its charge, you will hear
multiple tones in the headset, which will happen when you are not
pressing any buttons. If this happens, your call will not be lost. Simply switch immediately to your phone’s handset and continue the call. Place headset back in the charger base.
HOW TO MAXIMIZE TALK TIME
You can lengthen available Talk Time by putting the headset back into Standby Mode
after a call. To do this, simply press and release the multifunction button on the
headset for 1 second after your call has ended. The handset icon will light up on
the base after 1-5 seconds. If you prefer to keep the headset in Talk Time mode continually, you may wish to place the headset back in the charger after 4 hours of use
before you take a one hour break. One hour of recharge time will add approximately
2.5 hours of Talk Time to your headset. Storing headset in the charger base when
not in use provides a continual charging to the headset.
Battery Information
The BlueParrott B200 battery is guaranteed for 1 year. To order a new battery, please
call VXI at 1-800-742-8588 or order online at www.blueparrott.com. Instructions for
installation of the new battery will be included.
Page 13

13
Talk Time And Standby Time
After the headset is fully charged, you will enjoy a total talk time of up to 6 hours
and a standby time of up to 100 hours.
HEADSET ADJUSTMENTS / MICROPHONE POSITIONING
Microphone positioning is important to ensure proper microphone performance.
Headset Adjustment
1. Place the headset on your head with the ear cushion on your left or right ear.
2. Swivel microphone boom up and over, if necessary, to bring it to the chosen side.
3. Place T-bar on the side of your head above your ear.
4. Slide headband in or out for a secure fit.
Microphone Positioning
1. The microphone has the word TALK or a dot printed or
embossed on it under the cushion. This mark must face your
mouth.
2. For quality voice input and effective background noise cancellation, position microphone a finger’s width away from your face
just below your bottom lip. Because the B200’s professional
grade microphone is sensitive, you may need to make slight
adjustments in positioning to achieve optimum sound quality.
Page 14

14
BASIC OPERATIONS
See page 6 & 7 for location of controls and indicator light icons.
Standby And Talk Time Modes
The headset is automatically in Standby Mode after you remove it from the base.
The handset icon on the base will be lit and the headset’s yellow indicator light will
flash slowly every 4-5 seconds. To put the headset into Talk Time mode press and
release the multifunction button for 1 second (you will hear a single beep).
While in Talk Time mode, the headset icon on the base will be lit and the yellow
indicator light on the headset will flash quickly, about once per second. Whenever the
headset icon is lit on the base Talk Time is being used (even if you are not on a call).
To alternate between modes, press and release the multifunction button on the headset for 1 second. After 1-5 seconds the correct icon will light up on the base. Since
Standby Time is extensive and the headset continues to charge any time it is stored
in the base, it is usually not necessary to turn off the headset to conserve battery
power. However, if you wish to turn the headset off and on, follow these steps.
Turning The Headset Off And On
A flashing, yellow light on the headset indicates that it is on (wait 5 seconds to see it).
• Off – Press and hold the multifunction button on the headset for about 3 seconds
until you hear 3 beeps that descend in tone. The yellow light on the headset will stop
flashing. The headset is now off.
• On – Press and hold the multifunction button on the headset for about 3 seconds
until you hear 3 beeps that ascend in tone. The yellow light on the headset will flash
every 4-5 seconds. The headset is now on and in Standby Mode
Make A Call / End A Call
Before answering, make sure the headset is on (see above).
Page 15

1. Put the headset on and position the microphone properly.
2. Put the headset in Talk Time mode*: Firmly press and release the multifunction
button on the headset for 1 second. You will hear a beep. The headset icon will
light up on the right side of the base indicating that the headset is in Talk Time
mode (it may take 1-5 seconds for the icon to light up). Activate your phone by
removing the handset from the cradle or by pressing the line or headset button.
If the dial tone is too loud when you activate your phone, you can press the volume
decrease button 1-3 times before activating the headset.
3. Dial as usual.
* If the headset icon is already showing on the front of the base, then the headset is
already in Talk Time mode and you may proceed to step 3.
4. To end the call, place the handset back in cradle, or press the line or headset button on the phone to end the call. To return to Standby Mode, press the multifunction
button on the headset for 1 second. The handset icon will light up on the base after
1-5 seconds and Talk Time usage will cease.
Adjust The Microphone Volume
The Microphone Volume Adjustment is located on
the bottom of the B200 base (see photo). If the person on the other end of the call says your voice is
too quiet, position the base as shown and turn the
knob clockwise to increase the volume. If they say
your voice is too loud, turn the knob counterclockwise to decrease volume. A paper clip may be inserted in the slot of the knob to assist in the turning.
15
Page 16

16
Answer A Call / End A Call
Before answering, make sure the headset is on (page 14)
1. Put the headset on and position the microphone properly.
2. Put the headset in Talk Time mode* by pressing the multifunction button on the headset
for 1 second, then release. Within 1-5 seconds, the headset icon will light up on the
right front side of the base.
* If the headset icon is already showing on the front of the base, then the headset is
already in Talk Time mode and you may proceed to step 3.
3. Remove handset from cradle or press the line or headset button. You will be connected to the call.
4. To end the call, place the phone’s handset back in the cradle or press the phone’s
line or headset button to disconnect the call on your phone. To return to Standby
Mode, press the multifunction button on the headset for 1 second. The handset icon
will light up on the base within 1-5 seconds and Talk Time usage will cease.
Adjust Speaker Volume
To adjust the volume in your earpiece, press the increase or decrease volume button
for 1 second, then release. Repeat until volume is at desired level. You will hear a single beep each time you press the button.
Mute The Microphone On The Headset
To mute the microphone, press and hold down the Increase Volume button for 4 seconds. You will hear a beep and the microphone will mute. A beep will be heard periodically indicating that the microphone is in Mute Mode. This will not be heard on the
other end of the call.
Un-Mute The Microphone On The Headset
To un-mute the microphone, press and hold down the Increase Volume button for 4
seconds. You will hear a beep and the microphone will un-mute.
Page 17

Switch From Headset To Handset While On A Call
1. Remove the handset from the phone’s cradle (if it is not already removed).
2. Firmly press the multifunction button on the headset for 1 second. You will see the
handset icon light up on the left front side of the base within 1-5 seconds. Or you
may simply place the headset back in the base.
Note: If your B200 base is plugged into a headset port, you will need to press the line
or headset button to activate the handset.
3. Resume your conversation using the handset.
Switch From Handset To Headset While On A Call
Before answering, make sure the headset is on (page 14)
1. Put the headset on and position the microphone properly.
2. Put the headset in Talk Time mode by pressing the multifunction button for 1 second, then
release it. You will hear a beep and the headset icon will light up on the right
front side of the base within 1-5 seconds.
3. If your B200 base is plugged into the phone’s headset port: You may place the
handset back in the cradle as soon as the headset is activated.
If your B200 base is plugged into the phone’s handset port: Do not place the hand
set back in the cradle until after the call has ended.
17
Page 18

PAIRING See page 6 & 7 for location of controls and indicator lights.
For your convenience, the BlueParrott B200 base and headset have been paired in advance at the
factory. However, if you have since paired the headset or the base with an alternate Bluetooth
product, you will need to pair the BlueParrott B200 base and headset together again.
Before Pairing: Turn The Headset And Base Off
Note: Be sure the headset is off the base
To turn the B200 headset off: Press and hold down the multifunction button for
about 3 seconds. You will hear 3 beeps in the headset that descend in tone and the
yellow light on the headset will stop flashing.
To turn the B200 base off: Press and hold down the pairing button for about 4 seconds. The yellow light on the base will stop flashing.
Pair The BlueParrott B200 Base With The BlueParrott B200 Headset
Note: Be sure the headset is off the base and see “Before Pairing” above.
1. Turn off all other Bluetooth products or keep them at least 50 feet away.
2. Position the B200 base and B200 headset no more than 3 feet apart.
3. Press and hold down the pairing button on the B200 base for approximately 5 to
10 seconds. The yellow light will flash, followed by the red and yellow indicator
lights flashing alternately. Release the pairing button.
4. Press and hold down the the multifunction button on the B200 headset for about
5-10 seconds until you hear two series of melodic tones (hold it up to your ear)
and the yellow and red indicator lights on the headset will flash alternately. Release
the multifunction button.
5. The red light will stop flashing on both the headset and the base. The yellow will
continue. Successful pairing has been completed.
18
Page 19

Pair The BlueParrott B200 Base With A Different Bluetooth Headset
See compatibility information page 8. Be sure the B200 headset is off the B200
base and both are turned off. See “Before Pairing” page 18.
1. Position the B200 base and your alternate headset no more than 3 feet apart.
2. Press and hold down the pairing button on the B200 base for approximately 5 to
10 seconds. The yellow light will flash, followed by the red and yellow indicator
lights flashing alternately. Release the pairing button.
3. Follow the alternate headset’s user guide for putting the headset into pairing mode.
4. When the red light on the B200 base stops flashing, pairing has been completed
(check your headset user’s manual for pairing confirmation indicators).
Pair The BlueParrott B200 Headset With A Bluetooth Cellular Phone
See compatibility information page 8. Be sure the B200 headset is out of the B200
base and both are turned off. See “Before Pairing” page 18.
1. Position the B200 headset and your phone no more than 3 feet apart.
2. Press and hold down the the multifunction button on the B200 headset for about
5-10 seconds until you hear two series of melodic tones (hold it up to your ear).
The yellow and red indicator lights on the headset will flash alternately. Release the
multifunction button.
3. Refer to your phone’s user manual for pairing instructions. The phone’s pass code
must be set to 0000.
4. When the red indicator light on the B200 headset stops flashing, pairing has been
completed (check phone’s user manual for pairing confirmation indicators).
19
Page 20

VISUAL AND AUDIO INDICATORS EXPLAINED
Headset Indicator Lights / While In Base:
No lights Headset not receiving charge
Bright green light Fully charged/Okay to use
Red light Partially charged/okay to use
Headset Indicator Lights / While Off Base:
Yellow flashing every 5 seconds Headset is in Standby Mode
Yellow flashing every 1 second Headset is in Talk Time Mode
Red/yellow lights alternate, then red light stops Pairing successful
Headset Audio Indicators:
3 beeps that descend in tone Headset turned off
3 beeps that ascend in tone Headset turned on
1 single beep Follows press of Multifunction button
to activate headset or handset, also
indicates mute/unmute functions
1 single beep that repeats every few seconds Microphone is muted
Tones/beeps when buttons are not being pressed Battery about to lose power. Switch
immediately to handset if on a call.
Base Unit Indicator Lights:
Yellow flashing every 5 seconds Base is on
Yellow flashing every 1 second Talk Time Mode Active
Red/yellow lights alternate, then red light stops Pairing successful
Green handset icon- front, left side Handset Mode (Talk Time not being used)
Yellow headset icon- front, right side Headset Mode (Talk Time being used)
No lighted icons showing Unit not receiving power
20
Page 21

FAQS / TROUBLESHOOTING
Why don't I hear a dial tone?
1. Make sure the headset is on (page 14)
2. Make sure headset is in Talk Time mode (you should see a headset icon
on the front, right side of the base).
3. Check all cord connections (page 10)
4. Make sure the phone’s handset is removed from the cradle or the line/headset
button has been pressed (headset ready phones only).
How long do I have to charge the headset before I can use it?
You should charge the headset for 4 consecutive hours before first use. After that,
the headset will continue to charge any time it is mounted in the base.
Can I still use my telephone features?
Yes, you can utilize your phone’s features as you normally would.
My battery seemed to last less time than expected. How do I remedy this?
If this happens, condition the battery by taking the headset off the base and putting
it into TalkTime mode (page 14). You should see the headset icon on the base.
Let the battery drain like this for 4 hours. Then place the headset back in the base
and charge again for 4 full hours. It’s not likely that you will need to do this more
than once.
Can I use the BlueParrott B200 headset with other Bluetooth devices?
Yes. Read the “Pairing” and “Compatibility” sections of this user guide.
Why do people have trouble hearing me?
Check microphone placement (page 13) or adjust microphone volume knob on the
base (page 15).
21
Page 22

USA FCC Part 15
FCC Notice to Users/Product Statements
This device complies with part 15 of the FCC rules. Operation is subject to the following two
conditions:
(1) This device may not cause harmful interference, and (2) This device must accept any interference received, including interference that may cause undesired operation.
Users are not permitted to make changes or modify the device in any way. Changes or modifications not approved by VXI Corporation will void the user’s authority to operate the equipment.
NOTE: This equipment has been tested and found to comply with the limits for a Class B digital device, pursuant to part 15 of the FCC Rules. These limits are designed to provide reasonable protection against harmful interference in a residential installation.
This equipment generates, uses and can radiate radio frequency energy and, if not installed
and used in accordance with the instructions, may cause harmful interference to radio communications. However, there is no guarantee that interference will not occur in a particular
installation. If this equipment does cause harmful interference to radio or television reception,
which can be determined by turning the equipment off and on, the user is encouraged to try
to correct the interference by one or more of the following measures:
• Reorient or relocate the receiving antenna.
• Increase the separation between the equipment and receiver.
• Connect the equipment into an outlet on a circuit different from that to which the receiver is
connected.
• Consult the dealer or an experienced radio/TV technician
for help.
The user must place the base at least 8” (20cm) or more from any personnel and must not be
co-loaded or operating in conjunction with any other antenna or transmitter in order to comply with FCC RF exposure requirements.
Canada
IC Notice to Users/Product Statements
Operation is subject to the following two conditions:
(1) This device may not cause interference and (2) This device must accept any interference,
including interference that may cause undesired operation of the device.
The term “IC:” before the certification/registration number only signifies that registration was
performed based on a Declaration of Conformity indicating that Industry Canada technical
specifications were met. It does not imply that industry Canada approved the equipment.
22
Page 23

VXI LIMITED WARRANTY
1. VXI warrants that your BlueParrott B200 system will be free from defects in material and
workmanship for two years from the date of purchase. If, during the first two years from
the date of purchase, your BlueParrott B200 system fails to work due to a defect in material
or workmanship, VXI will repair or replace the product, at its election, free of charge.
Without proof of purchase, the warranty period begins on the date of manufacture.
2. The foregoing limited warranty does not cover equipment failure attributable to accident,
improper operation, misuse, abuse, or any cause other than defects in the materials or
workmanship of VXI’s products.
3. VXI’s obligations under this warranty are limited to repair or replacement (at our option) of
any defective part returned to VXI, freight prepaid. Returned products require a Return
Authorization that may be obtained by calling customer service at 1-800-742-8588.
4. THIS LIMITED WARRANTY IS IN LIEU OF ALL OTHER WARRANTIES, EXPRESS OR IMPLIED,
INCLUDING THE IMPLIED WARRANTIES OF MERCHANTABILITY AND FITNESS FOR A PARTICULAR PURPOSE. Some jurisdictions do not permit the exclusion of implied warranties and the
foregoing exclusions may not apply to you.
5. In no event shall VXI be responsible for any other damages whatsoever, including direct,
indirect, special, incidental, consequential, or other damages for breach of this or any other
warranty, express or implied.
6. Products returned to VXI for in-warranty repairs, freight prepaid and with proper Return
Authorization, will be return shipped to the customer at VXI’s expense.
For customer service, please call:
VXI Corporation
1-800-742-8588 or 603-742-2888
Technical support is available on our website at: www.blueparrott.com
23
Page 24

A brand of VXI Corporation
One Front Street. Rollinsford, NH 03869
800-742-8588 I 603-742-2888
PN201953B
 Loading...