

Page 1
VXi Reveal Pro
™
Quick-Start Guide
Office
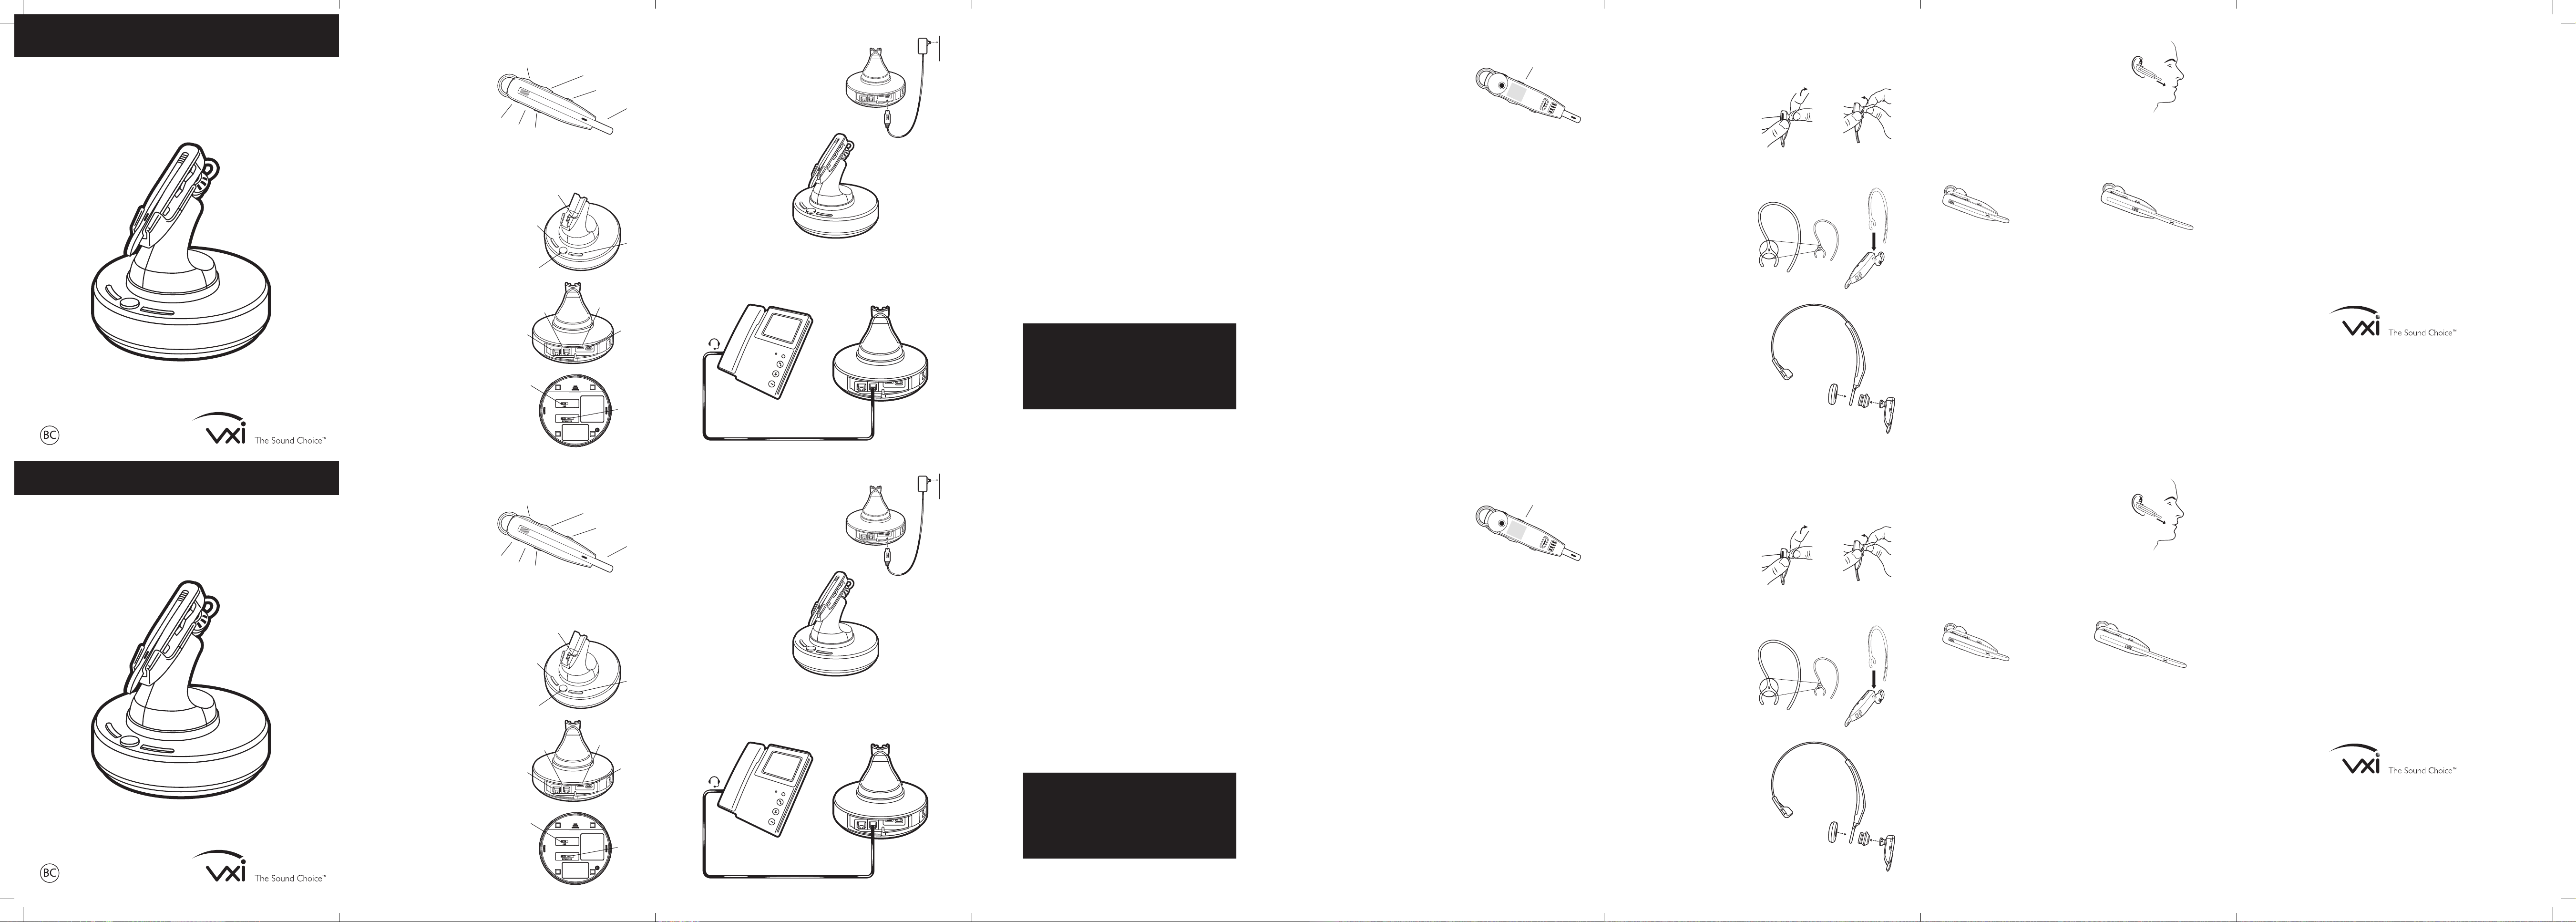
Reveal Pro Headset Features & Functions
A. Volume Up/Mute
B. Volume Down
C. Parrott Button™
D. Extendable Microphone Boom
E. On/Off Switch
F. Indicator Lights
G. Multifunction Button (MFB)
A
G
F
E
Reveal Pro Base Unit Features & Functions
Front
A. Headset Docking/Charging Cradle
B. PC Button/LED (function not applicable for
Reveal Pro Office version)
C. Multi-Function (MFB)/Pairing Button/MFB LED
D. Phone Button/LED
Back
A. EHS Interface Port
B. Telephone Interface Port
C. Micro-USB Port (for firmware updates)
D. Mini-USB Power Supply Port
Base
A. Compatibility Switch
B. Microphone (Tx) Gain Adjustment Switch
B
C
B
A
A
Desk Phone
Charge Headset on Base
B
C
D
A. Plug the mini-USB jack of the power
supply into the mini-USB port on the
back of the base unit and the other
end into a working power outlet.
B. Place the headset in the charging
cradle. A full charge takes less than
90 minutes.
Check Desk Phone Configuration/Make a Test Call
A. Set your desk phone volume to mid-range.
B. Check that the compatibility switch on the underside of the base is correct for
your phone. (Most phones use setting A, but many Cisco phones use setting B,
and many Avaya phones use setting C.)
C. Open the headset line on your desk phone, or remove the handset from the
cradle if you are connected to the handset port.
D. While wearing the headset, press the Multi–Function Button on the headset.
E. If you do not hear a dial tone (or tones) when pressing dial pad buttons, try the
other base compatibility switch settings until you do.
Cell Phone
Pair Headset to Cell Phone
NFC Pairing
1. Confirm that your cell phone is NFCcapable and that NFC is enabled.
2. Turn the headset on.
3. Place the NFC zone of your cell phone against
the NFC zone of the headset and hold them together
while your cell phone registers the headset.
4. Follow the prompts on your cell phone until it confirms pairing is successful.
NFC Zone
Wearing Options – Find Your Fit
The Reveal Pro Office wireless headset is supplied with a choice of wearing styles:
Ear Hook and Ear Buds
Choose your ear bud and attach as
shown below. The loop on the ear
bud should tuck into the back curve
of your ear. If it feels too loose or
tight, try a different size:
F. Dial a test call from the desk phone.
A
2) If additional microphone gain (speaking volume) is needed, you can adjust
this on the underside of the base. Position 8 gives you maximum gain.
Position 1 delivers minimum gain.
1) You can fine-tune the volume using the headset volume buttons.
D
Connect to Desk Phone
Note: For remote call control, use the VEHS accessory for your particular phone or
the L50 lifter. See vxicorp.com/accessories.
A. Connect the desk phone connection cable to the back of the base and the other
end to the headset port of the phone. If you do not have a headset port, you will
need to use the handset port.
C
D
Need More Help?
SET
B
Technical Support
www.vxicorp.com/support
Online User Guide
www.vxicorp.com/reveal-pro-office
Manual Pairing
1. Place the headset into pairing mode:
a. Power on the headset.
b. Press and hold the MFB for 5 seconds, until the light is flashing red and
blue. You will hear the voice prompt “Discovering.”
2. Place your cellphone into Bluetooth Search/Scan Mode per the
manufacturer’s instructions.
3. Select “VXi Reveal Pro” to pair. (Passcode is “0000” if needed.)
4. When connected, the headset will give you the voice prompt, “Your headset
is connected.”
Answer a Desk Phone Call While on a Cell Phone Call
Press the MFB on the headset once to end the cell phone call, and then press it
again to open the line to your desk phone. (Depending on how it is connected, you
may still need to lift the handset or press the desk phone headset button.)
Note: Use the same approach when answering a cell phone call while on a desk
phone call.
Rotate the ear bud on the headset
to position it. If desired, clip on one
of the optional ear hooks. Ear hooks
are configured for either left- or
right-ear wearing:
Headband or Behind-the-Neck
Remove the ear bud from the
headset.
Attach to headband as shown. Add
foam or rubber ear cushion. (The
behind-the-neck style uses the
same method.)
Headset Positioning
To get the best performance from our microphone
noise-canceling technology, angle the microphone
boom towards the corner of your mouth.
Positioning is important. Small adjustments in
microphone placement can improve performance.
Using the Headset in High-Noise Situations
The microphone boom is extendable for greater levels of noise cancellation in noisy
environments. Simply slide the boom in or out as needed.
For Normal Use
(Low-Noise Environment)
For Noisy Environments
VXi Corporation | 271 Locust Street, Dover, NH 03820 USA
USA Toll Free: 800-742-8588 | Phone: +1 603-742-2888
vxicorp.com
© 2016 VXi Corporation. All rights reserved.
Guide de démarrage rapide
™
du Reveal Pro
Office
Caractéristiques et fonctions de l’oreillette Reveal Pro
A. Volume +/Sourdine
B. Volume -
C. Parrott Button™
D. Tige de microphone télescopique
E. Interrupteur marche/arrêt
F. Voyants lumineux
G. Bouton multifonction (BMF)
A
G
F
E
B
Caractéristiques et fonctions de la base Reveal Pro
Face avant
A. Support d’oreillette/Socle de chargement
B. Bouton d’ordinateur/DEL (cette fonction
ne s’applique pas à la version Reveal Pro
Office)
C. Bouton multifonction (BMF)/Bouton de
jumelage/BMF DEL
D. Bouton de téléphone/DEL
Face arrière
A. Port d’interface EHS
B. Port d’interface de téléphone
C. Port micro USB (pour mises à
jour de micrologiciel)
D. Port d’alimentation mini USB
Base
A. Commutateur de compatibilité
B. Commutateur de réglage de puissance
du microphone (Tx)
A
A
B
C
B
A
PN 203815/APN 203826X
Téléphone de bureau
Chargement de l’oreillette sur la base
A. Branchez le connecteur mini USB de
C
D
D
C
D
l’alimentation dans le port mini USB
à l’arrière de la base et branchez
l’autre extrémité dans une prise
d’alimentation fonctionnelle.
B. Installez l’oreillette sur le socle
de chargement. L’appareil sera
complètement chargé en moins
de 90 minutes.
Connexion au téléphone de bureau
A. Branchez le câble de connexion du téléphone de bureau à l’arrière de la base
et l’autre extrémité au port de l’oreillette du téléphone. S’il n’y a pas de port
d’oreillette, utilisez le port du combiné.
Vérification de la configuration du téléphone de bureau / Appel d’essai
A. Réglez le volume de votre téléphone de bureau à l’intensité moyenne.
B. Vérifiez que le commutateur de compatibilité situé sous la base convient à votre
téléphone. (La plupart des marques de téléphone utilisent le réglage A; toutefois
plusieurs téléphones Cisco utilisent le réglage B et plusieurs téléphones Avaya,
le réglage C.)
C. Ouvrez la ligne de l’oreillette sur votre téléphone de bureau, ou retirez le
combiné du socle si vous êtes connecté au port du combiné.
D. Portez l’oreillette et appuyez sur le bouton multifonction de celle-ci.
E. Si vous n’entendez pas une ou des tonalités lorsque vous appuyez sur
les boutons du clavier de composition, essayez les autres réglages du
commutateur de compatibilité jusqu’à ce que vous entendiez une ou des
tonalités.
F. Faite un appel d’essai à partir de votre téléphone de bureau.
1) Vous pouvez régler le volume à l’aide des boutons de volume de l’oreillette.
2) Pour augmenter davantage la puissance du microphone (volume de la voix),
vous pouvez effectuer ce réglage sous la base. Le réglage 8 vous donnera
la puissance maximale. Le réglage 1 correspond à la puissance minimale.
Remarque : Pour le contrôle des appels à distance, utilisez l’accessoire VEHS
qui convient au téléphone que vous utilisez ou le système de décrochage L50.
Consultez vxicorp.com/accessories.
Téléphone cellulaire
Jumelage de l’oreillette à un téléphone cellulaire
Jumelage CCP
1. Confirmez que votre téléphone cellulaire
est compatible en CCP (NFC) et que la
CCP est activée.
2. Mettez l’oreillette en marche.
3. Appuyez la zone CCP de votre téléphone cellulaire
contre la zone CCP de l’oreillette et maintenez-les l’une contre l’autre
pendant que votre téléphone enregistre l’oreillette.
4. Suivez les messages vocaux de votre téléphone jusqu’à ce que le jumelage
soit confirmé.
Jumelage manuel
1. Mettez l’oreillette en mode de jumelage :
a. Mettez l’oreillette en marche.
b. Appuyez sur le bouton BMF pendant 5 secondes, jusqu’à ce que
le témoin clignote en rouge et bleu. Vous entendrez le message «
Discovering » (détection).
2. Mettez votre téléphone cellulaire en mode Bluetooth Recherche/Balayage,
selon les instructions du fabricant.
3. Sélectionnez « VXi Reveal Pro » pour le jumeler. (Si nécessaire, le mot de
passe est 0000.)
4. Une fois connectée, l’oreillette fera entendre le message « Your headset is
connected » (votre oreillette est connectée).
Zone CCP
Solutions de port - Trouvez ce qui vous convient
L’oreillette sans fil Reveal Pro Office offre un choix de styles de port :
Tour d’oreille et écouteurs bouton
Un écouteur bouton avec anneau
de taille moyenne est déjà fixé à
l’oreillette. L’anneau de l’écouteur
bouton doit s’ajuster sur la courbe
arrière de votre oreille. S’il vous
semble trop serré ou lâche, essayez
une autre taille :
Faites tourner l’écouteur bouton
sur l’oreillette pour le mettre en
place. Au besoin, utilisez un des
tours d’oreille offerts en option. Les
tours d’oreille sont conçus pour être
portés sur l’oreille gauche ou sur
l’oreille droite :
Arceau ou tour de cou
Positionnement de l’oreillette
Pour tirer le meilleur parti de notre technologie de
réduction du bruit, courbez le microphone vers la
commissure des lèvres.
Ce positionnement est très important. De petits
ajustements dans l’orientation du microphone
peuvent améliorer le rendement de l’appareil.
Utilisation de l’oreillette dans un environnement bruyant
La tige du micro est télescopique pour mieux atténuer les bruits parasites dans les
environnements bruyants. Il suffit de faire sortir la tige ou de la rétracter au besoin.
Utilisation normale
(environnement peu bruyant)
Dans un environnement
bruyant
Retirez l’écouteur bouton de
SET
Besoin d’aide supplémentaire?
Assistance technique
www.vxicorp.com/support
Guide d’utilisation en ligne
B
www.vxicorp.com/reveal-pro-office
Prise d’appel en provenance du téléphone de bureau durant un appel sur le
cellulaire
Appuyez une fois sur le bouton BMF de l’oreillette pour terminer la communication
avec le téléphone cellulaire, et appuyez une fois de plus pour ouvrir la ligne de
votre téléphone de bureau. (Selon le type de connexion, il vous faudra peut-être
décrocher le combiné ou appuyer sur le bouton de l’oreillette du téléphone de
bureau.)
Remarque : Procédez de la même façon pour répondre à un appel entrant du
cellulaire lorsque vous êtes en cours d’appel sur votre téléphone de bureau.
l’oreillette.
Fixez celle-ci à l’arceau comme
illustré. Ajoutez un coussinet d’oreille
en mousse ou en caoutchouc.
(Procédez de la même façon pour
utiliser le tour de cou.)
VXi Corporation | 271 Locust Street, Dover, NH 03820 USA
Numéro sans frais : 800-742-8588 | Téléphone : +1 603-742-2888
vxicorp.com
© 2016 VXi Corporation. Tous droits réservés.
PN 203815/PN 203676/APN 203826X
05/16
05/16
203826X_Reveal_Pro_Office_Quick-Start_Guide_EN-FR-ES-DE_052016.indd 1-8 5/20/16 1:15 PM
Page 2

VXi WARRANTY STATEMENT
The transmitter must not be co-located or operated in conjunction with any other antenna or transmitter. This equipment
complies with the FCC RF radiation exposure limits set forth for an uncontrolled environment. This equipment should be
installed and operated withaminimum distance of 20cm between the radiator and any part of your body.
(1) VXi warrants that your product will be free from defects in material and workmanship for one year from the date of
purchase. If, during the first year from the date of purchase, your product fails to work due to a defect in material or
workmanship, VXi will repair or replace th e product, at its election, free of charge. Without proof of purchase, the
warranty period begins on the date of manufacture. Consumable components (for example, cushions, battery and fuse)
are not included in this one-year warranty. (2) The foregoing limited warranty does not cover equipment failure
attributable to accident, improper operation, misuse, abuse, or any cause other than defects in the materials or
workmanship of VXi’s products. (3) VXi’s obligations under this warranty are limited to repair or replacement (at our
option) of any defective part returned to VXi at the customer’s expense. Returned products require a Return
Authorization that may be obtained by calling
under this warranty willbereturn shipped to the customer at VXi’s expense. (4) THIS LIMITED WARRANTY
IS IN LIEU OF ALL OTHER WARRANTIES, EXPRESSED OR IMPLIED, INCLUDING THE IMPLIED WARRANTIES OF
MERCHANTABILITY AND FITNESS FOR A PARTICULAR PURPOSE. Some jurisdictions do not permit the exclusion of
implied warranties and the foregoing exclusions may not apply to you. (5) In no event shall VXi be responsible for any
other damages whatsoever, including direct, indirect, special, incidental, consequential, or other damage s for breach of
this or any other warranty,expressed or implied.
603-742-2888
or visiting
vxicorp.com
. Products returned to VXi for repair
FCC NOTICE TO USERS
This device complies with part 15 of the FCC rules. Operation is subject to the following two conditions: (1) This device
may not cause harmful interference, and (2) This device must accept any interference received, including interference
that may cause undesired operation. Users are not permittedto make changes or modify the device in any way. Changes
or modifications not approved by VXi Corporation will void the user’s authority to operate the equipment. NOTE: This
equipment has been tested and foundto comply with the limitsfor a Class B digital device pursuant to part 15 of the FCC
rules. These limits are designed to provide reasonable protection against harmful interference in a residential installation.
This equipment generates, uses and can radiate radio frequency energy and, if not installed and used in accordance with
the instructions, may cause harmful interference to radiocommunications.However,thereisnoguaranteethat
interference will not occur in a particular installation. If this equipment does cause harmful interference to radio or
television reception, which can be determined by turning the equipment on and off, the user is encouraged to try to
correct the interferencebyone or more of the following measures:
– Reorient or relocate the receiving antennae.
– Increase the separation between the equipment and the receiver.
– Connect the equipment into an outlet on a circuit different from that to which the receiver is connected.
– Consult the dealer or an experienced radio/TV technician for help.
IC NOTICE TO CANADIAN USERS
This device complies with Industry Canada license-exempt RSS standard(s). Operation is subject to the following two
conditions: (1) This device may not cause interference, and (2) This device must accept any interference, including
interference that may cause undesired operation of the device. This device complies with RSS-310 of Industry Canada.
Operation is subject to the condition that this device does not cause harmful interference. This Class B digital apparatus
complies with Canadian ICES-003(Cet appareil numérique de la Classe B conforme à la norme NMB-003 du Canada).
CE NOTICE TO USERS
Hereby, VXi Corporation declares that this productis in compliance with the essentialrequirements and other relevant
provisions of Directive1999/5/EC.
271 LocustStreet | Dover,NH 03820 |Toll Free: (800)742-8588 | Phone:(603) 742-2888| vxicorp.com
© 2014VXi Corporation. All rightsreserved. APN 203601A 06/14
DECLARACIÓNDE GARANTÍA DE VXI
(1) VXi garantiza que su producto no presentará defectos de materiales ni de mano de obra por un año a partir de la
fecha de compra. Si, durante el primer año a partir de la fecha de compra, su producto no funcionara por un defecto de
materiales o de mano de obra, VXi reparará o sustituirá, a suelección, el producto de forma gratuita. Sin el comprobante
de compra, el período de garantía se inicia en la fecha de fabricación. Los componentes fungibles (por ejemplo,
almohadillas, baterías y fusibles) no están incluidosen esta garantía de un año. (2) La garantíalimitada anterior no cubre
fallas del equipo atribuibles a accidentes, operación inadecuada, uso indebido, abusooacualquierotromotivodistinto
de los defectos de materiales o mano de obra. (3) La obligación de VXi de conformidad con esta garantía se limita a la
reparación o sustitución(a elección de la empresa) de cualquier pieza defectuosa devuelta a VXi a cuenta del comprador.
Los productos devueltos deben contar con un número de Autorización de devolución que se puede obtener llamando al
603- 742-2888 o visitando el sitio vxicorp.com. Los productos devueltos a VXi para su reparación de conformidad con la
presente garantía serán enviados al cliente a cargo de VXi. LA PRESENTE GARANTÍA LIMITADA
SUSTITUYE A CUALQUIER OTRA GARANTÍA EXPRESA O IMPLÍCITA, INCLUSO A LAS GARANTÍAS IMPLÍCITAS
DE COMERCIABILIDAD E IDONEIDAD PARA UN FIN ESPECÍFICO. Algunas jurisdicciones no permiten laexclusión de
las garantías implícitas, por lo tanto, es posible que las exclusiones anteriormente mencionadas no se apliquen en su
caso. (5) En ningún caso VXi asumirá responsabilidad por cualquier otro tipo de daños, ya sean indirectos, especiales,
incidentales, consecuentes u otros daños derivados por incumplimiento de ésta u otra garantía expresa o implícita.
AVISO DE LA FCC A LOS USUARIOS
Page 3

Este dispositivo cumple con la parte 15 de las reglas de la FCC. El funcionamiento está sujeto a las dos condiciones
siguientes: (1) Este dispositivo no debe causar interferencias dañinas y (2) Este dispositivo debe aceptar cualquier
interferencia recibida, incluso aquellas que pudieran causar un funcionamiento no deseado. Los usuarios no están
autorizados a realizar cambios ni modificar el dispositivo de manera alguna. Todo cambio o modificación que no cuente
con la aprobación de VXi Corporation anulará la autorización para operar el equipo otorgada al usuario. NOTA: Este
equipo ha sido probado y se ha determinado que cumple con límites para dispositivos digitales Clase B de conformidad
con la parte 15 de las reglas de la FCC. Estos límites tienen por finalidad ofrecer una protección razonable contra
interferencias dañinas en una instalación residencial. Este equipo genera, usa y puede emitir energía de radiofrecuencia
y, si no es instalado y utilizado de conformidad con las instrucciones, podría causar interferencias dañinas a las
comunicaciones de radio. Sin embargo, no se garantiza que esa interferencia no se produzca en una instalación
determinada. Si este equipo causa interferencia dañina a la recepción de radio o televisión, que se puede determinar
encendiendo y apagando el equipo, se aconseja al usuario intentar corregir la interferencia tomando alguna de las
siguientes medidas:
– Reoriente o reubique la antena receptora.
– Aumente la distanciaentre el equipo y el receptor.
– Conecte el equipo a un tomacorriente o circuito diferente del utilizado por el receptor.
– Solicite ayuda a su distribuidor o a un técnico especializadoen radio y TV.
AVISO DE IC A LOS USUARIOS DEL CANADÁ
Este dispositivo cumple con la(s) norma(s) RSS de exención de licencia de Industry Canada. El funcionamiento está
sujeto a las dos condiciones siguientes: (1) Este dispositivo no debe causar interferencias dañinas y (2) Este dispositivo
debe aceptar cualquier interferencia recibida, incluso aquellas que pudieran causar un funcionamiento no deseado del
equipo. Este dispositivo cumple con la norma RSS-310 de Industry Canada. El funcionamiento está sujeto a la condición
de que este dispositivo no cause interferencias dañinas. Este aparato digital Clase B cumple con la norma ICES-003 de
Canadá (Cet appareil numérique de la Classe B conforme à la norme NMB-003 du Canada).
AVISO CE PARA LOS USUARIOS
Por el presente, VXi Corporation declara que este producto cumpleconlos requisitos esenciales y otras disposiciones
pertinentes de la Directiva1999/5/CE.
271 Locust Street|Dover, NH 03820 | Teléfono:+1603 742-2888 | vxicorp.com
© 2014VXi Corporation. All rightsreserved. APN 203601A-ES 06/14
 Loading...