

VWR International VWR 10, VWR 300, VWR 1200, VWR 20, VWR 8x20 Instruction Manual
...
VWR® ELECTRONIC PIPETTE
INSTRUCTION MANUAL
North American Catalog Numbers
10827-884
VWR ELECTRONIC PIPETTE 10µL
10827-918
VWR ELECTRONIC PIPETTE 20µL
10827-920
VWR ELECTRONIC PIPETTE 300µL
10827-922
VWR ELECTRONIC PIPETTE 1200µL
10827-924
VWR ELECTRONIC PIPETTE 8X10µL
10827-926
VWR ELECTRONIC PIPETTE 8X20µL
10827-928
VWR ELECTRONIC PIPETTE 8X300µL
10827-930
VWR ELECTRONIC PIPETTE 8X1200µL
10827-932
VWR ELECTRONIC PIPETTE 12X10µL
10827-934
VWR ELECTRONIC PIPETTE 12X20µL
10827-936
VWR ELECTRONIC PIPETTE 12X300µL
10827-938
VWR ELECTRONIC PIPETTE 12X1200µL
European Catalog Numbers:
613-5415
VWR ELECTRONIC PIPETTE 10µL
613-5416
VWR ELECTRONIC PIPETTE 20µL
613-5417
VWR ELECTRONIC PIPETTE 300µL
613-5418
VWR ELECTRONIC PIPETTE 1200µL
613-5419
VWR ELECTRONIC PIPETTE 8X10µL
613-5420
VWR ELECTRONIC PIPETTE 8X20µL
613-5421
VWR ELECTRONIC PIPETTE 8X300µL
613-5422
VWR ELECTRONIC PIPETTE 8X1200µL
613-5423
VWR ELECTRONIC PIPETTE 12X10µL
613-5424
VWR ELECTRONIC PIPETTE 12X20µL
613-5425
VWR ELECTRONIC PIPETTE 12X300µL
613-5426
VWR ELECTRONIC PIPETTE 12X1200µl
2
Version: 1
Issued: 02/18/2016
United States
Europe
VWR International, LLC
VWR International bvba
100 Matsonford Rd
Researchpark Haasrode 2020
Radnor, PA 19087
Geldenaaksebaan 464
800-932-5000
B-3001 Leuven
http://www.vwr.com
+ 32 16 385011
http://be.vwr.com
Country of origin: FRANCE
Intended use :
VWR® ELECTRONIC PIPETTE is intended to be used in liquid handling applications for dispensing
liquids in volume range of 0.5 μl to 1200 µl.
This liquid handling device is designed and manufactured to be used as general purpose laboratory
equipment. Before operating it is recommended to read the user manual, which contains useful
information e.g. for good pipetting practice.

3
Table of Contents
Page
1 - INTRODUCTION 4
2 - PARTS CHECK LIST AND ACCESSORIES 5
3 - GETTING STARTED 6
4 - DESCRIPTION 6
5 - PIPETTING 8
6 - PIPETTING MODES 8
7 - PIPETTING SPEED CONTROL 14
8 - GUIDELINES FOR GOOD PIPETTING 14
9 - PERSONALIZE YOUR VWR ELECTRONIC PIPETTE 16
10 - GOOD LABORATORY PRACTICE FEATURES 17
11 – VWR ELECTRONIC PIPETTE POWER MANAGEMENT 17
12 - CONFIGURATION 19
13 - MAINTENANCE OF YOUR VWR ELECTRONIC PIPETTE 20
14 - CLEANING AND DECONTAMINATION 25
15 - LEAK TEST 27
16 - TROUBLESHOOTING 28
17 - SPECIFICATIONS 28
18 - SAFETY PRECAUTIONS AND LIMITATIONS OF USE 29
19 - REPLACEMENT PARTS 31
APPENDICES 32:
Appendix 1: Example of a performance check 32
Appendix 2: Z Factor 33
Appendix 3: Evaporation Loss 34
Appendix 4: VWR Protocol Builder Software 34
WARRANTY 53
4
1 INTRODUCTION :
Ease-of-use: Only 2 buttons and 5 pipetting modes
including the CUSTOM Mode which allows to create
pipetting protocols easily and rapidly
Advanced Ergonomics: Lightweight and Perfectly
Balanced, it requires virtually no force to
significantly reduce RSI
Fully Motorized Piston Drive: For an even and regular sample delivery across each
channel
Large Volume range: 4 single channels (from 0.5 μL to 1200 µL) and 8 multichannels
(from 0.5 μL to 1200 μL)
Use while Charging: VWR Electronic Pipette can be used while charging without
compromising performance
VWR Two-Year Warranty
Ideal Electronic pipette with outstanding performances in all pipetting modes. VWR Electronic
pipette requires virtually no force to aspirate and dispense samples and significantly reduces RSI
(Repetitive strain injury) associated with routine work. It combines superior accuracy, precision
and robustness with advanced ergonomics design: it fits comfortably in either left or right hand
and allows a 360° rotating manifold. This pipette is a unique electronic pipette as easy to use as a
mechanical one. With only two buttons to enable the pipette and reach modes/functions: The
Push-Button to set the volume by turning the button left or right and pipette with a simple push and
the Mode-Button to access the 5 essential pipetting modes and pipettes functions. The VWR
electronic pipette has an intuitive interface with 5 available modes: PIPET, REPETITIVE, MIX,
REVERSE and CUSTOM Mode into which you can create, quickly and easily, specific protocols
thanks to VWR Protocol Builder Software .
Choose from a wide range of electronic pipettes covering volumes from 0.5 µL to 1200 µL in
single channel and in multichannel versions - all engineered to optimize your pipetting tasks.
5
2 PARTS CHECK LIST AND ACCESSORIES:
Contents:
Take a moment to verify that the following items are in the box:
• VWR Electronic Pipette
• Power Supply 5V with AC adapter and cable
• 4 Battery side tags
• Lubricant (except for 10µl and the multichannel models)
• Tip-ejector extension (10µl model only)
• Quick Start Guide
• Certificate of conformity
• 2-year warranty
Accessories:
Catalog Number
The following items are sold separately:
US
Europe
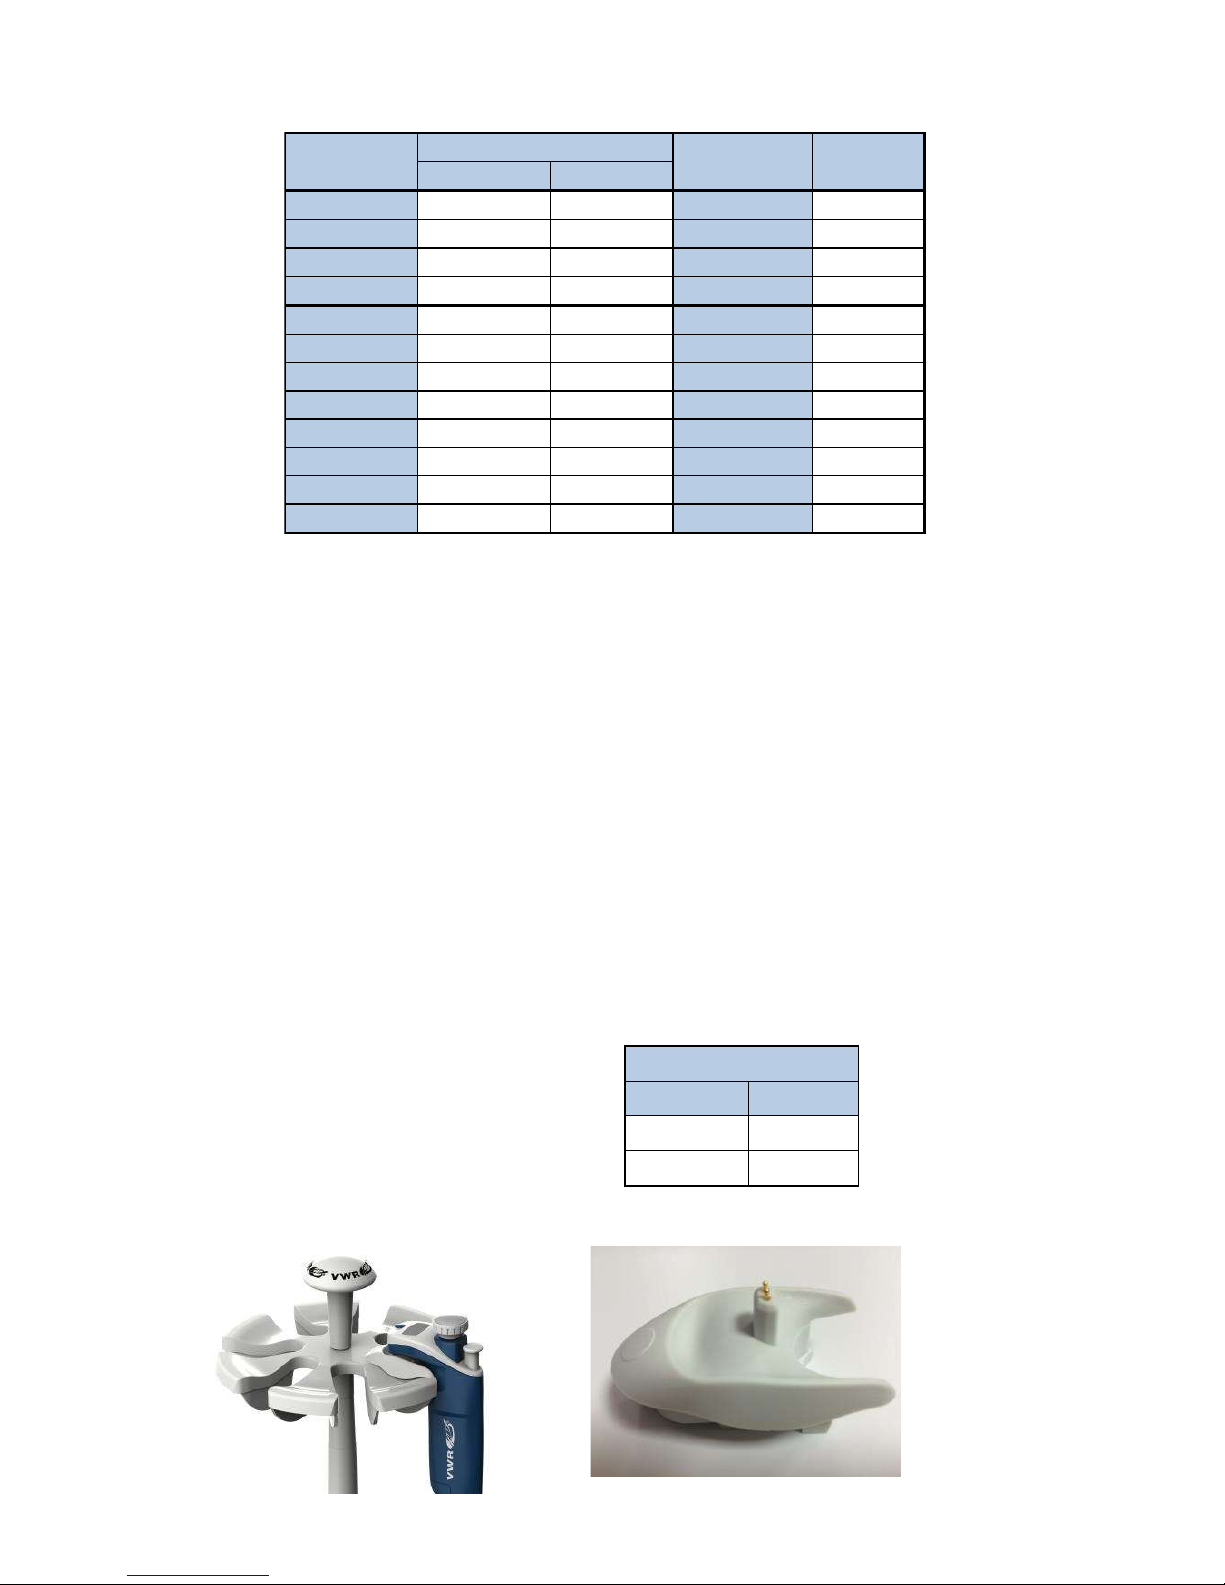
• VWR CARROUSEL PIPETTE STAND
10827-940
613-5427
• VWR CHARGING STAND ADAPTER WHITE
10827-942
613-5428
US Europe
VWR 10 10827-884 613-5415 0,5-10µl Red
VWR 20 10827-918 613-5416 2-20µl Pale Yellow
VWR 300 10827-920 613-5417 20-300µl Green
VWR 1200 10827-922 613-5418 100-1200µl Blue
VWR 8x10 10827-924 613-5419 0,5-10µl Red
VWR 8x20 10827-926 613-5420 1-20µl Pale Yellow
VWR 8x300 10827-928 613-5421 10-300µl Green
VWR 8x1200 10827-930 613-5422 50-1200µl Blue
VWR 12x10 10827-932 613-5423 0,5-10µl Red
VWR 12x20 10827-934 613-5424 1-20µl Pale Yellow
VWR 12x300 10827-936 613-5425 10-300µl Green
VWR 12x300 10827-938 613-5426 50-1200µl Blue
Model
Catalog Number
Volume range
Color code
6
3 GETTING STARTED
Switch on your VWR Electronic Pipette:
Press the Push-button to activate the pipette. The start-up screen
appears:
The pipette will do a self-calibration test, the firmware resets
the piston.
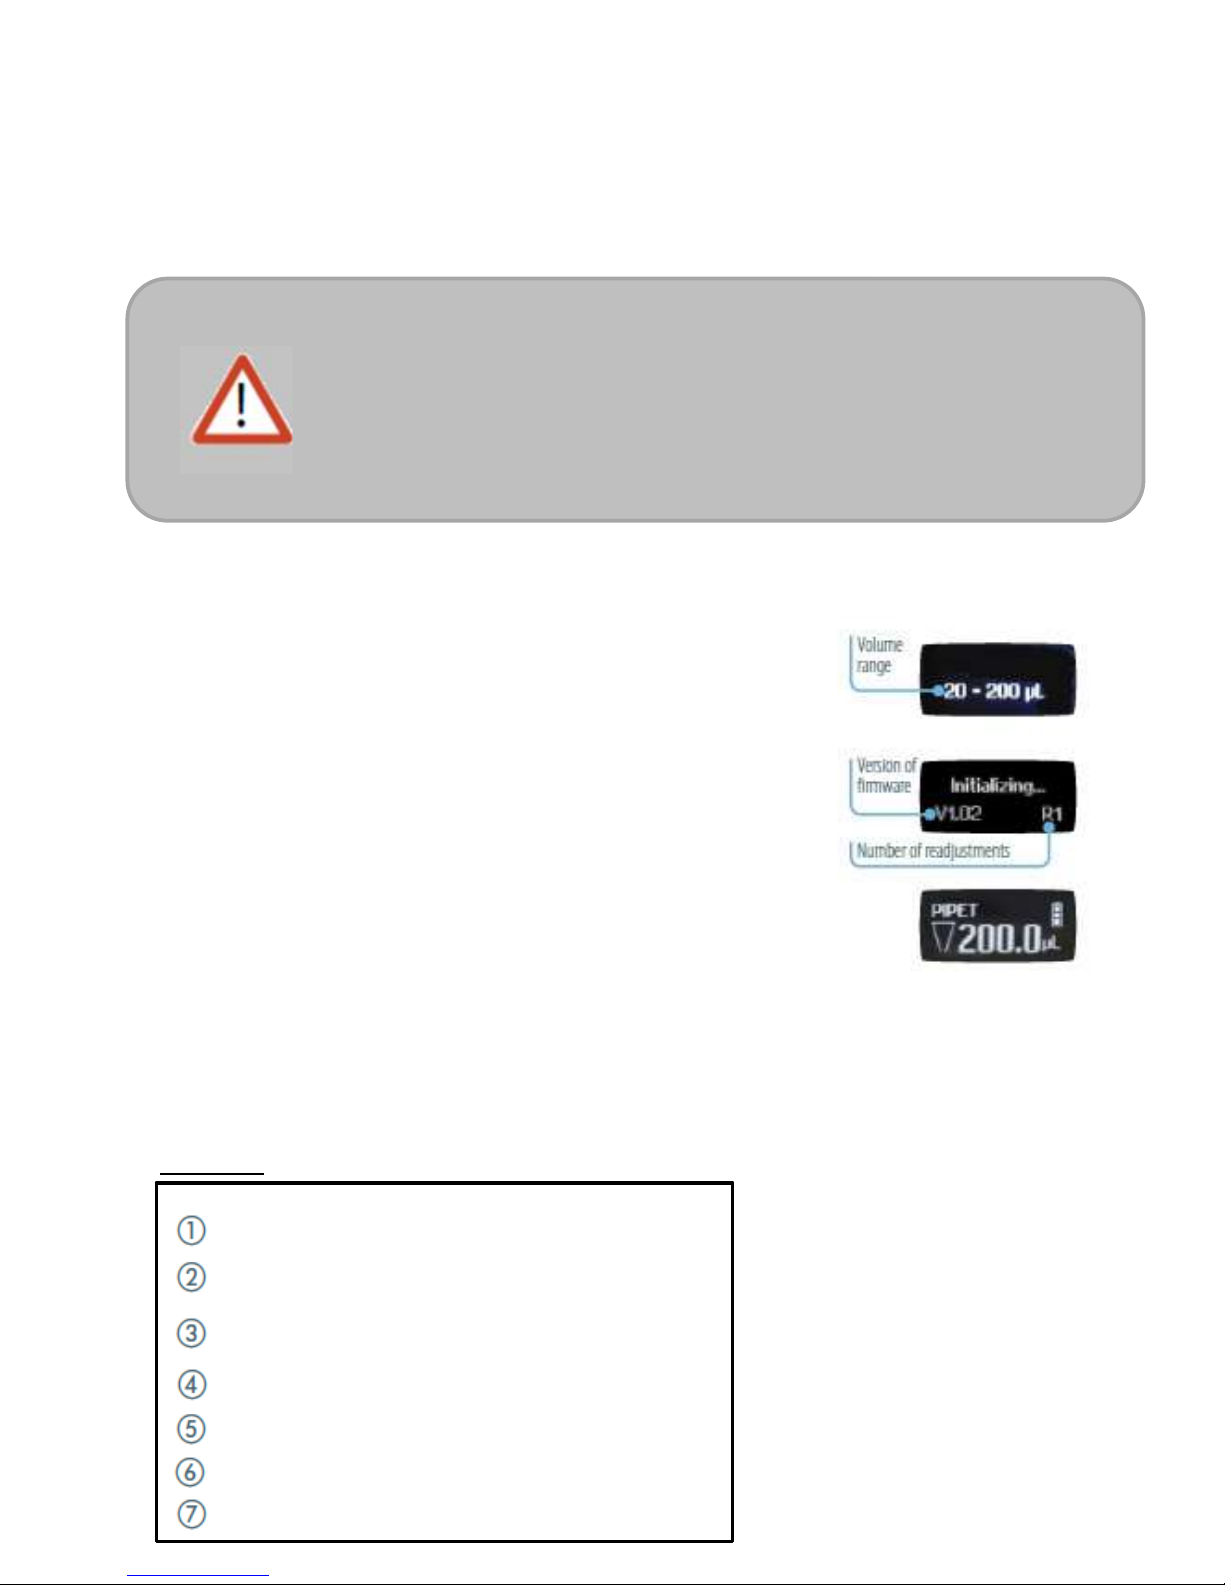
During initialization, displayed on the screen, you will see the
volume range,version of firmware and the number of readjustments.
Your VWR Electronic Pipette is preset on PIPET mode and is now
ready to pipette (see Chapter 5).
VWR Electronic Pipette goes into sleep mode after 3 minutes
of inactivity. The display will shut off.
Just press the Push-button to reactivate the pipette, your last setting
and pipetting mode will appear on the screen.
4 DESCRIPTION
VWR Electronic Pipette single and multichannel models:
Upper part:
VWR Electronic Pipette is provided with a minimal battery charge. Before
using it, we strongly recommend you to fully charge the battery. VWR
Electronic pipette charges 80 % of its full battery capacity in less than an hour;
it takes three hours to fully charge the battery.
Please refer to VWR Electronic pipette power management for charging
procedure.
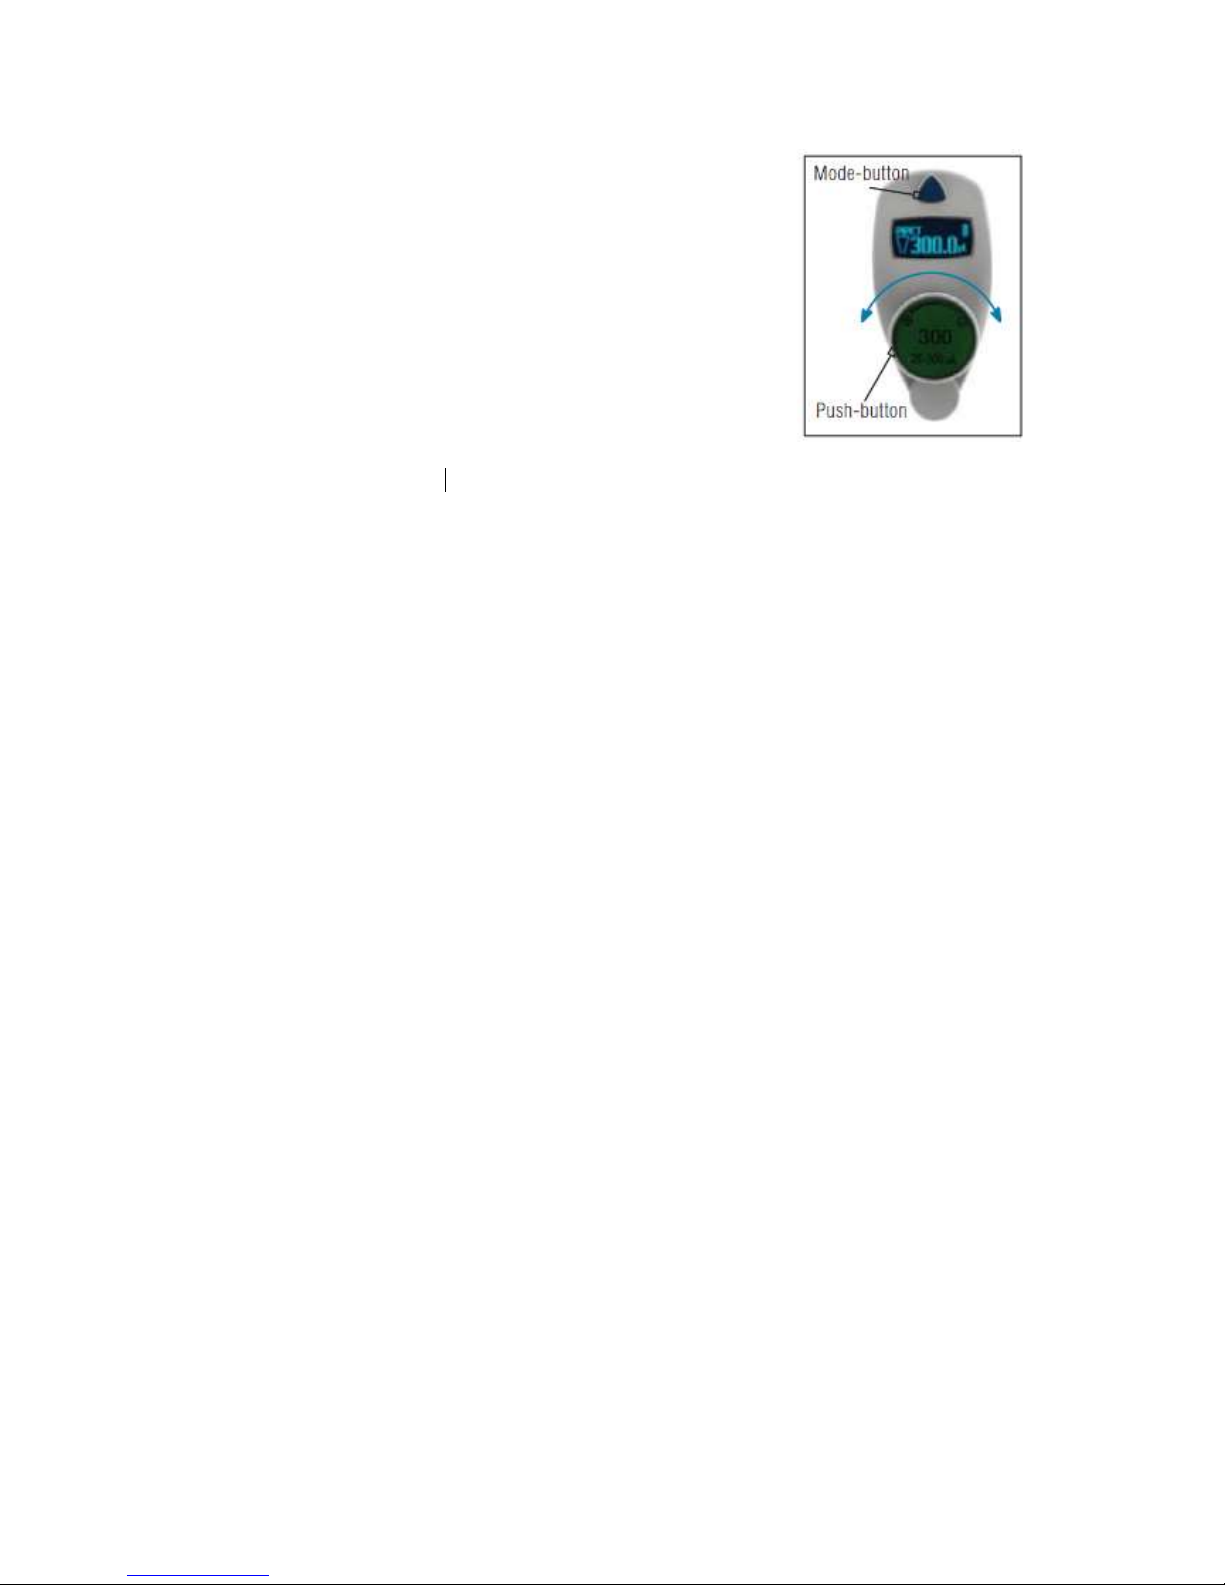
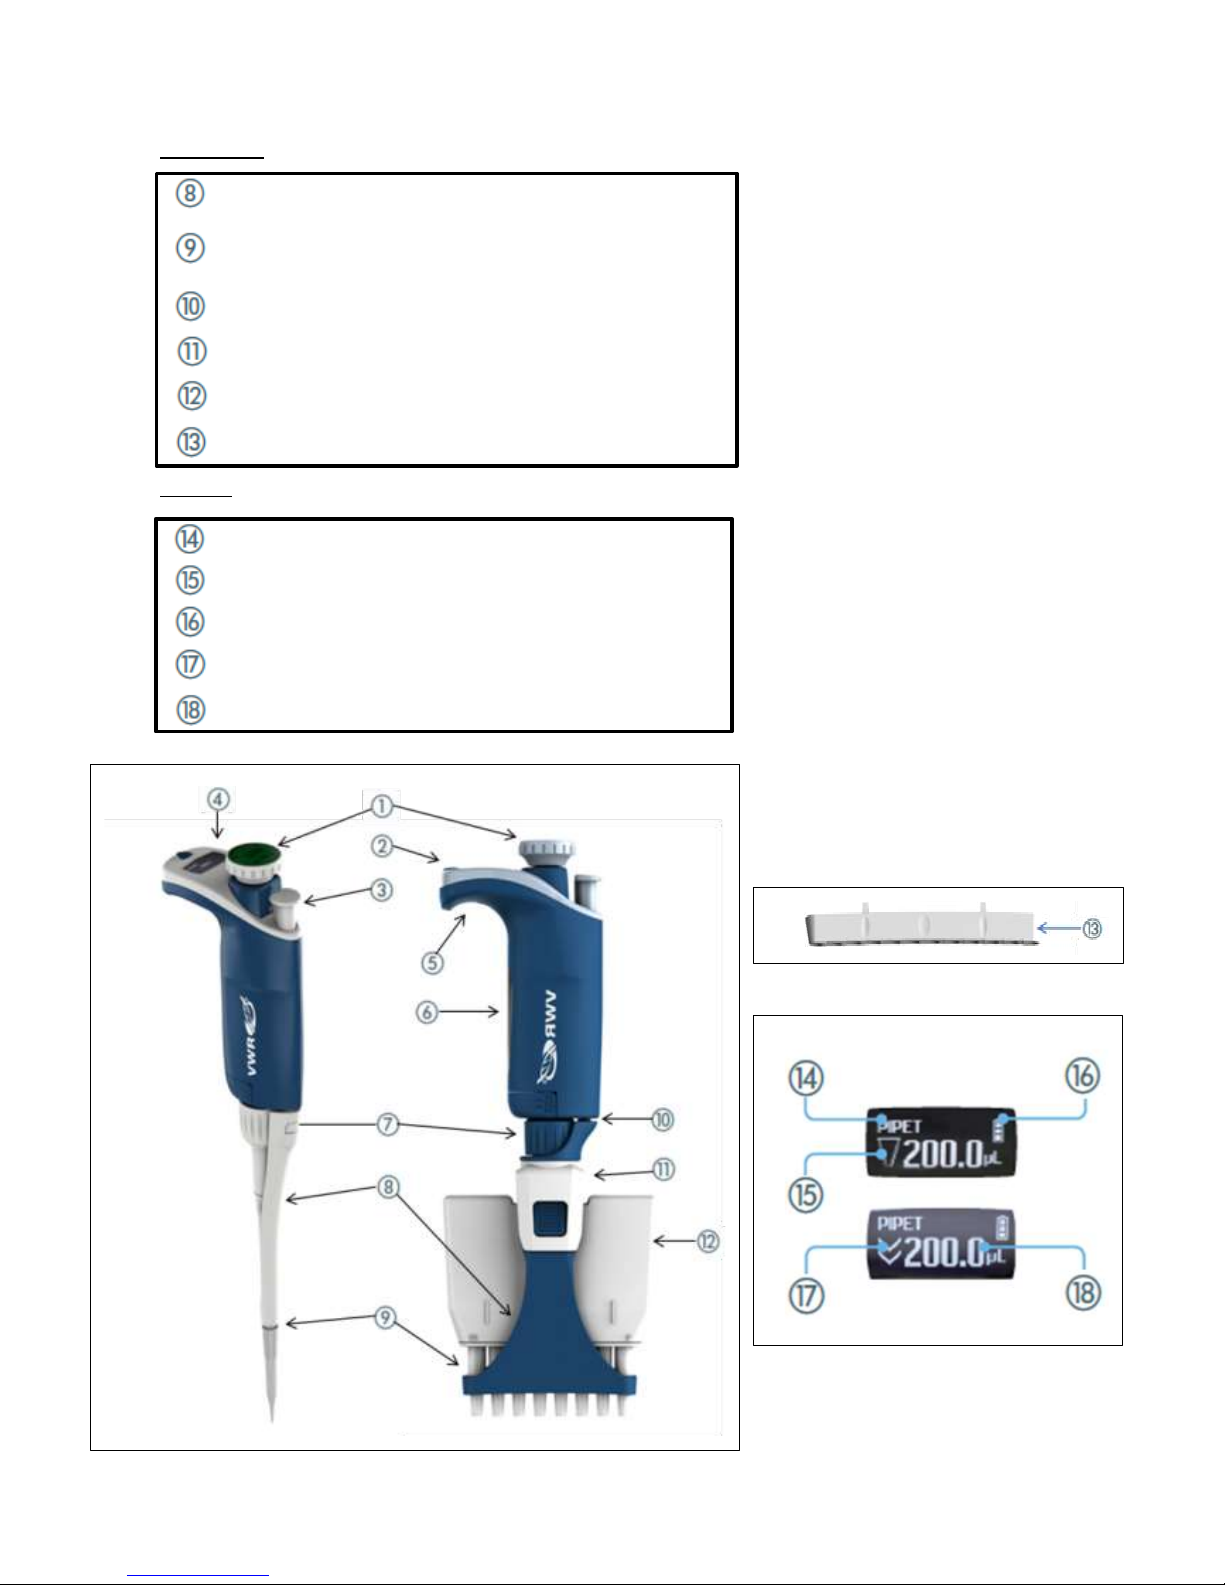
Push-button and volume adjustment knob
Mode-button: direct access to all menu functions
Tip-ejector button
Display
Elastomer plug to cover the battery charging port
Identity-tag window
Connecting nut – attaches handle to lower part
7
Lower part:
Screen:
Tip-ejector: removable access to tip-holder
Optimized tip-holder to reduce tip fitting and ejection forces,
removable for cleaning and servicing
Ejector clip
Ejector support
Cover
Ejector spacer (only for Multi 1200µl)
Pipetting Mode
Aspirate and dispense indicator
Battery status
Purge indicator
Volume
8
Reset: To reset your pipette, simultaneously press on the Push-button and the Mode-button for at
least 5 seconds.
Switch off: To switch off your VWR Electronic Pipette, press the Push-button for at least 5 sec.
Display: The VWR Electronic Pipette display is an OLED screen. It shows the current mode and
operation step, pipetting volume, battery indicator and piston status (aspirated and dispensed
volume) in real time.
Warning messages appear in the place of volume.
5 PIPETTING
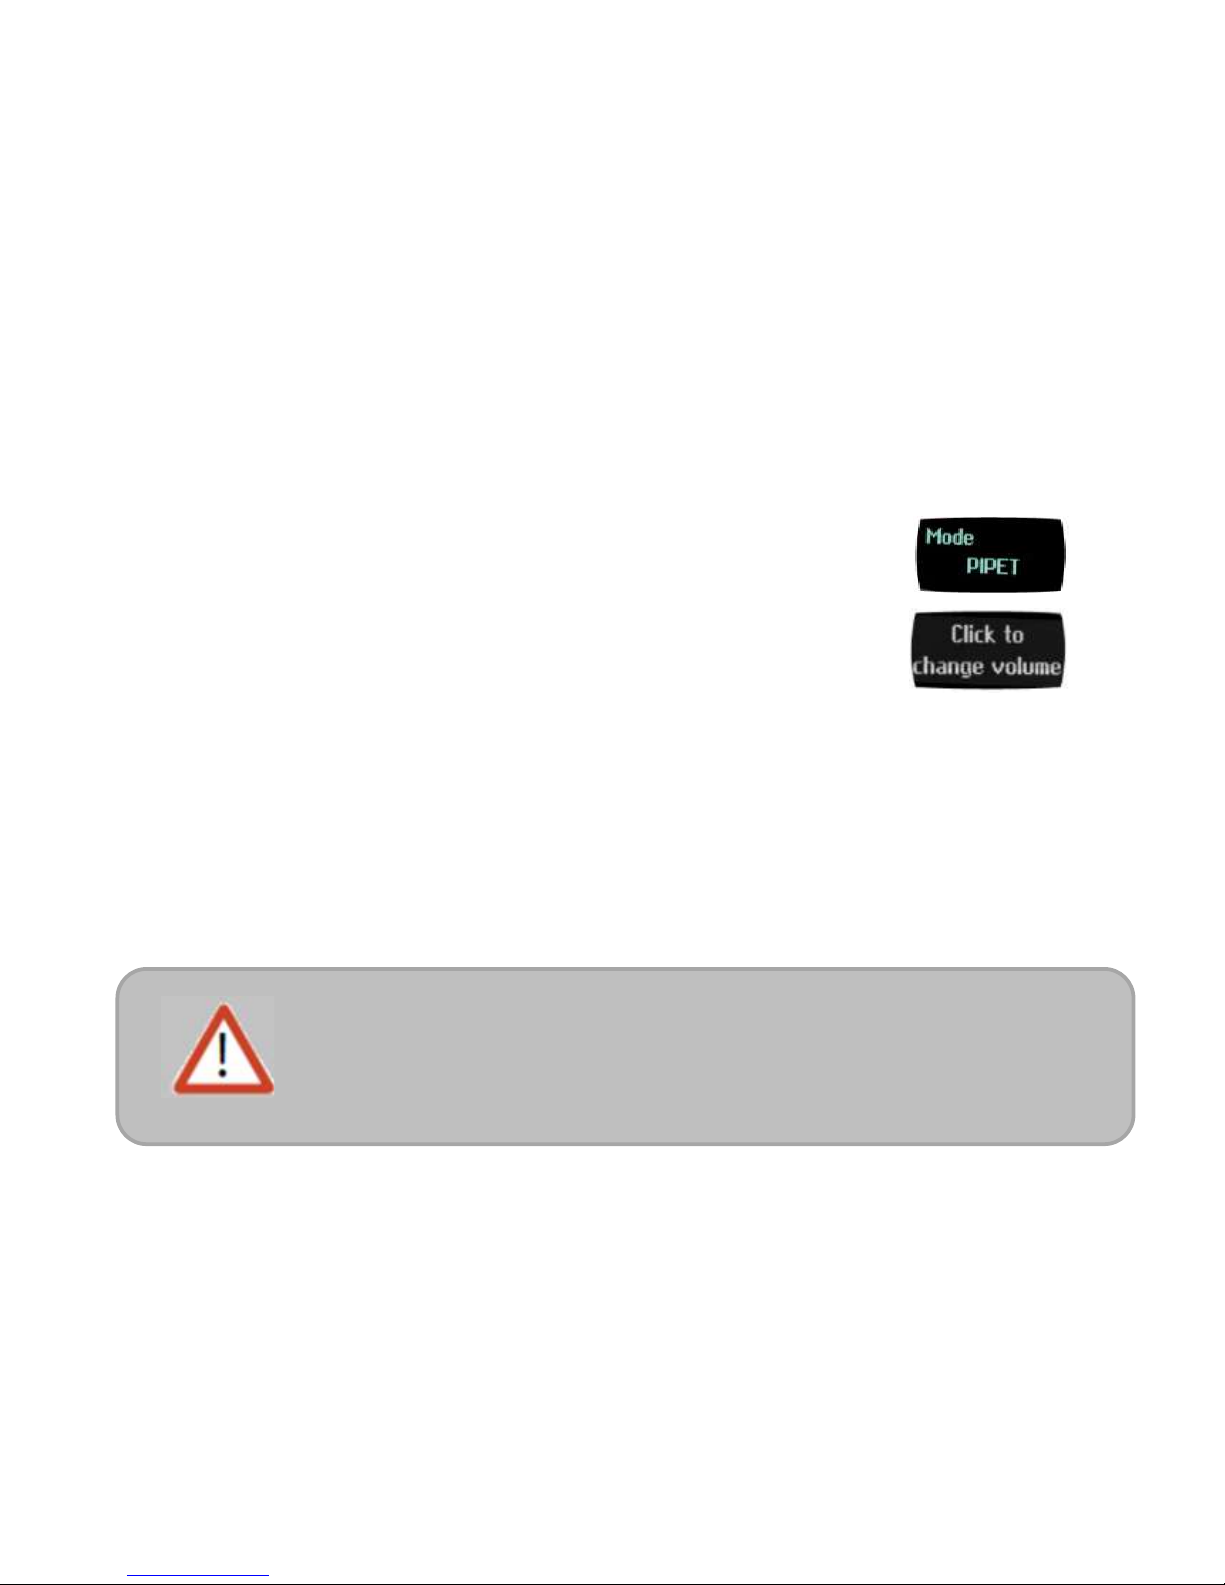
Your VWR Electronic Pipette is set by default on “PIPET Mode”, that means forward pipetting.
You can select a volume and start to pipette.
Switch on
Press Push-button.
Adjust the volume setting
• Hold your VWR electronic pipette in pipette position.
• Turn the Push-button half way (quite quickly), the screen will display:
“click to change volume”
• Now press the Push-button; the volume on the display will start blinking, you can now adjust the
volume:
• Turn the Push-button either clockwise to decrease volume or counter clockwise to increase
volume, like indicated on the button.
• Press the Push-button one time when finished. The volume is locked.
You are ready to pipette!
6 PIPETTING MODES
VWR Electronic Pipette offers essential pipette modes for a large number of applications: you will
find all pipetting modes in the menu (for system settings refer to the chapters 7 and 13). Access the
menu by pushing the Mode-button. To choose one of the pipetting modes, turn the
Push-button and confirm your selection with a simple click!
The tip can be emptied at any time during a pipetting cycle. To do so, turn
the Push-button quickly: the message “click to abort” will appear on the
screen. Click on the Push-button to validate: the liquid will be dispensed
and an automatic purge followed by piston reset to zero will occur.
9
PIPET Mode
This is the classic pipette mode (forward pipetting), your pipette is simply aspirating and dispensing.
• Fit a suitable tip
• Press the Push-button to aspirate the selected volume.
• To dispense: Click (press and release) the Push-button. Three things happen: sample dispense,
automatic purge and piston reset to zero.
Or Keep your thumb pressing the Push-button until the end of the dispense cycle: the piston reset
takes place after releasing the Push-button again. This feature enables you to remove the tip from
the liquid, without aspirating anything.
• Eject tip by pressing the ejection button.
VWR electronic pipette is ready again for next pipetting cycle while maintaining the volume and the
last settings!
Continue pipetting as you would as if you were using a mechanical pipette.
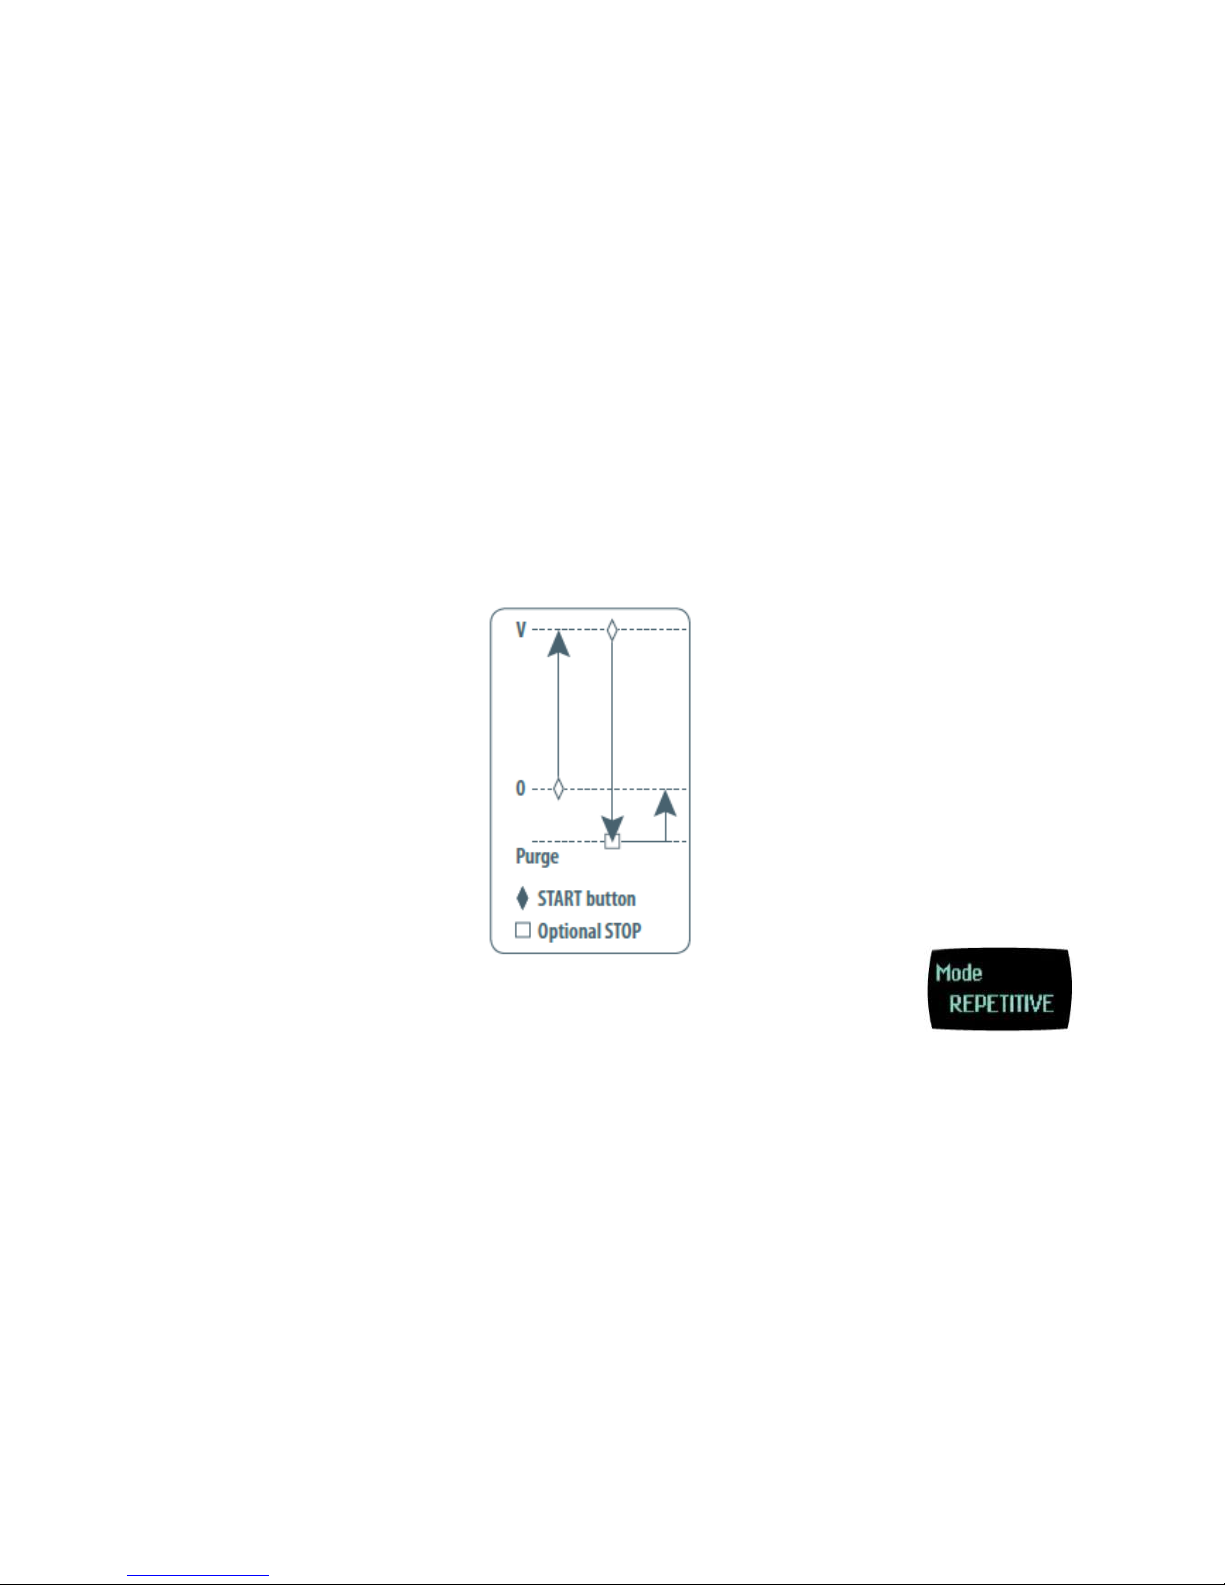
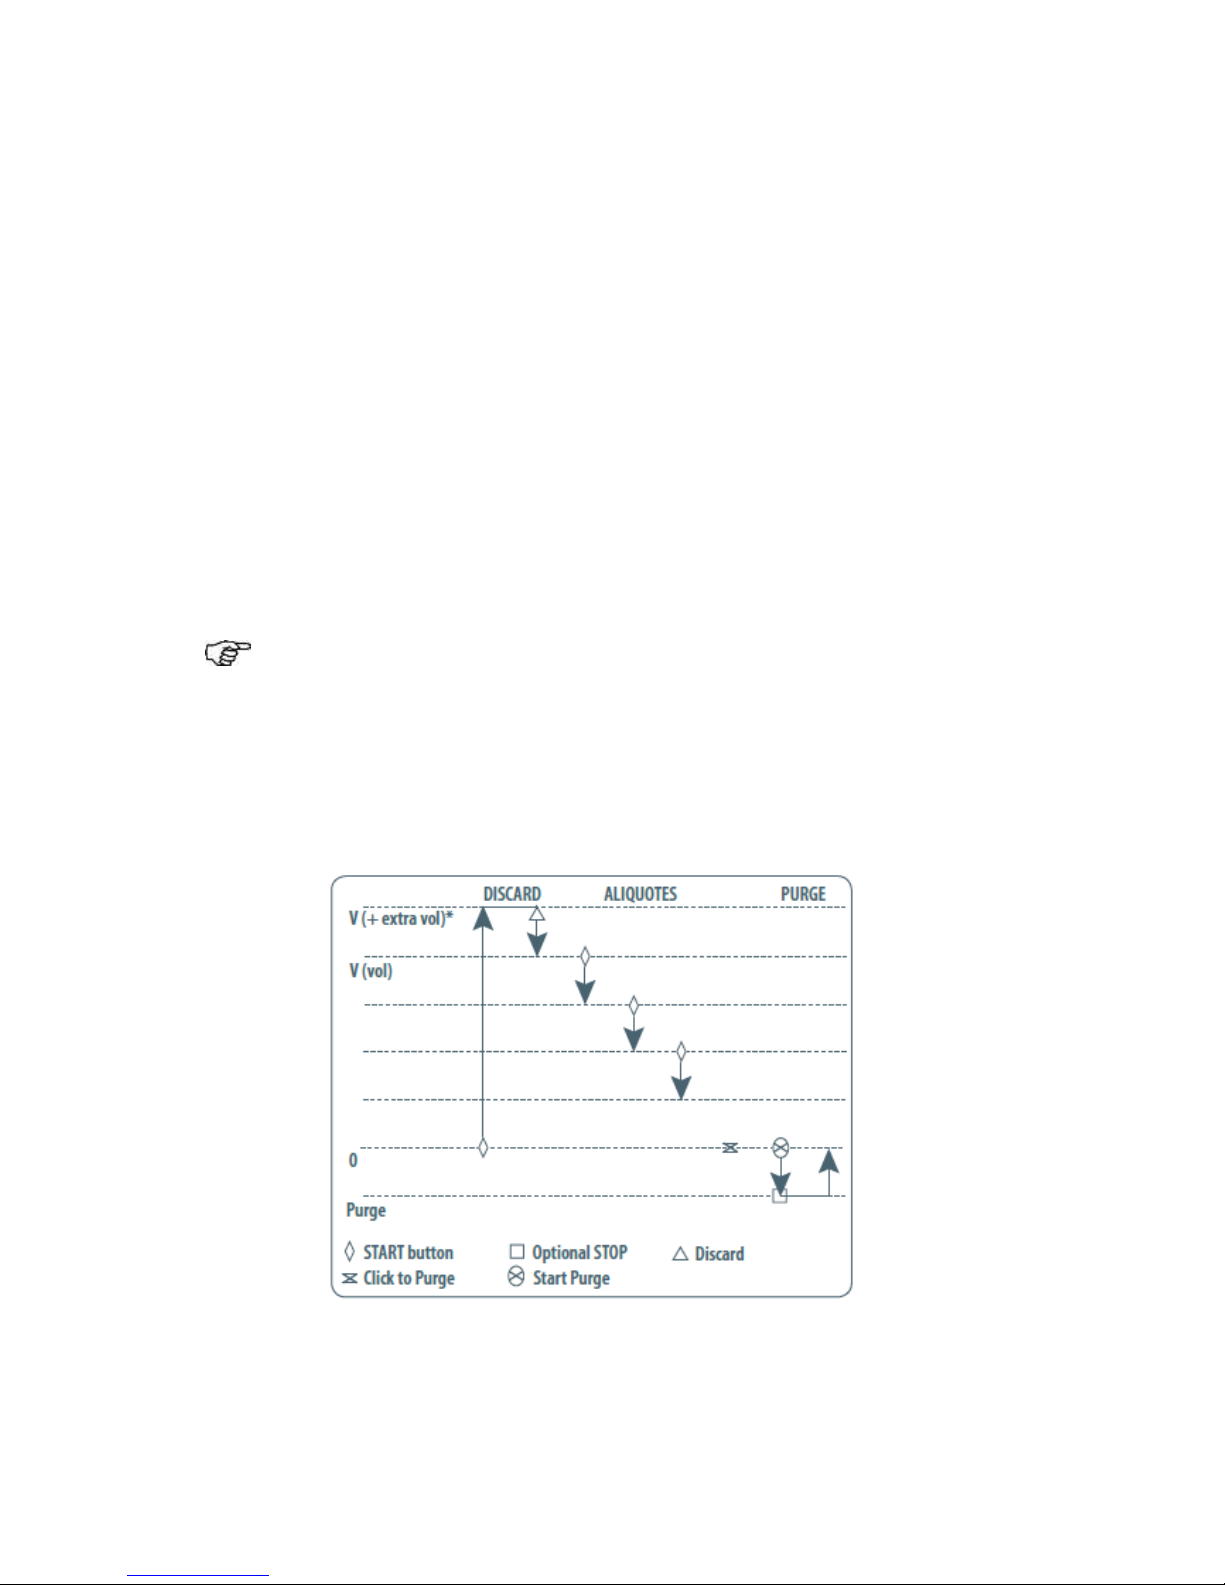
REPETITIVE Mode
The REPETITIVE Mode allows you to distribute the same volume repeatedly in predefined number
(N) of equal aliquots. You supply the aliquot volume (AV) and the pipette automatically calculates
the number of aliquots possible from the nominal (maximum) volume (NV) of the pipette as follows:
N = NV/AV (e.g. 120 μL x 10 for VWR 1200).
You also can decrease the number of repetitions (e.g. 120 μL x 10-(n ≥1) for VWR 1200).
• Press the Mode-button to access system menu, where you can choose between different pipette
modes by turning left or right the Push-button.
Select REPETITIVE Mode by turning the Push-button.To confirm your selection click on the
Push-button.
• Turn the Push-button half way, the screen will display: “click to change volume”
10
• Set the aliquot volume : Press the Push-button; the volume on the display will start to blink, you
can now adjust the volume by turning left or right the Push-button. Then, click on the Push-button to
confirm the volume choosen. The maximum number of aliquots has been calculated by your
pipette.
• Set the aliquot number: the Aliquot numbers will start blinking: set the desired numbers of aliquots
by turning the Push-button and click again to confirm your settings.
You are ready to pipette!
1/ Fit a suitable tip
2/ Click the Push-button to aspirate total volume. The volume aspirated will be a little bit more than
required (extra volume). The extra volume is necessary to ensure equal operating conditions for
each dispensed aliquot.
3/ To dispense: click the Push-button. “DISCARD” appears on the screen. Discard the extra volume
and continue dispensing the aliquots. VWR electronic pipette distributes the aliquot volume each
time you click the push-button. The number of aliquots left to dispense is displayed on the screen.
A warning beep indicates the last aliquot!
4./ To purge: Press the Push-button, “PURGE” appears on the screen, click again to purge and
reset the piston. Keep your thumb pressing the push-button until the end of the purge: the piston
reset takes place after you release the push-button again. This feature enables you to remove the
tip from the liquid, without aspirating anything.
5/ Eject tip by pressing the ejection button.

11
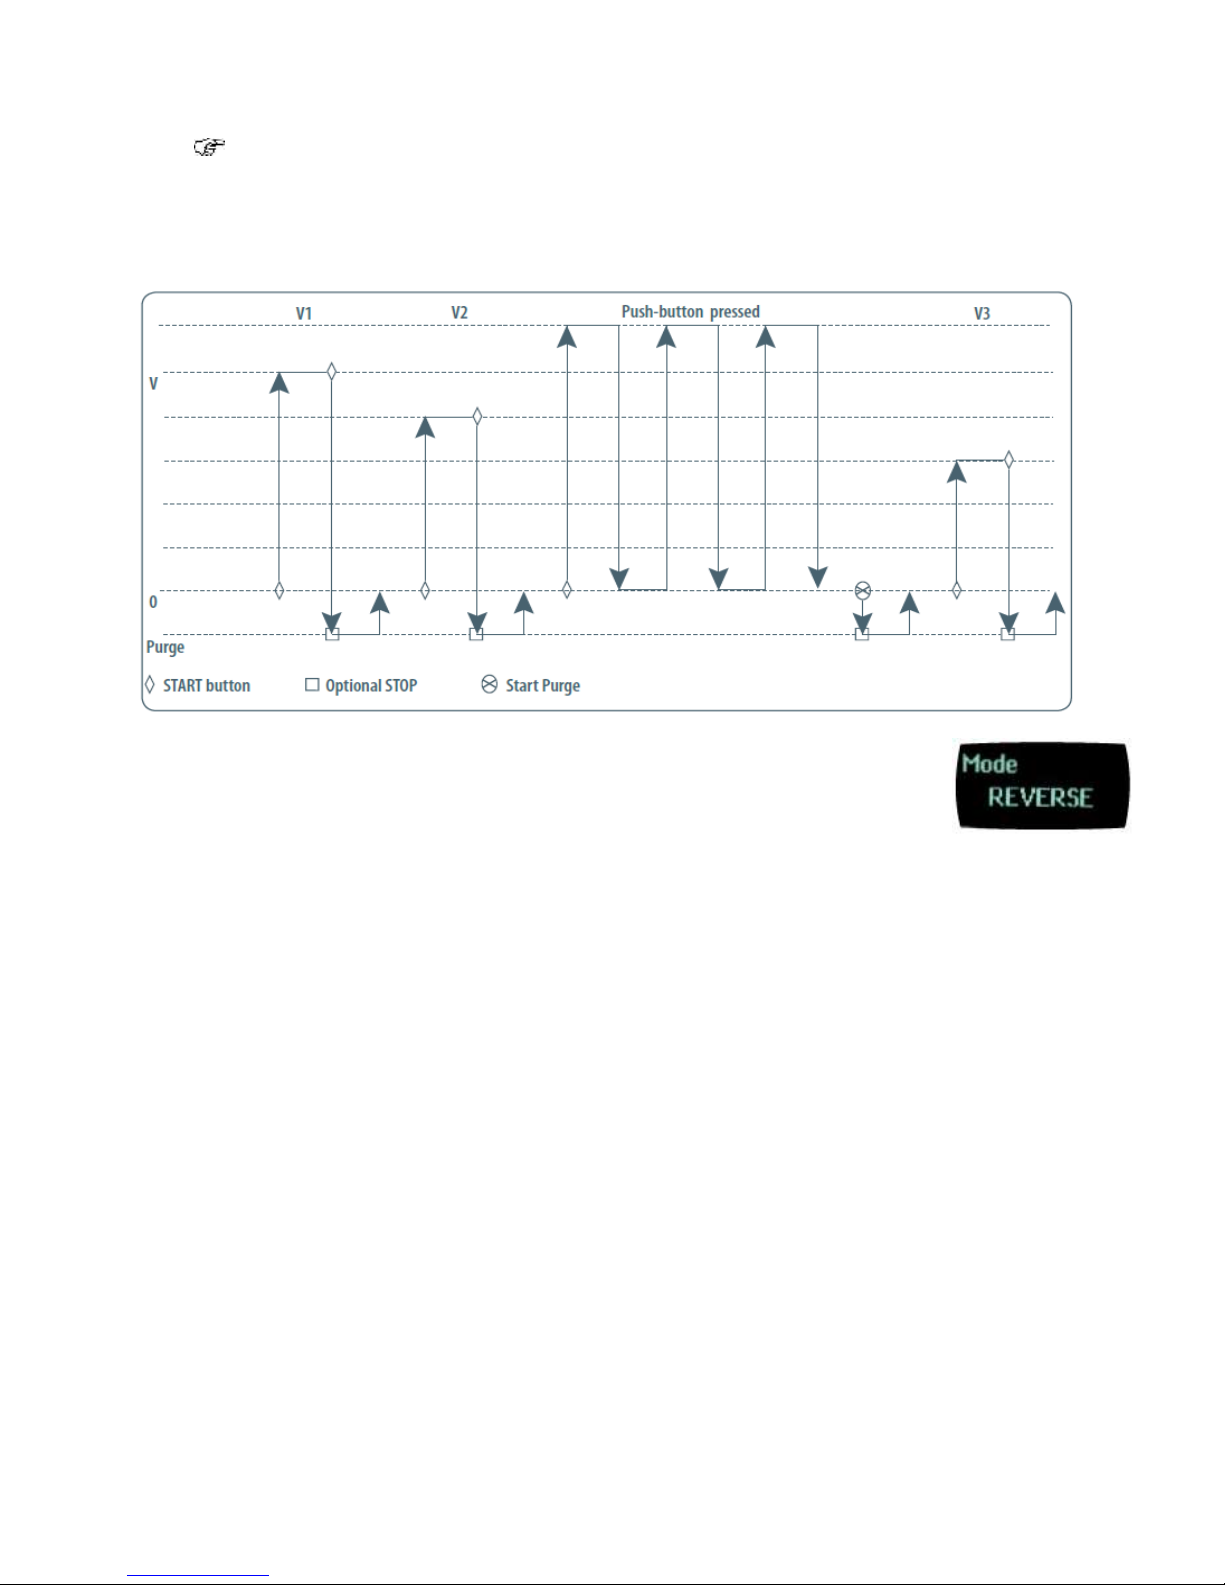
MIX Mode
This is the classic pipette mode (forward pipetting) followed by a mixing phase, composed of
repeatedly aspirating and dispensing, as well as an optional forward pipetting step.
• Press the Mode-button to access menu, where you can choose between different pipette modes.
Select “MIX Mode” by turning the Push-button, to confirm your selection click on the Push-button.
• Set the first volume, named “VOLUME 1”: click the Push-button, set the volume by turning the
Push-button and click to confirm your selection. This is the first volume you will aspirate and
dispense.
Set the second volume, named “VOLUME 2”: click the Push-button, you can now set the second
volume by turning the Push-button. Click again to confirm your settings.
If you set “VOLUME 1” or “VOLUME 2”= 0 μL, the step will not appear. If you set
“VOLUME 1” and “VOLUME 2” = 0 μL the cycle will start directly with the MIX step.
• Set the MIX volume: click the Push-button, set the volume by turning the Push-button. Confirm
your settings with a simple click. This is the volume which will be aspirated and dispensed
repeatedly. “MIX” as long as you press the push-button.
• Set the additional pipetting volume, named “VOLUME 3”: You can choose a volume to be
aspirated and dispensed after the mixing step, so you can continue routine pipetting.
Click the Push-button, set the volume by turning the Push-button. Confirm your settings by a
simple click.
If you set the “VOLUME 3 “= 0 μL the cycle will stop after the MIX step.
You are ready to mix!
1/ Fit a suitable tip
2/ To aspirate “VOLUME 1” press the Push-button
3/ To dispense: Click (press and release) the Push-button: three things happen: sample dispense,
automatic purge and piston reset to zero
or
Keep your thumb pressing the Push-button until the end of the dispense cycle: the piston reset
takes place after you release the Push-button again. This feature enables you to remove the tip
from the liquid, without aspirating anything.
4/ To aspirate and dispense the second volume “VOLUME 2”, repeat steps 2 and 3.
5/ To mix: press the Push-button; as long as you keep your thumb pressing the button, the pipette
continues mixing. Release the Push-button to complete the current mixing cycle.
6/ To purge: press push-button, “PURGE” appears on the screen, click again to purge and reset
the piston.
7/ To pipette: if you have chosen a “VOLUME 3” > 0, you can now aspirate and dispense this
volume by repeating steps 2 and 3.
12
If you choose VOLUME1 = 0, step 2 won’t occur, if you choose VOLUME 2 = 0 μL, step 4
won’t occur, as well if you set
VOLUME 1 and 2 = 0 μL, step 1-4 will disappear. If you set VOLUME 3 = 0 μL step 7 will not
occur.
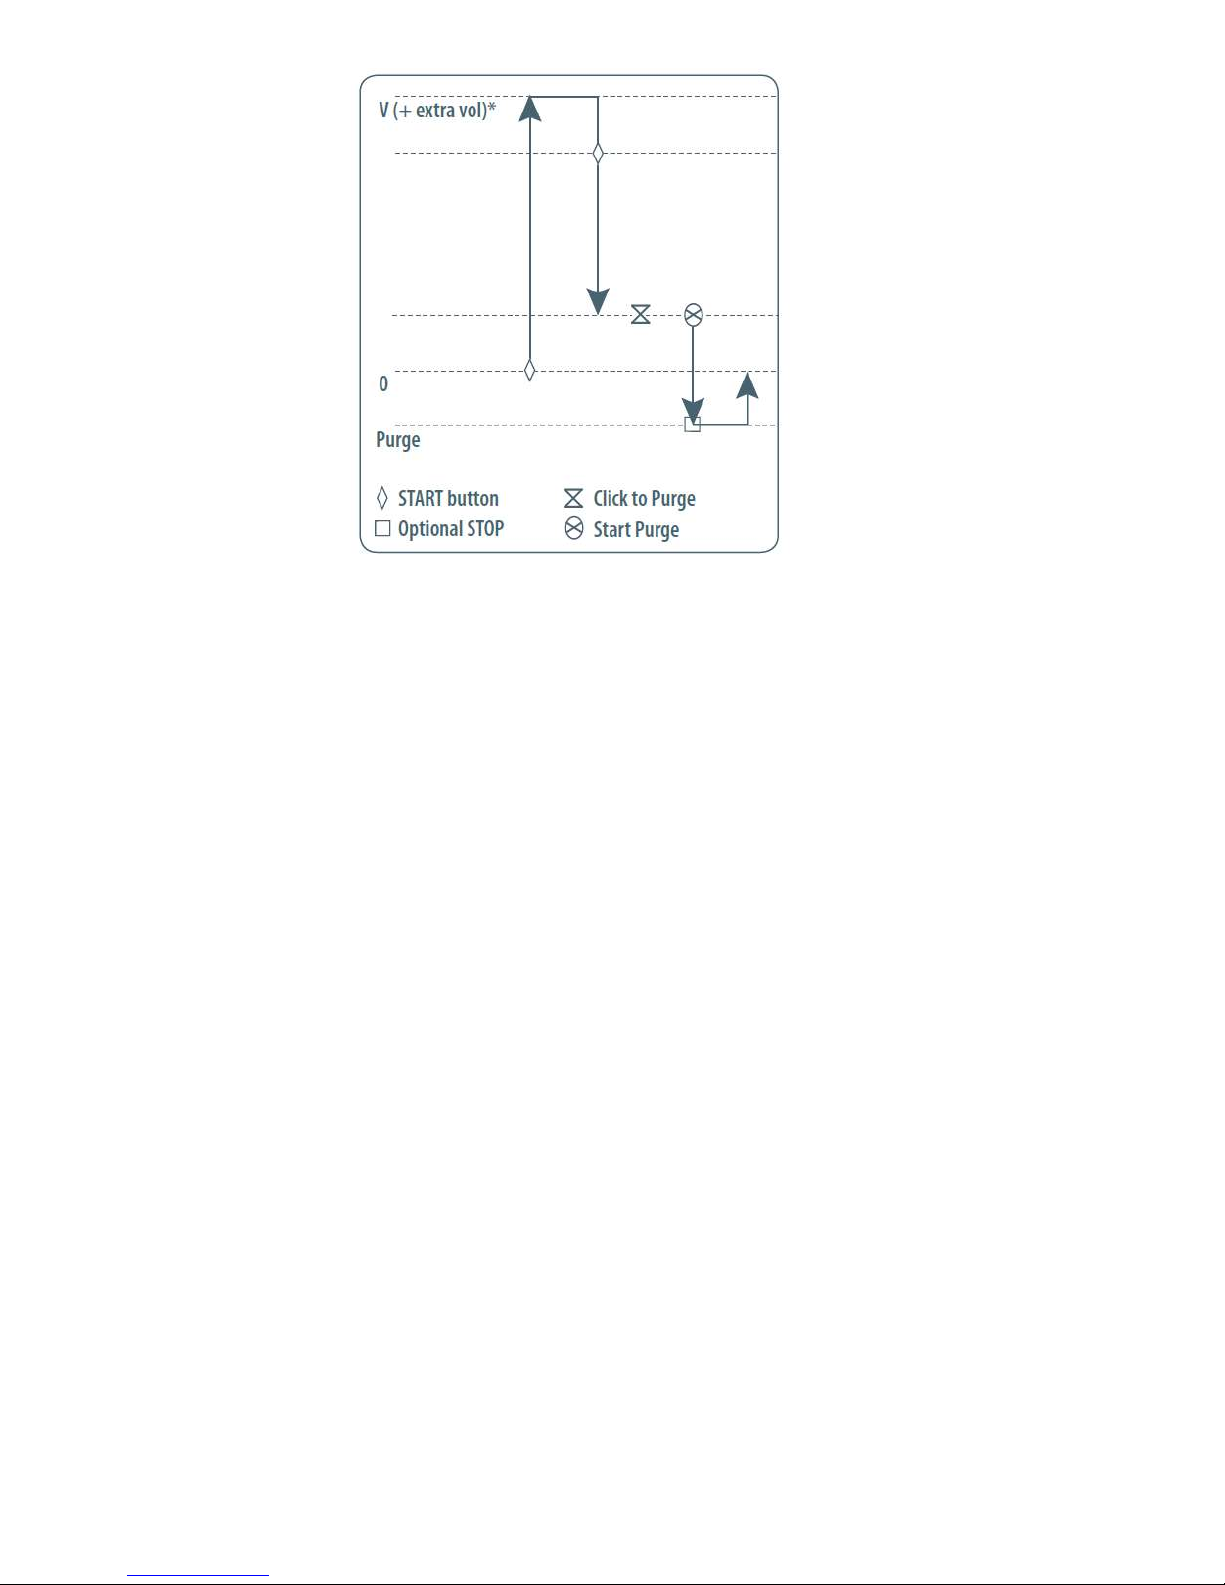
REVERSE Mode
The REVERSE Mode is reverse pipetting with a manual pipette. During aspiration,
additional liquid is added. After delivery, the excess volume remains in the tip and is discarded.
• Press the Mode-button to access system menu, where you can choose between different pipette
modes.
Select REVERSE Mode by turning the Push-button, to confirm your selection click the Push-button.
• Set the volume: click the Push-button, set the volume by turning the Push-button and click again
to confirm your settings.
You are ready to do reverse pipetting!
1/ Fit a suitable tip
2/ Click the Push-button to aspirate the selected volume. An amount of liquid equal to the amount of
purged air is added, the volume aspirated will be a little bit more than the set volume.
3/ Click the Push-button to dispense the volume, the additional amount of liquid remains in the tip.
4/ To purge: press the Push-button, “PURGE” appears on the screen, click again to purge and
reset the piston. Keep your thumb pressing the push-button until the end of the purge: the piston
reset takes place after you release the Push-button again. This feature enables you to remove the
tip from the liquid, without aspirating anything.
5/ Eject tip by pressing the ejection button.
13
CUSTOM Mode
The CUSTOM Mode enables personalized pipetting protocol creation on a computer for transfer
to VWR Electronic Pipette through VWR Protocol Builder software, an easy-to-use software.
To use this mode, the software has to be installed on the computer (file downloadable on
www.vwr.com/e-pipette).
To install VWR Protocol builder software:
1/ Download the appropriate VWR Protocol builder software installation file for your
operating system to the computer (Windows 32bits/ Windows 64 bits)
2/ Double-click the installer and follow the instructions on the screen to complete the installation.
3/ When completed, the VWR Protocol builder software icon will appear on desktop of the computer
if “Create desktop shortcut” is checked.
4/ If VWR Protocol builder software is not launched automatically double-click the VWR Protocol
builder icon on the desktop.
5/ Once installed, the VWR Protocol builder software can be run by any user on the installed
computer.
You can then create, edit, import or export custom protocols easily and rapidly.
To create a protocol, choose among the available tasks VWR Protocol builder software:
• Aspirate: aspirates specified volume into the tip
• Dispense: dispenses specified volume from the tip
• Dispense all: dispenses all remaining volume from the tip followed by a purge action
• Repeat: enables repetition of any other tasks once or more
• Mix: mixes the specific volume in one or more cycles
• Purge: dispenses all remaining volume from the tip followed by purging extra volume
• Wait: introduces a wait for a specified number of seconds

14
• Beep: makes pipette produce a beep sound while selected tasks are executed
To transfer a protocol to your VWR Electronic Pipette, click the “Transfer custom protocols to
pipette” button and follow the instructions on the screen.
The CUSTOM mode is available in pipettes from firmware version cf01.00.03
For more information on VWR Protocol builder software, see page 34.
7 PIPETTING SPEED CONTROL
VWR Electronic Pipette is set by default on speed 6 (maximum speed). You may need to change
the speed of aspiration or dispensing depending on your application. You can change aspiration
speed and dispensing speed independently of one other: from very slow to very fast (speed 1 –
speed 6). Your speed selection is memorized for each pipetting mode until you change it again.
• Press the Mode-button to access system menu, where you can find the different pipette modes,
the speed menu and configuration menu.
• Select SPEED by turning the Push-button, to confirm your selection click on the Push-button.
• Set ASPIRATION SPEED: aspiration speed is blinking, set the speed by turning the Push-button
and click to confirm your selection.
• Set DISPENSING SPEED: dispensing speed is blinking, set the speed by turning the Push-button
and click to confirm your selection.
• After selecting the speed you go automatically back to pipetting mode.
8 GUIDELINES FOR GOOD PIPETTING
Aspirate and dispense:
1/ Fit a suitable tip
2/ Pre-rinse the tip. Pre-rinsing consists of aspirating the first volume of liquid and then dispensing it
back into the same vessel (or to waste). Subsequent volumes that you pipette will have levels of
accuracy and precision within specifications. Some liquids (e.g. protein-containing solutions and
organic solvents) can leave a film of liquid on the inside the wall of the tip; pre-rinsing the tip
minimizes any errors that may be related to this phenomenon.
3/ Hold the pipette vertically and immerse the tip in the liquid . Press the push-button to aspirate the
set volume of liquid. Wait a few seconds then withdraw the pipette-tip from the liquid. You may wipe
any droplets away from the outside of the tip using a medical wipe, however if you do so take care
to avoid touching the tip’s orifice.
4/ Place the end of the tip against the inside wall of the recipient vessel (at an angle of 10° to 40°).
Press the Push-button.
15
Wait for at least a few seconds before releasing the Push-button to expel any residual liquid from
the tip. While removing the pipette, draw the tip along the inside surface of the vessel.
5/ Eject the tip by pressing firmly on the tip-ejector button.
General guidelines for good pipetting:
a. Make sure that you fit new tips.
b. Each new tip should be pre-rinsed with the liquid to be pipetted.
c. When aspirating, keep the tip at a constant depth below the surface of the liquid
d. Change the tip before aspirating a different liquid, sample, or reagent.
e. Change the tip if a droplet remains at the end of the tip from the previous pipetting operation.
f. Liquid should never enter the tip holder. To prevent this:
• Never turn the pipette upside down,
• Never lay the pipette on its side when there is liquid in the tip(s),
g. The VWR charging Stand Adapter (refer to chapter 2) is recommended for use with the VWR
Carrousel Pipette Stand to store the pipette in the vertical position.
h. When pipetting liquids with temperatures different to the ambient temperature, pre-rinse the tip
several times before use in order to reach equilibrium between the temperatures of the liquid and
the pipette’s dead-volume.
i. For volatile liquids you should saturate the dead-volume by aspirating and dispensing the liquid
repeatedly before aspirating the sample.
j. After pipetting acids or other corrosive liquids that emit vapors, clean the pipette, as described in
chapter 14
k. The pipette can be used between + 4 °C and
+ 40 °C, but the specifications may vary
(refer to chapter 17).
l. Do not pipette liquids having temperatures
above 50 °C or below 4 °C.
Extreme temperature
can affect accuracy
and precision
16
9 PERSONALIZE YOUR VWR Electronic Pipette
Tip-ejector extension for use VWR Electronic Pipette 10µl Single and Multi channels:
In order to eject 10µl tips, tip-ejector extensions are
supplied with VWR Electronic Pipette 10µl Single
and Multi channels.
The tip-ejector extension for Single channel which is made of PVDF
(polyvinylidene Fluoride),is autoclavable, as well as the one
of the Multi-channel which is in PBT.
To fit a tip-ejector extension for the Single Channel:
• Hold the pipette with the push-button upright.
• Hold the extension with the slot upright.
• Slide the extension over the tip-holder.
• Push the extension firmly onto the end of the tip-ejector until
it clicks into place (see opposite).
To remove a tip-ejector extension (see opposite):
• Hold the pipette in one hand and grip the extension with the other.
• Gently twist the extension (either direction) and pull it away from
the pipette
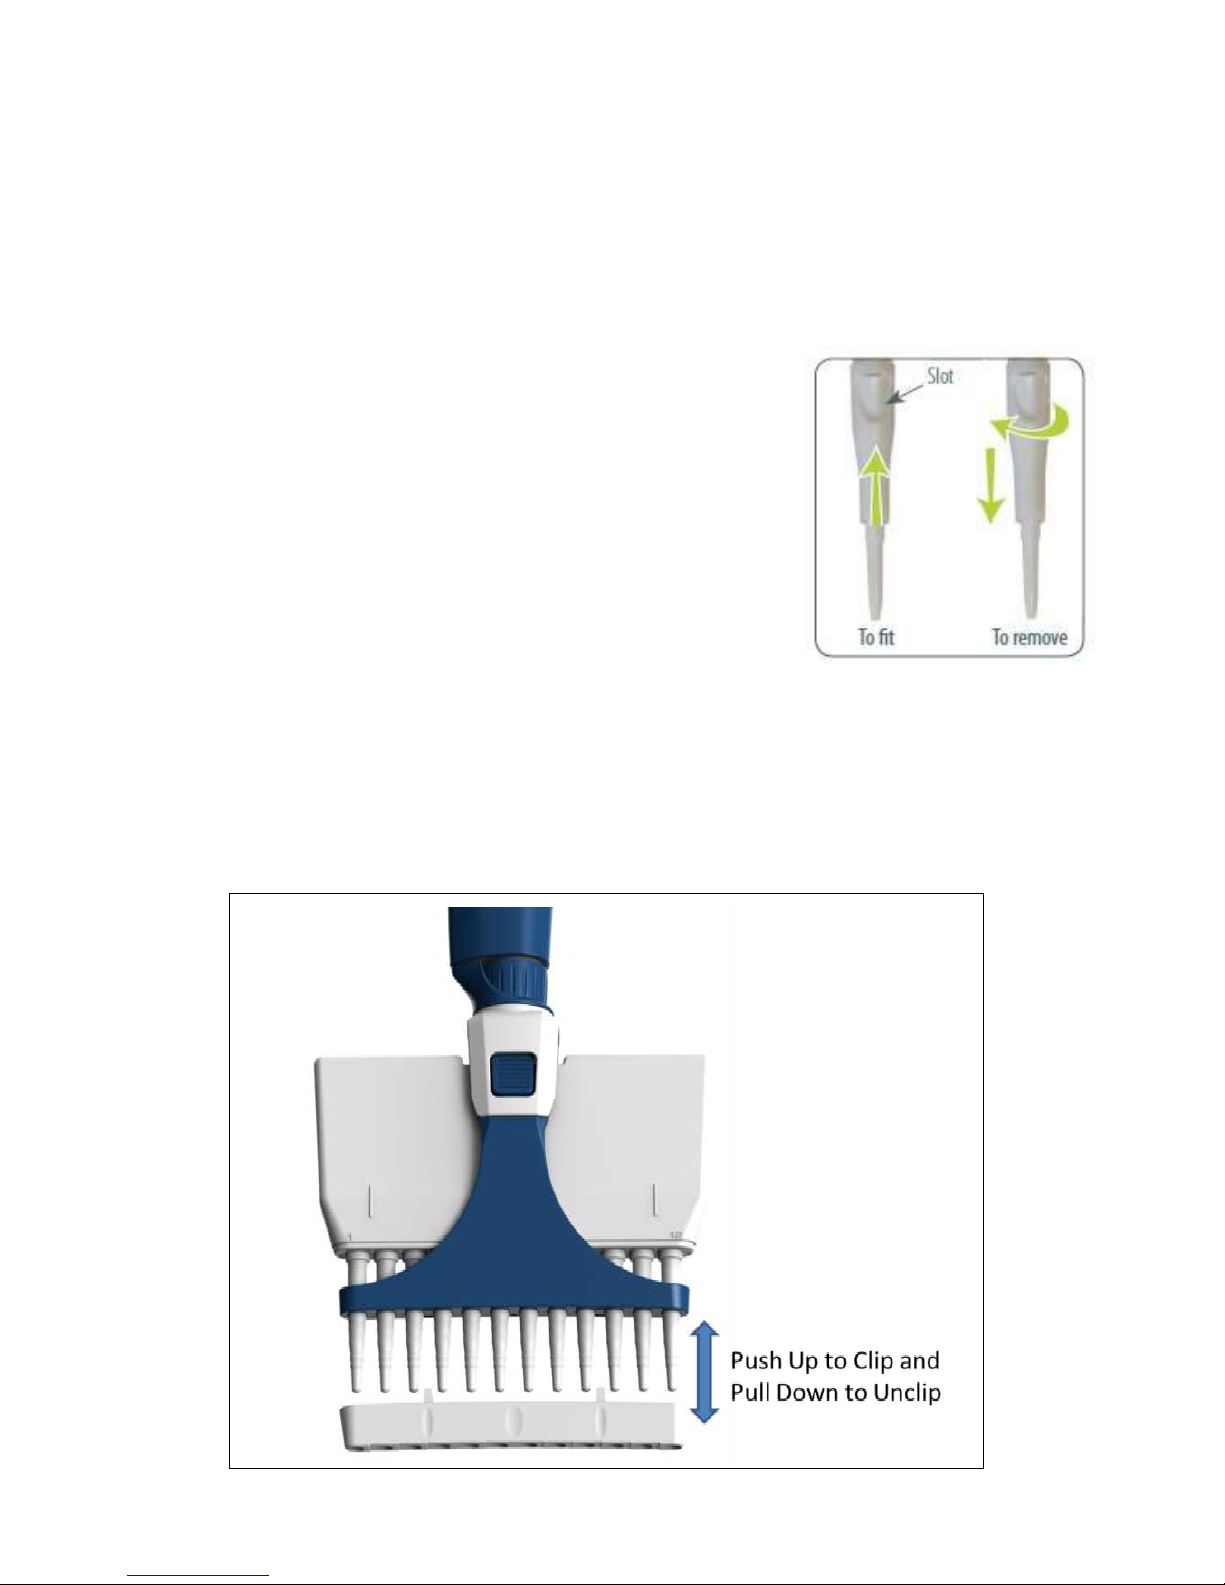
To fit and remove a tip-ejector extension for the Multi Channels:
• Slide the extension over the tip-holder.
• Push the extension firmly up into the slots to fit and pull it out to remove it (see below)
17
Personal label – Name and/or application tag:
VWR Electronic Pipette offers you the possibility
to mark your pipette. You can
personalize your pipette with a name tag and/or an
application tag:
Window-tag:
• Remove the window by inserting a small screwdriver
in the access slot.
• Position the name tag on the pipette
• Clip the window back in place.
10 GOOD LABORATORY PRACTICE FEATURES
VWR Electronic Pipette is fully compliant to ISO8655 standard and is CE marked .
VWR Electronic Pipette includes the following GLP features.
General
• Lockable volume.
• Useful volume-range is printed on the push-button.
• Volume range is displayed on the screen.
• Serial number is engraved on the body (handle) of the pipette and encoded in the firmware.
• Bar code: on the box
• Personalization by nametags (for marking application and/or user name), refer to chapter 9.
Cycle counters
• From last volume setting (to count the number of cycles in the current “run”).
• From manufacture and since the last service (refer to chapter 13).
• By indicators (R1, R2, R3 … Rx) each time pipette is readjusted.
• Maintenance intervals can be specified by weeks or number of cycles elapsed.
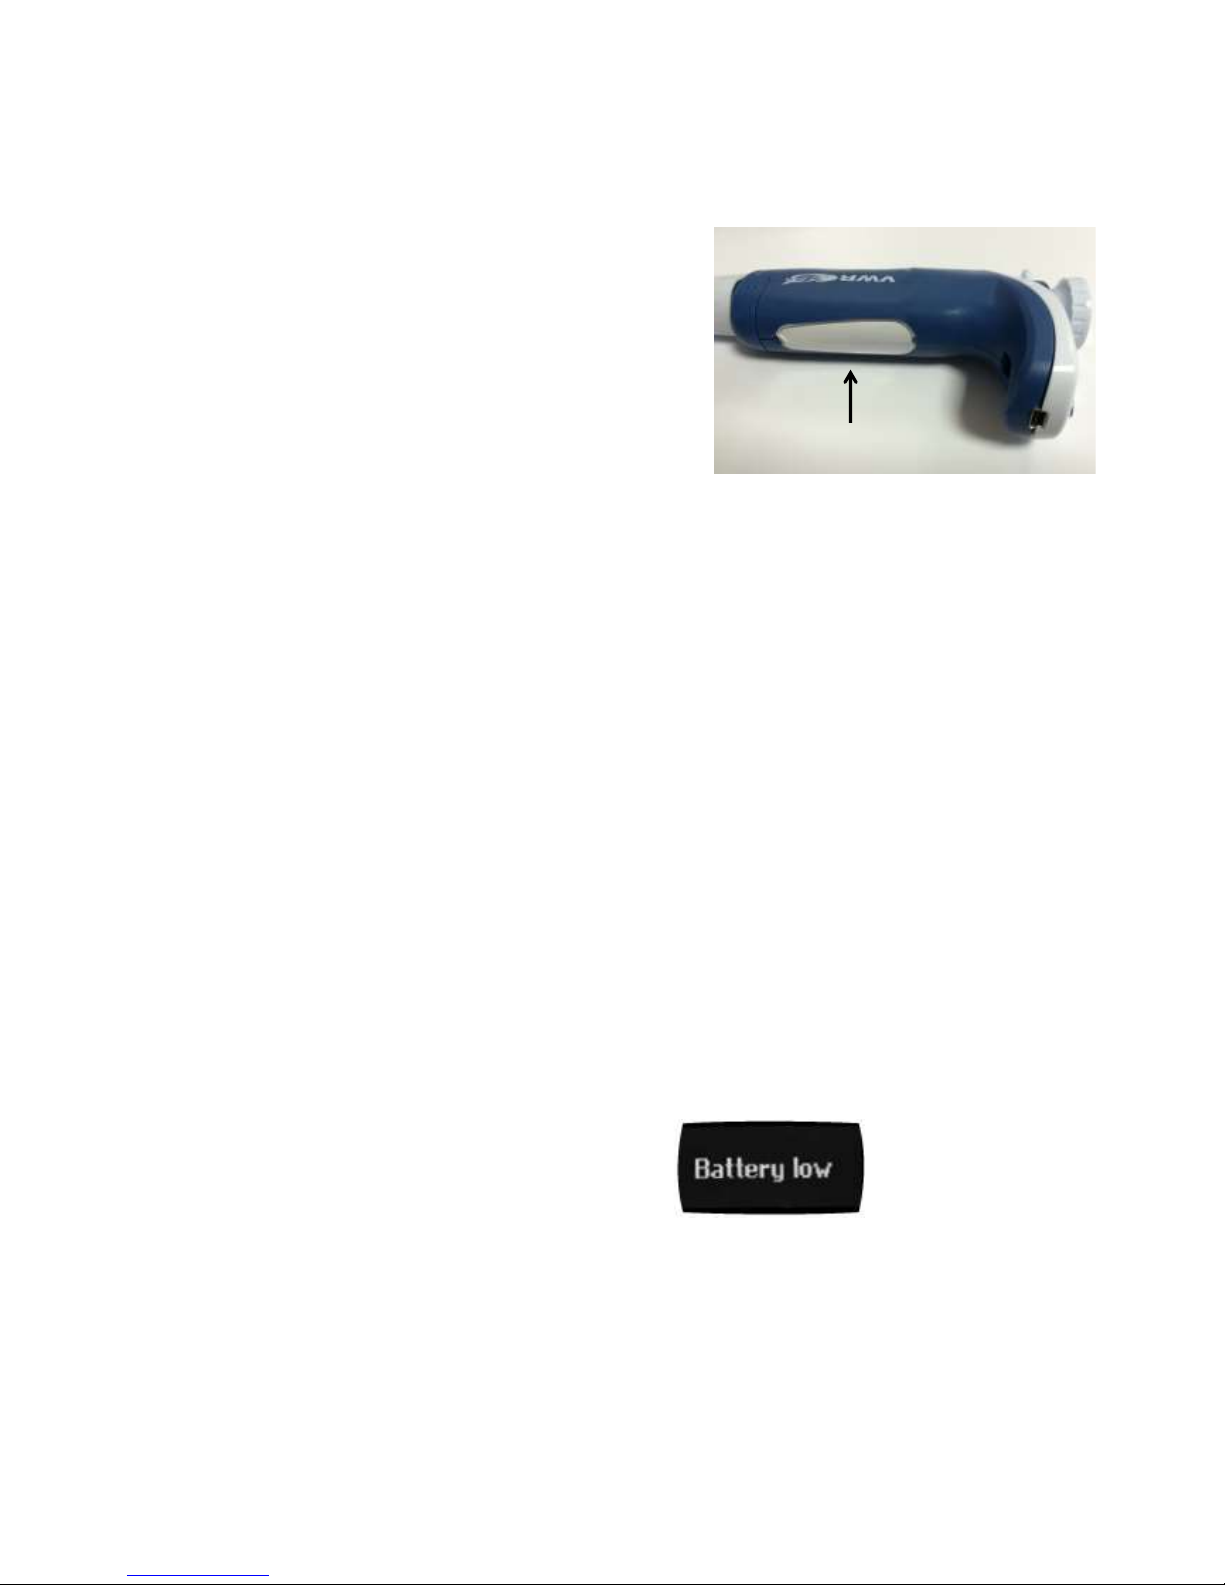
Alarms
• Low battery warning.
• Service is overdue warning (refer to chapter 13).
• Service alert can be set “On” or “Off”.
11VWR ELECTRONIC PIPETTE POWER MANAGEMENT
The VWR Electronic Pipette battery has been designed to ensure around 900 pipetting cycles
(around 750 for Multichannel models) at maximum speed between two charge cycles (approx.
2h30 of use continuously). For service continuity when needing more
capacity, VWR Electronic Pipette can also be used while charging with the same performance as a
fully charged pipette!
Window-tag
 Loading...