

VWR International 634-6002, UV-3100PC Instruction Manual
VWR Collection Manual ver 1, rel 15.05.2007
UV-3100PC Spectrophotometer
INSTRUCTION MANUAL
European Catalogue Number(s):
634-6002
Version: 1.0.0
Issued: 07 , April 2010


Legal Address of Manufacturer
Europe
VWR International Europe bvba
Researchpark Haasrode 2020
Geldenaaksebaan 464
B 3001 Leuven
Tel.:+ 32 16 385 011
http://www.be.vwr.com
Made in China


Table of Contents
Part 1: Spectrophotometer
Safety Information 1
Package Contents 1
Unpacking 2
Installation 2
Intended Use 2
Symbols and Conventions 3
Specifications 3
Overview 4
Description of Buttons and Switches 4
Operational Keys 6
Getting Started 8
Important Guidelines 9
General Operating Instructions 10
Operation 11
Basic Mode 12
Quantitative Mode 14
Wavelength Scan 19
Kinetics 21
DNA/Protein Mode 24
Multi Wavelength Mode 26
System Utility 28
Troubleshooting 34
Repair and Maintenance 35
Daily Maintain 35
Spare Parts Replacement 36
Accessories and Spares Parts 41
Technical Service 43

Warranty 43
Equipment Disposal 44
Part 2: Software
Functions 45
Main Functions 45
Spectrum Processing Function 46
System Check and Calibration Function 46
Installation 47
Introduction 50
Operation 55
Single Wavelength Photometric Measurement 55
Fixed Point Measurement 55
Wavelength Scanning 61
Time Scanning (Kinetic Analysis) 73
DNA/Protein Measurement 75
Appendix 1 78
Appendix 2 78

Part 1: Spectrophotometer

1
Safety Information
Please follow the guidelines below, and read this manual in its entirety to ensure safe
operation of the unit.
VWR recommends against the use of UV-3100PC Spectrophotometer.
Do not open the device.
Disconnect the device from the mains supply before carrying out
maintenance work or changing the fuses.
The inside of the device is a high-voltage area Danger!
Do not use the device if it is damaged, especially if the main power
cable is in any way damaged or defective.
Repairs may only be carried out by the service technicians from your
local VWR office and authorized contractual partners.
The device must be connected to a power outlet that has a protective
ground connection.
If the equipment is used in a manner not specified by the
manufacturer, the protection provided by the equipment may be
impaired.
Do not allow any liquid to enter into the device.
Do not operate the device in a hazardous location or potentially
explosive environment.
Package Contents
Description Quantity
Spectrophotometer 1PC
Glass cuvette 4PCS
Quartz cuvette 2PCS
Power Cord ( Euro Plug ) 1PC
Power Cord ( UK Plug ) 1PC

2
Power Cord ( SW Plug ) 1PC
USB Cable 1PC
CD-ROM 1PC
Manual 1PC
Unpacking
Open the package, according to carefully check the packaging packing list items, if found
inside the packaging are missing or damaged items please your local VWR office and
authorized contractual partners.
Installation
Placement
Place the instrument on the stable table carefully.
Install printer (Optional)
Check to confirm instrument power switch is turned off, connect the printer’s data cable to
the Instrument’s parallel port.
Link the power cord
Check to confirm instrument power switch is turned off, the power cord plug into two
separate power interface and power supply socket apparatus.
Intended Use
UV-3100PC Spectrophotometer used in Chemistry, Pharmaceuticals, Biochemical,
metallurgy, Light Industry, Textile, Material, Environments, Medical, Education and some
other fields. It is one of the most important instruments in Quality Control and an essential
in normal laboratories.
3
Symbols and Conventions
The following chart is an illustrated glossary of the symbols that are used in this manual.
CAUTION This symbol indicates a potential risk and alerts you to
proceed with caution
CAUTION This symbol indicates the presence of high voltage and
warns the user to proceed with caution
CAUTION This symbol indicates risks associated with hot surfaces
Specifications
Optical System Single Beam
Wavelength Range 190-1100nm
Band Width 2nm
Stray Light ≤0.05%T @ 220nm & 360nm
Photometric Range 0-200%T,-0.3-3.0A, 0-9999C
Wavelength Accuracy ±0.5nm
Photometric Accuracy ≤±0.5%T or 0.005A@1A
Stability 0.002A/h @ 500nm
Memory 32K
Language English, French, German, Spanish
Display 320×240 Dots Matrix LCD
Interface USB, Parallel
Measuring Procedure Photometry, Quantitation, Wavelength Scan,
Kinetics, DNA/Protein, Multi-wavelength
Power Supply AC 110/220V, 50/60Hz
Dimension 490×360×240mm
Weight 14kg
This instrument is compliant to the European Directives on
4
Low Voltage Directive 2006/95/EC
Electromagnetic compatibility 2004/108/EC
Restriction on use of Hazardous Substances RoHS 2002/95/EC
and theirs amandements.
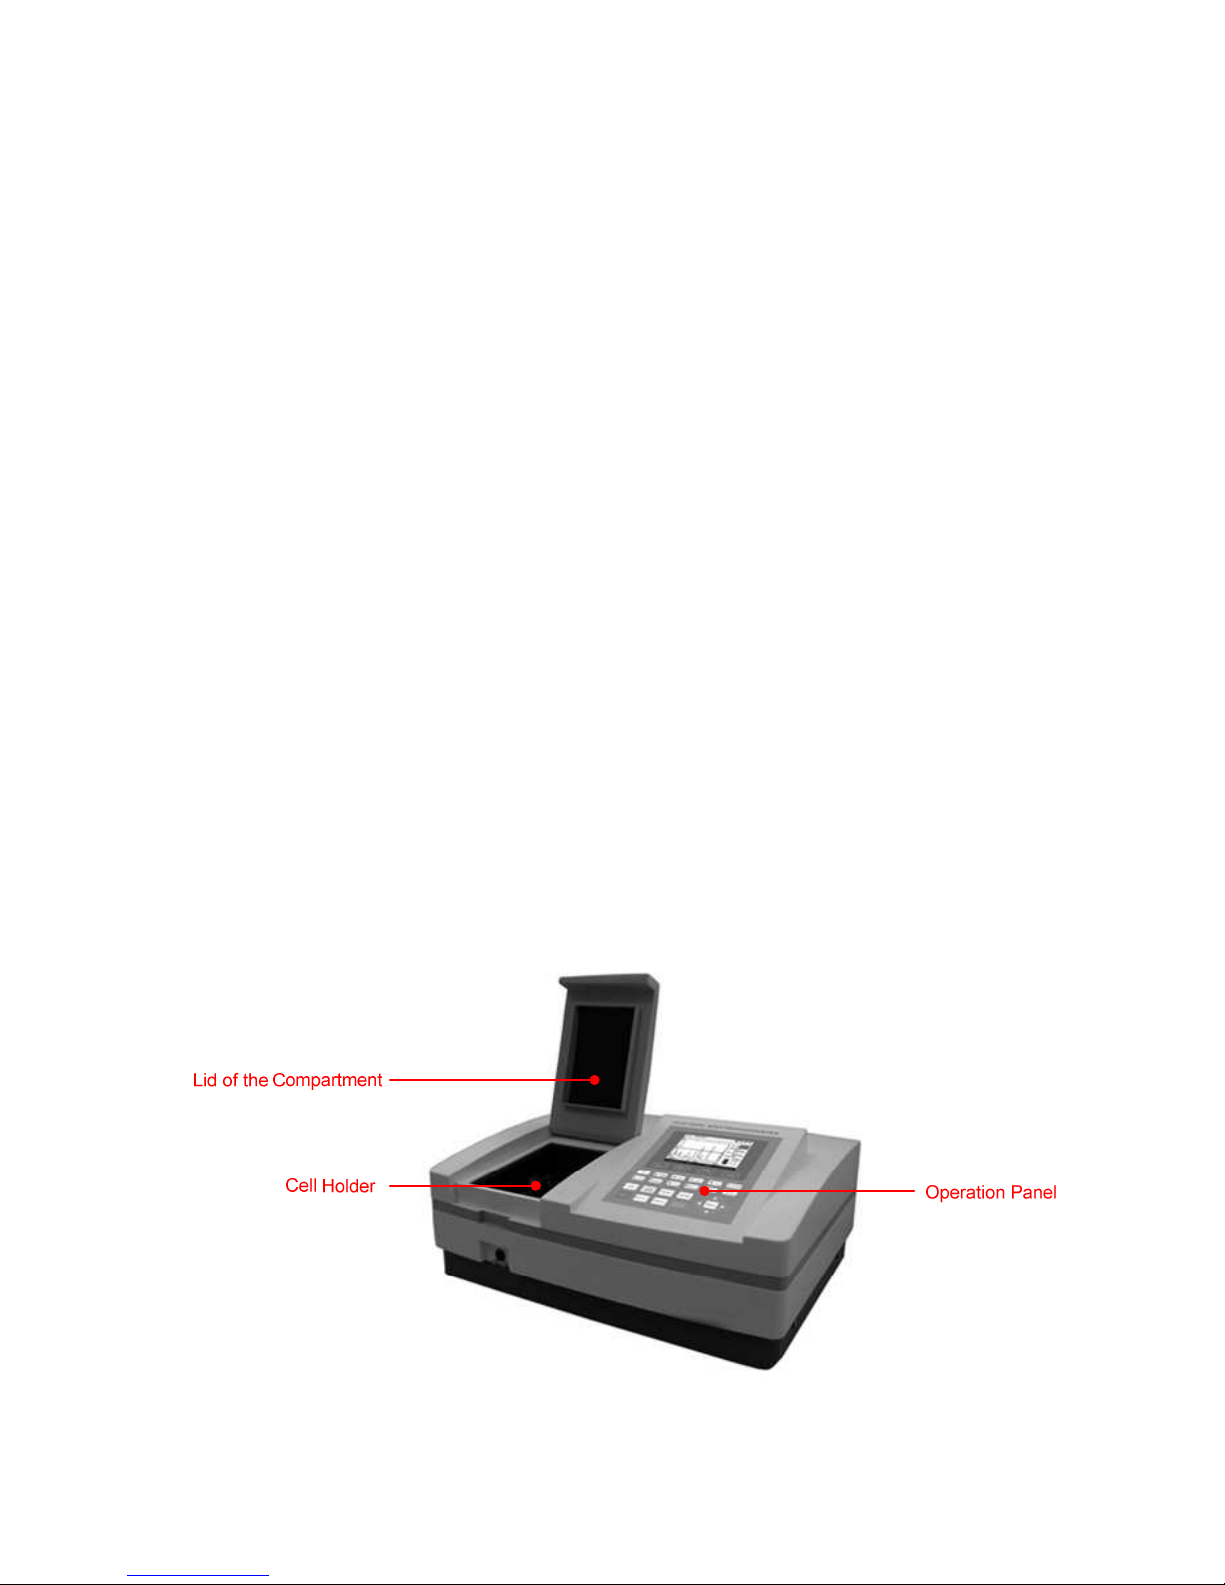
Overview
UV-3100PC Spectrophotometer has the characters of wide range of wavelength, high
sensitivity, powerful function, easy to use, simple structure and pretty figure. Besides these,
the large LCD, High Precise A/D and easy to store RAM makes the instrument much more
superior than other originals. It is widely used in Chemistry, Pharmaceuticals, Biochemical,
metallurgy, Light Industry, Textile, Material, Environments, Medical, Education and some
other fields. It is one of the most important instruments in Quality Control and an essential
in normal laboratories.
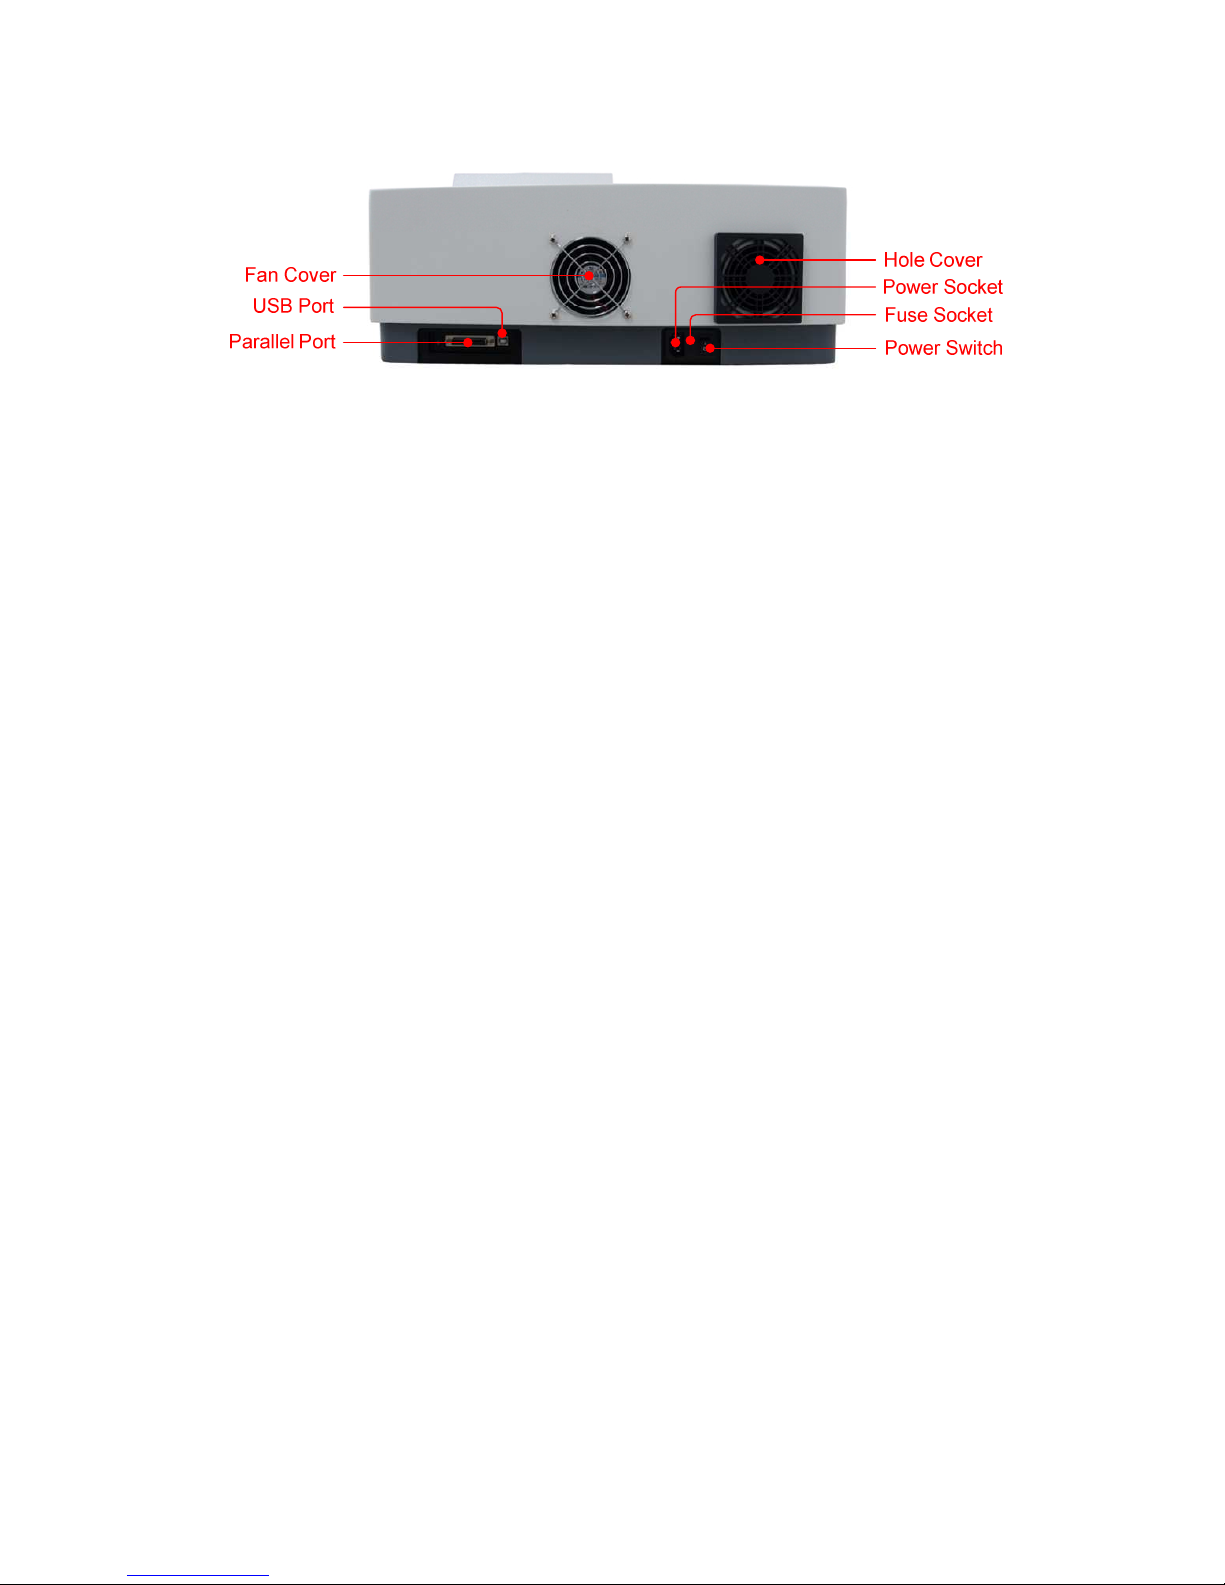
Description of Buttons and Switches
Front View
5
Rear View

6
Operational Keys
Key Functions
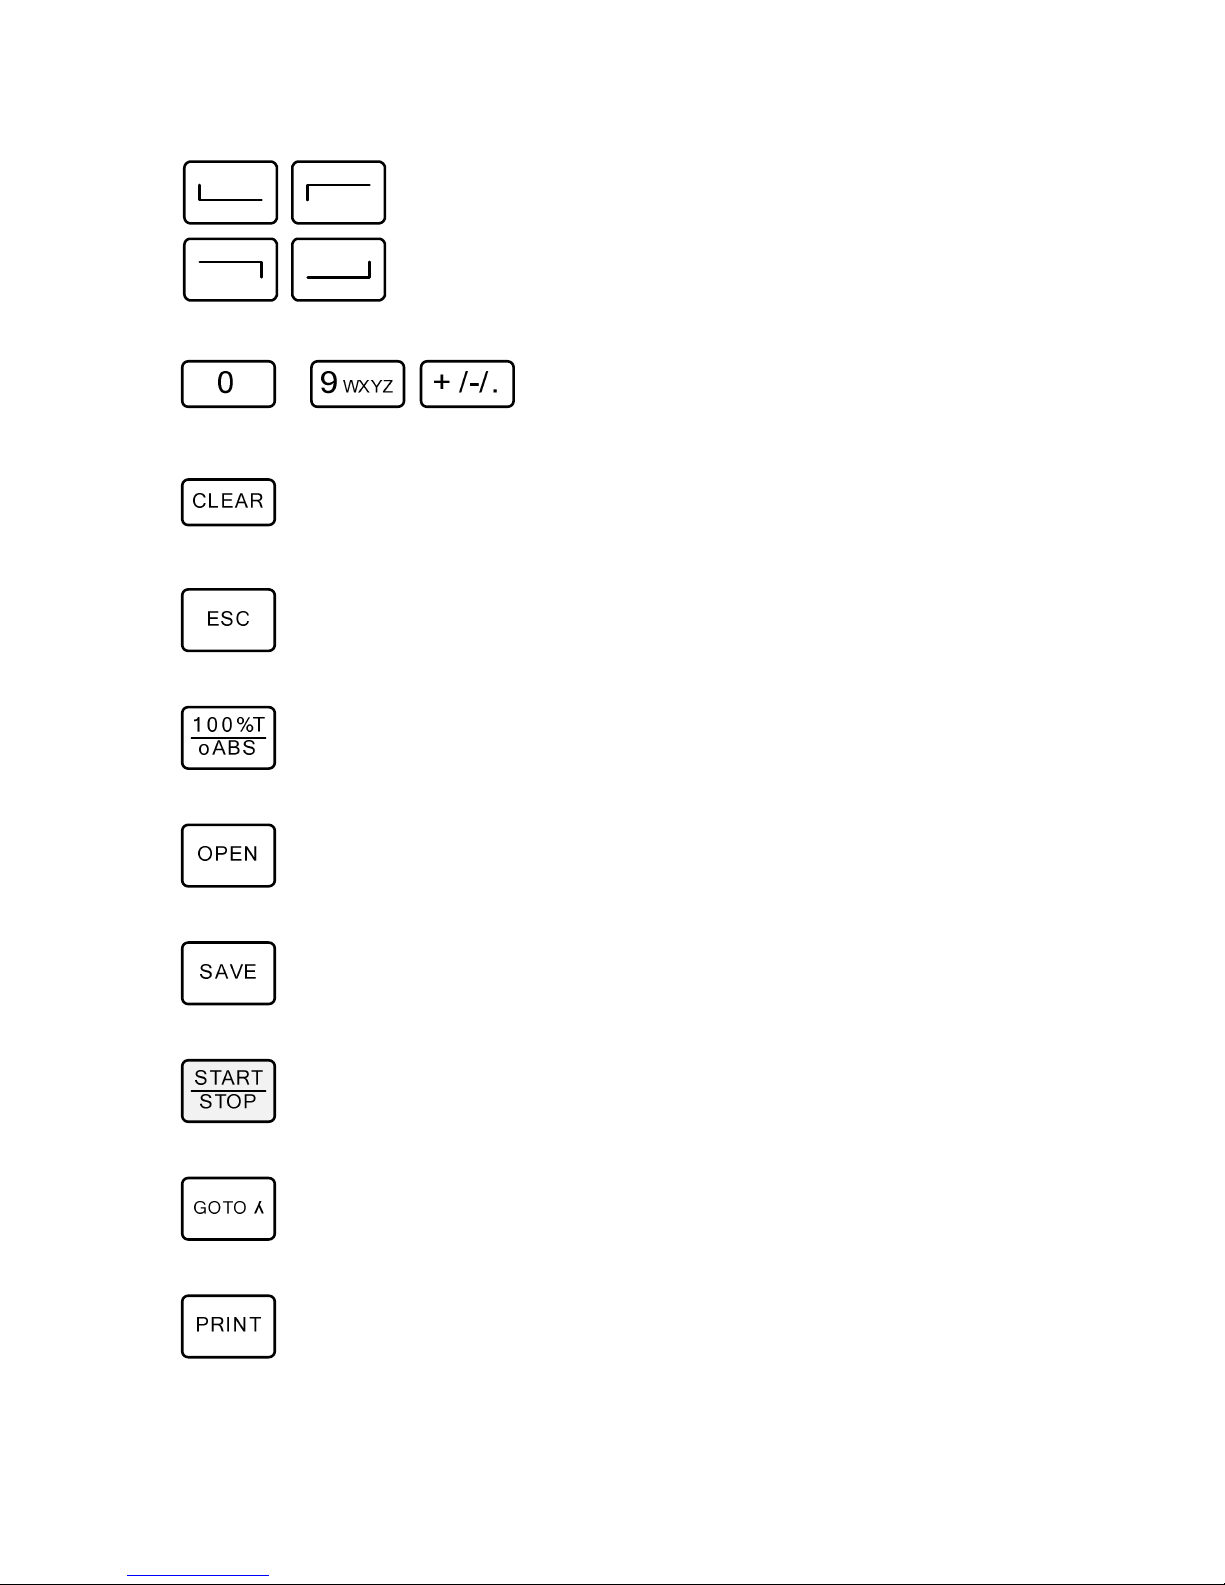
7
Function Keys: Functions on-screen prompts
… ,
Numeric Keys: Enter numbers and letters
CLEAR Key: Delete the input value or stored data
ESC Key: Return to previous Interface
100%T/0Abs Key: Blank
OPEN Key: Open files stored in internal memory
SAVE Key: Save files to internal memory
START/STOP Key: Start/Stop testing
GOTO ʎ Keys: Set wavelength
PRINT Key: Print measuring result
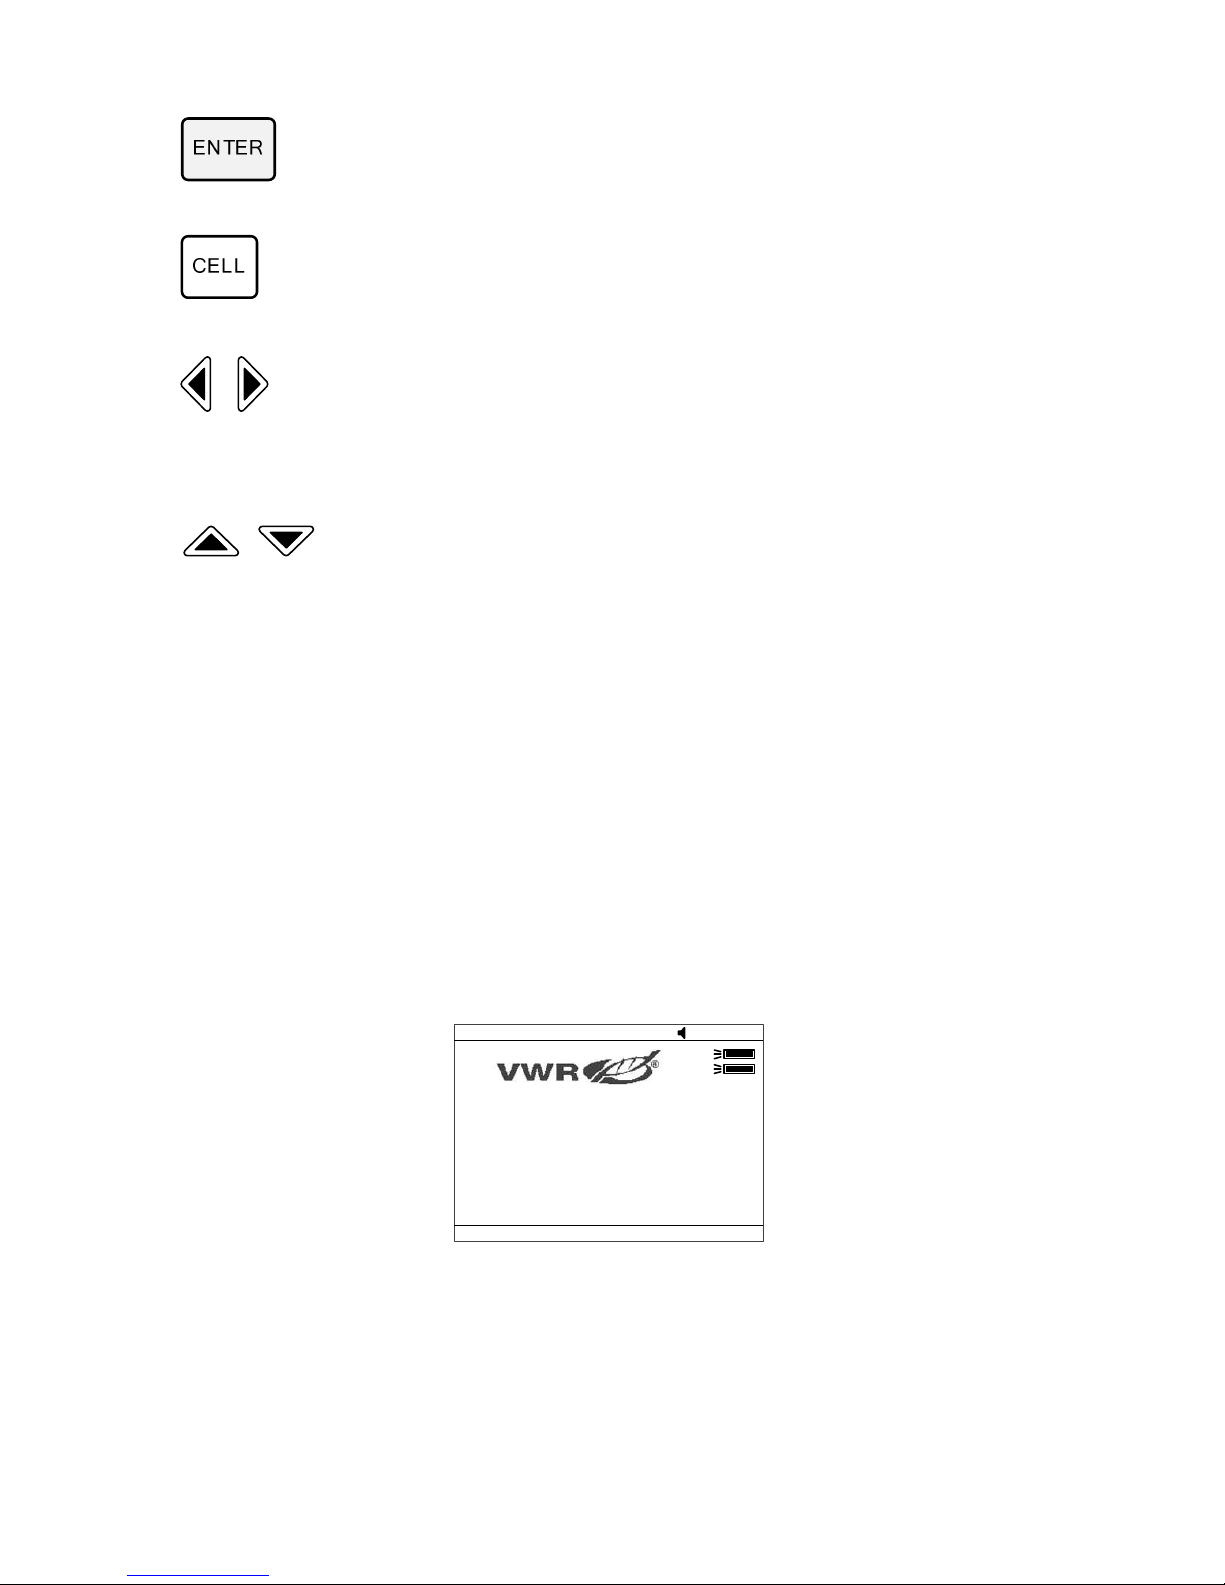
8
ENTER Key: Confirm operation
CELL Key: Select/Deselect Auto-cell Holder
,
RIGHT, LEFT Keys: Search peak/valley and set X
scale
,
UP, DOWN Keys: Scroll menu/data and set Y
scale
Getting Started
The following chart describes the basic operation of the instrument.
Turn On and Self-check
Switch on the power. Then the instrument begins to self-check and 15 minutes’ warm up.
Self-check includes the following steps:
WL: 500.0nm 10:00:00
D2
W
VWR International bvba
Wait until EasyRTOS booted:
Turn on lamps →RAM Check→ Start RTOS kernel→ Initialize Comm. Port → Initialize
Printer → Initialize AD → System position → Warm up.
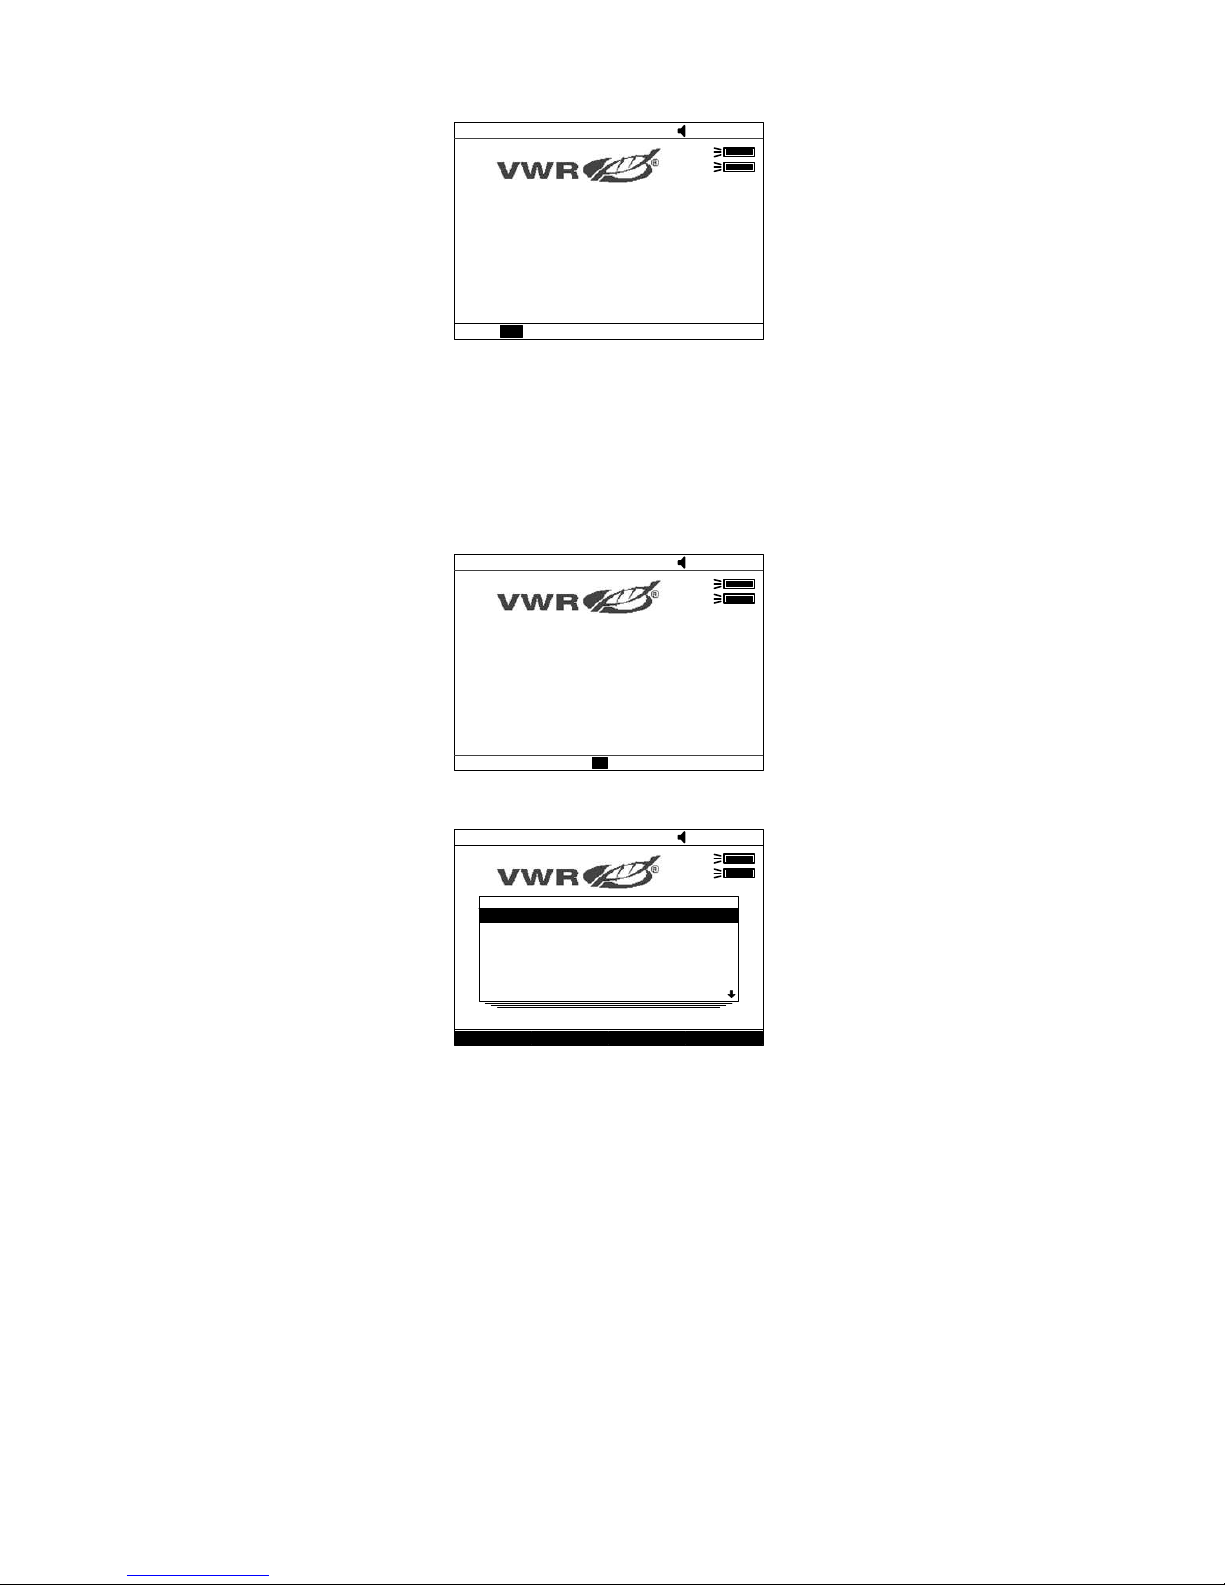
9
D2
W
Press ESC to skip…
WL: 500.0nm 10:00:00
Wait until EasyRTOS booted:
Warm up 15 minutes…………?
After warm up, the instrument will ask the user to re-calibrate the system. Users can
decide if they need to re-calibrate the system or not. After this step, the instrument can
work normally.
Wait until EasyRTOS booted:
Warm up 15 minutes…………?
D2
W
WL: 500.0nm 10:00:00
System calibration? No
D2
W
Cancel Move Dn Select
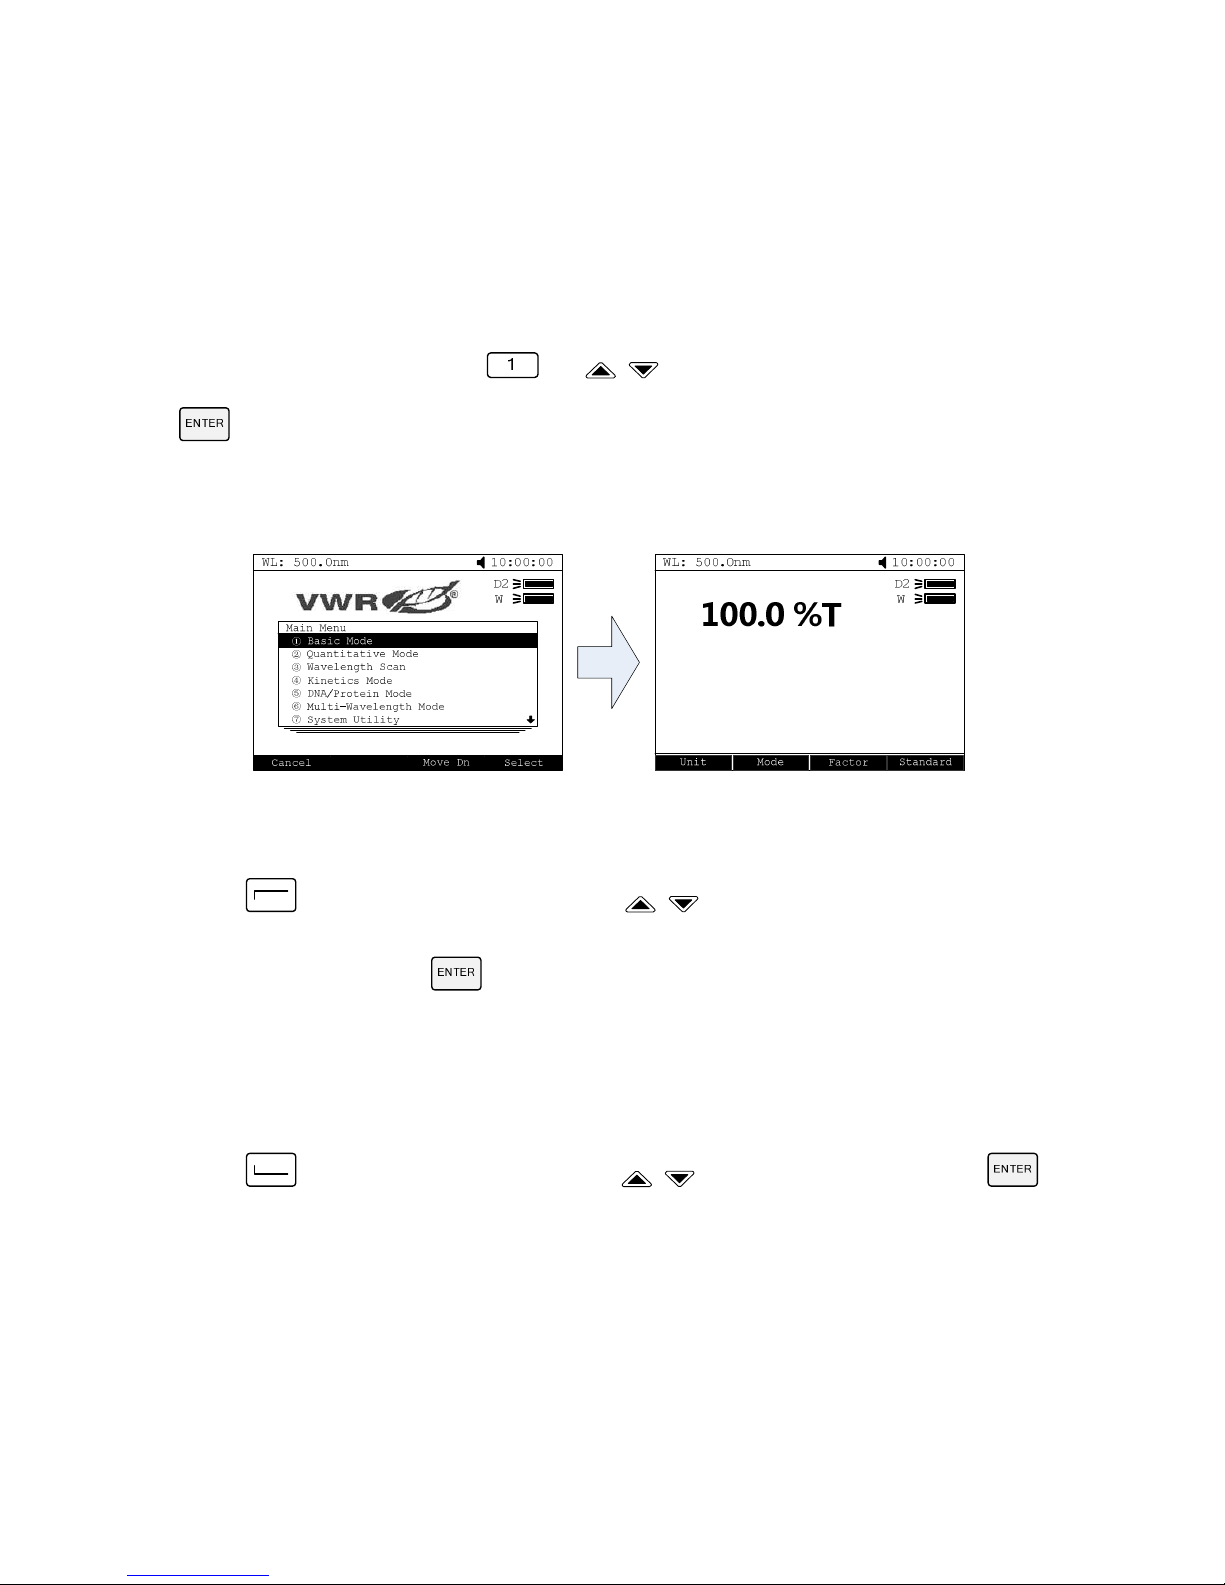
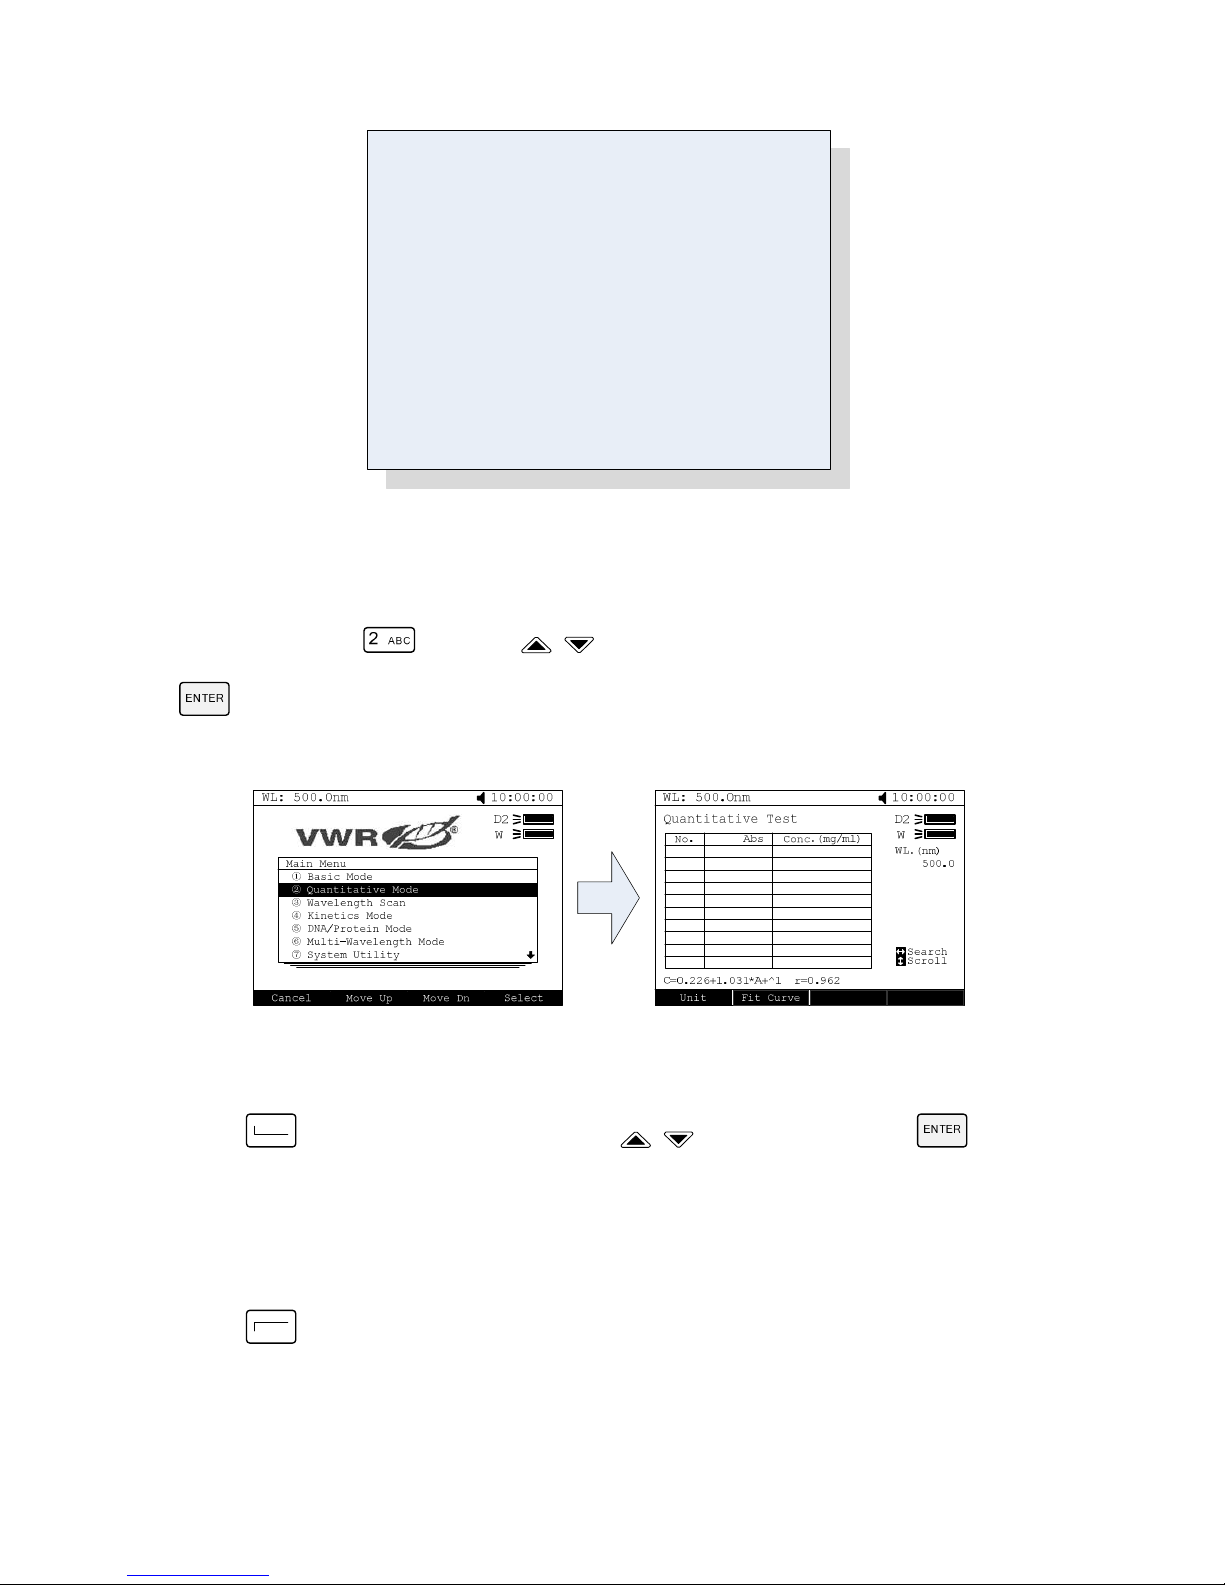
WL: 500.0nm 10:00:00
Main Menu
① Basic Mode
② Quantitative Mode
③ Wavelength Scan
④ Kinetics Mode
⑤ DNA/Protein Mode
⑥ Multi-Wavelength Mode
⑦ System Utility
Important Guidelines
Reagents and dilution buffers can cause cauterization and other damage to health.
Samples (nucleic acids, proteins, bacteria cultures) can be infectious and cause
serious damage to health.
During sample preparation, measuring procedures and maintenance and cleaning
work, observe all local laboratory safety precautions (e.g. wear protective clothing
and gloves, use of disinfectant) regarding the handling of sample material.

10
Dispose of measuring solutions and cleaning and disinfectant materials in
accordance with the relevant local laboratory regulations.
General Operating Instructions
Select Application
Main menu, press numeric keys or use the key , to choose corresponding menu,
then press to enter into.
Set Wavelength
Press to set wavelength, use numeric keys to input the values, press to
confirm and go to the point you set, then do blank automatically.
Set Parameters
In different application, press function key to set parameters, press , to choose or
input the values by numeric keys, press to enter into, press to return.
Set Auto-cell Holder
Press to active the auto cell holder and press the numeric key (1-8)to make
corresponding cell position at the light path. Press again to inactive the auto cell
holder.
Delete the Input Value
Press to delete a character, press to delete all the characters.
Delete the Test Results and Stored data
Press to delete the test result or stored data.
Blank
11
Put the Reference in the light path, press to do blank.
Measure Samples
Put the samples in the light path, press to measure.
Print the Test Results
Press to print the test results.
Store the Test Results
Press to store the test results, input the file name by numeric keys and press
to save.
Load the Stored File
In the test interface, press to go into file selecting interface, press , to
choose the file you want, press to open.
Operation
Self-check
Remove all the blocks in the light path and close the lid of the compartment; Switch on the
power supply to begin the self-test.
Warm up
After self-test, the instrument goes into pre-warm state. For accurate test, at least 30
minutes of warm up is required.
12
Check the cuvettes
The cuvettes must be clear and there’s no remains of the samples on the surface of it.
Only Silicon (Quartz) cuvettes are permitted to be used in the range of UV area.
Basic Mode
1. Enter into Basic Mode
Main menu, press numeric key or , to choose “Basic Mode”, then press
to go into.
2. Set Photometric Mode
Press to set photometric mode. Press , to choose “Abs.”, “T%” or
“Conc./Factor” and press to confirm. If users choose “Abs.” or “T%”, please go to
step 5 directly.
3. Set Concentration Unit
Press to set concentration unit. Press , to choose unit followed with
pressed to confirm. You can also choose “other” to input the self defined unit.
4. Set “Factor” or “Standard”
Two methods are under your choice:
Method 1::::Input Factor F
13
Press to set F. Input the value of F by numeric keypad, press to
confirm. Then the F value would display on the screen.
Method 2::::Standards Mark
Put the reference sample in the light path and calibrate 100%T/0Abs; Put the
standard sample in the light path,press to start the mark. Input the
concentration value of the standard and press to confirm, then it displays
on the screen.
5. Set Wavelength
Press to set wavelength, input the value by the numeric keypad followed with
pressed to confirm.
6. Blank
Put the Reference in the light path and press to do blank.
7. Measurement samples
Put the sample to be measured in the light path, then the result displays on the screen
automatically.
8. Print the Test Results
Press to print the Test Results.
14
Basic Mode Test Report
Wavelength: 500.0nm
Result: 0.000 Abs
Date & Time: mm-dd-yyyy, hh:mm:ss
Model: UV-3100PC
SN: UEFXXXXXXX
Version: A1.176
VWR International bvba.
Quantitative Mode
1. Enter into Quantitative Mode
Main menu, press or press , to choose “Quantitative Mode” followed with
pressed to confirm.
2. Set Unit
Press to set concentration unit, press , to choose and press to
confirm.
3. Set up Standard Curve or load the stored curves
Press to go into set up interface, 2 methods are under your choice.
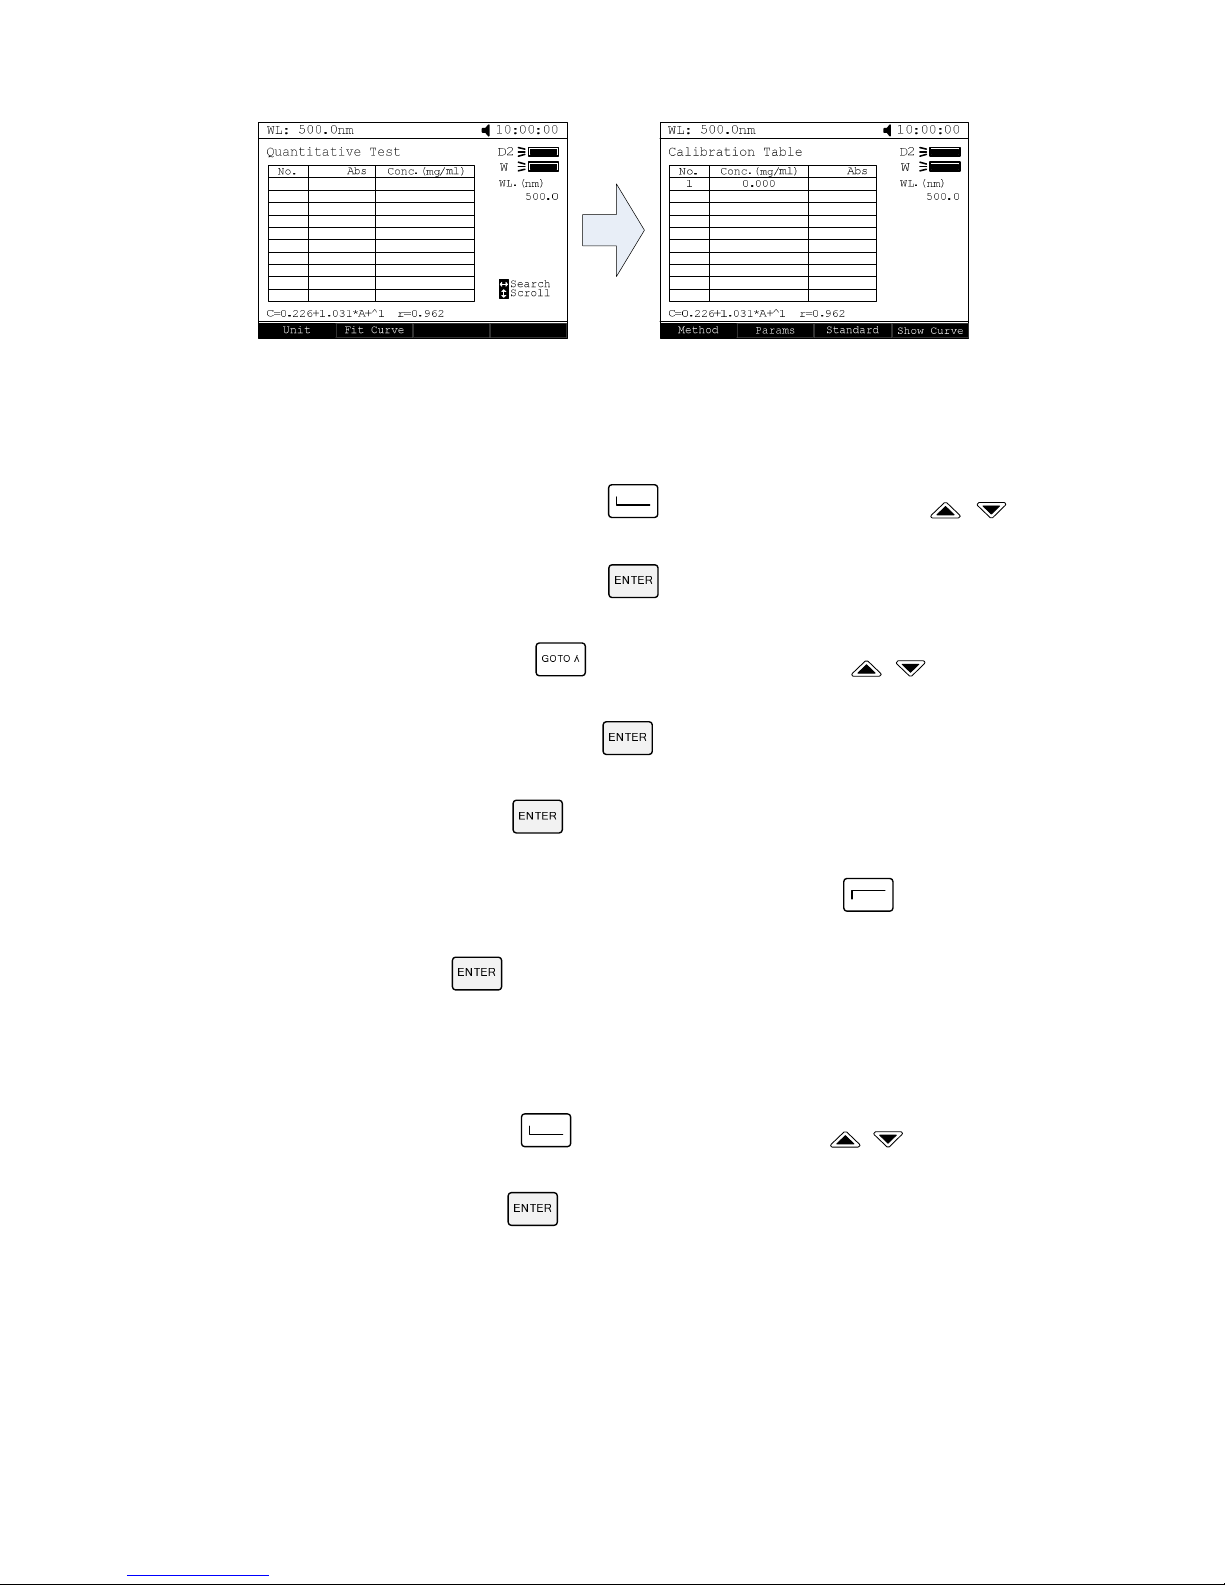
15
Set up Standard Curve:
Method 1: Input Regression Equation
1) Set Fit Curve Method. Press to set Fit method,use , to
choose the method and press to confirm.
2) Set Wavelength. Press to set wavelength. Use , to choose
measure method, then press to confirm. Input the wavelength value
you need and press to confirm.
3) Input the Factor of the Regression Equation. Press and input the
factors, press to confirm.
Method 2: Use Standard Samples
1) Set Fit Method. Press to set fit method, press , to choose fit
method, then press to confirm.
16
2) Set Wavelength. Press to go into wavelength setting interface, press
, to select measure method and press to confirm. Input the
value of the wavelength and press to confirm.
3) Blank. Put the Reference Sample in the light path and press to do
blank.
4) Setup Standard Samples. Press to setup standard, input the
concentrations of corresponding standard samples according the indication
and press to confirm. Users can use , to choose the value
you just input and press to delete, then input a new value, press
to confirm. Press to cancel after all the input.
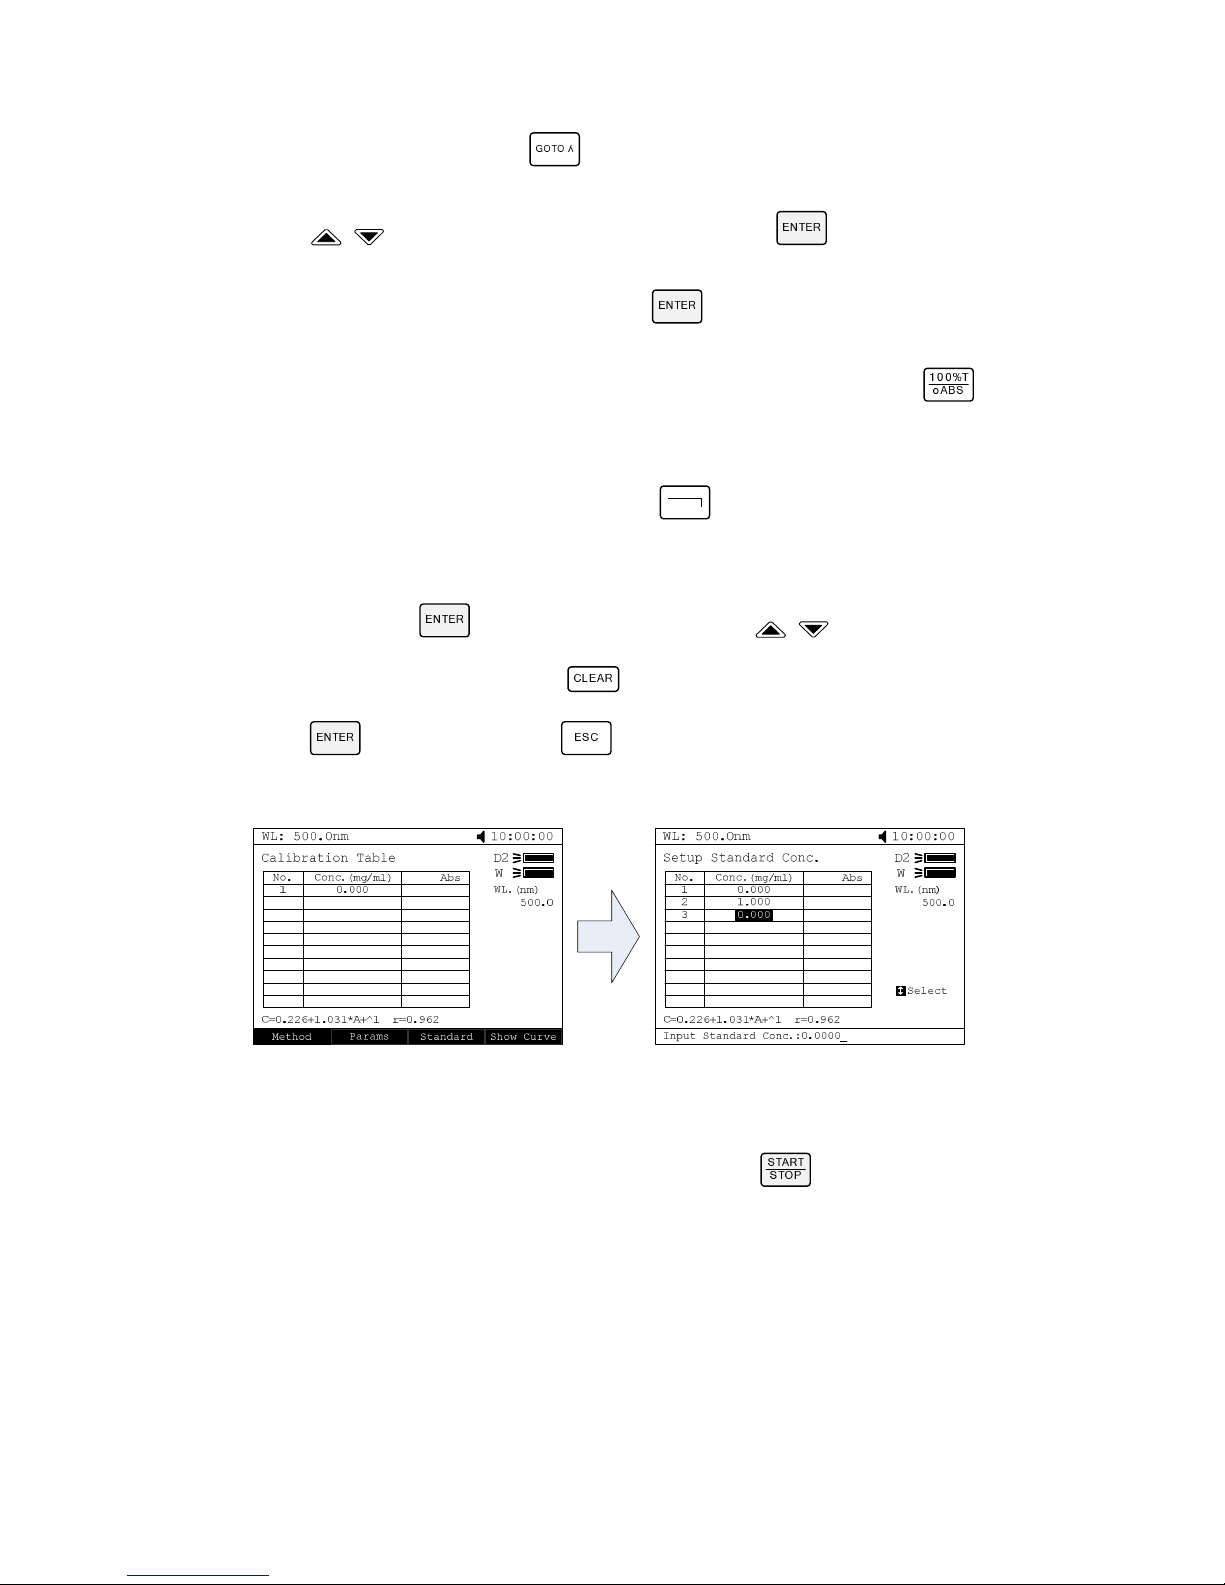
5) Calibrate Standard Samples. Put the corresponding standard samples in the
light path as the screen indicates and press to measure. Then the
Abs. value would appear in the corresponding table.

17
Load the Stored Curves
In the “Calibration Table” interface, press to go into files select interface. Use
, to select the curve you need and press to load. Users can press
to view the curve, press to cancel.
0 Conc. 4
4. Return the sample measurement interface
In the “Calibration Table” interface, press to return the Quantitative Test interface.
5. Blank
18
Put the Reference Sample in the light path, press to do blank.
6. Measure Samples
Place the sample to be tested in the light path, press to measure. Then the test
result will display in the data sheet. Repeat this step to finish measuring all the samples.
7. Print the Test Results
Press to print the Test Results.
Quantitative Test Report
File Name: Abc
Date & Time: mm-dd-yyyy, hh:mm:ss
No. 500.0nm Abs(eff) C(mg/L)
1 0.212 0.212 0.212
2 0.210 0.210 0.210
3 0.209 0.209 0.209
Fitting Params:
C=1.000*A^1
r=1.000
Model: UV-3100PC
SN: UEFXXXXXXX
Version: A1.176
VWR International bvba.
19
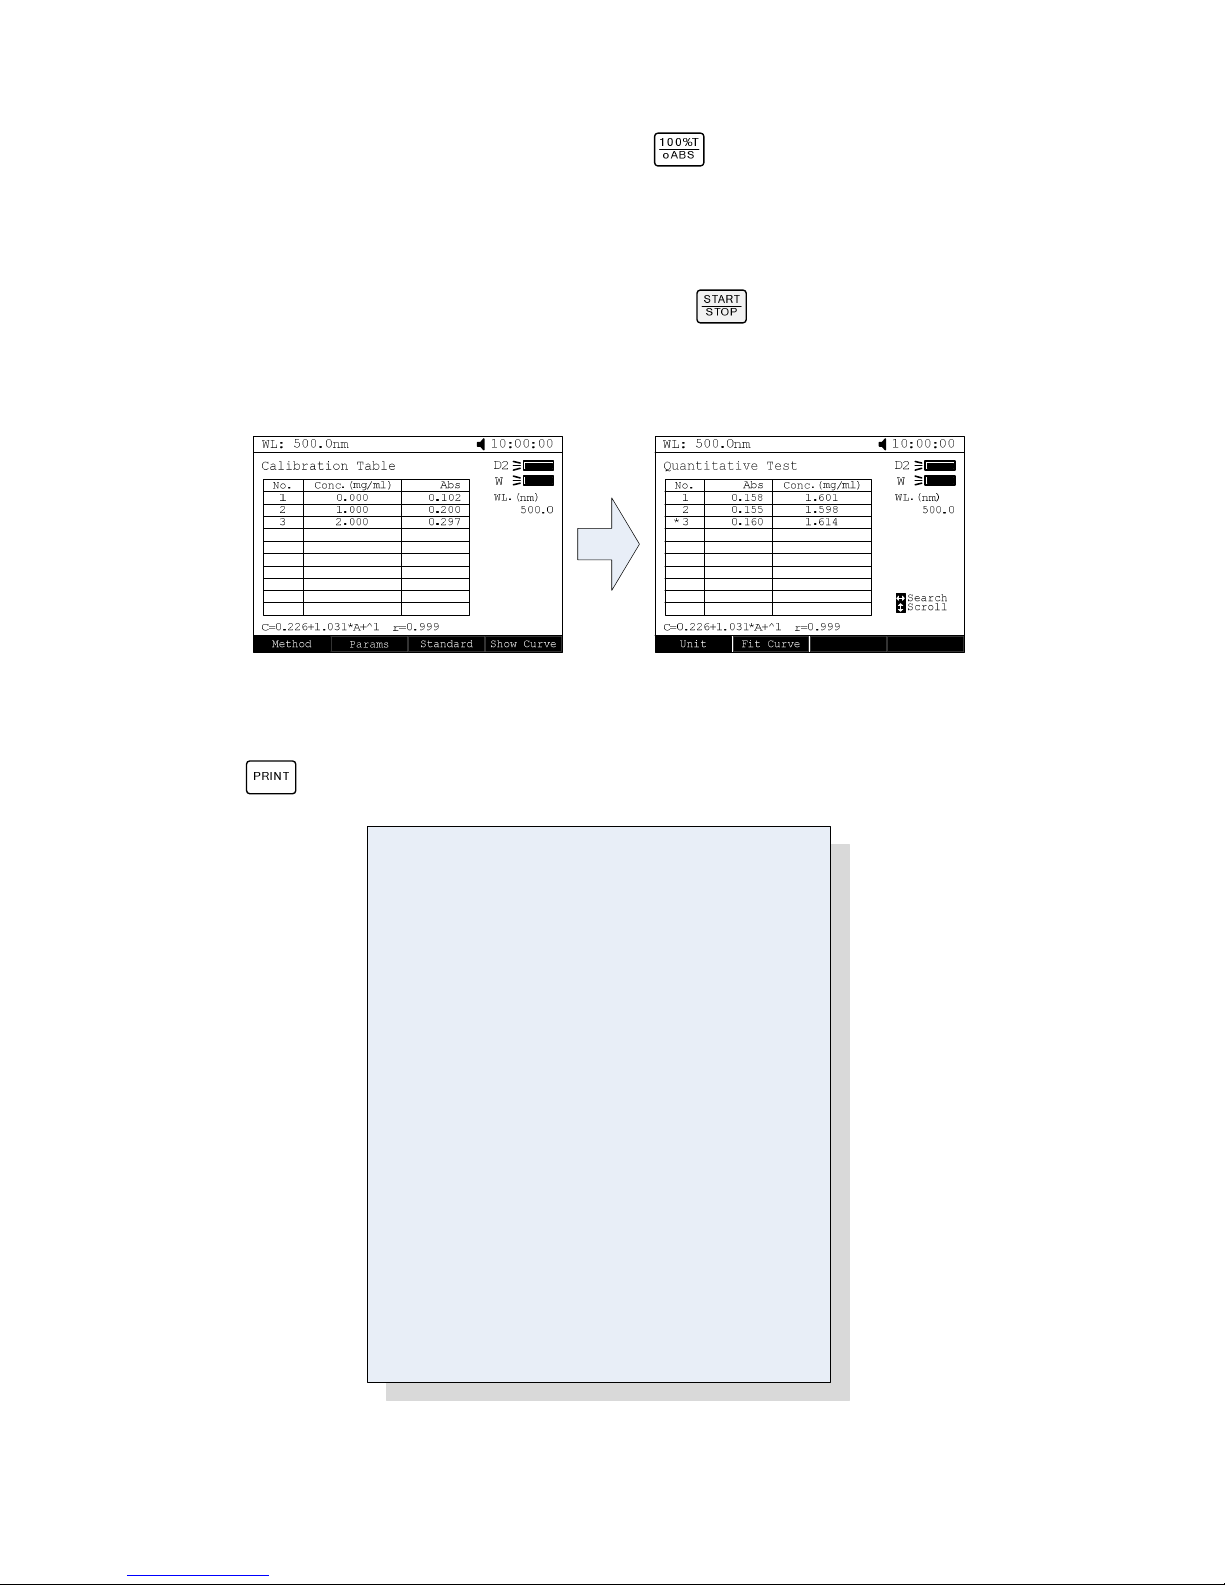
Wavelength Scan
1. Enter into Wavelength Scan
Main menu, press numeric key or , to choose “Wavelength Scan” and
press to enter.
0.000 Abs 1.200
2. Parameters Setup
Press to set parameters, set “Scan From” , “scan to”, “scan step” and “scan speed”,
press to confirm.
3. Set Photometric Mode
Press to set photometric mode,choose “T%”, “Abs.” or “E” and press to
confirm.
4. Scan Baseline
Put Reference Sample in the light path, press to scan the baseline, press to
cancel.
5. Scan Samples
Put the samples in the light path,press to scan the sample, press to
cancel.
 Loading...