

I
I
I
N
N
N
S
S
S
T
T
T
R
R
R
U
U
U
C
C
C
T
T
T
I
I
I
O
O
O
N
N
N
M
M
M
A
A
A
N
N
N
U
U
U
A
A
A
L
L
L
VWR Cooled Incubators
INCU-Line 68R: 390-0728
INCU-Line 150R: 390-0729
INCU-Line 250R: 390-0731
Before using the equipment, please read carefully
this instruction manual!
Version 3.6
Instruction Manual INCU-Line Cooled
Page 2 / 32
Legal Adress of Manufacturer:
Country of Origin: Poland
Instruction Manual INCU-Line Cooled
Page 3 / 32
Instruction Manual INCU-Line Cooled
Page 4 / 32

Instruction Manual INCU-Line Cooled
Page 5 / 32
Contents
1 IMPORTANT INFORMATION FOR THE USER ............................................................. 7
2 PACKAGE CONTENTS ................................................................................................. 7
3 BEFORE THE FIRST USE ............................................................................................. 8
3.1 Installation of shelf ................................................................................................... 9
3.2 Remarks on the type of samples .............................................................................. 9
3.3 Remarks on the placement of samples .................................................................. 10
4 DEVICE DESCRIPTION ............................................................................................... 11
4.1 Control panel ......................................................................................................... 12
4.2 Programming possibilities ...................................................................................... 13
5 OPERATING THE DEVICE .......................................................................................... 14
5.1 Start-up .................................................................................................................. 14
5.2 Temperature control............................................................................................... 14
6 HOW TO OPERATE THE CONTROLLER ................................................................... 15
6.1 Simple mode .......................................................................................................... 15
6.1.1 To stop the unit in the simple mode .................................................................... 15
6.1.2 To start the unit in the simple mode .................................................................... 15
6.2 Switching between simple and complex modes ..................................................... 16
6.3 Complex mode....................................................................................................... 16
6.3.1 Editing program parameters ............................................................................... 16
6.3.2 To start a saved program ................................................................................... 18
6.3.3 To stop a program .............................................................................................. 18
7 SETTINGS OF DEVICE ................................................................................................ 18
8 TEST RESULTS MEMORY .......................................................................................... 20
9 BASIC CONTROL SOFTWARE ................................................................................... 21
10 STATISTICS ................................................................................................................. 22
10.1 Preview of statistics. .............................................................................................. 22
11 ALARMS ...................................................................................................................... 23
11.1 To set an alarm ...................................................................................................... 24
11.1.1 Clock alarm ........................................................................................................ 24
11.1.2 Power alarm ....................................................................................................... 24
12 TEMPERATURE PROTECTION .................................................................................. 24
13 OPERATION OF THE COOLING SYSTEM .................................................................. 25
14 CLEANING AND MAINTENANCE OF THE DEVICE ................................................... 26

Instruction Manual INCU-Line Cooled
Page 6 / 32
14.1 Housing cleaning ................................................................................................ ... 26
14.2 Interior cleaning ..................................................................................................... 27
15 RESUMING OPERATION AFTER A LONGER PERIOD OF TIME .............................. 27
16 TROUBLESHOOTING ................................................................................................. 28
16.1 REPLACEMANT OF FUSE .................................................................................... 29
17 PRODUCT IDENTIFICATION LABEL .......................................................................... 29
18 WARRANTY CONDITIONS .......................................................................................... 30
19 TECHNICAL DETAILS ................................................................................................. 31

Instruction Manual INCU-Line Cooled
Page 7 / 32
1 IMPORTANT INFORMATION FOR THE USER
To guarantee your security and the longest efficiency of the unit, please comply with the following rules:
1.
The unit cannot be installed:
• outside,
• in damp places or places which can be easily flooded,
• near flammable or volatile substances,
• near acids or in corrosive environments.
2.
It is forbidden to:
• store inflammable or volatile substances inside the unit,
• touch live parts of the unit
• operate the unit with wet hands,
• put water vessels on the unit,
• climb or put any objects on the unit,
• do not overload the shelves ( the maximum load is described in technical data)
3.
You should:
• place samples in such a way to provide proper air circulation in the chamber
• open the door for the shortest period of time to reduce temperature fluctuations
• defrost the chamber more often if you open the door a lot or store humid samples
• if possible, do not store warm samples
• secure samples from being blown out by the chamber fan e.g powdery samples
• always check that the doors are closed
• use only mains with earth to avoid electric shocks,
• unplug the power cable holding the protective cover and not the cable itself,
• disconnect the unit from the mains before undertaking any repairs or maintenance works,
• protect the power cable and the plug from any damage
• disconnect the power plug before moving the unit,
• disconnect the power plug if the device will not be used for a long period of time,
• disconnect the unit and protect it from reconnecting if it has any visual faults.
2 PACKAGE CONTENTS
INCU-Line devices are delivered with the following equipment:
INCU-Line 68R, 2 wire shelves with set of slides – 2 pcs. each, keys to the lock (2pcs.), Manufacturer test
certificate at 37oC, Multilingual instruction manual and Basic Control Software (on CD) for download data
from internal memory
INCU-Line 150R, 2 wire shelves with set of slides – 2 pcs. each, 1 bottom wire shelf with set of slides (2
pcs.), keys to the lock (2pcs.), manufacturer test certificate at 37oC, Multilingual instruction manual and
Basic Control Software (on CD) for download data from internal memory
INCU-Line 250R, 3 wire shelves with set of slides – 2 pcs. each, 1 bottom wire shelf with set of slides (2
pcs.), keys to the lock (2pcs.), manufacturer test certificate at 37oC, Multilingual instruction manual and
Basic Control Software (on CD) for download data from internal memory
Instruction Manual INCU-Line Cooled
Page 8 / 32
3 BEFORE THE FIRST USE
On the surface of unit components made of stainless steel, slight discoloration may occur. It is a result of
the technologies used in the production of metal sheet in accordance with the requirements of PN-EN
10088-2 standard and it is not a defect of the unit.
While carrying the unit, please do not tilt it to one side more than 45° from the upright position,
as there is a high probability of the damaging the compressor. If it is necessary to tilt it to one
side more than 45°, then after placing it, please wait at least 3 hours before connecting the unit
to the mains.
The place of installation of the unit should meet the following conditions:
• Ambient temperature +10°C...+28°C, for INCU-Line 68R (with glass door) +10°C...+25°C,
• Low relative humidity of the ambient air to 60%
• The unit has not been designed to work in highly dusty environments
• The place of installation should be appropriately ventilated according to its size
• The unit should be put on a hard and stable substrate
• The unit should be placed at least 100mm away from the wall
• The height of the room must be at least 300mm greater than the height of the unit
• This unit may not be exposed to direct sunlight
• The unit should be kept away from any heat sources
• The unit is not designed to be built-in
• The place of installation of the unit should contain a mains socket.
If you don’t comply with the above recommendations, the unit may get broken or it may worsen the tech-
nical parameters.
The electric installation should meet the following conditions:
The electric installation should be secured by a 16 A antisurge fuse.
The device is powered by AC 230V/50Hz. Please connect it to a socket with ground in order
to avoid electric shocks in case of the unit’s failure.
Instruction Manual INCU-Line Cooled
Page 9 / 32
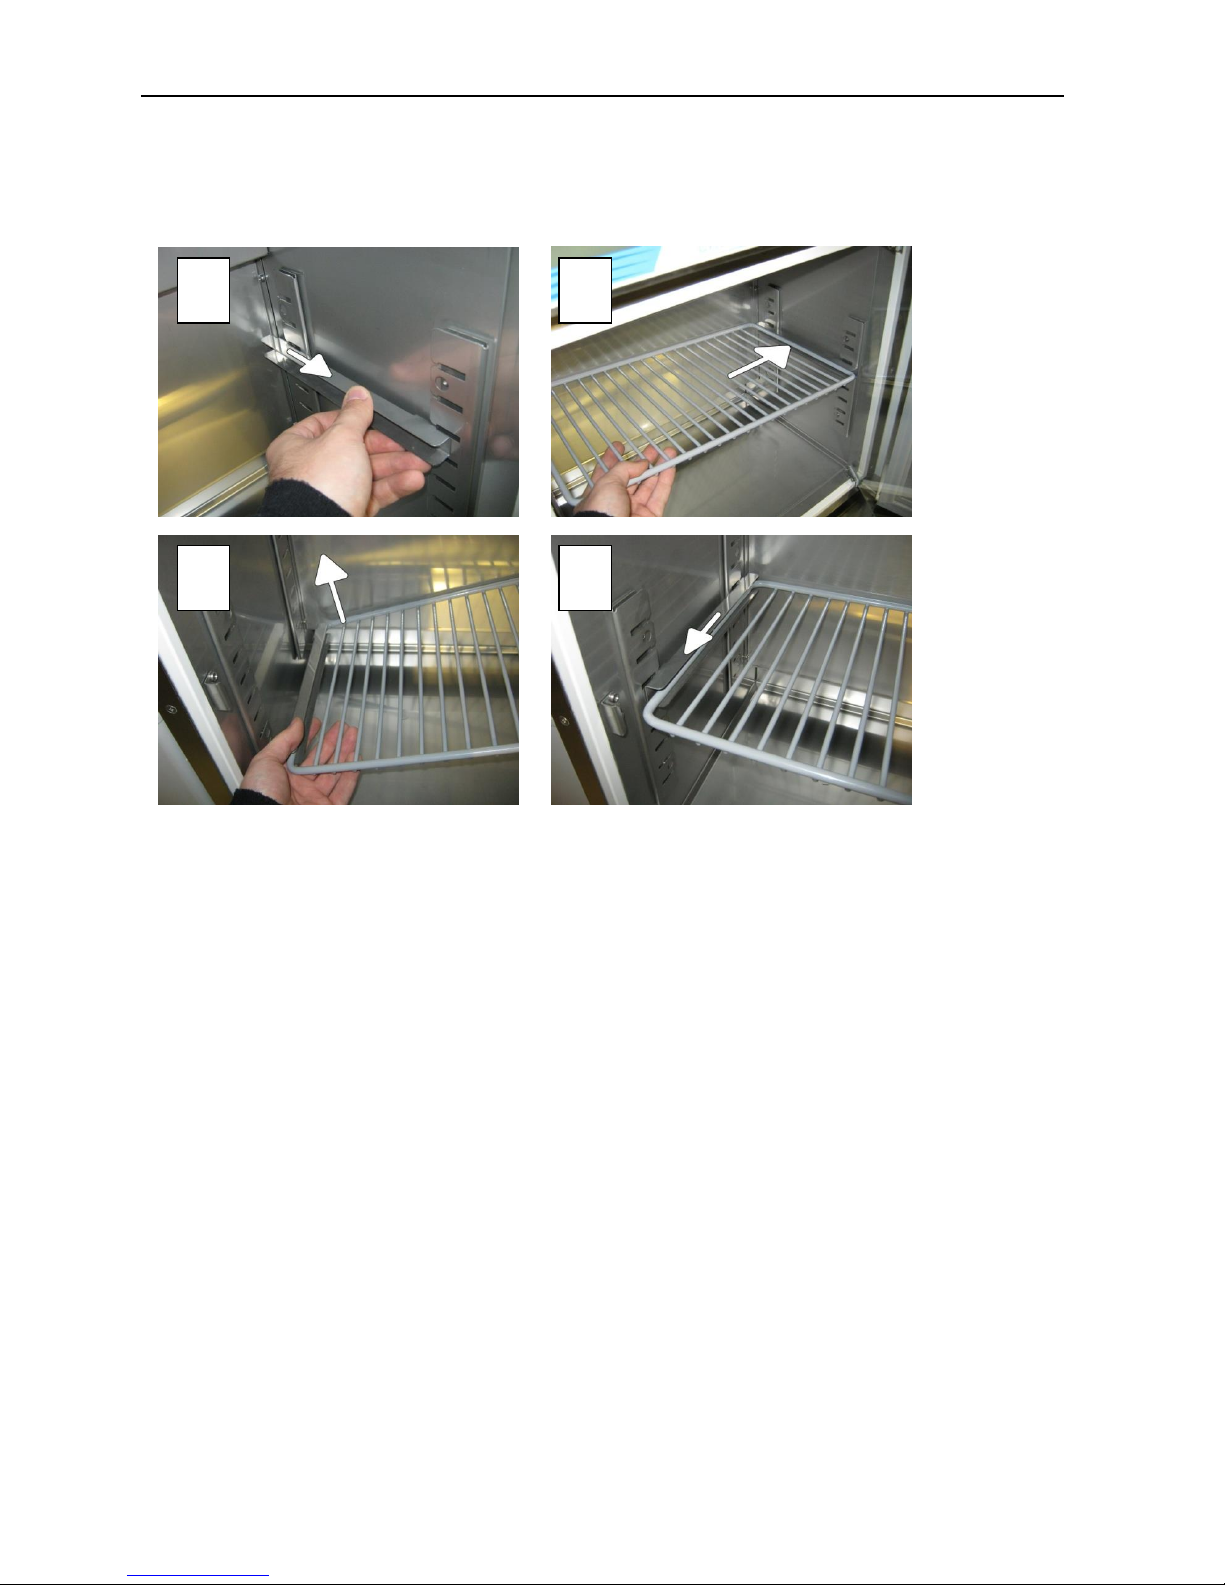
3.1 Installation of shelf
Perform the following steps to adjust shelf height:
1) Install the shelf holder at the selected height by inserting it into proper slots on the wall.
2) Insert the shelf into the holder on one side.
3) Slide the second shelf holder onto the other side of the shelf.
4) Insert the shelf holder into proper slots on the other wall.
To remove a shelf, perform the above steps in reverse order. To remove the shelf holder from the slots, lift
it up and slide it towards the rear of the chamber.
3.2 Remarks on the type of samples
Water may gather on the bottom of the chamber. It is a result of condensation of the water vapor located in
air if the set temperature is considerably lower than the ambient temperature.
The amount of water depends on the following factors:
- Differences between ambient and set temperatures
- Number and frequency of door openings
- Temperature of samples
2
1
4
3
Instruction Manual INCU-Line Cooled
Page 10 / 32
Do not use any cardboard boxes, sponges and other hygroscopic materials for storing the samples since
they may increase the relative humidity in the chamber.
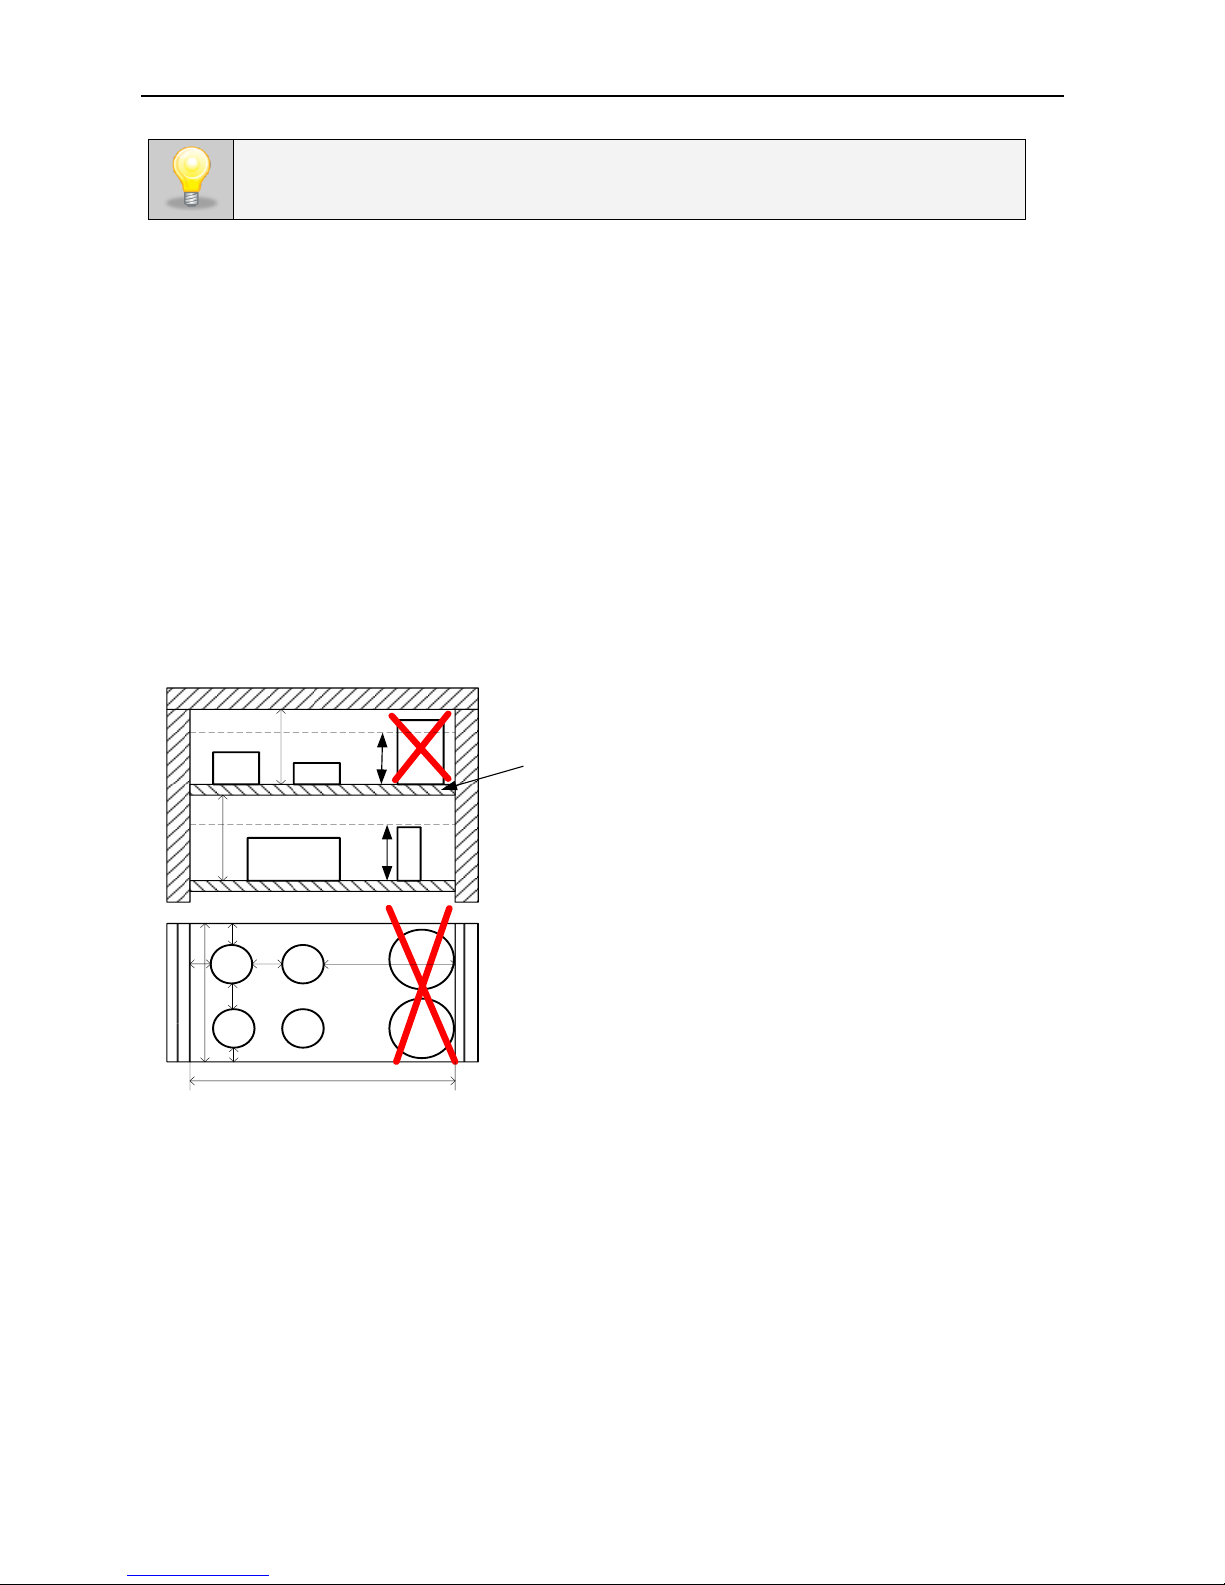
3.3 Remarks on the placement of samples
To provide proper air circulation and stable conditions in which the samples are stored in the chamber, it is
necessary to keep the following rules:
- the max height of the samples should not exceed 1/3 of the space below the shelves
- the samples should be placed in such a way that so that the horizontal surface between the
containers does not exceed 1/3 of the width and height of the empty shelf
- the space between the samples and between the samples and the wall should be more or less
equal
The picture below is an example of the placement of samples in the chamber.
Hmax
H
Hmax
a
u
v w
x
y z
b
u+v+w > 1/3 a
x+y+z > 1/3 b
Hmax = 2/3H
u v w
x y z
H
≅
≅ ≅
≅
Front view
Top view
Shelf
Following the above rules will provide best optimal parameters of temperature stability and uniformity.
If water gathers, use a dry cloth to wipe the bottom of the chamber.

Instruction Manual INCU-Line Cooled
Page 11 / 32
4 DEVICE DESCRIPTION
(1) RS-232C and USB socket
(2) Electronic controller with LCD display
(3) Chamber fan
(4) Access port (30mm)
(5) Shelf
(6) Key lock
(7) Main switch
(8) Internal electrical socket
(9) Internal lighting LED
(10) Temperature sensor
(11) Height adjustable feets
(12) Mains socket (for power cable)
(13) Condenser
(14) Compressor
13
14
12
7
10
1 2 3
4
5 6 8
9
11

Instruction Manual INCU-Line Cooled
Page 12 / 32
4.1 Control panel
The control panel is used to check the current temperature inside the chamber as well as to program and
set up the parameters of the device.
(1)
(1) Quick turn on/off button
(2) Alarm signalization (red LED)
(3) LCD graphical display
(4) Escape/exit button
(5) Down button
(6) Up button
(7) Enter/accept button
The value may be changed by the following buttons: / up/down (selection keys). Confirm using the
enter button. The program continues to set the next parameter. If the parameter value is incorrect, using the selection keys / up/down select the parameter again and set the correct value. To exit the
current window, please press down the ESC button.
Internal lighting LED
Internal lighting is switched on automatically when the outside door is open. For INCU-Line 68R the internal
light can be switched on even when the glass door is closed. Press down the enter button and hold it
for about 2 sec to switch on the light. Once the light has been switch on, a bulb icon will appear on the display.

Instruction Manual INCU-Line Cooled
Page 13 / 32
4.2 Programming possibilities
There are two temperature program modes of the device: simple and complex. In the simple mode the
stress is on maximum simplification of the programming procedure. The only parameter needed to start the
program is setting up the desired temperature.
The complex mode offers more possibilities in terms of programming the temperature, it is also possible to
set up a six-segment time-temperature program.
Programming mode is defined in the menu settings (parameter Prog.mode )
The possibilities of the program controlling the operation of the device depend on the type of the device.
The most advanced software allows storing up to 3 six-segment programs.
Simple mode
Temperature
Time
Tp
To
Tp – set temperature
To – ambient temperature
Operating the device in this mode is extremely simple, with temperature being the only parameter needed
to set up.
Complex mode
The complex mode is used when there is a need to conduct research requiring varied temperature with
specific duration. In this mode you can also store programs consisting of a maximum of six segments. For
each segment you can set up temperature and its duration. For units with photoperiodic system you may
also switch on/off the light inside the chamber.
Device series
IL
Number of programs
3
Number of segments in
each program
6

Instruction Manual INCU-Line Cooled
Page 14 / 32
5 OPERATING THE DEVICE
5.1 Start-up
The main switch is located on the left side of the front panel.
To enter the parameters, please use the control panel which is located in the upper front part of the unit.
After the unit has been switched on, there is a self test of the following parts performed: EEPROM memory,
Data Flash memory, real time clock RTC, and a temperature sensor. After a successful auto-test, you will
see the main screen on the display:
- unit working in quick mode (see point 7.1)
- unit working in complex mode (see point 7.3), program 1 is active.
If the device has been switched off during an active program, it will automatically resume once the
device has been switched on again.
- no program is being carried out.
Start-up
To start-up the unit, please perform the following sequence:
after connecting the unit to the mains, please switch it on using the on/off switch
please press down the button which is located below the control panel after a successful start-up
Switching off the unit
please press down the button which is located below the control panel
after a successful shut down, there is no illumination of the display
the user may switch off the unit completely using the on/off switch located in the front panel
5.2 Temperature control
The device has been adjusted and calibrated. The calibration is carried out in accordance with the manufacturer's procedures and instructions, using instruments which are inspected regularly.
Temperature is measured by a sensor built inside the chamber and its value shows on the display of the
control panel. The device has been calibrated in such a way that the display shows the temperature in the
middle of the chamber.
Use the main switch to turn off the unit only if you are not going to use it for a longer period of time
(e.g. a couple of days) or for maintenance.

Instruction Manual INCU-Line Cooled
Page 15 / 32
6 HOW TO OPERATE THE CONTROLLER
6.1 Simple mode
After the unit has been turned on, you can see the set temperature on the display. You can change the
value using the UP/DOWN / buttons. Press ENTER to confirm.
Example:
Press UP or DOWN to edit the temperature.
The temperature will flicker. Use UP or DOWN to set a new
temperature. Press ENTER to confirm.
Use UP or DOWN to set the decimal value and confirm with
ENTER .
A new temperature has been set.
You can press ESC at any time to cancel.
6.1.1 To stop the unit in the simple mode
Press ESC twice. You will see STOP on the display. Confirm with ENTER .
6.1.2 To start the unit in the simple mode
In the main window, please press ESC twice. You will be able to set the temperature as described
above. Once set, press ENTER to confirm. The unit will start achieving the set temperature.

Instruction Manual INCU-Line Cooled
Page 16 / 32
6.2 Switching between simple and complex modes
The complex mode is used when there is a need to conduct research requiring varied temperature with
specific duration. In this mode you can also store programs consisting of a maximum of six segments. For
each segment you can set up temperature and its duration.
To switch from simple to complex mode, perform the following steps:
In the main window press ESC to enter the MENU.
Enter SETUP using ENTER . Press down and choose
PROG.MODE.
Press ENTER . The setting will flicker.
Press and choose >complex<.
Confirm with ENTER .
To switch from complex to simple mode, perform the above steps analogically.
6.3 Complex mode
6.3.1 Editing program parameters
It is impossible to make changes to a currently running program – it needs to be terminated
first.
You can press ESC at any time to cancel the adjustment.

Instruction Manual INCU-Line Cooled
Page 17 / 32
In the main window press ESC twice.
Enter PROGRAMMING using ENTER .
Choose the program you want to edit using and .
Press ENTER , then use and to set the number of
segments. Confirm with ENTER .
Then you can choose the set temperature for segment 1. Use
and to set a new value, then confirm with ENTER . Set
the decimal value in the same way.
Now you can set the segment time in dd:hh:mm format.
If the program has more than one segment, you can set its parameters here.
Here you can set start delay in hh:mm format if required.
Here you can set if the program should run in cycles:
- it can be OFF, the program will stop after finishing
- infinite cycles – the program will continue to run till it is stopped
by the user

Instruction Manual INCU-Line Cooled
Page 18 / 32
- you can define the number of cycles between 2 and 99
After all parameters have been set, you can start the program.
Use ENTER to confirm.
6.3.2 To start a saved program
In the main window, press .
Using and choose the program you would like to start and
press .
6.3.3 To stop a program
In the main window press twice.
Confirm with .
7 SETTINGS OF DEVICE
To set up working parameters of the device go to the ‘SETUP’ menu. Using / the UP/DOWN and
then ACCEPT buttons you can change the relevant options.
In the main window press ESC twice to enter MENU.

Instruction Manual INCU-Line Cooled
Page 19 / 32
Choose SETUP using .
Press ENTER to enter the menu.
Description of options available in the ‘SETUP’ menu:
TIME ALARM, TEMP ALARM.,
POWER ALARM,
More information in 10.1
[hh:mm], first you set up the hour, then the minutes. You change the
value using / the up/down buttons and confirm with the ac-
cept button. The program automatically moves to setting the next value.
After selecting a sub-menu the user is able to choose a protocol for
each socket separately – Please press the button. Available proto-
cols:
- none (interface off)
- text (protocol for printers with serial port, terminal),
- service (service and text protocol).
- dedicated software
After selecting a protocol with / buttons, the user is able to determine its settings.
- Print interval: [mm:ss] determines the interval after which data is
sent to the serial port (available in service and text protocols),
- address [1-255] – determines the address of the instrument connected to the network
selecting the type of programming the device, there are two options
available ‘simple’– simple mode and ‘complex ‘ – complex mode of
programming the device. See point 5.4.
There is a possibility to choose controller backlight mode. “Fixed”
mode means constant backlight. “Temporary” mode means that the
backlight will go off in approximately one minute from the last bottom
touch.

Instruction Manual INCU-Line Cooled
Page 20 / 32
8 TEST RESULTS MEMORY
In MENU choose LOGGER
To choose from DATA or EVENTS.
In the menu you can set the interval time of saving temperature in the
chamber. Note <00:15> means, that every 15 minutes data of temperature will be registered in internal memory (max 2048 results). If the
memory will be fulfilled, the data will be over written.
Erase the data.
Reading the data from logger is possible by using a PC application –
Basic Control
Event window opens the internal event logger.
Command ‘view will display events like: start, stop or end of program
as well as loss and return of power, alarm of over temperature, door
openings.
Sample of displayed events and occur time of the event. After pressing
and pushing the date of the event will be displayed.
Erasing the event from the memory (max. numbers of saved events is
110), If the memory will be fulfilled, the data will be over written.
Reading the data from logger is possible by using a PC application –
Basic Control.

Instruction Manual INCU-Line Cooled
Page 21 / 32
9 BASIC CONTROL SOFTWARE
Data from test results memory can be downloaded to PC by BASIC CONTROL software with instruction
manual located on supplied CD. To do this:
1. Install BASIC CONTROL software and launch it.
2. Connect incubator to PC using USB port in the device and computer (using appropriate USB cable).
3. In menu SETUP, choose COMUNICATION à USB port and choose BASIC CONTROL. During the
first connection, PC will automatically install the driver support.
4. In program BASIC CONTROL, select CONNECT and specify COM port to which the device is connected. By clicking ACCEPT, the connection will be established.
5. When you choose DOWNLOAD, the data will be downloaded from device memory to PC. The data
will be shown on the screen in a table form.
6. Data can be exported to test file or *.csv
7. Message ‘No data registration’ means that the memory in the device is empty. The data was
erased or the interval was set on so high value, data has not been stored yet.
To break the connection, choose DISCONNECT.

Instruction Manual INCU-Line Cooled
Page 22 / 32
10 STATISTICS
While a program is operating it is possible to check the average, minimum and maximum temperature value for all time-temperature segments. The values starts to register when unit reach the set temperature (or
to be more precise when the temperature inside the chamber is 0,2°C different from the programmed temperature) at a ten-second interval.
Once a segment is finished, the recording stops and the device moves to the next temperature – defined
for the next segment. When next set temperature is reached – the recording starts again. For multisegment programs there are available statistics for each segment. If the program has not reached a segment yet, the display shows 'none data ' (there is no data available using which the average, minimum and
maximum values are calculated).
10.1 Preview of statistics.
In the main window press ESC .
Enter STATISTICS using ENTER .
Using and choose the segment which you want to see the
statistics of, then press ENTER .
Using and you can see the average, max and min temperature recordings.
You can also see how many recordings are available.
If the simple mode is active the statistics of chosen segment is not possible to preview.

Instruction Manual INCU-Line Cooled
Page 23 / 32
Choose RESET and confirm with ENTER to zero the
recordings.
11 ALARMS
Every alarm is signaled by red diode placed on front panel, sound and
'ALARM' text shows on display. Pressing the accept button you can
see date and time of alarm event and kind of alarm. The alarm will appear
when:
1. temperature sensor is damaged – the alarm message - 'sensor error'.
2. temperature in a given temperature segment, after the set temperature is reached:
a) is higher than the set point at least by the value set by the user in the menu: SETUP / ALARMS /
ALARMTEMP.HI - the alarm message 'HI temp'.
b) is lower than the set point at least by the value set by the user in the menu: SETUP / ALARMS /
ALARMTEMP.LO - the alarm message 'LO temp'.
3. power failure - alarm message 'power failure' only if it was turned on by the user in the menu: SETUP /
ALARMS / POWER ALARM.
4. door has been opened - alarm message 'open door' will appear after the set time in the menu: SETUP
/ ALARMS / ALARM DOOR.
5. preset time in the user menu has elapsed: SETUP / ALARMS / CLOCK ALARM – the alarm message
‘time alarm’.
6. when the temperature of protection class 3.3 will be :
a) higher than the set temperature by the user in the menu: SETUP / PROTECTION / HI protection –
the alarm message ‘HI prot’.
b) lower than the set temperature by the user in the menu: SETUP / PROTECTION / LO protection –
the alarm message ‘LO prot’.
When the cause of the alarm stops, the alarm may be cancelled. To cancel the information of the
event, press down the enter button for a while.
Sort of event
Duration
of sound
alarm
Red di-
ode
Duration of break
between sounds
[second]
Terminate of event
Displayed
command
Temperature
sensor fault
0.1s
yes
1s
Replacing of tempera-
ture sensor
SENSOR
ERROR
Time alarm
1s
no
1s
Pressing of any button
TIME ALARM
Power alarm
0.1s
no
5s
Pressing EXIT button
POWER
ALARM
Open door alarm
1s
no
1s
Closing door or press-
ing any button
DOOR OPEN

Instruction Manual INCU-Line Cooled
Page 24 / 32
11.1 To set an alarm
11.1.1 Clock alarm
An audible signal is emitted at a specified time, setting up the alarm [hh:mm] – is done similarly to setting
up real time. The alarm can be activated selecting (on) and deactivated selecting (off).
11.1.2 Power alarm
If this function is turned ON and the program is running, after the power shortage over 1 minute and after
switching on again a message pops up in the display saying at what time did the power shortage occur.
When you turn the alarm on (ON) you can adjust the following parameters:
- pause – from 1 min up to 24h with 1min resolution or (off) – setting max length of power shortage after
which the program will be resumed
- decrease temp – from 0,5°C to 25°C or (off) – max drop below set temperature after which the program
will continue
- increase temp – from 0,5°C to 25°C or (off) – max increase over set temperature after which the pro-
gram will continue
12 TEMPERATURE PROTECTION
As default the unit is equipped with protection of input – over/under temperature protection. If the part responsible for maintaining of set temperature will damage or unaware user will change the temperature setting operation, the temperature protection will work. Protection class 3.3 is a standard. The picture below
the figure shows how this works.
If the parameters: interruption, fall/rise of temp will be turned off (selected off) and the alarm is on, the
user will be informed about the time of power failure, and the program will continue.

Instruction Manual INCU-Line Cooled
Page 25 / 32
Protection Class 3.3. according to DIN 12880 norm is called protecting sample function. The user set the
temperature protection (lower and upper) by himself and when the set temperature is exceeded, the power
heaters or compressor is switched off. When the temperature returns to the allowed range, the device continues the work.
13 OPERATION OF THE COOLING SYSTEM
If the device is operating in low temperatures the evaporator may get covered with ice. One symptom of too
much ice on the evaporator is lower cooling efficiency of the device. To ensure proper operation of the device you should obey these principles:
1.
At temperatures above +8ºC the air automatically defrosts the ice cover, defrosting is selfoperating.
2.
In temperatures below +8ºC the evaporator may be covered in ice and the device should be
defrosted manually. In order to do that you need to open the door and turn on the defrost
function on the controller (go to the SETUP / DEFROSTING, choose “on”). Defrosting lasts
30 minutes, after this time function will turn off automatically. You can also stop defrosting
function in any time (turning it off takes place in the same location as turning on). To start
defrosting stop the program first. Defrosting will cause that the temperature inside the unit
will oscillate in ca. 30°C
After the defrosting has finished, wipe the chamber precisely.
If the unit works in a temperature below +8°C and the user does not defrost it periodically, it may make the compressor overheat and break down the unit.

Instruction Manual INCU-Line Cooled
Page 26 / 32
3.
The device is equipped with a protection mechanism against damaging the cooling system.
The mechanism makes it impossible to turn on cooling when the temperature exceeds 45ºC.
As a result if the device has been programmed to go down with temperature (e.g. from 60ºC
to 20ºC) it may take longer for the program to operate until it reaches 45ºC. The tempera-
ture inside the device is lowered naturally by emitting the heat to the surrounding environment.
4.
Always make sure that the door has been closed properly!
14 CLEANING AND MAINTENANCE OF THE DEVICE
Before cleaning the device, it needs to be disconnected from the electrical supply!
Maintenance (cleaning of the housing and the chamber) should be carried out at least once a week
(depending on the environmental conditions in the workplace).
To clean products made of stainless steel (INOX) we recommend using cleaning solution dedicated particularly to stainless steel material. It preserves the steel surface from permanent stains and at the same
time retains aesthetic appearance of the product.
INOX products are made of stainless steel. When used in standard laboratory conditions they do not rust.
However it is possible that stains (which may look like rust) form on the steel surface (e.g. due to the kind
of samples that are incubated in the chamber). In such case we recommend using cleaning solution (to
clean the stains) which is dedicated to this particular application, e.g. Pelox.
14.1 Housing cleaning
1.
The housing and door should be cleaned with caution using a soft cloth dampened with
water.
2
Only mild cleaning products should be used to clean the device.
3.
Electrical parts should not get in contact with water or detergent.
When cleaning stainless steel product with dedicated cleaning solution, one should
pay attention to the suggestions and recommendations given in the user manual (or
in the safety data sheet) of the cleaning solution.

Instruction Manual INCU-Line Cooled
Page 27 / 32
4.
On a regular basis clean with a vacuum cleaner of a duster the cooling unit and condenser
(exchanger) which is placed in the rear (or upper) part of the device. Disobeying this pre-
caution may harm the compressor. In such case the warranty repair will not be accepted!
14.2 Interior cleaning
1.
The chamber should be emptied of any samples before cleaning.
2.
Open the door of the device and wait for the frost to melt, take out the shelves and start
cleaning the device,
3.
Only water or water with mild detergent should be used.
4.
Having finished cleaning, you should allow the device to dry completely.
5.
During cleaning pay attention not to damage the temperature sensor in the chamber.
15 RESUMING OPERATION AFTER A LONGER PERIOD OF TIME
1.
Remove all objects from the chamber.
2.
Disconnect the device from the mains.
3.
Clean and dry the chamber.
4.
Leave the door open to avoid bad smell.
5.
Store in temperature between 0°C and 50°C and relative humidity maximum 70%.

Instruction Manual INCU-Line Cooled
Page 28 / 32
16 TROUBLESHOOTING
If the device is not working
You should check if:
1.
There is not an electrical supply failure?
2.
The power cord is plugged in the mains socket properly?
3.
The fuse has not been blown?
4.
The power cord has not been damaged?
Cooling systems is not effective.
1.
What is the temperature outside the device?
2.
Is the door shut tight?
3.
Is the condenser clean?
4.
Is the device placed in direct sunlight?
5.
Is there any heat source near the device?
6.
Are there too many objects inside the device that are not cool enough?
Water is condensing inside the chamber
1.
Is the defrosted water outlet not blocked?
Frost occurs on walls:
1.
Usual condition while working in low temperatures.
The device is operating too loud
1.
Is the device not leaning against furniture or other objects?
2.
Are the pipes at the back in direct contact or are they vibrating?
3.
Is the device leveled properly?
CAUTION: Buzz and noise from decompression coming from the cooling circuit are
normal noises.

Instruction Manual INCU-Line Cooled
Page 29 / 32
16.1 REPLACEMANT OF FUSE
Fuse drawer
Disconnect the power cable. Pull the fuse drawer (located in the housing of socket power cable), and then
push the fuse to the top.
Insert efficient T6.3 230V fuse, push the fuse drawer into place. Connect the power cable to the unit and
then to a power outlet. Turn on the device.
17 PRODUCT IDENTIFICATION LABEL
The product identification label is located in the upper left corner.
Below there is an example of rating plate:
1. Logo
2. Type of device
3. Catalogue number
4. CE mark
5. Name and address of manufacturer
6. Serial number

Instruction Manual INCU-Line Cooled
Page 30 / 32
18 WARRANTY CONDITIONS
VWR International warrants that this product will be free from defects in material and workmanship for a
period of two (2) years from date of delivery. If a defect is present, VWR will, at its option and cost, repair,
replace, or refund the purchase price of this product to the customer, provided it is returned during the warranty period. This warranty does not apply if the product has been damaged by accident, abuse, misuse, or
misapplication, or from ordinary wear and tear. If the required maintenance and inspection services are not
performed according to the manuals and any local regulations, such warranty turns invalid, except to the
extent, the defect of the product is not due to such non-performance.
Items being returned must be insured by the customer against possible damage or loss. This warranty shall
be limited to the aforementioned remedies. IT IS EXPRESSLY AGREED THAT THIS WARRANTY WILL
BE IN LIEU OF ALL WARRANTIES OF FITNESS AND IN LIEU OF THE WARRANTY OF MERCHANTABILITY.
Compliance with local laws and regulations
The customer is responsible for applying for and obtaining the necessary regulatory approvals or other
authorizations necessary to run or use the Product in its local environment. VWR will not be held liable for
any related omission or for not obtaining the required approval or authorization, unless any refusal is due to
a defect of the product.
Before you contact service:
• Turn the unit off and on again to make sure it is not working properly. If this is the case, disconnect the
unit from the mains and repeat the procedure after an hour (See Troubleshooting chapter)
Technical service
Visit the VWR’s website at www.vwr.com for:
• Complete technical service contact information
• Access to VWR’s Online Catalogue, and information about accessories and related products
• Additional product information and special offers
Contact us For information or technical assistance contact your local VWR representative or visit.
www.vwr.com.

Instruction Manual INCU-Line Cooled
Page 31 / 32
19 TECHNICAL DETAILS
The technical data allows for ± 5% tolerance.
Model
Parameter '
INCU-Line 68R
INCU-Line 150R
INCU-Line 250R
air convection
forced
chamber capacity ¹
[l]
68
143
245
door type
glass door
solid + internal glass door
temperature range [ºC]
+3ºC… up to 70ºC
temperature variation (spatial) at 37ºC
+/- 0,3ºC
+/- 0,8ºC
+/- 1,0ºC
temperature fluctuation (time) at 37ºC
+/- 0,1ºC
+/- 0,2ºC
+/- 0,3ºC
controller
microprocessor with external LCD graphic display
interior
stainless steel
housing
powder coated sheet
overal dims
[mm]**
width 570
620
620
height 600
860
1260
depth 680
650
650
internal dims
2
[mm]
width
470
520
520
height
430
660
1060
depth
300
410
410
weight (kg)
41
68
86
shelves fitted/max3
2/2
3/4
4/6
max shelf workload [kg]*
10
10
10
max unit workload [kg]
20
30
50
voltage 50/60 Hz [V]
220-240
nominal powder [W]
250
250
250
warranty
24 months
* - at even surface workload
** - dims of power cable (50 mm) not included
1 - working capacity of chamber can be smaller
2- "fitted” number of shelves fitted, included in price
- "max" number of shelves which can be fitted
Specifications are given with a tolerance of ± 5%, the volume of chamber is always smaller.

Instruction Manual INCU-Line Cooled
Page 32 / 32
 Loading...