

VWR International 611-8622, 611-8623, 611-8624 User Manual

MAN_VWR_KL_EN_th_RL_6.xx_RL_3.xx_Rev1 14.04.2015
High Capacity Balances
Europen Catalogue Numbers:
611-8622
ELECTR. HIGH CAPACITY BALANCE, 32KG/0.1G
611-8623
ELECTR.HIGH CAPACITY BALANCE, 32KG/0.5G
611-8624
ELECTR. HIGH CAPACITY BALANCE, 4.5/32KG/0.1/1G
User Manual
Version 1 Issued 14/04/15
Soft. RL_6.xx_RL_3.xx

Legal Address of Manufacturer
Europa
VWR International bvba
Researchpark Haasrode 2020
Geldenaaksebaan 464
B-3001 Leuven
+ 32 16 385011
http://be.vwr.com
Country of origin
Italy
Intended use
The precision balances with high capacity are used in industry for the control in
production processes and quality.

1
INDEX
1 INSTALLATION INSTRUCTION.............................................................................................3
2 STORAGE.......................................................................................................................................4
3 KEYPAD AND DISPLAY ............................................................................................................5
4 OVERVIEW....................................................................................................................................6
4.1 R
EAR AND BOTTOM PART OF BALANCE
......................................................................................6
5 WEIGHING....................................................................................................................................7
5.1 S
TAND BY
............................................................................................................................7
5.2 S
IMPLE WEIGHING
................................................................................................................7
6 CALIBRATION.............................................................................................................................8
6.1 E
XTERNAL CALIBRATION BALANCES
...................................................................................8
7 TARE FUNCTION......................................................................................................................10
7.1 M
ANUAL TARE FUNCTION
..................................................................................................11
7.2 O
PTIONAL ALPHANUMERIC EXTERNAL KEYBOARD
(
CODE
T201)
.........................................12
8 WEIGHING UNITS.....................................................................................................................14
9 PC COMMUNICATION SETTING.........................................................................................16
10 PRINTER SERIAL COMUNICATION SELECTION........................................................17
11 TRANSMISSION SPEED SELECTION................................................................................18
12 AUTOZERO FUNCTION........................................................................................................19
13 FILTERS SELECTION............................................................................................................20
14 STABILITY FUNCTION.........................................................................................................21
15 DISPLAY CONTRAST REGULATION................................................................................22
16 BACKLIGHT SETUP...............................................................................................................23
17 AUTO POWER-OFF FUNCTION..........................................................................................24
18 SELECTION OF WORKING MODE WITH TABLET......................................................25
19 PIECECOUNTING FUNCTION............................................................................................27
19.1 V
ISUALIZATION OF TOTAL AND UNIT WEIGHT OF PIECES
.......................................................28
19.2 M
ANUAL INSERTION OF THE UNIT AVERAGE WEIGHT
............................................................29
19.3 A
UTOMATIC UPDATE OF UNIT WEIGHT
..................................................................................30
20 DENSITY DETERMINATION OF A SOLID OR A LIQUID............................................31
20.1 D
ENSITY DETERMINATION OF A SOLID
..................................................................................31
20.2 D
ENSITY DETERMINATION OF A LIQUID
.............................................................................33
21 MAXIMUM LOAD DETERMINATION FUNCTION........................................................35
22 PERCENTAGE WEIGHING FUNCTION............................................................................36
22.1 M
ODE WITH WEIGHT REFERENCE
.......................................................................................36
22.2 M
ODE WITH MANUAL INSERTION OF THE REFERENCE WEIGHT
..............................................37
23 ANIMAL WEIGHING FUNCTION.......................................................................................39
24 TOTALIZING............................................................................................................................40

2
25 THRESHOLD FUNCTION......................................................................................................42
25.1 B
OTH THRESHOLDS SET
.....................................................................................................43
25.2 L
OWER THRESHOLD SET ONLY
...........................................................................................43
25.3 H
IGHER THRESHOLD SET ONLY
..........................................................................................43
26 RS232 INTERFACE FEATURES...........................................................................................44
27 ERROR CODES.........................................................................................................................50
28 MAINTENANCE AND CARE.................................................................................................51
29 QUICK GUIDE TO BALANCE PARAMETERS SETUP..................................................52
30 QUICK GUIDE TO THE USE OF THE BALANCE PROGRAMS..................................53
31 BALANCE TECHNICAL FEATURES..................................................................................54
32 OPTIONAL ACCESSORIES...................................................................................................55
33 TECHNICAL SERVICE...........................................................................................................55
34 WARRANTY..............................................................................................................................56
35 COMPLIANCE WITH LOCAL LAWS AND REGULATIONS.......................................56
36 EQUIPMENT DISPOSAL........................................................................................................56
3
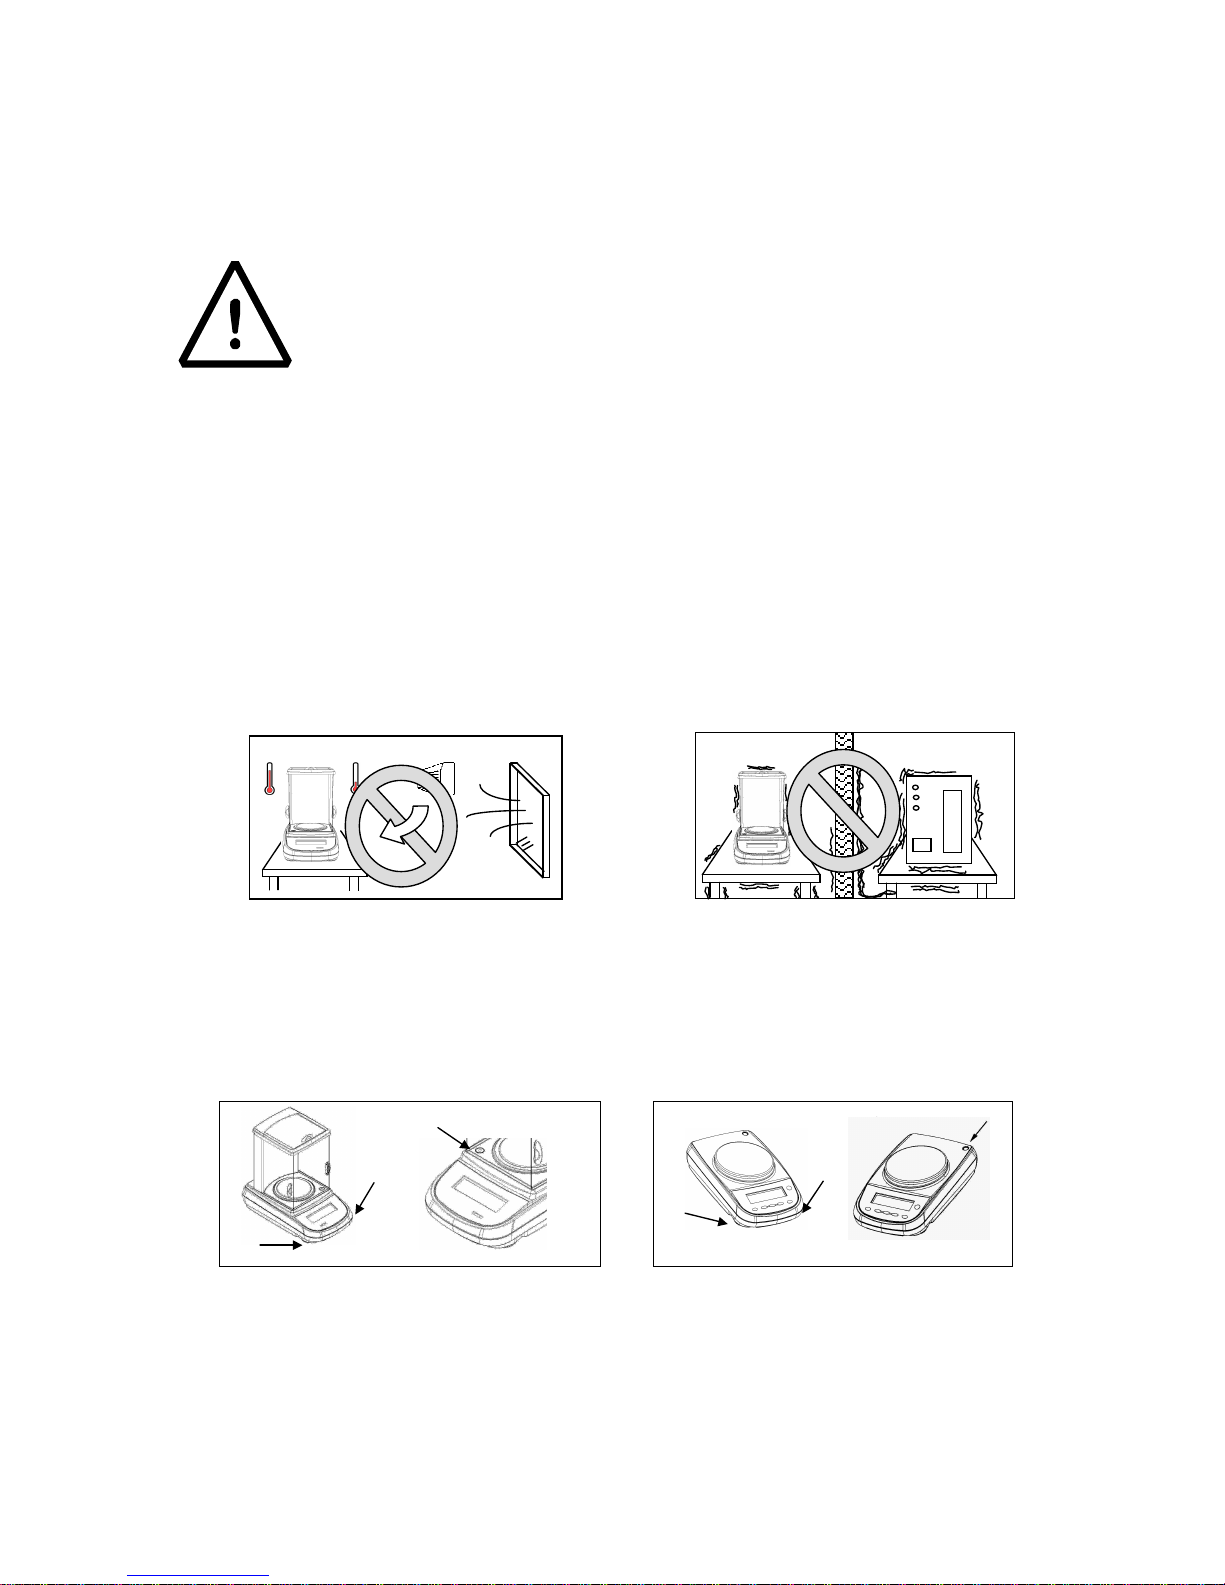
1 Installation instruction
WARNING:
Please follow carefully these steps for installing and use the new balance
before starting your work routine. A way of use of the instrument different
from this user manual will not guarantee the instrument’s safety anymore.
Remove the balance and accessories from the cartoon and check for any visible
damage of the instrument.
Do not install the balance in a place with air flows, heavy thermic changes and
vibrations.
Do not use the balance in blast risk environment.
The humidity rate of the balance environment must be between 45% and 75%
Place the weighing pan and the support pan on the balance (see par. 3).
Level the balance using the level bubble and levelling feet located underneath the
case
Connect power supply to connector 2 located on the rear panel of the unit (see
par.5).

4
Insert power unit into AC outlet, which shall be easily accessible; after few
seconds the balance will automatically switch on.
Wait 30 minutes from switch on and then calibrate the balance using the
appropriate mass, following the instructions (par.7)
Calibrate again the balance every time it’s moved to another place
Check the balance calibration periodically.
We recommend not to drop heavy objects on balance pan, in order to avoid
damages.
Assistance service must be effected by specialized staff and the spare parts used
must be original. Therefore, it is necessary to apply to the reseller who sold the
equipment.
2 Storage
.
Storage temperature: +5 °C…+40°C
Storage humidity 45% - 75%.
Keep package in the case the balance should be sent back to the factory for service.
Disconnect the cables and the accessories for avoiding damages during
transportation.
Do not place the balance in extreme temperature and humidity condition and avoid
the balance to take strong hit.
5
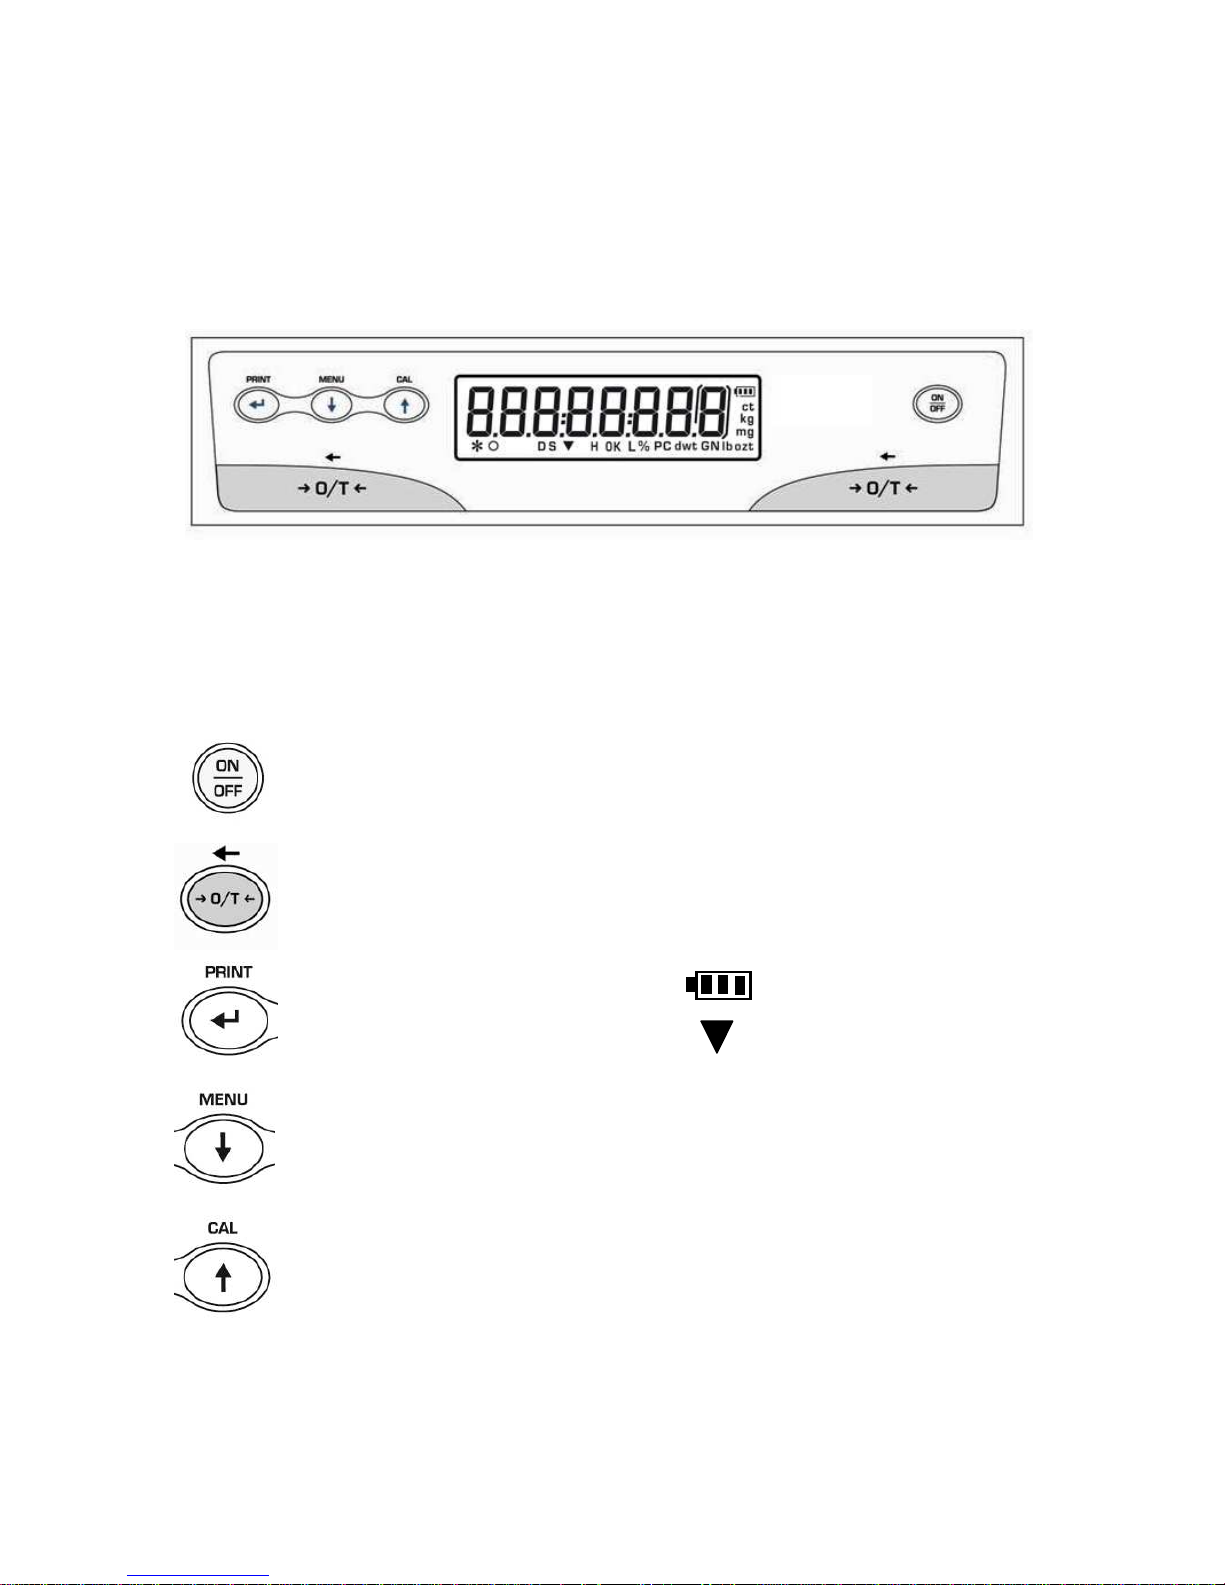
3 Keypad and display
*
Stability indicator
O
Zero indicator
%
Percentage weighing
PC
Piece counting
Battery charge indicator
Insert data mode
H
Upper threshold
L
Lower threshold
DS
Density measure mode
ct,
Measure unit
ozt, lb, GN, dwt, Kg, mg
Standby (OFF) or power on
(ON).
TARE or zero button.
Selection CONFIRM or SEND
data to printer.
Balance setup MENU button.
Balance CALIBRATION button.
ESC
6
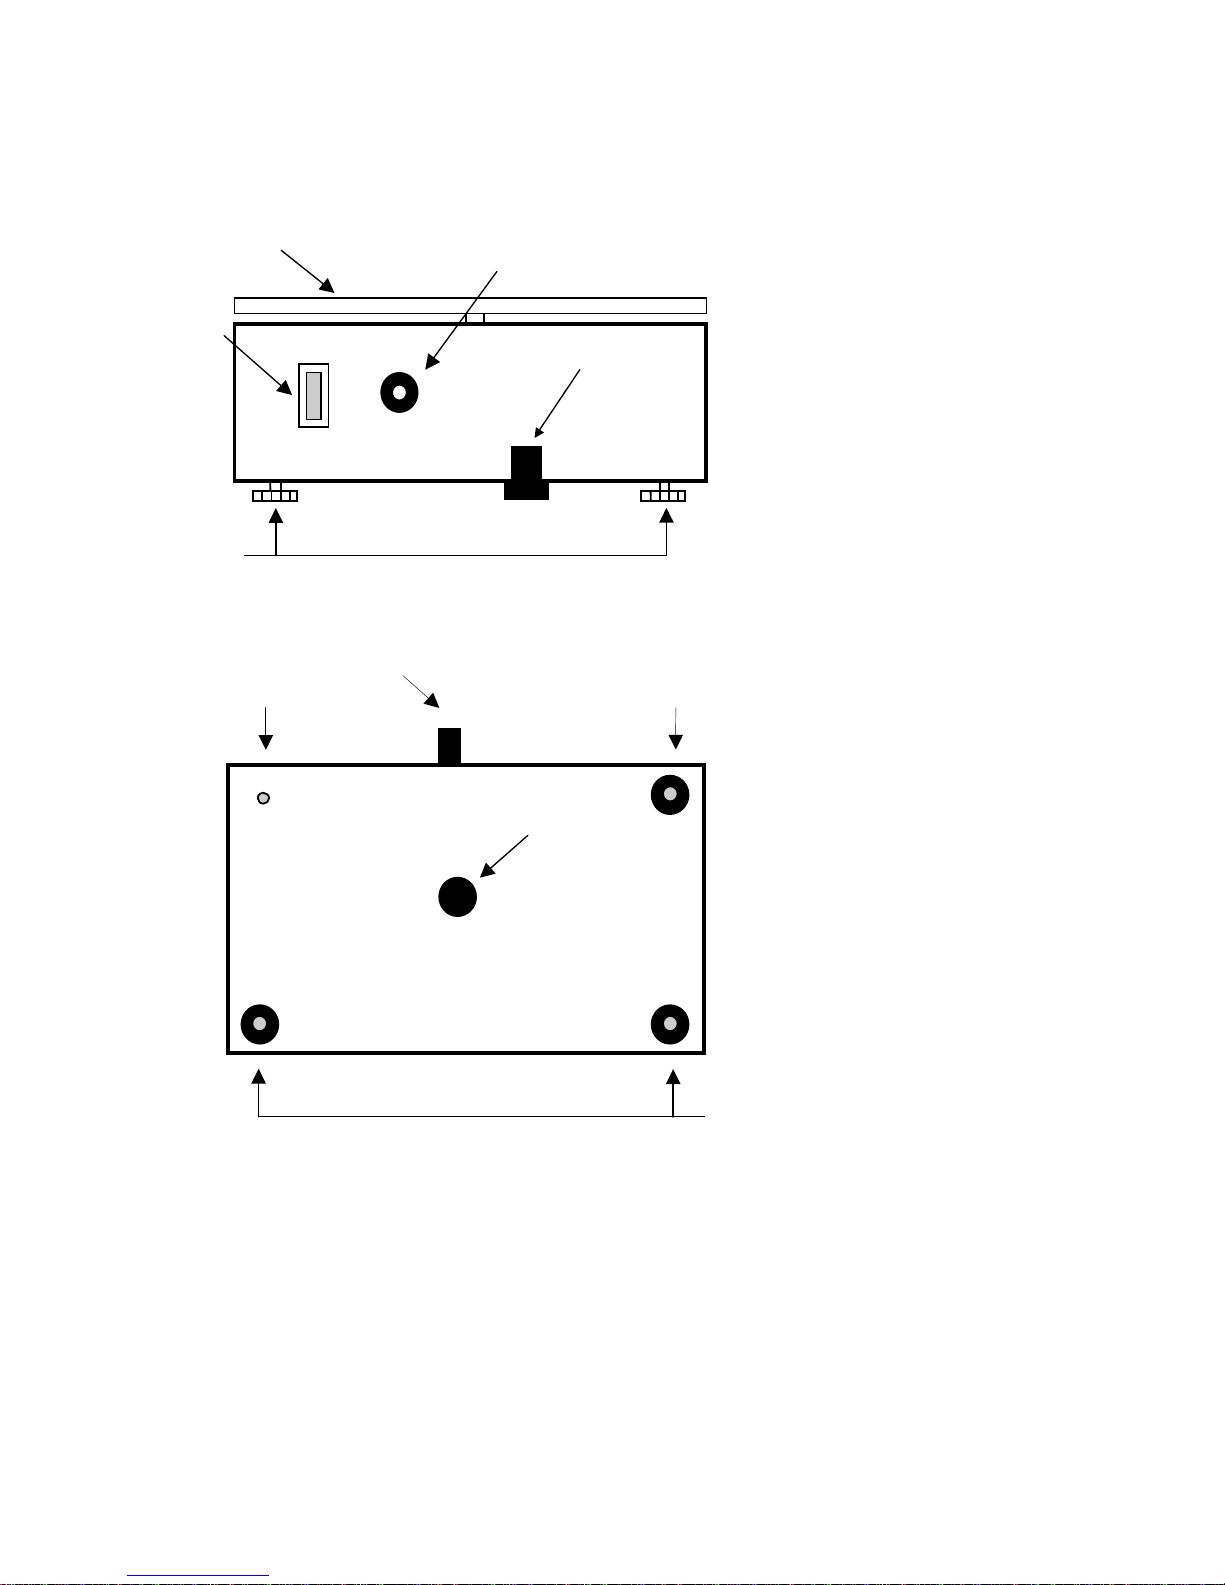
4 Overview
4.1 Rear and bottom part of balance
Fig.1
1. Weighing pan
2. CONNECTOR
9 pin RS232 Interface Output for
PC/keyboard or printer
3. levelling feet
4. CONNECTOR
power supply connector
Fig.2
5. Closing screws
6. Hook for weighing under
balance pan. First remove
hook cap.
4
2
3
5
1
5
7
3
3
6
7
5 Weighing
After having connected the balance to AC outlet, it will perform an internal circuits test,
after that the balance will set itself in stand-by mode.
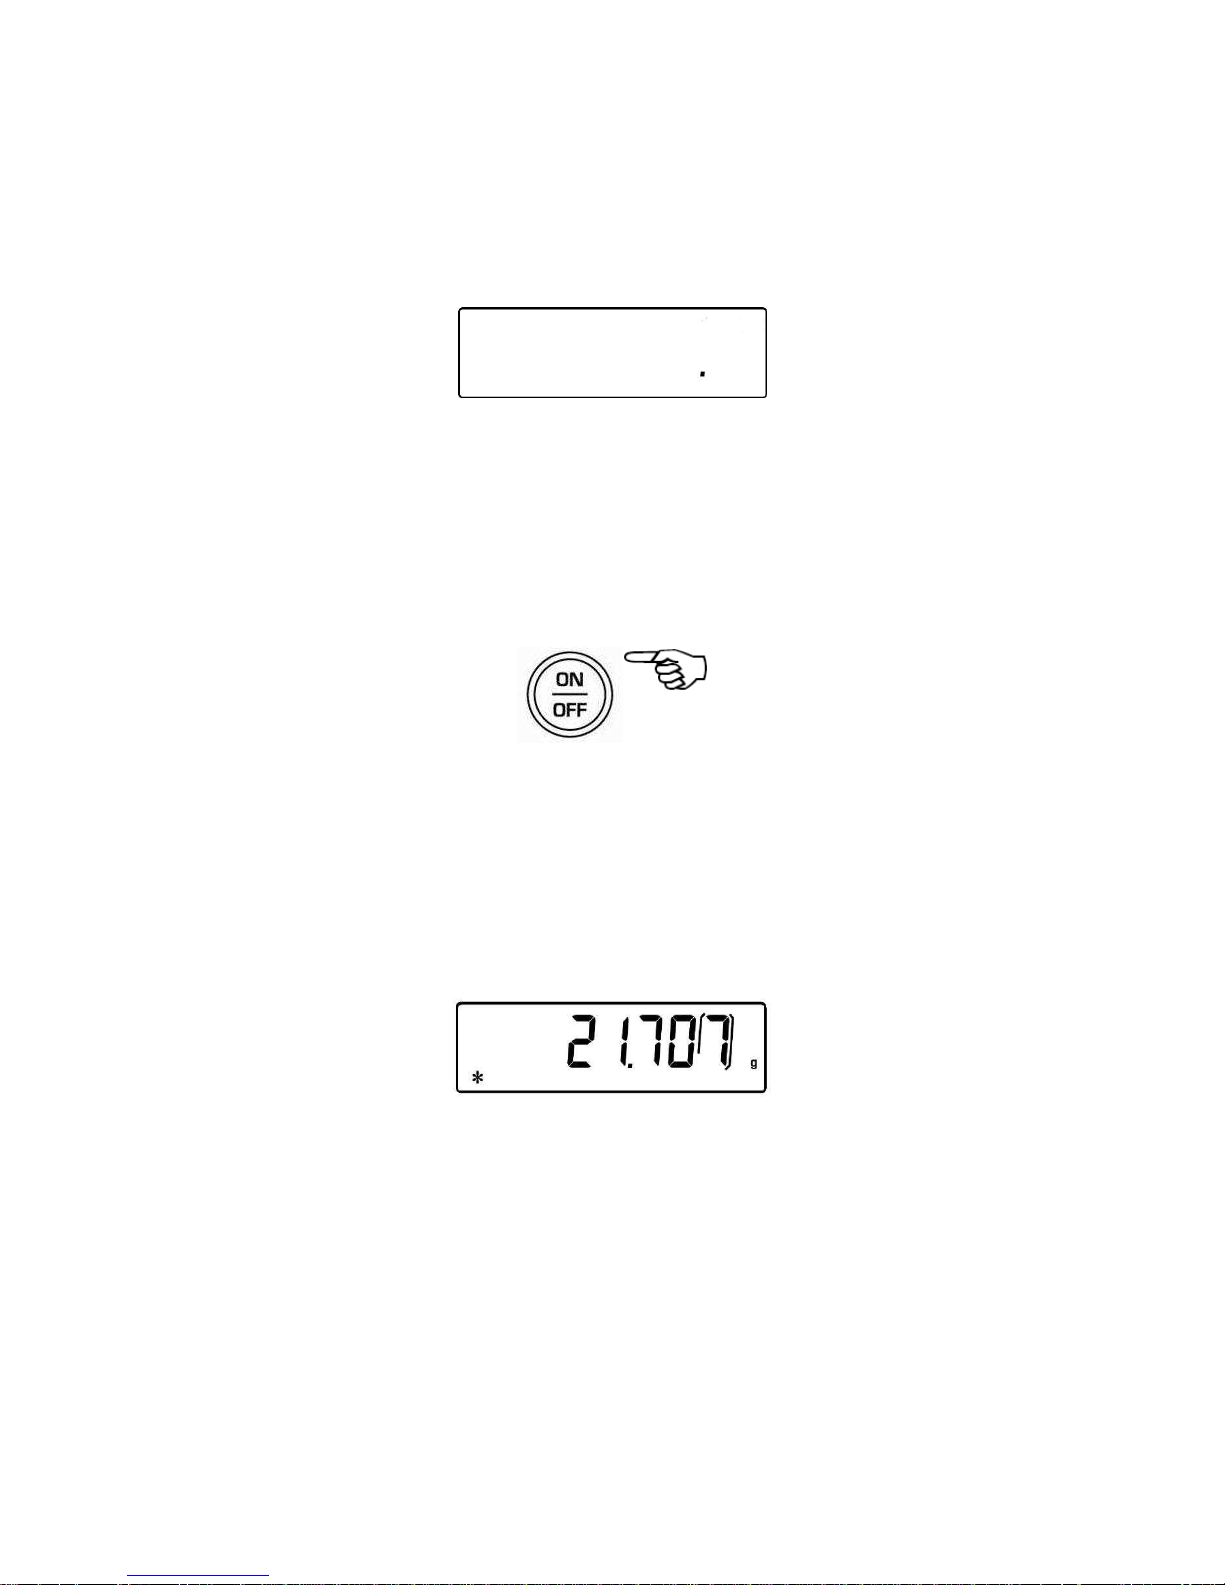
5.1 Stand By
From “STAND BY” mode:
Press ON/OFF button to bring balance to work conditions.
Press again ON/OFF button to return to “STAND BY” condition.
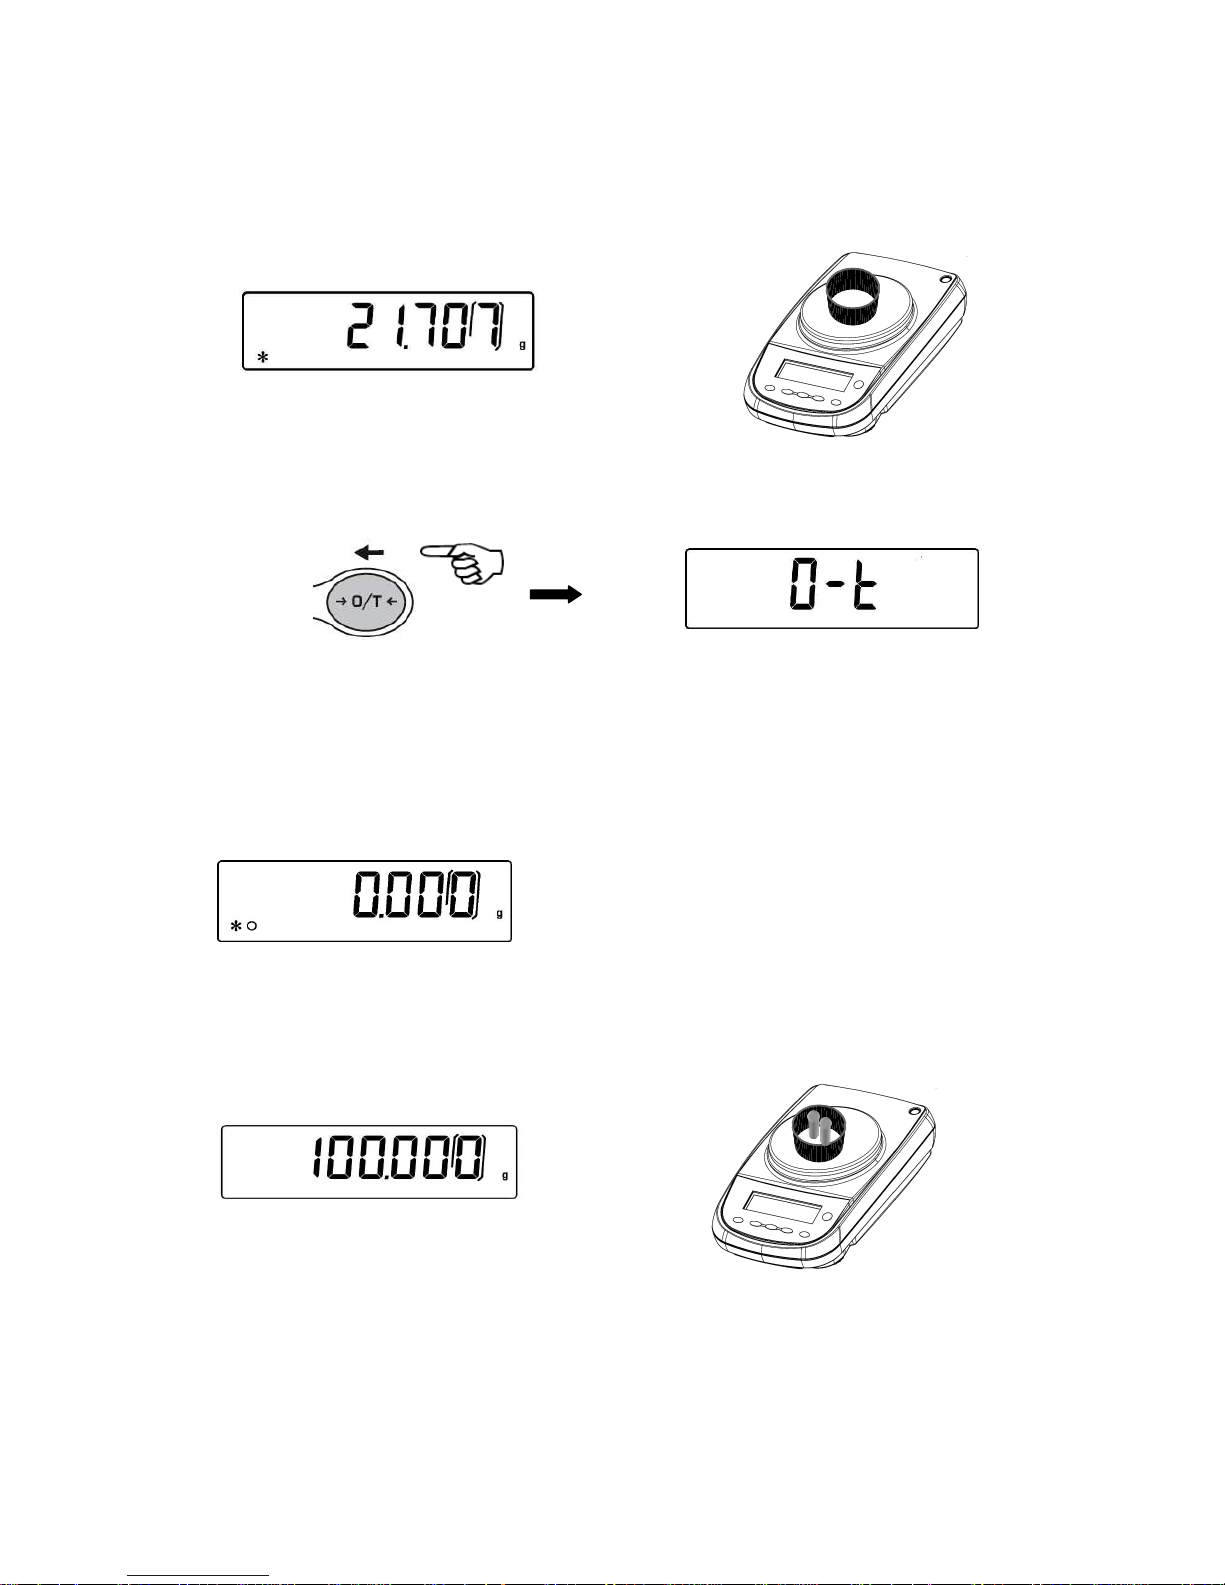
5.2 Simple weighing
Load the sample to weigh on the pan and read the value on display as soon as the
stability symbol ж (star) appears

8
6 Calibration
Electronic balances take mass measurements making use of gravity (g). Difference of
latitude in geographic areas and altitude will vary gravity acceleration value (g).
Therefore, for accurate measurements, the balance must be adjusted to the local
environment. This adjustment is accomplished by calibration function.
6.1 External calibration balances
Calibration is accomplished by pressing CAL button.
1. Press CAL button when pan is empty, dashes are displayed on the display.
2. When calibration weight value starts to flash, load the weight on the pan.
3. The display will stop flashing, indicating calibration weight value.
Once the calibration is effected will be shown the value of the calibrated weight and
the current unit of measure.
4. Unload calibration weight from the pan.
The balance is ready for weighing operations.
NOTE: if there is interference during calibration process, an error message will be displayed.

9
Moreover, it is possible to calibrate the balance with a calibration weight higher than the
one set by default:
1. Press and keep CAL button pressed with empty pan until the acoustic alarm
stops, then release the button. On display it will be visualized the string "-CAL-",
followed by flashing string "LOAD".
2. Load on the pan a weight equal higher or lower than default calibration weight; the
balance will recognize it as valid weight if equal or higher than calibration weight
as long as it is a whole number in comparison with the most meaningful digit of
calibration weight .
e.g.: if calibration weight is 200g, it will be possible to calibrate the balance with
values from 100g 200g, 300g, 400g up to the highest limit of balance weighing
range.
The message “LOAD” on display will stop flashing. Once calibration has been
effected, the value of calibrated weight will be displayed.
3. Unload calibration weight. The balance is ready for weighing operations.
NOTE: if there is an interference during calibration process, an error message will be displayed.
2 Sec
10
7 Tare function
1. Load the container on the pan. The display will show the weight.
2. Press O/T button. “O-t” string will be displayed
3. After reaching stability, the value “0.000” will be displayed. If the stability is not
reached (due to air flows or vibrations or other disturbs) the dashes will remain
displayed.
4. Load the objects to weigh in the container. Read net weight value on display.
11
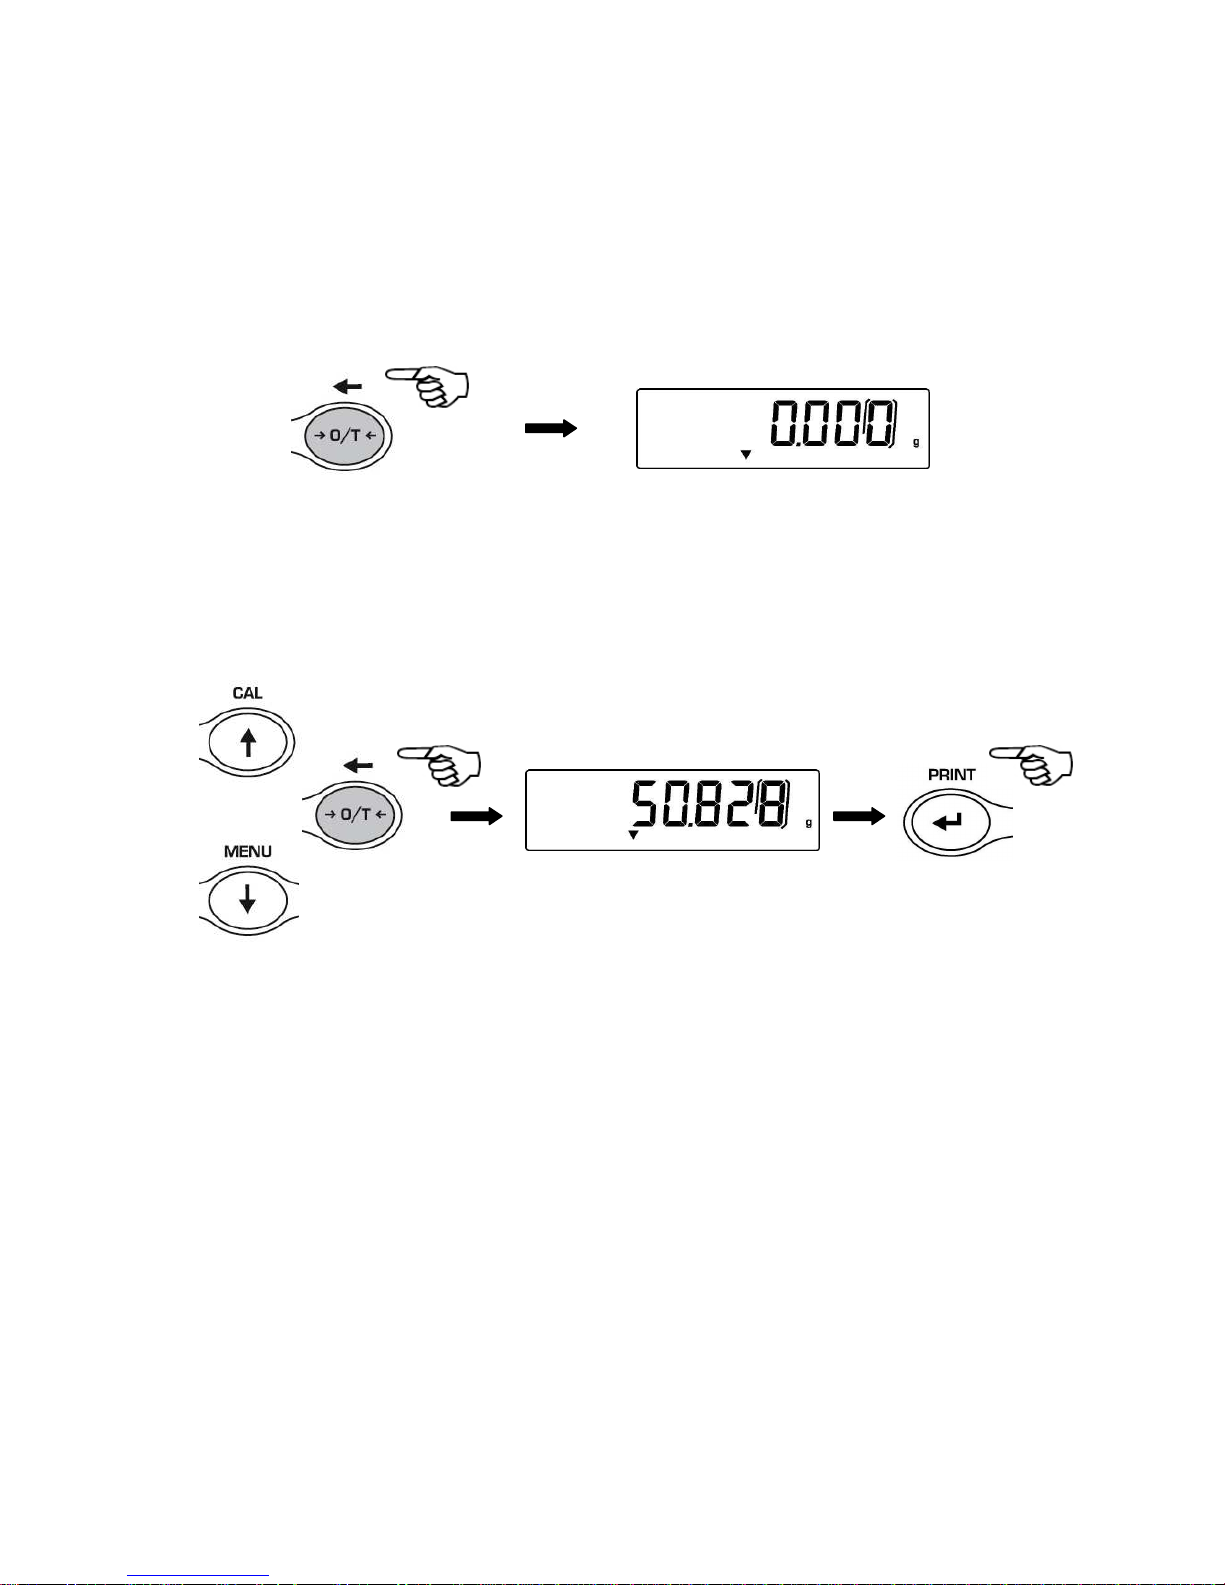
7.1 Manual tare function
This function allow to insert manually the tare values.
1. Press and keep pressed the O/T key whit no objects on the weighing pan until the
beep alarm stops, then release the key.
2. Will be shown on the display the following string:
3. Insert now the desired tare value using the keys CAL and MENU for increase or
decrease the value, and press the O/T key for skip to the following digit. During the
value insert mode, if keep pressed the O/T key is possible to delete the inserted
value.
4. Press PRINT key to confirm the value inserted.
2 Sec
12
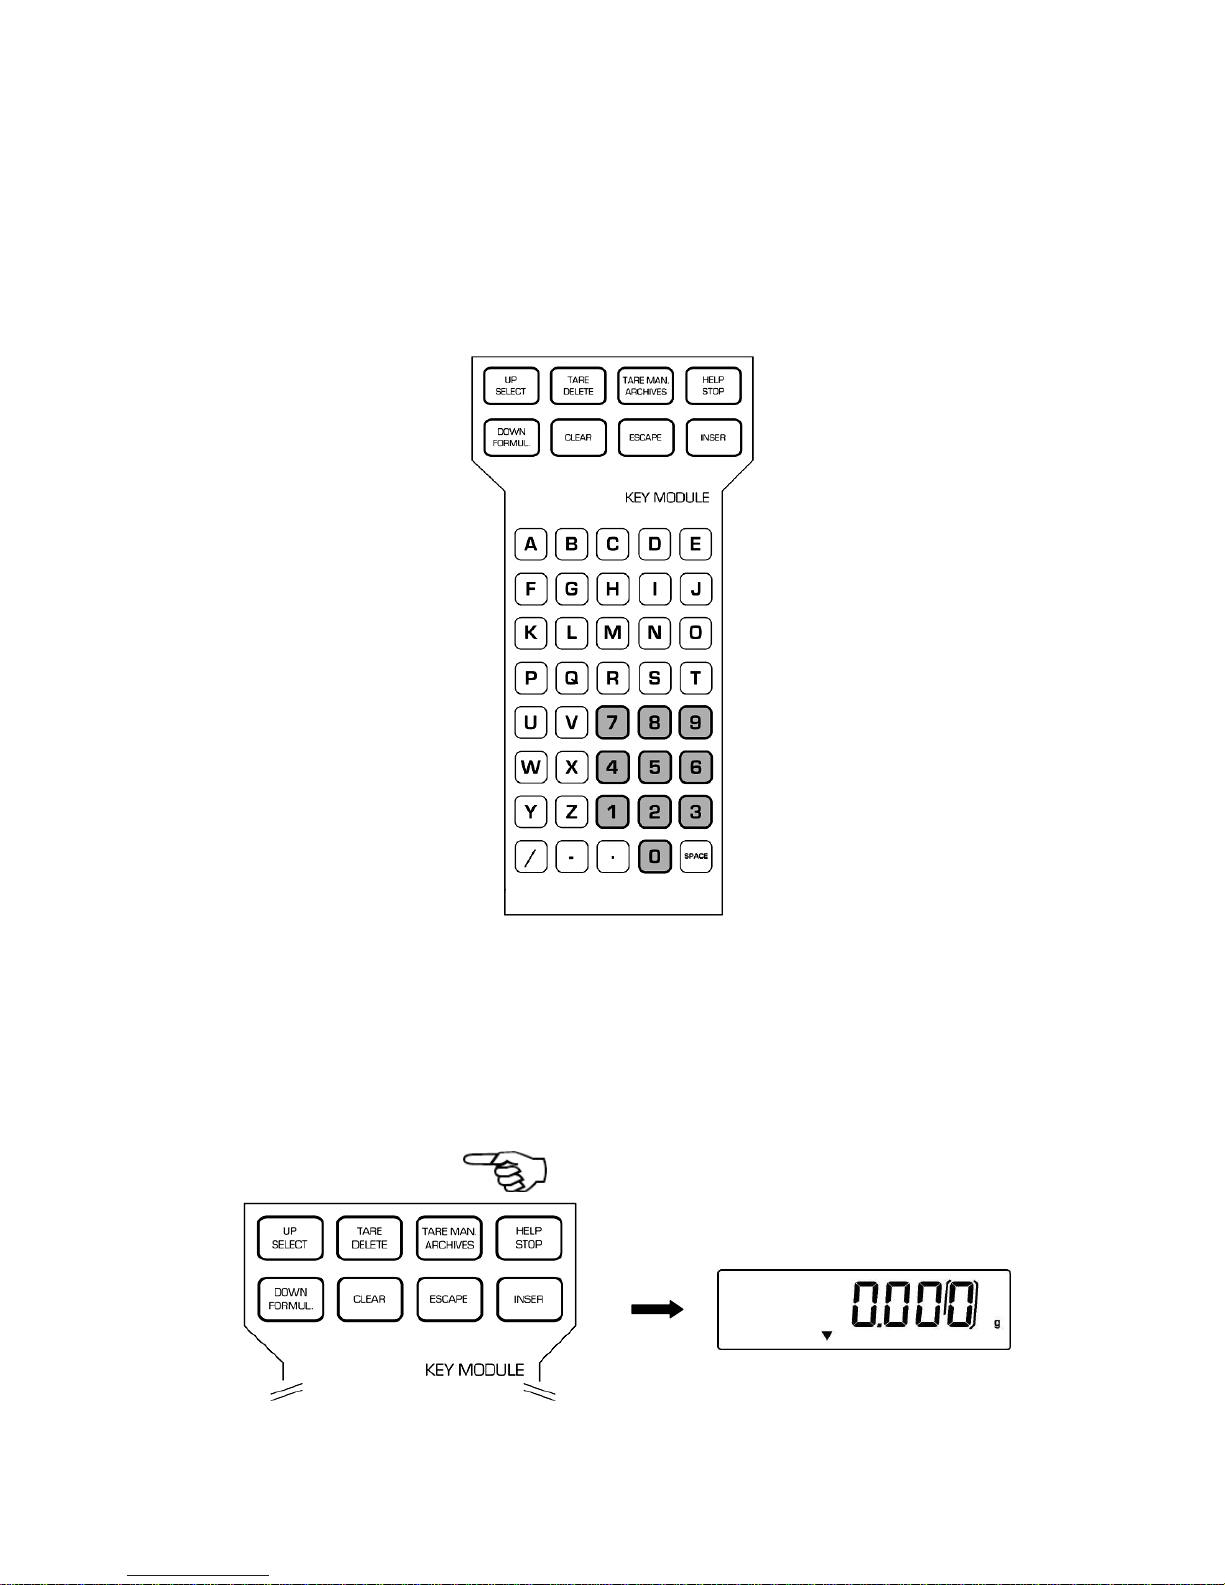
7.2 Optional alphanumeric external keyboard
(code T201)
If you have the optional external alphanumeric keyboard, then it is possible to perform
tare also by pressing the TARE/DELETE button of this keyboard, in the same way as
previously described.
It’s also possible to manually insert a known tare value by the keypad.
1. Press TARE MAN button on the alphanumeric keyboard. An arrow will appear on the
balance display along with the previous value of manual tare, if one has been
inserted before.

13
2. Press CLEAR to set at zero the previous value (if any) then insert the new value
using the alphanumeric buttons placed on the bottom part of alphanumeric keyboard.
3. Press INSER to confirm.
4. Press ESCAPE button to escape from tare condition.
To set to zero the value of the manual tare inserted by means of alphanumeric keyboard,
effect a normal operation of tare by pressing O/T button of the balance or with
TARE/DELETE button placed on the optional alphanumeric keyboard.
14
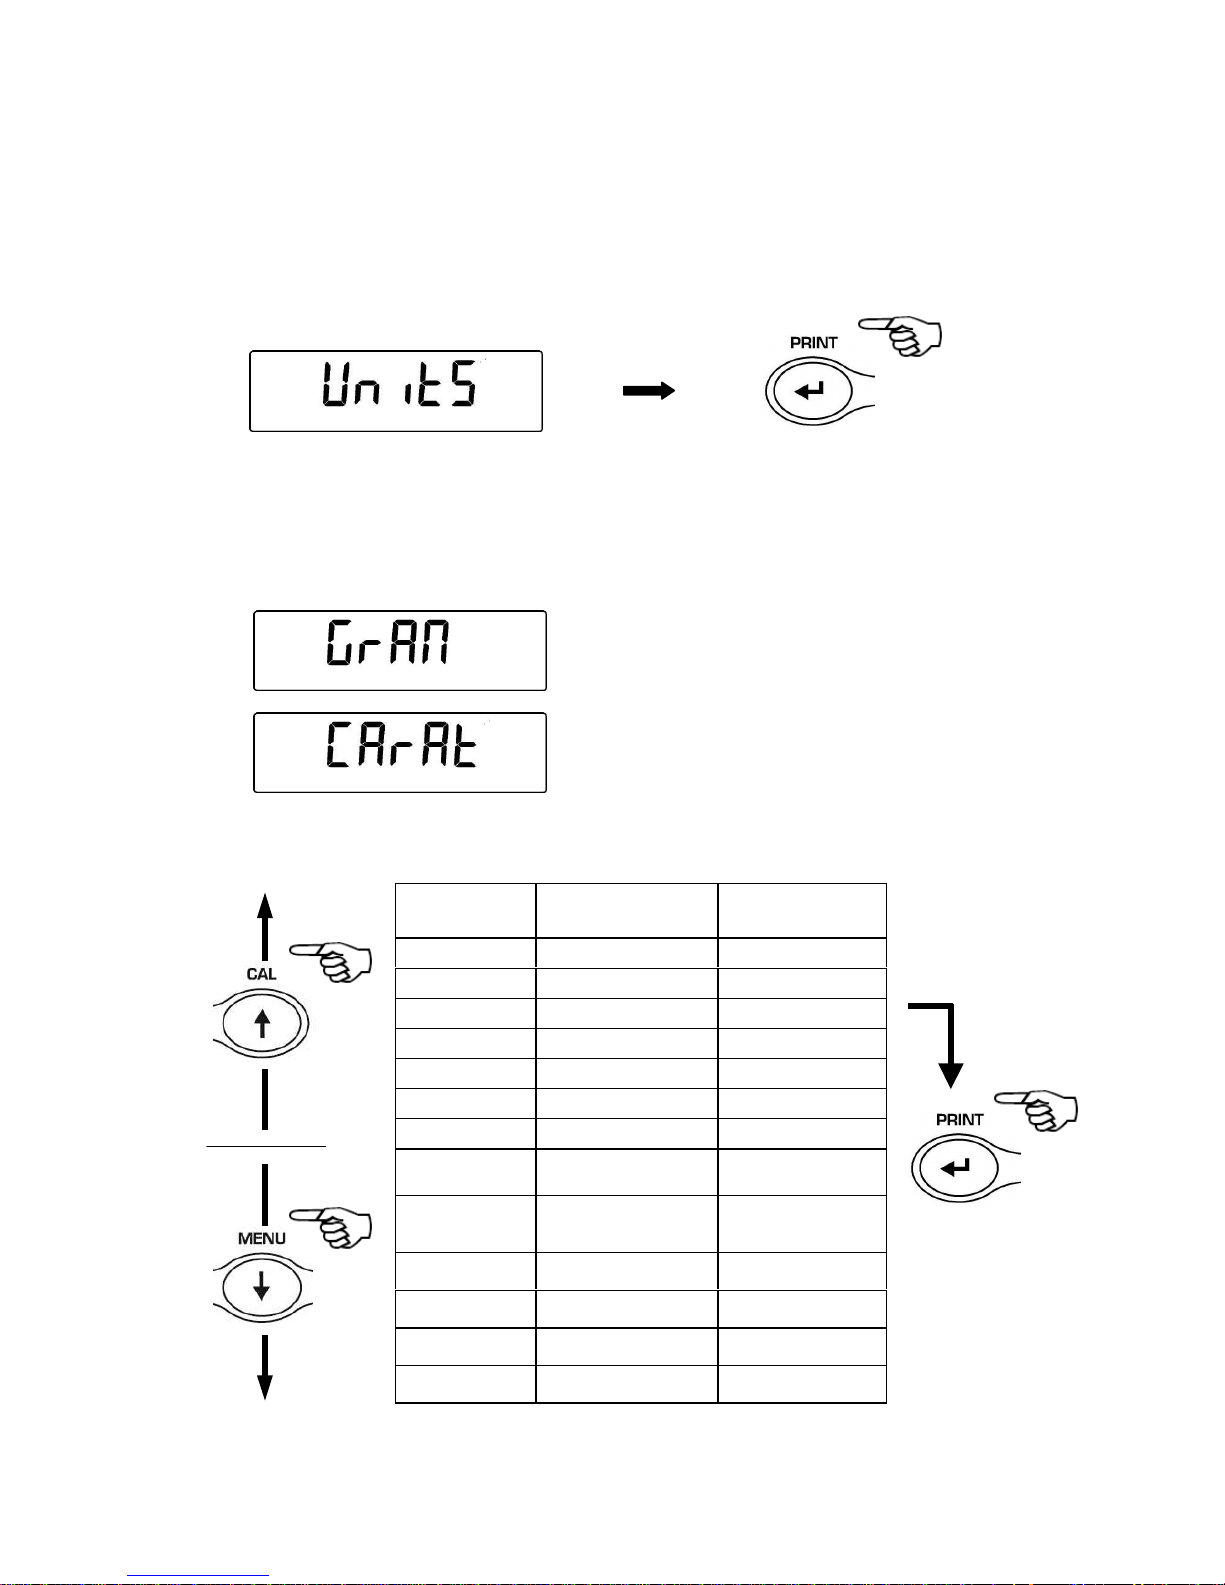
8 Weighing units
It is possible to select the weight unit that balance will use to display weight.
1. From display zero condition press and keep pressed the MENU button until the
acoustic alarm is over, then release the button. The message “unitS” will be
displayed then press PRINT to confirm.
2. It will be displayed “GRAM” unit. Pressing now the MENU or CAL button, it will be
possible to scroll forward or backward the weight units menu.
3. Press PRINT button to confirm or MENU button to shift to the other weight unit.
SYMBOL
UNIT
CONVERSION
FACTOR 1g =
GRAM GRAM 1.
CARAT CARAT 5.
OUNCE ONCE 0.035273962
POUND POUND 0.0022046226
PENN. PENNYWEIGHTS 0.643014931
ONCETR. ONCE TROY 0.032150747
GRANO GRAIN 15.43235835
TAEL HON
HONG KONG
TAEL
0.02671725
* TAEL SGP
SYNGAPORE
TAEL
0.02646063
* TAEL ROC R.O.C. TAEL 0.02666666
* MOMME MOMME 0.2667
M 10 x 10 10.
M 100 x 100 100.
15
4. After having selected the desired weight unit, press the MENU button to go to next
parameter or CAL button to return to previous.
5. To escape from parameters setup menu, press the MENU button until the acoustic
alarm is over, then release the button. The balance returns to normal weighing
conditions.
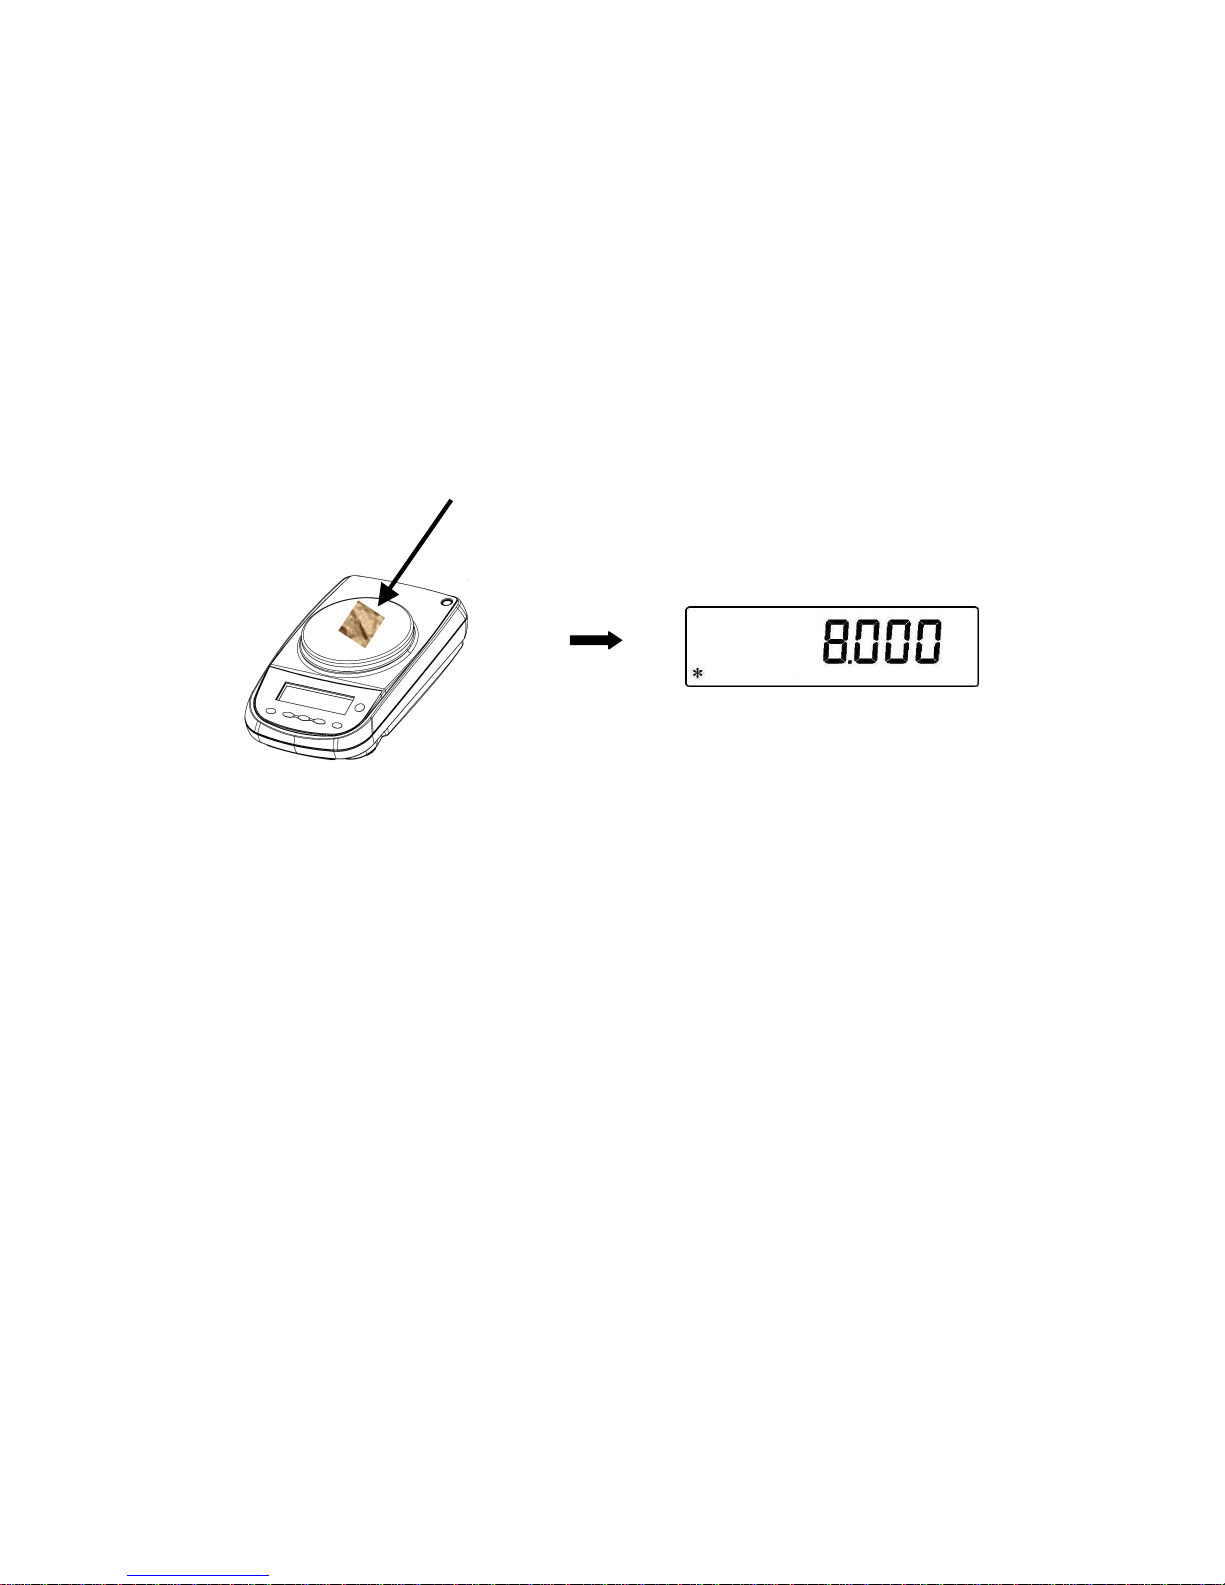
* The unit of measure with the star (*) are not available in the balances with the software
for paper grammage. In these models is possible to set from the menu of the units of
measure the multiply factor of the weight “M 10” or “M 100”. For visualizing the m² weight,
select the M 100 multiply factor (as described at par.9) and load on the pan a 10x10 cm
piece of paper.
10x10cm paper sample
16
9 PC communication setting
Connect the balance to PC with proper cable (not included) (par.0)
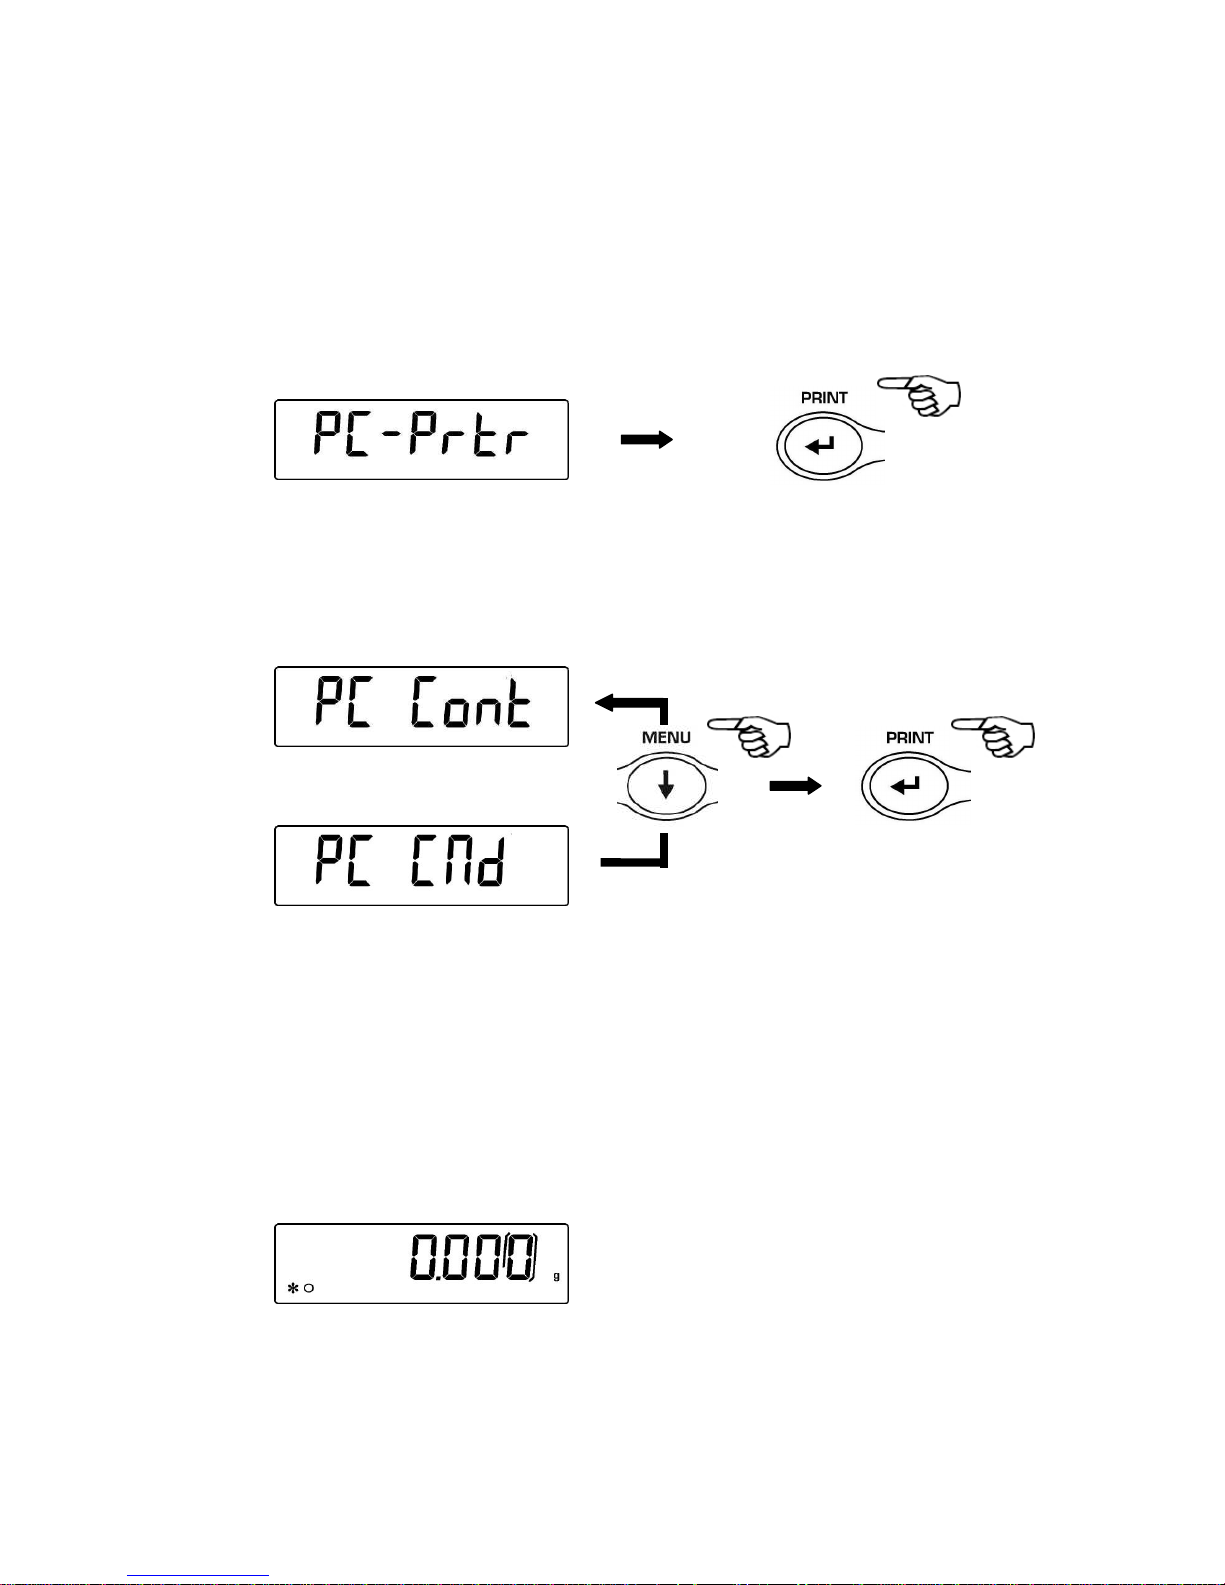
1. From zero display condition press and keep pressed the MENU button until the
acoustic alarm is over, then release the button. It will be displayed the string “unitS”,
then press the MENU button until it is displayed “PC-PRTR” message then confirm by
pressing PRINT button.
2. Press the MENU button until the “PC cont” is displayed to choose continuous print or
“PC CMd” to choose print to PC at user command, then press the PRINT button to
confirm the choice.
3. After having selected the desired transmission mode, press the MENU button to go to
next parameter or the CAL button to go to previous.
4. To escape from parameters setup menu, press the MENU button until the acoustic
alarm is over, then release the button. The balance returns to normal weighing
conditions.
5. The balance returns to normal weighing conditions sending the data continuously or
at user command.
NOTE: select speed transmission (par. 0)
 Loading...