

Page 1
Instruction Manual
Professional Series
Hotplates, Stirrers, Hotplate-Stirrers
Page 2

1
Warranty
Manufacturer warrants this product to be free from defects in material and workmanship
when used under normal conditions for five (5) years. Register your equipment of
instrument online at www.vwrsp.com/warranty for US residents or www.vwrcanlab.
com/warranty for Canadian residents. For your reference, make a note of the serial
number, date of purchase and supplier here.
Serial Number: _______________________________________________________
Date of Purchase: ____________________________________________________
Supplier: ____________________________________________________________
table of Contents
Package Contents . . . . . . . . . . . . 1
Warranty . . . . . . . . . . . . 1
Installation . . . . . . . . . . . . 2
Maintenance & Servicing . . . . . . . . . . . . 2
Intended Use . . . . . . . . . . . . 2
Environmental Conditions . . . . . . . . . . . . 2
Safety Instructions . . . . . . . . . . . . 3-4
Standards & Regulations . . . . . . . . . . . . 3-4
Control Panel . . . . . . . . . . . . 5
7 x 7 Specifications . . . . . . . . . . . . 6
10 x 10 Specifications . . . . . . . . . . . . 7-8
Heating Operating Instructions . . . . . . . . . . . . 9
Stirring Operating Instructions . . . . . . . . . . . . 9-14
Function Mode . . . . . . . . . . . . 14
Technical Service . . . . . . . . . . . . 14
Troubleshooting . . . . . . . . . . . . 15-17
Replacement Parts . . . . . . . . . . . . 18
PaCkage Contents
Hotplate, Stirrer or Hotplate-Stirrer
92” (234cm) detachable power cord (except 10 x 10, 120V heating models)
Spin bar (stirring models only)
Probe Kit (heating models only): 8” stainless steel probe, 18” support rod, thermometer/
temperature probe extension clamp, hook connector
Instruction manual
Page 3

Upon receiving the VWR Hotplate/Stirrer/Hotplate-Stirrer, check to ensure that no
damage has occurred in shipment. It is important that any damage that occurred in
transport is detected at the time of unpacking. If you do find such damage the carrier
must be notified immediately.
After unpacking, place the Hotplate/Stirrer/Hotplate-Stirrer on a level bench or table,
away from explosive vapors. Ensure that the surface on which the unit is placed will
withstand typical heat produced by the unit and place the unit a minimum of six (6)
inches (15.2cm) from vertical surfaces. Always place the unit on a sturdy work surface.
The Hotplate/Stirrer/Hotplate-Stirrer is supplied with a power cord that is inserted into
the IEC connector on the back of the unit first, then it can be plugged into a properly
grounded outlet. The 120V unit plugs into a 120 volt, 50/60 Hz source. The 230V unit
plugs into a 230 volt, 50/60 Hz source. Be sure the power cord is fully and correctly
installed into the IEC connector before powering the unit.
Note: 10 x 10, 120V heating models have a fixed power cord terminated with a NEMA
5-15P appliance connector.
MaintenanCe & serviCing
The Hotplate/Stirrer/Hotplate-Stirrer is built for long, trouble-free, dependable service.
It needs no user maintenance beyond keeping the surfaces clean. The unit should
be given the care normally required for any electrical appliance. Avoid wetting or
unnecessary exposure to fumes. Spills should be removed promptly after the unit has
cooled down. Do not use a cleaning agent or solvent on the front panel or top plate
which is abrasive or harmful to plastics, nor one which is flammable. Always ensure
the power is disconnected from the unit prior to any cleaning. If the unit ever requires
service, contact your VWR representative.
CLEANING CERAMIC TOPS:
First remove any burnt-on deposits or spills from the top plate with a scraper (similar
to scraping paint off of windowpanes in your home). For your safety, please wear an
insulated mitt when using a metal scraper. When the top plate has cooled, apply a few
dabs of a non-abrasive cleaner over the surface with a damp paper towel. As a final
step, clean with water and wipe surface with a clean, dry paper towel.
CLEANING ALUMINUM TOPS:
For simple dust and dirt, clean the aluminum top by using a damp cloth with soap and
water. For more stubborn deposits, try using a flat edge wooden spatula to scrape off
as much as possible. For more stubborn stains, try using a couple of tablespoons of
white vinegar to two pints of water and mix well. Dip a clean cloth into the mixture and
gently rub the exterior of the aluminum surface. Generally, it is not a good idea to use
abrasive pads or cleaners on aluminum, as the metal will scratch easily. If you must
use some type of abrasive, try applying baking soda to the surface and then rubbing
with a moist cloth. This will work as well as most scouring pads and is less likely to
create deep scratches in the surface. Be careful not to use steel wool or scouring
pads as they can leave the aluminum riddled with little scratches that make it harder
to clean in the future. If you feel you must use steel wool, use the finest grade you
can find and use as sparingly as possible with as little pressure as possible. Go with
the grain rather than using circular motions.
intended Use
These Hotplates/Stirrers/Hotplate-Stirrers are intended for general laboratory use.
environMental Conditions
Operating Conditions: Indoor use only.
Temperature: 5 to 40°C (41 to 104°F)
Humidity: 20% to 80% relative humidity, non-condensing
Altitude: 0 to 6,562 ft (2000 M) above sea level
Non-Operating Storage:
Temperature: -20 to 65°C (-4 to 149°F)
Humidity: 20% to 80% relative humidity, non-condensing
Installation Category II and Pollution Degree 2 in accordance with IEC 664.
2
installation MaintenanCe & serviCing Cont’d
Page 4
Please read the entire instruction manual before operating the Hotplate,
Stirrer, Hotplate-Stirrer.
WARNING! DO NOT use the Hotplate, Stirrer, Hotplate-Stirrer in a hazardous
atmosphere or with hazardous materials for which the unit was not designed.
Also, the user should be aware that the protection provided by the equipment
may be impaired if used with accessories not provided or recommended by the
manufacturer, or used in a manner not specified by the manufacturer.
Always operate unit on a level surface for best performance and maximum safety.
DO NOT lift unit by the top plate.
CAUTION! To avoid electrical shock, completely cut off power to the unit
by disconnecting the power cord from the unit or unplug from the wall outlet.
Disconnect unit from the power supply prior to maintenance and servicing.
Spills should be removed promptly after the unit has cooled down. DO NOT
immerse the unit for cleaning. Alkalis spills, hydrofluoric acid or phosphoric acid
spills may damage the unit and lead to thermal failure.
CAUTION! The top plate can reach 500°C, DO NOT touch the heated
surface. Use caution at all times. Keep the unit away from explosive vapors
and clear of papers, drapery and other flammable materials. Keep the power
cord away from the heater plate.
DO NOT operate the unit at high temperatures without a vessel/sample on the
top plate.
WARNING! Units are NOT explosion proof. Use caution when heating volatile
materials.
Replace the ceramic top immediately if damaged. A damaged top can break
in use.
DO NOT operate the unit if it shows signs of electrical of mechanical damage.
Earth Ground - Protective Conductor Terminal
Alternating Current
standards & regUlations
Henry Troemner LLC hereby declares under it’s sole responsibility that the
construction of this product conforms in accordance with the following
standards:
Safety standards:
IEC 61010-1 Safety requirements for electrical equipment for measurement,
control and laboratory use. Part: General Requirements.
IEC 61010-2-010 Part II: Particular requirements for laboratory equipment
for the heating of materials.
IEC 61010-2-051 Part II: Particular requirements for laboratory equipment
for mixing and stirring.
UL Std. No. 61010-1
EMC standards:
EN61326-1 Class A EN61000-3-3/3-2
EN6100-4-5 EN61000-4-4
EN55022-B EN61000-4-3
EN61000-4-11 EN61000-4-6
Associated EU guidelines:
EMC directive 2004/108/EC
LVD directive 2006/95/EC
RoHS directive 2011/65/EU
This device complies with Part 15 of the FCC Rules. Operation is subject to the
following two conditions: (1) this device may not cause harmful interference, and (2)
this device must accept any interference received, including interference that may
cause undesired operation.
This Class A digital apparatus complies with Canadian ICES-003.
3
safety instrUCtions safety instrUCtions Cont’d
Page 5

Remplacez la plaque céramique immédiatement si celle-ci est endommagée. Une
plaque endommagée peut se fendre si elle est utilisée.
N’UTILISEZ PAS le dispositif s’il y a des signes de dommages électriques ou
mécaniques.
Mise à la terre - Borne du conducteur de protection
Courant alternatif
norMes et régleMentations
VWR International déclare par la présente sous sa seule responsabilité que la
conception de ce produit répond aux exigences des normes suivantes:
Normes de sécurité:
CEI 61010-1 Conditions de sécurité des composants électriques pour
la mesure, le contrôle et l’utilisation en laboratoire. Partie:
Conditions générales.
CEI 61010-2-010 Partie II: Conditions spécifiques à l’équipement en laboratoire
pour le chauffage de matériaux.
CEI 61010-2-051 Partie II: Conditions spécifiques à l’équipement en laboratoire
pour le mélange et l’agitation.
Norme UL No. 61010-1
Normes EMC:
EN61326-1 Catégorie A EN61000-3-3/3-2
EN6100-4-5 EN61000-4-4
EN55022-B EN61000-4-3
EN61000-4-11 EN61000-4-6
Directives UE associées:
Directive CEM 2004/108/EEC
Directive LVD 2006/95/EEC
Directive RoHS 2011/65/EU
Veuillez lire la totalité du manuel d’instruction avant d’utiliser le dispositif Agitateur/
Agitateur à plaque chauffante.
AVERTISSEMENT! N’UTILISEZ PAS le dispositif Plaque chauffante/Agitateur/
Agitateur à plaque chauffante dans une atmosphère dangereuse ou avec des
matériaux dangereux pour lesquels l’emploi du dispositif n’a pas été conçu.
L’utilisateur doit en outre toujours être conscient du fait que la protection fournie
par le fabricant peut être désactivée si le dispositif est utilisé avec des accessoires
non fournis ni recommandés par le fabricant ou s’il est utilisé de manière non
stipuléepar le fabricant.
Utilisez toujours le dispositif sur une surface à niveau pour optimiser non seulement la
performance mais la sécurité.
NE SOULEVEZ PAS le dispositif en saisissant la plaque supérieure.
ATTENTION! Pour éviter tout choc électrique, coupez le courant vers le dispositif
en débranchant le cordon d’alimentation du dispositif ou de la prise murale.
Débranchez le dispositif de l’alimentation avant d’effectuer toute opération de
maintenance ou de réparation.
Les liquides renversés doivent être nettoyés tout de suite après le refroidissement
du dispositif. N’IMMERGEZ PAS le dispositif pour le nettoyer. Les produits
déversés comme les alcalis et les acides hydrofluorique et phosphorique peuvent
entraîner un choc thermique.
ATTENTION! La plaque supérieure peut atteindre 400°C, NE TOUCHEZ PAS la
surface chauffée. Faites preuve de prudence à tout moment. Tenir le dispositif
loin des vapeurs explosives et des papiers, rideaux et autres substances
inflammables. Tenir le cordon d’alimentation loin de la plaque chauffante.
N’UTILISER PAS le dispositif à des températures élevées si un récipient/échantillon
n’est pas sur la plaque supérieure.
AVERTISSEMENT! Les dispositifs NE SONT PAS antidéflagrants. Faites preuve
de prudence lors du chauffage de substances volatiles.
4
Consignes de séCUrité Consignes de séCUrité Cont’d
Page 6
Control Panel
A.
B.
J.
K.
G.
L.C.
I.H.
D.
E.
F.
5
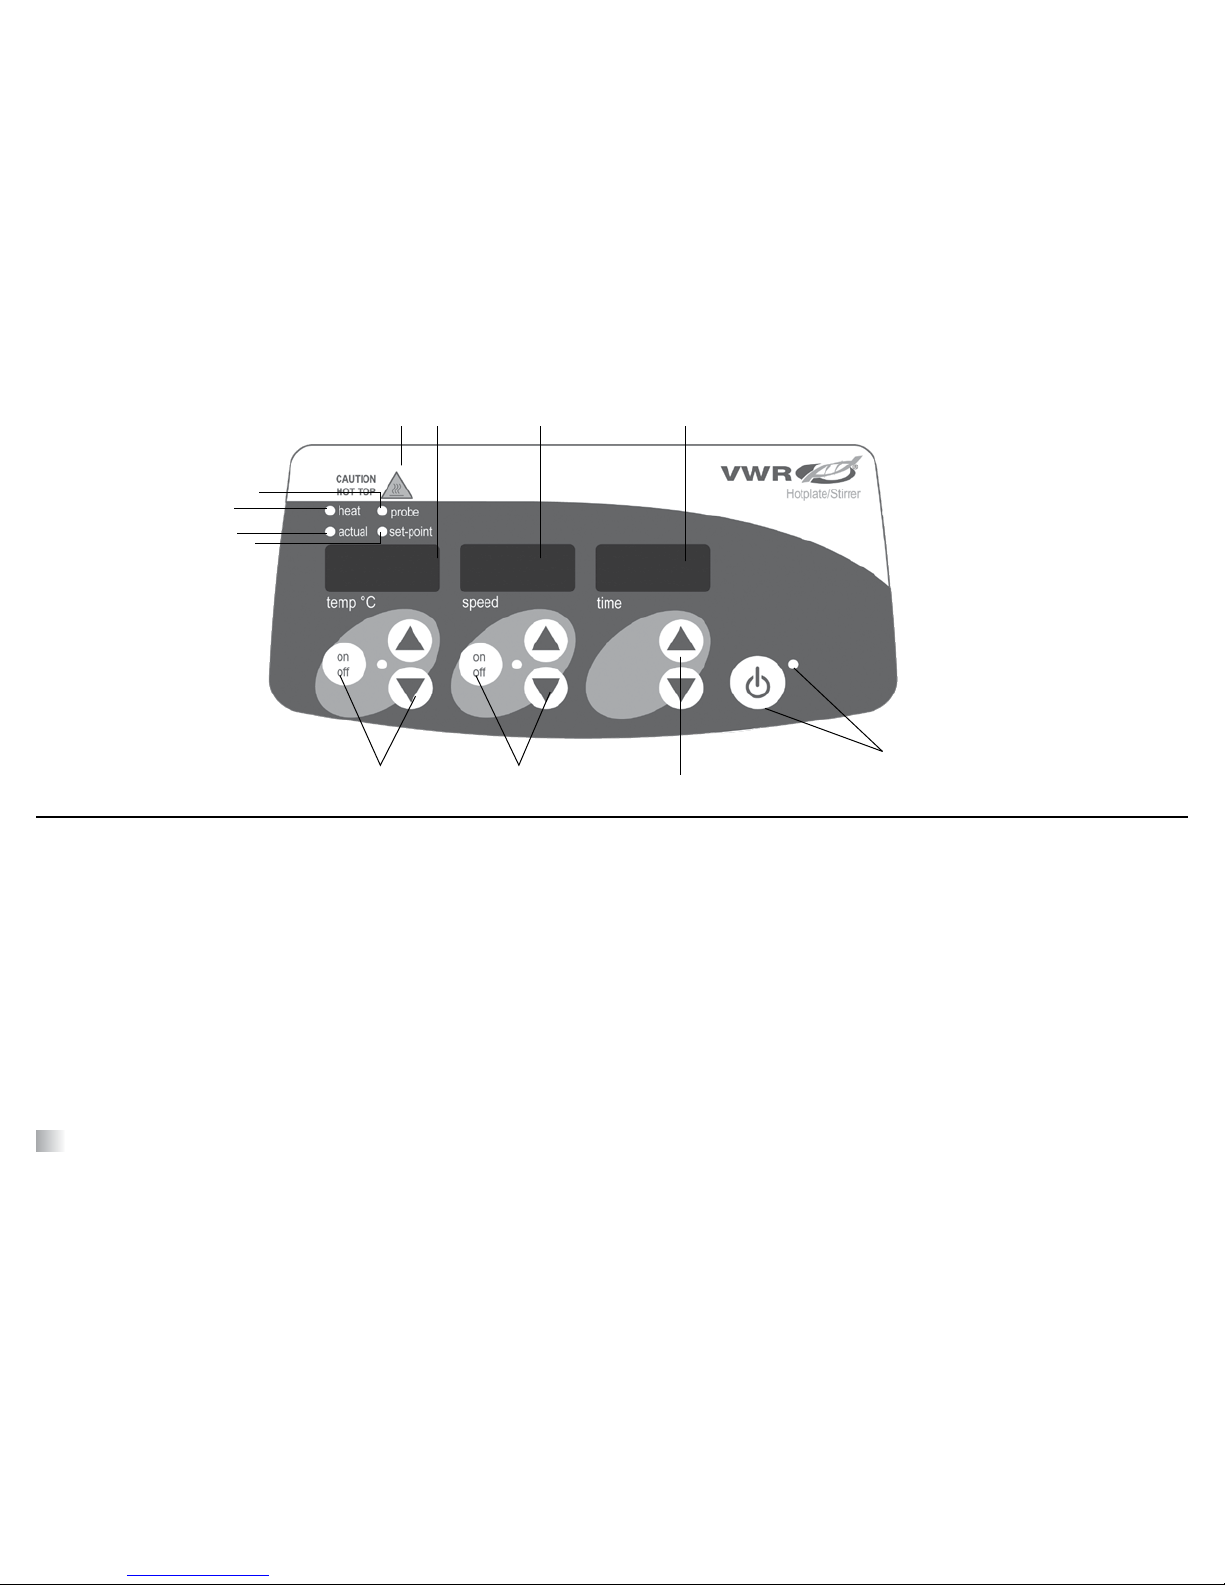
The front panel of the Professional Series Hotplate/Stirrer/Hotplate-Stirrer contains all
the controls and displays needed to operate the unit.
A. Standby button/standby indicator light: The standby indicator light will illuminate
when the unit is plugged in. The unit will be in standby mode. Press the standby
button to illuminate the temperature, speed, and time displays.
B. Temperature display: Temperature display: Displays the actual/set point
temperatures in conjunction with the actual/set point indicator lights. C. Up/down
arrows for set-point control. On/off button starts/stops the heating function.
D. Heat indicator light: Illuminates when the external temperature probe is not being
used. The actual temperature displayed is the heater temperature.
E. Actual indicator light: Illuminates when the temperature displayed is the actual
temperature of the heater/temperature probe.
F. Probe indicator light: Illuminates when the external temperature probe is plugged
in. The actual temperature displayed is the probe temperature.
G. Set-point indicator light: Illuminates when the set-point temperature is displayed.
H. Caution hot top indicator light: Illuminates when the heat is turned on and warns
the top plate is too hot to touch. Remains on until the top plate has cooled down.
I. Speed display: Displays the speed of the unit. J. Up/down arrows for set-point
control. On/off button starts/stops the stirring function.
K. Time display: Displays accumulated time (continuous mode) or how much time is
remaining (timed mode). The display range is from 0 to 9,999 minutes in one (1)
second increments. The display will indicate minutes and seconds until the timer
reaches 99 minutes and 59 seconds (99:59), then the display will automatically
display minutes up to 9999. L. Up/down arrows for set-point control.
Page 7
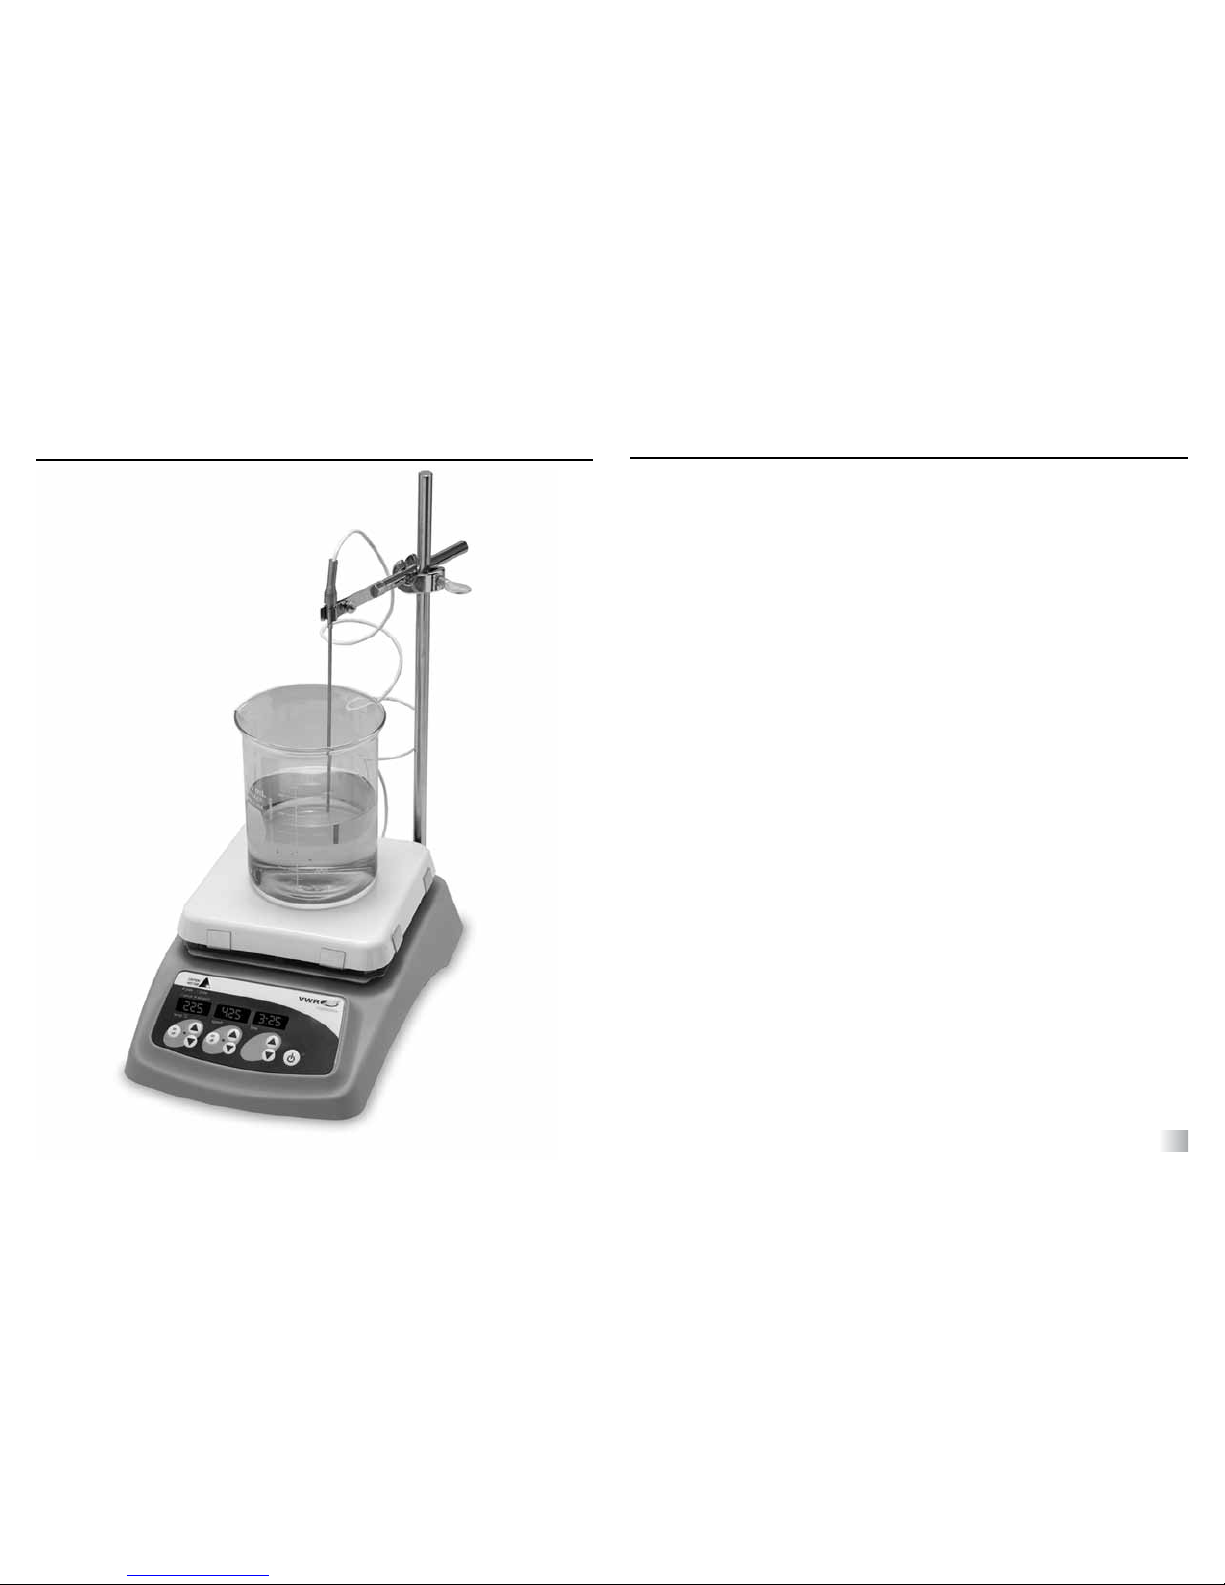
*glassware not included
6
Professional series 7 x 7
7 x 7 HotPlate/stirrer/HotPlate-stirrer sPeCifiCations
Dimensions (L x W x H): 14.77 x 9.85 x 4.27” (37.5 x 25 x 10.8cm)
Top plate dimensions (L x W): 7 x 7” (17.8 x 17.8cm)
Electrical (50/60 Hz):
Hotplate: 120V: 7.9 amps/950 watts
230V: 4.4 amps/1000 watts
Stirrer: 120V: 0.4 amps/50 watts
230V: 0.2 amps/50 watts
Hotplate-Stirrer: 120V: 8.3 amps/1000 watts
230V: 4.6 amps/1050 watts
Fuses: HP/HPS: 5mm x 20mm, 10 amp slow blow
Stirrer: 5mm x 20mm, 5 quick acting
Temperature range: ceramic: ambient +5°C to 500°C
aluminum: ambient +5°C to 400°C
Temperature stability*: +/-1%
Speed range: 60 to 1600rpm
Speed stability: +/-2%
Capacity: 2500mL, gross weight should not exceed 40lbs
Controls: see page 5
Ship weight: 12.0lbs (5.4kg)
* Plate Control: Below 100°C +/-2°C. Environmental and sample conditions permitting.
* Probe Control: Below 100°C +/-1°C. Environmental and sample conditions permitting.
Page 8
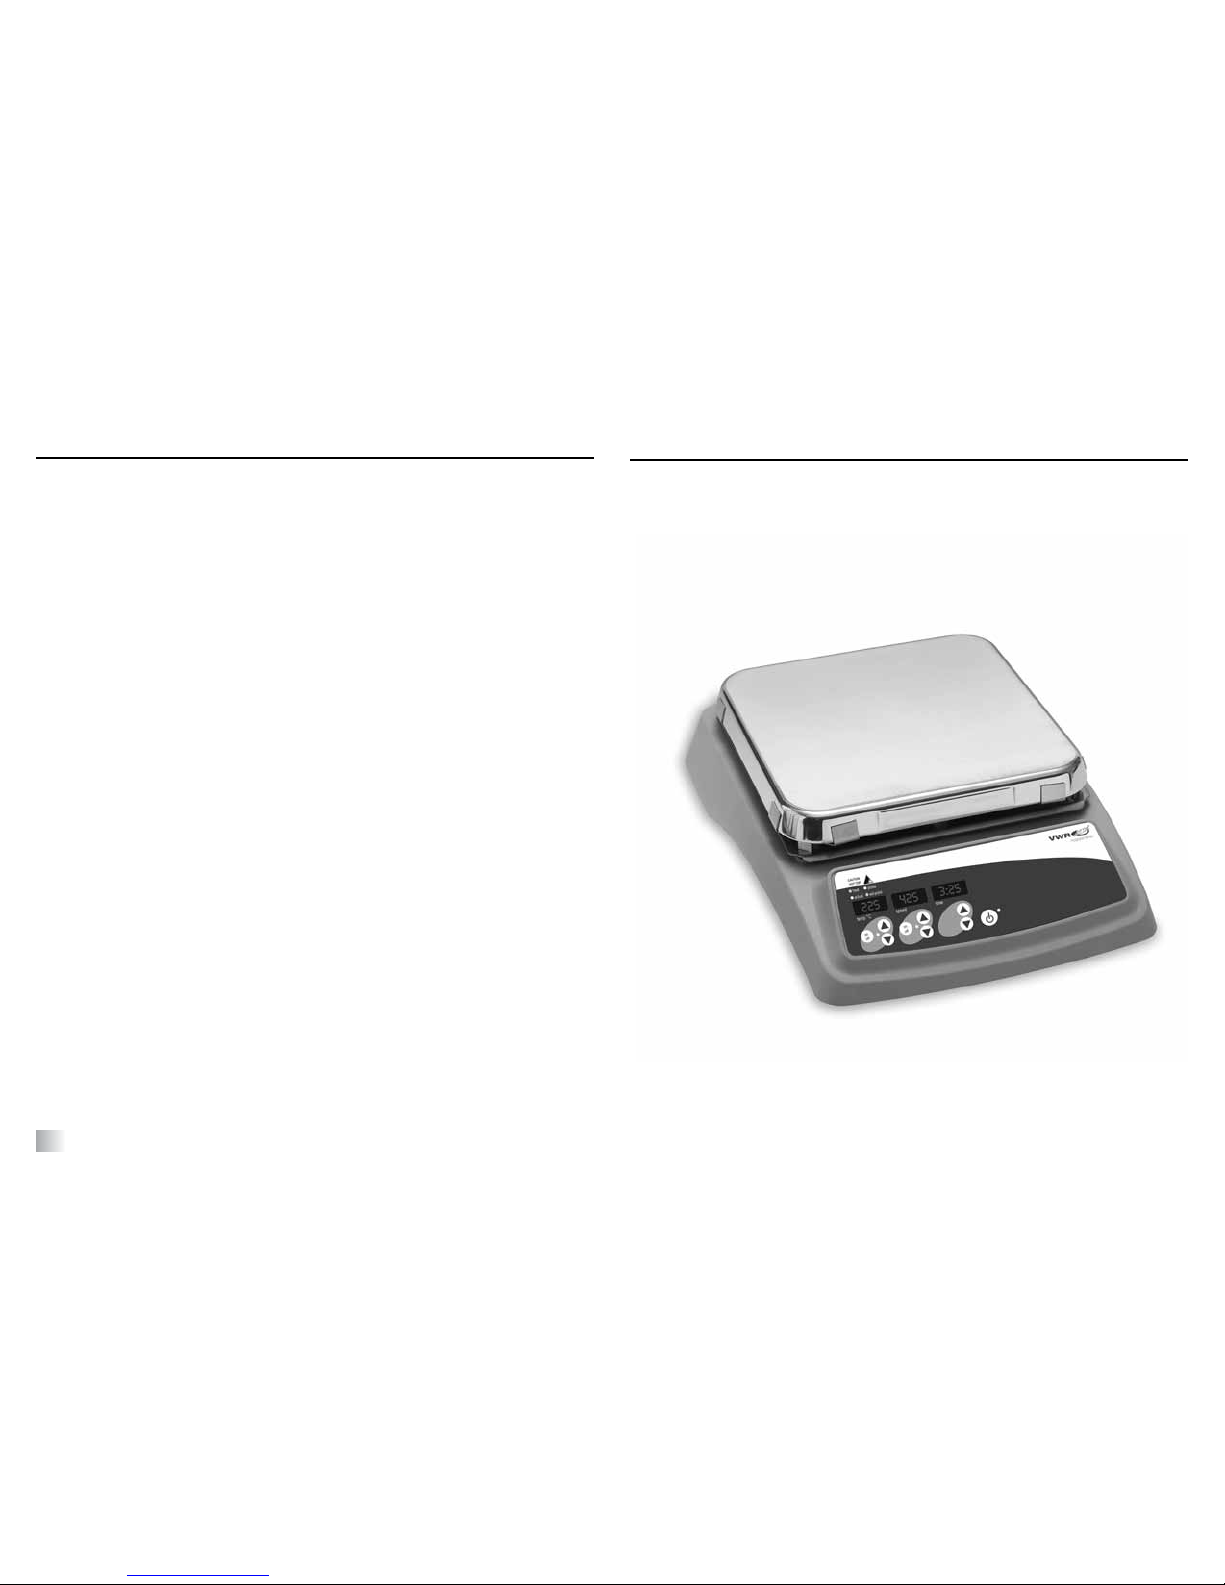
Professional series 10 x 10
7
Dimensions (L x W x H): 17.90 x 13.00 x 4.27” (45.5 x 33.0 x 10.8cm)
Top plate dimensions (L x W): 10 x 10” (25.4 x 25.4cm)
Electrical (50/60 Hz):
Hotplate: 120V: 10.8 amps/1300 watts
230V: 6.7 amps/1550 watts
Stirrer: 120V: 0.4 amps/50 watts
230V: 0.2 amps/50 watts
Hotplate-Stirrer: 120V: 11.2 amps/1345 watts
230V: 7.0 amps/1600 watts
Fuses: 120V HP/HPS: 1 1/4 x 1/4 in, 15 amp quick acting (internal)
230V HP/HPS: 5mm x 20mm, 16 amp slow blow
Stirrer: 5mm x 20mm, 5 quick acting
Temperature range: ceramic: ambient +5°C to 500°C
aluminum: ambient +5°C to 400°C
Temperature stability*: +/-1%
Speed range: 60 to 1600rpm
Speed stability: +/-2%
Capacity: 6000mL, gross weight should not exceed 50lbs
Controls: see page 5
Ship weight: 17.4lbs (7.9kg)
* Plate Control: Below 100°C +/-2°C. Environmental and sample conditions permitting.
* Probe Control: Below 100°C +/-1°C. Environmental and sample conditions permitting.
10 x 10 HotPlate/stirrer/HotPlate-stirrer sPeCifiCations
Page 9

Heating oPerating instrUCtions
8
The Hotplates and Hotplate-Stirrers have a micro-processor controlled heater that is
designed to bring samples to temperature quickly and accurately.
1. Getting ready:
a. Plug power cord into a properly grounded 3-prong outlet.
b. Place a vessel with solution and the appropriate accessories in the center of the
top plate. This is important because the vessel should be over the hottest part
of the top plate.
c. Press the standby button to move the unit from standby mode. The temperature
and time displays will illuminate. On power-up, allow the unit approximately 30
seconds to stabilize before accurate temperature readings are displayed.
2. Setting temperature:
a. Press the up/down arrows below the temperature display until you reach the
desired temperature. Press the on/off button below the temperature display to
start the heating function. The indicator light below the temperature display will
illuminate to indicate the heating function is in use. Audible beeps will sound to
indicate the set-point temperature has been reached. (LED display will toggle
between actual and set point temperatures. Indicator lights will toggle between
actual and set point to indicate what is displayed).
b. Set-point temperature adjustments can be made without interrupting heating using
the up/down arrows below the temperature display. Removing or adding more
to a sample content could cause the temperature to fluctuate.
c. To stop heating function, press the on/off button below the temperature display.
Your vessel can then be removed.
3. Setting temperature with probe:
a. Probe must be connected to the unit before turning on the heating function.
b. Follow step 2a through 2c.
Caution hot top indicator:
The caution hot top indicator light warns that the top
plate is too hot to touch. The caution hot top indicator
light will illuminate when the heat is turned on and remain
on until the top plate cools down.
4. Set timed mode:
a. Press the up/down arrows below the time display until you reach the desired
time.
b. When the unit is started, by pressing the on/off button below the temperature or
speed display, the unit will run for the selected time. There are audible beeps to
indicate the time down function is complete. The unit will shut off automatically.
c. To repeat for the same time, simply depress the on/off button again.
d. To interrupt an automatic timing cycle before it is completed, press the on/off
button below the temperature or speed display.
5. Set time to continuous mode:
a. Set timer to zero (0) using the up/down arrows below time display.
b. When the unit is started, by pressing the on/off button below the temperature or
speed display, the time display will show actual running time.
c. To stop, press the on/off button below the temperature or speed display.
Max Temperature:
If the unit has an aluminum top, the max temperature setting is 400°C. If the unit has a
ceramic top, the max temperature setting is 500°C. The only exception is if the unit is a
Professional Series with a ceramic top. In that case when using probe control, the software
limits the Professional ceramic top unit to 400°C. If the probe is not plugged in, the unit
can be set to 500°C.
* CAUTION: If you are using a probe accessory with a Professional unit, make
sure you don’t exceed a sample temperature of 250°C, otherwise the probe tip
might become damaged!
Page 10

Heating oPerating tiPs
9
Overshoot:
The unit may overshoot the temperature up to 10°C before stabilizing at the set-point.
The two methods suggested to minimize overshoot are:
1. Metal containers minimize overshoot. CAUTION! When heating metal containers
on a ceramic top it is recommended to use the lowest temperature setting possible
to limit thermal stress to the ceramic top.
2. If a glass vessel is used, anticipate overshoot. Start with a setting 5 to 10°C below
the desired temperature. When the temperature stabilizes at this lower setting,
press the up/down arrows to the final temperature. Overshoot is then reduced to
about 1°C.
The temperature display on the units show the actual temperature of the heater not the
top plate or sample. The vessel contents being heated may be at a lower temperature
depending on the size and insulating qualities of the vessel. It may be beneficial to
monitor the temperature of the vessel contents and adjust the set-point temperature
accordingly. If you need precise control a probe will be necessary.
tyPiCal tiMe to boil Water
The chart below is an example of an approximate time to boil for the specified amount of water in a specific vessel.
These values are only approximate and can vary from unit to unit. Values are based on 23ºC water in an ambient environment of 23ºC.
CERAMIC TOP ALUMINUM TOP
Size of Top Plate Volume of Water Time Size of Top Plate Volume of Water Time
7 x 7 1500ml in 2000ml beaker 45 7 x 7 1500ml in 2000ml beaker 60
10 x 10
5000ml in 6000ml
Erlenmeyer Flask
60 10 x 10
5000ml in 6000ml
Erlenmeyer Flask
70
Page 11

10
teMPeratUre Calibration ProCedUre (single Point Calibration)
This method can be used for calibrating the RTD probe or the top plate surface of
the unit.
NOTE: RTD probe set points can only be set or cleared with the external probe
connected to the unit. Top plate set points can only be set or cleared with the RTD
probe not connected.
1. If unit is in standby mode press the standby button to take unit out of standby
mode.
2. To set a Single Point Calibration adjustment:
a. Set the unit to the desired temperature, turn the temperature control system on
and let the system stabilize to the user input temperature.
b. While pressing and holding the standby button, press and release the
temperature up button.
c. The unit will beep two times (if not in silent mode) and the temperature display
will blink to indicate a Single Point Calibration adjustment is in progress.
d. Measure the sample or top plate with a traceable thermometer or temperature
probe.
e. Use the temperature up and down buttons to adjust the display to read the
actual measured temperature indicated on the external temperature measuring
device. (Example: Desired temperature is 80°C. Set unit at 80°C per step
(a). Follow steps (b & c). Display reads 80°C and the external temperature
measuring device reads higher at 84°C. Push the temperature up arrow so
the display will match the external temperature device and also read 84°C. By
doing this a biased offset for 80°C will be used any time the unit is set to 80°C.
f. Press the standby button to save the Single Point Calibration adjustment.
The temperature display will stop blinking and the decimal point will flash
periodically to indicate that a Single Point Calibration adjustment is in use. This
indication will occur whenever the temperature is adjusted to the temperature
used in part “a” of this procedure.
g. This process may be repeated for up to three separate set points (three RTD
probe set points, and three top plate set points). If a fourth calibration set point
is entered, the first set point will be overwritten.
h. The adjustments are limited to the maximum and minimum temperature range
of the particular model.
The unit will now use the biased offset for that specific temperature setting and
increase or decrease temperature accordingly to bring the unit temperature to setpoint. The decimal point of the display will flash to indicate a biased offset is being
used. All other temperature settings will use the factory default settings. The offset will
be stored in memory and retained until reset.
3. To clear existing Single Point Calibration adjustments:
a. Top plate Single Point Calibration adjustments can only be cleared with the
RTD probe not connected to the unit. RTD probe Single Point Calibration
adjustments can only be cleared with the RTD probe connected to the
unit.
b. While pressing and holding the standby button, press and release the
temperature down button.
c. The unit will beep two times (if not in silent mode) to indicate all Single Point
Calibration adjustments have been cleared.
Page 12

11
stirring oPerating instrUCtions
The micro-processor controlled ramping feature slowly increases speed until the setpoint is reached. This feature helps to avoid splashing, improves magnetic coupling
and provides excellent low end control. The micro-processor also monitors and
regulates the stirring speed, sensing your requirements whether you’re stirring an
aqueous, viscous or semi-solid solution.
Initial stirring speed may exceed set speed if the following conditions exist:
1. The stirrer is set at a low speed and the stirrer has not been operated for a
extended period of time.
2. The stirrer is set at a low speed and it is the stirrer’s initial use.
1. Getting ready:
a. Plug power cord into a properly grounded outlet.
b. Place a vessel with solution and the appropriate accessories in the center of the
top plate. This is important because the spin bar will be well within the magnetic
field.
c. Press the standby button to move the unit from standby mode. The speed and
time displays will illuminate.
2. Setting speed:
a. Press the up/down arrows below the speed display until you reach the
desired speed.
b. To start stirring function, press the on/off button below the speed display.
c. The indicator light below the speed display will illuminate to indicate the stirring
function is in use.
d. Speed adjustments can be made without interrupting stirring by using the up/
down arrows below the speed display.
e. To stop stirring function, press the on/off button below the speed display.
3. Set timed mode:
a. Press the up/down arrows below the time display until you reach the desired
time.
b. When the unit is started, by pressing the on/off button below the temperature or
speed display, the unit will run for the selected time. There are audible beeps to
indicate the time down function is complete. The unit will shut off automatically.
To repeat for the same time, simply depress the on/off button again.
c. To interrupt an automatic timing cycle before it is completed, press the on/off
button below the temperature or speed display.
4. Set time to continuous mode:
a. Set timer to zero (0) using the up/down arrows below time display.
b. When the unit is started, by pressing the on/off button below the temperature or
speed display, the time display will show actual running time.
c. To stop, press the on/off button below the temperature or speed display.
Stir protection for Hotplate-Stirrers:
If stirrer motor stops or fails, the unit will automatically shut down the heater.
OPERATING TIPS
The stirrer increases speed at a steady rate until the set-point is reached, if the spin
bar is too large or the liquid is too viscous, the stirrer may not reach its set-point. The
set-point speed needs to be reduced. The magnetic strength of stir bars reduce over
time and may need to be replaced.
Stirring vessels in oil baths:
When heating and stirring a reaction vessel within an oil bath or similar set-up, the
stirring function will stir up to approximately one (1) inch (2.54cm) from the top plate.
The stirring speed will vary according to liquid viscosity, spin bar length and distance
from the top plate. Adjust one or all of these to achieve the desired stirring speed.
EXAMPLE: The closer the reaction vessel is to the top plate the stronger the magnetic
connection.
Page 13

12
fUnCtion Mode
Hotplate-Stirrers and Stirrers (Hotplate only models see page 14):
The steps listed below allow you to customize the functionality of your Hotplate-Stirrer
or Stirrer unit.
Enable/Disable Function Settings
To enter into the Function Modes, perform the following steps:
1. Place unit in standby mode.
2. Press and hold the time down button.
3. While pressing and holding the time down button, press and release the standby
button.
The speed up/down arrows allow you to toggle between functions. The time up/down
arrows allow you to turn the function off or on. Press the standby button at any time to
exit the Function Mode and save the current settings.
BEEP DISABLE (this function will disable the beep, except one caused by an error).
Speed display will show “bEEP” and time display will show current setting “on” or “off”.
a. Press the time up or down button to toggle beeper on/off.
b. Press the speed up button to select the next option or speed down button to
select the previous option.
PLATE LIMIT SETTING (this procedure will limit the top plate temperature when the
probe is NOT being used). Speed display will show “SEtL” and time display will show
current setting (degrees C).
a. This option will be skipped on Professional Stirrer models.
b. The heat LED will be on during this step.
c. Press the time up or down button to adjust the current plate temperature limit.
d. Press the speed up button to select the next option or speed down button to
select the previous option.
E3 (motor error) DISABLE (Disabling this function will enable a Hotplate-Stirrer
to continue to heat in the event of a motor error or E3 error which could be caused
by highly viscous liquids). Speed display will show “SEr” and time display will show
current setting “on” or “off”.
a. Press the time up or down button to toggle Speed Error (motor error) on/off.
b. Press the speed up button to select the next option or speed down button to
select the previous option.
E7 (Probe Out of Sample) DISABLE (Disabling this function will enable a unit to
continue to heat a sample in the event the sample can not reach the set point. This
may be due to the fact the set point is above what the sample can achieve. Speed
display will show “POOS” and time display will show current setting “on” or “off”).
a. This option will be skipped on Professional Stirrer models.
b. Press the time up or down button to toggle Probe Out of Sample on/off.
c. Press the speed up button to select the next option or speed down button to
select the previous option.
POWER FAILURE AUTO-RECOVERY DISABLE
Speed display will show “PF” and time display will show current setting “on” or “off”.
a. Press the time up or down button to toggle Power Fail option on/off. On means
that the unit will automatically recover from a power failure, OFF means that the
unit will indicate that a power failure has occurred, but always return the unit to
standby mode in the event of a power failure.
b. Press the Speed Up button to select the next option or Speed Down button to
select the previous option.
During normal operation (factory default setting) if power failed while heating, stirring,
or timing the unit will recover and resume the operation being performed. If the unit
was running in continuous mode, it will resume in continuous mode, if the unit was
running in timed mode, the time will reset to the original set time and begin counting
down again. Turning this feature off will disable this function. In the event of a power
failure if the function is turned off, the unit will not recover, but indicate a power failure
occurred by a “PF” in the time display. To clear the “PF” indication (and place the unit
in standby) press and release the standby button.
Page 14

fUnCtion Mode
13
TIMER DISABLE FUNCTIONS
The factory default setting allows for both heating and stirring functions to turn off
simultaneously when the timer reaches zero. The Heater/Timer and Speed/Timer
Disable functions below allow you to change the default setting and program what is
turned off when the timer reaches zero.
HEATER/TIMER DISABLE
Speed display will show “tHEt” and time display will show current setting (“on” or “off”).
a. This option will be skipped on Professional Stirrer models
b. Press the time up or down button to toggle Heater/Timer interaction option on/
off. On means that the unit will shut off the heater when the timer counts down
to zero, OFF means that the heater will continue to run when the timer counts
down to zero.
c. Press the speed up button to select the next option or speed down button to
select the previous option.
SPEED/TIMER DISABLE
Speed display will show “tSPd” and time display will show current setting (“on” or “off”).
a. Press the time up or down button to toggle Speed/Timer interaction option on/
off. On means that the unit will shut off the motor when the timer counts down
to zero, OFF means that the motor will continue to run when the timer counts
down to zero.
b. Press the speed up button to select the next option or speed down button to
select the previous option.
Press the standby button at any time to exit the Function Mode and save current
settings. Power Fail setting, Temperature Limit, and Timer functions are saved in the
memory. All other options are not stored in the memory and restored to the default
setting (enabled) when power is cycled.
Probe Controlled Plate Temperature Limit (Flash point Setting):
(for Hotplates and Hotplate-Stirrers)
To adjust the maximum probe controlled plate temperature
1. Place unit in standby mode and ensure probe is properly connected.
2. Press and hold the temperature on/off and time down buttons.
3. While pressing and holding the temperature on/off and time down buttons, press and
release the standby button.
a. The probe LED will be on during this step.
b. If maximum probe controlled plate temperature (flash point) is set below the
maximum, the temperature LED will be off for the first 1 second of the actual and
set temperature display while heating.
c. Use the temperature up and temperature down buttons to adjust the maximum
probe controlled plate temperature (flash point).
d. The minimum value for this temperature is 60ºC for both aluminum top and ceramic
top units.
e. The maximum value for this temperature is 400ºC for aluminum top units and
430ºC for ceramic top units.
f. Press and release the standby button to return to standby mode.
NOTE: The indicator light below the temperature display will blink every 3 to 4 seconds
to indicate this function is enabled.
EXAMPLE:
Change the plate over-temperature limit from the current 430°C to 200°C.
1. Start with the unit turned off.
2. Press and hold the on/off button below the temperature display and the time down
arrow while turning the unit on, by pressing the standby button. The temperature
displayed is the current plate over-temperature limit setting, 430°C.
3. Press the up/down arrows until the display reads 200°C. After approximately 2
seconds, the display will blink off, then on again to store the new setting.
4. The new over-temperature limit is now set for 200°C. Turn the unit off before using.
Page 15

fUnCtion Mode
14
This may be due to the fact the set point is above what the sample can achieve).
Temperature display will show “POOS” and time display will show current setting
(“on” or “off”).
a. Press the time up or down button to toggle Probe Out of Sample on/off.
b. Press the temperature up button to select the next option or temperature down
button to select the previous option.
POWER FAILURE AUTO RECOVERY DISABLE
Temperature display will show “PF” and time display will show current setting (“on”
or “off”).
a. Press the time up or down button to toggle Power Fail option on/off. On means
that the unit will automatically recover from a power failure, OFF means that the
unit will indicate that a power failure has occurred, but always return to standby
mode in the event of a power failure.
b. Press the temperature up button to select the next option or temperature down
button to select the previous option.
During normal operation (factory default setting) if power failed while heating, stirring,
or timing the unit will recover and resume the operation being performed. If the unit
was running in continuous mode, it will resume in continuous mode, if the unit was
running in timed mode, the time will reset to the original set time and begin counting
down again. Turning this feature off will disable this function. In the event of a power
failure if the function is turned off, the unit will not recover, but indicate a power failure
occurred by a “PF” in the time display. To clear the “PF” indication (and place the unit
in standby) press and release the standby button.
Press the standby button at any time to exit the Function Mode and save current
settings. Power Fail setting and Temperature Limit are saved in the memory. All other
options are not stored in the memory and restored to the default setting (enabled)
when power is cycled.
Probe Controlled Plate Temperature Limit (Flash point Setting):
(for Hotplates and Hotplate-Stirrers, see page 13-14)
Hotplates (Hotplate-Stirrers and Stirrers see page 12):
The steps listed below allow you to customize the functionality of your Hotplate only
unit.
Enable/Disable Function Settings
To enter into the Function Modes, perform the following steps:
1. Place unit in standby mode.
2. Press and hold the time down button.
3. While pressing and holding the time down button, press and release the standby
button.
The temperature up/down arrows allow you to toggle between functions. The time up/
down arrows allow you to turn the function off or on. Press the standby button at any
time to exit the Function Mode and save the current settings.
BEEP DISABLE
Temperature display will show “bEEP” and time display will show current setting (“on”
or “off”).
a. Press the time up or down button to toggle beeper on/off.
b. Press the temperature up button to select the next option or temperature down
button to select the previous option.
PLATE LIMIT SETTING (this procedure will limit the top plate temperature when the
probe is NOT being used). Temperature display will show “SEtL” and time display will
show current setting (degrees C).
a. The heat LED will be on during this step.
b. Press the time up or down button to adjust the current plate temperature limit.
c. Press the temperature up button to select the next option or temperature down
button to select the previous option.
E7 (probe out of sample) DISABLE (Disabling this function will enable a unit to
continue to heat a sample in the event the sample can not reach the set point.
Page 16

troUblesHooting
teCHniCal serviCe
For information or technical assistance contact your local VWR representative or visit vwr.com.
15
If the unit gives an error code, immediately switch the unit off. See error table below for proper corrective action. If the error cannot be cleared, please contact your VWR
representative for repairs.
Error Cause of Error How to Fix
E1
An “E1” error means the heater sensor is open or malfunctioned
This error cannot be xed by the end user. Please contact your VWR representative
for repair.
E2
An “E2” error means the heater sensor shorted or malfunctioned.
This error cannot be xed by the end user. Please contact your VWR representative
for repair.
E3
An “E3” error means there is either no motion on the motor or the motor is not
working properly.
Reset the unit by pressing the on/off button for speed. (Also the heater will shut off.
If you were heating, press the On/Off button for heat to reset). If it still doesn’t work,
please contact your VWR representative for repair.
E4
An “E4” error means there is an open probe. It is detected when the heating
is started in probe control (with probe connected); after heating begins, the
probe fails or is unplugged during the heating process. (If you want to run unit
in PLATE control, heating must be started without external probe plugged in.)
Reset the unit by pressing the heat on/off button twice. Also make sure the probe is
plugged in to the back of the unit. If it still does not work, please contact your VWR
representative for repair.
E5
An “E5” error means the probe shorted or malfunctioned.
Reset the unit by pressing the heat on/off button twice. Also try plugging in another
probe that is known to be working. If this doesn’t work, please contact your VWR
representative for repair.
Error codes continued on next page.
Page 17

16
troUblesHooting
* When using probe control, the temperature set point should be adjusted to the desired sample temperature. If the temperature set point is higher than the sample can achieve, an
E7 error will occur. Reduce sample volume or temperature set point value. For Example: Water has a theoretical temperature limit of 100°C (boiling). A temperature set point greater
than 100°C will cause an E7 error.
Error Cause of Error How to Fix
E6
An “E6” error means there is an internal electronics system error.
This error cannot be xed by the end user. Please contact your VWR representative
for repair.
E7*
An “E7” error means the probe is not able to reach set point. It could mean
the probe is out of the sample, or the temperature of the probe doesn’t rise
after a certain amount of time, or the probe temperature falls when the heater
temperature is rising.
Reset the unit by pressing the heat on/off button twice. Also make sure the probe
is in the sample. If it still does not work, please contact your VWR representative
for repair.
E8
An “E8” error means the unit had a catastrophic over temperature condition
or temperature runaway condition (temperature greater than 600°C) and
therefore automatically shuts down to prevent damage.
This error cannot be xed by the end user. Please contact your VWR representative
for repair.
E9
An “E9” error means the heater failed. This might occur if the heater
temperature fails to rise when asked to, or there is a sudden drop in heater
temperature for no apparent reason.
This error cannot be xed by the end user. Please contact your VWR representative
for repair.
Page 18
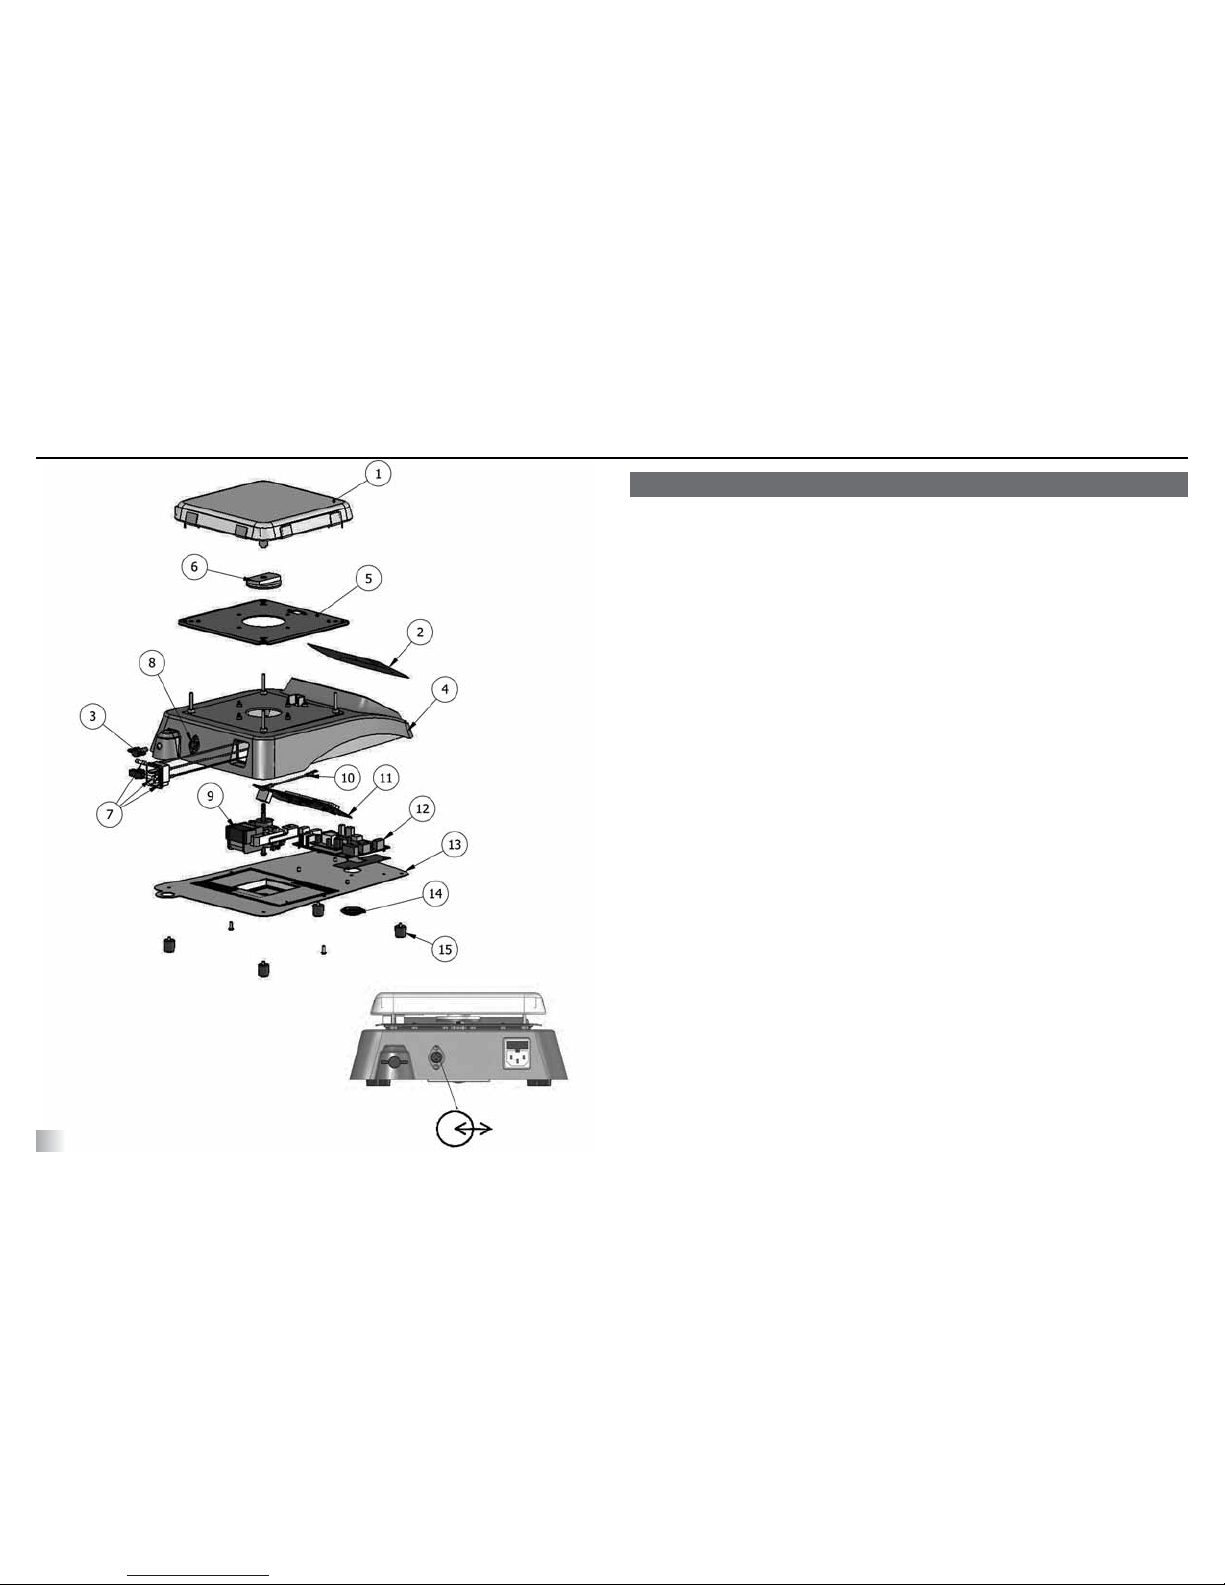
7 x 7 rePlaCeMent Parts
17
desCriPtion Part nUMber
1. Top plate assembly:
120V, ceramic, Hotplate, Hotplate-Stirrer 886316-00
230V, ceramic, Hotplate, Hotplate-Stirrer 886317-00
120V/230V, ceramic, Stirrer 886318-00
120V, aluminum, Hotplate, Hotplate-Stirrer 886319-00
230V, aluminum, Hotplate, Hotplate-Stirrer 886320-00
120V/230V, aluminum, Stirrer 886321-00
2. Front panel overlay: Professional Series Hotplate 386268-00
Professional Series Hotplate-Stirrer 386269-00
Professional Series Stirrer 386267-00
3. Support stand thumb knob 186208-00
4. Housing 286614-00
5. Heat Shield 286608-00
6. Magnet assembly: Hotplate-Stirrer, Stirrer 286616-00
7. IEC module 386679-00
Fuse 10 Amp Hotplate, Hotplate-Stirrer 386005-00
Fuse 5 Amp Stirrer 380238-00
8. Assembly, Wire, DIN and MTA 386677-00
9. Motor: 286627-00
10. Ground Jumper Wire aluminum top units 386678-00
11. Digital Display PCB 386664-00
12. Main PCB: 386660-00
13. Bottom Plate 286611-00
14. Bottom Plate plug 186201-00
15. Feet 186200-00
Detachable 92” (234cm) power cord: 120V 330100-00
Euro plug 330101-00
Page 19
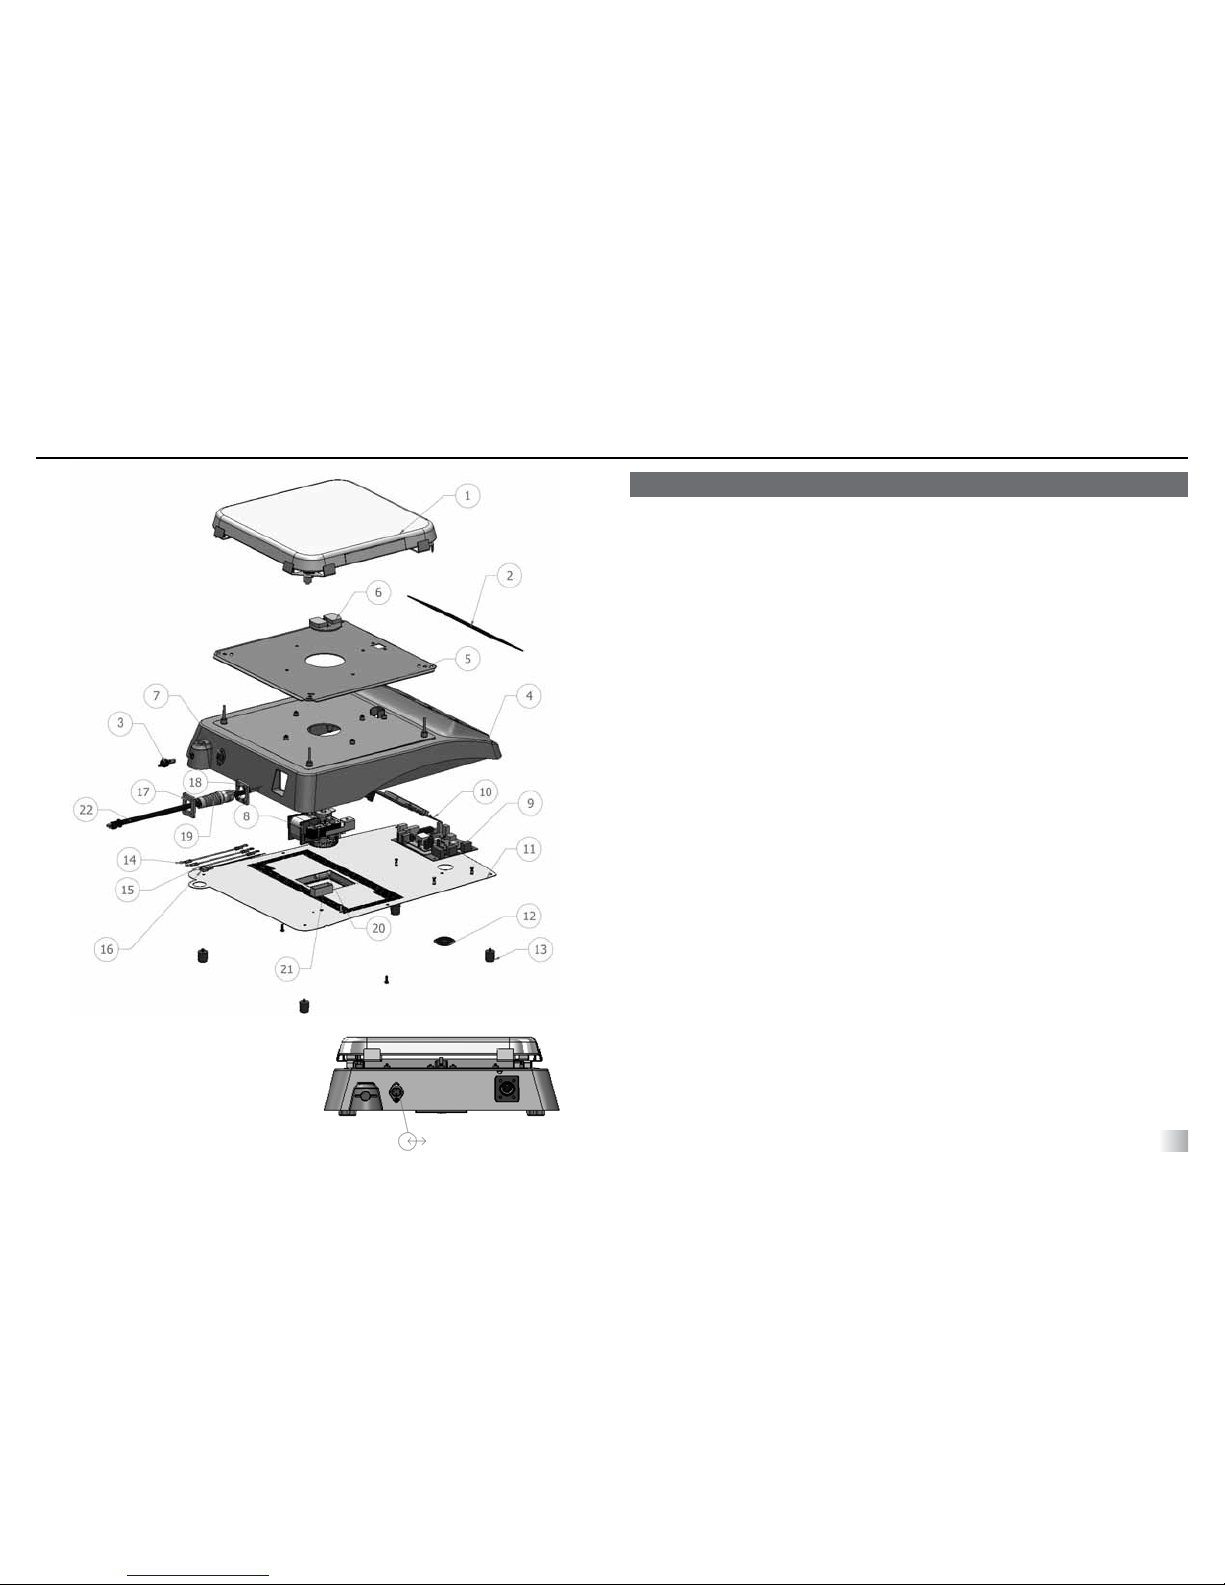
18
desCriPtion Part nUMber
1. Top plate assembly:
120V, ceramic, Hotplate, Hotplate-Stirrer 886322-00
120V, aluminum, Hotplate, Hotplate-Stirrer 886325-00
2. Front panel overlay: Professional Series Hotplate 386276-00
Professional Series Hotplate-Stirrer 386277-00
Professional Series Stirrer 386275-00
3. Support stand thumb knob 186208-00
4. Housing 286615-00
5. Heat Shield 286609-00
6. Magnet assembly: Hotplate-Stirrer, Stirrer 286616-00
7. Assembly, Wire, DIN and MTA 386677-00
8. Motor: 286623-00
9. Main PCB: 386660-00
10. Digital Display PCB 386664-00
11. Bottom Plate 286612-00
12. Bottom Plate plug 186201-00
13. Feet 186200-00
14. Motor to Chassis wire, AI plate 386696-00
15. PCBA to Chassis wire 386697-00
16. PCBA to fuse holder wire 386698-00
17. Face plate 286644-00
18. Retention plate 286645-00
19. Strain relief bushing 386688-00
20. Fuse 15 Amps 386034-00
21. Fuse holder 386126-00
22. Fixed AC power cord
380109-00
10 x 10, 120v HotPlate, HotPlate-stirrer rePlaCeMent Parts
Page 20
Manufactured by:
201 Wolf Drive • PO Box 87 • Thorofare, NJ 08086-0087
Phone: 856-686-1600 • Fax: 856-686-1601 • E-mail: [email protected]
586058-00 (Rev 7 - 4/15)
HENRY TROEMNER LLC
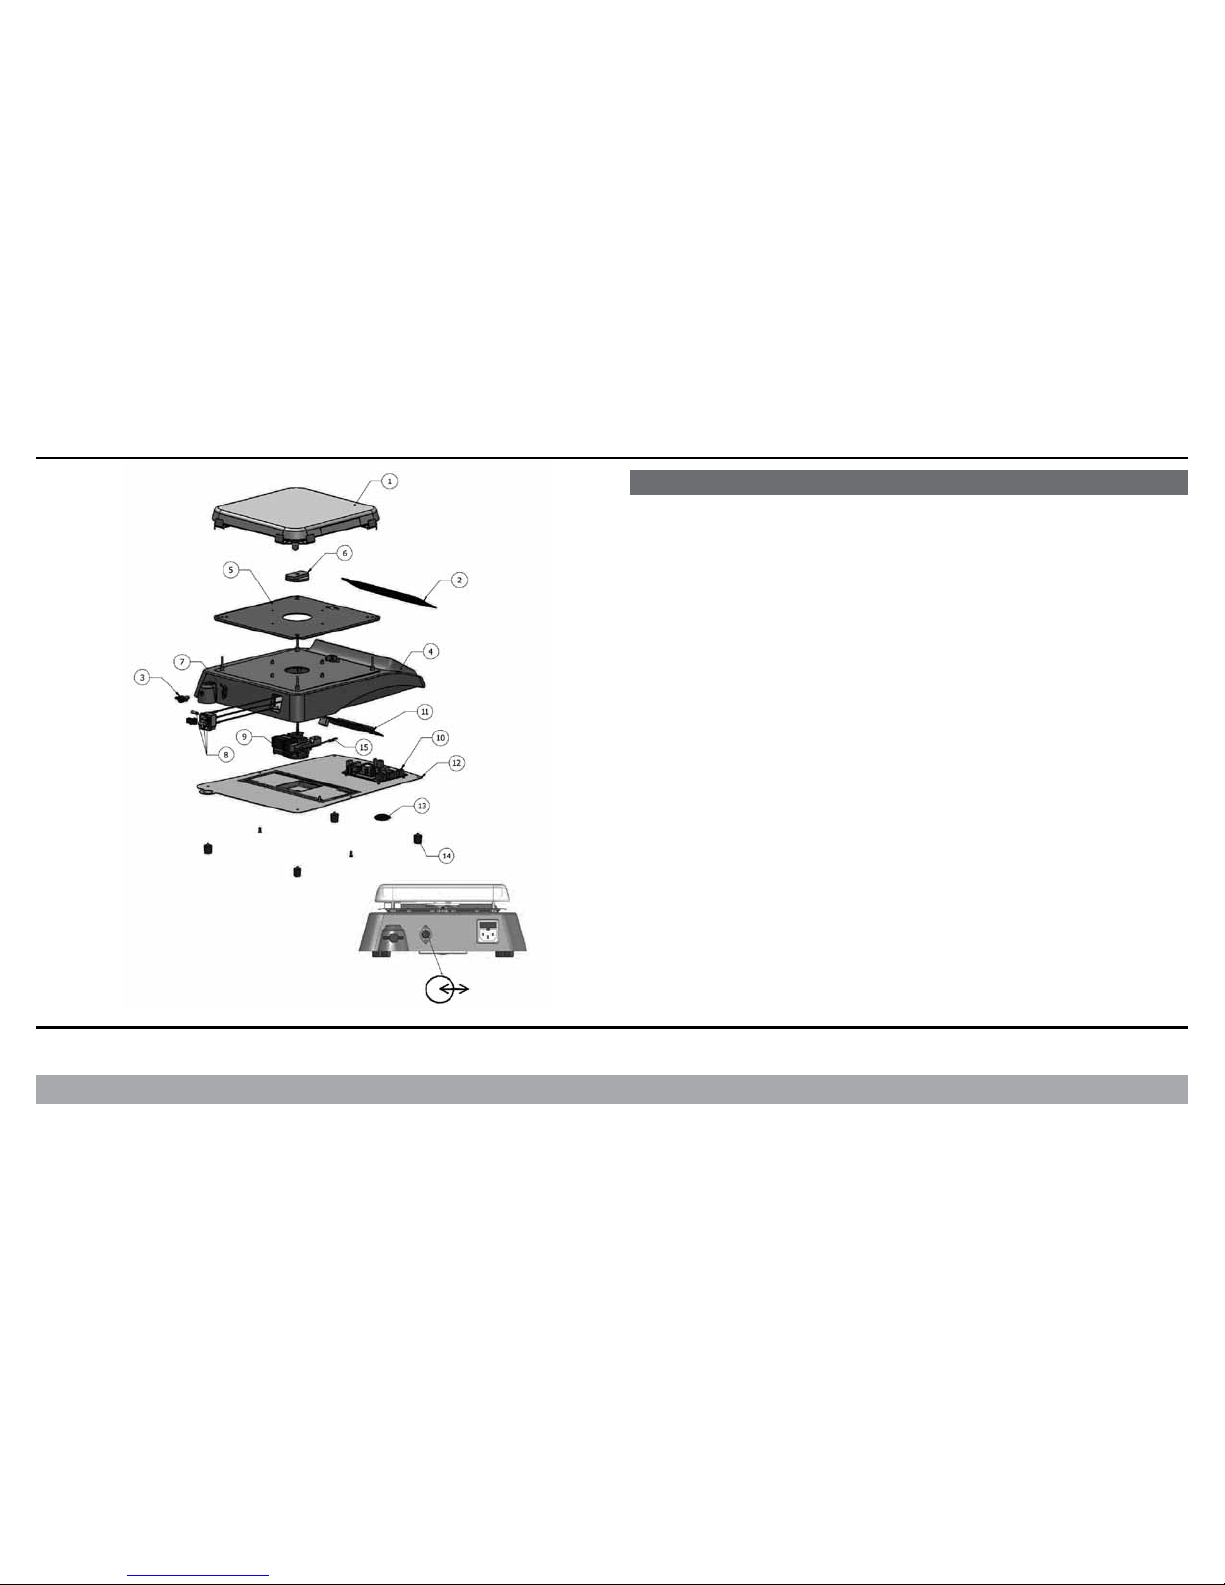
desCriPtion Part nUMber
1. Top plate assembly:
230V, ceramic, Hotplate, Hotplate-Stirrer 886323-00
120V/230V, ceramic, Stirrer 886324-00
230V, aluminum, Hotplate, Hotplate-Stirrer 886326-00
120V/230V, aluminum, Stirrer 886327-00
2. Front panel overlay: Professional Series Hotplate 386283-00
Professional Series Hotplate-Stirrer 386284-00
Professional Series Stirrer 386282-00
3. Support stand thumb knob 186208-00
4. Housing 286615-00
5. Heat Shield 286609-00
6. Magnet assembly: Hotplate-Stirrer, Stirrer 286616-00
7. Assembly, Wire, DIN and MTA 386677-00
8. IEC module 386681-00
Fuse 16 Amp Hotplate, Hotplate-Stirrer 386033-00
Fuse 5 Amp Stirrer 380238-00
9. Motor: 286623-00
10. Main PCB: 386660-00
11. Digital Display PCB 386664-00
12. Bottom Plate 286612-00
13. Bottom Plate plug 186201-00
14. Feet 186200-00
15. Ground Jumper Wire aluminum top units 386678-00
Detachable 92” (234cm) power cord: Stirrer 120V 330100-00
Euro plug 330101-00
10 x 10 rePlaCeMent Parts - 120v stirrer, 230v all Units
 Loading...