

Page 1
Wrap™ 920 VR Bundle
User Guide
Page 2

Table of Contents
Overview ........................................................................................................... 4!
Using This Manual ............................................................................................ 6!
1. Installation & Setup ................................................................................................. 8!
Installation Overview ......................................................................................... 9!
Hardware Assembly ........................................................................................... 9!
Wrap Noise Isolating Earphones .................................................................... 9!
Wrap Tracker 6TC ...................................................................................... 10!
Nose Bridge ................................................................................................. 10!
Focus Adjustment ........................................................................................ 11!
AA Control Box - Media Player Connection .................................................... 12!
Computer Connection .................................................................................... 15!
VR Manager Setup ...................................................................................... 15!
Compatibility .............................................................................................. 15!
System Preparation ...................................................................................... 15!
VR Manager Installation .............................................................................. 16!
Wrap Eyewear to PC Hardware Connection ................................................ 17!
Display Configuration ................................................................................. 19!
Tracker Calibration ...................................................................................... 20!
2. A/V Controls ........................................................................................................... 24!
Control Box ..................................................................................................... 25!
Page 3

Control Buttons ........................................................................................... 25!
Display Controls & Options ........................................................................ 27!
Battery Indicator .......................................................................................... 29!
Audio Level & Controls ............................................................................... 30!
PC Audio ..................................................................................................... 30!
3. Wrap Tracker 6TC .................................................................................................. 31!
Installation ................................................................................................... 32!
Degrees of Freedom ..................................................................................... 33!
4. Vuzix VR Manager ................................................................................................. 34!
VR Manager 3.0 .............................................................................................. 35!
Calibrator ........................................................................................................ 36!
Drift ............................................................................................................ 39!
Monitor ........................................................................................................... 39!
Extension Notes ........................................................................................... 40!
Enabling Extensions ..................................................................................... 41!
Detecting Installed Applications .................................................................. 42!
Enabling Extension ...................................................................................... 42!
Misc. Tools ...................................................................................................... 43!
5. Service & Support ................................................................................................. 46!
Cleaning .......................................................................................................... 47!
Troubleshooting .............................................................................................. 47!
Support Services .............................................................................................. 49!
Vuzix Developer Program ................................................................................ 49!
FCC Compliance ............................................................................................ 50!
Waste Electrical & Electronic Equipment (WEEE) ......................................... 50!
Page 4

Introduction
Overview
The Wrap 920 VR is a standard Wrap 920 video eyewear bundled with a Wrap VGA
Adapter and a Wrap Tracker 6TC. The addition of these accessories transforms the
Wrap 920 into a virtual reality system that empowers you to step inside virtual
worlds. Video is displayed in standard 2D or stereoscopic 3D video from a broad
range of media sources ranging from a portable media players with composite video
out, such as popular iPod® and iPhone® devices, to desktop and laptop PCs. The
included Wrap Tracker 6TC adds the all-important VR capability of enabling you to
see where you look. Turn or tilt your head and you see the virtual world in that
direction, just like in the real world.
Two Products in One
The Wrap 920 VR Bundle is two products in one.
Connect the AA Control Box and you have a versatile media player for watching
video content from media players or virtually any composite video enabled media
device. An optional rechargeable lithium ion battery pack, the Wrap PowerPak +, can
also be used in place of the AA Control Box for viewing media player content. The
Wrap PowerPak + extends video playback time and enables connection to
component video devices for improved video quality.
Page 5

Replace the AA Control Box with the Wrap VGA Adapter and your video eyewear is
compatible with virtually any make or model of Windows graphics card or laptop.
An optional Wrap Lightshield further enhances the your VR experience, immersing
you fully into your VR environment.
Wrap 920
The Wrap 920 video eyewear forms the base of the Wrap 920 VR Bundle. It
provides a 67-inch virtual display, as seen from 10 feet, that is worn like a pair of
sunglasses. The Wrap 920 can be used solely as a wearable 67-in display for viewing
2D or 3D video, or when equipped with the Wrap VGA Adapter, it can connect to
virtually any Windows powered desktop or laptop personal computer.
Out of the box it supports standard 2D video and a simple selection of a 3D video
format from its OSD (On Screen Display) enables viewing any one of multiple
stereoscopic 3D video formats. Removable earphones round out this product for the
ultimate portable big-screen experience.
Wrap VGA Adapter
A standard Wrap 920 includes a universal composite audio/video cable set plus a
custom composite cable for Apple iPod touch and iPhones. Personal computers use a
different video format. The Wrap VGA Adapter not only provides the appropriate
VGA and USB connectors but also convert the video to a compatible format that
enables viewing PC generated content on the Wrap 920 video eyewear.
Out of the box the Wrap 920 output cable connects to the Wrap VGA Adapter and
it in turns connects to a VGA and USB 2.0 ports on your PC. If your PC does not
provide a VGA port, a DVI/VGA adapter (not included) can be used or a VGA
splitter (not included) can also be used for systems with only a single video port.
This connection provides 2D and 3D stereoscopic video support when connected to
virtually any make or model of Windows compatible graphics card.
Page 6
Wrap Tracker 6TC
Head tracking brings applications to life, placing you right in the middle of the
action and enabling you to see where you are looking.
The Wrap Tracker 6TC is the newest and most advanced head tracker available in
the consumer market. This tiny 6 DoF (Degrees of Freedom) capable tracker plugs
into a small port on the Wrap 920 and communicates with supporting applications
through the Wrap eyewear and the VGA Adapter’s USB connection.
Vuzix VR Manager™
VR Manager is a software application that provides head tracker calibration, drivers
for 3D stereoscopic video, and VR support for a wide variety of games, simulators
and other applications.
A copy of VR Manager is included in the Wrap 920 VR Bundle software package,
available for download from the Digital Distribution page of the Vuzix website:
WWW.VUZIX. COM/DD
Software Download
The
software for this product
is available for download from
the Vuzix website at:
www.vuzix.com/DD
1. Go to
www.vuzix.com/dd
2. Locate your new
Vuzix product
3. Click its “download”
button
The Vuzix Digital
Distribution system
provides one-click
access to all the
latest software and
documentation for
your product.
The latest package of software and documen-
tation will be downloaded to your
computer ready for you to unpack
and install.
Page 7

Using This Manual
When viewing a User Guide, especially for a product as diverse as the Wrap 920 VR
Bundle, you may be tempted to skip over certain portions or even entire sections. We
have tried to make the important points visible and be easy to find through special
formatting and related topic organization.
Quick Start Guide
A Quick Start Guide is provided for experienced users. The Quick Start is intended
to help you get up and running as quickly as possible with the option of seeking
more in-depth information from the User Guide if needed.
Tips & Notations
Tips and important notations are formatted in a special way for easy recognition. We
suggest that even when skimming a section that you stop and check out these notes.
Note: Tips and special notations are presented in this format.
Instruction Steps
Step-by-step instructions are presented in bold font, preceded by bullet points. If you
are skimming over installation and setup procedures, these are the key points to
watch for.
Do as directed by this instruction to avoid potential problems.
Double-click the Wrap 920 VR Bundle software package to unpack it.
Read the “Readme.txt” file and follow any instructions provided.
Page 8

Section 1
Installation & Setup
Page 9
Installation Overview
The Wrap eyewear installation is divided into three stages:
1. assembling and adjusting the basic eyewear components,
2. connecting the AA Control Box for media players, connecting and
configuring a VGA computer connection, and
3. adjusting the onscreen audio/video controls.
It may sound complex but its really quite simple.
Your Wrap 920 can be connected to almost any media source by simply changing the
Control Box and its cable. For connecting to a personal computer, connect the Wrap
VGA Adapter between eyewear and computer. For all types of media players, use the
AA Control Box and the appropriate cable.
Hardware Assembly
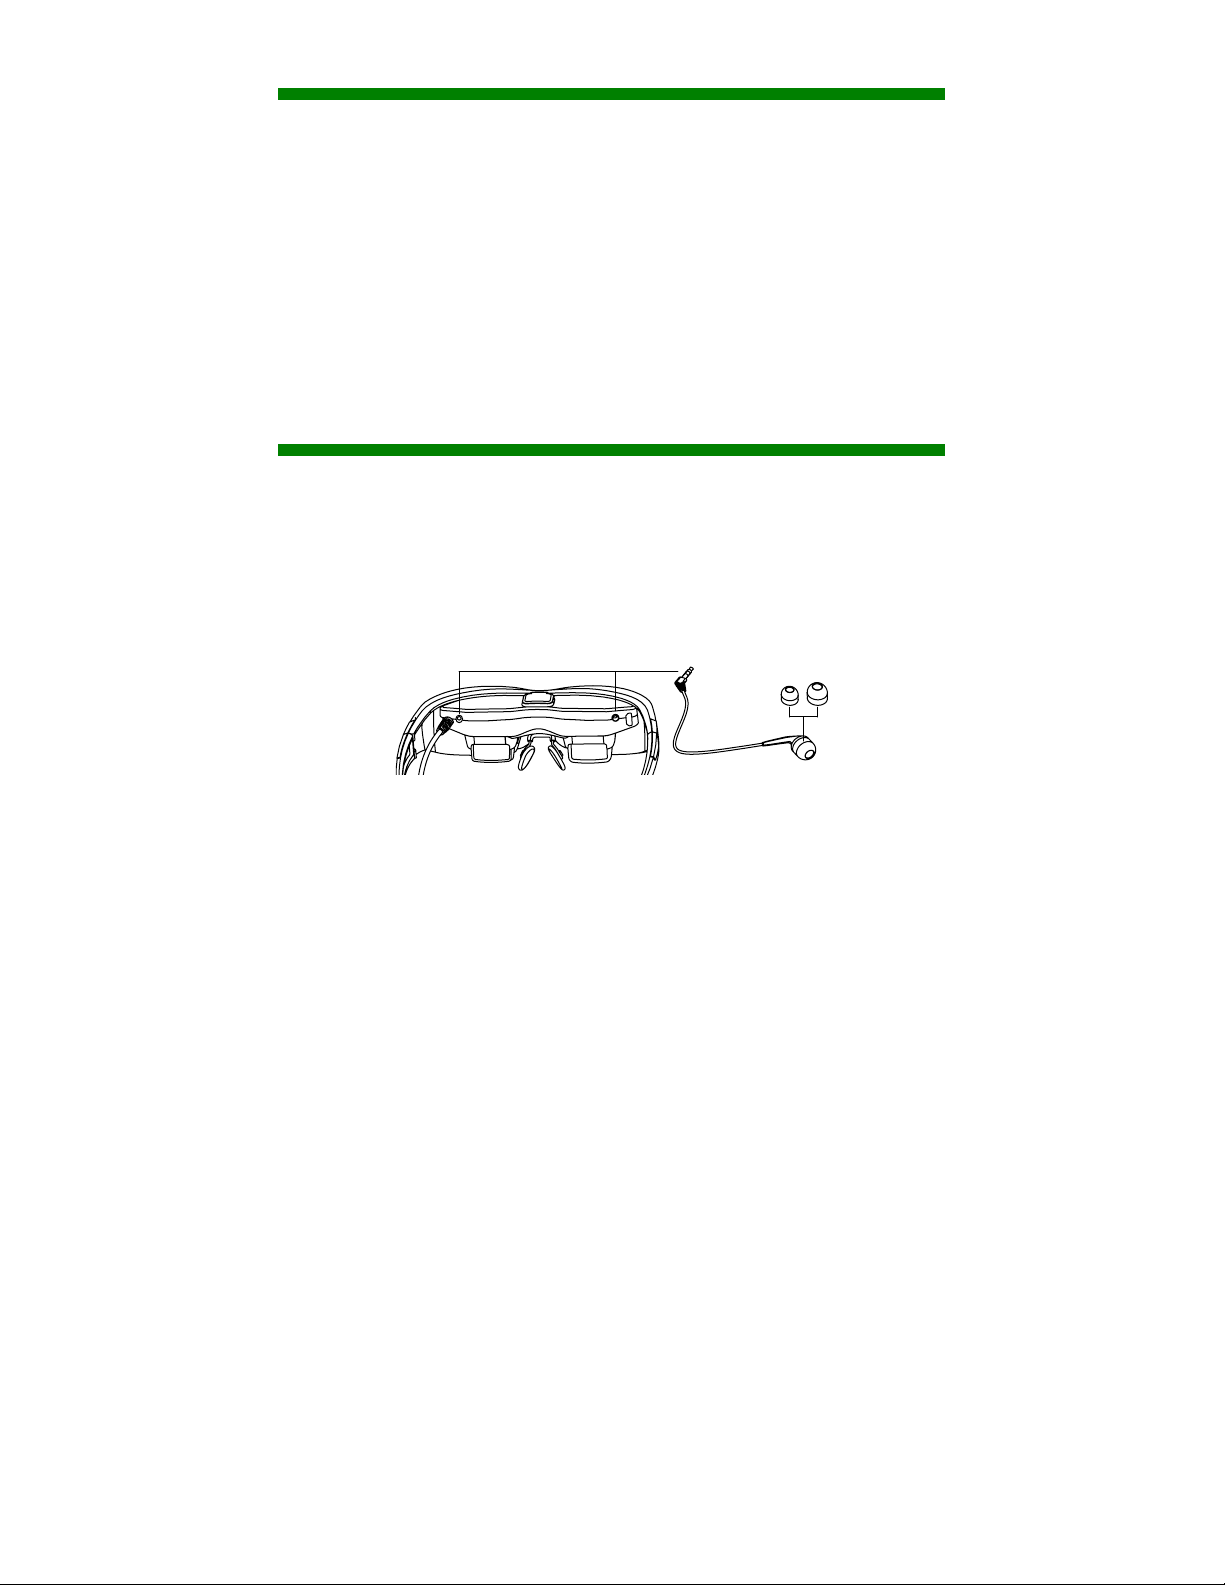
Wrap Noise Isolating Earphones
In addition to providing great sound quality, the noise isolating Wrap earphones are
removable to enable the use of alternate speaker systems.
The earphones come with three pairs noise isolators to allow you to choose the set
that provides the best comfort and fit. The noise isolators simply slip on/off the
audio post.
Page 10
To install the Wrap Earphones:
Plug an earphone into each of the audio ports on either side of the
display module. Either earphone can be used on the left or right.
To use the eyewear without the earphones:
Unplug the earphones from your Wrap eyewear and control volume
using the audio controls provided on your media source.
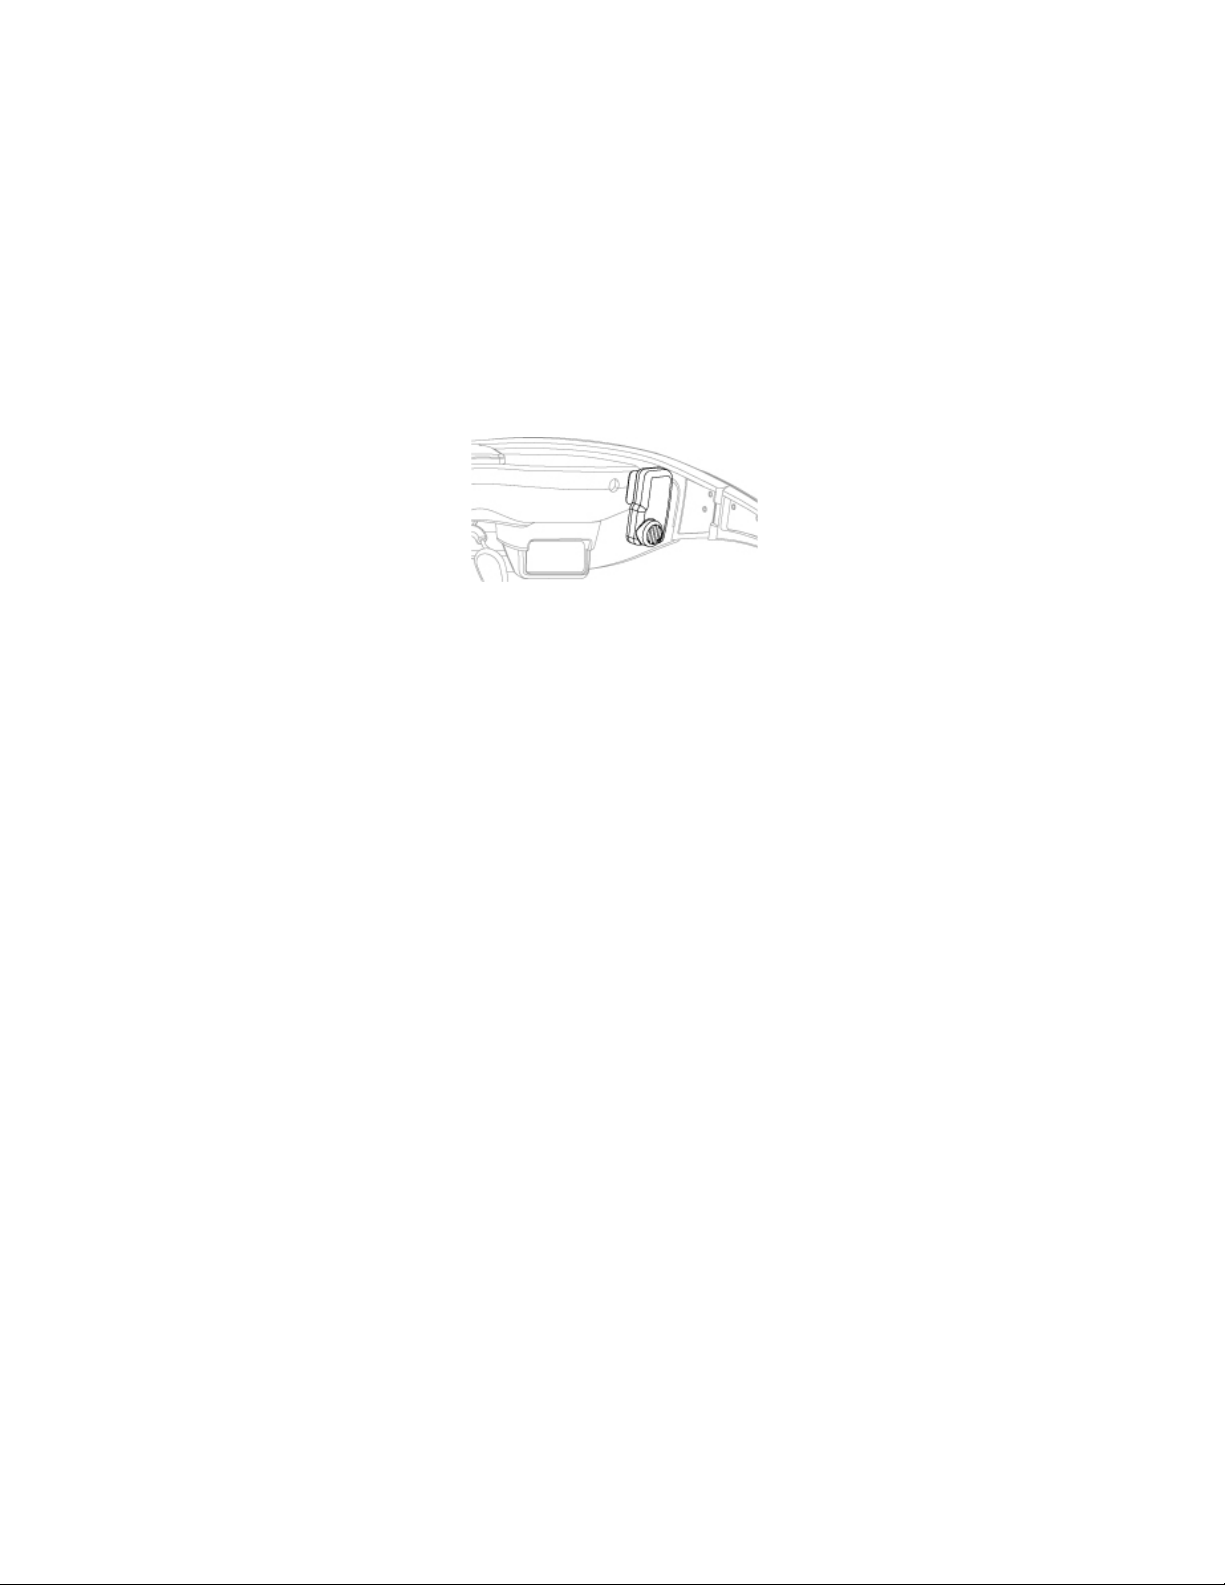
Wrap Tracker 6TC
Wrap video eyewear can be used with out without the Tracker installed and the
Tracker works only with supporting applications.
To install the Tracker:
Plug your Wrap Tracker 6TC into the small oblong port located between
the right temple hinge and the right earphone port on the back of the
display module.
Note: Although the Tracker connector looks much like a UBS micro-B port, it is not. Do not
attempt to connect a USB micro-B connector into this port and do not attach the Wrap
Tracker 6TC to a USB micro-B cable or device.
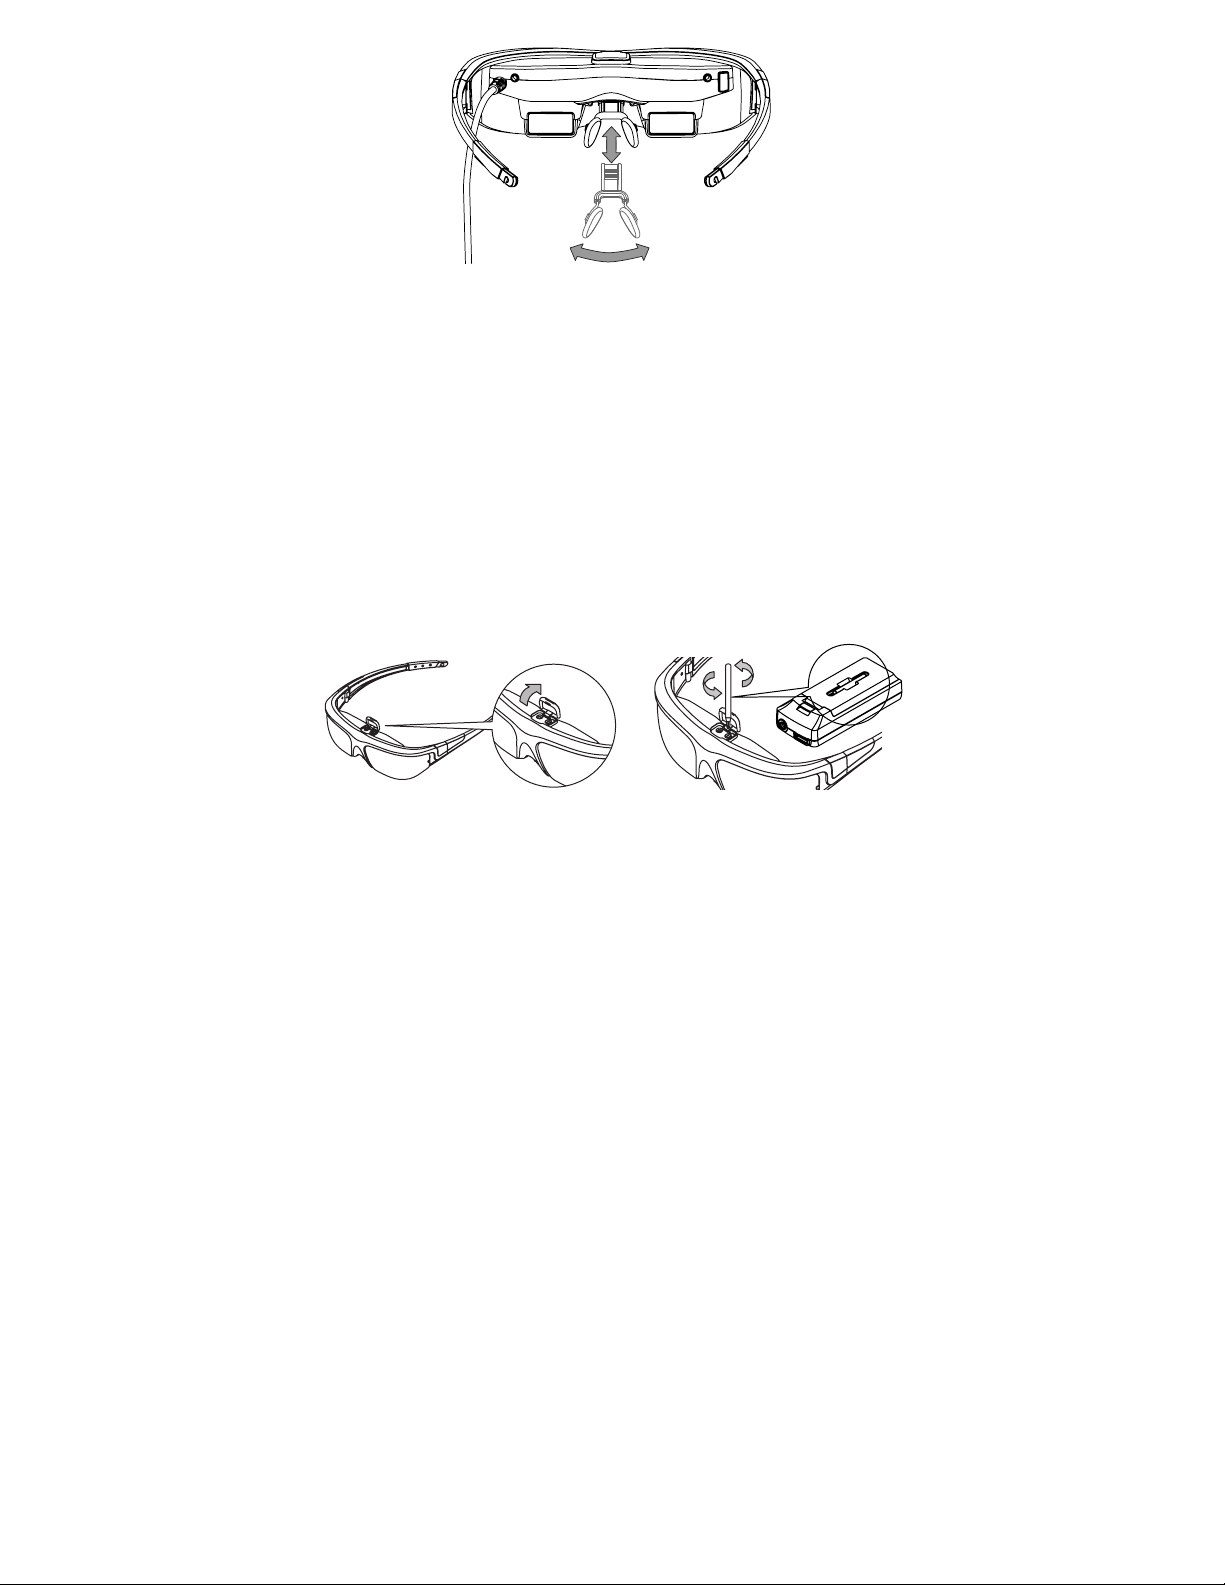
Nose Bridge
Your Wrap 920 nose bridge is both adjustable and replaceable. The nose bridge
stems slides in and out and its malleable wire arms, like those on standard eyeglasses,
adjust to almost any width and angle for broad fit requirements and comfort.
Page 11
For the best quality display, your video eyewear should sit on the bridge of your nose
with the display panels directly in your line of sight.
Note: The nose pad assembly is designed for a single user and its wire arms should not be
bent repeatedly or at sharp angles as this may cause a weakening and eventual
breakage of the nose pad arms. Should you break one of these arms, contact Vuzix
(www.vuzix.com) to order a replacement.
Focus Adjustment
Your Wrap video eyewear can be worn over many styles of prescription glasses or you
can adjust the focus of each eye’s display independently from +2 to -5 diopters.
To adjust the focus:
Lift the Focus Adjuster Cover, above the display section of the eyewear.
Page 12
A focus adjustment screwdriver is provided in a receptacle on the back
of both the AA Control Box and VGA Adapter Control Box.
Note: Remove the battery compartment cover of the AA Control Box to push the screwdriver
out from its holder.
Remove the focus adjustment screwdriver and adjust each display to
suit your needs.
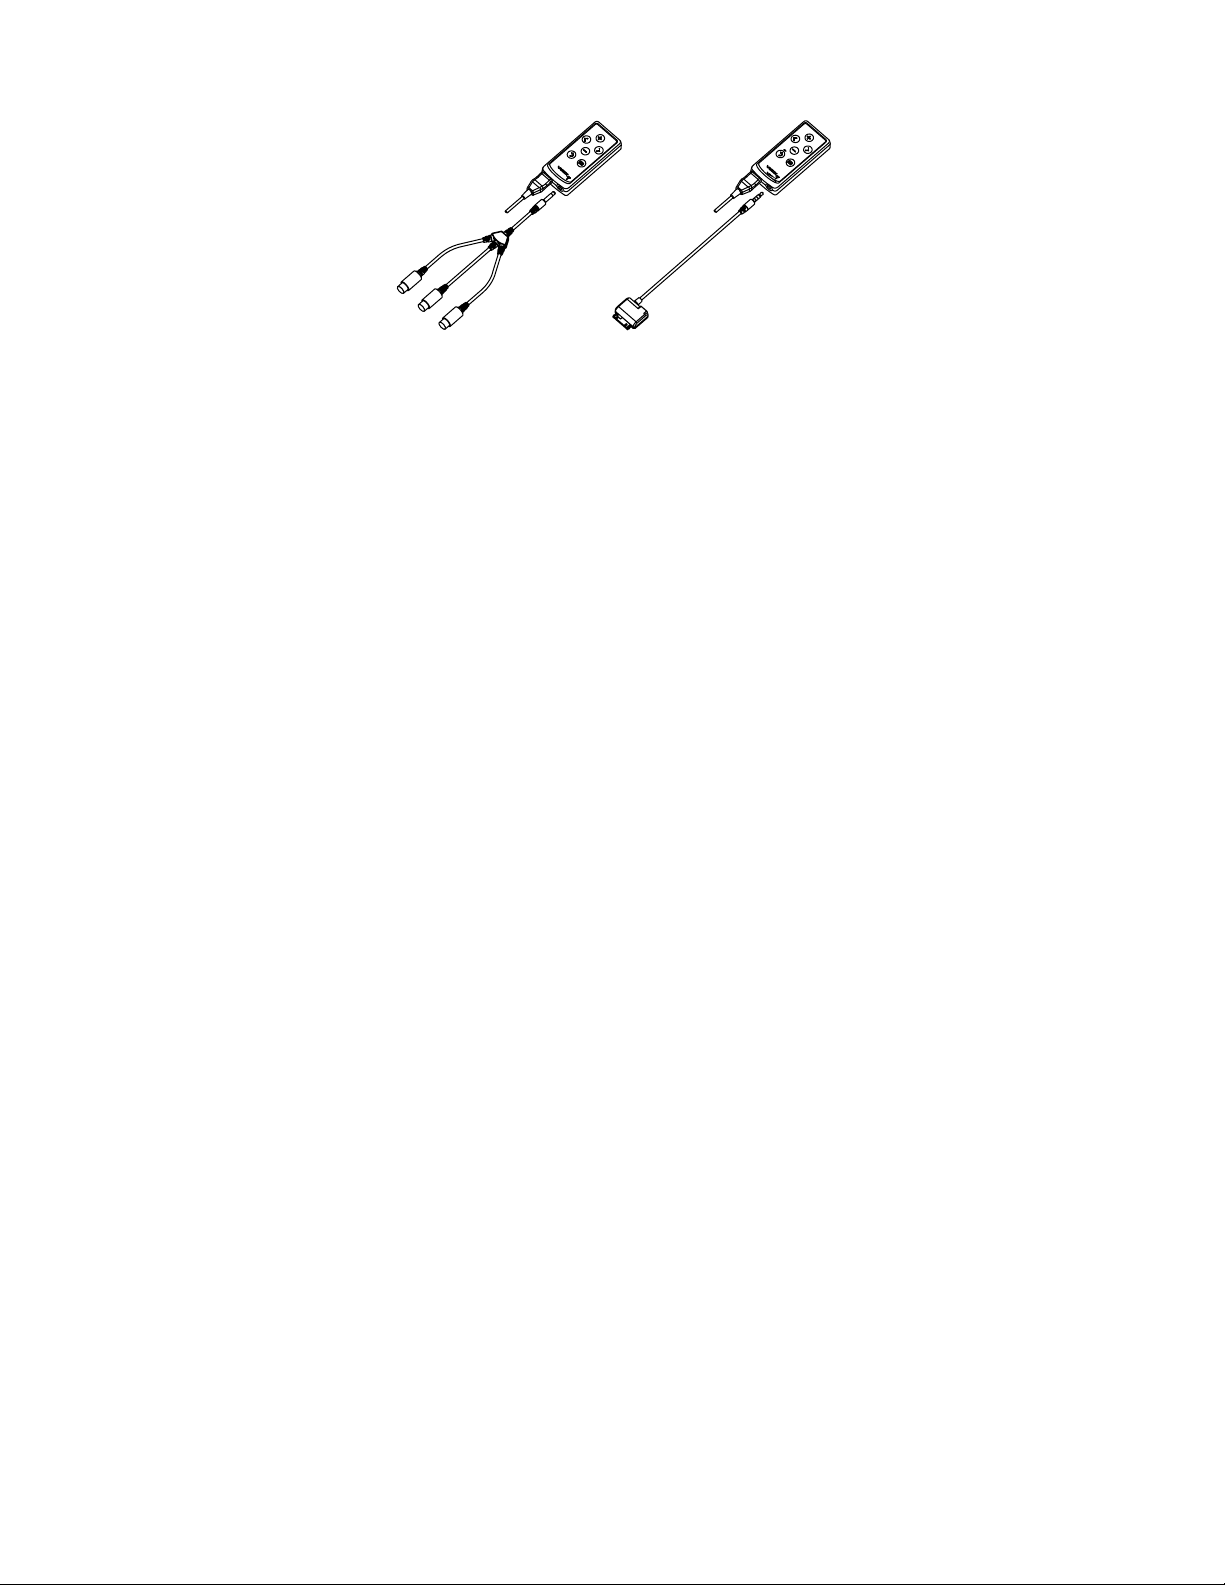
AA Control Box - Media Player Connection
The AA battery and control box (AA Control Box) and a universal or custom cable
allow your Wrap 920 eyewear to work with almost any media device including DVD
players, iPod touch and iPhones and virtually any other device equipped with
composite video out. A universal a composite cable set, sometimes referred to as
“RCA cables” is provided with your eyewear as is a custom composite cable for Apple
iPod touch, iPhone and iPad. Additional cables and accessories are available from the
Vuzix website (www.vuzix.com).
The AA Control Box serves two functions; it provides eyewear audio/video controls
and power, provided by two (2) AA batteries (included). The batteries can be
replaced with rechargeable batteries though run time may be effected.
Page 13
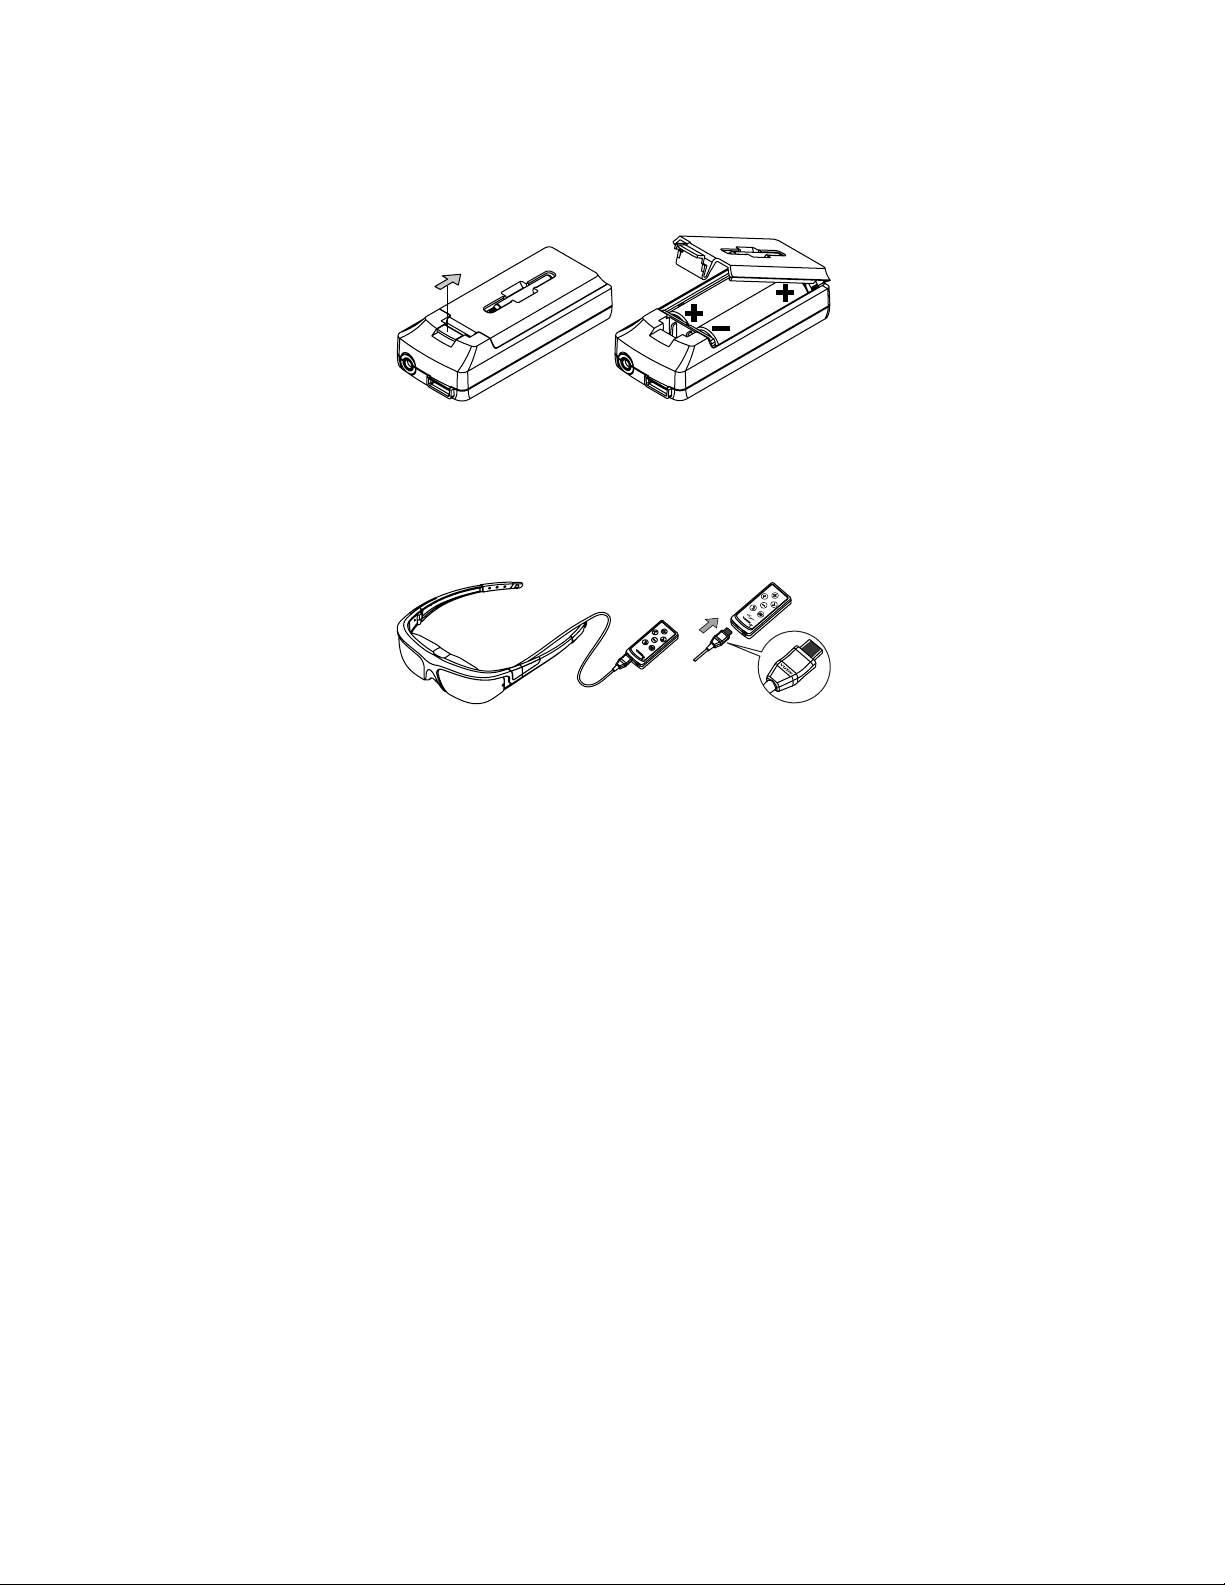
To install the batteries:
Open the back of the media player Control Box and insert the two AA
batteries.
o Pull the lid closure tab back and swing the door up to open the
battery compartment.
o Insert the batteries as indicated and then close the lid.
This Control Box provides two cable connectors. The rectangular port is for the cable
coming from the Wrap video eyewear and the round port is for the cable going to
your media player.
Plug the eyewear’s Multi-connect Cable from your eyewear into the
matching connector on the Battery/Control Box.
The black side of the connector tip and the “Vuzix” imprint face up toward the
buttons on the Control Box.
Connect a Vuzix compatible composite cable into the Control Box port
labeled “AV”.
Page 14
Note: Be sure to insert the push the cable connector all the way into the “AV” port on the
Control Box. Partial insertion is a common error.
You can use the universal composite cable, with the three barrel connectors, or the
custom Apple composite cable that plugs directly into iPod touch, iPhone and iPad
products. Additional cable models are available from the Vuzix website
(www.vuzix.com).
Connect the composite cable to your media player.
Note: The eyewear will automatically turn off if no video signal is received for approximately
30 seconds. Turn on your media player before your eyewear to prevent this.
Tip: Some devices are fussy about the order in which things are turned on and attached. If
you connect to a working device and no video is displayed, turn everything off and then
back on again. This will usually resolve the problem.
Page 15

Computer Connection
DO NOT connect your Wrap video eyewear and VGA Adapter to your
computer until after the VR Manager software has been installed.
Well, since you purchased the VR Bundle version of the Wrap 920, chances are good
that you want to connect your eyewear to a computer. For this you need to swap the
AA Control Box for the Wrap VGA Adapter (VGA Control Box) and install the
Vuzix VR Manager software. Its setup program installs video drivers and the VR
Manager program containing tracker calibration tools and Vuzix Extension files that
enable tracking and 3D video support for many software titles.
VR Manager Setup
Compatibility
The Wrap VGA Adapter and VR Manager software are compatible with 32 and 64bit versions of Windows 7, Vista and XP using virtually any make or model of
graphics card in a desktop, laptop or netbook computer.
Note: The Wrap 920 VR may display 2D video and play audio on computer systems configured
with Mac and other operating systems. These operating environments are not officially
supported for this product and neither technical support nor supporting software, such
as 3D video drivers and tracker calibration, are provided for these configurations.
System Preparation
It is important that your system be properly prepared before you begin the software
installation and that any software or video drivers that may conflict be removed or
disabled.
If you have any of the following installed on your computer, use the
Windows Programs and Features Control Panel to uninstall them before
proceeding:
Page 16

o 3rd party stereoscopic display drivers (any brand)
o Vuzix VR Manager or Vuzix iWear VR920 support software
o Vuzix SDK (Software Development Kit.
VR Manager Installation
Your Wrap video eyewear requires special 3D video drivers and support software to
perform properly and enable all of its features. This software is available for
download from the Digital Distribution page of the Vuzix website at:
WWW.VUZIX. COM/DD
To download the latest version of software and documentation for your Vuzix
eyewear:
Go to “WWW.VUZIX.COM/DD”, locate the listing for your Vuzix eyewear
model and then press its “download” button.
When the download is complete, double-click the file to decompress it.
Note: The digital distribution files are compressed in a “.zip” file. A .zip compatible
compression program comes with Windows so the file will automatically decompress
when double-clicked.
Your decompressed files will be in a folder titled “Wrap 920 VR.” This folder
contains the complete software set for your Vuzix eyewear, including its
documentation.
Locate and double-click the “README.txt” document in the Wrap 920 VR
folder.
The README document contains additional information and special notes that did
not make it into this version of the User Guide.
After following any instructions provided in the README document:
Double-click the “VR_Manager_Installer.exe” program located in the
“Wrap_920_VR_Bndl” folder.
Page 17

Follow the onscreen instructions, enabling any permission requested by
your computer and its operating system.
Tip: During the installation process, the screens, options and buttons displayed will vary
from one version of the Windows to the next. We suggest choosing the default options.
The Setup program will advise you when the installation is complete.
Wrap Eyewear to PC Hardware Connection
Connecting your eyewear to your PC requires only three steps:
Connect your Wrap eyewear cable to rectangular port on the Wrap VGA
Adapter (Control Box).
Connect the VGA cable from the Control Box to a video port on your PC.
Connect the USB cable from the Control Box to a USB 2.0 port on your
PC.
Since there are many potential variations from one computer’s configuration to
another, here are a few notes that may or may not apply to your computer system:
• The VGA Adapter is equipped with a VGA connector, the most common and
adaptable format for video on a PC. If your computer does not have a matching
VGA port you can use commonly available port adapters such as a DVI-to-VGA
or mini-DVI-to-VGA Adapter. These can be purchased from most computer
stores.
Page 18

• If your computer does not have any video ports available, you can acquire and
use a VGA Splitter.
• The USB connector requires a USB 2.0 port able to deliver the required data
transfer speed and power. If you are connecting through a USB hub, ensure that
the hub is 2.0 compliant and that it is serviced by an external power supply.
At this point you may choose to dawn your eyewear and check out the view but don’t
be surprised if see only a blue screen – that is normal – as the display settings are
likely not configured correctly yet.
Page 19

Display Configuration
If your display settings are not configured correctly your eyewear will display blank
blue screens.
To configure your display settings:
Adjust your display resolution to 1024 x 768.
Set the display refresh rate to 60 Hz.
Set your multiple displays configuration for Duplicate, Mirrored or Clone
mode. The term used varies by operating system version.
The steps software elements used to enabling the above display configuration vary
between the different version of Windows and, in some cases, software provided with
your graphics card can also be used.
As Windows 7 is currently shipping with most Windows based computers, the
following are the steps specific to that family of operating system software:
Right-click on an open area of your desktop and select “Screen
resolution”.
From the “Multiple displays:” drop list, select “Duplicate these displays”
Choose “1024x768” from the “Resolution:” drop list,
Click on “Advanced Settings”.
Select the “Monitor” tab.
Select a “Screen refresh rate:” of “60 Hertz”.
Set the Wrap 920 as the Primary Display.
Apply the changes and close the Control Panel.
You should now be able to see your desktop in your Wrap video eyewear.
The Wrap 920VR supports display resolutions of 640x480, 800x600, and 1024x768,
each at a 60 Hz refresh rate. Though most eyewear users prefer 1024 x 768, you can
Page 20

use any of the above. The lower resolution show a smaller display area but with
increased clarity.
Tracker Calibration
The last step in the setup process is to calibrate the Wrap Tracker 6TC.
Your Wrap Tracker uses nine different sensors to track movement. These include
gyroscopes, accelerometers and magnetometers. Some of these sensors require
calibration.
The gyro calibration will automatically occur the first time the VR Manager software
runs and finds a pair of Wrap eyewear tracker installed. This calibration is required
whenever the Wrap Tracker is connected to a different computer.
Note: More extensive information on calibration is provided in “Calibrator” chapter of the “VR
Manager” section of this guide.
Magnetometers also require calibration. These sensors utilize the earth’s magnetic
field and are sensitive to certain metallic masses and electronic devices. Common
electronic devices, with magnetic fields, that may be near your computer include
monitors and speakers, including the tiny earphones provided with your eyewear.
Calibration adjusts for these influencing factors and may be required as those factors
change.
To calibrate the tracker on your Wrap eyewear:
Start the calibration process by connecting your Wrap eyewear to your
computer, with the display configuration correctly set and your desktop
displayed in the eyewear.
Run the VR Manager application.
If this is the first time VR Manager has been run, with the Tracker installed, a Zero
Gyros application will automatically run.
Page 21

When the Zero Gyros screen appears:
o Place the Wrap eyewear flat on your desk facing your computer.
o Do not move the eyewear while the gyro zeroing process is
being performed.
o Follow the on-screen instructions.
Upon completion of the gyro zeroing process, the VR Manager program will
complete loading and present you with its Calibration screen.
Tip: For the most accurate calibration, try to stabilize earphone movement and position
your eyewear as close as possible to the position it will be in when used. This will
minimize fluctuations in the eyewear’s relative position to nearby magnetic influences.
Press the “Begin Calibration” button.
Holding your eyewear as near as possible to where they would be when
worn, upright and facing your desktop computer monitor, rotate them
as follows:
o Rotate your eyewear fully through each of the three axes.
Page 22

This process captures tracker data through its full range of movement for the yaw,
pitch and roll axis. The indicator bars will move while additional data is being
received but will stop when no new data is received, indicating its full range of
movement has been captured.
Note: The indicator bars will not fill completely – this is normal.
When the indicator bars stop moving, press the “Lock Calibration”
button.
Put on your eyewear or place them in the position in which they will be
used – upright, at eyelevel and facing your computer – and then press
the “Set Zero” button.
Pitch RollYaw
Page 23

The Set Zero button establishes the Tracker’s home or centered position. As you
move your head you will see the indicators and values in the Yaw, Pitch and Roll
indicators reflect movement relative to that centered position.
Your Wrap video eyewear is now setup and ready for use.
Some types of video and certain operating situations may require audio or video
adjustment to achieve optimum performance.
Page 24

Section 2
A/V Controls
Page 25

Control Box
The Wrap 920 VR Bundle includes two Control Boxes; the AA battery powered
model for media players and the VGA Control Box for connecting to a personal
computer. Both models look similar and provide the same set of control buttons.
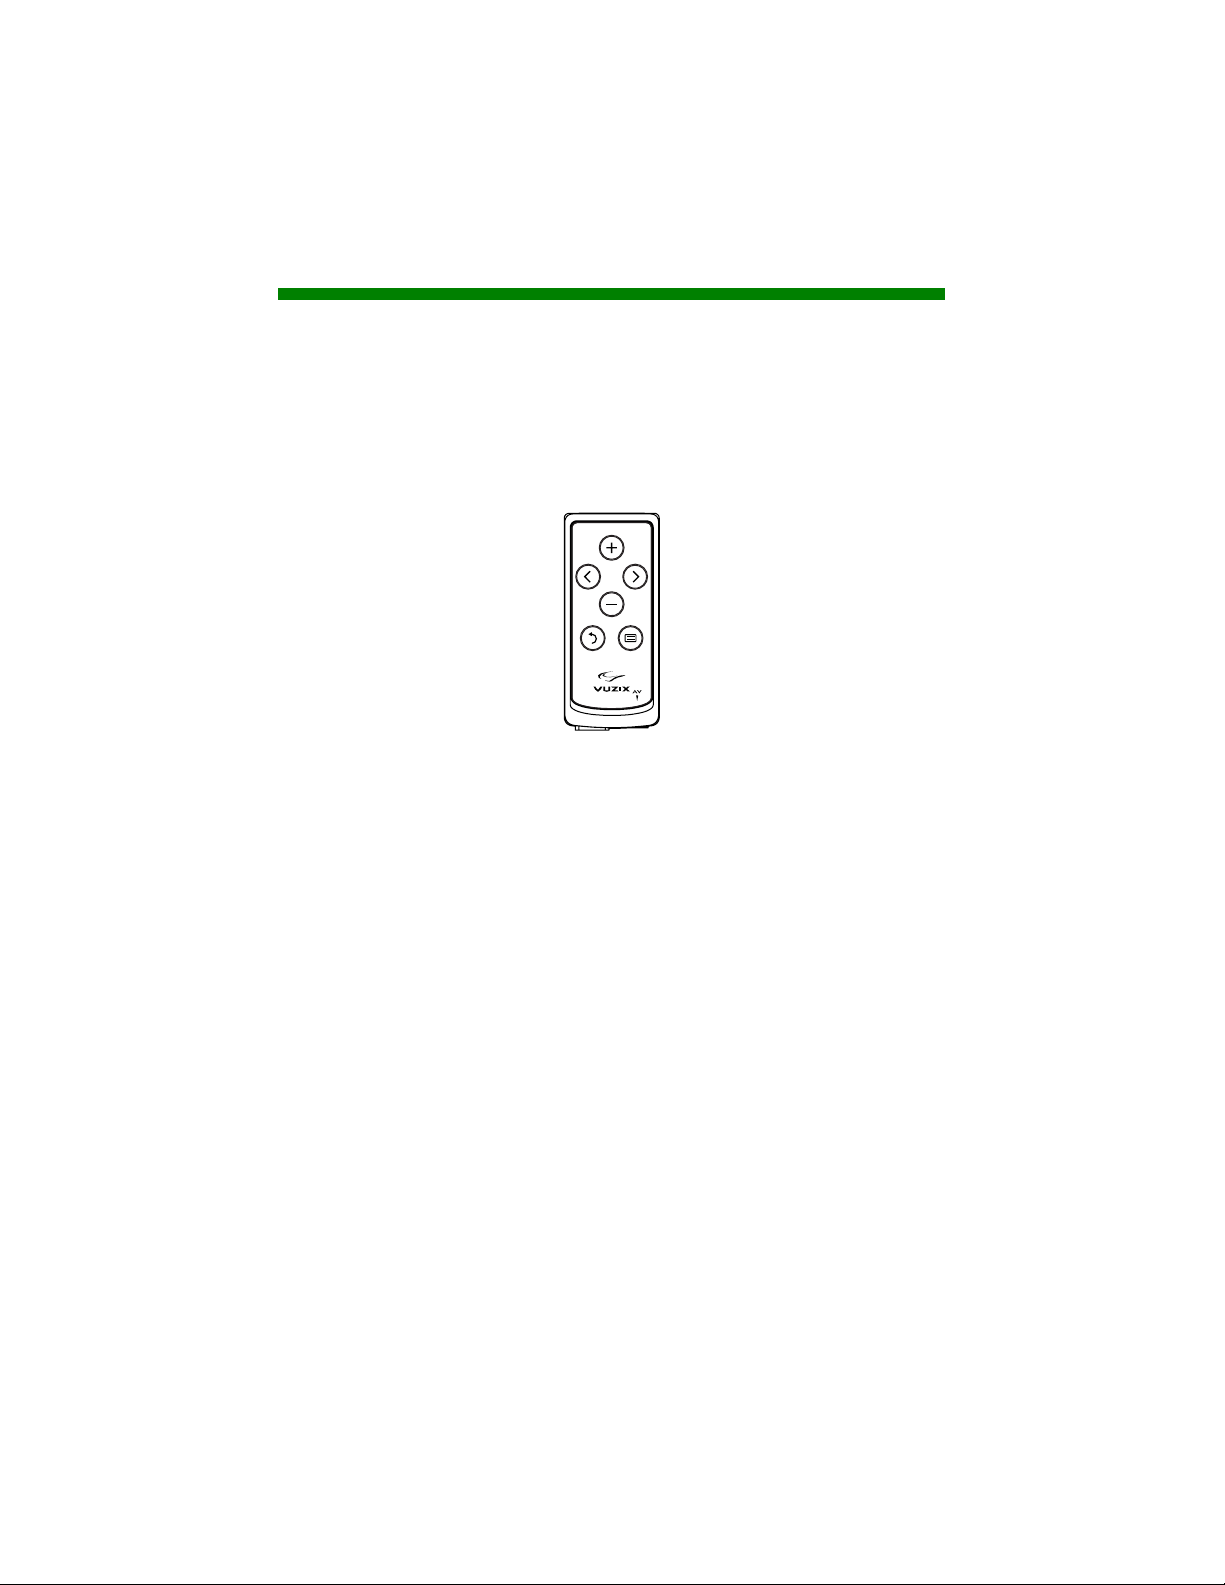
Control Buttons
Menu Select Buttons
Adjustment Buttons
Power Off & Toggle View Button
Power On & Menu Button
Page 26

The Control Box has two modes of operation, when the OSD (On Screen Display) is
shown and when is it not displayed, and the Control Buttons perform different tasks
in each of these operating modes.
When the OSD is NOT displayed:
Menu Select Buttons Opens or displays the OSD.
Adjustment Buttons Adjusts Wrap earphone volume.
Power Off & Toggle View Double-press to toggle between the previous 2D and 3D
mode.
Press and hold to toggle between Straight and Cross-eye
3D Views.
Power On & Menu Button Press to turn power on (AA Control Box only).
Press to display the OSD.
Press & hold to turn power off (Media Player Control
Box only).
Note: When using a Wrap VGA Adapter, unplug the eyewear’s USB connector if you wish to
turn the eyewear display off.
When the OSD IS displayed:
Menu Select Buttons Press to change OSD selection.
Adjustment Buttons Press to adjust the current OSD selection.
Power Off & Toggle Button Press to turn OSD display off.
Power On & Menu Button Press to cycle through OSD selections.
Page 27

Display Controls & Options
The OSD varies slightly dependent upon the Control Box being used. The AA
Control Box provides access to a Saturation Adjustment menu option and the VGA
Control Box provides access to Horizontal and Vertical Screen Position options.
OSD Presets
A selection of preset configurations designed to allow for easy one-step setting for
common viewing conditions.
U When this “User” setting is selected, the user selected display options are
saved and recalled when this option is selected again.
D “Default” resets the eyewear display to its default configuration.
1 A preset for viewing light content.
2 A preset for viewing medium content.
3 A preset for viewing dark content.
PC The “PC” preset is configured for viewing computer-based content using a
VGA Control Box.
! "
#
$
%
&'
(
%" $" )*) +,- +,. .,/
%"
01234
/!56
000%"
677 68
! "
#
$
%
&'
)
(
%" $" )*) +,- +,. .,/
%"
01234
/!56
000%"
677 68
Battery Control Box OSD
VGA Control Box OSD
! "
#
$
%
&'
Page 28

The functions of the following four options are self-evident. Their values are adjusted
using the left and right arrow Adjustment Buttons.
Brightness Adjustment
Contrast Adjustment
Hue Adjustment
Saturation Adjustment
The Saturation Adjustment control is not present when a VGA Control Box is used.
Horizontal Alignment
Vertical Alignment
The screen position may vary when your eyewear is connected to different PCs and
require adjustment, just like occurs when you connect a different desktop monitor.
This is relevant to computer connections only so these controls are not available
when using the AA Control Box.
Format Selection
Your Vuzix video eyewear eyewear supports standard 2D video and multiple formats
of stereoscopic 3D content.
2D This option is used for displaying all standard 2D content. It is the default
format option.
SxS A “Side-by-Side” format is as used for many TV broadcasts and Wrap
stereoscopic 3D support for PC connections.
!
!
!" #" $%$ &'( &') )'*
Page 29

R/G Three formats of anaglyph 3D video are supported. This option is for
content designed to use red and green filters.
R/B Anaglyph 3D format support for red and blue filters.
B/A Anaglyph 3D format support for blue and amber filters.
Note: “Field Sequential” 3D video format used for the Vuzix iWear VR920 is not supported.
3D View
3D images and video can be composed in parallel or cross-eye views. In parallel view
the left-camera image is shown on the left display where as cross-eye format crosses
the images over.
With no industry standard for this the 3D View may change from one video to the
next but a quick double-press of the Power Off & Toggle View Button makes
adjustment fast and easy without requiring the OSD.
Auto 3D
Vuzix has developed a watermark technology that, when placed in a 3D video,
enables Vuzix eyewear to identify and automatically reconfigure the eyewear for the
content’s 3D format and view options. By default this OSD option is turned off.
Note: Contact the Vuzix Developer Support Program for information of the Vuzix 3D
Watermark Specifications.
Battery Indicator
A battery indicator is displayed in the upper right corner of the video eyewear’s
display when the OSD is displayed while using a AA Control Box. This indicator is
not displayed when when your eyewear is used with a VGA Control Box.
!"
#$%&'
!"#$
%%%&'
$(( $)
Page 30

Four bars indicate a fully charged battery. When the remaining battery level drops to
approximately 10% the indicator will display only a single bar and a low battery
indicator will be displayed regardless of the OSD display status.
Note: Some batteries, such as rechargeable units, may not display four bars even when fully
charged.
Audio Level & Controls
Your Wrap video eyewear is equipped with removable noise isolating earphones and
three sizes of noise isolator inserts.
Medium sized noise isolators are pre-installed on the earphones but these can be
slipped off and replaced with larger or smaller isolators for the best possible fit.
Wrap earphone volume adjustment is made using the Adjustment Buttons on the
Control Box when the OSD is not displayed.
Tip: If you are using an alternate speaker system, you must use the volume controls
provided with that audio system.
PC Audio
When you connect your Wrap eyewear to a Windows based computer, the operating
system automatically reconfigures your system to use the Wrap earphones. If you
wish to play audio through an alternate sound system, use the Windows Sound and
Audio Devices Control Panel to enable the preferred audio system.
Page 31

Section 3
Wrap Tracker 6TC
Page 32

The Wrap Tracker 6TC is a 6-DoF (Degrees of Freedom) capable tracker with
compass. It plugs directly into your Wrap eyewear and communicates with your
computer through the VGA Control Box USB connection.
Installation
Installation of a Tracker onto your Wrap eyewear is as simple as plugging it into the
eyewear and installing the VR Manager software.
The Tracker plugs into the small connector, that looks similar to a micro-USB
connector, to the right side of the display module.
Note: Although the tracker connector looks similar to a micro-USB connector, it is not. Do not
attempt to connect a USB device or cable into this port.
The Tracker requires calibration before being used and periodically thereafter.
• If you connect your Tracker to a different computer, you should reset or zero
the gyro (see Misc Tools of VR Manager.)
• If you move the tracker to a different location or rearrange nearby electronic
devices, we suggest re-calibrating the tracker as the changes may have effected it
calibration.
• Periodically “Set Zero” to re-center the home position
Page 33

The calibration process is performed using the VR Manager software, described in
the next section of this manual.
Degrees of Freedom
The Wrap Tracker 6TC supports 6 degrees of freedom (DOF) tracking.
Three degrees of freedom tracking (yaw, pitch and roll) are supported by the VR
Manager software and in tracker enabled Vuzix Extensions. The additional 3 DOF,
X, Y and Z, (up/down, left/right and forward/back) require direct or native support
written directly into applications.
Note: A royalty free Software Developer Kit (SDK) is available to assist software developers in
enabling native support for the Wrap Tracker 6TC in their applications. It provides
sample code and technical information that enables programmers to read raw tracker
sensor data. See the Support section of this User Guide for additional information on
the Vuzix Developer Program, found in the Developer Program section of the Vuzix
website: www.vuzix.com/developer.
Page 34

Section 4
Vuzix VR Manager
Page 35

VR Manager 3.x
VR Manager version 3.x is a software application that provides support services for
Vuzix video eyewear products connected to a Windows based personal computer. It
provides a calibration system for a Wrap Tracker, support for Vuzix Extensions, and
diagnostic tools.
The VR Manager’s interface is divided into three sections, Calibrator, Monitor, and
Misc. Tools, each accessed through tabs along the top of its window.
Calibrator: Enables calibration of the Wrap Tracker.
Page 36

Monitor: Provides access to and management of Vuzix Extension files. These
Extension files enable stereoscopic 3D video and/or head tracking in select
applications lacking native support for these features.
Misc. Tools: Technical data and diagnostic resources designed to assist in
troubleshooting stereoscopic 3D and tracking problems.
Calibrator
The Wrap Tracker uses multiple sensors for calculating movement and positioning.
Magnetometers are among these sensors and they are influenced by natural magnetic
fields and the magnetic fields created by certain electronic devices. In order to
compensate for these influences they must be calibrated, initial and whenever the
operating environment changes. The Tracker also contains gyroscopic sensors that
require zeroing before they’re used and whenever the Tracker is connected to a
different computer system.
To calibrate the tracker on your Wrap eyewear:
Start the calibration process by connecting your Wrap eyewear to your
computer, with the display configuration correctly set and your desktop
displayed in the eyewear.
Run the VR Manager application.
If this is the first time VR Manager has been run, with the Tracker installed, a Zero
Gyros application will automatically run.
When the Zero Gyros screen appears:
o Place the Wrap eyewear flat on your desk facing your computer.
o Do not move the eyewear while the gyro zeroing process is
being performed.
o Follow the on-screen instructions.
Page 37

Upon completion of the gyro zeroing process, the VR Manager program will
complete loading and present you with its Calibration screen.
Tip: For the most accurate calibration, try to stabilize earphone movement and position
your eyewear as close as possible to the position it will be in when used. This will
minimize fluctuations in the eyewear’s relative position to nearby magnetic influences.
Press the “Begin Calibration” button.
Holding your eyewear as near as possible to where they would be when
worn, upright and facing your desktop computer monitor, rotate them
as follows:
o Rotate your eyewear fully through each of the three axes.
Page 38

This process captures tracker data through its full range of movement for the yaw,
pitch and roll axis. The indicator bars will move while additional data is being
received but will stop when no new data is received, indicating its full range of
movement has been captured.
Note: The indicator bars will not fill completely – this is normal.
When the indicator bars stop moving, press the “Lock Calibration”
button.
Put on your eyewear or place them in the position in which they will be
used – upright, at eyelevel and facing your computer – and then press
the “Set Zero” button.
Pitch RollYaw
Page 39

The Set Zero button establishes the Tracker’s home or centered position. As you
move your head you will see the indicators and values in the Yaw, Pitch and Roll
indicators reflect movement relative to that centered position.
Drift
Some degree of drift on the Yaw axis is normal.
The Wrap Tracker provides an auto-centering capability that will automatically
compensate for most drift while the Tracker is in use. Occasionally, before starting a
session you can use the Set Zero button to re-center the Tracker for optimum
calibration. You do not have to go through the entire calibration process to use the
Set Zero function.
Vuzix Extensions Monitor
Stereoscopic 3D video and head tracking require support specific to each application.
This may be incorporated directly into the application (native support) or externally
through a Vuzix Extension.
Vuzix Extensions are accessed and managed through the Monitor section of the VR
Manager. The Title list shows all of the Vuzix Extensions and their current status.
Page 40

Note: Software titles employing native 3D video and/or head tracking support are not listed
in the Monitor, as they do not require VR Manager Extension support. Only titles
requiring Extensions are included in the Monitor listing.
Extension Notes
Extension Notes describe the capabilities, configuration instruction and manual
installation information for each Extension.
Page 41

Not all Vuzix Extension includes both stereoscopic 3D video and tracking support;
some may support only one. Some Extension may also include support for additional
features and capabilities, such as Hot Keys for zooming in your view.
To access the Vuzix Extension Notes:
Double-click on any Extension title, or
Right-click on an Extension title and choose “View Extension Info” from
the pop-up menu.
Enabling Extensions
Vuzix Extensions are automatically installed with the VR Manager but they are not
automatically enabled.
In order for an Extension to be used, the VR Manager must detect the appropriate
file directory and the Extension must be enabled. Only after being enabled will an
Extension’s tracking and/or stereoscopic 3D video support be available for use.
Color-coded indicators show the current status of each Extension.
A grey marker indicates an Extension that has not yet been associated with an
application directory.
A yellow indicator identifies Extensions for which the appropriate directories have
been found but the Extension has not yet been enabled.
A green indicator identifies Extensions linked to applications and enabled, ready to
use.
Page 42

To better manage the long list of Extensions, enable the “Show Installed Titles Only”
option, in the lower-left corner of the window. This restricts the list to only
Extension with matching applications on your computer.
Detecting Installed Applications
When the VR Manager is installed it searches for installed applications with
matching Vuzix Extensions. It them identifies the appropriate Extension with a
yellow indicator – available but not enabled. If an application is installed after VR
Manager, you must manually initiate a title search for an Extension to be associated
with the newly installed programs.
To detect newly installed programs:
Press the “Refresh Installed Titles”.
Tip: VR Manager may be unable to find applications that have been installed in a directory
other than the one suggested by the install program. You can manually locate an
application’s file directory by right clicking on the desired Extension and choosing
“Browse for Directory” from the pop-up menu.
Enabling Extension
To use an Extension, it must be associated with an application and then enabled.
Enabling loads the required files and makes program configuration changes if
required.
Page 43

To enable a single Extension:
Right-click each detected Extension (yellow) and choose “Enable Title
Support” from the menu options.
To enable all Extensions:
Press the “Enable All Detected” button to enable all the detected
(yellow) Extension in a single action.
Once enabled, the Extension’s indicator is green.
Misc. Tools
This section of the VR Manager provides assistance in identifying and correcting
technical problems with your Vuzix eyewear and Extensions. It provides Vuzix
Customer Service with the information required to quickly identify the cause and
solution to your problem.
Page 44

View Logfile
The VR Manager creates a log file of recent activity. Customer Service may request
you open the file and provide them with its contents.
Technical Information
This provides technical information that may assist you in troubleshooting problems
encountered with your eyewear and extension supported titles.
About Vuzix VR Manager
Clicking on this button provides information on the current versions of supporting
software and hardware firmware.
Status
Status displays technical information regarding your Vuzix hardware, drivers and
other information that might assist Customer Service in identifying the cause of a
problem you are encountering.
Zero Gyros
The first time VR Manager is run, it will sense the Tracker and advise that its Gyros
require zeroing.
If you connect your Wrap Tracker to a different computer, you will have to zero
your Tracker’s gyros again.
Page 45

To manual initiate a Zero Gyro process:
Place your eyewear flat on a desktop and do not move it during the Zero
Gyro process.
Press the “Zero Gyros” button.
Follow the on-screen instructions.
Page 46

Section 5
Service & Support
Page 47

Cleaning
Your Wrap eyewear is virtually maintenance free, requiring only occasional cleaning
with a soft microfiber cloth. Do not spray cleaners onto the eyewear or any of its
components or immerse them in water. If required, spray a small amount of optical
lens cleaner on a microfiber cloth and use that to clean stubborn marks or any oily
film.
Never use solvents, abrasive cleaners or paper towel on your eyewear. These items
will damage the lens coatings, permanently degrading the eyewear’s image quality.
Troubleshooting
The first step in correcting a problem is to accurately determine the source and cause
of the problem. Below are a number of typical symptoms and the most common
solutions for each. In most cases, these solutions should remedy the problem or
identify the source of the problem and aid our technical support staff in assisting you
further.
Video Display
There is not video image displayed, or only a blue screen.
Blue screens typically indicate incorrect display settings or the computer failing to correctly identify
the Wrap eyewear as an external monitor.
1. Carefully verify that your display setting are configured as follows:
• Display resolution of 1024 x 768, 800 x 600 or 640 x 480.
• Refresh rate of 60 Hz.
• Dual monitor display in Duplicate, Mirrored or Clone mode.
• Wrap video eyewear set as Primary display.
2. If the display settings are correct, it may simply be that your computer has not correctly
identified the Wrap eyewear.
• Disconnect the VGA Control Box USB cable, wait 30 seconds and then re-connect it.
Page 48

• Disconnect the VGA Control Box VGA cable, wait 30 seconds and then re-connect it.
• A better alternative, but more time consuming, is to simply reboot your computer.
Video is displayed in 2D only.
Your Control Box may be configured for 2D display, possibly caused by an unknown button press on
the Control Box, setting the eyewear to 2D or the media content may not be a compatible 3D format.
1. Double-press the Power Off & Toggle View Button on the Control Box. This resets the display to
the last user selected 2D/3D display mode.
2. Open the OSD and set the eyewear to display 3D video in Side-by-Side format.
3. If your video content does not support the popular side-by-side format, or one of the supported
anaglyph formats you will have to use a third-party application to convert it to a supported
format.
4. If you are using a computer application known to support side-by-side 3D, check the VR
Manager software to determine of an Extension is required for that application and if that
Extension is enabled. Each Extension is accompanied by Extension Notes to describe any special
procedures required to enable or configure that application.
Head Tracking
The tracking function does not re-center correctly or drifts.
1. The Wrap Tracker does require re-calibration from time to time. Open the VR Manager software
and follow the calibration instructions provide earlier in this manual to re-calibrate your tracker.
2. Magnetic interference will play havoc with a head-tracker. If you are near and substantial metal
objects or magnetic devices, like large speakers, re-positioning may be required to lessen the
magnetic interference.
Audio
I just installed my eyewear and now I don’t have any audio.
Your Wrap eyewear includes removable earphones that are recognized by Windows as a USB speaker
system. Upon noting that you have just installed a new speaker system, Windows automatically
configures these as your active speaker system, disabling the speakers you were previously using. If
you wish to use another speaker system, other than your Wrap earphones, use the Windows Sound
and Audio Devices Control Panel to select your preferred speaker system.
Page 49

Support Services
For product support and information please contact Vuzix at:
Corporate website: www.vuzix.com
Email Customer Support: technical_support@vuzix.com
Customer Helpline: (800) 436-7838
Customer service hours: 9 AM to 6 PM EST, weekdays
When contacting support services please provide the following information:
• Serial number, complete model name, and model number of your video
eyewear. (i.e.: Wrap 920 VR)
• Make and model number of the audio video device being used.
• The name of any video content related to your support needs.
• Detailed explanation of the symptoms you are experiencing your questions.
Vuzix Developer Program
Vuzix provides a Developer Support Program that offers support services to software
developers, including access to an SDK for tracker and stereoscopic video support.
This SDK is available for royalty free use and can be downloaded free of charge from
the Vuzix website.
For additional information of the Vuzix Developer Support Program, go to:
www.vuzix.com/support/developer
Page 50

FCC Compliance
NOTE: This equipment has been tested and found to comply with the limits for a Class B
digital device, pursuant to Part 15 of the FCC Rules. These limits are designed to provide
reasonable protection against harmful interference in a residential installation. This equipment
generates, uses and can radiate radio frequency energy and, if not installed and used in
accordance with the instructions, may cause harmful interference to radio communications.
However, there is no guarantee that interference will not occur in a particular installation. If
this equipment does cause harmful interference to radio or television reception, which can be
determined by turning the equipment off and on, the user is encouraged to try to correct the
interference by one or more of the following measures: 1) Increase the separation between the
equipment and receiver or 2) Connect the equipment into an outlet on a circuit different from
that to which the receiver is connected.
Waste Electrical & Electronic Equipment (WEEE)
1. The equipment that you bought has required the extraction and use of natural resources for
its production. It may contain hazardous substances that could impact health and the
environment.
2. In order to avoid the dissemination of those substances in our environment and to diminish
the pressure on the natural resources, we encourage you to use the appropriate take-back
systems. Those systems will reuse or recycle most of the materials of your end life equipment in
a sound way.
3. The crossed-out wheeled bin symbol invites you to use those systems.
4. If you need more information on the collection, reuse and recycling systems, please contact
your local or regional waste administration.
5. You can also contact us for more information on the environmental performances of our
products.
Page 51

Subject to change without notice. Items may not be exactly as illustrated.
iPod, iPod touch, iPhone and iPad are trademarks of Apple Inc., registered in the U.S. and other
countries.
Vuzix, the Vuzix logo, View the Future and Wrap are trademarks of Vuzix Corporation registered in the
U.S. and other countries.
© 2011 Vuzix Corporation. All rights reserved.
Designed by Vuzix in New York.
Made in USA
329PB0021-A
 Loading...